Pioneer SC-1223-S: instruction
Class: Household, kitchen appliances, electronics and equipment
Type: Home Theater System
Manual for Pioneer SC-1223-S
Table of contents
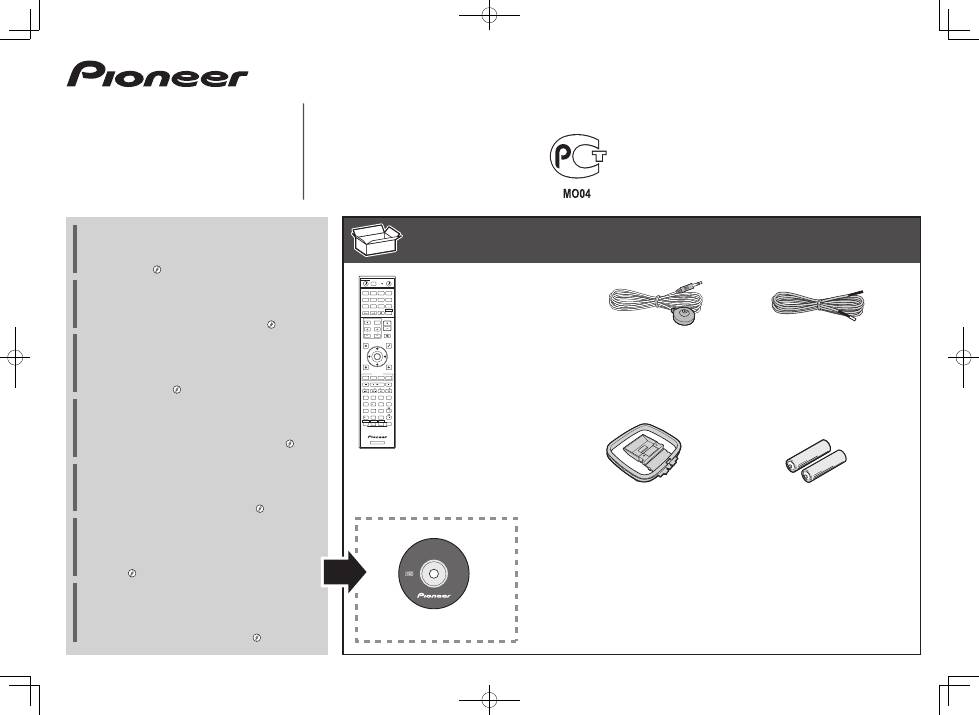
- Remote Control Setup microphone AAA size IEC R03 dry cell batteries x2 AM loop antenna FM wire antenna These quick start guide Power cord Warranty card Safety Brochure
- English Connection and initial setup
- Connecting up Connecting the speakers
- Connecting a TV and playback components Connecting antennas Connecting to the network through LAN interface
- Before you start Automatically setting up for surround sound (MCACC)
- Multichannel playback
- Playing an iPod Listening to Internet radio stations
SC-1223-
K/
-
S
AV Receiver
Amplificateur AV
AV Receiver
Sintoamplificatore AV
AV Receiver
Receptor AV
AV-
ресивер
Quick Start Guide
Guide rapide
Kurzanleitung
Guida di avvio rapido
Snelstartgids
Guía de inicio rápido
Краткое
руководство
пользователя
What’s in the box
Contenu du carton d’emballage
Lieferumfang
Contenuto della confezione
Inhoud van de doos
Contenido de la caja
Комплект
поставки
Thank you for buying this Pioneer product. This Quick Start
Guide includes instructions for basic connections and operations
to allow simple use of the receiver. For detailed descriptions of
the receiver, see the “Operating Instructions” provided on the
included CD-ROM ( ).
Merci pour l’achat de ce produit Pioneer. Ce guide rapide
contient les instructions relatives aux raccordements et
opérations de base permettant une utilisation simple de ce
récepteur. Pour des descriptions plus détaillées du récepteur,
référez-vous au “Mode d’emploi” sur le CD-ROM ( ) fourni.
Vielen Dank, dass Sie sich für dieses Pioneer-Produkt entschieden
haben. Die Kurzanleitung enthält Anweisungen für grundlegende
Verbindungen und Bedienvorgänge, um eine einfache Bedienung
des Receivers zu ermöglichen. Detaillierte Beschreibungen des
Receivers finden Sie in der „Bedienungsanleitung“ auf der
mitgelieferten CD-ROM ( ).
Vi ringraziamo per avere acquistato questo prodotto Pioneer.
Questa Guida di avvio rapido comprende istruzioni per i
collegamenti fondamentali e per le operazioni essenziali di
questo ricevitore. Per una descrizione dettagliata del ricevitore,
vedere le “Istruzioni per l’uso” contenute nel CD-ROM ( )
accluso.
Hartelijk dank voor de aanschaf van dit Pioneer product. In deze
snelstartgids vindt u de instructies voor de basisaansluitingen en
de basisbediening voor een eenvoudig gebruik van de receiver.
Voor meer gedetailleerde informatie wordt u verwezen naar de
“Handleiding” die op de bijgeleverde CD-ROM ( ) staat.
Muchas gracias por haber adquirido este producto de Pioneer.
Esta Guía de inicio rápido incluye instrucciones para hacer las
conexiones y operaciones básicas que le permitirán hacer un uso
sencillo del receptor. Para conocer una descripción detallada del
receptor, consulte el “Manual de instrucciones” suministrado con
el CD-ROM ( ) incluido.
Благодарим
вас
за
приобретение
данного
изделия
Pioneer.
В
данном
Кратком
руководстве
пользователя
содержатся
инструкции
по
основным
подключениям
и
операциям
для
упрощенного
использования
ресивера
.
Подробное
описание
ресивера
см
.
в
«
Инструкции
по
эксплуатации
»,
содержащихся
на
поставляемом
CD-ROM ( ).
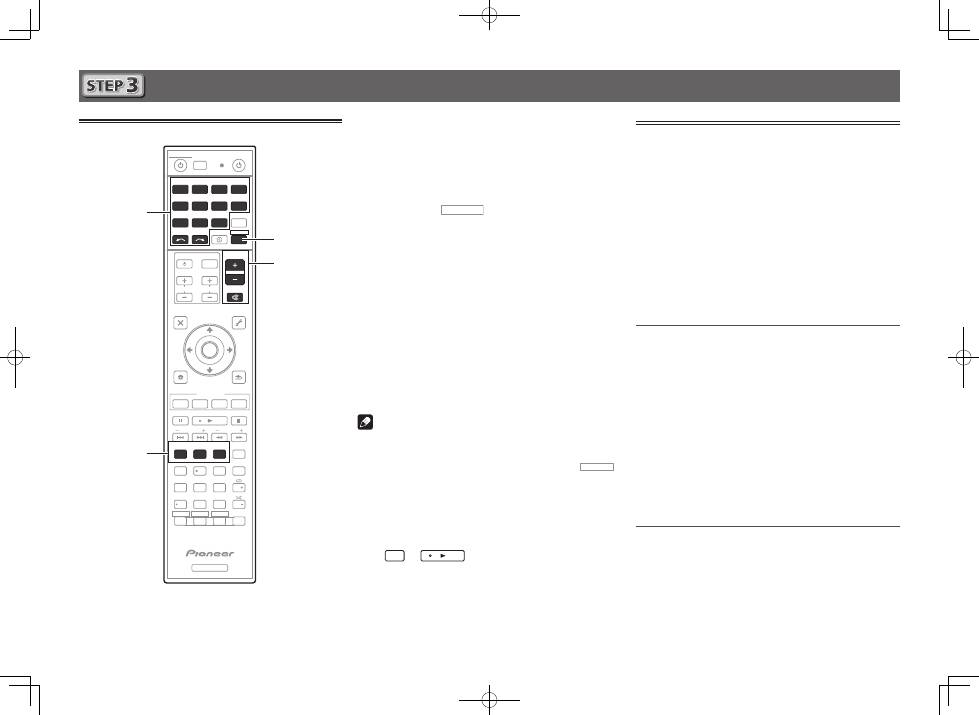
Remote Control
Télécommande
Fernbedienung
Telecomando
Afstandsbediening
Mando a distancia
Пульт
дистанционного
управления
Setup microphone
Microphone de configuration
Mikrofon für die Einstellung
Impostazione microfono
Microfoon voor instellen
Micrófono de configuración
Установочный
микрофон
AAA size IEC R03 dry cell batteries x2
Piles à anode sèche AAA IEC R03 x 2
AAA/IEC/R03 Trockenbatterien x2
Pile a secco AAA IEC R03 x2
AAA/IEC/R03 drogecelbatterijen x2
Pilas secas AAA, IEC R03 x 2
Сухие
батарейки
размера
AAA IEC R03, 2
шт
.
AM loop antenna
Antenne cadre AM
MW-Rahmenantenne
Antenna AM a telaio
AM-raamantenne
Antena de cuadro de AM
Рамочная
антенна
АМ
FM wire antenna
Antenne filaire FM
UKW-Drahtantenne
Antenna FM a filo
FM-draadantenne
Antena de hilos de FM
Проволочная
антенна
FM
These quick start guide
Le présent Guide de démarrage
Diese Kurzanleitung
Guida per l’avvio rapido
Deze Quick Start-gids
Esta guía de inicio rápido
Это
краткое
руководство
пользователя
Power cord
Cordon d’alimentation
Netzkabel
Cavo di alimentazione
Netsnoer
Cable de alimentación
Кабель
питания
Warranty card
Carte de garantie
Garantiekarte
Tarjeta de garantía
Documento di garanzia
Garantiebewijs
Гарантийный
сертификат
Safety Brochure
Brochure sur la Sécurité
Sicherheritsbroshüre
Volantino sulla sicurezza
Veiligheidsbrochure
Folleto de Seguridad
Брошюра
по
безопасноти
CD-ROM (AVNavigator)
AVNavigator
RECEIVER
D.ACCESS
CH LEVEL
DIMMER
SLEEP
SIGNAL SEL
SPEAKERS
MPX
PRESET
TUNE
BAND
PTY
iPod CTRL
HOME
MENU
CH
TV CONTROL
INPUT
INPUT SELECT
iPod
USB
CBL
STATUS
SAT
TUNER
MHL
ZONE 2
ZONE 3
HD ZONE
ADPT
CD
TV
RCU SETUP
SOURCE
STANDBY/ON
BDR
BD
DVD
DVR
NET
HDMI
RECEIVER
MUTE
VOLUME
VOL
TOP MENU
VIDEO
PARAMETER
AUDIO
PARAMETER
ENTER
RETURN
CLASS
ENTER
/ CLR
CH
CH
2
5
4
6
8
0
7
9
1
3
FEATURES
TOOLS
MENU
ALL ZONE STBY
DISCRETE ON
+Favorite
Z2
Z3
HDZ
P.CTRL+
PHASE
HDMI OUT
MCACC
AUTO/ALC/
DIRECT
AUTO
S.RTRV
STANDARD ADV SURR
ECO
PQLS
OPTION
AUDIO
DISP
2
English
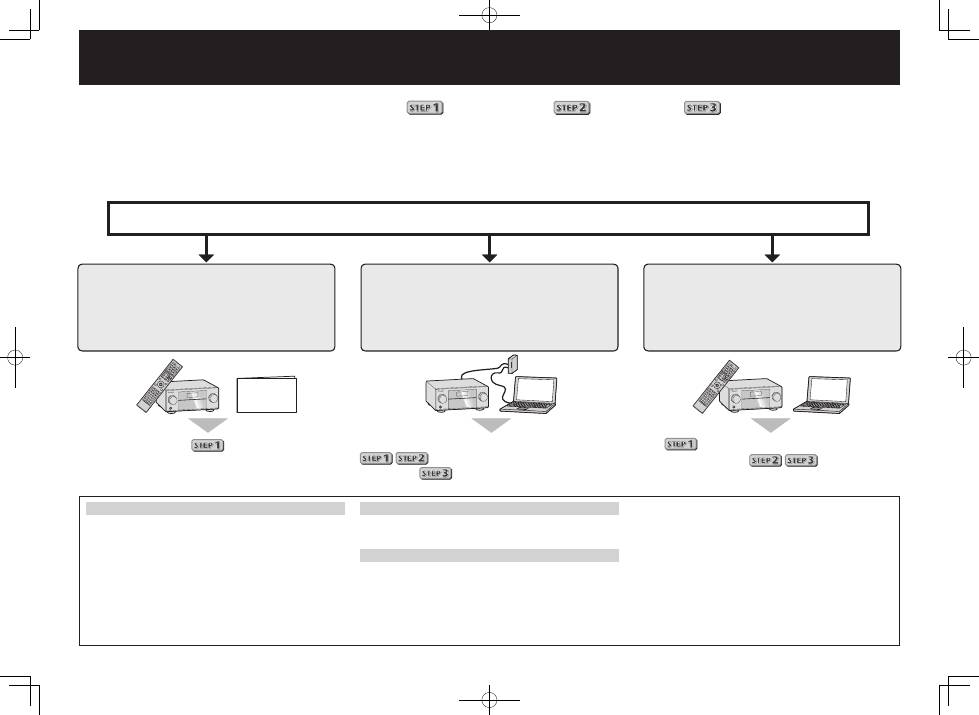
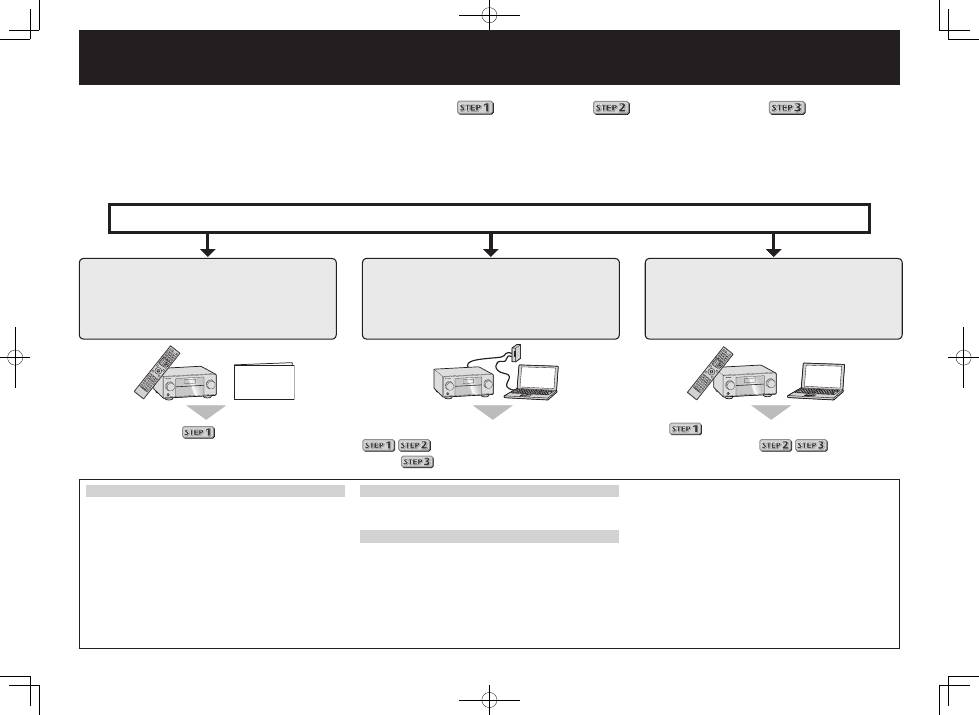
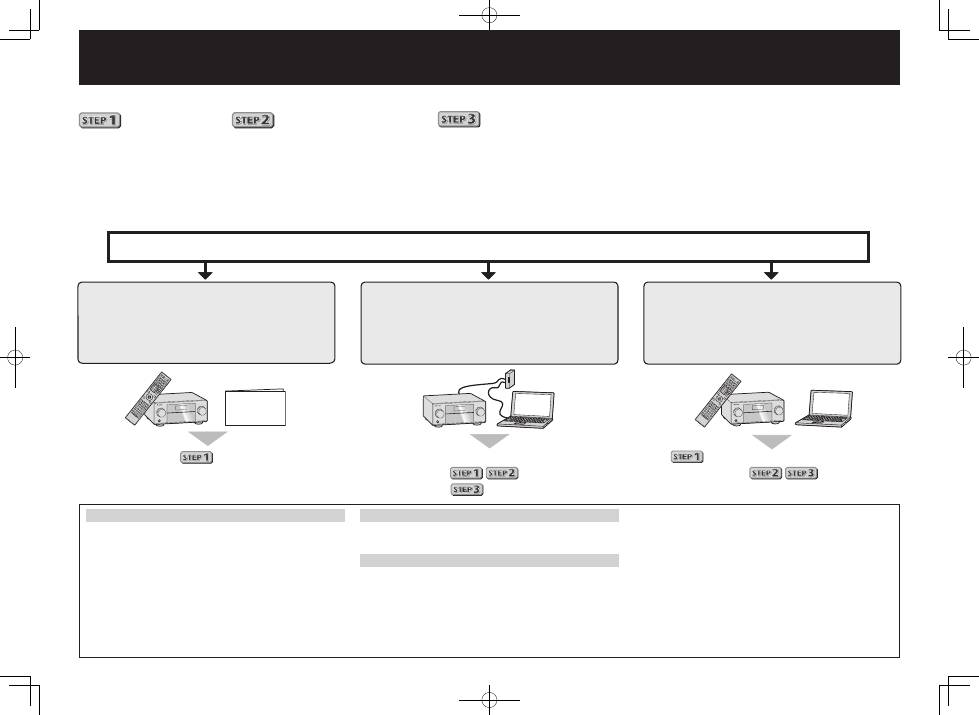
Connection and initial setup following
the instructions in the
“Wiring Navi” in AVNavigator
(Connection to the network is required
for the initial setup.)
Connect by following the instructions
in the “Wiring Navi” in AVNavigator
(For when the receiver is not to be
connected to a network.)
Connection and initial setup by
referring to this Quick Start Guide
It is unnecessary to read this guide for explanations;
will be explained in the “Wiring Navi”
and
in the “Operation Guide”.
will be conducted in the “Wiring Navi”,
so move on to
in this guide’
after “Wiring Navi” is completed.
Move on to
in this guide.
Connection and initial setup
Using AVNavigator
AVNavigator for Mac
1
Download “AVNavigator 2013.pkg” from
http://www.pioneer.eu.
2
Launch “AVNavigator 2013.pkg” from the “Downloads”
folder.
3
Follow the instructions on the screen to install.
4
Launch “AVNavigator 2013”.
• The file is located in the “Applications” folder just under
the hard disk (Macintosh HD).
• AVNavigator for Mac can be used with Mac OS X (10.7 or
10.8) .
AVNavigator for iPad
1
Download AVNavigator from the App Store.
2
Launch AVNavigator.
AVNavigator for Windows
Launch the desktop from the start screen (for Windows 8 only).
1
Load the included CD-ROM into your computer’s CD drive.
• If the CD-ROM’s top menu screen is not displayed,
double-click “MAIN_MENU.exe” on the CD-ROM.
• The CD-ROM’s top menu screen appears.
• This CD-ROM can be used with Microsoft
®
Windows
®
XP/Windows Vista
®
/Windows
®
7/Windows
®
8.
• The supported browser is Microsoft Internet Explorer
®
8, 9 or 10.
2
Click “AVNavigator” on the “Installing Software” menu.
3
Follow the instructions on the screen to install.
4
Click [AVNavigator 2013.II] on the desktop to launch
AVNavigator.
• AVNavigator is launched and Wiring Navi starts up.
• Depending on the network or security settings on the
computer on which AVNavigator is to be installed,
AVNavigator’s functions may not work properly.
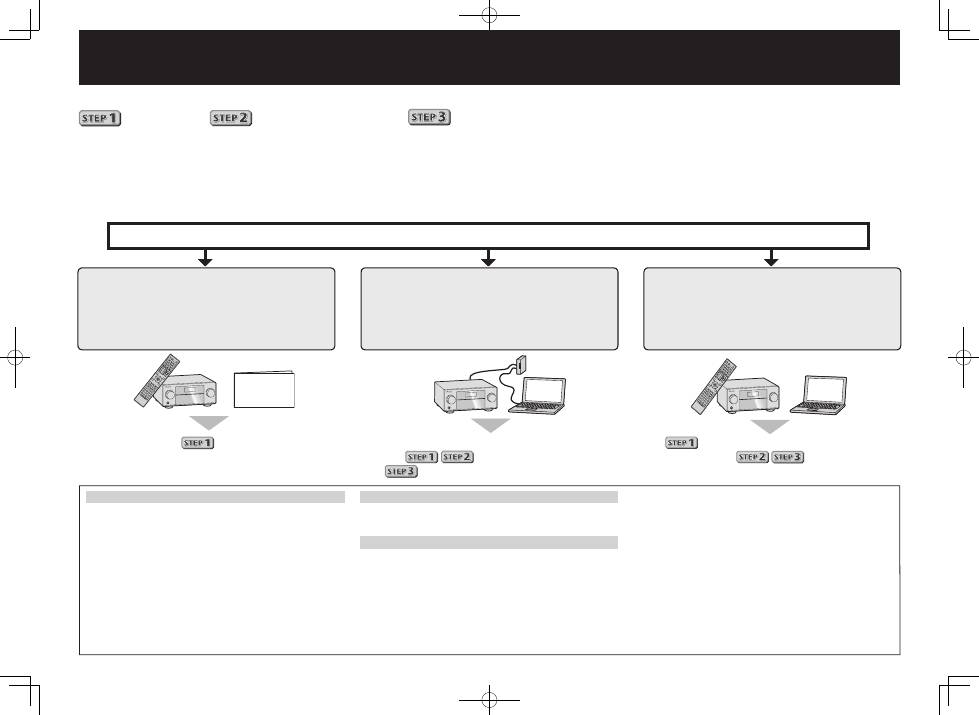
Enjoy easy multichannel playback with this unit in 3 steps:
Connecting up
→
Initial setup
→
Basic playback
.
Convenient with easy connection and initial setup upon following the instructions displayed on-screen by installing AVNavigator.
• The Mac OS version of AVNavigator can be downloaded from http://www.pioneer.eu.
• The iPad version of AVNavigator can be downloaded from the App Store.
• The provided CD-ROM includes the Windows version of AVNavigator.
Start connecting by choosing one method from among the following in accordance with your play environment.
Quick Start
Guide
3
PRE OUT
SUBWOOFER
1
2
(Single)
FRONT
SPEAKERS
FRONT
CENTER
A
A
R
L
SURROUND
R
L
SURROUND BACK
R
L
FRONT HEIGHT / FRONT WIDE /
B
R
L
PRE OUT
SUBWOOFER
1
2
(Single)
FRONT
SPEAKERS
FRONT
CENTER
A
A
R
L
SURROUND
R
L
SURROUND BACK
R
L
FRONT HEIGHT / FRONT WIDE /
B
R
L
LINE LEVEL
INPUT
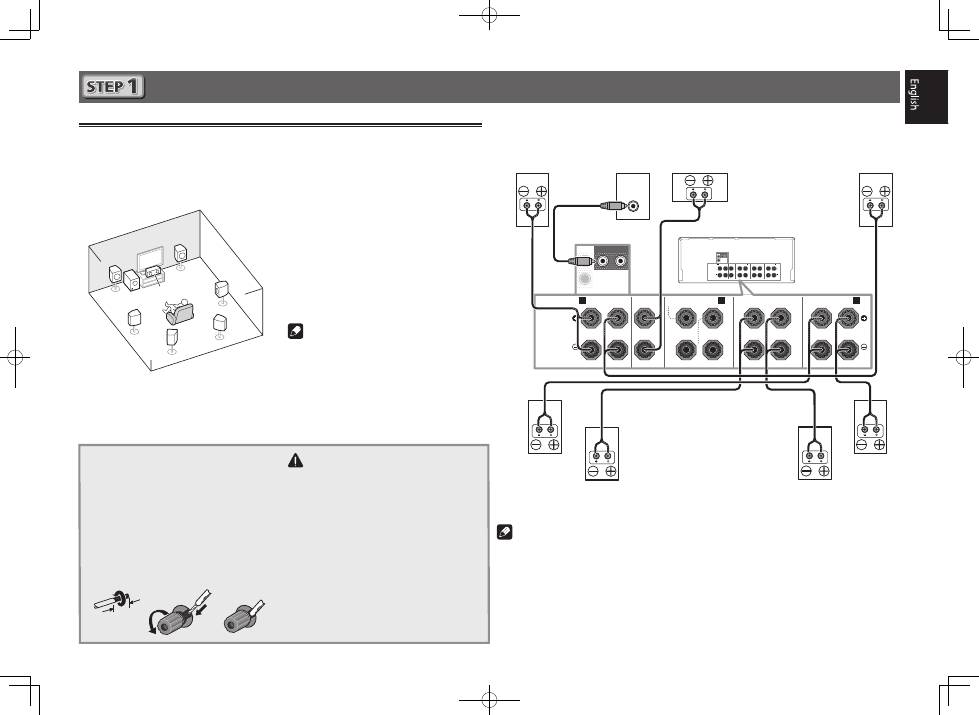
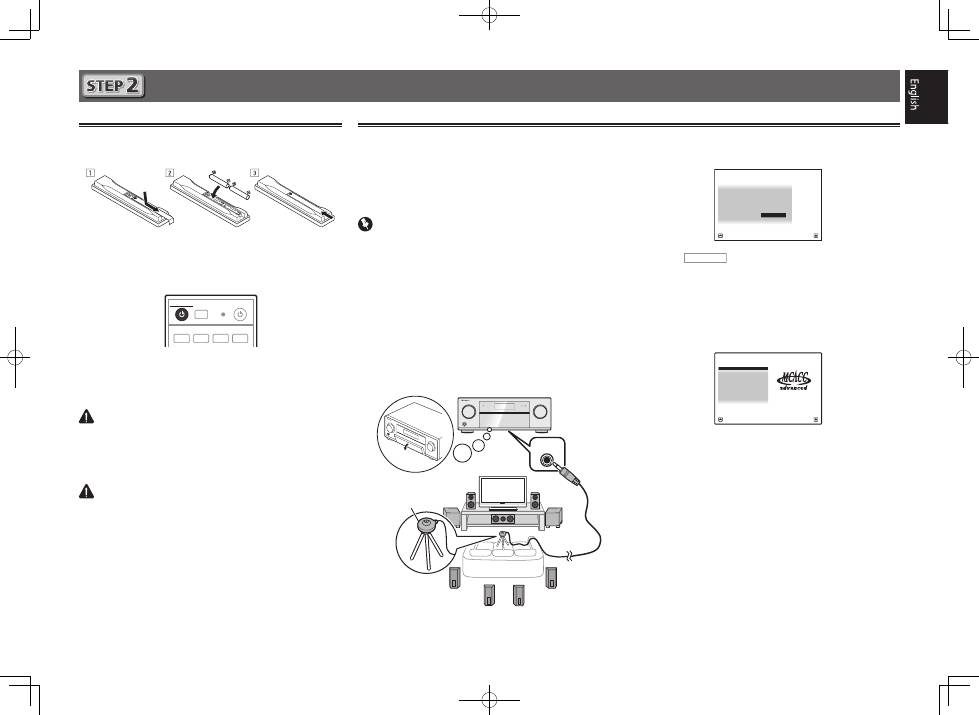
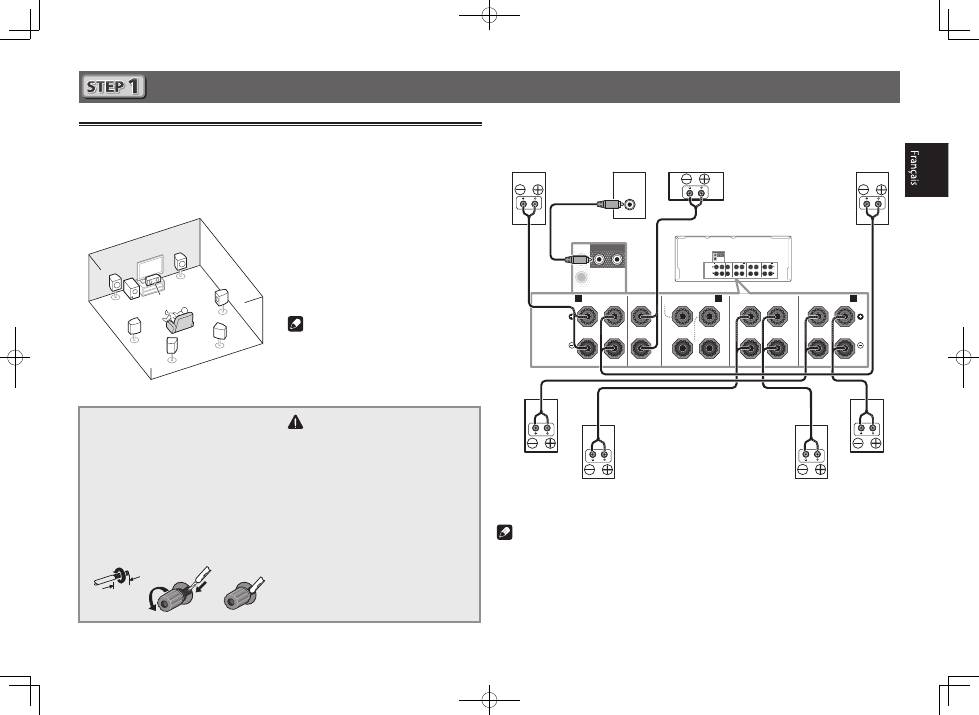
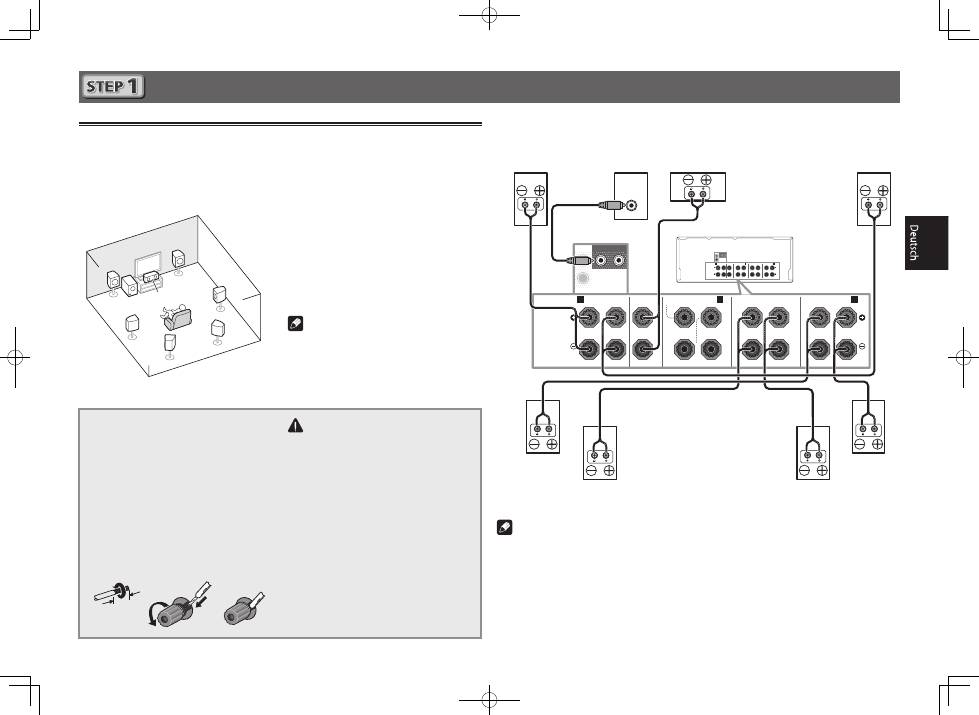
Connecting up
Connecting the speakers
The receiver will work with just two stereo speakers (the front speakers in the diagram) but using
at least five speakers is recommended, and a complete setup is best for surround sound.
To achieve the comfortable surround sound, install your speakers as shown below.
7.1 channel surorund system:
After installing the speakers, connect them as shown below.
L
– Front Left
C
– Center
R
– Front Right
SL
– Surround Left
SR
– Surround Right
SBL
– Surround back Left
SBR
– Surround back Right
SW
– Subwoofer
Note
• There are also other speaker connection
patterns (front height, front wide, etc.).
For details, see page 19 of the operating
instructions.
Connecting the speaker cables
Make sure you connect the speaker on
the right to the right (
R
) terminal and the
speaker on the left to the left (
L
) terminal.
Also make sure the positive and negative
(
+/–
) terminals on the receiver match those
on the speakers.
1
Twist exposed wire strands together.
2
Loosen terminal and insert exposed wire.
3
Tighten terminal.
1
2
3
10 mm
CAUTION
• Before making or changing connections,
switch off the power and disconnect the
power cord from the AC outlet.
• These speaker terminals carry
HAZARDOUS LIVE
voltage. To prevent the
risk of electric shock when connecting
or disconnecting the speaker cables,
disconnect the power cord before
touching any uninsulated parts.
SL
L
R
SR
SBL
SBR
SW
C
Subwoofer
(
SW
)
Front Right
(
R
)
Surround Right
(
SR
)
Surround Left
(
SL
)
Front Left
(
L
)
Center
(
C
)
Surround back Right
(
SBR
)
Surround back Left
(
SBL
)
Note
• When only connecting one surround back speaker, connect it to the
SURROUND BACK L
(Single)
terminals.
• This unit supports speakers with a nominal impedance of 4
W
to 16
W
.
4
Connecting a TV and playback
components
Note
• Refer to the operating instructions in the included CD-
ROM if you wish to connect a TV or playback component
in a method other than an HDMI connection.
• Refer to the operating instructions in the included CD-
ROM for other device connections.
CAUTION
• Handle the power cord by the plug part. Do not pull out
the plug by tugging the cord, and never touch the power
cord when your hands are wet, as this could cause a short
circuit or electric shock. Do not place the unit, a piece of
furniture, or other object on the power cord or pinch the
cord in any other way. Never make a knot in the cord or tie
it with other cables. The power cords should be routed so
that they are not likely to be stepped on. A damaged power
cord can cause a fire or give you an electric shock. Check
the power cord once in a while. If you find it damaged,
ask your nearest Pioneer authorized independent service
company for a replacement.
Connecting up (continued)
Connecting antennas
ANTENNA
AM LOOP
FM UNBAL 75
ANTENNA
AM LOOP
FM UNBAL 75
1
4
5
2
3
a
b
c
Connecting to the network through
LAN interface
LAN
(10/100)
WAN
3
2
1
LAN
LAN
(10/100)
VENTILATION CAUTION
When installing this unit, make sure to leave space
around the unit for ventilation to improve heat radiation
(at least 20 cm at top, 10 cm at rear, and 20 cm at each
side).
WARNING
Slots and openings in the cabinet are provided for
ventilation to ensure reliable operation of the product,
and to protect it from overheating. To prevent fire
hazard, the openings should never be blocked or
covered with items (such as newspapers, table-cloths,
curtains) or by operating the equipment on thick carpet
or a bed.
D3-4-2-1-7b*_A1_En
• If the TV does not support the HDMI Audio Return Channel
function, optical digital cable (
A
) connection is required to
listen to the TV sound over the receiver.
• If the TV supports the HDMI Audio Return Channel function,
the sound of the TV is input to the receiver via the HDMI
terminal, so there is no need to connect an optical digital
cable (
A
). In this case, set
ARC
at
HDMI Setup
to
ON
l
“
HDMI Setup
”
• Please refer to the TV’s operation manual for directions on
connections and setup for the TV.
HDMI
LAN
(10/100)
OUT 1
(CONTROL)
OUT 2
(HD ZONE)
DC OUTPUT
for WIRELESS LAN
(OUTPUT 5 V
0.6 A MAX)
OPTICAL
COAXIAL
ASSIGNABLE
SELECTABLE
ASSIGNABLE
1
-
7
IN
1
(DVD)
BD IN
IN
2
(SAT/CBL)
IN
3
(DVR/BDR)
IN
4
IN
6
IN
7
IN
1
(TV)
IN
2
(DVR/BDR)
IN
1
(DVD)
IN
2
(SAT/CBL)
ASSIGNABLE
LAN
(10/100)
OUT 1
(CONTROL)
DC OUTPUT
for WIRELESS LAN
(OUTPUT 5 V
0.6 A MAX)
OPTICAL
COAXIAL
NABLE
BD IN
IN
2
(SAT/CBL)
IN
3
(DVR/BDR)
IN
4
IN
6
IN
7
IN
1
(TV)
IN
2
(DVR/BDR)
IN
2
(SAT/CBL)
ASSIGNABLE
DIGITAL OUT
OPTICAL
HDMI IN
HDMI OUT
A
LAN cable (sold separately)
Internet
Modem
Router
Computer
HDMI/DVI-compatible
Blu-ray DIsc player
HDMI/DVI-compatible TV
AM loop antenna
FM wire
antenna
5
Initial Setup
Before you start
1
Put the batteries in the remote control.
The batteries included with the unit are to check initial
operations; they may not last over a long period. We
recommend using alkaline batteries that have a longer life.
2
Switch on the receiver and your TV.
RCU SETUP
SOURCE
STANDBY/ON
BDR
BD
DVD
DVR
HDMI
ALL ZONE STBY
DISCRETE ON
3
Switch the TV input so that it connects to the
receiver.
4
Turn the subwoofer on and turn up the volume.
WARNING
• Do not use or store batteries in direct sunlight or other
excessively hot place, such as inside a car or near a heater.
This can cause batteries to leak, overheat, explode or catch
fire. It can also reduce the life or performance of batteries.
CAUTION
• When inserting the batteries, make sure not to damage
the springs on the battery’s (–) terminals. This can cause
batteries to leak or overheat.
• When disposing of used batteries, please comply with
governmental regulations or environmental public institu-
tion’s rules that apply in your country/area.
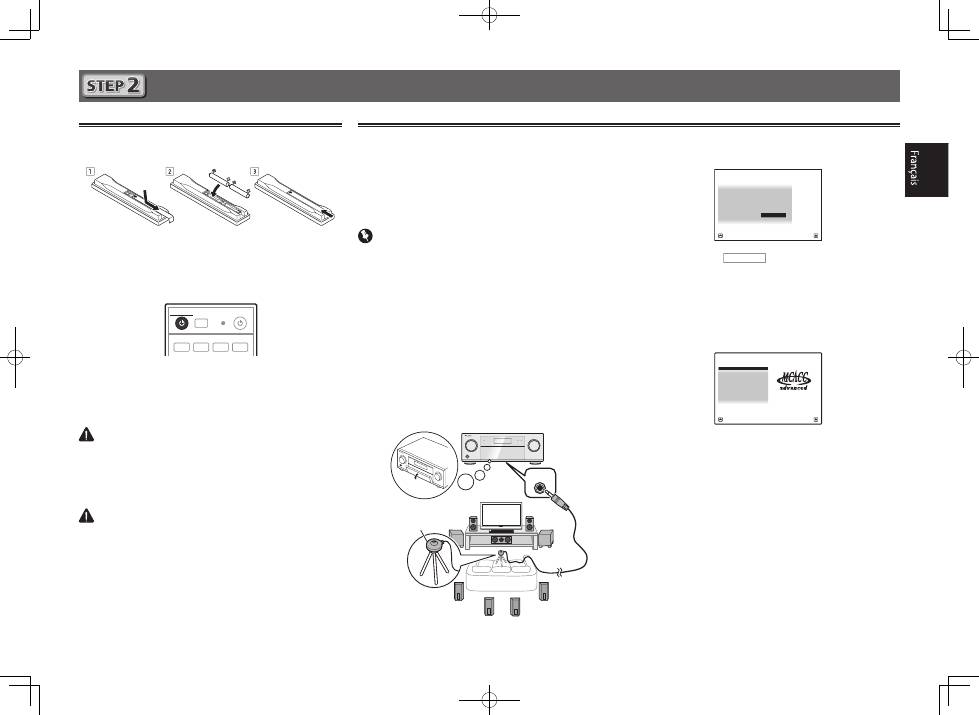
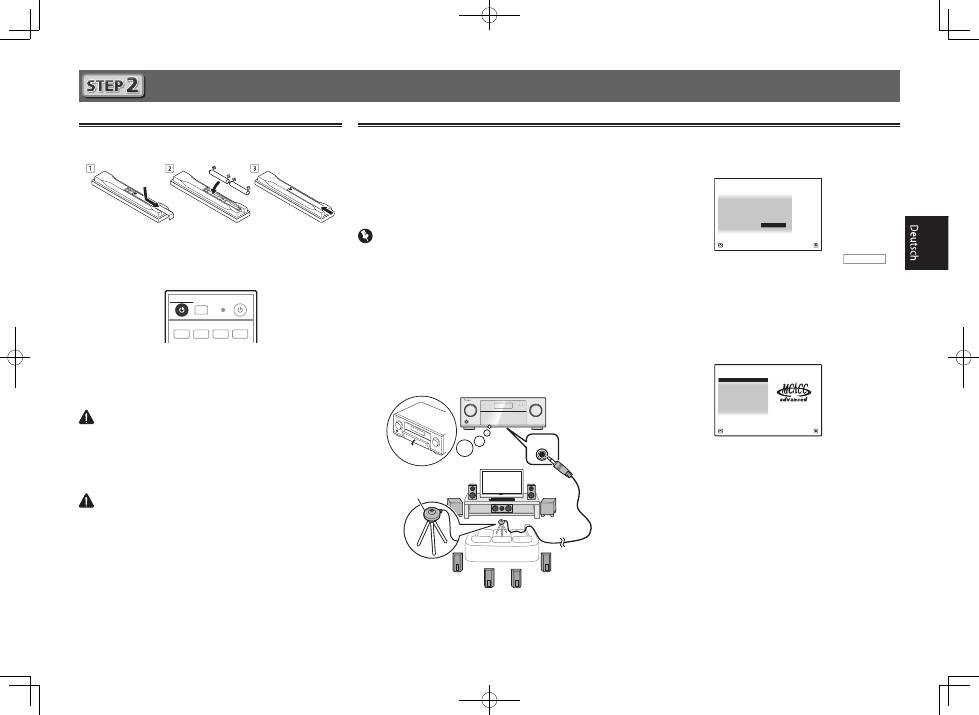
Automatically setting up for surround sound (MCACC)
The Auto Multi-Channel Acoustic Calibration (MCACC) setup
uses the supplied setup microphone to measure and analyze
the test tone that is outputted by the speakers. This setup
enables automatic high precision measuring and settings;
utilizing it will create an optimum user listening environment.
Important
• Measure in a quiet environment.
• If you have a tripod, use it to place the microphone so
that it’s about ear level at your normal listening position.
Otherwise, place the microphone at ear level using a table
or a chair.
• Accurate measurements may not be possible if there are
obstacles between the speakers and the listening position
(microphone).
• When measuring, step away from the listening position,
and operate using the remote control from the external
side of all the speakers.
1
Connect the supplied setup microphone.
MCACC
SETUP MIC
The
Full Auto MCACC
screen appears on your TV.
Speaker System
: Normal(SB/FH)
1a.Full Auto MCACC
A/V RECEIVER
Exit
Return
START
EQ Type
: SYMMETRY
MCACC
: M1.MEMORY 1
THX Speaker
:
NO
2
Press
RECEIVER
on the remote control, then
press the ENTER button.
• Automatic measuring will start.
• Measuring will take about 3 to 12 minutes.
3
Follow the instructions on-screen.
• Automatic setting is complete when the Home Menu
screen appears.
1. Advanced MCACC
2. MCACC Data Check
3. Data Management
4. System Setup
5. Network Information
6. Operation Mode Setup
Exit
Return
HOME MENU
A/V RECEIVER
• If
Reverse Phase
is displayed, the speaker’s wiring (+ and –)
may be inverted. Check the speaker connections.
Even if the connections are correct,
Reverse Phase
may be
displayed, depending on the speakers and the surrounding
environment. This does not affect measurements, however,
so select
Go Next
.
• If
ERR
is displayed, check that speaker is properly
connected.
E.g.) Check whether the surround speaker has been
mistakenly connected to the surround back terminal.
4
Make sure the setup microphone is
disconnected.
Tripod
Microphone
6
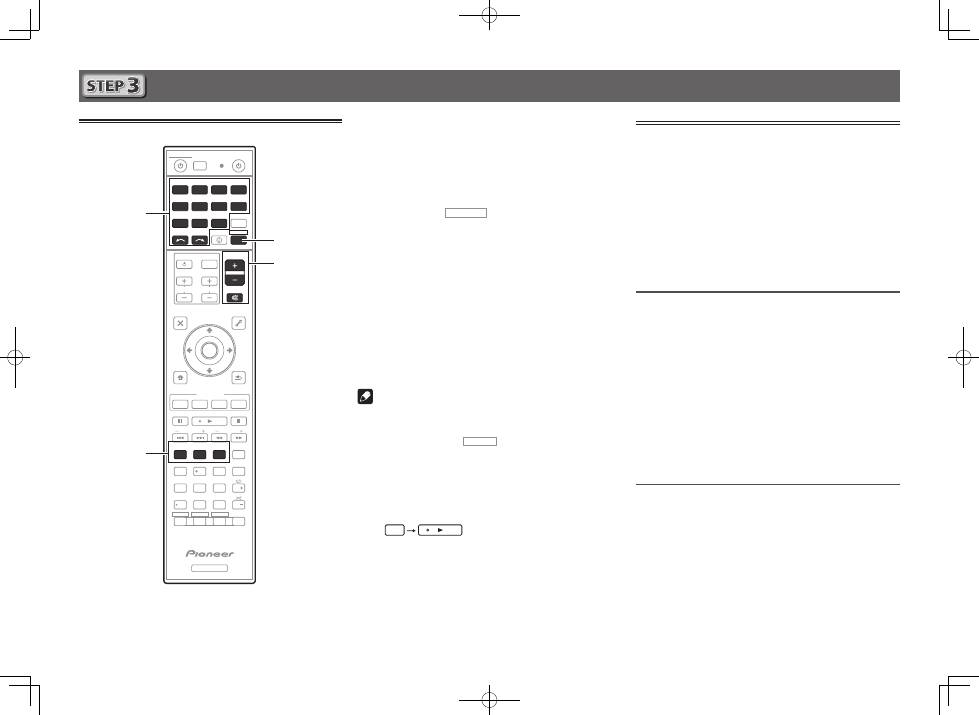
Basic playback
Multichannel playback
RECEIVER
D.ACCESS
CH LEVEL
DIMMER
SLEEP
SIGNAL SEL
SPEAKERS
MPX
PRESET
TUNE
BAND
PTY
iPod CTRL
HOME
MENU
CH
TV CONTROL
INPUT
INPUT SELECT
iPod
USB
CBL
STATUS
SAT
TUNER
ZONE 2
ZONE 3
HD ZONE
ADPT
CD
TV
RCU SETUP
SOURCE
STANDBY/ON
BDR
BD
DVD
DVR
NET
HDMI
RECEIVER
MUTE
VOLUME
VOL
TOP MENU
VIDEO
PARAMETER
AUDIO
PARAMETER
ENTER
RETURN
CLASS
ENTER
/ CLR
CH
CH
5
4
6
8
0
7
9
FEATURES
TOOLS
MENU
ALL ZONE STBY
DISCRETE ON
+Favorite
Z2
Z3
HDZ
P.CTRL+
PHASE
HDMI OUT
MCACC
AUTO/ALC/
DIRECT
AUTO
S.RTRV
STANDARD ADV SURR
ECO
PQLS
OPTION
AUDIO
DISP
MHL
2
1
3
2
4
6
3
1
Switch on the playback component.
E.g.) Turn the Blu-ray Disc player connected to the
HDMI
BD IN
terminal on.
2
Switch the input of the receiver.
E.g.) Press
BD
to select the
BD
input.
3
Press
RECEIVER
to the receiver operation mode.
4
Press AUTO/ALC/DIRECT to select ’AUTO
SURROUND’.
For multi-channel playback with a 2-channel audio input
(TV, music, etc.), press the
STANDARD
or
ADV SURR
button to select your preferred listening mode.
5
Start the playback component’s playback.
E.g.) Start playback of the Blu-ray Disc player.
6
Use VOLUME +/– to adjust the volume level.
Sound can be switched off by pressing
MUTE
button.
Note
• Switch to one of the underlined devices to use the remote
control to operate that device. To operate the receiver,
first press
RECEIVER
, then press the appropriate button to
operate.
• The receiver’s remote control can be used to operate
not only the receiver but also a variety of other devices,
including an iPod/USB device, a Blu-ray Disc player, a TV,
etc.
E.g.) Playing a Blu-ray Disc player
BD
Listening to the radio
1
Press TUNER to select the tuner.
If necessary, press
BAND
to change the band (FM or AM).
2
Press TUNE +/– to tune to a station.
• Press and hold
TUNE +/–
for about a second. The receiver
will start searching for the next station.
• If you’re listening to an FM station but the reception is
weak, press
MPX
to select FM MONO and set the receiver
to the mono reception mode.
Saving station presets
If you often listen to a particular radio station, it’s convenient to
have the receiver store the frequency for easy recall whenever
you want to listen to that station.
1
Press TOOLS while receiving a signal from the
station you want to store.
The preset number is blinking.
2
Press PRESET +/– to select the station preset
you want, then press ENTER.
The preset number stop blinking and the receiver stores
the station.
Listening to station presets
You will need to have some presets stored to do this.
Press PRESET +/– to select the station preset
you want.
7
Basic playback (continued)
To enjoy the many functions of the
unit to the fullest extent
Install the AVNavigator into your computer, and
use the "Interactive Manual" and “Operation
Guide”.
Load the CD-ROM into your computer and
download the PDF manual from the menu screen
to read.
Functions
#
Playing a USB device
#
Bluetooth ADAPTER for Wireless Enjoyment of Music
#
Playback with NETWORK feature
#
Setting the Audio options
#
Setting the Video options
#
Using the MULTI-ZONE controls
FAQ
Glossary
Features index
Note
• This unit supports AirPlay. For details, see page 55 of the
operating instructions and the Apple website (http://www.
apple.com).
• This unit’s software can be updated (page 90 of the
operating instructions). With Mac OS, it can be updated
using Safari (page 92 of the operating instructions).
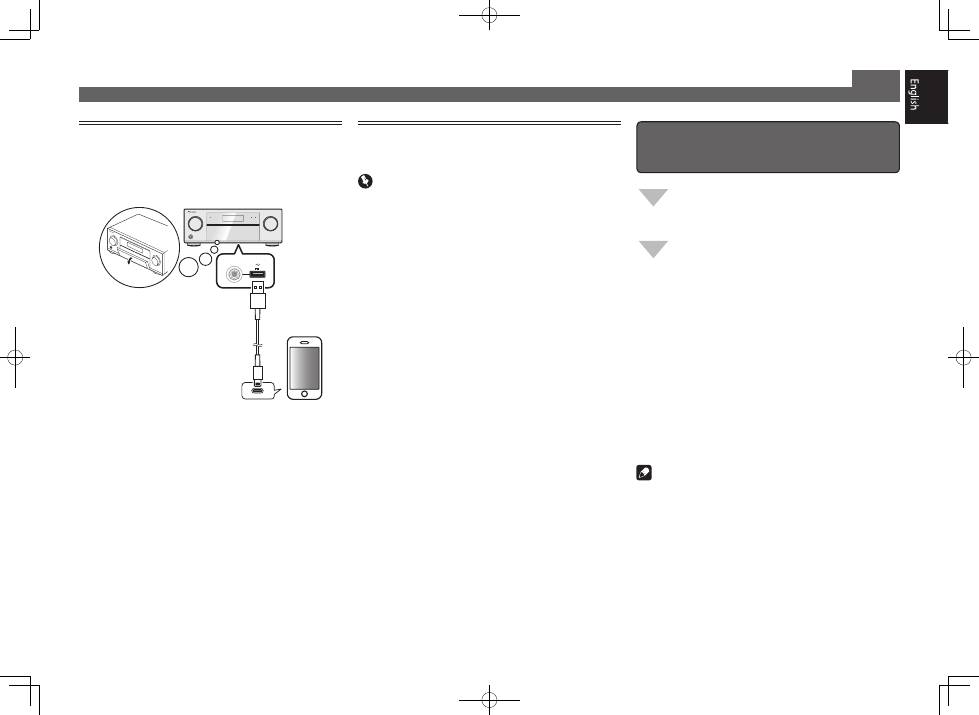
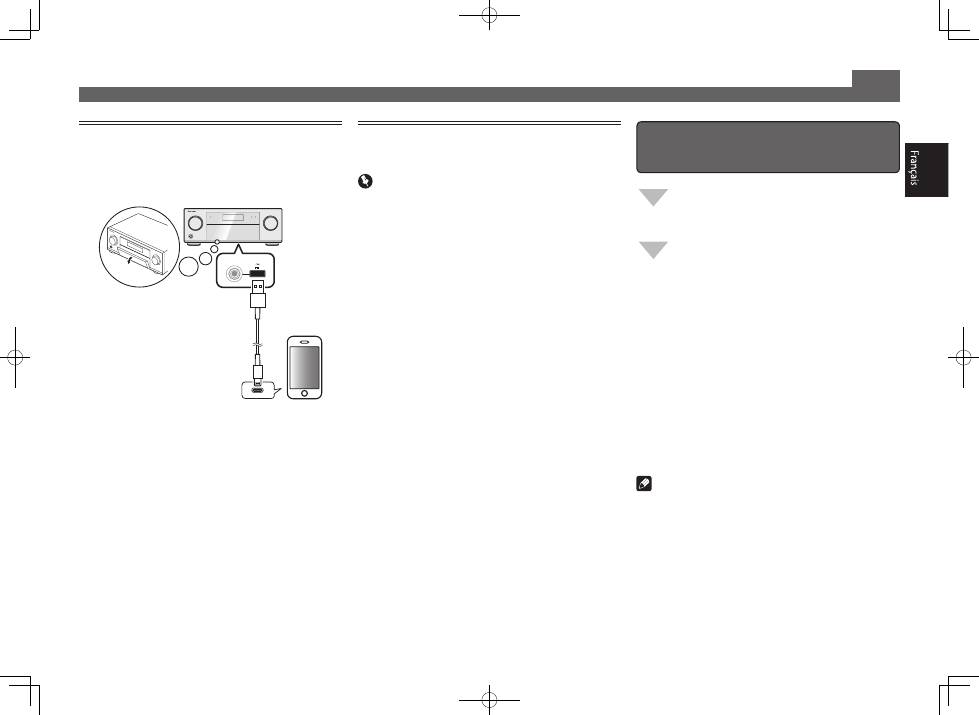
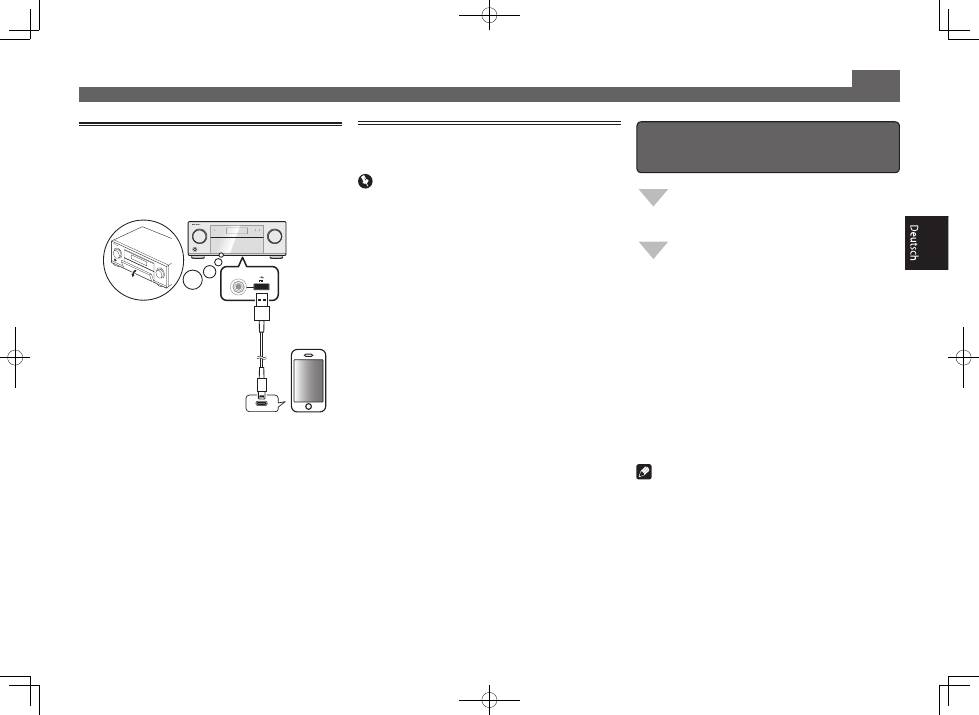
Playing an iPod
• About one minute is required between turning the power
on and completion of startup.
1
Connect your iPod.
An iPod/iPhone/iPad can be connected to the receiver.
5 V 2.1 A
with USB
2
Press iPod USB to select the iPod/USB input.
When the display shows the names of folders and files,
you’re ready to play music from the iPod.
3
Use
/
to select a category, then press
ENTER to browse that category.
• To return to the previous level any time, press
RETURN
.
4
Use
/
to browse the selected category (e.g.,
albums).
• Use
/l
to move to previous/next levels.
5
Continue browsing until you arrive at what
you want to play, then press
to start
playback.
Listening to Internet radio stations
• About one minute is required between turning the power
on and completion of startup.
Important
• When using a broadband Internet connection, a contract
with an Internet service provider is required. For more
details, contact your nearest Internet service provider.
• To listen to Internet radio stations, you must have high-
speed broadband Internet access. With a 56 K or ISDN
modem, you may not enjoy the full benefits of Internet
radio.
• Access to content provided by third parties requires a
high speed internet connection and may also require
account registration and a paid subscription. Third
party content services may be changed, suspended,
interrupted, or discontinued at any time without notice,
and Pioneer disclaims any liability in connection with such
occurrences. Pioneer does not represent or warrant that
content services will continue to be provided or available
for a particular period of time, and any such warranty,
express or implied, is disclaimed.
1
Press NET repeatedly to select the INTERNET
RADIO input.
It may take several seconds for this receiver to access the
network.
2
Use
/
to select the Internet radio station to
play back, and then press ENTER.
iPod/iPhone/iPad
© 2013 PIONEER CORPORATION.
All rights reserved.
USB cable
included with the iPod
2
Français
Raccordement et configuration initiale
en se référant aux instructions dans
“Wiring Navi” de l’AVNavigator
(Une connexion au réseau est nécessaire
pour la configuration initiale.)
Faites les raccordements en suivant les
instructions dans
“Wiring Navi” de l’AVNavigator
(Si le récepteur n’est pas connecté à un réseau.)
Raccordement et configuration initiale
en suivant le guide rapide
Il est inutile de lire les explications dans ce guide ;
sont expliqués dans “Wiring Navi” et
dans le “Guide d’utilisation”.
est expliqué dans “Wiring Navi”, vous
pouvez passer à
de ce guide
lorsque “Wiring Navi” est terminé.
Passez à
dans ce guide.
Raccordement et configuration initiale
Utilisation de l’AVNavigator
AVNavigator pour Mac
1
Téléchargez “AVNavigator 2013.pkg” de
http://www.pioneer.eu.
2
Lancez “AVNavigator 2013.pkg” à partir du dossier
“Downloads”.
3
Suivez les instructions apparaissant à l’écran pour
installer l’application.
4
Lancez “AVNavigator 2013”.
• Le fichier se trouve dans le dossier “Applications” juste
en dessous du disque dur (Macintosh HD).
• L’AVNavigator peut être utilisées avec Mac OS X (10.7 ou
10.8).
AVNavigator pour iPad
1
Téléchargez l’AVNavigator de l’App Store.
2
Lancez l’AVNavigator.
AVNavigator pour Windows
Lancez le bureau depuis l’écran de démarrage (Windows 8
seulement).
1
Posez le CD-ROM inclus dans le lecteur CD de votre ordinateur.
• Si le menu principal du CD-ROM n’apparaît pas, double-
cliquez sur “MAIN_MENU.exe” sur le CD-ROM.
• La première page du menu du CD-ROM apparaît.
• Ce CD-ROM peut être utilisé avec Microsoft
®
Windows
®
XP/Windows Vista
®
/Windows
®
7/Windows
®
8.
• Le navigateur pris en charge est Microsoft Internet Explorer
®
8, 9 ou 10.
2
Cliquez sur “AVNavigator” dans le menu “Installing Software”.
3
Suivez les instructions apparaissant à l’écran pour installer
l’application.
4
Cliquez sur [AVNavigator 2013.II] sur le bureau pour
lancer l’AVNavigator.
• L’AVNavigator s’ouvre et Wiring Navi démarre.
• Selon les réglages réseau ou sécurité de l’ordinateur
sur lequel l’AVNavigator est installé, les fonctions de
l’AVNavigator peuvent ne pas agir correctement.
Profitez de la lecture multicanaux sur cet appareil en 3 points seulement :
Raccordement
→
Configuration initiale
→
Lecture de base
.
En installant l’AVNavigator vous pourrez faire facilement les raccordements et la configuration initiale en suivant les instructions qui apparaissent sur l’écran.
• La version Mac OS de l’AVNavigator peut être téléchargée de http://www.pioneer.eu.
• La version iPad de l’AVNavigator peut être téléchargée d’App Store.
• Le CD-ROM fourni contient la version Windows de l’AVNavigator.
Choisissez tout d’abord une méthode de raccordement selon les enceintes utilisées.
Guide
rapide
3
Raccordement
Raccordement des enceintes
Le récepteur fonctionne avec deux enceintes stéréo seulement (enceintes avant sur le schéma)
mais il est conseillé d’utiliser au moins cinq enceintes, et avec une configuration complète le
son surround sera bien meilleur.
Pour obtenir le son surround le plus agréable, installez vos enceintes comme illustré ci-dessous.
Système surround à 7.1 canaux :
Après avoir installé les enceintes, raccordez-les de la façon ci-dessous.
L
– Avant Gauche
C
– Centre
R
– Avant Droite
SL
– Surround Gauche
SR
– Surround Droite
SBL
– Surround arrière Gauche
SBR
– Surround arrière Droite
SW
– Caisson de grave
Remarque
• Il existe aussi d’autres façons de connecter
les enceintes (avant haute, avant large,
etc.). Pour le détail, reportez-vous à la page
19 du mode d’emploi.
Raccordement des câbles d’en-
ceintes
Veillez à bien raccorder l’enceinte de droite
à la borne droite (
R
) et l’enceinte de gauche
à la borne de gauche (
L
). Assurez-vous aussi
que les bornes positives et négatives (
+/–
)
sur le récepteur correspondent à celles des
enceintes.
1
Torsadez les fils ensemble.
2
Dévissez la borne et insérez la partie
dénudée des fils.
3
Serrez la borne.
1
2
3
10 mm
ATTENTION
• Avant de réaliser ou de modifier des
liaisons, éteignez les appareils et
débranchez le cordon d’alimentation de
la prise électrique.
• Ces bornes d’enceintes sont soumises à
une tension
DANGEREUSE
. Pour éviter
tout risque de décharge électrique lors
du branchement ou débranchement
des câbles d’enceintes, débranchez le
cordon d’alimentation avant de toucher
les parties non isolées.
SL
L
R
SR
SBL
SBR
SW
C
Caisson de
grave
(
SW
)
Avant Droite
(
R
)
Surround Droite
(
SR
)
Surround Gauche
(
SL
)
Avant
Gauche
(
L
)
Centre
(
C
)
Surround arrière Droite
(
SBR
)
Surround arrière Gauche
(
SBL
)
Remarque
• Si vous raccordez une seule enceinte surround arrière, raccordez-la aux bornes
SURROUND
BACK L (Single)
.
• Cet appareil accepte les enceintes ayant une impédance nominale de 4
W
à 16
W
.
PRE OUT
SUBWOOFER
1
2
(Single)
FRONT
SPEAKERS
FRONT
CENTER
A
A
R
L
SURROUND
R
L
SURROUND BACK
R
L
FRONT HEIGHT / FRONT WIDE /
B
R
L
PRE OUT
SUBWOOFER
1
2
(Single)
FRONT
SPEAKERS
FRONT
CENTER
A
A
R
L
SURROUND
R
L
SURROUND BACK
R
L
FRONT HEIGHT / FRONT WIDE /
B
R
L
LINE LEVEL
INPUT

4
Raccordement des antennes
Raccordement au réseau par l’inter-
face LAN
LAN
(10/100)
WAN
3
2
1
LAN
LAN
(10/100)
ANTENNA
AM LOOP
FM UNBAL 75
ANTENNA
AM LOOP
FM UNBAL 75
1
4
5
2
3
a
b
c
Raccordement d’un téléviseur et de
lecteurs
Remarque
• Reportez-vous aux instructions sur le CD-ROM fourni si
vous voulez raccorder un téléviseur ou un lecteur d’une
autre façon que par une liaison HDMI.
• Reportez-vous aux instructions sur le CD-ROM fourni pour
d’autres liaisons.
ATTENTION
Raccordement (suite)
Téléviseur compatible
HDMI/DVI
• Si votre téléviseur ne prend pas en charge la fonction HDMI
de canal de retour audio, vous devrez effectuer une liaison par
câble numérique optique (
A
) pour écouter le son du téléviseur
via le récepteur.
• Si votre téléviseur prend en charge la fonction HDMI de canal
de retour audio, le son du téléviseur est transmis au récepteur
par la prise HDMI et il est inutile de raccorder un câble
numérique optique (
A
). Dans ce cas, réglez
ARC
dans
HDMI
Setup
sur
ON
l
“Réglage de l’HDMI”
• Veuillez vous reporter au Guide d’utilisation du téléviseur pour
consulter les instructions concernant les connexions et la
configuration du téléviseur.
Antenne
fil FM
Antenne cadre AM
Câble LAN (vendu séparément)
Internet
Modem
Routeur
Ordinateur
PRÉCAUTION DE VENTILATION
Lors de l’installation de l’appareil, veillez à laisser un
espace suffisant autour de ses parois de manière à
améliorer la dissipation de chaleur (au moins 20 cm sur
le dessus, 10 cm à l’arrière et 20 cm de chaque côté).
AVERTISSEMENT
Les fentes et ouvertures du coffret sont prévues pour la
ventilation, pour assurer un fonctionnement stable de
l’appareil et pour éviter sa surchauffe. Pour éviter les
risques d’incendie, ne bouchez jamais les ouvertures et
ne les recouvrez pas d’objets, tels que journaux, nappes
ou rideaux, et n’utilisez pas l’appareil posé sur un tapis
épais ou un lit.
D3-4-2-1-7b*_A1_Fr
• Saisissez le cordon d’alimentation par la prise. Ne
débranchez jamais la fiche en tirant sur le cordon et ne
touchez jamais le cordon d’alimentation lorsque vous avez
les mains mouillées, car cela pourrait causer un court-
circuit ou une électrocution. Ne placez pas l’appareil, un
meuble ou tout autre objet sur le cordon d’alimentation et
ne coincez pas le cordon. Ne faites jamais de nœud sur
le cordon, et ne le nouez pas avec d’autres câbles. Les
cordons d’alimentation doivent être placés de telle sorte
que l’on ne risque pas de marcher dessus. Un cordon
d’alimentation endommagé peut entraîner un incendie
ou une électrocution. Vérifiez le cordon d’alimentation
de temps en temps. Si vous le trouvez abîmé, demandez
à votre service après-vente Pioneer le plus proche de le
remplacer.
HDMI
LAN
(10/100)
OUT 1
(CONTROL)
OUT 2
(HD ZONE)
DC OUTPUT
for WIRELESS LAN
(OUTPUT 5 V
0.6 A MAX)
OPTICAL
COAXIAL
ASSIGNABLE
SELECTABLE
ASSIGNABLE
1
-
7
IN
1
(DVD)
BD IN
IN
2
(SAT/CBL)
IN
3
(DVR/BDR)
IN
4
IN
6
IN
7
IN
1
(TV)
IN
2
(DVR/BDR)
IN
1
(DVD)
IN
2
(SAT/CBL)
ASSIGNABLE
LAN
(10/100)
OUT 1
(CONTROL)
DC OUTPUT
for WIRELESS LAN
(OUTPUT 5 V
0.6 A MAX)
OPTICAL
COAXIAL
NABLE
BD IN
IN
2
(SAT/CBL)
IN
3
(DVR/BDR)
IN
4
IN
6
IN
7
IN
1
(TV)
IN
2
(DVR/BDR)
IN
2
(SAT/CBL)
ASSIGNABLE
DIGITAL OUT
OPTICAL
HDMI IN
HDMI OUT
A
Lecteur de disque Blu-ray
compatible HDMI/DVI
5
Configuration initiale
Avant de commencer
1
Insérez des piles dans la télécommande.
Les piles fournies avec l’appareil sont destinées à vérifier
le bon fonctionnement de l’appareil et risquent de ne pas
durer longtemps. Nous vous conseillons d’utiliser des
piles alcalines dont l’autonomie est plus longue.
2
Allumez le récepteur et votre téléviseur.
RCU SETUP
SOURCE
STANDBY/ON
BDR
BD
DVD
DVR
HDMI
ALL ZONE STBY
DISCRETE ON
3
Sélectionnez l’entrée du téléviseur pour qu’il
se connecte au récepteur.
4
Allumez le caisson de grave et augmentez le
volume.
AVERTISSEMENT
• N’utilisez pas ou ne rangez pas les piles en plein soleil
ou à un endroit très chaud, comme dans une voiture ou
près d’un appareil de chauffage. Les piles pourraient fuir,
surchauffer, exploser ou prendre feu. Cela peut aussi
réduire leur durée de vie et leurs performances.
ATTENTION
• Lors de l’insertion des piles, veillez à ne pas endommager
les ressorts au niveau des bornes (–) des piles. Les piles
pourraient fuir ou surchauffer.
• Pour la mise au rebut des piles/batteries usées, veuillez
vous conformer aux réglementations gouvernementales
ou environnementales en vigueur dans votre pays/région.
Configuration automatique du son surround (MCACC)
Lors du calibrage acoustique multicanaux automatique
(MCACC), le microphone de configuration fourni est utilisé
pour mesurer et analyser la tonalité de test émise par les
enceintes. Cette configuration permet d’effectuer des mesures
et réglages extrêmement précis et de créer un environnement
d’écoute optimal pour chaque situation.
Important
• Les mesures doivent être faites dans un environnement
calme.
• Positionnez le microphone sur un trépied (si vous en avez
un) pour qu’il se trouve à hauteur d’oreilles en position
d’écoute normale. Sinon, positionnez le microphone à
hauteur d’oreille en le posant sur une table ou sur une
chaise.
• Il ne sera pas possible d’obtenir des mesures précises s’il
y a des obstacles entre les enceintes et la position d’écoute
(microphone).
• Pendant les mesures éloignez-vous de la position d’écoute
et actionnez la télécommande loin de toutes les enceintes.
1
Raccordez le microphone de configuration
fourni.
MCACC
SETUP MIC
L’écran
Full Auto MCACC
apparaît sur votre téléviseur.
Speaker System
: Normal(SB/FH)
1a.Full Auto MCACC
A/V RECEIVER
Exit
Return
START
EQ Type
: SYMMETRY
MCACC
: M1.MEMORY 1
THX Speaker
:
NO
2
Appuyez sur
RECEIVER
de la télécommande,
puis appuyez sur la touche ENTER.
• La mesure automatique commence.
• La mesure dure de 3 à 12 minutes.
3
Suivez les instructions affichées à l’écran.
• Le réglage automatique est terminé lorsque la page Home
Menu apparaît.
1. Advanced MCACC
2. MCACC Data Check
3. Data Management
4. System Setup
5. Network Information
6. Operation Mode Setup
Exit
Return
HOME MENU
A/V RECEIVER
• Si
Reverse Phase
s’affiche, les fils du cordon d’enceinte
(+ et –) ont peut-être été inversés. Vérifiez les liaisons des
enceintes.
Même si les liaisons sont correctes,
Reverse Phase
peut
s’afficher selon les enceintes et l’environnement ambiant.
Toutefois, ceci n’affecte pas les mesures et vous pouvez
sélectionner
Go Next
.
• Si
ERR
s’affiche, assurez-vous que l’enceinte est raccordée
correctement.
Ex.) Vérifiez si l’enceinte surround n’a pas été raccordée
par erreur à la prise surround arrière.
4
Assurez-vous de débrancher le microphone de
configuration.
Trépied
Microphone
6
Lecture de base
Lecture multicanaux
RECEIVER
D.ACCESS
CH LEVEL
DIMMER
SLEEP
SIGNAL SEL
SPEAKERS
MPX
PRESET
TUNE
BAND
PTY
iPod CTRL
HOME
MENU
CH
TV CONTROL
INPUT
INPUT SELECT
iPod
USB
CBL
STATUS
SAT
TUNER
ZONE 2
ZONE 3
HD ZONE
ADPT
CD
TV
RCU SETUP
SOURCE
STANDBY/ON
BDR
BD
DVD
DVR
NET
HDMI
RECEIVER
MUTE
VOLUME
VOL
TOP MENU
VIDEO
PARAMETER
AUDIO
PARAMETER
ENTER
RETURN
CLASS
ENTER
/ CLR
CH
CH
5
4
6
8
0
7
9
FEATURES
TOOLS
MENU
ALL ZONE STBY
DISCRETE ON
+Favorite
Z2
Z3
HDZ
P.CTRL+
PHASE
HDMI OUT
MCACC
AUTO/ALC/
DIRECT
AUTO
S.RTRV
STANDARD ADV SURR
ECO
PQLS
OPTION
AUDIO
DISP
MHL
2
1
3
2
4
6
3
1
Allumez le lecteur.
Ex.) Allumez le lecteur de disque Blu-ray raccordé à la
prise
HDMI BD IN
.
2
Sélectionnez l’entrée du récepteur.
Ex.) Appuyez sur
BD
pour sélectionner l’entrée
BD
.
3
Appuyez sur
RECEIVER
pour sélectionner le
mode de fonctionnement du récepteur.
4
Appuyez sur AUTO/ALC/DIRECT pour
sélectionner ‘AUTO SURROUND’.
Pour la lecture multicanaux à partir de signaux audio à 2
canaux (Téléviseur, musique, etc.), appuyez sur la touche
STANDARD
ou
ADV SURR
pour sélectionner votre mode
d’écoute préféré.
5
Démarrez la lecture sur le lecteur.
Ex.) Démarrez la lecture sur le lecteur de disque Blu-ray.
6
Utilisez VOLUME +/– pour régler le volume.
Le son peut être coupé par la touche
MUTE
.
Remarque
• Basculez sur un des appareils soulignés pour agir des-
sus depuis la télécommande. Pour agir sur le récepteur,
appuyez d’abord sur
RECEIVER
, puis appuyez sur la touche
appropriée.
• La télécommande du récepteur peut être utilisée pour agir
non seulement sur le récepteur mais aussi sur d’autres
dispositifs, comme un appareil iPod/USB, un lecteur de
disque Blu-ray, un téléviseur, etc.
Ex.) Lecture d’un lecteur de disque Blu-ray
BD
Écoute de la radio
1
Appuyez sur TUNER pour sélectionner le tuner.
Si nécessaire, appuyez sur
BAND
pour changer de bande
(FM ou AM).
2
Appuyez sur TUNE +/– pour accorder une
station.
• Appuyez sur
TUNE +/–
et maintenez une seconde
enfoncée. Le récepteur recherche la station suivante.
• Si vous écoutez une station FM mais que la réception est
faible, appuyez sur
MPX
pour sélectionner FM MONO et
réglez le récepteur sur le mode de réception mono.
Sauvegarde des stations préréglées
Si vous écoutez souvent une station radio précise, il est
intéressant d’en mémoriser la fréquence pour faire l’accord
rapidement sur cette station lorsque vous souhaitez l’écouter.
1
Appuyez sur TOOLS pendant la réception
du signal de la station que vous voulez
sauvegarder.
Le numéro de préréglage clignote.
2
Appuyez sur PRESET +/– pour sélectionner le
numéro de préréglage souhaité, puis appuyez
sur ENTER.
Le numéro de préréglage cesse de clignoter et la station
est sauvegardée.
Écouter des stations préréglées
Pour ce faire, vous devez avoir préréglé des stations.
Appuyez sur PRESET +/– pour sélectionner la
station préréglée de votre choix.
7
5 V 2.1 A
with USB
Lecture de base (suite)
Pour profiter au maximum des
nombreuses fonctions de l’appareil
Installez l’AVNavigator sur votre ordinateur et
utilisez le “Manuel interactif” et le
“Guide d’utilisation”.
Insérez le CD-ROM dans votre ordinateur et
téléchargez le manuel PDF apparaissant sur le
menu pour le lire.
Fonctions
#
Lecture d’un dispositif USB
#
ADAPTATEUR Bluetooth pour l’écoute de musique sans
fil
#
Lecture avec la fonction NETWORK
#
Réglage des options audio
#
Réglages des options vidéo
#
Utilisation des commandes MULTI-ZONE
FAQ
Glossaire
Index des fonctions
Remarque
• Cet appareil prend en charge AirPlay. Pour le détail, repor-
tez-vous à la page 55 du mode d’emploi et au site d’Apple
(http://www.apple.com).
• Le logiciel de cet appareil peut être mis à jour (page 90 du
mode d’emploi). Avec Mac OS, il peut être mis à jour avec
Safari (page 93 du mode d’emploi).
Lecture d’un iPod
• Environ une minute est nécessaire entre la mise sous
tension et la fin de la phase de démarrage.
1
Raccordez votre iPod.
Vous pouvez raccorder un iPod/iPhone/iPad au récepteur.
2
Appuyez sur iPod USB pour sélectionner
l’entrée iPod/USB.
Lorsque les noms de dossiers et de fichiers apparaissent
sur l’afficheur, vous pouvez écouter la musique enregistrée
sur l’iPod.
3
Utilisez
/
pour sélectionner une catégorie,
puis appuyez sur ENTER pour naviguer dans
cette catégorie.
• Pour revenir à tout moment au niveau précédent,
appuyez sur
RETURN
.
4
Utilisez
/
pour naviguer dans la catégorie
sélectionnée (par exemple, albums).
• Utilisez
/l
pour passer au niveau précédent/suivant.
5
Poursuivez votre navigation jusqu’à atteindre
les éléments que vous souhaitez lire, puis
appuyez sur
pour lancer la lecture.
Ecoute des stations radio Internet
• Environ une minute est nécessaire entre la mise sous
tension et la fin de la phase de démarrage.
Important
• Pour utiliser une connexion Internet à haut débit, il faut
être abonné à un fournisseur de service Internet. Pour le
détail, contactez le fournisseur de service Internet le plus
proche.
• Pour écouter les stations radio Internet, vous devez avoir
un accès haute vitesse à Internet par une large bande.
Avec un modem de 56 K ou ISDN, vous ne pourrez pas
profiter pleinement de la radio Internet.
• L’accès aux contenus fournis par des tiers exige une
connexion Internet haut débit et peut aussi exiger la
création d’un compte et des droits de souscription. Les
services de contenus de tiers peuvent être changés,
suspendus ou interrompus à tout moment sans préavis,
et Pioneer décline toute responsabilité quant à ces
changements. Pioneer ne certifie ou garantit que les
services de contenus continueront d’être fournis ou
disponibles pendant une période précise et décline toute
garantie explicite ou implicite de ce type.
1
Appuyez plusieurs fois de suite sur NET pour
sélectionner l’entrée INTERNET RADIO.
Il faut quelques secondes au récepteur pour accéder au
réseau.
2
Utilisez
/
pour sélectionner la station
radio Internet que vous voulez écouter, puis
appuyez sur ENTER.
iPod/iPhone/iPad
© 2013 PIONEER CORPORATION.
Tous droits de reproduction et de traduction réservés.
Câble USB
fourni avec l’iPod
2
Deutsch
Anschluss und Anfangseinstellungen
entsprechend den Anweisungen in
„Wiring Navi“ im AVNavigator
(Anschluss am Netzwerk ist für die
Anfangseinstellungen erforderlich.)
Anschluss und Anfangseinstellungen
entsprechend den Anweisungen in „Wiring
Navi“ im AVNavigator
(Für die Situation, dass der Receiver nicht an ein
Netzwerk angeschlossen ist.)
Anschluss und Anfangseinstellungen
unter Bezug auf diese Kurzanleitung
Es ist nicht nötig, diese Anleitung für Erläuterungen
zu lesen;
wird unter „Wiring Navi“ und
in der „Operation Guide“ erläutert.
wird im „Wiring Navi“ ausgeführt; gehen
Sie deshalb zu
in dieser Anleitung
weiter, nachdem „Wiring Navi“ ausgeführt ist.
Gehen Sie zu
in dieser Anleitung
weiter.
Anschluss und Anfangseinstellungen
Genießen Sie leichte Mehrkanal-Wiedergabe mit diesem Gerät in 3 Schritten:
Anschlüsse
→
Anfangseinstellungen
→
Grundlegende Wiedergabe
.
Praktisch mit leichtem Anschluss und Anfangseinstellungen entsprechend den Anweisungen, die auf dem Bildschirm durch Installieren von
AVNavigator angezeigt werden.
• Die Mac-OS-Version von AVNavigator kann von http://www.pioneer.eu heruntergeladen werden.
• Die iPad-Version von AVNavigator kann vom App Store heruntergeladen werden.
• Die mitgelieferte CD-ROM enthält die Windows-Version von AVNavigator.
Starten Sie die Verbindung durch Auswahl einer der Methoden unter den folgenden entsprechend der Wiedergabeumgebung.
Kurzanleitung
Verwendung von AVNavigator
AVNavigator für Mac
1
Laden Sie „AVNavigator 2013.pkg“ von http://www.
pioneer.eu herunter.
2
Starten Sie „AVNavigator 2013.pkg“ aus dem
„Downloads“-Ordner.
3
Befolgen Sie die Anweisungen auf der Bildschirmansicht
zur Installation.
4
Starten Sie „AVNavigator 2013“.
• Die Datei befindet sich im „Applications“-Ordner direkt
unter der Festplatte (Macintosh HD).
• AVNavigator kann mit Mac OS X (10.7 oder 10.8)
verwendet werden.
AVNavigator für iPad
1
Laden Sie AVNavigator vom App Store herunter.
2
Starten Sie AVNavigator.
AVNavigator für Windows
Starten Sie den Desktop vom Start-Bildschirm (nur für Windows 8).
1
Setzen Sie die mitgelieferte CD-ROM in das CD-Laufwerk
Ihres Computers.
• Wenn die Topmenü-Bildschirmansicht der CD-ROM
nicht erscheint, doppelklicken Sie auf „MAIN_MENU.
exe“ auf der CD-ROM.
• Das Topmenü-Bildschirmansicht der CD-ROM erscheint.
• Diese CD-ROM kann mit den Betriebssystemen
Microsoft
®
Windows
®
XP/Windows Vista
®
/Windows
®
7/
Windows
®
8 verwendet werden.
• Der unterstützte Browser ist Microsoft Internet Explorer
®
8,
9 oder 10.
2
Klicken Sie auf „AVNavigator“ im „Installing Software“-
Menü.
3
Befolgen Sie die Anweisungen auf der Bildschirmansicht
zur Installation.
4
Klicken Sie auf [AVNavigator 2013.II] auf dem Desktop, um
AVNavigator zu starten.
• AVNavigator wird gestartet, und Wiring Navi startet.
• Je nach den Netzwerk- oder Sicherheitseinstellungen auf
dem Computer, auf dem AVNavigator installiert werden
soll, können die Funktionen von AVNavigator nicht richtig
arbeiten.
3
Anschlüsse
Anschluss der Lautsprecher
Der Receiver arbeitet mit nur zwei Stereolautsprechern (den vorderen Lautsprechern in der
Abbildung), aber die Verwendung von mindestens fünf Lautsprechern wird empfohlen, und eine
komplette Einrichtung ist am besten für den Surroundklang.
Stellen Sie Ihre Lautsprecher wie unten dargestellt auf, um einen angenehmen Surroundklang zu erzielen.
7.1-Kanal-Surround-System:
Schließen Sie Lautsprecher nach der Installation wie unten dargestellt an.
L
– Vorne links
C
– Center
R
– Vorne rechts
SL
– Surround links
SR
– Surround rechts
SBL
– Surround hinten links
SBR
– Surround hinten rechts
SW
– Subwoofer
Note
• There are also other speaker connection
patterns (front height, front wide, etc.).
For details, see page 19 of the operating
instructions.
Anschluss der Lautsprecherkabel
Stellen Sie sicher, dass Sie den Lautsprecher
rechts an den rechten Anschluss (
R
) und den
Lautsprecher links an den linken Anschluss (
L
)
anschließen. Stellen Sie außerdem sicher, dass die
positiven/negativen (
+/–
) Lautsprecheranschlüsse
am Receiver den entsprechenden Anschlüssen
der Lautsprecher entsprechen.
1
Drehen Sie freiliegende Drahtstränge
zusammen.
2
Lösen Sie die Klemme und setzen Sie
den freiliegenden Draht ein.
3
Ziehen Sie die Klemme fest.
1
2
3
10 mm
AUHTUNG
• Bevor Sie Verbindungen herstellen
oder ändern, schalten Sie bitte
die
Stromversorgung aus, und
ziehen Sie das Netzkabel aus der
Wechselstromsteckdose.
• Diese Lautsprecheranschlüsse führen
LEBENSGEFÄHRLICHE
Spannung. Um
beim Anschließen oder Trennen der
Lautsprecherkabel Stromschlaggefahr
zu vermeiden, ziehen Sie den
Netzstecker, bevor Sie nicht isolierte
Teile berühren.
SL
L
R
SR
SBL
SBR
SW
C
Subwoofer 1
(
SW
)
Vorne rechts
(
R
)
Surround rechts
(
SR
)
Surround links
(
SL
)
Vorne links
(
L
)
Center
(
C
)
Surround hinten rechts
(
SBR
)
Surround hinten links
(
SBL
)
Hinweis
• Falls Sie nur einen hinteren Surround-Lautsprecher anschließen, schließen Sie diesen an
die
SURROUND BACK L (Single)
-Anschlüsse an.
• Dieses Gerät unterstützt Lautsprecher mit einer Nennimpedanz von 4
W
bis 16
W
.
PRE OUT
SUBWOOFER
1
2
(Single)
FRONT
SPEAKERS
FRONT
CENTER
A
A
R
L
SURROUND
R
L
SURROUND BACK
R
L
FRONT HEIGHT / FRONT WIDE /
B
R
L
PRE OUT
SUBWOOFER
1
2
(Single)
FRONT
SPEAKERS
FRONT
CENTER
A
A
R
L
SURROUND
R
L
SURROUND BACK
R
L
FRONT HEIGHT / FRONT WIDE /
B
R
L
LINE LEVEL
INPUT
4
HDMI
LAN
(10/100)
OUT 1
(CONTROL)
OUT 2
(HD ZONE)
DC OUTPUT
for WIRELESS LAN
(OUTPUT 5 V
0.6 A MAX)
OPTICAL
COAXIAL
ASSIGNABLE
SELECTABLE
ASSIGNABLE
1
-
7
IN
1
(DVD)
BD IN
IN
2
(SAT/CBL)
IN
3
(DVR/BDR)
IN
4
IN
6
IN
7
IN
1
(TV)
IN
2
(DVR/BDR)
IN
1
(DVD)
IN
2
(SAT/CBL)
ASSIGNABLE
LAN
(10/100)
OUT 1
(CONTROL)
DC OUTPUT
for WIRELESS LAN
(OUTPUT 5 V
0.6 A MAX)
OPTICAL
COAXIAL
NABLE
BD IN
IN
2
(SAT/CBL)
IN
3
(DVR/BDR)
IN
4
IN
6
IN
7
IN
1
(TV)
IN
2
(DVR/BDR)
IN
2
(SAT/CBL)
ASSIGNABLE
DIGITAL OUT
OPTICAL
HDMI IN
HDMI OUT
A
Anschluss der Antennen
Herstellen der Verbindung zum
Netzwerk über die LAN-Schnittstelle
LAN
(10/100)
WAN
3
2
1
LAN
LAN
(10/100)
ANTENNA
AM LOOP
FM UNBAL 75
ANTENNA
AM LOOP
FM UNBAL 75
1
4
5
2
3
a
b
c
Anschluss eines Fernsehgeräts und
von Wiedergabe-Komponenten
Hinweis
• Siehe Bedienungsanleitung auf der mitgelieferten
CD-ROM, wenn Sie ein Fernsehgerät oder eine
Wiedergabekomponente auf andere Weise als über HDMI-
Verbindung anschließen wollen.
• Siehe Bedienungsanleitung auf der mitgelieferten
bezüglich Anschluss anderer Geräte.
AUHTUNG
• Fassen Sie das Netzkabel am Stecker an. Ziehen Sie
den Stecker nicht durch Ziehen am Kabel heraus, und
berühren Sie das Netzkabel niemals mit nassen Händen,
da dies einen Kurzschluss oder einen elektrischen Schlag
verursachen könnte. Stellen Sie weder das Gerät, noch
ein Möbelstück oder einen anderen Gegenstand auf das
Netzkabel, und klemmen Sie das Netzkabel nicht ein.
Machen Sie niemals einen Knoten in das Kabel, und
befestigen Sie es auch nicht an anderen Kabeln. Netzkabel
müssen möglichst so verlegt werden, dass niemand
darauf treten kann. Ein beschädigtes Netzkabel kann
einen Brand oder einen elektrischen Schlag verursachen.
Überprüfen Sie das Netzkabel hin und wieder. Wenn Sie
eine Beschädigung feststellen, wenden Sie sich zwecks
eines Austauschs an einen von Pioneer autorisierten,
unabhängigen Kundendienst.
Anschließen
(Fortsetzung)
VORSICHTSHINWEIS ZUR BELÜFTUNG
Bei der Aufstellung dieses Gerätes muss für einen
ausreichenden Freiraum gesorgt werden, um eine
einwandfreie Wärmeabfuhr zu gewährleisten
(mindestens 20 cm oberhalb des Gerätes, 10 cm hinter
dem Gerät und jeweils 20 cm an der Seite des Gerätes).
WARNUNG
Im Gerätegehäuse sind Ventilationsschlitze und andere
Öffnungen vorgesehen, die dazu dienen, eine
Überhitzung des Gerätes zu verhindern und einen
zuverlässigen Betrieb zu gewährleisten. Um
Brandgefahr auszuschließen, dürfen diese Öffnungen
auf keinen Fall blockiert oder mit Gegenständen (z.B.
Zeitungen, Tischdecken und Gardinen) abgedeckt
werden, und das Gerät darf beim Betrieb nicht auf
einem dicken Teppich oder Bett aufgestellt sein.
D3-4-2-1-7b*_A1_De
HDMI/DVI-kompatibles
Fernsehgerät
HDMI/DVI-kompatibler
Blu-ray Disc-Player
• Wenn der Fernseher die HDMI Audio Return Channel-Funktion
nicht unterstützt, erfordert dies den Anschluss eines optischen
Digitalkabels (
A
) zum Hören des Fernsehtons über den Receiver.
• Wenn der Fernseher die HDMI Audio Return Channel-Funktion
unterstützt, wird der Ton des Fernsehers über den HDMI-
Anschluss zum Receiver eingespeist, sodass Sie kein
optisches
Digitalkabel (
A
) anschließen müssen
. Stellen Sie in diesem Fall
ARC
im
HDMI Setup
auf
ON
l
„
HDMI Setup
“
• Beachten Sie auch die Bedienungsanleitung des Fernsehgeräts
für Anweisungen zum Anschließen und Einrichten für das
Fernsehgerät.
UKW-
Drahtantenne
MW-Rahmenantenne
LAN-Kabel (getrennt erhältlich)
Internet
Modem
Router
Computer
5
Die Auto Multi-Channel Acoustic Calibration (MCACC)
Einrichtung verwendet das mitgelieferte Setup-Mikrofon, um
den von den Lautsprechern ausgegebenen Testton zu messen
und zu analysieren. Dieses Setup aktiviert automatische
hochpräzise Messung und Einstellungen; seine verwendet
führt zu einer optimalen Hörumgebung für den Anwender.
Wichtig
• Führen Sie die Messung in einer leisen Umgebung aus.
• Wenn ein Stativ zur Verfügung steht, stellen Sie das Mikrofon bitte
in der Höhe auf, die Ihrer Hörposition entspricht. Wenn nicht,
stellen Sie das Mikrofon in Ohrhöhe auf einen Tisch oder Stuhl.
• Genaue Messung kann unmöglich sein, wenn sich
Hindernisse zwischen den Lautsprechern und der
Hörposition (Mikrofon) befinden.
• Treten Sie bei der Messung von der Hörposition zurück
und führen Sie Bedienung mit der Fernbedienung von der
Außenseite aller Lautsprecher aus.
1
Schließen Sie das mitgelieferte Setup-Mikrofon an.
MCACC
SETUP MIC
Anfangseinstellungen
Vor der Inbetriebnahme
1
Legen Sie die Batterien in die Fernbedienung ein.
Die mit dem Gerät mitgelieferten Batterien sind dazu
gedacht, den anfänglichen Betrieb zu prüfen; sie halten
nicht für längere Zeit. Wir empfehlen die Verwendung von
Alkalibatterien, da diese eine längere Lebensdauer haben.
2
Schalten Sie den Receiver und Ihr Fernsehgerät ein.
RCU SETUP
SOURCE
STANDBY/ON
BDR
BD
DVD
DVR
HDMI
ALL ZONE STBY
DISCRETE ON
3
Schalten Sie den Fernseheingang um, so dass
er mit dem Receiver verbunden ist.
4
Schalten Sie den Subwoofer ein und steigern
die Lautstärke.
WARNUNG
• Verwenden oder lagern Sie Batterien nicht in direktem Sonnenlicht
oder an sehr heißen Orten wie im Inneren eines Fahrzeugs oder in
der Nähe von Heizkörpern. Dadurch können Batterien leck werden,
sich überhitzen oder in Brand geraten. Außerdem kann die
Lebensdauer oder Leistung von Batterien beeinträchtigt werden.
AUHTUNG
• Stellen Sie beim Einsetzen der Batterien sicher, dass nicht
die Federn an den (–)-Batteriepolen beschädigt werden.
Dadurch können die Batterien auslaufen oder sich
überhitzen.
• Beachten Sie bei der Entsorgung verbrauchter Batterien
und Akkus die gesetzlichen und umweltrechtlichen
Bestimmungen Ihres Wohnortes.
Automatische Einstellung des Surround-Klangs (MCACC)
Die Bildschirmansicht
Full Auto MCACC
erscheint auf
Ihrem Fernsehgerät.
Speaker System
: Normal(SB/FH)
1a.Full Auto MCACC
A/V RECEIVER
Exit
Return
START
EQ Type
: SYMMETRY
MCACC
: M1.MEMORY 1
THX Speaker
:
NO
2
Drücken Sie auf der Fernbedienung
RECEIVER
,
und drücken Sie anschließend die ENTER-Taste.
• Die automatische Messung beginnt.
• Die Messung dauert etwa 3 bis 12 Minuten.
3
Befolgen Sie die Anweisungen auf der
Bildschirmanzeige.
• Die automatische Einstellung ist beendet, wenn die
Bildschirmansicht Home Menu erscheint.
1. Advanced MCACC
2. MCACC Data Check
3. Data Management
4. System Setup
5. Network Information
6. Operation Mode Setup
Exit
Return
HOME MENU
A/V RECEIVER
• Wenn Reverse Phase angezeigt wird, kann die Verdrahtung
(+ und –) des Lautsprechers invertiert sein.
Überprüfen Sie die Lautsprecheranschlüsse.
Even if the connections are correct,
Reverse Phase
may be
displayed, depending on the speakers and the surrounding
environment. This does not affect measurements, however,
so select
Go Next
.
• If
ERR
is displayed, check that speaker is properly
connected.
Z.B.) Prüfen Sie, ob der Surround-Lautsprecher
versehentlich an den hinteren Surround-Anschluss
angeschlossen ist.
4
Stellen Sie sicher, dass das Setup-Mikrofon
nicht angeschlossen ist.
Stativ
Mikrofon
6
Grundlegende Wiedergabe
Mehrkanalwiedergabe
RECEIVER
D.ACCESS
CH LEVEL
DIMMER
SLEEP
SIGNAL SEL
SPEAKERS
MPX
PRESET
TUNE
BAND
PTY
iPod CTRL
HOME
MENU
CH
TV CONTROL
INPUT
INPUT SELECT
iPod
USB
CBL
STATUS
SAT
TUNER
ZONE 2
ZONE 3
HD ZONE
ADPT
CD
TV
RCU SETUP
SOURCE
STANDBY/ON
BDR
BD
DVD
DVR
NET
HDMI
RECEIVER
MUTE
VOLUME
VOL
TOP MENU
VIDEO
PARAMETER
AUDIO
PARAMETER
ENTER
RETURN
CLASS
ENTER
/ CLR
CH
CH
5
4
6
8
0
7
9
FEATURES
TOOLS
MENU
ALL ZONE STBY
DISCRETE ON
+Favorite
Z2
Z3
HDZ
P.CTRL+
PHASE
HDMI OUT
MCACC
AUTO/ALC/
DIRECT
AUTO
S.RTRV
STANDARD ADV SURR
ECO
PQLS
OPTION
AUDIO
DISP
MHL
2
1
3
2
4
6
3
1
Schalten Sie die Wiedergabekomponente ein.
Z.B.) Schalten Sie den Blu-ray Disc-Player, der an den
HDMI BD IN
-Anschluss angeschlossen ist, ein.
2
Schalten Sie den Eingang des Receivers ein.
Z.B.) Drücken Sie
BD
, um den
BD
-Eingang zu wählen.
3
Drücken Sie
RECEIVER
, um auf den Receiver-
Betriebsmodus zu schalten.
4
Drücken Sie AUTO/ALC/DIRECT zur Wahl von
‚AUTO SURROUND‘.
Für Mehrkanal-Wiedergabe mit einem 2-Kanal-
Audioeingang (Fernsehgerät, Musik usw.) drücken Sie die
Taste
STANDARD
oder
ADV SURR
, um Ihren bevorzugten
Hörmodus zu wählen.
5
Starten Sie die Wiedergabe der
Wiedergabekomponente.
Z.B.) Starten Sie die Wiedergabe des Blu-ray Disc-Players.
6
Mit dem VOLUME +/– können Sie die
Lautstärke einstellen.
Der Ton kann durch Drücken der Taste
MUTE
stummgeschaltet werden.
Hinweis
• Schalten Sie eines der unterstrichenen Geräte ein, um die
Fernbedienung zum Bedienen des Geräts zu verwenden.
Zum Bedienen des Receivers drücken Sie zuerst
RECEIVER
,
und drücken Sie dann die geeignete Taste zur Bedienung.
• Die Fernbedienung des Receivers kann verwendet werden,
um nicht nur den Receiver sondern auch eine Reihe
anderer Geräte zu steuern, einschließlich ein iPod/USB-
Gerät, einen Blu-ray Disc-Player, ein Fernsehgerät usw.
Beisp.: Wiedergabe von einem Blu-ray Disc-Player
BD
→
Radio hören
1
Drücken Sie TUNER, um den Tuner
auszuwählen.
Drücken Sie bei Bedarf
BAND
, um den Wellenbereich
(UKW oder MW) zu wechseln.
2
Drücken Sie TUNE +/–, um auf einen Sender
abzustimmen.
• Halten Sie
TUNE +/–
für ca. eine Sekunde gedrückt. Der
Receiver beginnt mit der Suche nach dem nächsten
Sender.
• Wenn der Empfang eines schwach einfallenden UKW-
Senders schwach ist, drücken Sie
MPX
, um FM MONO
zu wählen und den Receiver auf Mono-Empfang
umzuschalten.
Speichern der Sender-Voreinstellung
Wenn Sie einen bestimmten Radiosender oft hören, ist es
praktisch, die Frequenz zu speichern, um den Sender später
immer dann einfach aufrufen zu können, wenn Sie ihn hören
möchten.
1
Drücken Sie TOOLS, während ein Signal
von dem zu Speichern gewünschten Sender
empfangen wird.
Die Festsendernummer blinkt.
2
Drücken Sie PRESET +/–, um den von Ihnen
gewünschten voreingestellten Sender
auszuwählen, und drücken Sie dann ENTER.
Die Festsendernummer hört auf zu blinken, und der
Receiver speichert den Sender.
Hören voreingestellter Sender
Dazu müssen zunächst Sender voreingestellt sein.
Drücken Sie PRESET +/–, um den von Ihnen
gewünschten voreingestellten Sender
auszuwählen.
7
Grundlegende Wiedergabe
(Fortsetzung)
Um die zahlreichen Funktionen des
Geräts zum größten Umfang zu genießen
Installieren Sie AVNavigator in Ihrem Computer,
und verwenden Sie die „Interaktive Anleitung“
und die „Bedienerführung“.
Setzen Sie die CD-ROM in Ihren Computer ein
und laden Sie die PDF-Anleitung von der Menü-
Bildschirmansicht zum Lesen herunter.
Funktionen
■
Abspielen eines USB-Geräts
■
Bluetooth-ADAPTER für drahtlose Musikwiedergabe
■
Wiedergabe mit NETWORK-Merkmal
■
Einstellen der Audio-Optionen
■
Einstellen der Video-Optionen
■
Verwenden der MULTI-ZONE-Regler
Häufig gestellte Fragen
Glossar
Index der Merkmale
Hinweis
• Dieses Gerät unterstützt AirPlay. Einzelheiten siehe Seite
55 in der Bedienungsanleitung und Apple-Website (http://
www.apple.com).
• Die Software des Geräts kann aktualisiert werden (Seite 91
der Bedienungsanleitung). Bei Mac OS kann sie mit Safari
aktualisiert werden (Seite 93 der Bedienungsanleitung).
Abspielen eines iPod
• Etwa eine Minute ist zwischen Einschalten und
Fertigstellen der Einrichtung erforderlich.
1
Schließen Sie Ihren iPod an.
Ein iPod/iPhone/iPad kann an den Receiver angeschlossen
werden.
2
Drücken Sie iPod USB, um den iPod/USB-
Eingang auszuwählen.
Sobald auf dem Display die Namen der Ordner und Dateien
angezeigt werden, können Sie über den iPod Musik abspielen.
3
Mit
/
können Sie eine Kategorie
auswählen. Drücken Sie anschließend ENTER,
um diese Kategorie zu durchsuchen.
• Durch Drücken von
RETURN
können Sie jederzeit zur
vorhergehenden Ebene gelangen.
4
Mit
/
können Sie die ausgewählte
Kategorie durchsuchen (z. B. Alben).
• Mit
/l
gelangen Sie zu den vorhergehenden/
nächsten Ebenen.
5
Fahren Sie mit dem Durchsuchen fort, bis Sie
die gewünschte Musik gefunden haben, und
drücken Sie zum Wiedergeben
.
Internet-Radiosender hören
• Etwa eine Minute ist zwischen Einschalten und
Fertigstellen der Einrichtung erforderlich.
Wichtig
• Bei Verwendung einer Broadband-Internetverbindung
müssen Sie einen Vertrag mit einem Internet-Provider
haben. Für weitere Einzelheiten wenden Sie sich an Ihren
Internet-Provider.
• Zum Hören von Internet-Radiosendern ist Highspeed-
Broadband-Internetzugang erforderlich. Mit einem 56-K-
oder ISDN-Modem können Sie möglcherweise die Vorteile
von Internet-Radio nicht voll nutzen.
• Dienste von Drittanbietern können eine High-Speed-
Internet-Verbindung sowie Ihre Registrierung voraussetzen
und ggfs. Gebühren nach sich ziehen. Dienste von
Drittanbietern können ohne Inkenntnissetzung verändert,
ausgesetzt, gestört oder beendet werden. Pioneer schließt
jede Haftung in Verbindung mit solchen Ereignissen
aus. Pioneer gibt keine Gewähr auf die Dauer der
Aufrechterhaltung der Dienstleistungen von Drittanbietern
und weist jede Art von Garantie hierauf von sich.
1
Drücken Sie NET wiederholt, um den INTERNET
RADIO-Eingang zu wählen.
Es kann einige Sekunden dauern, bevor dieser Receiver
auf das Netzwerk zugreift.
2
Verwenden Sie
/
, um den Internet-
Radiosender zur Wiedergabe zu wählen, und
drücken dann ENTER.
© 2013 PIONEER CORPORATION.
Alle Rechte vorbehalten.
5 V 2.1 A
with USB
iPod/iPhone/iPad
USB-Kabel mit dem
iPod mitgeliefert
2
Italiano
Collegamenti ed impostazione iniziali
secondo le istruzioni date in “Wiring
Navi” di AVNavigator.
(Il collegamento alla rete è necessario per
l’impostazione iniziale.)
Fare i collegamenti seguendo le
istruzioni date in “Wiring Navi” di
AVNavigator.
(Se il ricevitore non verrà collegato ad una rete.)
Collegamento ed impostazione iniziali
consultando questa Guida di avvio
rapida.
La lettura di questa guida per le spiegazioni del caso
non è necessaria;
verranno spiegati in
“Wiring Navi” e
della “Operation Guide”.
verrà fatto in “Wiring Navi”, così che
potete passare a
di questa guida
dopo che “Wiring Navi” è finito.
Passare a
di questa guida.
Collegamento ed impostazione iniziali
La riproduzione multicanale con questo ricevitore è ottenibile facilmente con tre operazioni:
Collegamenti
→
Impostazione iniziale
→
Riproduzione di base
.
Conveniente grazie e collegamenti facili ed impostazione iniziale seguendo le istruzioni visualizzate sullo schermo installando
AVNavigator.
• La versione per Mac OS di AVNavigator è scaricabile presso http://www.pioneer.eu.
• La versione per iPad di AVNavigator è scaricabile dall’App Store.
• Il CD-ROM in dotazione contiene la versione per Windows di AVNavigator.
Avviare i collegamenti scegliendo un metodo fra i seguenti in accordo con l’ambiente di riproduzione.
Guida di
avvio rapido
Uso di AVNavigator
AVNavigator for Mac
1
Scaricare “AVNavigator 2013.pkg” da
http://www.pioneer.eu.
2
Lanciare “AVNavigator 2013.pkg” dalla cartella
“Downloads”.
3
Seguire le istruzioni di installazione sullo schermo.
4
Lanciare “AVNavigator 2013”.
• Il file si trova nella cartella “Applications” nel livello base
del disco fisso (Macintosh HD).
• AVNavigator è utilizzabile con Mac OS X (10.7 o 10.8).
AVNavigator for iPad
1
Scaricare AVNavigator dall’App Store.
2
Lanciare AVNavigator.
AVNavigator for Windows
Lanciare il desktop dalla schermata di avvio (solo Windows 8).
1
Caricare il CD-ROM accluso nell’unità disco del computer.
• Se la schermata del menu principale del CD-ROM non
compare, fare doppio clic su “MAIN_MENU.exe” del CD-
ROM.
• Apparirà la schermata del menu principale del CD-ROM.
• Questo CD-ROM è utilizzabile con Microsoft
®
Windows
®
XP/Windows Vista
®
/Windows
®
7/Windows
®
8.
• Il browser supportato è Microsoft Internet Explorer
®
8, 9 o 10.
2
Fare clic su “AVNavigator” del menu “Installing
Software”.
3
Seguire le istruzioni di installazione sullo schermo.
4
Fare clic su [AVNavigator 2013.II] sul desktop per avviare
AVNavigator.
• AVNavigator parte e Wiring Navi si apre.
• AVNavigator potrebbe non funzionare correttamente con
certe impostazioni di rete o sicurezza del computer su
cui viene installato.
