Pioneer VSX-S510-W: instruction
Class: Household, kitchen appliances, electronics and equipment
Type: Home Theater System
Manual for Pioneer VSX-S510-W
Table of contents
- AV Receiver Quick Start Guide What’s in the box
- Safety Brochure
- Connecting up Connecting the speakers VSX-S510 connection diagram
- VSX-S310 connection diagram
- Connecting a TV and playback components Connecting antennas
- Connecting to the network through LAN interface
- Initial Setup Before you start Automatically setting up for surround sound (MCACC)
- Basic playback Multichannel playback Listening to the radio
- Playing an iPod Listening to Internet radio stations
VSX-S510
-K/-S/-W
VSX-S310
-K/-S
AV Receiver
Amplificateur AV
AV Receiver
Sintoamplificatore AV
AV Receiver
Receptor AV
AV-
ресивер
Quick Start Guide
Guide rapide
Kurzanleitung
Guida di avvio rapido
Snelstartgids
Guía de inicio rápido
Краткое руководство пользователя
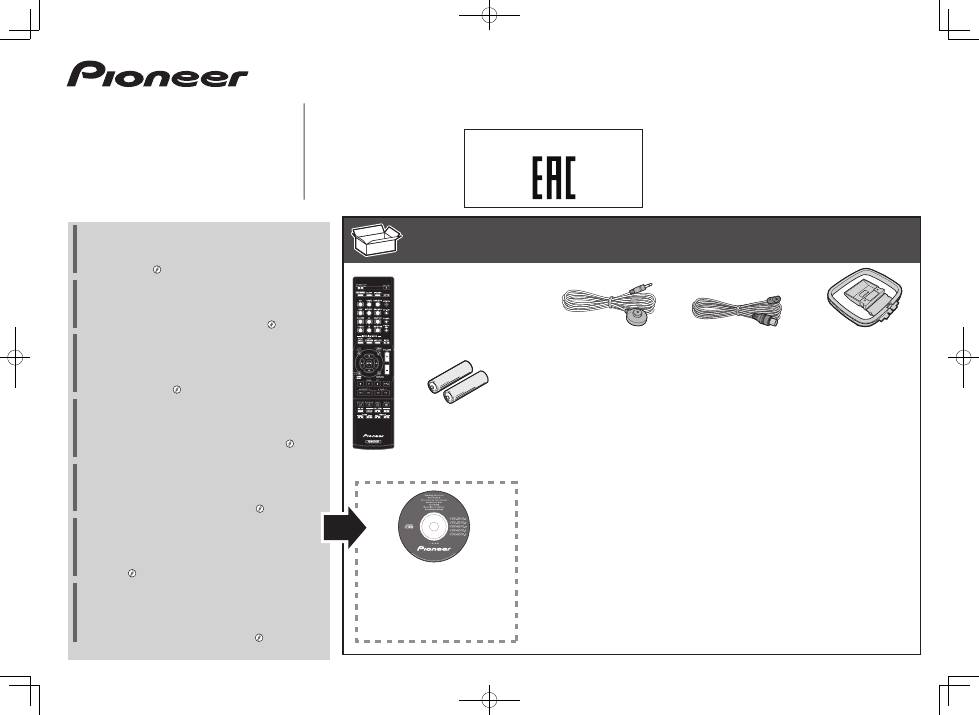
What’s in the box
Contenu du carton d’emballage
Lieferumfang
Contenuto della confezione
Inhoud van de doos
Contenido de la caja
Комплект поставки
Thank you for buying this Pioneer product. This Quick Start
Guide includes instructions for basic connections and operations
to allow simple use of the receiver. For detailed descriptions of
the receiver, see the “Operating Instructions” provided on the
included CD-ROM ( ).
Merci pour l’achat de ce produit Pioneer. Ce guide rapide
contient les instructions relatives aux raccordements et
opérations de base permettant une utilisation simple de ce
récepteur. Pour des descriptions plus détaillées du récepteur,
référez-vous au “Mode d’emploi” sur le CD-ROM ( ) fourni.
Vielen Dank, dass Sie sich für dieses Pioneer-Produkt entschieden
haben. Die Kurzanleitung enthält Anweisungen für grundlegende
Verbindungen und Bedienvorgänge, um eine einfache Bedienung
des Receivers zu ermöglichen. Detaillierte Beschreibungen des
Receivers finden Sie in der „Bedienungsanleitung“ auf der
mitgelieferten CD-ROM ( ).
Vi ringraziamo per avere acquistato questo prodotto Pioneer.
Questa Guida di avvio rapido comprende istruzioni per i
collegamenti fondamentali e per le operazioni essenziali di
questo ricevitore. Per una descrizione dettagliata del ricevitore,
vedere le “Istruzioni per l’uso” contenute nel CD-ROM ( )
accluso.
Hartelijk dank voor de aanschaf van dit Pioneer product. In deze
snelstartgids vindt u de instructies voor de basisaansluitingen en
de basisbediening voor een eenvoudig gebruik van de receiver.
Voor meer gedetailleerde informatie wordt u verwezen naar de
“Handleiding” die op de bijgeleverde CD-ROM ( ) staat.
Muchas gracias por haber adquirido este producto de Pioneer.
Esta Guía de inicio rápido incluye instrucciones para hacer las
conexiones y operaciones básicas que le permitirán hacer un uso
sencillo del receptor. Para conocer una descripción detallada del
receptor, consulte el “Manual de instrucciones” suministrado con
el CD-ROM ( ) incluido.
Благодарим вас за приобретение данного изделия Pioneer.
В данном Кратком руководстве пользователя содержатся
инструкции по основным подключениям и операциям для
упрощенного использования ресивера. Подробное
описание ресивера см. в «Инструкции по эксплуатации»,
содержащихся на поставляемом CD-ROM
( )
.
Remote Control
Télécommande
Fernbedienung
Telecomando
Afstandsbediening
Mando a distancia
Пульт дистанционного
управления
Setup microphone
Microphone de configuration
Mikrofon für die Einstellung
Impostazione microfono
Microfoon voor instellen
Micrófono de configuración
Установочный микрофон
Только VSX-S510-K/-S, VSX-S310-K/-S
AAA size IEC R03 dry cell batteries x2
Piles à anode sèche AAA IEC R03 x 2
AAA/IEC/R03 Trockenbatterien x2
Pile a secco AAA IEC R03 x2
AAA/IEC/R03 drogecelbatterijen x2
Pilas secas AAA, IEC R03 x 2
Сухие батарейки размера AAA IEC R03, 2 шт.
AM loop antenna
Antenne cadre AM
MW-Rahmenantenne
Antenna AM a telaio
AM-raamantenne
Antena de cuadro de AM
Рамочная антенна АМ
FM wire antenna
Antenne filaire FM
UKW-Drahtantenne
Antenna FM a filo
FM-draadantenne
Antena de hilos de FM
Проволочная антенна FM
These quick start guide
Le présent Guide de démarrage
Diese Kurzanleitung
Guida per l’avvio rapido
Deze Quick Start-gids
Esta guía de inicio rápido
Это краткое руководство пользователя
Power cord
Cordon d’alimentation
Netzkabel
Cavo di alimentazione
Netsnoer
Cable de alimentación
Кабель питания
Warranty card
Carte de garantie
Garantiekarte
Tarjeta de garantía
Documento di garanzia
Garantiebewijs
Гарантийный сертификат
CD-ROM (Operating instructions)
CD-ROM (Mode d’emploi)
CD-ROM (Bedienungsanleitung)
CD-ROM (Istruzioni per l’uso)
CD-ROM (Handleiding)
CD-ROM (Manual de instrucciones)
CD-ROM (Инструкции по эксплуатации)
SPEAKER CAUTION Sheet (English only)
Note d’avertissement relative aux enceintes (en anglais uniquement)
Lautsprecher-Sicherheitshinweise (nur Englisch)
Scheda PRECAUZIONI ALTOPARLANTI (solo inglese)
Informatieblad over SPEAKER CAUTION (alleen Engels)
Hoja de PRECAUCIONES ACERCA DE LOS ALTAVOCES (solo en inglés)
Лист SPEAKER CAUTION (МЕРЫ ПРЕДОСТОРОЖНОСТИ ДЛЯ
ГРОМКОГОВОРИТЕЛЕЙ) (только на английском языке)

2
English
Safety Brochure
For detailed descriptions of the receiver, see the “Operating Instructions” provided on the included CD-ROM. The operating instructions can also be downloaded from the Pioneer website (http:// www.pioneer.eu). See below
for instructions on handling the CD-ROM.
0
Operating Environment
— In regard to viewing the user’s manual PDF included on the CD-ROM, operation has been confirmed on the following operating environments. Microsoft® Windows® XP / Windows Vista® /
Windows® 7 / Windows® 8 and Apple Mac OS X 10.7 or later, Adobe Reader (Version 10, 11).
0
Precautions For Use
— This CD-ROM is for use with a personal computer. It cannot be used with a DVD player or music CD
player. Attempting to play this CD-ROM with a DVD player or music CD player can damage speakers or cause impaired hearing due to the large volume.
0
License
— Please agree to the “Terms of Use” indicated below
before using this CD-ROM. Do not use if you are unwilling to consent to the terms of its use.
0
Terms of Use
— Copyright to data provided on this CD-ROM belongs to PIONEER CORPORATION. Unauthorized transfer,
duplication, broadcast, public transmission, translation, sales, lending or other such matters that go beyond the scope of “personal use” or “citation” as defined by Copyright Law may be subject to punitive actions.
Permission to use this CD-ROM is granted under license by PIONEER CORPORATION.
0
General Disclaimer
— PIONEER CORPORATION does not guarantee the operation of this CDROM with respect to personal
computers using any of the applicable OS. In addition, PIONEER CORPORATION is not liable for any damages incurred as a result of use of this CD-ROM and is not responsible for any compensation. The names of private
corporations, products and other entities described herein are the registered trademarks or trademarks of their respective firms.
*
When Using a Mac OS
: Place the CD-ROM in the CD drive, click the CD drive from Finder, and double click the Index.html (table of contents) for operation instructions.
CAUTION
TO PREVENT THE RISK OF ELECTRIC SHOCK, DO NOT REMOVE
COVER (OR BACK). NO USER-SERVICEABLE PARTS INSIDE. REFER
SERVICING TO QUALIFIED SERVICE PERSONNEL.
D3-4-2-1-1_B1_En
WARNING
This equipment is not waterproof. To prevent a fire or shock hazard, do
not place any container filled with liquid near this equipment (such
as a vase or flower pot) or expose it to dripping, splashing, rain or
moisture.
D3-4-2-1-3_A1_En
WARNING
To prevent a fire hazard, do not place any naked flame sources (such
as a lighted candle) on the equipment.
D3-4-2-1-7a_A1_En
Operating Environment
Operating environment temperature and humidity:
+5 °C to +35 °C (+41 °F to +95 °F); less than 85 %RH (cooling vents
not blocked)
Do not install this unit in a poorly ventilated area, or in locations
exposed to high humidity or direct sunlight (or strong artificial light).
D3-4-2-1-7c*_A2_En
This product is for general household purposes. Any failure due
to use for other than household purposes (such as long-term use
for business purposes in a restaurant or use in a car or ship) and
which requires repair will be charged for even during the warranty
period.
K041_A1_En
VENTILATION CAUTION
When installing this unit, make sure to leave space around the unit
for ventilation to improve heat radiation (at least 10 cm at top, 5 cm at
rear, and 5 cm at each side).
WARNING
Slots and openings in the cabinet are provided for ventilation to ensure
reliable operation of the product, and to protect it from overheating. To
prevent fire hazard, the openings should never be blocked or covered
with items (such as newspapers, table-cloths, curtains) or by operating
the equipment on thick carpet or a bed.
D3-4-2-1-7b*_A1_En
CAUTION
The
u
STANDBY/ON
switch on this unit will not completely shut
off all power from the AC outlet. Since the power cord serves as the
main disconnect device for the unit, you will need to unplug it from
the AC outlet to shut down all power. Therefore, make sure the unit
has been installed so that the power cord can be easily unplugged
from the AC outlet in case of an accident. To avoid fire hazard, the
power cord should also be unplugged from the AC outlet when left
unused for a long period of time (for example, when on vacation).
D3-4-2-2-2a*_A1_En
WARNING
Store small parts out of the reach of children and infants. If
accidentally swallowed, contact a doctor immediately.
D41-6-4_A1_En
Information for users on collection and disposal of old equipment and used batteries
These symbols on the products, packaging, and/or accompanying documents mean that used electrical and
electronic products and batteries should not be mixed with general household waste.
For proper treatment, recovery and recycling of old products and used batteries, please take them to applicable
collection points in accordance with your national legislation.
By disposing of these products and batteries correctly, you will help to save valuable resources and prevent any
potential negative effects on human health and the environment which could otherwise arise from inappropriate
waste handling.
For more information about collection and recycling of old products and batteries, please contact your local
municipality, your waste disposal service or the point of sale where you purchased the items.
These symbols are only valid in the European Union.
For countries outside the European Union:
If you wish to discard these items, please contact your local authorities or dealer and ask for the correct method of
disposal.
K058a_A1_En
Symbol for
equipment
Symbol examples
for batteries
Pb

3
English
Français
Italiano
Español
Nederlands
Deutsch
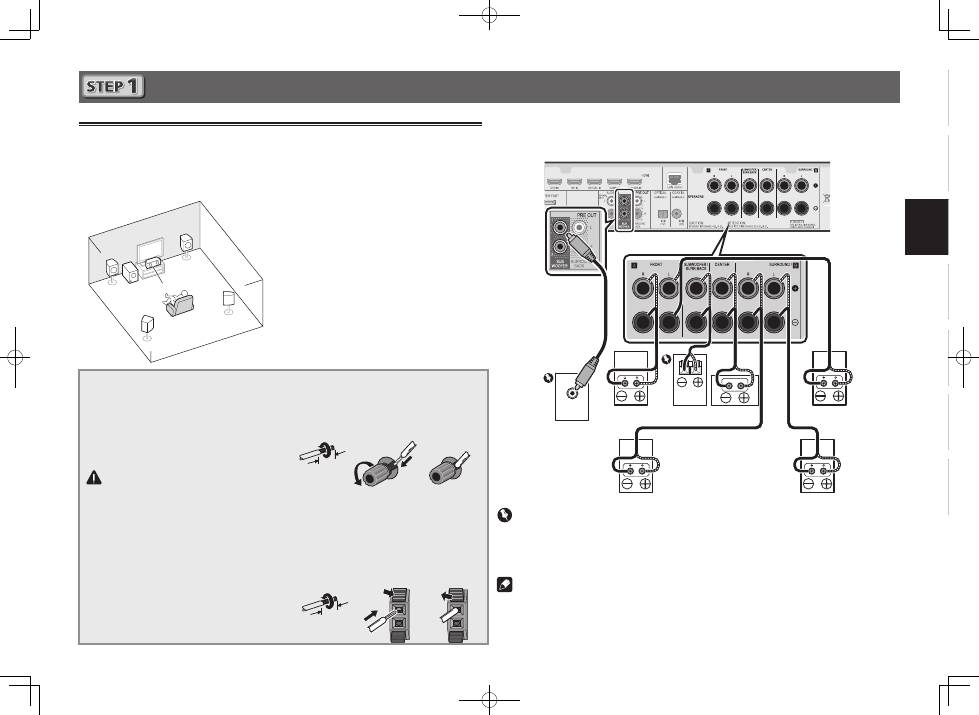
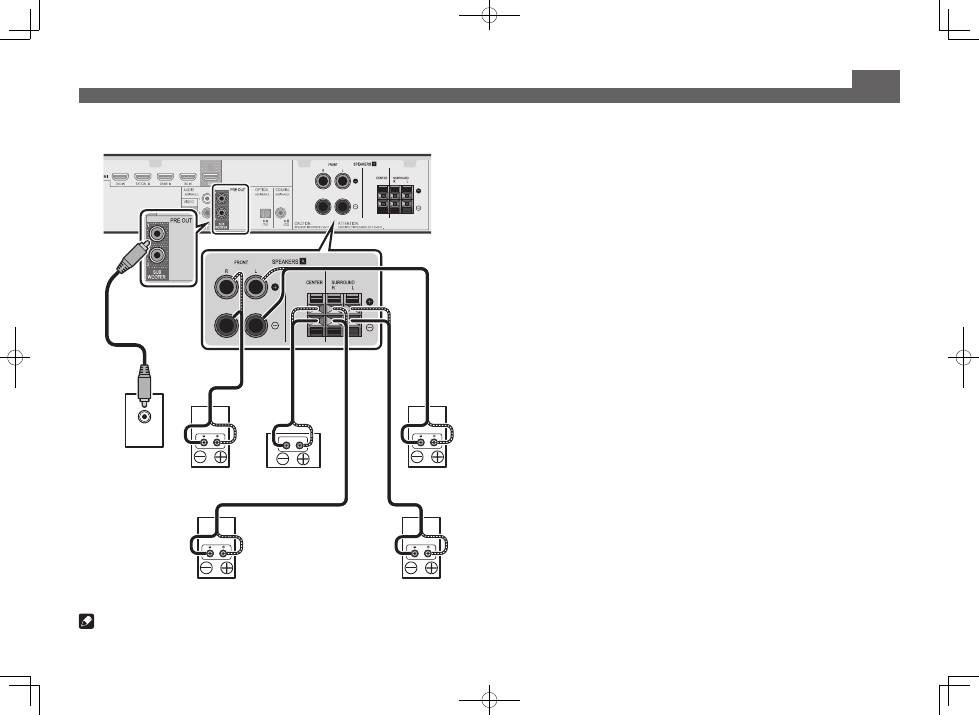
Connecting up
Connecting the speakers
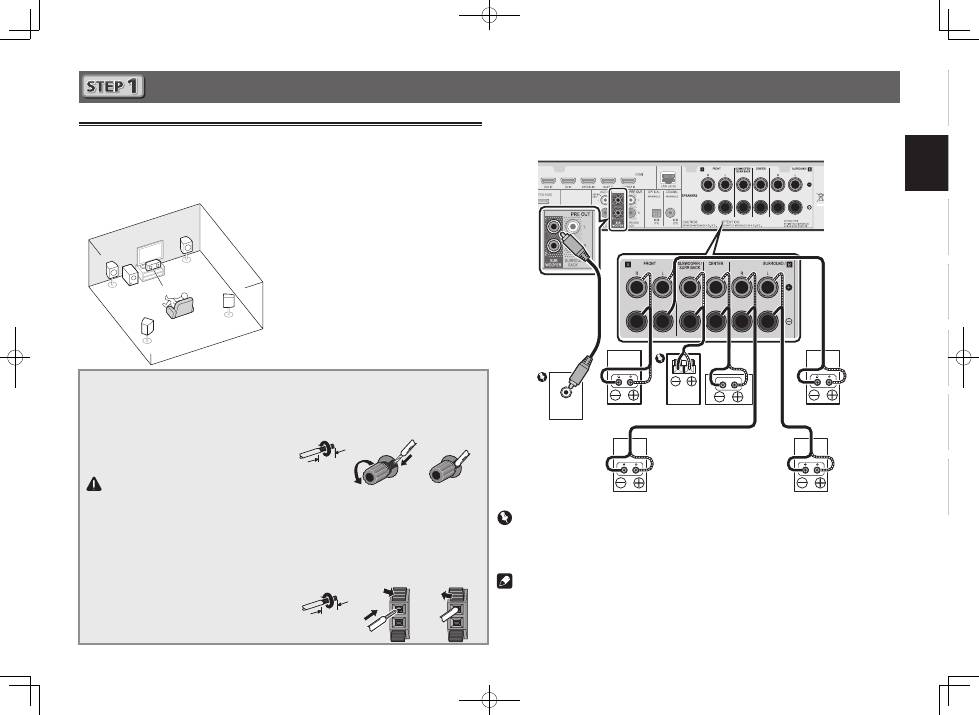
The receiver will work with just two stereo speakers (the front speakers in the diagram) but using
at least three speakers is recommended, and a complete setup is best for surround sound.
To achieve the best possible surround sound, install your speakers as shown below.
5.1 channel surorund system:
After installing the speakers, connect them as shown below.
VSX-S510 connection diagram
LINE LEVEL
INPUT
L
– Front Left
C
– Center
R
– Front Right
SL
– Surround Left
SR
– Surround Right
SW
– Subwoofer
• In addition, surround back speakers or
Speaker B
(VSX-S510 only)
can also be
connected.
• For details, see page 11 of the Operating
Instructions (CD-ROM).
Connecting the speaker cables
Make sure you connect the speaker on
the right to the right (
R
) terminal and the
speaker on the left to the left (
L
) terminal.
Also make sure the positive and negative
(
+/–
) terminals on the receiver match those
on the speakers.
CAUTION
• Before making or changing
connections, switch off the power and
disconnect the power cord from the AC
outlet.
• These speaker terminals carry
HAZARDOUS LIVE
voltage. To prevent
the risk of electric shock when
connecting or disconnecting the
speaker cables, disconnect the power
cord before touching any uninsulated
parts.
1
Twist exposed wire strands together.
2
Loosen terminal and insert exposed wire.
3
Tighten terminal.
1
2
3
10 mm
The wires should be connected as follows to the
VSX-S310’s CENTER or SURROUND terminals.
1
Twist exposed wire strands together.
2
Push open the tabs and insert exposed
wire.
3
Release the tabs.
1
2
3
10 mm
R
SL
L
SW C
SR
Powered
Subwoofer (
SW
)
Front Right (
R
)
Surround Right
(
SR
)
Surround Left
(
SL
)
Front Left (
L
)
Center (
C
)
Important
• Connect passive subwoofers such as Pioneer S-SLW500 to the SPEAKERS SUBWOOFER
terminals.
• Please connect either the passive subwoofers or the powered subwoofers, not both.
Note
• This unit supports speakers with a nominal impedance of 4
W
to 16
W
.
Passive
Subwoofer

4
Connecting up (continued)
LINE LEVEL
INPUT
Powered
Subwoofer (
SW
)
Front Right (
R
)
Front Left (
L
)
Center (
C
)
Surround Right
(
SR
)
Surround Left
(
SL
)
VSX-S310 connection diagram
Note
• This unit supports speakers with a nominal impedance of 4
W
to 16
W
.
5
English
Français
Italiano
Español
Nederlands
Deutsch
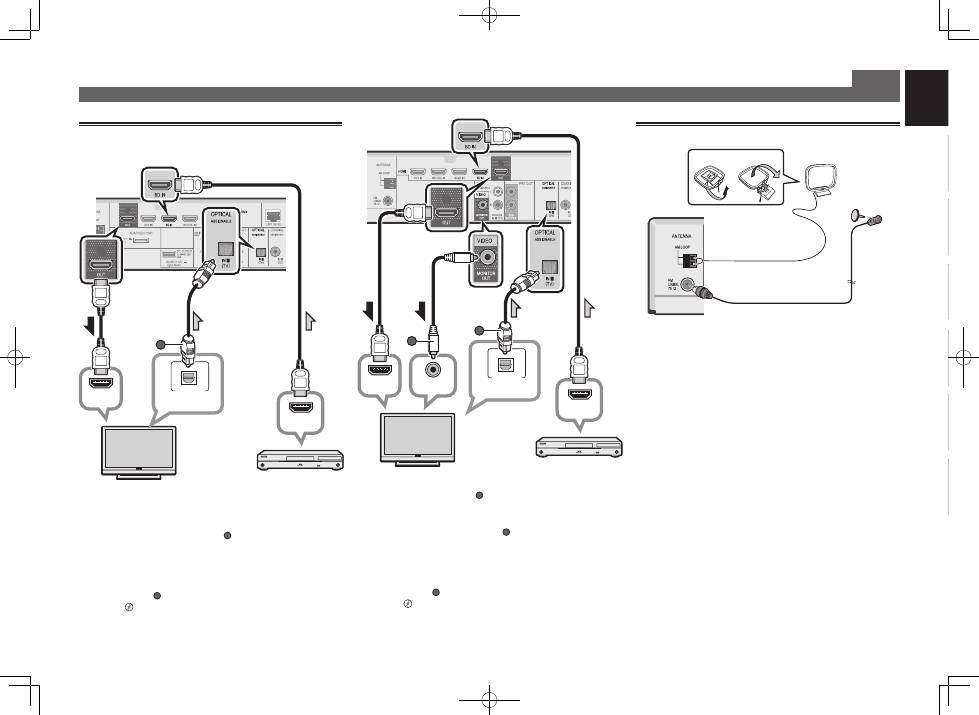
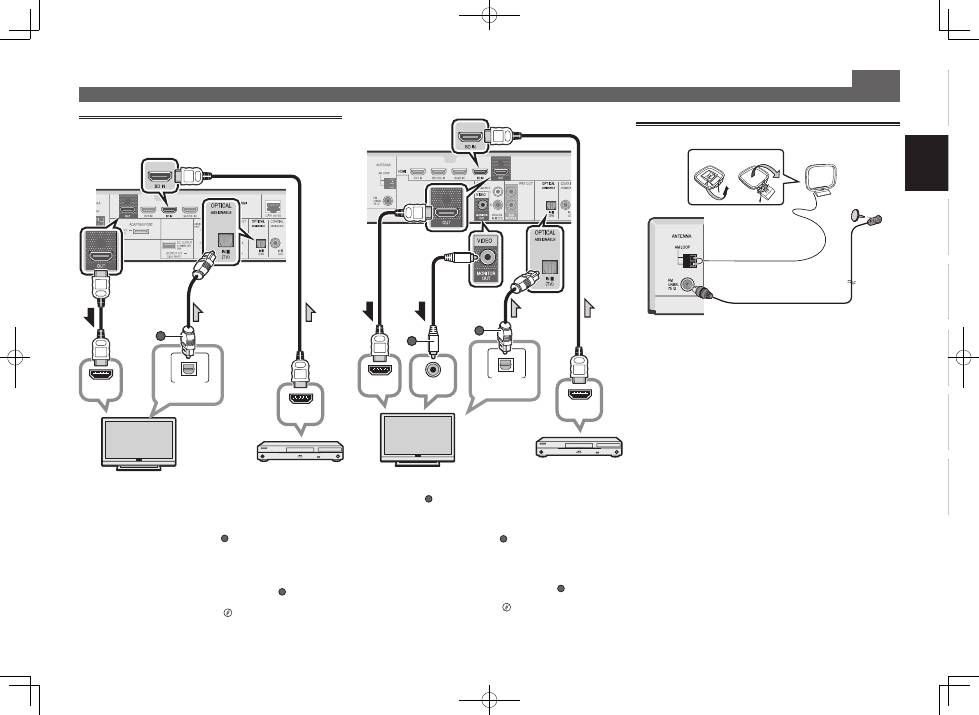
Connecting a TV and playback
components
Connecting up (continued)
Connecting antennas
2
1
AM loop antenna
FM wire antenna
HDMI/DVI-compatible TV
VSX-S510
HDMI/DVI-compatible
Blu-ray Disc player, etc.
• The OSD will only be output from the HDMI OUT terminal.
• If the TV does not support the HDMI Audio Return Channel
function, optical digital cable (
A
) connection is required to
listen to the TV sound over the receiver.
• If the TV supports the HDMI Audio Return Channel
function, the sound of the TV is input to the receiver via the
HDMI terminal, so there is no need to connect an optical
digital cable (
A
). In this case, set
ARC
at
HDMI Setup
to
ON
l
“HDMI Setup”
on page 56.
•
Please refer to the TV’s operation manual for directions on
connections and setup for the TV.
• Composite video cable (
A
) connection is necessary in
order to see the OSD of the unit on the TV.
• If the TV does not support the HDMI Audio Return Channel
function, optical digital cable (
B
) connection is required to
listen to the TV sound over the receiver.
• If the TV supports the HDMI Audio Return Channel
function, the sound of the TV is input to the receiver via the
HDMI terminal, so there is no need to connect an optical
digital cable (
B
). In this case, set
ARC
at
HDMI Setup
to
ON
l
“HDMI Setup”
on page 56.
•
Please refer to the TV’s operation manual for directions on
connections and setup for the TV.
HDMI IN
HDMI OUT
VIDEO IN
DIGITAL AUDIO OUT
OPTICAL
B
A
VSX-S310
HDMI/DVI-compatible TV
HDMI/DVI-compatible
Blu-ray Disc player, etc.
HDMI IN
HDMI OUT
DIGITAL AUDIO OUT
OPTICAL
A

6
Connecting up (continued)
Note
• Refer to the operating instructions in the included CD-
ROM if you wish to connect a TV or playback component
in a method other than an HDMI connection.
• Refer to the operating instructions in the included CD-
ROM for other device connections.
CAUTION
• Handle the power cord by the plug part. Do not pull out
the plug by tugging the cord, and never touch the power
cord when your hands are wet, as this could cause a short
circuit or electric shock. Do not place the unit, a piece of
furniture, or other object on the power cord or pinch the
cord in any other way. Never make a knot in the cord or tie
it with other cables. The power cords should be routed so
that they are not likely to be stepped on. A damaged power
cord can cause a fire or give you an electric shock. Check
the power cord once in a while. If you find it damaged,
ask your nearest Pioneer authorized independent service
company for a replacement.
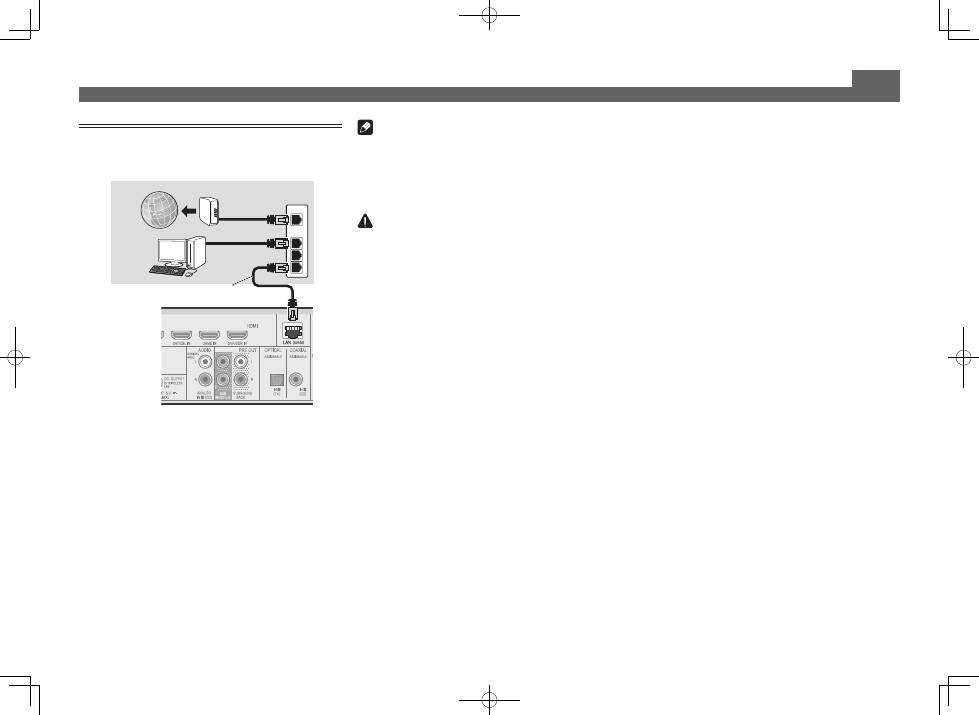
Connecting to the network through
LAN interface
VSX-S510 only
WAN
3
2
1
LAN
LAN cable (sold separately)
Router
Modem
Computer
Internet
VSX-S510
7
English
Français
Italiano
Español
Nederlands
Deutsch
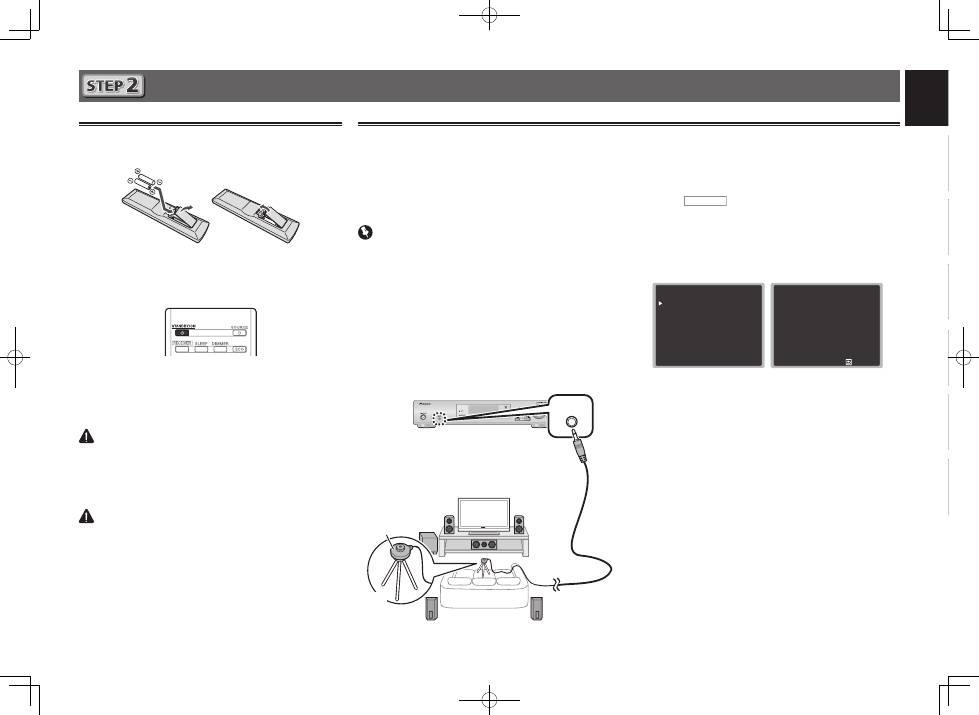
Initial Setup
Before you start
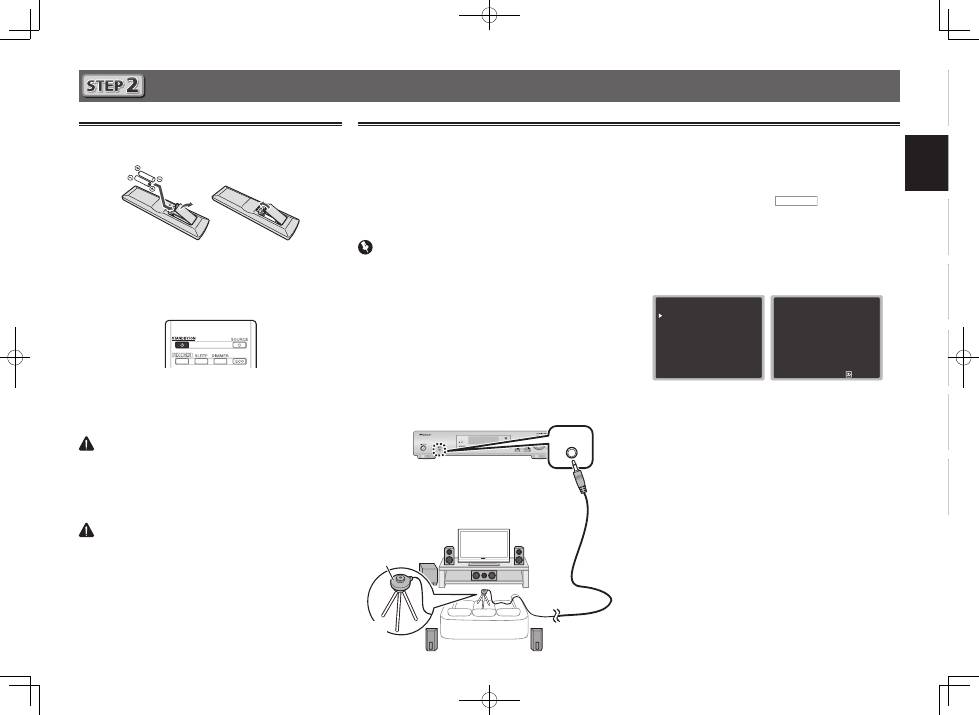
1
Put the batteries in the remote control.
The batteries included with the unit are to check initial
operations; they may not last over a long period. We
recommend using alkaline batteries that have a longer life.
2
Switch on the receiver and your TV.
3
Switch the TV input so that it connects to the
receiver.
4
Turn the powered subwoofer on and turn up
the volume.
WARNING
• Do not use or store batteries in direct sunlight or other
excessively hot place, such as inside a car or near a
heater. This can cause batteries to leak, overheat, explode
or catch fire. It can also reduce the life or performance of
batteries.
CAUTION
• When inserting the batteries, make sure not to damage
the springs on the battery’s (–) terminals. This can cause
batteries to leak or overheat.
• When disposing of used batteries, please comply with
governmental regulations or environmental public
institution’s rules that apply in your country/area.
Automatically setting up for surround sound (MCACC)
The Auto Multi-Channel ACoustic Calibration (MCACC) setup
uses the supplied setup microphone to measure and analyze
the test tone that is outputted by the speakers. This setup
enables automatic high precision measuring and settings;
utilizing it will create an optimum user listening environment.
Important
• Measure in a quiet environment.
• If you have a tripod, use it to place the microphone so
that it’s about ear level at your normal listening position.
Otherwise, place the microphone at ear level using a table
or a chair.
• Accurate measurements may not be possible if there are
obstacles between the speakers and the listening position
(microphone).
• When measuring, step away from the listening position,
and operate using the remote control from the external
side of all the speakers.
1
Connect the supplied setup microphone.
MCACC
SETUP MIC
2
Press BD button on the remote control to
switch to BD entry.
3
Press
RECEIVER
on the remote control, then
press the HOME MENU button.
The Home Menu appears on your TV.
4
Select ’Auto MCACC’ from the Home Menu,
then press ENTER.
Automatic measuring will start.
Home Menu
1 . Auto MCACC
2 . Manual SP Setup
3 . Input Assign
4. Auto Power Down
5. HDMI Setup
6. Network Standby
7. MHL Setup
8. Speaker System
9. OSD Setup
1 . Auto MCACC
Now Analyzing
Environment Check
Ambient Noise
Speaker YES/NO
Return
• Measuring will take about 3 to 12 minutes.
5
Follow the instructions on-screen.
• Automatic setting is complete when the Home Menu
screen appears.
6
Make sure the setup microphone is
disconnected.
Tripod
Microphone
VSX-S510

8
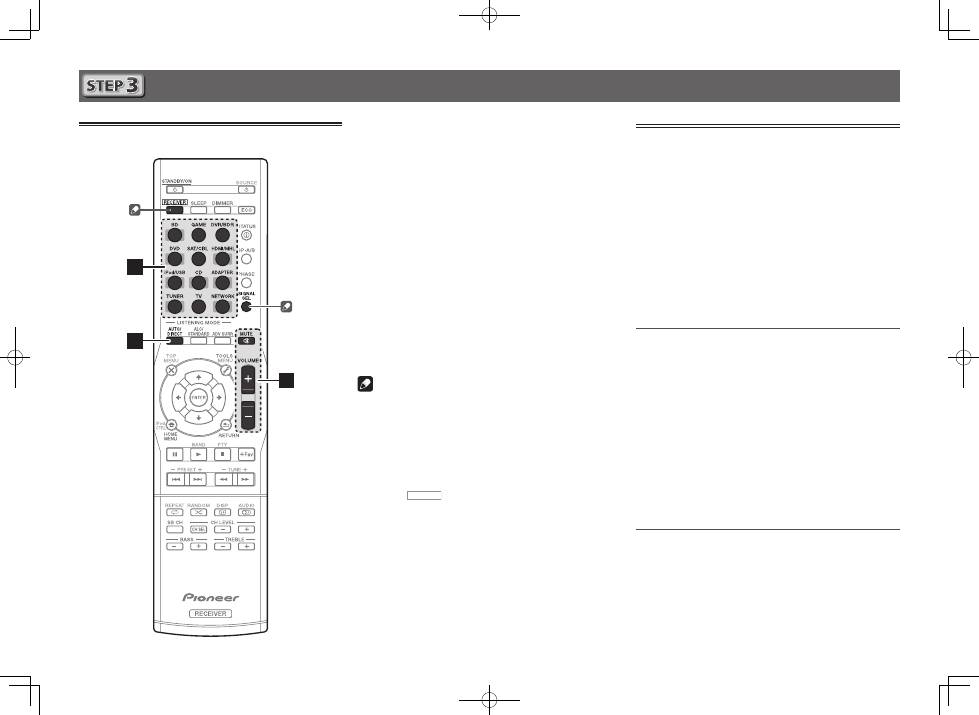
Basic playback
Multichannel playback
2
3
5
1
Switch on the playback component.
E.g. Turn the Blu-ray Disc player connected to the
HDMI BD IN
terminal on.
2
Switch the input of the receiver.
E.g. Press
BD
to select the
BD
input.
3
Press AUTO/DIRECT to select
’AUTO SURROUND’.
For multi-channel playback with a 2-channel audio input
(TV, music, etc.), press the
ALC/STANDARD
or
ADV SURR
button to select your preferred listening mode.
4
Start the playback component’s playback.
E.g. Start playback of the Blu-ray Disc player.
5
Use VOLUME +/– to adjust the volume level.
Sound can be switched off by pressing
MUTE
button.
Note
• In order to listen to the audio from the source component
that is connected to this receiver using a coaxial or an
optical cable, choose the
C1
(coaxial) or
O1
(optical) input.
Please press
SIGNAL SEL
in accordance with either CD or
TV input.
• The input of the receiver will switch over, and you will
be able to operate other components using the remote
control. To operate the receiver, first press
RECEIVER
on
the remote control, then press the appropriate button to
operate.
Listening to the radio
1
Press TUNER to select the tuner.
If necessary, press
BAND
to change the band (FM or AM).
2
Press TUNE+/– to tune to a station.
• Press and hold
TUNE+/–
for about a second. The receiver
will start searching for the next station.
• If you’re listening to an FM station but the reception
is weak, press
BAND
to select FM MONO and set the
receiver to the mono reception mode.
Saving station presets
If you often listen to a particular radio station, it’s convenient to
have the receiver store the frequency for easy recall whenever
you want to listen to that station.
1
Press TOOLS while receiving a signal from the
station you want to store.
The preset number is blinking.
2
Press PRESET+/– to select the station preset
you want, then press ENTER.
The preset number stop blinking and the receiver stores
the station.
Listening to station presets
You will need to have some presets stored to do this.
Press PRESET+/– to select the station preset
you want.
9
English
Français
Italiano
Español
Nederlands
Deutsch
Basic playback (continued)
To enjoy the many functions of the
unit to the fullest extent
Load the CD-ROM into your computer and download the
PDF manual from the menu screen to read.
Functions
■
Playing a USB device
l
page 29
■
Bluetooth
ADAPTER for Wireless Enjoyment of Music
l
page 32
(VSX-S510 only)
■
Playback with NETWORK features
l
page 42
(VSX-S510 only)
■
Setting the Audio options
l
page 40
■
Using the Home Menu
l
page 51
Troubleshooting
l
page 58
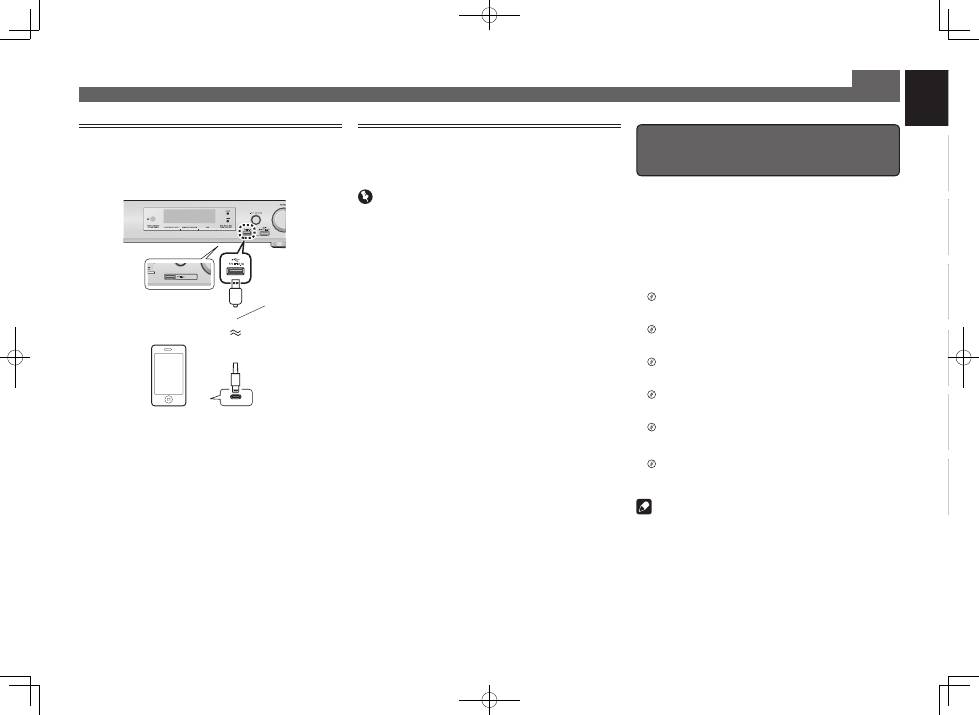
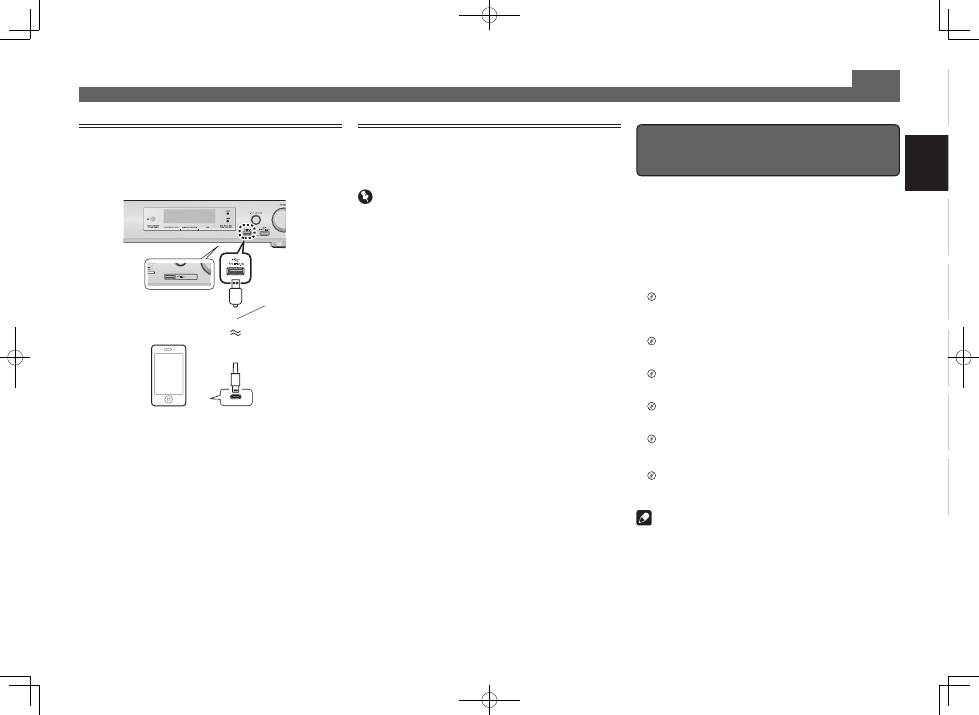
Playing an iPod
• About one minute is required between turning the power
on and completion of startup.
1
Connect your iPod.
2
Press iPod/USB to select the iPod/USB input.
When the display shows the names of folders and files,
you’re ready to play music from the iPod.
3
Use
/
to select a category, then press
ENTER to browse that category.
• To return to the previous level any time, press
RETURN
.
4
Use
/
to browse the selected category (e.g.,
albums).
• Use
/l
to move to previous/next levels.
5
Continue browsing until you arrive at what
you want to play, then press
to start
playback.
Listening to Internet radio stations
VSX-S510 only
• About one minute is required between turning the power
on and completion of startup.
Important
• When using a broadband Internet connection, a contract
with an Internet service provider is required. For more
details, contact your nearest Internet service provider.
• To listen to Internet radio stations, you must have high-
speed broadband Internet access. With a 56 K or ISDN
modem, you may not enjoy the full benefits of Internet
radio.
• Access to content provided by third parties requires a
high speed internet connection and may also require
account registration and a paid subscription. Third
party content services may be changed, suspended,
interrupted, or discontinued at any time without notice,
and Pioneer disclaims any liability in connection with such
occurrences. Pioneer does not represent or warrant that
content services will continue to be provided or available
for a particular period of time, and any such warranty,
express or implied, is disclaimed.
1
Press NETWORK repeatedly to select the
NETRADIO input.
It may take several seconds for this receiver to access the
network.
2
Use
/
to select the Internet radio station to
play back, and then press ENTER.
USB cable that
comes with the iPod
iPod/iPhone or iPad
(VSX-S510 only)
© 2013 PIONEER CORPORATION.
All rights reserved.
VSX-S510only
Note
• This unit supports AirPlay. For details, see page 42 of the
operating instructions and the Apple website (http://www.
apple.com).
• This unit’s software can be updated (page 46 of the
operating instructions). With Mac OS, it can be updated
using Safari (page 47 of the operating instructions).
VSX-S510
VSX-S310

2
Français
Instructions de sécurité
Pour des descriptions plus détaillées du récepteur, référez-vous au « Mode d’emploi » sur le CD-ROM fourni. Le mode d’emploi peut aussi être téléchargé du site Pioneer (http://www.pioneer.eu). Voir ci-dessous pour l’emploi
du CD-ROM.
0
Environnement d’exploitation
— Concernant le manuel de l’utilisateur PDF inclus sur le CD-ROM, la visualisation a été confirmée sur les environnements d’exploitation : Microsoft® Windows® XP / Windows Vista® /
Windows® 7 / Windows® 8 et Apple Mac OS X 10.7 ou supérieur, Adobe Reader (Version 10, 11).
0
Précautions d’utilisation
— Ce CD-ROM est conçu pour être utilisé avec un ordinateur personnel. Il ne peut pas être
utilisé avec un lecteur de DVD ni un lecteur de CD audio. Essayer de lire ce CD-ROM avec un lecteur de DVD ou un lecteur de CD audio peut endommager les enceintes ou causer une altération auditive à cause du
volume sonore élevé qui pourrait être produit.
0
License
— Veuillez accepter les « Conditions d’utilisation » indiquées ci-dessous avant d’utiliser ce CD-ROM. Ne l’utilisez pas si vous ne souhaitez pas accepter les
conditions d’utilisation.
0
Conditions d’utilisation
— Les droits d’auteur des données de ce CD-ROM appartiennent à PIONEER CORPORATION. Un transfert, une copie, une diffusion, une transmission publique, une
traduction, une vente, un prêt ou toute autre action non autorisée qui sort des limites de l’« utilisation personnelle » ou d’une « citation », comme défini par les lois sur les droits d’auteur, peut être soumise à des actions
pénales. L’autorisation d’utiliser ce CD-ROM est donnée sous licence de PIONEER CORPORATION.
0
Avis de non-responsabilité
— PIONEER CORPORATION ne garantit pas le fonctionnement de ce CD-ROM pour les
ordinateurs personnels utilisant n’importe lequel des systèmes d’exploitation applicables. De plus, PIONEER CORPORATION ne peut être tenu responsable pour tout dommages subis à la suite de l’utilisation de ce CD-
ROM, n’est tenu à aucune compensation. Les nom des sociétés privées, des produits ou d’autres entités citées ici sont des marques déposées ou des marque de commerce de leur entreprise respective.
*
Lors de l’utilisation de Mac OS
: Insérez le CD-ROM dans le lecteur CD, cliquez sur le lecteur CD dans le Finder et double-cliquez sur le fichier Index.html (sommaire) pour accéder aux instructions d’utilisation.
ATTENTION
POUR ÉVITER TOUT RISQUE D’ÉLECTROCUTION, NE PAS ENLEVER
LE COUVERCLE (NI LE PANNEAU ARRIÈRE). AUCUNE PIÈCE RÉPA-
RABLE PAR L’UTILISATEUR NE SE TROUVE À L’INTÉRIEUR. CONFIER
TOUT ENTRETIEN À UN PERSONNEL QUALIFIÉ UNIQUEMENT.
D3-4-2-1-1_B1_Fr
AVERTISSEMENT
Cet appareil n’est pas étanche. Pour éviter les risques d’incendie et de
décharge électrique, ne placez près de lui un récipient rempli d’eau, tel
qu’un vase ou un pot de fleurs, et ne l’exposez pas à des gouttes d’eau,
des éclaboussures, de la pluie ou de l’humidité.
D3-4-2-1-3_A1_Fr
AVERTISSEMENT
Pour éviter les risques d’incendie, ne placez aucune flamme nue (telle
qu’une bougie allumée) sur l’appareil.
D3-4-2-1-7a_A1_Fr
Milieu de fonctionnement
Température et humidité du milieu de fonctionnement :
De +5 °C à +35 °C (de +41 °F à +95 °F) ; Humidité relative inférieure à
85 % (orifices de ventilation non obstrués)
N’installez pas l’appareil dans un endroit mal ventilé ou un lieu soumis
à une forte humidité ou en plein soleil (ou à une forte lumière artifi-
cielle).
D3-4-2-1-7c*_A2_Fr
Ce produit est destiné à une utilisation domestique générale. Toute
panne due à une utilisation autre qu'à des fins privées (comme une
utilisation à des fins commerciales dans un restaurant, dans un
autocar ou sur un bateau) et qui nécessite une réparation sera aux
frais du client, même pendant la période de garantie.
K041_A1_Fr
PRÉCAUTION DE VENTILATION
Lors de l’installation de l’appareil, veillez à laisser un espace suffisant
autour de ses parois de manière à améliorer la dissipation de chaleur
(au moins 10 cm sur le dessus, 5 cm à l’arrière et 5 cm de chaque
côté).
AVERTISSEMENT
Les fentes et ouvertures du coffret sont prévues pour la ventilation,
pour assurer un fonctionnement stable de l’appareil et pour éviter sa
surchauffe. Pour éviter les risques d’incendie, ne bouchez jamais les
ouvertures et ne les recouvrez pas d’objets, tels que journaux, nappes
ou rideaux, et n’utilisez pas l’appareil posé sur un tapis épais ou un lit.
D3-4-2-1-7b*_A1_Fr
ATTENTION
L’interrupteur
u
STANDBY/ON
de cet appareil ne coupe pas
complètement celui-ci de sa prise secteur. Comme le cordon
d’alimentation fait office de dispositif de déconnexion du secteur,
il devra être débranché au niveau de la prise secteur pour que
l’appareil soit complètement hors tension. Par conséquent,
veillez à installer l’appareil de telle manière que son cordon
d’alimentation puisse être facilement débranché de la prise secteur
en cas d’accident. Pour éviter tout risque d’incendie, le cordon
d’alimentation sera débranché au niveau de la prise secteur si vous
prévoyez une période prolongée de non utilisation (par exemple
avant un départ en vacances).
D3-4-2-2-2a*_A1_Fr
AVERTISSEMENT
Gardez les pièces de petite taille hors de la portée des bébés et
des enfants. En cas d’ingestion accidentelle, veuillez contacter
immédiatement un médecin.
D41-6-4_A1_Fr
Information à destination des utilisateurs sur la collecte et l’élimination des équipements et batteries usagés
Ces symboles qui figurent sur les produits, les emballages et/ou les documents d’accompagnement signifient que
les équipements électriques et électroniques et batteries usagés ne doivent pas être jetés avec les déchets ménagers
et font l’objet d’une collecte sélective.
Pour assurer l’enlèvement et le traitement appropriés des produits et batteries usagés, merci de les retourner dans
les points de collecte sélective habilités conformément à la législation locale en vigueur.
En respectant les circuits de collecte sélective mis en place pour ces produits, vous contribuerez à économiser des
ressources précieuses et à prévenir les impacts négatifs éventuels sur la santé humaine et l’environnement qui pour-
raient résulter d’une mauvaise gestion des déchets.
Pour plus d’information sur la collecte et le traitement des produits et batteries usagés, veuillez contacter votre muni-
cipalité, votre service de gestion des déchets ou le point de vente chez qui vous avez acheté ces produits.
Ces symboles ne sont valables que dans les pays de l’Union Européenne.
Pour les pays n’appartenant pas à l’Union Européenne :
Si vous souhaitez jeter ces articles, veuillez contacter les autorités ou revendeurs locaux pour connaître les méthodes
d’élimination appropriées.
K058a_A1_Fr
Marquage pour
les équipements
Exemples de marquage
pour les batteries
Pb
3
English
Français
Italiano
Español
Nederlands
Deutsch
Raccordements
Raccordement des enceintes
Le récepteur fonctionnera avec seulement deux enceintes stéréo (les enceintes avant sur le
schéma), mais il est recommandé d’en utiliser au moins trois ; une configuration complète de
huit enceintes est cependant idéale pour la production du son surround.
Pour obtenir le meilleur son surround possible, installez vos enceintes conformément à
l’illustration ci-dessous.
Système surround à 5.1 canaux :
Après avoir installé les enceintes, connectez-les comme indiqué ci-dessous.
Schéma de connexion du système VSX-S510
LINE LEVEL
INPUT
L
– Avant-gauche
C
– Centre
R
– Avant-droit
SL
– Surround gauche
SR
– Surround droit
SW
– Caisson de graves
• De plus, il est possible de connecter
des enceintes surround arrière ou des
enceintes B
(VSX-S510 uniquement)
.
• Pour plus d’informations, consulter le
Mode d’emploi (sur CD-ROM) page 11.
Raccordement des câbles d’enceintes
Vérifiez que l’enceinte droite est raccordée
à la borne droite (
R
) et que l’enceinte
gauche est raccordée à la borne gauche
(
L
). Assurez-vous également que les bornes
positive et négative (
+/–
) du récepteur sont
reliées aux bornes positive et négative des
enceintes.
ATTENTION
• Avant un raccordement ou une
modification de raccordement, mettez
l’appareil hors tension et débranchez
le cordon d’alimentation de la prise
secteur.
• Les bornes des haut-parleurs sont sous
une tension
DANGEREUSE
. Pour éviter
tout risque de décharge électrique lors
du branchement et du débranchement
des câbles de haut-parleur, débranchez
le cordon d’alimentation avant de
toucher des parties non isolées.
1
Torsadez ensemble les brins de fil
dénudés.
2
Libérez la borne de l’enceinte et insérez-y
le fil.
3
Refermez la borne.
1
2
3
10 mm
Les fils doivent être raccordés aux bornes
CENTER ou SURROUND du VSX-S310 comme
indiqué ci-dessous.
1
Torsadez ensemble les brins de fil
dénudés.
2
Poussez sur les languettes pour les
ouvrir et insérez le fil dénudé.
3
Relâchez les languettes.
1
2
3
10 mm
R
SL
L
SW C
SR
Subwoofer amplifié
(
SW
)
Avant-
droit (
R
)
Surround droit
(
SR
)
Surround gauche
(
SL
)
Avant-gauche
(
L
)
Centre (
C
)
Important
• Connectez des caissons de graves passifs tel que le modèle Pioneer S-SLW500 aux bornes
d’enceinte SUBWOOFER.
• Connectez soit des caissons de graves passifs soit des caissons de graves actifs, mais pas
les deux.
Remarque
• Cet appareil accepte les enceintes dont l’impédance nominale est comprise entre 4
W
et 16
W
.
Caisson de
basse passif

4
Raccordements (suite)
LINE LEVEL
INPUT
Subwoofer amplifié
(
SW
)
Avant-droit (
R
)
Avant-gauche
(
L
)
Centre (
C
)
Surround droit
(
SR
)
Surround gauche
(
SL
)
Schéma de connexion du système VSX-S310
Remarque
• Cet appareil accepte les enceintes dont l’impédance nominale est comprise entre 4
W
et 16
W
.
5
English
Français
Italiano
Español
Nederlands
Deutsch
Raccordement d’un téléviseur et de
périphériques de lecture
Raccordements (suite)
Raccordement des antennes
2
1
AM loop antenna
FM wire antenna
Téléviseur compatible HDMI/DVI
VSX-S510
Lecteur de Blu-ray Disc
compatible HDMI/DVI etc.
• Le signal de l’affichage OSD est envoyé uniquement sur la
prise de sortie HDMI OUT.
• Si le téléviseur ne prend pas en charge la fonction HDMI
Audio Return Channel, la connexion doit être réalisée via
un câble optique numérique (
A
) pour écouter le son du
téléviseur par l’intermédiaire du récepteur.
• Si le téléviseur prend en charge la fonction HDMI Audio
Return Channel, le son du téléviseur est envoyé vers le
récepteur via la prise HDMI et il n’est alors pas nécessaire
de connecter un câble optique numérique (
A
). Dans
ce cas, activez (
ON
) l’option
ARC
dans le menu de
configuration
HDMI Setup
l
« Le menu HDMI Setup »
à la page 57.
•
Veuillez vous reporter au Guide d’utilisation du téléviseur
pour consulter les instructions concernant les connexions
et la configuration du téléviseur.
• La connexion doit être réalisée via un câble vidéo
composite (
A
) afin de faire apparaître l’affichage OSD de
l’appareil sur le téléviseur.
• Si le téléviseur ne prend pas en charge la fonction HDMI
Audio Return Channel, la connexion doit être réalisée via
un câble optique numérique (
B
) pour écouter le son du
téléviseur par l’intermédiaire du récepteur.
• Si le téléviseur prend en charge la fonction HDMI Audio
Return Channel, le son du téléviseur est envoyé vers le
récepteur via la prise HDMI et il n’est alors pas nécessaire
de connecter un câble optique numérique (
B
). Dans
ce cas, activez (
ON
) l’option
ARC
dans le menu de
configuration
HDMI Setup
l
« Le menu HDMI Setup »
à la page 57.
•
Veuillez vous reporter au Guide d’utilisation du téléviseur
pour consulter les instructions concernant les connexions
et la configuration du téléviseur.
HDMI IN
HDMI OUT
VIDEO IN
DIGITAL AUDIO OUT
OPTICAL
B
A
VSX-S310
Téléviseur compatible HDMI/DVI
Lecteur de Blu-ray Disc
compatible HDMI/DVI etc.
HDMI IN
HDMI OUT
DIGITAL AUDIO OUT
OPTICAL
A
6
Raccordements (suite)
Remarque
• Reportez-vous au Mode d’emploi inclus dans le CD-ROM
fourni si vous souhaitez connecter un téléviseur ou un
lecteur en utilisant une autre méthode que la connexion
HDMI.
• Reportez-vous au Mode d’emploi inclus dans le CD-ROM
fourni si vous souhaitez connecter d’autres équipements.
ATTENTION
• Tenez le cordon d’alimentation par sa prise lorsque vous
le manipulez. Ne débranchez pas l’appareil en tirant sur
le cordon et ne touchez jamais le cordon d’alimentation
avec les mains mouillées ; vous pourriez provoquer un
court-circuit ou prendre un choc électrique. Ne placez
pas l’appareil, un meuble ou tout autre objet sur le
cordon d’alimentation, et évitez de le pincer de toute
autre manière. Ne faites jamais de nœud dans le cordon
et ne le liez jamais avec d’autres câbles. Les cordons
d’alimentation doivent être acheminés de façon à ce qu’on
ne puisse pas marcher dessus. Un cordon d’alimentation
endommagé peut provoquer un incendie ou un choc
électrique. Vérifiez l’état du cordon de temps à autre. Si le
cordon est endommagé, demandez-en le remplacement
auprès du service après-vente agréé Pioneer le plus
proche.
Raccordement au réseau par
l’interface LAN
VSX-S510 uniquement
WAN
3
2
1
LAN
Câble LAN (vendu séparément)
Routeur
Modem
Ordinateur
Internet
VSX-S510
7
English
Français
Italiano
Español
Nederlands
Deutsch
Initial Setup
Préparatifs
1
Insérez les piles dans la télécommande.
Les piles de la télécommande fournies avec l’appareil
permettent d’effectuer les premières opérations ; il est
possible qu’elles ne durent pas très longtemps. Nous
recommandons l’usage de piles alcalines, dont la durée
de vie est supérieure.
2
Allumez le récepteur et votre téléviseur.
3
Sélectionnez l’entrée TV de sorte que le
téléviseur se connecte à l’appareil.
4
Mettez le caisson de graves actif sous tension
et augmentez le volume.
AVERTISSEMENT
• N’utilisez ni ne conservez les piles sous la lumière directe
du soleil ou dans un endroit excessivement chaud, comme
une voiture ou à proximité d’un appareil de chauffage. Les
piles risqueraient de fuir, de surchauffer, d’exploser ou de
s’enflammer. Leur durée de vie et/ou leur performance
pourrait également être réduite.
ATTENTION
• Lors de l’installation des piles, veillez à ne pas
endommager les ressorts des bornes (–) des piles. Les
piles risqueraient de fuir ou de surchauffer.
• Lorsque vous éliminez des piles / batteries usées, veuillez
vous conformer aux normes gouvernementales ou aux
règles des institutions publiques environnementales en
vigueur dans votre pays ou région.
Configuration automatique du son surround (MCACC)
Le système de calibrage acoustique multicanaux (Multi-
Channel Acoustic Calibration, MCACC) utilise le microphone
de configuration fourni pour mesurer et analyser la tonalité de
test émise par les enceintes. Cette fonction permet de mesurer
et de configurer automatiquement les paramètres avec
précision. En l’utilisant, vous bénéficierez d’un environnement
d’écoute optimal.
Important
• La procédure doit être effectuée dans un environnement
calme.
• Si vous avez un trépied, utilisez-le pour y placer le
microphone afin qu’il soit au niveau des oreilles à votre
position d’écoute normale. Sinon, placez le microphone au
niveau des oreilles en utilisant une table ou une chaise.
• Les mesures risquent d’être impossibles si un ou plusieurs
obstacles se trouvent entre les enceintes et la position
d’écoute (microphone).
• Pendant la procédure de mesure, éloignez-vous de la
position d’écoute et utilisez la télécommande en vous
plaçant à l’extérieur de la zone des enceintes.
1
Branchez le microphone de configuration
fourni.
MCACC
SETUP MIC
2
Appuyez sur la touche BD de la télécommande
pour passer sur l'’ntrée BD.
3
Appuyez sur la touche
RECEIVER
de
la télécommande, puis sur la touche
HOME MENU.
Le menu d’accueil (Home) s’affiche sur le téléviseur.
4
Sélectionnez ‘Auto MCACC’ dans le menu
d’accueil (Home), puis appuyez sur ENTER.
La procédure de mesure automatique commence.
Home Menu
1 . Auto MCACC
2 . Manual SP Setup
3 . Input Assign
4. Auto Power Down
5. HDMI Setup
6. Network Standby
7. MHL Setup
8. Speaker System
9. OSD Setup
1 . Auto MCACC
Now Analyzing
Environment Check
Ambient Noise
Speaker YES/NO
Return
• Les mesures prennent entre 3 et 12 minutes.
5
Suivez les instructions à l’écran.
• La configuration automatique est terminée lorsque l’écran
revient au menu « Home Menu ».
6
Assurez-vous de débrancher le microphone de
configuration.
Trépied
Microphone
VSX-S510
8
Lecture de base
Lecture multicanaux
2
3
5
1
Mettez le lecteur sous tension.
Exemple : Mettez sous tension le lecteur de disque Blu-ray
connecté à la prise d’entrée
HDMI BD IN
.
2
Sélectionnez l’entrée sur le récepteur.
Exemple : Appuyez sur la touche
BD
pour sélectionner
l’entrée
BD
.
3
Appuyez sur la touche ‘AUTO/DIRECT’ pour
sélectionner AUTO SURROUND.
Pour la lecture multicanaux à partir de signaux audio à
2 canaux (Téléviseur, musique, etc.), appuyez sur la touche
ALC/STANDARD
ou
ADV SURR
pour sélectionner votre
mode d’écoute préféré.
4
Lancez la lecture sur le lecteur.
Exemple : Lancez la lecture sur le lecteur de disque Blu-
ray.
5
Utilisez le bouton rotatif VOLUME +/– pour
régler le volume sonore.
Pour couper le son, appuyez sur la touche
MUTE
.
Remarque
• Pour écouter le son d’un composant source connecté à
ce récepteur via un câble coaxial ou un câble optique,
sélectionner le signal d’entrée
C1
(coaxial) ou
O1
(optique). Appuyez sur
SIGNAL SEL
pour choisir l’entrée
CD ou TV.
• L’entrée du récepteur commute et vous pourrez alors
utiliser d’autres composants via la télécommande. Pour
faire fonctionner ce récepteur, appuyez d’abord sur la
touche
RECEIVER
de la télécommande, puis appuyez sur la
touche voulue.
Ecoute de la radio
1
Appuyez sur TUNER pour sélectionner le
syntoniseur.
Appuyez sur la touche
BAND
pour changer de bande de
fréquences (FM ou AM), si nécessaire.
2
Pour rechercher une station de radio, utilisez
les touches TUNE+/– .
• Appuyez sur une des touches
TUNE+/–
sans la relâcher
pendant environ une seconde. Le récepteur lance
la recherche de la station suivante dans la direction
correspondant à la touche.
• Si la réception du signal radio FM est faible, appuyez sur
la touche
BAND
pour sélectionner FM MONO, et réglez le
récepteur en mode de réception mono.
Mémorisation de stations préréglées
Si vous écoutez souvent une station de radio, il peut être
pratique d’enregistrer sa fréquence dans le récepteur afin de
pouvoir y accéder facilement lorsque vous le souhaitez.
1
Pour mémoriser une station de radio que vous
êtes en train d’écouter, appuyez d’abord sur la
touche TOOLS.
Le numéro de préréglage clignote.
2
Utilisez les touches PRESET+/– pour
sélectionner le numéro de préréglage que
vous souhaitez attribuer à cette station, puis
appuyez sur ENTER.
Le numéro préréglé cesse de clignoter et le récepteur
mémorise la station.
Écoute des stations préréglées
Vous devez mémoriser des stations préréglées pour avoir accès
à cette fonction.
Appuyez sur PRESET+/– pour sélectionner la
station préréglée de votre choix.
9
English
Français
Italiano
Español
Nederlands
Deutsch
Lecture de base (suite)
Pour profiter entièrement de toutes
les fonctions du récepteur
Insérez le CD-ROM dans votre ordinateur et ouvrez le
Mode d’emploi au format PDF pour le lire.
Fonctions
■
Lecture à partir d’un périphérique USB
l
page 29
■
ADAPTATEUR
Bluetooth
pour profiter de la musique
sans fil
l
page 32
(VSX-S510 uniquement)
■
Utilisation des fonctions de lecture réseau (NETWORK)
l
page 42
(VSX-S510 uniquement)
■
Réglage des options audio
l
page 40
■
Utilisation du menu d’accueil HOME
l
page 51
Guide de dépannage
l
page 59
Lecture à partir d’un iPod
• L’opération de démarrage prend environ une minute à
partir de la mise sous tension.
1
Connectez votre iPod.
2
Appuyez sur la touche iPod/USB pour
sélectionner l’entrée iPod/USB.
Lorsque l’affichage indique les noms de dossiers et de
fichiers, le récepteur est prêt à lire le contenu audio stocké
sur l’iPod.
3
Utilisez
//
pour sélectionner une catégorie,
puis appuyez sur ENTER pour naviguer dans
cette catégorie.
• Pour revenir au niveau précédent à tout moment,
appuyez sur
RETURN
.
4
Utilisez
//
pour naviguer dans la catégorie
sélectionnée (par exemple, albums).
• Utilisez
/l/
pour passer au niveau précédent/suivant.
5
Poursuivez votre navigation jusqu’à atteindre
les éléments que vous souhaitez lire, puis
appuyez sur
pour lancer la lecture.
Ecoute des stations radio Internet
VSX-S510 uniquement
• L’opération de démarrage prend environ une minute à
partir de la mise sous tension.
Important
• L’utilisation d’une connexion Internet haut-débit nécessite
un contrat auprès d’un fournisseur d’accès Internet. Pour
plus d’informations, contactez votre fournisseur d’accès
Internet local.
• Pour écouter les stations radio Internet, vous devez avoir
un accès haute vitesse à Internet par une large bande.
Avec un modem de 56 K ou ISDN, vous ne pourrez pas
profiter pleinement de la radio Internet.
• L’acces a du contenu Web requiert un acces internet
haut debit et peut aussi necessiter l’enregistrement de
vos coordonnees et le paiement d’un abonnement sur
un site. Le contenu du site peut etre change, suspendu,
interrompu sans aucun avertissement, Pioneer declinant
toute responsabilite quant a d’eventuels changements.
Pioneer decline toute responsabilite quant au contenu, a
sa disponibilite et quant a la continuite du service.
1
Appuyez sur la touche NETWORK pour
sélectionner l’entrée NETRADIO.
Il faut quelques secondes au récepteur pour accéder au
réseau.
2
Utilisez les touches
//
pour sélectionner la
station radio Internet voulue, puis appuyez
sur ENTER.
Câble USB fourni
avec l’iPod
iPod/iPhone ou iPad
(VSX-S510 uniquement)
© 2013 PIONEER CORPORATION.
Tous droits de reproduction et de traduction réservés.
VSX-S510 uniquement
Remarque
• Cet appareil prend en charge le protocole AirPlay. Pour
plus d’informations, consultez le Mode d’emploi page 42
et visitez le site Apple (http://www.apple.com).
• Le micrologiciel de cet appareil peut être mis à jour (voir le
Mode d’emploi, page 46). Avec un ordinateur fonctionnant
sous Mac OS, la mise à jour peut être téléchargée via
Safari (Voir le Mode d’emploi, page 47).
VSX-S510
VSX-S310
2
Deutsch
Sicherheitsbroschüre
Detaillierte Beschreibungen des Receivers finden Sie in der „Bedienungsanleitung“ auf der mitgelieferten CD-ROM. Die Bedienungsanleitung kann auch von der Website von Pioneer (http://www.pioneer.eu)
heruntergeladen werden. Näheres zur Behandlung der CD-ROM finden Sie im Folgenden.
0
Betriebsumgebung
— Die Operation, die auf der CD-ROM enthaltene PDF mit der Bedienungsanleitung lesen zu können, ist unter den folgenden Betriebssystemen möglich. Mcrosoft® Windows® XP / Windows
Vista® / Windows® 7 / Windows® 8 und Apple Mac OS X 10.7 oder später, Adobe Reader (Version 10, 11).
0
Vorsichtshinweise für den Gebrauch
—Diese CD-ROM ist für die Verwendung mit einem Personalcomputer
vorgesehen. Sie kann nicht mit einem DVD-Spieler oder Musik-CD-Spieler verwendet werden. Falls Sie versuchen, diese CD-ROM mit einem DVD-Spieler oder Musik-CD-Spieler zu verwenden, besteht die Gefahr einer
Beschädigung der Lautsprecher oder eines Gehörschadens infolge zu hoher Lautstärke.
0
Lizenz
— Bitte stimmen Sie den unten angeführten „Gebrauchsbedingungen“ zu, bevor Sie diese CD-ROM verwenden. Verwenden
Sie die CD-ROM bitte nicht, falls Sie mit den Gebrauchsbedingungen nicht einverstanden sind.
0
Gebrauchsbedingungen
— Das Urheberrecht der Daten, die auf dieser CD-ROM enthalten sind, gehört der PIONEER
CORPORATION. Die unerlaubte Übertragung, Duplizierung, Versendung, öffentliche Übertragung, Übersetzung sowie der unerlaubte Verkauf, Verleih und dergleichen, die den Rahmen von „persönlichem Gebrauch“
oder „Zitieren“, wie im Urheberrechtsgesetz definiert, überschreiten, können strafrechtlich verfolgt werden. Die Erlaubnis zur Verwendung dieser CD-ROM erfolgt unter Lizenz der PIONEER CORPORATION.
0
Allgemeine
Gegenerklärung
— Die PIONEER CORPORATION garantiert nicht, dass diese CD-ROM mit allen PCs und Betriebssystemen funktioniert. Außerdem haftet die PIONEER CORPORATION nicht für irgendwelche Schäden,
die infolge des Gebrauchs dieser CD-ROM anfallen, und kann auch nicht für Entschädigungen irgendwelcher Art haftbar gemacht werden. Die Namen der Privatunternehmen, Produkte und anderer Entitäten, die in
diesem Dokument angeführt sind, sind die eingetragenen Warenzeichen oder Warenzeichen der jeweiligen Unternehmen.
*
Bei Verwendung eines Mac OS-Betriebssystems
: Legen Sie die CD in das CD-ROM-Laufwerk ein, klicken Sie das CD-Laufwerk von Finder aus an und doppelklicken Sie für Oerationsanweisungen Index. html
(Inhaltsverzeichnis).
ACHTUNG
UM SICH NICHT DER GEFAHR EINES ELEKTRISCHEN SCHLAGES
AUSZUSETZEN, DÜRFEN SIE NICHT DEN DECKEL (ODER DIE
RÜCKSEITE) ENTFERNEN. IM GERÄTEINNEREN BEFINDEN SICH
KEINE VOM BENUTZER REPARIERBAREN TEILE. ÜBERLASSEN SIE
REPARATUREN DEM QUALIFIZIERTEN KUNDENDIENST
D3-4-2-1-1_B1_De
WARNUNG
Dieses Gerät ist nicht wasserdicht. Zur Vermeidung der Gefahr von
Brand und Stromschlag keine Behälter mit Flüssigkeiten (z.B. Blu-
menvasen und -töpfe) in die Nähe des Gerätes bringen und dieses vor
Tropfwasser, Spritzwasser, Regen und Nässe schützen.
D3-4-2-1-3_A1_De
WARNUNG
Keine Quellen offener Flammen (z.B. eine brennende Kerze) auf dieses
Gerät stellen.
D3-4-2-1-7a_A1_De
Betriebsumgebung
Betriebstemperatur und Betriebsluftfeuchtigkeit:
+5 °C bis +35 °C, 85 % rel. Feuchte max. (Ventilationsschlitze nicht
blockiert)
Eine Aufstellung dieses Gerät an einem unzureichend belüfteten,
sehr feuchten oder heißen Ort ist zu vermeiden, und das Gerät darf
weder direkter Sonneneinstrahlung noch starken Kunstlichtquellen
ausgesetzt werden.
D3-4-2-1-7c*_A2_De
Dieses Gerät ist für den Heimgebrauch vorgesehen. Falls bei Einsatz
zu einem anderem Zweck (z.B. Langzeitgebrauch zu gewerblichen
Zwecken in einem Restaurant oder Betrieb in einem Fahrzeug
bzw. Schiff) eine Funktionsstörung auftritt, die eine Reparatur des
Gerätes erforderlich macht, werden die Reparaturkosten dem
Kunden selbst dann in Rechnung gestellt, wenn die Garantiefrist
noch nicht abgelaufen ist.
K041_A1_De
VORSICHTSHINWEIS ZUR BELÜFTUNG
Bei der Aufstellung dieses Gerätes muss für einen ausreichenden
Freiraum gesorgt werden, um eine einwandfreie Wärmeabfuhr zu ge-
währleisten (mindestens 10 cm oberhalb des Gerätes, 5 cm hinter dem
Gerät und jeweils 5 cm an der Seite des Gerätes).
WARNUNG
Im Gerätegehäuse sind Ventilationsschlitze und andere Öffnungen vor-
gesehen, die dazu dienen, eine Überhitzung des Gerätes zu verhindern
und einen zuverlässigen Betrieb zu gewährleisten. Um Brandgefahr
auszuschließen, dürfen diese Öffnungen auf keinen Fall blockiert oder
mit Gegenständen (z.B. Zeitungen, Tischdecken und Gardinen) abge-
deckt werden, und das Gerät darf beim Betrieb nicht auf einem dicken
Teppich oder Bett aufgestellt sein.
D3-4-2-1-7b*_A1_De
ACHTUNG
Der
u
STANDBY/ON
-Schalter dieses Gerätes trennt das Gerät nicht
vollständig vom Stromnetz. Um das Gerät vollständig vom Netz zu
trennen, muss der Netzstecker aus der Netzsteckdose gezogen
werden. Daher sollte das Gerät so aufgestellt werden, dass stets ein
unbehinderter Zugang zur Netzsteckdose gewährleistet ist, damit
der Netzstecker in einer Notsituation sofort abgezogen werden
kann. Um Brandgefahr auszuschließen, sollte der Netzstecker
vor einem längeren Nichtgebrauch des Gerätes, beispielsweise
während des Urlaubs, grundsätzlich von der Netzsteckdose
getrennt werden.
D3-4-2-2-2a*_A1_De
WARNUNG
Lagern Sie kleine Teile außerhalb der Reichweite von Kindern oder
Kleinkindern. Suchen Sie, wenn es zu einem zufälligen Verschlucken
gekommen ist, unverzüglich einen Arzt auf.
D41-6-4_A1_De
Informationen für Anwender zur Sammlung und Entsorgung von Altgeräten und gebrauchten Batterien
Diese Symbole auf den Produkten, der Verpackung und/oder Begleitdokumenten bedeuten, dass gebrauchte elektri-
sche und elektronische Produkte und Batterien nicht über den Haushaltsmüll entsorgt werden dürfen.
Zur richtigen Handhabung, Rückgewinnung und Wiederverwertung von Altprodukten und gebrauchten Batterien
bringen Sie diese bitte zu den gemäß der nationalen Gesetzgebung dafür zuständigen Sammelstellen.
Mit der korrekten Entsorgung dieser Produkte und Batterien helfen Sie dabei, wertvolle Ressourcen zu schonen und
vermeiden mögliche negative Auswirkungen auf die Gesundheit und die Umwelt, die durch eine unsachgemäße
Behandlung des Abfalls entstehen könnten.
Weitere Informationen zur Sammlung und Wiederverwertung von Altprodukten und Batterien erhalten Sie von Ihrer
örtlichen Gemeindeverwaltung, Ihrem Müllentsorger oder dem Verkaufsort, an dem Sie die Waren erworben haben.
Diese Symbole gelten ausschließlich in der Europäischen Union.
Für Länder außerhalb der Europäischen Union:
Wenn Sie diese Gegenstände entsorgen wollen, wenden Sie sich bitte an Ihre lokalen Behörden oder Händler und
fragen Sie dort nach der korrekten Entsorungsweise.
K058a_A1_De
Symbol für
Geräte
Symbolbeispiele
für Batterien
Pb
3
English
Français
Italiano
Español
Nederlands
Deutsch
Anschlüsse
Anschluss der Lautsprecher
Der Receiver funktioniert auch bei Verwendung von nur zwei Stereolautsprechern (die Front-Lautsprecher
in der Abbildung), aber wir empfehlen Ihnen die Verwendung von mindestens drei Lautsprechern, wobei
ein vollständiges Setup immer noch den besten Raumklang liefert.
Stellen Sie Ihre Lautsprecher wie unten dargestellt auf, um den bestmöglichen Surroundklang zu erzielen.
5.1-Kanal-Surround-System:
Schließen Sie die Lautsprecher, nachdem Sie sie installiert haben, wie unten dargestellt an.
Anschluss-Diagramm für den VSX-S510
LINE LEVEL
INPUT
L
– Front links
C
– Center
R
– Front rechts
SL
– Surround links
SR
– Surround rechts
SW
– Subwoofer
• Außerdem können auch Surround-Back-
Lautsprecher oder der Lautsprecher B
(nur VSX-S510)
angeschlossen werden.
• Zu Einzelheiten siehe Seite 11 der
Bedienungsanleitung (CD-ROM).
Anschließen der Lautsprecherkabel
Stellen Sie sicher, dass Sie die rechten
Lautsprecher am rechten (
R
) Anschluss
und die linken Lautsprechern am linken
(
L
) Anschluss anschließen. Stellen Sie
außerdem sicher, dass die positiven und
negativen (
+/–
) Anschlüsse am Receiver
denen an den Lautsprechern entsprechen.
ACHTUNG
• Bevor Sie Anschlüsse vornehmen
oder ändern, schalten Sie die
Stromversorgung aus und ziehen Si das
Netzkabel aus der Steckdose.
• An den Lautsprecherklemmen
dieses Gerätes liegt eine potentiell
GEFÄHRLICHE
Spannung an. Zur
Vermeidung von Stromschlaggefahr
ist unbedingt darauf zu achten, den
Netzstecker beim Anschließen und
Abtrennen der Lautsprecherkabel von
der Netzsteckdose zu trennen, bevor
irgendwelche nicht isolierten Teile
berührt werden.
1
Verdrillen Sie die hervorstehenden
Drahtstränge miteinander.
2
Lösen Sie den Anschluss und setzen Sie
den hervorstehenden Draht ein.
3
Ziehen Sie den Anschluss wieder an.
1
2
3
10 mm
Die Anschlussdrähte sollten wie folgt an
die Anschlüsse CENTER oder SURROUND
angeschlossen werden.
1
Verdrillen Sie die hervorstehenden
Drahtstränge miteinander.
2
Öffnen Sie die Klemmen und schieben
Sie den hervorstehenden Draht ein.
3
Lassen Sie die Klemmen los.
1
2
3
10 mm
R
SL
L
SW C
SR
Leistungs-
Subwoofer (
SW
)
Front rechts (
R
)
Surround rechts
(
SR
)
Surround links
(
SL
)
Front links (
L
)
Center (
C
)
Wichtig
• Schließen Sie einen passiven Subwoofer wie z. B. den Pioneer S-SLW 500 an die Anschlüsse
SPEAKERS SUBWOOFER an.
• Bitte schließen Sie entweder den passiven Subwoofer oder den aktiven Subwoofer an, nicht
beide.
Hinweis
• Diese Einheit unterstützt Lautsprecher mit einer Nennimpedanz von 4
W
bis 16
W
.
Passiver
Subwoofer
4
Anschlüsse (Fortsetzung)
LINE LEVEL
INPUT
Leistungs-
Subwoofer (
SW
)
Front rechts (
R
)
Front links (
L
)
Center (
C
)
Surround rechts
(
SR
)
Surround links
(
SL
)
Anschluss-Diagramm für den VSX-S310
Hinweis
• Diese Einheit unterstützt Lautsprecher mit einer Nennimpedanz von 4
W
bis 16
W
.
