Philips GC2305: instruction
Class: Household, kitchen appliances, electronics and equipment
Type: Iron
Manual for Philips GC2305
Mistral
GC2425, GC2420, GC2415, GC2330, GC2326, GC2325,
GC2320, GC2315, GC2310, GC2305

2
3
A D F GECB I
H
J
K
L
M

4

ENGLISH 6
POLSKI 14
ROMÂNĂ 23
РУССКИЙ 31
ČESKY 41
MAGYAR 49
SLOVENSKY 57
УКРАЇНСЬКА 66
HRVATSKI 76
EESTI 84
LATVISKI 92
LIETUVIŠKAI 102
SLOVENŠČINA 110
БЪЛГАРСКИ 118
SRPSKI 128
GC2425, GC2420, GC2415, GC2330, GC2326,
GC2325, GC2320, GC2315, GC2310, GC2305

ENGLISH6
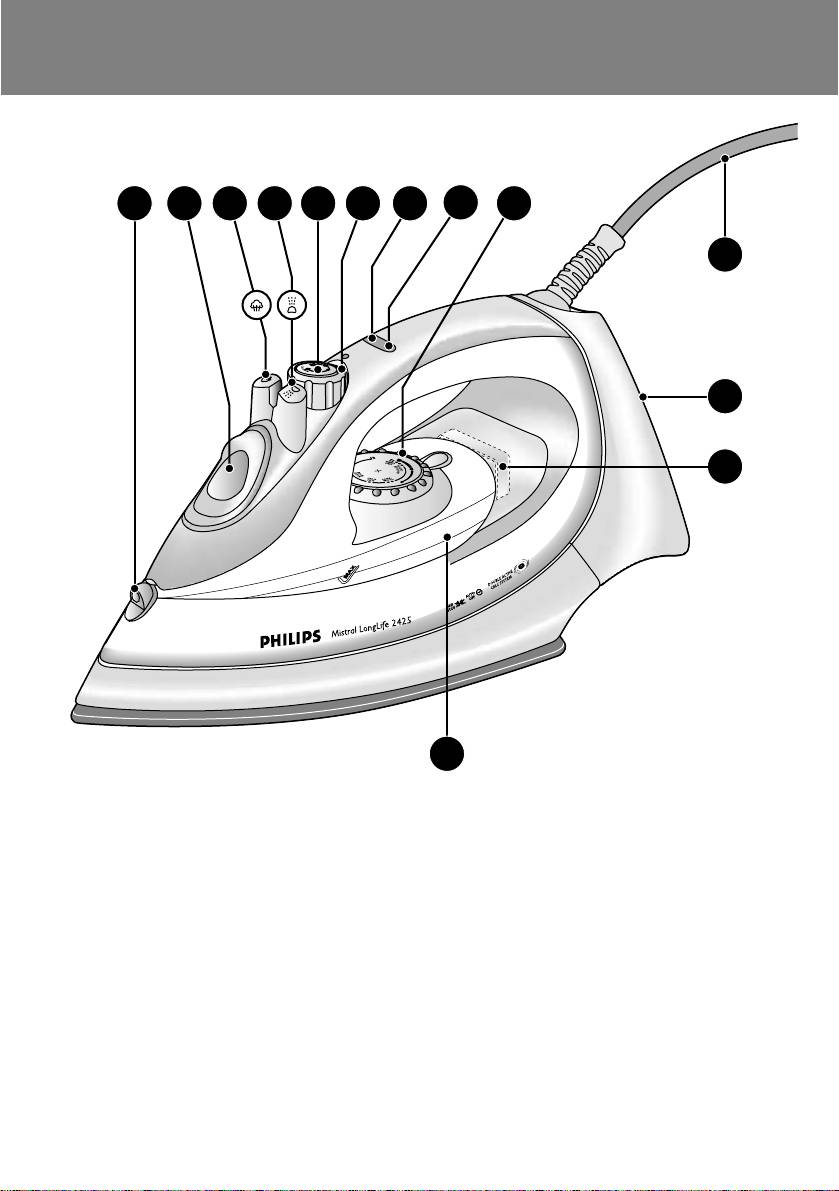
General description
A Spray nozzle
B Filling cap
(GC2425/2420/2415/GC2330/2326/2325/2320 only)
C Shot-of-steam button
(GC2425/2420/2415/GC2330/2326/2325/2320/2315/2310 only)
D Spray button T
E Steam control
- O = no steam
- Á = minimum steam
- q = moderate steam
(GC2425/2420/2415/GC2330/2326/2325/2320 only)
- w = maximum steam
- 1 = Calc-Clean function
F Extra-steam function (GC2305 only)
G Temperature light
H Automatic shut-off light (GC2425/GC2330 only)
I Temperature dial
J Mains cord
K Type plate
L Anti-calc tablet
M Water tank
Important
Read these instructions for use carefully before using the appliance and
save them for future reference.
◗ Check if the voltage indicated on the type plate corresponds to
the local mains voltage before you connect the appliance.
◗ Only connect the appliance to an earthed wall socket.
◗ Do not use the appliance if the plug, the cord or the appliance
itself shows visible damage, or if the appliance has been dropped
or is leaking.
◗ Check the cord regularly for possible damage.
◗ If the mains cord is damaged, it must be replaced by Philips, a
service centre authorised by Philips or similarly qualified persons
in order to avoid a hazard.
◗ Never leave the iron unattended when it is connected to the
mains.
◗ Never immerse the iron in water.
◗ Keep the appliance out of the reach of children.
◗ The soleplate of the iron can become extremely hot and may
cause burns if touched.
◗ Do not allow the cord to come into contact with the soleplate
when it is hot.
◗ Do not put perfume, vinegar, starch, descaling agents, ironing aids
or other chemicals in the water tank.
◗ When you have finished ironing, when you clean the appliance,
when you fill or empty the water tank and also when you leave
ENGLISH 7
the iron even for a short while: set the steam control to position
O, put the iron on its heel and remove the mains plug from the
wall socket.
◗ Place and use the iron on a stable ironing board or table.
◗ If a stand is provided with the appliance, ensure that the stand is
placed on a stable surface.
◗ This appliance is intended for household use only.
Preparing for use
Filling the water tank
1 Remove the mains plug from the wall socket.
2 Set the steam control to position O (= no steam).
C
3 Open the filling cap (specific types only).
4 Tilt the iron and fill the water tank up to maximum level.
C
Do not fill the water tank beyond the MAX indication.
5 Close the filling cap (click!) (specific types only).
If the tap water in your area is very hard, we advise you to use distilled
water. Do not use vinegar, starch or chemically descaled water.
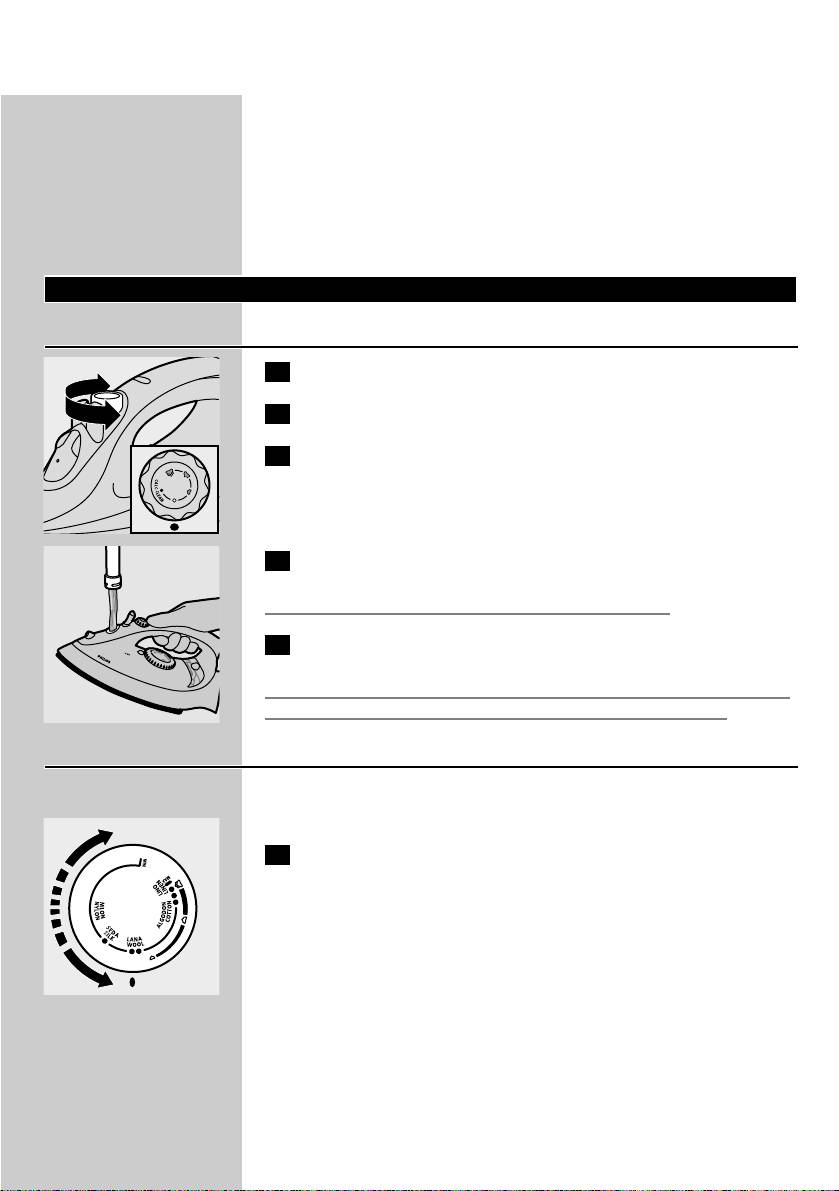
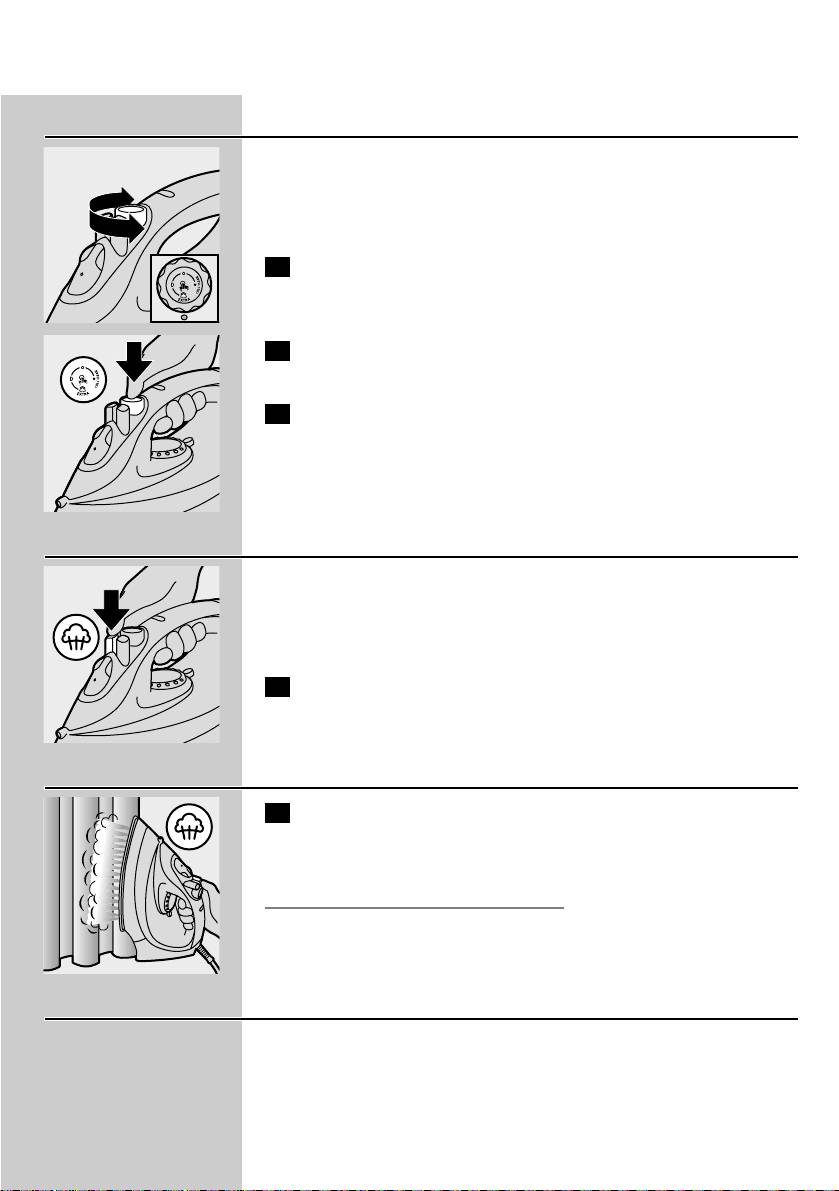
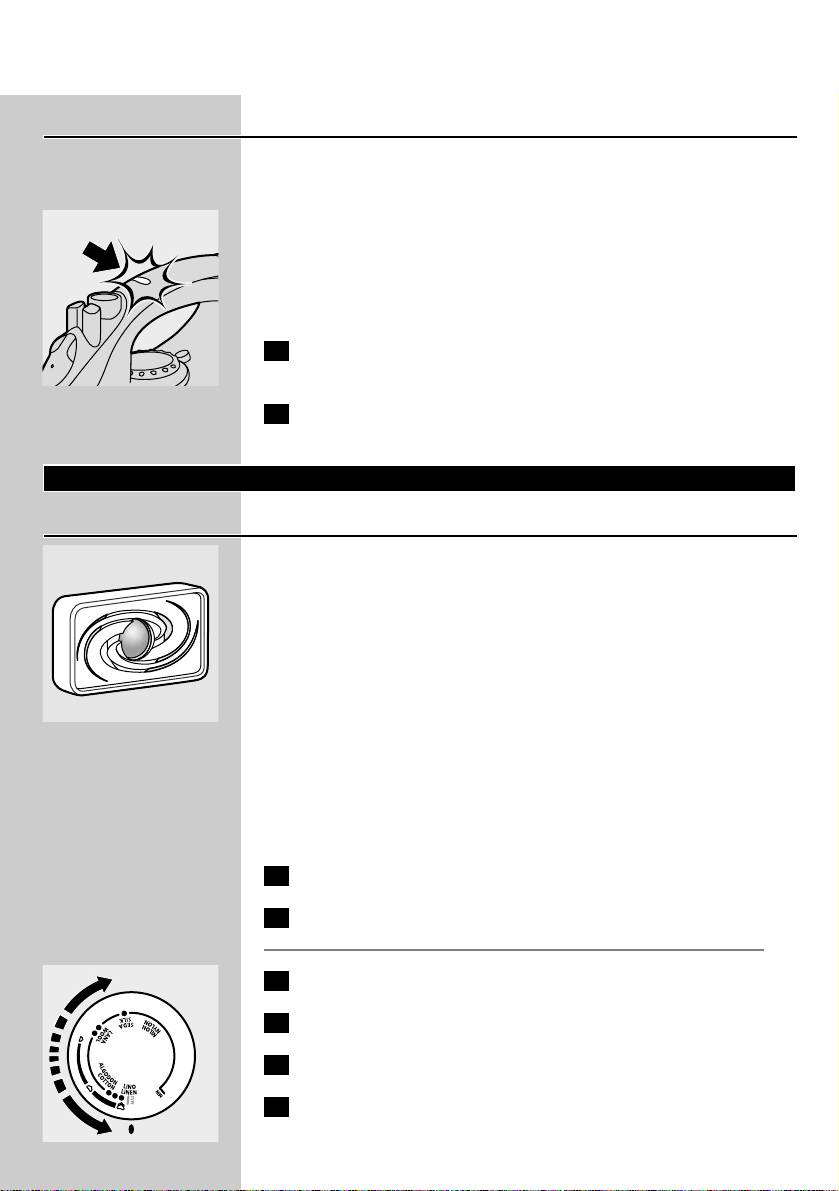
Setting the temperature
◗ The iron may give off some smoke when you use it for the first
time.This will cease after a short while.
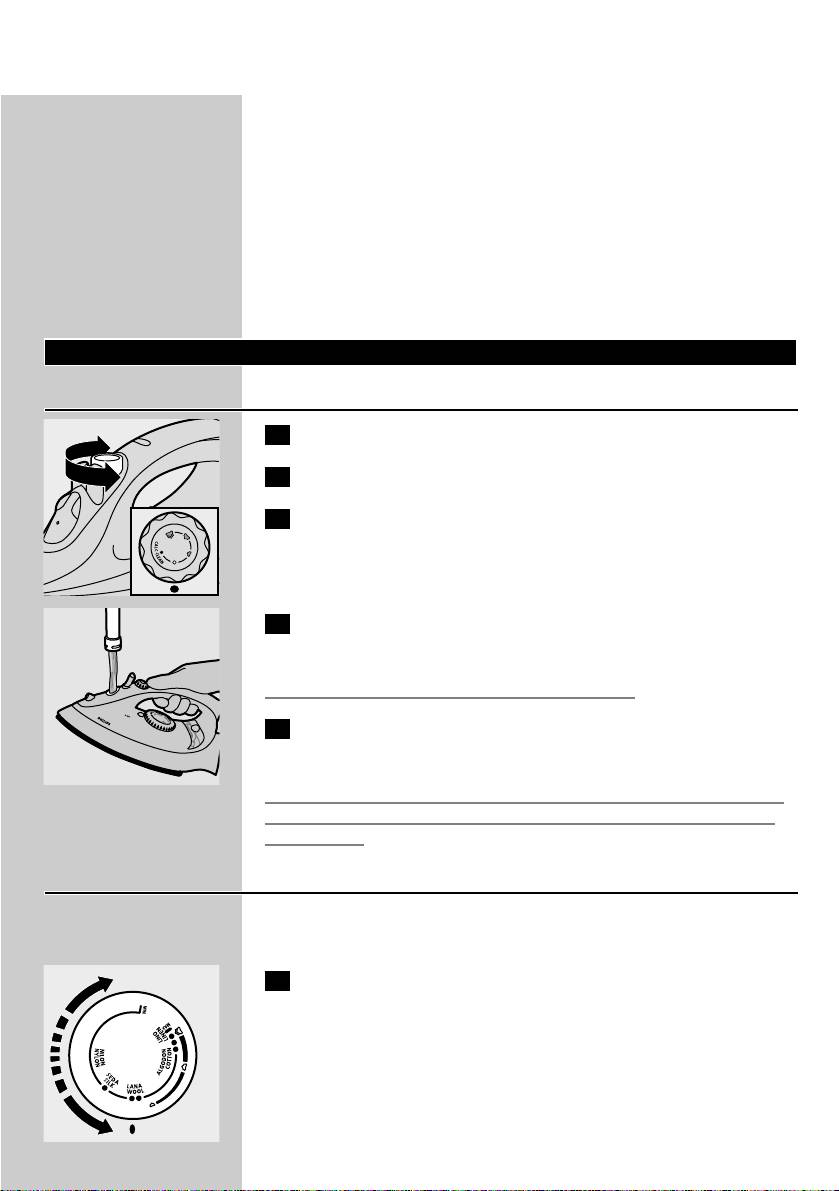
1 Put the iron on its heel and set the temperature dial to the
C
required ironing temperature by turning it to the appropriate
position.
- Check the garment label for the required ironing temperature.
- 1 Synthetic fabrics (e.g. acrylic, viscose, polyamide, polyester)
- 1 Silk
- 2 Wool
- 3 Cotton, linen
- If you do not know what kind or kinds of fabric an article is made of,
determine the right ironing temperature by ironing a part that will
not be visible when you wear or use the article.
- Silk, woollen and synthetic materials: iron the reverse side of the
fabric to prevent shiny patches. Avoid using the spray function to
prevent stains.
ENGLISH8
2 Put the mains plug in an earthed wall socket.
3 When the temperature light has gone out, wait a while before
you start ironing.
B
The temperature light will go on from time to time during ironing.
Using the appliance
Steam ironing
Make sure that there is enough water in the water tank.
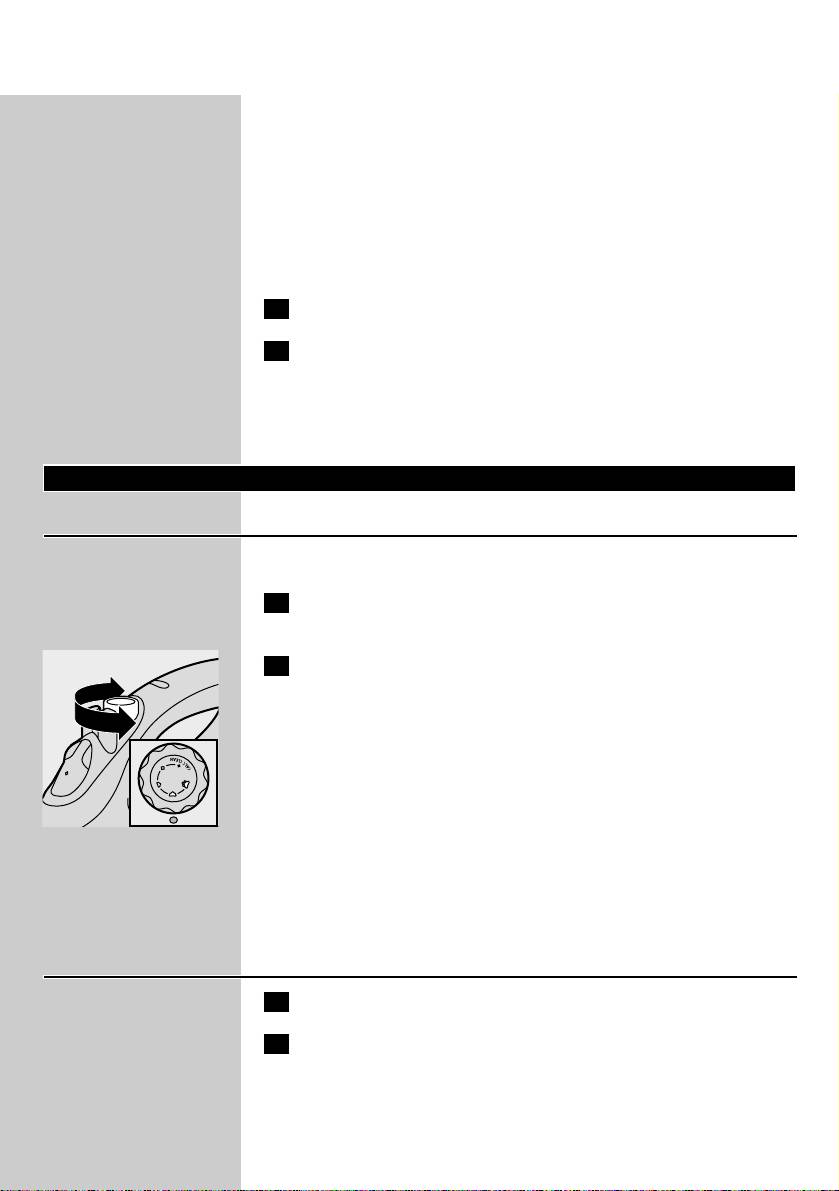
1 Set the temperature dial to the recommended position.
See 'Setting the temperature'.
2 Set the steam control to the appropriate steam position.
C
- Á for minimum steam (temperature settings 2 and 3).
- Ë for moderate steam (temperature settings 3 to MAX)
(specific types only).
- È for maximum steam (temperature settings 3 to MAX).
B
Steaming will start as soon as the set temperature has been reached.
GC2415/2320/2315/2310/2305 only:
Water may leak from the soleplate if the set temperature is too low
(MIN to 2).
Ironing without steam
1 Set the steam control to position O (= no steam).
2 Set the temperature dial to the recommended position.
See 'Setting the temperature'.
Features
Spraying
To remove stubborn creases at any temperature
1 Make sure that there is enough water in the water tank.
2 Press the spray button several times to moisten the garment to
C
be ironed.
ENGLISH 9
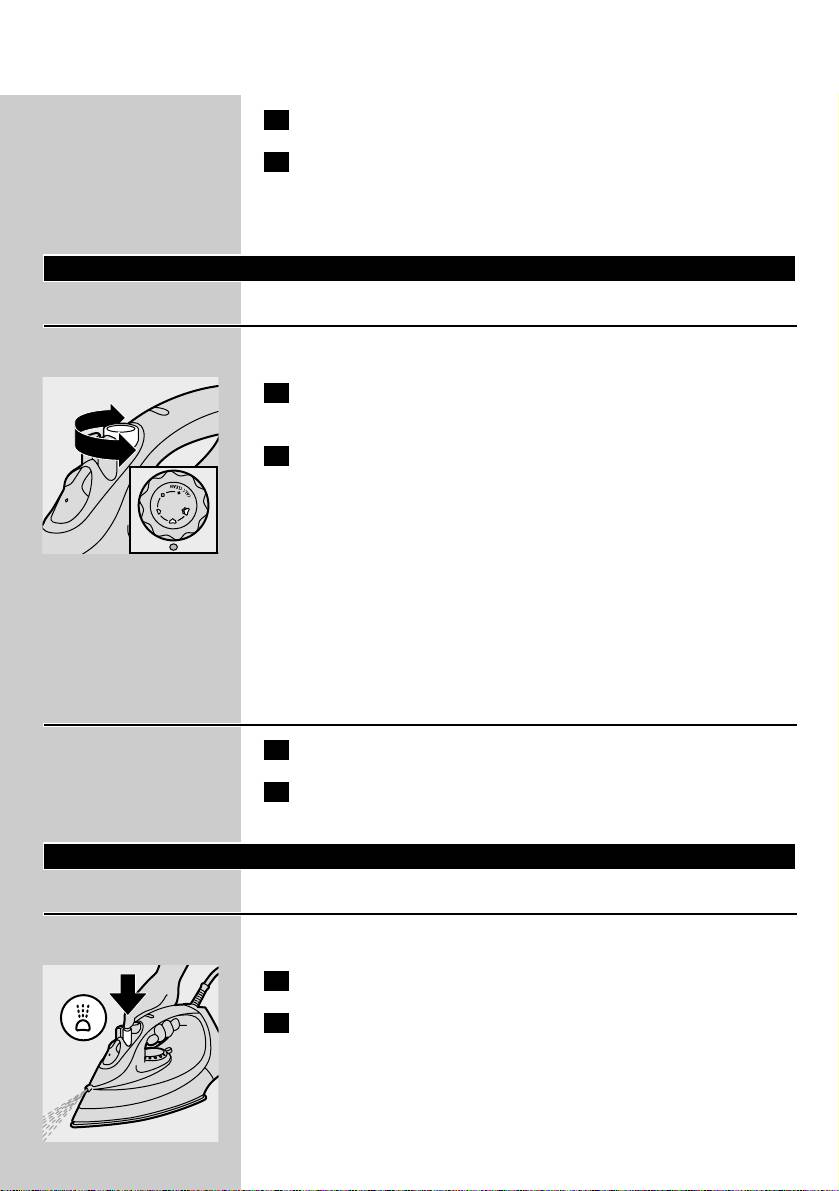
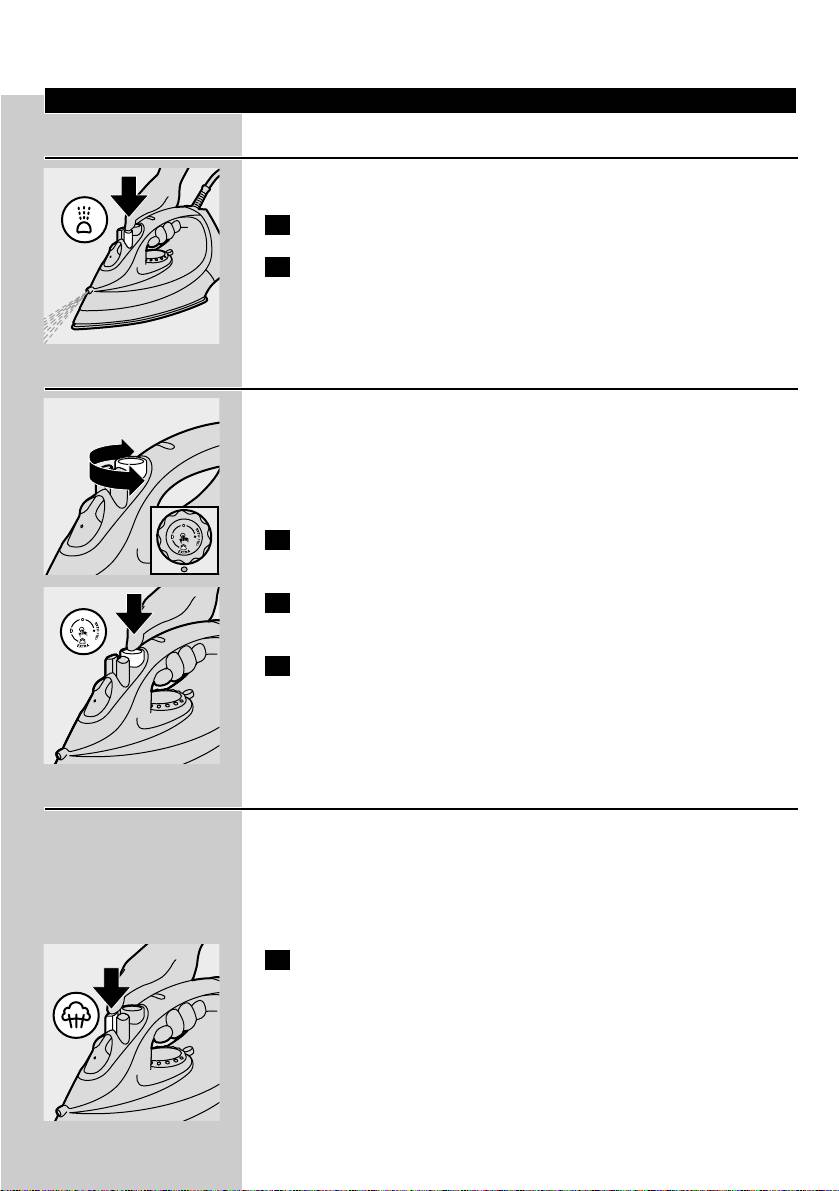
Extra Steam (GC2305 only)
This function provides extra steam to remove really stubborn creases.
The Extra Steam function only works at temperature settings between
3 and MAX.
1 Set the steam control to maximum position È.
C
2 Press and hold the Steam Control button down for max. 5
C
seconds.
3 Wait at least 1 minute before using Extra Steam again to
prevent water from dripping out of the soleplate.
Shot of Steam (specific types only)
A powerful shot of steam helps to remove very stubborn creases.
The Shot-of-Steam function only works at temperature settings
between 2 and MAX.
1 Press and release the Shot-of-Steam button.
C
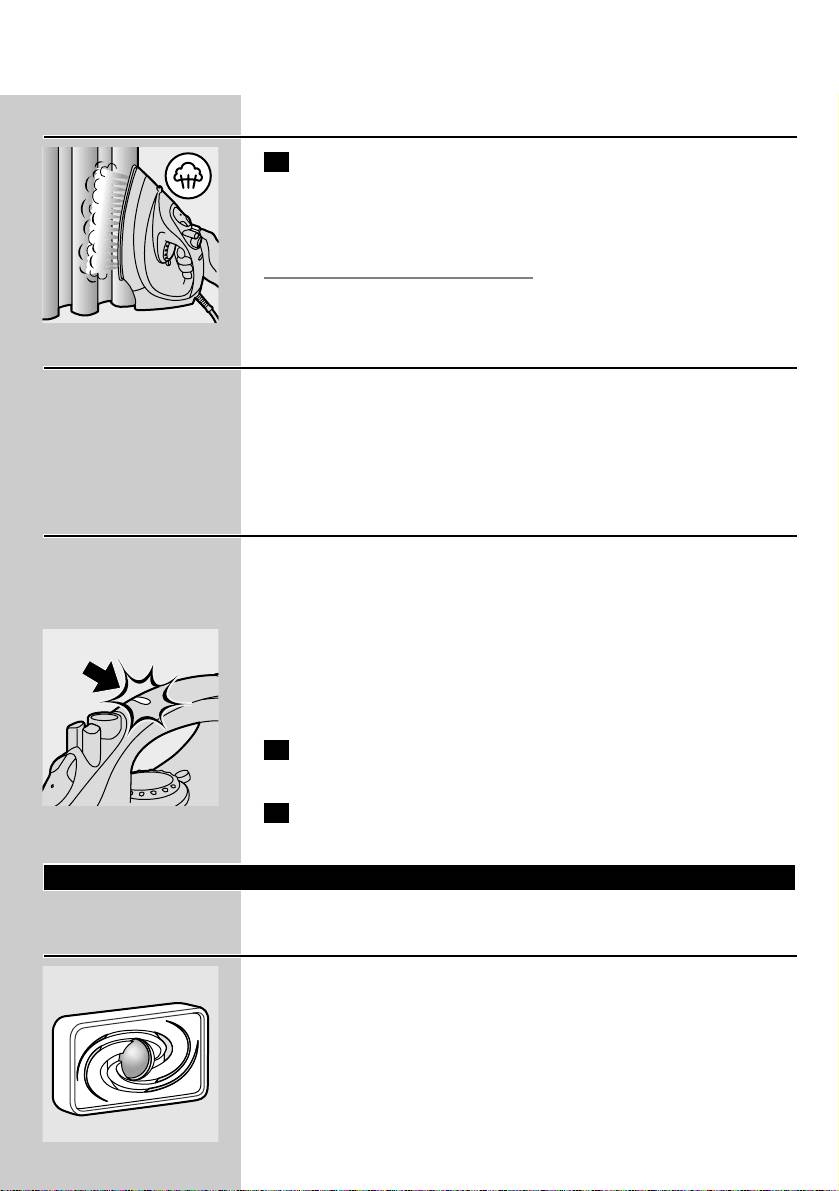
Vertical Shot of Steam (specific types only)
1 The Shot-of-Steam function can also be used when you are
C
holding the iron in vertical position.This is useful for removing
creases from hanging clothes, curtains, etc.
Never direct the steam towards people.
Drip stop (GC2425/2420/GC2330/2326/2325 only)
This iron is equipped with a drip stop function: the iron automatically
stops steaming when the temperature is too low to prevent water
from dripping out of the soleplate.When this happens you will hear a
click.
ENGLISH10
Automatic shut-off (GC2425/GC2330 only)
An electronic safety device will automatically switch the heating
element off if the iron has not been moved for a while.
◗ To indicate that the heating element has been switched off, the
C
automatic shut-off light will start blinking.
To heat up the iron again: pick it up or move it slightly.The automatic
shut-off light will go out.
1 If the temperature light goes on, wait for it to go out before
you start ironing.
2 If the temperature light does not go on, the iron is ready for
use.
Cleaning and maintenance
Double-Active Calc System
◗ The anti-calc tablet prevents scale from clogging the steam vents.
C
The tablet is constantly active and does not need to be replaced.
◗ The Calc-Clean function removes the scale particles.
Calc-Clean function
Use the Calc-Clean function once every two weeks. If the water in
your area is very hard (i.e. when flakes come out of the soleplate
during ironing), the Calc-Clean function should be used more
frequently.
1 Set the steam control to position O.
2 Fill the water tank to the maximum level.
Do not pour vinegar or other descaling agents into the water tank..
3 Set the temperature dial to MAX.
C
4 Put the plug in the wall socket.
5 Unplug the iron when the temperature light has gone out.
6 Hold the iron over the sink and set the steam control to
position 1 (Calc-Clean).The steam control knob will spring up
slightly.
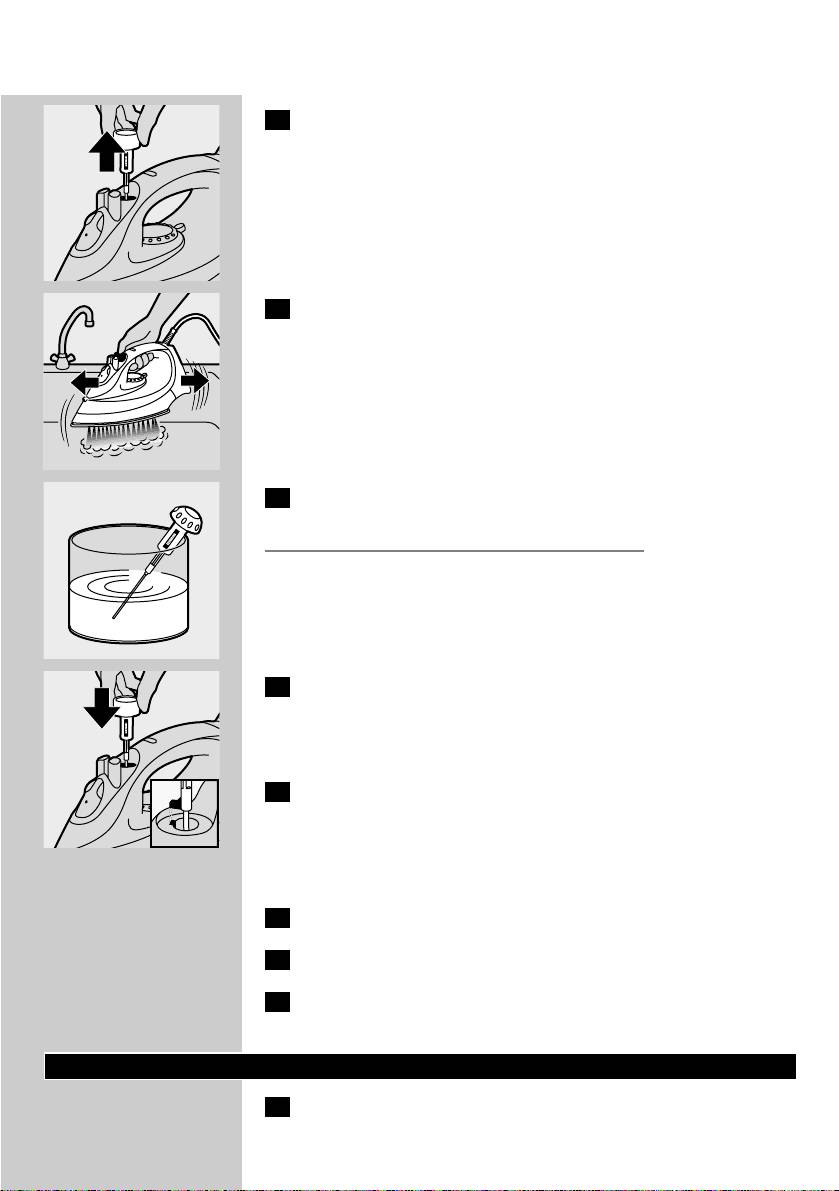
ENGLISH 11
7 Pull the steam control knob upwards to remove the steam
C
control needle.
8 Hold the iron over the sink and move it to and fro.
C
B
Steam and boiling water will come out of the soleplate. Impurities and
scale (if any) will be flushed out.
9 Use vinegar to remove scale, if any, from the needle.
C
Do not bend or damage the steam control needle.
10 Put the steam control needle back by inserting the point of the
C
needle exactly in the centre of the hole and by fitting the small
projection on the side of the needle into the slot. Set the
steam control knob to position O.
11 Repeat the Calc-Clean process if the iron still contains a lot of
impurities.
After the Calc-Clean process
1 Plug the iron in to let the soleplate dry up.
2 Unplug the iron when the temperature light has gone out.
3 Move the iron gently over a piece of used cloth to remove any
water stains that may have formed on the soleplate.
Storage
1 Remove the mains plug from the wall socket, let the iron cool
down and set the steam control to position O.
ENGLISH12
2 Clean the appliance and wipe scale and any other deposits off
the soleplate with a damp cloth and a non-abrasive (liquid)
cleaner.
Keep the soleplate smooth: avoid hard contact with metal objects.
Never use a scouring pad, vinegar or other chemicals.
3 Regurarly rinse the water tank with water and empty it after
C
cleaning.
4 Wind the mains cord round the cord storage facility.
C
5 Always store the iron standing on its heel in a safe and dry
place.
Environment
◗ Do not throw the appliance away with the normal household
C
waste at the end of its life, but hand it in at an official collection
point for recycling. By doing this you will help to preserve the
environment.
Guarantee & service
If you need information or if you have a problem, please visit the Philips
website at www.philips.com or contact the Philips Customer Care
Centre in your country (you will find its phone number in the
worldwide guarantee leaflet). If there is no Customer Care Centre in
your country, turn to your local Philips dealer or contact the Service
Department of Philips Domestic Appliances and Personal Care BV.

ENGLISH 13
Troubleshooting
This chapter summarises the most common problems you could encounter with your iron. Please
read the different sections for more details. If you are unable to solve the problem, please contact the
Philips Customer Care Centre in your country.
Problem
Possible cause(s)
Solution
The iron is plugged in but the soleplate
Connection problem
Check the mains cord, the plug and
is cold.
the wall socket.
Temperature dial set at MIN
Set the temperature dial to the
required position.
No steam
Not enough water in the water tank.
Fill the water tank (see 'Preparing for
use'; section 'Filling the watertank'.)
The steam control has been set to
Set the steam position to Á, Ë or È
position O.
(see 'Using the appliance', section
'Steam ironing').
The soleplate is not hot enough
Set the temperature dial to a position
and/or the drip stop function (specific
in the steam area (2 to MAX). Put
types only) has been activated.
the iron on its heel and wait until the
temperature light has gone out before
you start ironing.
No shot of steam or no Vertical Shot
The (Vertical) Shot of Steam function
Put the iron in horizontal position and
of Steam (specific types only).
has been used too often within a very
wait a while before using the (Vertical)
short period.
Shot of Steam function again.
The soleplate is not hot enough.
Set the temperature dial to a position
in the steam area (2 to MAX). Put
the iron on its heel and wait until the
temperature light has gone out before
you start ironing.
Flakes and impurities come out of the
Hard water forms flakes inside the
Use the Calc-Clean function a few
soleplate during ironing.
soleplate.
times (see 'Cleaning and maintenance',
section 'Calc-Clean').
Red light is blinking (GC2425 and
The automatic shut-off function has
Pick the iron up or move it slightly to
GC2330 only).
been activated (see 'Other features',
deactivate the automatic shut-off
section 'Automatic shut-off').
function: the red light will stop blinking.
Water droplets on fabric
The filling cap has not been closed
Press the filling cap until you hear a
(GC2425/2420/2415/GC2330/2326/2
properly.
click.
325/2320 only)
Water droplets on fabric
The temperature has been set too
Set the temperature dial to a position
(GC2415/2320/2315/2310/2305 only)
low.
in the steam area (2 to MAX). Put
the iron on its heel and wait until the
temperature light has gone out before
you start ironing.
Water drips from the soleplate after
The iron has been put in horizontal
Empty the water tank and set the
the iron has cooled down or has been
position while there was still water in
steam control to position O after use.
stored.
the water tank.
Store the iron on its heel.
POLSKI14
Opis urządzenia
A Dysza zraszająca
B Kapturek otworu do napełniania
(tylko dla modeli GC2425/2420/2415/GC2330/2326/2325/2320)
C Przycisk uderzenia pary (tylko dla modeli
GC2425/2420/2415/GC2330/2326/2325/2320/2315/2310)
D Przycisk zraszania T
E Regulator pary
- O = brak pary
- Á = minimalna ilość pary
- q = umiarkowana ilość pary
(tylko dla modeli GC2425/2420/2415/GC2330/2326/2325/2320)
- w = maksymalna ilość pary
- 1 = funkcja Calc-Clean - usuwania kamienia wapiennego
F Funkcja dodatkowej pary (tylko w modelu GC2305)
G Lampka sygnalizacyjna temperatury
H Lampka sygnalizacyjna automatycznego wyłączania
(tylko w modelach GC2425/GC2330)
I Pokrętło temperatury
J Przewód zasilający
K Tabliczka znamionowa
L Pastylka do systemu anti-calc
M Zbiornik na wodę
Ważne
Przed pierwszym użyciem urządzenia zapoznaj się dokładnie z
instrukcją jego obsługi i zachowaj ją na przyszłość, do ewentualnej
konsultacji.
◗ Przed podłączeniem urządzenia upewnij się, czy napięcie podane
na tabliczce znamionowej jest zgodne z napięciem w sieci
elektrycznej.
◗ Podłączaj urządzenie wyłącznie do gniazdka z uziemieniem.
◗ Nie używaj urządzenia jeśli wtyczka, przewód sieciowy lub żelazko
są uszkodzone albo jeśli żelazko spadło z wysokości lub przecieka
◗ Regularnie sprawdzaj, czy nie jest uszkodzony przewód zasilający.
◗ Jeśli przewód zasilający ulegnie uszkodzeniu, musi zostać
wymieniony w autoryzowanym punkcie serwisowym firmy Philips
lub przez osobę o podobnych kwalifikacjach, co pozwoli uniknąć
ewentualnego niebezpieczeństwa.
◗ Nigdy nie zostawiaj żelazka podłączonego do sieci bez nadzoru.
◗ Nigdy nie zanurzaj żelazka w wodzie.
◗ Przechowuj urządzenie w miejscu niedostępnym dla małych dzieci.
◗ Stopa żelazka może być bardzo rozgrzana i dotknięcie jej może
spowodować poparzenia.
◗ Nie pozwalaj, aby przewód stykał się z rozgrzaną stopą żelazka.
◗ Do zbiornika na wodę nie wlewaj perfum, octu, krochmalu,
środków odwapniających, środków ułatwiających prasowanie ani
żadnych innych środków chemicznych.
POLSKI 15
◗ Po skończeniu prasowania, podczas mycia żelazka, podczas
napełniania lub opróżniania zbiornika na wodę, a także gdy
zostawiasz żelazko choćby na krótką chwilę: ustaw regulator pary
na pozycję O, ustaw żelazko w pozycji pionowej i wyjmij wtyczkę
z gniazdka ściennego.
◗ Trzymaj i używaj żelazko na stabilnej desce do prasowania lub na
stole
◗ Jeśli na wyposażeniu żelazka jest podstawka, pamietak aby stawiać
ją na stabilnej powierzchni.
◗ Urządzenie to przeznaczone jest wyłącznie do użytku domowego.
Przygotowanie do użycia
Napełnianie zbiornika na wodę
1 Wyjmij wtyczkę z gniazdka ściennego.
2 Ustaw regulator pary na pozycję 0 (= brak pary).
C
3 Zdejmij kapturek z otworu do napełniania (tylko w niektórych
modelach).
4 Przechyl żelazko i napełnij zbiornik na wodę do maksymalnego
C
poziomu.
Nie napełniaj zbiornika powyżej oznaczenia MAX.
5 Zamknij kapturkiem otwór do napełniania (usłyszysz
charakterystyczne "kliknięcie") (tylko w niektórych modelach).
Jeśli w twojej okolicy woda z kranu jest bardzo twarda, radzimy używa
wody destylowanej. Nie stosuj octu, krochmalu, ani wody chemicznie
odwapnionej.
Ustawianie temperatury
◗ Podczas pierwszego użycia, z żelazka może wydostawać się dym.
Zjawisko to ustanie po krótkiej chwili.
1 Ustaw żelazko na jego pięcie i nastaw pokrętło regulatora
C
temperatury na żądaną temperaturę prasowania, obracając nim
do odpowiedniej pozycji.
- Sprawdź informacje na temat prasowania na metce ubrania.
- 1 Tkaniny syntetyczne (np. akryl, wiskoza, poliamid, poliester)
- 1 Jedwab
- 2 Wełna
- 3 Bawełna, len
POLSKI16
- Jeśli nie znasz rodzaju (lub rodzajów) materiału, z którego wykonana
jest prasowana sztuka, ustal właściwą temperaturę prasowania,
prasując taką jej część, która będzie niewidoczna podczas noszenia
czy używania.
- Jedwab, mieszanki wełniane i materiały syntetyczne: aby nie dopuścić
do powstawania błyszczących plam, prasuj tkaniny na lewej stronie.
Unikaj używania funkcji zraszania, żeby podczas prasowania nie
powstawały plamy.
2 Włącz wtyczkę do uziemionego gniazdka.
3 Gdy zgaśnie lampka kontrolna temperatury, zaczekaj jeszcze
chwilę, zanim zaczniesz prasować.
B
Podczas prasowania lampka kontrolna temperatury będzie się od czasu
do czasu zapalała.
Korzystanie z urządzenia
Prasowanie parowe
Upewnij się, czy w zbiorniku jest wystarczająca ilość wody.
1 Ustaw termostat na zalecaną pozycję.
Patrz rozdział "Ustawianie temperatury".
2 Ustaw regulator pary na odpowiednią pozycję.
C
- Á dla minimalnej ilości pary (ustawienia temperatury: 2 oraz 3)
- Ë dla umiarkowanej ilości pary (ustawienia temperatury: od 3
do MAX) (tylko w niektórych modelach).
- È dla maksymalnej ilości pary (ustawienia temperatury: 3 do
wartości MAX)
B
Para zacznie się wydobywać, gdy tylko zostanie osiągnięta wybrana
temperatura.
Tylko w modelach GC2415/2320/2315/2310/2305:
Jeśli nastawiona temperatura jest zbyt niska (pomiędzy MIN a 2),
wówczas ze stopy prasującej może wyciekać woda.
Prasowanie bez pary
1 Ustaw regulator pary w położeniu O (= bez pary).
2 Ustaw termostat na zalecaną pozycję.
Patrz rozdział "Ustawianie temperatury".
POLSKI 17
Cechy
Spryskiwanie
Usuwa uporczywe zagniecenia przy każdej temperaturze prasowania.
1 Upewnij się, czy w zbiorniku jest wystarczająca ilość wody.
2 Aby zwilżyć prasowaną sztukę odzieży, kilkakrotnie wciśnij
C
przycisk zraszania.
Dodatkowa ilość pary (tylko w modelu GC2305)
Funkcja ta zapewnia dostarczenie dodatkowej pary w celu usunięcia
wyraźnie uporczywych zgnieceń.
Funkcja dodatkowej pary działa tylko przy ustawieniach temperatury
od 3 do maksymalnej.
1 Ustaw pokrętło regulatora temperatury w maksymalnym
C
położeniu È.
2 Wciśnij i przytrzymaj pokrętło regulacji pary nie dłużej niż
C
przez 5 sekund.
3 Odczekaj co najmniej 1 minutę przed ponownym użyciem
funkcji dodatkowej pary (Extra Steam), aby ze stopy prasującej
nie skapywała woda.
Uderzenie pary (tylko w niektórych modelach).
Energiczne uderzenie pary pozwala usunąć najbardziej uporczywe
zgniecenia.
Funkcja ta działa tylko przy ustawieniach temperatury od 2 do
maksymalnej.
1 Wciśnij i zwolnij przycisk "uderzenie parowe".
C
POLSKI18
Pionowe uderzenie pary (tylko w niektórych modelach)
1 Funkcji uderzenia pary można używać również wtedy, gdy
C
żelazko znajduje się w pozycji pionowej. Jest to praktyczne w
przypadku usuwania zgnieceń na wiszących ubraniach,
zasłonach, itd.
Nigdy nie kieruj pary w stronę ludzi.
Zapobieganie skapywaniu wody
(tylko w modelach GC245/2420/GC2330/ 2326/2325)
Modele te zostały wyposażone w funkcje zapobiegającą kapaniu:
żelazko automatycznie zatrzymuje wytwarzanie pary, jeśli temperatura
jest za niska. Dzięki temu woda nie kapie spod stopy żelazka.W chwili
uaktywnienia tej funkcji usłyszysz kliknięcie.
Automatyczne wyłączanie
(tylko w modeluach GC2425/GC2330)
Elektoniczne zabezpieczenie automatycznie wyłącza żelazko, gdy nie jest
ono w ruchu przez jakiś czas.
◗ Aby zasygnalizować wyłączenie grzałki, zacznie migotać lampka
C
kontrolna automatycznego wyłączania.
Aby ponownie podgrzać żelazko, podnieś je lub lekko nim przesuń.
Zgaśnie lampka kontrolna automatycznego wyłączania.
1 Jeśli zaświeci się lampka kontrolna temperatury, wówczas
zaczekaj, aż zgaśnie, i dopiero wtedy zacznij prasować.
2 Jeśli lampka temperatury nie zaświeci się, będzie to oznaczać,
że żelazko jest gotowe do prasowania.
Mycie i konserwacja
Podwójny system zapobiegania tworzeniu się osadów
wapiennych
◗ Pastylka do systemu anti-calc zapobiega zatykaniu przez kamień
C
kotłowy otworów wylotu pary. Pastylka jest wciąż aktywna i nie
trzeba jej wymieniać.
◗ Funkcja Calc-Clean usuwa cząstki kamienia wapiennego.
Funkcja antywapienna Calc-Clean
Korzystaj z tej funkcji raz na dwa tygodnie. Jeśli woda w Twoim rejonie
jest bardzo twarda (tzn. jeśli podczas prasowania spod stopy żelazka
wydostają się osady), używaj tej funkcji częściej.
POLSKI 19
1 Ustaw pokrętło regulatora pary w położeniu O.
2 Napełnij zbiornik na wodę do poziomu MAX.
Nie wlewaj do zbiornika na wodę octu ani innych substancji
odkamieniających.
3 Ustaw termostat na pozycję MAX.
C
4 Włącz wtyczkę do gniazdka ściennego.
5 Odłącz żelazko od sieci z chwilą, gdy zgaśnie lampka kontrolna
temperatury.
6 Przenieś żelazko nad zlew i ustaw regulator pary w położeniu
1 (Calc-Clean). Pokrętło regulacji pary nieznacznie sprężyście
uniesie się.
7 Pociągnij ku górze pokrętło regulacji pary, aby wyjąć igłę
C
regulacji pary.
8 Trzymaj żelazko nad zlewem i poruszaj nim ruchem
C
wahadłowym.
B
Para i wrzątek będą wydobywać się ze stopy żelazka.W ten sposób
resztki kamienia lub innych zanieczyszczeń zostaną wypłukane.
9 Do usunięcia z igły ewentualnego kamienia wapiennego użyj
C
octu.
Nie zginaj ani nie uszkodź igły pokrętła pary.
10 Włóż igłę z powrotem, umieszczając ją dokładnie pośrodku
C
otworu i wpasowując mały występ w boku igły w zagłębienie.
Ustaw pokrętło pary na pozycję O.
11 Jeśli żelazko nadal jest zanieczyszczone kamieniem, powtórz
całą procedurę.
Po usunięciu kamienia
1 Aby wysuszyć stopę prasującą żelazka, podłącz je do sieci.
POLSKI20
2 Odłącz żelazko od sieci z chwilą, gdy zgaśnie lampka kontrolna
temperatury.
3 Przesuwaj żelazko delikatnie po kawałku zużytego materiału,
by usunąć pozostałości wody, które mogłyby poplamić inne
tkaniny.
Przechowywanie
1 Wyjmij wtyczkę z gniazdka sieciowego, odczekaj, aż żelazko się
ostudzi i ustaw regulator pary w pozycji O.
2 Używając wilgotnej szmatki i niezawierającego elementów
ściernych (płynnego) środka czyszczącego, oczyść żelazko i
zetrzyj z jego stopy kamień oraz wszelkie pozostałe osady.
Dbaj, by stopa żelazka była gładka: unikaj kontaktu z ostrymi
przedmiotami.
Nigdy nie używaj szorujących zmywaków, octu ani innych chemikaliów.
3 Regularnie płucz zbiornik wodą i opróżniaj go po oczyszczeniu.
C
4 Owiń przewód zasilający wokół specjalnych wsporników.
C
5 Przechowuj żelazko w pozycji pionowej, w suchym i
bezpiecznym miejscu.
Ochrona środowiska
◗ Nie wyrzucaj zużytego urządzenia wraz ze zwykłymi
C
odpadkami/śmieciami. Zanieś je do specjalnego punktu
zbierającego odpadki do utylizacji w celu ich utylizacji.W ten
sposób pomożesz chronić środowisko naturalne.
Gwarancja i serwis
Jeśli chcesz skorzystać z serwisu lub potrzebujesz informacji, bądź jeśli
masz jakiś problem, odwiedź naszą stronę w Internecie: www.philips.pl
lub skontaktuj się z Działem Obsługi Klienta firmy Philips
(numer telefonu znajdziesz w ulotce gwarancyjnej).
