Pioneer SEP-C1: instruction
Class: Audio and DJ Equipment
Type:
Manual for Pioneer SEP-C1
Table of contents
- IMPORTANT
- Operating Environment We Want You Listening For A Lifetime
- FEATURES
- FEATURES
- SPECIFICATIONS COMFIRM ACCESSORIES
- INSTALLATION GUIDELINES
- CONNECTIONS
- PARTS AND THEIR FUNCTIONS
- PARTS AND THEIR FUNCTIONS Center Display
- PARTS AND THEIR FUNCTIONS Display A/Display B
- ABOUT DJS SOFTWARE SOFTWARE END USER LICENSE AGREEMENT
- ABOUT DJS SOFTWARE SYSTEM REQUIREMENTS (Minimum Operating Environment) COPYRIGHT WARNING
- INSTALLING DJS SOFTWARE NOTES REGARDING TRIAL PERIOD AND USER REGISTRATION
- ABOUT DJS SOFTWARE REGARDING ONLINE SUPPORT DISCLAIMER
- ABOUT THE DRIVER PROGRAM SOFTWARE END USER LICENSE AGREEMENT DRIVER INSTALLATION
- ABOUT THE DRIVER PROGRAM
- ABOUT THE DRIVER PROGRAM
- USING DJ SOFTWARE
- PREPARING YOUR DJ SOFTWARE PROGRAM CONTROLLING YOUR COMPUTER USING THE DEDICATED COMMUNICATIONS PROTOCOL
- USING DJ SOFTWARE USING MIDI FOR COMPUTER CONTROL
- MIDI MESSAGE TABLE
- USING DJ SOFTWARE
- USING THE UTILITY
- USING THE UTILITY TO PERFORM A FACTORY RESET
- TROUBLESHOOTING ABOUT THE LCD SCREEN ABOUT OEL (ORGANIC EL) SCREENS
- DISCLAIMER
SEP-C1_EN.book 1 ページ 2008年4月22日 火曜日 午後5時26分
SOFTWARE ENTERTAINMENT CONTROLLER
CONTRÔLEUR POUR LOGICIEL DE MIX DJ
SOFTWARE-UNTERHALTUNGS-STEUERGERÄT
UNITÀ DI CONTROLLO PER SOFTWARE D’INTRATTENIMENTO
SOFTWARE-ENTERTAINMENT BEDIENINGSEENHEID
CONTROLADOR DE SOFTWARE MULTIMEDIA
ПРОГРАММНЫЙ РАЗВЛЕКАТЕЛЬНЫЙ ПУЛЬТ
SEP-C1
Operating Instructions
Mode d’emploi
Bedienungsanleitung
Istruzioni per l’uso
Handleiding
Manual de instrucciones
SEP-C1_EN.book 2 ページ 2008年3月24日 月曜日 午前10時52分
Thank you for buying this Pioneer product.
Please read through these operating instructions so you will know how to operate your model properly. After you have finished reading
the instructions, put them away in a safe place for future reference.
In some countries or regions, the shape of the power plug and power outlet may sometimes differ from that shown in the explanatory
drawings. However the method of connecting and operating the unit is the same.
K015 En
WARNING
IMPORTANT
This equipment is not waterproof. To prevent a fire
or shock hazard, do not place any container filled
CAUTION
with liquid near this equipment (such as a vase or
RISK OF ELECTRIC SHOCK
flower pot) or expose it to dripping, splashing, rain
DO NOT OPEN
or moisture.
D3-4-2-1-3_B_En
The lightning flash with arrowhead symbol,
CAUTION:
The exclamation point within an equilateral
within an equilateral triangle, is intended to
TO PREVENT THE RISK OF ELECTRIC
triangle is intended to alert the user to the
IMPORTANT NOTICE
– THE SERIAL NUMBER FOR
alert the user to the presence of uninsulated
SHOCK, DO NOT REMOVE COVER (OR
presence of important operating and
THIS EQUIPMENT IS LOCATED ON THE BOTTOM.
"dangerous voltage" within the product's
BACK). NO USER-SERVICEABLE PARTS
maintenance (servicing) instructions in the
PLEASE WRITE THIS SERIAL NUMBER ON YOUR
enclosure that may be of sufficient
INSIDE. REFER SERVICING TO QUALIFIED
literature accompanying the appliance.
magnitude to constitute a risk of electric
SERVICE PERSONNEL.
ENCLOSED WARRANTY CARD AND KEEP IN A
shock to persons.
SECURE AREA. THIS IS FOR YOUR SECURITY.
D3-4-2-1-1_En-A
D1-4-2-6-1_En
Information to User
Alteration or modifications carried out without
appropriate authorization may invalidate the user’s
right to operate the equipment.
D8-10-2_En
1)
Read these instructions.
11)
Only use attachments/accessories
CAUTION: This product satisfies FCC regulations
2)
Keep these instructions.
specified by the manufacturer.
when shielded cables and connectors are used to
3)
Heed all warnings.
12)
Use only with the cart, stand, tripod,
connect the unit to other equipment. To prevent
4)
Follow all instructions.
bracket, or table specified by the
electromagnetic interference with electric appliances
such as radios and televisions, use shielded cables
5)
Do not use this apparatus near water.
manufacturer, or sold with the apparatus.
and connectors for connections.
D8-10-3a_En
6)
Clean only with dry cloth.
When a cart is used, use caution when
7)
Do not block any ventilation openings.
moving the cart/apparatus combination to
This Class B digital apparatus complies with
Install in accordance with the
avoid injury from tip-over.
Canadian ICES-003.
manufacturer’s instructions.
Cet appareil numérique de la Classe B est conforme
8)
Do not install near any heat sources such
à la norme NMB-003 du Canada.
D8-10-1-3_EF
as radiators, heat registers, stoves,
WARNING: Handling the cord on this product or
or other apparatus (including amplifiers)
cords associated with accessories sold with the
that produce heat.
product will expose you to chemicals listed on
9)
Do not defeat the safety purpose of the
proposition 65 known to the State of California and
polarized or grounding-type plug.
other governmental entities to cause cancer and
birth defect or other reproductive harm.
A polarized plug has two blades with one
13)
Unplug this apparatus during lightning
Wash hands after handling
D36-P4_A_En
wider than the other. A grounding type
storms or when unused for long periods of
plug has two blades and a third grounding
time.
WARNING
prong. The wide blade or the third prong
14)
Refer all servicing to qualified service
To prevent a fire hazard, do not place any naked
flame sources (such as a lighted candle) on the
are provided for your safety. If the provided
personnel. Servicing is required when the
equipment.
D3-4-2-1-7a_A_En
plug does not fit into your outlet, consult
apparatus has been damaged in any way,
an electrician for replacement of the
such as power-supply cord or plug is
VENTILATION CAUTION
obsolete outlet.
damaged, liquid has been spilled or
When installing this unit, make sure to leave space
around the unit for ventilation to improve heat
10)
Protect the power cord from being walked
objects have fallen into the apparatus, the
radiation (at least 5 cm at rear, and 3 cm at each
on or pinched particularly at plugs,
apparatus has been exposed to rain or
side).
convenience receptacles, and the point
moisture, does not operate normally, or
WARNING
Slots and openings in the cabinet are provided for
where they exit from the apparatus.
has been dropped.
P1-4-2-2_En
ventilation to ensure reliable operation of the
product, and to protect it from overheating. To
prevent fire hazard, the openings should never be
NOTE: This equipment has been tested and found to comply with the limits for a Class B digital device, pursuant to
blocked or covered with items (such as newspapers,
Part 15 of the FCC Rules. These limits are designed to provide reasonable protection against harmful interference in
table-cloths, curtains) or by operating the
a residential installation. This equipment generates, uses, and can radiate radio frequency energy and, if not
equipment on thick carpet or a bed.
D3-4-2-1-7b_A_En
installed and used in accordance with the instructions, may cause harmful interference to radio communications.
However, there is no guarantee that interference will not occur in a particular installation. If this equipment does
This product complies with the Low Voltage Directive
cause harmful interference to radio or television reception, which can be determined by turning the equipment off
2006/95/EC and EMC Directive 2004/108/EC.
and on, the user is encouraged to try to correct the interference by one or more of the following measures:
D3-4-2-1-9a_A_En
– Reorient or relocate the receiving antenna.
– Increase the separation between the equipment and receiver.
– Connect the equipment into an outlet on a circuit different from that to which the receiver is connected.
– Consult the dealer or an experienced radio/TV technician for help.
D8-10-1-2_En
If you want to dispose this product, do not mix it with general household waste. There is a separate collection system for used
electronic products in accordance with legislation that requires proper treatment, recovery and recycling.
Private households in the member states of the EU, in Switzerland and Norway may return their used electronic products free of charge to
designated collection facilities or to a retailer (if you purchase a similar new one).
For countries not mentioned above, please contact your local authorities for the correct method of disposal.
By doing so you will ensure that your disposed product undergoes the necessary treatment, recovery and recycling and thus prevent potential
negative effects on the environment and human health.
K058_A_En
Operating Environment
We Want You Listening For A Lifetime
Operating environment temperature and humidity:
+5 ºC – +35 ºC (+41 ºF – +95 ºF); less than 85 %RH
Used wisely, your new sound equipment will
provide a lifetime of fun and enjoyment. Since
(cooling vents not blocked)
hearing damage from loud noise is often
Do not install this unit in a poorly ventilated area, or in
undetectable until it is too late, this manufacturer
locations exposed to high humidity or direct sunlight (or
and the Electronic Industries Association’s
Selecting fine audio equipment such as the unit
Consumer Electronics Group recommend you avoid
strong artificial light)
D3-4-2-1-7c_A_En
you’ve just purchased is only the start of your
prolonged exposure to excessive noise. This list of
musical enjoyment. Now it’s time to consider how
sound levels is included for your protection.
you can maximize the fun and excitement your
equipment offers. This manufacturer and the
Decibel
Electronic Industries Association’s Consumer
Level Example
Electronics Group want you to get the most out of
your equipment by playing it at a safe level. One that
30 Quiet library, soft whispers
lets the sound come through loud and clear without
40
Living room, refrigerator, bedroom away from traffic
annoying blaring or distortion-and, most importantly,
50 Light traffic, normal conversation, quiet office
without affecting your sensitive hearing.
60 Air conditioner at 20 feet, sewing machine
70 Vacuum cleaner, hair dryer, noisy restaurant
Sound can be deceiving. Over time your hearing
80
Average city traffic, garbage disposals, alarm clock
“comfort level” adapts to higher volumes of sound.
at two feet.
So what sounds “normal” can actually be loud and
harmful to your hearing. Guard against this by
THE FOLLOWING NOISES CAN BE DANGEROUS
setting your equipment at a safe level BEFORE your
UNDER CONSTANT EXPOSURE
hearing adapts.
90
Subway, motorcycle, truck traffic, lawn mower
To establish a safe level:
100 Garbage truck, chain saw, pneumatic drill
• Start your volume control at a low setting.
120 Rock band concert in front of speakers,
• Slowly increase the sound until you can hear it
thunderclap
comfortably and clearly, and without distortion.
140 Gunshot blast, jet plane
180 Rocket launching pad
Once you have established a comfortable sound
level:
Information courtesy of the Deafness Research Foundation.
• Set the dial and leave it there.
Taking a minute to do this now will help to prevent
hearing damage or loss in the future. After all, we
want you listening for a lifetime.
S001_En
FEDERAL COMMUNICATIONS COMMISSION DECLARATION OF CONFORMITY
This device complies with part 15 of the FCC Rules. Operation is subject to the following two conditions: (1) This
device may not cause harmful interference, and (2) this device must accept any interference received, including
interference that may cause undesired operation.
Product Name: SOFTWARE ENTERTAINMENT CONTROLLER
Model Number: SEP-C1
Responsible Party Name:
PIONEER ELECTRONICS SERVICE, INC.
Address: 1925 E. DOMINGUEZ ST. LONG BEACH, CA 90801-1760, U.S.A.
Phone: 1-800-421-1404
When using this product follow the instructions
written on the underside of the unit, which
concern rated voltage, etc.
D3-4-2-2-4_En
SEP-C1_EN.book 3 ページ 2008年3月24日 月曜日 午前10時52分

CONTENTS
CONTENTS
FEATURES ....................................................................5
SPECIFICATIONS ..........................................................7
COMFIRM ACCESSORIES.............................................7
INSTALLATION GUIDELINES........................................8
CONNECTIONS.............................................................9
PARTS AND THEIR FUNCTIONS..................................10
FRONT PANEL ............................................................................. 10
REAR PANEL ............................................................................... 12
ABOUT DJS SOFTWARE .............................................13
SOFTWARE END USER LICENSE AGREEMENT....................... 13
COPYRIGHT WARNING............................................................... 14
SYSTEM REQUIREMENTS (Minimum Operating
Environment)................................................................................ 14
INSTALLING DJS SOFTWARE .................................................... 15
NOTES REGARDING TRIAL PERIOD AND USER
REGISTRATION ............................................................................ 15
REGARDING ONLINE SUPPORT................................................ 16
DISCLAIMER ................................................................................ 16
ABOUT THE DRIVER PROGRAM.................................17
SOFTWARE END USER LICENSE AGREEMENT....................... 17
DRIVER INSTALLATION .............................................................. 17
USING DJ SOFTWARE ................................................20
PREPARING YOUR DJ SOFTWARE PROGRAM ....................... 21
CONTROLLING YOUR COMPUTER USING THE DEDICATED
COMMUNICATIONS PROTOCOL............................................... 21
USING MIDI FOR COMPUTER CONTROL ................................. 22
MIDI MESSAGE TABLE ............................................................... 23
USING THE UTILITY....................................................25
SETTING METHOD....................................................................... 25
SETTINGS ..................................................................................... 25
TO PERFORM A FACTORY RESET ............................................. 26
TROUBLESHOOTING...................................................27
ABOUT THE LCD SCREEN.......................................................... 27
ABOUT OEL (ORGANIC EL) SCREENS...................................... 27
SEP-C1 UPDATES........................................................................ 27
DISCLAIMER ..............................................................28
4
En
http://www.prodjnet.com/support/
The Pioneer website listed above provides answers to frequently
asked questions, information about software, and other up-to-date
data of assistance to our customers.
SEP-C1_EN.book 4 ページ 2008年3月24日 月曜日 午前10時52分
SEP-C1_EN.book 5 ページ 2008年3月24日 月曜日 午前10時52分
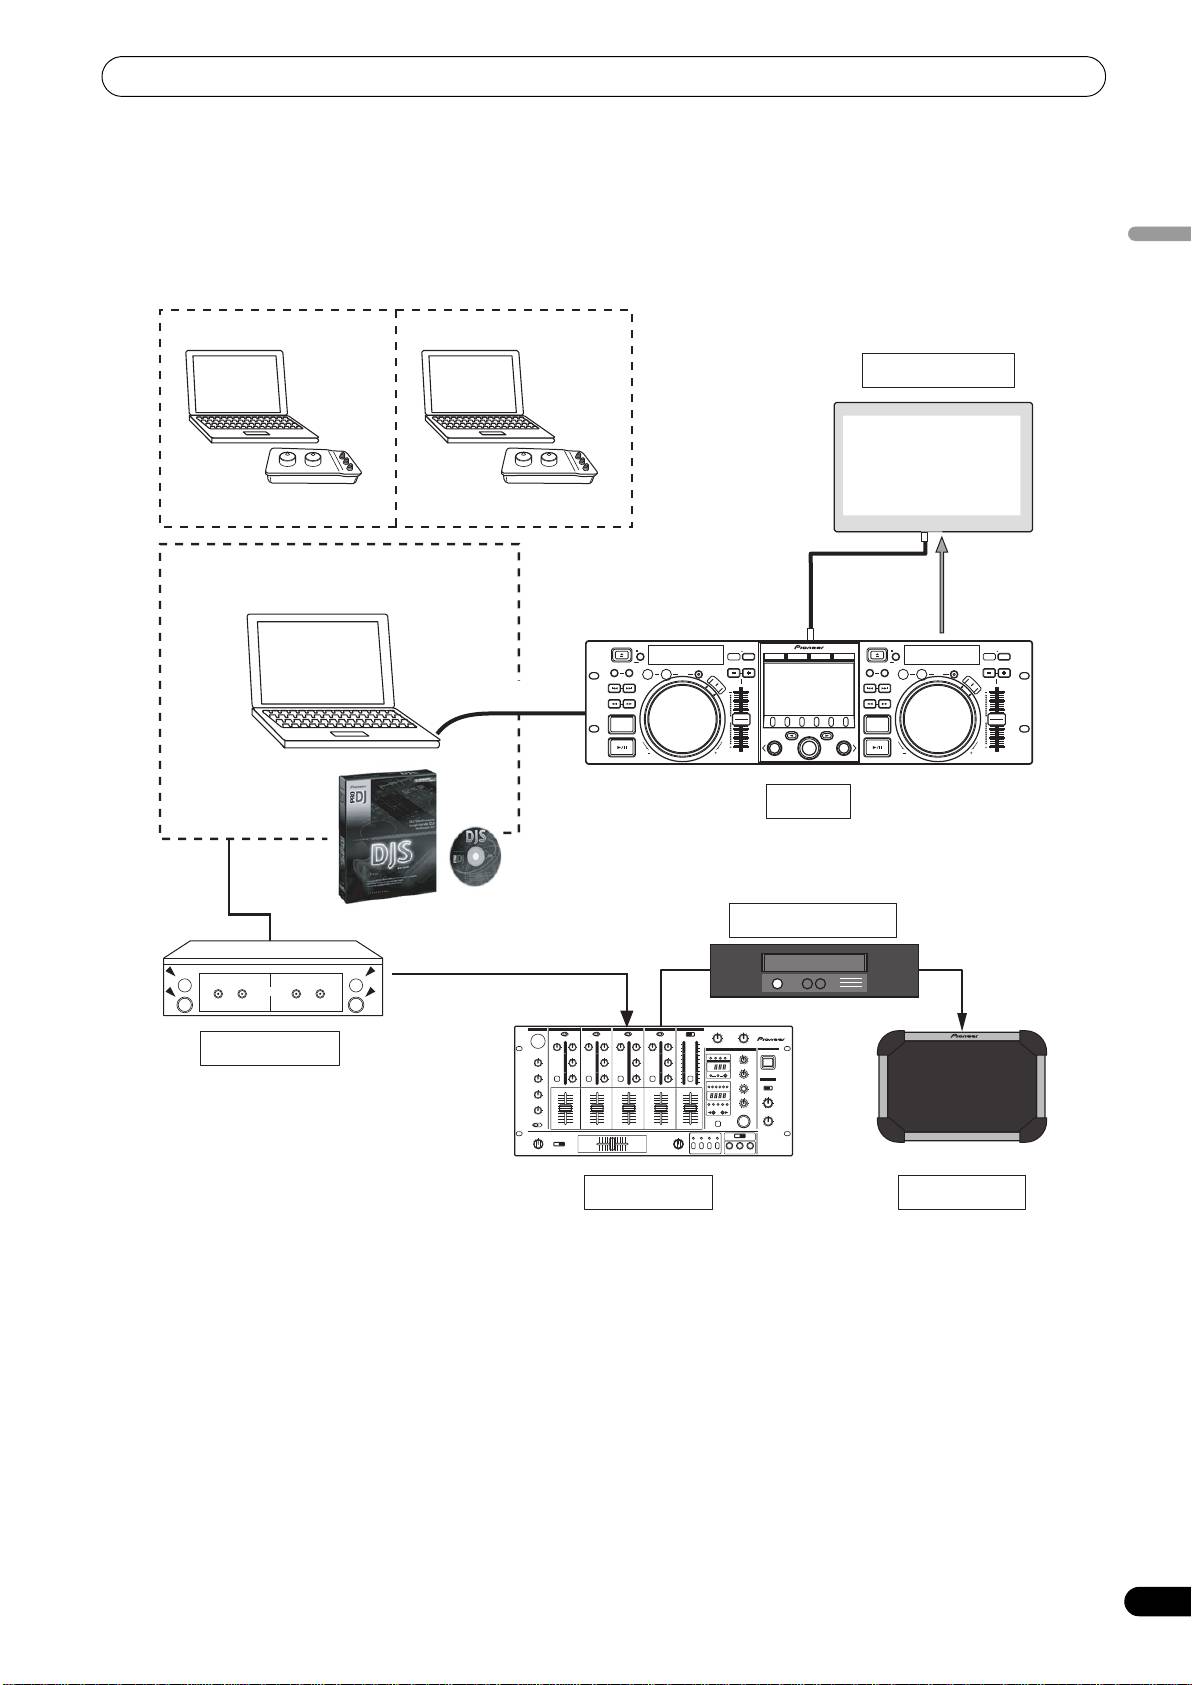
FEATURES
FEATURES
This unit is a professional mobile DJ software entertainment controller featuring a wide range of the performance functions demanded at
parties and events, together with superb operational characteristics.
Continuing the tradition of Pioneer’s CDJ series of players in its panel layout, functions, and operations, the unit can be connected to a
English
computer using USB bus power, allowing genuine DJ play of music tracks loaded in the accessory DJS software program without the
need to operate mouse or keyboard.
External Monitor
Special I/F DJ software
MIDI I/F DJ software
Video
EJECT
TIME
MASTER
TEMPO
6/10/16WIDE
TEMPO
EJECT
TIME
MASTER
TEMPO
6/10/16WIDE
TEMPO
A.CUE
MT
BROWSE MIX EFFECT UTILITY
MT
MEMORY CALL
CUE/LOOP
IN/CUE
OUT/ADJUST
RELOOP/EXIT
PITCH BEND
MEMORY CALL
CUE/LOOP
A.CUE
IN/CUE
OUT/ADJUST
RELOOP/EXIT
PITCH BEND
LOOP
LOOP
TRACK SEARCH
HOT LOOP
S
C
R
A
T
C
H
TRACK SEARCH
HOT LOOP
S
C
R
A
T
C
H
USB bus-power
SEARCH
J
O
G
B
SEARCH
J
R
O
E
G
A
B
K
R
E
A
K
QUE
0
QUE
0
LOAD
A
LOAD
B
FWD TEMPOREV
SEP-C1
FWD TEMPOREV
SEP-C1
PIONEER DJS
Power amplifier
OUT
Audio I/F Unit
Mixer
Speaker
5
En
SEP-C1_EN.book 6 ページ 2008年3月24日 月曜日 午前10時52分
FEATURES
VARIOUS DJ SOFTWARE CONTROL
DJS FUNCTION SUPPORT
The accessory Pioneer DJS software program as well as other DJ
Using the accessory DJS software program allows not only DJ
programs can be operated freely without the need for a control
play, but a wide variety of other control operations as well,
disc. MIDI-type DJ programs are also supported.
including track selection and mixing using the center display.
DJ CONTROL
MEMO
In addition to basic functions like tempo control, cue operations,
• Most of the data regarding button and TEMPO adjust slider
and loop play, most DJ play functions of DJS are supported by the
operations on this unit can be output to external devices using
unit including scratch and pitch bend using the jog dial.
USB MIDI or dedicated formats. In order to use this unit to
TRACK INFORMATION
control DJ software, it is necessary to install a driver program.
When playing tracks using DJS, time, title, artist name and other
track information can be shown on the display.
HIGH FUNCTION DISPLAY
BROWSE CONTROL
Center Display
The unit can control DJS track lists or play lists. Lists can also be
Features a wide 4.3” color LCD display with high luminance for
viewed on the center display and track selection performed
easy visibility. The intelligent GUI and rotary selector dial allows for
without looking at the computer screen.
no-stress track selection.
MIX CONTROL
Controller Display A/B
The DJS mixer function can be controlled. A single button can be
The elapsed time and tempo display feature top-quality, area-color
used to perform mixing, selecting from four mix modes.
full-segment OEL displays with high response and terrific visibility.
EFFECT CONTROL
In concert with the center display, these displays and indicators
DJS effects can be controlled. Selection of effects and effect beat
encourage no-stress DJ play in a wide variety of lighting
switching, level/tempo adjustment can all be performed using the
environments.
unit’s rotary selector and buttons.
JOG DIAL
MEMO
Furnished with large 80 mm jog dial with scratch function,
• When controlling other (non-DJS) brands of DJ software,
allowing operations with the same sense of touch as an analog
consult the individual program’s operating instructions for
turntable.
information regarding function support.
MONITOR OUT
By outputting the center display’s BROWSE screen to a larger
external monitor, operations can be performed with greater ease.
6
En
SEP-C1_EN.book 7 ページ 2008年3月24日 月曜日 午前10時52分
SPECIFICATIONS / COMFIRM ACCESSORIES
SPECIFICATIONS
1 General
4 Center Display Section
Model . . . . . . . . . . . . . . . . . . . . . . . . . . . . . . . . . . . . . . . . . . . SEP-C1
Type . . . . . . . . . . . . . . . . . . . . . . . . . . TFT LCD active matrix display
Name . . . . . . . . . . . . . . . . . . . . . Software entertainment controller
Size . . . . . . . . . . . . . . . . . . . . . . . . . . . . . . . . . . . . . . . . . 4.3” (WIDE)
English
Power voltage. . . . . . . . . . . . . . . . . . . . . . . DC 5 V (USB bus-power)
Supported languages. . . . . . . . . . . 9 languages including English,
Current consumption . . . . . . . . . . . . . . . . . . . . . . . . . . . . . . 600 mA
Japanese, and Chinese (simplified Mandarin)
Power consumption . . . . . . . . . . . . . . . . . . . . . . . . . . . . . . . . . . 3 W
5 Controller Display A/B Section
Operating temperature . . . . . . +5 °C to +35 °C (+41 °F to +95 °F)
Type . . . . . . . . . . . . . . . . . . . . . . . . . OEL (Organic EL) Full segment
Operating humidity . . . . . 5 % to 85 % RH (without condensation)
6 Other Connectors
Mass (Weight) . . . . . . . . . . . . . . . . . . . . . . . . . . . . . . 1.7 kg (3.75 lb.)
5 V connector . . . . . . . . . . . . . . . . . . . . . . . . . . . . . . . . . . . . .DC jack
Maximum external dimensions
. . . . . . . . . . . . . . . 482.6 mm (W) x 133.0 mm (H) x 83.5 mm (D)
19.0 in (W) x 5.24 in (H) 3.29 in (D)
Specifications and appearance are subject to change without
notice.
2 USB Upstream Section
Connector. . . . . . . . . . . . . . . . . . . .USB B-type port (PC connector)
3 Video Output Section
Output connector . . . . . . . . . . . . . . . . . . . . . . . . . . . . . . . .RCA jack
Composite output level . . . . . . . . . . . . . . . . . . . . . . . . .1 Vp-p (75 Ω)
COMFIRM ACCESSORIES
Confirm that all furnished accessories are present.
USB cable
DJS: 1 Set
USB auxiliary power cable
CD-ROM DJS installation key sticker
Operating Instructions (this manual)
SEP-C1
Warranty card
MEMO
• Three instruction manuals are furnished (including the one you are reading). Please study these manuals in accord with your
manner of use:
– SEP-C1 Operating Instructions (this manual)
Read this first.
– SEP-C1 DJS Control Guide (PDF file recorded on accessory CD-ROM)
Basic operation instructions when using DJS together with the SEP-C1.
– DJS User’s Manual (PDF file recorded on accessory CD-ROM)
Full functional explanation and operation manual for DJS software.
7
En

INSTALLATION GUIDELINES
INSTALLATION GUIDELINES
• Placing and using the unit for long periods on heat-generating
About carrying cases
sources such as amplifiers or near spotlights, etc. will affect
The jog dial is equipped with a delicate switch. If the unit is placed
product performance. Avoid placing the unit on heat-generating
in a carrying case, take precautions to prevent any pressure from
sources.
being exerted on the surface of the jog dial.
• Install this unit as far as possible away from tuners and TV sets.
A unit installed in close proximity to such equipment may cause
Condensation
noise or degradation of the picture. Noise may be noticeable
When this unit is brought into a warm room from previously cold
when an indoor antenna is used. In such cases, make use of an
surroundings or when the room temperature rises sharply,
outdoor antenna or turn off power to the unit.
condensation may form inside the unit and impair its
• When the unit is used in a loud-sound environment, e.g., near a
performance. In such cases, allow the unit to stand for about an
speaker, sound skip may occur. Install the unit away from the
hour or raise the room temperature gradually.
speaker or reduce the listening volume.
• Place this unit on a level surface and a stable platform.
Cleaning the unit
• Do not place heavy objects on top of the unit.
To clean the unit wipe with a polishing or a soft, dry cloth. For
stubborn dirt, moisten a soft cloth with a weak solution of neutral
detergent (diluted in five to six parts water), wring the cloth well,
Be sure the unit, including USB cable, does not touch vibrating
and wipe away the dirt. Use a dry cloth to wipe the surface dry. Do
materials. Any cause of vibration other than the insulators may
not use volatile liquids such as benzene or thinner which will
cause sound skip.
damage to the unit.
Take special care when using the unit while it is installed in a
carrying case.
Cleaning the Jog Dial
To clean the jog dial wipe with a polishing or a soft, dry cloth. For
stubborn dirt, moisten a soft cloth with a weak solution of neutral
detergent (diluted in five to six parts water), wring the cloth well,
and wipe away the dirt. Use a dry cloth to wipe the surface dry.
Applying alcohol, paint thinner, benzene, insecticides, or other
stringent substances to the jog dial may cause the markings or
finishing of the dial to peel or become discolored, and the use of
any such substances should accordingly be avoided.
Installing the SEP-C1 in an EIA rack
The screw holes on the front panel of the SEP-C1 are designed for
use in attaching the unit to a 19-inch EIA rack.
This unit complies with 3U specifications. Maximum depth of unit
is 83.5 mm.
• Attach the unit to the rack using screws of the appropriate size
(screws not provided with the unit).
NOTE
• Do not install the unit immediately above a power amplifier,
since damage may occur from the heat produced by the
amplifier, or humming or other noise may be caused.
• When transporting the unit, remove the unit from its rack.
Attempting to move the rack with the unit installed may
result in damage to the unit.
• If the unit must be moved while still in its rack, take
precautions to protect the unit from vibration and impact.
8
En
Do not allow contact
with vibrating surfaces.
To assure proper heat-
dissipation, be sure to
maintain this open space.
To assure proper
To assure proper
heat-dissipation, be
heat-dissipation, be
sure to maintain this
sure to maintain this
open space.
open space.
SEP-C1_EN.book 8 ページ 2008年3月24日 月曜日 午前10時52分

SEP-C1_EN.book 9 ページ 2008年3月24日 月曜日 午前10時52分
CONNECTIONS
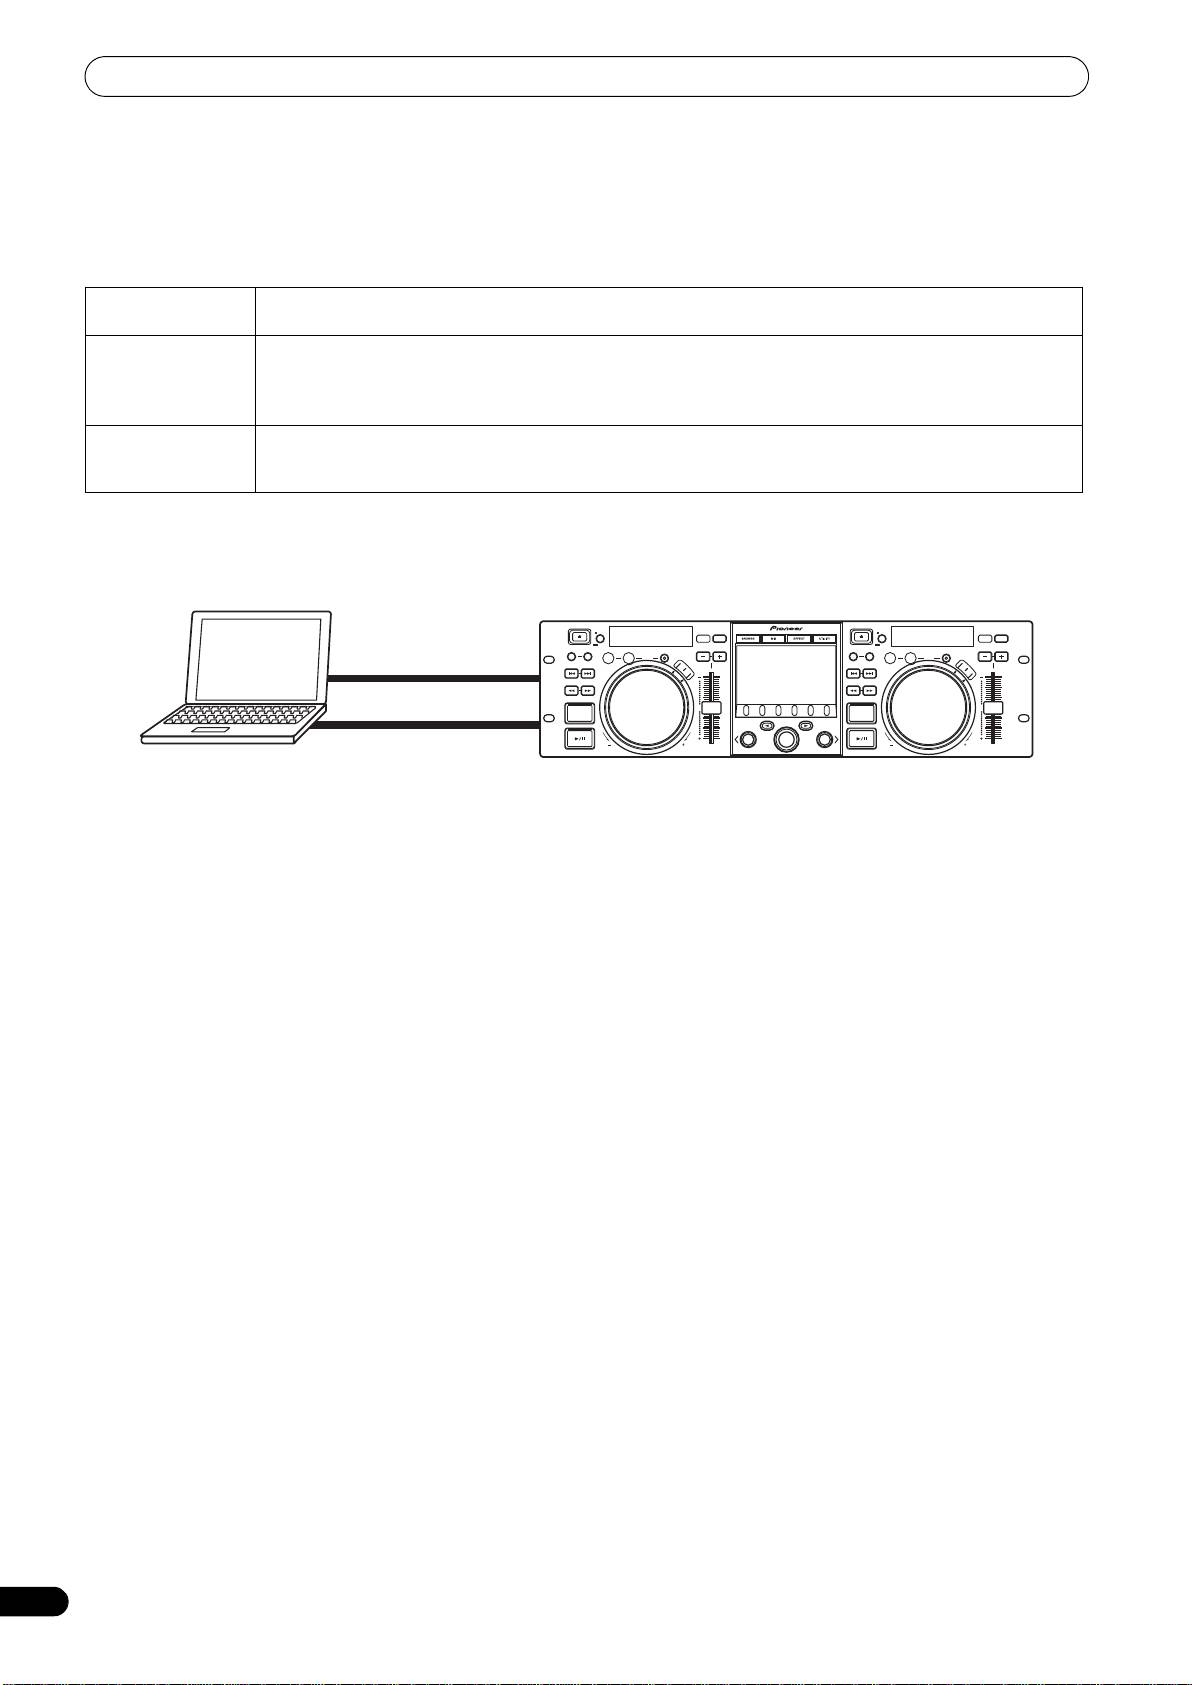
CONNECTIONS
Use the accessory USB auxiliary power cable and the normal USB cable to connect the unit to the computer (connect the USB auxiliary
power cable first).
English
Accessory USB cable
PC
5V
Accessory USB auxiliary
MONITOR OUT
REMOTE
CONTROL
power cable.
Computer
Audio interface (sold separately)
Audio cable
Do not connect the USB auxiliary power cable or USB
cable until the driver software has been installed in the
computer.
Mixer
NOTE
• Do not connect anything to the 5 V connector other than the accessory USB auxiliary power cable.
• Always use the accessory USB auxiliary power cable and USB cable only.
• Always connect the accessory USB auxiliary power cable and USB cable to one and the same computer.
• Do not connect this unit to a computer through a USB hub.
• Do not connect this unit to a computer through a CardBus-supported USB interface card.
Connection to external monitor (pin-jack connector)
Use these connections when you wish to output the center display images to a large screen. After connecting this unit to the external
monitor, the unit’s settings must be changed (see the item “MONITOR OUT” in the topic “[1] DISPLAY” under the section “USING THE
UTILITY” on P. 25).
PC
5V
MONITOR OUT
REMOTE
CONTROL
External monitor
9
En
SEP-C1_EN.book 10 ページ 2008年3月24日 月曜日 午前10時52分
PARTS AND THEIR FUNCTIONS
PARTS AND THEIR FUNCTIONS
FRONT PANEL
1
8 23 2 3 11 12 13 14
18109
EJECT
MASTER
TEMPO
EJECT
MASTER
TEMPO
TIME
TEMPO
6/10/16WIDE
TIME
TEMPO
6/10/16WIDE
MT
BROWSE MIX EFFECT UTILITY
MT
17
CUE/LOOP
A.CUE
CUE/LOOP
A.CUE
MEMORY CALL
IN/CUE
OUT/ADJUST
RELOOP/EXIT
PITCH BEND
MEMORY CALL
IN/CUE
OUT/ADJUST
RELOOP/EXIT
PITCH BEND
LOOP
LOOP
16
TRACK SEARCH
HOT LOOP
S
C
R
A
T
S
C
TRACK SEARCH
HOT LOOP
C
H
R
A
T
C
H
4
22
SEARCH
J
O
G
J
B
SEARCH
O
G
R
E
B
A
R
K
E
A
K
5
0
0
QUE
QUE
6
A
B
LOAD
LOAD
7
FWD TEMPOREV
SEP-C1
FWD TEMPOREV
19 15 21
2024
19
This section explains the use of the unit when controlling DJS. Depending on the DJ software program used, some functions may not be
supported or may require different operations than those described in this manual.
1EJECT (
) button
7 Play/pause (
) button and indicator
Not used during DJS control.
Use to start and pause playback.
2 Loop control buttons
8 Time mode/auto cue button (TIME/A.CUE)
Loop-in button (IN/CUE)
TIME:
Use to set loop-in points. When this button is pressed during
Each time the button is pressed, the display’s time display
loop playback, playback returns to the loop-in point and
alternates between the current track’s elapsed playing time,
recommences.
and the remaining time (REMAIN).
Loop-out button (OUT/ADJUST)
A.CUE:
Use to set loop-out points. If this button is pressed during loop
When held depressed for one second or more, the AUTO CUE
playback, the jog dial or SEARCH buttons can be used to adjust
function alternates ON/OFF.
the position of the out point.
AUTO CUE function
RELOOP/EXIT button
Whenever a track is set or track search is performed, this
Press this button during loop playback to cancel loop play.
function automatically sets a cue point and cue standby
When the unit is not in loop play mode, pressing the button will
immediately before the point where music starts.
cause loop play to begin from the previously set loop-in point.
3 TEMPO control section
TEMPO control range button (±6/10/16/WIDE):
9 SCRATCH button
Press to set the scratch mode ON/OFF.
Each time the button is pressed, the variable range of the
TEMPO adjust slider changes.
10 JOG BREAK button
Not used during DJS control.
MASTER TEMPO button and indicator (MT):
11 BROWSE button
Each time the button is pressed, the master tempo function
Use to switch to the BROWSE screen.
alternates ON/OFF.
12 MIX button
TEMPO adjust slider:
Use to switch to the MIX screen.
From the center detent position, pull the slider towards you (+)
to increase the tempo, and push the slider away from you (–)
13 EFFECT button
to slow down the tempo.
Use to switch to the EFFECT screen.
PITCH BEND +/– buttons:
14 UTILITY button
Use to switch to the UTILITY screen (P. 25).
When pressed during play, the pitch bend function is enabled.
Pressing the “+” button accelerates the pitch bend speed, and
15 Rotary selector dial
pressing the “–” button decelerates the pitch bend speed.
When in the BROWSE and UTILITY screens, rotating the dial
allows track selection and movement of the cursor between
The speed of the pitch change can be modified by holding the
selection items. Press the dial to confirm the selection.
button depressed while rotating the jog dial.
For operations in the MIX and EFFECT screens, consult the
4 TRACK SEARCH (
,
) buttons
DJS Control Guide.
Use to perform track search.
16 CUE/LOOP MEMORY button
5SEARCH (
,
) buttons
Not used during DJS control.
Use to perform fast forward and reverse.
17 CUE/LOOP CALL button
6 CUE button and indicator
Not used during DJS control.
Use to set cue points. Also when a cue point has been set,
pressing the CUE button sets the unit to the cue standby mode.
10
En
SEP-C1_EN.book 11 ページ 2008年3月24日 月曜日 午前10時52分
PARTS AND THEIR FUNCTIONS
18 Function buttons (F1 to F6, from left)
Center Display
Use to select modes and categories.
Selectable items differ depending on the screen or menu.
For details, consult the DJS Control Guide.
19 LOAD A/B buttons
3
English
When in the BROWSE screen, press to set selected track in
controller A/B.
For operations in the MIX and EFFECT screens, consult the
1
DJS Control Guide.
20 Select up (
) button
2
When in the BROWSE and UTILITY screens, each time the
button is pressed the menu moves up (to left) one level in the
current menu hierarchy.
For operations in the MIX and EFFECT screens, consult the
DJS Control Guide.
21 Select down (
) button
When in the BROWSE and UTILITY screens, each time the
button is pressed the menu moves down (to right) one level in
1 Main menu display
the current menu hierarchy.
The center display’s menus are changed by using the
For operations in the MIX and EFFECT screens, consult the
BROWSE button, MIX button, EFFECT button, and UTILITY
DJS Control Guide.
button. The function buttons, select up ()/down() buttons,
LOAD A/B buttons, and the rotary selector dial are used to
22 Center display (P. 11)
manipulate the contents of each menu.
23 Display A / Display B (P. 12)
BROWSE screen
24 Jog dial (+FWD / –REV)
Use to display DJS track lists or playlists and to select tracks.
When scratch mode is ON:
For details, consult the DJS Control Guide’s “Using DJS Lists.”
Touch the surface of the dial and rotate to perform scratch
MIX screen
play.
Use to perform DJS mixer operations. For details, consult the
When scratch mode is OFF:
DJS Control Guide’s “DJS Mixer Operations.”
Use to perform pitch bend. Acceleration (+FWD) and
EFFECT screen
deceleration (–REV) are performed in proportion to the amount
Use to perform DJS effecter operations. For details, consult the
of dial rotation. When rotation of the dial is stopped, playback
DJS Control Guide’s “DJS Effecter Operations.”
returns to its previous speed.
UTILITY
screen
Use to make unit settings (P. 25).
2 Function tab
Displays items that can be changed using the six function
buttons. Items displayed differ depending on the contents
shown on the main menu display.
3 A/B track information display
Displays track information and current status for tracks
playing on controller A/B.
Track name Play status
Artist name
Play status
Indicates track is currently playing.
Indicates track is currently paused.
Indicates track is currently in cue standby
condition.
MEMO
• This unit can display names of titles and artists in Western
European languages, Russian, Simplified Mandarin
Chinese, and Japanese, but some languages may not be
supported, depending on the DJ software program used.
Consult the operating instructions for your DJ software
program for more information about supported languages.
11
En
PARTS AND THEIR FUNCTIONS
Display A/Display B
5 Time display
Displays the current track’s elapsed time ([REMAIN] indicator
is off), or remaining time ([REMAIN] indicator is lighted), in
minutes [M], seconds [S], and frames [F].
6 Playing address display
To provide a quick intuitive grasp of the relative progress of a
track’s playback (either elapsed time or remaining time), a bar
graph is used to represent the full length of the track.
• Elapsed time display: Starts with all segments off, then
gradually lights from left to right.
• Remaining time display: Starts with all segments on, then
1 Track number display
gradually goes off from left to right.
“DJS” is displayed during DJS control.
• When 30 seconds of remaining playing time is reached, the
graph begins to flash slowly.
2 TEMPO control range display (±6, ±10, ±16, WIDE)
• When 15 seconds of remaining playing time is reached, the
Displays the selected variable range mode of the TEMPO
graph begins to flash quickly.
adjust slider.
7 BPM display
3 TEMPO change ratio display
Shows the currently playing track’s BPM (Beats Per Minute)
Displays the change in tempo produced by the operation of the
8 MEMO indicator
TEMPO adjust slider.
Not displayed during DJS control.
4 A.CUE indicator
9 REMAIN indicator
Lights when the Auto Cue function is ON.
Lights when the time display is set for remaining time.
REAR PANEL
1 PC connector: USB port (type B)
3 Video output connector (MONITOR OUT)
Use the accessory USB cable to connect this port to a
Use a video cable to connect to an external display.
computer.
4 Remote control connector (REMOTE CONTROL)
2 5 V connector
Not used with this unit.
Use the accessory USB auxiliary power cable to connect to a
computer.
12
En
9
5
3
2
1
8
4
6
7
PC
1
5V
2
MONITOR OUT
REMOTE
3
CONTROL
4
SEP-C1_EN.book 12 ページ 2008年3月24日 月曜日 午前10時52分

SEP-C1_EN.book 13 ページ 2008年3月24日 月曜日 午前10時52分
ABOUT DJS SOFTWARE
ABOUT DJS SOFTWARE
Pioneer DJS is a software program that allows the use of MP3 files to control DJ play from a computer. Load the program into your
computer from the supplied CD-ROM disc.
English
MEMO
• DJS is not equipped with functions for recording DJ play.
3 WARRANTY DISCLAIMER
SOFTWARE END USER LICENSE
THE PROGRAM AND DOCUMENTATION ARE PROVIDED “AS
IS” WITHOUT ANY REPRESENTATIONS OR WARRANTIES,
AGREEMENT
AND YOU AGREE TO USE THEM AT YOUR SOLE RISK. TO THE
This Software End User License Agreement (“Agreement”) is
FULLEST EXTENT PERMISSIBLE BY LAW, PIONEER
between you (both the individual installing the Program and any
EXPRESSLY DISCLAIMS ALL WARRANTIES OF ANY KIND
single legal entity for which the individual is acting) (“You” or
WITH RESPECT TO THE PROGRAM AND DOCUMENTATION,
“Your”) and PIONEER CORPORATION (“Pioneer”).
WHETHER EXPRESS, IMPLIED, STATUTORY, OR ARISING
TAKING ANY STEP TO SET UP OR INSTALL THE PROGRAM
OUT OF COURSE OF PERFORMANCE, COURSE OF DEALING
MEANS THAT YOU ACCEPT ALL OF THE TERMS OF THIS LICENSE
OR USAGE OF TRADE, INCLUDING ANY WARRANTIES OF
AGREEMENT. PERMISSION TO DOWNLOAD AND/OR USE THE
MERCHANTABILITY, FITNESS FOR A PARTICULAR
PROGRAM IS EXPRESSLY CONDITIONED ON YOUR FOLLOWING
PURPOSE, SATISFACTORY QUALITY, ACCURACY, TITLE OR
THESE TERMS. WRITTEN OR ELECTRONIC APPROVAL IS NOT
NON-INFRINGEMENT.
REQUIRED TO MAKE THIS AGREEMENT VALID AND
4 DAMAGES AND REMEDIES FOR BREACH
ENFORCEABLE. IF YOU DO NOT AGREE TO ALL OF THE TERMS
You agree that any breach of this Agreement’s restrictions
OF THIS AGREEMENT, YOU ARE NOT AUTHORIZED TO USE THE
would cause Pioneer irreparable harm for which money
PROGRAM AND MUST STOP INSTALLING IT OR UNINSTALL IT,
damages alone would be inadequate. In addition to damages
AS APPLICABLE.
and any other remedies to which Pioneer may be entitled, You
1 DEFINITIONS
agree that Pioneer may seek injunctive relief to prevent the
1.1 “Documentation” means written documentation,
actual, threatened or continued breach of this Agreement.
specifications and help content made generally available
5 TERMINATION
by Pioneer to aid in installing and using the Program.
Pioneer may terminate this Agreement at any time upon Your
1.2 “Program” means all or any part of Pioneer’s software
breach of any provision. If this Agreement is terminated, You
licensed to You by Pioneer under this Agreement.
will stop using the Program, permanently delete it from the
2 PROGRAM LICENSE
computer where it resides, and destroy all copies of the
2.1 Limited License. Subject to this Agreement’s restrictions,
Program and Documentation in Your possession, confirming
Pioneer grants to You a limited, non-exclusive, non-
to Pioneer in writing that You have done so. Sections 2.2, 2.3,
transferable, license (without the right to sublicense):
2.4, 3, 4, 5 and 6 will continue in effect after this Agreement’s
termination.
(a) To install a single copy of the Program on the hard
disk drive of Your computer, to use the Program only
6 GENERAL TERMS
for Your personal purpose complying with this
6.1 Limitation of Liability. In no event will Pioneer or its
Agreement and the Documentation (“Authorized
subsidiaries be liable in connection with this Agreement
Use”);
or its subject matter, under any theory of liability, for any
indirect, incidental, special, consequential or punitive
(b) To use the Documentation in support of Your
damages, or damages for lost profits, revenue, business,
Authorized Use; and
savings, data, use, or cost of substitute procurement,
(c) To make one copy of the Program solely for backup
even if advised of the possibility of such damages or if
purposes, provided that all titles and trademark,
such damages are foreseeable. In no event will Pioneer’s
copyright and restricted rights notices are reproduced
liability for all damages exceed the amounts actually paid
on the copy.
by You to Pioneer or its subsidiaries for the Program. The
2.2 Restrictions. You will not copy or use the Program or
parties acknowledge that the liability limits and risk
Documentation except as expressly permitted by this
allocation in this Agreement are reflected in the Program
Agreement. You will not transfer, sublicense, rent, lease
price and are essential elements of the bargain between
or lend the Program, or use it for third-party training,
the parties, without which Pioneer would not have
commercial time-sharing or service bureau use. You will
provided the Program or entered into this Agreement.
not Yourself or through any third party modify, reverse
6.2 The limitations or exclusions of warranties and liability
engineer, disassemble or decompile the Program, except
contained in this Agreement do not affect or prejudice
to the extent expressly permitted by applicable law, and
Your statutory rights as consumer and shall apply to You
then only after You have notified Pioneer in writing of Your
only to the extent such limitations or exclusions are
intended activities. You will not use the Program on
permitted under the laws of the jurisdiction where You are
multiple processors without Pioneer’s prior written
located.
consent.
6.3 Severability and Waiver. If any provision of this Agreement
2.3 Ownership. Pioneer or its licensor retains all right, title
is held to be illegal, invalid or otherwise unenforceable,
and interest in and to all patent, copyright, trademark,
that provision will be enforced to the extent possible or, if
trade secret and other intellectual property rights in the
incapable of enforcement, deemed to be severed and
Program and Documentation, and any derivative works
deleted from this Agreement, and the remainder will
thereof. You do not acquire any other rights, express or
continue in full force and effect. The waiver by either party
implied, beyond the limited license set forth in this
of any default or breach of this Agreement will not waive
Agreement.
any other or subsequent default or breach.
2.4 No Support. Pioneer has no obligation to provide support,
maintenance, upgrades, modifications or new releases
for the Program or Documentation under this Agreement.
13
En

SEP-C1_EN.book 14 ページ 2008年3月24日 月曜日 午前10時52分
ABOUT DJS SOFTWARE
6.4 No Assignment. You may not assign, sell, transfer,
delegate or otherwise dispose of this Agreement or any
SYSTEM REQUIREMENTS (Minimum
rights or obligations under it, whether voluntarily or
Operating Environment)
involuntarily, by operation of law or otherwise, without
Pioneer’s prior written consent. Any purported
Use of DJS requires a PC/AT computer fulfilling the following
assignment, transfer or delegation by You will be null and
minimum operating conditions:
®
®
void. Subject to the foregoing, this Agreement will be
CPU: 1.5 GHz or more Intel
Pentium M
(or compatible)
binding upon and will inure to the benefit of the parties
processor.
and their respective successors and assigns.
®
However, in the case of Windows Vista
, the processor must be a
TM
6.5 Entire Agreement. This Agreement constitutes the entire
1.5 GHz or above Intel Core
2 Duo (or compatible).
agreement between the parties and supersedes all prior
Memory:
or contemporaneous agreements or representations,
512 MB or more RAM
whether written or oral, concerning its subject matter.
®
However, when running Windows Vista
, 1 GB or more RAM
This Agreement may not be modified or amended without
Pioneer’s prior and express written consent, and no other
Hard disc:
act, document, usage or custom will be deemed to amend
250 MB of free HD space (excluding space necessary for storing
or modify this Agreement.
MP3 and other music files)
6.6 You agree that this Agreement shall be governed and
Optical drive:
construed by and under the laws of Japan.
Disc drive capable of reading CD-ROM, and playing music CD (CD-
DA)
Display:
COPYRIGHT WARNING
XGA (1024x768) or above, with HighColor (16-bit) or greater video
adapter and monitor.
The use of DJS is restricted with regard to the playing and
copying of copy-protected music contents.
Sound:
• The program may not operate properly if copy-protect encryption
2-channel or more audio output (internal or external sound card or
data is embedded in recorded media.
audio unit).
• Ripping, playback, and other operations may stop if copy-protect
Input device:
encryption data is detected to be embedded in recorded media.
Keyboard, mouse (or equivalent pointing device)
• Due to copy-protection technology for recorded media (CPRM),
Internet connection:
writing (“check-out”) to SD memory cards is limited to three
®
Connection speed 56 kbps or above recommended. Microsoft
times for each music content.
Internet Explorer 5.5 or above, or other web browser supporting
• To write (“check-out”) music contents to SD memory cards, the
128-bit SSL.
reader/writer used must support the SD memory card’s “copy-
• When this unit is connected to a computer and used in
protection for recorded media” technology. For details, consult
conjunction with the DJS software, the computer must be
the operating instructions for the reader/writer you intend to
equipped with two USB ports complying with USB 1.1 or later.
use.
For details, consult the section “CONNECTIONS” (P. 9).
• The music contents that you write (“check-out”) to SD memory
cards can be played back only on players supporting the “SD-
NOTE
audio standard.” For details, consult the operating instructions
• Even if your computer is equipped with the memory
for the player you intend to use.
capacity specified in the operating environment noted
The materials you record are for your own listening enjoyment,
above, other software and services running in the computer
and cannot be used for other purposes without permission from
at the time may cause insufficient memory that can result
the copyright owner.
in degradation of the program’s functions or performance.
• Music recorded from CDs and other media may be protected by
In this case, close any other services or programs running
the copyright laws of individual countries as well as by
so as to free up more of your computer’s memory, or
international convention. You are solely responsible for the
increase the amount of memory installed in your computer.
lawful use of the recordings you make.
• DJS operation may not function properly when combined
with other software programs installed on your computer.
• Full functionality is not guaranteed with all computers even
when the above operating environment conditions are
fulfilled.
• The DJS software program is not supported by Macintosh
computers (including those equipped with Intel CPUs).
14
En
SEP-C1_EN.book 15 ページ 2008年3月24日 月曜日 午前10時52分
ABOUT DJS SOFTWARE
3 When the screen for selecting the language appears, select
INSTALLING DJS SOFTWARE
[English], then click on [OK].
Precautions regarding installation
• Before installing DJS, please read the “SOFTWARE END USER
LICENSE AGREEMENT” and “SYSTEM REQUIREMENTS
English
(Minimum Operating Environment)”.
®
®
• DJS is supported by the following Microsoft
Windows
versions:
®
Windows Vista
Home Basic
®
Windows Vista
Home Premium
®
Windows Vista
Ultimate
• Depending on your computer operating environment, more
®
than one language may be available.
Windows Vista
Business
®
• When you click on the [OK] button, the [Preparing to install
Windows
XP Home Edition
®
DJS...] message will appear.
Windows
XP Professional
®
When preparations are completed, the [Commencing
Windows
2000 Professional (SP4)
installation of DJS...] message will appear. Follow the
• DJS is not supported by Microsoft’s 64-bit operating systems
instructions in the message to complete DJS installation.
®
®
(Windows
XP Professional x64 edition and Windows Vista
64-
• To cancel installation, click on the [Cancel] button.
bit editions).
4 When DJS installation is completed, reboot the computer in
• The accessory CD-ROM includes installation programs and
accord with the instructions that appear on the screen.
user’s manuals in the following eight languages: English,
French, German, Italian, Dutch, Spanish, Chinese (simplified
Mandarin), Japanese.
MEMO
®
• When using this unit in conjunction with the DJS software
• When using DJS on a computer whose Windows
display
program, the software driver must be installed in the computer
language is other than one of those listed above, follow the
before connecting the computer to the SEP-C1. For details, see
menu instructions to select [English].
P. 17
• Installation and uninstallation of DJS require administrator’s
rights on the computer concerned. You must log on as
DJS User’s Manual (PDF)
administrator before installing the software.
When installation of DJS is completed, the user’s manual can be
Installation Procedure
viewed from the Windows [START] menu if desired. Click on
[START] [View All Programs] [DJS] [User’s Manual].
1 When the accessory CD-ROM installation disc is loaded in
your computer’s DVD/CD drive, the installation menu will
It is recommended to read the user’s manual in order to gain a
basic understanding of DJS features before actually starting the
automatically appear. Follow the menu instructions to install
program.
the DJS software.
• If the installation menu does not automatically appear, click
on [START] [My Computer (or Computer)] and select
the optical disc drive, and double click on the [Install] icon.
NOTES REGARDING TRIAL PERIOD AND
2 When the installation menu appears, click on the [Install DJS]
USER REGISTRATION
button.
DJS can be used without registration for a 60-day trial period after
installation.
This period represents the time you can use DJS without officially
registering it. When the trial period is over, DJS can no longer be
used, so be sure to complete user registration before that period
has elapsed.
Online registration can be completed for users connected to the
Internet. For details regarding user registration procedures,
consult the DJS user’s manual contained on the accessory CD-
ROM disc.
The Pioneer Group collects personal user information for the
following purposes:
1. To provide after service for the product.
2. To inform users via email of important information and events
regarding the product.
• If a trial version of DJS is currently installed on the
3. To collect survey data from customers and reflect those results
computer, in place of the [Install DJS] button, the [Uninstall
into product development.
DJS trial version of DJS] button will appear. Click on that
• Personal information collected from customers is handled and
button to uninstall the trial version, then once again click on
managed in accordance with our personal information privacy
the [Install DJS] button.
policy.
• To display the user’s manual, click on the [Display DJS
®
• For more information regarding Pioneer’s personal information
User’s Manual] button. Adobe Reader
is required to
privacy policy, see the following Pioneer website:
display the user’s manual.
http://www.prodjnet.com/privacy.html
®
• To install Adobe Reader
, click on the [Install Adobe
Reader] button. If your computer already has an older
®
version of Adobe Reader
installed, uninstall the older
®
version of Adobe Reader
before clicking on the [Install
Adobe Reader] button.
• To close the installation menu, click on the [Exit] button.
15
En
SEP-C1_EN.book 16 ページ 2008年3月24日 月曜日 午前10時52分
ABOUT DJS SOFTWARE
Users without Internet connections should enter the necessary
information on the “User registration card” and return it via mail
REGARDING ONLINE SUPPORT
to Pioneer. After the completed “User registration card” is
Before making direct enquiries regarding DJS operating
received, we will send the “Registration ID” (installation key)
procedures and other technical matters, please read the DJS
necessary for unlocking the software beyond the trial period. For
user’s manual furnished on the accessory CD-ROM, together with
detailed instructions regarding the user registration procedure,
the FAQ section on the DJS support website.
please consult the DJS user’s manual included in the accessory
See the DJS user’s manual for information regarding how to
CD-ROM.
access the DJS support website. To access the support site, you
will need the “Login name” and “Password” which you specified
NOTE
at the time of user registration.
• An installation key (Registration ID) can be used on the DJS
When making an enquiry to the DJS support website regarding
software installed on a single computer. In the event you
malfunctions, please furnish your name, product name,
replace your computer or otherwise need to reinstall the
registration ID (install key), computer type and specifications
DJS software, a new user’s registration and “Registration
(CPU, installed memory, other connected peripherals, etc.), the
ID” must be issued to unlock the software beyond the trial
operating system and version used, and concrete information
period. Also, the initial “Registration ID” issued by Pioneer
regarding the symptoms observed.
will be needed in the event of reregistration or after-service
Support is furnished only to customers who have completed the
enquiries, so be sure to store the registration information in
user registration process. Please take care to safely preserve the
a safe place even after completion of the registration
“Login name” and “Password” you specified during registration,
procedure.
as well as your “Registration ID.”
If you experience problems with installation or user registration,
The address on the “User registration card” is as follows. The
please consult the following website:
address may differ depending on your location of residence,
<Enquiries regarding installation and user registration>
however, so please be careful to send the card to the correct
http://www.prodjnet.com/djs/support/
location:
<User Registration Card Address>
NOTE
North America
• For technical information regarding use of this unit with
PIONEER ELECTRONICS (USA) INC.
your computer, peripheral components, or other non-
BUSINESS SOLUTIONS DIVISION, PRO AUDIO GROUP
Pioneer products, please consult your sales dealer or the
2265 East 220th Street, Long Beach, CA 90810, U.S.A
manufacturers of the respective components.
Europe
PIONEER EUROPE NV
Further version updates are anticipated to improve the
MULTIMEDIA DIVISION
functionality and performance of DJS.
Pioneer House, Hollybush Hill, Stoke Poges, Slough SL2 4QP U.K.
Officially registering this product allows you to access Pioneer’s
support website, as well as to download updated versions of the
South Asia, Southeast Asia
program. We encourage users to take advantage of this update
PIONEER ELECTRONICS ASIACENTRE PTE. LTD.
service to constantly utilize the latest version of the program.
MULTIMEDIA DEPARTMENT
253 Alexandra Road, #04-01, Singapore 159936
HongKong
DISCLAIMER
PIONEER (HK) LIMITED
Pioneer shall not be held responsible for reissuing license keys
SALES AND MARKETING DEPARTMENT
or registration IDs in the event of loss. Be sure to store your
Suite 901-906, 9th Floor World Commerce Centre, Harbour City 11
registration information and passwords safely in a separate
Canton Road, Tsim Sha Tsui Kowloon, Hong Kong
location for future access.
Taiwan
Note that the SD memory card transmission function (check-
®
PIONEER HIGH FIDELITY TAIWAN CO., LTD.
out/check-in) is not supported by Windows Vista
.
SALES DIVISION, INDUSTRIAL ELECTRONIC SECTION
The music CD ripping function of this software program is not
supported for music CD that do not display one of these logo
13F, No. 44, Sec. 2, Jhongshan N. Road, Taipei City, Taiwan
marks.
Oceania
PIONEER ELECTRONICS AUSTRALIA PTY. LTD.
178-184 Boundary Road, Braeside, Victoria 3195, Australia
Middle East, Africa
PIONEER GULF, FZE.
Lob 11-017, Jabel Ali Free Zone, P.O.Box 61226, Jabel Ali, Dubai,
U.A.E.
Central & South America
PIONEER INTERNATIONAL LATIN AMERICA, S.A.
SALES DEPARTMENT
Plaza Credicorp Bank Panama, 50 Street, #120, 14th Floor
P.O. Box 0816-01361, Panama, Rep of Panama
Mexico
PIONEER ELCTRONICS DE MEXICO, S.A. DE C.V.
Blvd. Manuel Avila Camacho No. 138, Piso 10, Col. Lomas de
Chapultepec, Mexico, D.F. C.P. 111000 Deleg. Miguel Hidalgo
16
En
SEP-C1_EN.book 17 ページ 2008年3月24日 月曜日 午前10時52分
ABOUT THE DRIVER PROGRAM
ABOUT THE DRIVER PROGRAM
This unit is designed to control Pioneer DJS and other DJ software when connected to a computer. When connecting this unit to a
Windows computer for use with DJ software, the software driver program must first be loaded into the computer.
English
MEMO
• Drivers for Macintosh OS as well as updated information regarding other manufacturers’ DJ software can be found on the following
website:
http://www.prodjnet.com/support/
Using the accessory CD-ROM to install the application
SOFTWARE END USER LICENSE
1 Boot the computer and log in with administrator’s privileges.
AGREEMENT
2 Load the accessory CD-ROM in the computer’s CD/DVD drive.
When installing or using the driver software, be sure to first read
3 Open the computer’s [START]
[My Computer (or
the “SOFTWARE END USER LICENSE AGREEMENT” (P. 13). By
Computer)] menu, then access the CD-ROM and double-click
installing and using the software, you agree to be bound by the
on the folder [SEP-C1].
terms of the Agreement.
4 After opening the [SEP-C1] folder, double click on the driver
installation program [MEP-7000[SEP-C1]_#.###.exe].
(#.### indicates the driver version.)
DRIVER INSTALLATION
5 When the [Language Selections] menu appears, select
[English], then click on [OK].
Before installing (IMPORTANT)
• Before installing this driver, be sure to read the “SOFTWARE
END USER LICENSE AGREEMENT”.
• This unit can be connected to a computer running one of the
following operating system environments:
®
®
Windows Vista
Home Basic, Windows Vista
Home Premium,
®
®
Windows Vista
Ultimate, Windows Vista
Business,
®
®
Windows
XP Home Edition, Windows
XP Professional, or
®
Windows
2000 Professional.
• To interrupt the installation process, click on the [Cancel]
It may be necessary to use the Windows update facility in order
button.
to install the most recent Service Pack.
6 When the [License] screen appears, read the “Software End
• The driver installation program is provided in 10 languages
User License Agreement”, click on the [I agree.] box, then
(English, French, German, Italian, Dutch, Spanish, Russian,
click on [OK].
Chinese (simplified), Chinese (traditional), and Japanese). If
using a version of Windows in another language, follow the
onscreen instructions to select [English] as the language.
• You must have administrator privileges on your computer in
order to install the driver software. Log on as the user set as the
computer’s administrator before attempting driver installation.
• If any other Windows programs are running, close them before
beginning driver installation.
NOTE
• Before installing the driver software, disconnect the USB
auxiliary power cable and USB cable connecting this unit to
the computer.
• If this unit is connected to a computer without first
installing the driver, errors may occur on the computer,
depending on the computer environment involved.
• If you do not agree with the terms of the “Software End User
License Agreement”, click on the [Cancel] button to
• In the event the driver installation is interrupted midway
terminate the installation.
through, follow the procedures below to reinstall the driver
from the beginning.
17
En

SEP-C1_EN.book 18 ページ 2008年3月24日 月曜日 午前10時52分
ABOUT THE DRIVER PROGRAM
7 Follow the instructions that appear on the screen.
8 When installation is completed, the [Installation is now
•If the [Windows Security] screen appears during
complete.] message will appear. Click on the [Finish] button
installation, click on [Install this driver software anyway]
to complete the process.
to continue the installation process.
Connecting this unit to the computer
1 Connect the USB auxiliary power cable to this unit and the
computer.
2 Connect the USB cable to this unit and the computer.
When first connecting this unit to the computer, and when
disconnecting and reconnecting the computer USB port, the
computer may display the message [Installing device driver
software]. In this case, wait until the computer displays the
message [Your devices are ready to use].
<For Windows XP>
<For Windows XP>
•If the [Hardware Installation] screen appears during
• During the installation process, if the computer displays the
installation, click on [Continue Anyway] to continue the
message [Can Windows connect to Windows Update to
installation process.
search for software?] select [No, not this time], then click
on the [Next] button to continue the installation process.
<For Windows 2000>
•If the [Digital Signature Not Found] screen appears during
• During installation, if the computer displays the message
installation, click on the [Yes] button to continue the
[What do you want the wizard to do?] select [Install the
installation process.
software automatically (Recommended)], then click on
the [Next] button to continue the installation process.
•If the [Hardware Installation] screen appears during
installation, click on [Continue Anyway] to continue the
installation process.
18
En

SEP-C1_EN.book 19 ページ 2008年3月24日 月曜日 午前10時52分
ABOUT THE DRIVER PROGRAM
Most recent version of driver
Consult the following website regarding the latest driver versions.
http://www.prodjnet.com/support/
When using this unit to control DJS software
Please read the sections “USING DJ SOFTWARE” (P. 20) and the
English
“DJS Control Guide” (PDF file) before attempting to actually use
this unit to operate DJS. The “DJS Control Guide” can be found
under the name [manual_SEP-C1_control_en.pdf] in the [SEP-
C1\English] folder of the accessory CD-ROM.
<For Windows 2000>
•If the [Digital Signature Not Found] screen appears during
installation, click on the [Yes] button to continue the
installation process.
Confirming the driver version
To confirm the version of the loaded driver, click on Windows
[START] [View All Programs] [Pioneer] [MEP-
7000[SEP-C1]] [MEP-7000[SEP-C1] Version Display Utility].
MEMO
• This screen also allows you to confirm the version of the
firmware currently installed. Note, however, that the firmware
version will not be displayed if the SEP-C1 is not connected to
a computer, or if the computer is not communicating properly
with the SEP-C1.
19
En
SEP-C1_EN.book 20 ページ 2008年3月24日 月曜日 午前10時52分
USING DJ SOFTWARE
USING DJ SOFTWARE
By loading the accessory DJS software or another DJ software to a computer connected to this unit via USB cable, the unit can be used
to operate the DJ software program.
Supported DJ softwares
DJS Included as an accessory with the SEP-C1, the all-in-one DJ software program “DJS” allows immediate use of
DJ software.
Communication-
Commercially available DJ softwares supporting the SEP-C1’s dedicated communications protocol can be
supported DJ
operated even without the use of a control disc. For latest information regarding supported DJ software, please
software
consult the following Pioneer website:
http://www.prodjnet.com/support/
MIDI-supported DJ
The SEP-C1 outputs data regarding button and TEMPO adjust slider status in universal MIDI format, so DJ
software
softwares with MIDI support can be used to assign the unit’s MIDI messages, thus using the MIDI
communication for control.
Style of Play
The unit can be made to operate as a DJ software manipulator. When the SEP-C1 is used as a manipulator, you can control your DJ
software without need for either mouse or keyboard, using the same layout, functions, and ease of operation transmitted from the Pioneer
CDJ series.
USB auxiliary power cable
USB cable
Computer
20
En
