Pioneer VSX-S300-S: instruction
Class: Household, kitchen appliances, electronics and equipment
Type: Home Theater System
Manual for Pioneer VSX-S300-S
Table of contents
- What’s in the box AUDIO/VIDEO MULTI-CHANNEL RECEIVER Thank you for buying this Pioneer product. This Quick Start Guide includes instructions for basic connections and operations to allow simple use of the receiver. For detailed descriptions of the receiver, see the “Operating Instructions” provided on the included CD-ROM ( ).
- Connecting the speakers Flow of settings on the receiver
- Connecting a TV and playback component Plugging the receiver
- Basic setup Automatically setting up for surround sound (MCACC) Canceling the Auto Power Down Canceling the demo display
- Basic playback

Quick Start Guide
Guide rapide
Guida di avvio rapido
Snelstartgids
Guía de inicio rápido
Kurzanleitung
What’s in the box
Contenu du carton d’emballage
Комплект поставки
Contenuto della confezione
Inhoud van de doos
Contenido de la caja
Lieferumfang
VSX-S300
-
K/
-
S
AUDIO/VIDEO MULTI-CHANNEL RECEIVER
RECEPTEUR AUDIOVISUEL MULTICANAL
SINTOAMPLIFICATORE AUDIO/VIDEO MULTICANALE
AUDIO/VIDEO MULTIKANAALS RECEIVER
RECEPTOR AUDIO-VIDEO MULTICANAL
AUDIO-/VIDEO- MEHRKANAL-RECEIVER
Thank you for buying this Pioneer product. This Quick Start Guide includes instructions for basic connections and operations to allow simple use of the
receiver. For detailed descriptions of the receiver, see the “Operating Instructions” provided on the included CD-ROM ( ).
Merci pour l’achat de ce produit Pioneer. Ce guide rapide contient les instructions relatives aux raccordements et opérations de base permettant une
utilisation simple de ce récepteur. Pour des descriptions plus détaillées du récepteur, référez-vous au “Mode d’emploi” sur le CD-ROM ( ) fourni.
Благодарим вас за приобретение данного изделия Pioneer. В данном Кратком руководстве пользователя содержатся инструкции по основным
подключениям и операциям для упрощенного использования ресивера. Подробное описание ресивера см. в «Инструкции по эксплуатации»,
содержащихся на поставляемом CD-ROM
( )
.
Vi ringraziamo per avere acquistato questo prodotto Pioneer. Questa Guida di avvio rapido comprende istruzioni per i collegamenti fondamentali e per le
operazioni essenziali di questo ricevitore. Per una descrizione dettagliata del ricevitore, vedere le “Istruzioni per l’uso” contenute nel CD-ROM ( ) accluso.
Hartelijk dank voor de aanschaf van dit Pioneer product. In deze snelstartgids vindt u de instructies voor de basisaansluitingen en de basisbediening voor een
eenvoudig gebruik van de receiver. Voor meer gedetailleerde informatie wordt u verwezen naar de “Handleiding” die op de bijgeleverde CD-ROM ( ) staat.
Muchas gracias por haber adquirido este producto de Pioneer. Esta Guía de inicio rápido incluye instrucciones para hacer las conexiones y operaciones
básicas que le permitirán hacer un uso sencillo del receptor. Para conocer una descripción detallada del receptor, consulte el “Manual de instrucciones”
suministrado con el CD-ROM ( ) incluido.
Vielen Dank, dass Sie sich für dieses Pioneer-Produkt entschieden haben. Die Kurzanleitung enthält Anweisungen für grundlegende Verbindungen und
Bedienvorgänge, um eine einfache Bedienung des Receivers zu ermöglichen. Detaillierte Beschreibungen des Receivers finden Sie in der „Bedienungsanlei-
tung“ auf der mitgelieferten CD-ROM ( ).
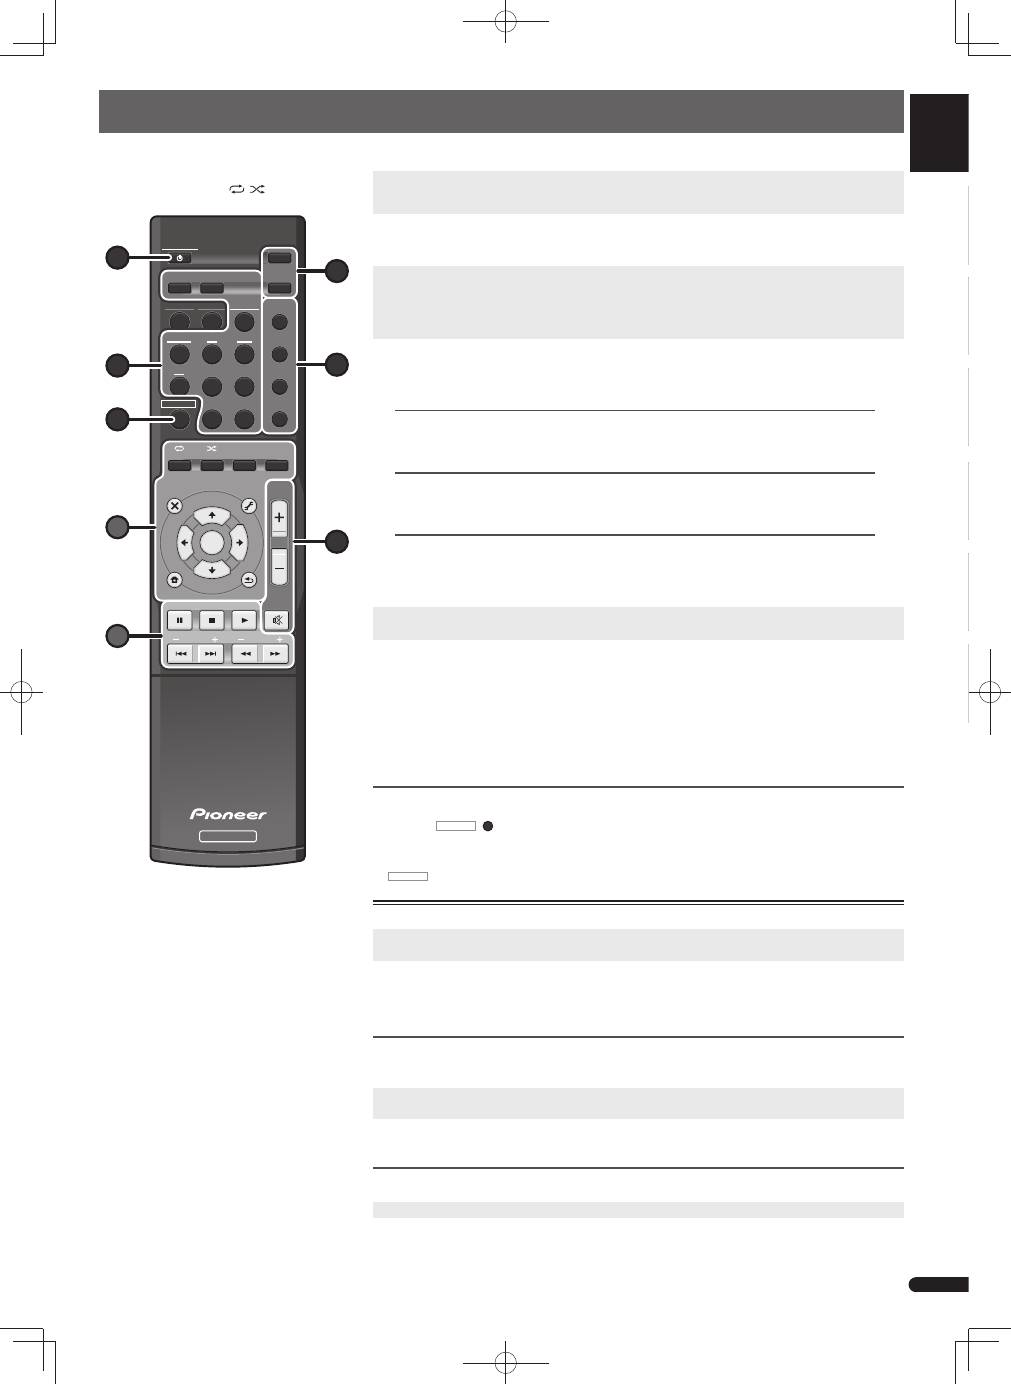
Remote Control
Télécommande
Пульт дистанционного управления
Telecomando
Afstandsbediening
Mando a distancia
Fernbedienung
Setup microphone
Microphone de configuration
Установочный микрофон
Impostazione microfono
Microfoon voor instellen
Micrófono de configuración
Mikrofon für die Einstellung
AAA size IEC R03 dry cell batteries x2
Piles à anode sèche AAA IEC R03 x 2
Сухие батарейки размера AAA IEC R03, 2 шт.
Pile a secco AAA IEC R03 x2
AAA/IEC/R03 drogecelbatterijen x2
Pilas secas AAA, IEC R03 x 2
AAA/IEC/R03 Trockenbatterien x2
AM loop antenna
Antenne cadre AM
Рамочная антенна АМ
Antenna AM a telaio
AM-raamantenne
Antena de cuadro de AM
MW-Rahmenantenne
FM wire antenna
Antenne filaire FM
Проволочная антенна FM
Antenna FM a filo
FM-draadantenne
Antena de hilos de FM
UKW-Drahtantenne
These quick start guide
Le présent Guide de démarrage
Это краткое руководство пользователя
Guida per l’avvio rapido
Deze Quick Start-gids
Esta guía de inicio rápido
Diese Kurzanleitung
Power cord
Cordon d’alimentation
Кабель питания
Cavo di alimentazione
Netsnoer
Cable de alimentación
Netzkabel
Warranty card
Carte de garantie
Гарантийный сертификат
Documento di garanzia
Garantiebewijs
Tarjeta de garantía
Garantiekarte
CD-ROM (Operating instructions)
CD-ROM (Mode d’emploi)
CD-ROM (Инструкции по эксплуатации)
CD-ROM (Istruzioni per l’uso)
CD-ROM (Handleiding)
CD-ROM (Manual de instrucciones)
CD-ROM (Bedienungsanleitung)
STANDBY/ON
iPod USB NETWORK
AUTO /
DIRECT
ALC /
STANDARD
ADV
SURR
SOUND
WING
AUDIO
DIMMER
TOP
MENU
MENU
TOOLS
VOL
RETURN
PTY
PRESET
BAND
MUTE
HOME MENU
iPod
CTRL
DISP
STATUS
ADAPTER
TUNER
BD
DVD
CD
STB
GAME
TV
PORTABLE
SLEEP
SP-AB
ENTER
TUNE
RECEIVER
RECEIVER
ECO
D AUX
A AUX
S.RTRV
Safety Brochure
Brochure sur la Sécurité
Брошюра по безопасноти
Volantino sulla sicurezza
Veiligheidsbrochure
Folleto de Seguridad
Sicherheritsbroshüre
VSX-S300
VSX-S300̲SYXCN̲QSG̲設変book.indb 1
VSX-S300̲SYXCN̲QSG̲設変book.indb 1
2012/04/23 14:16:55
2012/04/23 14:16:55

2
En
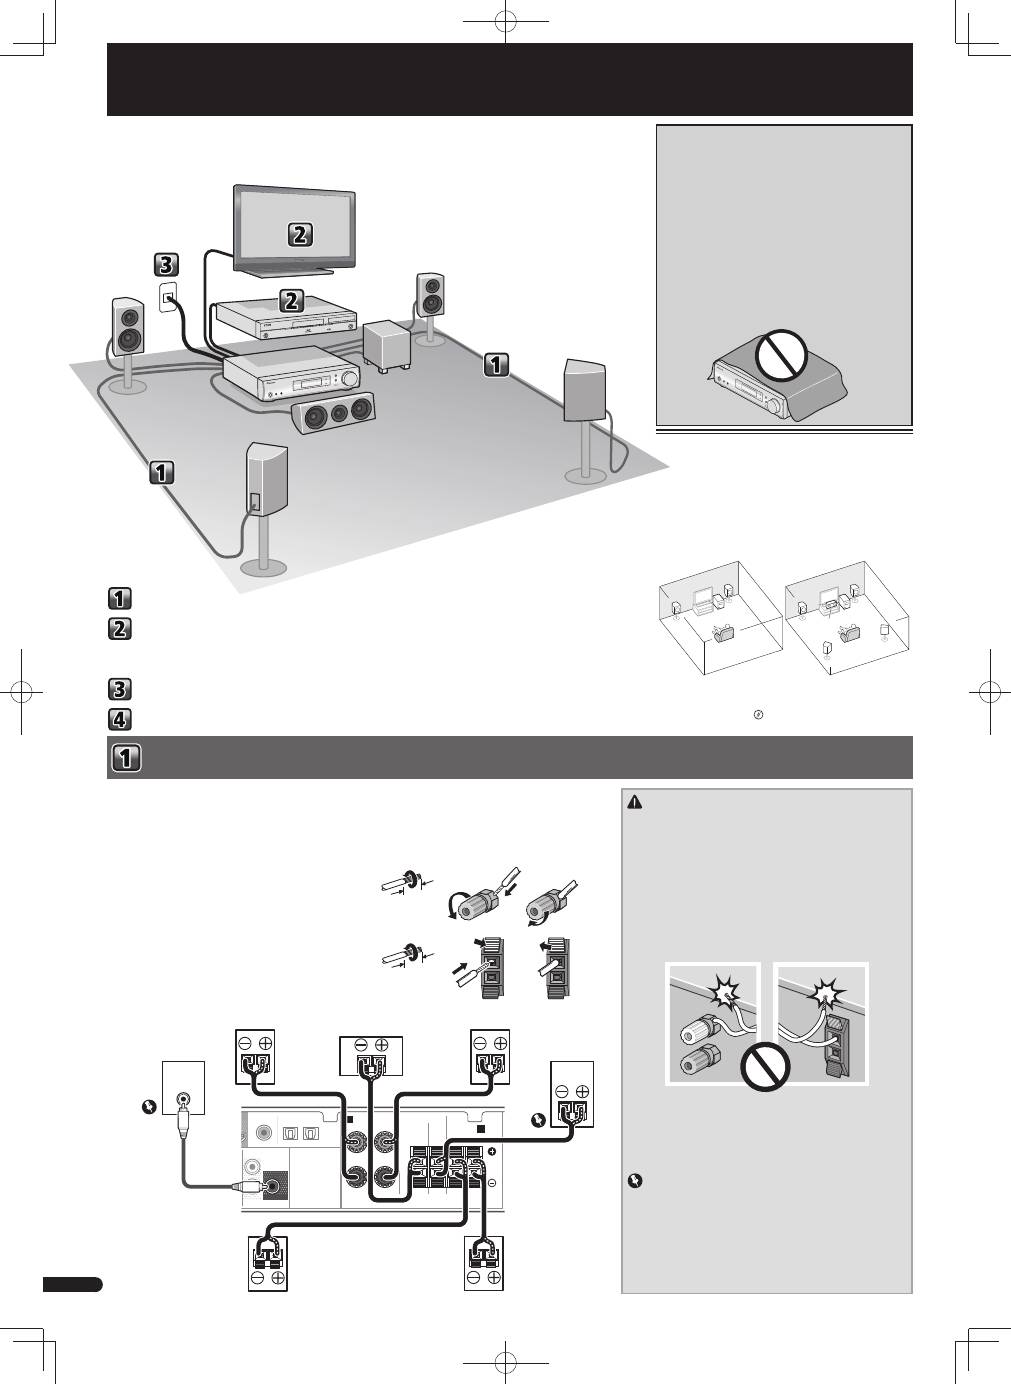
Connecting the speakers
Connecting the speakers
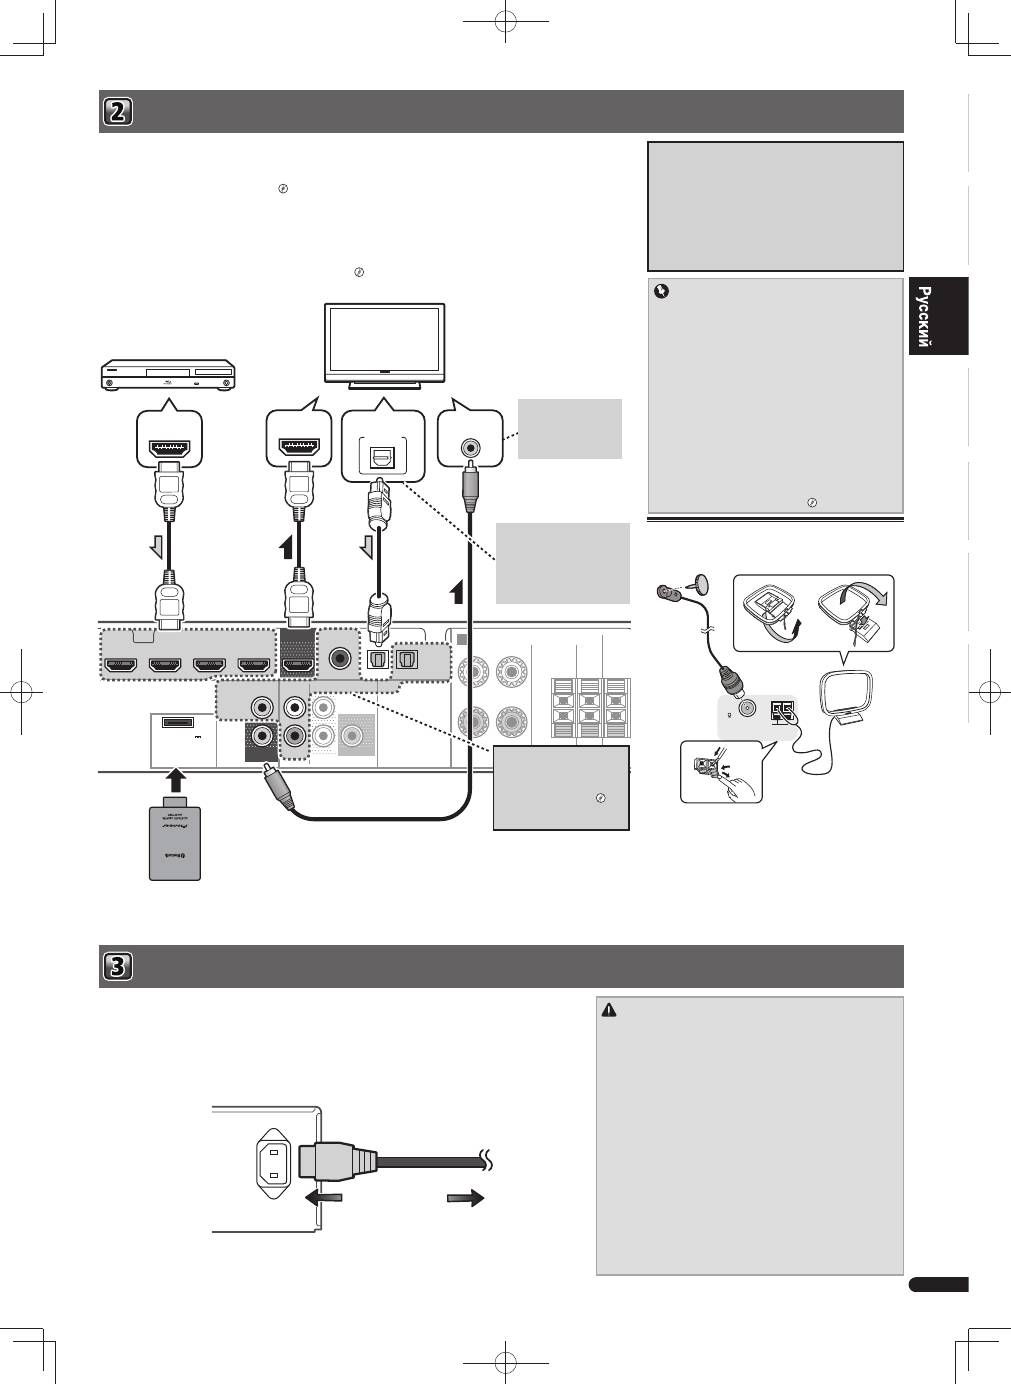
Connecting a TV and playback component
Plugging the receiver
Basic setup
CAUTION
• These speaker terminals carry
HAZARDOUS LIVE
voltage.
To prevent the risk of electric shock when connecting or
disconnecting the speaker cables, disconnect the power
cord before touching any uninsulated parts.
• Make sure that all the bare speaker wire is twisted
together and inserted fully into the speaker terminal. If
any of the bare speaker wire touches the back panel it
may cause the power to cut off as a safety measure.
• Do not allow the speaker cable core to come into contact
with the receiver body.
– If the speaker cable core comes into contact with any
metal portion of the receiver’s body, it may damage the
speakers and cause smoke and fire.
Insert speaker cables securely into the terminals and
check that the cable does not come out of easily.
Important
• SPEAKERS SUBWOOFER terminals are Pioneer’s passive
subwoofer S-SLW500 connection terminals. If using
another model of subwoofer, be sure to use a model with
built-in amp and connect to the PREOUT SUBWOOFER
terminal.
• Please connect either passive or powered subwoofers,
as connecting both makes it impossible to achieve the
correct sound effect.
SPEAKERS
AUDIO
SURR BACK/
FRONT HEIGHT
PRE OUT
OPTICAL
SUBWOOFER
R
L
(Single)
COAXIAL
CD IN
TV IN DIGITAL AUX IN
FRONT
R
L
A
CENTER
SUB
WOOFER SURROUND /
R
L
B
LINE LEVEL
INPUT
Front Right
Center
Front Left
Subwoofer
S-SLW500
Powerd
Subwoofer
Surround
Right
Surround
Left
Make sure you connect the speaker on the right to the right (R) terminal and the speaker on the left to the
left (L) terminal. Also make sure the positive and negative (+/–) terminals on the receiver match those on
the speakers.
You can use speakers with a normal impedance between 4
Ω
and 16
Ω
.
Bare wire connections
Front speaker terminals:
1
Twist exposed wire strands together.
2
Loosen terminal and insert exposed wire.
3
Tighten terminal.
Other speaker terminals:
1
Twist exposed wire strands together.
2
Push open the tabs and insert exposed wire.
3
Release the tabs.
Placing the speakers
The receiver will work with just two stereo speakers (the
front speakers in the diagram) but using at least three
speakers is recommended, and a complete setup is
best for surround sound.
To achieve the best possible surround sound, install
your speakers as shown below.
2.1 channel surorund system: 5.1 channel surorund system:
R
L
SW
R
SL
L
SW
C
SR
• In addition, surround back speakers, front height
speakers or Speaker B can also be connected.
"Connect the surround back or front height
speakers"
1
2
3
1
2
3
English
Flow of settings on the receiver
VENTILATION CAUTION
When installing this unit, make sure to leave space
around the unit for ventilation to improve heat radiation
(at least 10 cm at top, 5 cm at rear, and 5 cm at each
side).
WARNING
Slots and openings in the cabinet are provided for
ventilation to ensure reliable operation of the product,
and to protect it from overheating. To prevent fire
hazard, the openings should never be blocked or
covered with items (such as newspapers, table-cloths,
curtains) or by operating the equipment on thick carpet
or a bed.
D3-4-2-1-7b*_A1_En
Be sure to complete
all connections before
connecting this unit to
the AC power source.
The unit is a full-fledged AV receiver equipped with an
abundance of functions and terminals. It can be used
easily after following the procedure below to make the
connections and settings.
L
Front left
SW
Subwoofer
C
Center
TV
This receiver
Blu-ray Disc player
R
Front right
SL
Surround left
SR
Surround right
10 mm
10 mm
VSX-S300̲SYXCN̲QSG̲設変book.indb 2
VSX-S300̲SYXCN̲QSG̲設変book.indb 2
2012/04/23 14:17:06
2012/04/23 14:17:06
English
Français
Italiano
Español
Nederlands
Deutsch
3
En
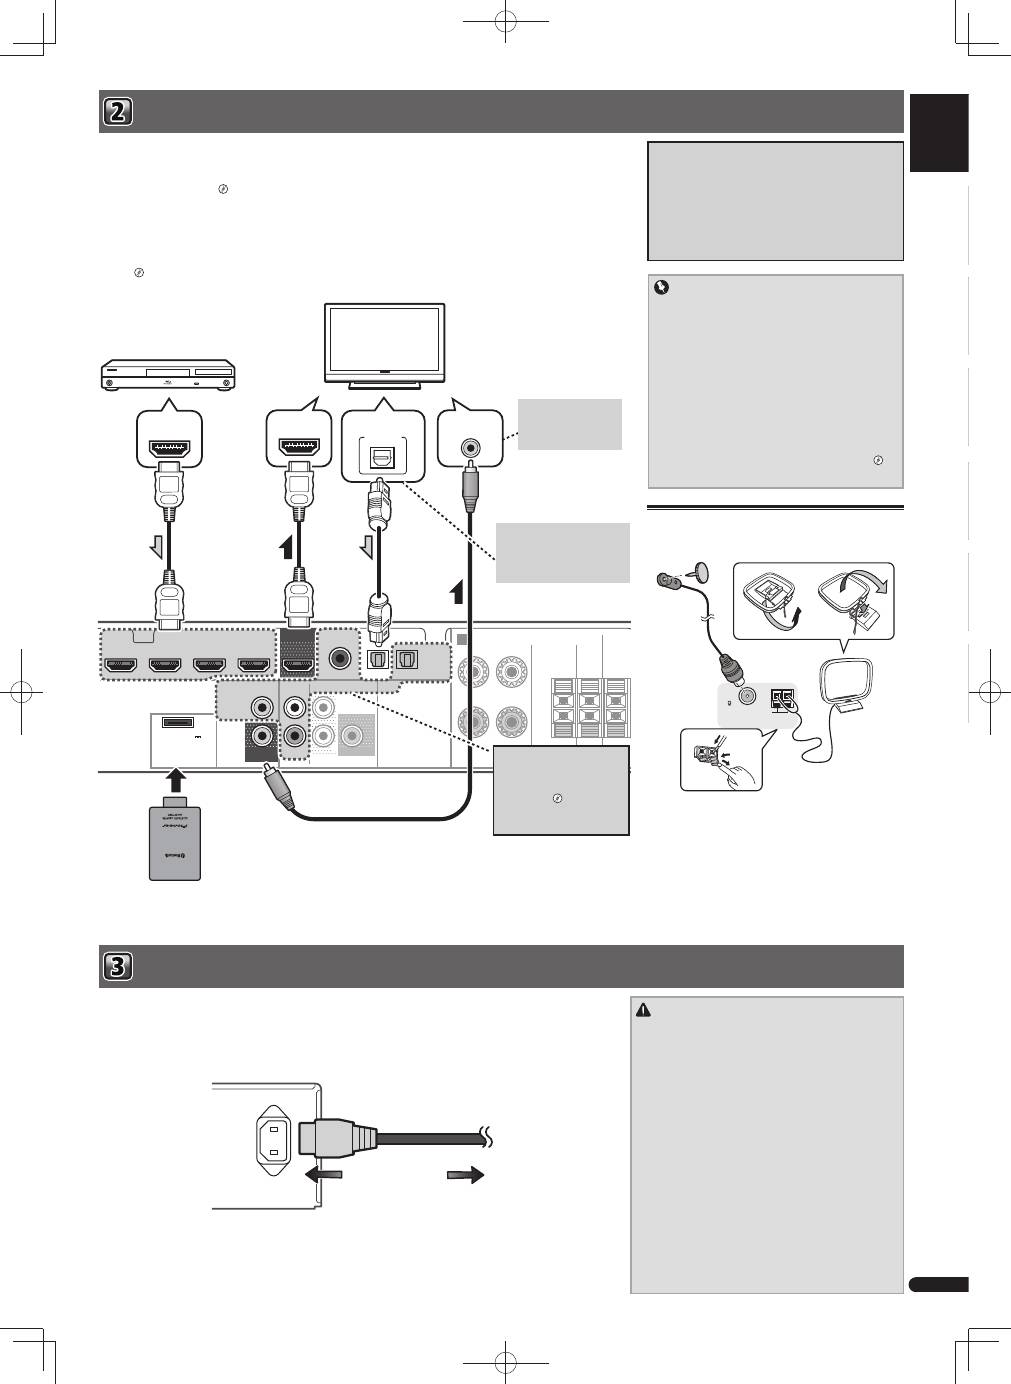
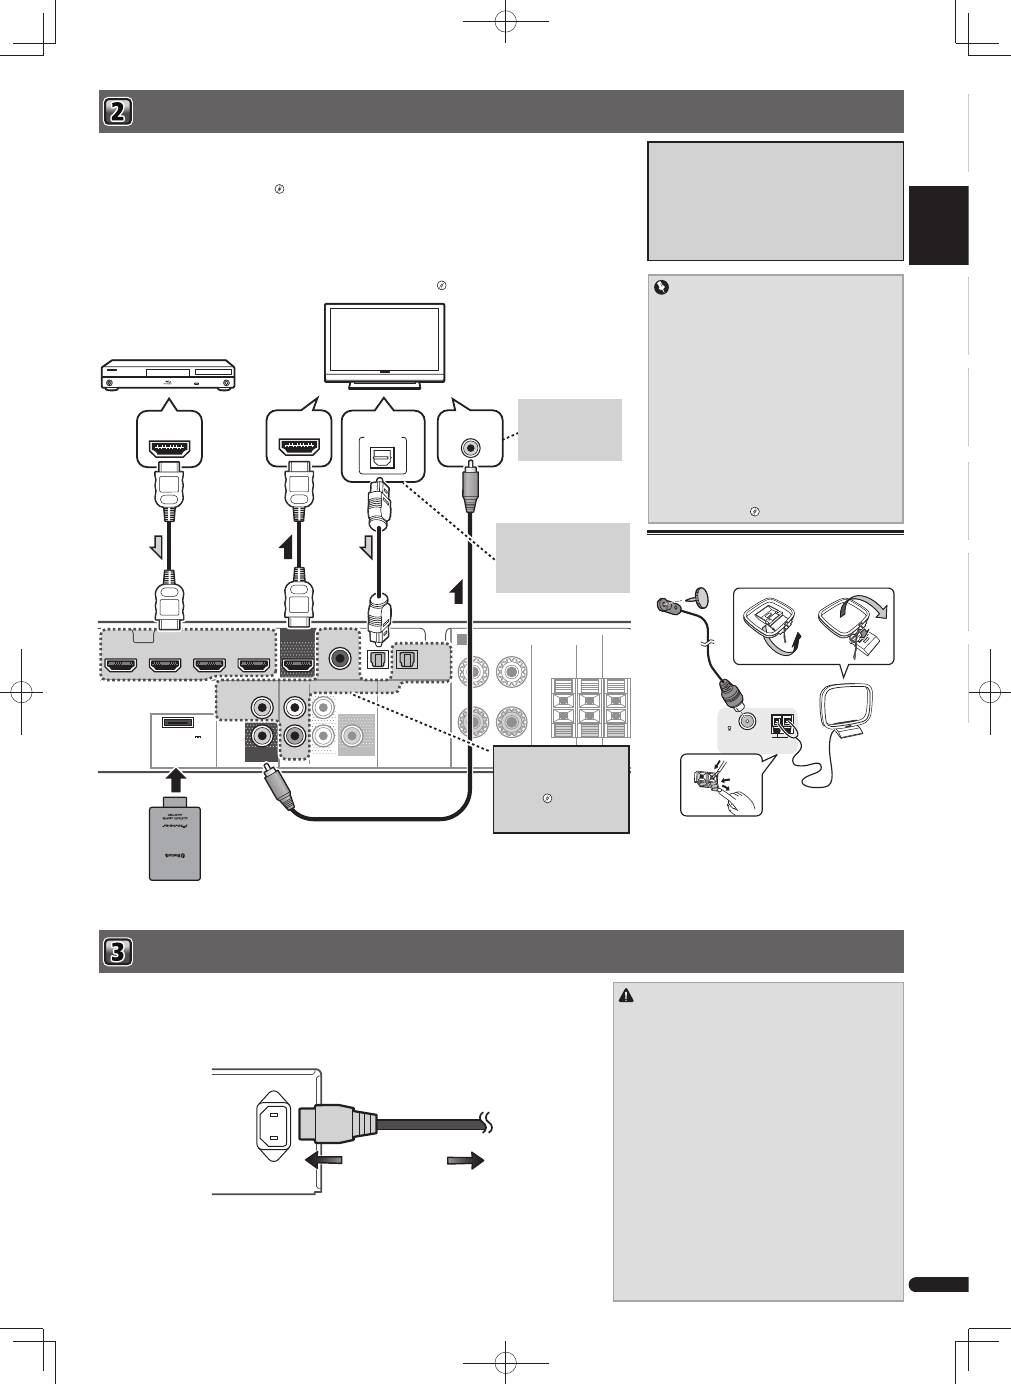
Connecting a TV and playback component Plugging the receiver
Important
• If the receiver is connected to a TV using an HDMI
cable, the on-screen display (OSD) will not be
displayed. Be sure to use a standard RCA analog
video cable to connect. In this case, switch the TV
input to analog to see the OSD screen (for setup,
etc.) on the TV.
• When the Control with HDMI function is ON and
the receiver is connected to a compatible TV with
an HDMI cable, and you switch the input of the
TV to composite, the input of the receiver may
automatically switch to TV. If this happens, switch
the receiver’s input back to the original input, or
turn OFF the Control with HDMI function.
"HDMI Setup"
If you have an HDMI or DVI (with HDCP) equipped component (Blu-ray Disc player, etc.), you can connect it to this
receiver using a commercially available HDMI cable.
If the TV and playback components support the Control with HDMI feature, the convenient Control with HDMI
functions can be used.
"Control with HDMI function"
• The following connection/setting is required to listen to the sound of the TV over this receiver.
– If the TV does not support the HDMI Audio Return Channel function, connect the receiver and TV with audio
cables (as shown).
– If the TV supports the HDMI Audio Return Channel function, the sound of the TV is input to the receiver via the
HDMI terminal, so there is no need to connect an audio cable. In this case, set ARC at HDMI Setup to ON.
"HDMI Setup"
About video outputs connection
This receiver is not loaded with a video converter.
When you use HDMI cables for connecting to the
input device, the same cables should be used for
connecting to the TV.
The signals input from the analog (composite) video
input of this unit will not be output from the HDMI
OUT.
HDMI
SPEAKERS
AUDIO
VIDEO
SURR BACK/
FRONT HEIGHT
PRE OUT
ASSIGNABLE
OPTICAL
SUBWOOFER
R
L
(Single)
OUT
MONITOR
OUT
ANALOG
AUX
IN
(
ANALOG
AUX
)
IN
COAXIAL
CD IN
STB IN
GAME IN
BD/BDR IN
DVD/DVR IN
TV IN DIGITAL AUX IN
FRONT
R
L
A
ADAPTER PORT
(
OUTPUT 5 V
0.1 A MAX
)
CENTER
SUB
WOOFER SURROU
R
VIDEO IN
HDMI IN
HDMI OUT
DIGITAL AUDIO OUT
OPTICAL
HDMI/DVI-compatible components
(Blu-ray Disc player, etc.)
HDMI/DVI-compatible TV
This connection is
necessary in order to
see the OSD of the unit
on the TV.
If the TV does not support the
HDMI Audio Return Channel
function, this connection is
required to listen to the TV
sound over the receiver.
If the device you wish to
connect does not have an
HDMI output terminal, it
can be connected via these
terminals.
"
Connecting
your component with no HDMI
terminal
"
CAUTION
• Handle the power cord by the plug part. Do not pull
out the plug by tugging the cord, and never touch the
power cord when your hands are wet, as this could
cause a short circuit or electric shock. Do not place
the unit, a piece of furniture, or other object on the
power cord or pinch the cord in any other way. Never
make a knot in the cord or tie it with other cables. The
power cords should be routed so that they are not
likely to be stepped on. A damaged power cord can
cause a fire or give you an electric shock. Check the
power cord once in a while. If you find it damaged,
ask your nearest Pioneer authorized independent
service company for a replacement.
• Do not use any power cord other than the one
supplied with this unit.
• Do not use the supplied power cord for any purpose
other than that described below.
• The receiver should be disconnected by removing the
mains plug from the wall socket when not in regular
use, e.g., when on vacation.
Connecting antennas
Connect FM wire antenna and the the AM loop antenna
as shown below.
ANTENNA
FM
UNBAL
75
AM LOOP
Only plug in after you have connected all your components to this receiver, including the speakers.
1
Plug the supplied power cord into the AC IN socket on the back of the receiver.
2
Plug the other end into a power outlet.
AC IN
To power outlet
Bluetooth
® ADAPTER
AS-BT100 or AS-BT200
(sold separately)
Refer to the Operating Instructions in CD-ROM for
instructions on how to connect and setup the
Bluetooth
ADAPTER and how to play music.
The Bluetooth® word mark and logos are registered
trademarks owned by Bluetooth SIG, Inc. and any use
of such marks by PIONEER CORPORATION is under
license. Other trademarks and trade names are those of
their respective owners.
VSX-S300̲SYXCN̲QSG̲設変book.indb 3
VSX-S300̲SYXCN̲QSG̲設変book.indb 3
2012/04/23 14:17:07
2012/04/23 14:17:07

4
En
PORTABLE /
MCACC SETUP MIC
PHONES
STANDBY / ON
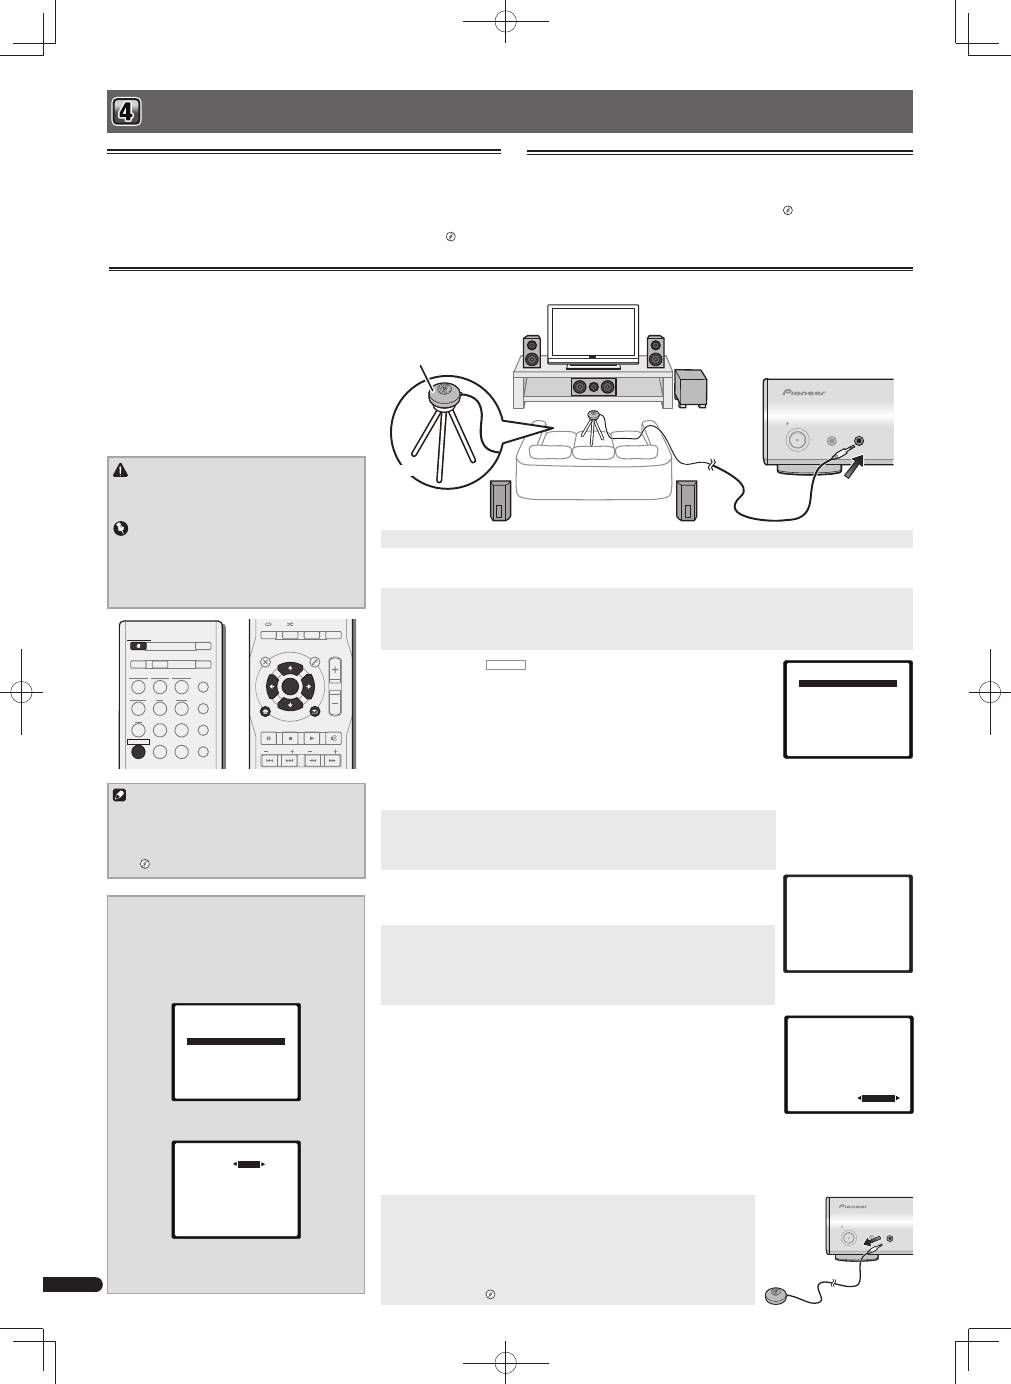
Basic setup
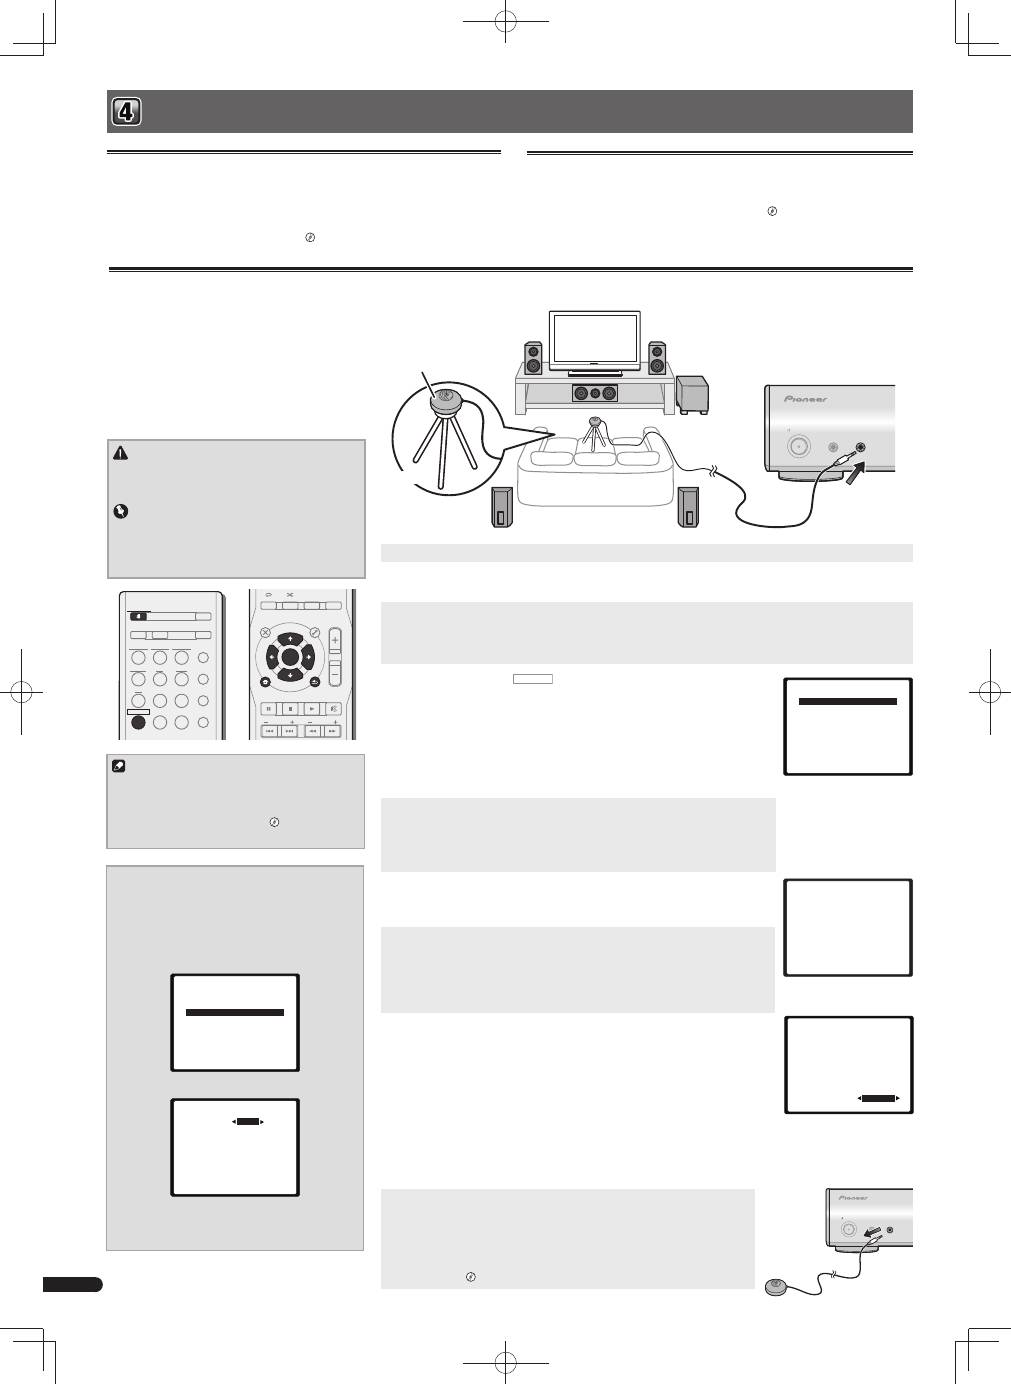
Automatically setting up for surround sound (MCACC)
CAUTION
• The test tones used in the Auto MCACC setup are
output at high volume.
Important
• The OSD will not appear if you have connected
using the HDMI output to your TV. Use composite
connections for Auto MCACC setup.
Note
• The subwoofer distance setting may be farther
than the actual distance from the listening
position. If this is the case, perform settings
manually.
"Speaker Distance"
1
Switch on the receiver and your TV.
2
Switch the TV input to the input that connects this receiver to the TV through the corresponding
composite cable.
3
Connect the microphone to the MCACC SETUP MIC jack on the front panel.
Make sure there are no obstacles between the speakers and the microphone.
If you have a tripod, use it to place the microphone so that it’s about ear level at your normal listening position.
Otherwise, place the microphone at ear level using a table or a chair.
4
Press
RECEIVER
on the remote control, then press the HOME MENU button.
The Home Menu appears on your TV. Use
and
ENTER
on the remote
control to navigate through the screens and select menu items. Press
RETURN
to exit
the current menu.
• Since the S-HV600B/S-HV500-LR/S-SL100-LR/S-SL100CR are designed as compact
satellite speakers, it is recommended that they be used in combination with a
subwoofer to provide full base sound. In this case, set the
X.OVER
to 200 Hz here
(see
"Change the X.OVER setting"
on this page).
5
Select ’Auto MCACC’ from the Home Menu, then press ENTER.
•
Mic In!
blinks when the microphone is not connected to MCACC SETUP MIC jack.
Try to be as quiet as possible after pressing
ENTER
. The system outputs a series of
test tones to establish the ambient noise level.
6
Follow the instructions on-screen.
• When using a powered subwoofer, make sure the subwoofer is on and the volume
is turned up.
7
Wait for the test tones to fi nish.
A progress report is displayed on-screen while the receiver outputs test tones to
determine the speakers present in your setup. Try to be as quiet as possible while it’s
doing this.
• For correct speaker settings, do not adjust the volume during the test tones.
8
Confi rm the speaker confi guration.
The configuration shown on-screen should reflect the actual speakers you have.
• With error messages (such as
Too much ambient noise
) select
RETRY
after
checking for ambient noise.
If the speaker configuration displayed isn’t correct, use
to select the speaker and
to change the setting. When you’re finished, go to the next step.
If you see an error message (
ERR
) in the right side column, there may be a problem
with the speaker connection. If selecting
RETRY
doesn’t fix the problem, turn off the
power and check the speaker connections.
9
The Auto MCACC setup has fi nished! You return to the Home Menu.
Make sure the setup microphone is disconnected.
The settings made in the Auto MCACC setup should give you excellent surround
sound from your system, but it is also possible to adjust these settings manually
using the Manual speaker setup.
"Manual speaker setup"
Canceling the Auto Power Down
When this receiver is not used over a period of several hours, it will power down
automatically. The automatic power-off timer is set to six hours under factory settings,
and the timing can be changed or the power-off function switched off altogether.
"The Auto Power Down menu"
Canceling the demo display
The display on the front panel shows various information (demo displays) when the
receiver is not operating.
You can turn off the demo display.
"The FL Demo Mode menu"
• The demo mode is canceled automatically when the Auto MCACC setup is
performed (see below).
The Auto Multi-Channel Acoustic Calibration (MCACC)
setup measures the acoustic characteristics of your
listening area, taking into account ambient noise,
speaker size and distance, and tests for both channel
delay and channel level. After you have set up the
microphone provided with your system, the receiver
uses the information from a series of test tones to
optimize the speaker settings and equalization for your
particular room.
iPod USB NETWORK
STANDBY/ON
AUTO /
DIRECT
ALC /
STANDARD
ADV
SURR
SOUND
WING
ADAPTER
TUNER
BD
DVD
CD
STB
GAME
TV
PORTABLE
RECEIVER
ECO
D AUX
A AUX
S.RTRV
AUDIO
DISP
DIMMER
TOP
MENU
MENU
TOOLS
VOL
RETURN
PTY
PRESET
BAND
MUTE
HOME MENU
iPod
CTRL
STATUS
SLEEP
SP-AB
ENTER
TUNE
Microphone
Tripod
Home Menu
1.Auto MCACC
2.Manual SP Setup
3.Input Assign
4.Pre Out Setting
5.HDMI Setup
6.Auto Power Down
7.FL Demo Mode
1.Auto MCACC
Now Analyzing
Environment Check
Ambient Noise
Speaker YES/NO
Return
1.Auto MCACC
Check!
OK
Return
10:Next
Front
Center
Surr
Surr. Back
Subwoofer
[ YES ]
[ YES ]
[ YES ]
[ - - - ]
[ YES ]
PORTABLE /
MCACC SETUP MIC
PHONES
STANDBY / ON
Change the X.OVER setting
For S-HV600B/S-HV500-LR/S-SL100-LR/S-SL100CR
speakers
1
Select ‘Manual SP Setup’ from the
Home Menu, then press ENTER.
2
Select ‘X.OVER’ from the Manual SP Setup
menu, then press ENTER.
2.Manual SP Setup
Return
a.Speaker System
b.Speaker Setting
c.X.OVER
d.Channel Level
e.Speaker Distance
3
Choose ‘200 Hz’ for the frequency cutoff
point.
2c.X.OVER
Return
Frequency
200Hz
4
When you’re fi nished, press RETURN twice.
You return to the Home Menu.
VSX-S300̲SYXCN̲QSG̲設変book.indb 4
VSX-S300̲SYXCN̲QSG̲設変book.indb 4
2012/04/23 14:17:09
2012/04/23 14:17:09
English
Français
Italiano
Español
Nederlands
Deutsch
5
En
Basic playback
Here are the basic instructions for playing a source (such as a Blu-ray Disc) with your home theater system.
1
Switch on your system components and receiver.
Start by switching on the playback component (for example a Blu-ray Disc player), your TV and subwoofer (if you
have one), then the receiver (press
STANDBY/ON
).
2
Switch the TV input to the input that connects this receiver.
For example, if you connected this receiver to the
VIDEO
jacks on your TV, make sure that the
VIDEO
input is now
selected.
3
Press input function buttons to select the input function you want to play.
• The input of the receiver will switch over, and you will be able to operate other components using the remote
control.
• The input source can also be selected by using the front panel
INPUT SELECTOR
button. In this case, the remote
control won’t switch operational modes.
4
Press AUTO/DIRECT to select ’AUTO SURR’ and start playback of the source.
If you’re playing a Dolby Digital or DTS surround sound Blu-ray/DVD disc, with a digital audio connection, you
should hear surround sound. If you’re playing a stereo source or if the connection is an analog audio connection,
you will only hear sound from the front left/right speakers in the default listening mode.
RECEIVER
STANDBY/ON
iPod USB NETWORK
AUTO /
DIRECT
ALC /
STANDARD
ADV
SURR
SOUND
WING
AUDIO
DIMMER
TOP
MENU
MENU
TOOLS
VOL
RETURN
PTY
PRESET
BAND
MUTE
HOME MENU
iPod
CTRL
DISP
STATUS
ADAPTER
TUNER
BD
DVD
CD
STB
GAME
TV
PORTABLE
SLEEP
SP-AB
ENTER
TUNE
RECEIVER
ECO
D AUX
A AUX
S.RTRV
1 4 3 7 6 A 5 B
Listening in Standard surround sound
This receiver provide basic surround sound for stereo and multichannel sources.
While listening to a source, press ALC/STANDARD repeatedly to select a listening mode.
Listening in Advanced surround sound
The Advanced surround effects can be used for a variety of additional surround sound effects.
While listening to a source, press ADV SURR repeatedly to select a listening mode.
Listening in Sound Wing mode
HVT speakers make it possible to enjoy a broader-ranging sound.
While listening to a source, press SOUND WING to select the SOUND WING mode.
5
Use VOL +/– to adjust the volume level.
• Sound can be switched off by pressing
MUTE
button.
6
Enjoy a variety of sounds.
Press ECO to select the Ecology mode.
• Select the Ecology mode for Stereo (max. 2.1 ch) playback to enable the reduction of power consumption to a
maximum of half normal levels.
Press S.RTRV to switch the Sound Retriever feature ON or OFF.
• When audio data is removed during the compression process, sound quality often suffers from an uneven
sound image. The Sound Retriever feature employs new DSP technology that helps bring CD quality sound
back to compressed 2-channel audio by restoring sound pressure and smoothing jagged artifacts left over after
compression.
Other remote control functions
• Switch to one of the underlined devices to use the remote control to operate that device. To operate the receiver,
first press
RECEIVER
(
7
)
, then press the appropriate button to operate.
Use the "A" buttons to adjust the settings of this receiver and operate other devices.
Use the "B" buttons to operate other devices. Operations are still possible even after pressing the
RECEIVER
button.
Listening to the radio
1
Press TUNER to select the tuner.
If necessary, press
BAND
to change the band (FM or AM),
2
Press TUNE+/– (or
) to tune to a station.
• Press and hold
TUNE+/–
(or
) for about a second. The receiver will start searching for the next station.
If you’re listening to an FM station but the reception is weak, press
BAND
to select
FM MONO
and set the receiver
to the mono reception mode.
Saving station presets
If you often listen to a particular radio station, it’s convenient to have the receiver store the frequency for easy recall
whenever you want to listen to that station.
1
Press TOOLS while receiving a signal from the station you want to store.
The preset number is blinking.
2
Press PRESET+/– (or
) to select the station preset you want, then press ENTER.
The preset number stop blinking and the receiver stores the station.
Listening to station presets
You will need to have some presets stored to do this.
Press PRESET+/– (or
) to select the station preset you want.
© 2012 PIONEER CORPORATION.
All rights reserved.
• The following buttons are not used with this receiver:
–
iPod USB
,
NETWORK
,
,
,
iPod CTRL
VSX-S300̲SYXCN̲QSG̲設変book.indb 5
VSX-S300̲SYXCN̲QSG̲設変book.indb 5
2012/04/23 14:17:10
2012/04/23 14:17:10

2
Fr
Raccordement des enceintes
Raccordement des enceintes
Raccordement d’un téléviseur et de périphériques de lecture
Branchement du récepteur
Confi guration de base
ATTENTION
• Les bornes des haut-parleurs sont sous une tension
DANGEREUSE
. Pour éviter tout risque de décharge électrique
lors du branchement et du débranchement des câbles de haut-
parleur, débranchez le cordon d’alimentation avant de toucher
des parties non isolées.
• Assurez-vous que tous les brins de fil dénudés du câble
d’enceinte sont torsadés ensemble et insérés complètement
dans la borne de l’enceinte. Si une partie du fil d’enceinte
exposé entre en contact avec le panneau arrière, l’alimentation
peut être coupée par mesure de sécurité.
• Ne laissez pas l’âme des câbles d’enceintes venir en contact
avec le boîtier du récepteur.
– Si l’âme des câbles d’enceintes entraient en contact avec
une partie métallique du boîtier du récepteur, cela créerait
un court-circuit qui pourrait endommager les enceintes et
provoquer un départ de feu.
Insérez correctement les câbles d’enceintes dans les bornes et
vérifiez que les câbles ne peuvent pas se détacher facilement.
Important
• Les bornes SPEAKERS SUBWOOFER sont des bornes de
connexion pour caisson de basse passif Pioneer S-SLW500.
Si vous utilisez un autre modèle de caisson de basse, veillez à
utiliser un modèle avec amplificateur intégré et connectez-le à la
borne PREOUT SUBWOOFER.
• Connectez soit un caisson de basse passif soit un caisson
de basse actif, car le fait de connecter les deux types
simultanément empêche d’obtenir un effet sonore correct.
SPEAKERS
AUDIO
SURR BACK/
FRONT HEIGHT
PRE OUT
OPTICAL
SUBWOOFER
R
L
(Single)
COAXIAL
CD IN
TV IN DIGITAL AUX IN
FRONT
R
L
A
CENTER
SUB
WOOFER SURROUND /
R
L
B
LINE LEVEL
INPUT
Avant droite
Centrale
Avant gauche
Caisson de
basses
S-SLW500
Subwoofer
amplifié
Surround
droite
Surround
gauche
Vérifiez que l’enceinte droite est raccordée à la borne droite (R) et que l’enceinte gauche est raccordée à
la borne gauche (L). Assurez-vous également que les bornes positive et négative (+/–) du récepteur sont
reliées aux bornes positive et négative des enceintes.
Vous pouvez utiliser des enceintes ayant une impédance normale comprise entre 4
Ω
et 16
Ω
.
Branchement des fi ls nus
Bornes des enceintes avant :
1
Torsadez ensemble les brins de fi l dénudés.
2
Libérez la borne de l’enceinte et insérez-y le fi l.
3
Refermez la borne.
Autres bornes d’enceinte :
1
Torsadez ensemble les brins de fi l dénudés.
2
Poussez sur les languettes pour les ouvrir et
insérez le fi l dénudé.
3
Relâchez les languettes.
Installation des enceintes
Le récepteur fonctionnera avec seulement deux
enceintes stéréo (les enceintes avant sur le schéma),
mais il est recommandé d’en utiliser au moins trois ; une
configuration complète de huit enceintes est cependant
idéale pour la production du son surround.
Pour obtenir le meilleur son surround possible, installez
vos enceintes conformément à l’illustration ci-dessous.
Système surround à 2.1 canaux : Système surround à 5.1 canaux :
R
L
SW
R
SL
L
SW
C
SR
• De plus, il est possible de connecter des enceinte
surround arrière, des enceintes surround avant-
haut, ou des enceintes B.
“Connectez les enceintes surround arrière ou
surround avant-haut”
1
2
3
1
2
3
Organigramme des réglages sur le récepteur
PRÉCAUTION DE VENTILATION
Lors de l’installation de l’appareil, veillez à laisser un
espace suffisant autour de ses parois de manière à
améliorer la dissipation de chaleur (au moins 10 cm sur
le dessus, 5 cm à l’arrière et 5 cm de chaque côté).
AVERTISSEMENT
Les fentes et ouvertures du coffret sont prévues pour la
ventilation, pour assurer un fonctionnement stable de
l’appareil et pour éviter sa surchauffe. Pour éviter les
risques d’incendie, ne bouchez jamais les ouvertures et
ne les recouvrez pas d’objets, tels que journaux, nappes
ou rideaux, et n’utilisez pas l’appareil posé sur un tapis
épais ou un lit.
D3-4-2-1-7b*_A1_Fr
Assurez-vous que
tous les branchements
ont été effectués
correctement avant de
raccorder cet appareil
au secteur.
Cet appareil est un récepteur AV à part entière
présentant un grand nombre de fonctions et de prises.
Il peut être utilisé facilement lorsque les raccordements
et les réglages mentionnés ci-dessous ont été effectués.
L
Avant
gauche
SW
Caisson de basses
c
Centrale
Téléviseur
Ce récepteur
Lecteur de Blu-ray Disc
R
Avant droite
SL
Surround gauche
SR
Surround droite
10 mm
10 mm
Français
VSX-S300̲SYXCN̲QSG̲設変book.indb 2
VSX-S300̲SYXCN̲QSG̲設変book.indb 2
2012/04/23 14:17:11
2012/04/23 14:17:11
English
Français
Italiano
Español
Nederlands
Deutsch
3
Fr
Raccordement d’un téléviseur et de périphériques de lecture Branchement du récepteur
Important
• Si cet appareil est connecté à un téléviseur via
un câble HDMI, l’affichage des informations à
l’écran (OSD) n’apparaît pas. Veillez à utiliser
un câble vidéo analogique RCA pour réaliser le
branchement. Dans ce cas, si vous souhaitez
que l’affichage OSD apparaisse (pour effectuer
la configuration, etc.), basculez l’entrée TV sur le
mode analogique.
• Lorsque la fonction Control HDMI est activée
(ON) et que le récepteur est connecté via un
câble HDMI à un téléviseur compatible, lorsque
vous commutez l’entrée du téléviseur sur vidéo
composite, il se peut que l’entrée du récepteur
commute automatiquement sur TV. Si cela se
produit, commutez l’entrée du récepteur sur
le réglage d’origine, ou désactivez la fonction
Control HDMI.
“Menu HDMI Setup”
Si vous avez un composant équipé d’une prise HDMI ou DVI (avec HDCP) (Lecteur Blu-ray Disc, etc.), vous pouvez
le raccorder à ce récepteur à l’aide d’un câble HDMI disponible dans le commerce.
Si le téléviseur et les équipements de lecture connectés prennent en charge la fonction d’Control HDMI, cette
fonction pratique peut être utilisée.
“Fonction Control HDMI”
• La connexion et/ou le réglage suivant est nécessaire pour écouter le son du téléviseur par l’intermédiaire du
récepteur.
– Si le téléviseur ne prend pas en charge la fonction HDMI Audio Return Channel, connectez le récepteur et le
téléviseur à l’aide de câbles audio (comme indiqué).
– Si le téléviseur prend en charge la fonction HDMI Audio Return Channel, le son du téléviseur est envoyé vers
le récepteur via la prise HDMI et il n’est alors pas nécessaire de connecter un câble audio. Dans ce cas, réglez
l’option ARC sur ON dans le menu de configuration HDMI Setup.
“Menu HDMI Setup”
À propos du raccordement des sorties vidéo
Ce récepteur ne comporte pas de convertisseur vidéo.
Si vous utilisez des câbles HDMI pour raccorder un
équipement en entrée, le même type de câble doit
être utilisé pour le raccordement du téléviseur.
Les signaux des entrées vidéo analogiques
(composites) de cet appareil ne seront pas envoyés
vers la sortie HDMI OUT.
HDMI
SPEAKERS
AUDIO
VIDEO
SURR BACK/
FRONT HEIGHT
PRE OUT
ASSIGNABLE
OPTICAL
SUBWOOFER
R
L
(Single)
OUT
MONITOR
OUT
ANALOG
AUX
IN
(
ANALOG
AUX
)
IN
COAXIAL
CD IN
STB IN
GAME IN
BD/BDR IN
DVD/DVR IN
TV IN DIGITAL AUX IN
FRONT
R
L
A
ADAPTER PORT
(
OUTPUT 5 V
0.1 A MAX
)
CENTER
SUB
WOOFER SURROU
R
VIDEO IN
HDMI IN
HDMI OUT
DIGITAL AUDIO OUT
OPTICAL
Équipements compatibles HDMI/DVI
(Lecteur de Blu-ray Disc, etc.)
Téléviseur compatible
HDMI/DVI
Cette connexion est
nécessaire afin de faire
apparaître l’affichage
OSD de l’appareil sur le
téléviseur.
Si le téléviseur ne prend pas
en charge la fonction HDMI
Audio Return Channel, cette
connexion est nécessaire pour
écouter le son du téléviseur par
l’intermédiaire du récepteur.
Si l’ équipement que vous
souhaitez connecter ne possède
pas de prise de sortie HDMI,
il peut être connecté via ces
bornes.
“Raccordement
d’un équipement dépourvu de
borne HDMI”
ATTENTION
• Tenez le cordon d’alimentation par sa prise lorsque vous
le manipulez. Ne débranchez pas l’appareil en tirant sur
le cordon et ne touchez jamais le cordon d’alimentation
avec les mains mouillées ; vous pourriez provoquer
un court-circuit ou prendre un choc électrique. Ne
placez pas l’appareil, un meuble ou tout autre objet
sur le cordon d’alimentation, et évitez de le pincer de
toute autre manière. Ne faites jamais de nœud dans
le cordon et ne le liez jamais avec d’autres câbles. Les
cordons d’alimentation doivent être acheminés de façon
à ce qu’on ne puisse pas marcher dessus. Un cordon
d’alimentation endommagé peut provoquer un incendie
ou un choc électrique. Vérifiez l’état du cordon de temps
à autre. Si le cordon est endommagé, demandez-en
le remplacement auprès du service après-vente agréé
Pioneer le plus proche.
• N’utilisez aucun autre cordon d’alimentation que celui
fourni avec cet appareil.
• N’utilisez pas le cordon d’alimentation fourni à d’autres
fins que celles décrites ci-après.
• Lorsque le récepteur n’est pas utilisé durant une
longue période (par ex. pendant les vacances), il est
recommandé de le débrancher, en retirant le connecteur
d’alimentation de la prise murale.
Raccordement des antennes
Raccordez l’antenne filaire FM et l’antenne cadre AM
comme indiqué ci-dessous.
ANTENNA
FM
UNBAL
75
AM LOOP
Ne raccordez le récepteur au secteur qu’après y avoir connecté tous les composants, y compris les
haut-parleurs.
1
Enfi chez le cordon d’alimentation fourni dans la prise AC IN à l’arrière du récepteur.
2
Enfi chez l’autre extrémité dans une prise électrique.
AC IN
Vers la prise secteur
ADAPTATEUR
Bluetooth®
AS-BT100 ou AS-BT200
(vendu séparément)
Pour plus d’informations sur la connexion et la
configuration de la clé
Bluetooth
ADAPTER et sur la lecture
audio à l’aide de cette clé, veuillez consulter le Mode
d’emploi sur le CD-ROM.
La marque de mot et les logos Bluetooth® sont des
marques déposées appartenant à Bluetooth SIG, Inc.
et toute utilisation de ces marques par PIONEER
CORPORATION est faite sous licence. Les autres
marques commerciales et noms commerciaux
appartiennent à leurs propriétaires respectifs.
VSX-S300̲SYXCN̲QSG̲設変book.indb 3
VSX-S300̲SYXCN̲QSG̲設変book.indb 3
2012/04/23 14:17:13
2012/04/23 14:17:13
4
Fr
PORTABLE /
MCACC SETUP MIC
PHONES
STANDBY / ON
Confi guration de base
Confi guration automatique du son surround (MCACC)
ATTENTION
• Les tonalités de test utilisées dans la configuration
MCACC automatique sont générées à un volume
élevé.
Important
• L’affichage à l’écran n’apparaît pas si vous avez
effectué la connexion au téléviseur via la sortie
HDMI. Utilisez les connexions composites pour la
configuration Auto MCACC.
Remarque
• Il peut arriver que le réglage de la distance du
subwoofer soit supérieur à la distance réelle
de la position d’écoute. Dans ce cas, effectuez
les réglages manuellement.
“Distance des
enceintes”
1
Allumez le récepteur et votre téléviseur.
2
Commutez l’entrée du téléviseur sur l’entrée qui connecte ce récepteur au téléviseur via le câble cor-
respondant vidéo composite.
3
Connectez le microphone à la prise MCACC SETUP MIC sur le panneau avant.
Assurez-vous qu’il n’y a pas d’obstacles entre les enceintes et le microphone.
Si vous avez un trépied, utilisez-le pour y placer le microphone afin qu’il soit au niveau des oreilles à votre position
d’écoute normale. Sinon, placez le microphone au niveau des oreilles en utilisant une table ou une chaise.
4
Appuyez sur la touche
RECEIVER
de la télécommande, puis sur la touche
HOME MENU.
L’affichage revient à l’écran d’accueil Home Menu. Utilisez les touches
et
ENTER
de la télécommande pour naviguer dans les écrans et sélectionner des options
de menu. Appuyez sur la touche
RETURN
pour sortir du menu actuel.
• Étant donné que les enceintes S-HV600B/S-HV500-LR/S-SL100-LR/S-SL100CR
sont des enceintes satellites compactes, il est recommandé de les utiliser
conjointement avec un caisson de grave pour restituer toute la richesse du son.
Dans ce cas, réglez le paramètre
X.OVER
sur 200 Hz (voir
“Pour modifier le paramètre X.OVER”
sur cette page).
5
Sélectionnez ‘Auto MCACC’ dans le Home Menu, puis appuyez sur ENTER.
•
Mic In!
clignote lorsque le microphone n’est pas raccordé à la prise
MCACC SETUP MIC.
Veillez à faire le moins de bruit possible après avoir appuyé sur
ENTER
. Le système
émet une série de tonalités de test pour établir le niveau de bruit ambiant.
6
Suivez les instructions à l’écran.
• En cas d’utilisation d’un caisson de basse actif, vérifiez que le caisson de basse est
sous tension et que vous avez monté le volume.
7
Attendez que les tonalités de test ne retentissent plus.
Un rapport de progression est affiché à l’écran pendant que le récepteur émet des
tonalités de test afin de déterminer la présence des enceintes dans votre configuration.
Essayez de rester aussi silencieux que possible pendant cette opération.
• Pour régler correctement vos enceintes, ne réglez pas le volume pendant que les
tonalités de test sont générées.
8
Confi rmez la confi guration des enceintes.
La configuration affichée à l’écran doit indiquer les enceintes que vous avez réellement
installées.
• Si un message d’erreur (tel que
Too much ambient noise
) s’affiche, sélectionnez
RETRY
après avoir vérifié le bruit ambiant.
Si la configuration des enceintes affichée n’est pas correcte, utilisez
pour
sélectionner l’enceinte et
modifier la configuration. Lorsque vous avez terminé,
passez à l’étape suivante.
Si un message d’erreur (
ERR
) s’affiche dans la colonne de droite, il est possible que
vous ayez mal raccordé vos enceintes. Si le fait de sélectionner la touche
RETRY
ne corrige pas le problème, arrêtez le récepteur et vérifiez les raccordements des
enceintes.
9
La confi guration Auto MCACC est terminée ! L’affi chage revient à
l’écran d’accueil Home Menu.
Assurez-vous de débrancher le microphone de configuration.
Les réglages effectués en utilisant la configuration Auto MCACC doivent
permettre à votre système de restituer une excellente qualité de son surround. Il
est également possible d’ajuster ces réglages manuellement via le menu Manual
Speaker Setup.
“Réglage manuel des enceintes”
Annulation de la fonction d’arrêt automatique Auto Power
Down
Lorsque ce récepteur n’est pas utilisé pendant une période de plusieurs heures, il se
met automatiquement hors tension. La minuterie d’arrêt automatique est réglée en
usine sur une durée six heures. Cette durée peut être modifiée et la fonction d’arrêt
automatique peut aussi être désactivée.
“Le menu Auto Power Down”
Désactivation du mode d’affi chage de démonstration
Diverses informations (de démonstration) s’affichent sur le panneau avant lorsque
le récepteur ne fonctionne pas.
Il est possible de désactiver ce mode d’affichage.
“Le menu FL Demo Mode”
• Le mode démo est annulé automatiquement lorsque la configuration Auto
MCACC est effectué (voir ci-dessous).
Le système de calibrage acoustique multicanaux (Multi-
Channel Acoustic Calibration, MCACC) mesure les
caractéristiques acoustiques de votre position d’écoute
en tenant compte du bruit ambiant, de la taille et de
la distance des enceintes et des tests sur le retard et
le niveau de canal. Une fois que vous avez installé le
microphone fourni avec votre système, le récepteur
utilise les informations provenant d’une série de
tonalités de test afin d’optimiser les réglages d’enceinte
et l’égalisation pour une pièce spécifique.
iPod USB NETWORK
STANDBY/ON
AUTO /
DIRECT
ALC /
STANDARD
ADV
SURR
SOUND
WING
ADAPTER
TUNER
BD
DVD
CD
STB
GAME
TV
PORTABLE
RECEIVER
ECO
D AUX
A AUX
S.RTRV
AUDIO
DISP
DIMMER
TOP
MENU
MENU
TOOLS
VOL
RETURN
PTY
PRESET
BAND
MUTE
HOME MENU
iPod
CTRL
STATUS
SLEEP
SP-AB
ENTER
TUNE
Microphone
Trépied
Home Menu
1.Auto MCACC
2.Manual SP Setup
3.Input Assign
4.Pre Out Setting
5.HDMI Setup
6.Auto Power Down
7.FL Demo Mode
1.Auto MCACC
Now Analyzing
Environment Check
Ambient Noise
Speaker YES/NO
Return
1.Auto MCACC
Check!
OK
Return
10:Next
Front
Center
Surr
Surr. Back
Subwoofer
[ YES ]
[ YES ]
[ YES ]
[ - - - ]
[ YES ]
PORTABLE /
MCACC SETUP MIC
PHONES
STANDBY / ON
Pour modifi er le paramètre X.OVER
Pour les enceintes S-HV600B/S-HV500-LR/S-SL100-LR/
S-SL100CR
1
Sélectionnez ‘Manual SP Setup’ dans le
Home Menu, puis appuyez sur ENTER.
2
Sélectionnez ‘X.OVER’ dans le
Manual SP Setup, puis appuyez sur ENTER.
2.Manual SP Setup
Return
a.Speaker System
b.Speaker Setting
c.X.OVER
d.Channel Level
e.Speaker Distance
3
Réglez la fréquence de coupure sur ‘200 Hz’.
2c.X.OVER
Return
Frequency
200Hz
4
Lorsque vous avez terminé, appuyez deux
fois sur RETURN.
Retournez au menu d’accueil (Home).
VSX-S300̲SYXCN̲QSG̲設変book.indb 4
VSX-S300̲SYXCN̲QSG̲設変book.indb 4
2012/04/23 14:17:14
2012/04/23 14:17:14

English
Français
Italiano
Español
Nederlands
Deutsch
5
Fr
Lecture de base
Voici les instructions de base pour lire une source (telle qu’un Blu-ray Disc) avec votre système home cinéma.
1
Allumez les composants de votre système et votre récepteur.
Allumez en premier lieu l’équipement de lecture (par exemple, un lecteur Blu-ray Disc), votre téléviseur et le
caisson de graves (si vous en avez un), puis le récepteur (appuyez sur
STANDBY/ON
).
2
Commutez l’entrée TV sur l’entrée qui est connectée à ce récepteur.
Par exemple, si vous connectez ce récepteur aux prise
VIDEO
de votre téléviseur, veillez à ce que l’entrée
sélectionnée soit
VIDEO
.
3
Utilisez les touches de fonctions d’entrée pour sélectionner la fonction d’entrée souhaitée.
• L’entrée du récepteur commute et vous pourrez alors utiliser d’autres composants via la télécommande.
• La source d’entrée peut aussi être sélectionnée à l’aide du bouton
INPUT SELECTOR
. Dans ce cas, la
télécommande ne permutera pas les modes de fonctionnement.
4
Appuyez sur AUTO/DIRECT pour sélectionner “AUTO SURR”, puis lancez la lecture de la source.
Si vous lisez un disque Blu-ray/DVD enregistré en Dolby Digital ou DTS surround, l’utilisation d’une connexion
audionumérique doit vous permettre de profiter du son surround. Si vous lisez à partir d’une source stéréo ou si la
connexion audio est une connexion analogique, le son ne sera émis que par les enceintes avant gauche et droite
en mode d’écoute par défaut.
RECEIVER
STANDBY/ON
iPod USB NETWORK
AUTO /
DIRECT
ALC /
STANDARD
ADV
SURR
SOUND
WING
AUDIO
DIMMER
TOP
MENU
MENU
TOOLS
VOL
RETURN
PTY
PRESET
BAND
MUTE
HOME MENU
iPod
CTRL
DISP
STATUS
ADAPTER
TUNER
BD
DVD
CD
STB
GAME
TV
PORTABLE
SLEEP
SP-AB
ENTER
TUNE
RECEIVER
ECO
D AUX
A AUX
S.RTRV
1 4 3 7 6 A 5 B
Écoute en mode surround standard
Ce récepteur permet d’obtenir, sans réglage particulier, un son surround de base pour les sources
stéréo et multicanaux.
Lorsque vous écoutez une source, appuyez de manière répétée sur la touche
ALC/STANDARD pour sélectionner un mode d’écoute.
Écoute en mode surround avancé
Les effets Advanced surround peuvent être utilisés pour une large gamme d’effets sonores surround
supplémentaires.
Lorsque vous écoutez une source, appuyez de manière répétée sur la touche ADV SURR
pour sélectionner un mode d’écoute.
Écoute en mode Sound Wing
Les enceintes HVT permettent de profiter d’un son de plus large envergure.
Pendant la lecture d’une source, appuyez sur la touche SOUND WING pour sélectionner le
mode correspondant (SOUND WING).
5
Utilisez le bouton rotatif VOL +/– pour régler le volume sonore.
• Pour couper le son, appuyez sur la touche
MUTE
.
6
Profi tez de toute une variété de sons.
Appuyez sur la touche ECO pour sélectionner le mode correspondant.
• Lorsque vous sélectionnez le mode Ecology, le son est restitué en stéréo (2.1 canaux maximum) afin de réduire
la consommation du système jusqu’à la moitié de la consommation normale.
Appuyez sur la touche S.RTRV pour activer ou désactiver la fonction Sound Retriever.
• Lorsque des données audio sont supprimées lors de la compression, la qualité du son est souvent amoindrie
du fait de l’inégalité de l’image sonore. La fonction Sound Retriever a recours à une nouvelle technologie DSP
pour restaurer un son de qualité CD vers des sources audio compressées à 2 canaux en rétablissant la pression
sonore et en lissant les artéfacts dentelés restants après la compression.
Autres fonctions de la télécommande
• Sélectionnez l’un des équipements soulignés pour commander cet équipement à l’aide de la télécommande.
Pour faire commander ce récepteur, appuyez d’abord sur la touche
RECEIVER
(
7
)
de la télécommande, puis
appuyez sur la touche souhaitée.
Utilisez les touches “A” pour ajuster les réglages de ce récepteur et pour commander d’autres
équipements.
Utilisez les touches “B” pour commander d’autres équipements. Les commandes restent utilisables
même après avoir appuyé sur la touche
RECEIVER
.
Ecoute de la radio
1
Appuyez sur TUNER pour sélectionner le syntoniseur.
Appuyez sur la touche
BAND
pour changer de bande de fréquences (FM ou AM), si nécessaire.
2
Pour rechercher une station de radio, utilisez les touches TUNE+/– (ou
).
• Appuyez sur une des touches
TUNE+/–
(ou
) sans la relâcher pendant environ une seconde. Le récepteur
lance la recherche de la station suivante dans la direction correspondant à la touche.
Si la réception du signal radio FM est faible, appuyez sur la touche
BAND
pour sélectionner
FM MONO
, et réglez le
récepteur en mode de réception mono.
Mémorisation de stations préréglées
Si vous écoutez souvent une station de radio, il peut être pratique d’enregistrer sa fréquence dans le récepteur afin
de pouvoir y accéder facilement lorsque vous le souhaitez.
1
Pour mémoriser une station de radio que vous êtes en train d’écouter, appuyez d’abord sur la touche
TOOLS.
Le numéro de préréglage clignote.
2
Utilisez les touches PRESET+/– (ou
) pour sélectionner le numéro de préréglage que vous
souhaitez attribuer à cette station, puis appuyez sur ENTER.
Le numéro préréglé cesse de clignoter et le récepteur mémorise la station.
Écoute des stations préréglées
Vous devez mémoriser des stations préréglées pour avoir accès à cette fonction.
Appuyez sur la touche PRESET+/– (ou
) pour sélectionner la station préréglée que vous désirez.
© 2012 PIONEER CORPORATION.
Tous droits de reproduction et de traduction réservés.
• Les touches suivantes ne sont pas utilisées avec ce
récepteur :
–
iPod USB
,
NETWORK
,
,
,
iPod CTRL
VSX-S300̲SYXCN̲QSG̲設変book.indb 5
VSX-S300̲SYXCN̲QSG̲設変book.indb 5
2012/04/23 14:17:15
2012/04/23 14:17:15
2
Ru
Подключение громкоговорителей
Подключение
громкоговорителей
Подключение
телевизора
и
компонентов
воспроизведения
Подключение
ресивера
к
электророзетке
Основная
настройка
ОСТОРОЖНО
•
На
контактах
громкоговорителей
имеется
ОПАСНОЕ
•
ДЛЯ
ЖИЗНИ
напряжение
.
Во
избежание
опасности
поражения
электрическим
током
при
подключении
или
отключении
кабелей
громкоговорителей
отсоединяйте
кабель
питания
,
прежде
чем
прикасаться
к
любым
неизолированным
деталям
.
•
Оголенные
концы
провода
громкоговорителя
должны
быть
обязательно
скручены
и
вставлены
в
контакт
громкоговорителя
до
конца
.
Если
любой
из
неизолированных
проводов
громкоговорителя
коснется
задней
панели
,
это
может
вызвать
отключение
питания
в
целях
безопасности
.
•
Не
допускайте
контакта
сердечника
кабеля
громкоговорителя
с
корпусом
ресивера
.
–
Если
произойдет
контакт
оголенного
кабеля
громкоговорителя
с
любой
металлической
частью
корпуса
ресивера
,
это
может
повредить
громкоговоритель
и
стать
причиной
задымления
и
возгорания
.
Надежно
вставьте
кабели
громкоговорителей
в
зажимы
и
убедитесь
,
что
кабель
не
выпадает
из
зажима
.
Внимание
•
Терминалы
SPEAKERS SUBWOOFER -
это
терминалы
для
подключения
пассивного
сабвуфера
S-SLW500 Pioneer.
При
использовании
другой
модели
сабвуфера
убедитесь
,
что
используется
модель
со
встроенным
усилителем
и
подключается
к
терминалу
PREOUT SUBWOOFER.
•
Подключить
или
пассивные
или
активные
сабвуферы
,
так
как
подключение
сразу
обоих
делает
невозможным
достижение
нужного
звукового
эффекта
.
SPEAKERS
AUDIO
SURR BACK/
FRONT HEIGHT
PRE OUT
OPTICAL
SUBWOOFER
R
L
(Single)
COAXIAL
CD IN
TV IN DIGITAL AUX IN
FRONT
R
L
A
CENTER
SUB
WOOFER SURROUND /
R
L
B
LINE LEVEL
INPUT
Передний
правый
Центральный
Передний
левый
Низкочастотный
громкоговоритель
S-SLW500
Активный
сабвуфер
Правый
объемного
звучания
Левый
объемного
звучания
Убедитесь
,
что
правый
громкоговоритель
подключен
к
правому
(R)
разъему
,
а
левый
громкоговоритель
–
к
левому
(L)
разъему
.
Также
убедитесь
,
что
положительный
и
отрицательный
(+/–)
разъемы
ресивера
совпадают
с
соответствующими
разъемами
громкоговорителей
.
Можно
использовать
громкоговорители
с
нормальным
импедансом
мощностью
от
4
Ω
до
16
Ω
.
Подключение
проводов
Зажимы
передних
громкоговорителей
:
1
Скрутите
оголенные
жилы
провода
.
2
Ослабьте
зажим
контакта
и
вставьте
оголенный
провод
.
3
Зажмите
контакт
.
Другие
терминалы
громкоговорителей
:
1
Скрутите
оголенные
жилы
провода
.
2
Откройте
защитные
выступы
и
вставьте
оголенный
провод
.
3
Отпустите
защитные
выступы
.
Размещение
громкоговорителей
Ресивер
может
работать
с
двумя
стерео
громкоговорителями
(
передние
громкоговорители
на
рисунке
),
тем
не
менее
,
рекомендуется
использовать
по
крайней
мере
три
,
а
полный
комплект
обеспечивает
наилучшее
объемное
звучание
.
Для
получения
наилучшего
качества
объемного
звучания
установите
громкоговорители
,
как
показано
ниже
.
Акустическая
система
2.1:
Акустическая
система
5.1:
R
L
SW
R
SL
L
SW
C
SR
•
В
дополнение
,
можно
также
подключить
громкоговорители
объемного
звучания
,
передние
верхние
громкоговорители
или
громкоговорители
B.
«
Подключение
задних
громкоговорителей
объемного
звучания
или
передних
верхних
громкоговорителей
»
1
2
3
1
2
3
Порядок выполнения настроек на ресивере
ОБЯЗАТЕЛЬНАЯ ВЕНТИЛЯЦИЯ
При установке устройства обеспечьте достаточное
пространство для вентиляции во избежание
повышения температуры внутри устройства (не
менее 10 см сверху, 5 см сзади и по 5 см слева и
справа).
ПРЕДУПРЕЖДЕНИЕ
В корпусе устройства имеются щели и отверстия
для вентиляции, обеспечивающие надежную
работу изделия и защищающие его от перегрева.
Во избежание пожара эти отверстия ни в коем
случае не следует закрывать или заслонять
другими предметами (газетами, скатертями и
шторами) или устанавливать оборудование на
толстом ковре или постели.
D3-4-2-1-7b*_A1_Ru
Подключайте
устройство
к
сети
переменного
тока
только
после
завершения
всех
соединений
.
Аппарат
является
полноценным
аудио
-
видео
ресивером
,
оборудованным
множеством
функций
и
терминалов
.
Он
может
без
проблем
использоваться
после
выполнения
процедуры
подключений
и
настроек
,
описанных
ниже
.
L
Передний
левый
SW
Низкочастотный
громкоговоритель
C
Центральный
Телевизор
Данный
ресивер
Проигрыватель
Blu-ray Disc
R
Передний
правый
SL
Левый
объемного
звучания
SR
Правый
объемного
звучания
Русский
10
мм
10
мм
VSX-S300̲SYXCN̲QSG̲設変book.indb 2
VSX-S300̲SYXCN̲QSG̲設変book.indb 2
2012/04/23 14:17:16
2012/04/23 14:17:16
English
Français
Italiano
Español
Nederlands
Deutsch
3
Ru
Подключение телевизора и компонентов воспроизведения Подключение ресивера к электророзетке
Внимание
•
Если
ресивер
подключается
к
телевизору
с
помощью
кабеля
HDMI,
экранный
дисплей
(OSD)
не
будет
отображаться
.
Убедитесь
,
что
для
подключения
используется
стандартный
аналоговый
видеокабель
RCA.
В
таком
случае
,
переключитесь
на
аналоговый
вход
телевизора
,
чтобы
увидеть
экранный
дисплей
устройства
на
телевизоре
(
для
настройки
и
т
.
д
.).
•
Если
функция
Control
по
HDMI
установлена
на
ON (
ВКЛ
),
ресивер
подключен
к
совместимому
телевизору
кабелем
HDMI
и
вход
телевизора
переключается
на
композитный
,
то
вход
ресивера
может
автоматически
переключиться
на
.
Если
это
произойдет
,
переключите
вход
ресивера
обратно
на
начальный
вход
или
установите
на
OFF
функцию
Control
по
HDMI.
«HDMI Setup»
При
наличии
компонента
с
интерфейсом
HDMI
или
DVI (
с
HDCP) (
проигрыватель
Blu-ray Disc,
и
др
.),
его
можно
подключить
к
данному
ресиверу
с
помощью
имеющегося
в
продаже
кабеля
HDMI.
Если
телевизор
и
компоненты
воспроизведения
поддерживают
функцию
Control
по
HDMI,
можно
использовать
обычные
функции
Control
по
HDMI.
«
Управление
по
HDMI»
•
Следующее
подключение
/
настройка
требуется
для
прослушивания
звучания
телевизора
через
ресивер
.
–
Если
телевизор
не
поддерживает
функцию
возвратного
аудиоканала
через
HDMI,
подключите
ресивер
и
телевизор
через
аудиокабели
(
как
показано
).
–
Если
телевизор
поддерживает
функцию
возвратного
аудиоканала
через
HDMI,
звук
с
телевизора
вводится
в
ресивер
через
терминал
HDMI,
поэтому
нет
необходимости
подсоединять
аудиокабель
.
В
таком
случае
,
установите
параметр
ARC
в
HDMI Setup
на
ON.
«HDMI Setup»
Подключение
видеовыходов
Данный
ресивер
не
оборудован
видеопреобразователем
.
Если
для
подключения
к
входному
устройству
используются
кабели
HDMI,
такие
же
кабели
нужно
использовать
для
подключения
к
телевизору
.
Сигналы
,
поступающие
с
аналоговых
(
композитных
)
видеовходов
устройства
,
не
будут
передаваться
c
HDMI OUT.
HDMI
SPEAKERS
AUDIO
VIDEO
SURR BACK/
FRONT HEIGHT
PRE OUT
ASSIGNABLE
OPTICAL
SUBWOOFER
R
L
(Single)
OUT
MONITOR
OUT
ANALOG
AUX
IN
(
ANALOG
AUX
)
IN
COAXIAL
CD IN
STB IN
GAME IN
BD/BDR IN
DVD/DVR IN
TV IN DIGITAL AUX IN
FRONT
R
L
A
ADAPTER PORT
(
OUTPUT 5 V
0.1 A MAX
)
CENTER
SUB
WOOFER SURROU
R
VIDEO IN
HDMI IN
HDMI OUT
DIGITAL AUDIO OUT
OPTICAL
Компоненты
,
совместимые
с
HDMI/DVI
(
Проигрыватель
Blu-ray Disc,
и
др
.)
Телевизор
,
совместимый
с
HDMI/DVI
Это
подключение
необходимо
,
чтобы
увидеть
экранный
дисплей
устройства
на
телевизоре
.
Если
телевизор
не
поддерживает
функцию
возвратного
аудиоканала
через
HDMI,
данное
подключение
требуется
для
прослушивания
звучания
телевизора
через
ресивер
.
Если
устройство
,
которое
необходимо
подключить
,
не
имеет
выходного
терминала
HDMI,
его
можно
подключить
через
эти
терминалы
.
«
Подключение
компонента
без
разъема
HDMI»
ОСТОРОЖНО
•
Держите
кабель
питания
за
вилку
.
Вынимая
вилку
из
электророзетки
,
никогда
не
тяните
за
сам
кабель
,
никогда
не
дотрагивайтесь
до
кабеля
питания
влажными
руками
,
так
как
это
может
стать
причиной
короткого
замыкания
и
поражения
электрическим
током
.
Не
ставьте
на
кабель
питания
устройство
,
мебель
или
другие
предметы
и
не
зажимайте
его
каким
-
либо
иным
образом
.
Запрещается
завязывать
узлы
на
кабеле
питания
или
связывать
его
с
другими
кабелями
.
Кабели
питания
следует
прокладывать
в
таких
местах
,
где
возможность
наступить
на
них
будет
маловероятной
.
Поврежденный
кабель
питания
может
стать
причиной
возгорания
или
поражения
электрическим
током
.
Периодически
проверяйте
кабель
питания
.
Если
кабель
питания
поврежден
,
обратитесь
за
сменным
кабелем
в
ближайший
уполномоченный
независимый
сервис
-
центр
Pioneer.
•
Используйте
только
кабель
питания
,
входящий
в
комплект
поставки
данного
устройства
.
•
Используйте
прилагаемый
кабель
питания
только
по
его
прямому
назначению
,
как
описано
ниже
.
•
Когда
ресивер
не
используется
(
например
,
во
время
отпуска
),
его
следует
отключать
от
питания
,
вынув
вилку
из
розетки
электросети
.
Подключение
антенн
Подключите
проволочную
антенну
FM
и
рамочную
антенну
АМ
,
как
показано
ниже
.
ANTENNA
FM
UNBAL
75
AM LOOP
Включайте
вилку
в
сеть
только
после
подключения
к
ресиверу
всех
устройств
(
включая
громкоговорители
).
1
Вставьте
разъем
кабеля
питания
,
входящего
в
комплект
поставки
,
в
гнездо
AC IN
на
задней
панели
ресивера
.
2
Вилку
кабеля
питания
вставьте
в
розетку
электросети
.
AC IN
К
сетевой
розетке
АДАПТЕР
Bluetooth®
AS-BT100
или
AS-BT200
(
продается
отдельно
)
Обратитесь
к
Инструкции
по
эксплуатации
на
диске
CD-
ROM
для
получения
инструкций
по
подключению
и
настройке
АДАПТЕРА
Bluetooth
и
по
воспроизведению
музыки
.
Bluetooth® (
слово
и
логотипы
)
является
зарегистрированным
товарным
знаком
и
принадлежит
компании
Bluetooth SIG, Inc.;
использование
PIONEER
CORPORATION
этих
товарных
знаков
разрешено
соответствующей
лицензией
.
Прочие
товарные
знаки
и
торговые
наименования
принадлежат
соответствующим
владельцам
.
VSX-S300̲SYXCN̲QSG̲設変book.indb 3
VSX-S300̲SYXCN̲QSG̲設変book.indb 3
2012/04/23 14:17:18
2012/04/23 14:17:18
4
Ru
PORTABLE /
MCACC SETUP MIC
PHONES
STANDBY / ON
Основная настройка
Автоматическая
настройка
объемного
звучания
(MCACC)
ОСТОРОЖНО
•
Тестовые
сигналы
,
издаваемые
системой
автоматической
настройки
MCACC,
имеют
высокую
громкость
.
Внимание
•
Экранный
дисплей
не
появится
,
если
подключение
к
используемому
телевизору
выполнено
с
помощью
выхода
HDMI.
Используйте
композитные
подключения
для
автоматической
настройки
MCACC.
Примечание
•
Настройка
расстояния
до
низкочастотного
громкоговорителя
может
быть
больше
фактического
расстояния
от
точки
прослушивания
.
В
этом
случае
выполните
настройки
вручную
.
«
Расстояние
до
громкоговорителей
»
1
Включите
ресивер
и
используемый
телевизор
.
2
Переключите
вход
телевизора
на
вход
,
который
подключает
этот
ресивер
к
телевизору
через
соответствующий
композитный
кабель
.
3
Подключите
микрофон
в
гнездо
MCACC SETUP MIC
на
передней
панели
.
Проверьте
,
нет
ли
препятствий
между
громкоговорителями
и
микрофоном
.
Если
у
вас
есть
штатив
,
используйте
его
для
установки
микрофона
приблизительно
на
уровне
уха
в
обычной
точке
прослушивания
.
Иначе
установите
микрофон
на
уровне
уха
,
используя
стол
или
стул
.
4
Нажмите
кнопку
RECEIVER
(
РЕСИВЕР
)
на
пульте
дистанционного
управления
,
после
чего
нажмите
кнопку
.
На
телевизоре
появляется
Home Menu (
главное
меню
).
Для
перехода
между
экранами
и
выделения
пунктов
меню
используйте
кнопки
и
ENTER
на
пульте
дистанционного
управления
.
Нажмите
кнопку
RETURN
(
ВОЗВРАТ
)
для
выхода
из
текущего
меню
.
•
Так
как
громкоговорители
S-HV600B/S-HV500-LR/S-SL100-LR/S-SL100CR
сконструированы
как
компактные
сателлитные
громкоговорители
,
то
для
получения
полного
низкого
звука
рекомендуется
их
использовать
в
сочетании
с
низкочастотным
громкоговорителем
.
В
этом
случае
установите
значение
X.OVER
на
200 Hz (
см
.
«
Изменение
настройки
X.OVER»
на
этой
странице
).
5
Выберите
«Auto MCACC»
в
Home Menu,
затем
нажмите
ENTER.
•
Mic In!
мигает
,
если
микрофон
не
подключен
к
гнезду
MCACC SETUP MIC.
После
нажатия
кнопки
ENTER
старайтесь
соблюдать
тишину
.
Система
сгенерирует
ряд
тестовых
звуковых
сигналов
,
чтобы
определить
уровень
внешних
шумов
.
6
Следуйте
инструкциям
,
отображаемым
на
экране
.
•
При
использовании
активного
низкочастотного
громкоговорителя
проверьте
,
что
сабвуфер
включен
и
что
громкость
звука
включена
.
7
Для
завершения
дождитесь
тестовых
звуковых
сигналов
.
Когда
ресивер
издает
тестовые
звуковые
сигналы
,
чтобы
определить
,
какие
громкоговорители
установлены
в
системе
,
на
экране
отображается
сообщение
о
состоянии
.
Во
время
звучания
этих
сигналов
старайтесь
соблюдать
тишину
.
•
Для
обеспечения
правильности
настроек
громкоговорителей
не
регулируйте
громкость
во
время
тестовых
звуковых
сигналов
.
8
Подтвердите
конфигурацию
громкоговоритеей
.
Конфигурация
,
показанная
на
экране
,
должна
соответствовать
фактическому
набору
громкоговорителей
.
•
В
случае
появления
сообщений
об
ошибках
(
таких
как
Too much ambient noise
(
Слишком
высокий
уровень
фонового
шума
)),
выберите
RETRY
после
проверки
фонового
шума
.
Если
конфигурация
громкоговорителей
отображается
неправильно
,
используйте
кнопки
,
чтобы
выбрать
громкоговоритель
,
и
,
чтобы
изменить
настройку
.
По
окончании
перейдите
к
следующему
пункту
.
Возникновение
сообщения
об
ошибке
(
ERR
)
в
правом
столбце
может
означать
неполадку
в
подключении
громкоговорителя
.
Если
неполадка
не
устраняется
при
выборе
пункта
RETRY
,
отключите
питание
и
проверьте
подключение
громкоговорителей
.
9
Автоматическая
настройка
многоканальной
акустической
калибровки
(MCACC)
завершена
! Auto MCACC
Вы
возвращаетесь
в
Home Menu (
главное
меню
).
Убедитесь
,
что
установочный
микрофон
отсоединен
.
Параметры
,
настроенные
с
помощью
Auto MCACC (
автоматической
настройки
MCACC),
должны
обеспечивать
превосходное
объемное
звучание
системы
,
но
эти
параметры
также
можно
настроить
вручную
с
помощью
ручной
настройки
громкоговорителей
.
«
Ручная
настройка
громкоговорителей
»
Отмена
функции
Auto Power Down (
автоматическое
отключение
питания
)
Если
данный
ресивер
не
используется
в
течение
нескольких
часов
,
произойдет
автоматическое
отключение
питания
.
Таймер
автоматического
отключения
питания
по
заводским
настройкам
установлен
на
шесть
часов
,
и
настройку
времени
можно
изменить
или
можно
совсем
выключить
функцию
отключения
питания
.
«
Меню
Auto Power Down (
автоматическое
отключение
питания
)»
Отмена
режима
демонстрации
дисплея
Когда
ресивер
не
работает
,
дисплей
на
передней
панели
показывает
различную
информацию
(
режим
демонстрации
дисплея
).
Вы
можете
отключить
режим
демонстрации
дисплея
.
«
Меню
FL Demo Mode
(
режим
демонстрации
)»
•
Режим
демонстрации
отменяется
автоматически
,
когда
выполняется
автоматическая
настройка
MCACC (
см
.
ниже
).
Автоматическая
настройка
многоканальной
акустической
калибровки
(MCACC)
определяет
акустические
характеристики
помещения
,
предназначенного
для
прослушивания
,
с
учетом
внешних
шумов
,
размера
громкоговорителей
и
расстояния
до
них
и
измеряет
как
задержку
,
так
и
уровень
сигнала
в
канале
.
С
ее
помощью
ресивер
получает
информацию
от
ряда
тестовых
звуковых
сигналов
и
на
ее
основе
выбирает
оптимальные
параметры
громкоговорителей
и
коррекции
сигнала
,
наиболее
подходящие
для
конкретного
помещения
.
iPod USB NETWORK
STANDBY/ON
AUTO /
DIRECT
ALC /
STANDARD
ADV
SURR
SOUND
WING
ADAPTER
TUNER
BD
DVD
CD
STB
GAME
TV
PORTABLE
RECEIVER
ECO
D AUX
A AUX
S.RTRV
AUDIO
DISP
DIMMER
TOP
MENU
MENU
TOOLS
VOL
RETURN
PTY
PRESET
BAND
MUTE
HOME MENU
iPod
CTRL
STATUS
SLEEP
SP-AB
ENTER
TUNE
Микрофон
Штатив
Home Menu
1.Auto MCACC
2.Manual SP Setup
3.Input Assign
4.Pre Out Setting
5.HDMI Setup
6.Auto Power Down
7.FL Demo Mode
1.Auto MCACC
Now Analyzing
Environment Check
Ambient Noise
Speaker YES/NO
Return
1.Auto MCACC
Check!
OK
Return
10:Next
Front
Center
Surr
Surr. Back
Subwoofer
[ YES ]
[ YES ]
[ YES ]
[ - - - ]
[ YES ]
PORTABLE /
MCACC SETUP MIC
PHONES
STANDBY / ON
Изменение
настройки
X.OVER
Для
громкоговорителей
S-HV600B/S-HV500-LR/
S-SL100-LR/S-SL100CR
1
Выберите
«Manual SP Setup»
в
Home Menu,
затем
нажмите
ENTER.
2
Выберите
«X.OVER»
в
Manual SP Setup,
затем
нажмите
ENTER.
2.Manual SP Setup
Return
a.Speaker System
b.Speaker Setting
c.X.OVER
d.Channel Level
e.Speaker Distance
3
Выберите
значение
«200 Hz»
для
частоты
среза
.
2c.X.OVER
Return
Frequency
200Hz
4
По
завершении
нажмите
два
раза
RETURN
(
ВОЗВРАТ
).
Вы
возвращаетесь
в
«Home Menu» (
главное
меню
).
VSX-S300̲SYXCN̲QSG̲設変book.indb 4
VSX-S300̲SYXCN̲QSG̲設変book.indb 4
2012/04/23 14:17:20
2012/04/23 14:17:20
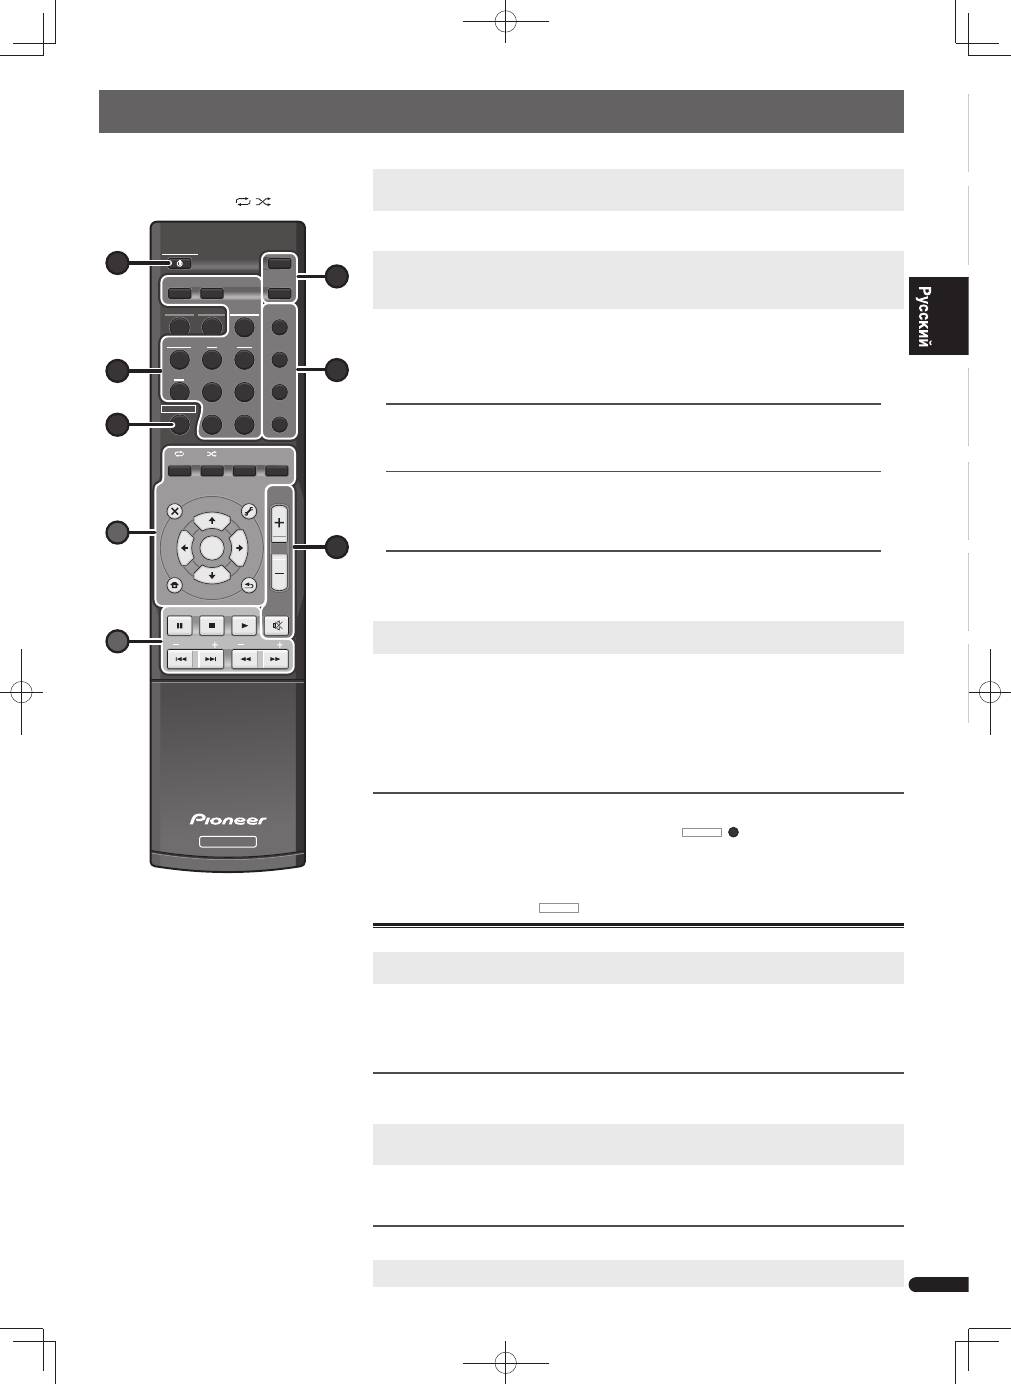
English
Français
Italiano
Español
Nederlands
Deutsch
5
Ru
Основные операции воспроизведения
В
данном
разделе
приведены
основные
инструкции
по
воспроизведению
источника
(
например
, Blu-ray Disc)
с
помощью
системы
домашнего
кинотеатра
.
1
Включите
компоненты
системы
и
ресивер
.
Сначала
включите
аппаратуру
для
воспроизведения
(
например
,
Проигрыватель
Blu-ray Disc),
используемый
телевизор
и
низкочастотный
громкоговоритель
(
если
имеется
),
затем
-
ресивер
(
нажмите
STANDBY/ON
).
2
Переключите
вход
телевизора
на
вход
для
подключения
к
данному
ресиверу
.
Например
,
при
подключении
данного
ресивера
к
гнездам
VIDEO
на
телевизоре
,
убедитесь
,
что
выбран
вход
VIDEO
.
3
Нажмите
кнопки
функций
входа
для
выбора
функции
входа
,
которую
требуется
воспроизвести
.
•
Вход
ресивера
будет
переключаться
,
и
можно
будет
работать
с
другими
компонентами
с
помощью
пульта
ДУ
.
•
Входной
источник
можно
также
выбрать
с
помощью
кнопки
INPUT SELECTOR
на
передней
панели
.
В
таком
случае
,
с
помощью
пульта
ДУ
невозможно
переключать
рабочие
режимы
.
4
Нажмите
AUTO/DIRECT
для
выбора
пункта
«AUTO SURR»
и
начните
воспроизведение
источника
.
Если
воспроизводится
диск
Blu-ray/DVD
с
объемным
звучанием
в
формате
Dolby Digital
или
DTS,
с
цифровым
аудиоподключением
,
звучание
должно
быть
объемным
.
Если
воспроизводится
стереофонический
источник
,
или
если
выполняется
подключение
аналогового
аудио
,
в
режиме
прослушивания
по
умолчанию
звучание
будет
воспроизводиться
через
передние
правый
и
левый
громкоговорители
.
RECEIVER
STANDBY/ON
iPod USB NETWORK
AUTO /
DIRECT
ALC /
STANDARD
ADV
SURR
SOUND
WING
AUDIO
DIMMER
TOP
MENU
MENU
TOOLS
VOL
RETURN
PTY
PRESET
BAND
MUTE
HOME MENU
iPod
CTRL
DISP
STATUS
ADAPTER
TUNER
BD
DVD
CD
STB
GAME
TV
PORTABLE
SLEEP
SP-AB
ENTER
TUNE
RECEIVER
ECO
D AUX
A AUX
S.RTRV
1 4 3 7 6 A 5 B
Прослушивание
в
режиме
стандартного
объемного
звучания
Данный
ресивер
обеспечивает
базовое
объемное
звучание
для
стерео
и
многоканальных
источников
.
Во
время
прослушивания
источника
нажмите
кнопку
ALC/STANDARD
несколько
раз
для
выбора
режима
прослушивания
.
Прослушивание
в
режиме
расширенного
объемного
звучания
Эффекты
дополнительного
объемного
звучания
можно
использовать
для
получения
дополнительных
эффектов
объемного
звучания
.
Во
время
прослушивания
источника
нажмите
кнопку
ADV SURR
несколько
раз
для
выбора
режима
прослушивания
.
Прослушивание
в
режиме
Sound Wing
Громкоговорители
HVT
позволяют
насладиться
звучанием
в
более
широком
диапазоне
.
Во
время
прослушивания
источника
нажмите
кнопку
SOUND WING
для
выбора
режима
SOUND WING.
5
Для
регулировки
уровня
громкости
используйте
регулятор
VOL +/–.
•
Звук
можно
отключить
,
нажав
кнопку
MUTE
.
6
Наслаждайтесь
разнообразием
звуков
.
Нажмите
ECO
для
выбора
режима
Ecology.
•
Выберите
режим
Ecology
для
стереофонического
воспроизведения
(
макс
. 2.1-
канального
),
чтобы
обеспечить
снижение
потребляемой
мощности
максимум
до
половины
нормального
уровня
.
Нажмите
кнопку
S.RTRV
для
включения
или
выключения
функции
восстановления
звучания
.
•
Если
аудиоданные
были
удалены
во
время
процесса
сжатия
,
качество
звука
часто
отличается
неравномерностью
звукового
поля
.
В
функции
Sound Retriever (
Восстановление
звучания
)
используется
новая
технология
DSP,
которая
помогает
восстановить
качество
звучания
диска
CD
для
2-
канального
звука
путем
восстановления
сжатого
звука
и
сглаживания
искажений
,
сохранившихся
после
сжатия
.
Другие
функции
пульта
дистанционного
управления
•
Переключитесь
на
одно
из
подчеркнутых
устройств
,
чтобы
использовать
пульт
ДУ
для
работы
на
этом
устройстве
.
Для
управления
ресивером
сначала
нажмите
кнопку
RECEIVER
(
7
)
,
затем
нажмите
соответствующую
кнопку
для
управления
.
Используйте
кнопки
«A»
для
регулирования
настроек
данного
ресивера
и
управления
другими
устройствами
.
Используйте
кнопки
«B»
для
управления
другими
устройствами
.
Операции
еще
возможны
даже
после
нажатия
кнопки
RECEIVER
.
Прослушивание
радиопередач
1
Нажмите
TUNER
для
выбора
тюнера
.
При
необходимости
,
нажмите
кнопку
BAND
для
изменения
диапазона
(FM
или
AM),
2
Нажмите
кнопки
TUNE+/– (
или
)
для
настройки
на
радиостанцию
.
•
Нажмите
и
удерживайте
кнопки
TUNE+/–
(
или
)
в
течение
примерно
секунды
.
Ресивер
начнет
поиск
следующей
радиостанции
.
Если
вы
слушаете
FM-
радиостанцию
,
но
принимаемый
сигнал
слаб
,
нажмите
BAND
для
выбора
значения
FM
MONO
и
перевода
ресивера
в
монофонический
режим
.
Сохранение
запрограммированных
радиостанций
Если
Вы
хотите
слушать
конкретную
радиостанцию
,
то
удобно
,
чтобы
ресивер
сохранил
частоту
для
быстрого
поиска
в
любое
необходимое
время
.
1
Нажмите
кнопку
TOOLS
во
время
приема
сигнала
от
радиостанции
,
которую
требуется
занести
в
память
.
Мигает
заданное
число
.
2
Нажмите
кнопки
PRESET+/– (
или
)
для
выбора
нужной
предустановленной
радиостанции
,
затем
нажмите
ENTER.
Запрограммированный
номер
перестает
мигать
,
и
ресивер
сохраняет
данные
радиостанции
.
Прослушивание
предустановленных
станций
Для
этого
в
ресивере
должно
быть
сохранено
несколько
запрограммированных
станций
.
Нажимайте
кнопки
PRESET+/– (
или
)
для
выбора
нужной
запрограммированной
радиостанции
.
©PIONEER CORPORATION, 2012.
Все
права
защищены
.
•
Следующие
кнопки
не
используются
с
данным
ресивером
:
–
iPod USB
,
NETWORK
,
,
,
iPod CTRL
VSX-S300̲SYXCN̲QSG̲設変book.indb 5
VSX-S300̲SYXCN̲QSG̲設変book.indb 5
2012/04/23 14:17:21
2012/04/23 14:17:21

2
It
Collegamento degli altoparlanti
Collegamento degli altoparlanti
Connettere una TV e componenti playback
Collegamento del ricevitore
Impostazioni di base
ATTENZIONE
• I terminali degli altoparlanti sono sotto tensione, la
stessa
PERICOLOSA
tensione della corrente di rete. Per
prevenire rischi di folgorazioni nel corso delle operazioni
di collegamento o di distacco dei cavi degli altoparlanti,
staccare il cavo di alimentazione principale prima di toccare
qualsiasi parte non isolata.
• Assicurarsi che il filo nudo dell’altoparlante sia attorcigliato
e inserito completamente nel terminale dell’altoparlante.
Se la parte scoperta di un cavo dovesse entrare in contatto
con il pannello posteriore, può prodursi un’interruzione di
corrente per l’attivazione dell’interruttore differenziale.
• Evitate il contatto tra la parte centrale del cavo
dell’altoparlante e il corpo del ricevitore.
– Se la parte centrale del cavo dell’altoparlante entra in
contatto con qualsiasi parte metallica del corpo del
ricevitore potrebbe danneggiare gli altoparlanti e causare
fumo o incendiarsi.
Inserite i cavi dell’altoparlante in modo sicuro nei terminali
e controllate che il cavo non possa fuoriuscire facilmente.
Importante
• I terminali degli SPEAKERS SUBWOOFER sono i terminali
di connessione subwoofer passivi S-SLW500 di Pioneer. Se
usate un altro modello di subwoofer, accertatevi di usare
un modello che comprenda un amplificatore incorporato e
connettetelo al terminale PREOUT SUBWOOFER.
• Si prega di connettere subwoofer passivi o amplificati,
poiché se sono entrambi connessi sarà impossibile ottenere
il giusto effetto sonoro.
SPEAKERS
AUDIO
SURR BACK/
FRONT HEIGHT
PRE OUT
OPTICAL
SUBWOOFER
R
L
(Single)
COAXIAL
CD IN
TV IN DIGITAL AUX IN
FRONT
R
L
A
CENTER
SUB
WOOFER SURROUND /
R
L
B
LINE LEVEL
INPUT
Destro anteriore
Centro
Sinistro anteriore
Subwoofer
S-SLW500
Subwoofer
alimentato
Destro
surround
Sinistro
surround
Assicuratevi di connettere l’altoparlante a destra al terminale destro (R) e quello a sinistra al terminale
sinistro (L). Inoltre, assicurarsi che i terminali positivo e negativo (+/–) del ricevitore corrispondano a
quelli degli altoparlanti.
È possibile utilizzare altoparlanti con una normale impedenza compresa tra 4
Ω
e 16
Ω
.
Collegamenti a fi li nudi
Terminali degli altoparlanti anteriori:
1
Attorcigliare i trefoli esposti.
2
Allentare il terminale e inserire il fi lo esposto.
3
Serrare il terminale.
Altri terminali per gli altoparlanti:
1
Attorcigliare i trefoli esposti.
2
Premere le linguette per aprirle e inserire la
parte scoperta del cavo.
3
Rilasciare le linguette.
Posizionamento degli altoparlanti
Il ricevitore funziona anche con due soli altoparlanti
stereo (gli altoparlanti anteriori dello schema); si
consiglia tuttavia di utilizzare almeno tre altoparlanti.
Una configurazione completa risulta ottimale per il
suono surround.
Per ottenere il miglior suono surround possibile,
installare gli altoparlanti come segue.
Sistema surround a 2.1 canali: Sistema surround a 5.1 canali:
R
L
SW
R
SL
L
SW
C
SR
• Inoltre, è possibile connettere gli altoparlanti
surround posteriori, quelli alti e gli altoparlanti B.
“Connettete l’altoparlante surround o posteriore
o l’alto anteriore”
1
2
3
1
2
3
Flusso delle impostazioni del ricevitore
AVVERTENZA PER LA VENTILAZIONE
Installare l’apparecchio avendo cura di lasciare un
certo spazio all’intorno dello stesso per consentire una
adeguata circolazione dell’aria e migliorare la
dispersione del calore (almeno 10 cm sulla parte
superiore, 5 cm sul retro, e 5 cm su ciascuno dei lati).
ATTENZIONE
L’apparecchio è dotato di un certo numero di fessure e
di aperture per la ventilazione, allo scopo di garantirne
un funzionamento affidabile, e per proteggerlo dal
surriscaldamento. Per prevenire possibili pericoli di
incendi le aperture non devono mai venire bloccate o
coperte con oggetti vari (quali giornali, tovaglie, tende o
tendaggi, ecc.), e l’apparecchio non deve essere
utilizzato appoggiandolo su tappeti spessi o sul letto.
D3-4-2-1-7b* A1 It
Completate tutti
i collegamenti
prima di collegare
quest’unità alla presa
d’alimentazione CA.
Questa unità è un potente ricevitore AV dotato di molte
funzioni e molti terminali. Può venire usato senza
difficoltà dopo aver eseguito la procedura seguente per
fare i collegamenti e le impostazioni.
L
Sinistro
anteriore
SW
Subwoofer
C
Centro
TV
Questo ricevitore
Lettore Blu-ray Disc
R
Destro
anteriore
SL
Sinistro surround
SR
Destro surround
Italiano
10 mm
10 mm
VSX-S300̲SYXCN̲QSG̲設変book.indb 2
VSX-S300̲SYXCN̲QSG̲設変book.indb 2
2012/04/23 14:17:22
2012/04/23 14:17:22
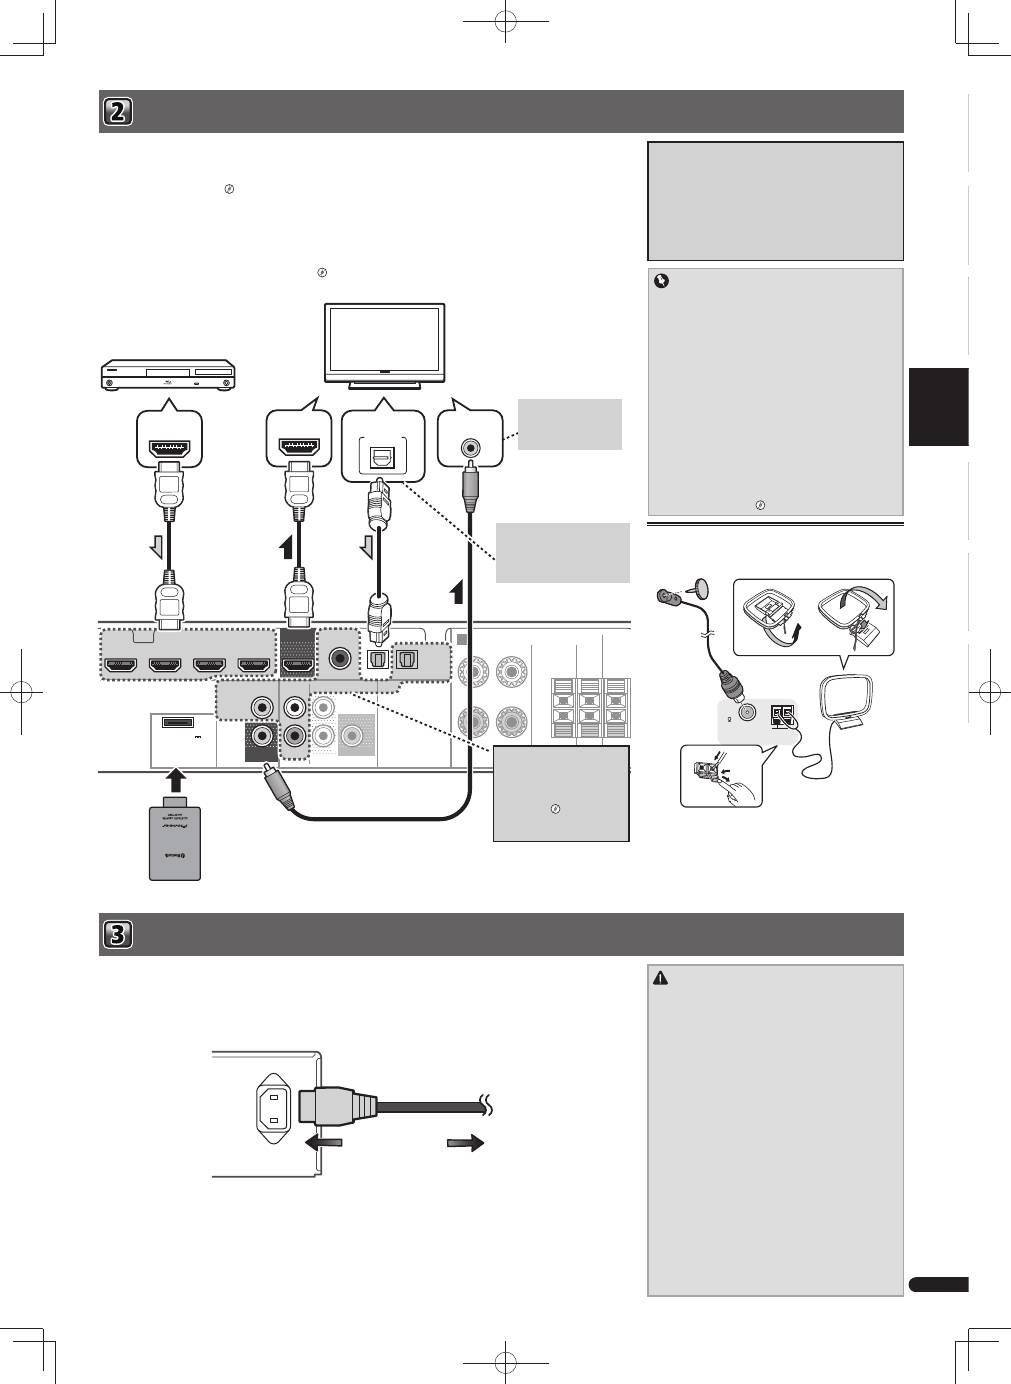
English
Français
Italiano
Español
Nederlands
Deutsch
3
It
Connettere una TV e componenti playback Collegamento del ricevitore
Importante
• Se il ricevitore è stato connesso a una TV tramite
un cavo HDMI, la schermata (OSD) non sarà
visualizzata sullo schermo. Assicuratevi di
usare un cavo video analogico RCA standard
per la connessione. In questo caso, commutate
l’entrata della TV su analogico per visualizzare la
schermata OSD (per le impostazioni, ecc.) sulla
TV.
• Se il Control con la funzione HDMI è impostato
su ON e il ricevitore è connesso a una TV
compatibile tramite un cavo HDMI, e commutate
l’entrata della TV su una struttura composita,
l’entrata del ricevitore potrebbe commutare
automaticamente su TV. Se questo si verificasse,
commutate l’entrata del ricevitore nuovamente su
quella originale o impostate su OFF il Control con
funzione HDMI.
“HDMI Setup”
Se si dispone di un componente dotato di funzionalità HDMI o DVI (con HDCP) (lettore di Blu-ray Disc o altro), sarà
possibile collegarlo a questo ricevitore utilizzando un cavo HDMI reperibile in commercio.
Se le componenti della TV e di riproduzione supportano il Control con funzioni HDMI, il Control adatto con funzioni
HDMI può essere usato.
“Control con la funzione HDMI”
• La seguente connessione/impostazione è richiesta per ascoltare il suono della TV da questo ricevitore.
– Se la TV non supporta la funzione HDMI Audio Return Channel, connettete il ricevitore e la TV ai cavi audio
(come mostrato).
– Se la TV supporta la funzione HDMI Audio Return Channel, il suono della TV viene immesso al ricevitore
attraverso il terminale HDMI, in modo che non sia necessario connettersi a un cavo audio. In questo caso,
impostate ARC nel HDMI Setup su ON.
“HDMI Setup”
Le connessioni di emissione video
Questo ricevitore non dispone di convertitore
video. Se si usano cavi HDMI per connettersi
all’apparecchio di entrata, gli stessi cavi dovrebbero
essere usati per connettersi alla TV.
I segnali immessi dalle uscite video analogiche
(composite) di questo apparecchio non saranno
emessi dall’uscita HDMI OUT.
HDMI
SPEAKERS
AUDIO
VIDEO
SURR BACK/
FRONT HEIGHT
PRE OUT
ASSIGNABLE
OPTICAL
SUBWOOFER
R
L
(Single)
OUT
MONITOR
OUT
ANALOG
AUX
IN
(
ANALOG
AUX
)
IN
COAXIAL
CD IN
STB IN
GAME IN
BD/BDR IN
DVD/DVR IN
TV IN DIGITAL AUX IN
FRONT
R
L
A
ADAPTER PORT
(
OUTPUT 5 V
0.1 A MAX
)
CENTER
SUB
WOOFER SURROU
R
VIDEO IN
HDMI IN
HDMI OUT
DIGITAL AUDIO OUT
OPTICAL
Componenti compatibili HDMI/DVI
(Blu-ray Disc, ecc.)
TV compatibile HDMI/DVI
Questa connessione
è necessaria per
visualizzare lo schermo
OSD dell’unità sulla TV.
Se la TV non supporta la
funzione HDMI Audio Return
Channel, questa connessione è
indispensabile per ascoltare il
suono della TV dal ricevitore.
Se l’apparecchio che desiderate
collegare non possiede un
terminale di uscita HDMI,
la connessione può essere
eseguita attraverso questi
terminali.
“Connettere il
vostro componente senza un
terminale HDMI”
ATTENZIONE
• Maneggiare il cavo di alimentazione dal lato
della spina. Non estrarre la spina tirando il cavo
e non toccare mai il cavo d’alimentazione con
le mani bagnate, altrimenti si può verificare un
corto circuito o scosse elettriche. Non appoggiare
l’apparecchio, mobili o altri oggetti sul cavo di
alimentazione, né comprimerlo in alcun modo.
Non fare mai nodi al cavo, né legarlo ad altri
cavi. Far passare i cavi d’alimentazione in modo
tale che non sia possibile calpestarli. Un cavo
d’alimentazione danneggiato può causare un
incendio o folgorazione. Controllare il cavo
d’alimentazione ogni tanto. Se si dovesse trovare
il cavo danneggiato, rivolgersi al più vicino centro
di assistenza autorizzato Pioneer per richiederne
la sostituzione.
• Utilizzare solo ed esclusivamente il cavo di
alimentazione fornito con questo apparecchio.
• Utilizzare il cavo di alimentazione fornito solo ed
esclusivamente al fine descritto qui di seguito.
• Quando si prevede di non utilizzare il ricevitore per
un certo tempo, ad esempio se si va in vacanza,
staccare la spina dalla presa a muro.
Collegamento delle antenne
Connettete un’antenna FM a cavo e la loop antenna AM
come mostrato qui sotto.
ANTENNA
FM
UNBAL
75
AM LOOP
Procedere al collegamento solo dopo aver connesso al ricevitore tutti i componenti, ivi compresi gli
altoparlanti.
1
Collegare il cavo di alimentazione fornito alla presa AC IN sul retro del ricevitore.
2
Inserire l’altra estremità in una presa di corrente.
AC IN
All’uscita di corrente
ADATTATORE
Bluetooth®
AS-BT100 o AS-BT200
(venduto separatamente)
Vedi le Istruzioni per l’uso in CD-ROM per come connettere
e impostare il
Bluetooth
ADAPTER e per come riprodurre la
musica.
Il marchio nominale e il logo Bluetooth® sono marchi
registrati di proprietà di Bluetooth SIG, Inc. e sono
utilizzati in licenza da PIONEER CORPORATION. Tutti
gli altri marchi registrati e marchi nominali sono marchi
dei rispettivi proprietari.
VSX-S300̲SYXCN̲QSG̲設変book.indb 3
VSX-S300̲SYXCN̲QSG̲設変book.indb 3
2012/04/23 14:17:24
2012/04/23 14:17:24
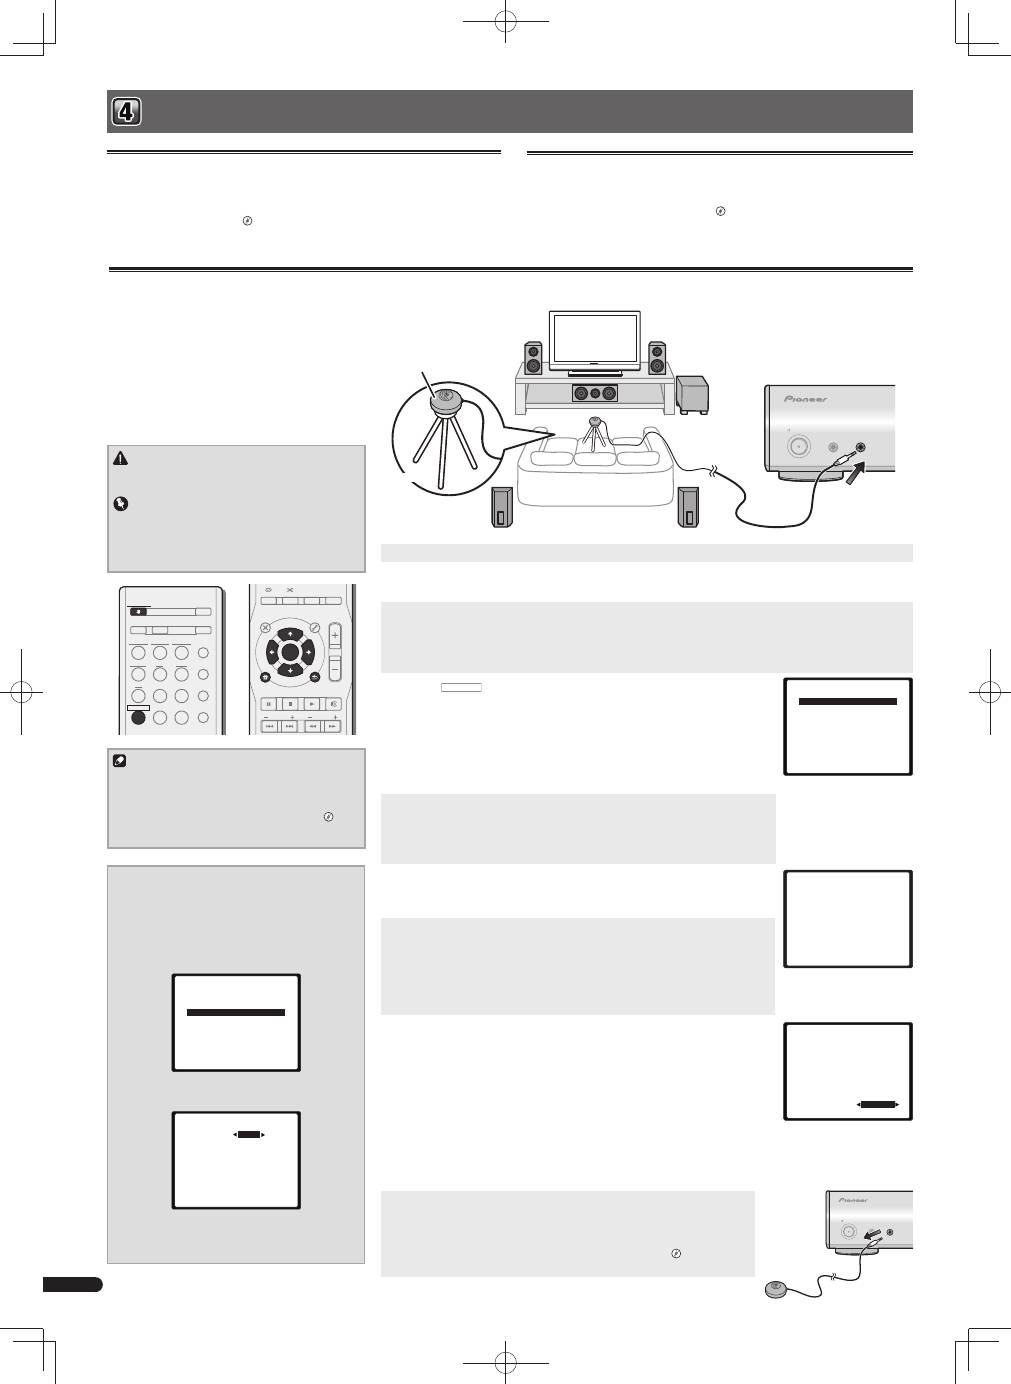
4
It
PORTABLE /
MCACC SETUP MIC
PHONES
STANDBY / ON
Impostazioni di base
Impostazione automatica del suono surround (MCACC)
ATTENZIONE
• I toni di prova utilizzati nell’impostazione Auto
MCACC vengono emessi a volume elevato.
Importante
• L’OSD non compare se il collegamento è stato
effettuato dall’uscita HDMI al televisore. Usate le
connessioni composite per l’impostazione Auto
MCACC.
Nota
• Le impostazioni di distanza del subwoofer
potrebbero essere maggiori della distanza vera e
propria dalla posizione di ascolto. In questo caso,
eseguite le impostazioni manualmente.
“Distanza degli diffusori”
1
Accendere il ricevitore e il televisore.
2
Commutate l’entrata della TV su quella che connette questo ricevitore alla TV tramite il corrispondete
cavo composito.
3
Collegare il microfono alla presa MCACC SETUP MIC sul pannello anteriore.
Assicurarsi che non ci siano ostacoli tra gli altoparlanti ed il microfono.
Se avete un treppiedi a disposizione, usatelo per posizionare il microfono in modo tale che sia all’altezza delle
orecchie nella vostra normale posizione d’ascolto. Altrimenti, posizionare il microfono al livello dell’orecchio usando
un tavolo o una sedia.
4
Premere
RECEIVER
sul telecomando, poi premere il tasto HOME MENU.
L’Home Menu appare sulla vostra TV. Usare i tasti
e
ENTER
sul
telecomando per navigare attraverso le schermate e per selezionare le voci di menù.
Premere
RETURN
per uscire dal menu corrente.
• Poiché S-HV600B/S-HV500-LR/S-SL100-LR/S-SL100CR sono stati progettati con
altoparlanti satellitari compatti, si consiglia di usarli in combinazione con un
subwoofer per ottenere un suono pieno. In tal caso, impostate
X.OVER
su 200 Hz
(vedere
“Cambiare le impostazioni di X.OVER”
su questa pagina).
5
Scegliere ‘Auto MCACC’ da Home Menu, poi premere ENTER.
•
Mic In!
lampeggia se il microfono non è connesso a una presa jack
MCACC SETUP MIC.
Cercare di stare il più possibile in silenzio dopo aver premuto
ENTER
. Il sistema
emette una serie di test di prova per stabilire il livello di rumore ambientale.
6
Seguire le istruzioni visualizzate.
• Se state usando un subwoofer amplificato, accertatevi che il subwoofer e il volume
siano entrambi attivati.
7
Attendere il completamento dell’emissione dei toni di prova.
Mentre il ricevitore emette i toni di prova per determinare gli altoparlanti presenti nella
configurazione in uso, sullo schermo viene visualizzato un rapporto sull’avanzamento
delle operazioni. Mentre il sistema esegue queste attività, cercare di rimanere il più
possibile in silenzio.
• Per una corretta impostazione degli altoparlanti, non regolare il volume durante
l’emissione dei toni di prova.
8
Confermare la confi gurazione degli altoparlanti.
La configurazione visualizzata sullo schermo dovrebbe rispecchiare la configurazione
effettiva degli altoparlanti in uso.
• In caso di messaggi di errore (come
Too much ambient noise
) selezionate
RETRY
dopo aver controllato il rumore ambientale.
Se la configurazione degli altoparlanti visualizzata non è corretta, usare
per
selezionare l’altoparlante e
per modificare l’impostazione. Al termine, procedere
al punto successivo.
Se viene visualizzato un messaggio di errore (
ERR
) nella colonna di destra, potrebbe
trattarsi di un problema di connessione dell’altoparlante. Se l’opzione
RETRY
non risolve il problema, spegnere l’alimentazione e verificare i collegamenti degli
altoparlanti.
9
L’impostazione Auto MCACC è terminata! Ritornate all’Home Menu.
Assicurarsi di avere scollegato il microfono utilizzato per l’impostazione.
Le impostazioni eseguite in Auto MCACC potrebbero fornire un eccellente suono
surround dal vostro impianto, ma è possibile anche eseguire le regolazioni
manualmente usando le impostazioni altoparlante Manuale.
“Configurazione
manuale degli altoparlanti”
Annullare lo Spegnimento Automatico
Se il ricevitore non viene usato per diverse ore, si spegnerà automaticamente. Il timer
di spegnimento automatico è fissato su sei ore secondo le impostazioni di fabbrica
e il periodo può essere cambiato oppure la funzione di spegnimento può essere
eliminata completamente.
“Il menù Spegnimento Automatico”
Annullare la schermata demo
Lo schermo sul pannello frontale mostra diverse informazioni (schermata demo) se
il ricevitore non è in funzione.
Si può disattivare la schermata demo.
“Il menù Modalità Demo FL”
• La modalità demo viene annullata automaticamente quando si esegue
l’impostazione Auto MCACC (vedi qui sotto).
L’impostazione del sistema automatico di calibratura
acustica multicanale (MCACC) misura le caratteristiche
acustiche dell’area di ascolto, prendendo in
considerazione il rumore ambientale, la dimensione
e la distanza degli altoparlanti e i test per il ritardo e
il livello dei canali. Dopo aver impostato il microfono
in dotazione con il sistema, il ricevitore utilizza le
informazioni di una serie di toni di prova per ottimizzare
le impostazioni degli altoparlanti e l’equalizzazione per
la stanza in questione.
iPod USB NETWORK
STANDBY/ON
AUTO /
DIRECT
ALC /
STANDARD
ADV
SURR
SOUND
WING
ADAPTER
TUNER
BD
DVD
CD
STB
GAME
TV
PORTABLE
RECEIVER
ECO
D AUX
A AUX
S.RTRV
AUDIO
DISP
DIMMER
TOP
MENU
MENU
TOOLS
VOL
RETURN
PTY
PRESET
BAND
MUTE
HOME MENU
iPod
CTRL
STATUS
SLEEP
SP-AB
ENTER
TUNE
Microfoni
Treppiede
Home Menu
1.Auto MCACC
2.Manual SP Setup
3.Input Assign
4.Pre Out Setting
5.HDMI Setup
6.Auto Power Down
7.FL Demo Mode
1.Auto MCACC
Now Analyzing
Environment Check
Ambient Noise
Speaker YES/NO
Return
1.Auto MCACC
Check!
OK
Return
10:Next
Front
Center
Surr
Surr. Back
Subwoofer
[ YES ]
[ YES ]
[ YES ]
[ - - - ]
[ YES ]
PORTABLE /
MCACC SETUP MIC
PHONES
STANDBY / ON
Cambiare le impostazioni di X.OVER
Per altoparlanti S-HV600B/S-HV500-LR/S-SL100-LR/
S-SL100CR
1
Scegliere ‘Manual SP Setup’ da Home Menu,
poi premere ENTER.
2
Scegliere ‘X.OVER’ da Manual SP Setup, poi
premere ENTER.
2.Manual SP Setup
Return
a.Speaker System
b.Speaker Setting
c.X.OVER
d.Channel Level
e.Speaker Distance
3
Scegliere ‘200 Hz’ per il punto di frequenza
limite massimo.
2c.X.OVER
Return
Frequency
200Hz
4
Quando avete terminato, premere due volte
RETURN.
Ritornate all’Home Menu.
VSX-S300̲SYXCN̲QSG̲設変book.indb 4
VSX-S300̲SYXCN̲QSG̲設変book.indb 4
2012/04/23 14:17:25
2012/04/23 14:17:25
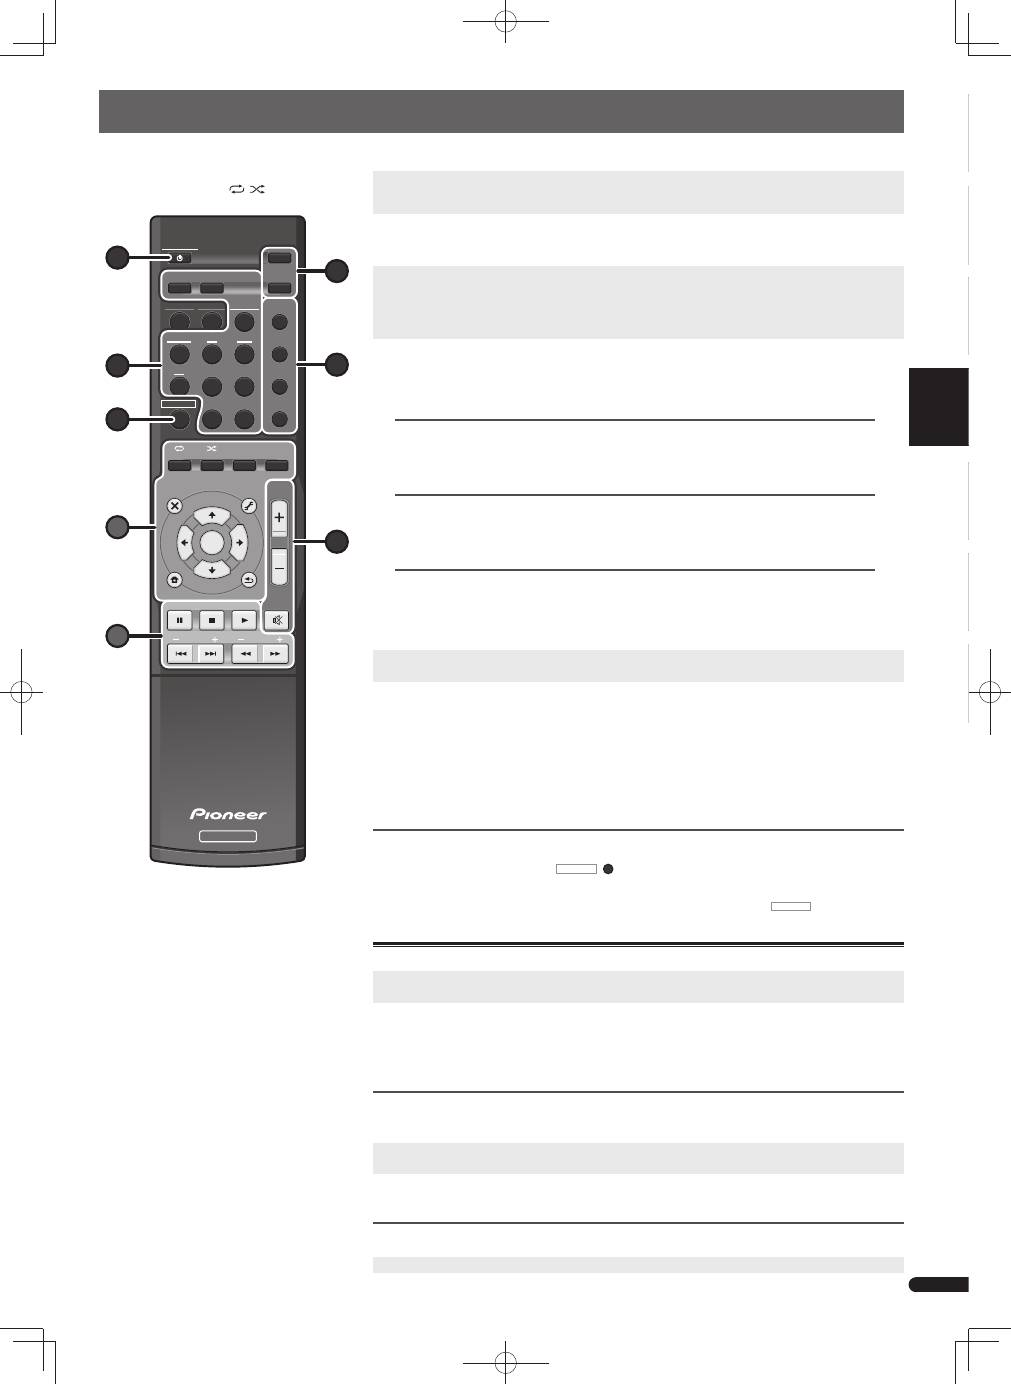
English
Français
Italiano
Español
Nederlands
Deutsch
5
It
Riproduzione di base
Di seguito sono riportate le istruzioni di base per riprodurre una sorgente (ad esempio un Blu-ray Disc) con il sistema home theater.
1
Accendere i componenti del sistema e il ricevitore.
Iniziare dal componente utilizzato per la riproduzione (ad esempio un lettore Blu-ray Disc), accendere quindi il
televisore e il subwoofer, se installato, infine accendere il ricevitore premendo
STANDBY/ON
.
2
Commutate l’entrata della TV su quella che connette questo ricevitore.
Per esempio, se avete connesso questo ricevitore alle prese jack
VIDEO
sulla vostra TV, assicuratevi che l’entrata
VIDEO
sia stata selezionata.
3
Premete i tasti di entrata funzione per selezionare la funzione d’entrata che volete attivare.
• L’entrata del ricevitore si attiverà e sarete in grado di mettere in funzione altre componenti attraverso il
telecomando.
• La sorgente di entrata può essere selezionata anche usando il tasto
INPUT SELECTOR
sul pannello frontale. In
tal caso, il telecomando non commuterà sulle modalità operative.
4
Premere AUTO/DIRECT per scegliere ‘AUTO SURR’ e riprendere la riproduzione della sorgente.
Se state riproducendo un suono surround Dolby Digital o DTS di un disco Blu-ray/DVD, con una connessione audio-
digitale, dovreste ascoltare un suono surround. Se state riproducendo da una sorgente stereo o se la connessione
è audio-analogica, ascolterete solo suono proveniente dagli altoparlanti anteriori, sinistro e destro in modalità di
ascolto default.
RECEIVER
STANDBY/ON
iPod USB NETWORK
AUTO /
DIRECT
ALC /
STANDARD
ADV
SURR
SOUND
WING
AUDIO
DIMMER
TOP
MENU
MENU
TOOLS
VOL
RETURN
PTY
PRESET
BAND
MUTE
HOME MENU
iPod
CTRL
DISP
STATUS
ADAPTER
TUNER
BD
DVD
CD
STB
GAME
TV
PORTABLE
SLEEP
SP-AB
ENTER
TUNE
RECEIVER
ECO
D AUX
A AUX
S.RTRV
1 4 3 7 6 A 5 B
Ascoltare in suono surround standard
Questo ricevitore fornisce suono surround base per sorgenti stereo e multicanale.
Se state ascoltando una sorgente, premete ALC/STANDARD ripetutamente per selezionare
la modalità di ascolto.
Ascoltare in suono surround avanzato
Gli effetti surround avanzati possono essere utilizzati per numerosi effetti surround aggiuntivi.
Se state ascoltando una sorgente, premete ADV SURR ripetutamente per selezionare la
modalità di ascolto.
Ascoltare in modalità Sound Wing
Con gli altoparlanti HVT è impossibile avvalersi di un suono di gamma più ampia.
Mentre state ascoltando una sorgente, premete SOUND WING per selezionare la modalità
SOUND WING.
5
Usate VOL +/– per regolare il livello del volume.
• Il suono può essere disattivato premendo il tasto
MUTE
.
6
Gustate il piacere di una varietà di suoni.
Premete ECO per selezionare la modalità Ecologia.
• Selezionate la modalità Ecologia per il playback Stereo (max. 2.1 can.) in modo da consentire una riduzione di
consumo di corrente fino a massimo la metà dei livelli normali.
Premete S.RTRV per commutare l’impostazione del Sound Retriever su ON o su OFF.
• Quando si rimuovono dati audio durante il processo di compressione, la qualità del suono spesso si riduce a
causa della mancanza di uniformità di immagine dei suoni. La funzione Sound Retriever impiega l’innovativa
tecnologia DSP, che consente di ripristinare un suono di qualità CD per il suono a 2 canali compresso,
ripristinando la pressione sonora e livellando i picchi causati dalla compressione.
Altre funzioni del telecomando
• Commutate su uno degli apparecchi indicati per usare il telecomando con questo apparecchio. Per mettere in
funzione il ricevitore, prima premete
RECEIVER
(
7
)
, poi premete il tasto adatto per operare.
Usate i tasti “A” per regolare le impostazioni di questo ricevitore e operare su altri apparecchi.
Usate i tasti “B” per operare su altri apparecchi. Dopo aver premuto il tasto
RECEIVER
è ancora possibile
operare.
Ascolto della radio
1
Per scegliere il sintonizzatore, premere TUNER.
Se necessario, premete
BAND
per cambiare banda (FM o AM),
2
Premete TUNE+/– (o
) per sintonizzarvi su una stazione.
• Premete e tenete premuto
TUNE+/–
(o
) per circa un secondo. Il ricevitore inizierà a cercare la prossima
stazione.
Se state ascoltando una stazione FM ma la ricezione è debole, premete
BAND
per selezionare
FM MONO
e
impostate il ricevitore in modalità di ricezione mono.
Come salvare le stazioni di preselezione
Se si ascolta spesso una particolare stazione radio, è comodo memorizzare la frequenza della stessa per un facile
richiamo ogni qualvolta si desidera ascoltare la stazione in questione.
1
Premete TOOLS mentre state ricevendo il segnale di una stazione che intendete memorizzare.
Il numero preimpostato lampeggia.
2
Premete PRESET+/– (o
) per selezionare la stazione preimpostata che volete, poi premete ENTER.
Il numero pre-impostato cessa di lampeggiare e il ricevitore memorizza la stazione.
Ascolto delle stazioni memorizzate
È necessario aver memorizzato delle stazioni per poterle ascoltare.
Premere PRESET+/– (o
) per selezionare la stazione di preselezione desiderata.
© 2012 PIONEER CORPORATION.
Tutti i diritti riservati.
• I seguenti tasti non sono usati con questo ricevitore:
–
iPod USB
,
NETWORK
,
,
,
iPod CTRL
VSX-S300̲SYXCN̲QSG̲設変book.indb 5
VSX-S300̲SYXCN̲QSG̲設変book.indb 5
2012/04/23 14:17:27
2012/04/23 14:17:27

2
Nl
De luidsprekers aansluiten
De luidsprekers aansluiten
Aansluiting van uw TV en weergave-apparatuur
De receiver aansluiten op het stopcontact
Basisinstellingen
LET OP
• Op deze luidsprekeraansluitingen staat een
GEVAARLIJKE
spanning. Om een elektrische schok te voorkomen bij het aansluiten
en losmaken van de luidsprekerkabels, moet u de stekker uit het
stopcontact halen voordat u niet geïsoleerde onderdelen aanraakt.
• Zorg dat de ontblote draaduiteinden van de luidsprekerkabel stevig
in elkaar zijn gedraaid en volledig in de luidsprekeraansluiting
steken. Wanneer kale luidsprekerdraad contact maakt met het
achterpaneel, kan hierdoor het apparaat worden uitgeschakeld als
veiligheidsmaatregel.
• Zorg ervoor dat de kabelkern van de speaker niet in contact komt
met de behuizing van de receiver.
– Als de kabelkern van de speaker in contact komt met een metalen
gedeelte van de behuizing van de receiver, kan deze schade
toebrengen aan de speakers, wat kan leiden tot rook en brand.
Steek de speakerkabels stevig in de aansluitpunten en controleer
dat de kabel er niet gemakkelijk uit kan komen.
Belangrijk
• De aansluitpunten van de SPEAKERS SUBWOOFER zijn de
aansluitpunten van de Passive subwoofer S-SLW500 van Pioneer.
Als u gebruik maakt van een ander model subwoofer, gebruik dan
een model met een ingebouwde versterker en sluit deze aan op het
aansluitpunt van de PRE-OUT SUBWOOFER.
• Sluit één van de twee sufwoofers aan, de Passive óf Powered, omdat
door aansluiting van beide de juiste geluidsweergave niet wordt
verkregen.
SPEAKERS
AUDIO
SURR BACK/
FRONT HEIGHT
PRE OUT
OPTICAL
SUBWOOFER
R
L
(Single)
COAXIAL
CD IN
TV IN DIGITAL AUX IN
FRONT
R
L
A
CENTER
SUB
WOOFER SURROUND /
R
L
B
LINE LEVEL
INPUT
Voor-rechts
Midden
Voor-links
Subwoofer
S-SLW500
Aangestuurde
subwoofer
Surround-
rechts
Surround-
links
Zorg ervoor dat de luidspreker aan de rechterzijde op het rechteraansluitpunt (R), en de luidspreker aan
de linkerzijde op het linkeraansluitpunt (L) wordt aangesloten. Ook moeten de positieve en negatieve (+/–)
aansluitingen op de receiver overeenkomen met die op de luidsprekers.
U kunt luidsprekers met een normale impedantie tussen 4
Ω
en 16
Ω
gebruiken.
Basisbedradingsaansluitingen
Voorluidsprekeraansluitingen:
1
Draai de ontblote draaduiteinden in elkaar.
2
Maak de aansluiting wat los en steek de blote
draad er in.
3
Draai de aansluiting vast.
Overige speakeraansluitpunten:
1
Draai de ontblote draaduiteinden in elkaar.
2
Duw de klemaansluiting open en steek de
ontblote draad naar binnen.
3
Laat de klemaansluiting los.
De luidsprekers opstellen
De receiver werkt al met twee stereoluidsprekers (de
voorluidsprekers in de afbeelding). Het verdient echter
aanbeveling ten minste drie luidsprekers te gebruiken en een
complete opstelling is het beste voor surroundgeluid.
Stel uw luidsprekers op zoals hieronder getoond om
een optimaal surroundgeluid te verkrijgen.
2.1-kanaals surroundsysteem: 5.1-kanaals surroundsysteem:
R
L
SW
R
SL
L
SW
C
SR
• Daarnaast kunnen tevens surroundback-speakers,
Front Height-speakers of Speaker B worden
aangesloten.
“Sluit de surround-achter- of Front
Heightluidsprekers aan”
1
2
3
1
2
3
Stroomschema voor de instellingen op de receiver
BELANGRIJKE INFORMATIE BETREFFENDE
DE VENTILATIE
Let er bij het installeren van het apparaat op dat er
voldoende vrije ruimte rondom het apparaat is om een
goede doorstroming van lucht te waarborgen
(tenminste 10 cm boven, 5 cm achter en 5 cm aan de
zijkanten van het apparaat).
WAARSCHUWING
De gleuven en openingen in de behuizing van het
apparaat zijn aangebracht voor de ventilatie, zodat een
betrouwbare werking van het apparaat wordt verkregen
en oververhitting wordt voorkomen. Om brand te
voorkomen, moet u ervoor zorgen dat deze openingen
nooit geblokkeerd worden of dat ze afgedekt worden
door voorwerpen (kranten, tafelkleed, gordijn e.d.) of
door gebruik van het apparaat op een dik tapijt of een
bed.
D3-4-2-1-7b*_A1_Nl
Zorg ervoor dat alle
aansluitingen tot
stand zijn gebracht
voordat u de stekker
van dit toestel in het
stopcontact steekt.
Dit apparaat is een multifunctionele AV-receiver die is
uitgerust met talloze voorzieningen en aansluitingen.
Het apparaat kan gemakkelijk worden gebruikt door de
onderstaande aanwijzingen te volgen voor het maken
van de aansluitingen en instellingen.
L
Voor-links
SW
Subwoofer
C
Midden
TV
Deze receiver
Blu-ray Disc-apparaat
R
Voor-rechts
SL
Surround-links
SR
Surround-rechts
10 mm
10 mm
Nederlands
VSX-S300̲SYXCN̲QSG̲設変book.indb 2
VSX-S300̲SYXCN̲QSG̲設変book.indb 2
2012/04/23 14:17:28
2012/04/23 14:17:28
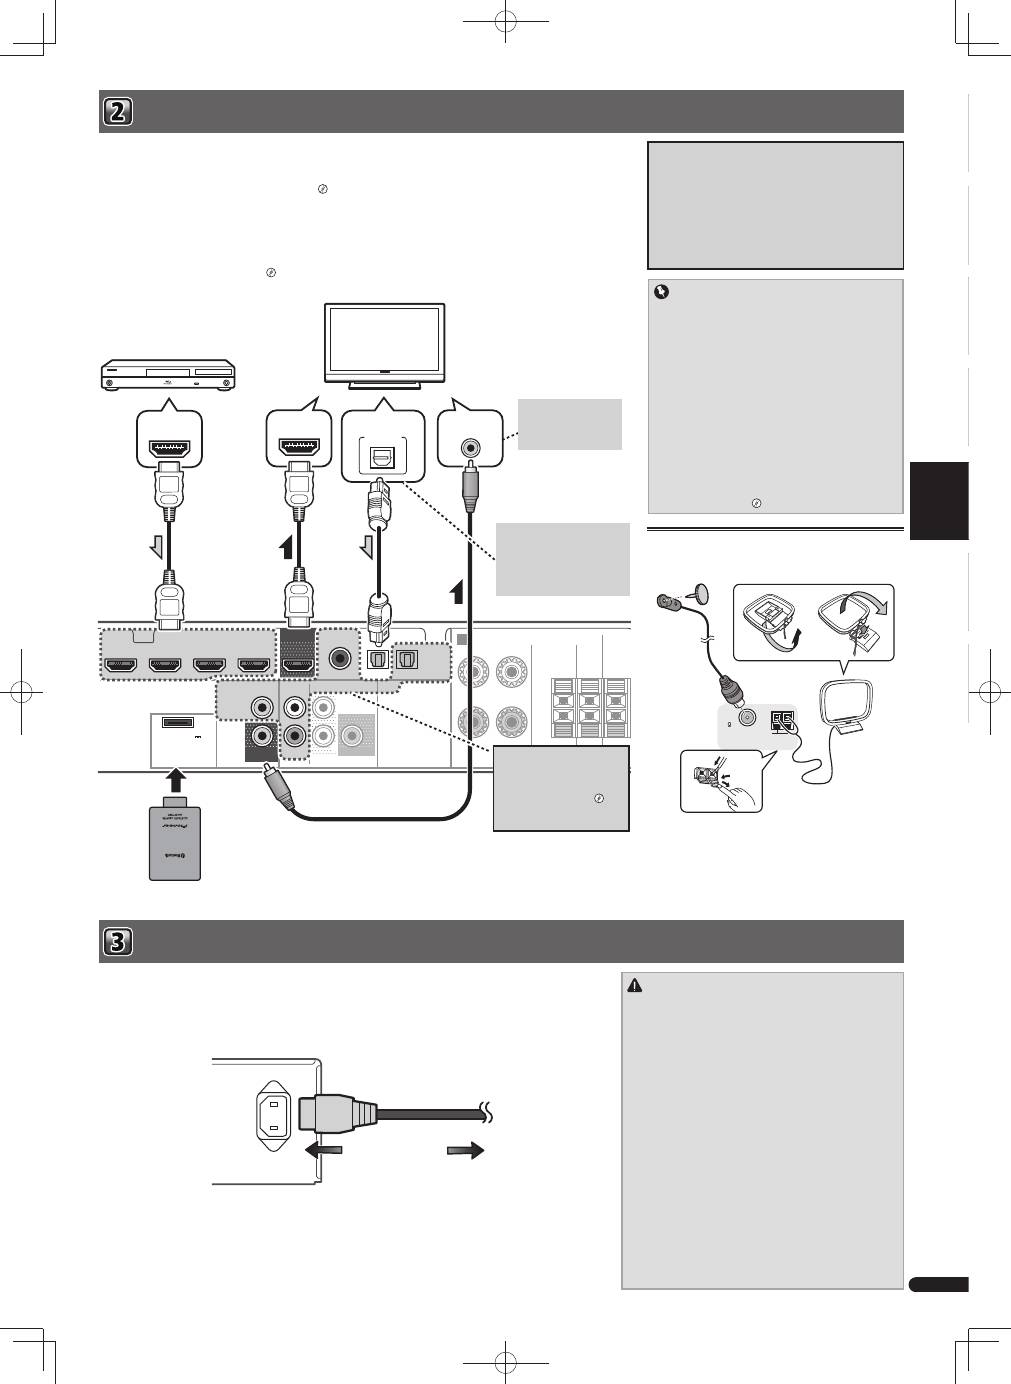
English
Français
Italiano
Español
Nederlands
Deutsch
3
Nl
Aansluiting van uw TV en weergave-apparatuur De receiver aansluiten op het stopcontact
Belangrijk
• Als de receiver via een HDMI-kabel op de TV is
aangesloten, wordt de On-screendisplay (OSD)
niet weergegeven. Zorg ervoor dat een standaard
RCA analoge videokabel voor de aansluiting
wordt gebruikt. Schakel in dat geval de TV-ingang
over naar analoog om het OSD-scherm (voor de
set-up etc.) op de TV te zien.
• Wanneer de Control met HDMI-functie op ON
staat en de receiver met een HDMI-kabel op een
compatible TV is aangesloten, en u wijzigt de
ingang van de TV naar composiet, dan wordt de
ingang van de receiver mogelijk automatisch
gewijzigd naar TV. Als dit zich voordoet, schakel
dan de ingang van de receiver terug naar de
originele ingang, of zet de Control met HDMI-
functie op OFF.
“HDMI Setup”
Als u een apparaat hebt dat is uitgerust met HDMI of DVI (met HDCP) (zoals een Blu-ray Disc-speler enz.), kunt u
dit aansluiten op de receiver met een algemeen verkrijgbare HDMI-kabel.
Indien de TV- en weergavecomponenten de Control met HDMI-functie ondersteunen, dan kunnen de handige
Control met HDMI-functies worden gebruikt.
“Control met HDMI-functie”
• De volgende aansluiting/instelling is vereist om naar geluid van de TV via deze receiver te luisteren.
– Als de TV de HDMI Audio Return Channel-functie niet ondersteunt, sluit dan de receiver en de TV met
audiokabels aan (zoals getoond).
– Als de TV de HDMI Audio Return Channel-functie ondersteunt, dan wordt het geluid van de TV via het HDMI-
aansluitpunt op de receiver weergegeven, zodat aansluiting van een audiokabel niet nodig is. Zet in dat geval
ARC bij HDMI Setup op ON.
“HDMI Setup”
Informatie over aansluitingen voor de
video-uitgangen
Deze receiver is niet voorzien van een videoconverter.
Als u HDMI-kabels gebruikt voor aansluiting op het
ingangsapparaat, dienen dezelfde kabels te worden
gebruikt voor aansluiting op de TV.
De invoer van signalen van de analoge (composite)
video-ingangen van dit apparaat worden niet
uitgevoerd via de HDMI OUT.
HDMI
SPEAKERS
AUDIO
VIDEO
SURR BACK/
FRONT HEIGHT
PRE OUT
ASSIGNABLE
OPTICAL
SUBWOOFER
R
L
(Single)
OUT
MONITOR
OUT
ANALOG
AUX
IN
(
ANALOG
AUX
)
IN
COAXIAL
CD IN
STB IN
GAME IN
BD/BDR IN
DVD/DVR IN
TV IN DIGITAL AUX IN
FRONT
R
L
A
ADAPTER PORT
(
OUTPUT 5 V
0.1 A MAX
)
CENTER
SUB
WOOFER SURROU
R
VIDEO IN
HDMI IN
HDMI OUT
DIGITAL AUDIO OUT
OPTICAL
HDMI/DVI-compatible componenten
(Blu-ray Disc-apparaat,enz.)
HDMI/DVI-compatible TV
Deze aansluiting is
nodig om de OSD van
het apparaat op de TV te
kunnen zien.
Als de TV de HDMI Audio
Return Channel-functie niet
ondersteunt, dan moet deze
aansluiting worden uitgevoerd
om naar TV-geluid via de recei-
ver te luisteren.
Als het apparaat dat u wilt
aansluiten geen HDMI-
uitgangaansluitpunt heeft, kan
het via deze aansluitpunten
worden aangesloten.
“Een
apparaat zonder HDMI-ingang
aansluiten”
LET OP
• Pak het netsnoer alleen bij het stekkerdeel beet. Trek
de stekker niet uit door aan het snoer te rukken en raak
het netsnoer nooit met natte handen aan; dit kan een
kortsluiting of elektrische schok tot gevolg hebben.
Plaats het apparaat, een meubelstuk of enig ander
voorwerp niet op het netsnoer en knel het netsnoer
op geen enkele manier af. Maak nooit een knoop in
het netsnoer of knoop deze samen met andere kabels.
Leid de netsnoeren zodanig dat de kans klein is dat
er iemand op trapt. Een beschadigd netsnoer kan
brand of een elektrische schok veroorzaken. Controleer
regelmatig de staat van het netsnoer. Wanneer u
beschadigingen aantreft, vraagt u uw dichtstbijzijnde
Pioneer-erkende, onafhankelijke servicecentrum om het
netsnoer te vervangen.
• Gebruik uitsluitend het netsnoer dat bij dit apparaat is
meegeleverd.
• Gebruik het netsnoer uitsluitend voor het doel dat
hieronder staat beschreven.
• Wanneer de receiver niet geregeld wordt gebruikt, bijv.
tijdens vakanties, moet hij losgekoppeld zijn door de
stekker van het netsnoer uit het stopcontact te trekken.
Antennes aansluiten
Sluit de FM-draadantenne en de AM-lusantenne aan
zoals hieronder aangegeven.
ANTENNA
FM
UNBAL
75
AM LOOP
Sluit de receiver pas aan, nadat u al uw componenten op deze receiver hebt aangesloten, waaronder de
luidsprekers.
1
Steek het meegeleverde netsnoer in de AC IN-aansluiting aan de achterzijde van de receiver.
2
Steek de stekker van het netsnoer in het stopcontact.
AC IN
Naar het stopcontact
Bluetooth
® ADAPTER
AS-BT100 of AS-BT200
(los verkrijgbaar)
Zie de Handleiding op de CD-ROM voor aanwijzingen over
de aansluiting en set-up van de
Bluetooth
ADAPTER en
over het afspelen van muziek.
Het merk Bluetooth® en de logo’s daarvan zijn
gedeponeerde handelsmerken van Bluetooth SIG,
Inc. PIONEER CORPORATION gebruikt deze onder
licentie Andere handelsmerken en handelsnamen zijn
eigendom van de respectieve eigenaren.
VSX-S300̲SYXCN̲QSG̲設変book.indb 3
VSX-S300̲SYXCN̲QSG̲設変book.indb 3
2012/04/23 14:17:30
2012/04/23 14:17:30
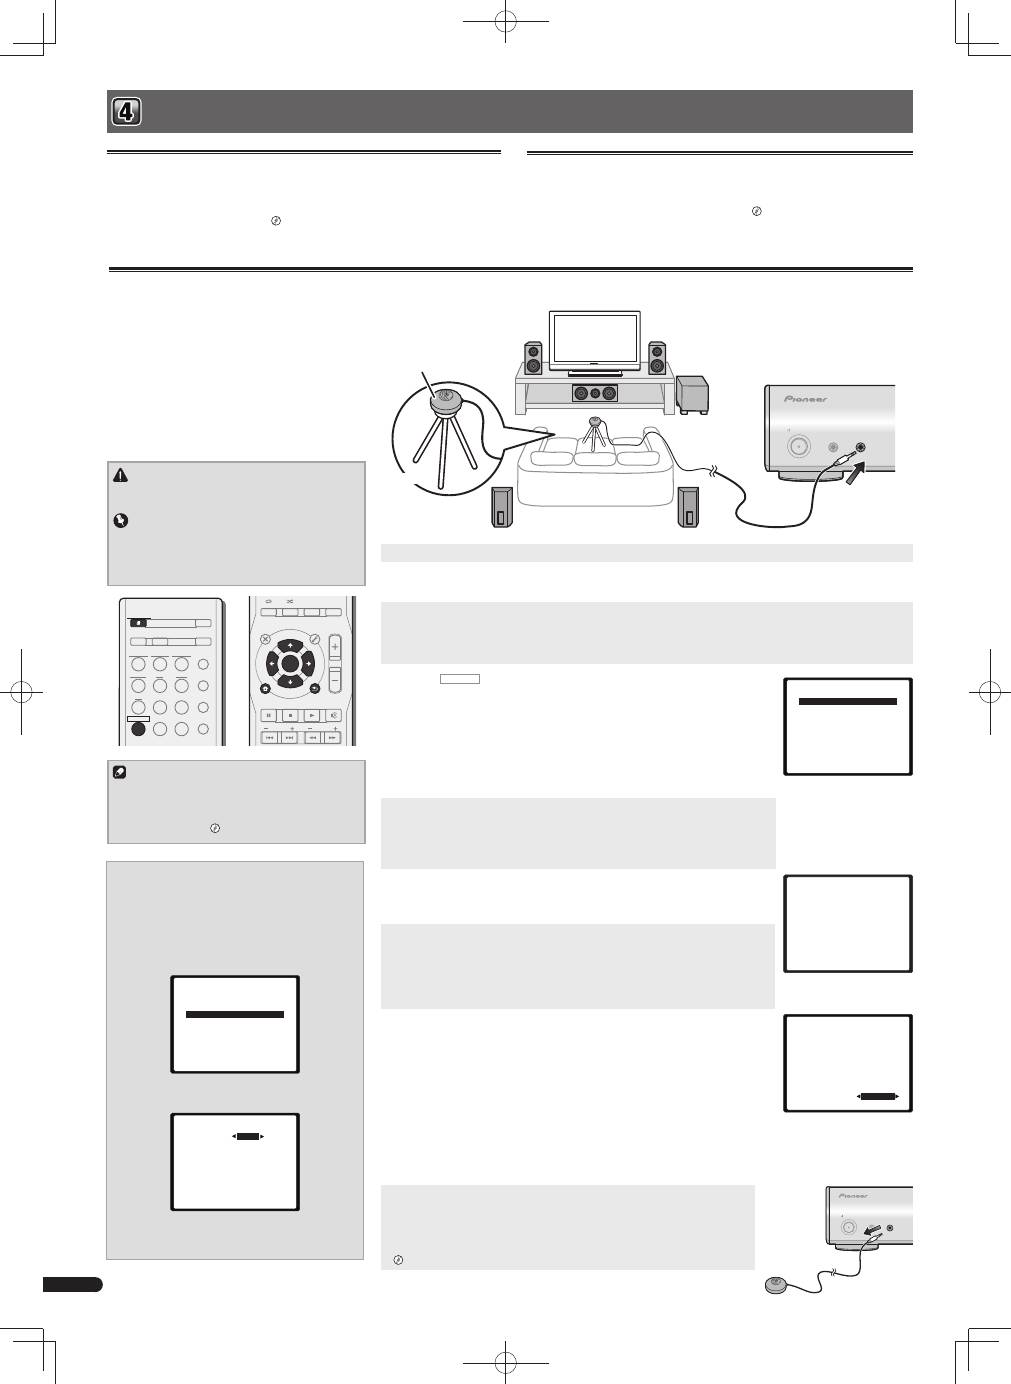
4
Nl
PORTABLE /
MCACC SETUP MIC
PHONES
STANDBY / ON
Basisinstellingen
Automatische instelling van surroundgeluid (MCACC)
LET OP
• De testtonen die worden voortgebracht tijdens de
Auto MCACC-instelling klinken erg hard.
Belangrijk
• Het schermmenu (OSD) verschijnt niet wanneer u
uw televisie met behulp van de HDMI-uitgang hebt
aangesloten. Gebruik de composietaansluitingen
voor de Auto MCACC-setup.
Opmerking
• De instelling van de subwooferafstand is
mogelijk verder dan de feitelijke afstand vanaf de
luisterpositie. Voer de instellingen in dat geval
handmatig uit.
“Luidsprekerafstand”
1
Zet de receiver en de TV aan.
2
Wijzig de TV-ingang naar de ingang waarmee deze receiver is aangesloten op de TV door middel van
de overeenkomstige composietkabel.
3
Sluit de microfoon aan op de aansluiting MCACC SETUP MIC op het voorpaneel.
Controleer of er zich geen obstakels tussen de luidsprekers en de microfoon bevinden.
Als u een statief heeft, kunt u dit gebruiken om de microfoon ongeveer op oorhoogte te plaatsen op uw normale
luisterpositie. U kunt de microfoon ook op oorhoogte plaatsen met behulp van een tafel of een stoel.
4
Druk op
RECEIVER
op de afstandsbediening en druk vervolgens op de toets
HOME MENU.
Het Home Menu verschijnt op de TV. Gebruik
en
ENTER
op de
afstandsbediening om door de schermen te navigeren en menu-onderdelen te
selecteren. Druk op
RETURN
om het huidige menu af te sluiten.
• Aangezien de S-HV600B/S-HV500-LR/S-SL100-LR/S-SL100CR zijn uitgevoerd
als compacte satellietspeakers, verdient het aanbeveling deze te gebruiken in
combinatie met een subwoofer om een vol basisgeluid te verkrijgen. Zet in dat
geval de
X.OVER
op 200 Hz (zie
“Wijzig de X.OVER-instelling”
op deze pagina).
5
Selecteer ‘Auto MCACC’ in het Home Menu en druk hierna op ENTER.
•
Mic In!
knippert wanneer de microfoon niet op het contactpunt
MCACC SETUP MIC is aangesloten.
Maak zo min mogelijk geluid nadat u op
ENTER
hebt gedrukt. Het systeem produceert
een reeks testtonen om het omgevingsgeluidsniveau vast te stellen.
6
Volg de instructies op het scherm.
• Als u gebruik maakt van een Powered subwoofer, zorg er dan voor dat de subwoofer
is ingeschakeld en het volume omhoog is gedraaid.
7
Wacht tot de testtonen beëindigd zijn.
Er wordt een voortgangsrapport weergegeven op het scherm terwijl de receiver
testtonen weergeeft om de aanwezigheid van de luidsprekers in uw opstelling te
bepalen. Probeer zo stil mogelijk te zijn wanneer dit plaatsvindt.
• Voor de juiste luidsprekerinstellingen dient u het volume niet in te stellen tijdens
de testtonen.
8
Bevestig de luidsprekerconfi guratie.
De configuratie die op het scherm wordt weergegeven, dient overeen te komen met de
feitelijke luidsprekers die u hebt.
• Bij foutmeldingen (zoals
Too much ambient noise
(Te veel omgevingsruis)) kies
RETRY
nadat u de omgevingsruis heeft gecontroleerd.
Als de weergegeven luidsprekerconfiguratie niet correct is, gebruikt u
om de
luidspreker te selecteren en
om de instelling te wijzigen. Wanneer u klaar bent,
gaat u door naar de volgende stap.
Wanneer u een foutbericht (
ERR
) in de kolom aan de rechter zijkant ziet, kan er een
probleem zijn met de luidsprekeraansluiting. Wanneer door het selecteren van
RETRY
het probleem niet’ wordt opgelost, schakelt u het apparaat uit en controleert u de
luidsprekeraansluitingen.
9
De Auto MCACC-setup is gereed! U keert terug naar het Home Menu.
Zorg ervoor dat de instelmicrofoon niet is aangesloten.
Met de instellingen die in de Auto MCACC-setup zijn gedaan wordt een
weergaloos geluid uit uw systeem verkregen, maar het is tevens mogelijk deze
instellingen handmatig te doen met gebruik van de Manual Speaker Setup.
“Handmatige luidsprekerinstelling”
Uitschakelen van de Auto Power Down
Als deze receiver enkele uren lang niet wordt gebruikt, schakelt hij automatisch
uit. De automatische Power Off-timer is ingesteld op zes uren volgens de
fabrieksinstellingen, en deze timing kan worden gewijzigd of de Power Off-functie kan
helemaal worden uitgeschakeld.
“Het Auto Power Down-menu”
Uitschakelen van de demodisplay
De display op het voorpaneel toont verschillende soorten informatie (demodisplays)
wanneer de receiver niet in werking is.
Deze demodisplay kan worden uitgeschakeld.
“Het FL Demo Mode-menu”
• De demomodus wordt automatisch uitgeschakeld wanneer de Auto MCACC-
setup wordt uitgevoerd (zie hieronder).
De automatische meerkanaals akoestische calibratie
(MCACC, voor ‘Auto Multi-Channel Acoustic
Calibration’) meet de akoestische karakteristieken van
uw luisterruimte, waarbij rekening wordt gehouden
met omgevingsgeluid, luidsprekergrootte en –
afstand; ook worden kanaalgalm en kanaalvolume
getest. Nadat u de microfoon heeft ingesteld die
bij uw systeem wordt geleverd, kiest de receiver op
basis van de informatie van een reeks testtonen de
optimale luidsprekerinstellingen en egalisatie voor uw
luisterruimte.
iPod USB NETWORK
STANDBY/ON
AUTO /
DIRECT
ALC /
STANDARD
ADV
SURR
SOUND
WING
ADAPTER
TUNER
BD
DVD
CD
STB
GAME
TV
PORTABLE
RECEIVER
ECO
D AUX
A AUX
S.RTRV
AUDIO
DISP
DIMMER
TOP
MENU
MENU
TOOLS
VOL
RETURN
PTY
PRESET
BAND
MUTE
HOME MENU
iPod
CTRL
STATUS
SLEEP
SP-AB
ENTER
TUNE
Microfoon
Statief
Home Menu
1.Auto MCACC
2.Manual SP Setup
3.Input Assign
4.Pre Out Setting
5.HDMI Setup
6.Auto Power Down
7.FL Demo Mode
1.Auto MCACC
Now Analyzing
Environment Check
Ambient Noise
Speaker YES/NO
Return
1.Auto MCACC
Check!
OK
Return
10:Next
Front
Center
Surr
Surr. Back
Subwoofer
[ YES ]
[ YES ]
[ YES ]
[ - - - ]
[ YES ]
PORTABLE /
MCACC SETUP MIC
PHONES
STANDBY / ON
Wijzig de X.OVER-instelling
Voor S-HV600B/S-HV500-LR/S-SL100-LR/S-SL100CR-
speakers
1
Selecteer ‘Manual SP Setup’ in het Home
Menu en druk hierna op ENTER.
2
Selecteer ‘X.OVER’ in het Manual SP Setup en
druk hierna op ENTER.
2.Manual SP Setup
Return
a.Speaker System
b.Speaker Setting
c.X.OVER
d.Channel Level
e.Speaker Distance
3
Kies ‘200 Hz’ als grenswaarde van de
frequentie.
2c.X.OVER
Return
Frequency
200Hz
4
Druk tweemaal op RETURN als u klaar bent.
U keert terug naar het Home Menu.
VSX-S300̲SYXCN̲QSG̲設変book.indb 4
VSX-S300̲SYXCN̲QSG̲設変book.indb 4
2012/04/23 14:17:31
2012/04/23 14:17:31
- 1
- 2
