Pioneer DEH-3300UB: instruction
Class: Auto, Moto equipment and Transportation
Type:
Manual for Pioneer DEH-3300UB
Table of contents
- In case of trouble About this unit Demo mode
- Head unit Basic Operations Menu operations identical for function settings/audio adjustments/initial settings/lists Display indication
- Tuner
- CD/CD-R/CD-RW and US B storage devices iPod
- Audio Adjustments
- Initial Settings Selecting the illumination color
- Using an AUX source Sound muting
- Power cord Installation DIN front/rear mount Power amp (sold separately)
- Troubleshooting Error messages Removing and re-attaching the front panel
- Handling guidelines
- Compressed audio compatibility (disc, USB) Sequence of audio files iPod compatibility
- Russian character chart Copyright and trademark Specifications
CD RDS RECEIVER
AUTORADIO CD RDS
English Français Italiano Español Deutsch Nederlands
SINTOLETTORE CD RDS
REPRODUCTOR DE CD CON RECEPTOR RDS
CD RDS-EMPFÄNGER
CD RDS-ONTVANGER
CD RDS ПРИЕМНИК
Owner’s Manual
DEH-3300UB
Mode d’emploi
Manuale d’istruzioni
DEH-4300UB
Manual de instrucciones
Bedienungsanleitung
Handleiding
Руководство пользователя
Русский
<CRD4524-A/N>1
Section
01
Before You Start
Thank you for purchasing this PIONEER
Middle East, Africa and Oceania. Use in other
product.
areas may result in poor reception. The RDS
To ensure proper use, please read through this
(radio data system) function only operates in
manual before using this product. It is espe-
areas with broadcasting RDS signals for FM
cially important that you read and observe
stations.
WARNINGs and CAUTIONs in this manual.
Please keep the manual in a safe and accessible
CAUTION
place for future reference.
This product is a class 1 laser product classi-
fied under the Safety of laser products, IEC
60825-1:2007, and contains a class 1M laser
module. To ensure continued safety, do not re-
move any covers or attempt to gain access to
the inside of the product. Refer all servicing to
qualified personnel.
If you want to dispose this product, do not mix
it with general household waste. There is a se-
parate collection system for used electronic
products in accordance with legislation that re-
quires proper treatment, recovery and recy-
CAUTION—CLASS 1M INVISIBLE LASER
cling.
RADIATION WHEN OPEN, DO NOT VIEW
DIRECTLY WITH OPTICAL INSTRUMENTS.
Private households in the member states of
the EU, in Switzerland and Norway may return
their used electronic products free of charge
to designated collection facilities or to a retai-
CAUTION
ler (if you purchase a similar new one).
! Do not allow this unit to come into contact
For countries not mentioned above, please
with liquids. Electrical shock could result.
contact your local authorities for the correct
Also, damage to this unit, smoke, and over-
method of disposal.
heating could result from contact with liquids.
By doing so you will ensure that your disposed
! The Pioneer CarStereo-Pass is for use only in
product undergoes the necessary treatment,
Germany.
recovery and recycling and thus prevent po-
! Always keep the volume low enough to hear
tential negative effects on the environment
outside sounds.
and human health.
! Avoid exposure to moisture.
! If the battery is disconnected or discharged,
any preset memory will be erased.
In case of trouble
Notes
Should this unit fail to operate properly, please
! Function setting operations are completed
contact your dealer or nearest authorized
even if the menu is cancelled before the op-
PIONEER Service Station.
erations are confirmed.
! In this manual, iPod and iPhone will be re-
ferred to as “iPod”.
About this unit
The tuner frequencies on this unit are allo-
cated for use in Western Europe, Asia, the
2
En
Section
Before You Start
01
English
Demo mode
Important
! Failure to connect the red lead (ACC) of this
unit to a terminal coupled with ignition switch
on/off operations may lead to battery drain.
! Remember that if the feature demo continues
operating when the car engine is turned off, it
may drain battery power.
The demo automatically starts when the igni-
tion switch is set to ACC or ON while the unit
is turned off. Turning off the unit does not can-
cel demo mode. To cancel the demo mode, op-
erate the function in the initial setting menu.
Operating the demo while the ignition switch
is set to ACC may drain battery power.
En
3
<CRD4524-A/N>2
Section
Section
02
Operating this unit
Operating this unit
02
English
Head unit
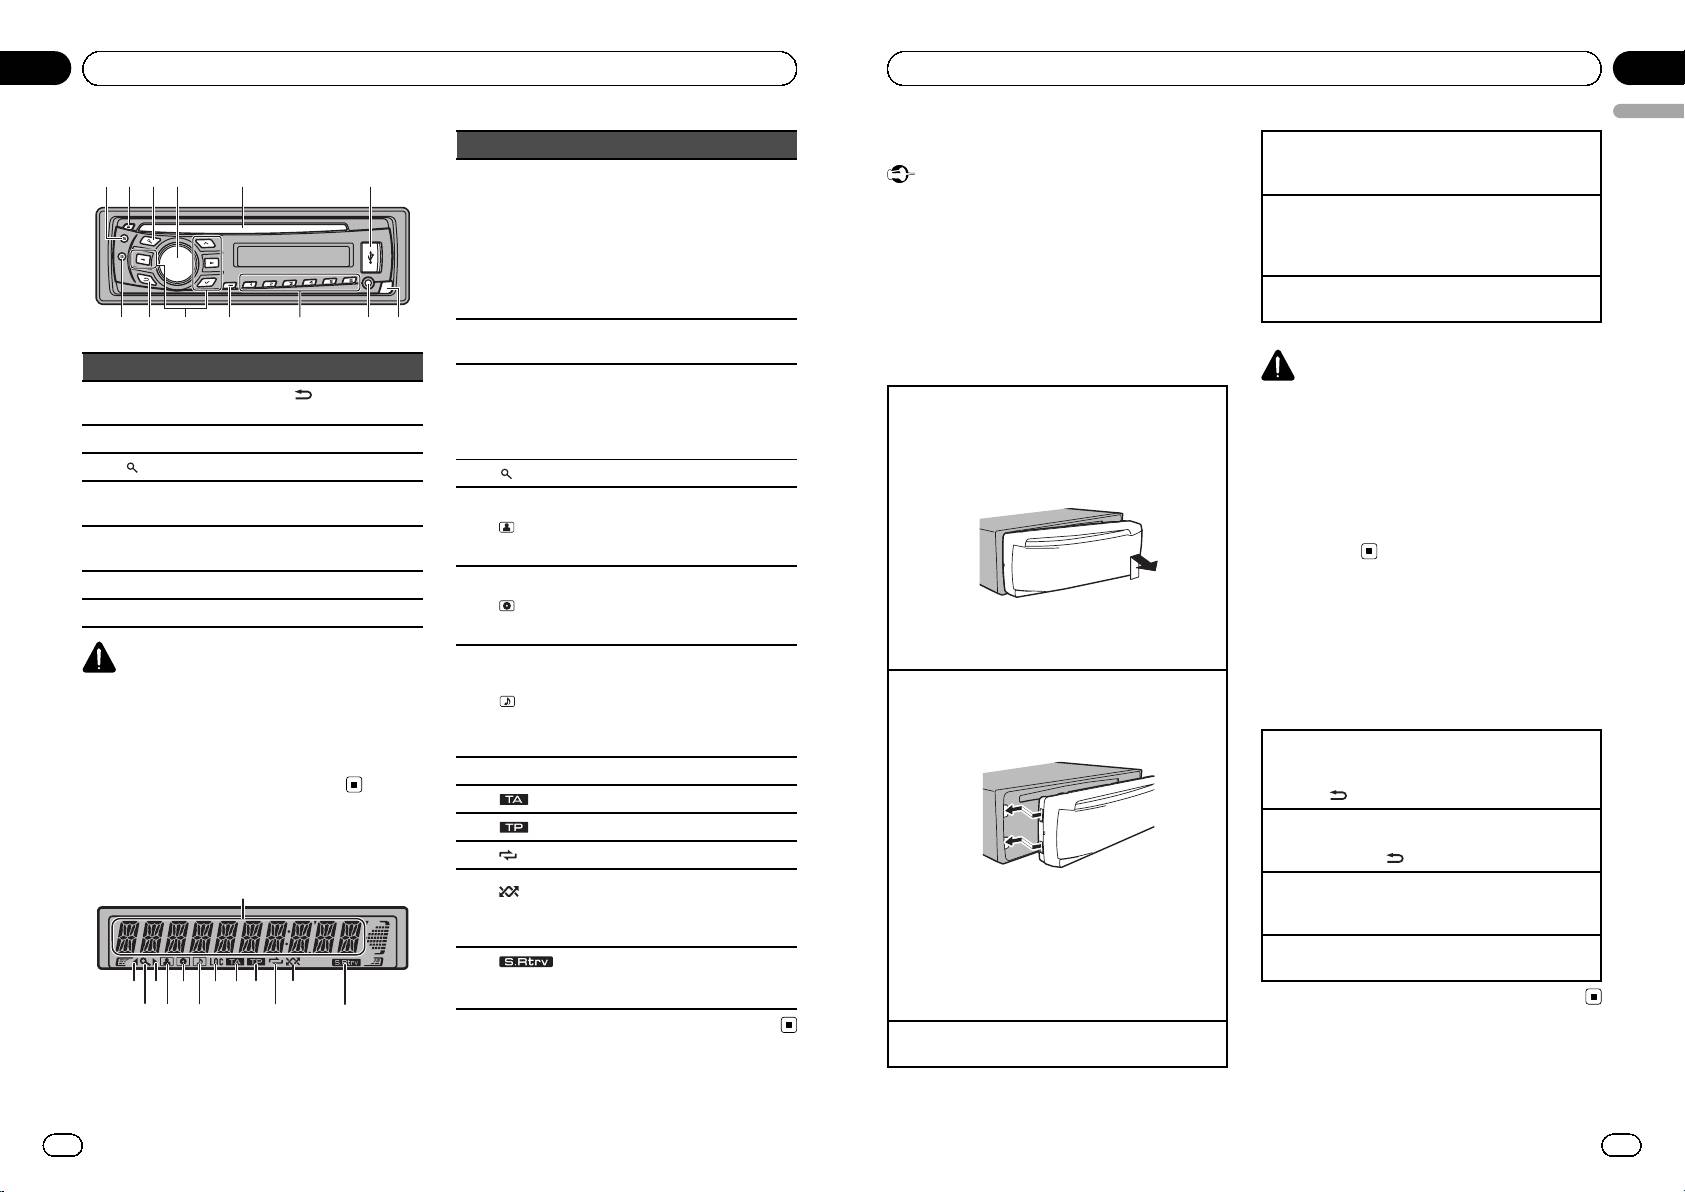
Indicator State
Basic Operations
Turning the unit off
1 Press and hold S (SRC/OFF) until the unit turns
1
24 5 63
! Tuner: band and frequency
Important
off.
! RDS: program service name,
! Handle gently when removing or attaching
PTY information and other lit-
Selecting a source
Main dis-
the front panel.
1 Press S (SRC/OFF) to cycle between:
1
play sec-
eral information
! Avoid subjecting the front panel to excessive
tion
! Built-in CD, USB storage de-
TUNER (tuner)—CD (built-in CD player)—USB
shock.
vice and iPod: elapsed play-
(USB)/iPod (iPod)—AUX (AUX)
back time and text
! Keep the front panel out of direct sunlight and
Adjusting the volume
information
high temperatures.
1 Turn M.C. to adjust the volume.
78 a b c d9
! To avoid damaging the device or vehicle inter-
An upper tier of the folder or
2 c
menu exists.
ior, remove any cables and devices attached
Part Part
to the front panel before detaching it.
CAUTION
A lower tier of the folder or menu
(Back/display/
exists.
For safety reasons, park your vehicle when remov-
1 S (SRC/OFF) 8
Removing the front panel to protect your unit from
scroll)
3 d
It flashes when a song/album re-
theft
ing the front panel.
lated to the song currently playing
2 h (eject) 9 a/b/c/d
1 Press the detach button to release the front
is selected from iPod.
panel.
Note
3
(list) a TA/NEWS
4
(list) The list function is operated.
2 Push the front panel upward and pull it toward
When this unit’s blue/white lead is connected to
MULTI-CONTROL
you.
the vehicle’s auto-antenna relay control terminal,
4
b 1 to 6
The disc (track) artist name is dis-
(M.C.)
played.
the vehicle’s antenna extends when this unit’s
5
(artist)
Artist search refinement of the
source is turned on. To retract the antenna, turn
AUX input jack (3.5
5 Disc loading slot c
mm stereo jack)
iPod browsing function is in use.
the source off.
6 USB port d Detach button
The disc (album) name is dis-
played.
7 B (BAND/ESC)
6
(disc)
Album search refinement of the
Menu operations identical
iPod browsing function is in use.
3 Always keep the detached front panel in a protec-
for function settings/audio
CAUTION
The track (song) name is dis-
tion device such as a protection case.
! Use an optional Pioneer USB cable (CD-U50E)
played.
Re-attaching the front panel
adjustments/initial
A playable audio file has been se-
to connect the USB audio player/USB mem-
7
(song)
lected while operating the list.
1 Slide the front panel to the left.
settings/lists
ory as any device connected directly to the
Song search refinement of the
Make sure to insert the tabs on the left side of the
unit will protrude out from the unit and may
iPod browsing function is in use.
head unit into the slots on the front panel.
Returning to the previous display
be dangerous.
Returning to the previous list (the folder one level
8 LOC Local seek tuning is on.
higher)
! Do not use unauthorized products.
9
(TA) TA function is on.
1 Press
.
a
(TP) A TP station is tuned in.
Returning to the main menu
Returning to the top tier of list
Display indication
b
(repeat) Track or folder repeat is on.
1 Press and hold
.
Random play is on.
1
(ran-
Returning to the ordinary display
The iPod source is selected and
2 Press the right side of the front panel until it is
c
dom/shuf-
Canceling the initial setting menu
the shuffle or shuffle all function
firmly seated.
fle)
1 Press B (BAND/ESC).
is on.
If you cannot attach the front panel to the head
unit successfully, make sure that you are placing
Returning to the ordinary display from the list
The sound retriever function is
1 Press B (BAND/ESC).
d
(sound re-
the front panel onto the head unit correctly. For-
2
63
8 a
9
c
on.
triever)
cing the front panel into place may result in da-
mage to the front panel or head unit.
4
5
7
b
d
Turning the unit on
1 Press S (SRC/OFF) to turn the unit on.
4
En
En
5
<CRD4524-A/N>3
Section
02
Operating this unit
Tuner
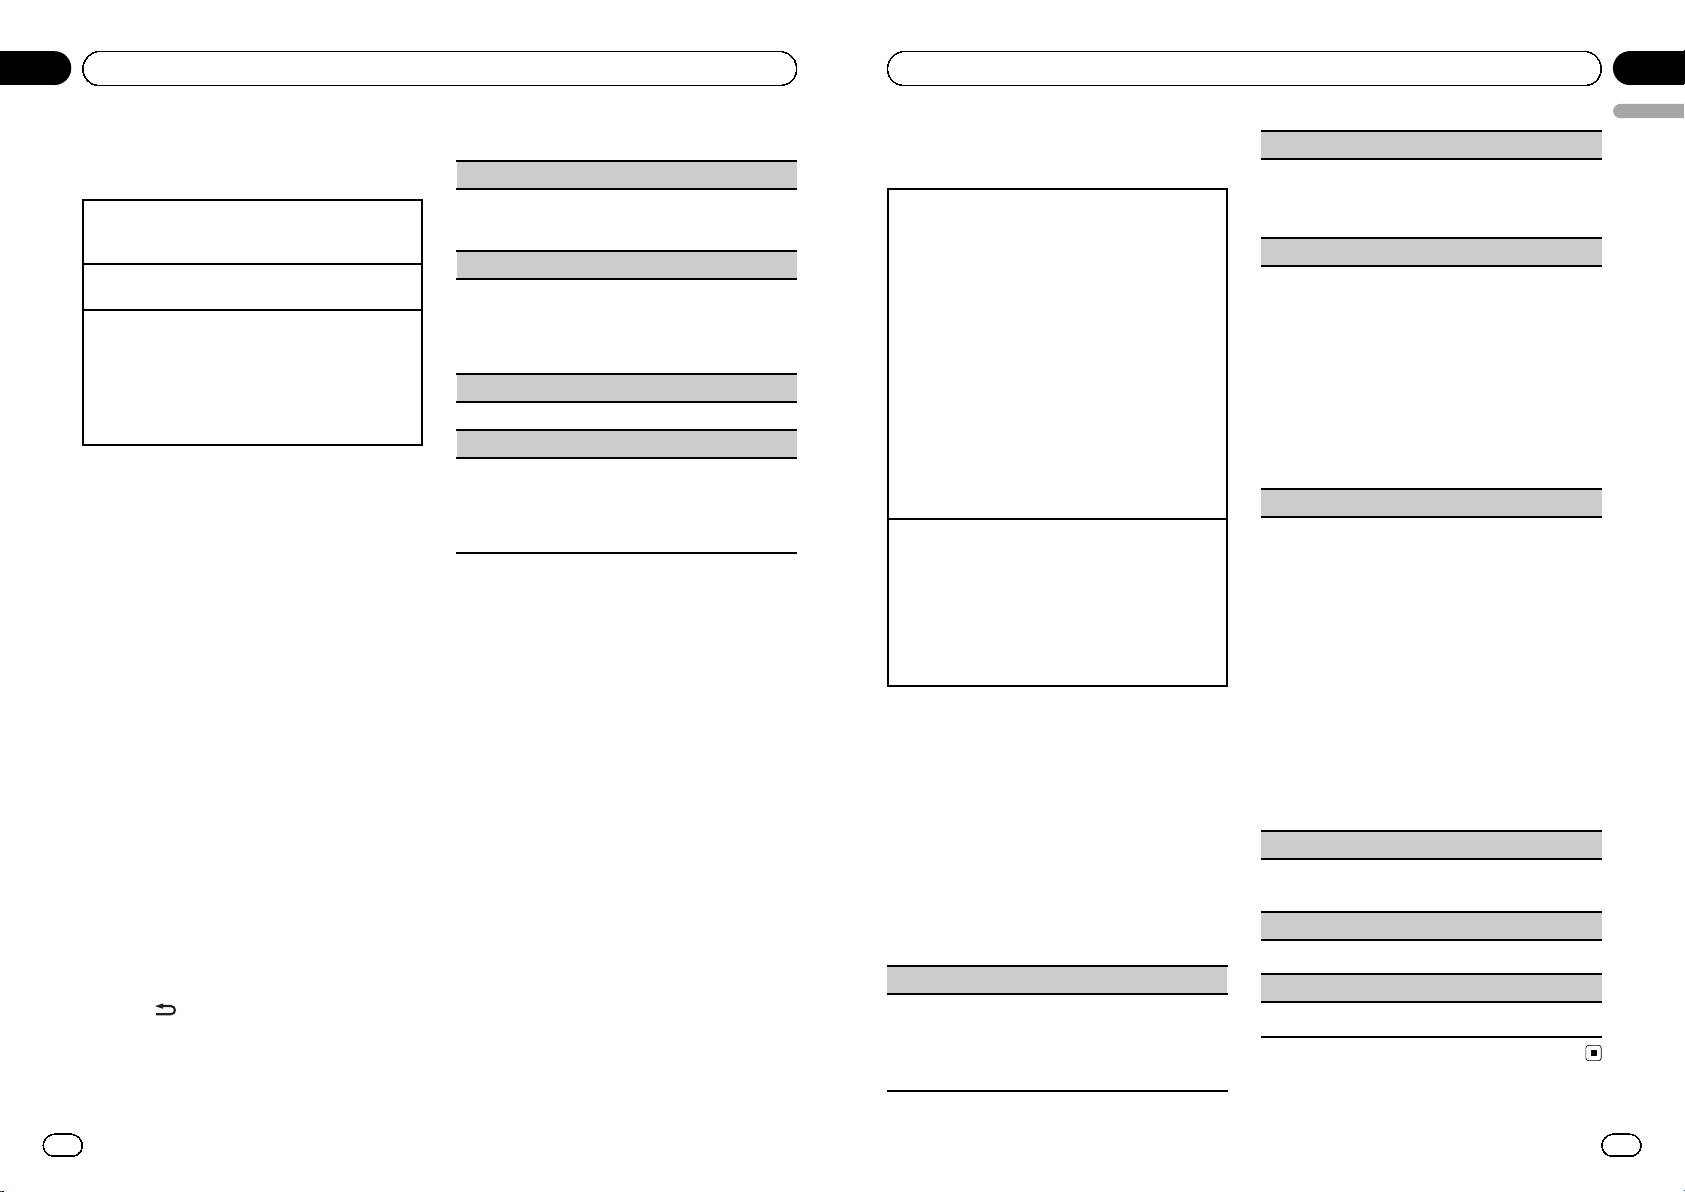
PTY list
Basic Operations
NEWS/INFO
NEWS (News), AFFAIRS (Current affairs), INFO (Infor-
Selecting a band
mation), SPORT (Sports), WEATHER (Weather), FI-
1 Press B (BAND/ESC) until the desired band (F1,
NANCE (Finance)
F2, F3 for FM or MW/LW) is displayed.
POPULAR
Manual tuning (step by step)
1 Press c or d.
POP MUS (Popular music), ROCK MUS (Rock
music), EASY MUS (Easy listening), OTH MUS
Seeking
(Other music), JAZZ (Jazz), COUNTRY (Country
1 Press and hold c or d, and then release.
music), NAT MUS (National music), OLDIES (Oldies
You can cancel seek tuning by briefly pressing c
music), FOLK MUS (Folk music)
or d.
While pressing and holding c or d, you can skip
CLASSICS
stations. Seek tuning starts as soon as you re-
L. CLASS (Light classical), CLASSIC (Classical)
lease c or d.
OTHERS
Note
EDUCATE (Education), DRAMA (Drama), CULTURE
This unit’s AF (alternative frequencies search)
(Culture), SCIENCE (Science), VARIED (Varied), CHIL-
function can be turned on and off. AF should be
DREN (Children’s), SOCIAL (Social affairs), RELIGION
off for normal tuning operation (refer to the next
(Religion), PHONE IN (Phone in), TOURING (Travel),
LEISURE (Leisure), DOCUMENT (Documentaries)
page).
Storing and recalling stations
for each band
Using preset tuning buttons
1 When you find a station that you want
to store in memory, press one of the preset
tuning buttons (1 to 6) and hold until the
preset number stops flashing.
2 Press one of the preset tuning buttons
(1 to 6) to select the desired station.
# You can also recall stored radio stations by
pressing a or b during the frequency display.
Switching the RDS display
RDS (radio data system) contains digital infor-
mation that helps search for the radio sta-
tions.
% Press
.
Program service name—PTY information—
Frequency
# PTY information and the frequency appear on
the display for eight seconds.
6
En
Section
Operating this unit
02
English
Advanced operations using
REGION (regional)
special buttons
When AF is used, the regional function limits the se-
lection of stations to those broadcasting regional pro-
Receiving traffic announcements
grams.
Regardless of the source you are listening to, you can
1 Press M.C. to turn the regional function on or off.
receive traffic announcements automatically with TA
(traffic announcement standby).
LOCAL (local seek tuning)
1 Tune in to a TP or enhanced other network’sTP
Local seek tuning lets you tune in to only those radio
station.
stations with sufficiently strong signals for good re-
2 Press TA/NEWS to turn traffic announcement
ception.
standby on or off.
1 Press M.C. to display the setting mode.
3 Use M.C. to adjust the TA volume when a traffic
2 Turn M.C. to select the desired setting.
announcement begins.
FM: OFF—LEVEL 1—LEVEL 2—LEVEL 3—LEVEL
The newly set volume is stored in the memory
4
and will be recalled for subsequent traffic an-
MW/LW: OFF—LEVEL 1—LEVEL 2
nouncements.
The highest level setting allows reception of only
4 Press TA/NEWS while a traffic announcement is
the strongest stations, while lower levels allow the
being received to cancel the announcement.
reception of weaker stations.
The tuner returns to the original source but re-
3 Press M.C. to confirm the selection.
mains in the standby mode until TA/NEWS is
pressed again.
PTY SEARCH (program type selection)
Using news program interruption
You can tune in to a station using PTY (program type)
When a news program is broadcast from a PTY code
information.
news station, the unit automatically switches to the
1 Press M.C. to display the setting mode.
news broadcast station. When the news program
2 Turn M.C. to select the desired setting.
ends, reception of the previous program resumes.
NEWS/INFO—POPULAR—CLASSICS—OTHERS
1 Press and hold TA/NEWS to turn news program
3 Press M.C. to begin the search .
interruption on or off.
The unit searches for a station broadcasting that
A news program can be canceled by pressing TA/
type of program. When a station is found, its pro-
NEWS.
gram service name is displayed.
For PTY (program type ID code) information, refer
to the previous page.
The program of some stations may differ from
Function settings
that indicated by the transmitted PTY.
1 Press M.C. to display the main menu.
If no station is broadcasting the type of program
you searched for, NOT FOUND is displayed for
2 Turn M.C. to change the menu option
about two seconds and then the tuner returns to
and press to select FUNCTION.
the original station.
TA (traffic announcement standby)
3 Turn M.C. to select the function.
After selecting, perform the following proce-
1 Press M.C. to turn traffic announcem ent standby
dures to set the function.
on or off.
# If MW/LW band is selected, only BSM or
AF (alternative frequencies search)
LOCAL is available.
1 Press M.C. to turn AF on or off.
BSM (best stations memory)
NEWS (news program interruption)
BSM (best stations memory) automatically stores the
six strongest stations in the order of their signal
1 Press M.C. to turn the NEWS function on or off.
strength.
1 Press M.C. to turn BSM on.
To cancel, press M.C. again.
En
7
<CRD4524-A/N>4
Section
02
Operating this unit
CD/CD-R/CD-RW and US B
Selecting and playing files/
storage devices
tracks from the name list
1 Press to switch to the file/track
Basic Operations
name list mode.
Playing a CD/CD-R/CD-RW
2 Use M.C. to select the desired file name
1 Insert the disc into the disc loading slot with the
label side up.
(or folder name).
Ejecting a CD/CD-R/CD-RW
Changing the file or folder name
1 Press h.
1 Turn M.C.
Playing songs on a USB storage device
Playing
1 Open the USB connector cover and plug in the
1 When a file or track is selected, press M.C.
USB storage device using a USB cable.
Viewing a list of the files (or folders) in the selected
Stopping playback of files on a USB storage device
folder
1 You may disconnect the USB storage device at
1 When a folder is selected, press M.C.
anytime.
Playing a song in the selected folder
Selecting a folder
1 When a folder is selected, press and hold M.C.
1 Press a or b.
Selecting a track
1 Press c or d.
Advanced operations using
Fast forwarding or reversing
special buttons
1 Press and hold c or d.
! When playing compressed audio, there is no
Selecting a repeat play range
sound during fast forward or reverse.
1 Press 6/
to cycle between the following:
CD/CD-R/CD-RW
Returning to root folder
! DISC – Repeat all tracks
1 Press and hold B (BAND/ESC).
! TRACK – Repeat the current track
Switching between compressed audio and CD-DA
! FOLDER – Repeat the current folder
1 Press B (BAND/ESC).
USB audio player/USB memory
! ALL – Repeat all files
Note
! TRACK – Repeat the current file
Disconnect USB storage devices from the unit
! FOLDER – Repeat the current folder
when not in use.
Playing tracks in random order
1 Press 5/
to turn random play on or off.
Tracks in a selected repeat range are played in
Displaying text information
random order.
Selecting the desired text information
Pausing playback
1 Press
.
1 Press 2/PAUSE to pause or resume.
Scrolling the text information to the left
Enhancing compressed audio and restoring rich
sound (sound retriever)
1 Press and hold
.
1 Press 1/S.Rtrv to cycle between:
Notes
OFF (off)—1—2
1 is effective for low compression rates, and 2 is
! Depending on the version of iTunes used to
effective for high compression rates.
write MP3 files to a disc or media file types, in-
compatible text stored within an audio file
may be displayed incorrectly.
Function settings
! Text information items that can be changed
depend on the media.
1 Press M.C. to display the main menu.
8
En
Section
Operating this unit
02
English
2 Turn M.C. to change the menu option
! The iPod will turn off about two minutes after
and press to select FUNCTION.
the ignition switch is set to OFF.
3 Turn M.C. to select the function.
After selecting, perform the following proce-
Displaying text information
dures to set the function.
Selecting the desired text information
REPEAT (repeat play)
1 Press
.
1 Press M.C. to display the setting mode.
Scrolling the text information to the left
2 Turn M.C. to select a repeat play range.
1 Press and hold
.
For details, refer to Selecting a repeat play range on
the previous page.
3 Press M.C. to confirm the selection.
Browsing for a song
RANDOM (random play)
1 Press to switch to the top menu of
1 Press M.C. to turn random play on or off.
list search.
PAUSE (pause)
2 Use M.C. to select a category/song.
1 Press M.C. to pause or resume.
Changing the name of the song or category
1 Turn M.C.
S.RTRV (sound retriever)
Playlists—artists—albums—songs—podcasts—
Automatically enhances compressed audio and re-
genres—composers—audiobooks
stores rich sound.
Playing
1 Press M.C. to display the setting mode.
1 When a song is selected, press M.C.
2 Turn M.C. to select the desired setting.
For details, refer to Enhancing compressed audio
Viewing a list of songs in the selected category
and r estoring rich sound (sound retriever) on the
1 When a category is selected, press M.C.
previous page.
3 Press M.C. to confirm the selection.
Playing a song in the selected category
1 When a category is selected, press and hold M.C.
Searching the list by alphabet
1 When a list for the selected category is displayed,
press
to switch to alphabet search mode.
iPod
2 Turn M.C. to select a letter.
3 Press M.C. to display the alphabetical list.
Basic Operations
Playing songs on an iPod
Advanced operations using
1 Open the USB connector cover.
2 Connect an iPod to the USB cable using an iPod
special buttons
Dock Connector.
Selecting a repeat play range
Selecting a track (chapter)
1 Press 6/
to cycle between the following:
1 Press c or d.
! ONE – Repeat the current song
Fast forwarding or reversing
! ALL – Repeat all songs in the selected list
1 Press and hold c or d.
Playing all songs in random order (shuffle all)
Notes
1 Press 5/
to turn shuffle all on.
! When the control mode is set to CTRL iPod/CTRL
! The iPod cannot be turned on or off when the
APP, shuffle play is on.
control mode is set to CTRL AUDIO.
! Disconnect headphones from the iPod before
Pausing playback
1 Press 2/PAUSE to pause or resume.
connecting it to this unit.
En
9
<CRD4524-A/N>5
Section
02
Operating this unit
Playing songs related to the currently playing song
Function settings
You can play songs from the following lists.
1 Press M.C. to display the main menu.
• Album list of the currently playing artist
• Song list of the currently playing album
2 Turn M.C. to change the menu option
• Album list of the currently playing genre
1 Press and hold M.C. to switch to link play mode.
and press to select FUNCTION.
2 Turn M.C. to change the mode; press to select.
! ARTIST – Plays an album of the artist cur-
3 Turn M.C. to select the function.
rently being played.
After selecting, perform the following proce-
! ALBUM – Plays a song from the album cur-
dures to set the function.
rently being played.
! GENRE – Plays an album from the genre cur-
REPEAT (repeat play)
rently being played.
The selected song/album will be played after the
1 Press M.C. to display the setting mode.
currently playing song.
2 Turn M.C. to select a repeat play range.
The selected song/album may be canceled if you op-
For details, refer to Selecting a repeat play range on
erate functions other than link search (e.g. fast for-
the previous page.
ward and reverse).
3 Press M.C. to confirm the selection.
Depending on the song selected to play, the end of
the currently playing song and the beginning of the
SHUFFLE (shuffle)
selected song/album may be cut off.
1 Press M.C. to display the setting mode.
Operating this unit’s iPod function from your iPod
2 Turn M.C. to select your favorite setting.
You can listen to the sound from your iPod applica-
! SONGS – Play back songs in the selected list
tions using your car's speakers, when CTRL APP is se-
in random order.
lected.
! ALBUMS – Play back songs from a randomly
This function is not compatible with the following
selected album in order.
iPod models.
! OFF – Cancel random play.
! iPod nano 1st generation
3 Press M.C. to confirm the selection.
! iPod 5th generation
APP mode is compatible with the following iPod
SHUFFLE ALL (shuffle all)
models.
! iPod touch 3rd generation (software version 3.0 or
1 Press M.C. to turn shuffle all on.
later)
To turn off, set SHUFFLE in the FUNCTION menu
! iPod touch 2nd generation (software version 3.0
to off.
or later)
LINK PLAY (link play)
! iPod touch 1st generation (software version 3.0 or
later)
1 Press M.C. to display the setting mode.
! iPhone 3GS (software version 3.0 or later)
2 Turn M.C. to change the mode; press to select.
! iPhone 3G (software version 3.0 or later)
For details about the settings, refer to Playing
! iPhone (software version 3.0 or later)
songs related to the currently playing song on this
1 Press 4/iPod to switch the control mode.
page.
! CTRL iPod – This unit’s iPod function can be
operated from the connected iPod.
PAUSE (pause)
! CTRL APP – Play ba ck the sound from your
iPod applications.
1 Press M.C. to pause or resume.
! CTRL AUDIO – This unit’s iPod function can
be operated from this unit.
AUDIO BOOK (audiobook speed)
Enhancing compressed audio and restoring rich
1 Press M.C. to display the setting mode.
sound (sound retriever)
2 Turn M.C. to select your favorite setting.
1 Press 1/S.Rtrv to cycle between:
! FASTER – Playback at a speed faster than nor-
OFF (off)—1—2
mal
1 is effective for low compression rates, and 2 is
! NORMAL – Playback at normal speed
effective for high compression rates.
! SLOWER – Playback at a speed slower than
normal
3 Press M.C. to confirm the selection.
10
En
Section
Operating this unit
02
English
S.RTRV (sound retriever)
FAD/BAL (fader/balance adjustment)
Automatically enhances compressed audio and re-
1 Press M.C. to display the setting mode.
stores rich sound.
2 Press M.C. to cycl e between fader (front/rear) and
1 Press M.C. to display the setting mode.
balance (left/right).
2 Turn M.C. to select the desired setting.
3 Turn M.C. to adjust speaker balance.
For details, refer to Enhancing compressed audio
! When the rear output and RCA output setting are
and r estoring rich sound (sound retriever) on the
SW, you cannot adjust front/rear speaker balance.
previous page.
Refer to SW CONTROL (rear output and subwoofer
3 Press M.C. to confirm the selection.
setting) on the next page.
EQUALIZER (equalizer recall)
Notes
! Switching the control mode to CTRL iPod
1 Press M.C. to display the setting mode.
pauses song playback. Operate the iPod to re-
2 Turn M.C. to select the equalizer.
sume playback.
DYNAMIC—VOCAL—NATURAL—CUSTOM—
! The following functions are still accessible
FLAT—POWERFUL
3 Press M.C. to confirm the selection.
from the unit even if the control mode is set to
CTRL iPod/CTRL APP.
TONE CTRL (equalizer adjustment)
— Pausing
! Adjusted equalizer curve settings are stored in
— Fast forward/reverse
CUSTOM.
— Track up/down
1 Press M.C. to display the setting mode.
— Repeat play (ONE/ALL/OFF)
2 Press M.C. to sel ect BASS (bass)/MID (mid)/TRE-
— Random play (shuffle)
BLE (treble).
—
(list) to use iPod menu
3 Turn M.C. to adjust the level.
— a to turn the iPod click wheel to the left
Adjustment range: +6 to -6
— b to turn the iPod click wheel to the right
LOUDNESS (loudness)
! When the control mode is set to CTRL iPod,
Loudness compensates for deficiencies in the low-
operations are limited as follows:
and high-frequency ranges at low volume.
— The function settings are not available.
1 Press M.C. to display the setting mode.
— The browse function cannot be operated
2 Turn M.C. to select the desired setting.
from this unit.
OFF (off)—LOW(low)—HIGH (high)
3 Press M.C. to confirm the selection.
SUBWOOFER1 (subwoofer on/off setting)
Audio Adjustments
This unit is equipped with a subwoofer output which
can be turned on or off.
1 Press M.C. to display the main menu.
1 Press M.C. to display the setting mode.
2 Turn M.C. to change the menu option
2 Turn M.C. to select the desired setting.
NORMAL (normal phase)—REVERSE (reverse
and press to select AUDIO.
phase)—OFF (subwoofer off)
3 Press M.C. to confirm the selection.
3 Turn M.C. to select the audio function.
After selecting, perform the following proce-
SUBWOOFER2 (subwoofer adjustment)
dures to set the audio function.
En
11
<CRD4524-A/N>6
Section
02
Operating this unit
The cut- off frequency and output level can be ad-
3 Turn M.C. to select the initial setting.
justed when the subwoofer output is on.
After selecting, perform the following proce-
Only frequencies lower than those in the selected
dures to set the initial setting.
range are outputted from the subwoofer.
1 Press M.C. to display the setting mode.
FM STEP (FM tuning step)
2 Press M.C. to cycl e between the cut-off frequency
and output level of the subwoofer.
Normally, the FM tuning step employed by seek tun-
Cut-off frequency (Cut-off frequency display
ing is 50 kHz. When AF or TA is on, the tuning step
flashes.)—Output level (Output level display
automatically changes to 100 kHz. It may be prefer-
flashes.)
able to set the tuning step to 50 kHz when AF is on.
3 Turn M.C. to select the desired setting.
! The tuning step remains at 50 kHz during manual
Cut-off frequency: 50HZ—63HZ—80HZ—100HZ
tuning.
—125HZ
1 Press M.C. to display the setting mode.
Output level: -24 to +6
2 Turn M.C. to select the FM tuning step.
50 KHZ (50 kHz)—100 KHZ (100 kHz)
SLA (source level adjustment)
3 Press M.C. to confirm the selection.
SLA (Source Level Adjustment) lets you adjust the vo-
AUTO-PI (auto PI seek)
lume level of each source to prevent radical changes
in volume when switching between sources.
The unit can automatically search for a different sta-
! Settings are based on the FM volume level, which
tion with the same programming, even during preset
remains unchanged.
recall.
! The MW/LW volume level can also be adjusted
1 Press M.C. to turn Auto PI seek on or off.
with this function.
AUX (auxiliary input)
! When selecting FM as the source, you cannot
switch to SLA.
Activate this setting when using an auxiliary device
1 Press M.C. to display the setting mode.
connected to this unit.
2 Turn M.C. to adjust the source volume.
1 Press M.C. to turn AUX on or off.
Adjustment range: +4 to –4
USB (plug and play)
3 Press M.C. to confirm the selection.
This setting allows you to switch your source to USB/
iPod automatically.
1 Press M.C. to turn the plug and play function on
or off.
ON – When a USB storage device/iPod is con-
Initial Settings
nected, depending on the type of device, the
Important
source is automatically switched to USB/iPod
when you turn on the engine. If you disconnect
PW SAVE (power saving) is cancelled if the vehi-
your USB storage device/iPod, this unit’s source
cle battery is disconnected and will need to be
is turned off.
turned back on once the battery is reconnected.
OFF – When a USB storage device/iPod is con-
When PW SAVE (power saving) is off, depending
nected, the source is not switched to USB/iPod
on connection methods, the unit may continue to
automatically. Please change the source to USB/
draw power from the battery if your vehicle's igni-
iPod manually.
tion switch doesn't have an ACC (accessor y posi-
SW CONTROL (rear output and subwoofer setting)
tion).
1 Press and hold S (SRC/OFF) until the
unit turns off.
2 Press S (SRC/OFF) and hold until func-
tion name appears in the display.
12
En
Section
Operating this unit
02
English
The rear speaker leads output and RCA output can be
Selecting the illumination
used for full- range speaker or subwoofer connection.
color
If you switch to REAR-SP :SW, you can connect a rear
speaker lead directly to a subwoofer without using an
(Function of DEH-4300UB)
auxiliary amp.
This unit is equipped with multiple-color illu-
Initially, REAR-SP is set for rear full-range speaker
connection (FUL).
mination. You can select a desired color from
1 Press M.C. to display the setting mode.
the color list.
2 Turn M.C. to change the output and press to se-
lect.
REAR-SP—PREOUT
Direct selection from the
3 Turn M.C. to change the setting.
illumination color list
REAR-SP: FUL—SW
PREOUT: SW—REA
1 Press M.C. to display the main menu.
! Even if you change this setting, there is no
output unless you turn the subwoofer output
2 Turn M.C. to change the menu option
on (refer to SUBWOOFER1 (subwoofer on/off
and press to select ILLUMI.
setting) on page 11).
! If you change this setting, subwoo fer output
3 Turn M.C. to select the illumination
in the audio menu will return to the factory
color.
settings.
You can select one option from the following
DEMO (demo display setting)
list.
! 30 preset colors (WHITE to ROSE)
1 Press M.C. to turn the demo display on or off.
! SCAN (cycle through all colors)
SCROLL (scroll mode setting)
! CUSTOM (customized illumination color)
When ever scroll is set to ON, recorded text informa-
4 Press M.C. to confirm the selection.
tion scrolls continuously in the display. Set to OFF if
you prefer the information to scroll just once.
Notes
1 Press M.C. to turn the ever scroll on or off.
! When SCAN is selected, the illuminated color
TITLE (multi-language)
automatically cycles through the 30 preset
This unit can display the text information of a com-
colors.
pressed audio file even if they are embedded in a
! When CUSTOM is selected, the customized
Western European or Russian language.
color saved is selected.
! If the embedded language and the selected lan-
guage setting are not the same, text information
may not be displayed properly.
Customizing the illumination color
! Some characters may not be displayed properly.
1 Press M.C. to display the setting mode.
1 Press M.C. to display the main menu.
2 Turn M.C. to select the desired setting.
EUROPEAN (European)—RUSSIAN (Russian)
2 Turn M.C. to change the menu option
3 Press M.C. to confirm the selection.
and press to select ILLUMI.
PW SAVE (power saving)
3 Turn M.C. to select the preset color or
Switching this function on enables you to reduce the
CUSTOM illumination color.
consumption of battery power.
# You cannot create a custom illumination color
! Turning on the source is the only operation al-
when SCAN is selected.
lowed when this function is on.
1 Press M.C. to turn the power save on or off.
4 Press M.C. and hold until the customiz-
ing illumination color setting appears in
the display.
En
13
<CRD4524-A/N>7
Section
02
Operating this unit
5 Press M.C. to select the primary color.
R (red)—G (green)—B (blue)
6 Turn M.C. to adjust the brightness level.
Adjustment range: 0 to 60
# You cannot select a level below 10 for all three
of R (red), G (green), and B (blue) at the same
time.
# You can also perform the same operation on
other colors.
7 Press M.C. and hold until CUSTOM ap-
pears.
Using an AUX source
1 Insert the stereo mini plug into the
AUX input jack.
2 Press S (SRC/OFF) to select AUX as the
source.
Note
AUX cannot be selected unless the auxiliary set-
ting is turned on. For more details, refer to AUX
(auxiliary input) on page 12.
Sound muting
Sound is muted automatically when:
! A call is made or received using a cell
phone connected to this unit.
! Voice guidance is output from a connected
Pioneer navigation unit.
The sound is turned off, MUTE is displayed
and no audio adjustments, except volume con-
trol, are possible. Operation returns to normal
when the phone connection or the voice gui-
dance is ended.
14
En
Connections
— Never band together negative cables of
multiple speakers.
Important
! When this unit is on, control signals are sent
! When installing this unit in a vehicle without
through the blue/white cable. Connect this
an ACC (accessor y) position on the ignition
cable to the system remote control of an exter-
switch, failure to connect the red cable to the
nal power amp or the vehicle’s auto-antenna
terminal that detects operation of the ignition
relay control terminal (max. 300 mA 12 V DC).
key may result in battery drain.
If the vehicle is equipped with a glass anten-
na, connect it to the antenna booster power
F
F
O
N
O
supply terminal.
S
T
A
T
R
! Never connect the blue/white cable to the
power terminal of an external power amp.
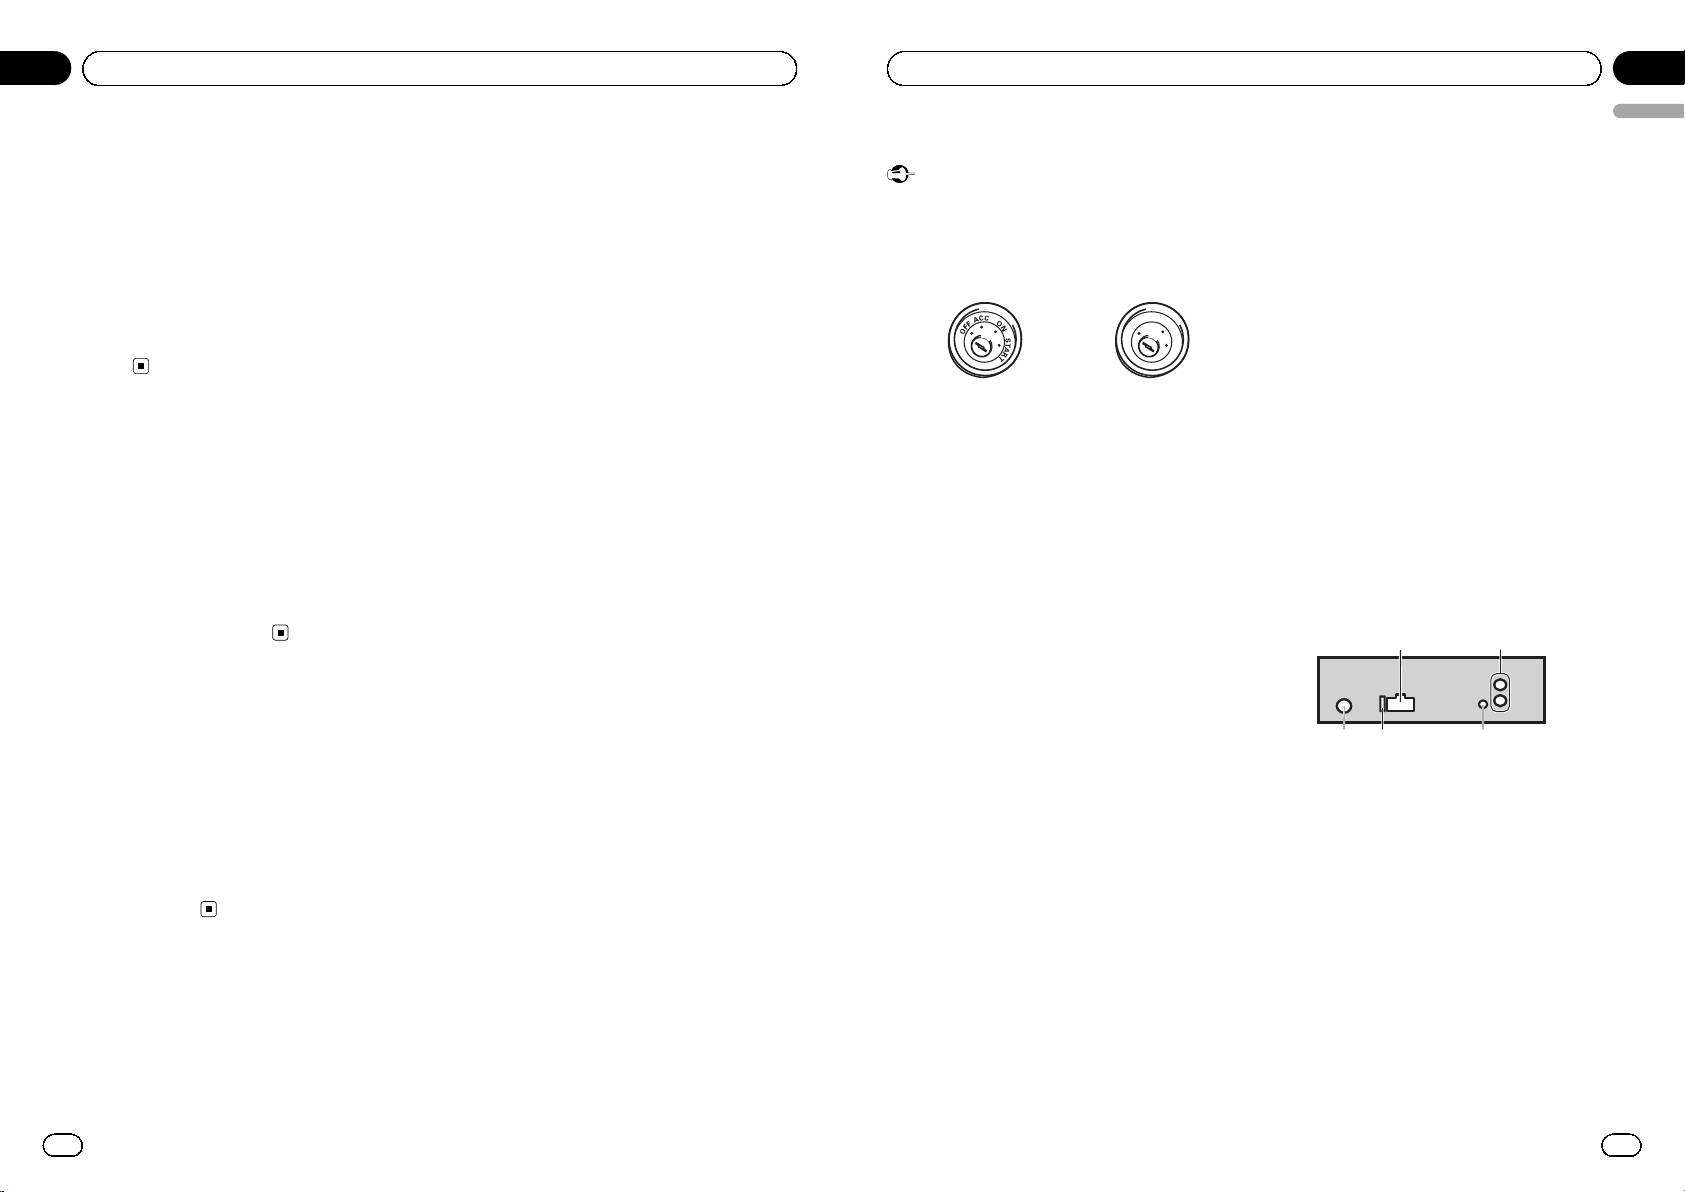
ACC position No ACC position
Also, never connect it to the power terminal of
the auto antenna. Doing so may result in bat-
! Use of this unit in conditions other than the
tery drain or a malfunction.
following could result in fire or malfunction.
! The black cable is ground. Ground cables for
— Vehicles with a 12-volt battery and negative
this unit and other equipment (especially,
grounding.
high-current products such as power amps)
— Speakers with 50 W (output value) and 4
must be wired separately. If they are not, an
ohm to 8 ohm (impedance value).
accidental detachment may result in a fire or
! To prevent a short-circuit, overheating or mal-
malfunction.
function, be sure to follow the directions
below.
— Disconnect the negative terminal of the
This unit
battery before installation.
— Secure the wiring with cable clamps or ad-
1
hesive tape. Wrap adhesive tape around
wiring that comes into contact with metal
parts to protect the wiring.
— Place all cables away from moving parts,
such as the gear shift and seat rails.
— Place all cables away from hot places,
such as near the heater outlet.
— Do not connect the yellow cable to the bat-
tery by passing it through the hole to the
engine compartment.
— Cover any disconnected cable connectors
with insulating tape.
— Do not shorten any cables.
— Never cut the insulation of the power cable
of this unit in order to share the power
with other devices. The current capacity of
the cable is limited.
— Use a fuse of the rating prescribed.
— Never wire the negative speaker cable di-
rectly to ground.
3
4 5
Section
Installation
03
English
2
1 Power cord input
2 Rear output or subwoofer output
3 Antenna input
4 Fuse (10 A)
5 Wired remote input
Hard-wired remote control adaptor can be
connected (sold separately).
En
15
<CRD4524-A/N>8
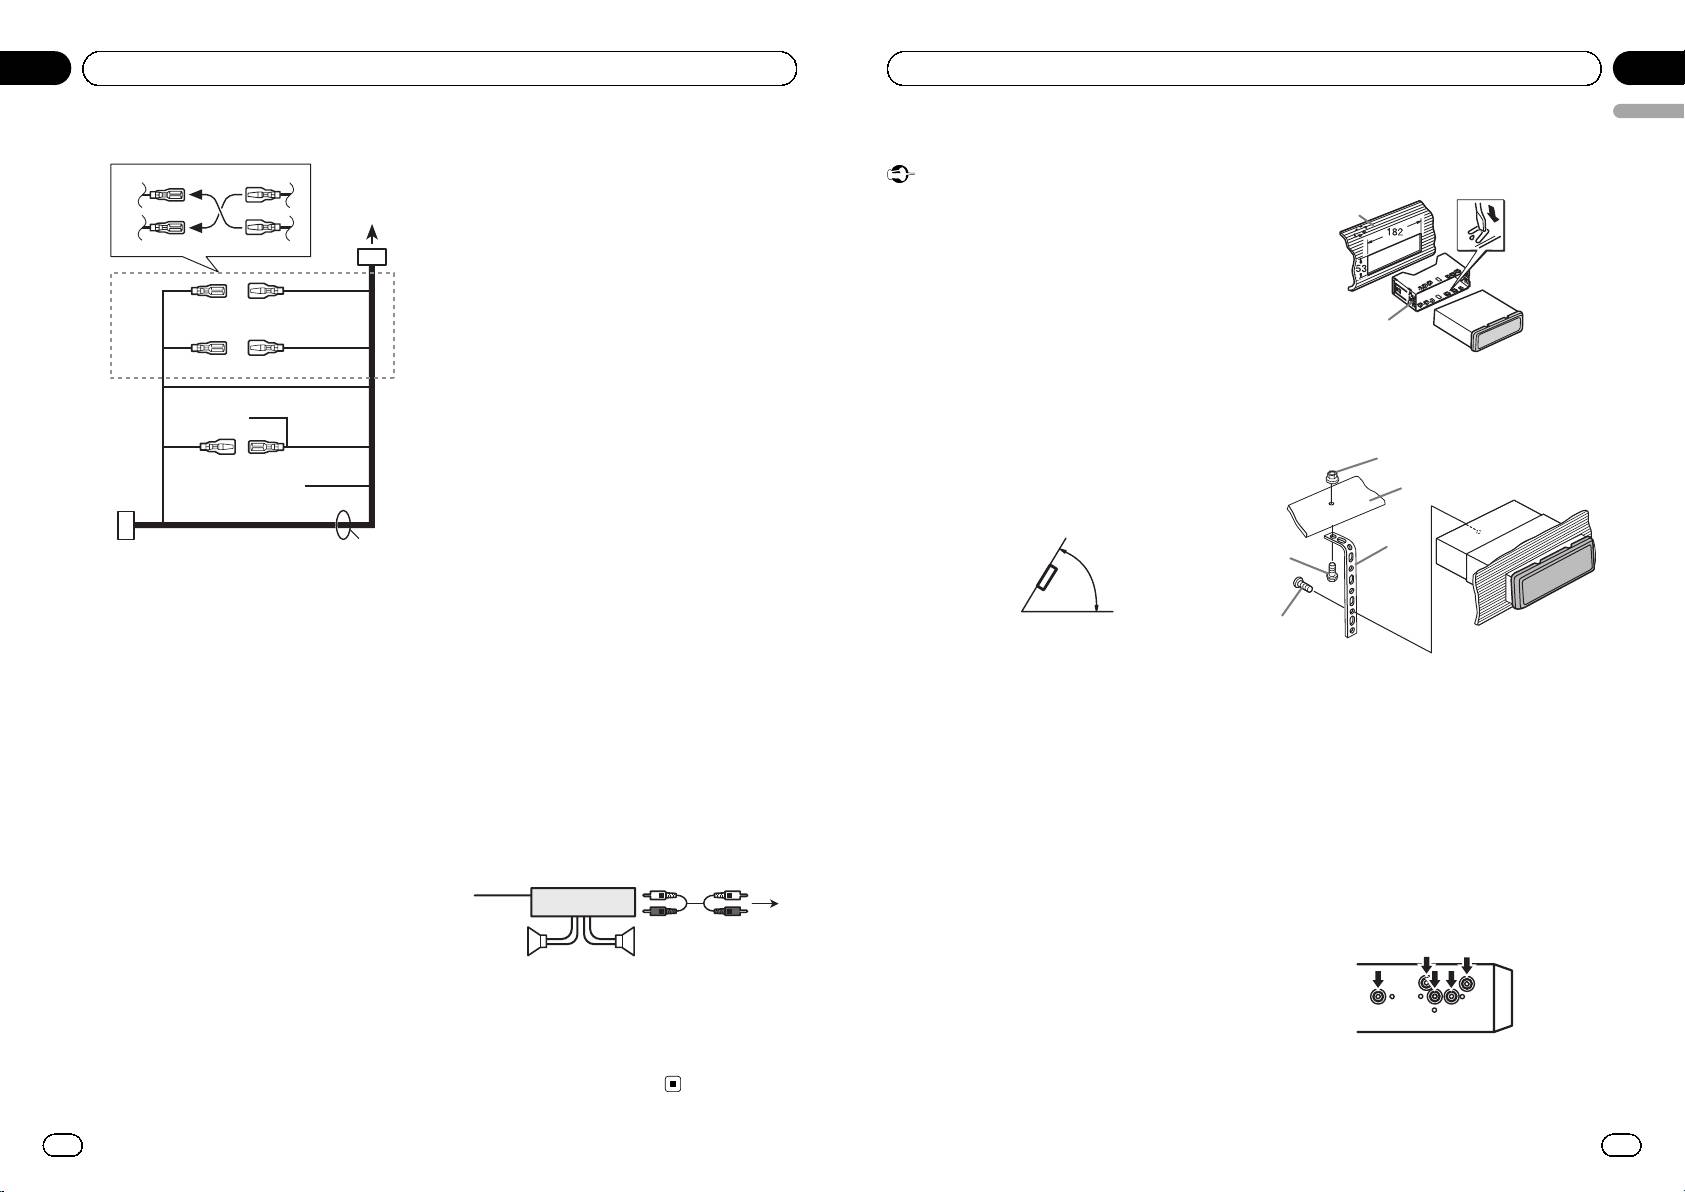
Power cord
3
4
2
5
6
1
3
4
7
5
6
8
a
9
b
e
d
Section
Section
03
Installation
Installation
03
English
b Blue/white
Installation
2 Secure the mounting sleeve by using a
Connect to auto-antenna relay control term-
screwdriver to bend the metal tabs (90°)
inal (max. 300 mA 12 V DC).
Important
into place.
c Yellow/black
! Check all connections and systems before
If you use an equipment with Mute function,
final installation.
1
wire this lead to the Audio Mute lead on that
! Do not use unauthorized parts as this may
equipment. If not, keep the Audio Mute lead
cause malfunctions.
free of any connections.
! Consult your dealer if installation requires dril-
d Speaker leads
ling of holes or other modifications to the vehi-
White: Front left +
cle.
2
White/black: Front left *
! Do not install this unit where:
Gray: Front right +
— it may interfere with operation of the vehi-
Gray/black: Front right *
cle.
1 Dashboard
Green: Rear left + or subwoofer +
— it may cause injury to a passenger as a re-
2 Mounting sleeve
Green/black: Rear left * or subwoofer *
sult of a sudden stop.
3 Install the unit as illustrated.
Violet: Rear right + or subwoofer +
! The semiconductor laser will be damaged if it
Violet/black: Rear right * or subwoofer *
overheats. Install this unit away from hot
1
e ISO connector
places such as near the heater outlet.
2
c
In some vehicles, the ISO connector may be
! Optimum performance is obtained when the
divided into two. In this case, be sure to con-
unit is installed at an angle of less than 60°.
nect to both connectors.
3
60°
4
1 To power cord input
Notes
2 Depending on the kind of vehicle, the function
! Change the initial setting of this unit. Refer to
of 3 and 5 may be different. In this case, be
SW CONTROL (rear output and subwoofer set-
5
sure to connect 4 to 5 and 6 to 3.
ting) on page 12.
3 Yellow
The subwoofer output of this unit is monaural.
Back-up (or accessory)
! When using a subwoofer of 70 W (2 Ω), be
DIN front/rear mount
1 Nut
4 Yellow
sure to connect the subwoofer to the violet
This unit can be properly installed using either
2 Firewall or metal support
Connect to the constant 12 V supply terminal.
and violet/black leads of this unit. Do not con-
front-mount or rear-mount installation.
3 Metal strap
5 Red
nect anything to the green and green/black
Use commercially available parts when instal-
4 Screw
Accessory (or back-up)
leads.
ling.
5 Screw (M4 × 8)
6 Red
# Make sure that the unit is installed securely in
Connect to terminal controlled by ignition
Power amp (sold separately)
DIN Front-mount
place. An unstable installation may cause skip-
switch (12 V DC).
ping or other malfunctions.
7 Connect leads of the same color to each
Perform these connections when using the
1 Insert the mounting sleeve into the
other.
optional amplifier.
dashboard.
8 Black (chassis ground)
For installation in shallow spaces, use the sup-
DIN Rear-mount
1
3
9 Blue/white
plied mounting sleeve. If there is enough
1 Determine the appropriate position
The pin position of the ISO connector will dif-
2
space, use the mounting sleeve that came
4
where the holes on the bracket and the
fer depending on the type of vehicle. Connect
with the vehicle.
side of the unit match.
9 and b when Pin 5 is an antenna control
55
type. In another type of vehicle, never connect
9 and b.
1 System remote control
a Blue/white
Connect to Blue/white cable.
Connect to system control terminal of the
2 Power amp (sold separately)
power amp (max. 300 mA 12 V DC).
3 Connect with RCA cable (sold separately)
4 To Rear output or subwoofer output
5 Rear speaker or subwoofer
16
En
En
17
<CRD4524-A/N>9
Section
Appendix
03
Installation
Additional Information
English
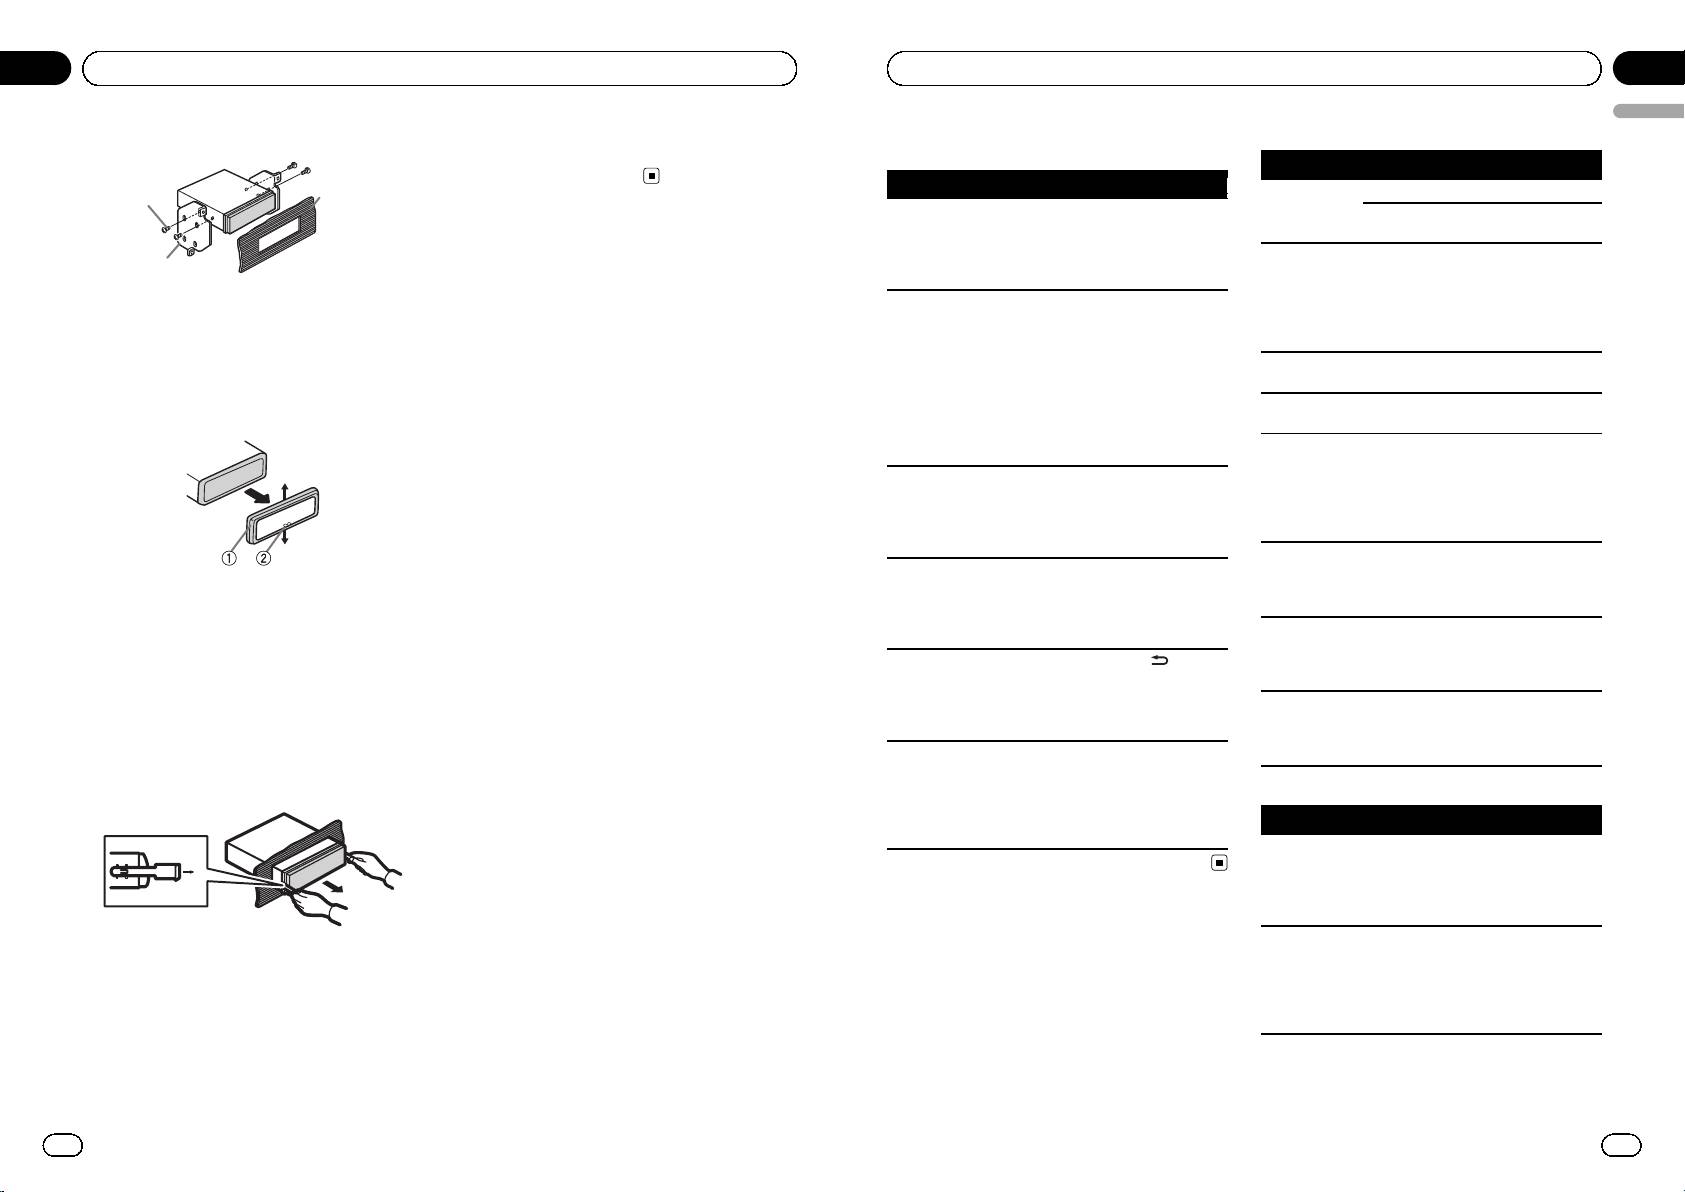
2 Tighten two screws on each side.
For details, refer to Removing the front panel to
Troubleshooting
Built-in CD Player
protect your unit from theft and Re-attaching
Message Cause Action
the front panel on page 5.
Symptom Cause Action
3
ERROR-11, 12,
The disc is dirty. Clean the disc.
1
The display
You did not per-
Perform operation
17, 30
The disc is
Replace the disc.
automatically
form any opera-
again.
scratched.
returns to the
tion within about
ordinary dis-
30 seconds.
ERROR-10, 11,
There is an elec-
Turn the ignition
2
play.
12, 15, 17, 30,
trical or mechan-
switch OFF and
A0
ical error.
back ON, or switch
1 Tapping screw (5 mm × 8 mm)
The repeat play
Depending on
Select the repeat
to a different
2 Mounting bracket
range changes
the repeat play
play range again.
source, then back
unexpectedly.
range, the se-
3 Dashboard or console
to the CD player.
lected range may
change when se-
ERROR-15 The inserted disc
Replace the disc.
Removing the unit
lecting another
is blank
folder or track, or
ERROR-23 Unsupported CD
Replace the disc.
1 Remove the trim ring.
when fast for-
format
warding/rever-
FRMT READ Sometimes there
Wait until the mes-
sing.
is a delay be-
sage disappears
A subfolder is
Subfolders can-
Select another re-
tween the start of
and you hear
not played
not be played
peat play range.
playback and
sound.
back.
when FOLDER
when you start to
(folder repeat) is
hear any sound.
selected.
NO AUDIO The inserted disc
Replace the disc.
NO XXXX ap-
There is no text
Switch the display
does not contain
1 Trim ring
pears when a
information em-
or play another
any playable
2 Notched tab
display is chan-
bedded.
track/file.
files.
ged (NO TITLE,
! Releasing the front panel allows easier ac-
SKIPPED The inserted disc
Replace the disc.
for example).
cess to the trim ring.
contains DRM
The display is
Demo mode is
! Press
to can-
protected WMA
! When reattaching the trim ring, point the
illuminated
on.
cel demo mode.
files.
side with the notched tab down.
when the unit
! Turn off the
PROTECT All the files on
Replace the disc.
is turned off.
demo display set-
2 Insert the supplied extraction keys into
the inserted disc
ting.
both sides of the unit until they click into
are embedded
The unit is mal-
You are using a
Move electrical de-
place.
with DRM.
functioning.
device, such as a
vices that may be
3 Pull the unit out of the dashboard.
There is inter-
cellular phone,
causing the inter-
USB storage device/iPod
ference.
that transmits
ference away from
electric waves
the unit.
Message Cause Action
near the unit.
NO DEVICE When plug and
! Turn the plug
play is off, no
and play on.
USB storage de-
! Connect a com-
vice or iPod is
patible USB sto-
connected.
rage device/iPod.
Error messages
FRMT READ Sometimes there
Wait until the mes-
When you contact your dealer or your nearest
is a delay be-
sage disappears
Removing and re-attaching the
Pioneer Service Center, be sure to note the
tween the start of
and you hear
playback and
sound.
front panel
error message.
when you start to
You can remove the front panel to protect your
hear any sound.
unit from theft.
Press the detach button and push the front
panel upward and pull it toward you.
18
En
En
19
<CRD4524-A/N>10
Appendix
Additional Information
Message Cause Action
Message Cause Action
NO AUDIO There are no
Transfer the audio
CHECK USB The USB connec-
Check that the
songs.
files to the USB
tor or USB cable
USB connector or
storage device and
has short-
USB cable is not
connect.
circuited.
caught in some-
The connected
Follow the USB
thing or damaged.
USB storage de-
storage device in-
The connected
Disconnect the
vice has security
structions to dis-
USB storage de-
USB storage de-
enabled
able the security.
vice consumes
vice and do not
SKIPPED The connected
Play an audio file
more than 500
use it. Turn the
USB storage de-
not embedded with
mA (maximum
ignition switch to
vice contains
Windows Media
allowable cur-
OFF, then to ACC
WMA files em-
DRM 9/10.
rent).
or ON and then
bedded with
connect only com-
Windows Med-
pliant USB storage
iaä DRM 9/10
devices.
PROTECT All the files in the
Transfer audio files
The iPod oper-
Make sure the con-
USB storage de-
not embedded with
ates correctly but
nection cable for
vice are em-
Windows Media
does not charge
the iPod has not
bedded with
DRM 9/10 to the
shorted out (e.g.,
Windows Media
USB storage de-
not caught in
DRM 9/10
vice and connect.
metal objects).
After checking,
N/A USB The connected
! Connect a USB
turn the ignition
USB storage de-
Mass Storage
switch OFF and
vice is not sup-
Class compliant
back ON, or dis-
ported by this
device.
connect the iPod
unit.
! Disconnect your
and reconnect.
device and replace
it with a compati-
ERROR-19 Communication
! Perform one of
ble USB storage
failed.
the following op-
device.
erations.
–Turn the ignition
switch OFF and
back ON.
–Disconnect the
USB storage de-
vice.
–Change to a dif-
ferent source.
Then, return to the
USB source.
! Disconnect the
cable from the
iPod. Once the
iPod's main menu
is displayed, recon-
nect the iPod and
reset it.
iPod failure Disconnect the
cable from the
iPod. Once the
iPod's main menu
is displayed, recon-
nect the iPod and
reset it.
20
En
Appendix
Additional Information
English
Message Cause Action
Unfinalized CD-R/CD-RW disc playback is not possi-
ble.
ERROR-23 USB storage de-
USB storage de-
vice is not for-
vice should be for-
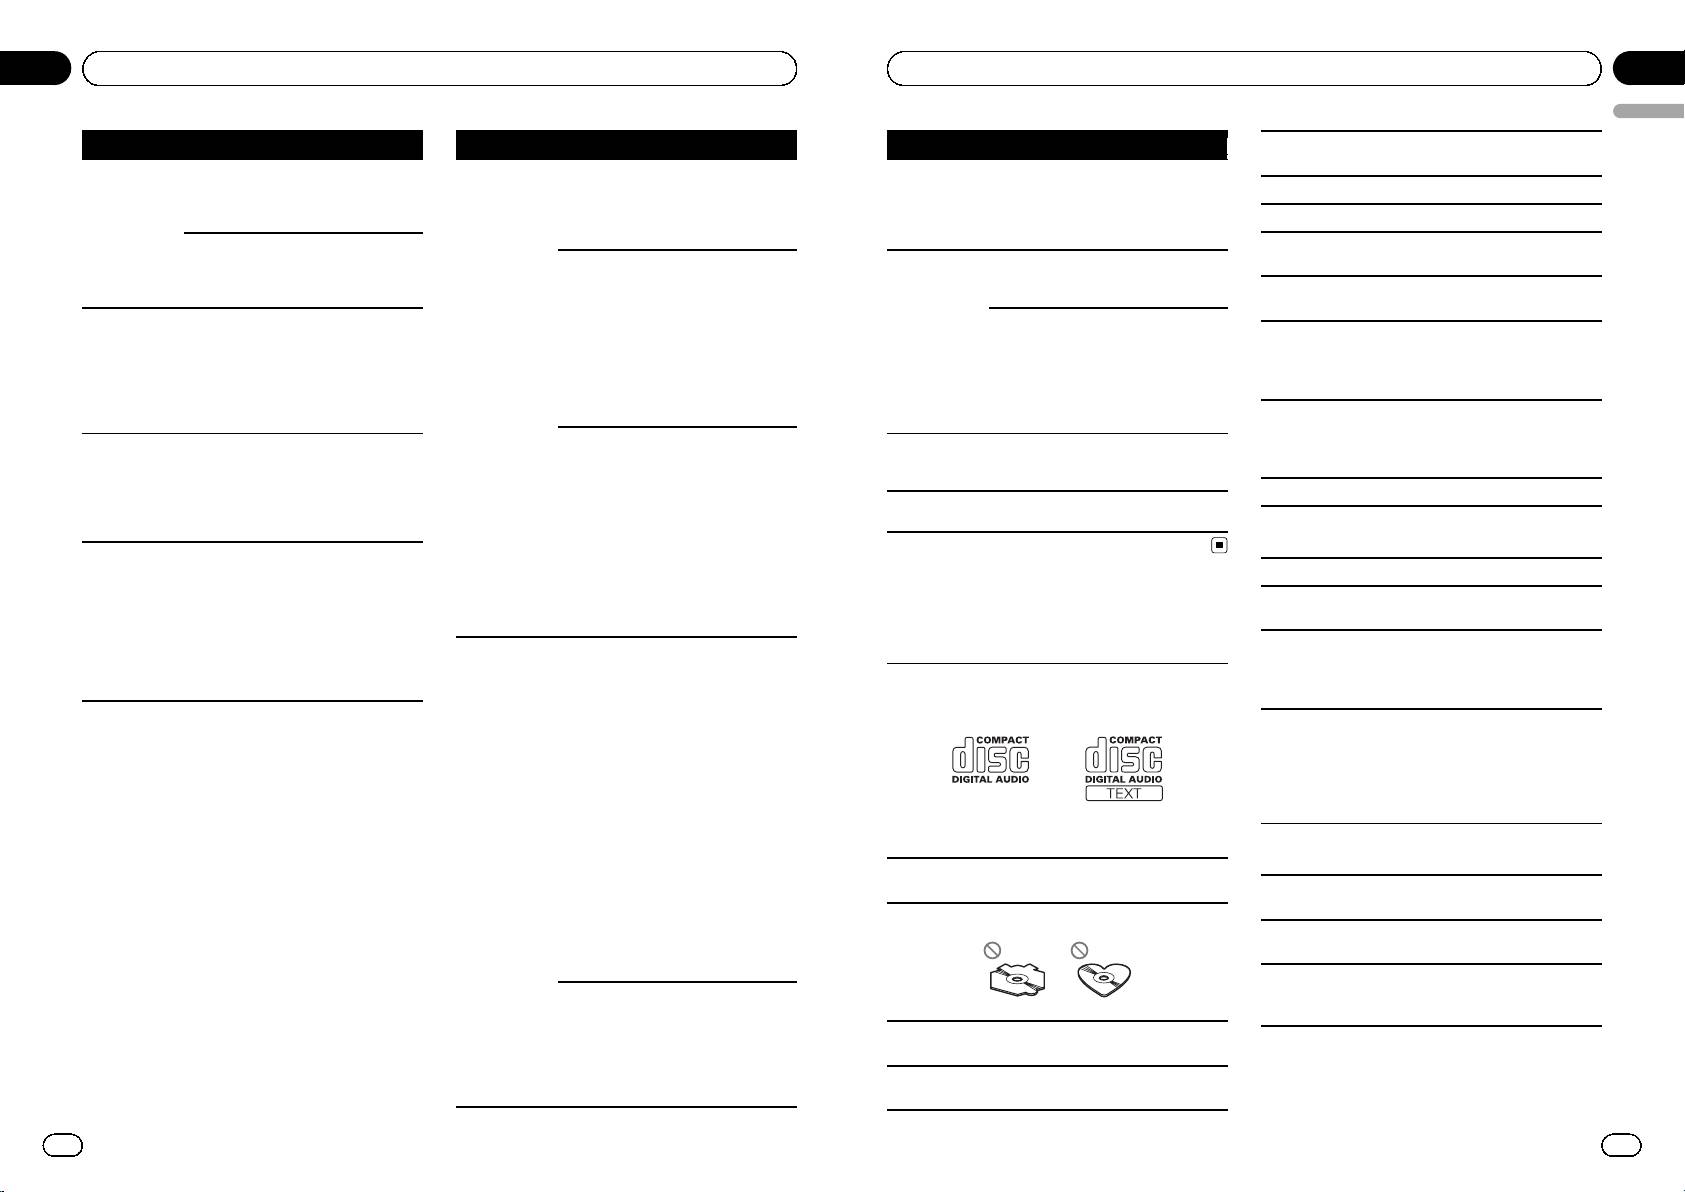
Do not touch the recorded surface of the discs.
matted with
matted with FAT12,
FAT12, FAT16 or
FAT16 or FAT32.
Store discs in their cases when not in use.
FAT32
Do not attach labels, write on or apply chemicals to
ERROR-16 The iPod firm-
Update the iPod
the surface of the discs.
ware version is
version.
old
To clean a CD, wipe the disc with a soft cloth outward
from the center.
iPod failure Disconnect the
cable from the
Condensation may temporarily impair the player’s
iPod. Once the
per formance. Leave it to adjust to the warmer tem-
iPod's main menu
perature for about one hour. Also, wipe any damp
is displayed, recon-
discs with a soft cloth.
nect the iPod and
Playback of discs may not be possible because of
reset it.
disc characteristics, disc format, recorded applica-
STOP There are no
Select a list that
tion, playback environment, storage conditions, and
songs in the cur-
contains songs.
so on.
rent list.
Road shocks may interrupt disc playback.
NOT FOUND No related songs Transfer songs to
the iPod.
USB storage device
Connections via USB hub are not supported.
Do not connect anything other than a USB storage
Handling guidelines
device.
Discs and player
Firmly secure the USB storage device when driving.
Do not let the USB storage device fall onto the floor,
Use only discs that feature either of the following two
where it may become jammed under the brake or ac-
logos.
celerator pedal.
Depending on the USB storage device, the following
problems may occur.
! Operations may vary.
! The storage device may not be recognized.
! Files may not be played back properly.
! The device may generate noise in the radio.
iPod
Use 12-cm discs. Do not use 8-cm discs or an adapter
for 8-cm discs.
Do not leave the iPod in places with high tempera-
tures.
Use only conventional, fully circular discs. Do not use
shaped discs.
To ensure proper operation, connect the dock connec-
tor cable from the iPod directly to this unit.
Firmly secure the iPod when driving. Do not let the
iPod fall onto the floor, where it may become jammed
under the brake or accelerator pedal.
Do not insert anything other than a CD into the CD
loading slot.
Do not use cracked, chipped, warped, or otherwise
damaged discs as they may damage the player.
En
21
<CRD4524-A/N>11
Appendix
Additional Information
About iPod settings
Compatible ID3 tag version: 1.0, 1.1, 2.2, 2.3, 2.4 (ID3
! When an iPod is connected, this unit changes the
tag Version 2.x is given priority over Version 1.x.)
EQ (equalizer) setting of the iPod to off in order to
optimize the acoustics. When you disconnect the
M3u playlist: Not compatible
iPod, the EQ returns to the original setting.
MP3i (MP3 interactive), mp3 PRO: Not compatible
! You cannot set Repeat to off on the iPod when
using this unit. Repeat is automatically changed
to All when the iPod is connected to this unit.
WAV
Incompatible text saved on the iPod will not be dis-
File extension: .wav
played by the unit.
Quantization bits: 8 and 16 (LPCM), 4 (MS ADPCM)
DualDiscs
Sampling frequency: 16 kHz to 48 kHz (LPCM), 22.05
kHz and 44.1 kHz (MS ADPCM)
DualDiscs are two-sided discs that have a recordable
CD for audio on one side and a recordable DVD for
video on the other.
Supplemental information
Since the CD side of DualDiscs is not physically com-
patible with the general CD standard, it may not be
Only the first 32 characters can be displayed as a file
possible to play the CD side with this unit.
name (including the file extension) or a folder name.
Frequent loading and ejecting of a DualDisc may re-
Russian text to be displayed on this unit should be en-
sult in scratches on the disc. Serious scratches can
coded with the following character sets:
lead to playback problems on this unit. In some
! Unicode (UTF-8, UTF-16)
cases, a DualDisc may become stuck in the disc load-
! A character set other than Unicode that is used in
ing slot and will not eject. To prevent this, we recom-
a Windows environment and is set to Russian in
mend you refrain from using DualDisc with this unit.
the multi-language setting
Please refer to the information from the disc manu-
facturer for more detailed information about Dual-
This unit may not operate correctly depending on the
Discs.
application used to encode WMA files.
There may be a slight delay at the start of playback of
audio files embedded with image data or audio files
stored on a USB storage device that has numerous
folder hierarchies.
Compressed audio
compatibility (disc, USB)
Disc
WMA
Playable folder hierarchy: up to eight tiers (A practical
hierarchy is less than two tiers.)
File extension: .wma
Playable folders: up to 99
Bit rate: 48 kbps to 320 kbps (CBR), 48 kbps to 384
kbps (VBR)
Playable files: up to 999
Sampling frequency: 32 kHz, 44.1 kHz, 48 kHz
File system: ISO 9660 Level 1 and 2, Romeo, Joliet
Windows Media Audio Professional, Lossless, Voice/
Multi-session playback: Compatible
DRM Stream/Stream with video: Not compatible
Packet write data transfer: Not compatible
MP3
Regardless of the length of blank sections between
the songs from the original recording, compressed
File extension: .mp3
audio discs play with a short pause between songs.
Bit rate: 8 kbps to 320 kbps (CBR), VBR
Sampling frequency: 8 kHz to 48 kHz (32 kHz, 44.1
kHz, 48 kHz for emphasis)
22
En
Appendix
Additional Information
English
USB storage device
About the file/format compatibil ity, refer to the iPod
manuals.
Playable folder hierarchy: up to eight tiers (A practical
hierarchy is less than two tiers.)
Audio Book, Podcast: Compatible
Playable folders: up to 500
Playable files: up to 15 000
CAUTION
Pioneer accepts no responsibility for data lost on
Playback of copyright-protected files: Not compatible
the iPod even if that data is lost while using this
Partitioned USB storage device: Only the first partition
unit.
can be played.
There may be a slight delay when starting playback of
audio files on a USB storage device with numerous
Sequence of audio files
folder hierarchies.
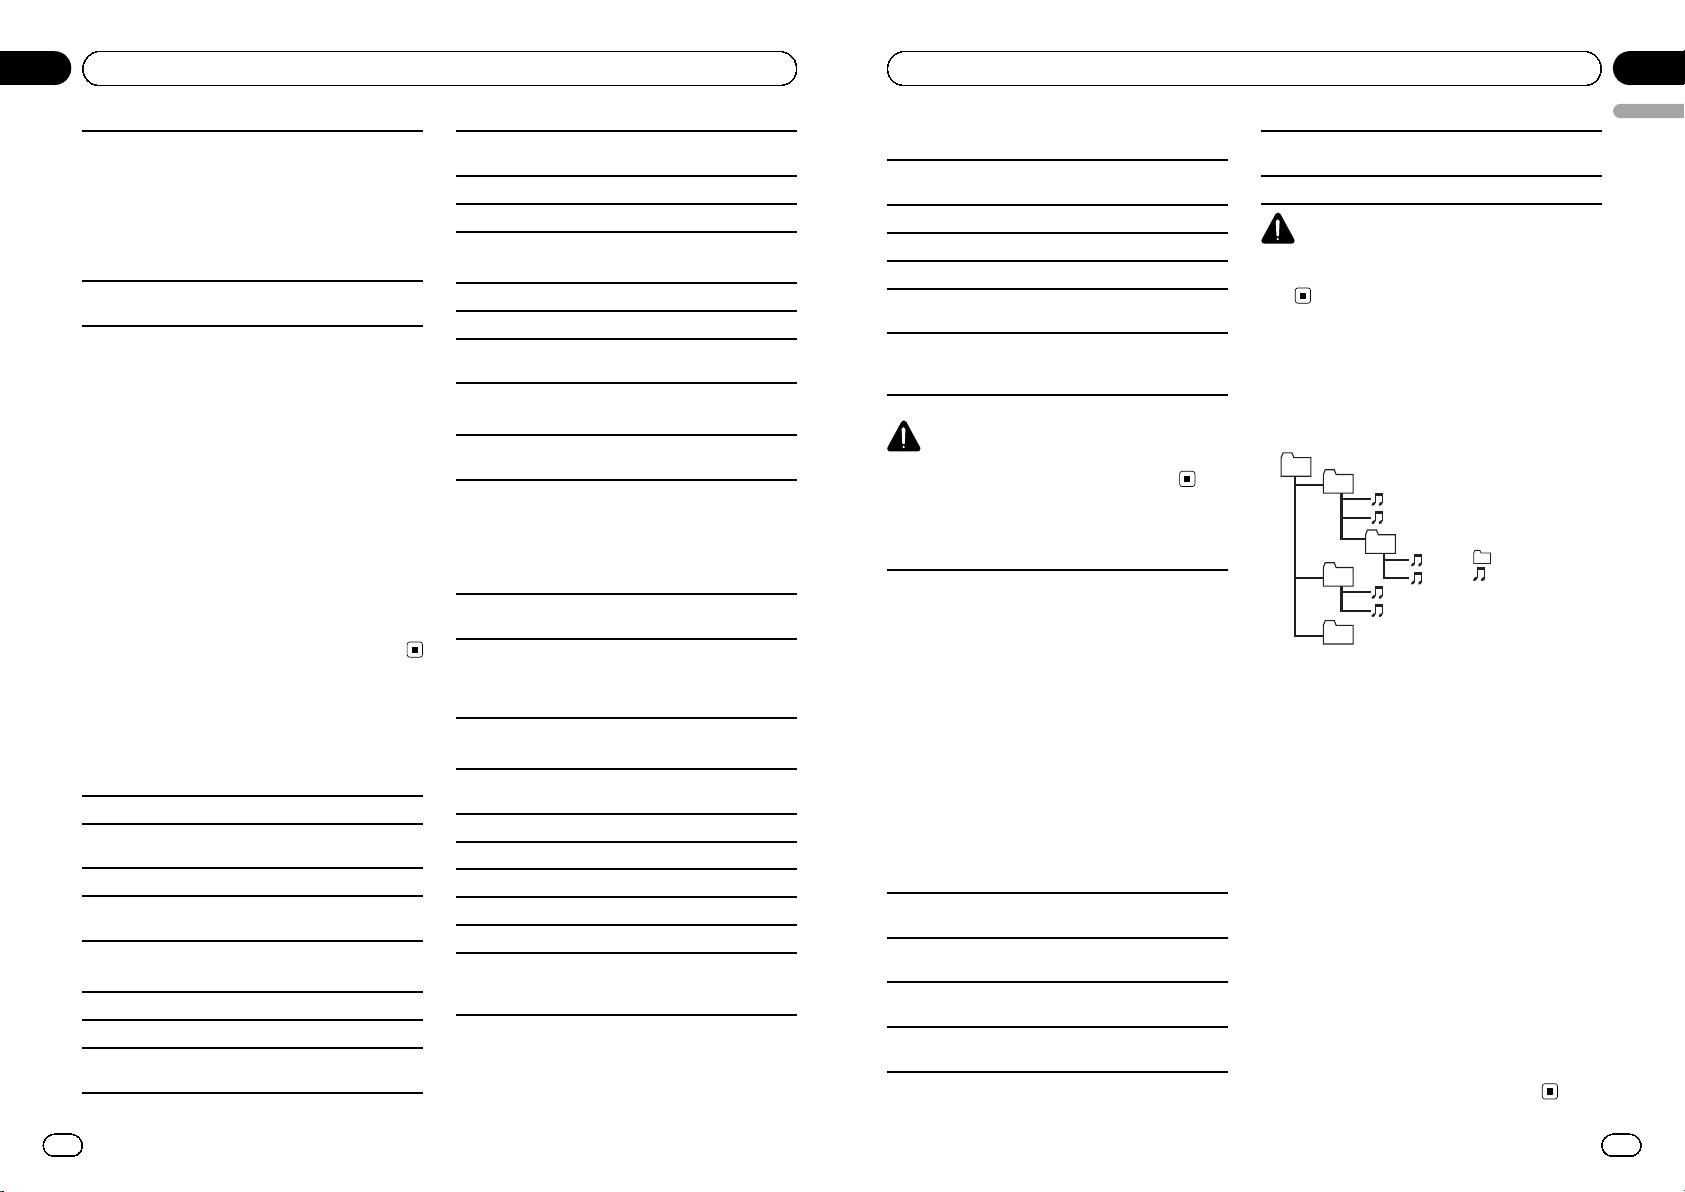
The user cannot assign folder numbers and
specify playback sequences with this unit.
CAUTION
Example of a hierarchy
Do not leave discs or a USB storage device in any
01
place that is subject to high temperatures.
02
iPod compatibility
03
: Folder
This unit supports only the following iPod models.
04
: Compressed
Supported iPod software versions are shown below.
audio file
Older versions may not be supported.
01 to 05: Folder
number
! iPod nano 5th generation (software version 1.0.1)
05
1 to 6: Playback
! iPod nano 4th generation (software version 1.0.4)
Level 1 Level 2 Level 3 Level 4
sequence
! iPod nano 3rd generation (software version 1.1.3)
! iPod nano 2nd generation (software version 1.1.3)
Disc
! iPod nano 1st generation (software version 1.3.1)
! iPod touch 3rd generation (software version 3.1.2)
Folder selection sequence or other operation
! iPod touch 2nd generation (software version 3.1.2)
may differ depending on the encoding or writ-
! iPod touch 1st generation (software version 3.1.2)
ing software.
! iPod classic 160GB (soft ware version 2.0.3)
! iPod classic 120GB (soft ware version 2.0.1)
USB storage device
! iPod classic (software version 1.1.2)
Playback sequence is the same as recorded
! iPod 5th generation (software version 1.3)
sequence in the USB storage device.
! iPhone 3GS (software version 3.1.2)
To specify the playback sequence, the follow-
! iPhone 3G (software version 3.1.2)
ing method is recommended.
! iPhone (software version 3.1.2)
1 Create a file name that includes numbers that
Depending on the generation or version of the iPod,
specify the playback sequence (e.g., 001xxx.
some functions may not be available.
mp3 and 099yyy.mp3).
Operations may vary depending on the software ver-
2 Put those files into a folder.
sion of iPod.
3 Save the folder containing files on the USB
When using an iPod, an iPod Dock Connector to USB
storage device.
Cable is required.
However, depending on the system environ-
A Pioneer CD-IU50 interface cable is also available.
ment, you may not be able to specify the play-
For details, consult your dealer.
back sequence.
For USB portable audio players, the sequence
is different and depends on the player.
En
23
<CRD4524-A/N>12
Appendix
Additional Information
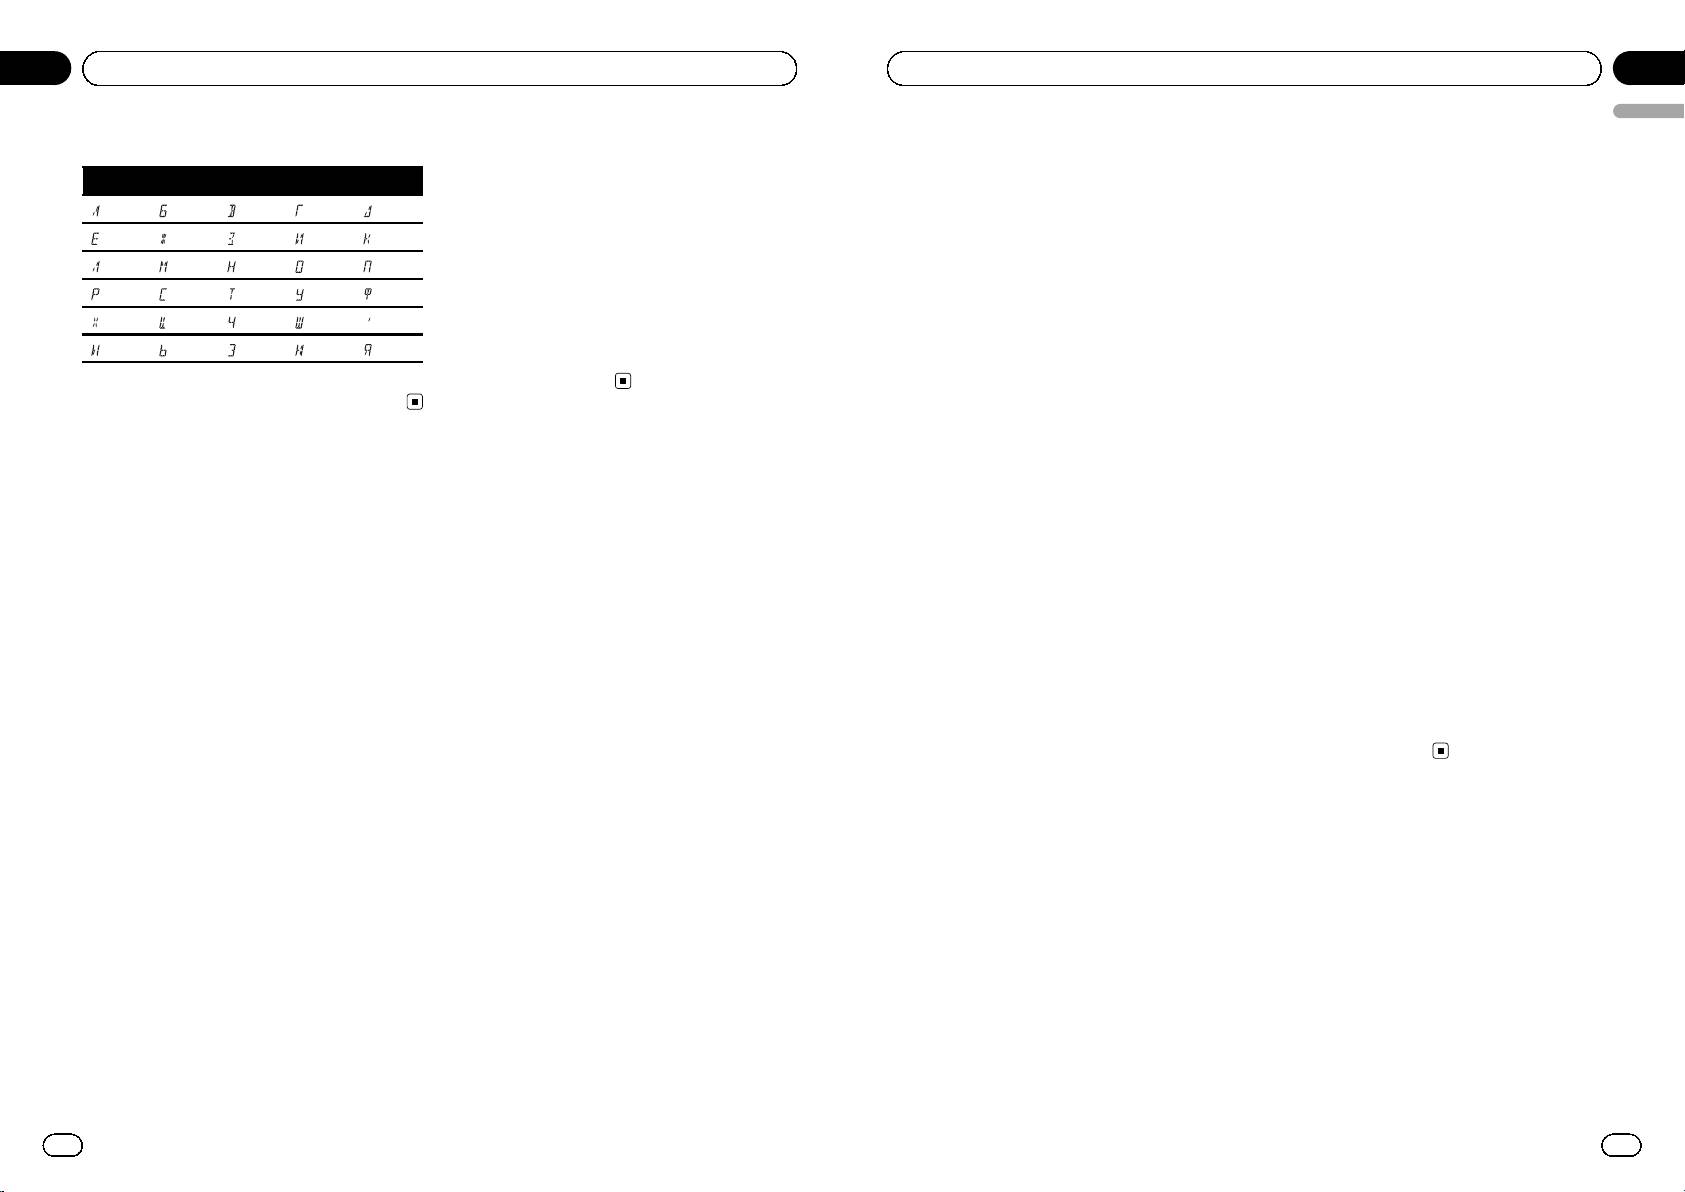
Russian character chart
iPod & iPhone
iPhone, iPod, iPod classic, iPod nano, and
D: C D: C D: C D: C D: C
iPod touch are trademarks of Apple Inc., regis-
tered in the U.S. and other countries.
: А : Б : В : Г : Д
“Made for iPod” and “Made for iPhone” mean
: Е, Ё : Ж : З : И, Й : К
that an electronic accessory has been de-
: Л : М : Н : О : П
signed to connect specifically to iPod or
iPhone, respectively, and has been certified by
: Р : С : Т : У : Ф
the developer to meet Apple performance
: Х : Ц : Ч : Ш, Щ : Ъ
standards.
: Ы : Ь : Э : Ю : Я
Apple is not responsible for the operation of
this device or its compliance with safety and
D: Display C: Character
regulatory standards.
Copyright and trademark
iTunes
Apple and iTunes are trademarks of Apple
Inc., registered in the U.S. and other coun-
tries.
MP3
Supply of this product only conveys a license
for private, non-commercial use and does not
convey a license nor imply any right to use
this product in any commercial (i.e. revenue-
generating) real time broadcasting (terrestrial,
satellite, cable and/or any other media), broad-
casting/streaming via internet, intranets and/
or other networks or in other electronic con-
tent distribution systems, such as pay-audio or
audio-on-demand applications. An indepen-
dent license for such use is required. For de-
tails, please visit
http://www.mp3licensing.com.
WMA
Windows Media and the Windows logo are tra-
demarks or registered trademarks of Microsoft
Corporation in the United States and/or other
countries.
This product includes technology owned by
Microsoft Corporation and cannot be used or
distributed without a license from Microsoft
Licensing, Inc.
24
En
Appendix
Additional Information
English
WAV signal format .................. Linear PCM & MS ADPCM
Specifications
(Non-compressed)
General
Power source ............................. 14.4 V DC (10.8 V to 15.1 V
USB
allowable)
USB standard specification
Grounding system ................... Negative type
..................................................... USB 2.0 full speed
Maximum current consumption
Maximum current supply .... 500 mA
..................................................... 10.0 A
USB Class ................................... MSC (Mass Storage Class)
Dimensions (W × H × D):
File system .................................. FAT12, FAT16, FAT32
DIN
WMA decoding format ......... Ver. 7, 7.1, 8, 9, 10, 11, 12
Chassis ..................... 178 mm × 50 mm × 165
(2ch audio)
mm
(Windows Media Player)
Nose ........................... 188 mm × 58 mm × 17 mm
MP3 decoding format ........... MPEG-1 & 2 Audio Layer 3
D
WAV signal format .................. Linear PCM & MS ADPCM
Chassis ..................... 178 mm × 50 mm × 165
(Non-compressed)
mm
Nose ........................... 170 mm × 46 mm × 17 mm
FM tuner
Weight .......................................... 1.2 kg
Frequency range ...................... 87.5 MHz to 108.0 MHz
Usable sensitivity ..................... 9 dBf (0.8 µV/75 W, mono,
Audio
S/N: 30 dB)
Maximum power output ....... 50 W × 4
Signal-to-noise ratio ............... 72 dB (IEC-A network)
Continuous powe r output ... 22 W × 4 (50 Hz to 15 000
Hz, 5 % THD, 4 W load, both
MW tuner
channels driven)
Frequency range ...................... 531 kHz to 1 602 kHz
Load impedance ...................... 4 W (4 W to 8 W allowable)
Usable sensitivity ..................... 25 µV (S/N: 20 dB)
Preout maximum output level
Signal-to-noise ratio ............... 62 dB (IEC-A network)
..................................................... 2.0 V
Tone controls:
LW tuner
Bass
Frequency range ...................... 153 kHz to 281 kHz
Frequency ................ 100 Hz
Usable sensitivity ..................... 28 µV (S/N: 20 dB)
Gain ............................ ±12 dB
Signal-to-noise ratio ............... 62 dB (IEC-A network)
Mid
Frequency ................ 1 kHz
Note
Gain ............................ ±12 dB
Specifications and the design are subject to mod-
Treble
ifications without notice.
Frequency ................ 10 kHz
Gain ............................ ±12 dB
Subwoofer (mono):
Frequency .......................... 50/63/80/100/125 Hz
Slope .................................... –18 dB/oct
Gain ...................................... +6 dB to –24 dB
Phase .................................. Normal/Reverse
CD player
System .......................................... Compact disc audio system
Usable discs .............................. Compact disc
Signal-to-noise ratio ............... 94 dB (1 kHz) (IEC-A net-
work)
Number of channels .............. 2 (stereo)
WMA decoding format ......... Ver. 7, 7.1, 8, 9, 10, 11, 12
(2ch audio)
(Windows Media Player)
MP3 decoding format ........... MPEG-1 & 2 Audio Layer 3
En
25
<CRD4524-A/N>13
Section
01
Avant de commencer
Nous vous remercions d’avoir acheté cet
Quelques mots sur cet appareil
appareil PIONEER.
Les fréquences du syntoniseur de cet appareil
Pour garantir une utilisation correcte, lisez
sont attribuées pour une utilisation en Europe
bien ce mode d’emploi avant d’utiliser cet ap-
de l’Ouest, Asie, Moyen Orient, Afrique et Océ-
pareil. Il est particulièrement important que
anie. Son utilisation dans d’autres régions
vous lisiez et respectiez les indications AT-
peut se traduire par une réception de mau-
TENTION et PRÉCAUTION de ce mode
vaise qualité. La fonction RDS (radio data sys-
d’emploi. Conservez-le dans un endroit sûr et
tem) n’est opérationnelle que dans les régions
facilement accessible pour toute consultation
où des signaux RDS sont diffusés pour les sta-
ultérieure.
tions FM.
PRÉCAUTION
Ce produit est classifié comme produit laser
de classe 1 selon la norme IEC 60825-1:2007
“Sécurité des appareils à laser” et contient un
Si vous souhaitez vous débarrasser de cet ap-
module laser de classe 1M. Pour assurer une
pareil, ne le mettez pas à la poubelle avec vos
sécurité permanente, n’enlevez aucun couver-
ordures ménagères. Il existe un système de
cle et n’essayez pas d’accéder à l’intérieur du
collecte séparé pour les appareils électroni-
produit. Faites effectuer l’entretien par du per-
ques usagés, qui doivent être récupérés, traités
sonnel qualifié.
et recyclés conformément à la législation.
APPAREIL À LASER DE CLASSE 1
Dans les états membres de l’UE, en Suisse et
en Norvège, les foyers domestiques peuvent
rapporter leurs produits électroniques usagés
ATTENTION—ÉMISSIONS DE RADIATIONS LASER
gratuitement à des points de collecte spécifiés
INVISIBLES DE CLASSE 1M SI OUVERT. NE PAS OBSERVER
DIRECTEMENT AVEC DES INSTRUMENTS OPTIQUES.
ou à un revendeur (sous réserve d’achat d’un
produit similaire).
Dans les pays qui ne sont pas mentionnés ci-
dessus, veuillez contacter les autorités locales
PRÉCAUTION
pour vous informer de la méthode correcte de
! Ne laissez pas cet appareil entrer en contact
mise au rebut.
avec des liquides. Cela pourrait provoquer une
En agissant ainsi vous assurerez que le pro-
électrocution. Tout contact avec des liquides
duit que vous mettez au rebut est soumis au
pourrait aussi provoquer des dommages, de
processus de traitement, de récupération et
la fumée et une surchauffe de l’appareil.
de recyclage nécessaire et éviterez ainsi les ef-
! Le Pioneer CarStereo-Pass est utilisable seule-
fets négatifs potentiels sur l’environnement et
ment en Allemagne.
la santé publique.
! Maintenez le niveau d’écoute à une valeur
telle que vous puissiez entendre les sons pro-
venant de l’extérieur.
En cas d’anomalie
! Évitez tout contact avec l’humidité.
En cas d’anomalie, veuillez contacter votre re-
! Si la batterie est débranchée ou déchargée, le
vendeur ou le centre d’entretien agréé par
contenu de la mémoire sera effacé.
PIONEER le plus proche.
26
Fr
Section
Avant de commencer
01
Remarques
! Les opérations de réglage des fonctions sont
validées même si le menu est annulé avant la
confirmation des opérations.
! Dans ce manuel, iPod et iPhone sont dési-
gnés par le terme “iPod”.
Français
Mode de démonstration
Important
! La non-connexion du fil rouge (ACC) de cet
appareil à une borne couplée avec les opéra-
tions de mise en/hors service du contact d’al-
lumage peut conduire au déchargement de la
batterie.
! Rappelez-vous que si la démonstration des
fonctions continue à fonctionner quand le
moteur est coupé, cela peut décharger la bat-
terie.
La démonstration démarre automatiquement
quand le contact d’allumage est en position
ACC ou ON lorsque l’alimentation de cet ap-
pareil est coupée. Mettre l’appareil hors ten-
sion n’annule pas le mode de démonstration.
Pour annuler le mode démonstration, paramé-
trez la fonction dans le menu des réglages ini-
tiaux. Utiliser la démonstration lorsque le
contact d’allumage est en position ACC peut
décharger la batterie.
Fr
27
<CRD4524-A/N>14
Section
Section
02
Utilisation de l’appareil
Utilisation de l’appareil
02
Appareil central
Indicateur État
Indicateur État
Retrait de la face avant pour protéger l’appareil
contre le vol
La lecture aléatoire est activée.
1
24 5 63
! Syntoniseur : gamme et fré-
1 Appuyez sur la touche de retrait pour libérer la
La fonction lecture aléatoire ou
quence
(lecture
face avant.
c
lecture aléatoire de toutes les pla-
! RDS : nom du service de pro-
aléatoire)
ges est activée alors que la source
2 Poussez la face avant vers le haut, puis tirez-la
Section
gramme, informations PTY et
iPod est sélectionnée.
vers vous.
1
d’affichage
autres informations textuelles
principal
! Lecteur de CD intégré, péri-
Français
La fonction Sound Retriever est
phérique de stockage USB et
d
(sound re-
activée.
iPod : temps de lecture écoulé
triever)
78 a b c d9
et informations textuelles
Un niveau supérieur de dossier
Partie Partie
2 c
ou de menu existe.
3 Conservez toujours la face avant dans un boîtier
(Retour/affi-
1 S (SRC/OFF) 8
Un niveau inférieur de dossier ou
Opérations de base
de protection lorsqu’elle est détachée.
chage/défilement)
de menu existe.
Clignote quand une plage musi-
Important
Remontage de la face avant
2 h (éjection) 9 a/b/c/d
3 d
cale/un album lié(e) à la plage
! Lorsque vous enlevez ou remontez la face
1 Faites glisser la face avant vers la gauche.
3
(liste) a TA/NEWS
musicale en cours de lecture est
Assurez-vous d’insérer les encoches sur le côté
sélectionné(e) à partir de l’iPod.
avant, manipulez-la doucement.
gauche de l’appareil central dans les fentes du
MULTI-CONTROL
! Évitez de heurter la face avant.
4
b 1 à 6
4
panneau de commande.
(M.C.)
(liste) La fonction liste est utilisée.
! Conservez la face avant à l’abri des tempéra-
Jack d’entrée AUX
Le nom de l’artiste du disque (de
tures élevées et de la lumière directe du soleil.
Fente de charge-
5
c
(jack stéréo 3,5
la plage) s’affiche.
ment des disques
! Pour éviter d’endommager le périphérique ou
mm)
L’affinement de recherche d’un
5
(artiste)
artiste avec la fonction de recher-
l’intérieur du véhicule, retirez tous les câbles
Touche de retrait de
che de l’iPod est en cours d’utili-
et périphériques connectés à la face avant
6 Port USB d
la face avant
sation.
avant d’enlever cette dernière.
7 B (BAND/ESC)
Le nom du disque (de l’album)
s’affiche.
2 Appuyez sur le côté droit de la face avant jusqu’à
L’affinement de recherche d’un
ce qu’elle soit bien en place.
PRÉCAUTION
6
(disque)
album avec la fonction de recher-
Si vous ne pouvez pas monter la face avant sur
! Utilisez un câble USB Pioneer optionnel (CD-
che de l’iPod est en cours d’utili-
l’appareil central, vérifiez que la face avant est
U50E) pour connecter le lecteur audio USB/la
sation.
correctement placée sur l’appareil central. Forcer
mémoire USB car si un périphérique est direc-
la face avant en position risque de l’endommager
Le nom de la plage (plage musi-
ou d’endommager l’appareil central.
tement connecté à l’appareil, ce dernier dé-
cale) s’affiche.
passera de l’appareil et peut s’avérer
Un fichier audio pouvant être lu
Mise en service de l’appareil
est sélectionné lorsque vous utili-
dangereux.
(plage
1 Appuyez sur S (SRC/OFF) pour mettre en service
7
sez la fonction liste.
l’appareil.
! N’utilisez pas de produits non autorisés.
musicale)
L’affinement de recherche d’une
plage musicale avec la fonction
Mise hors service de l’appareil
de recherche de l’iPod est en
1 Maintenez appuyé S (SRC/OFF) jusqu’à ce que
cours d’utilisation.
l’appareil soit mis hors tension.
Indications affichées
L’accord automatique sur une sta-
Choix d’une source
8 LOC
1
tion locale est en service.
1 Appuyez sur S (SRC/OFF) pour parcourir les op-
tions disponibles :
9
(TA) La fonction TA est en service.
TUNER (syntoniseur) —CD (lecteur de CD intégré)
L’appareil est accordé sur une sta-
—USB (USB)/iPod (iPod)—AUX (AUX)
a
(TP)
tion TP.
Réglage du volume
2
63
8 a
9
c
(répéti-
1 Tournez M.C. pour régler le volume.
La fonction de répétition d’une
b
tion de la
4
5
7
b
d
plage ou d’un dossier est activée.
lecture)
28
Fr
Fr
29
<CRD4524-A/N>15
Section
02
Utilisation de l’appareil
Syntoniseur
PRÉCAUTION
Pour des raisons de sécurité, garez votre véhicule
Opérations de base
pour retirer la face avant.
Sélection d’une gamme
Remarque
1 Appuyez sur B (BAND/ESC) jusqu’à ce que la
Si le fil bleu/blanc de l’appareil est relié à la prise
gamme désirée (F1, F2, F3 en FM ou MW/LW
(PO/GO)) s’affiche.
de commande du relais de l’antenne motorisée
du véhicule, celle-ci se déploie lorsque la source
Accord manuel (pas à pas)
est mise en service. Pour rétracter l’antenne, met-
1 Appuyez sur c ou d.
tez la source hors service.
Recherche
1 Appuyez de façon continue sur c ou d, puis relâ-
chez.
Vous pouvez annuler l’accord automatique en ap-
Opérations communes des
puyant brièvement sur c ou d.
menus pour les réglages des
Lorsque vous appuyez sur c ou d de façon pro-
longée, vous pouvez sauter des stations. L’accord
fonctions/réglages audio/
automatique démarre dès que vous relâchez c
réglages initiaux/listes
ou d.
Remarque
Retour à l’affichage précédent
Retour à la liste précédente (le dossier de niveau im-
La fonction AF (recherche des autres fréquences
médiatement supérieur)
possibles) de cet appareil peut être mise en ser-
1 Appuyez sur
.
vice ou hors service. La fonction AF doit être hors
Retour au menu principal
service pendant une opération d’accord normal
Retour au niveau le plus élevé de la liste
(reportez-vous à la page 32).
1 Appuyez sur
de façon prolongée.
Retour à l’affichage ordinaire
Enregistrement et rappel des
Annulation du menu des réglages initiaux
1 Appuyez sur B (BAND/ESC).
stations pour chaque gamme
Retour à l’affichage ordinaire à partir de la liste
Utilisation des touches de présélection
1 Appuyez sur B (BAND/ESC).
1 Lorsque se présente une station que
vous désirez mettre en mémoire, mainte-
nez la pression sur une des touches de pré-
sélection (1 à 6) jusqu’à ce que le numéro
de la présélection cesse de clignoter.
2 Appuyez sur une des touches de présé-
lection (1 à 6) pour sélectionner la station
désirée.
# Vous pouvez aussi rappeler les fréquences
des stations radio mémorisées en appuyant sur
a ou b pendant l’affichage de la fréquence.
30
Fr
Section
Utilisation de l’appareil
02
Changement de l’affichage RDS
Utilisation avancée à l’aide de
RDS (radio data system) contient des informa-
touches spéciales
tions numériques qui facilitent la recherche
des stations de radio.
Réception des bulletins d’informations routières
Quelle que soit la source que vous écoutez, vous pou-
% Appuyez sur
.
vez recevoir des bulletins d’informations routières au-
tomatiquement avec la fonction TA (mise en attente
Nom du service de programme—Informations
de bulletins d’informations routières).
Français
PTY—Fréquence
1 Accordez le syntoniseur sur une station TP ou
# Les informations PTY et la fréquence s’affi-
une station TP de réseau étendu.
chent pendant huit secondes.
2 Appuyez sur TA/NEWS pour mettre en service ou
hors service l’attente d’un bulletin d’informations
routières.
Liste des codes PTY
3 Utilisez M.C. pour régler le niveau sonore de la
fonction TA au moment où débute un bulletin
NEWS/INFO
d’informations routières.
NEWS (Bulletin d’informations), AFFAIRS (Actuali-
Le réglage du niveau sonore est mis en mémoire
tés), INFO (Informations), SPORT (Sports), WEATHER
et sera utilisé lors de nouvelles réceptions d’un
(Météo), FINANCE (Finance)
bulletin d’informations routières.
4 Appuyez sur TA/NEWS pendant la réception d’un
POPULAR
bulletin d’informations routières pour abandon-
ner cette réception.
POP MUS (Musique populaire), ROCK MUS (Rock),
La source d’origine est rétablie mais le syntoni-
EASY MUS (Musique légère), OTH MUS (Autre mu-
sique), JAZZ (Jazz), COUNTRY (Country), NAT MUS
seur demeure en attente d’un bulletin d’informa-
(Musique nationale), OLDIES (Musique du bon vieux
tions routières aussi longtemps que vous
temps), FOLK MUS (Folk)
n’appuyez pas sur TA/NEWS de nouveau.
CLASSICS
Utilisation de l’interruption pour réception d’un bulle-
tin d’informations
L. CLASS (Musique classique légère), CLASSIC (Mu-
Quand un programme d’informations est diffusé par
sique classique)
une station d’informations ayant un code PTY, l’appa-
reil bascule automatiquement de n’importe quelle
OTHERS
station sur la station de diffusion d’informations.
EDUCATE (Éducation), DRAMA (Drame), CULTURE
Quand le programme d’informations se termine, la
(Culture), SCIENCE (Science), VARIED (Programmes
réception du programme précédent reprend.
variés), CHILDREN (Émissions destinées aux enfants),
1 Maintenez la pression sur TA/NEWS pour mettre
SOCIAL (Sujets de société), RELIGION (Religion),
en service ou hors service l’interruption pour ré-
PHONE IN (Programmes à ligne ouverte), TOURING
ception d’un bulletin d’information s.
(Voyages), LEISURE (Loisirs), DOCUMENT (Documen-
La réception du programme d’informations peut
taires)
être abandonnée en appuyant sur TA/NEWS.
Réglages des fonctions
1 Appuyez sur M.C. pour afficher le menu
principal.
2 Tournez M.C. pour changer l’option de
menu et appuyez pour sélectionner
FUNCTION.
Fr
31
<CRD4524-A/N>16
Section
02
Utilisation de l’appareil
3 Tournez M.C. pour sélectionner la fonc-
Vous pouvez rechercher une station à l’aide de son
tion.
code PTY (type de programme).
Après avoir sélectionné la fonction, effectuez
1 Appuyez sur M.C. pour afficher le mode de para-
les procédures de paramétrage suivantes.
métrage.
# Si la gamme MW/LW (PO/GO) est sélection-
2 Tournez M.C. pour choisir le réglage désiré.
NEWS/INFO—POPULAR—CLASSICS—OTHERS
née, seul BSM ou LOCAL est disponible.
3 Appuyez sur M.C. pour lancer la recherche.
Cet appareil recherche une station qui diffuse ce
BSM (mémoire des meilleures stations)
type de programme. Quand une station est trou-
La fonction BSM (mémoire des meilleures stations)
vée, son nom de service de programme est affi-
mémorise automatiquement les six stations les plus
ché.
fortes dans l’ordre de la force du signal.
Pour des informations PTY (code d’identification
1 Appuyez sur M.C. pour mettre la fonction BSM en
du type de programme), reportez-vous à la page
service.
précédente.
Pour annuler, appuyez de nouv eau sur M.C.
Le type de l’émission captée peut différer de celui
indiqué par le code PTY transmis.
REGION (stations régionales)
Si aucune station ne diffuse d’émission du type
Quand la fonction AF est utilisée, la fonction de re-
choisi, l’indication NOT FOUND s’affiche pendant
cherche des stations régionales limite la sélection
environ deux secondes puis le syntoniseur s’ac-
aux stations qui diffusent des programmes régio-
corde sur la fréquence d’origine.
naux.
1 Appuyez sur M.C. pour mettre la fonction de re-
TA (attente de bulletins d’informations routières)
cherche des stations régionales en service ou
1 Appuyez sur M.C. pour mettre en service ou hors
hors service.
service l’attente d’un bulletin d’informations rou-
LOCAL (accord automatique sur une station locale)
tières.
L’accord automatique sur une station locale ne s’inté-
AF (recherche des autres fréquences possibles)
resse qu’aux stations de radio dont le signal reçu est
suffisamment puissant pour garantir une réception
1 Appuyez sur M.C. pour mettre la fonction AF en
de bonne qualité.
service ou hors ser vice.
1 Appuyez sur M.C. pour afficher le mode de para-
métrage.
NEWS (interruption pour réception d’un bulletin d’in-
2 Tournez M.C. pour choisir le réglage désiré.
formations)
FM : OFF—LEVEL 1—LEVEL 2—LEVEL 3—LEVEL
4
1 Appuyez sur M.C. pour mettre la fonction NEWS
(bulletin d’informations) en service ou hors ser-
MW/LW (PO/GO) : OFF—LEVEL 1—LEVEL 2
vice.
La valeur la plus élevée permet la réception des
seules stations très puissantes ; les autres valeurs
autorisent la réception de stations moins puissan-
tes.
3 Appuyez sur M.C. pour confirmer la sélection.
PTY SEARCH (sélection du type de programme)
CD/CD-R/CD-RW et
périphériques de stockage USB
Opérations de base
Lecture d’un CD/CD-R/CD -RW
1 Introduisez un disque, l’étiquette vers le haut,
dans le logement de chargement des disques.
Éjection d’un CD/CD-R/CD-RW
1 Appuyez sur h.
32
Fr
Section
Utilisation de l’appareil
02
Lecture de plages musicales sur un périphérique de
Sélection et lecture des fichiers/
stockage USB
plages à partir de la liste des noms
1 Ouvrez le cache du connecteur USB et branchez
le périphérique de stockage USB à l ’aide d’un
1 Appuyez sur pour passer en mode
câble USB.
liste des noms de fichiers/plages.
Arrêt de la lecture de fichiers sur un périphérique de
2 Utilisez M.C. pour sélectionner le nom
stockage USB
Français
1 Vous pouvez débrancher le périphérique de stoc-
de fichier (ou nom de dossier) désiré.
kage USB à tout moment.
Modification du nom de fichier ou de dossier
Sélection d’un dossier
1 Tournez M.C.
1 Appuyez sur a ou b.
Lecture
Sélection d’une plage
1 Lorsqu’un fichier ou une plage est sélectionné,
1 Appuyez sur c ou d.
appuyez sur M.C.
Avance ou retour rapide
Affichage d’une liste des fichiers (ou des dossiers)
1 Appuyez de façon continue sur c ou d.
dans le dossier sélectionné
! Lors de la lecture d’un disque d’audio compressé,
1 Quand un dossier est sélectionné, appuyez sur
aucun son n’est émis pendant l’avance ou le re-
M.C.
tour rapide.
Lecture d’une plage musicale dans le dossier sélec-
Retour au dossier racine
tionné
1 Appuyez sur B (BAND/ESC) de façon prolongée.
1 Quand un dossier est sélectionné, appuyez sur
M.C. de façon prolongée.
Commutation entre les modes audio compressé et
CD-DA
1 Appuyez sur B (BAND/ESC).
Utilisation avancée à l’aide de
Remarque
touches spéciales
Débranchez les périphériques de stockage USB
de l’appareil lorsque vous ne l’utilisez pas.
Sélection d’une étendue de répétition de lecture
1 Appuyez sur 6/
pour parcourir les options dis-
ponibles :
Affichage des informations
CD/CD-R/CD-RW
textuelles
! DISC – Répétition de toutes les plages
! TRACK – Répétition de la plage en cours de
Sélection des informations textuelles désirées
lecture
1 Appuyez sur
.
! FOLDER – Répétition du dossier en cours de
lecture
Défilement des informations textuelles sur la gauche
Lecteur audio USB/mémoire USB
1 Appuyez sur
de façon prolongée.
! ALL – Répétition de tous les fichiers
! TRACK – Répétition du fichier en cours de
Remarques
lecture
! Selon la version de iTunes utilisée pour enre-
! FOLDER – Répétition du dossier en cours de
gistrer les fichiers MP3 sur un disque ou les
lecture
types de fichiers média, des informations tex-
Lecture des plages dans un ordre aléatoire
tuelles incompatibles enregistrées dans le fi-
1 Appuyez sur 5/
pour activer ou désactiver la
chier audio peuvent ne pas s’afficher
lecture aléatoire.
correctement.
Les plages d’une étendue de répétition sélection-
! Les informations textuelles pouvant être modi-
née sont lues dans un ordre aléatoire.
fiées dépendent du média.
Fr
33
<CRD4524-A/N>17
Section
02
Utilisation de l’appareil
Pause de la lecture
S.RTRV (sound retriever)
1 Appuyez sur 2/PAUSE pour mettre en pause ou
Améliore automatiquement l’audio compressé et res-
reprendre la lecture.
taure un son riche.
Amélioration de l’audio compressé et restauration
1 Appuyez sur M.C. pour afficher le mode de para-
d’un son riche (sound retriever (correcteur de son
métrage.
compressé))
2 Tournez M.C. pour choisir le réglage désiré.
1 Appuyez sur 1/S.Rtrv pour parcourir les options
Pour les détails, reportez-vous à cette page, Amé-
disponibles :
lioration de l’audio compressé et restauration d’un
OFF (hors service) —1 —2
son riche (sound retriever (correcteur de son
1 est efficace pour les faibles taux de compres-
compressé)).
sion et 2 est efficace pour les taux de compres-
3 Appuyez sur M.C. pour confirmer la sélection.
sion élevés.
Réglages des fonctions
iPod
1 Appuyez sur M.C. pour afficher le menu
principal.
Opérations de base
2 Tournez M.C. pour changer l’option de
Lecture de plages musicales sur un iPod
menu et appuyez pour sélectionner
1 Ouvrez le capot du connecteur USB.
FUNCTION.
2 Connecter un iPod au câble USB à l’aide d’un
connecteur Dock iPod.
3 Tournez M.C. pour sélectionner la fonc-
Sélection d’une plage (chapitre)
tion.
1 Appuyez sur c ou d.
Après avoir sélectionné la fonction, effectuez
Avance ou retour rapide
les procédures de paramétrage suivantes.
1 Appuyez de façon continue sur c ou d.
REPEAT (répétition de la lecture)
Remarques
! L’iPod ne peut pas être mis en service ou hors
1 Appuyez sur M.C. pour afficher le mode de para-
métrage.
service lorsque le mode de commande est
2 Tournez M.C. pour sélectionner une étendue de
réglé sur CTRL AUDIO.
répétition de lecture.
! Débranchez les écouteurs de l’iPod avant de
Pour les détails, reportez-vous à la page précé-
le connecter à cet appareil.
dente, Sélection d’une étendue de répétition de lec-
! L’iPod sera mis hors service environ deux mi-
ture.
nutes après que le contact d’allumage est mis
3 Appuyez sur M.C. pour confirmer la sélection.
en position OFF (coupé).
RANDOM (lecture aléatoire)
1 Appuyez sur M.C. pour mettre en service ou hors
Affichage des informations
service la lecture aléatoire.
textuelles
PAUSE (pause)
Sélection des informations textuelles désirées
1 Appuyez sur M.C. pour mettre en pause ou re-
1 Appuyez sur
.
prendre la lecture.
Défilement des informations textuelles sur la gauche
1 Appuyez sur
de façon prolongée.
34
Fr
Section
Utilisation de l’appareil
02
Recherche d’une plage musicale
Pause de la lecture
1 Appuyez sur 2/PAUSE pour mettre en pause ou
1 Appuyez sur pour passer au menu
reprendre la lecture.
principal de la recherche par liste.
Lecture de plages musicales liées à la plage musicale
2 Utilisez M.C. pour sélectionner une ca-
en cours de lecture
tégorie/plage musicale.
Vous pouvez lire des plages musicales dans les listes
suivantes.
Français
Modification du nom d’une plage musicale/catég orie
• Liste d’albums de l’interprète en cours de lecture
1 Tournez M.C.
• Liste de plages musicales de l’album en cours de
Listes de lecture—interprètes—albums—plages
lecture
musicales—podcasts—genres—compositeurs—
• Liste d’albums du genre en cours de lecture
livres audio
1 Appuyez de façon prolongée sur M.C. pour acti-
ver le mode de lecture en liaison.
Lecture
2 Tournez M.C. pour changer le mode, appuyez
1 Quand une plage musicale est sélectionnée, ap-
pour sélectionner.
puyez sur M.C.
! ARTIST – Lit un album de l’interprète en
cours de lecture.
Affichage d’une liste des plages musicales dans la
! ALBUM – Lit une plage musicale de l’album
catégorie sélection née
en cours de lecture.
1 Quand une catégorie est sélectionnée, appuyez
! GENRE – Lit un album du genre en cours de
sur M.C.
lecture.
Lecture d’une plage musicale dans la catégorie sélec-
La plage musicale/l’album sélectionné sera lu
tionnée
après la lecture de la plage musicale en cours.
1 Quand une catégorie est sélectionnée, appuyez
La plage musicale/l’album sélectionné peut être an-
sur M.C. de façon prolongée.
nulé si vous utilisez d’autres fonctions que la fonction
de recherche de liaison (retour rapide et avance ra-
Recherche par ordre alphabétique dans la liste
pide, par exemple).
1 Lorsque la liste de la catégorie sélectionnée s’affi-
En fonction de la plage musicale sélectionnée pour
che, appuyez sur
pour activer le mode de re-
la lecture, la fin de la plage en cours de lecture et le
cherche par ordre alphabétique.
début de la plage musicale/de l’album sélectionné
2 Tournez M.C. pour sélectionner une lettre.
peuvent être tronqués.
3 Appuyez sur M.C. pour afficher la liste alphabé-
tique.
Utilisation avancée à l’aide de
touches spéciales
Sélection d’une étendue de répétition de lecture
1 Appuyez sur 6/
pour parcourir les options dis-
ponibles:
! ONE – Répétition de la plage musicale en
cours de lecture
! ALL – Répétition de toutes les plages musica-
les de la liste sélectionnée
Lecture de toutes les plages musicales dans un ordre
aléatoire (lecture aléatoire de toutes les plages)
1 Appuyez sur 5/
pour mettre en service la fonc-
tion de lecture aléatoire de toutes les plages.
! Lorsque le mode de commande est réglé sur
CTRL iPod/CTRL APP, la lecture aléatoire est acti-
vée.
Fr
35
<CRD4524-A/N>18
Section
02
Utilisation de l’appareil
Utilisation de la fonction iPod de cet appareil à partir
REPEAT (répétition de la lecture)
de votre iPod
Vous pouvez écouter l’audio des applications de votre
1 Appuyez sur M.C. pour afficher le mode de para-
iPod depuis les haut-parleurs de votre véhicule
métrage.
lorsque CTRL APP est sélectionné.
2 Tournez M.C. pour sélectionner une étendue de
Cette fonction n’est pas compatible avec les modèles
répétition de lecture.
d’iPod suivants.
Pour les détails, reportez-vous à la page précé-
! iPod nano 1ère génération
dente, Sélection d’une étendue de répétition de lec-
! iPod 5ème génération
ture.
Le mode APP est compatible avec les modèles d’iPod
3 Appuyez sur M.C. pour confirmer la sélection.
suivants.
! iPod touch 3ème génération (version logicielle 3.0
SHUFFLE (lecture aléatoire)
ou ultérieure)
! iPod touch 2ème génération (version logicielle 3.0
1 Appuyez sur M.C. pour afficher le mode de para-
ou ultérieure)
métrage.
! iPod touch 1ère génération (version logicielle 3.0
2 Tournez M.C. pour choisir le réglage désiré.
ou ultérieure)
! SONGS – Lecture des plages musicales dans
! iPhone 3GS (version logicielle 3.0 ou ultérieure)
un ordre aléatoire à l’intérieur de la liste sélec-
! iPhone 3G (version logicielle 3.0 ou ultérieure)
tionnée.
! iPhone (version logicielle 3.0 ou ultérieure)
! ALBUMS – Lecture dans l’ordre de plages mu-
1 Appuyez sur 4/iPod pour changer le mode de
sicales à partir d’un album sélectionné au ha-
commande.
sard.
! CTRL iPod – La fonction iPod de cet appareil
! OFF – Annulation de la lecture aléatoire.
peut être utilisée à partir de l’iPod connecté.
3 Appuyez sur M.C. pour confirmer la sélection.
! CTRL APP – Lecture de l’audio des applica-
SHUFFLE ALL (lecture aléatoire de toutes les plages)
tions de votre iPod.
! CTRL AUDIO – La fonction iPod de cet appa-
1 Appuyez sur M.C. pour mettre en service la lec-
reil peut être utilisée à partir de cet appareil.
ture aléatoire de toutes les plages.
Amélioration de l’audio compressé et restauration
Pour mettre hors service, mettez SHUFFLE hors
d’un son riche (sound retriever (correcteur de son
service dans le menu FUNCTION.
compressé))
LINK PLAY (lecture en liaison)
1 Appuyez sur 1/S.Rtrv pour parcourir les options
disponibles :
1 Appuyez sur M.C. pour afficher le mode de para-
OFF (hors service) —1 —2
métrage.
1 est efficace pour les faibles taux de compres-
2 Tournez M.C. pour changer le mode, appuyez
sion et 2 est efficace pour les taux de compres-
pour sélectionner.
sion élevés.
Pour des détails sur les réglages, reportez-vous à
la page précédente, Lecture de plages musicales
liées à la plage musicale en cours de lecture.
Réglages des fonctions
PAUSE (pause)
1 Appuyez sur M.C. pour afficher le menu
1 Appuyez sur M.C. pour mettre en pause ou re-
principal.
prendre la lecture.
2 Tournez M.C. pour changer l’option de
AUDIO BOOK (vitesse du livre audio)
menu et appuyez pour sélectionner
FUNCTION.
1 Appuyez sur M.C. pour afficher le mode de para-
métrage.
3 Tournez M.C. pour sélectionner la fonc-
2 Tournez M.C. pour choisir le réglage désiré.
! FASTER – Lecture plus rapide que la vitesse
tion.
normale
Après avoir sélectionné la fonction, effectuez
! NORMAL – Lecture à la vitesse normale
les procédures de paramétrage suivantes.
! SLOWER – Lecture plus lente que la vitesse
normale
3 Appuyez sur M.C. pour confirmer la sélection.
36
Fr
Section
Utilisation de l’appareil
02
S.RTRV (sound retriever)
3 Tournez M.C. pour sélectionner la fonc-
tion audio.
Améliore automatiquement l’audio compressé et res-
Après avoir sélectionné la fonction audio, ef-
taure un son riche.
fectuez les procédures de paramétrage suivan-
1 Appuyez sur M.C. pour afficher le mode de para-
métrage.
tes.
2 Tournez M.C. pour choisir le réglage désiré.
Pour les détails, reportez-vous à la page précé-
FAD/BAL (réglage de l’équilibre avant-arrière/droite-
Français
dente, Amélioration de l’audio compressé et restau-
gauche)
ration d’un son riche (sound retriever (correcteur de
son compressé)).
1 Appuyez sur M.C. pour afficher le mode de para-
3 Appuyez sur M.C. pour confirmer la sélection.
métrage.
2 Appuyez sur M.C. pour basculer entre l’équilibre
avant-arrière/droite-gauche.
Remarques
3 Tournez M.C. pour régler l’équilibre sonore entre
! Régler le mode de commande sur CTRL iPod
les haut-parleurs.
met en pause la lecture d’une plage musicale.
! Si les réglages de la sortie arrière et de la sortie
Utilisez l’iPod pour reprendre la lecture.
RCA sont SW, vous ne pouvez pas régler l’équili-
bre des haut-parleurs avant-arrière. Reportez-vous
! Les fonctions suivantes sont toujours accessi-
à la page 39, SW CONTROL (réglage de la sortie ar-
bles à partir de l’appareil même si le mode de
rière et du haut-parleur d’extrêmes graves).
commande est réglé sur CTRL iPod/
EQUALIZER (rappel de l’égaliseur)
CTRL APP.
— Pause
1 Appuyez sur M.C. pour afficher le mode de para-
— Avance/retour rapide
métrage.
— Avance/retour d’une plage
2 Tournez M.C. pour sélectionner l’égali seur.
— Répétition de la lecture (ONE/ALL/OFF)
DYNAMIC—VOCAL—NATURAL—CUSTOM—
— Lecture dans un ordre quelconque (lecture
FLAT—POWERFUL
3 Appuyez sur M.C. pour confirmer la sélection.
aléatoire)
—
(liste) pour utiliser le menu de l’iPod
TONE CTRL (réglage de l’égaliseur)
— a pour tourner la molette cliquable de
! Les réglages de la courbe d’égalisation ajustée
l’iPod vers la gauche
sont mémorisés dans CUSTOM .
— b pour tourner la molette cliquable de
1 Appuyez sur M.C. pour afficher le mode de para-
l’iPod vers la droite
métrage.
! Lorsque le mode de commande est réglé sur
2 Appuyez sur M.C. pour sélectionner BASS (gra-
CTRL iPod, les opérations sont limitées
ves)/MID (médiums)/TREBLE (aigus).
comme suit :
3 Tournez M.C. pour régler le niveau.
Plage de réglage : +6 à -6
— Les réglages des fonctions ne sont pas dis-
ponibles.
LOUDNESS (correction physiologique)
— La fonction de recherche ne peut pas être
La correction physiologique a pour objet d’accentuer
utilisée à partir de cet appareil.
les hautes et les basses fréquences à bas niveaux d’é-
coute.
1 Appuyez sur M.C. pour afficher le mode de para-
métrage.
Réglages sonores
2 Tournez M.C. pour choisir le réglage désiré.
1 Appuyez sur M.C. pour afficher le menu
OFF (désactivé)—LOW (faible)—HIGH (élevé)
3 Appuyez sur M.C. pour confirmer la sélection.
principal.
SUBWOOFER1 (réglage en service/hors service du
2 Tournez M.C. pour changer l’option de
haut-parleur d’extrêmes graves)
menu et appuyez pour sélectionner
AUDIO.
Fr
37
<CRD4524-A/N>19
Section
02
Utilisation de l’appareil
Cet appareil est équipé d’une sortie haut-parleur d’ex-
Réglages initiaux
trêmes graves qui peut être mise en service ou hors
service.
Important
1 Appuyez sur M.C. pour afficher le mode de para-
La fonction PW SAVE (économie d’énergie) est
métrage.
annulée si la batterie du véhicule est déconnec-
2 Tournez M.C. pour choisir le réglage désiré.
tée et devra être réactivée une fois la batterie re-
NORMAL (phase normale)—REVERSE (phase in-
connectée. Quand PW SAVE est hors service, il
versée)—OFF (haut-parleur d’extrêmes graves
désactivé)
est possible que selon la méthode de connexion
3 Appuyez sur M.C. pour confirmer la sélection.
utilisée l’appareil continue à consommer du cou-
rant de la batterie si le commutateur de contact
SUBWOOFER2 (réglage du haut-parleur d’extrêmes
graves)
de votre véhicule ne possède pas de position ACC
(accessoire).
La fréquence de coupure et le niveau de sortie peu-
vent être réglés lorsque la sortie haut-parleur d’extrê-
1 Maintenez appuyé S (SRC/OFF) jusqu’à
mes graves est activée.
ce que l’appareil soit mis hors tension.
Seules les fréquences inférieures à celles de la plage
sélectionnée sont produites par le haut-parle ur d’ex-
2 Appuyez de façon prolongée sur
trêmes graves.
S (SRC/OFF) jusqu’à ce que le nom de la
1 Appuyez sur M.C. pour afficher le mode de para-
métrage.
fonction apparaisse sur l’affichage.
2 Appuyez sur M.C. pour basculer entre fréquence
de coupure et niveau de sortie du haut-parleur
3 Tournez M.C. pour sélectionner le ré-
d’extrêmes grav es.
glage initial.
Fréquence de coupure (L’affichage de la fré-
Après avoir sélectionné le réglage initial, effec-
quence de coupure clignote.)—Niveau de sortie
tuez les procédures de paramétrage suivantes.
(L’affichage du niveau de sortie clignote.)
3 Tournez M.C. pour choisir le réglage désiré.
FM STEP (incrément d’accord FM)
Fréquence de coupure : 50HZ—63HZ—80HZ—
100HZ—125HZ
Normalement, l’incrément d’accord FM employé par
Niveau de sortie : -24 à +6
l’accord automatique est 50 kHz. Quand la fonction
AF ou TA est en service, l’incrément d’accord passe
SLA (réglage du niveau de la source)
automatiquement à 100 kHz. Il peut être préférable de
régler l’incrément d’accord à 50 kHz quand la fonc-
La fonction SLA (réglage du niveau de la source) per-
tion AF est en service.
met d’ajuster les niveaux sonores de chaque source
! Pendant l’accord manuel, l’ incrément d’accord
afin d’éviter que ne se produisent de fortes variations
est maintenu à 50 kHz.
d’amplitude sonore lorsque vous passez d’une source
1 Appuyez sur M.C. pour afficher le mode de para-
àl’autre.
métrage.
! Les réglages sont basés sur le niveau du volume
2 Tournez M.C. pour choisir l’incrément d’accord
FM qui lui, demeure inchangé.
FM.
! Le niveau du volume MW/LW (PO/GO) peut égale-
50 KHZ (50 kHz)—100 KHZ (100 kHz)
ment être réglé avec cette fonction.
3 Appuyez sur M.C. pour confirmer la sélection.
! Si FM a été choisie comme source, vous ne pou-
vez pas afficher la fonction SLA.
AUTO-PI (recherche automatique PI)
1 Appuyez sur M.C. pour afficher le mode de para-
métrage.
L’appareil peut rechercher automatiquement une
2 Tournez M.C. pour régler le volume de la source.
autre station avec le même type de programme, y
Plage de réglage : +4 à –4
compris si l’accord a été obtenu par le rappel d’une
3 Appuyez sur M.C. pour confirmer la sélection.
fréquence en mémoire.
1 Appuyez sur M.C. pour mettre en service ou hors
service la recherche automatique PI .
AUX (entrée auxiliaire)
38
Fr
Section
Utilisation de l’appareil
02
Activez ce réglage lorsque vous utilisez un appareil
SCROLL (réglage du mode de défilement)
auxiliaire connecté à cet appareil.
1 Appuyez sur M.C. pour mettre AUX en service ou
Quand la fonction Ever Scroll est en service, les infor-
hors service.
mations textuelles enregistrées défilent en perma-
nence. Mettez la fonction hors service si vous
USB (Plug-and-Play)
préférez que l’information défile une fois seulement.
1 Appuyez sur M.C. pour mettre la fonction de défi-
Ce réglage vous permet de commuter votre source
lement perman ent en service ou hors service.
sur USB/iPod automatiquement.
Français
1 Appuyez sur M.C. pour activer ou désactiver la
TITLE (multilingue)
fonction Plug-and-Play.
ON – Lorsqu’un périphérique de stockage USB ou
Cet appareil peut afficher les informations textuelles
d’un fichier audio compressé même si elles sont in-
un iPod est connecté, la source peut, selon le type
corporées dans une langue d’Europe de l’Ouest ou
de périphérique, basculer automatiquement sur
Russe.
USB/iPod lorsque vous mettez le moteur en mar-
! Si la langue incorporée et la langue sélectionnée
che. Si vous déconnectez le périphérique de stoc-
sont différentes, les informations textuelles peu-
kage USB/l’iPod, la source de cet appareil est
vent ne pas s’afficher correctement.
mise hors tension.
! Certains caractères peuvent ne pas s’afficher cor-
OFF – Lorsqu’un périphérique de stockage USB
rectement.
ou un iPod est connecté, la source n’est pas auto-
1 Appuyez sur M.C. pour afficher le mode de para-
matiquement commutée sur USB/iPod. Basculez
métrage.
la source manuellement sur USB/iPod.
2 Tournez M.C. pour choisir le réglage désiré.
SW CONTROL (réglage de la sortie arrière et du haut-
EUROPEAN (Langue européenne)—RUSSIAN
parleur d’extrêmes graves)
(Russe)
3 Appuyez sur M.C. pour confirmer la sélection.
La sortie de connexion des haut-parleurs arrière et la
sortie RCA peuvent être utilisées pour la connexion
PW SAVE (économie d’énergie)
d’un haut-parleur pleine gamme ou d’un haut-parleur
d’extrêmes grav es.
Activer cette fonction vous permet de réduire la
Si vous basculez sur REAR-SP : SW, vous pouvez
consommation de la batterie.
connecter une borne de haut-parleur arrière à un
! La mise en service de la source est la seule opéra-
haut-parleur d’extrêmes graves directement, sans uti-
tion permise quand cette fonction est en service.
liser un amplificateur auxiliaire.
1 Appuyez sur M.C. pour mettre l’économie d’éner-
Initialement, REAR-SP est réglé pour la connexion
gie en service ou hors service.
d’un haut-parleur arrière pleine gamme (FUL).
1 Appuyez sur M.C. pour afficher le mode de para-
métrage.
2 Tournez M.C. pour changer la sortie et appuyez
pour sélectionner.
Choix de la couleur de
REAR-SP—PREOUT
3 Tournez M.C. pour changer de réglage.
l’éclairage
REAR-SP: FUL—SW
(Fonction de DEH-4300UB)
PREOUT: SW—REA
! Même si vous modifiez ce réglage, aucun si-
Cet appareil dispose d’un éclairage multico-
gnal n’est émis aussi longtemps que la sortie
lore. Vous pouvez sélectionner la couleur dési-
vers le haut-parleur d’extrêmes graves n’est
rée dans la liste des couleurs.
pas en service (reportez-vous à la page 37,
SUBWOOFER1 (réglage en service/hors service
du haut-parleur d’extrêmes graves)).
Sélection directe à partir de la
! Si vous modifiez ce réglage, la sortie haut-par-
leur d’extrêmes graves est repositionnée sur
liste des couleurs d’éclairage
les réglages d’usine dans le menu audio.
1 Appuyez sur M.C. pour afficher le menu
DEMO (réglage de l’affichage de démonstrat ion)
principal.
1 Appuyez sur M.C. pour mettre l’affichage de dé-
monstration en service ou hors service.
Fr
39
<CRD4524-A/N>20