Pioneer CP-2EX: instruction
Class: Household, kitchen appliances, electronics and equipment
Type: Microphone
Manual for Pioneer CP-2EX
Table of contents

CP-2EX
Speaker Stand / Socle d’enceinte / Lautsprecherständer /
Base per diffusori / Luidsprekerstandaard / Soportes de altavoz /
Suporte para colunas / Högtalarstativ / Højttalerstativ /
Høyttalerstativ / Kaiutinjalusta /
Стойка под динамик
2
En
Thank you for buying this Pioneer product. Please read
through these operating instructions for proper assembly
and use. After you have finished reading the instructions, put
them away in a safe place for future reference.
Before you start
Before setting up your speaker system, we recommend
reading the operating instructions for your system thor-
oughly.
• Only use the screws supplied when fixing the speaker to
the speaker stand.
• Do not place the stand on an unstable and/or sloping
surface. The stand and speaker may fall and cause
injury.
• Do not use with any speaker system other than the one
for which the unit was designed. The stand may collapse
and be damaged and/or the speaker may fall and cause
injury.
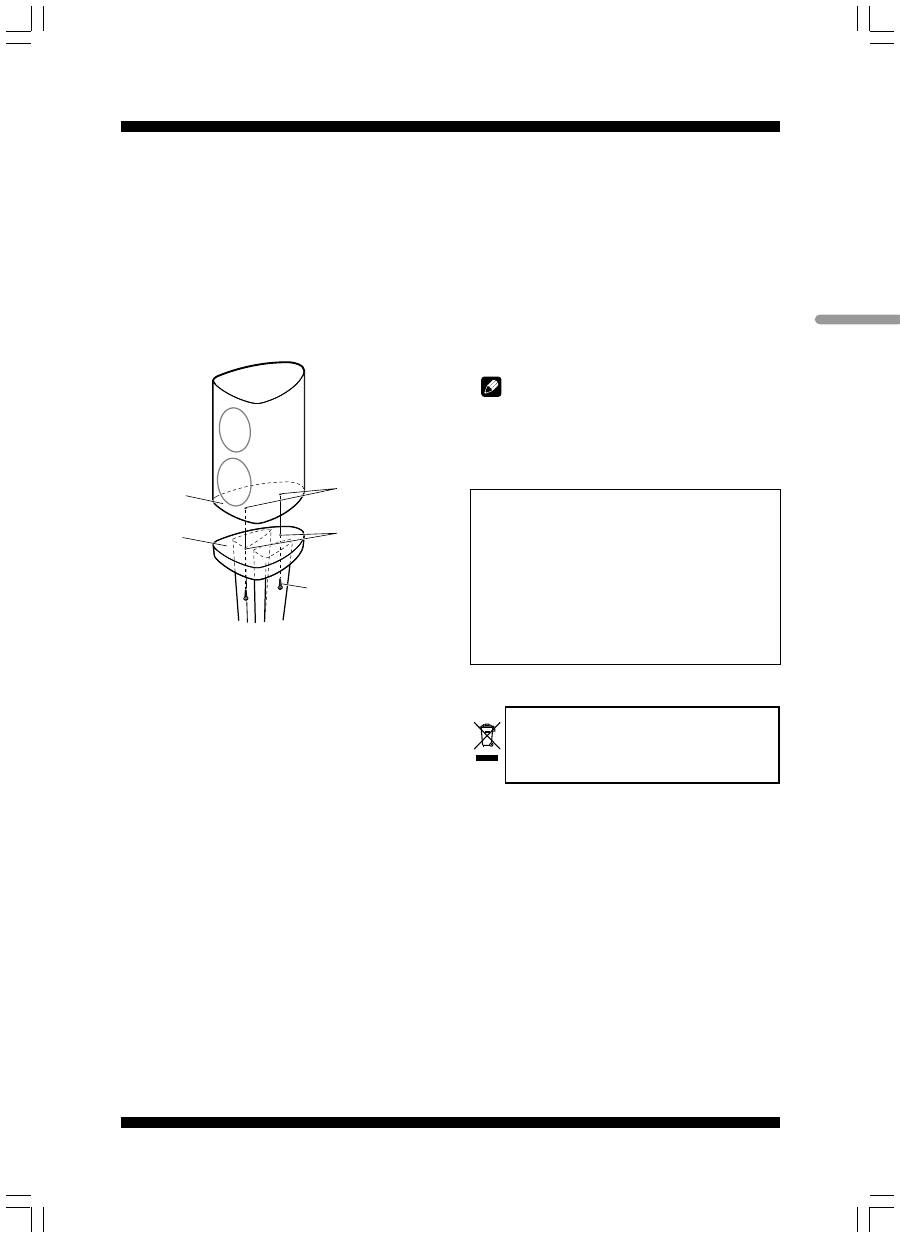
• When moving the speaker and stand, first remove the
speaker from the stand, and then move the stand,
holding it by the two stems.
Installing the speaker stands
Place the stand on a stable, level surface; placing the stand
on an unstable surface can be dangerous.
When placing the speaker, keep in mind that the tone is
affected by the position of the speaker.
If the bass is insufficient, move the speaker closer to the wall.
The richest bass sound is obtained when the speaker is right
against the wall. If the bass is too powerful, producing a
muffled tone, move the speaker away from the wall. Placing
the speaker against a thick curtain may also be effective.
50 cm
20 cm
Adjust the position as necessary to obtain optimal sound
from your system.
• Pioneer assumes no liability whatsoever for damages
resulting from assembly, improper mounting, insuffi-
cient reinforcement, misuse of the product, acts of
nature, etc.
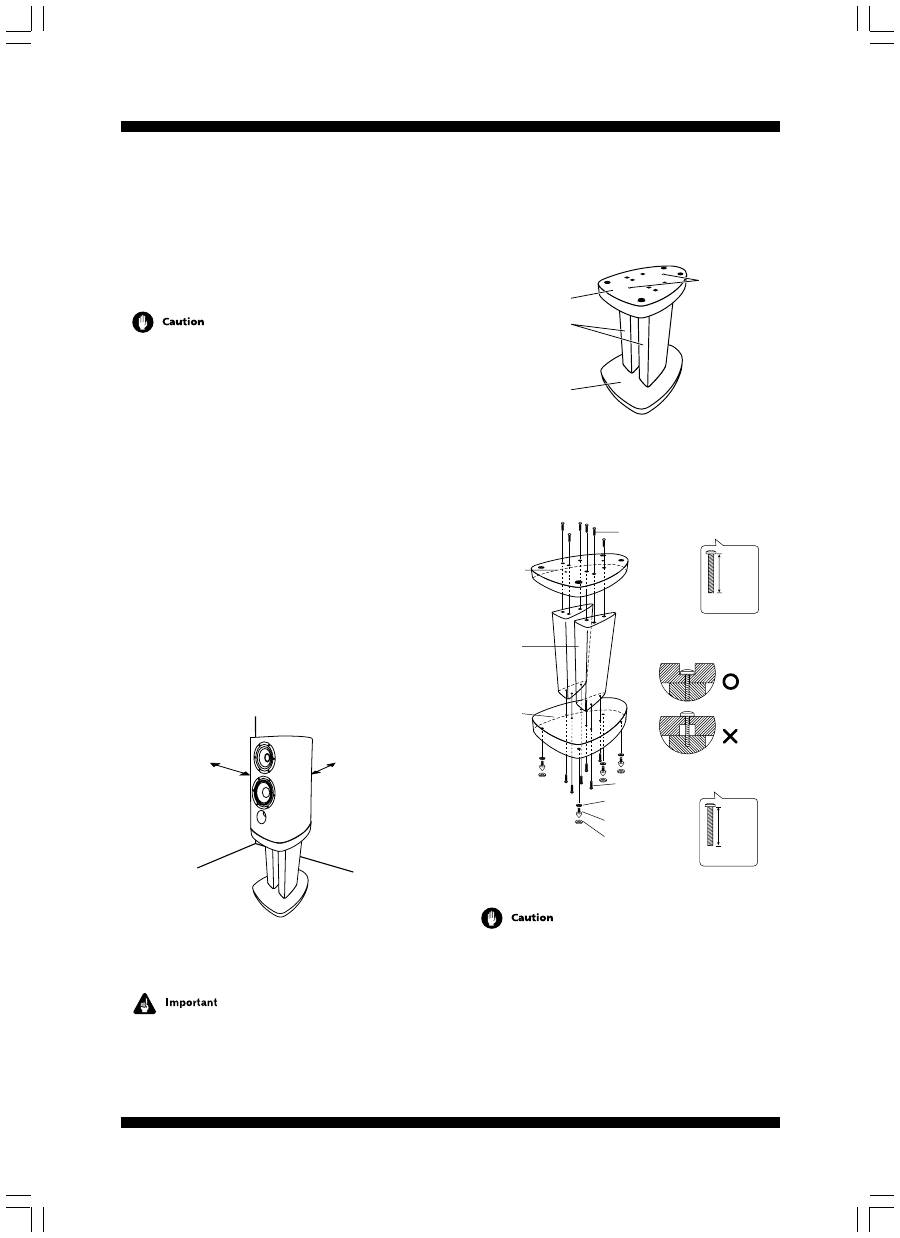
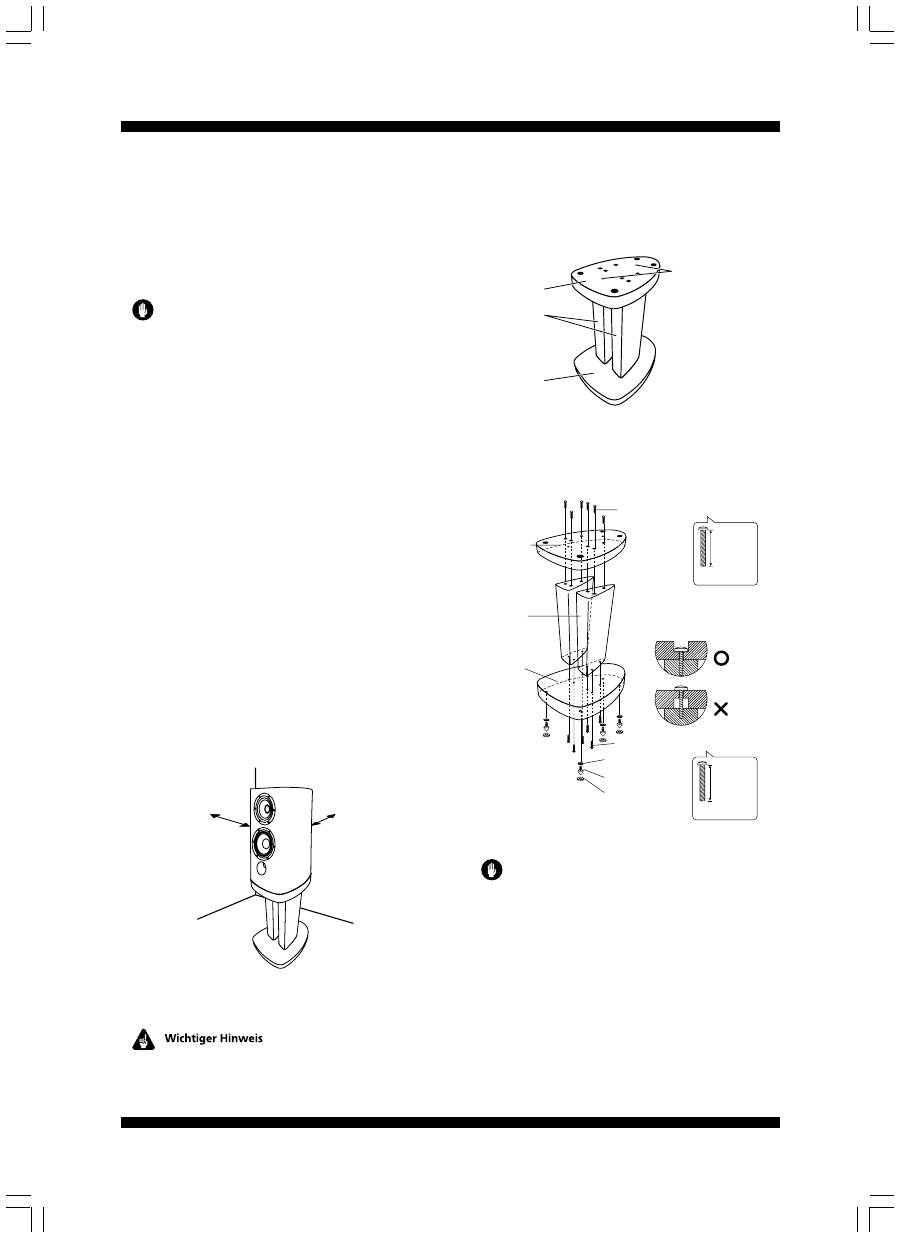
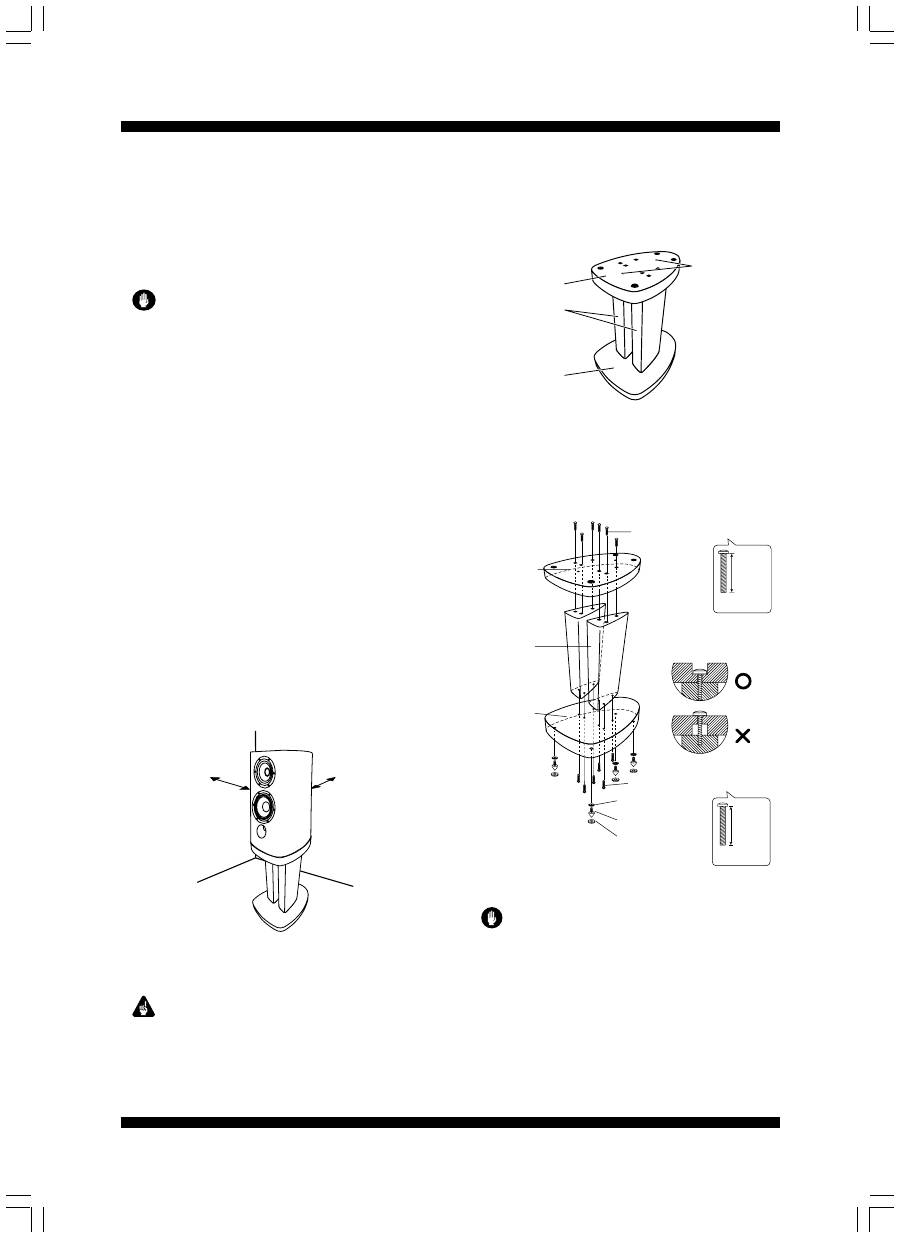
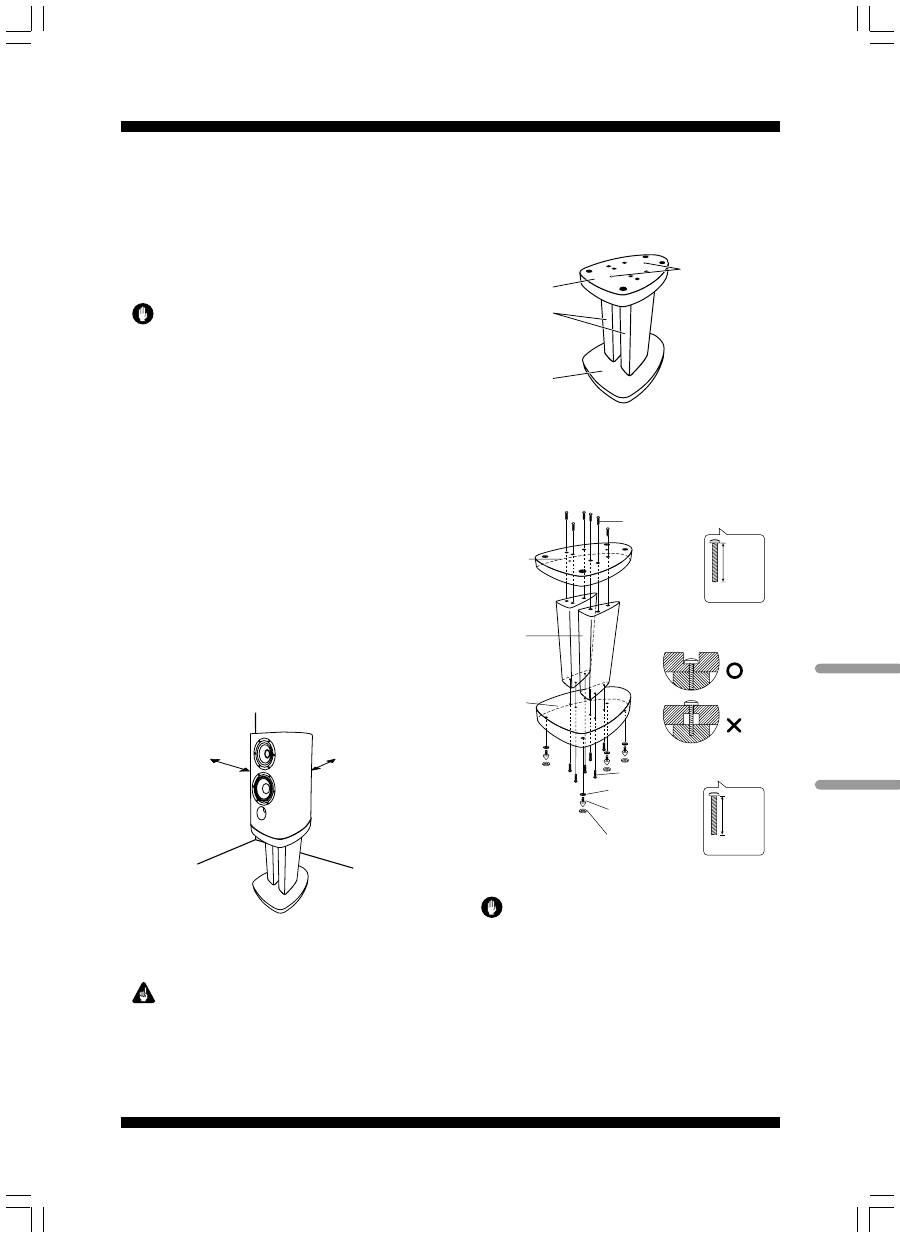
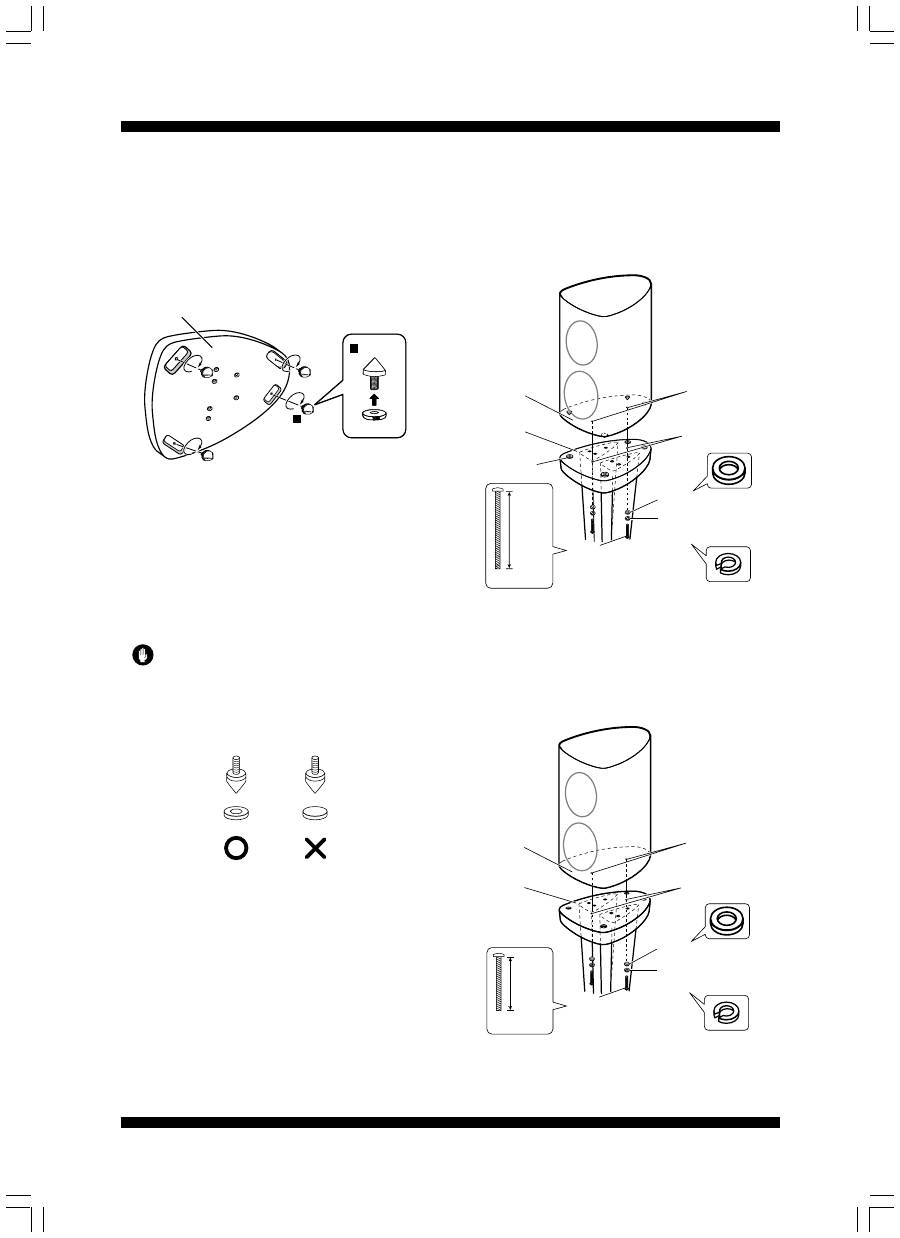
Assembling the speaker stands
Assemble the speaker stands as illustrated below. Please
note that a flathead screwdriver will be necessary for
assembly. The following illustration shows the fully assem-
bled speaker stand:
Screw holes
for securing
speaker
Speaker support
Stand base
Stand stems
•
Align the screw holes on the stand base and speaker
support with the screw holes in the two stems, then
insert the screws and tighten.
Screws (Bind head, M6xL40)
40 mm
Black
Screws (Bind head, M6xL40)
Nut
Spike (SBA6053)
Spike base
(SLA1057)
40 mm
Black
Speaker
support
Stand
base
Stand
stems
Please note that sunken
screw holes are provided
in the speaker support.
(SBA6054)
(SBA6054)
• Make sure you assemble the stand on a flat surface that
is relatively soft (such as a carpet).
• Make sure the screws are inserted in the screw holes as
shown above (with the screw head hidden) when
securing the speaker. Improper setup could result in
damage or injury if the speaker falls from the stand.

3
En
English
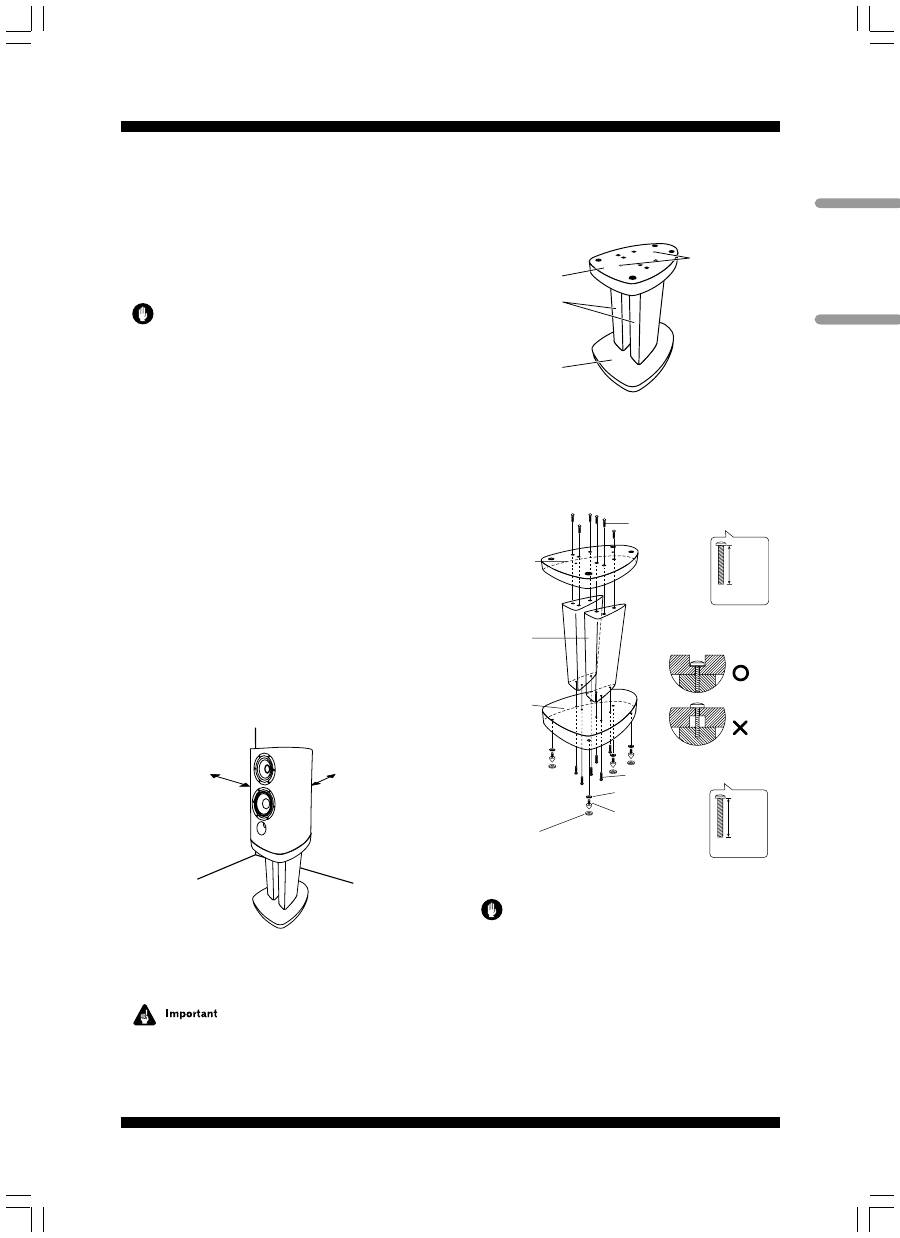
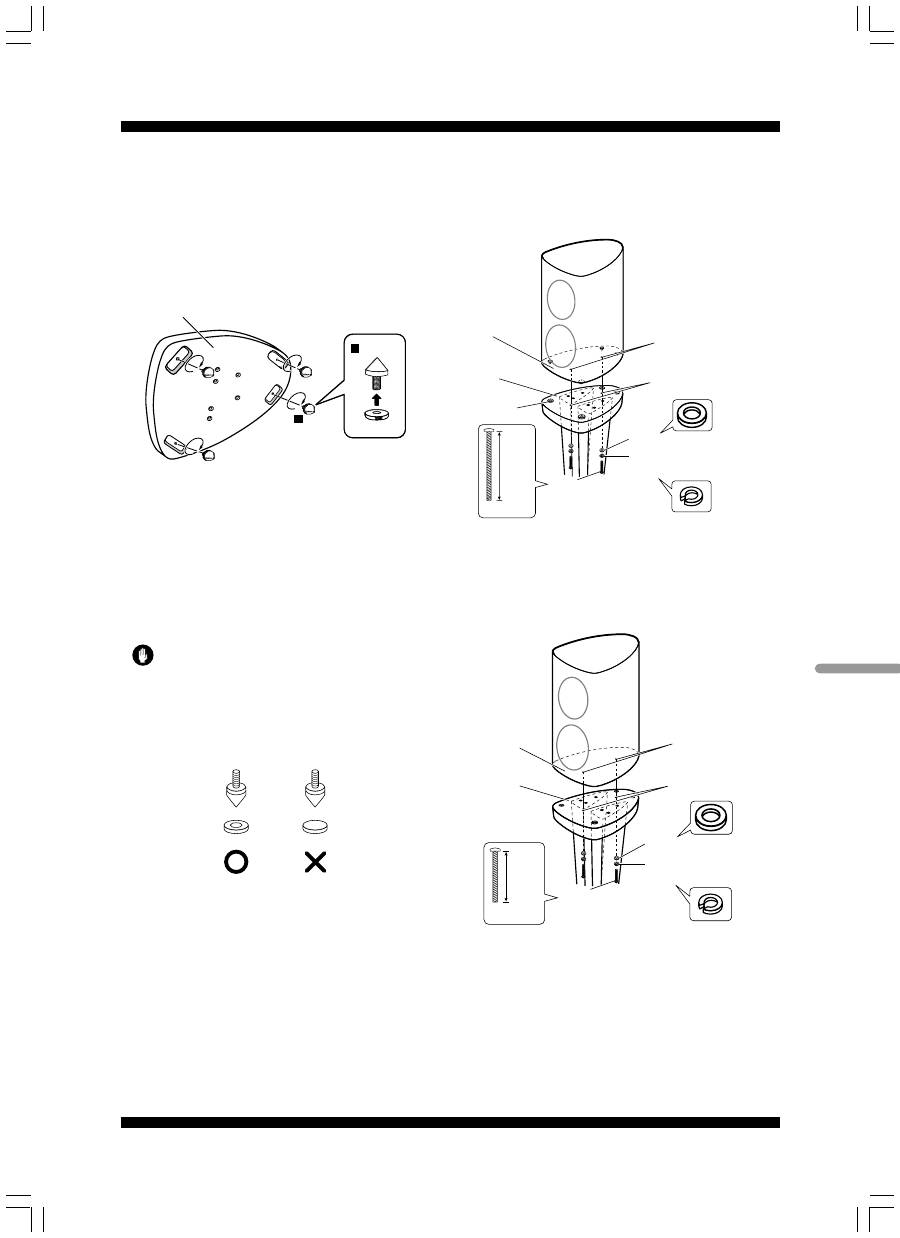
Using the spikes
The speaker stands include spikes that you can use to isolate
the speaker from the floor. Spikes are recommended when
placing the stand on a thick carpet (for added stability), or for
better sound when placing the stand on a hard reverberant
surface (such as a concrete or wood floor). Use the supplied
spike bases to avoid scratching the floor or other surface
where the stand is placed.
Spike
1
2
Nut
Stand base plate
1
Attach the spikes to the nuts provided.
2
Attach all four spikes to the threaded metal inserts
at the base of the speaker stand.
3
Choose the location for speaker placement then put
the spike bases on the floor.
4
Place the stand so that the spikes are resting on the
spike bases on the floor.
Before placing the speaker on the speaker stand, make sure
the stand is stable and resting squarely on all four spikes.
• Note that these spikes are sharp metal and can cause
damage to flooring. Make sure to lay down a cloth or
suitable base before setting up.
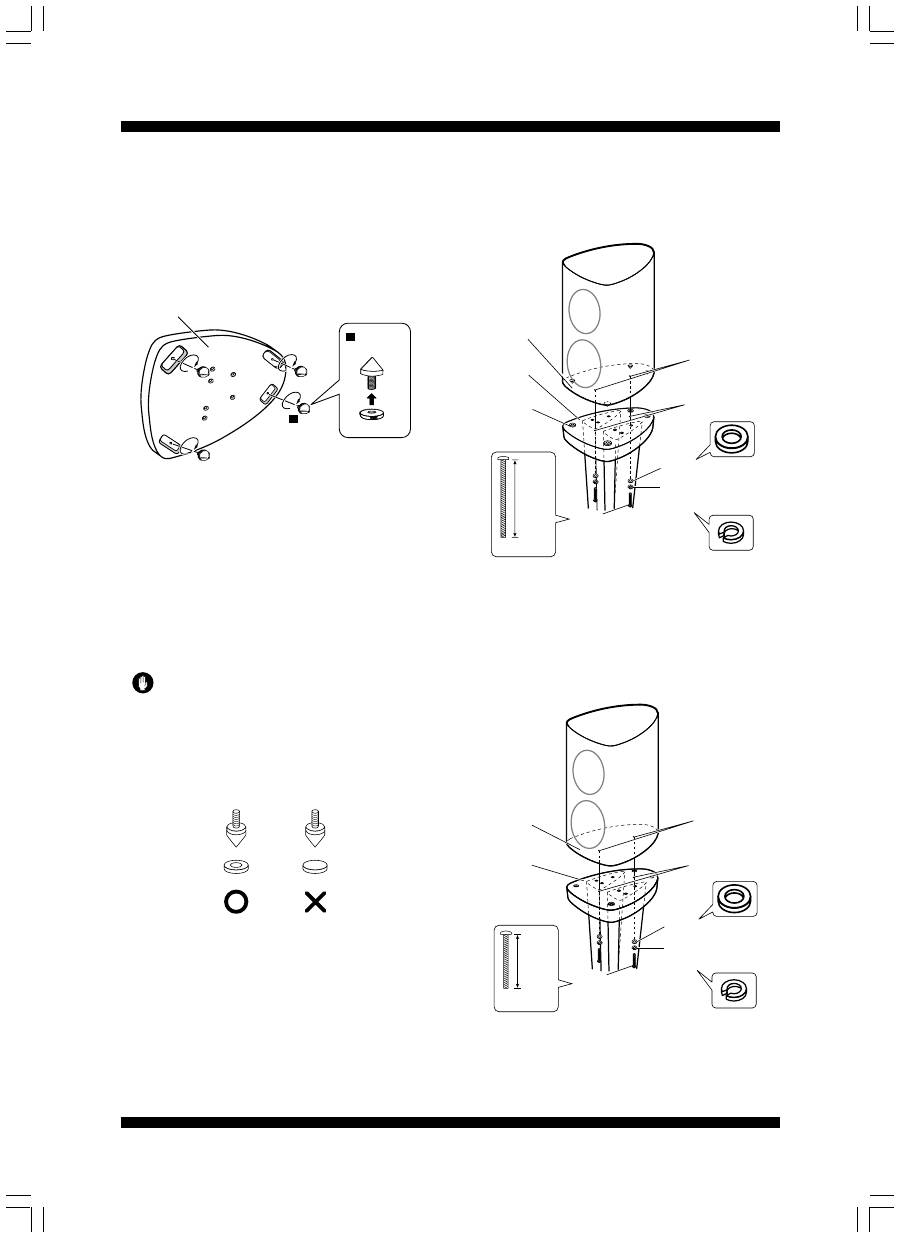
• The spike bases should be placed as shown below (with
the depression on the top side).
• Make sure to use the spike bases provided to avoid
damaging the surface where you place the stand.
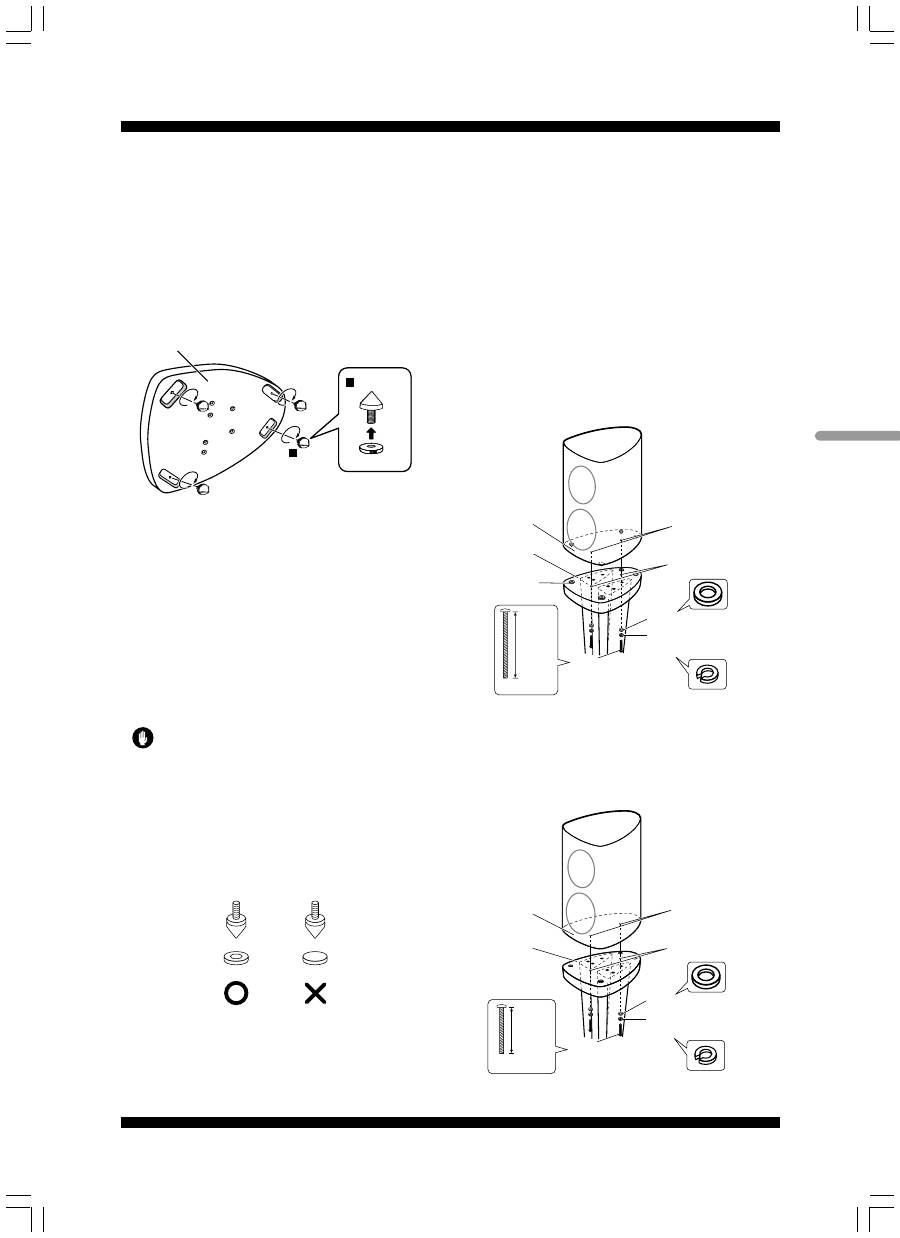
Attaching speakers to the stands
To avoid accident or injury, please use screws to secure the
speakers to the speaker stands.
Assembly with the S-2EX speaker system
If you are using the S-2EX speaker system, note that there is
a fastening nut provided on the speaker base (see below).
When using speaker spikes:
Place the speaker spike bases in the four holes provided on
the speaker support, then secure the speaker to the speaker
support using the washer, spring washer and the 62 mm
screws as shown below.
(SBA6050)
Speaker
base
Speaker
support
Washer (SBE6006)
Speaker
spike base
Fastening nut
Spring washer
(SBE6005)
Screws
(Bind head, M5xL62)
62 mm
Black
Screw holes
for securing
speaker
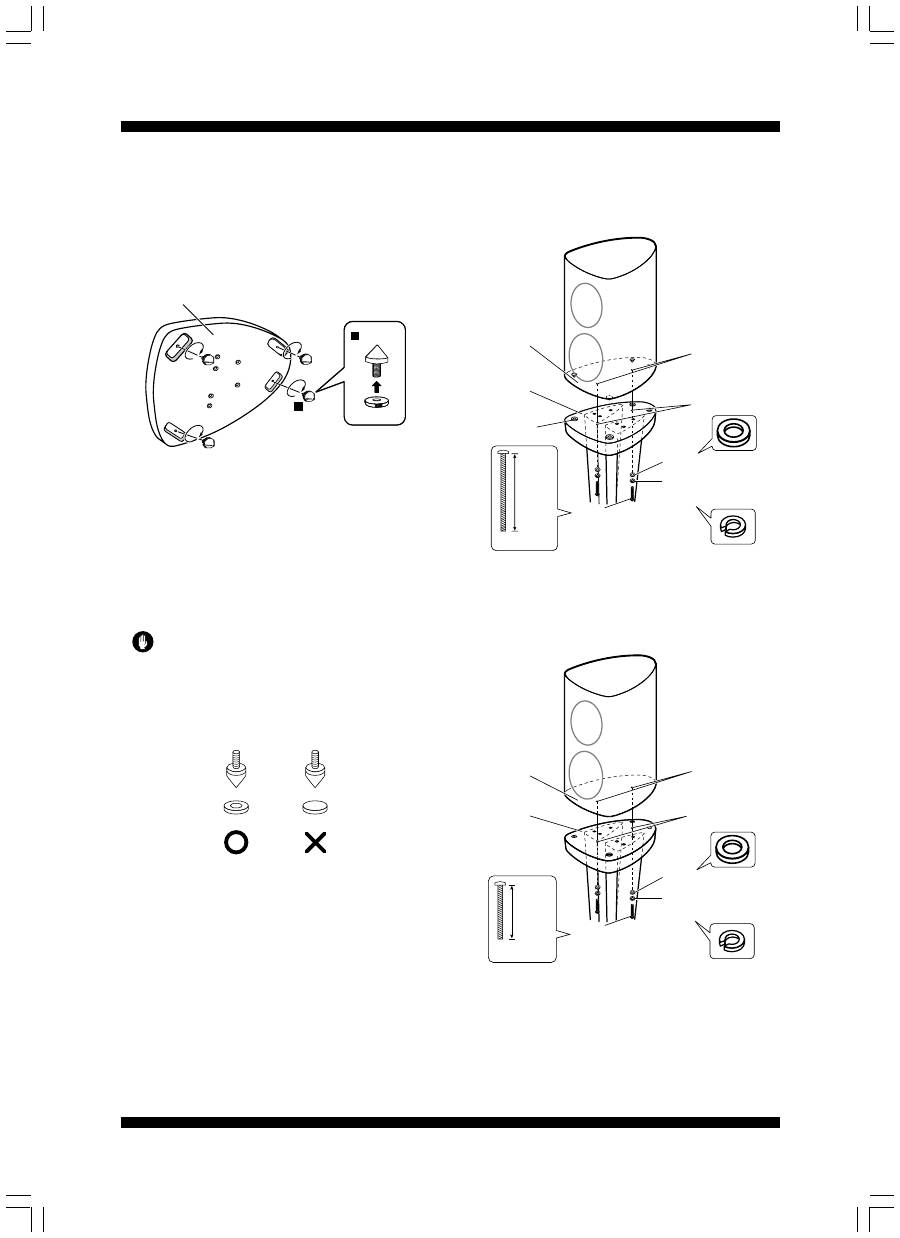
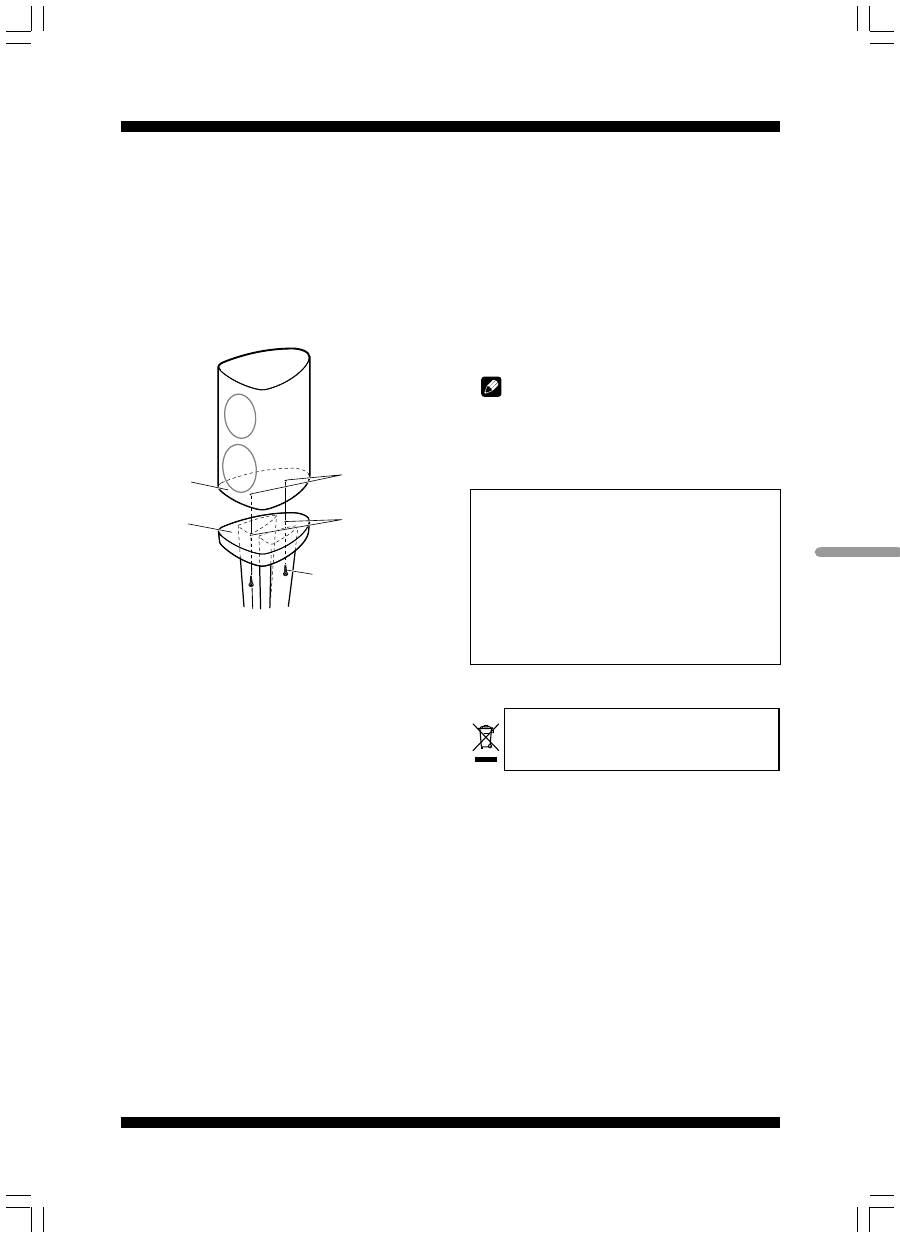
When not using speaker spikes:
Secure the speaker to the speaker support using the washer,
spring washer and the 36 mm screws as shown below.
(SBA6048)
Speaker
base
Speaker
support
Washer (SBE6006)
Fastening nut
Screws
(Bind head, M5xL36)
36 mm
Black
Screw holes
for securing
speaker
Spring washer
(SBE6005)
4
En
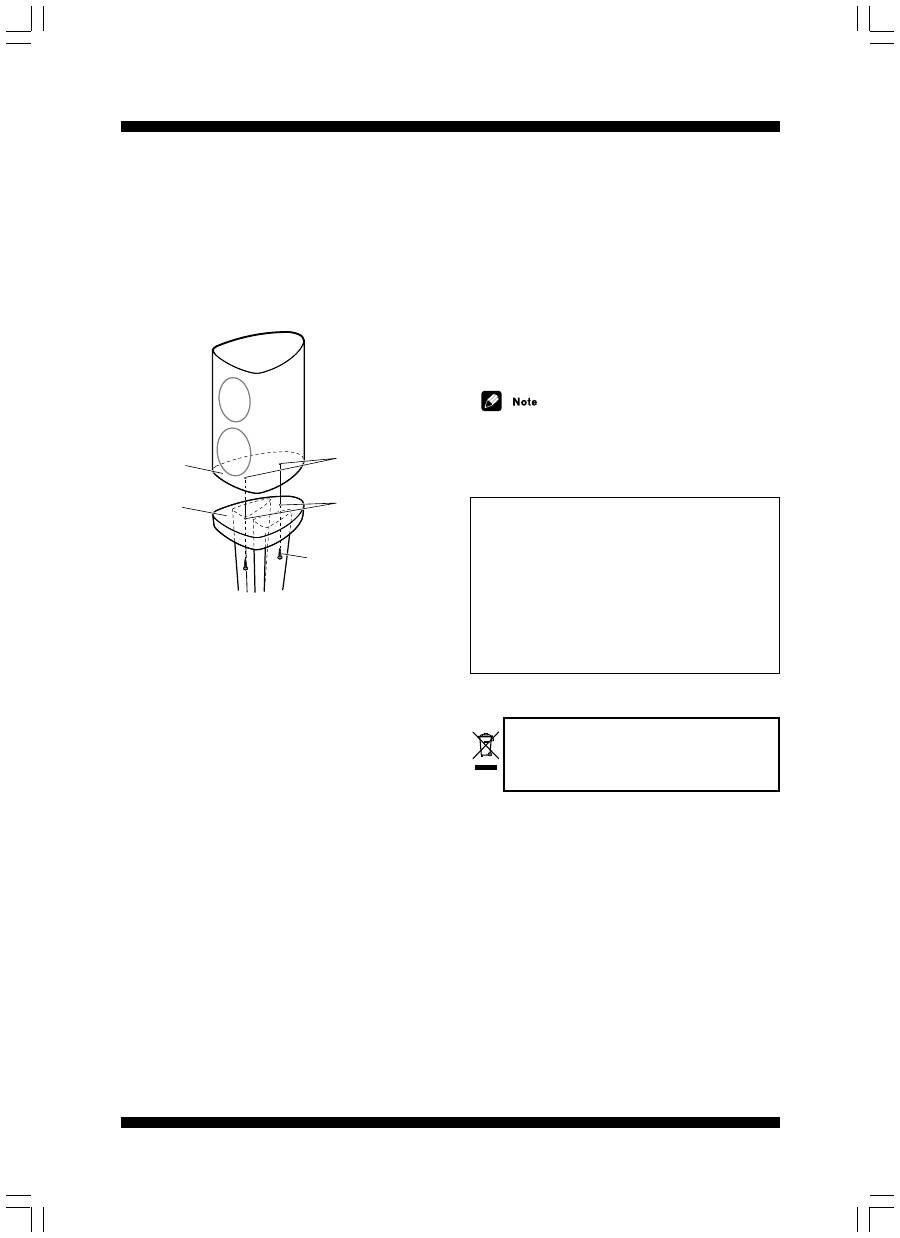
Assembly with a separate speaker system
If you are using a speaker system other than the S-2EX, note
that you will have to use a hand drill (or the like) to make
holes on the speaker base to secure it to the stand. Make
sure the speaker weight does not exceed 29 kg.
After making holes on the speaker base where indicated
(make sure they line up with the screw holes on the speaker
support), secure the speaker to the speaker support using
commercially available wood screws as shown below.
Speaker
base
Speaker
support
Fastening nut
Commercially
available wood
screw
Screw holes
for securing
speaker
Cabinet and stand maintenance
• Use a polishing cloth or dry cloth to wipe off dust and
dirt.
• If the cabinet or stand is very dirty, use a soft cloth
dipped in some neutral cleanser diluted 5 or 6 times
with water. Finally, wipe again using a dry cloth. Do not
use furniture wax or cleaners.
• Never use thinners, benzine, insecticide sprays and
other chemicals on or near the cabinet or stand, since
these will corrode the surfaces.
Specifications
External dimensions ............... 400 (W) x 604 (H) x 513 (D) mm
Weight .............................................................................. 17.8 kg
Supplied accessories
Stand base plates ...................................................................... 2
Speaker supports ....................................................................... 2
Stems .......................................................................................... 4
Spikes (with attached nuts) [SBA6053] ................................... 8
Spike bases [SLA1057] .............................................................. 8
Screws (Bind head, M5xL62) [SBA6050] ................................. 4
Screws (Bind head, M5xL36) [SBA6048] ................................. 4
Screws (Bind head, M6xL40) [SBA6054] ............................... 24
Spring washers [SBE6005] ........................................................ 4
Washers [SBE6006] ................................................................... 4
These operating instructions [SRD6045] ................................. 1
• Specifications and design subject to possible modifica-
tion without notice, due to improvements.
• The product number are listed above in square brackets.
If you want to dispose this product, do not mix it with
general household waste. There is a separate collection
system for used electronic products in accordance with
legislation that requires proper treatment, recovery and
recycling.
Private households in the 25 member states of the EU, in
Switzerland and Norway may return their used electronic
products free of charge to designated collection facilities or to a
retailer (if you purchase a similar new one).
For countries not mentioned above, please contact your local
authorities for the correct method of disposal.
By doing so you will ensure that your disposed product under-
goes the necessary treatment, recovery and recycling and thus
prevent potential negative effects on the environment and
human health.
Part name
• Protector (Bottom)
• Protector (Middle)
• Protector (Top)
• Protector
• Packing case
• Protection sheet
• Protection sheet
• Protection sheet
Part no.
SHA6095
SHA6096
SHA6097
SHA6098
SHG6150
SHC6044
SHC6045
SHC6046
Replacement part numbers
Published by Pioneer Corporation.
Copyright © 2005 Pioneer Corporation.
All rights reserved.
5
Fr
FrançaisFrançais
Nous vous remercions pour l’achat de ce produit Pioneer.
Veuillez lire attentivement ce mode d’emploi pour assembler
et utiliser correctement le produit. Après avoir lu ces
explications, rangez-les dans un endroit sûr pour vous y
référer éventuellement à l’avenir.
Avant de commencer
Avant d’installer les enceintes acoustiques, nous vous
conseillons de lire attentivement le mode d’emploi qui les
accompagne.
Attention
• Utilisez uniquement les vis fournies pour fixer l’enceinte
sur le socle d’enceinte.
• Ne placez pas le socle sur une surface instable et/ou
glissante, car le socle et l’enceinte pourraient tomber et
provoquer des blessures.
• N’utilisez avec aucune autre enceinte que celle pour
laquelle ce socle a été conçu. Le socle pourrait se
renverser et être endommagé et/ou l’enceinte pourrait
tomber et provoquer des blessures.
• Avant de déplacer l’enceinte et le socle, déposez d’abord
l’enceinte, puis déplacez le socle en le tenant par ses
deux montants.
Installation des socles d’enceinte
Placez le socle sur une surface stable et horizontale; il serait
dangereux de le poser sur une surface instable.
Lors de l’installation de l’enceinte, gardez à l’esprit le fait que
les tonalités sont affectées par la position de l’enceinte.
Si les graves laissent à désirer, déplacez l’enceinte plus près
du mur. Des tonalités graves plus riches seront obtenues si
l’enceinte se trouve juste à côté d’un mur. Si les graves sont
trop puissantes au point de produire des tonalités
assourdies, écartez l’enceinte par rapport au mur. Le fait de
placer l’enceinte contre un rideau épais peut aussi fournir
des résultats adéquats.
50 cm
20 cm
Ajustez la position selon les besoins de manière à obtenir de
votre enceinte un son optimal.
• Pioneer n’assume aucune responsabilité en cas de
dégâts, découlant d’une assemblage ou d’un montage
inadéquat, d’un renforcement insuffisant, d’une
utilisation inapproprié du produit, de catastrophes
naturelles, etc.
Assemblage des socles d’enceinte
Assemblez les socles d’enceinte comme illustré ci-dessous.
Notez qu’un tournevis à tête plate est requis pour cet assem-
blage. L’illustration suivante présente le socle d’enceinte à
l’état assemblé.
Orifices de vis
pour fixation
de l’enceinte
Support
d’enceinte
Base du socle
Montants
du socle
•
Faites correspondre les orifices de vis sur la base du
socle et sur le support d’enceinte avec les orifices de vis
prévus dans les deux montants, puis insérez les vis et
serrez-les.
Vis (tête intégrée, M6xL40)
40 mm
Noir
Vis (tête intégrée, M6xL40)
Écrou
Pointe de
découplage
(SBA6053)
Base pour pointe de
découplage (SLA1057)
40 mm
Noir
Support
d’enceinte
Base du
socle
Montants
du socle
Notez que des orifices
pour vis noyée sont prévu
sur le support d’enceinte.
(SBA6054)
(SBA6054)
Attention
• Prenez soin d’assembler le socle sur une surface plate
qui soit relativement souple (comme un tapis).
• Lors de la fixation de l’enceinte, prenez soin que les vis
soient insérées dans les orifices de vis comme illustré ci-
dessus (leur tête étant noyée). Une installation
inadéquate pourrait provoquer des dégâts ou des
blessures si l’enceinte devait tomber de son socle.
English
6
Fr
Utilisation des pointes de découplage
Les socles d’enceinte sont munis de pointes de découplage
qui permettent d’isoler ceux-ci du plancher. Ces pointes de
découplage sont recommandées si le socle est posé sur un
tapis épais, car elles améliorent la stabilité, ou pour
améliorer les sons si le socle est posé sur une surface dure
et réfléchissante, comme un carrelage ou un plancher.
Utilisez les bases de pointes de découplage fournies pour
éviter de griffer le plancher ou toute autre surface sur
laquelle le socle serait déposé.
Pointe de
découplage
Écrou
Base du socle
1
2
1
Fixez les pointes de découplage au moyen des
écrous fournis.
2
Fixez toutes les quatre pointes de découplage sur les
raccords métalliques filetés à la base du socle d’enceinte.
3
Choisissez l’endroit d’emplacement de l’enceinte, puis
posez les supports de pointes de découplage sur le sol.
4
Placez le socle de telle sorte que les pointes de
découplage reposent sur les supports, eux-mêmes posés
sur le sol.
Avant de placer l’enceinte sur son socle, assurez-vous que
celui-ci et bien stable et qu’il repose fermement sur les
quatre pointes de découplage.
Attention
• Sachez que ces pointes de découplage sont pointues et
fabriquées en métal; elles risquent donc d’endommager
le plancher. Prenez soin de déposer un linge ou un
renfort adéquat avant la mise en place.
• Le support des pointes de découplage doit être placé
comme illustré ci-dessous (la cavité tournée vers le
haut).
• Veillez à utiliser les supports des pointes de découplage
fournis pour éviter d’endommager la surface sur
laquelle le socle sera posé.
Fixation des enceintes sur les socles
Pour éviter des accidents ou des blessures, utilisez les vis
pour immobiliser les enceintes sur leur socle.
Assemblage avec l’enceinte acoustique S-2EX
Si vous utilisez l’enceinte acoustique S-2EX, remarquez
qu’un écrou de fixation est prévus sur le fond de l’enceinte
(voir ci-après).
À l’emploi des pointes de découplage d’enceinte :
Placez les supports de pointes de découplage d’enceinte
dans les quatre orifices, prévus sur le socle d’enceinte, puis
immobilisez l’enceinte sur son socle au moyen de la
rondelle, de la rondelle à ressort et des vis de 62 mm comme
illustré ci-après.
(SBA6050)
Fond
d’enceinte
Support
d’enceinte
Rondelle (SBE6006)
Support de
pointe de
découplage
d’enceinte
Écrou de fixation
Rondelle à ressort
(SBE6005)
Vis
(tête intégrée, M5xL62)
62 mm
Noir
Orifices de vis
pour fixation de
l’enceinte
Si vous n’utilisez pas les pointes de découplage
d’enceinte :
Immobilisez l’enceinte sur le support au moyen de la
rondelle, de la rondelle à ressort et des vis de 36 mm, comme
illustré ci-après.
(SBA6048)
Fond
d’enceinte
Support
d’enceinte
Rondelle (SBE6006)
Écrou de
fixation
Vis
(tête intégrée, M5xL36)
36 mm
Noir
Orifices de vis
pour fixation
de l’enceinte
Rondelle à ressort
(SBE6005)
7
Fr
Fran
ç
ais
Assemblage avec une enceinte acoustique
différente
Si vous utilisez une enceinte acoustique autre que la S-2EX,
notez que vous devrez utiliser une perceuse à main (ou un
outil comparable) pour forer des orifices dans le fond de
l’enceinte de manière à pouvoir la fixer sur le socle. Assurez-
vous que le poids de l’enceinte utilisée ne dépasse pas 29 kg.
Après avoir percé des trous dans le fond de l’enceinte aux
endroits indiqués (assurez-vous qu’ils soient alignés sur les
orifices de vis sur le support d’enceinte), immobilisez
l’enceinte sur le support, comme illustré ci-après, au moyen
de vis à bois disponibles dans le commerce.
Fond
d’enceinte
Support
d’enceinte
Écrou de fixation
Vis à bois disponible
dans le commerce
Orifices de vis
pour fixation
de l’enceinte
Entretien du coffret et du socle
• Utilisez un chiffon à lustrer ou un linge sec pour enlever
la poussière et la saleté.
• Si le coffret ou le socle est très sale, utilisez un linge
doux trempé dans un détergent neutre, dilué dans 5 à 6
fois son volume d’eau. Frottez à nouveau avec un linge
sec. N’utilisez aucun détergent ou cire pour mobilier.
• N’utilisez jamais de diluant, benzine, insecticide en
atomiseur ou autre produit chimique sur le coffret ou le
support ou dans leur voisinage, car ces produits
pourraient endommager leurs surfaces.
Fiche technique
Dimensions extérieures .......... 400
×
604
×
513 mm (L
×
H
×
P)
Poids ................................................................................. 17,8 kg
Accessoires fournis
Plaques de base du socle ......................................................... 2
Supports d’enceinte ................................................................... 2
Montants ..................................................................................... 4
Pointes de découplage (avec écrous attachés) [SBA6053] ... 8
Supports des pointes de découplage [SLA1057] .................... 8
Vis (tête intégrée,. M5xL62) [SBA6050] .................................... 4
Vis (tête intégrée,. M5xL36) [SBA6048] .................................... 4
Vis (tête intégrée,. M6xL40) [SBA6054] .................................. 24
Rondelles à ressort [SBE6005] ................................................. 4
Rondelles [SBE6006] ................................................................. 4
Le présent mode d’emploi [SRD6045] ..................................... 1
Remarque
• Spécifications et design sous réserve de modifications
sans préavis en raison d’améliorations éventuelles.
• Les numéros de produit sont indiqués ci-dessus entre
crochets.
Nom de pièce
• Protecteur (Bas)
• Protecteur (Milieu)
• Protecteur (Haut)
• Protecteur
• Etui d’emballage
• Feuille de protection
• Feuille de protection
• Feuille de protection
No. de pièce
SHA6095
SHA6096
SHA6097
SHA6098
SHG6150
SHC6044
SHC6045
SHC6046
Numéros des pièces de rechange
Si vous souhaitez vous débarrasser de cet appareil, ne le
mettez pas à la poubelle avec vos ordures ménagères. Il
existe un système de collecte séparé pour les appareils
électroniques usagés, qui doivent être récupérés, traités
et recyclés conformément à la législation.
Les habitants des 25 états membres de l’UE, de Suisse et de
Norvège peuvent retourner gratuitement leurs appareils
électroniques usagés aux centres de collecte agréés ou à un
détaillant (si vous rachetez un appareil similaire neuf).
Dans les pays qui ne sont pas mentionnés ci-dessus, veuillez
contacter les autorités locales pour savoir comment vous pouvez
vous débarrasser de vos appareils.
Vous garantirez ainsi que les appareils dont vous vous
débarrassez sont correctement récupérés, traités et recyclés et
préviendrez de cette façon les impacts néfastes possibles sur
l’environnement et la santé humaine.
Publication de Pioneer Corporation.
© 2005 Pioneer Corporation.
Tous droits de reproduction et de traduction réservés.
8
Ge
Wir danken Ihnen dafür, dass Sie sich für dieses Produkt von
Pioneer entschieden haben. Bitte lesen Sie diese
Bedienungsanleitung vor dem Gebrauch aufmerksam durch,
damit ein fehlerfreier Zusammenbau und Betrieb
gewährleistet ist. Bitte bewahren Sie diese Anleitung
anschließend für spätere Bezugnahme griffbereit auf.
Vor der Inbetriebnahme
Bitte lesen Sie vor der Aufstellung Ihres Lautsprechersystems
dessen Bedienungsanleitung vollständig durch.
Vorsichtshinweise
• Verwenden Sie ausschließlich die mitgelieferten
Schrauben zur Befestigung des Lautsprechers am
Lautsprecherständer.
• Stellen Sie den Ständer auf keinen Fall auf einer
unstabilen und/oder schrägen Unterlage auf.
Anderenfalls besteht die Gefahr, dass Ständer und
Lautsprecher umkippen und Verletzungen verursachen.
• Verwenden Sie diesen Ständer auf keinen Fall mit einem
anderen Lautsprechersystem als dem für diesen Ständer
bestimmten Modell. Anderenfalls besteht die Gefahr, dass
der Ständer zusammenbricht und beschädigt wird und/oder
der Lautsprecher herunterfällt und Verletzungen verursacht.
• Wenn der Aufstellungsort des am Ständer montierten
Lautsprechers verändert werden soll, entfernen Sie
diesen zunächst vom Ständer, und tragen Sie den Ständer
dann, indem Sie ihn an den beiden Pfeilern halten.
Aufstellung der Lautsprecherständer
Stellen Sie den Ständer auf einer stabilen, ebenen Unterlage
auf; die Aufstellung auf einer unstabilen Unterlage ist
potentiell gefährlich.
Bitte beachten Sie bei der Wahl des Aufstellungsorts, dass der
Klang von der Position des Lautsprechers beeinflusst wird.
Wenn die Bässe zu leise sind, platzieren Sie den Lautsprecher
näher an einer Wand. Die sattesten Bässe werden erhalten,
wenn die Rückwand des Lautsprechers die Wand berührt.
Wenn die Bässe zu laut sind, so dass ein dumpfer Klang
erzeugt wird, sorgen Sie für einen größeren Abstand des
Lautsprechers von der Wand. Dieses Problem lässt sich
möglicherweise auch durch eine Aufstellung des
Lautsprechers vor einem dicken Vorhang beseitigen.
50 cm
20 cm
Justieren Sie die Position des Lautsprechers nach
Erfordernis, bis Sie den Aufstellungsort ermittelt haben, an
dem die optimale Klangabstrahlung erhalten wird.
• Pioneer lehnt jegliche Haftung für Schäden ab, die
durch Fehler bei Zusammenbau oder Aufstellung, eine
unzureichende Verstärkung, zweckentfremdeten
Gebrauch oder höhere Gewalt entstehen.
Zusammenbau der Lautsprecherständer
Bauen Sie die Lautsprecherständer wie in den Abbildungen
unten gezeigt zusammen. Ein Flachschraubendreher wird für
den Zusammenbau benötigt. Die nachstehende Abbildung
zeigt den Lautsprecherständer im vollständig
zusammengebauten Zustand:
Schraubenlöcher
für Befestigung
des Lautsprechers
Lautsprecher-
Trägerplatte
Bodenplatte
Pfeiler
•
Bringen Sie die Schraubenlöcher in Bodenplatte und
Lautsprecher-Trägerplatte mit den Schraubenlöchern in
den beiden Pfeilern zur Deckung, setzen Sie die
Schrauben ein, und ziehen Sie sie an.
Schrauben (Flachkopf, M6 x L40)
40 mm
schwarz
Schrauben (Flachkopf, M6 x L40)
Mutter
Stabilisator
(SBA6053)
Untersetzer für
Stabilisator
(SLA1057)
40 mm
schwarz
Lautsprecher-
Trägerplatte
Bodenplatte
Pfeiler
Bitte beachten Sie, dass die
Schraubenlöcher versenkt in
der Lautsprecher-Trägerplatte
angeordnet sind.
(SBA6054)
(SBA6054)
Vorsichtshinweise
• Es ist ratsam, den Ständer auf einer ebenen, relativ
weichen Unterlage, z.B. einem Teppich,
zusammenzubauen.
• Achten Sie bei der Befestigung des Lautsprechers am
Ständer darauf, die Schrauben wie in der obigen
Abbildung gezeigt in die Schraubenlöcher einzusetzen
(mit versenktem Schraubenkopf). Bei unsachgemäßem
Zusammenbau besteht die Gefahr, dass der
Lautsprecher vom Ständer fällt, was zu Verletzungen
oder Beschädigung führen kann.
9
Ge
Deutsch
Verwendung der Stabilisatoren
Zum Lieferumfang des Lautsprecherständers gehören
kegelförmige Stabilisatoren, die eine Isolierung des
Lautsprechers vom Boden ermöglichen. Der Gebrauch dieser
Stabilisatoren empfiehlt sich insbesondere bei Aufstellung
des Lautsprechers auf einem dicken Teppich (zur Erhöhung
der Stabilität) oder, bei Aufstellung auf einer harten, halligen
Unterlage (z.B. einem Beton- oder Holzboden) zur Erzielung
eines besseren Klanges. Verwenden Sie die mitgelieferten
Untersetzer, um ein Zerkratzen des Bodens bzw. der
Unterlage des Lautsprechers durch die Spitzen der
Stabilisatoren zu verhindern.
Stabilisator
Mutter
Bodenplatte des Ständers
1
2
1
Befestigen Sie die mitgelieferten Muttern an allen
vier Stabilisatoren.
2
Befestigen Sie jeden Stabilisator an dem mit einem
Gewinde versehenen Metalleinsatz in der Bodenplatte
des Ständers.
3
Legen Sie die Untersetzer für die Stabilisatoren am
vorgesehenen Aufstellungsort des Lautsprechers auf
den Boden.
4
Platzieren Sie den Ständer so, dass die Stabilisatoren
auf den Untersetzern auf dem Boden ruhen.
Vergewissern Sie sich vor der Montage des Lautsprechers
am Lautsprecherständer, dass der Ständer einwandfrei
nivelliert ist und stabil auf allen vier Stabilisatoren steht.
Vorsichtshinweise
• Bitte beachten Sie, dass die scharfen Metallspitzen
dieser Stabilisatoren den Fußboden beschädigen
können. Es empfiehlt sich daher, vor der Befestigung der
Stabilisatoren an der Bodenplatte eine Decke auf den
Boden zu legen oder eine andere geeignete Unterlage zu
verwenden.
• Die Untersetzer für die Stabilisatoren sind wie in der
nachstehenden Abbildung gezeigt (mit nach oben
weisender Vertiefung) auf den Boden zu legen.
• Bitte achten Sie darauf, die mitgelieferten Untersetzer zu
verwenden, um ein Zerkratzen des Bodens bzw. der
Unterlage des Ständers am Aufstellungsort durch die
Spitzen der Stabilisatoren zu verhindern.
Montage der Lautsprecher an den Ständern
Verwenden Sie unbedingt die dafür vorgesehenen
Schrauben zur Befestigung der Lautsprecher an den
Lautsprecherständern, da anderenfalls die Gefahr von
Unfällen und Verletzungen besteht.
Montage des Lautsprechersystems S-2EX
Bei Verwendung des Lautsprechersystems S-2EX ist zu beachten,
dass sich eine Befestigungsmutter an der Lautsprecher-
Bodenplatte befindet (siehe die nachstehende Abbildung).
Bei Verwendung der Lautsprecher-Stabilisatoren:
Setzen Sie die Untersetzer für die Stabilisatoren in die vier
Vertiefungen in der Lautsprecher-Trägerplatte des Ständers
ein, und verwenden Sie dann die Unterlegscheiben, die
Federscheiben und die 62-mm-Schrauben wie in der
nachstehenden Abbildung gezeigt, um den Lautsprecher an
der Lautsprecher-Trägerplatte zu befestigen.
(SBA6050)
Lautsprecher-
Bodenplatte
Lautsprecher-
Trägerplatte
Unterlegscheibe (SBE6006)
Untersetzer für
Lautsprecher-
Stabilisator
Befestigungsmutter
Federscheibe
(SBE6005)
Schrauben
(Flachkopf, M5xL62)
62 mm
schwarz
Schraubenlöcher
für Befestigung des
Lautsprechers
Bei Nichtverwendung der Lautsprecher-Stabilisatoren:
Verwenden Sie die Unterlegscheiben, die Federscheiben und
die 36-mm-Schrauben wie in der nachstehenden Abbildung
gezeigt, um den Lautsprecher an der Lautsprecher-
Trägerplatte zu befestigen.
Lautsprecher-
Bodenplatte
Lautsprecher-
Trägerplatte
Unterlegscheibe (SBE6006)
Befestigungsmutter
Federscheibe
(SBE6005)
schwarz
Schraubenlöcher
für Befestigung des
Lautsprechers
(SBA6048)
Schrauben
(Flachkopf, M5xL36)
36 mm

10
Ge
Montage eines separaten
Lautsprechersystems
Bitte beachten Sie bei Verwendung eines anderen
Lautsprechersystems als des S-2EX, dass ein Bohrer oder
anderes geeignetes Werkzeug zum Anbringen von Löchern
in der Bodenplatte des Lautsprechers verwendet werden
muss, um diesen am Ständer befestigen zu können. Das
Gewicht eines an diesem Ständer montierten Lautsprechers
darf 29 kg nicht überschreiten.
Nachdem Sie Löcher an den angegebenen Stellen (unter
Ausrichtung auf die Schraubenlöcher in der Lautsprecher-
Trägerplatte) in der Lautsprecher-Bodenplatte angebracht
haben, verwenden Sie handelsübliche Holzschrauben, um
den Lautsprecher wie in der nachstehenden Abbildung
gezeigt an der Lautsprecher-Trägerplatte zu befestigen.
Lautsprecher-
Bodenplatte
Lautsprecher-
Trägerplatte
Befestigungsmutter
handelübliche
Holzschraube
Schraubenlöcher für
Befestigung des
Lautsprechers
Reinigen des Lautsprechergehäuses und Ständers
• Verwenden Sie ein Poliertuch oder ein weiches Tuch, um
Schmutzflecken und Staub abzuwischen.
• Bei starker Verschmutzung von Lautsprechergehäuse
oder Ständer tauchen Sie ein weiches Tuch in eine
Lösung aus 5–6 Teilen eines neutralen
Haushaltsreinigers und 1 Teil Wasser, wringen Sie es
gründlich aus, und wischen Sie die Schmutzflecken
damit ab. Reiben Sie anschließend mit einem trockenen
Tuch nach. Benutzen Sie dazu keine Möbelpolituren
oder -reinigungsmittel.
• Verwenden Sie auf keinen Fall Farbverdünner,
Leichtbenzin, Insektizide oder andere Chemikalien zur
Reinigung bzw. in der Nähe des Lautsprechergehäuses
oder Ständers, da derartige Mittel das Oberflächenfinish
anlösen.
Technische Daten
Außenabmessungen ............... 400 (B)
×
604 (H)
×
513 (T) mm
Masse ............................................................................... 17,8 kg
Mitgeliefertes Zubehör
Ständer-Bodenplatten ..................................................... 2 Stck.
Lautsprecher-Trageplatten ............................................... 2 Stck.
Pfeiler ................................................................................ 4 Stck.
Stabilisatoren
(mit daran befestigten Muttern) [SBA6053] .................. 8 Stck.
Untersetzer für Stabilisatoren [SLA1057] ...................... 8 Stck.
Schrauben (Flachkopf, M5 x L62) [SBA6050] ................ 4 Stck.
Schrauben (Flachkopf, M5 x L36) [SBA6048] ................ 4 Stck.
Schrauben (Flachkopf, M6 x L40) [SBA6054] .............. 24 Stck.
Federscheiben [SBE6005] ............................................... 4 Stck.
Unterlegscheiben [SBE6006] .......................................... 4 Stck.
Vorliegende Anleitung [SRD6045] .................................. 1 Stck.
Hinweis
• Änderungen der technischen Daten und äußeren
Aufmachung bleiben im Sinne der ständigen
Produktverbesserung jederzeit vorbehalten.
• Die Teilenummern sind oben jeweils in eckige
Klammern gesetzt.
Mischen Sie dieses Produkt, wenn Sie es entsorgen
wollen, nicht mit gewöhnlichen Haushaltsabfällen. Es
gibt ein getrenntes Sammelsystem für gebrauchte
elektronische Produkte, über das die richtige
Behandlung, Rückgewinnung und Wiederverwertung
gemäß der bestehenden Gesetzgebung gewährleistet
wird.
Privathaushalte in den 25 Mitgliedsstaaten der EU, in der
Schweiz und in Norwegen können ihre gebrauchten
elektronischen Produkte an vorgesehenen
Sammeleinrichtungen kostenfrei zurückgeben oder aber an
einen Händler zurückgeben (wenn sie ein ähnliches neues
Produkt kaufen).
Bitte wenden Sie sich in den Ländern, die oben nicht aufgeführt
sind, hinsichtlich der korrekten Verfahrensweise der Entsorgung
an die örtliche Kommunalverwaltung.
Auf diese Weise stellen Sie sicher, dass das zu entsorgende
Produkt der notwendigen Behandlung, Rückgewinnung und
Wiederverwertung unterzogen wird, und so mögliche negative
Einflüsse auf die Umwelt und die menschliche Gesundheit
vermieden werden.
Teilebezeichnung
• Schutz (unten)
• Schutz (Mitte)
• Schutz (oben)
• Schutz
• Verpackungskarton
• Schutzfolie
• Schutzfolie
• Schutzfolie
Teile-Nr.
SHA6095
SHA6096
SHA6097
SHA6098
SHG6150
SHC6044
SHC6045
SHC6046
Ersatzteilnummer
Veröffentlicht von Pioneer Corporation.
Urheberrechtlich geschützt © 2005 Pioneer Corporation.
Alle Rechte vorbehalten.

11
It
Italiano
Vi ringraziamo per avere acquistato questo prodotto Pioneer.
Leggere con attenzione questo manuale per imparare ad
assemblarlo ed usarlo correttamente. Finito di leggerlo,
conservarlo in un luogo sicuro per poterlo riutilizzare in futuro.
Prima di cominciare
Prima di impostare il proprio sistema di diffusori,
raccomandiamo di leggerne fino in fondo il manuale.
Attenzione
• Per fissare il diffusore alla sua base, usare solo le viti in
dotazione.
• Non installare la base del diffusore su superfici poco
stabili e/o inclinate. La base del diffusore ed il diffusore
possono cadere e causare infortuni.
• Non usare diffusori che non siano quello studiato per
quest’unità. La base del diffusore potrebbe cadere e
venire danneggiata oppure il diffusore potrebbe cadere e
causare infortuni.
• Nello spostare il diffusore e la sua base, prima togliere il
diffusore dalla base e quindi spostare la base
prendendola per i due gambi.
Installazione della base del diffusore
Posare la base del diffusore su di una superficie solida ed in
piano; usando una superficie instabile potrebbe essere
pericoloso.
Nel posarvi sopra il diffusore, tenere presente che i toni sono
influenzati dalla posizione del diffusore.
Se i bassi sono insufficienti, avvicinare il diffusore al muro. I
bassi più ricchi si ottengono quando un diffusore si trova
contro la parete. Se i bassi sono troppo potenti e producono
rombo, allontanarli dal muro. Può anche essere utile
installare i diffusori contro una tenda spessa.
50 cm
20 cm
Regolare la posizione come necessario per ottenere un
suono ottimale dal sistema.
Importante
• Pioneer non si assume alcuna responsabilità per danni
risultanti da una scorretta messa in posa, un
insufficiente rinforzo, un uso scorretto del prodotto,
catastrofi naturali, ecc.
Montaggio della base del diffusore
La base del diffusore va montata come visto di seguito.
Tenere presente che il montaggio richiede un cacciavite. Le
seguenti illustrazioni mostrano la base del diffusore del tutto
montata.
Fori delle viti
di fissaggio
del diffusore
Sostegno
del diffusore
Basamento
della base
del diffusore
Gambi
della base
•
Allineare i fori delle viti della base del diffusore e del
sostegno del diffusore con i fori delle viti nei due gambi,
inserire le viti e stringere.
Viti (testa autobloccante, M6 x L40)
40 mm
Nero
Viti (testa autobloccante, M6 x L40)
Dado
Zampe (SBA6053)
Base delle zampe
(SLA1057)
40 mm
Nero
Sostegno del
diffusore
Basamento
della base del
diffusore
Gambi
della base
Tenere presente che i fori
delle viti nel sostegno del
diffusore sono incassati.
(SBA6054)
(SBA6054)
Attenzione
• Controllare di aver posato la base del diffusore su di una
superficie piana ma relativamente soffice (ad esempio
un tappeto).
• Nel fissare il diffusore, controllare che le viti siano
inserite nei fori delle viti nel modo visto qui sopra (con la
testa nascosta). Un montaggio scorretto potrebbe
causare guasti o ferite in caso di cadute del diffusore.
Deutsch
12
It
Uso delle zampe
Il supporto del diffusore include zampe che possono venire
usate per isolare il diffusore dal pavimento. Esse sono utili
per installare la base su moquette (per renderla più stabile) o
per migliorare il suono quando è installata su di una
superficie dura che causa riverbero (ad esempio cemento o
legno). Usare le basi in dotazione per evitare che le zampe
graffino il pavimento o la superficie di installazione.
Zampe
Dado
Piastra della base del diffusore
1
2
1
Applicare le zampe ai dadi in dotazione.
2
Applicare le quattro zampe agli inserti metallici
filettati del basamento della base del diffusore.
3
Scegliere la posizione di installazione del diffusore
prima di preparare le zampe del diffusore.
4
Installare la base diritta in modo che le zampe si
vadano a posare sulle loro basi sul pavimento.
Prima di posare il diffusore sulla sua base, controllare che
questa sia stabile e che poggi bene sulle quattro zampe.
Attenzione
• Tenere presente che queste zampe sono in metallo
aguzzo e possono danneggiare il pavimento. Esse devono
sempre posarsi su di un panno o altra base adatta.
• Le basi delle zampe devono venire messe in posizione
come visto di seguito (con la depressione in alto).
• Esser certi di usare le basi delle zampe in dotazione,
così da evitare di danneggiare la superficie su cui
poggia la base del diffusore.
Applicazione dei diffusori alle basi dei diffusori
Per evitare incidenti e ferite, fissare i diffusori alle loro basi
con delle viti.
Messa in posa dei diffusori S-2EX
Se si usano diffusori S-2EX, tenere presente che c’è un dado
di fissaggio sulla base del diffusore (vedi di seguito).
Se si usano le zampe dei diffusori:
Posare le basi delle zampe dei diffusori nei quattro fori
presenti nel sostegno dei diffusori, quindi fermare il diffusore
alla sua base usando la rondella, la rondella elastica e le viti
da 62 mm nel modo mostrato in figura.
(SBA6050)
Base dei
diffusori
Sostegno del
diffusore
Rondella (SBE6006)
Base delle
zampe dei
diffusori
Dado di
fissaggio
Rondella elastica
(SBE6005)
Viti (testa
autobloccante, M5xL62)
62 mm
Nero
Fori delle viti
di fissaggio
del diffusore
Se non si usano le zampe dei diffusori:
Fermare i diffusori al loro sostegno usando la rondella, la
rondella elastica e le viti da 36 mm nel modo mostrato in
figura qui di seguito.
(SBA6048)
Rondella (SBE6006)
Viti (testa
autobloccante, M5xL36)
36 mm
Nero
Rondella elastica
(SBE6005)
Base dei
diffusori
Sostegno del
diffusore
Dado di
fissaggio
Fori delle viti
di fissaggio
del diffusore
13
It
Italiano
Installazione di un sistema di diffusori
separato
Se si usano diffusori diversi dagli S-2EX, tenere presente che
sarà necessario aprire dei fori con un trapano nella base dei
diffusori per fermarli ad essa. Controllare anche che i
diffusori non pesino oltre 29 kg.
Dopo aver aperto fori nella base dei diffusori dove indicato
(controllando che si allineino con i fori delle viti del
sostegno), fermare il diffusore al sostegno dei diffusori
usando viti a legno del tipo in commercio nel modo mostrato
in figura di seguito.
Base dei
diffusori
Sostegno
del diffusore
Dado di
fissaggio
Vite a legno
disponibile
in commercio
Fori delle viti
di fissaggio
del diffusore
Manutenzione del cabinet e della base dei diffusori
• Usare un panno per pulizie o semplicemente un panno
morbido ed asciutto per togliere sporco e polvere.
• Se il cabinet o le basi dei diffusori sono molto sporche,
usare un panno morbido leggermente inumidito con
una soluzione neutra diluita cinque o sei volte.
Ripassare infine con un panno asciutto. Non usare cere
o pulenti per mobilia.
• Non usare mai diluenti, benzina, spray insetticidi o altre
sostanze chimiche su o vicino al cabinet o alle basi, dato
che essi ne corrodono la superficie.
Dati tecnici
Dimensioni esterne .................. 400 (L)
×
604 (A)
×
513 (P) mm
Peso .................................................................................. 17,8 kg
Accessori in dotazione
Piastre di base ............................................................................ 2
Sostegni dei diffusori ................................................................. 2
Gambi .......................................................................................... 4
Zampe (con dadi acclusi) [SBA6053] ....................................... 8
Basi delle zampe [SLA1057] ...................................................... 8
Viti (testa autobloccante, M5 x L62) [SBA6050] ...................... 4
Viti (testa autobloccante, M5 x L36) [SBA6048] ...................... 4
Viti (testa autobloccante, M6 x L40) [SBA6054] .................... 24
Rondelle elastiche [SBE6005] ................................................... 4
Rondelle [SBE6006] ................................................................... 4
Questo manuale d’istruzioni [SRD6045] .................................. 1
Nota
• I dati tecnici ed il design sono soggetti a modifiche
senza preavviso a causa di migliorie.
• I numeri di serie dei pezzi sono racchiusi fra parentesi
quadre.
Se si vuole eliminare questo prodotto, non gettarlo
insieme ai rifiuti domestici. Esiste un sistema di
raccolta differenziata in conformità alle leggi che
richiedono appositi trattamenti, recupero e riciclo.
I privati cittadini dei venticinque paesi membri dell’UE, di
Svizzera e Norvegia, possono restituire senza alcun costo i loro
prodotti elettronici usati ad appositi servizi di raccolta o a un
rivenditore (se si desidera acquistarne uno simile).
Per i paesi non citati qui sopra, si prega di prendere contatto con
le autorità locali per il corretto metodo di smaltimento.
In questo modo, si è sicuri che il proprio prodotto eliminato
subirà il trattamento, il recupero e il riciclo necessari per
prevenire gli effetti potenzialmente negativi sull’ambiente e sulla
vita dell’uomo.
Nome del pezzo
• Protezione (inferiore)
• Protezione (intermedio)
• Protezione (superiore)
• Protezione
• Imballaggio
• Foglio protettivo
• Foglio protettivo
• Foglio protettivo
N° del pezzo
SHA6095
SHA6096
SHA6097
SHA6098
SHG6150
SHC6044
SHC6045
SHC6046
Numero di serie dei pezzi di ricambio
Pubblicato da Pioneer Corporation.
Copyright © 2005 Pioneer Corporation.
Tutti i diritti riservati.
14
Du
Hartelijk dank voor de aanschaf van dit Pioneer product. Lees
deze gebruiksaanwijzing aandachtig door zodat u het
product op de juiste wijze monteert en gebruikt. Bewaar de
gebruiksaanwijzing op een veilige plaats voor eventuele
naslag in de toekomst.
Voordat u begint
Alvorens u de luidsprekers gaat opstellen, raden wij u aan de
bijbehorende gebruiksaanwijzing zorgvuldig door te lezen.
Let op
• Gebruik uitsluitend de bijgeleverde schroeven om de
luidspreker aan de luidsprekerstandaard te bevestigen.
• Zet de standaard niet op een onstabiele en/of schuine
ondergrond. De standaard en de luidspreker zouden
kunnen vallen en letsel veroorzaken.
• Gebruik deze standaard uitsluitend met de luidspreker
waarvoor ze is ontworpen. Bij een andere luidspreker kan
de standaard beschadigd worden en/of de luidspreker
kan vallen en letsel veroorzaken.
• Wanneer de luidspreker en de standaard worden
verplaatst, moet u eerst de luidspreker van de standaard
afnemen en dan de standaard verplaatsen door deze bij
de twee stelen vast te pakken.
Opstellen van de luidsprekerstandaards
Zet de standaard op een stabiele, horizontale ondergrond;
het is gevaarlijk wanneer de standaard op een onstabiele
ondergrond staat.
Wanneer u een plaats voor de luidspreker uitzoekt, houd er
dan rekening mee dat de geluidsweergave beïnvloed wordt
door de positie van de luidspreker.
Als de lagetonenweergave onvoldoende is, kunt u de
luidspreker dichter bij de muur zetten. De lage tonen klinken
het beste wanneer de luidspreker pal tegen de muur staat.
Als de lage tonen te krachtig zijn, waardoor het geluid dof
klinkt, kunt u de luidspreker beter verder van de muur
vandaan zetten. U kunt de luidspreker ook tegen een dik
gordijn aan zetten.
50 cm
20 cm
Stel de positie zodanig af dat een optimaal geluid van de
luidsprekers wordt verkregen.
Belangrijk
• Pioneer kan niet aansprakelijk worden gesteld voor
beschadigingen als gevolg van een foutieve montage of
bevestiging, onvoldoende versteviging, verkeerd gebruik
van het product, natuurrampen enz.
Montage van de luidsprekerstandaards
Monteer de luidsprekerstandaards zoals hieronder is
aangegeven. Voor de montage hebt u een schroevendraaier
met platte kop nodig. De volgende afbeelding toont de
volledig gemonteerde luidsprekerstandaard:
Schroefgaten
voor het
bevestigen van
de luidspreker
Luidsprekersteun
Standaardvoet
Standaardstelen
•
Lijn de schroefgaten in de standaardvoet en de
luidsprekersteun uit met de schroefgaten in de twee
stelen, steek de schroeven naar binnen en draai deze
vast.
Schroeven (drukschroef,
M6xL40)
40 mm
Zwart
Schroeven (drukschroef,
M6xL40)
Moer
Pen (SBA6053)
Penvoetje
(SLA1057)
40 mm
Zwart
Luid-
sprekersteun
Standaard-
voet
Standaard-
stelen
In de luidsprekersteun zijn
verzonken schroefgaten
aangebracht.
(SBA6054)
(SBA6054)
Let op
• Monteer de standaard op een vlakke en zachte
ondergrond (zoals een vloerkleed).
• Zorg dat de schroeven in de schroefgaten zijn gestoken
zoals hierboven is afgebeeld (met de schroefkop
verborgen) wanneer u de luidspreker vastmaakt.
Verkeerde montage kan resulteren in beschadigingen of
letsel in geval de luidspreker van de standaard zou vallen.
15
Du
Nederlands
Gebruik van de standaardpennen
De luidsprekerstandaards zijn voorzien van pennen die u
kunt gebruiken om de standaards verhoogd van de vloer op
te stellen. Gebruik deze pennen wanneer u de standaards op
een dik tapijt zet (voor extra stabiliteit), of voor een beter
geluid wanneer u de standaards op een harde ondergrond
met veel nagalm zet (bijv. een betonnen of houten vloer).
Gebruik de bijgeleverde penvoetjes om krassen in de vloer of
een ander oppervlak waarop de standaard wordt geplaatst te
voorkomen.
Pen
Moer
Standaardvoetplaat
1
2
1
Bevestig de pennen aan de bijgeleverde moeren.
2
Bevestig alle vier de pennen in de metalen
schroefdraadgaten aan de onderkant van de
luidsprekerstandaard.
3
Kies de plaats voor de standaard en zet de standaard
op de penvoetjes op de vloer.
4
Zet de standaard zodanig dat de pennen goed op de
penvoetjes rusten.
Controleer of de standaard stabiel staat en op alle vier de
pennen rust voordat u de luidspreker op de standaard zet.
Let op
• De pennen zijn van scherp metaal vervaardigd en
kunnen beschadiging aan de ondergrond veroorzaken.
Leg indien nodig een matje of iets dergelijks onder de
standaard.
• De penvoetjes moeten op de afgebeelde wijze worden
geplaatst (met de uitgeholde kant boven).
• Gebruik de bijgeleverde penvoetjes om beschadiging te
voorkomen aan de ondergrond waarop de standaard
wordt geplaatst.
Bevestigen van de luidsprekers aan de standaards
Om een ongeluk of letsel te voorkomen, moet u de schroeven
gebruiken om de luidsprekers aan de luidsprekerstandaards
te bevestigen.
Montage van de S-2EX luidsprekers
Als u de S-2EX luidsprekers hebt, ziet u een
bevestigingsmoer op de luidsprekervoet (zie hierna).
Bij gebruik van de luidsprekerpennen:
Plaats de penvoetjes in de vier gaten van de luidsprekersteun
en maak dan de luidspreker met de vulring, de veerring en de
62 mm schroeven aan de luidsprekersteun vast, zoals
hieronder is afgebeeld.
(SBA6050)
Luidspreker-
voet
Luidspreker-
steun
Vulring (SBE6006)
Penvoetje
Bevestigingsmoer
Veerring
(SBE6005)
Schroeven
(drukschroef, M5xL62)
62 mm
Zwart
Schroefgaten
voor het
bevestigen van
de luidspreker
Wanneer de luidsprekerpennen niet gebruikt worden:
Bevestig de luidspreker met de vulring, de veerring en de
36 mm schroeven aan de luidsprekersteun, zoals hieronder is
afgebeeld.
(SBA6048)
Vulring (SBE6006)
Schroeven
(drukschroef, M5xL36)
36 mm
Zwart
Veerring
(SBE6005)
Luidspreker-
voet
Luidspreker-
steun
Bevestigingsmoer
Schroefgaten voor
het bevestigen van
de luidspreker

16
Du
Montage van andere luidsprekers
Als u andere luidsprekers dan de S-2EX gebruikt, dient u met
een boormachine (of een gelijkwaardig gereedschap) gaten
in de luidsprekervoet te maken om deze aan de standaard te
monteren. Het gewicht van de luidspreker mag niet meer
bedragen dan 29 kg.
Nadat u op de aangegeven plaatsen gaten in de
luidsprekervoet hebt gemaakt (zorg dat de gaten
overeenkomen met de gaten in de luidsprekersteun), bevestigt
u de luidspreker met los verkrijgbare houtschroeven aan de
luidsprekersteun, zoals hieronder is afgebeeld.
Luidspreker-
voet
Luidspreker-
steun
Bevestigingsmoer
Los verkrijgbare
houtschroef
Schroefgaten voor
het bevestigen van
de luidspreker
Onderhoud van de luidspreker en standaard
• Gebruik een poetsdoek of een droge doek om stof en vuil
te verwijderen.
• Als de luidspreker of standaard erg vuil is, kunt u een
zachte doek bevochtigen met een neutraal
reinigingsmiddel dat 5 tot 6 maal verdund is met water.
Veeg naderhand met een droge doek na. Gebruik geen
meubelwas of sterke reinigingsmiddelen.
• Gebruik nooit witte spiritus, benzine, insecticidenspray
of andere chemische middelen op of in de buurt van de
luidspreker of standaard, want deze kunnen de
afwerking aantasten.
Technische gegevens
Buitenafmetingen ................... 400 (B)
×
604 (H)
×
513 (D) mm
Gewicht ............................................................................ 17,8 kg
Bijgeleverde accessoires
Standaardvoetplaten .................................................................. 2
Luidsprekersteunen ................................................................... 2
Stelen .......................................................................................... 4
Pennen (met gemonteerde moeren) [SBA6053] ..................... 8
Penvoetjes [SLA1057] ................................................................ 8
Schroeven (drukschroef, M5xL62) [SBA6050] ......................... 4
Schroeven (drukschroef, M5xL36) [SBA6048] ......................... 4
Schroeven (drukschroef, M6xL40) [SBA6054] ....................... 24
Veerringen [SBE6005] ................................................................ 4
Vulringen [SBE6006] .................................................................. 4
Deze gebruiksaanwijzing [SRD6045] ....................................... 1
Opmerking
• Wijzigingen in ontwerp en technische gegevens
voorbehouden, zonder voorafgaande kennisgeving.
• De productnummers staan hierboven tussen rechte
haken.
Deponeer dit product niet bij het gewone huishoudelijk
afval wanneer u het wilt verwijderen. Er bestaat een
speciaal wettelijk voorgeschreven verzamelsysteem
voor de juiste behandeling, het opnieuw bruikbaar
maken en de recycling van gebruikte elektronische
producten.
In de 25 lidstaten van de EU, Zwitserland en Noorwegen kunnen
particulieren hun gebruikte elektronische producten gratis bij de
daarvoor bestemde verzamelplaatsen of een verkooppunt (indien
u aldaar een gelijkwaardig nieuw product koopt) inleveren.
Indien u zich in een ander dan bovengenoemd land bevindt kunt
u contact opnemen met de plaatselijke overheid voor informatie
over de juiste verwijdering van het product.
Zodoende zorgt u ervoor dat het verwijderde product op de juiste
wijze wordt behandeld, opnieuw bruikbaar wordt gemaakt, t
gerecycleerd en het niet schadelijk is voor de gezondheid en het
milieu.
Onderdeelnaam
• Beschermstuk (onder)
• Beschermstuk (midden)
• Beschermstuk (boven)
• Beschermstuk
• Pakkinghouder
• Beschermblad
• Beschermblad
• Beschermblad
Onderdeelnummer
SHA6095
SHA6096
SHA6097
SHA6098
SHG6150
SHC6044
SHC6045
SHC6046
Vervangingsonderdelen
Uitgegeven door Pioneer Corporation.
Copyright © 2005 Pioneer Corporation.
Alle rechten voorbehouden.
17
Sp
Espa
ñ
ol
Nederlands
Muchas gracias por la adquisición de este producto Pioneer.
Lea todo este manual de instrucciones para aprender a
realizar correctamente el montaje y la utilización. Después
de haber leído las instrucciones, guarde el manual en un
lugar seguro para poderlo consultar en el futuro.
Antes de comenzar
Antes de configurar su sistema de altavoces, le
recomendamos leer todo el manual de instrucciones de su
sistema.
Precaución
• Emplee sólo los tornillos suministrados para fijar el
altavoz al soporte de altavoz.
• No ponga el soporte sobre una superficie inestable ni/o
inclinada. El soporte y el altavoz podrían caerse y
ocasionar heridas.
• No lo emplee con ningún otro sistema de altavoces que
no sea para el que se ha diseñado la unidad. El soporte
podría desplomarse y dañarse y/o el altavoz podría
caerse y ocasionar heridas.
• Cuando desee mover el altavoz y el soporte, primero
extraiga el altavoz del soporte, y luego mueva el soporte,
tomándolo por los dos pilares.
Instalación de los soportes de altavoz
Ponga el soporte sobre una superficie estable y nivelada; la
colocación del soporte sobre una superficie inestable puede
ser peligrosa.
Cuando monte el altavoz, recuerde que el tono se ve afectado
por la posición del altavoz.
Si los graves son insuficientes, acerque más el altavoz a la
pared. El sonido de graves más potente se obtiene cuando se
pone el altavoz contra la pared. Si los graves son demasiado
potentes, produciendo un tono apagado, separe el altavoz de
la pared. También puede ser eficaz colocar el altavoz contra
una cortina gruesa.
50 cm
20 cm
Ajuste la posición como sea necesario para obtener el
sonido óptimo del sistema.
Importante
• Pioneer no se hace responsable por ningún tipo de daño
debido al montaje, a la instalación incorrecta, al
refuerzo insuficiente, a la utilización indebida del
producto, a desastres naturales, etc.
Montaje de los soportes de altavoz
Monte los soportes de altavoz como se ilustra a continuación.
Tenga presente que necesitará un destornillador de punta
plana para realizar el montaje. La ilustración siguiente
muestra el soporte de altavoz completamente montado:
Orificios de
tornillo para
fijar el altavoz
Soporte
de altavoz
Base del
soporte
Pilares del
soporte
•
Alinee los orificios de tornillo de la base del soporte y
del soporte de altavoz con los orificios de tornillo de los
dos pilares, e inserte entonces los tornillos y apriételos.
Tornillos (prisioneros, M6xL40)
40 mm
Negro
Tornillos (prisioneros, M6xL40)
Tuerca
Perno
(SBA6053)
Base de perno
(SLA1057)
40 mm
Negro
Soporte
de altavoz
Base del
soporte
Pilares del
soporte
Tenga en cuenta que el
soporte de altavoz tiene
orificios de tornillo hundidos.
(SBA6054)
(SBA6054)
Precaución
• Realice el montaje del soporte sobre una superficie
plana que sea relativamente blanda (como encima de
una alfombra).
• Asegúrese de insertar los tornillos en los orificios de
tornillo como se muestra arriba (con la cabeza del
tornillo escondida) cuando fije el altavoz. El montaje
incorrecto podría ocasionar daños o heridas si el altavoz
se cayera del soporte.
18
Sp
Utilización de los pernos
Los soportes de altavoz tienen pernos que usted podrá
utilizar para aislar del piso el altavoz. Se recomienda emplear
los pernos cuando se ponen los soportes sobre una alfombra
gruesa (para mayor estabilidad), o para mejorar el sonido
cuando se ponen los soportes sobre una superficie dura
reverberante (como pueda ser un piso de hormigón o de
madera). Emplee las bases de los pernos para evitar rayadas
en el piso o en otras superficies donde se pongan los
soportes.
Perno
Tuerca
Placa de la base del soporte
1
2
1
Coloque los pernos en las tuercas suministradas.
2
Monte los cuatro pernos en las piezas metálicas
roscadas que hay en la base del soporte de altavoz.
3
Seleccione la ubicación de instalación del altavoz y
luego ponga las bases de los pernos en el piso.
4
Ponga el soporte de modo que los pernos se apoyen
en las bases de los pernos sobre el piso.
Antes de poner el altavoz sobre el soporte de altavoz,
asegúrese de que el soporte esté estable y se apoye por igual
sobre los cuatro pernos.
Precaución
• Tenga presente que estos pernos son metálicos y
puntiagudos y pueden dañar la moqueta. Asegúrese de
poner un paño o base adecuada antes del montaje.
• Las bases de los pernos deben ponerse como se
muestra a continuación (con la parte hueca arriba).
• Utilice las bases de los pernos suministradas para no
causar daños en la superficie cuando coloque el
soporte.
Montaje de los altavoces en los soportes
Para evitar accidentes y heridas, emplee tornillos para fijar
los altavoces a los soportes de altavoz.
Montaje con el sistema de altavoces S-2EX
Si emplea el sistema de altavoces S-2EX, tenga presente que
hay una tuerca de fijación provista en la base de altavoz (vea
la ilustración siguiente).
Cuando utilice los pernos de altavoz:
Ponga las bases de los pernos de altavoz en los cuatro
orificios del soporte del altavoz, y fije entonces el altavoz al
soporte de altavoz empleando la arandela, la arandela de
resorte y los tornillos de 62 mm como se muestra a
continuación.
(SBA6050)
Base del
altavoz
Soporte de
altavoz
Arandela (SBE6006)
Base de los
pernosdel
altavoz
Tuerca de
fijación
Arandela de resorte
(SBE6005)
Tornillos
(prisioneros, M5xL62)
62 mm
Negro
Orificios de
tornillo para
fijar el altavoz
Cuando no utilice los pernos de altavoz:
Fije el altavoz al soporte de altavoz empleando la arandela, la
arandela de resorte y los tornillos de 36 mm como se
muestra a continuación.
(SBA6048)
Arandela (SBE6006)
Tornillos
(prisioneros, M5xL36)
36 mm
Negro
Arandela de resorte
(SBE6005)
Base del
altavoz
Soporte de
altavoz
Tuerca de
fijación
Orificios de
tornillo para
fijar el altavoz

19
Sp
Espa
ñ
ol
Montaje con otro sistema de altavoces
Si emplea un sistema de altavoces que no es el S-2EX, tenga
presente que deberá emplear una taladradora (o herramienta
semejante) para abrir orificios en la base de altavoz para
poderlo fijar el soporte. Asegúrese de que el peso del altavoz
no exceda de 29 kg.
Después de haber abierto los orificios en la base del altavoz
en las posiciones indicadas (asegúrese de alinearlos con los
orificios de tornillo del soporte de altavoz), fije el altavoz al
soporte de altavoz con tornillos para madera, de venta en los
establecimientos del ramo, como se muestra a continuación.
Base del
altavoz
Soporte de
altavoz
Tuerca de fijación
Tornillo para madera
de venta en los
establecimientos
del ramo
Orificios de
tornillo para
fijar el altavoz
Mantenimiento de la caja acústica y del soporte
• Utilice un paño abrillantador o un paño seco para
limpiar el polvo o suciedad.
• Si la caja acústica o el soporte están muy sucios,
emplee un paño suave humedecido en limpiador neutro
diluido en 5 ó 6 partes de agua. Finalmente, frótelo otra
vez con un paño seco. No emplee cera para muebles u
otros productos de limpieza.
• No utilice nunca, ni en la caja acústica o soporte como
cerca de ellos, disolventes, bencina, pulverizadores de
insecticida u otros productos químicos, ya que estos
productos podrían corroer las superficies.
Especificaciones
Dimensiones externas ....... 400 (An)
×
604 (Al)
×
513 (Prf) mm
Peso .................................................................................. 17,8 kg
Accesorios suministrados
Placas de la base del soporte ................................................... 2
Soportes de altavoz .................................................................... 2
Pilares ......................................................................................... 4
Pernos (con tuercas incorporadas) [SBA6053] ....................... 8
Bases de pernos [SLA1057] ...................................................... 8
Tornillos (prisioneros, M5xL62) [SBA6050] .............................. 4
Tornillos (prisioneros, M5xL36) [SBA6048] .............................. 4
Tornillos (prisioneros, M6xL40) [SBA6054] ............................ 24
Arandelas de resorte [SBE6005] ............................................... 4
Arandelas [SBE6006] ................................................................. 4
Este manual de instrucciones [SRD6045] ............................... 1
Nota
• Especificaciones y diseño sujetos a posibles cambios
sin previo aviso debido a mejoras del producto.
• Los números de producto se mencionan arriba entre
corchetes.
Si desea deshacerse de este producto, no lo mezcle
con los residuos generales de su hogar. De
conformidad con la legislación vigente, existe un
sistema de recogida distinto para los productos
electrónicos que requieren un procedimiento adecuado
de tratamiento, recuperación y reciclado.
Las viviendas privadas en los 25 estados miembros de la UE, en
Suiza y Noruega pueden devolver gratuitamente sus productos
electrónicos usados en las instalaciones de recolección
previstas o bien en las instalaciones de minoristas (si adquieren
un producto similar nuevo).
En el caso de los países que no se han mencionado en el
párrafo anterior, póngase en contacto con sus autoridades
locales a fin de conocer el método de eliminación correcto.
Al actuar siguiendo estas instrucciones, se asegurará de que el
producto de desecho se somete a los procesos de tratamiento,
recuperación y reciclaje necesarios, con lo que se previenen los
efectos negativos potenciales para el entorno y la salud
humana.
Nombre de pieza
• Protector (Inferior)
• Protector (Intermedio)
• Protector (Superior)
• Protector
• Caja de embalaje
• Lámina de protección
• Lámina de protección
• Lámina de protección
N.° de pieza
SHA6095
SHA6096
SHA6097
SHA6098
SHG6150
SHC6044
SHC6045
SHC6046
Número de las piezas de reemplazo
Publicado por Pioneer Corporation.
Copyright © 2005 Pioneer Corporation.
Todos los derechos reservados.

20
Po
Obrigado por ter adquirido este produto Pioneer. Leia por
favor estas instruções de utilização na sua totalidade para
ficar a saber como montar e utilizar correctamente o seu
produto. Depois de terminar a leitura destas instruções,
guarde-as num local seguro para referência futura.
Antes de começar
Antes de instalar o seu sistema de colunas, recomendamos
a leitura completa dos manuais de instruções do seu
sistema.
Precaução
• Quando fixar a coluna ao seu suporte, utilize apenas os
parafusos fornecidos.
• Não coloque o suporte numa superfície instável ou
inclinada. O suporte pode cair, causando ferimentos.
• Não utilize nenhum sistema de colunas diferente
daquele para o qual este aparelho foi concebido. O
suporte pode abater e ficar danificado, e a coluna pode
cair e causar ferimentos.
• Quando deslocar a coluna e o seu suporte, retire
primeiro a coluna do suporte. Desloque depois o
suporte, segurando-o pelos dois pés.
Instalação dos suportes de coluna
Coloque o suporte numa superfície estável e plana. A
disposição do suporte numa superfície instável pode ser
perigosa.
Quando colocar a coluna, lembre-se que o timbre é afectado
pela posição da coluna.
Se os baixos forem insuficientes, aproxime a coluna de uma
parede. Os baixos mais ricos são obtidos quando a coluna
está encostada a uma parede. Se os baixos forem demasiado
fortes, produzindo um som abafado, afaste a coluna da
parede. A colocação da coluna de encontro a uma cortina
grossa também pode ajudar.
50 cm
20 cm
Ajuste a posição das colunas de modo a obter do seu
sistema um som óptimo.
Importante
• A Pioneer não assume qualquer responsabilidade sobre
danos resultants da montagem, fixação deficiente,
reforço insuficiente, má utilização do produto, actos da
natureza, etc.
Montagem dos suportes das colunas
Monte os suportes, tal como ilustrado abaixo. Note que
precisa de uma chave de parafusos para a montagem. A
ilustração seguinte apresenta o suporte da coluna
completamente montado:
Furos para
parafusos
para fixar a
coluna
Suporte da coluna
Base do suporte
Pés do suporte
•
Alinhe os furos dos parafusos na base do suporte e
no suporte da coluna com os furos nos pés do suporte.
Insira os parafusos e aperte.
Parafusos (Cabeça de embutir,
M6xL40)
40 mm
Preto
Parafusos (Cabeça de embutir, M6xL40)
Porca
Espigão (SBA6053)
Base do espigão
(SLA1057)
40 mm
Preto
Suporte
da coluna
Base do
suporte
Pés do
suporte
Note que o suporte da coluna
dispõe de encastres para as
cabeças dos parafusos.
(SBA6054)
(SBA6054)
Precaução
• Certifique-se que monta o suporte numa superfície
plana e relativamente macia (tal como um tapete).
• Quando fixar a coluna, certifique-se que os parafusos
são introduzidos nos seus furos tal como ilustrado
acima (com a cabeça do parafuso embutida). Uma
montagem incorrecta pode resultar em danos ou
ferimentos, se a coluna cair do seu suporte.
- 1
- 2
