Pioneer DEH-3300UB: Head unit Basic Operations Menu operations identical for function settings/audio adjustments/initial settings/lists Display indication
Head unit Basic Operations Menu operations identical for function settings/audio adjustments/initial settings/lists Display indication: Pioneer DEH-3300UB
Table of contents
- In case of trouble About this unit Demo mode
- Head unit Basic Operations Menu operations identical for function settings/audio adjustments/initial settings/lists Display indication
- Tuner
- CD/CD-R/CD-RW and US B storage devices iPod
- Audio Adjustments
- Initial Settings Selecting the illumination color
- Using an AUX source Sound muting
- Power cord Installation DIN front/rear mount Power amp (sold separately)
- Troubleshooting Error messages Removing and re-attaching the front panel
- Handling guidelines
- Compressed audio compatibility (disc, USB) Sequence of audio files iPod compatibility
- Russian character chart Copyright and trademark Specifications
Section
Section
02
Operating this unit
Operating this unit
02
English
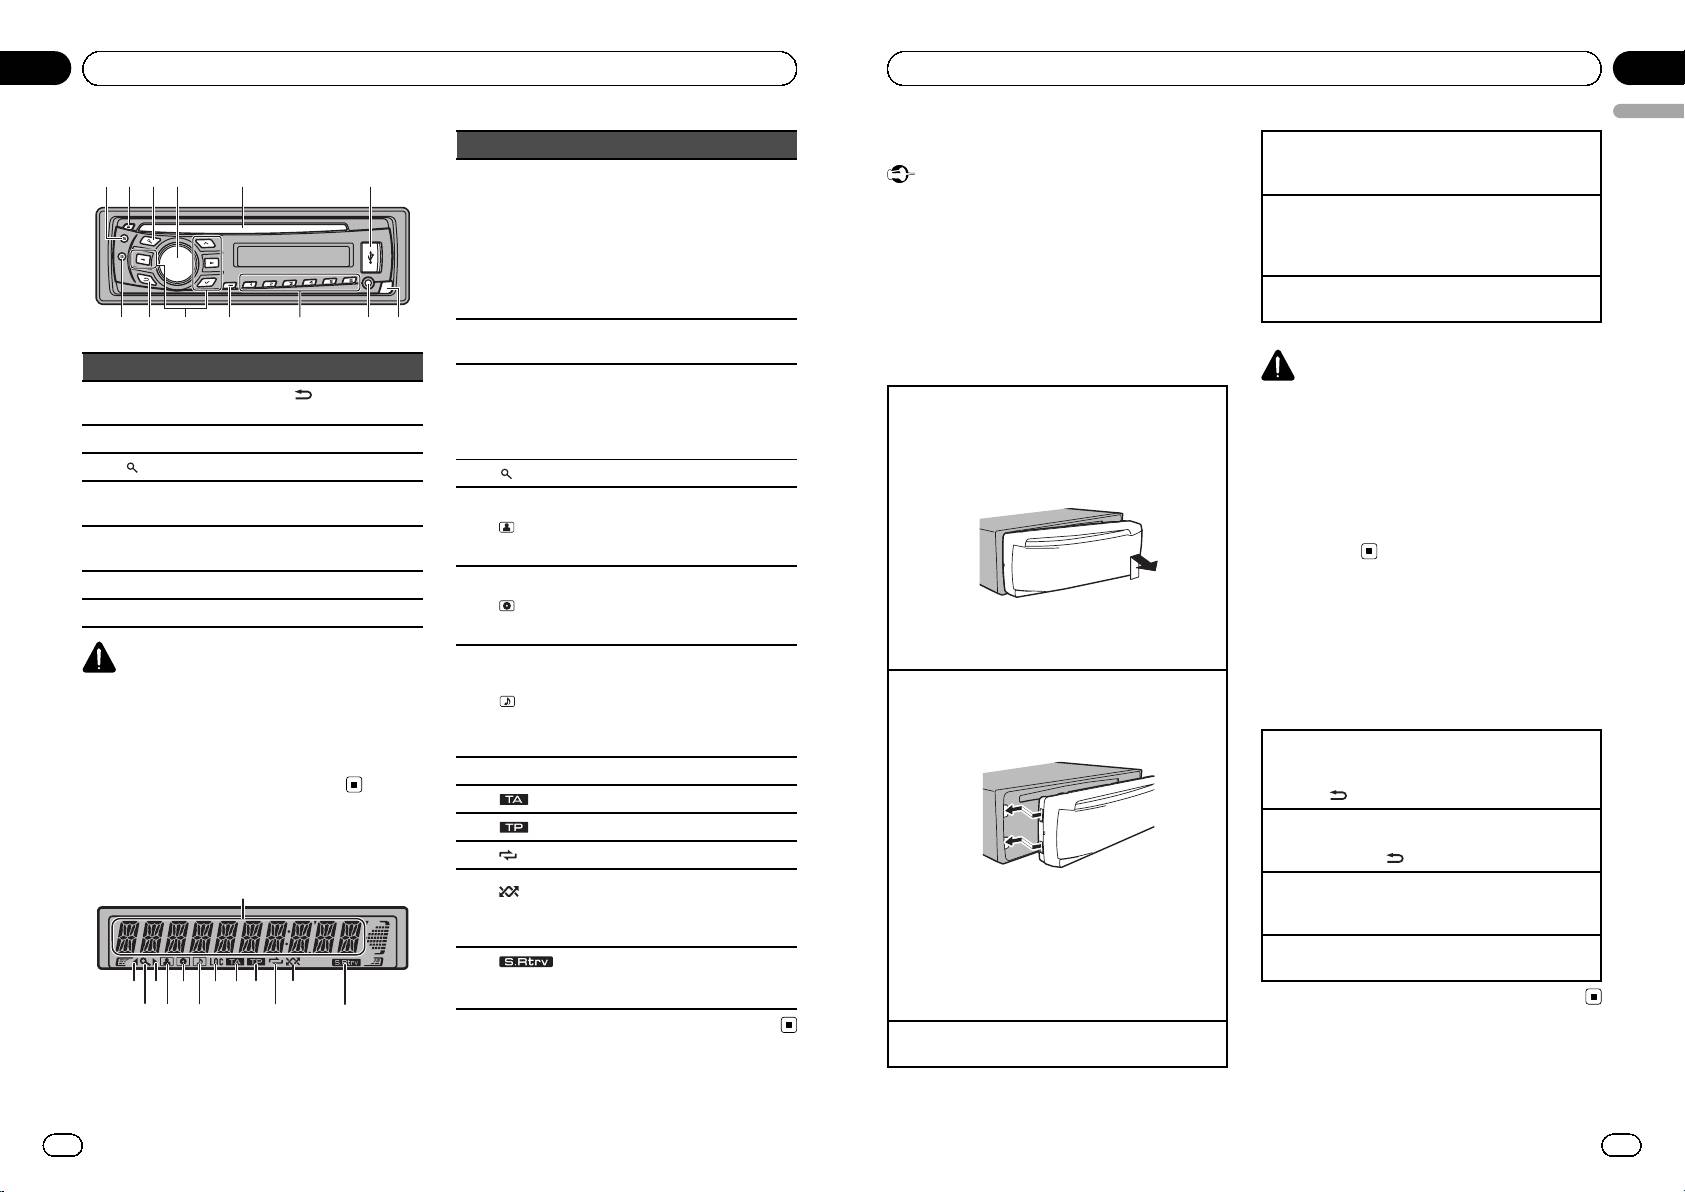
Head unit
Indicator State
Basic Operations
Turning the unit off
1 Press and hold S (SRC/OFF) until the unit turns
1
24 5 63
! Tuner: band and frequency
Important
off.
! RDS: program service name,
! Handle gently when removing or attaching
PTY information and other lit-
Selecting a source
Main dis-
the front panel.
1 Press S (SRC/OFF) to cycle between:
1
play sec-
eral information
! Avoid subjecting the front panel to excessive
tion
! Built-in CD, USB storage de-
TUNER (tuner)—CD (built-in CD player)—USB
shock.
vice and iPod: elapsed play-
(USB)/iPod (iPod)—AUX (AUX)
back time and text
! Keep the front panel out of direct sunlight and
Adjusting the volume
information
high temperatures.
1 Turn M.C. to adjust the volume.
78 a b c d9
! To avoid damaging the device or vehicle inter-
An upper tier of the folder or
2 c
menu exists.
ior, remove any cables and devices attached
Part Part
to the front panel before detaching it.
CAUTION
A lower tier of the folder or menu
(Back/display/
exists.
For safety reasons, park your vehicle when remov-
1 S (SRC/OFF) 8
Removing the front panel to protect your unit from
scroll)
3 d
It flashes when a song/album re-
theft
ing the front panel.
lated to the song currently playing
2 h (eject) 9 a/b/c/d
1 Press the detach button to release the front
is selected from iPod.
panel.
Note
3
(list) a TA/NEWS
4
(list) The list function is operated.
2 Push the front panel upward and pull it toward
When this unit’s blue/white lead is connected to
MULTI-CONTROL
you.
the vehicle’s auto-antenna relay control terminal,
4
b 1 to 6
The disc (track) artist name is dis-
(M.C.)
played.
the vehicle’s antenna extends when this unit’s
5
(artist)
Artist search refinement of the
source is turned on. To retract the antenna, turn
AUX input jack (3.5
5 Disc loading slot c
mm stereo jack)
iPod browsing function is in use.
the source off.
6 USB port d Detach button
The disc (album) name is dis-
played.
7 B (BAND/ESC)
6
(disc)
Album search refinement of the
Menu operations identical
iPod browsing function is in use.
3 Always keep the detached front panel in a protec-
for function settings/audio
CAUTION
The track (song) name is dis-
tion device such as a protection case.
! Use an optional Pioneer USB cable (CD-U50E)
played.
Re-attaching the front panel
adjustments/initial
A playable audio file has been se-
to connect the USB audio player/USB mem-
7
(song)
lected while operating the list.
1 Slide the front panel to the left.
settings/lists
ory as any device connected directly to the
Song search refinement of the
Make sure to insert the tabs on the left side of the
unit will protrude out from the unit and may
iPod browsing function is in use.
head unit into the slots on the front panel.
Returning to the previous display
be dangerous.
Returning to the previous list (the folder one level
8 LOC Local seek tuning is on.
higher)
! Do not use unauthorized products.
9
(TA) TA function is on.
1 Press
.
a
(TP) A TP station is tuned in.
Returning to the main menu
Returning to the top tier of list
Display indication
b
(repeat) Track or folder repeat is on.
1 Press and hold
.
Random play is on.
1
(ran-
Returning to the ordinary display
The iPod source is selected and
2 Press the right side of the front panel until it is
c
dom/shuf-
Canceling the initial setting menu
the shuffle or shuffle all function
firmly seated.
fle)
1 Press B (BAND/ESC).
is on.
If you cannot attach the front panel to the head
unit successfully, make sure that you are placing
Returning to the ordinary display from the list
The sound retriever function is
1 Press B (BAND/ESC).
d
(sound re-
the front panel onto the head unit correctly. For-
2
63
8 a
9
c
on.
triever)
cing the front panel into place may result in da-
mage to the front panel or head unit.
4
5
7
b
d
Turning the unit on
1 Press S (SRC/OFF) to turn the unit on.
4
En
En
5
<CRD4524-A/N>3
