Pioneer KRL-46V: instruction
Class: Household, kitchen appliances, electronics and equipment
Type: Home Theater System
Manual for Pioneer KRL-46V
Table of contents
- Contents
- Important Safety Precautions
- Remote control unit
- Controlling other equipment using the supplied remote control unit Presetting manufacture codes Manufacture codes STB DVD
- DVR VCR BD VCR
- Using with other equipment (STB) Using with other equipment (VCR)
- Using with other equipment (DVD/DVR)
- Trademarks
- TV (Front view) TV (Rear view)
- Preparation Supplied accessories Attaching the stand unit
- Preparation Inserting the batteries Using the remote control unit
- Installation precautions
- Quick guide Initial installation overview
- Before turning on the power
- Initial auto installation
- Watching TV Daily operation
- EPG (Electronic Programme Guide) EPG Overview Useful settings for using EPG
- Selecting a programme using EPG
- Timer recording using EPG Cancelling the timer recording
- Teletext Using the MHEG-5 application (UK only)
- Connecting external devices Introduction to connections
- HDMI connection Component connection S-VIDEO/VIDEO connection
- SCART connection Controlling devices with SCART using i/o link.A
- Speaker/amplifier connection
- Inserting a smart card
- HDMI CONTROL Controlling HDMI devices using HDMI CONTROL
- HDMI CONTROL connection HDMI CONTROL Setup
- Operating an HDMI CONTROL device
- Menu operation What is the HOME MENU?
- Basic adjustment Picture Settings
- Sound Settings Power Save Settings
- Channel Settings
- Analogue channel settings
- Password/Parental lock settings Language Settings (language, subtitle, multi audio)
- Useful Viewing functions Selecting the picture size
- Other picture and audio settings
- Display Settings
- Other useful features Setting when using external devices Additional features
- Connecting a PC Connecting a PC Displaying a PC image on the screen
- Selecting input resolution
- RS-232C port specifications
- PC compatibility chart RS-232C command list
- Appendix Troubleshooting
- Updating your TV via DVB-T Reset Identification
- Specifications
- End of life disposal
KRL46V_C1C4.pdf 2008/07/04 13:09:26
Примечание:
В соответствии со статьей 5 Закона Российской Федерации “О защите прав потребителя” и
Указанием Правительства Российской Федерации № 720 от 16 июня 1997 года, корпорация
Pioneer Europe NV устанавливает условие на следующую продолжительность срока
службы официально поставляемых на Российский рынок товаров.
Аудио и видеооборудование: 7 лет
Переносное аудиооборудование: 6 лет
Другое оборудование (наушники, микрофон и т.д.): 5 лет
Автомобильная электроника: 6 лет
D3-7-10-6_A_Ru
Discover the benefits of registering your product online at
http://www.pioneer.co.uk
(or http://www.pioneer.eu).
Découvrez les nombreux avantages offerts en enregistrant votre produit en ligne
maintenant sur
http://www.pioneer.fr
(ou http://www.pioneer.eu).
Bitte nutzen Sie die Möglichkeit zur Registrierung Ihres Produktes unter
http://www.pioneer.de
(oder http://www.pioneer.eu)
Registra il tuo prodotto su
http://www.pioneer.it
(o http://www.pioneer.eu) e
scopri subito quali vantaggi puoi ottenere!
Ontdek nu de voordelen van online registratie! Registreer uw Pioneer product via
C
http://www.pioneer.nl - http://www.pioneer.be
(of http://www.pioneer.eu)
M
Registre su producto en
http://www.pioneer.es
(o en http://www.pioneer.eu)
Descubra los beneficios de registrarse on-line:
Y
Зарегистрируйте Baшe изделие на
http://www.pioneer-rus.ru
(или
CM
http://www.pioneer.eu). Oзнакомьтесь с преимуществами регистрации в Интернет
MY
CY
CMY
K
PIONEER CORPORATION
4-1, Meguro 1-Chome, Meguro-ku, Tokyo 153-8654, Japan
Корпорация Пайонир
4-1, Мегуро 1-Чоме, Мегуро-ку, Токио 153-8654, Япония
PIONEER ELECTRONICS (USA) INC.
P.O. BOX 1540, Long Beach, California 90801-1540, U.S.A. TEL: (800) 421-1404
PIONEER ELECTRONICS OF CANADA, INC.
300 Allstate Parkway, Markham, Ontario L3R 0P2, Canada TEL: 1-877-283-5901, 905-479-4411
PIONEER EUROPE NV
Haven 1087, Keetberglaan 1, B-9120 Melsele, Belgium TEL: 03/570.05.11
PIONEER ELECTRONICS ASIACENTRE PTE. LTD.
253 Alexandra Road, #04-01, Singapore 159936 TEL: 65-6472-7555
PIONEER ELECTRONICS AUSTRALIA PTY. LTD.
178-184 Boundary Road, Braeside, Victoria 3195, Australia, TEL: (03) 9586-6300
PIONEER ELECTRONICS DE MEXICO S.A. DE C.V.
Blvd.Manuel Avila Camacho 138 10 piso Col.Lomas de Chapultepec, Mexico, D.F. 11000 TEL: 55-9178-4270
K002_Ru
Published by Pioneer Corporation.
Copyright © 2008 Pioneer Corporation.
All rights reserved.
Publication de Pioneer Corporation.
© 2008 Pioneer Corporation.
Tous droits de reproduction et de traduction réservés.
Printed in Spain
<TINS-D818WJZZ>
Imprimé en Espagne
1101
96
(1023.4)
(575.6)
(575,6)
(1023,4)
761
453
63 698
(122.5)
(122,5)
550
325
400
175
400

ENGLISH
OPERATION MANUAL
•
The illustrations and the OSD (On-Screen Display) in this operation manual are for explanation purposes and may vary slightly
from the actual operations.
•
The examples used throughout this manual are based on the KRL-46V model.
Contents
ENGLISH
Contents ............................................................................. 1
Menu operation................................................................ 29
Introduction ........................................................................ 2
What is the HOME MENU? ......................................... 29
Dear Pioneer customer ................................................. 2
Common operations .............................................. 29
Important Safety Precautions ........................................ 2
Basic adjustment ............................................................. 30
Remote control unit.......................................................3
Picture Settings ........................................................... 30
Controlling other equipment using the supplied
AV SELECTION ...................................................... 31
remote control unit ................................................ 4
Sound Settings ........................................................... 31
Trademarks ................................................................... 8
Power Save Settings ................................................... 31
TV (Front view) .............................................................. 9
Channel Settings ......................................................... 32
TV (Rear view) ............................................................... 9
Auto Installation ..................................................... 32
Preparation ...................................................................... 10
Digital channel settings .......................................... 32
Supplied accessories .................................................. 10
Analogue channel settings ..................................... 33
Attaching the stand unit .............................................. 10
Password/Parental lock settings ............................ 34
Inserting the batteries .................................................. 11
Language Settings (language, subtitle, multi audio) ..... 34
Using the remote control unit ...................................... 11
Useful Viewing functions ................................................ 35
Cautions regarding the remote control unit ............. 11
Selecting the picture size ............................................ 35
Installation precautions .......................................... 12
Selecting the WSS (Wide Screen Signalling)
Quick guide ...................................................................... 13
picture size automatically ..................................... 35
Initial installation overview ............................................ 13
Selecting the WSS (Wide Screen Signalling)
Before turning on the power........................................ 14
picture size manually ........................................... 35
Bundling the cables ............................................... 14
Selecting the picture size manually ......................... 35
Initial auto installation .................................................. 15
Selecting the recording picture size manually ......... 36
Checking signal strength and channel strength ...... 15
Selecting the HDMI picture size automatically ........ 36
Watching TV ..................................................................... 16
Other picture and audio settings ................................. 36
Daily operation ............................................................ 16
Adjusting image position ........................................ 36
Switching on/off ..................................................... 16
Reducing noise on the screen ................................ 36
Switching between analogue and
Automatic volume adjustment ................................ 36
digital broadcasts ................................................ 16
Emphasising dialogue ............................................ 36
Changing channels ................................................ 16
Outputting audio only ............................................. 36
Selecting an external video source ......................... 16
Display Settings .......................................................... 37
Selecting a sound mode ........................................ 16
Channel display ..................................................... 37
EPG (Electronic Programme Guide) ............................. 17
Time and Title display ............................................ 37
EPG Overview ............................................................. 17
Other useful features ...................................................... 38
Useful settings for using EPG ...................................... 17
Setting when using external devices ........................... 38
Selecting a programme using EPG.............................. 18
Input source settings ............................................. 38
Timer recording using EPG ......................................... 19
Skipping specified inputs ....................................... 38
Cancelling the timer recording ..................................... 19
Colour system settings .......................................... 38
Teletext ....................................................................... 20
Additional features ...................................................... 38
Using the MHEG-5 application (UK only) ..................... 20
Connecting a PC .............................................................. 39
Connecting external devices .......................................... 21
Connecting a PC ........................................................39
Introduction to connections ......................................... 21
Displaying a PC image on the screen .......................... 39
HDMI connection ................................................... 22
Selecting the picture size ....................................... 39
Component connection ......................................... 22
Adjusting the PC image automatically .................... 40
S-VIDEO/VIDEO connection .................................. 22
Adjusting the PC image manually ........................... 40
SCART connection ................................................ 23
Selecting input resolution ............................................ 40
Controlling devices with SCART using i/o link.A ..... 23
RS-232C port specifications ....................................... 41
Speaker/amplifier connection ................................. 24
PC compatibility chart ................................................. 42
Inserting a smart card ................................................. 25
RS-232C command list............................................... 42
HDMI CONTROL .............................................................. 26
Appendix .......................................................................... 43
Controlling HDMI devices using HDMI CONTROL ....... 26
Troubleshooting .......................................................... 43
HDMI CONTROL connection ...................................... 27
Updating your TV via DVB-T ....................................... 44
HDMI CONTROL Setup .............................................. 27
Reset .......................................................................... 44
Operating an HDMI CONTROL device ........................ 28
Identification................................................................ 44
Specifications .............................................................45
End of life disposal ...................................................... 46
1
KRL46V_GB.indd 1 2008/07/09 14:08:32
Introduction
Dear Pioneer customer
Thank you for your purchase of the Pioneer Flat screen TV. To ensure safety and many years of trouble-free
operation of your product, please read the Important Safety Precautions carefully before using this product.
Important Safety Precautions
•
Cleaning—Unplug the AC cord from the AC outlet before cleaning the product. Use a damp cloth to clean the product. Do not
use liquid cleaners or aerosol cleaners.
•
Water and moisture—Do not use the product near water, such as bathtub, washbasin, kitchen sink, laundry tub, swimming pool
and in a wet basement.
•
Do not place vases or any other water-filled containers on this product. The water may spill onto the product
causing fire or electric shock.
•
Stand—Do not place the product on an unstable cart, stand, tripod or table. Doing so can cause the product
to fall, resulting in serious personal injuries as well as damage to the product. Use only a cart, stand, tripod,
bracket or table recommended by the manufacturer or sold with the product. When mounting the product on
a wall, be sure to follow the manufacturer’s instructions. Use only the mounting hardware recommended by the
manufacturer.
•
When relocating the product placed on a cart, it must be moved with utmost care. Sudden stops, excessive
force and uneven floor surface can cause the product to fall from the cart.
•
Ventilation—The vents and other openings in the cabinet are designed for ventilation. Do not cover or block
these vents and openings since insufficient ventilation can cause overheating and/or shorten the life of the
product. Do not place the product on a bed, sofa, rug or other similar surface, since they can block ventilation
openings. This product is not designed for built-in installation; do not place the product in an enclosed place
such as a bookcase or rack, unless proper ventilation is provided or the manufacturer’s instructions are
followed.
•
The LCD panel used in this product is made of glass. Therefore, it can break when the product is dropped or
impact applied. If the LCD panel is broken, be careful not to be injured by broken glass.
•
Heat sources—Keep the product away from heat sources such as radiators, heaters, stoves and other heat-
generating products (including amplifiers).
•
To prevent fire, never place any type of candle or naked flames on the top or near the TV set.
•
To prevent fire or shock hazard, do not place the AC cord under the TV set or other heavy items.
•
Do not display a still picture for a long time, as this could cause an afterimage to remain.
•
There is power consumption always if main plug is connected.
•
Entering of objects and liquids - Never insert an object into the product through vents or openings. High voltage
flows in the product, and inserting an object can cause electric shock and/ or short internal parts. For the same
reason, do not spill water or liquid on the product.
•
Servicing—Do not attempt to service the product yourself. Removing covers can expose you to high voltage and
other dangerous conditions. Request a qualified person to perform servicing.
The LCD panel is a very high technology product, giving you fine picture details.
Due to the very large number of pixels, occasionally a few non-active pixels may appear on the screen as a fixed point of
blue, green or red. This is within product specifications and does not constitute a fault.
Precautions when transporting the TV
Be sure to always carry the TV by two people holding it with two hands—one hand on each side of the TV.
WARNING:
This is a Class A product. In a domestic
environment this product may cause radio
interference in which case the user may be required
to take adequate measures.
2
KRL46V_GB.indd 2 2008/07/09 14:08:32
Introduction
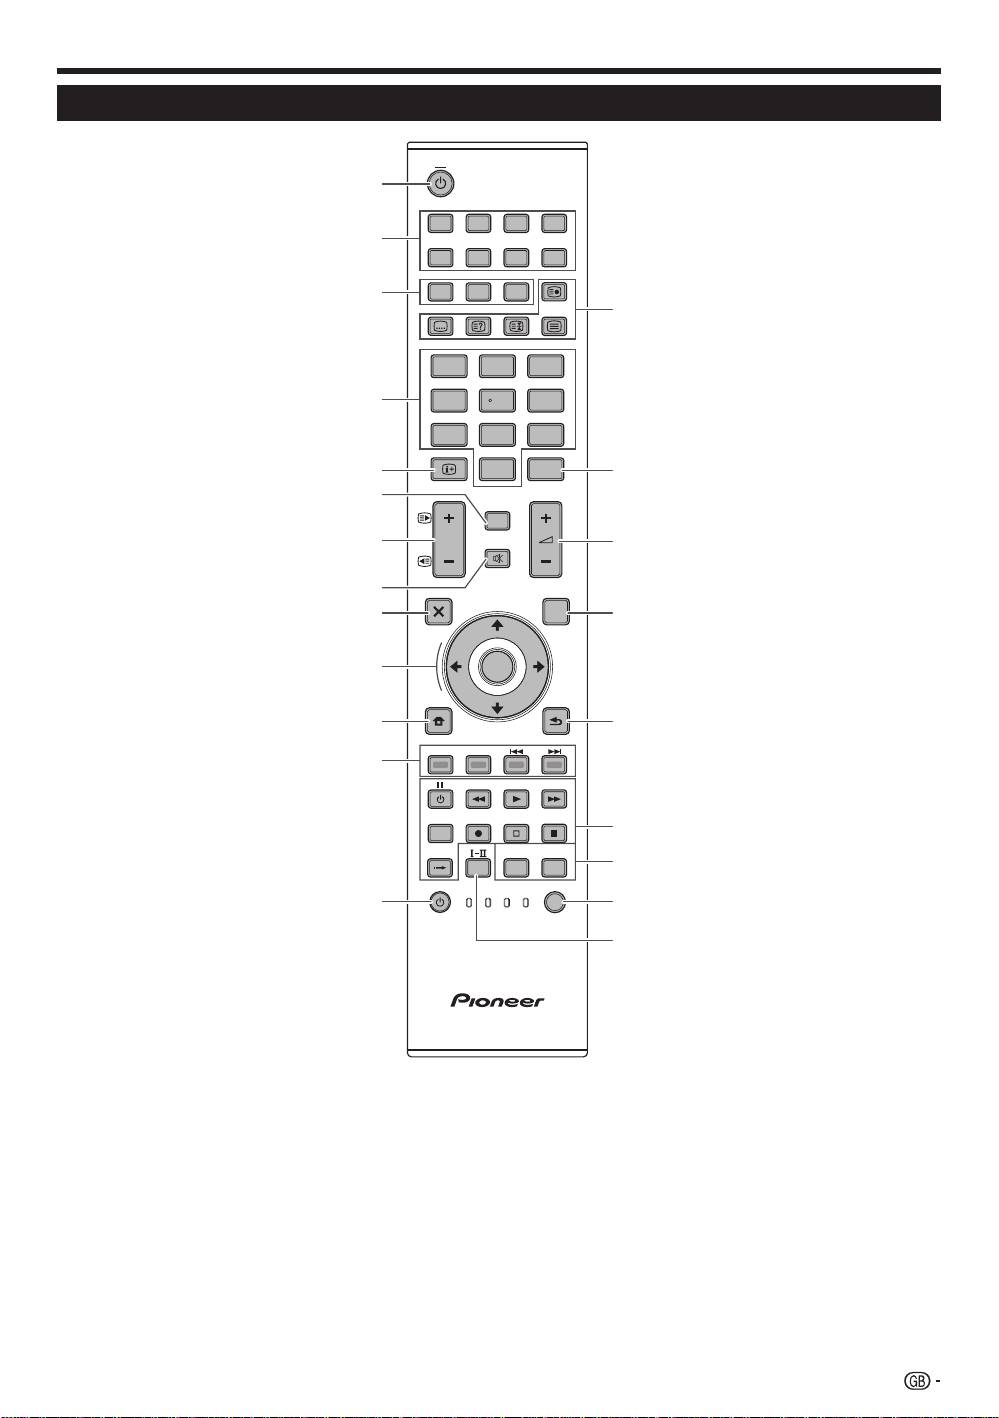
TV
1
INPUT
1 2 3 4
2
5 6 7 8
3
TV DTV
RADIO
14
1 2 3
4
4 5 6
7 8 9
INFO
5
0
P.INFO
15
6
CH RETURN
7
P
16
DVD TOPMENU/
8
EXIT
GUIDE
EPG
9
17
10
ENTER
HOME
MENU
RETURN
11
18
MENU
12
HDMI REC STOP
CTRL
19
SCREEN
AV
CM SKIP
SIZE
SELECTION
TOOLS
DVD
HDD
20
SOURCE
SELECT
TV
DVD
13
21
STB DVR VCR
22
Remote control unit
1
a (TV) (Standby/On)
R
Buttons for useful operations
(Page 16)
1 (Subpage)
2
INPUT1–8
(Page 20)
Select an input source (Page 16).
[ (Subtitle)
3
Buttons for mode switch
Switch subtitle languages on/off
(Pages 20 and 34).
T
V
Press to access conventional
k (
Reveal hidden
Teletext)
analogue TV mode.
(Page 20)
DTV
3 (Freeze/Hold)
Press to access digital TV mode.
Press to freeze a moving image on
the screen.
RADIO
Teletext: Stop updating teletext
DTV
: Switch between Radio and
pages automatically or release the
Data mode.
hold mode.
•
When only data broadcasting (no
radio broadcasting) is transmitted
m (
Teletext)
by DVB, the radio broadcasting
ATV
: Display analogue teletext (Page
will be skipped.
20).
DTV: Select MHEG-5 and teletext for
4
0–9 numeric buttons
DTV (Page 20).
Set the channel.
Enter desired numbers.
T
P. INFO
Set the page in teletext mode.
Press to display programme
•
When the five Nordic countries
information which is transmitted
(Sweden, Norway, Finland,
through digital video broadcasting in
Denmark, or Iceland) are selected
the upper left corner of the screen
in the country setting from “Auto
(DTV only).
Installation” (page 32), DTV
Y
ik/l (Volume)
services are four digits. When
Increase/decrease TV volume.
another country is selected, DTV
U
EP
G
services are three digits.
DTV: Display the EPG scr
een (Pages
5
p (
INF
O)
17–19).
Press to display the station
I
6 (
RETURN)
information (channel number, signal,
Retur
n to the previous “HOME
etc.) in the upper right corner of the
MENU” screen.
screen (Page 37).
O
Buttons for HDMI CONTROL
6
CH RETURN
If external equipment is connected
Press to return to the previously
via HDMI cables and is HDMI
selected channel or external input.
CONTROL compatible, you can use
7
Pk/l (e/f)
these HDMI CONTROL buttons. See
Select the TV channel.
pages 26 and 28 for details.
Select the page in teletext mode.
P
Buttons for picture adjustments
8
e (
Mute)
SC
REEN S
IZE
TV sound on/off.
Select a screen size (Pages 35 and
9
g (EX
IT)
39).
Exit the “HOME MENU” screen.
AV SELEC
TION
0
a/b/c/d (Cursor)
Select a video setting (Page 31).
Select a desired item on the setting
A
SELEC
T
screen.
Switch the selection among TV,
ENTER
S
TB, DVD/DVR, and VCR, so that
Execute a command within the
you can control other connected
“HOME MENU” screen.
W
Colour (Red/Green/Yellow/Blue)
equipment, using the supplied
ATV/DTV: Display the programme
buttons
remote control unit (Page 4–7).
list when no other “HOME MENU”
The coloured buttons are
S
t (Sound mode)
screen is running.
correspondingly used to select the
Select a sound multiplex mode
coloured items on the screen (e.g.
Q
h (H
OME
MENU)
(Page 16).
EPG, MHEG-5, Teletext).
“HOME MENU” screen on/off.
E
a (SOURC
E)
(Pages 6–7)
NOTE
Press and hold both 9 and 18 on the remote control unit to show “100Hz” demonstration in a dual screen.•
3
KRL46V_GB.indd 3 2008/07/09 14:08:32
Introduction
Controlling other equipment using
the supplied remote control unit
Using the supplied remote control unit, you can control
other equipment in connection: a set-top box (STB),
DVD player, DVD/HDD recorder (DVR), BD player or
VCR.
Before using this function, you need to preset the
supplied remote control unit with the manufacture
code of the equipment to be controlled. When you
then want to control the equipment, press S
ELEC
T
on the remote control unit to select an appropriate
mode depending on the equipment; the selection is
switched among TV,
STB, DVD/DVR, and VCR. The
corresponding mode indicators on the remote control
unit show the currently selected mode.
TV
INPUT
1 2 3 4
5 6 7 8
TV DTV
RADIO
1 2 3
4 5 6
7 8 9
INFO
0
P.INFO
CH RETURN
P
DVD TOPMENU/
EXIT
GUIDE
EPG
ENTER
HOME
MENU
RETURN
MENU
HDMI REC STOP
CTRL
SCREEN
AV
CM SKIP
SIZE
SELECTION
TOOLS
DVD
HDD
SOURCE
SELECT
TV
DVD
STB DVR VCR
NOTE
When you control a BD player, select the DVD/DVR
mode.
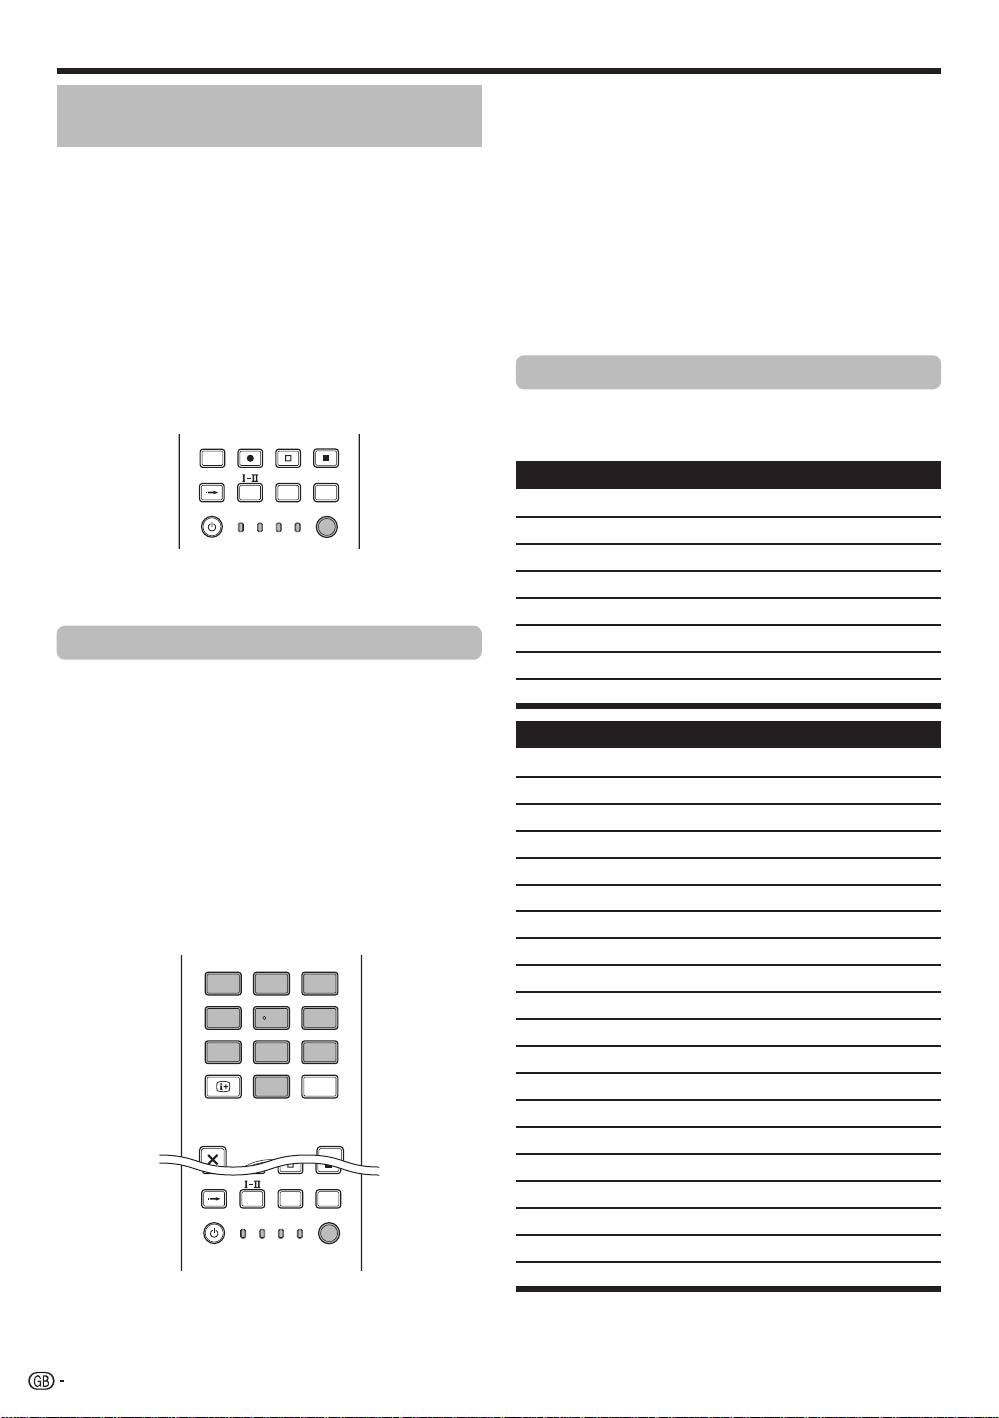
Presetting manufacture codes
Press SELECT on the remote control unit
to select the STB, DVD/DVR, or VCR mode
depending on the equipment.
After confirming that the indicator of the
previously selected mode goes off, press and
hold S
ELEC
T, and then press 1 on the remote
control unit.
The corresponding mode indicator flashes.
Press 0–9 to enter a three-digit manufacture
code.
See the manufacture code list to identify an
appropriate code. The mode indicator lights up
for approximately one second and then goes off;
presetting the manufacture code is completed.
TV
INPUT
1 2 3 4
5 6 7 8
TV DTV
RADIO
1 2 3
4 5 6
7 8 9
INFO
0
P.INFO
DVD TOPMENU/
EXIT
GUIDE
EPG
CTRL
SCREEN
AV
CM SKIP
SIZE
SELECTION
TOOLS
DVD
HDD
SOURCE
SELECT
TV
DVD
STB DVR VCR
NOTE
•
If you perform no operation for approximately one
minute while a mode indicator is flashing, the code
presetting procedure is quitted.
•
If you enter a code not listed in the table, a mode
indicator flashes quickly for approximately one
second and then flashes as before.
•
To quit the code presetting procedure halfway
while a mode indicator is flashing, you may press
S
ELEC
T on the remote control unit.
•
The factory default manufacture codes for the STB,
DVD/DVR, and VCR modes are “000”, “100”, and
“500” respectively.
Manufacture codes
*
You may not be able to control some equipment
in the tables partially or entirely with the supplied
remote control unit.
STB
000 PIONEER 1 (factory default)
001 PIONEER 2
002 CANAL SATELLITE
•
003 HUMAX
004 PACE 1
005 PACE 2
006 QUALI-TV
1
007 SKY DIGITAL
DVD
2
100 PIONEER 1 (factory default)
101 PIONEER 2
102 AKAI
•
103 DENON
3
104 HITACHI
•
105 JVC
106 KENWOOD 1
107 KENWOOD 2
108 PANASONIC 1
109 PANASONIC 2
110 PHILIPS 1
111 PHILIPS 2
112 SAMSUNG
113 SHARP
114 SONY 1
115 SONY 2
116 SONY 3
117 THOMSON
118 TOSHIBA
119 YAMAHA
4
KRL46V_GB.indd 4 2008/07/09 14:08:33

Introduction
DVR
VCR
200 PIONEER 1
527 PHILIPS 2
201 PIONEER 2
528 PHILIPS 3
202 PIONEER 3
529 SANYO
203 PANASONIC
530 SAMSUNG 1
204 PHILIPS 1
531 SAMSUNG 2
205 PHILIPS 2
532 SAMSUNG 3
206 SHARP
533 SAMSUNG 4
207 SONY
534 SHARP
208 TOSHIBA
535 SONY 1
536 SONY 2
BD
537 SONY 3
300 PIONEER
538 SONY 4
301 LG
539 SONY 5
302 PANASONIC
540 SONY 6
303 SAMSUNG
541 SONY 7
304 SONY
542 THOMSON
305 TOSHIBA
543 TOSHIBA
VCR
500 PIONEER 1 (factory default)
501 PIONEER 2
502 AIWA 1
503 AIWA 2
504 AKAI 1
505 AKAI 2
506 AKAI 3
507 DAEWOO
508 GRUNDIG 1
509 GRUNDIG 2
510 GRUNDIG 3
511 GRUNDIG 4
512 HITACHI 1
513 HITACHI 2
514 HITACHI 3
515 JVC 1
516 JVC 2
517 JVC 3
518 JVC 4
519 JVC 5
520 LOEWE 1
521 LOEWE 2
522 MATSUI
523 ORION
524 PANASONIC 1
525 PANASONIC 2
526 PHILIPS 1
5
KRL46V_GB.indd 5 2008/07/09 14:08:33
Introduction
Using with other equipment (STB)
TV
INPUT
1 2 3 4
5 6 7 8
TV DTV
RADIO
1 2 3
4 5 6
7 8 9
INFO
0
P.INFO
CH RETURN
P
DVD TOPMENU/
EXIT
GUIDE
EPG
ENTER
HOME
MENU
RETURN
MENU
SOURCE
SELECT
TV
DVD
STB DVR VCR
TV
D
T
V
RADI
O
1
2
3
4
5
6
7
8
TV
IN
PUT
P
.
INF
O
C
H RETURN
TV
D
V
R
V
CR
D
V
D
S
ELE
C
1
2
3
4
8
5
6
9
T
7
Using with other equipment (VCR)
TV
INPUT
1 2 3 4
5 6 7 8
TV DTV
RADIO
1 2 3
4 5 6
7 8 9
INFO
0
P.INFO
CH RETURN
P
HDMI REC STOP
CTRL
SCREEN
AV
CM SKIP
SIZE
SELECTION
TOOLS
DVD
HDD
SOURCE
SELECT
TV
DVD
STB DVR VCR
TV
D
TV
R
ADIO
1
2
3
4
5
6
7
8
TV
I
N
P
UT
P.
INF
O
INFO
C
H RET
U
R
N
C
TR
L
HD
M
I
R
E
C
S
T
OP
HDD
A
V
S
ELE
C
TI
ON
C
M SKIP
D
V
D
TOO
L
S
SCREEN
S
IZE
TV
ST
B
D
V
R
D
V
D
S
ELE
CT
1
2
3
6
7
4
5
E
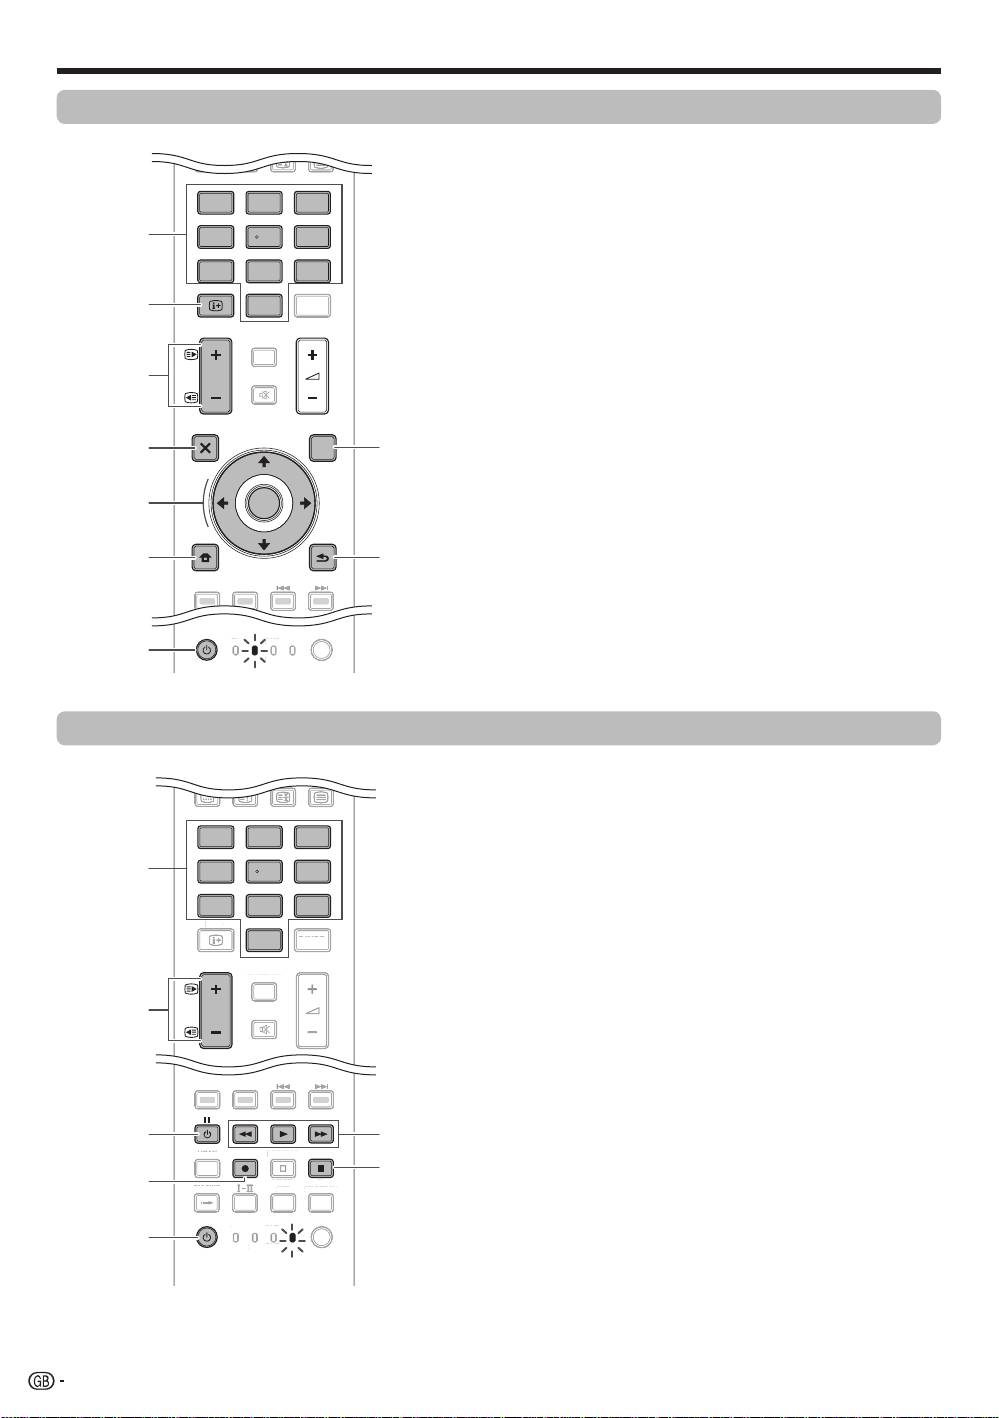
STB (set-top box) control buttons
When in the STB mode, the buttons on the remote
control unit function as below.
1
0–9
Function as the numeric buttons.
2
INFO
Press to display information on the current broadcasting.
3
Pk/l
Press to tune in a higher or lower channel.
4
E
XIT
Pr
ess to exit the broadcasting menu screen or the
broadcasting guide screen.
5
ENTER
Press to activate the selected function.
a/b/c/d
Press to select items on the broadcasting menu screen
or the broadcasting guide screen.
6
MENU
Press to display the broadcasting menu screen.
7
S
OURC
E a
Turns the set-top box on and off.
8
GUID
E
Press to display the broadcasting guide screen.
9
RETURN
When the broadcasting menu screen is in display, press
to restore the immediately previous screen.
E
VCR control buttons
When in the VCR mode, the buttons on the remote
control unit function as below.
1
0–9
Function as the numeric buttons.
2
Pk/l
Press to select channels of the TV tuner on the VCR.
3
l (
PAUSE/STILL)
Set pauses and still pictur
es.
4
p (REC)
Start r
ecording.
5
SOURCE a
Turn the power of the VCR on and off.
6
m (
REW)
Rewind the tape and allows pictur
e search.
n (PLAY)
Start playback.
o (FF)
Fast-forwar
d the tape and allows picture search.
7
r (S
TOP)
Stop playback.
6
KRL46V_GB.indd 6 2008/07/09 14:08:34

Introduction
Using with other equipment (DVD/DVR)
TV
INPUT
1 2 3 4
5 6 7 8
TV DTV
RADIO
1 2 3
4 5 6
7 8 9
INFO
0
P.INFO
CH RETURN
P
DVD TOPMENU/
EXIT
GUIDE
EPG
ENTER
HOME
MENU
RETURN
MENU
HDMI REC STOP
CTRL
SCREEN
AV
CM SKIP
SIZE
SELECTION
TOOLS
DVD
HDD
SOURCE
SELECT
TV
DVD
STB DVR VCR
TV
DTV
R
ADI
O
1
2
3
4
5
6
7
8
TV
I
N
PU
T
P
.INF
O
INF
O
C
H RETUR
N
EXIT
C
TR
L
HD
M
I
R
E
C
S
T
OP
C
M SKIP
TV
ST
B
VCR
S
ELE
CT
1
2
9
3
4
10
11
12
5
13
14
6
15
7
16
8
E
DVD/DVR control buttons
When in the DVD/DVR mode, the buttons on the
remote control unit function as below.
1
0–9
Function as the numeric buttons.
2
Pk/l (DVD/HDD recorder (DV
R) only)
Press to change the channel of the tuner built in the
DVD/HDD recorder (DVR).
3
ENTER
Press to activate the selected function.
a/b/c/d
Press to select items on the DVD menu screen.
4
MENU
Press to display the DVD menu.
5
l (
PAUSE/STILL)
Set pauses and still pictures.
6
p (REC) (DVD/HDD r
ecorder (DVR) only)
Start recording.
7
TOOLS (Pioneer BD player only)
Press to display the “TOOLS” menu.
8
SOURC
E a
Turn on and off the power of the DVD player or DVD/HDD
recorder (DVR).
9
DVD TOP
MENU
When this button is pressed, the DVD top menu will
appear.
0
RETURN
When the DVD menu is in display, press to restore the
immediately previous screen.
Q
j (CH
APTER SEARCH)
Each time you press, you move back to the start of the
previous chapter.
W
k (CHAPTER S
EARCH)
Each time you press, you move ahead to the start of the
next chapter.
E
m (SCAN)
Pr
ess to go backward.
n (PLAY)
Start playback.
o (SCAN)
Pr
ess for fast forward.
R
r (STOP)
Pr
ess to stop playback or recording. With some DVD
players or DVD/HDD recorders (DVRs), pressing the
button twice may open the disc tray.
REC STOP (DVD/HDD recorder (DVR) only)
Press p and r at the same time to stop recording. This
operation is available for only Pioneer and Sony DVD/
HDD recorders (DVRs).
T
HDD (DVD/HDD recorder (DV
R) only)
Press to select the hard disk (HDD) for playback or
recording.
Y
DVD (DVD/HDD recorder (DV
R) only)
Press to select the DVD for playback or recording.
NOTE
•
You can control a BD player in the DVD/DVR mode.
•
The DVD player, DVD/HDD recorder (DVR) or BD
player cannot be selected at the same time.
7
KRL46V_GB.indd 7 2008/07/09 14:08:35
Introduction
Trademarks
•
“HDMI, the HDMI logo and High-Definition Multimedia Interface are trademarks or
registered trademarks of HDMI Licensing LLC.”
•
Manufactured under license from Dolby Laboratories.
•
“Dolby” and the double-D symbol are trademarks of Dolby Laboratories.
•
TruSurround XT, SRS and h symbol are trademarks of SRS Labs, Inc.
•
TruSurround XT technology is incorporated under license from SRS Labs, Inc.
The “HD ready 1080P” Logo is a trademark of EICTA.•
•
The DVB logo is the registered trademark of the Digital Video Broadcasting—
DVB—project.
“x.v.Colour” and are trademarks of Sony Corporation.•
8
KRL46V_GB.indd 8 2008/07/09 14:08:36
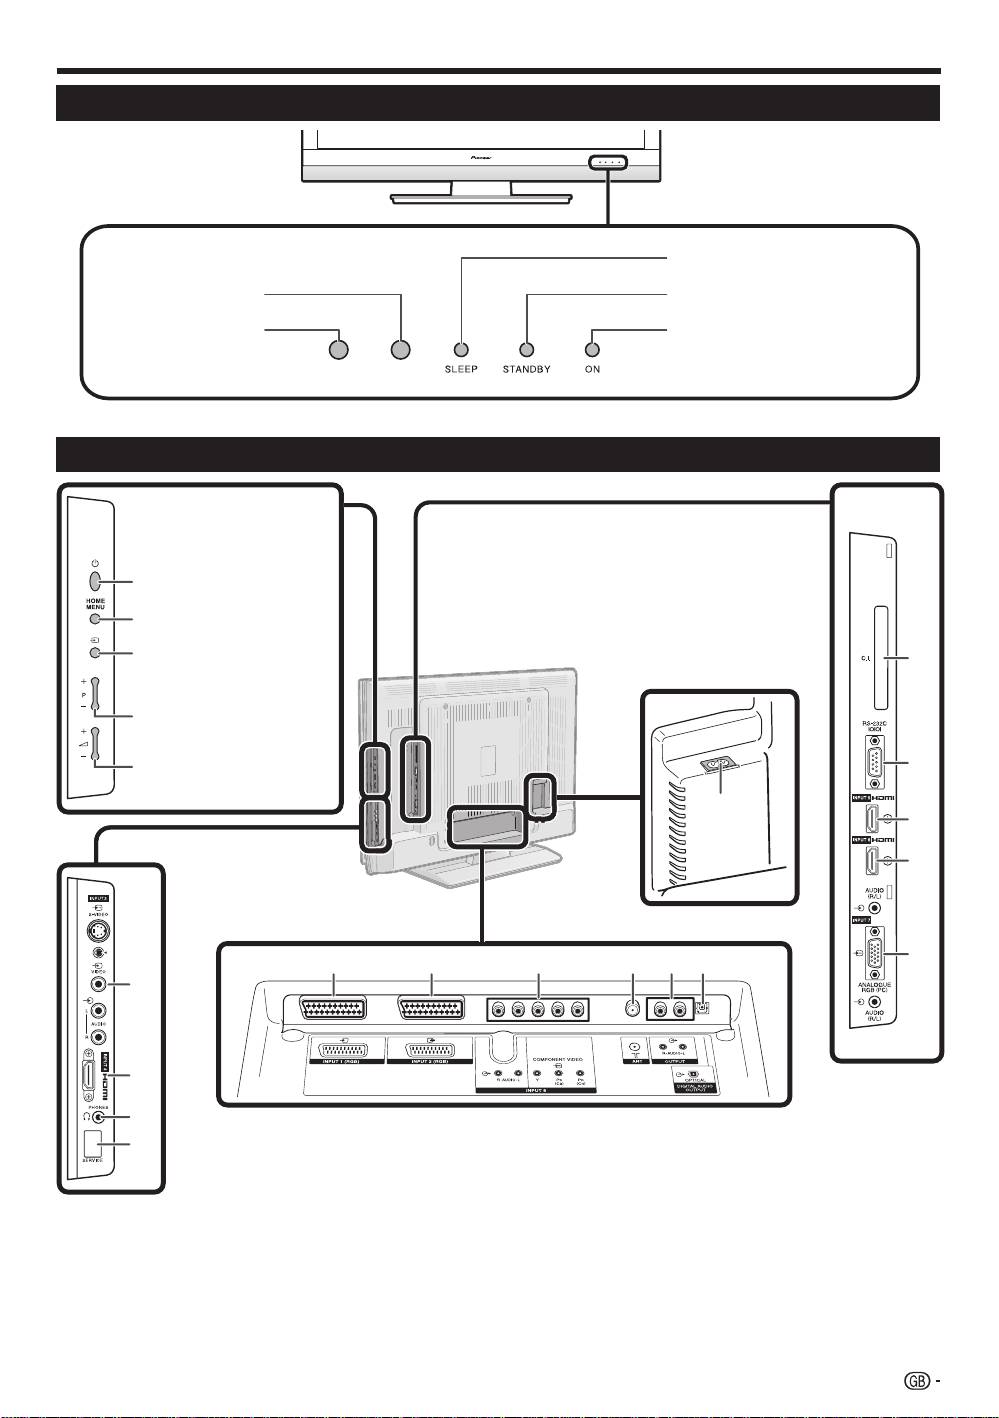
Introduction
TV (Front view)
RLS*
RLS = Room Light Sensor*
TV (Rear view)
1
AC INPUT terminal
7
INPUT2 (RGB) terminal
12
COMMON INTERFACE slot
2
INPUT3 terminals
8
INPUT8 (COMPONENT/AUDIO)
13
RS-232C terminal
3
INPUT4 (HDMI) terminal
terminal
14
INPUT5 (HDMI) terminal
4
PHONES (Headphones)
9
ANT (aerial) terminal
15
INPUT6 (HDMI/AUDIO) terminals
5
SERVICE socket
10
OUTPUT (AUDIO) terminals
16
INPUT7 (ANALOGUE RGB/AUDIO)
6
INPUT1 (RGB) terminal
11
DIGITAL AUDIO OUTPUT terminal
terminals
12
13
1
14
15
16
6 7 8 9 10 11
2
3
4
5
SLEEP indicator
STAN
DBY indicator
Remote control
ON indicator
sensor
a
(Power) button
HOME MENU button
b (INPUT SOURCE)
button
P (k/l) Programme
[channel] buttons
i (k/l)
Volume buttons
WARNING:
Excessive sound pressure from
earphones and headphones can cause
hearing loss.
9
KRL46V_GB.indd 9 2008/07/09 14:08:37
Preparation
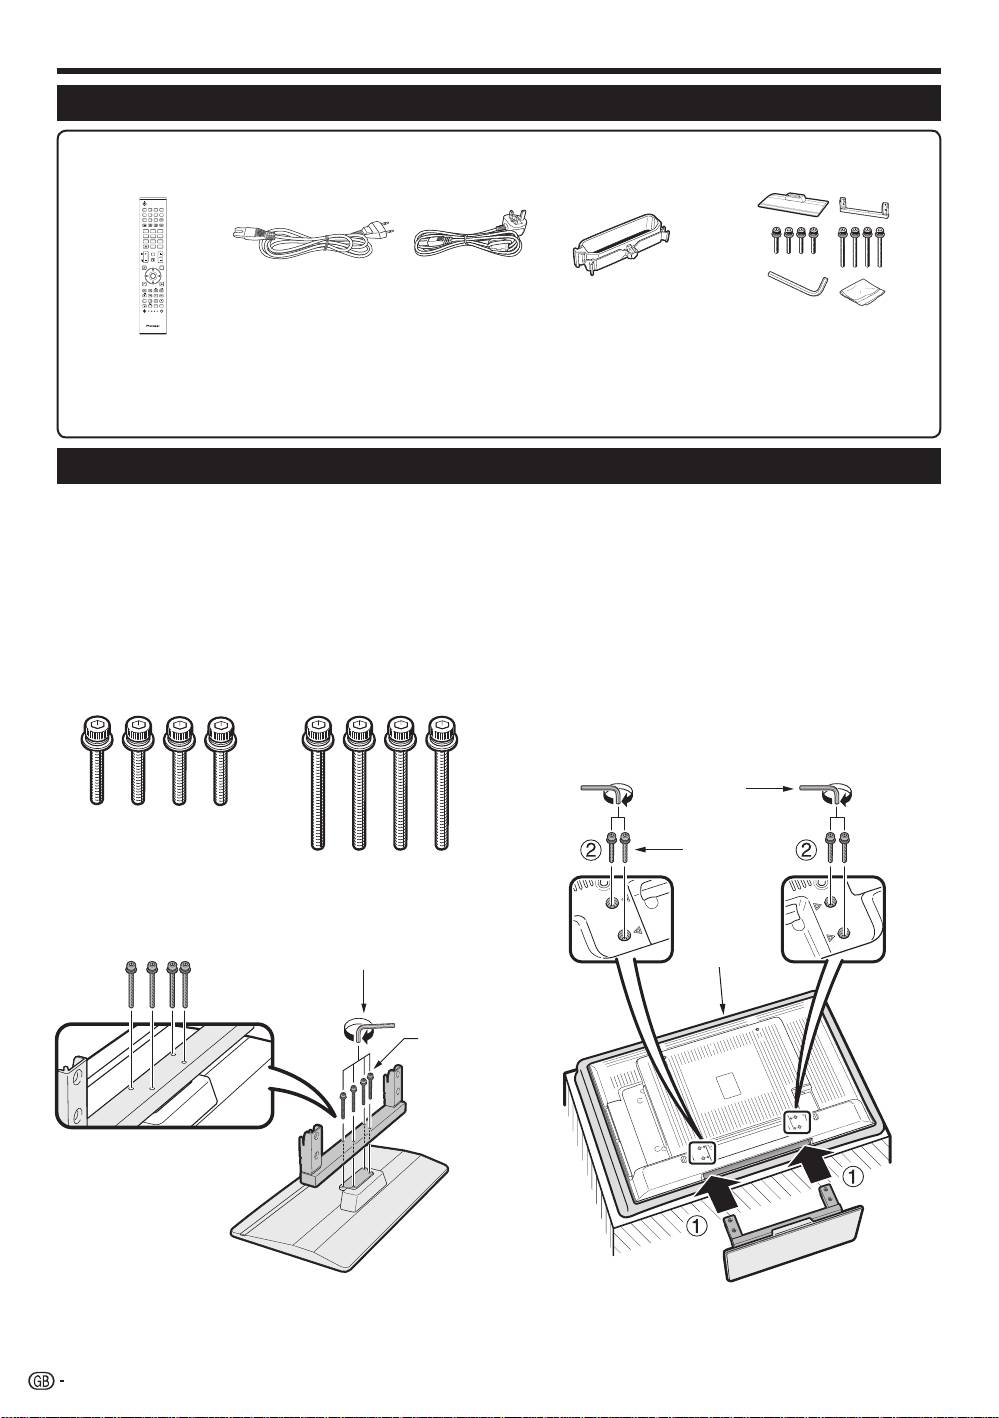
Supplied accessories
Remote control unit
AC cord (g2) Stand unit (g1)Cable clamp (g1)
(g1)
Pages 3 and 11 Page 10
Page 14Page 14
•
Operation manual (This publication)
“AA” size alkaline battery (g2) ... Page 11•
•
Warranty card
Attaching the stand unit
•
Before attaching (or detaching) the stand, unplug the AC cord from the AC INPUT terminal.
•
Before performing work, spread cushioning over the surface on which you will be laying the TV. This will prevent
it from being damaged.
CAUTION
•
Attach the stand in the corr
ect direction.
•
Be sure to follow the instructions. Incorrect installation of the stand may result in the TV falling over.
1
Confirm that there are eight screws (four short
3
1
Insert the stand into the openings on the
screws and four long screws) with the stand
bottom of the TV. (Hold the stand so it will
unit.
not drop from the edge of the base area.)
2
Insert and tighten the four short screws into
the four holes on the rear of the TV
Hex key
Short
screw
2
Attach the supporting post for the stand unit
onto the base using the four long screws with
the hex key (supplied) as shown.
Soft
Hex key
cushion
Long
screw
NOTE
•
To detach the stand unit, perform the steps in reverse
order.
10
TV
1 2 3 4
INPUT
5 6 7 8
TV
DTV
RADIO
1 2 3
4 5 6
INFO
7 8 9
0
P.INFO
CH RETURN
P
EXIT
DVD TOPMENU/
GUIDE
EPG
HOME
ENTER
MENU
RETURN
MENU
CTRL
HDMI REC STOP
CM SKIP
SCREEN
SIZE
SELECTION
AV
SOURCE
TV
TOOLS
DVD
DVD
SELECT
HDD
STBDVR VCR
KRL46V_GB.indd 10 2008/07/09 14:08:38
Preparation
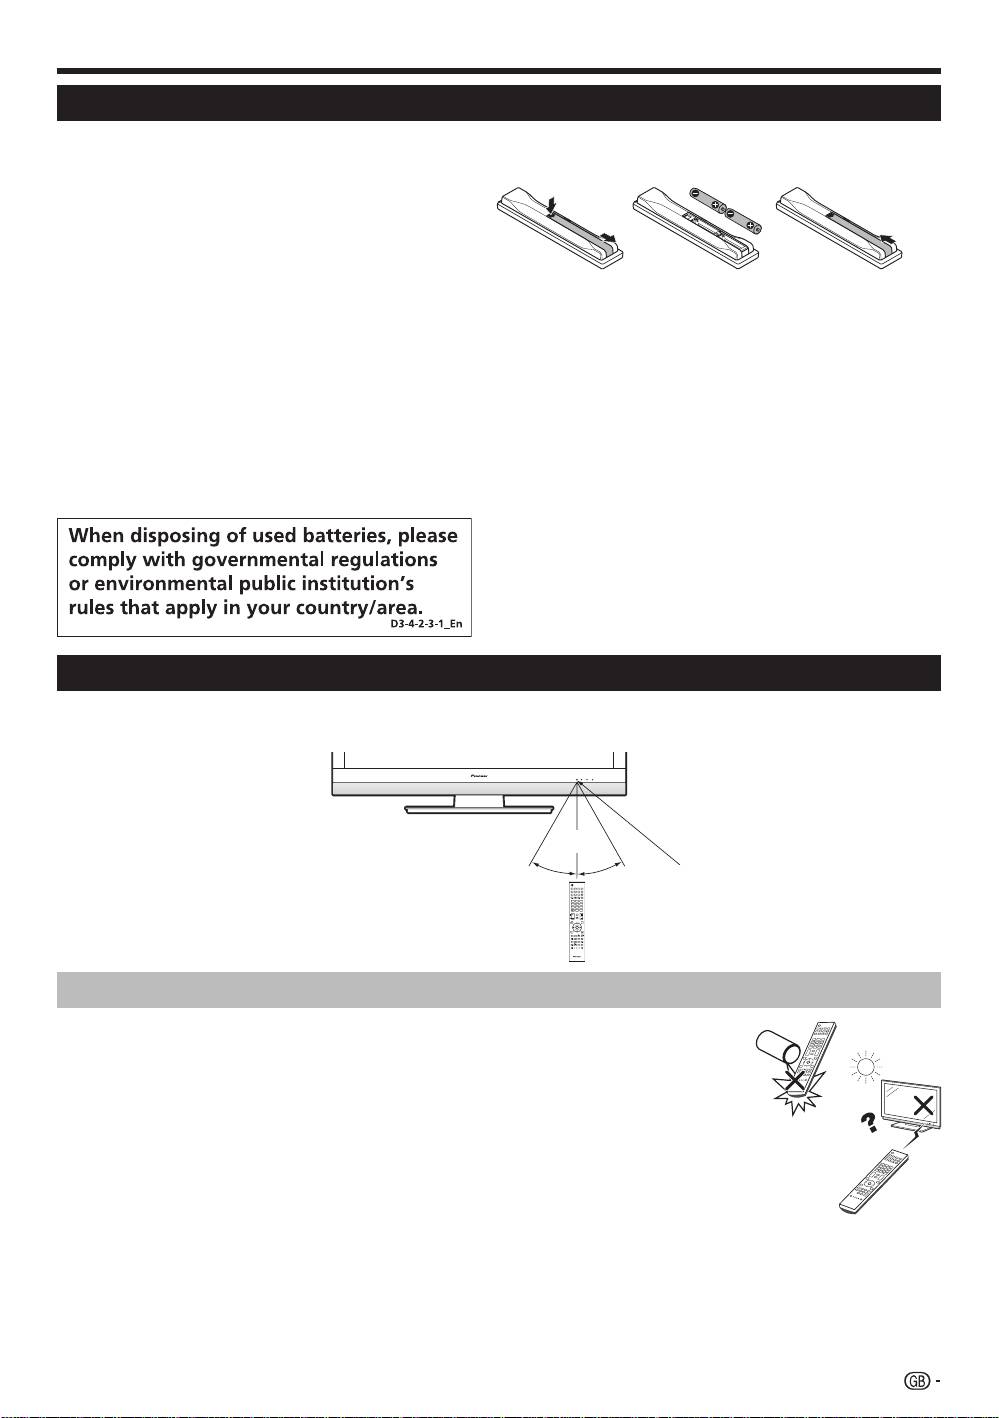
Inserting the batteries
Before using the TV for the first time, insert two supplied “AA” size alkaline batteries. When the batteries become
depleted and the remote control unit fails to operate, replace the batteries with new “AA” size batteries.
1
Open the battery cover.
2
Insert two supplied “AA” size alkaline batteries.
•
Place batteries with their terminals corresponding to the
(e) and (f) indications in the battery compartment.
3
Close the battery cover.
CAUTION
Improper use of batteries can result in chemical leakage or explosion. Be sure to follow the instructions below.
•
Do not mix batteries of different types. Different types of batteries have different characteristics.
•
Do not mix old and new batteries. Mixing old and new batteries can shorten the life of new batteries or cause
chemical leakage in old batteries.
•
Remove batteries as soon as they have worn out. Chemicals that leak from batteries can cause a rash. If you
find any chemical leakage, wipe thoroughly with a cloth.
•
The batteries supplied with this product may have a shorter life expectancy due to storage conditions.
•
If you will not be using the remote control unit for an extended period of time, remove the batteries from it.
•
When replacing the batteries, use alkaline batteries instead of zinc-carbon ones.
Cautions regarding the remote control unit
•
Do not expose the remote control unit to shock. In addition, do not expose the
remote control unit to liquids, and do not place in an area with high humidity.
•
Do not install or place the remote control unit under direct sunlight. The heat may
cause deformation of the unit.
•
The remote control unit may not work properly if the remote control sensor of the
TV is under direct sunlight or strong lighting. In such cases, change the angle of the
lighting or the TV, or operate the remote control unit closer to the remote control
sensor.
TV
30° 30°
1 2 3 4
INPUT
TV
5 6 7 8
DTV
RADIO
INFO
4 5 6
1 2 3
7 8 9
0
P
CH RETURN
P.INFO
EXIT
DVD TOPMENU/
GUIDE
EPG
HOME
MENU
ENTER
MENU
RETURN
CTRL
HDMI REC STOP
SOURCE
CM SKIP
TV
TOOLS
DVD
DVD
SCREEN
SIZE
SELECTION
SELECT
HDD
AV
STBDVR VCR
Using the remote control unit
Use the remote control unit by pointing it towards the remote control sensor. Objects between the remote control
unit and sensor may prevent proper operation.
5 m
Remote control sensor
11
KRL46V_GB.indd 11 2008/07/09 14:08:39
Preparation
Side view
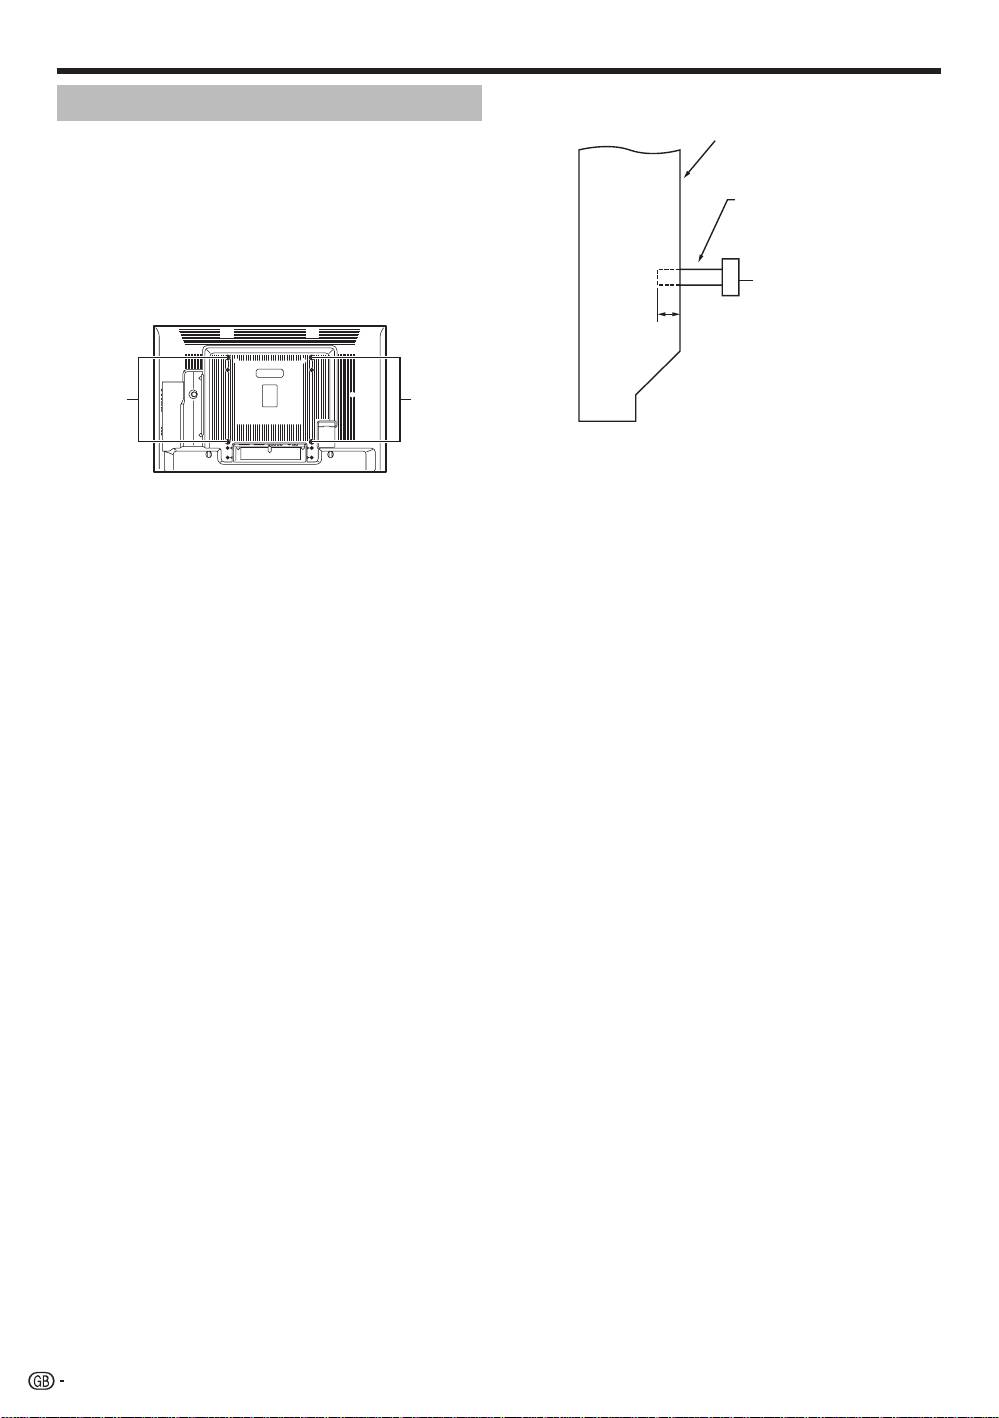
Installation precautions
Mounting surface
Observe the following precautions when installing with
any items such as the optional stand.
Mounting bracket
When using other stands, brackets or equivalent
Flat
(or equivalent item)
items
screen
•
Consult your dealer.
TV
•
The following mounting holes can be used for the
installation.
M6 screw
Rear view
12 mm to 15 mm
M
ounting
Mounting
holes
holes
NOTE
•
The mounting holes can be used after removing the
black seals and the screws.
CAUTION
•
Use M6 screws, which go 12 mm to 15 mm in
depth fr
om the mounting surface of the flat screen
TV. See the side view shown to the right.
•
Be careful not to block the ventilation opening at the
rear of the flat screen TV.
•
Be sure to install the flat screen TV on a flat surface
because the LCD panel used in this product is made
of glass.
•
The screw holes other than the illustrations above
are to be used only for the specified products. Never
use them for mounting non-specified products.
NOTE
•
Pioneer shall not be liable for any personal injury
or product damage that results from the use of
mounting items.
12
KRL46V_GB.indd 12 2008/07/09 14:08:40
Quick guide
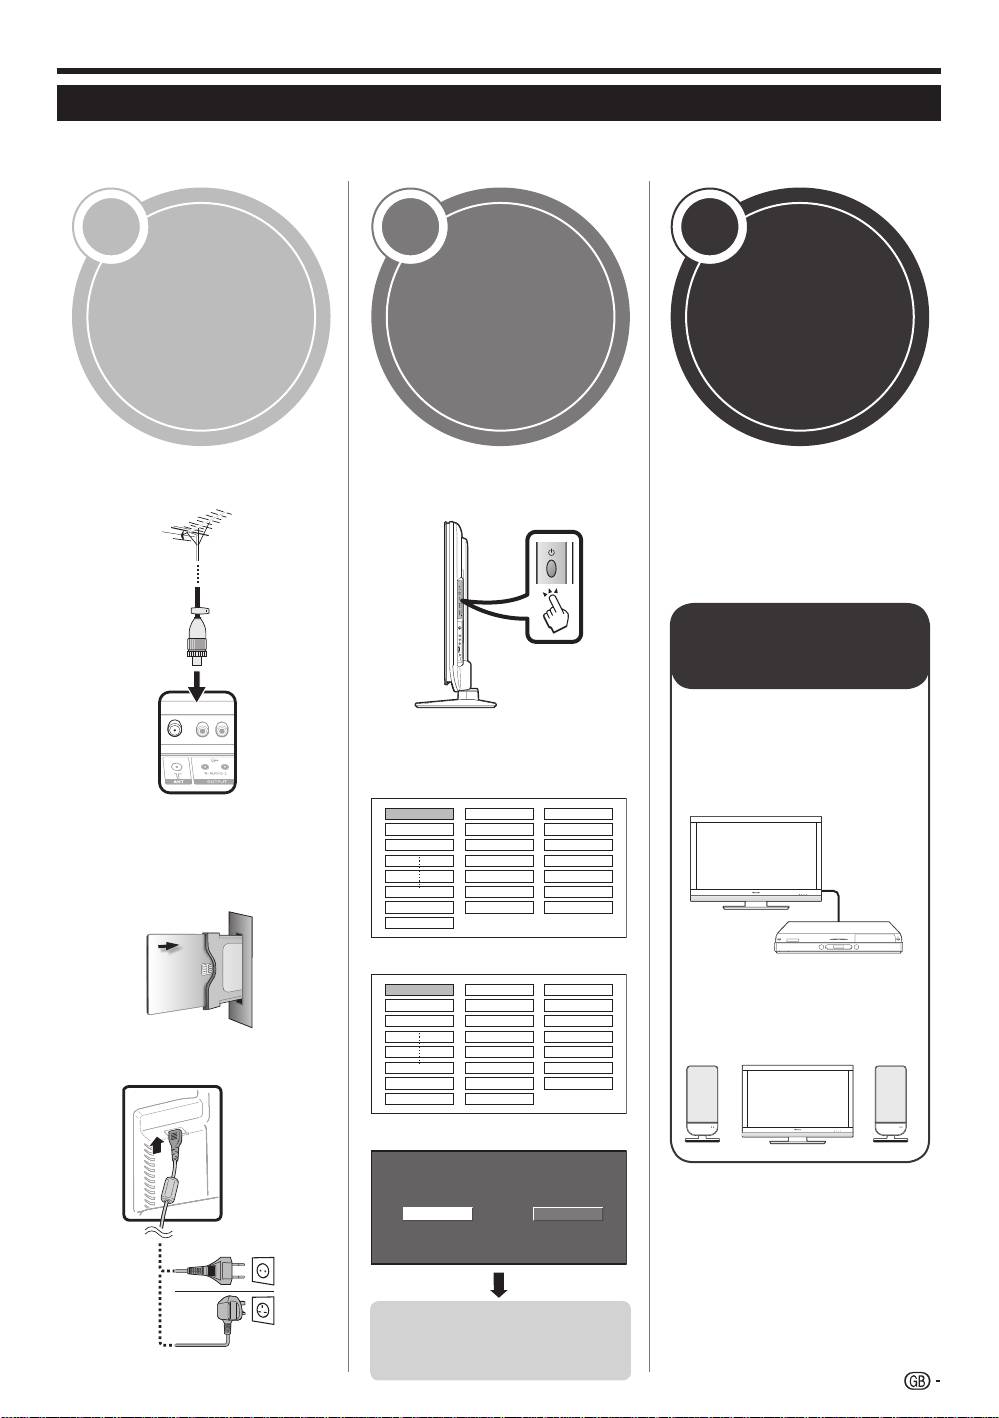
Initial installation overview
Follow the steps below one by one when using the TV for the first time. Some steps may not be necessary
depending on your TV installation and connection.
1 2 3
Connect an aerial cable to the
Turn on the power using a on
ANT terminal (Page 14).
the TV (Page 16).
Run the initial auto installation
(Page 15).
Language setting
If necessary, insert a smart
card into the Common
Interface slot to watch
scrambled broadcasts (Pages
14 and 25).
Connect the AC cord to the TV
(Page 14).
English
Italiano
Svenska
Country setting
Austria A B/G
Finland
FIN
B/G
Greece GR B/G
Channel search setting
Analogue SearchDigital Search
Power on and
Preparation
run the auto
Watch T
V
installation
Congratulations!
N
ow you can watch T
V.
If necessary, adjust the aerial
to attain maximum signal
reception (Page 15).
Connect
external devices
Connect external
devices such as a
DVD player/recorder
4
as instructed (Pages
21–23).
4
Connect external
audio devices such as
speakers/amplifier as
instructed (Pages 21
and 24).
4
Start searching
channels
13
KRL46V_GB.indd 13 2008/07/09 14:08:42

Quick guide
Before turning on the power
1
Carefully insert the
CA Module in the
Common Interface
slot with the contact
side forward.
2
The logo on the CA
Module must be
facing forward from
the rear of the TV.
Standard DIN45325
plug (IEC 169-2)
Place the TV close to the
75 q coaxial cable
AC outlet, and keep the
power plug within reach.
Ferrite Core*
(For Europe, except
U.K. and Eire)
Supplying power to the aerial
You must supply power to the aerial in order to
AC cord
receive digitally/terrestrially broadcast stations after
connecting the aerial cable to the ANT terminal on
the rear of the TV.
(For U.K. and Eire)
1
Press h and the “HOME MENU” screen displays.
2
Press a/b to select “Setup”.
3
Press a/b to select “Antenna Setup-DIGITAL”, and
then press ENTER.
4
Press a/b to select “Supply Voltage”, and then press
* Ferrite Core
ENTER.
The Ferrite Core should be permanently attached
5
Press c/d to select “On”, and then press ENTER.
and never removed from the AC cord.
Bundling the cables
Cable clamp
Bundle the cables with
the clamp.
14
KRL46V_GB.indd 14 2008/07/09 14:08:43
Quick guide
Initial auto installation
When the TV is powered on for the first time after
purchase, the initial auto installation wizard appears.
Follow the menus and make the necessary settings
one after another.
Press a on the TV.
The initial auto installation wizard appears.
Setting the OSD language.
English
Italiano
Svenska
Press a/b/c/d to select the desired language,
and then press ENTER.
Setting the country (Location of the TV).
Austria A B/G
Finland
FIN
B/G
Greece GR B/G
Press a/b/c/d to select your country or area,
and then press ENTER.
This setting screen only appears during the first
installation.
Starting channel search.
Analogue SearchDigital Search
The TV searches for, sorts and stores all the
receivable TV stations according to their settings
and the connected aerial.
To abort the initial auto installation in progress, press
6 (RETURN).
NOTE
If you turn off the power on the TV after performing step 4,
the initial auto installation wizard does not appear. The auto
installation function allows you to execute the installation
again from the “Setup” menu (Page 32).
The initial auto installation wizard will go off if you leave
the TV unattended for 30 minutes before searching for
channels in step 5.
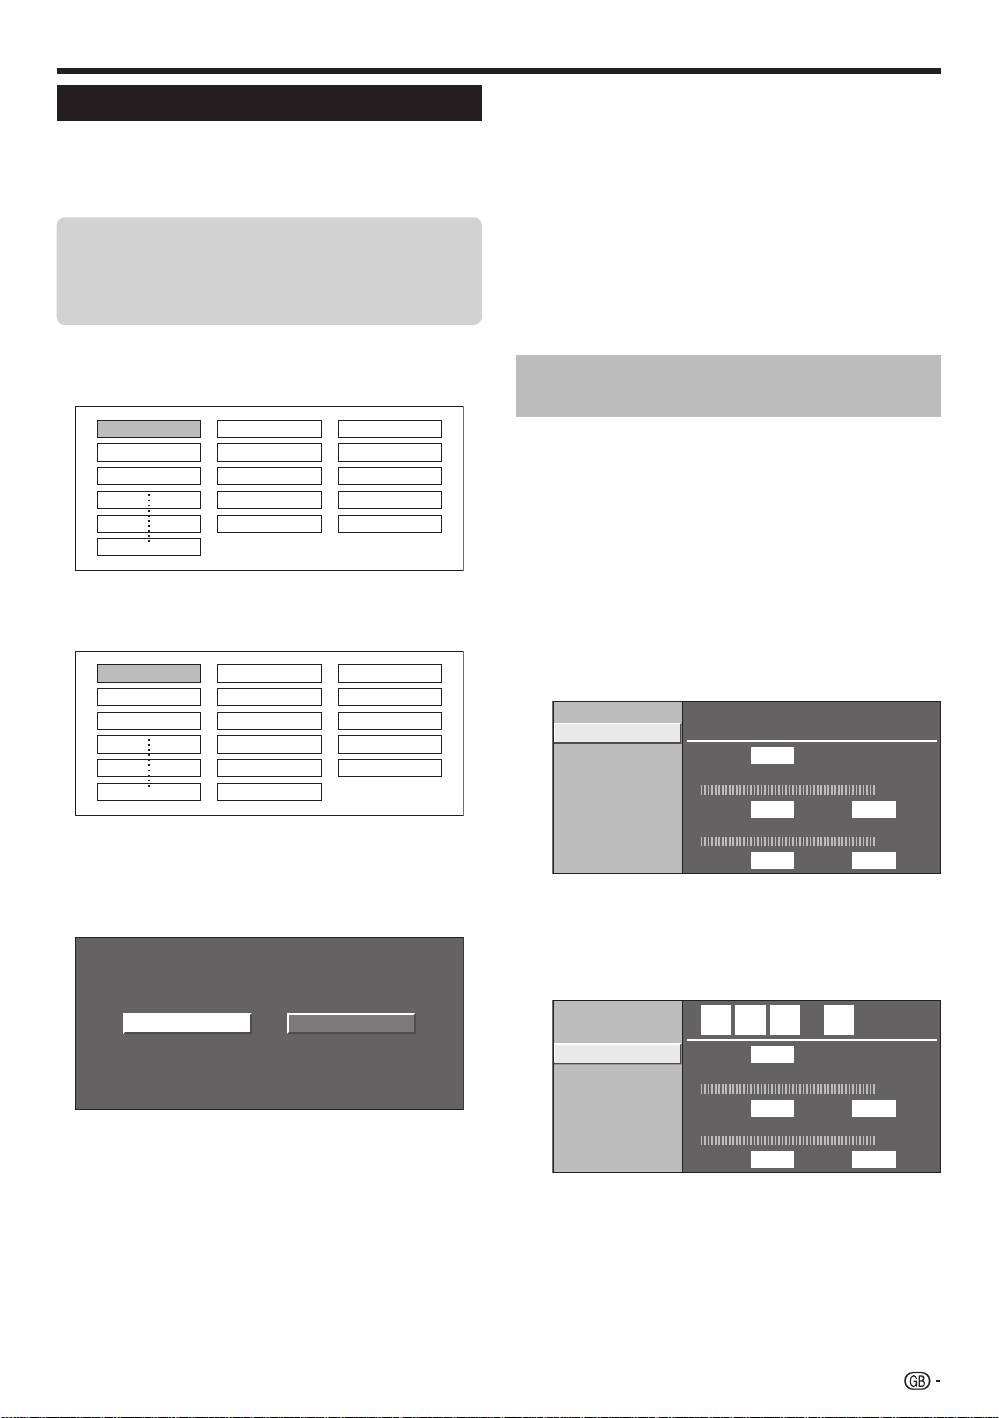
1
•
Checking signal strength and
2
channel strength
If you install a DVB-T aerial for the first time or relocate
it, you should adjust the alignment of the aerial to
receive a good reception while checking the antenna
setup screen.
Press h and the “HOME MENU” screen
displays.
Press a/b to select “Setup”.
Press a/b to select “Antenna Setup-DIGITAL”,
and then press ENTER.
3
Checking signal strength
Press a/b to select “Signal Strength”.
•
4
Press c/d to select “Digital Search” or
“Analogue Search”, and then press ENTER.
•
If you want to search for more broadcasts, execute
“Additional Search” from the “Programme Setup”
menu (Pages 32 and 33).
•
To watch both analogue broadcasts and digital
broadcasts, you should perform the channel search
setting for each format.
EXAMPLE
•
If you execute “Digital Search” in the initial auto
installation wizard, you should perform “Analogue
Search” from “Auto Installation” under the “Setup”
menu.
Supply Voltage
Signal Strength
Channel Strength
CH No. 21
Signal Strength
Current Max.0
0
Quality
Current Max.0 0
Checking channel strength
Press a/b to select “Channel Strength”, and
then press ENTER.
You can input a specified frequency band using the
0–9 numeric buttons.
Supply Voltage
4 7 4 . 0
MHz
Signal Strength
Channel Strength
CH No. 21
Signal Strength
Current Max.0
0
Quality
Current Max.0 0
5
•
•
Confirm the following before turning
on the power
E
Is the aerial cable connected?
•
E
Is the AC cord plugged in?
1
2
3
E
E
•
4
Position and align the aerial so that the
maximum possible values for “Signal Strength”
and “Quality” are obtained.
NOTE
•
The values of “Signal Strength” and “Quality” indicate when
to check the appropriate alignment of the aerial.
15
KRL46V_GB.indd 15 2008/07/09 14:08:44
Watching TV
Selecting a sound mode
DTV mode:
If multi sound modes are received, each time you
press t the mode switches as follows.
Audio (ENG) : STEREO
L/R L R LR
Audio (ENG) : CH A
CH A CH B CH AB
Audio (ENG) : MONO
Press c/d to select L or R sound when the STEREO
or DUAL MONO screen is displayed.
Audio (ENG) : STEREO
L/R L R LR
E
NOTE
•
The sound mode screen disappears in six seconds.
•
Selectable items vary depending on the received broadcasts.
E
ATV mode:
Each time you press t, the mode switches as
shown in the following tables.
NICAM TV broadcasts selection
Signal Selectable items
Stereo
NICAM STEREO, MONO
Bilingual
NICAM CH A, NICAM CH B, NICAM CH AB, MONO
Monaural
NICAM MONO, MONO
A2 TV broadcasts selection
Signal Selectable items
Stereo
STEREO, MONO
Bilingual
CH A, CH B, CH AB
M
onaural
MONO
E
EWatching digital
Watching analogue
NOTE
broadcasts
broadcasts
•
When no signal is input, the sound mode will display “MONO”.
TV DTV
RADIO
TV DTV
RADIO
P
TV
INPUT
1 2 3 4
5 6 7 8
TV DTV
RADIO
1 2 3
4 5 6
7 8 9
INFO
0
P.INFO
MENU
CM SKIP
SOURCE
HOME
MENU
EXIT
CTRL
HDMI REC STOP
P
TV
TOOLS
CH RETURN
STB DVR VCR
ENTER
DVD
SCREEN
DVD
SIZE
DVD TOPMENU/
SELEC TION
RETURN
SELECT
GUIDE
HDD
EPG
AV
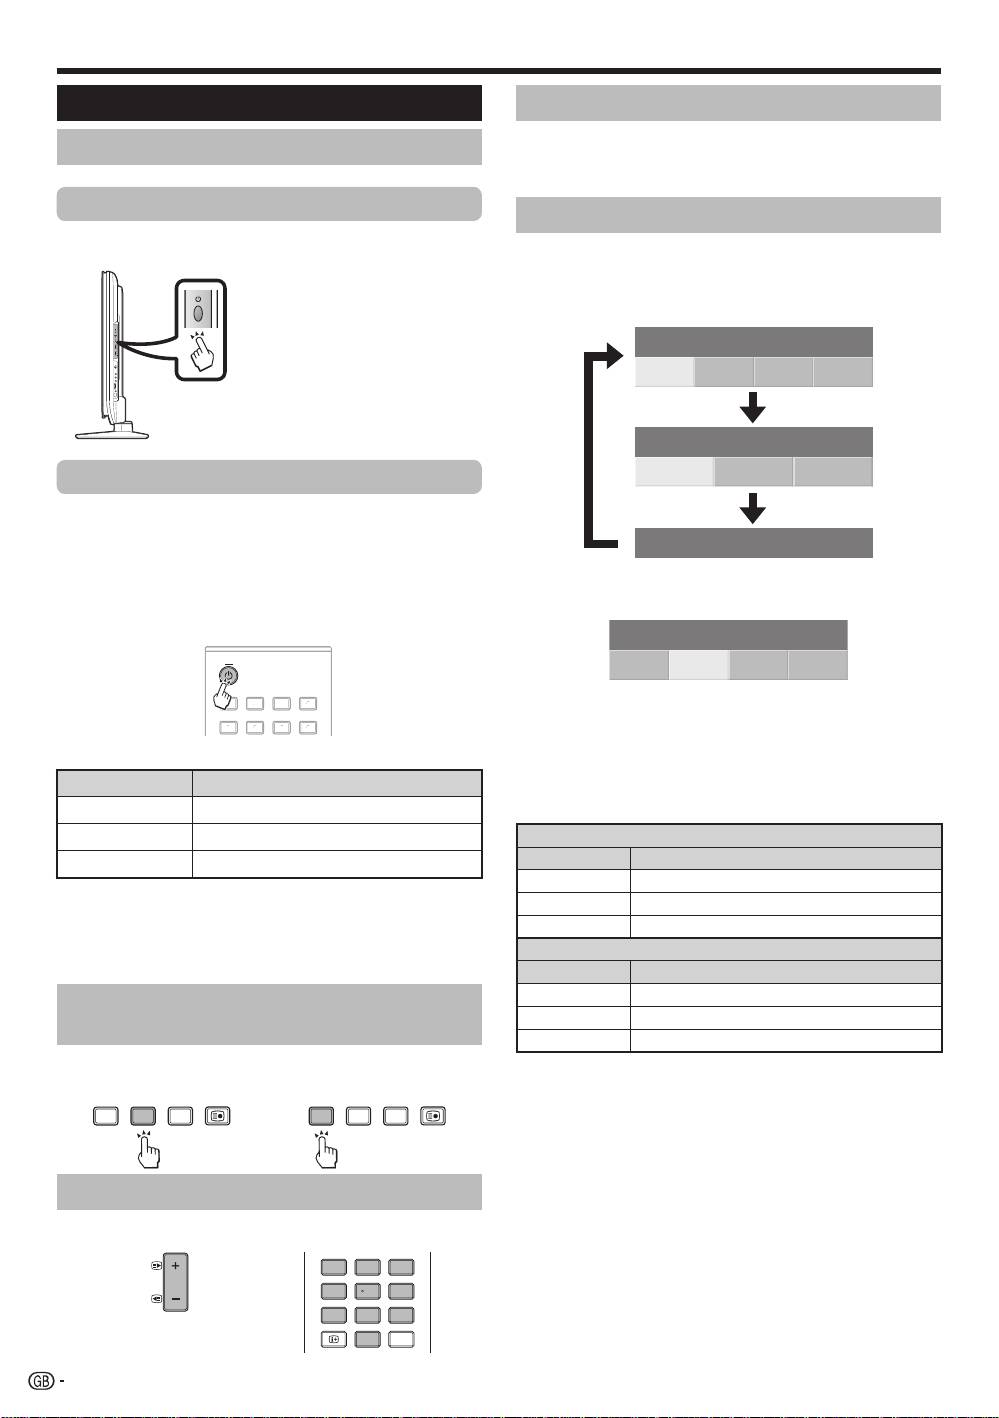
Daily operation
Switching on/off
Turning on/off the power
Press a on the TV.
Switch it off by pressing a on the TV.
Standby mode
To standby mode
If the TV is switched on, you can switch it to standby
by pressing a (TV)
on the remote control unit.
Switching on from standby
From standby, press a (TV) on the remote control unit.
TV
INPUT
1 2 3 4
5 6 7 8
MENU
CM SKIP
SOURCE
HOME
MENU
EXIT
HDMI REC STOP
CTRL
TV DTV
INFO
4 5 6
7 8 9
1 2 3
P
TV
TOOLS
CH RETURN
STB DVR VCR
ENTER
0
DVD
SCREEN
RADIO
DVD
SIZE
DVD TOPMENU/
P.INFO
SELEC TION
SELECT
GUIDE
RETURN
EPG
HDD
AV
TV
D
TV
RADI
O
1
2
3
4
5
6
7
8
I
N
PU
T
4
5
6
7
8
9
1
2
3
0
P.INF
O
INF
O
P
C
H RETUR
N
EXIT
DVD T
O
PMENU
/
G
UID
E
EP
G
ENTER
H
O
M
E
M
EN
U
MENU
R
ET
URN
C
TRL
HD
M
I
RE
C
S
T
OP
HDD
AV
S
ELE
C
TI
ON
C
M SKIP
D
V
D
T
OO
L
S
S
CREE
N
S
IZE
SOU
R
C
E
TV
STB
D
V
R
V
CR
D
V
D
S
ELE
CT
Selecting an external video source
Once the connection is made, press INPUT1–8 on the
remote control unit or b on the TV to switch over to
the appropriate external source.
NOTE
•
When turning off the power using
a on the TV, EPG data (Electronic
programme guide) will be lost, and
programmed timer recordings will
not be performed by the TV.
E
E
TV indicator status
TV indicator Status
ON (Blue)
Power on
STAN
DBY (Red)
Standby
SLEEP (Orange)
Sleep timer is on
NOTE
•
If you are not going to use this TV for a long period of time, be sure
to remove the AC cord from the AC outlet.
•
A small amount of electric power is still consumed even when a is
turned off.
Switching between analogue and
digital broadcasts
Changing channels
With Pk/l:
With 0–9:
16
KRL46V_GB.indd 16 2008/07/09 14:08:46
Watching TV
Useful functionsE
Common Operation
Press h and the “HOME MENU” screen
displays.
Press a/b to select “Digital Setup”.
Press a/b to select “EPG Setup”, and then
press ENTER.
REC Picture Size
[16:9 TV]
Download Setup
[Yes]
EPG Setup
Subtitle
CI Menu
Press a/b to select the desired item, and then
press ENTER (Example: “EPG Setup”, “Display
Range Setup”, etc.).
EPG Setup
Display Range Setup
Genre Icon Setup
Yes No
EPG (Electronic Programme Guide)
EPG (Electronic Programme Guide) is a programme list that is displayed on the screen. With the EPG, you can
check the schedule of DTV/RADIO/DATA, view detailed information about them, tune to an event currently on-air
and set a timer for future events.
EPG Overview
Basic functionsE
E
Select a programme using EPG (Page 18)
E
Search for a programme by category (Page 18)
E
Check programme information (Page 18)
E
Search for a programme by date and time
(Page 18)
E
Timer recording using EPG (Page 19)
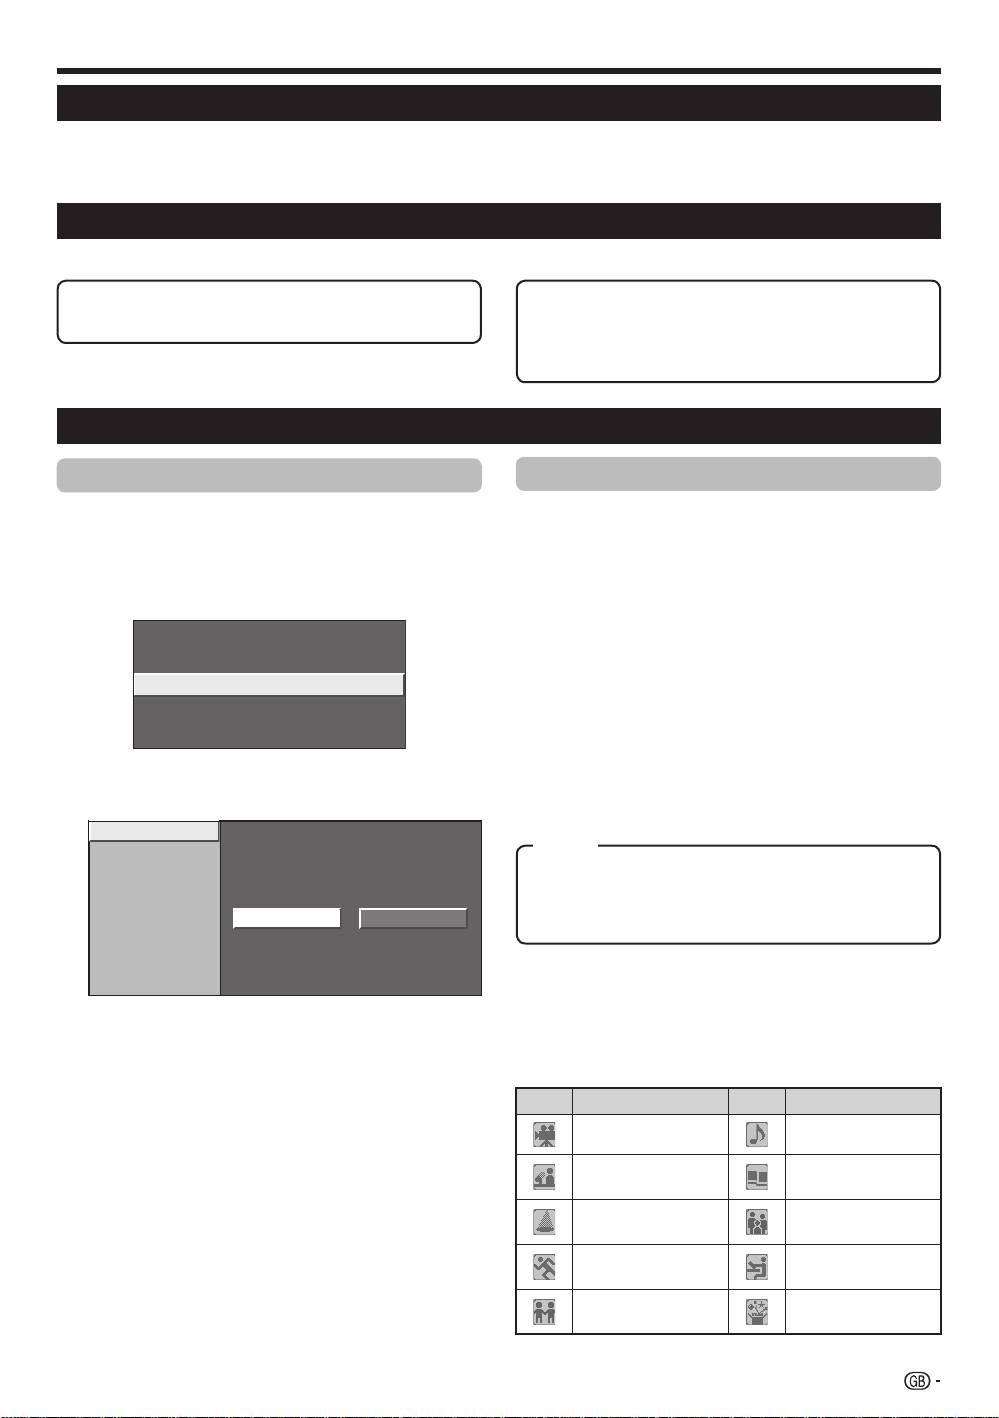
Useful settings for using EPG
EPG display settings
1
E
EPG Setup (setting for receiving EPG
data)
2
If you want to use the EPG for digital stations, select
3
“Yes”. The EPG data must be automatically captured
while the TV is in standby mode. After setting to “Yes”,
it may take some time to turn off the power using the
remote control unit due to the process of the data
capture.
NOTE
•
If the TV main power is switched off, the EPG data will not
be captured.
4
E
Display Range Setup
The “Display Range Setup” allows you to select three
types of time spans for display on the screen.
Item
Mode1: Displays six hours of programme information.
Mode2: Displays three hours of programme information.
Mode3: Changes to the EPG display format with a
vertical time span.
E
Genre Icon Setup
You can grey out or place a mark on desired genres
and smoothly search for programmes you frequently
5
Press a/b/c/d to select or adjust the desired
watch.
item, and then press ENTER (Example: “Yes”,
“No”, etc.).
E
Genre Icon List
Icon Genre Icon Genre
Movie/Drama Music/Ballet/Dance
Arts/Culture (without
News/Current affairs
music)
Social/Political
Show/Game show
Issues/Economics
Education/Science/
Sports
Factual Topics
Children’s/Youth
Leisure hobbies
programmes
17
KRL46V_GB.indd 17 2008/07/09 14:08:47
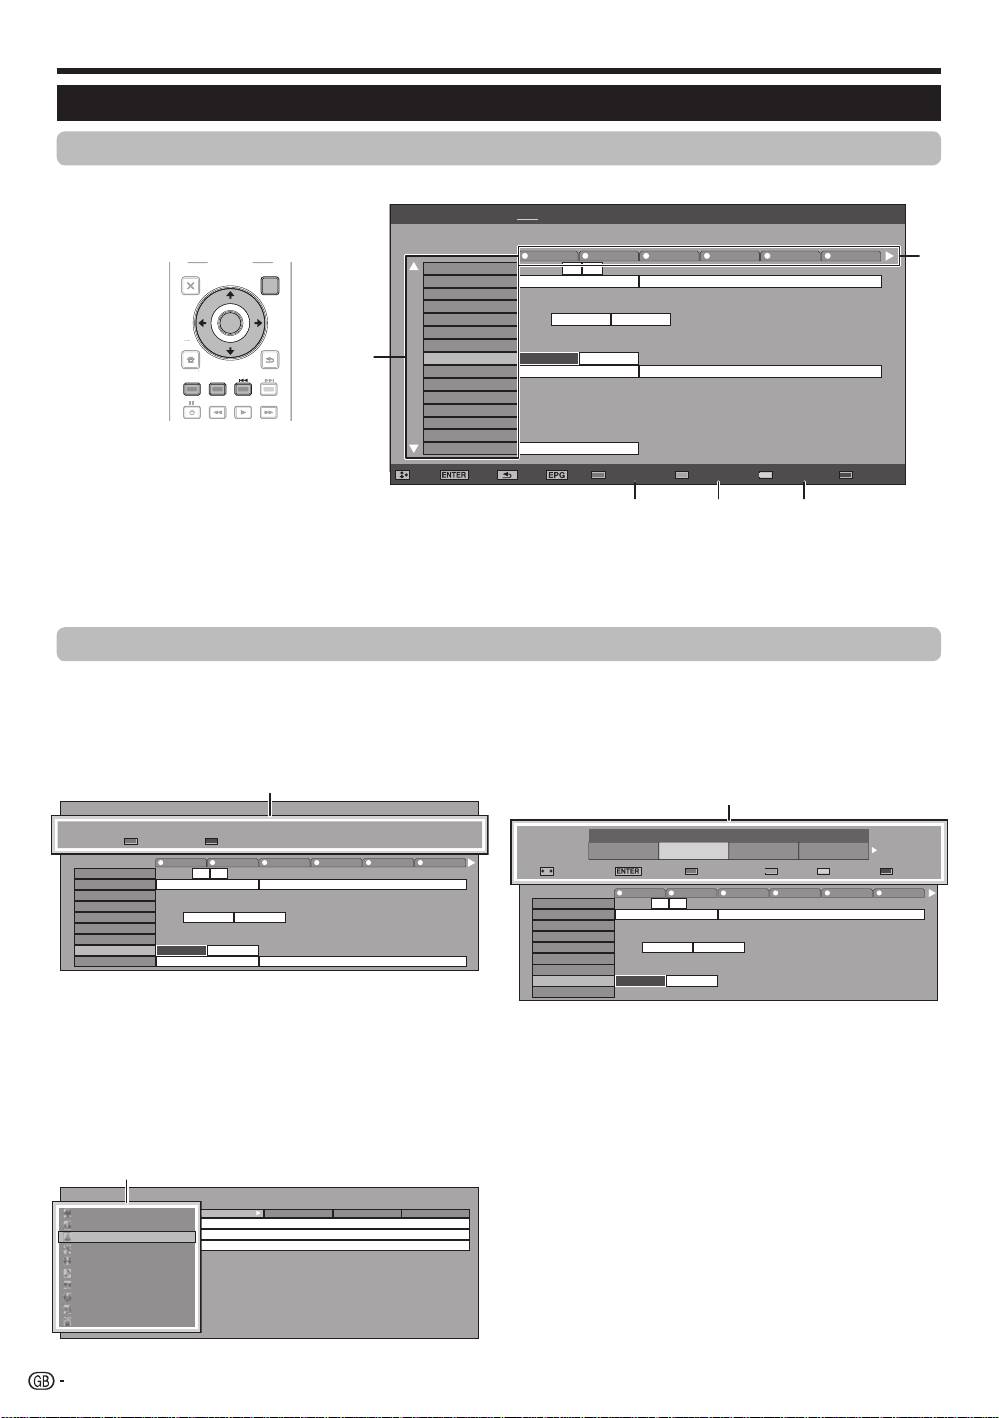
Check programme information
Press a/b/c/d to select the programme you
want to check.
Press Red button.
040
BBC News 24 BBC News
10 : 00AM - 1 : 00 AM
Programme Info.
The BBC’s rolling news service with headlines every 15 minutes.
R
Back to EPG
B
Next
10 AM 11 0 PM 1 2 3
BBC TWO 002
BBC THREE 007
This is BBC THREE
This is BBC THREE
BBC FOUR 010
BBC FIVE 012
CBBC Channel 030
BBC NEWS BBC NEWS
BBC 1 061
BB22 062
BBC NEWS 24 340
BBC NEWS BBC NEWS
BBCi 351
BBCi BBCi
Press ENTER to tune to the selected programme.
Search a programme in a category
Press Green button.
Press a/b to select the desired genre, and
then press ENTER.
Press a/b to select a programme you want to
watch, and then press ENTER.
[Today] 0-12 [Today] 12-0 [Tue] 20 0-12 [Tue] 20 12-0
Movie/Drama
10 : 50 AM - 11 : 05 AMMon 19/05CBBC Cahnnel 030 time
News/Current affairs
10 : 50 AM - 11 : 10 AMMon 19/05BBC TWO 002 School is Lock
Show/Game show
11 : 05 AM - 11 : 20 AMMon 19/05CBBC Cahnnel 030 Words and Pictures
Sports
Children’s/Youth programmes
Music/Ballet/Dance
Arts/Culture (without music)
Social/Political Issues/Economics
Education/Science/Factual Topics
Leisure hobbies
3
Search for a programme by date/time
1
Press Yellow button.
Press c/d to select the desired time span, and
2
then press ENTER.
3
4
1
2
3
•
Refer to page 17 for the genre setting.
Search by Time
Today
0 AM -
6 AM -
0 PM -
6 PM -
6 AM
0 PM
6 PM
0 AM
Next
: Select Time
OK
: Enter
R
Back to EPG
G
Enter
Y
+1 Week
B
Next
10 AM 11 0 PM 1 2 3
BBC TWO 002
BBC THREE 007
This is BBC THREE
This is BBC THREE
BBC FOUR 010
BBC FIVE 012
CBBC Channel 030
BBC NEWS BBC NEWS
BBC 1 061
BB22 062
BBC NEWS 24 340
BBC NEWS BBC NEWS
SIT 1 994
Watching TV
Selecting a programme using EPG
Basic Operation
The illustrations on this page are explained using three digit services.
E
Display/Close the EPG screen
Press EPG.
E
Select a programme
1
Select the time span
Press c/d to select the time span you want to search.
•
Continue to press d to display programmes in the next time span.
2
Select the desired programme
Press a/b to select the desired programme.
•
If a or b are displayed on the left of the services, continue to press a/b to display next or previous screen.
Selecting a programme
5
1
2
3
Press a/b to select the desired programme,
and then press ENTER.
NOTE
•
When you select a programme outside of the current time
span, the timer setting screen is displayed (Page 19).
18
EPG [Mon]16/04 10:57 AM[DTV-TV] Today (Tue)20 (Wed)21 (Thu)22 (Fri)23 (Sat)24 (Sun)25 (Mon)26
040
BBC News 24 BBC News
10 : 00AM - 1 : 00 AM
10 AM 11 0 PM 1 2 3
BBC TWO 002
BBC THREE 007
This is BBC THREE
This is BBC THREE
BBC FOUR 010
BBC FIVE 012
CBBC Channel 030
BBC NEWS BBC NEWS
BBC 1 061
BB22 062
BBC NEWS 24 340
BBC NEWS BBC NEWS
BBCi 351
BBCi BBCi
SIT 1 994
SIT 2 995
SIT 3 996
SIT 4 997
SIT 5 998
BBC ONE 999
This is BBC THREE
: Select : Enter : Back : Exit Programme info. Search By Genre Search By Date Timer List
1
2
3 4 5
TV
INPUT
1 2 3 4
5 6 7 8
TV DTV
RADIO
1 2 3
4 5 6
7 8 9
INFO
0
P.INFO
CH RETURN
P
DVD TOPMENU/
EXIT
GUIDE
EPG
ENTER
HOME
MENU
RETURN
MENU
CM SKIP
SOURCE
HDMI REC STOP
CTRL
TV
TOOLS
STB DVR VCR
DVD
SCREEN
DVD
SIZE
SELEC TION
SELECT
HDD
AV
TV
D
TV
RADI
O
1
2
3
4
5
6
7
8
TV
I
N
P
U
T
4
5
6
7
8
9
1
2
3
0
P
.INFO
I
NF
O
P
C
H RET
U
R
N
EXIT
HOME
MEN
U
MEN
U
RETURN
C
TRL
H
DM
I
RE
C
S
T
OP
HDD
AV
S
ELE
C
TI
O
N
C
M
S
KI
P
D
V
D
TOO
L
S
SC
REE
N
S
IZ
E
SOU
R
CE
TV
ST
B
DVR
V
C
R
D
V
D
SELECT
Programme Information
Search by Time
Today
0 - 6 6 -12 12 - 18 18 - 0
Next
: Select Time
: Enter
Back to EPG
Enter +1 Week
Next
Programme Info.
The BBC’s rolling news service with headlines every 15 minutes.
Back to EPG
Next
Movie/Drama
News/Current affairs
Show/Game show
Sports
Children’s/Youth programmes
Music/Ballet/Dance
Arts/Culture (without music)
Social/Political Issues/Economics
Education/Science/Factual Topics
Leisure hobbies
Date/Time
Genre
KRL46V_GB.indd 18 2008/07/09 14:08:49
