Pioneer KRL-46V: Installation precautions
Installation precautions: Pioneer KRL-46V
Table of contents
- Contents
- Important Safety Precautions
- Remote control unit
- Controlling other equipment using the supplied remote control unit Presetting manufacture codes Manufacture codes STB DVD
- DVR VCR BD VCR
- Using with other equipment (STB) Using with other equipment (VCR)
- Using with other equipment (DVD/DVR)
- Trademarks
- TV (Front view) TV (Rear view)
- Preparation Supplied accessories Attaching the stand unit
- Preparation Inserting the batteries Using the remote control unit
- Installation precautions
- Quick guide Initial installation overview
- Before turning on the power
- Initial auto installation
- Watching TV Daily operation
- EPG (Electronic Programme Guide) EPG Overview Useful settings for using EPG
- Selecting a programme using EPG
- Timer recording using EPG Cancelling the timer recording
- Teletext Using the MHEG-5 application (UK only)
- Connecting external devices Introduction to connections
- HDMI connection Component connection S-VIDEO/VIDEO connection
- SCART connection Controlling devices with SCART using i/o link.A
- Speaker/amplifier connection
- Inserting a smart card
- HDMI CONTROL Controlling HDMI devices using HDMI CONTROL
- HDMI CONTROL connection HDMI CONTROL Setup
- Operating an HDMI CONTROL device
- Menu operation What is the HOME MENU?
- Basic adjustment Picture Settings
- Sound Settings Power Save Settings
- Channel Settings
- Analogue channel settings
- Password/Parental lock settings Language Settings (language, subtitle, multi audio)
- Useful Viewing functions Selecting the picture size
- Other picture and audio settings
- Display Settings
- Other useful features Setting when using external devices Additional features
- Connecting a PC Connecting a PC Displaying a PC image on the screen
- Selecting input resolution
- RS-232C port specifications
- PC compatibility chart RS-232C command list
- Appendix Troubleshooting
- Updating your TV via DVB-T Reset Identification
- Specifications
- End of life disposal
Preparation
Side view
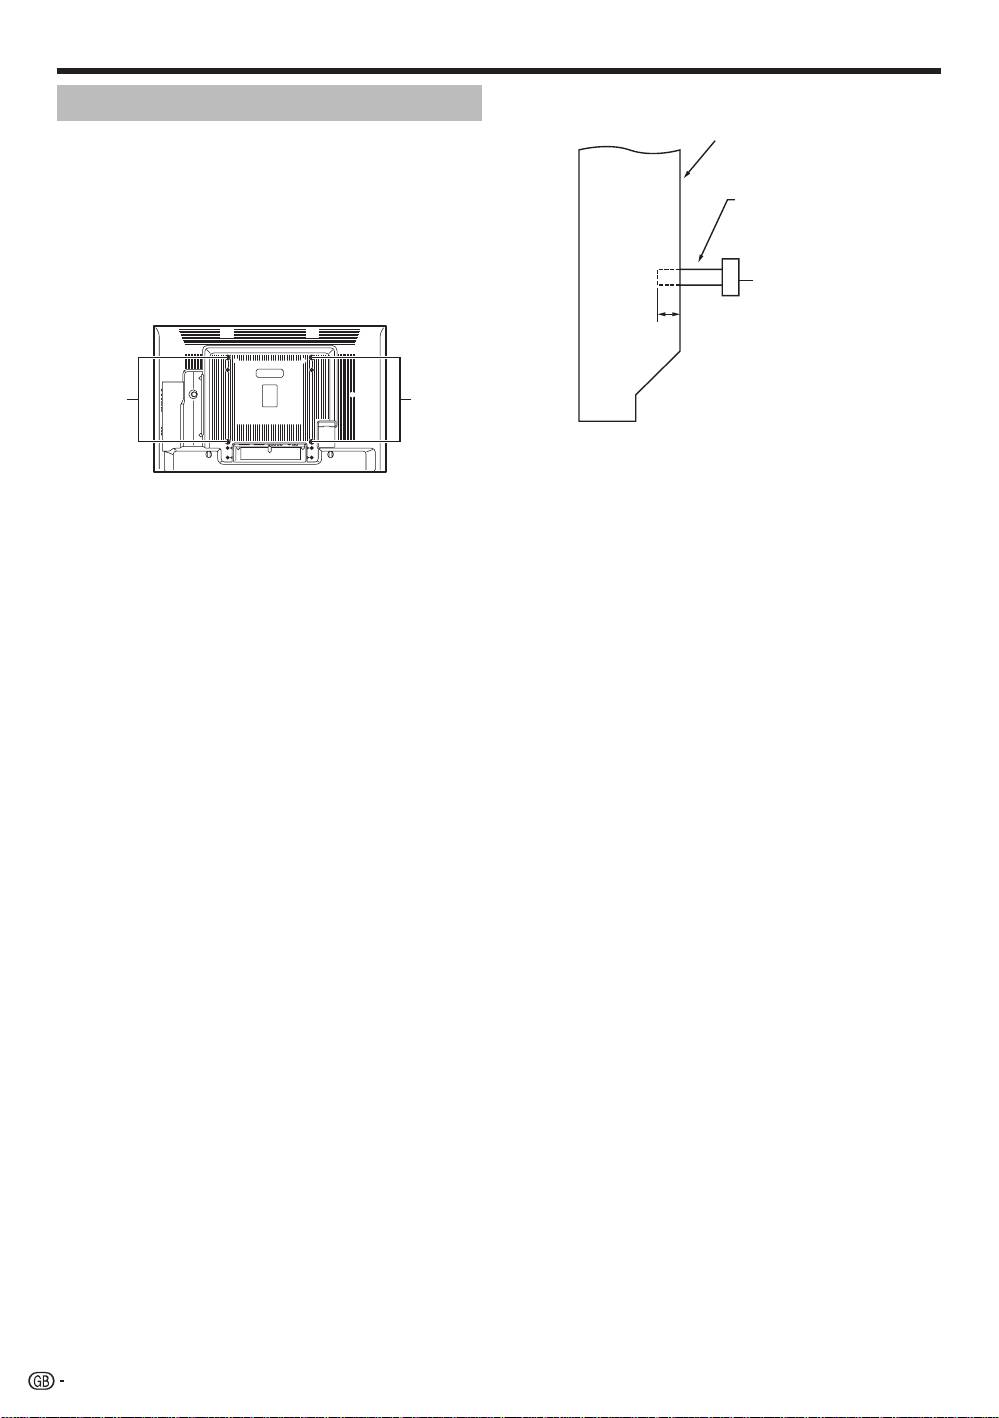
Installation precautions
Mounting surface
Observe the following precautions when installing with
any items such as the optional stand.
Mounting bracket
When using other stands, brackets or equivalent
Flat
(or equivalent item)
items
screen
•
Consult your dealer.
TV
•
The following mounting holes can be used for the
installation.
M6 screw
Rear view
12 mm to 15 mm
M
ounting
Mounting
holes
holes
NOTE
•
The mounting holes can be used after removing the
black seals and the screws.
CAUTION
•
Use M6 screws, which go 12 mm to 15 mm in
depth fr
om the mounting surface of the flat screen
TV. See the side view shown to the right.
•
Be careful not to block the ventilation opening at the
rear of the flat screen TV.
•
Be sure to install the flat screen TV on a flat surface
because the LCD panel used in this product is made
of glass.
•
The screw holes other than the illustrations above
are to be used only for the specified products. Never
use them for mounting non-specified products.
NOTE
•
Pioneer shall not be liable for any personal injury
or product damage that results from the use of
mounting items.
12
KRL46V_GB.indd 12 2008/07/09 14:08:40
