Pioneer KRL-46V: HDMI connection Component connection S-VIDEO/VIDEO connection
HDMI connection Component connection S-VIDEO/VIDEO connection: Pioneer KRL-46V
Table of contents
- Contents
- Important Safety Precautions
- Remote control unit
- Controlling other equipment using the supplied remote control unit Presetting manufacture codes Manufacture codes STB DVD
- DVR VCR BD VCR
- Using with other equipment (STB) Using with other equipment (VCR)
- Using with other equipment (DVD/DVR)
- Trademarks
- TV (Front view) TV (Rear view)
- Preparation Supplied accessories Attaching the stand unit
- Preparation Inserting the batteries Using the remote control unit
- Installation precautions
- Quick guide Initial installation overview
- Before turning on the power
- Initial auto installation
- Watching TV Daily operation
- EPG (Electronic Programme Guide) EPG Overview Useful settings for using EPG
- Selecting a programme using EPG
- Timer recording using EPG Cancelling the timer recording
- Teletext Using the MHEG-5 application (UK only)
- Connecting external devices Introduction to connections
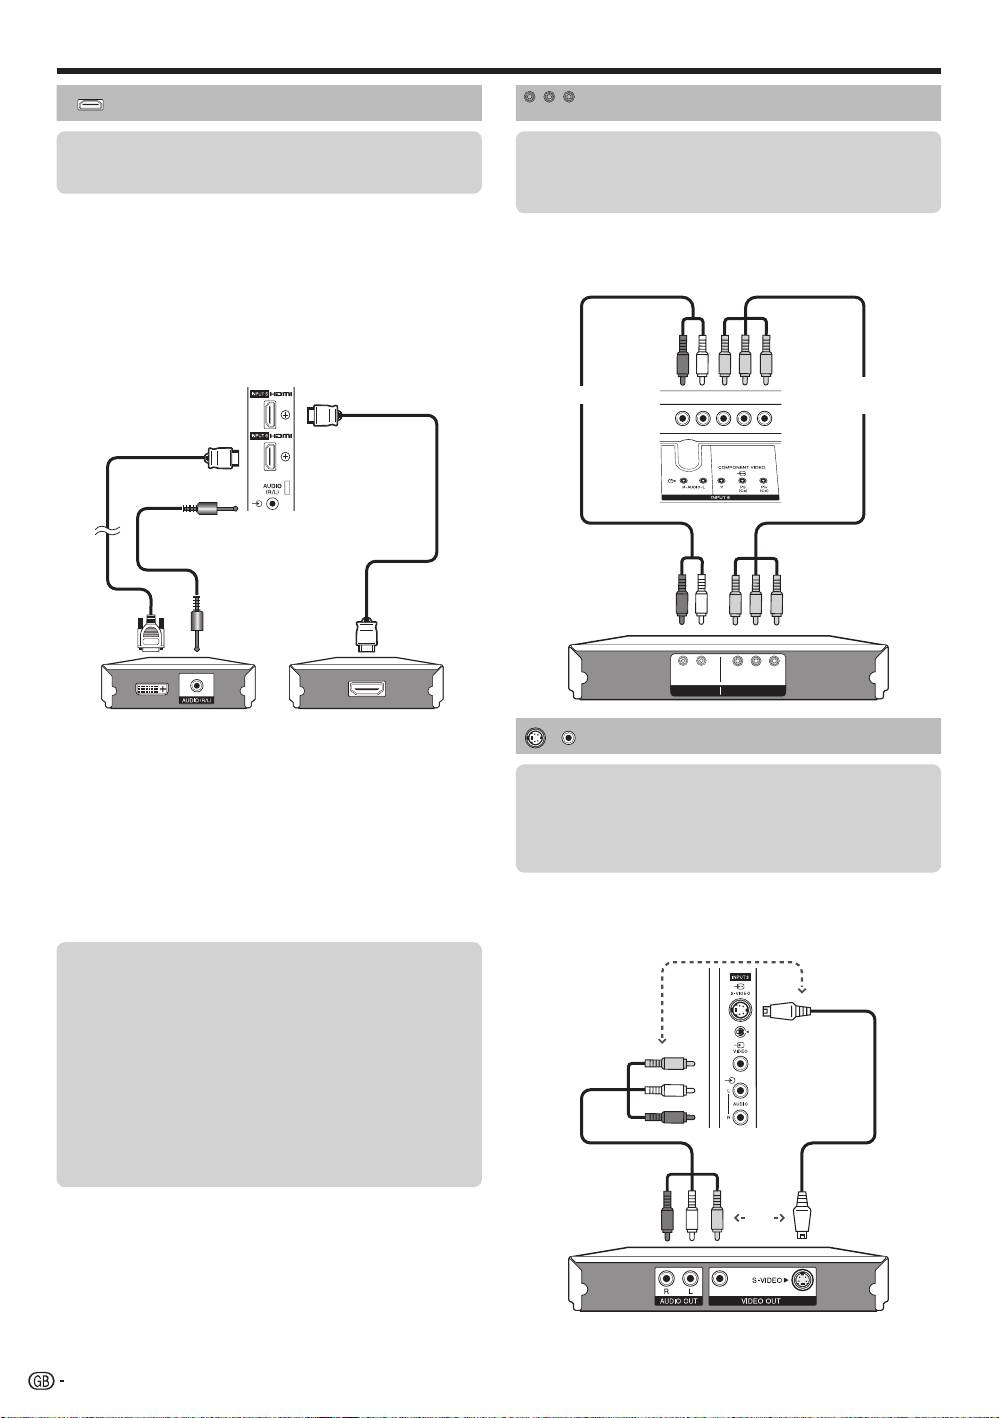
- HDMI connection Component connection S-VIDEO/VIDEO connection
- SCART connection Controlling devices with SCART using i/o link.A
- Speaker/amplifier connection
- Inserting a smart card
- HDMI CONTROL Controlling HDMI devices using HDMI CONTROL
- HDMI CONTROL connection HDMI CONTROL Setup
- Operating an HDMI CONTROL device
- Menu operation What is the HOME MENU?
- Basic adjustment Picture Settings
- Sound Settings Power Save Settings
- Channel Settings
- Analogue channel settings
- Password/Parental lock settings Language Settings (language, subtitle, multi audio)
- Useful Viewing functions Selecting the picture size
- Other picture and audio settings
- Display Settings
- Other useful features Setting when using external devices Additional features
- Connecting a PC Connecting a PC Displaying a PC image on the screen
- Selecting input resolution
- RS-232C port specifications
- PC compatibility chart RS-232C command list
- Appendix Troubleshooting
- Updating your TV via DVB-T Reset Identification
- Specifications
- End of life disposal
Connecting external devices
HDMI connection
Component connection
The HDMI connections (High Definition Multimedia
Interface) permit digital video and audio transmission
You will enjoy accurate colour reproduction and high
via a connection cable from a player/recorder. The
quality images through the INPUT8 terminal when
digital picture and sound data are transmitted without
connecting a DVD player/recorder or other device.
data compression and therefore lose none of their
quality. Analogue/digital conversion is no longer
necessary in the connected devices, which also would
result in quality losses.
DVI/HDMI conversion
Using an DVI/HDMI adapter cable, the digital video
signals of a DVD can also be played via the compatible
HDMI connection. The sound must be fed in additionally.
•
When connecting a DVI/HDMI conversion adapter/cable to the
HDMI terminal, the image may not come in clearly.
Both HDMI and DVI use the same HDCP copy
protection method.
NOTE
•
If a connected HDMI device is HDMI CONTROL compatible,
you can take advantage of versatile functions (Pages 26–28).
•
Video noise may occur depending on the type of HDMI cable used.
Make sure to use a certified HDMI cable.
•
When playing the HDMI image, the best possible format for the
picture will be detected and set automatically.
Supported video signal:
576i, 576p, 480i, 480p, 1080i, 720p, 1080p
See page 42 for PC signal compatibility.
LR PR
Y PB
(
CB)
(
CR)
COMPONENTAUDIO
Example of connectable devices
Example of connectable devices
DVD player/recorder E Blu-ray player/recorderE
E
VCR E DVD player/recorder
E
Blu-ray player/recorder
Component
Audio cable
cable
DVI/HDMI cable
HDMI-certified
cable
ø 3.5 mm stereo minijack
cable
S-VIDEO/VIDEO connection
Example of connectable devices
E
VCR E DVD player/recorder
E
Blu-ray player/recorder
E
Game console E Camcorder
You can use the INPUT3 terminal when connecting to
a game console, camcorder, a DVD player/recorder or
other device.
or
E
After connecting
HDMI Audio Select
After connecting, you must set the audio signal
compatible with the cable you use for the HDMI
device.
1
Go to “HOME MENU” > “Option” > “HDMI
Audio Select”.
2
Select “Digital” for audio signals via the
HDMI terminal. Select “Analogue” for audio
AV cable
S-video cable
signals via the AUDIO jack (INPUT6).
or
NOTE
•
When using an S-video cable, you also need to connect an
audio cable (R/L).
22
•
INPUT3: The S-VIDEO terminal has priority over the VIDEO terminal.
Y PB
PR
(
CB)
(
CR)
INPUT 4 or 5
KRL46V_GB.indd 22 2008/07/09 14:08:52
