Pioneer KRL-46V: Preparation Supplied accessories Attaching the stand unit
Preparation Supplied accessories Attaching the stand unit: Pioneer KRL-46V
Table of contents
- Contents
- Important Safety Precautions
- Remote control unit
- Controlling other equipment using the supplied remote control unit Presetting manufacture codes Manufacture codes STB DVD
- DVR VCR BD VCR
- Using with other equipment (STB) Using with other equipment (VCR)
- Using with other equipment (DVD/DVR)
- Trademarks
- TV (Front view) TV (Rear view)
- Preparation Supplied accessories Attaching the stand unit
- Preparation Inserting the batteries Using the remote control unit
- Installation precautions
- Quick guide Initial installation overview
- Before turning on the power
- Initial auto installation
- Watching TV Daily operation
- EPG (Electronic Programme Guide) EPG Overview Useful settings for using EPG
- Selecting a programme using EPG
- Timer recording using EPG Cancelling the timer recording
- Teletext Using the MHEG-5 application (UK only)
- Connecting external devices Introduction to connections
- HDMI connection Component connection S-VIDEO/VIDEO connection
- SCART connection Controlling devices with SCART using i/o link.A
- Speaker/amplifier connection
- Inserting a smart card
- HDMI CONTROL Controlling HDMI devices using HDMI CONTROL
- HDMI CONTROL connection HDMI CONTROL Setup
- Operating an HDMI CONTROL device
- Menu operation What is the HOME MENU?
- Basic adjustment Picture Settings
- Sound Settings Power Save Settings
- Channel Settings
- Analogue channel settings
- Password/Parental lock settings Language Settings (language, subtitle, multi audio)
- Useful Viewing functions Selecting the picture size
- Other picture and audio settings
- Display Settings
- Other useful features Setting when using external devices Additional features
- Connecting a PC Connecting a PC Displaying a PC image on the screen
- Selecting input resolution
- RS-232C port specifications
- PC compatibility chart RS-232C command list
- Appendix Troubleshooting
- Updating your TV via DVB-T Reset Identification
- Specifications
- End of life disposal
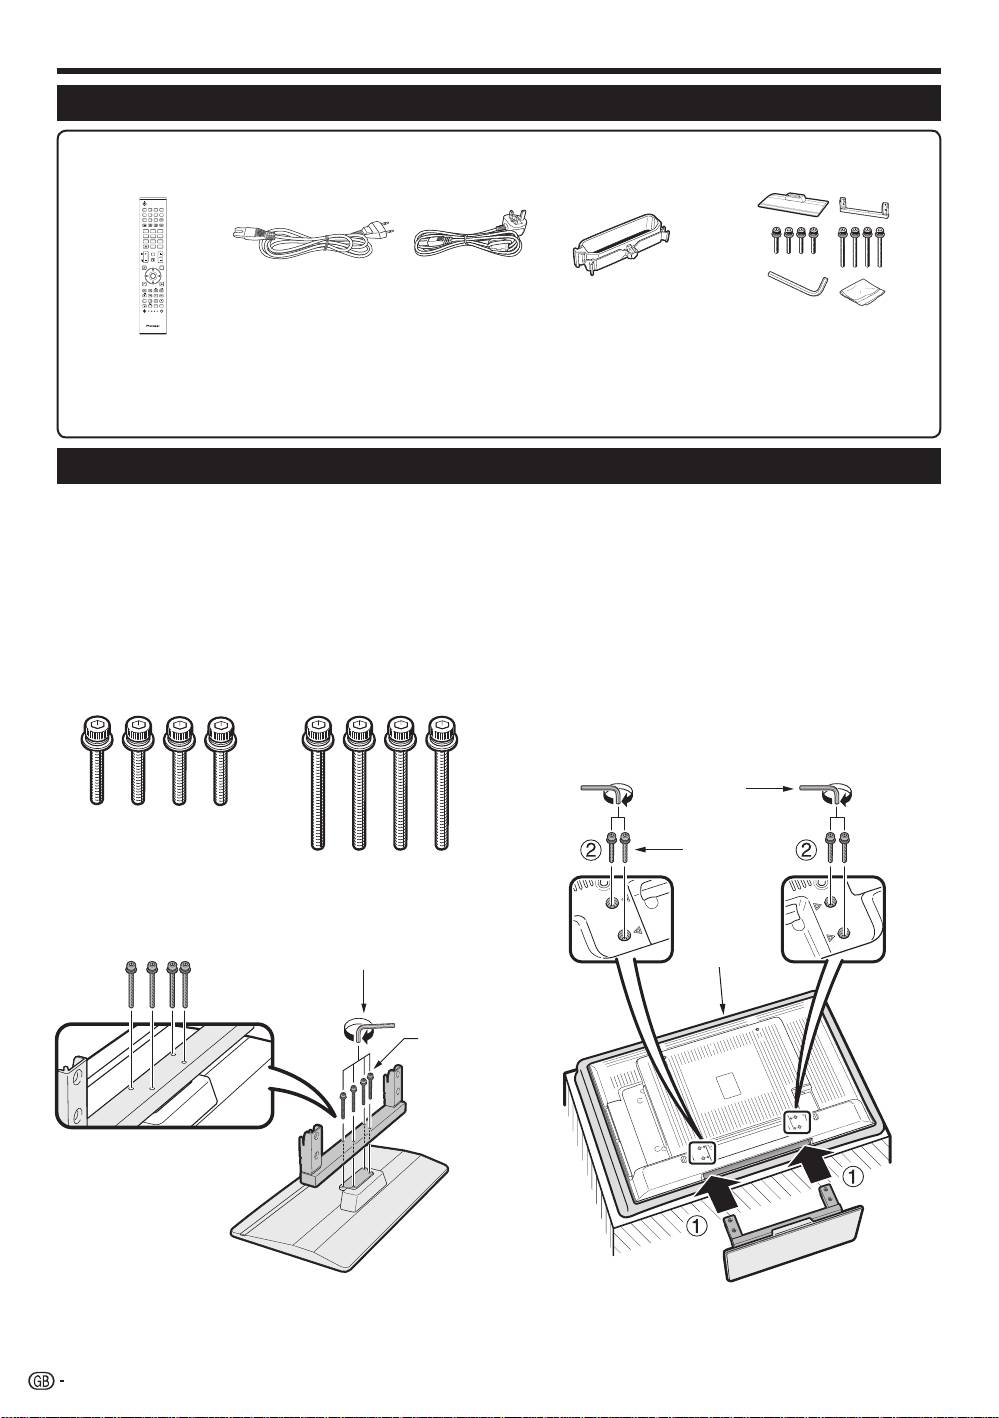
Preparation
Supplied accessories
Remote control unit
AC cord (g2) Stand unit (g1)Cable clamp (g1)
(g1)
Pages 3 and 11 Page 10
Page 14Page 14
•
Operation manual (This publication)
“AA” size alkaline battery (g2) ... Page 11•
•
Warranty card
Attaching the stand unit
•
Before attaching (or detaching) the stand, unplug the AC cord from the AC INPUT terminal.
•
Before performing work, spread cushioning over the surface on which you will be laying the TV. This will prevent
it from being damaged.
CAUTION
•
Attach the stand in the corr
ect direction.
•
Be sure to follow the instructions. Incorrect installation of the stand may result in the TV falling over.
1
Confirm that there are eight screws (four short
3
1
Insert the stand into the openings on the
screws and four long screws) with the stand
bottom of the TV. (Hold the stand so it will
unit.
not drop from the edge of the base area.)
2
Insert and tighten the four short screws into
the four holes on the rear of the TV
Hex key
Short
screw
2
Attach the supporting post for the stand unit
onto the base using the four long screws with
the hex key (supplied) as shown.
Soft
Hex key
cushion
Long
screw
NOTE
•
To detach the stand unit, perform the steps in reverse
order.
10
TV
1 2 3 4
INPUT
5 6 7 8
TV
DTV
RADIO
1 2 3
4 5 6
INFO
7 8 9
0
P.INFO
CH RETURN
P
EXIT
DVD TOPMENU/
GUIDE
EPG
HOME
ENTER
MENU
RETURN
MENU
CTRL
HDMI REC STOP
CM SKIP
SCREEN
SIZE
SELECTION
AV
SOURCE
TV
TOOLS
DVD
DVD
SELECT
HDD
STBDVR VCR
KRL46V_GB.indd 10 2008/07/09 14:08:38
