Pioneer KRP-SW01W: instruction
Class: Household, kitchen appliances, electronics and equipment
Type: Home Theater System
Manual for Pioneer KRP-SW01W
Table of contents
- Contents Cautions
- Checking the Enclosed Parts Care for the Glossy Surface of the Stand
- Attaching the Pioneer Display and Television Assembling the Stand
- Attaching the Pioneer Display and Television
- Forward/Backward Angle of Inclination Adjustment Mechanism
- Installing the Product on a TV table etc. Preparing the Cables
- Preventing Equipment from Falling Over
- Dimensions Diagram Detaching the Pioneer Display and Television from the Stand Specifications

2
Ja
このたびは、パイオニアの製品をお買い求めいただきまし
てまことにありがとうございます。お使いになる前には取扱
説明書をよくお読みになり、安全に正しくご使用ください。
また、お読みになったあとも、この取扱説明書は大切に保
管してください。
「据え付け」について
お客様がご自身で本機の取り付けを困難だと思われ
る場合は、販売店にご相談ください。
なお、据え付け、取り付けの不備、誤使用、改造、
天災などによる事故損傷については、弊社は一切責
任を負いません。
もくじ
取扱上の注意..................................................................2
同梱された部品の確認...................................................3
スタンドの光沢面のお手入れのしかた........................3
スタンドの組み立て方...................................................4
ディスプレイの取り付け方...........................................4
前後角度調整機構...........................................................6
テレビ台などに設置する場合.......................................7
ケーブル処理のしかた...................................................7
転倒防止..........................................................................8
ディスプレイをスタンドから取り外す場合................9
仕 様..............................................................................9
寸法図..............................................................................9
取扱上の注意
ご注意
安全上の絵表示について
取扱説明書および製品に記されている注意事項には、損害
のレベルや内容を示す絵表示が付けられていることがあり
ます。それら絵表示の意味は以下のとおりです。
本製品は弊社製フラットテレビ / フラットパネルディスプ
レイ(KRP-500A/KRP-500M)専用のテーブルトップ
スタンドです。その他の機器への取り付けには対応してお
りません。詳しくは、お買い求めの販売店にご相談ください。
. 注意
指定外のディスプレイへの取り付け、改造および
他の用途での使用はしないでください。
取扱説明書に従って、取り付け・設置を行ってく
ださい。取り付けなどに不具合があると、転倒な
どの事故につながり大変危険です。
設置場所について
設置場所には、スタンドとディスプレイの質量に十
分耐えられる強度をもつ場所を選定してください。
必ず平坦で安定した場所に設置してください。
屋外や温泉、海辺などの水場には設置しないでく
ださい。
振動や衝撃の加わるような場所には設置しないで
ください。
組み立て・設置について
組み立ての手順を守り、指定の箇所はすべて確実
にネジ留めしてください。
指定を守らないとディスプレイ取り付け後に、破
損や転倒など思わぬ事故の原因となることがあり
ます。
ディスプレイの取り付け作業は安全のため、必ず
2 人以上で行ってください。
作業の際には、ディスプレイと周辺機器の電源を
切り、電源プラグをコンセントから抜いてくださ
い。
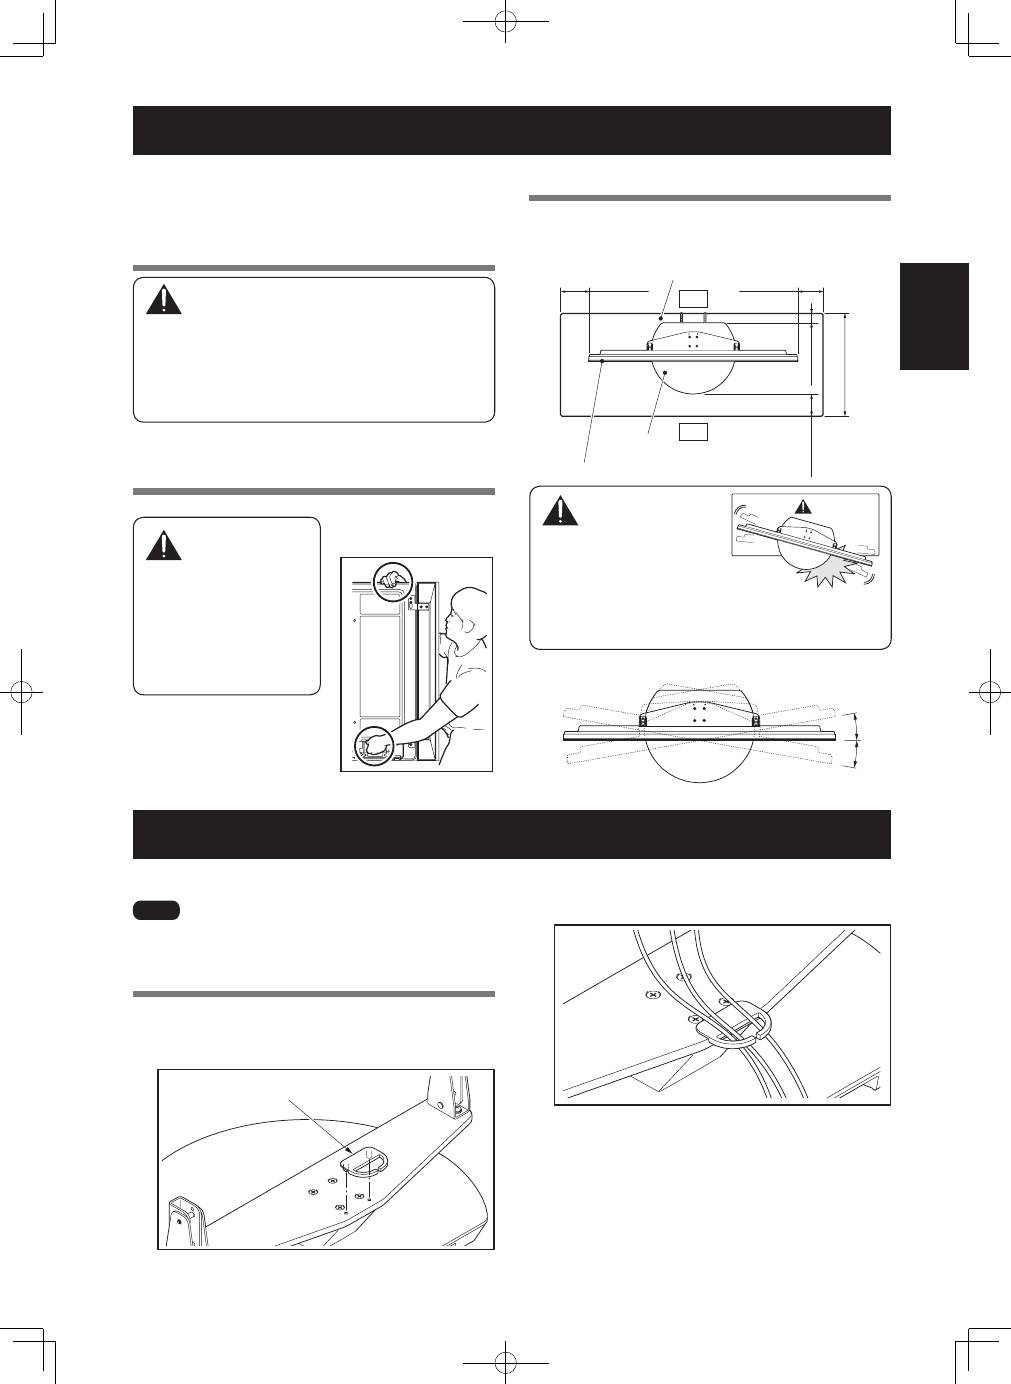
本製品は左右 10
˚
回転、前後約 2
˚
傾斜します。
本製品およびディスプレイ回転範囲に物を置かな
いでください。また、通常使用時および本製品が
回転した時に、テレビ台などの設置場所から外側
にはみ出さないように設置を行ってください。破
損や転倒など思わぬ事故の原因となることがあり
ます(7 ページ参照)。また、前後の角度調整中は
ディスプレイ下部とスタンドとの間に手を挟まな
いようにご注意ください(6 ページ参照)。
地震などでの製品の転倒・落下によるけがなどの
危害を軽減するために、必ず転倒・落下防止対策
を行ってください(8 ページ参照)。
ディスプレイを取り付けた状態でスタンドよりも
小さい台車、パレットに載せて輸送しないでくださ
い。破損や転倒など思わぬ事故の原因となります。
スタンドより小さい台の上に設置しないでくださ
い。
警告 . 注意
人がけがをしたり財産に損害を受
ける恐れがある内容を示します。
人が死亡または重傷を負う恐れが
ある内容を示します。
警告・注意
(気をつけること)
禁止
(やってはいけないこと)
指示・強制
(しなければならないこと)
3
Ja
日本語 日本語
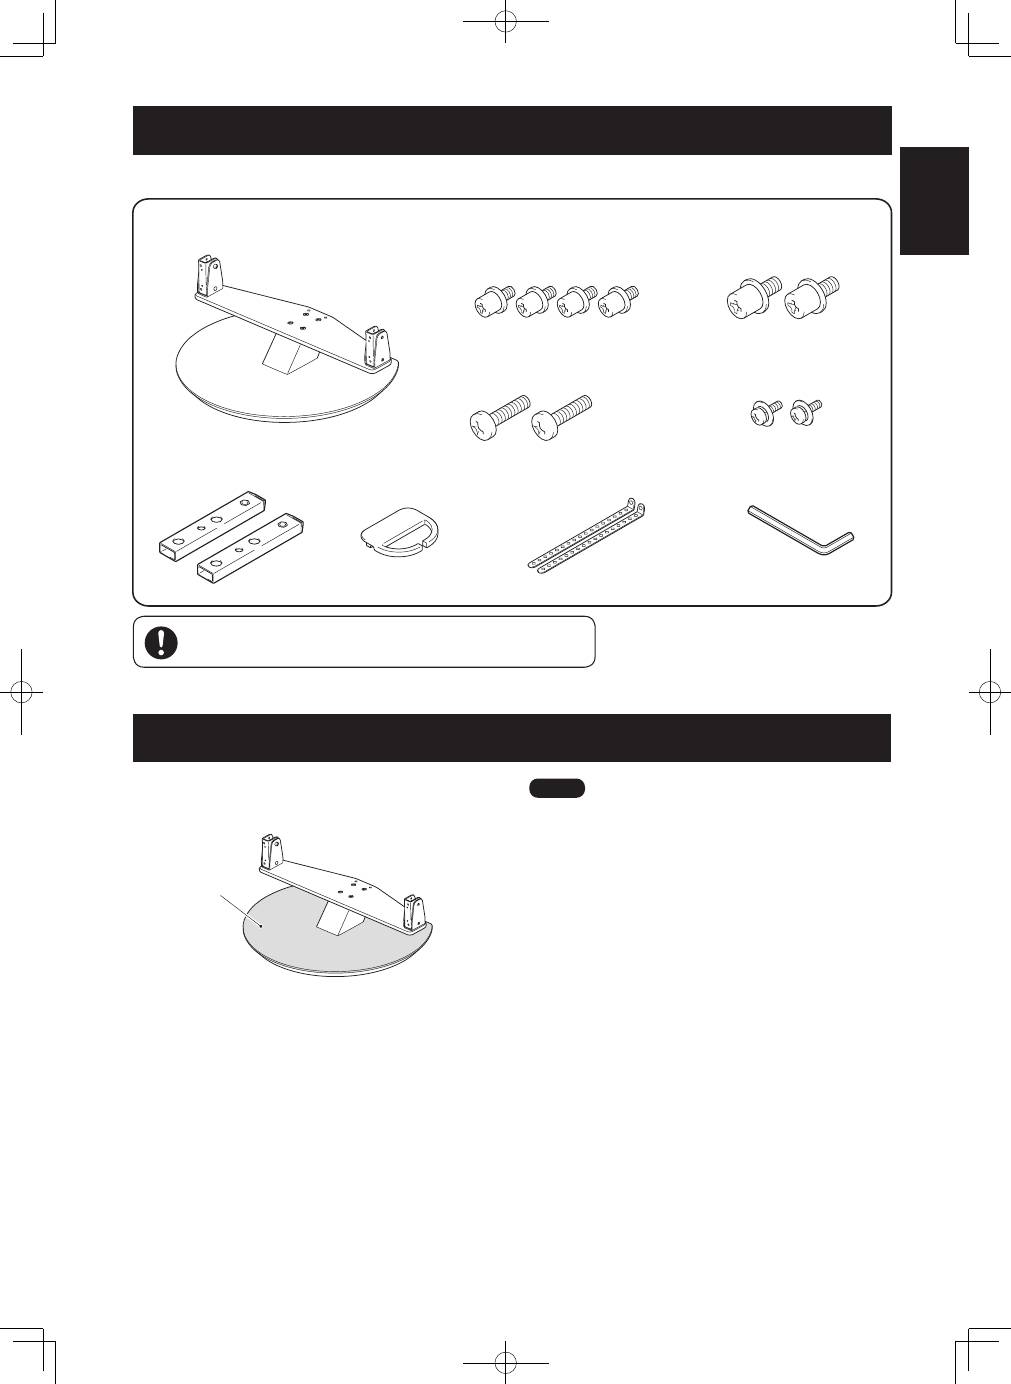
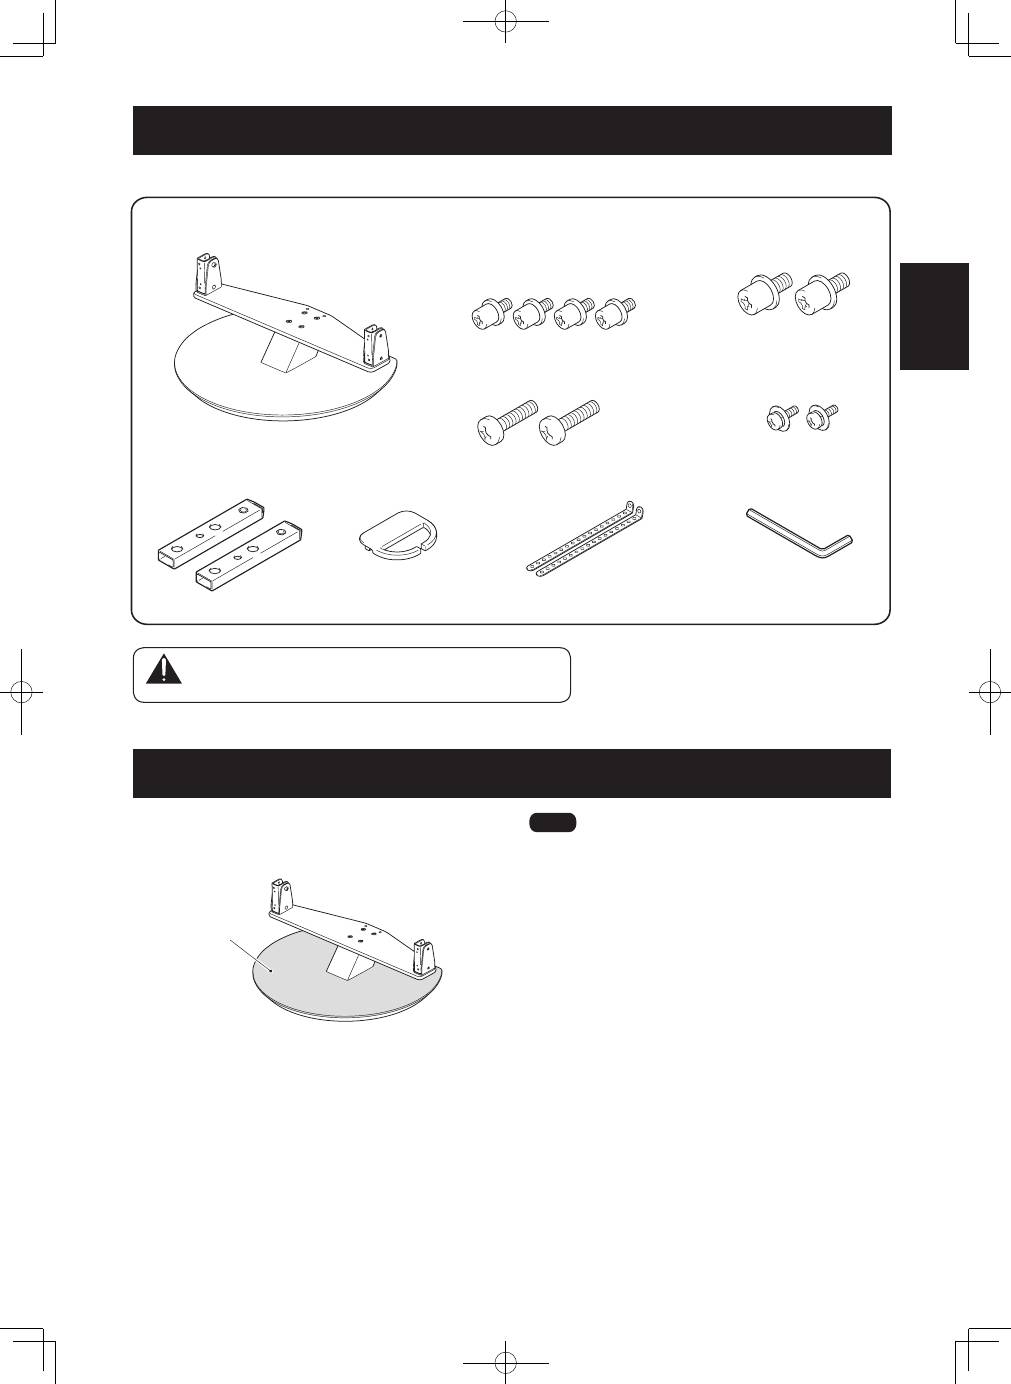
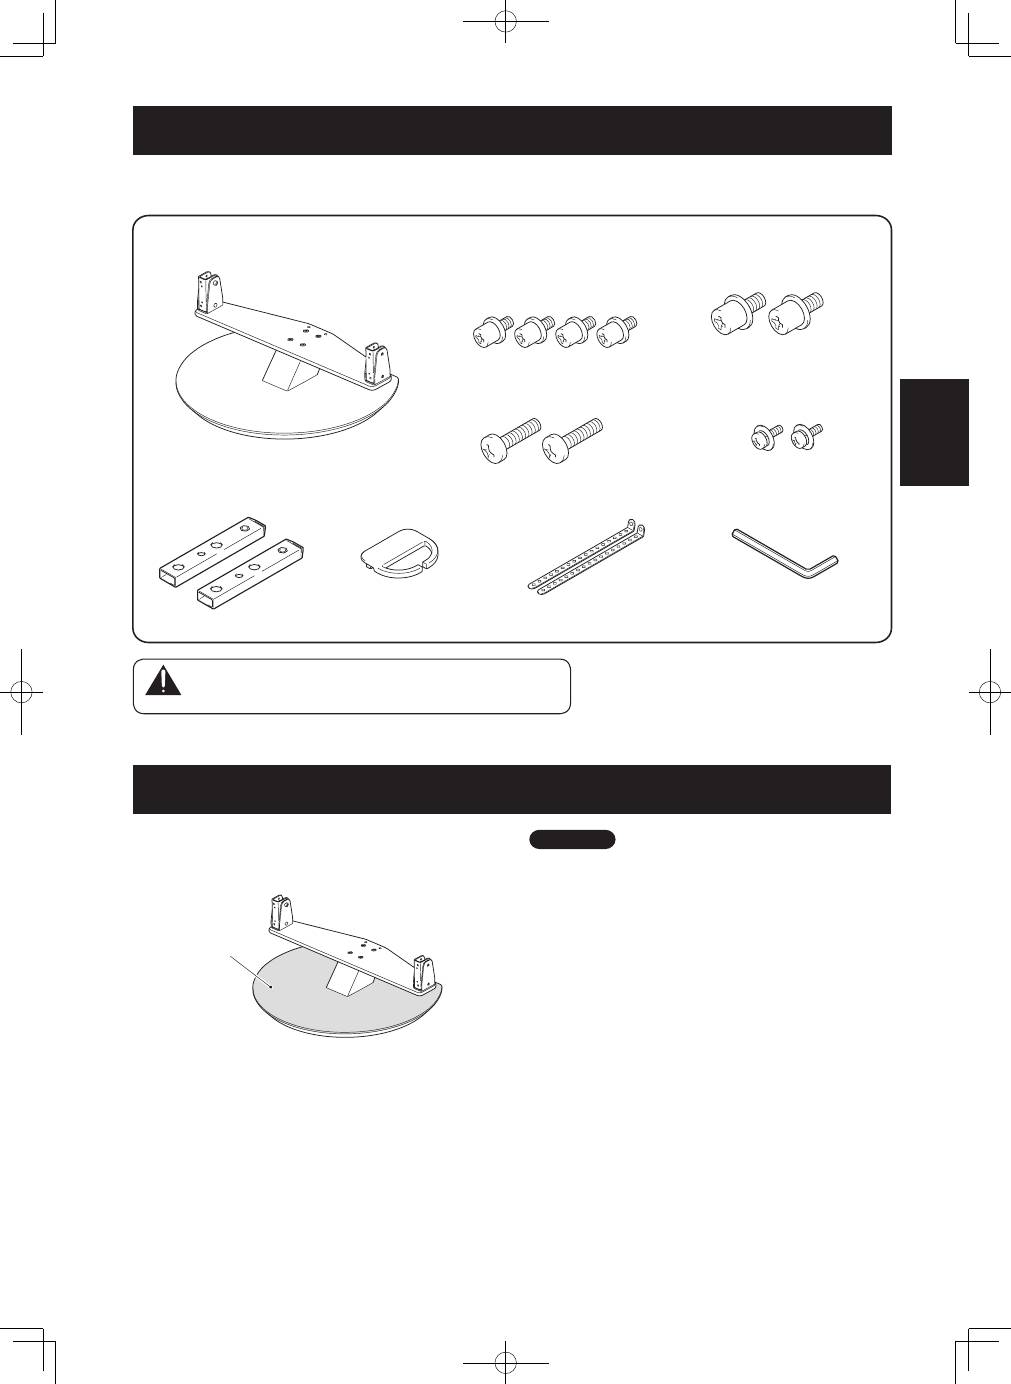
同梱された部品の確認
組み立て・設置の前に同梱された部品を確認してください。
�
テーブルトップスタンド本体 ×1
�
ネジ ④
(M4×10 mm:黒)×2
�
六角レンチ ×1
(対辺寸法:4 mm)
�
取扱説明書(本書)×1
�
支柱 ×2
�
ケーブルバインダー ×1
�
転倒防止ベルト ×2
�
取付ネジ ①
(M6×12 mm:黒)×4
[支柱、テーブルトップスタンド本体固定用]
�
取付ネジ ②
(M8×15 mm:黒)×2
�
取付ネジ ③
(M8×23 mm:黒)×2
不要な小さな部品などは幼児の手の届くところに置かないでください。
誤って飲み込む恐れがあります。
スタンドの光沢面のお手入れのしかた
スタンドの光沢表面は、ディスプレイ側に付属のワイピン
グクロスで軽くから拭きしてください。
光沢表面
ご注意
◦
ほこりのついた布や硬い布で拭いたり、強くこすったりすると
表面に傷がつくことがあります。
◦
スタンドにはプラスチックが多く使われているので、ベンジン、
シンナーなどで拭いたりしないでください。変質したり、塗料
がはがれることがあります。
◦
殺虫剤など、揮発性のものをかけないでください。また、ゴム
やビニール製品などを長時間接触させたままにしないでくださ
い。プラスチックの中に含まれる可塑剤の作用により変質した
り、塗料がはげるなどの原因となります。
4
Ja
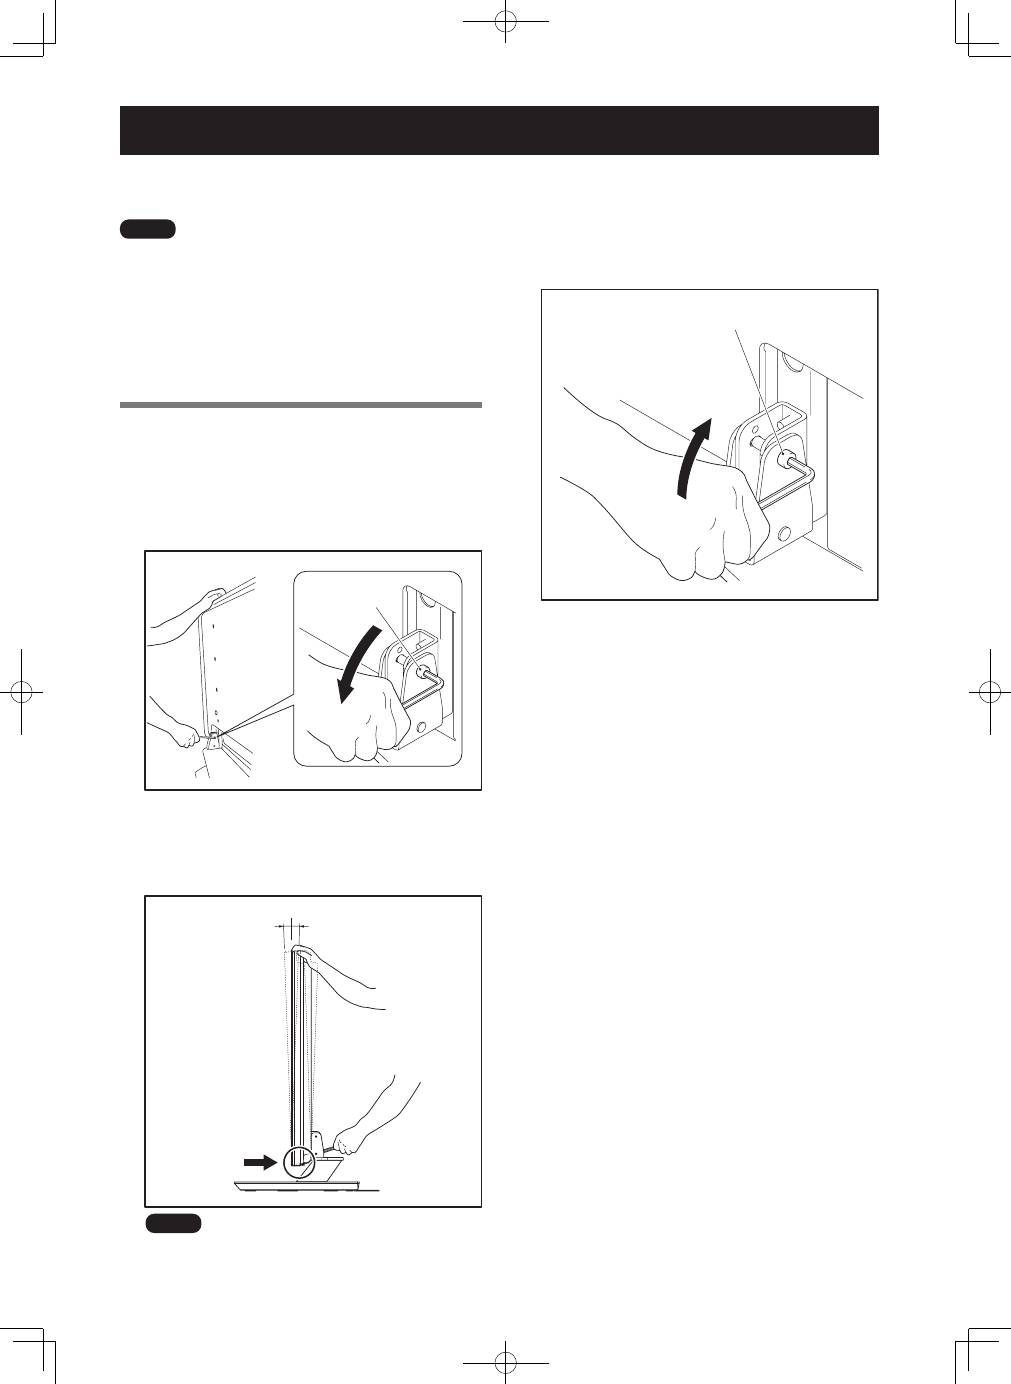
ディスプレイの取り付け方
ディスプレイ(スピーカーなし)は質量が約 31.4
kg あり、奥行きがなく不安定なため、取り付けおよ
び設置は必ず 2 人以上で行ってください。
ご注意
必ず平坦で安定した場所で取り付けをしてください。
ネジは穴に対して垂直に挿入し、しっかり締め付けてください。
取り付け手順
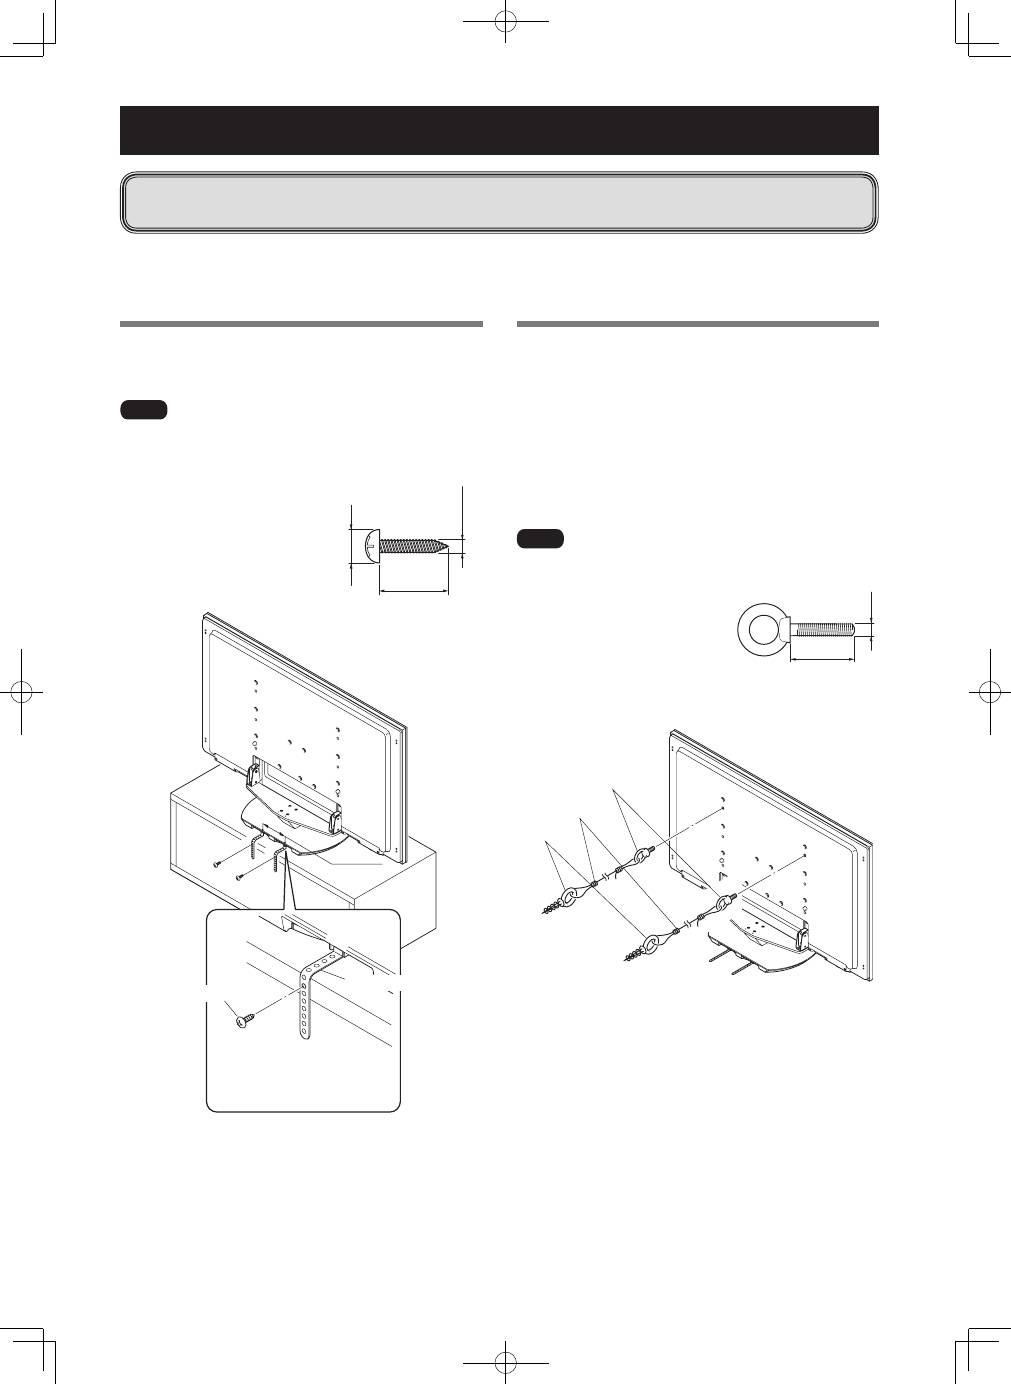
1
取付ネジ④でスタンドに転倒防止ベルトを取
り付ける
プラスドライバーを使用して固定してください。
ネジ④
(M4×10 mm:黒)
転倒防止ベルト
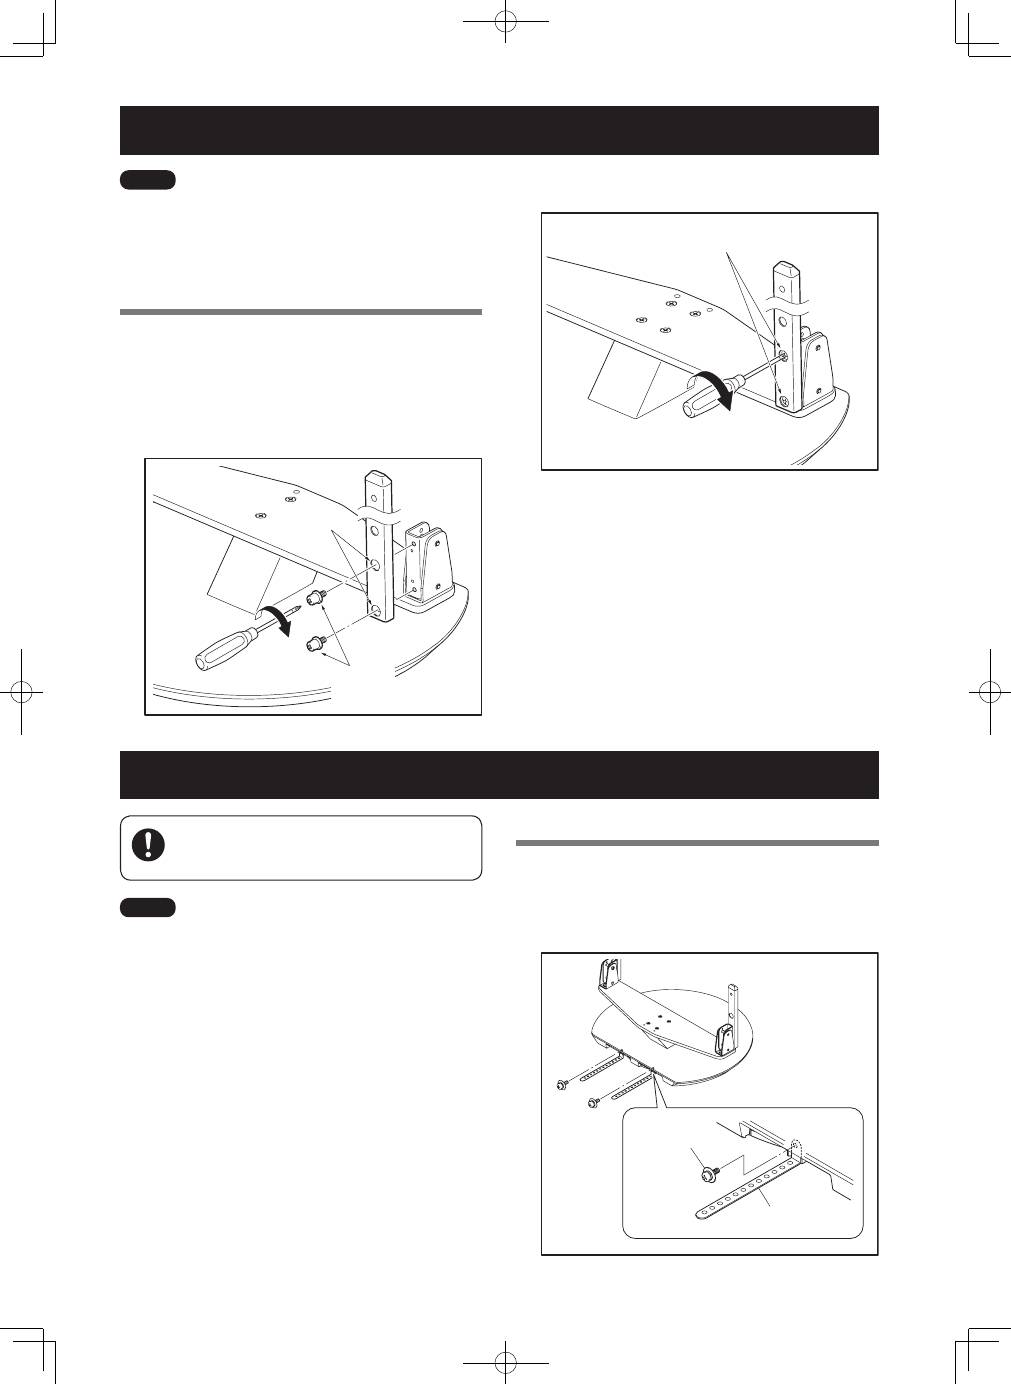
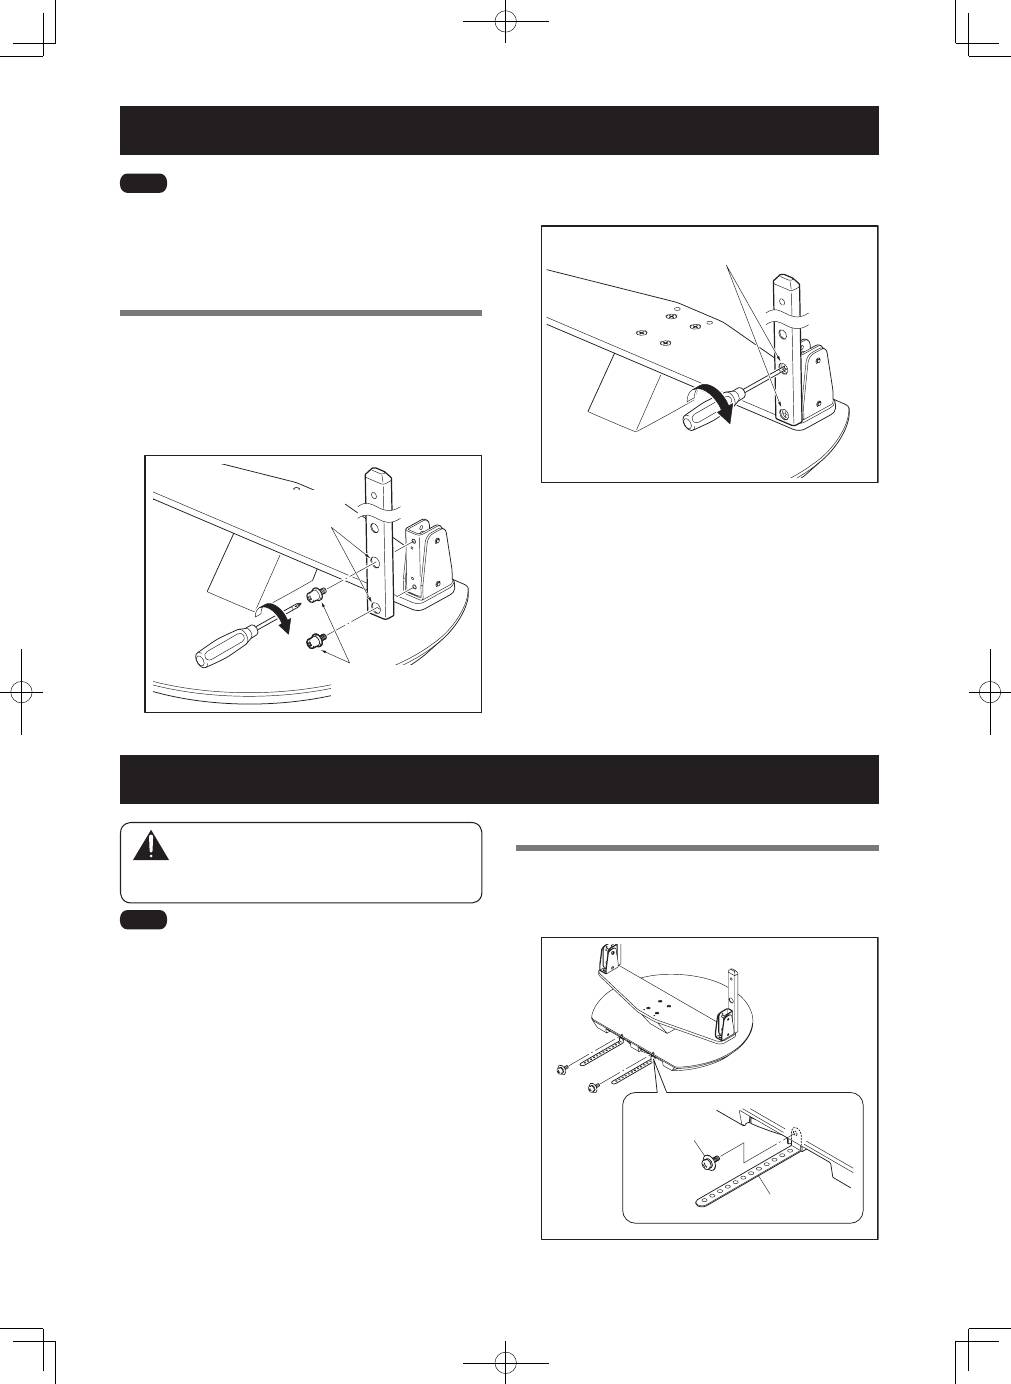
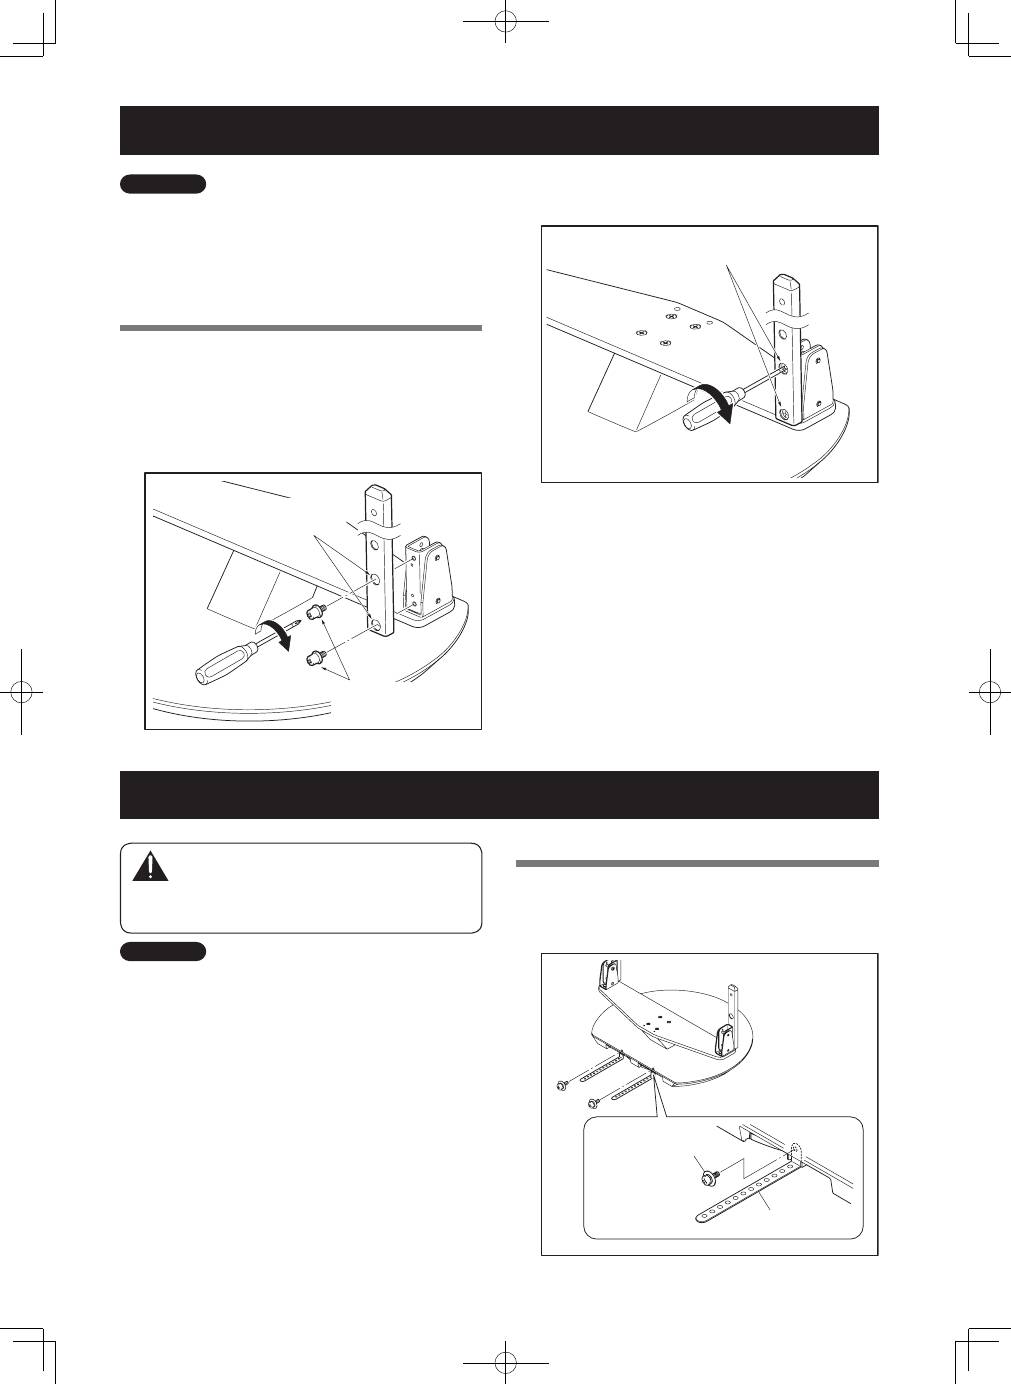
スタンドの組み立て方
ご注意
必ず平坦なテーブルなどの上で取り付けをしてください。
ネジは穴に対して垂直に挿入し、しっかり締めてください。
支柱の組み付け作業中は、支柱がしっかり固定されるまで支柱
から手をはなさないでください。
組み立て手順
1
. 支柱とスタンドを取付ネジ①で固定する(左
右 4 カ所)
プラスドライバーを使用して、はじめに上側の取付ネ
ジを仮留めし、そのあと下側の取付ネジを仮留めして
ください。
穴が大きい方
が手前です
取付ネジ①
(M6 × 12 mm:黒)
2
. 取り付けたネジを増し締めする(左右 4.カ所)
取り付けたネジを増し締めする
5
Ja
日本語 日本語
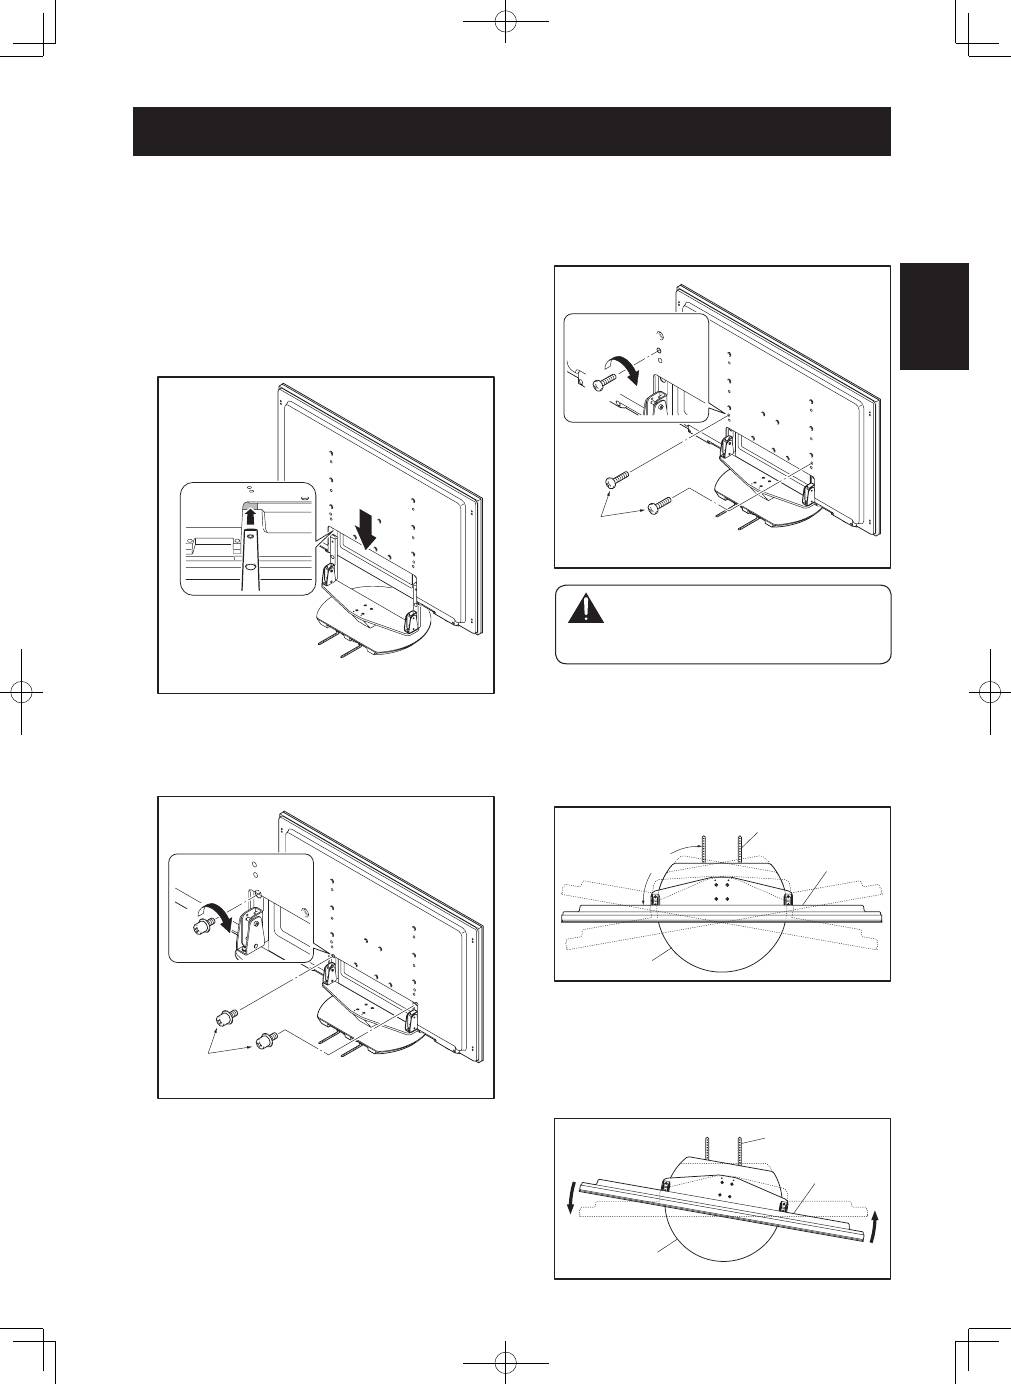
2
. ディスプレイをスタンドに取り付ける
ディスプレイの下側矢印にスタンドの支柱を合わせて、
垂直にゆっくり挿入してください。スタンドの支柱を
ディスプレイのスタンド挿入口以外の部分に当てない
ように注意してください。本体裏面や端子にキズをつ
けたり、変形させる危険があります。
ディスプレイ下部と支柱を
図のように合わせる
3
. 取付ネジ②でディスプレイを固定する
プラスドライバーを使用して固定してください。
取付ネジ②
(M8 × 15 mm:黒)
ディスプレイの取り付け方
4
. 取付ネジ③でディスプレイを固定する
プラスドライバーを使用して、本体矢印部(「T」の表
示がある穴)を固定してください。
取付ネジ③
(M8 × 23 mm:黒)
取付ネジを間違えると、破損や転倒などの思わ
ぬ事故の原因となることがあります。必ず指定の
取付ネジをご使用ください。
5
. スタンドの回転範囲の中央をだす
スタンドに取り付けた転倒防止ベルトがディスプレイ
に対して直角になっている状態が、スタンドの回転角
の中央です。
転倒防止ベルト
ディスプレイ
スタンド
90°
.
ディスプレイに対して転倒防止ベルトが左寄りの場合
ディスプレイを左に回転させると、転倒防止ベルトが
ディスプレイに対して直角に向くので、スタンドの回
転角を中央に合わせることができます。
ディスプレイ
転倒防止ベルト
スタンド
6
Ja
前後角度調整機構
本スタンドはお客様のお好みに合わせて、前後約 2
˚
の範
囲で傾きを調整することができます。
ご注意
角度調整は必ずディスプレイを設置したあとに
行ってください。
必ず平坦なテーブルなどの上で行ってください。
角度調整中は必ず本体上部を手で押さえてくださ
い。
調整手順
1
. 前後傾き固定ボルトを付属の六角レンチで緩
める(左右 2 カ所)
必ず本体上部を手で押さえながら、左右の
前後傾き固
定ボルト
を付属の六角レンチで反時計方向に回し、緩
めてくださ
い。
前後傾き固定ボルト
緩める
2
. お好みの角度に合わせる
ディスプレイをゆっくり動かし、お好みの角度に合わ
せてください。
2° 2°
ご注意
角度調整中は上図の矢印部に手を挟まないようにご注意くだ
さい。
3
. 前後傾き固定ボルトを締める(左右 2 カ所)
左右の
前後傾き固定ボルト
を付属の六角レンチで時計
方向に回し、しっかり締めつけてください。
完全に締めつけるまで、本体上部を手で押さえてくだ
さい。
前後傾き固定ボルト
締める
4
. 前後傾き固定ボルトがしっかりと締めつけら
れているか、再度確認してください

7
Ja
日本語 日本語
テレビ台などに設置する場合
ディスプレイを取り付けた本製品をテレビ台などに移動、
設置する場合は、下記の点にご注意ください。
移動時のご注意
長い距離の移動をする際は、先にスピーカーを取
り外し、次にディスプレイ本体もスタンドから取り
外し、別々に移動してください。
ディスプレイをスタンドから取り外す場合は、事故
を防止するために「ディスプレイをスタンドから取
り外す場合」(9 ページ)の手順を必ず守ってくだ
さい。
テレビ台などに設置する際のご注意
テレビ台などに設置
する際は、ディスプ
レイの上部と裏側の
取っ手を持ってくだ
さい。スピーカーを
持つと変形、破損の
原因となります。
設置上のご注意
テーブルトップスタンドの前側および後側は、必ず下図の
指示以上のスペースを確保して設置してください。
30 mm以上
30 mm以上
テレビ台
後側
前側
4
0 m
m
以
上
3
0 m
m
以
上
テ
レ
ビ
台
奥
行
き
寸
法
4
8
0 m
m
以
上
推
奨
テーブルトップ
スタンド
ディスプレイ
スタンドがテレビ
台からはみ出すと、
破損や転倒など思わ
ぬ事故の原因となり
ます。
回転させる時は、周囲
の壁や物に注意してゆっくり動かしてください。
.回転角度調整範囲
10°
10°
ディス プ レ イの 上 部 と
取っ手を持ってください。
はみ出すと危険です。
ケーブル処理のしかた
付属のケーブルバインダーを使用して、ケーブル類をまと
めてください。
ご注意
ディスプレイ側に接続するケーブルの根元に力が加わらないよう
に注意してください。
ケーブルバインダーの使い方
1
. スタンドの回転台上の穴にケーブルバイン
ダーを差す
ケーブルバインダー
2
..ケーブル類をまとめて、ケーブルバインダー
に通す
8
Ja
転倒防止
(設置後は転倒防止の備えを必ず行ってください)
壁を利用する方法
1
. ディスプレイに転倒防止用ボルトを取り付け
る(2 カ所)
転倒防止用ボルトは、ディスプレイ側に付属していま
す。
2
. 壁、柱などの頑丈な部分に、丈夫なひもでしっ
かりと固定する
◦
左右対称に同様の作業を行ってください。
◦.
ひもの長さはスタンド回転分の余裕をもって設定し
てください。
ご注意
◦
ひもに裸の金属ワイヤーを使用しないでください。ワイヤーの
先端が本体背面の通風孔に入り、感電や火災の原因になります。
◦
ひも、取付具は本製品およびディスプレイには付属していませ
ん。市販品をご使用ください。
1
転倒防止用ボルト
(ディスプレイ付属品)
2
ひも
取付具
設置後の転倒・落下防止のお願い
地震などでの製品の転倒・落下によるけがなどの危害を軽減するた
めに、必ず転倒・落下防止対策を行ってください。
ご注意:
転倒・落下防止器具を取り付ける壁や台の強度によっては、転倒・
落下防止効果が大幅に減少します。その場合は適当な補強を施して
ください。
また転倒・落下防止対策は、けがなどの危害の軽減を意図したもの
ですが、すべての地震に対してその効果を保障するものではありま
せん。
テレビ台などに固定する方法
転倒防止ベルトを使って、図のように固定してください。
ラックなどに固定するネジは、市販品を購入してご使用く
ださい。
ご注意
◦
本機はかなり重量がありますので、設置するテレビ台はこの重
さに耐えられるもので、かつ十分な幅と奥行きがあり、転倒し
ない台を使用してください。
◦
市販のネジを使用するときは、テレ
ビ台の材質に合った、直径 6 mmの
ネジをご用意ください。ネジの種類
についてはお買い上げの販売店や工
事店にご相談ください。
ラック天板の厚さの中心に下穴を
開けてから、市販のネジでネジ留
めしてください。
ネジ(市販品)
パイオニア製スピーカーラックB-07と組み合わせて使用
する場合には、B-07の取扱説明書を参照し、必ず下穴を
利用して取り付けてください。下穴以外に取り付けると、
塗装がはがれたり、天板に亀裂が発生し破損する場合が
あります。
転倒防止ベルト
136 mm
◦.本機は大型でかなり重量がありますので、転倒した場合、けがや事故の原因となる恐れがあります。
◦.安全にご使用いただくために、設置後は必ず転倒防止の処置をしてください。
20 mm以上
6 mm
9
m
m
〜
1
5
m
m
9
Ja
日本語 日本語
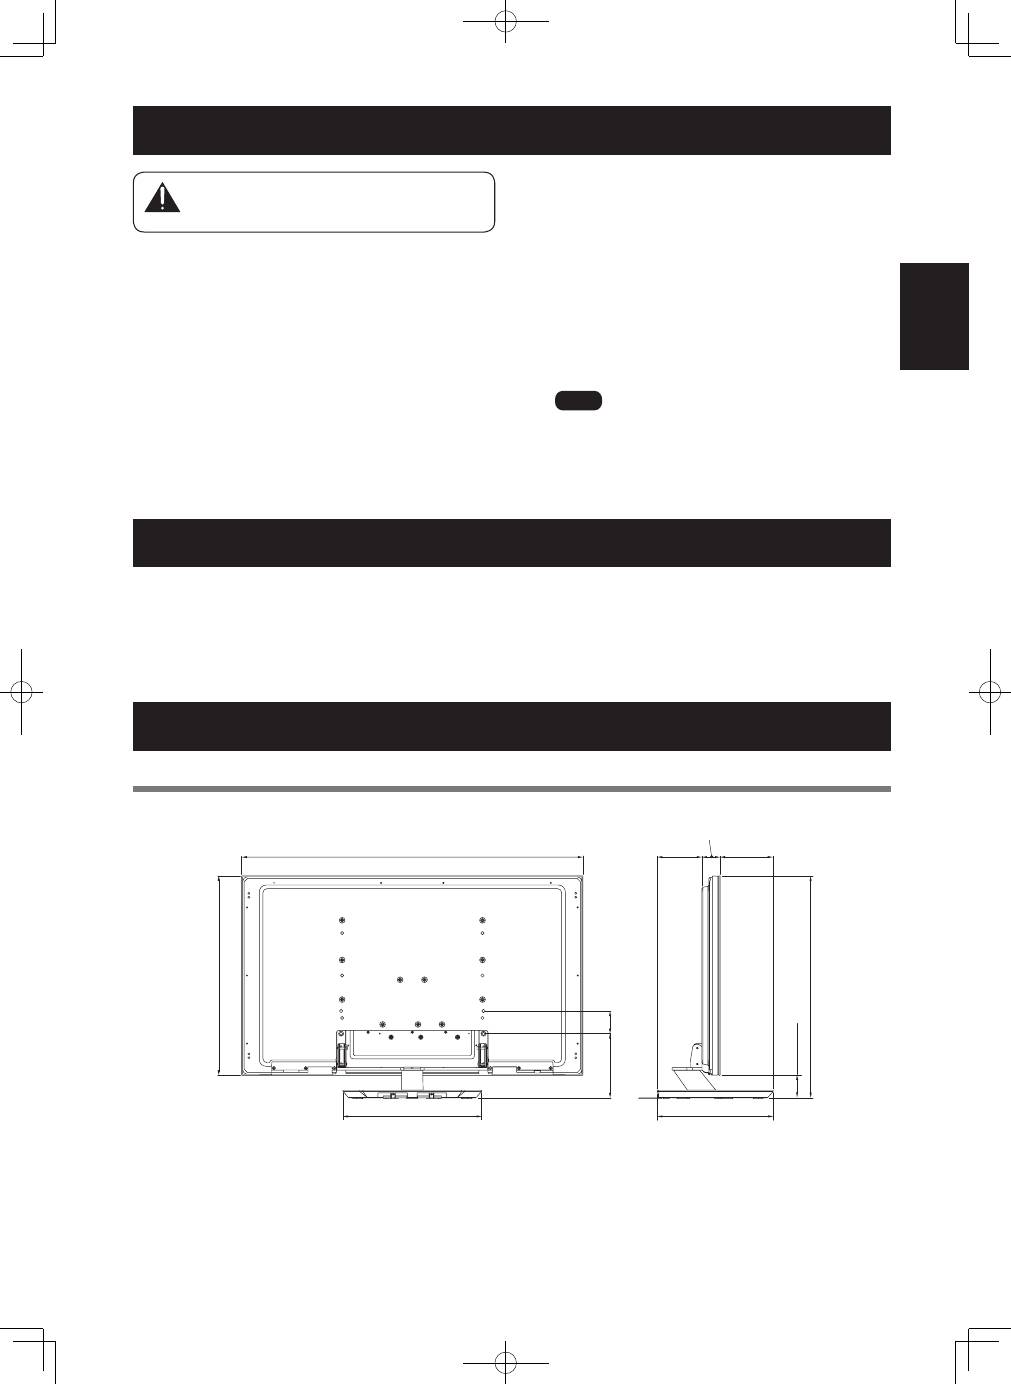
寸法図
KRP-500A 取り付け時(スピーカーなしの場合)
単位:mm
159
187
225
80
64
1233
723
410
490
81
804
©2008 パイオニア株式会社 禁無断転載
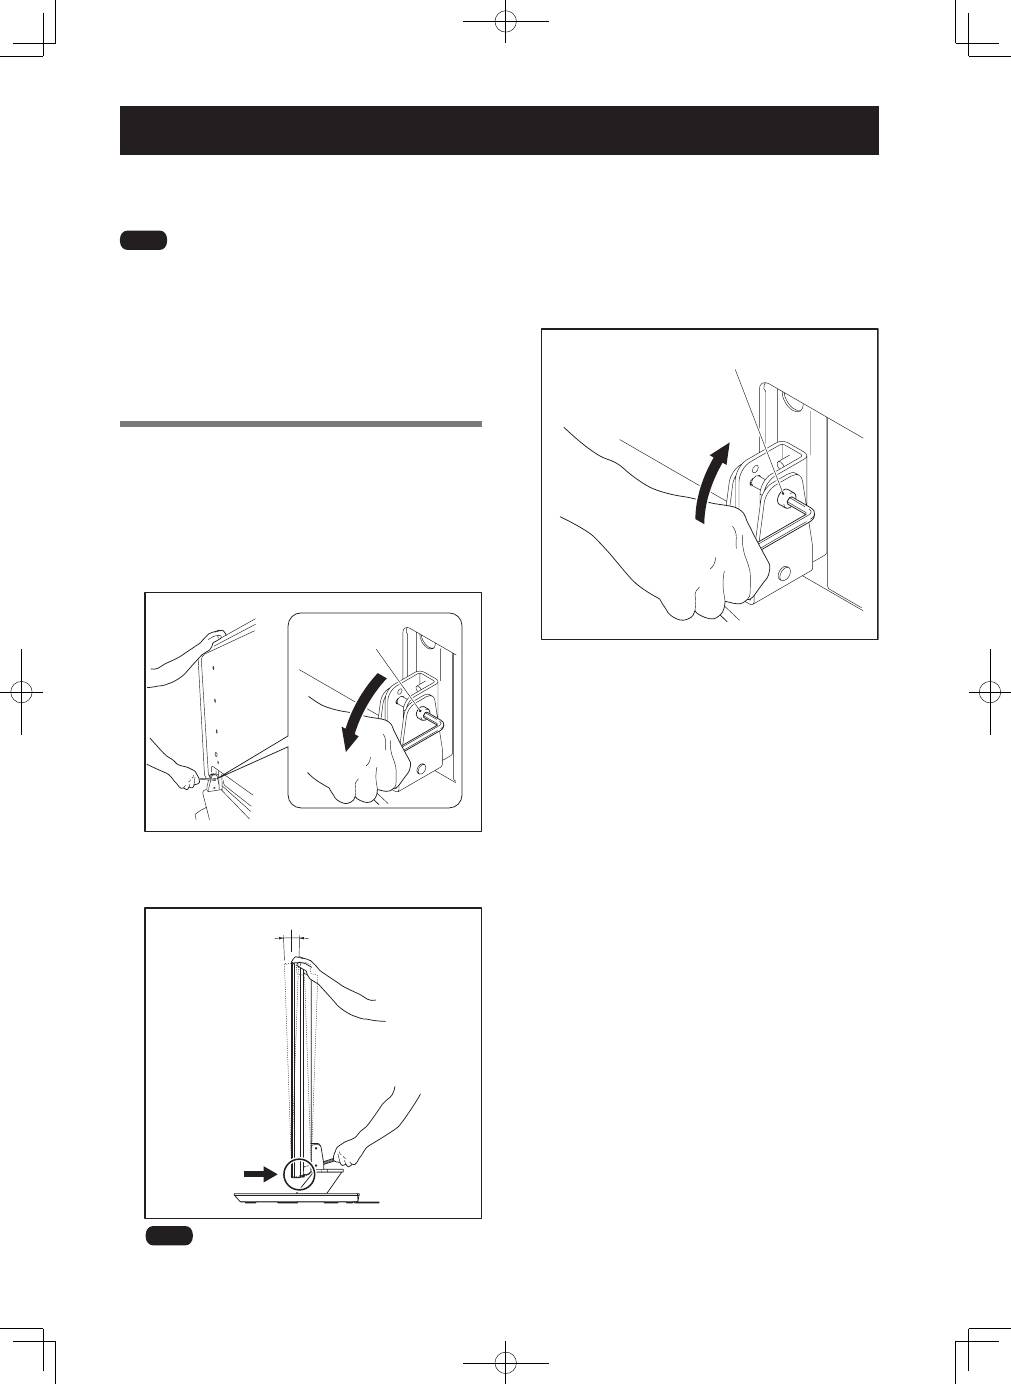
ディスプレイをスタンドから取り外す場合
注意
ディスプレイをスタンドから取り外す場合は、事故
を防止するために以下の手順を必ず守ってください。
1
. 電源を切り、電源プラグをコンセントから抜
き、ケーブル類はコネクタから抜く
2
. 転倒防止ベルトやひもを取り外す
3
. はじめに、前後傾き固定ボルトが確実に締
まっていることを確認する
4
. あらかじめ平らな床などにディスプレイを寝
かせるスペースを作り、キズおよび破損が生
じないようにシートを敷く
5
. スピーカーを取り外す
6
.「ディスプレイの取り付け方」(5 ページ)の
手順 3、4 を参照し、取付ねじ(4 本)を外
す
7
. ディスプレイの上側と取っ手を持って、ゆっ
くり垂直に持ち上げる
8
. 手順 4 で用意したシートの上に、画面を下側
にして静かに置く
ご注意
再度ディスプレイをスタンドに取り付ける場合は、左右の支
柱が同じ傾き設定であることを確認してください。
仕 様
外形寸法
533 mm ( 幅 ) × 339.4 mm ( 高さ ) ×410 mm ( 奥行き )
質量
10.7 kg
・上記の仕様および外観は、改良のため予告なく変更することがあります。
10
En
Thank you for buying Pioneer’s product.
Please read through the Operating Instructions to learn how
to operate your model safely and properly.
Please be advised to keep the Operating Instructions in your
place for future reference.
Installation
• Consult your dealer if you encounter any difficulties
with this installation.
• Pioneer is not liable for any damage resulting from
improper installation, improper use, modification, or
natural disasters.
Contents
Cautions ................................................................. 10
Checking the Enclosed Parts ................................. 11
Care for the Glossy Surface of the Stand ............ 11
Assembling the Stand ........................................... 12
Attaching the Pioneer Display and Television .... 12
Forward/Backward Angle of Inclination
Adjustment Mechanism ........................................ 14
Installing the Product on a TV table etc. ............. 15
Preparing the Cables ............................................. 15
Preventing Equipment from Falling Over ............ 16
Detaching the Pioneer Display and Television
from the Stand ....................................................... 17
Specifications ......................................................... 17
Dimensions Diagram ............................................. 17
Cautions
This product is a table top stand exclusively designed for
Pioneer displays and televisions (PRO-101FD/KRP-500A/
KRP-500M*). Use with other model is capable of resulting in
instability causing possible injury. For further information,
please contact the store where you purchased your display.
Do not install or modify the product other than specified.
Do not use this stand for a Pioneer display and television
other than those designated and do not modify it or use it for
other purposes.
Perform attachments and installation by referring to the
operating instructions. Improper installation is extremely
dangerous because it may result in it falling over or other
accident.
Installation Location
• Select a location that is strong enough to support the
weight of the stand and the Pioneer display and television.
• Make sure to place it in a level and stable location.
• Do not install it outdoors or in a wet place such as at a
hot spring or near a beach.
• Do not install the stand where it may be subjected to
vibration or shock.
Assembling and Installation
• Assemble the stand in accordance with the assembly
instructions and securely attach all screws at the
designated locations.
There have been cases where unforeseen accidents
such as the equipment breaking or falling over
occurred after the installation of the display because
the stand was not installed as instructed.
• The display must always be installed by two or more
people to assure it is installed safely.
• Before installation, turn off the power for the display
and peripheral devices then remove the power cord
plug from the power outlet.
This product rotates 10° to the left and right and inclines
approximately 2° forward and backward. Do not place
objects within the range of rotation of this product and the
Pioneer display and television. Install this product so that
during routine use or when it is rotated, it does not protrude
from the TV table or other location it has been installed.
Failure to do so could cause unforeseen accidents such as
the equipment breaking or falling over (see page 15). While
adjusting its angle forward and backward, be extremely
careful to keep your hands out of the space between the
bottom of the Pioneer display and television and the stand (see
page 14).
Prevent accidents caused by the product falling over, by
taking reliable measures to prevent it from falling over (see
page 16).
Do not handle an attached Pioneer display and television on
a wagon or pallet that is smaller that its stand. It may break
or fall.
Do not install on a table smaller than the stand.
* Except for the North American region.
11
En
English
Checking the Enclosed Parts
Check to make sure that you have all the enclosed parts before assembly and installation.
• Table top stand ×1
• Screws
�
(M4 × 10 mm: black) ×2
• Hexagonal wrench x 1
(Diagonal size: 4 mm)
• Operating instructions
(this document) x 1
• Support columns × 2
• Cable binder x 1
• Fall-prevention straps × 2
• Screws
�
(M6 × 12 mm: black) ×4
[used to anchor the support columns and
the table top stand]
• Screws
�
(M8 × 15 mm: black) ×2
• Screws
�
(M8 × 23 mm: black) ×2
Caution
Keep unused small parts out of reach of children to prevent
ingestion by mistake.
Care for the Glossy Surface of the Stand
Gently wipe the glossy surface of the stand with the wiping
cloth provided with the Pioneer display and television.
Glossy surface
Ìi
• Using a dusty or hard cloth to wipe the surface, or rubbing it
forcefully may cause damage.
• The stand includes a large amount of plastic, so be careful
not to wipe it with benzene, thinner, or other harsh
chemicals, as this may cause deterioration and paint peeling.
• Do not apply insecticide or volatile substances on the stand.
Also, do not leave rubber or vinyl articles in contact with the
base for a long time, as this may cause deterioration and
paint peeling due to the plasticizer in the plastic.
12
En
Attaching the Pioneer Display and Television
Caution
The weight of a Pioneer display and television is
about 31.4 kg (69.2 lbs), they have no depth, and
are unstable. Therefore, at least two people must
assemble and install them.
Ìi
• Be sure to install it on a flat stable location.
• Insert the screws in the holes vertically and tighten them
securely.
Attachment Method
1
Attach the fall-prevention straps to the stand
using attachment screws
4
.
Fix the screws with a Phillips screwdriver.
Screw
�
(M4 × 10 mm: black)
Fall-prevention strap
Assembling the Stand
Ìi
• Always assemble it on a flat table etc.
• Insert the screws in the holes vertically and tighten them
securely.
• When doing this, do not take off your hand from the support
column until it is fixed firmly.
Assembly Procedure
1
Secure the support column to the stand
with
the Installation screws
1
(4 locations on the
left and right).
Using a Phillips screwdriver, first loosely attach the
top attachment screw, then loosely attach the bottom
attachment screw.
Screws
�
(M6 × 12 mm: black)
The larger holes
are on the front.
2
Fully tighten the Installation screws (4 locations
on the left and right).
Fully tighten the attachment screws.
13
En
English
2
Attaching the Pioneer display and television to
the stand.
Fit the stand’s support columns to the bottom of the
Pioneer display and television as indicated by the arrows,
then slowly insert them vertically. Be extremely careful
not to insert the support columns of the stand into any
part of the Pioneer display and television other than the
stand insertion slots. Note that doing so might damage
the Pioneer display and television panel or its ports or
result in the warping of the stand.
Line up the column
supports with the bottom
of the Pioneer display and
television as indicated in
the accompanying
diagram.
3
Securing the Pioneer display and television
with Installation screws
2
.
Fix the screws with a Phillips screwdriver.
Screws
�
(M8 × 15 mm: black)
Attaching the Pioneer Display and Television
4
Securing the Pioneer display and television
with Installation screws
3
.
Attach the Pioneer display and television at the points
marked with “T” using a Phillips screwdriver.
Screws
�
(M8 × 23 mm: black)
Caution
There have been cases where unforeseen
accidents such as the equipment breaking or
falling over occurred because the stand was
installed with wrong screws.
5
Finding the center of the rotation range of the
stand.
The state in which the fall-prevention straps attached to
the stand are at a right angle in relation to the Pioneer
display and television is the center of the angle of
rotation of the stand.
Pioneer display
and television
Table top stand
Fall-prevention strap
90°
If the fall-prevention straps lean toward the left in relation
to the Pioneer display and television, the rotation angle
of the stand can be adjusted to the center by turning the
display toward the left so that the fall-prevention straps
form a right angle in relation to the Pioneer display and
television.
Pioneer display
and television
Table top stand
Fall-prevention strap
14
En
Forward/Backward Angle of Inclination Adjustment Mechanism
On this stand, you can adjust the angle of inclination of the
Pioneer display and television within a range of approximately
2° forward or backward according to your preference.
Ìi
• Be sure to adjust the angle only after you have
attached the Pioneer display and television.
• Be sure to install it on a flat table or other flat
surface.
• Be sure to hold the top of the Pioneer display
and television with your hand while adjusting
the angle.
Adjustment Procedure
1
Loosen the forward/backward inclination
anchor bolts using the enclosed hexagonal
wrench (2 locations on the left and right).
While being sure to hold the top of the Pioneer display
and television with your hand, loosen the
forward/
backward inclination anchor bolts
on the left and
right sides by rotating them counterclockwise using the
enclosed hexagonal wrench.
Forward/backward
inclination anchor bolt
Loosening
2
Set the angle you prefer.
Set the angle you prefer by slowly moving the Pioneer
display and television.
2° 2°
Ìi
While adjusting the angle, be very careful to keep your
hands out of the place indicated by the arrow on the
figure.
3
Tighten the forward/backward inclination
anchor bolts (2 locations on the left and right).
Firmly tighten the
forward/backward inclination
anchor bolts
on the left and right sides by rotating them
clockwise using the enclosed hexagonal wrench.
Be sure to hold the top of the Pioneer display and
television with your hand until you have fully tightened
the bolts.
Forward/backward
inclination anchor bolt
Tightening
4
Check once more to make sure that the
forward/backward inclination anchor bolts are
fully tightened.
15
En
English
Installing the Product on a TV table etc.
Be sure to observe the following precautions when moving
or installing this product with a Pioneer display and television
into a TV table or other enclosure.
Precautions when moving
Caution
• When moving the product more than a few
meters, first remove the speaker, then remove
the Pioneer display and television from the stand
and move the speaker,
stand, Pioneer display and
television separately.
• When detaching the Pioneer display and television
from the stand, be sure to follow the procedure
described in “Detaching the Pioneer Display and
Television from the Stand” on page 17.
Precautions when installing in a TV
table or other enclosure
When installing in
a TV table or other
enclosure, hold the
Pioneer display and television
by the handles located on the
rear of the Pioneer display
and television. If you hold
the speakers, they may be
damaged or twisted.
Installation precautions
Make sure that you always secure a space at least as large
as that shown in the following diagram in front of and behind
the table top stand.
Depth of the TV table
480 mm (18-29/32 inch)
or more recommended
Min. 30 mm
(1-3/16 inch)
Min. 30 mm
(1-3/16 inch)
TV table
Back
Front
Table top stand
Pioneer display and television
Min
. 30 mm
(1-3/16 inch)
Min
. 40 mm
(
1-9/16 inch
)
Caution
• If the stand
protrudes from the
TV table, it could
cause unforeseen
accidents such as
the equipment breaking or
falling over.
• When rotating, take care not to allow the
display to bump into walls or surrounding
objects.
Range of angle rotation
10°
10°
Hold the Pioneer display and
television by its handles and
from the top.
Preparing the Cables
Use the enclosed cable binder to bind the cables.
Ìi
Be very careful not to apply force to the bases of the cables on
the Pioneer display and television side.
Using the cable binder
1
Insert the cable binder through the hole on the
top of the rotating platform of the stand.
Cable binder
2
Gathering the cables and routing them through
the cable binder.
Protrusion is
dangerous.
Caution
16
En
Preventing Equipment from Falling Over
Using a wall for stabilization
1
Attaching falling prevention bolts to the
Pioneer display and television.
2
Using strong cords to stabilize it appropriately
and firmly to a wall, pillar, or other sturdy
element.
• Perform this work in the same way on the left and
right sides.
• The length of the cords used must be long enough to
allow the stand to rotate freely.
Ìi
• Do not use bare metal wire for the cords. The wire ends may
cause electric shock and fire if they get inside the Pioneer
display and television through the
ventilation holes.
• Use falling prevention bolts, ropes
and fittings that are available on
the market.
Recommended bolts:
Nominal diameter M8
Length 12 mm to 15 mm (1/2 to 5/8 inch)
1
Falling prevention bolts
2
Cords
Fittings
Stabilizing on TV table or other location
Fix the Pioneer display and television to a TV table using the
fall-prevention straps as in the diagram.
Fix the racks etc. using screws for sale on the market.
Ìi
• The Pioneer display and television being quite heavy, a TV
table that is sturdy enough to support it, and with sufficient
width and depth to ensure that it does not fall over should
always be used.
• To stabilize the Pioneer display
and television on a TV table,
use screws that have a nominal
diameter of 6 mm (1/4 inch).
Select the appropriate screws
after consulting a professional
installer if necessary.
Make a pilot hole in the rack’s
top board (center of the board’s
thickness), and fix the strap
with a store-bought screw.
136 mm
Screw
(commercially available)
Fall-prevention strap
After installing the stand, be sure to take special care to ensure that the Pioneer display and
television will not fall over.
• Because of the Pioneer displays and televisions weight, if it could fall down, this can result in injury.
• For safety, be sure to take special care to ensure that the Pioneer display and television will not fall over.
Min. 20 mm
(13/16 inch)
6 mm
(1/4 inch)
9 mm to 15 mm
(3/8 to 5/8 inch)
12 mm to 15 mm
(1/2 to 5/8 inch)
M
8
17
En
English
Published by Pioneer Corporation.
Copyright © 2008 Pioneer Corporation.
All rights reserved.
Dimensions Diagram
50 inch display model (PRO-101FD/KRP-500A/KRP-500M) (without speakers)
Unit: mm (inch)
159
(6-1/4)
187
(7-3/8)
225
(8-27/32)
80
(3-5/32)
64 (2-17/32)
1233 (48-17/32)
723 (28-15/32)
410 (16-5/32)
490 (19-9/32)
81
(
3-3/16
)
804 (31-21/32)
Detaching the Pioneer Display and Television from the Stand
To remove the Pioneer display and television
from the stand, be sure to always follow the
procedure described below to prevent accidents.
1
Turn off the power and remove the power
plug from the power outlet and the cables
from the connectors.
2
Remove the fall-prevention straps and cords.
3
First, confirm that the forward/backward
inclination anchor bolt is securely tightened.
4
First clear a space on a flat floor etc. where you
can lay the Pioneer display and television flat,
then lay a sheet to protect it from scratches or
other damage.
5
Remove the speakers.
6
Referring to steps 3 and 4 in “Attaching the
Pioneer Display and Television” (Page 13),
remove the installation screws (4 screws).
7
Holding the Pioneer display and television by
its handles and from the top, slowly lift the
display vertically.
8
Place the Pioneer display and television slowly
onto the sheet laid out in step 4 with its screen
facing downwards.
Ìi
When reattaching the Pioneer display and television to the
stand, be certain that the left/right support columns are
set at the same angle.
Specifications
External dimensions
533 mm (W) × 339.4 mm (H) × 410 mm (D) (20-31/32 inch (W) x 13-3/8 inch (H) x 16-5/32 inch (D))
Weight
10.7 kg (23.6 lbs)
• The above specifications and exterior may be modified without prior notice to improve the product.
Caution
18
Fr
Nous vous remercions d’avoir choisi un produit Pioneer.
Veuillez lire attentivement ce mode d’emploi pour savoir
comment utiliser votre pied de table correctement et en toute
sécurité. Nous vous conseillons de conserver soigneusement
ce mode d’emploi à portée de main et dans un endroit sûr
afin de pouvoir vous y référer le cas échéant.
Installation
• En cas de difficultés, veuillez consulter votre revendeur.
• Pioneer ne saurait être tenu responsable d’aucun
dommage résultant d’une installation ou d’une
utilisation incorrecte de ce produit, de sa modification
ou encore de catastrophes naturelles.
Table des matières
Avertissements ...................................................... 18
Vérification des pièces contenues dans le
carton d’emballage ................................................ 19
Entretien de la surface brillante du support ....... 19
Assemblage du support ........................................ 20
Installation du moniteur et téléviseur Pioneer ... 20
Mécanisme d’ajustement de l’angle d’inclinaison
en avant et en arrière ............................................ 22
Installation du produit sur un meuble de
télévision, etc.
........................................................ 23
Préparation des câbles .......................................... 23
Prévenir le basculement et la chute de
l’équipement .......................................................... 24
Démontage du moniteur et téléviseur Pioneer
du support .............................................................. 25
Caractéristiques ..................................................... 25
Schéma indiquant les dimensions ........................ 25
Avertissements
Ce produit est un pied de table conçu exclusivement pour les
moniteurs et téléviseurs Pioneer (modèles PRO-101FD / KRP-
500A / KRP-500M*). L’utilisation de ce produit avec un autre
modèle peut être à l’origine d’un manque de stabilité pouvant
provoquer une lessure. Pour de plus amples informations,
veuillez contacter le magasin où vous avez acheté votre écran.
Ne procédez à l’installation ou à la modification du produit
qu’en respectant les indications fournies. N’utilisez pas ce
pied de table pour un moniteur et téléviseur Pioneer autre
que ceux spécifiés et ne le modifiez pas ou ne l’utilisez pas à
des fins autres que celles pour lesquelles il a été conçu.
Pour la fixation et l’installation du produit, reportez-vous au
mode d’emploi. Une installation incorrecte est extrêmement
dangereuse car elle peut provoquer la chute du support ou
un autre accident.
Lieu d’installation
• Sélectionnez un emplacement assez solide pour supporter
le poids du support et du moniteur et téléviseur Pioneer.
• Assurez-vous de placer le produit sur une surface plane et
stable.
• N’installez pas le pied de table à l’extérieur ou dans un lieu
humide, par exemple à proximité d’une source chaude ou
d’une plage.
• N’installez pas le support à un endroit où il pourrait être
soumis à des chocs ou à des vibrations.
Montage et installation
• Montez le pied de table en suivant les instructions et
vissez solidement toutes les vis aux endroits prévus
à cet effet. Des accidents ont été constatés (casse,
chute du matériel, etc.) suite à l’installation de l’écran
parce que le pied de table n’avait pas été installé
conformément aux instructions.
• Pour une bonne installation, l’écran doit toujours être
installé par au moins deux personnes.
• Avant de procéder à l’installation, mettez l’écran
ainsi que les équipements périphériques hors tension
en coupant l’alimentation, puis retirez la prise du
câble d’alimentation de la prise murale.
Ce produit pivote de 10° vers la gauche et la droite et s’incline
de 2° environ en avant et en arrière. Ne placez pas d’objets
dans le champ de rotation de ce produit et du moniteur et
téléviseur Pioneer. Installez ce produit de façon à ce qu’en
utilisation normale ou lorsque vous le faites pivoter, il ne
dépasse pas de la surface ou du meuble de télévision sur
lequel il est posé. Sans cela, des accidents pourraient
survenir, entraînant la détérioration de l’appareil ou sa chute
(Voir page 23). Lorsque vous ajustez l’angle vers l’avant et
vers l’arrière, faites extrêmement attention à ne pas placer
vos mains entre le bas du moniteur et téléviseur Pioneer et le
support (Voir page 22).
Prévenez les accidents causés par la chute du produit en
prenant des mesures fiables visant à éviter toute chute (voir
Page 24).
Ne manipulez pas un moniteur et téléviseur Pioneer monté
sur un chariot ou une palette de plus petites dimensions que
son support. Il pourrait tomber ou se casser.
Ne pas installer sur une table de plus petite dimension que le
pied.
* Exception faite des régions d’Amérique du Nord.
19
Fr
Français
Vérification des pièces contenues dans le carton d’emballage
Cette vérification vous permettra de vous assurer que vous possédez bien toutes les pièces nécessaires avant de procéder au
montage et à l’installation du support.
• Pi
ed
de table ×
1
• Bandes anti
-chu
te ×
2
• Mode d’emploi (ce document) ×
1
• Clé hexagonale (à six pa
ns
) ×
1
(Taille en diagonale : 4 mm)
•
Serre-
câble ×
1
• Vis d’installation
1
(M6 x 12 mm : noir) × 4
[Utilisées pour fixer les colonnes de support
et le pied de table]
• Vis d’installation
3
(M8 x 23 mm : noir) x
2
• Vis d’installation
2
(M8 x 15 mm : noir) ×
2
• Vis d’installation
4
(M4 x 10 mm : noir) ×
2
• Colonn
es
de support ×
2
Attention
Conservez les pièces de petite taille que vous n’utilisez pas
hors de portée des enfants pour éviter les risques d’ingestion.
Entretien de la surface brillante du support
Essuyez doucement la surface brillante du support avec le
chiffon fourni avec le moniteur et téléviseur Pioneer.
Surface brillante
,i>ÀµÕi
• L’utilisation d’un chiffon poussiéreux ou rugueux ou un
essuyage trop vigoureux peut endommager cette surface.
• Le support est en grande partie composé de plastique et
il convient donc de veiller à ne pas utiliser de benzène,
de diluants ou d’autres produits chimiques corrosifs. Cela
pourrait le détériorer et faire peler la peinture.
• N’appliquez pas d’insecticide ni de substances volatiles sur le
support. De même, ne laissez pas des objets en caoutchouc
ou en vinyle rester en contact avec la base de façon
prolongée. Le plastifiant présent dans le plastique pourrait
entraîner des détériorations et faire peler la peinture.
20
Fr
Installation du moniteur et téléviseur Pioneer
Attention
Le poids d’un moniteurs et téléviseurs Pioneer
avoisine les 31,4 kg. Leur largeur étant limitée, ils
ne sont pas stables. La présence d’au moins deux
personnes est donc nécessaire pour leur montage
et leur installation.
,i>ÀµÕi
• Pour installer le moniteur et téléviseur Pioneer, travaillez
toujours sur une surface plane.
• Insérez les vis verticalement dans les trous et vissez-les à
fond.
Méthode de fixation
1
Vissez les bandes anti-chute sur le support à
l’aide des vis de fixation
4
.
Pour cela, utilisez un tournevis cruciforme.
Bandes anti-chute
Vis d’installation
4
(M4 x 10 mm : noir)
Assemblage du support
,i>ÀµÕi
• Pour monter le support, travaillez toujours sur une surface
plane.
• Insérez les vis verticalement dans les trous et vissez-les à
fond.
• Pour cela, ne lâchez pas la colonne de support tant qu’elle
n’est pas solidement fixée.
Procédure de montage
1
Fixez les colonnes sur le support à l’aide des vis
d’installation
1
(2 sur le côté gauche et 2 sur le
côté droit).
A l’aide d’un tournevis cruciforme, vissez en partie la vis
de fixation du haut, puis vissez en partie la vis de fixation
du bas.
Les trous les plus
larges se trouvent
à l’avant.
Vis d’installation
1
(M6 x 12 mm : noir)
2
Vissez à fond les vis d’installation (2 sur le côté
gauche et 2 sur le côté droit).
Vissez à fond les vis d’installation.
