Pioneer S-HS100: instruction
Class: Household, kitchen appliances, electronics and equipment
Type: Home Theater System
Manual for Pioneer S-HS100
Table of contents
- IMPORTANT Operating Environment VENTILATION CAUTION
- IMPORTANT: THE MOULDED PLUG
- POWER-CORD CAUTION
- Installation Speaker installation Features Accessory Items
- Installation precautions
- Effective Combination of Subwoofer and Satellite Speakers Connections and Use Panel facilities Front panel Affixing Non-Skid Pads
- Rear panel Connection Line level connection
- Connections and Use Connecting the power cord Connection Connecting the speakers Operation
- Wall-mounting the front and surround speaker system Attaching the brackets Before mounting Operation
- Specifications
- Troubleshooting Symptom Cause Remedy
- Symptom Cause Remedy

Powered Subwoofer
Enceinte Active d’Extrêmes Graves
Aktiver Subwoofer
Subwoofer Attiv
Subwoofer Met Spanningscircuit
S-21W
Altavoces De Graves Secundarios Energizados
Активньιй Сабвуфер
ߤழܺτᏣմඵᖑᏣ
パワードサブウーファー
Speaker System / Enceintes acoustiques / Lautsprechersystem /
Sistema di diffusori / Luidsprekersysteem / Sistema de altavoces /
S-11
Aкустическая система / ඵᖑᏣقಜġ/スピーカーシステム
Discover the benefits of registering your product online at
http://www.pioneer.co.uk (or http://www.pioneer.eu).
Découvrez les nombreux avantages offerts en enregistrant votre produit en ligne maintenant sur http://www.pioneer.fr
(ou http://www.pioneer.eu).
Bitte nutzen Sie die Möglichkeit zur Registrierung Ihres Produktes unter http://www.pioneer.de
(oder http://www.pioneer.eu)
Registra il tuo prodotto su http://www.pioneer.it (o http://www.pioneer.eu) e scopri subito quali vantaggi puoi ottenere!
Ontdek nu de voordelen van online registratie! Registreer uw Pioneer product via
http://www.pioneer.nl - http://www.pioneer.be (of http://www.pioneer.eu)
Registre su producto en http://www.pioneer.es (o en http://www.pioneer.eu) Descubra los beneficios de registrarse
on-line:
Зарегистрируйте Baшe изделие на
http://www.pioneer-rus.ru (или http://www.pioneer.eu).
Oзнакомьтесь с преимуществами регистрации в Интернет
インターネットによるお客様登録のお願い
http://pioneer.jp/support/
このたびはパイオニア製品をお買い上げいただきまして、まことにありがとうございます。弊社では、お買い上げいただいた
お客様に「お客様登録」をお願いしています。上記アドレスからご登録いただくと、ご使用の製品についての重要なお知らせ
などをお届けいたします。なお、上記アドレスは、困ったときのよくある質問や各種お問い合わせ先のご案内、カタログや取
扱説明書の閲覧など、お客様のお役に立てるサービスの提供を目的としたページです。
Register Your Product on:
Enregistrez votre produit sur :
http://www.pioneerelectronics.com (US)
http://www.pioneerelectronics.com (États-unis)
http://www.pioneerelectronics.ca (Canada)
http://www.pioneerelectronics.ca (Canada)
Operating Instructions / Mode d’emploi / Bedienungsanleitung / Istruzioni per l’uso / Handleiding /
Manual de instrucciones / Инструкции по зксплуатации / ᐈձКь/ 取扱説明書
BZ02
01_S-21W&S-11.book 1 ページ 2010年3月16日 火曜日 午前11時28分
Thank you for buying this PIONEER product. Please read through these operating instructions
so you will know how to operate your model properly. After you have finished reading the
instructions, put them away in a safe place for future reference.
These operating instructions have has been written for joint use with the S-21W and S-11 models.
Please consult those portions of the manual indicated for your model.
2
En
IMPORTANT
CAUTION
RISK OF ELECTRIC SHOCK
DO NOT OPEN
The lightning flash with arrowhead symbol,
CAUTION:
The exclamation point within an equilateral
within an equilateral triangle, is intended to
TO PREVENT THE RISK OF ELECTRIC
triangle is intended to alert the user to the
alert the user to the presence of uninsulated
SHOCK, DO NOT REMOVE COVER (OR
presence of important operating and
“dangerous voltage” within the product’s
BACK). NO USER-SERVICEABLE PARTS
maintenance (servicing) instructions in the
enclosure that may be of sufficient
INSIDE. REFER SERVICING TO QUALIFIED
literature accompanying the appliance.
magnitude to constitute a risk of electric
SERVICE PERSONNEL.
shock to persons.
D3-4-2-1-1_A1_En
WARNING
WARNING
This equipment is not waterproof. To
Slots and openings in the cabinet are
provided for ventilation to ensure reliable
prevent a fire or shock hazard, do not
operation of the product, and to protect it
place any container filled with liquid near
from overheating. To prevent fire hazard, the
this equipment (such as a vase or flower
openings should never be blocked or
pot) or expose it to dripping, splashing,
covered with items (such as newspapers,
rain or moisture.
table-cloths, curtains) or by operating the
D3-4-2-1-3_A1_En
equipment on thick carpet or a bed.
WARNING
D3-4-2-1-7b*_A1_En
Before plugging in for the first time, read
the following section carefully.
Operating Environment
The voltage of the available power
Operating environment temperature and
supply differs according to country or
humidity:
region. Be sure that the power supply
+5 °C to +35 °C (+41 °F to +95 °F); less
voltage of the area where this unit
than 85 %RH (cooling vents not blocked)
will be used meets the required
Do not install this unit in a poorly
voltage (e.g., 230 V or 120 V) written
ventilated area, or in locations exposed to
on the rear panel.
high humidity or direct sunlight (or strong
D3-4-2-1-4*_A1_En
artificial light)
D3-4-2-1-7c*_A1_En
WARNING
To prevent a fire hazard, do not place any
If the AC plug of this unit does not match the AC
naked flame sources (such as a lighted
outlet you want to use, the plug must be removed
and appropriate one fitted. Replacement and
candle) on the equipment.
mounting of an AC plug on the power supply cord of
D3-4-2-1-7a_A1_En
this unit should be performed only by qualified
service personnel. If connected to an AC outlet, the
VENTILATION CAUTION
cut-off plug can cause severe electrical shock. Make
sure it is properly disposed of after removal.
When installing the subwoofer, make sure
The equipment should be disconnected by removing
to leave space around the unit for
the mains plug from the wall socket when left unused
ventilation to improve heat radiation (at
for a long period of time (for example, when on
vacation).
least 10 cm at top, 10 cm at rear, and 10
D3-4-2-2-1a_A1_En
cm at each side).
01_S-21W&S-11.book 2 ページ 2010年3月16日 火曜日 午前11時28分
English Français Deutsch
Italiano Español
Nederlands
Pyccкий
.
3
En
For U.K. model and Singapore model only
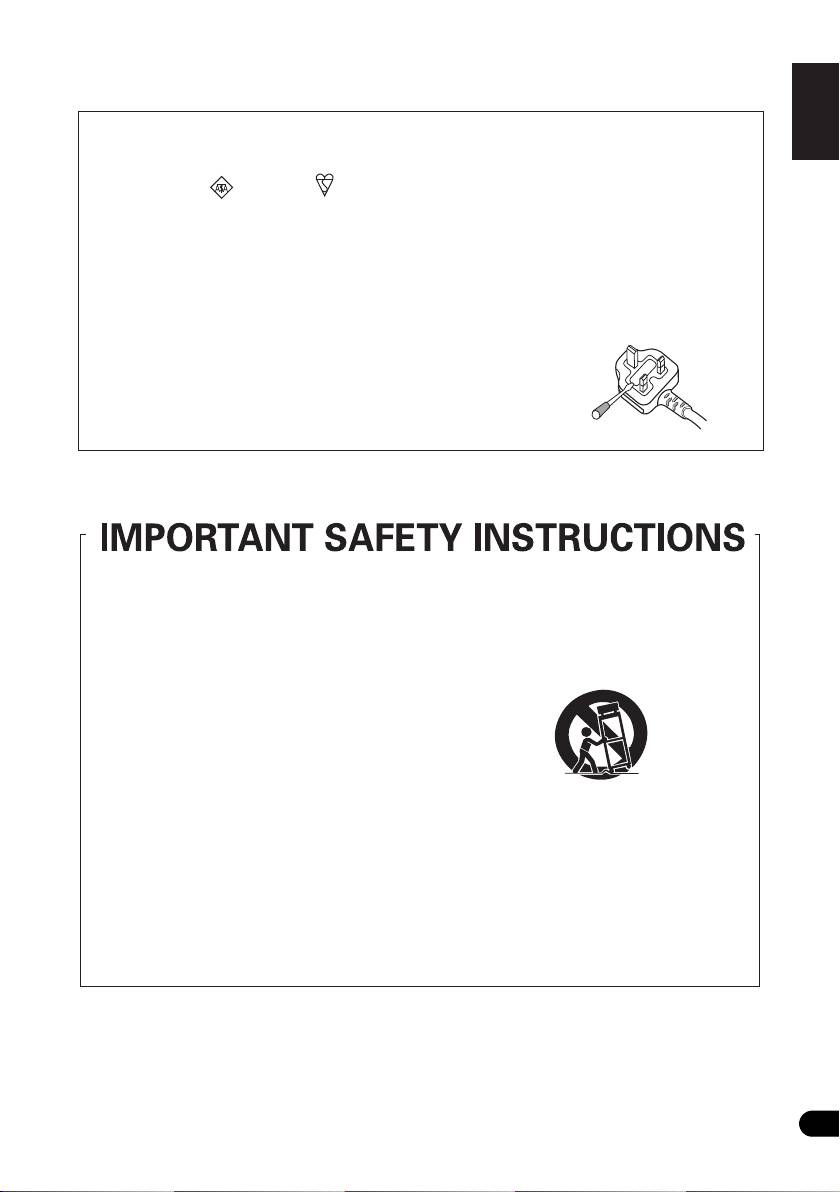
Replacement and mounting of an AC plug on the power supply cord of this unit should be performed only by qualified
service personnel.
IMPORTANT: THE MOULDED PLUG
This appliance is supplied with a moulded three pin mains plug for your safety and convenience. A 5 amp fuse is fitted in this plug.
Should the fuse need to be replaced, please ensure that the replacement fuse has a rating of 5 amps and that it is approved by ASTA or BSI to
BS1362.
Check for the ASTA mark or the BSI mark on the body of the fuse.
If the plug contains a removable fuse cover, you must ensure that it is refitted when the fuse is replaced. If you lose the fuse cover the plug
must not be used until a replacement cover is obtained. A replacement fuse cover can be obtained from your local dealer.
If the fitted moulded plug is unsuitable for your socket outlet, then the fuse shall be removed and the plug cut off and disposed of
safely. There is a danger of severe electrical shock if the cut off plug is inserted into any 13 amp socket.
If a new plug is to be fitted, please observe the wiring code as shown below. If in any doubt, please consult a qualified electrician
.
IMPORTANT: The wires in this mains lead are coloured in accordance with the following code:
Blue : Neutral Brown : Live
As the colours of the wires in the mains lead of this appliance may not correspond with the coloured markings identifying the terminals in
your plug, proceed as follows;
The wire which is coloured BLUE must be connected to the terminal which is marked with the
letter N or coloured BLACK.
The wire which is coloured BROWN must be connected to the terminal which is marked with the
letter L or coloured RED.
How to replace the fuse: Open the fuse compartment with a screwdriver and replace the fuse.
D3-4-2-1-2-2*_A2_En
1)
Read these instructions.
11)
Only use attachments/accessories specified by
2)
Keep these instructions.
the manufacturer.
3)
Heed all warnings.
12)
Use only with the ca
rt, stand, tripod, bracket, or
4)
Follow all instructions.
table specified by the manufacturer, or sold with
5)
Do not use this apparatus near water.
the apparatus. When a cart is used, use caution
6)
Clean only with dry cloth.
when moving the cart/apparatus combination to
7)
Do not block any ventilation openings. Install in
avoid injury from tip-o
ver.
accordance with the manufacturer’s
instructions.
8)
Do not install near any heat sources such as
radiators, heat registers, stoves, or other
apparatus (including amplifiers) that produce
heat.
9)
Do not defeat the safety purpose of the polarized
or grounding-type plug. A polarized plug has two
13)
Unplug this apparatus during lightning storms
blades with one wider than the other. A
or when unused for long periods of time.
grounding type plug has two blades and a third
14)
Refer all servicing to qualified service personnel.
grounding prong. The wide blade or the third
Servicing is required when the apparatus has
prong are provided for your safety
. If the provided
been damaged in any way, such as power-supply
plug does not fit into your outlet, consult an
cord or plug is damaged, liquid has been spilled
electrician for replacement of the obsolete outlet.
or objects have fallen into the apparatus, the
10)
Protect the power cord from being walked on or
apparatus has been exposed to rain or moisture,
pinched particularly at plugs, convenience
does not operate normally
, or has been dropped.
receptacles, and the point where they exit from
the apparatus.
D3-7-13-69_En
01_S-21W&S-11.book 3 ページ 2010年3月16日 火曜日 午前11時28分

01_S-21W&S-11.book 4 ページ 2010年3月16日 火曜日 午前11時28分
POWER-CORD CAUTION
CAUTION
Handle the power cord by the plug. Do not pull out the
The POWER switch on this unit will not completely
plug by tugging the cord and never touch the power cord
shut off all power from the AC outlet. Since the power
when your hands are wet as this could cause a short
cord serves as the main disconnect device for the
circuit or electric shock.
unit, you will need to unplug it from the AC outlet to
shut down all power. Therefore, make sure the unit
WARNING:
has been installed so that the power cord can be
Do not climb or sit on this unit. Be especially careful
easily unplugged from the AC outlet in case of an
when children are around. The unit may be damaged, or
accident. To avoid fire hazard, the power cord should
may fall over causing injury.
also be unplugged from the AC outlet when lef
t
unused for a long period of time (for example, when
on vacation).
D3-4-2-2-2a*_A1_En
Information to User
Alterations or modifications carried out without
appropriate authorization may invalidate the user’s
right to operate the equipment.
D8-10-2_A1_En
This Class B digital apparatus complies with
Canadian ICES-003.
D8-10-1-3_A1_En
NOTE:
This equipment has been tested and found to comply with the limits for a Class B digital device, pursuant to Part 15
of the FCC Rules. These limits are designed to provide reasonable protection against harmful interference in a
residential installation. This equipment generates, uses, and can radiate radio frequency energy and, if not installed
and used in accordance with the instructions, may cause harmful interference to radio communications. However,
there is no guarantee that interference will not occur in a particular installation. If this equipment does cause
harmful interference to radio or television reception, which can be determined by turning the equipment off and on,
the user is encouraged to tr y to correct the interference by one or more of the following measures:
— R
eorient or relocate the receiving antenna.
— Increase the separation between the equipment and receiver.
— Connect the equipment into an outlet on a circuit different from that to which the receiver is connected.
— Consult the dealer or an experienced radio/TV technician for help.
D8-10-1-2_A1_En
For Europe model only
If you want to dispose this product, do not mix it with general household waste. There is a separate collection system for used
electronic products in accordance with legislation that requires proper treatment, recovery and recycling.
Private households in the member states of the EU, in Switzerland and Norway may return their used electronic products free of charge to
designated collection facilities or to a retailer (if you purchase a similar new one).
For countries not mentioned above, please contact your local authorities for the correct method of disposal.
By doing so you will ensure that your disposed product undergoes the necessary treatment, recovery and recycling and thus prevent potential
negative effects on the environment and human health.
K058b_A1_En
4
En
English Français Deutsch
Italiano Español
Nederlands
Pyccкий
5
En
IMPORTANT NOTICE
THE MODEL NUMBER AND SERIAL NUMBER OF THIS EQUIPMENT ARE ON THE REAR.
RECORD THESE NUMBERS ON YOUR ENCLOSED WARRANTY CARD AND KEEP IN A SAFE PLACE FOR FUTURE
REFERENCE.
D36-AP9-1_A1_En
For U.S. model only
WARNING: Handling the cord on this product or
This product is for general household purposes. Any
cords associated with accessories sold with the
failure due to use for other than household purposes
product may expose you to chemicals listed on
(such as long-term use for business purposes in a
proposition 65 known to the State of California and
restaurant or use in a car or ship) and which requires
other governmental entities to cause cancer and
repair will be charged for even during the warranty
birth defect or other reproductive harm.
period.
Wash hands after handling.
K041_A1_En
D36-P5_B1_En
We Want You Listening For A Lifetime
Used wisely, your new sound equipment will
provide a lifetime of fun and enjoyment. Since
hearing damage from loud noise is often
undetectable until it is too late, this manufacturer
and the Electronic Industries Association’s
Selecting fine audio equipment such as the unit
Consumer Electronics Group recommend you avoid
you’ve just purchased is only the start of your
prolonged exposure to excessive noise. This list of
musical enjoyment. Now it’s time to consider how
sound levels is included for your protection.
you can maximize the fun and excitement your
equipment offers. This manufacturer and the
Decibel
Electronic Industries Association’s Consumer
Level Example
Electronics Group want you to get the most out of
your equipment by playing it at a safe level. One that
30 Quiet library, soft whispers
lets the sound come through loud and clear without
40
Living room, refrigerator, bedroom away from traffic
annoying blaring or distortion-and, most importantly,
50 Light traffic, normal conversation, quiet office
without affecting your sensitive hearing.
60 Air conditioner at 20 feet, sewing machine
70 Vacuum cleaner, hair dryer, noisy restaurant
Sound can be deceiving. Over time your hearing
80
Average city traffic, garbage disposals, alarm clock
“comfort level” adapts to higher volumes of sound.
at two feet.
So what sounds “normal” can actually be loud and
harmful to your hearing. Guard against this by
THE FOLLOWING NOISES CAN BE DANGEROUS
setting your equipment at a safe level BEFORE your
UNDER CONSTANT EXPOSURE
hearing adapts.
90
Subway, motorcycle, truck traffic, lawn mower
To establish a safe level:
100 Garbage truck, chain saw, pneumatic drill
• Start your volume control at a low setting.
120 Rock band concert in front of speakers,
• Slowly
increase the sound until you can hear it
thunderclap
comfortably and clearly, and without distortion.
140 Gunshot blast, jet plane
180 Rocket launching pad
Once you have established a comfortable sound
level:
Information courtesy of the Deafness Research Foundation.
• Set the dial and leave it there.
Taking a minute to do this now will help to prevent
hearing damage or loss in the future. After all, we
want you listening for a lifetime.
S001_A1_En
01_S-21W&S-11.book 5 ページ 2010年3月16日 火曜日 午前11時28分
Contents
Installation
Features ...............................................6
Accessory Items .................................. 6
Speaker installation
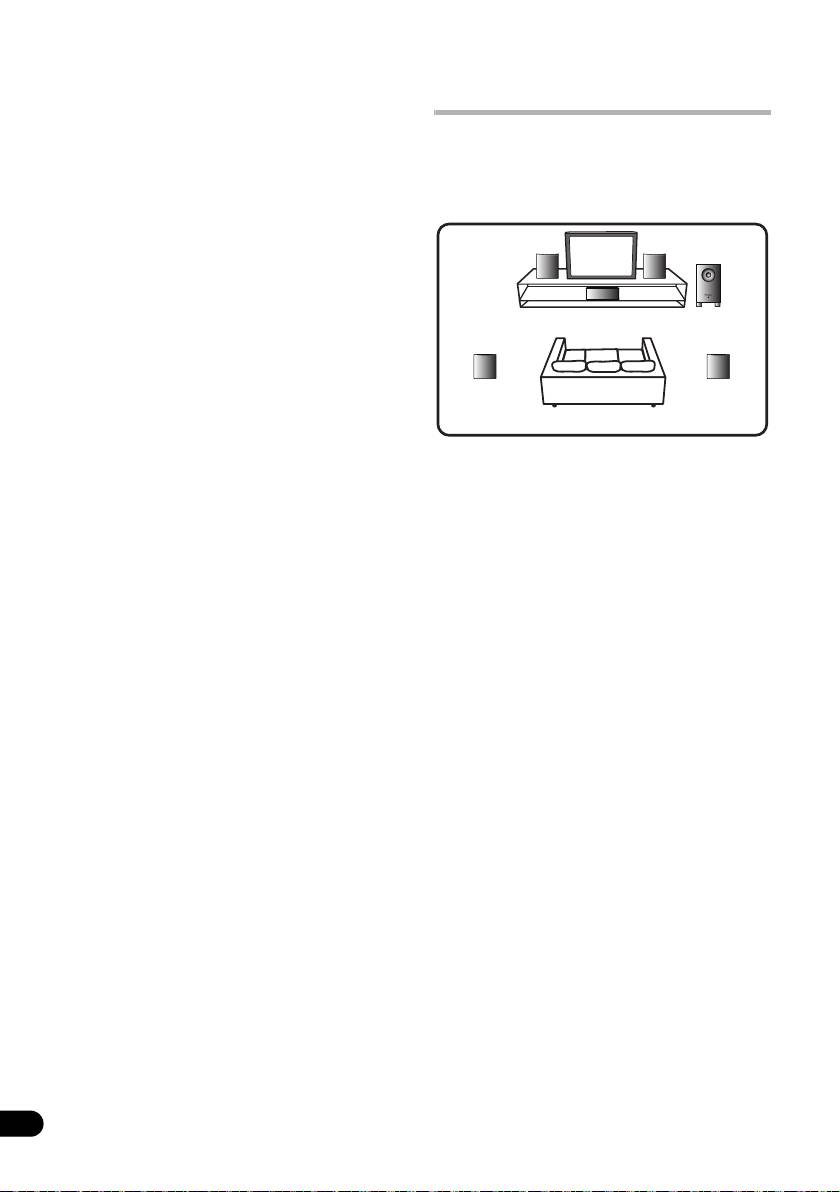
Installation .......................................... 6
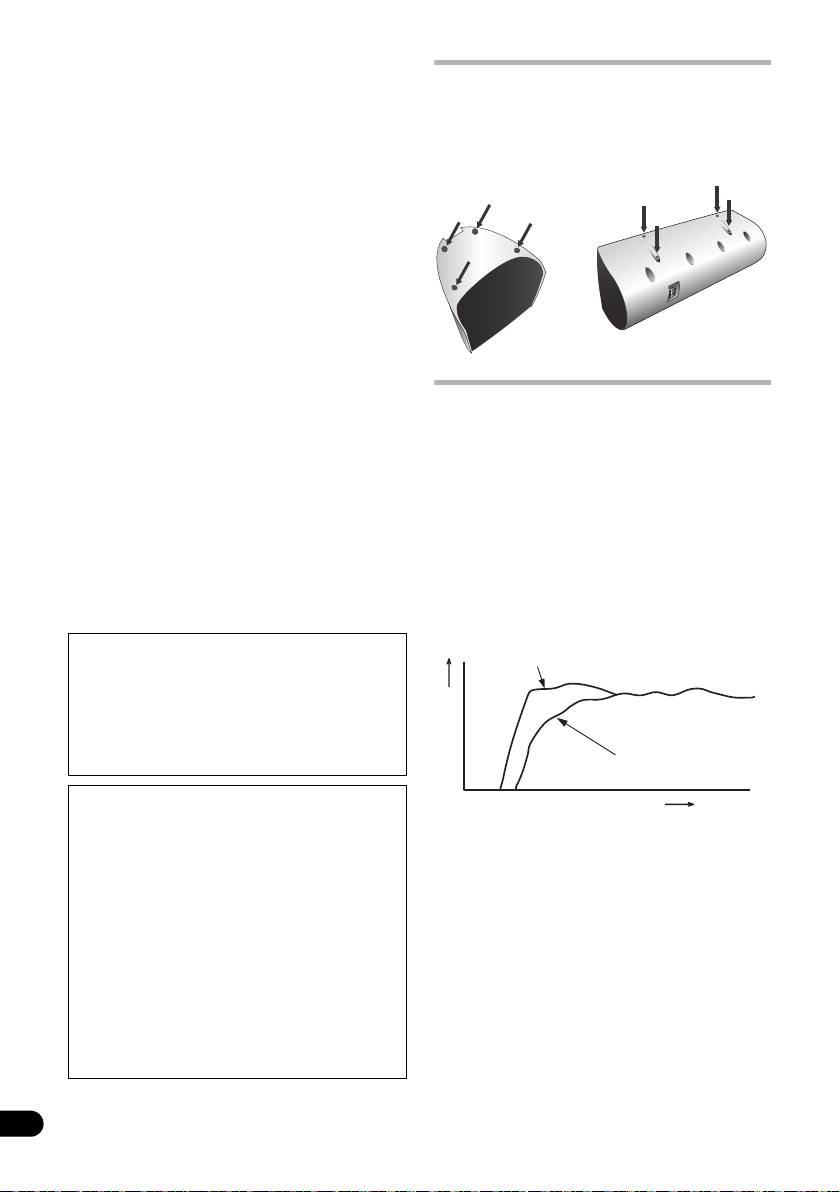
• As shown in the accompanying illustration,
Connections and Use (S-21W) ............8
when surround speakers are installed to
the rear of the listening position, you can
Connections and Use (S-11)..............10
enjoy genuine 5.1 channel surround sound.
Specifications....................................12
Troubleshooting ...............................13
Features
S-21W
• High Power 160 W (Peak)
• Compact Design and Deep Bass Sound
• Phase Control Technology
S-11
• 150 W Power Handling
1 Front left speaker
• Round shape enclosure
2 Center speaker
• Phase Control Technology
3 Front right speaker
4Subwoofer
5 Listening position
Accessory Items
6 Surround left speaker
7 Surround right speaker
S-21W
• The subwoofer and surround speakers in
this system cannot be used nearby a CRT-
• RCA plug cord (3 m) x 1
based TV or color monitor. When using this
•Power cord
kind of CRT-based TV or color monitor,
S-11
install the speakers away from the display
device. Any other device liable to be
• Speaker cords (4 m) x 3
influenced by magnetism (floppy disk drive,
• Speaker cords (10 m) x 2
cassette tape recorder, video tape player,
• Non-Skid Pads x 20
etc.) should also be kept at a distance from
• Brackets for wall mounting x 4
the subwoofer and surround speakers.
• Screw (M5) x 4
Subwoofer (S-21W)
Applies to both S-21W and S-11
• When moving the subwoofer, avoid
• Warranty card
touching the bottom surface, since the
• Operating instructions (this document)
speaker unit is located there.
• Orient the subwoofer’s front face pointing
toward the listening position.
• The subwoofer plays back the bass in
monaural, making use of the fact that the
human ear is not very sensitive to the
direction of low-pitched sound. Because of
this, the subwoofer can be installed almost
anywhere. If it is installed too far away,
however, the sound from the other
speakers may become unnatural.
The degree of bass effect can be adjusted
by moving the unit farther from or closer to
the wall.
6
En
1 3
2
4
6
7
5
01_S-21W&S-11.book 6 ページ 2010年3月16日 火曜日 午前11時28分

01_S-21W&S-11.book 7 ページ 2010年3月17日 水曜日 午後2時46分
Satellite speakers (S-11)
Installation precautions
English Français Deutsch
• Labels located on the rear of each speaker
• Do not place heavy or large objects on top
indicate whether they are designed for front
of the speaker. Doing so could provoke the
or surround use.
speaker to fall, causing damages or bodily
• Speakers installed to the right and left
injury.
should be separated by about 1.8 m to 2.7
• Do not place the speaker on an unstable
m distance. They should be installed at
surface, as doing so may cause the speaker
equal distances from the television, and at
to fall and cause damage or bodily injury.
equal heights from the floor.
• Switch off and unplug your AV equipment
• Optional speaker stands can be purchased
and consult the instructions when
to facilitate optimal mounting of the
connecting up components. Make sure you
surround speakers at or slightly above the
use the correct connecting cables.
listener’s ear height.
• Do not sit or stand on the speaker, or let
• The surround e ffect will be diminished if the
children play on the speaker. Doing so
surround speakers are mounted at extreme
could provoke the speaker to fall, causing
distances from the listener’s position.
damages or bodily injury.
• The front speakers and center speaker
• Install the subwoofer in a well-ventilated
furnished in this system are designed for
location where it will not be exposed to high
use close to a CRT-based TV or color
temperatures and high humidity.
monitor. However, if color distortion is
Italiano Español
• Do not place the subwoofer near stoves or
caused due to the installation, try turning
other heating equipment or at locations
off the power to the CRT-based TV or color
exposed to direct sunlight, as these can
monitor for 15 to 30 minutes, then turning
have an adverse effect on the cabinet and
on the power again. The self-degaussing
internal components. Also, do not install
function built into the CRT-based TV or
the unit where there is too much dust or
Nederlands
color monitor should help ameliorate the
high humidity, as these can cause
effect of the speakers on the image. If color
malfunctioning or breakdowns. (Avoid
distortion continues to be a problem,
cooking tables and other locations where
separate the speakers farther away from
the unit would be exposed to heat, steam
the screen. If magnets or devices emitting
and soot.)
magnetic fields are installed nearby, the
• Keep the subwoofer away from devices
interactive effect with the speaker system
such as cassette decks which are sensitive
may cause color distortion in a CRT-based
to magnetic fields.
TV or color monitor.
• Do not place cups, glasses, or other
containers with fluids on top of the units,
since the units may be damaged if the
liquid spills.
• Install the center speaker below the TV so
• The installation location selected should
Pyccкий
that the sound of the center channel is
have a sturdy floor surface. Mounting the
localized at the TV screen.
subwoofer on a long-pile carpet should be
• When installing the center speaker on top
avoided, since the carpet may touch the
of the TV, be sure to secure it with tape or
driver’s diaphram, causing distorted
some other suitable means. Otherwise, the
sound.
speaker may fall from the TV due to external
• Please install the subwoofer away from the
shocks such as earthquakes, endangering
antenna cable of the receiver, as noise can
those nearby or damaging the speaker.
be caused with installation close to the
antenna cable. In such a case, use the
subwoofer at a position away from the
antenna and the antenna cable, or when
playback of extra bass is not required,
switch off the power for the subwoofer.
• The front grilles on front/center/surround
speakers cannot be removed. Do not try to
forcibly remove them since doing so may
damage the grille.
• When mounting front speakers or surround
speakers on a wall surface, make sure that
the wall you intend to mount the speakers
7
on is strong enough to support them.
En
01_S-21W&S-11.book 8 ページ 2010年3月16日 火曜日 午前11時28分
When attaching the speakers to brackets,
always use the furnished brackets for wall
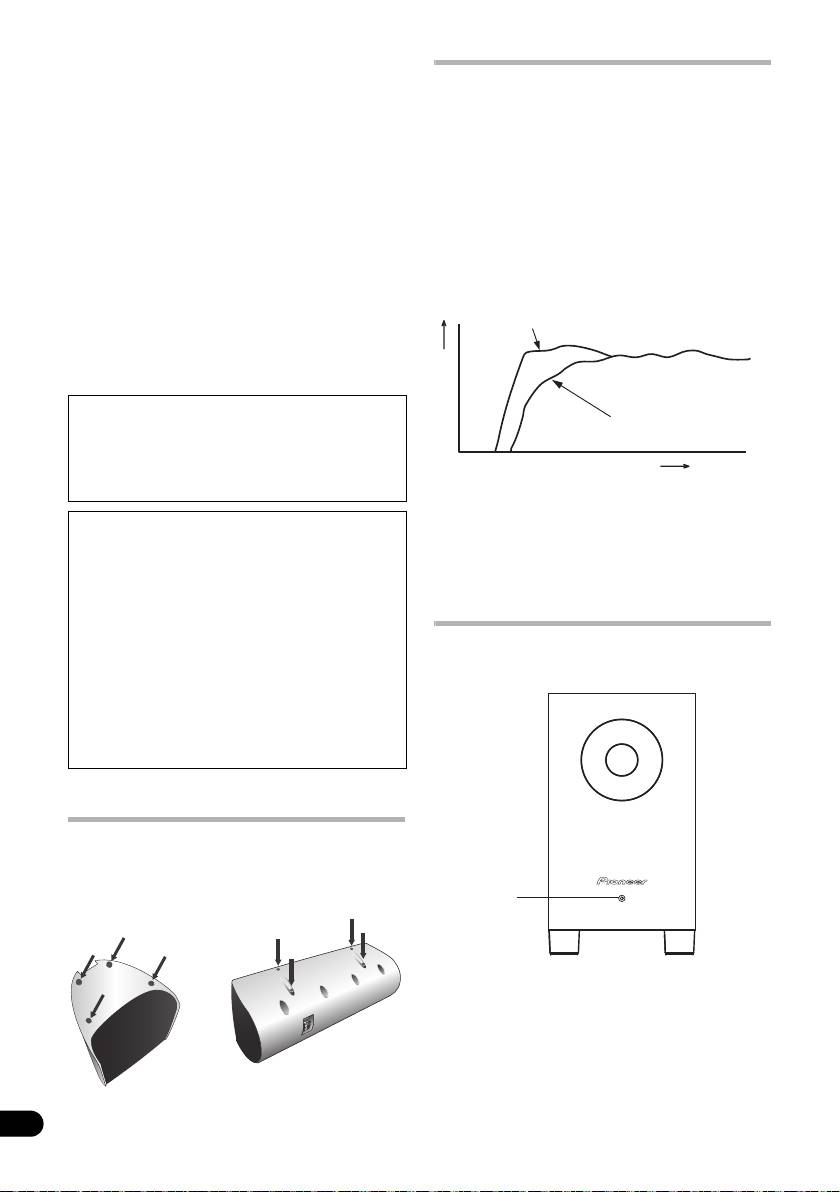
Effective Combination of
mounting.
Subwoofer and Satellite
• Do not attach center speaker and
Speakers
subwoofer to the wall or ceiling, as they
• When the subwoofer is combined with
may cause injury in the event of a fall.
satellite speakers in a total system, the
• This speaker system has an impedance of 6
sound characteristics produced are like
Ω, and should be connected only to an
those shown in the accompanying graph,
receiver designed with a load impedance of
depicting the enhancement of the bass
6 Ω (the receiver’s speaker output
frequencies.
connector should clearly be labeled “6 Ω”).
This is particularly effective for reproducing
• The S-11 incorporates autoregression
ground rumbles and other deep sound
technology to protect the speakers. If the
effects found in movies.
speakers stop emitting noise when
receiving too large a signal, turn the volume
Satellite speaker + Subwoofer
down on the receiver and wait a few
seconds. The protection feature disables
itself automatically.
Pioneer is not responsible for any
Only the satellite speaker
accidents or damage that result
from improper installation,
Response(dB)
misuse or modification of the
Frequency(Hz)
product, or natural disasters.
Maintenance of external surfaces:
• Clean the surface by wiping with a soft,
Connections and Use
dry cloth.
(S-21W)
• When the surfaces are very dirty, wipe
with a soft cloth dipped in some neutral
cleanser diluted five or six times with
water, and wrung out well, and then wipe
Panel facilities
again with a dry cloth. Do not use
Front panel
furniture wax or cleaners.
• Never use thinners, benzine, insecticide
sprays and other chemicals on or near
this unit, since these will corrode the
surfaces.
Affixing Non-Skid Pads
Apply the accessory non-skid pads to the
bottom surfaces of the front/center/surround
speakers
1
8
En

01_S-21W&S-11.book 9 ページ 2010年3月16日 火曜日 午前11時28分
Rear panel
Auto standby function
English Français Deutsch
When there is no (or only very weak) input
signal for a period of about ten minutes, the
power mode automatically changes to
MIN
MAX
2
standby (power indicator lights red). The
LINE IN
3
ON
AUTO STANDBY
4
power automatically turns on when a signal is
input. The auto standby function is
deactivated when AUTO STANDBY switch is
set to OFF.
ON
5
POWER
6
AC IN
• There may be cases where a connected
component outputs noise or some other
non-audio signal which causes the
subwoofer to automatically power on when
1Power Indicator
in Auto Standby mode. If this happens,
When the power is turned ON, the indicator
switch off the Auto Standby mode and
changes from flashing to steadily lighted
switch the subwoofer on/off manually.
blue. In the standby mode, the indicator
Italiano Español
5 Power switch (POWER)
lights red.
• Switches the subwoofer between ON
and OFF.
6AC IN
• The power is still supplied even when the
• Connect the power cord to a AC socket.
power indicator is off. The power plug
Nederlands
(interrupter) must be unplugged in order to
completely cut the power supply. When not
Connection
using this product for long periods of time,
Before making or changing the
such as when traveling, unplug the power
connections, switch off the power and
cord (interrupter) from the power outlet for
disconnect the power cord from the AC
safety purposes. Failure to do so could lead
outlet.
to fire.
Line level connection
2 Volume knob (MIN/MAX)
• Sets the subwoofer volume.
Supplied RCA plug cord
• With this unit, the bass level can be
independently set, so do not turn up the
Rear Panel
bass on the receiver.
Pyccкий
Connect the set’s LINE IN terminal to the
• The volume knob is factory set at the MIN
receiver’s SUBWOOFER PREOUT terminal
position.
using the included RCA plug cord.
3 Line Level Input terminal (LINE IN)
4 Auto Standby switch (AUTO STANDBY)
• Turning the Auto Standby function on or
• When connected to the PREOUT terminal
off.
for surround center channel on the
receiver, the bass is heard only on the
center channel, so it will be insufficient.
• The default setting for AUTO STANDBY
switch is ON.
9
En

Connections and Use
Connecting the power cord
(S-11)
Connection
Before making or changing the
connections, switch off the power and
disconnect the power cord from the AC
Connect the power cord for the this unit to the
outlet.
unit’s power connector (AC IN), and the other
Connecting the speakers
ends to an AC power supply. When turning on
the power, turn on the power to the receiver
To get the best out of your speakers it is
first, then the power to this unit.
important that you connect them properly to
your receiver. Each speaker connection
consists of a positive (+) and a negative (–)
terminal. These should be matched between
the receiver and the speaker.
Operation
1 Attach one end of the supplied speaker
For details regarding operating part functions,
cord to the rear of the each speaker.
refer to Panel facilities on page 8.
• Connect the wire with the colored
1 Turn the POWER switch (5) ON.
marker to the red (+) terminal; the plain
• If the unit’s power cord is connected to a
wire to the black (–) terminal. Press
switched AC outlet on the receiver and
down the spring-loaded tab and insert
the switch is left ON, the unit can be
the wire, as shown below. Release the
turned ON/OFF together with the
tab to secure the wire.
receiver.
• If the unit’s power cord cannot be
connected to the receiver, turn the
power to the receiver ON before turning
the power to the unit ON. When turning
the power OFF, turn the power to the unit
OFF before turning the power to the
receiver OFF.
• Set the cross-over frequency to match
that of the speakers actually used.
2 Connect the other end of each speaker
2 Operate the receiver and adjust the
cord to your receiver.
volume of the other speakers.
• To connect, insert the colored wire into
3 Adjust the volume of the bass with the
the matching positive (colored) terminal
volume knob (2).
and the other wire into the negative
• Turn the knob slowly from the MIN
(black) terminal. See also the Operating
position.
Instructions that came with your
receiver.
4 Turn the POWER switch (5) OFF.
• The power indicator disappears.
• Do not use the speaker to output distorted
sound for long periods of time. This can
result in damages to the speaker and poses
a potential fire hazard.
10
En
ON
POWER
AC IN
Power Cord
Red (+)
Black (–)
Red colored marker
01_S-21W&S-11.book 10 ページ 2010年3月16日 火曜日 午前11時28分

English Français Deutsch
Wall-mounting the front
• These speaker terminals carry
and surround speaker
HAZARDOUS LIVE voltage. To prevent the
system
risk of electric shock when connecting or
disconnecting the speaker cords,
Attaching the brackets
disconnect the power cord before touching
• When attaching the speakers to brackets,
any uninsulated parts.
always use the furnished brackets for wall
• After connecting the plugs, pull lightly on
mounting.
the cords to make sure that the ends of the
• Make sure to tighten the supplied screw as
cords are securely connected to the
securely as possible when attaching the
terminals. Poor connections can create
bracket to the back of the speaker.
noise and interruptions in the sound.
• Do not attach brackets to center speaker or
• If the cords’ wires happen to be pushed out
subwoofer.
of the terminals, allowing the wires to come
into contact with each other, it places an
excessive additional load on the receiver.
This may cause the amp to stop
• Use the M5 metric thread screw. Do not
functioning, and may even damage the
use inch thread screw.
receiver.
Italiano Español
Before mounting
• When using a set of speakers connected to
an receiver, you won’t be able to obtain the
• Remember that the speaker system is
normal stereo effect if the polarity (+, –) of
heavy and that its weight could cause the
one of the speakers (left or right) is
wood screws to work loose, or the wall
reversed.
material to fail to support it, resulting in the
Nederlands
speaker falling. Make sure that the wall on
which you intend to mount the speakers is
Operation
strong enough to support them. Do not
• Set the receiver’s cross-over frequency
mount on plywood or soft surface walls.
at 200 Hz.
• Mounting screws are not supplied. Use
screws suitable for the wall material and
support the weight of the speaker. If you are
unsure of the qualities and strength of the
walls, consult a professional for advice.
Pyccкий
Screw (supplied)
11
En
5 mm
(3/16 in.)
5 mm (3/16 in.) to 7 mm (9/32 in.)
10 mm
Mounting screw (not supplied)
(13/32 in.)
01_S-21W&S-11.book 11 ページ 2010年3月16日 火曜日 午前11時28分

01_S-21W&S-11.book 12 ページ 2010年3月17日 水曜日 午後2時46分
Specifications
S-21W
Power Amplifier Power Output (Peak) .................................................................................................160 W
Power Amplifier Power Output (RMS) ....................................................... 100 W (100 Hz, 4 Ω, THD 10 %)
Power Amplifier Power Output (FTC).............................................. 80 W (35 Hz to 500 Hz, 4 Ω, THD 1 %)
Input (sensitivity at 100 Hz) LINE LEVEL (RCA jack) .........................................................................300 mV
Cabinet.......................................................................................................................... Bass-reflex, floor type
Speaker..................................................................................................................................16 cm cone type
Speaker Frequency range .................................................................................................... 33 Hz to 700 Hz
Power Requirements
European model........................................................................................ AC 220 V to 240 V, 50 Hz/60 Hz
U.S., Canadian model ....................................................................................................... AC 120 V, 60 Hz
Other model ..............................................................................................AC 110 V to 240 V, 50 Hz/60 HZ
Power Consumption ................................................................................................................................25 W
Power consumption in standby.................................................................................................0.5W or less
Outline Dimension....................................................................... 230 mm (W) x 408 mm (H) x 344 mm (D)
(9 1/16 in.(W) x 16 1/16 in.(H) x 13 17/32 in. in.(D))
Weight (without package) .................................................................................................. 6.5 kg (14 lb 5 oz)
S-11
Front speakers / Surround speakers
Enclosure
Front speakers .........................................................Closed-box bookshelf type (magnetically shielded)
Surround speakers .......................................................................................... Closed-box bookshelf type
System ............................................................................................................................7.7 cm 1-way system
Speaker.................................................................................................................................7.7 cm cone type
Nominal impedance ...................................................................................................................................6 Ω
Frequency range .................................................................................................................. 100 Hz to 20 kHz
Sensitivity.................................................................................................................................................82 dB
Permissible input: maximum input......................................................................................................150 W
Dimensions .................................................................................. 106 mm (W) x 116 mm (H) x 106 mm (D)
(4 3/16 in.(W) x 4 9/16 in.(H) x 4 3/16 in.(D))
Weight
Front speakers ................................................................................................................ 0.8 kg (1 lb 12 oz)
Surround speakers ........................................................................................................... 0.6 kg (1 lb 5 oz)
Center speaker
Enclosure.....................................................................Closed-box bookshelf type (magnetically shielded)
System ............................................................................................................................7.7 cm 1-way system
Speaker.................................................................................................................................7.7 cm cone type
Nominal impedance ...................................................................................................................................6 Ω
Frequency range .................................................................................................................... 90 Hz to 20 kHz
Sensitivity.................................................................................................................................................83 dB
Permissible input: maximum input......................................................................................................150 W
Dimensions .................................................................................. 270 mm (W) x 100 mm (H) x 106 mm (D)
(10 5/8 in.(W) x 3 15/16 in.(H) x 4 3/16 in.(D))
Weight.................................................................................................................................... 1.0 kg (2 lb 3 oz)
Specifications and design subject to possible modification without notice, due to improvements.
12
En

01_S-21W&S-11.book 13 ページ 2010年3月16日 火曜日 午前11時28分
Troubleshooting
English Français Deutsch
Incorrect operations are often mistaken for trouble and malfunctions. If you think that there is
something wrong with this component, check the points below. Sometimes the trouble may lie
in another component. Investigate the other components and electrical appliances being used.
If the trouble cannot be rectified even after exercising the checks listed below, ask your nearest
PIONEER authorized service center or your dealer to carry out repair work.
S-21W
Symptom Cause Remedy
No power is being supplied
• Power supply plug is not
• Insert plug securely.
(Indicator does not light up
correctly inserted.
when POWER switch is
turned on) .
No sound
• Connection of accessory
• Check again and connect
(Indicator is lit blue) .
RCA plug cord is wrong or
correctly.
disconnected.
Italiano Español
• Volume knob is set to MIN.
• Turn clockwise slowly.
• Input level is too low.
• Raise the receiver’s output
level.
Sound is distorted. • Level is too high.
• Turn the volume knob
counter-clockwise to lower
Nederlands
the level.
• Input level is too high.
•Turn the
receiver’s output
level (volume, bass control,
bass boost) counter-
clockwise to lower the level.
Howling noise occurs. • No power supplied to the
• Connect an
receiver and
receiver.
supply power.
• Subwoofer level is set too
• Place the subwoofer a good
high.
distance from speakers.
Turn the volume knob
counter-clockwise to lower
the volume.
Pyccкий
Much noise when listening
• The AM loop antenna or
• Increase the distance
to AM or FM broadcasts.
the FM indoor antenna is
between the AM or FM
close to this unit.
antenna (for indoor use)
and this unit.
13
En
01_S-21W&S-11.book 14 ページ 2010年3月16日 火曜日 午前11時28分
Symptom Cause Remedy
No sound is produced
• Unit has entered standby
• Turn the Auto Standby
(power indicator lights red)
mode.
function OFF.
– When the Auto Standby
Initial sounds of a track
• The audio signal was input
function is turned ON, if
can’t be heard.
when the unit was in the
no signal (or only a very
standby mode.
weak signal) is input for
a period of about ten
minutes, the power
mode will automatically
change to standby.
– Note that when listening
with the volume set to a
very low level, the Auto
Standby function may
operate, switching the
unit to the standby
mode.
S-11
Symptom Cause Remedy
No sound. • Incorrect connection of
• Connect correctly.
speaker wire.
•Turn on receiver.
• Receiver is off.
• Slowly turn up volume.
• Volume control is at zero.
Sound is distorted. • Extreme signal condition. • Turn down the receiver’s
output level (volume, bass
control, bass boost) to
lower the level.
Speakers stop producing
• An excessively large signal
• Turn the volume down to
sound suddenly.
was input, resulting in the
resume normal speaker
operation of the automatic
output.
protection circuit.
Published by Pioneer Corporation.
Copyright © 2010 Pioneer Corporation.
All rights reserved.
14
En

01_S-21W&S-11.book 15 ページ 2010年3月16日 火曜日 午前11時28分
English Français Deutsch
Italiano Español
Nederlands
Pyccкий
15
En
02_S-21W&S-11_FR.book 2 ページ 2010年3月19日 金曜日 午後2時11分
Nous vous remercions pour cet achat d’un produit PIONEER. Nous vous demandons de lire
soigneusement ce mode d’emploi; vous serez ainsi à même de faire correctement
fonctionner l’appareil. Après avoir bien lu le mode d’emploi, le ranger dans un endroit sûr
pour pouvoir s’y référer ultérieurement.
Ce mode d’emploi a été rédigé de manière à être utilisé avec le modèle S-21W ou le S-11.
Consultez les sections du manuel qui se rapportent à votre modèle.
IMPORTANT
ATTENTION
DANGER D´ELECTROCUTION
NE PAS OUVRIR
Ce symbole de l’éclair, placé dans un
ATTENTION :
Ce point d’exclamation, placé dans un
triangle équilatéral, a pour but d’attirer
POUR ÉVITER TOUT RISQUE
triangle équilatéral, a pour but d’attirer
l’attention de l’utilisateur sur la présence, à
D’ÉLECTROCUTION, NE PAS ENLEVER LE
l’attention de l’utilisateur sur la présence,
l’intérieur du coffret de l’appareil, de
COUVERCLE (NI LE PANNEAU ARRIÈRE).
dans les documents qui accompagnent
“tensions dangereuses” non isolées d’une
AUCUNE PIÈCE RÉPARABLE PAR
l’appareil, d’explications importantes du
grandeur suffisante pour représenter un
L’UTILISATEUR NE SE TROUVE À
point de vue de l’exploitation ou de
risque d’électrocution pour les êtres
L’INTÉRIEUR. CONFIER TOUT ENTRETIEN À
l’entretien.
humains.
UN PERSONNEL QUALIFIÉ UNIQUEMENT.
D3-4-2-1-1_A1_Fr
AVERTISSEMENT
AVERTISSEMENT
Cet appareil n’est pas étanche. Pour
Les fentes et ouvertures du coffret sont
éviter les risques d’incendie et de
prévues pour la ventilation, pour assurer
décharge électrique, ne placez près de lui
un fonctionnement stable de l’appareil et
un récipient rempli d’eau, tel qu’un vase
pour éviter sa surchauffe. Pour éviter les
ou un pot de fleurs, et ne l’exposez pas à
risques d’incendie, ne bouchez jamais les
des gouttes d’eau, des éclaboussures, de
ouvertures et ne les recouvrez pas
la pluie ou de l’humidité.
d’objets, tels que journaux, nappes ou
D3-4-2-1-3_A1_Fr
rideaux, et n’utilisez pas l’appareil posé
sur un tapis épais ou un lit.
AVERTISSEMENT
D3-4-2-1-7b*_A1_Fr
Avant de brancher l’appareil pour la
première, lisez attentivement la section
Milieu de fonctionnement
suivante.
Température et humidité du milieu de
La tension de l’alimentation électrique
fonctionnement :
disponible varie selon le pays ou la
De +5 °C à +35 °C (de +41 °F à +95 °F) ;
région. Assurez-vous que la tension du
Humidité relative inférieure à 85 %
secteur de la région où l’appareil sera
(orifices de ventilation non obstrués)
utilisé correspond à la tension requise
N’installez pas l’appareil dans un endroit
(par ex. 230 V ou 120 V), indiquée sur
mal ventilé ou un lieu soumis à une forte
le panneau arrière.
humidité ou en plein soleil (ou à une forte
D3-4-2-1-4*_A1_Fr
lumière artificielle).
D3-4-2-1-7c*_A1_Fr
AVERTISSEMENT
Pour éviter les risques d’incendie, ne
Si la fiche d’alimentation secteur de cet appareil ne
placez aucune flamme nue (telle qu’une
convient pas à la prise secteur à utiliser, la fiche doit
bougie allumée) sur l’appareil.
être remplacée par une appropriée. Ce
D3-4-2-1-7a_A1_Fr
remplacement et la fixation d’une fiche secteur sur le
cordon d’alimentation de cet appareil doivent être
effectués par un personnel de service qualifié. En cas
PRÉCAUTION DE VENTILATION
de branchement sur une prise secteur, la fiche de
Lors de l’installation du caisson de
coupure peut provoquer une sérieuse décharge
électrique. Assurez-vous qu’elle est éliminée
graves, veillez à laisser un espace
correctement après sa dépose.
suffisant autour de ses parois de manière
L’appareil doit être déconnecté en débranchant sa
à améliorer la dissipation de chaleur (au
fiche secteur au niveau de la prise murale si vous
prévoyez une période prolongée de non utilisation
moins 10 cm sur le dessus, 10 cm à
(par exemple avant un départ en vacances).
2
l’arrière et 10 cm de chaque côté.)
D3-4-2-2-1a_A1_Fr
Fr
English Français Deutsch
Italiano Español
Nederlands
Pyccкий
3
Fr
ATTENTION
NOTE IMPORTANTE SUR LE
L’interrupteur POWER de cet appareil ne coupe pas
CABLE D’ALIMENTATION
complètement celui-ci de sa prise secteur. Comme le
Tenir le câble d’alimentation par la fiche. Ne pas
cordon d’alimentation fait office de dispositif de
débrancher la prise en tirant sur le câble et ne pas
déconnexion du secteur, il devra être débranché au
toucher le câble avec les mains mouillées. Cela risque
niveau de la prise secteur pour que l’appareil soit
de provoquer un court-circuit ou un choc électrique.
complètement hors tension. Par conséquent, veillez à
installer l’appareil de telle manière que son cordon
d’alimentation puisse être facilement débranché de
la prise secteur en cas d’accident. Pour éviter tout
ATTENTION:
risque d’incendie, le cordon d’alimentation sera
Ne montez pas et ne vous asseyez pas sur l’appareil.
débranché au niveau de la prise secteur si vous
Soyez spécialement prudent sides enfants sont à
prévoyez une période prolongée de non utilisation
proximité, car l’appareil pourraitêtre endommagé et
(par exemple avant un départ en vacances).
causer des blessures en tombant.
D3-4-2-2-2a*_A1_Fr
Cet appareil numérique de la Classe B est conforme
à la norme NMB-003 du Canada.
D8-10-1-3_A1_Fr
Ce produit est destiné à une utilisation domestique
générale. Toute panne due à une utilisation autre qu'à
des fins privées (comme une utilisation à des fins
commerciales dans un restaurant, dans un autocar
ou sur un bateau) et qui nécessite une réparation
sera aux frais du client, même pendant la période de
garantie.
K041_A1_Fr
Pour modèle européen uniquement
Si vous souhaitez vous débarrasser de cet appareil, ne le mettez pas à la poubelle avec vos ordures ménagères. Il existe un système de
collecte séparé pour les appareils électroniques usagés, qui doivent être récupérés, traités et recyclés conformément à la législation.
Les habitants des états membres de l’UE, de Suisse et de Norvège peuvent retourner gratuitement leurs appareils électroniques usagés aux
centres de collecte agréés ou à un détaillant (si vous rachetez un appareil similaire neuf).
Dans les pays qui ne sont pas mentionnés ci-dessus, veuillez contacter les autorités locales pour savoir comment vous pouvez vous débarrasser
de vos appareils.
Vous garantirez ainsi que les appareils dont vous vous débarrassez sont correctement récupérés, traités et recyclés et préviendrez de cette façon
les impacts néfastes possibles sur l’environnement et la santé humaine.
K058b_A1_Fr
02_S-21W&S-11_FR.book 3 ページ 2010年3月19日 金曜日 午後2時11分

Sommaire
Installation
Caractéristiques ..................................4
Articles accessoires............................. 4
Installation des enceintes
Installation .......................................... 4
• Comme indiqué sur cette illustration, si des
Branchements et utilisation (S-21W)
...7
enceintes d’ambiance (surround) sont
installées derrière la position d’écoute,
Branchements et utilisation (S-11).... 9
vous pouvez bénéficier d’un véritable son
Fiche technique.................................11
surround 5,1 canaux.
Guide de dépannage ........................12
Caractéristiques
S-21W
•Forte puissance de 160 W (crête)
•Design compact et réponse étendue dans
le grave
• Technologie Phase Control
S-11
• Puissance maximum de 150W
1 Enceinte avant gauche
• Coffret de forme arrondie
2 Enceinte centrale
• Technologie Phase Control
3 Enceinte avant droite
4 Caisson de graves
5 Position d’écoute
Articles accessoires
6 Enceinte surround gauche
7 Enceinte surround droite
S-21W
• Le caisson de graves et les enceintes
surround de ce système ne peuvent pas
• Câble à fiche RCA (3 m) x 1
être utilisés près d’un téléviseur ou d’un
• Cordon d’alimentation
moniteur couleur à tube cathodique. Si
S-11
vous utilisez ce genre de téléviseur ou de
moniteur couleur à tube cathodique,
• Cordons d’enceinte (4 m) x 3
installez les enceintes à l’écart de l’écran.
• Cordons d’enceinte (10 m) x 2
Tout dispositif susceptible d’être influencé
• Coussinets antidérapants x 20
par le magnétisme (lecteur de disquette,
•Appliques pour montage mural x 4
magnétocassette, lecteur vidéo, etc.) doit
•Vis (M5) x 4
être maintenu à l’écart du caisson de
Articles pour S-21W et S-11
graves et des enceintes surround.
• Carte de garantie
Caisson de graves (S-21W)
• Mode d’emploi (ce document)
• Lors d’un déplacement du caisson de
graves, évitez de toucher la surface du fond
sur laquelle est situé le haut-parleur.
•Orientez la face avant du caisson de graves
vers la position d’écoute.
• Le caisson de graves restitue les basses en
monophonie, profitant du fait que l’oreille
humaine n’est guère sensible pour
localiser les sons graves. Pour cette raison,
ce caisson peut être installé pratiquement
n’importe où. Toutefois, s’il est installé trop
loin, le son des autres enceintes risque de
ne plus être naturel.
4
Fr
1 3
2
4
6
7
5
02_S-21W&S-11_FR.book 4 ページ 2010年3月19日 金曜日 午後2時11分

Le degré de l’effet des graves peut s’ajuster
Précautions d’installation
English Français Deutsch
en éloignant ou en rapprochant le caisson
•Ne placez pas d’objets pesants ou
par rapport au mur.
volumineux sur le dessus des enceintes.
Ceci pourrait provoquer leur
Enceintes satellites (S-11)
chute,entraînant des dégâts ou des
• Les étiquettes prévues à l’arrière de chaque
blessures.
enceinte indiquent si elles sont destinées à
•Ne placez pas l’enceinte sur une surface
servir comme enceintes avant ou
instable, car elle pourrait tomber et
d’ambiance (surround).
provoquer des dégâts ou des blessures.
• Les enceintes installées à gauche et à
• Mettez votre système audiovisuel hors
droite doivent être distantes d’environ 1,8 m
tension et débranchez-le, puis consultez le
à 2,7 m. Elles doivent être placées à égale
mode d’emploi avant de brancher des
distance du téléviseur et à la même hauteur
composants. Prenez soin d’utiliser
par rapport au sol.
correctement les cordons de
•Vous pouvez acheter des supports
raccordement.
d’enceinte en option qui faciliteront le
• Ne montez pas et ne vous asseyez pas sur
placement des enceintes surround à la
les enceintes et ne laissez pas des enfants
hauteur des oreilles de l’auditeur ou
jouer avec celles-ci. Ceci pourrait
légèrement au-dessus.
provoquer leur chute,entraînant des dégâts
• L’effet d’ambiance diminuera si les
Italiano Español
ou des blessures.
enceintes surround sont placées très loin
• Installez le caisson de graves dans un
de la position d’écoute.
endroit bien ventilé où il ne sera pas soumis
• Les enceintes avant et l’enceinte centrale
à de l’humidité ou à des températures
fournies avec ce système sont conçues
excessives.
pour fonctionner à proximité d’un
•Ne placez pas le caisson de graves à
téléviseur ou d’un moniteur couleur à tube
Nederlands
proximité d’un radiateur ou d’un autre
cathodique. Cependant, si une distorsion
appareil de chauffage et ne l’exposez pas
des couleurs est constatée par suite de
aux rayons directs du soleil, car cela
cette installation, coupez l’alimentation du
risquerait d’endommager le coffret ou les
téléviseur ou du moniteur couleur à tube
composants internes. Ne le placez pas
cathodique pendant 15 à 30 minutes, puis
dans un endroit excessivement
remettez-le sous tension. Le dispositif de
poussiéreux ou humide, car ceci pourrait
démagnétisation incorporé au téléviseur ou
provoquer des anomalies de
au moniteur couleur à tube cathodique
fonctionnement ou une panne. (Evitez de le
devrait corriger l’effet des enceintes sur
placer sur une table de cuisine ou à un
l’image du téléviseur. Si la distorsion des
autre endroit où il serait soumis à de la
couleurs n’est pas corrigée, éloignez les
chaleur, de la vapeur ou de la suie.)
enceintes par rapport à l’écran. Si des
•Ne placez pas le caisson de graves à
aimants ou des dispositifs produisant un
Pyccкий
proximité d’un appareil, tel qu’un
champ magnétique sont installés à
magnéto
phone, susceptible d’ê
t
re affecté
proximité, une interaction avec les
par les champs magnétiques.
enceintes peut provoquer une distorsion
des couleurs sur un téléviseur ou un
•Ne posez pas de tasses, verres ou autres
moniteur couleur à tube cathodique.
récipients contenant un liquide sur le
dessus des appareils, car ceux-ci
pourraient être endommagés si du liquide
devait s’y infiltrer.
• Installez l’enceinte centrale en dessous du
•L’emplacement d’installation choisi doit
téléviseur, de sorte que le son du canal
être la surface d’un plancher solide. Evitez
central semble provenir de l’écran du
de poser le caisson de graves sur un tapis à
téléviseur.
longs poils, car ils pourraient toucher le
• Si vous installez l‘enceinte centrale sur le
diaphragme et provoquer une distorsion
téléviseur, veillez à l’immobiliser avec un
des sons.
cordon ou par un moyen approprié. Sinon,
• Veillez à installer le caisson de graves à
l’enceinte risquerait de tomber du fait de
l’écart du câble d’antenne du récepteur,
chocs extérieurs à l’appareil, comme lors
car des parasites peuvent être provoqués
d’un séisme ; vous pourriez mettre en
par une installation proche du câble
danger les
personn
es à prox
imité ou
d’antenne. Dans ce cas, utilisez le caisson
l’enceinte pourrait être endommagée.
de graves à une position éloignée de
5
Fr
ATTENTION
02_S-21W&S-11_FR.book 5 ページ 2010年3月19日 金曜日 午後2時11分
02_S-21W&S-11_FR.book 6 ページ 2010年3月19日 金曜日 午後2時11分
l’antenne et du câble d’antenne, ou si la
reproduction de basses supplémentaires
Fixation des coussinets
n’est pas nécessaire, coupez l’alimentation
antidérapants
du caisson de graves.
Placez les coussinets antidérapants fournis
• La grille avant des enceintes avant, centrale
sur le fond des enceintes avant, centrale et
et surround ne peut p as être enlevée.
surround.
N’essayez pas de l’enlever en forçant car
elle en serait endommagée.
• Si vous installez les enceintes avant et
surround sur une paroi, assurez-vous que
celle-ci soit suffisamment résistante pour
supporter leur poids.
• N’attachez pas l’enceinte centrale et le
caisson de graves sur un mur ou au plafond
car ils pourraient occasionner des
blessures en cas de chute.
• Cette enceinte acoustique a une
impédance de 6 Ω et on ne la raccordera
donc qu’à un récepteur conçu pour une
Combinaison efficace du
impédance de charge de 6 Ω (le
connecteur de sortie de haut-parleur du
caisson de graves et
récepteur doit clairement porter la mention
d’enceintes satellites
“6 Ω”).
• Si le caisson de graves est associé à des
•La S-11 incorpore une technologie dite
enceintes satellites pour former un
d’autorégression afin de protéger les haut-
ensemble, les caractéristiques sonores
parleurs. Si les enceintes cessent
obtenues ressembleront aux paramètres
d’émettre des sons à la réception d’un
du schéma ci-après qui illustre la mise en
signal trop puissant, réduisez le volume sur
valeur des basses fréquences.
le récepteur et attendez quelques
Cette combinaison est particulèrement
secondes. Cette fonction de protection se
efficace pour restituer les grondements du
désactive automatiquement.
sol et autres effets sonores profonds,
utilisés dans les films.
Pioneer n’assume aucune
Enceinte satellite + Caisson de graves
responsabilité en cas d’accidents
ou de dégâts, résultant d’une
installation inappropriée, d’une
erreur d’utilisation, d’une
altération du produit ou de
catastrophes naturelles.
Enceinte satellite seule
Réponse (dB)
Entretien des surfaces externes
Fréquence (Hz)
• Nettoyez les surfaces avec un linge doux
et sec.
• Si les surfaces sont très sales, utilisez un
linge doux et un produit détergent neutre
dilué dans cinq ou six fois son volume
d’eau. Tordez bien le linge avant de
nettoyer les surfaces. Essuyez-les ensuite
avec un linge sec. N’utilisez pas de cire
ou de détergent pour mobilier.
• N’utilisez jamais de diluant, benzine,
bombe insecticide et autres produits
chimiques à proximité de cette enceinte,
car ces produits détérioreraient la finition
de sa surface.
6
Fr
