Pioneer S-LX70C: instruction
Class: Household, kitchen appliances, electronics and equipment
Type: Microphone
Manual for Pioneer S-LX70C
Table of contents
- Caution Before you start
- Confirm your accessories Installing the speaker Speaker system grill
- 2 Paste the supplied wall mounting template on the area of installation.
- 7 Secure brackets together with screws. 8 Secure speaker to wall with a cord. 6 Attach speaker onto bracket (for wall).
- Placing on a shelves using the speaker stand
- Specifications

01_S-LX70C_En.book 1 ページ 2007年9月12日 水曜日 午後2時48分
Speaker System
Enceintes acoustiques
Lautsprechersystem
Sistema di diffusori
Luidsprekersysteem
Sistema de Colunas
Sistema de colunas
Högtalarsystem
Højttalersystem
Høyttalersystem
Kaiutinjärjestelmä
Акустическая система
S-LX C

Thank you for buying this Pioneer product. Please read through
these operating instructions so you will know how to operate your
Caution
model properly. After you have finished reading the instructions,
put them away in a safe place for future reference.
Installation
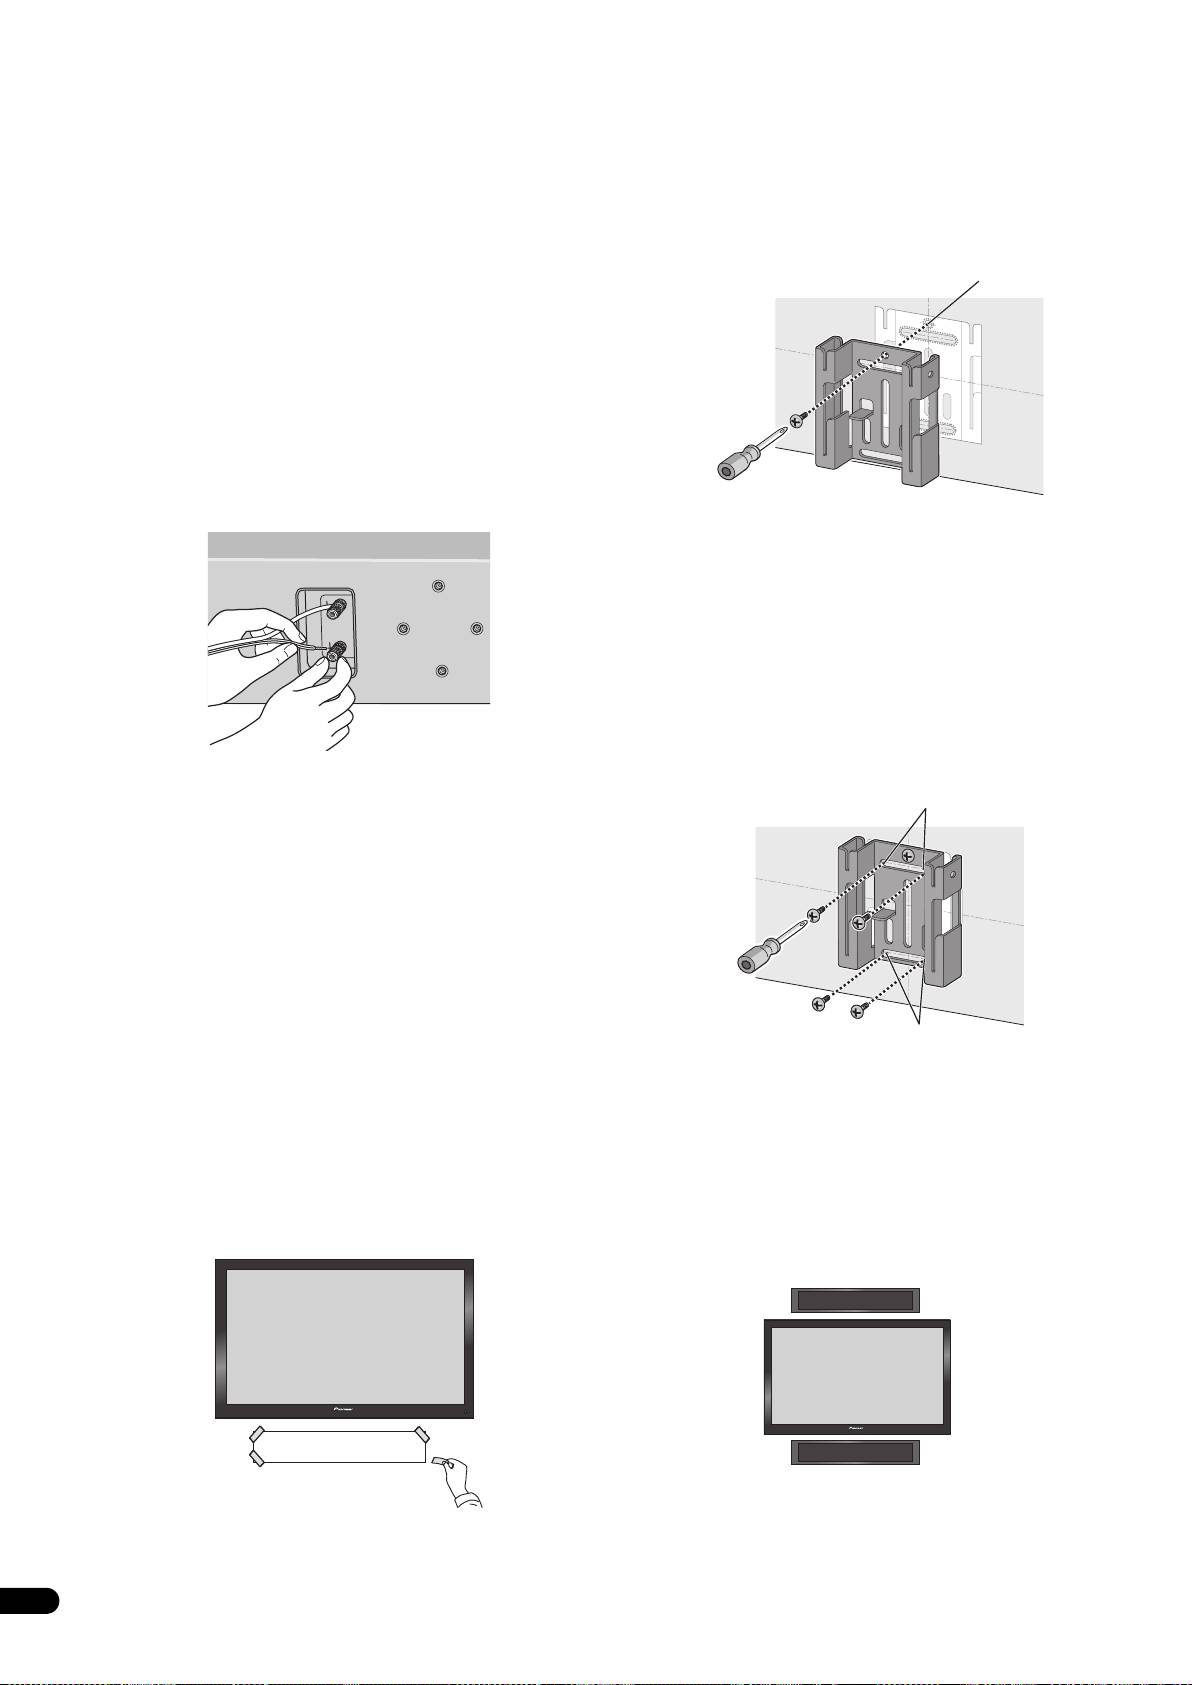
• Do not place the speaker on an unstable surface, as doing so
may cause the speaker to fall and cause damage or bodily
Before you start
injury.
• The nominal impedance of this speaker system is 6 Ω. Connect
• Switch off and unplug your AV equipment and consult the
the speaker system to an amplifier with a load impedance of
instructions when connecting up components. Make sure you
6 Ω (a model with “6 Ω“ displayed on the speaker output
use the correct connecting cables.
terminals).
• When placing this unit, avoid areas where it may be likely to fall
In order to prevent damage to the speaker system resulting from
and cause injury in the event of a natural disaster (such as an
input overload, please observe the following precautions:
earthquake). For more information, see page 5.
• Do not supply power to the speaker system in excess of the
• Pioneer is not responsible for any accidents or damage that
maximum permissible input.
result from improper installation, misuse or modification of the
• When using a graphic equalizer to emphasize loud sounds in
product, or natural disasters.
the high-frequency range, do not use excessive amplifier
volume.
Using the speakers
• Do not try to force a low-powered amplifier to produce loud
• Do not use the speaker to output distorted sound for long
volumes of sound (the amplifier’s harmonic distortion will be
periods of time. This can result in damages to the speaker and
increased, and you may damage the speaker).
poses a potential fire hazard.
• Do not sit or stand on the speaker, or let children play on the
Care of the speaker cabinets
speaker. Doing so could provoke the speaker to fall, causing
• With normal use, wiping with a soft cloth should be sufficient
damages or bodily injury.
to keep the cabinet clean. If necessary, clean with a cloth
dipped in a neutral cleanser diluted five or six times with water,
CAUTION
and wrung out well. Do not use furniture wax or cleansers.
Never use alcohol, thinners, benzine, insecticide sprays or
other chemicals on or near this unit since these will corrode the
surfaces. When using chemically-treated cloths, be sure to
carefully read their accompanying instruction manual.
Cleaning the glossy finish of the speaker system
• When cleaning the finish of the speaker system, gently wipe it
with a dry soft cloth; the supplied cleaning cloth.
• If you use a dusty or hard cloth or if you rub the screen hard, the
finish of the product will be scratched.
• If you clean the surface of the speaker system with a wet cloth,
water droplets on the surface may enter into the product,
resulting in malfunction.
2
En
T
01_S-LX70C_En.book 2 ページ 2007年9月12日 水曜日 午後2時48分
hese speaker terminals carry HAZARDOUS LIVE voltage. To
prevent the risk of electric shock when connecting or
disconnecting the speaker cables, disconnect the power cord
before touching any uninsulated parts.
01_S-LX70C_En.book 3 ページ 2007年9月12日 水曜日 午後2時48分
English Français Deutsch
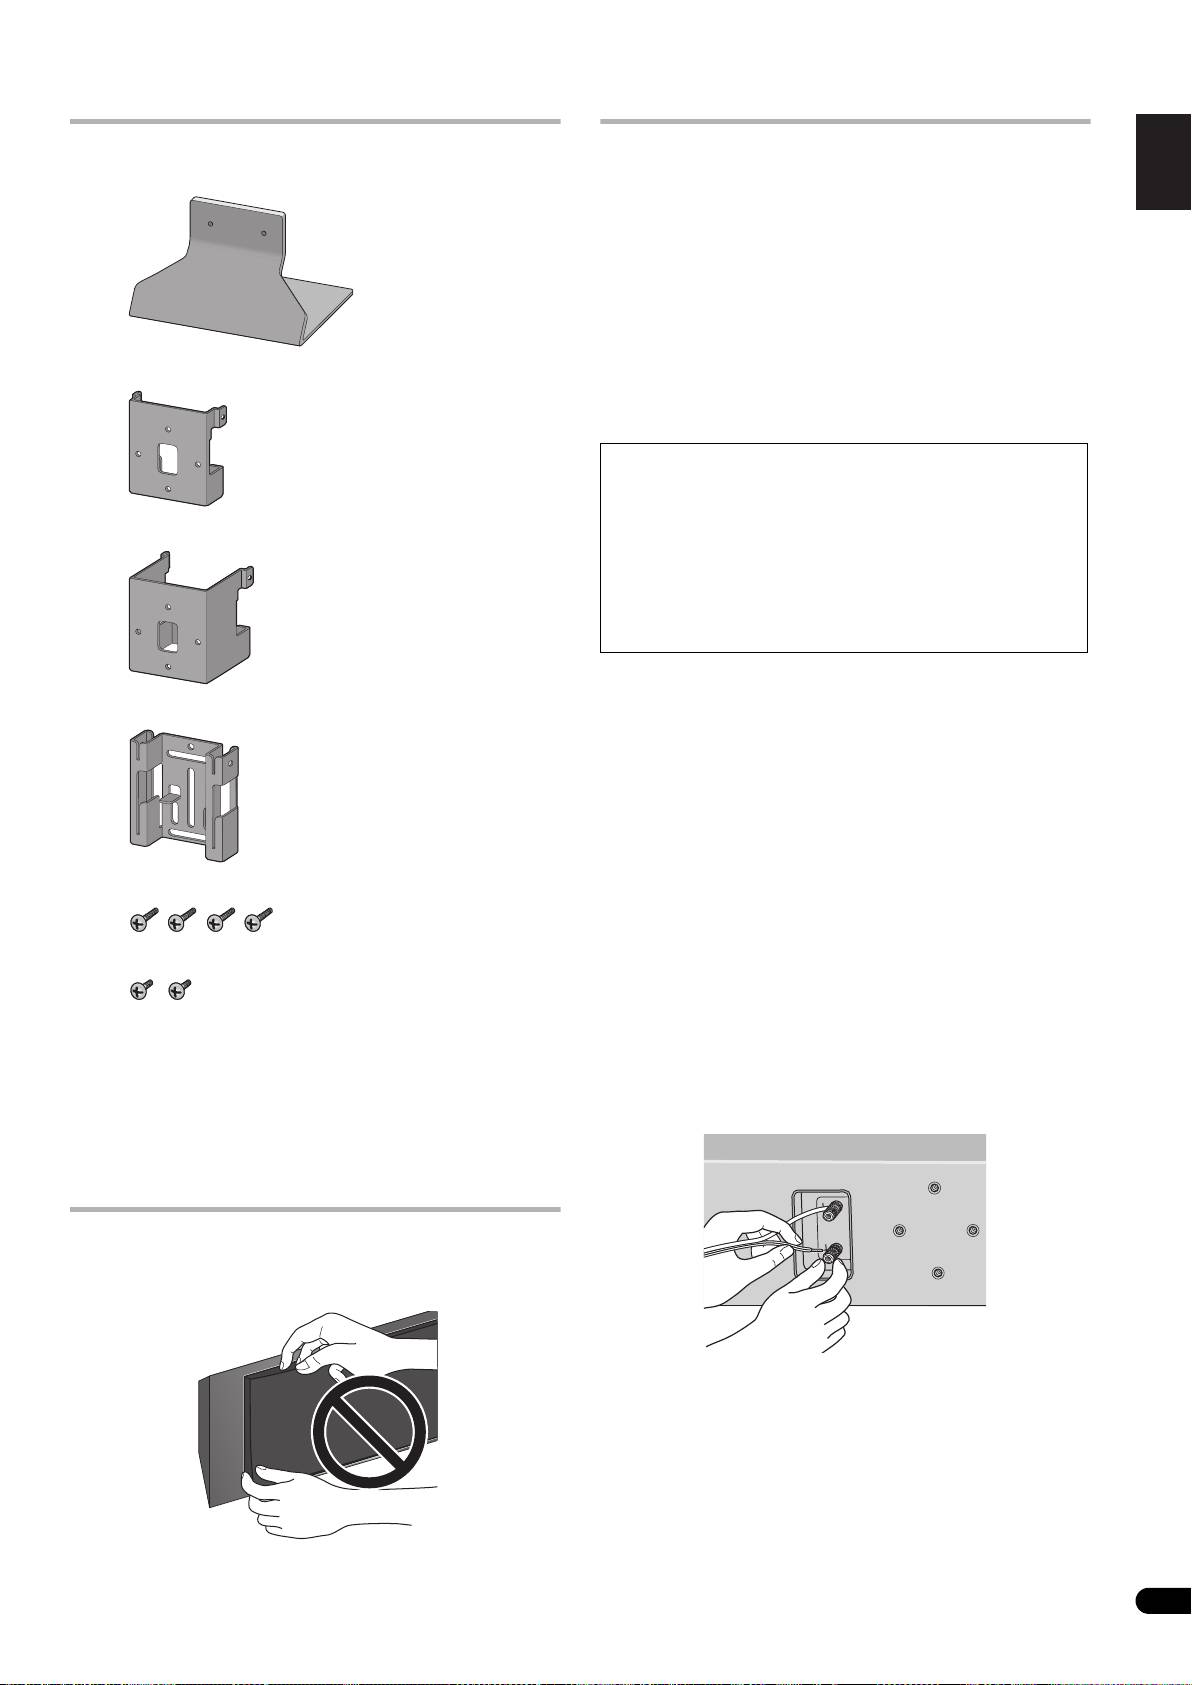
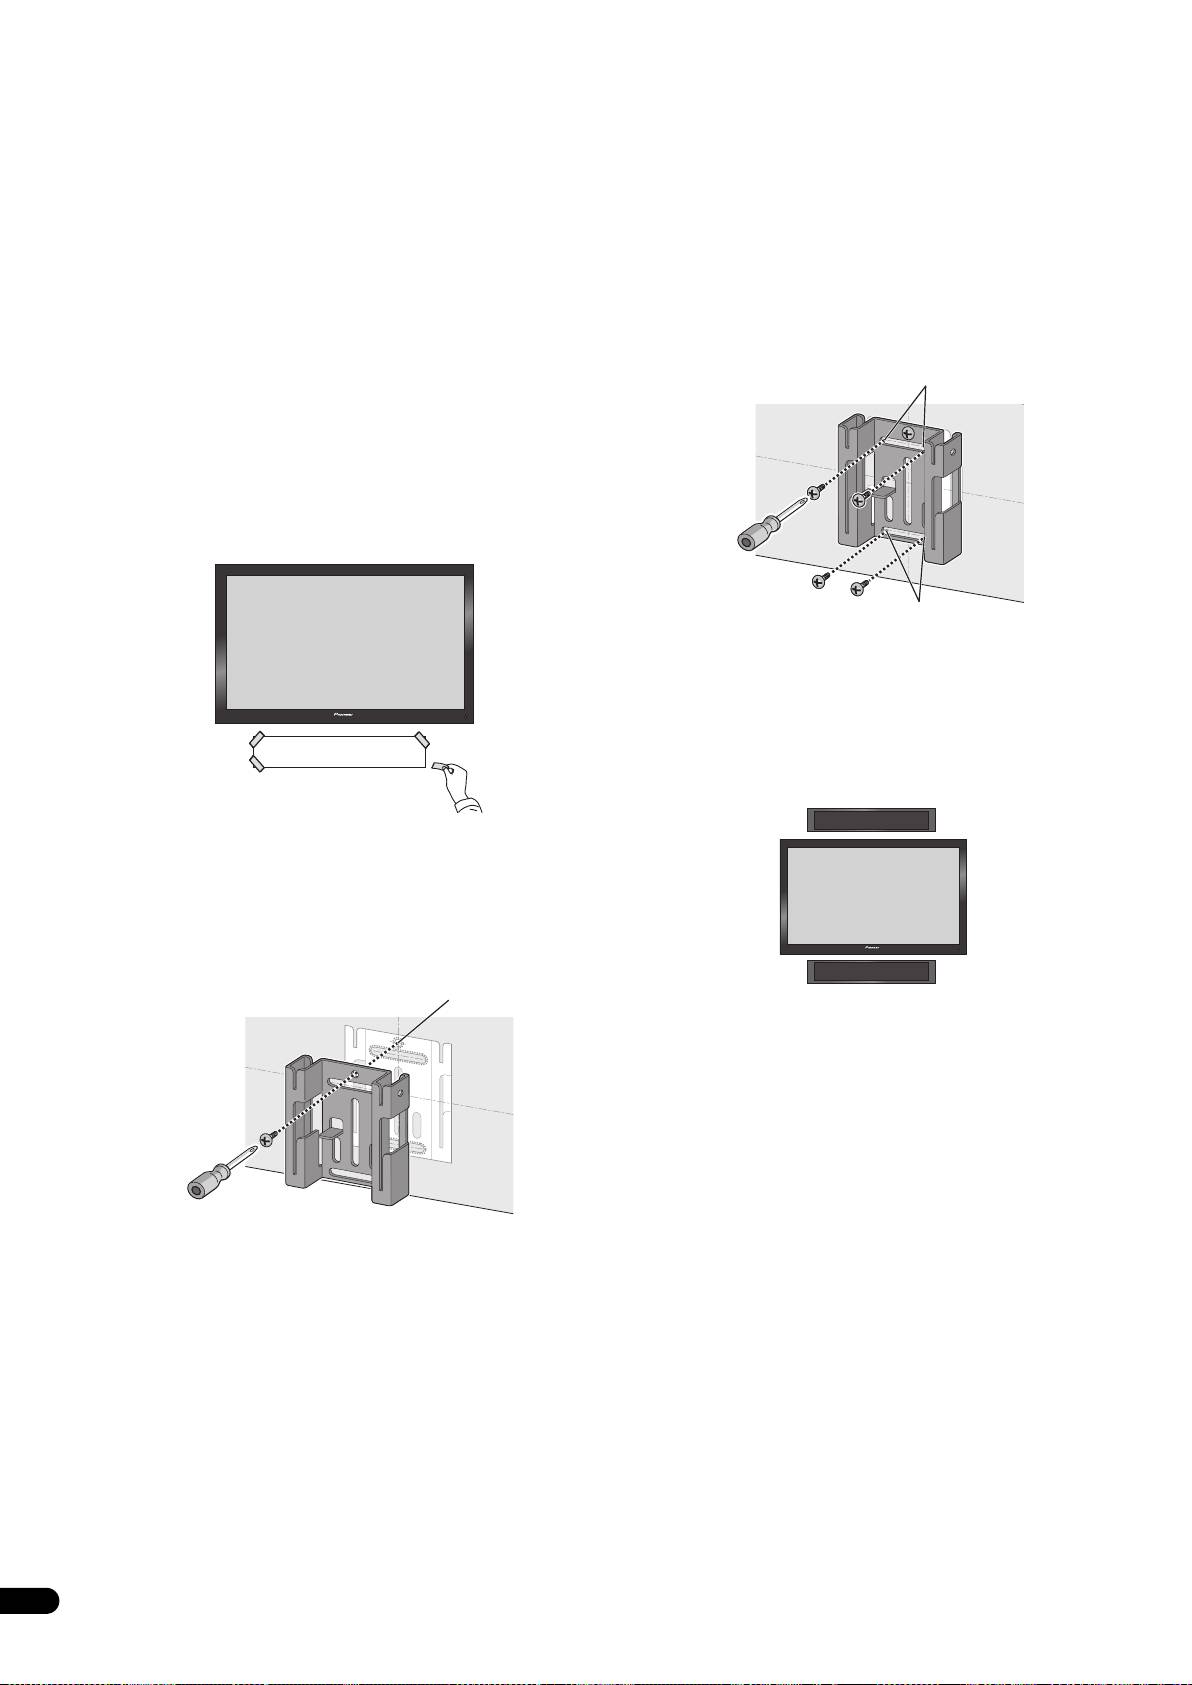
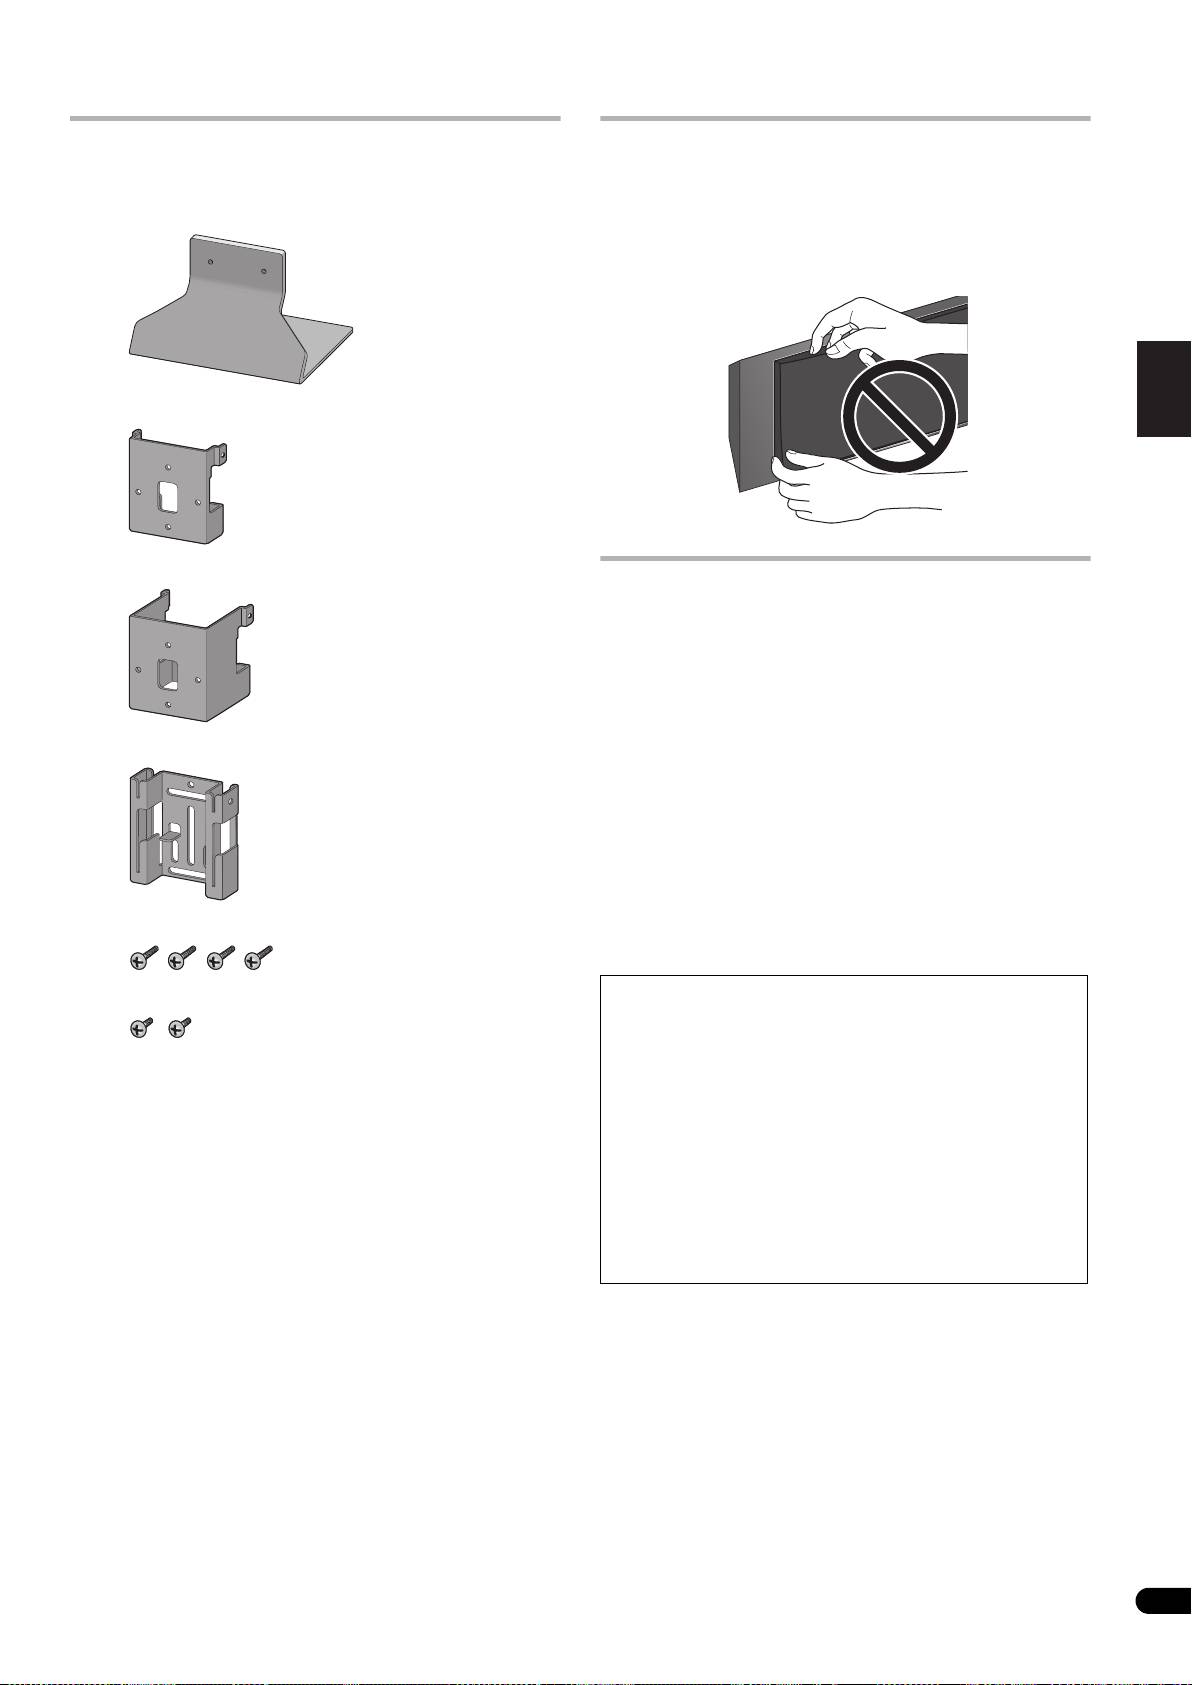
Confirm your accessories
Installing the speaker
•Speaker stand x 1
This speaker system cannot be placed directly on the surface of
floors or shelves. Always attach to a wall using the supplied
brackets, or place on a flat and secure surface using the supplied
speaker stand.
• This speaker system is magnetically shielded. However,
depending on the installation location, color distortion may
occur if the speaker system is installed extremely close to the
screen of a television set. If this happens, turn the power switch
of the television set OFF, and turn it ON after 15 to 30 minutes.
If the problem persists, place the speaker system away from the
• Bracket (for speaker/S) x 1
television set.
Mounting on walls
• Make sure that the wall you intend to mount the speaker on is
Italiano Español Português Dansk Norsk SuomiSvenska
strong enough to support it.
• Remember that the speaker system is heavy. Improper
installation of the speaker could cause it to fall and cause
• Bracket (for speaker/L) x 1
damage or injuries to persons nearby.
• Mounting screws are not supplied. Use screws suitable for
Nederlands
the wall material and support the weight of the speaker.
If you are unsure of the qualities and strength of the walls,
consult a professional for advice.
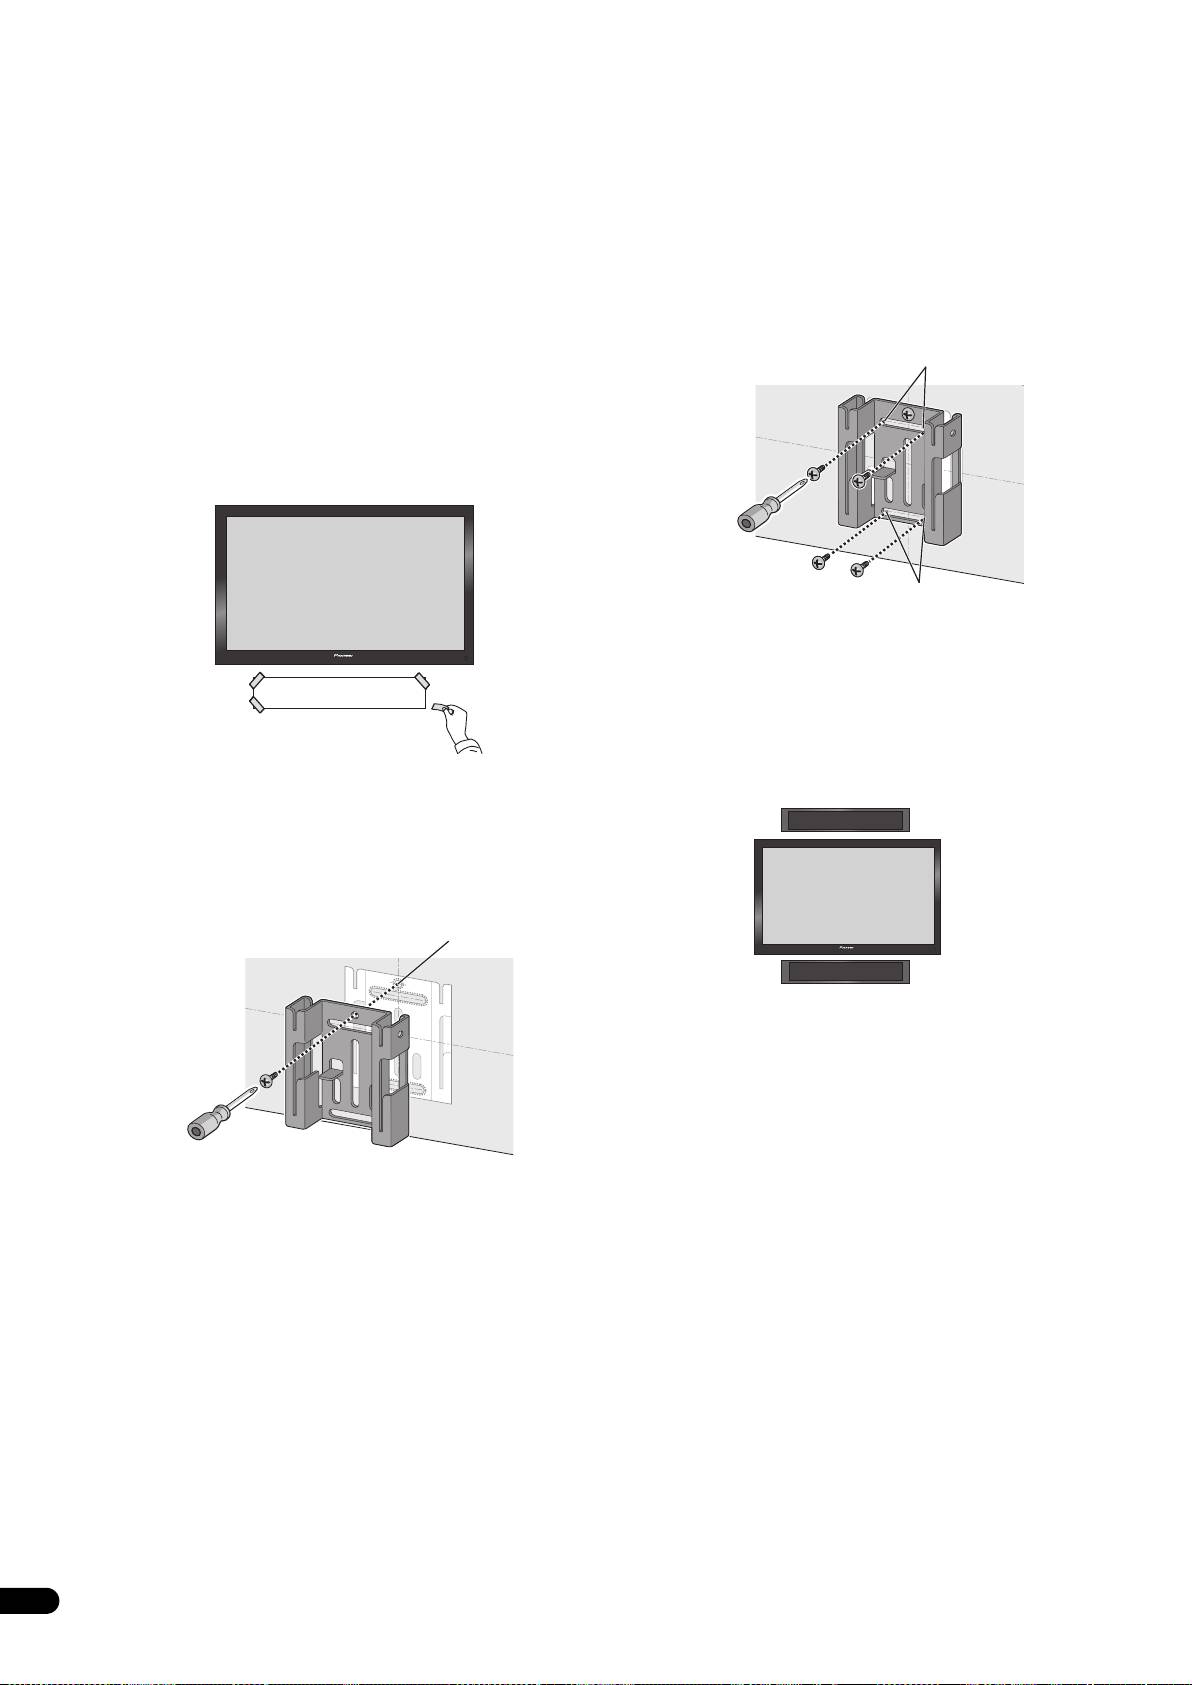
Once decided on the location of installation (such as the wall space
above or below of the TV), attach the speaker following the next
• Bracket (for wall) x 1
procedures.
Two types of brackets (for speaker) are supplied. When using
alongside with a Pioneer plasma television, use the L-type bracket.
When attaching flush against the wall, use the S-type bracket.
1 Connect speaker cable.
• Speaker cable is not included with this speaker system.
This speaker does not include speaker cables used for connecting
to an amplifier. Take the following factors into consideration when
•Screw (long) x 4
choosing speaker cables so that you can get the most from your
speaker system:
• Use heavy-gauge speaker cable if possible, and keep the cables
• Screw (short) x 2
to the minimum necessary length.
• Cables have differing characteristics. Keep this in mind when
using any cable.
• Non-skid pad x 1 (set)
• Connections at speaker and amplifier terminals should be
made as tight and secure as possible to help reduce contact
• Gasket (for speaker stand) x 1
resistance.
• Self-adhering fastener (hook) x 2
When mounting the speaker onto wall using the bracket, connect
• Self-adhering fastener (loop) x 2
the speaker cable before attaching speaker onto the bracket.
•Cleaning cloth x 1
• Wall mounting template x 1
• Operating instructions
Speaker system grill
The speaker system grill cannot be removed. Do not try to forcibly
remove it since doing so may damage the grille.
3
En
01_S-LX70C_En.book 4 ページ 2007年9月12日 水曜日 午後2時48分
• If the cables’ wires happen to be pushed out of the terminals,
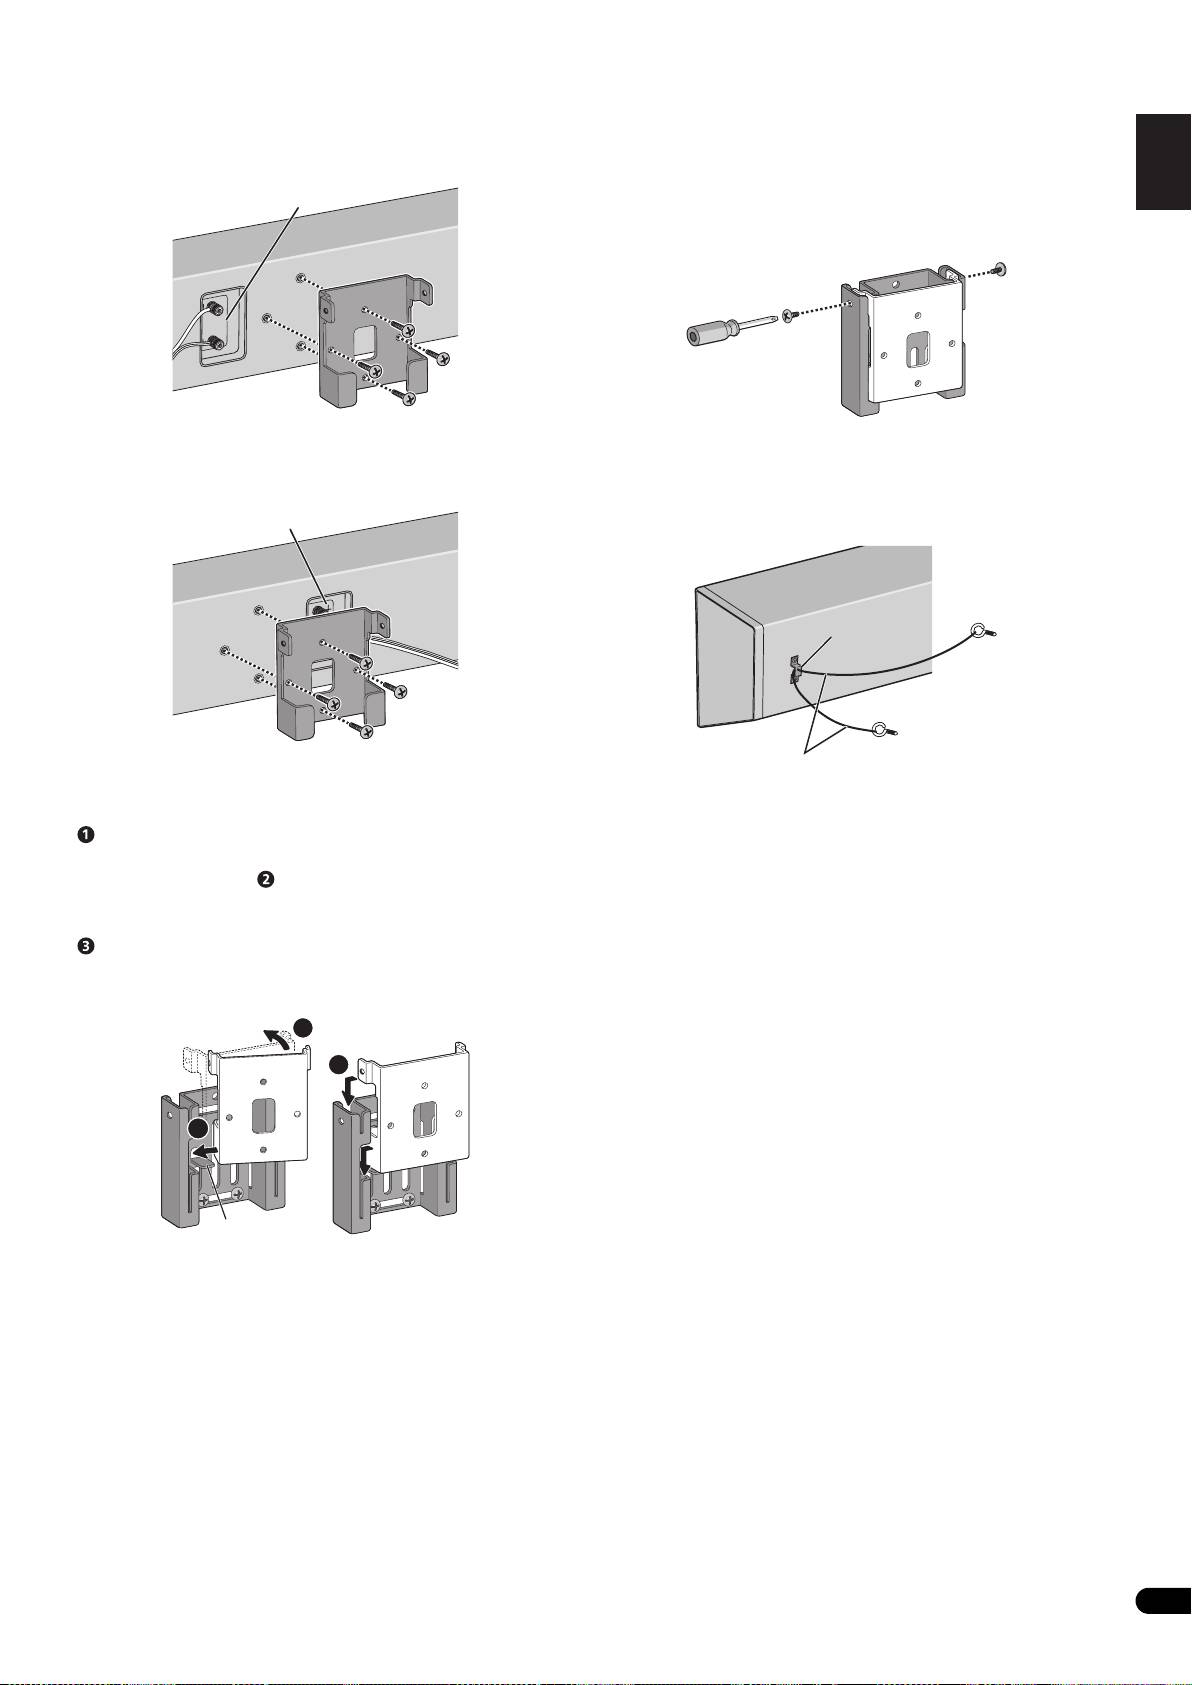
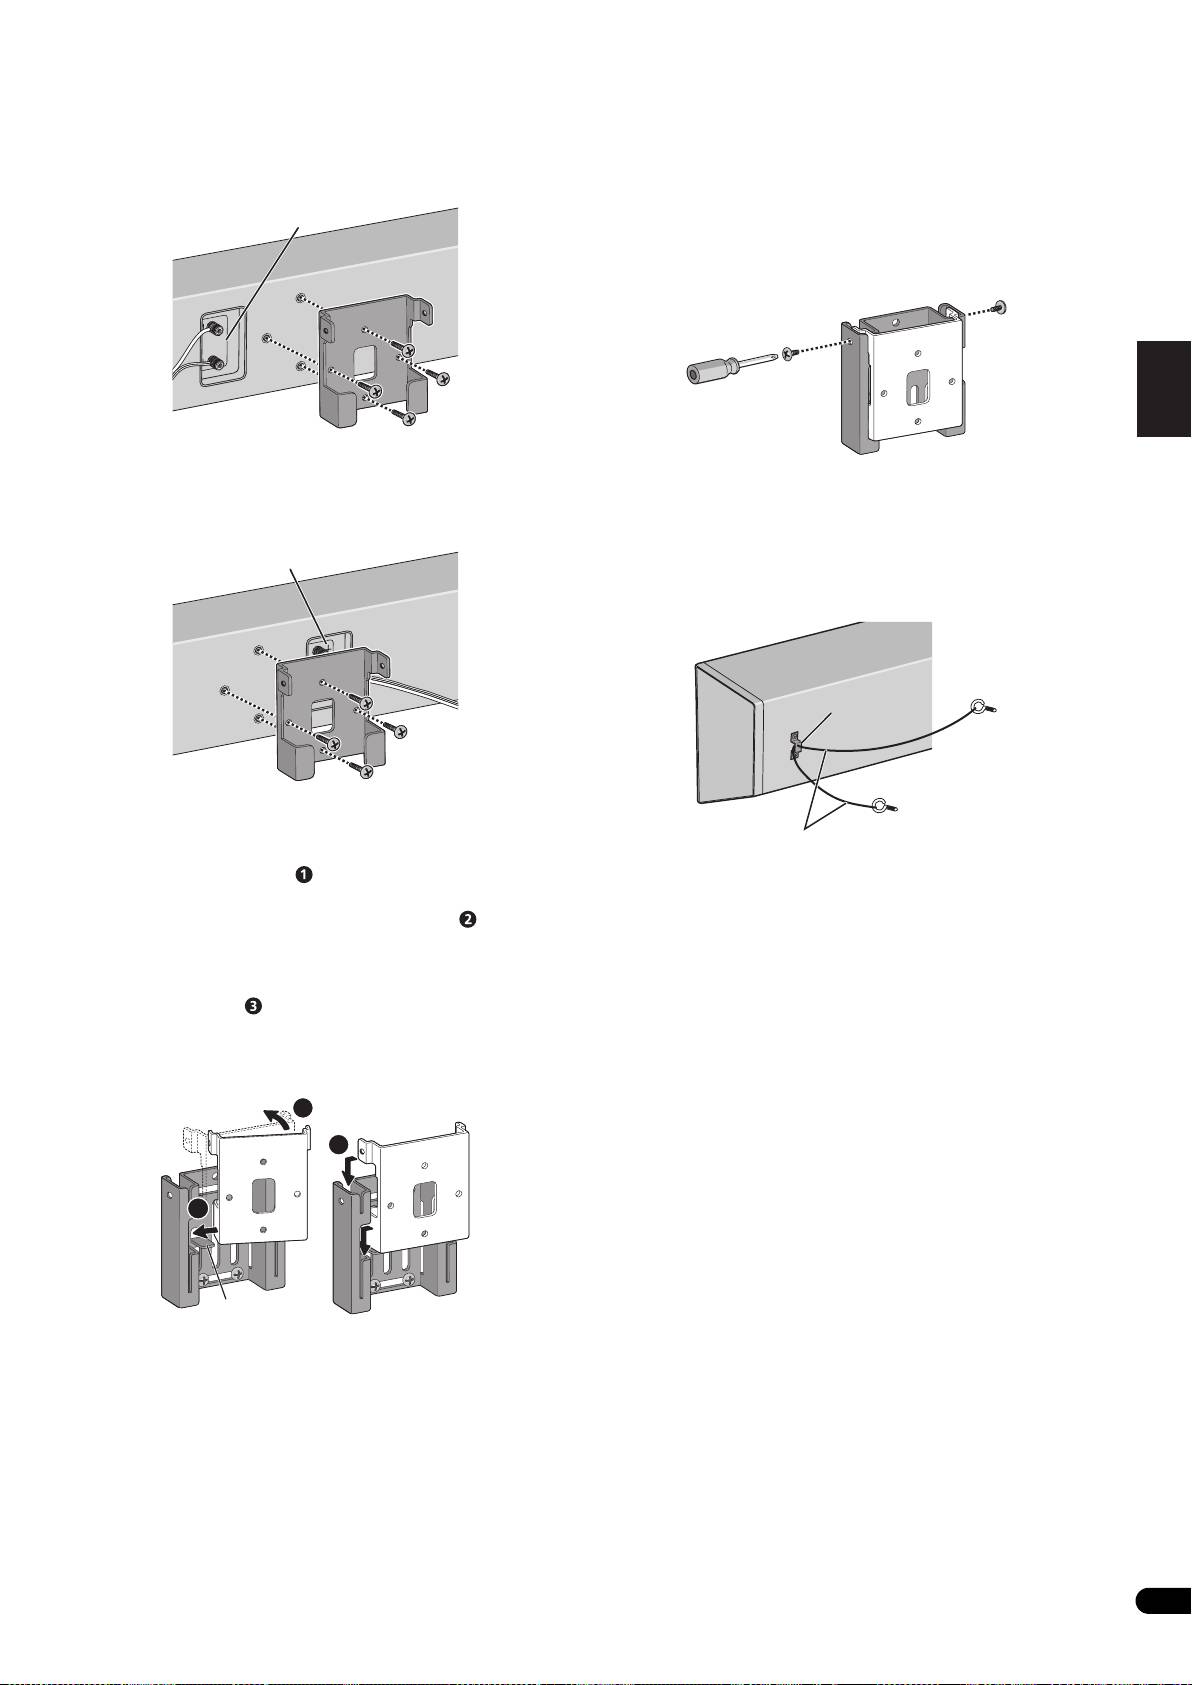
4 Attach the bracket (for wall).
allowing the wires to come into contact with each other, it
Attach bracket with screws (6 mm diameter screws recommended)
places an excessive additional load on the amp. This may cause
at the 4 locations [B] (recommended). Firmly tighten the screw [A]
the amp to stop functioning, and may even damage the amp.
that was used to temporarily attach the bracket to the wall as well.
To avoid speaker from wobbling or falling off, firmly attach bracket
• After connecting the plugs, pull lightly on the cables to make
at multiple locations.
sure that the ends of the cables are securely connected to the
• Afterwards, remove the template by tearing along the
terminals. Poor connections can create noise and interruptions
perforations.
in the sound.
• The following illustration is an example of attaching the bracket
• Be sure to connect wires to the correct terminal polarities
with screws at five locations: Screw location [A] and the 4
(+ , –) at the speaker and amplifier, or the proper surround
corners of screw location [B] (recommended).
effect will not be produced.
[B]
2 Paste the supplied wall mounting template on the area of
installation.
Attach the template level to the ground using an adhesive such as
tape. Make sure the template is straight to avoid mounting the
speaker crookedly. Pasting the template too close to the TV may
cause the TV to get in the way of the speaker when installing. Make
sure the template and TV do not overlap.
[B]
5 Attach the bracket (for speaker) onto speaker.
Attach the bracket on with supplied screws (long) at the 4 screw
holes.
This speaker system adopts a unique design that controls the
directionality of the sound. Due to this feature, this speaker system
Template
must be mounted differently depending on whether it is being
installed above or below the TV. Attach the brackets in the direction
described below.
3 Temporarily attach the bracket (for wall) to the specified
location on the template.
When installing above the TV
Align the bracket (for wall) to the specified location on the template,
and temporarily attach with a screw (6 mm diameter screw
recommended) at location [A].
Adjust the attachment position of the bracket so that it is aligned
with the template.
[A]
Television
When installing below the TV
4
En
01_S-LX70C_En.book 5 ページ 2007年9月12日 水曜日 午後2時48分
• When installing below the TV
7 Secure brackets together with screws.
English Français Deutsch
Attach bracket so that the speaker terminal is on its left when
Secure the brackets together by using the supplied screws (short)
viewing the back of the speaker.
at the screw holes located on the top of the left and right side of the
brackets.
Speaker terminal
If you cannot secure both sides (due to such cases as lack of space
Top
to use a screwdriver), make sure that one side is secured with a
screw.
Bottom
• When installing above the TV
8 Secure speaker to wall with a cord.
Attach bracket so that the speaker terminal is on its right when
Screw two picture hooks or similar into the wall behind the speaker.
Italiano Español Português Dansk Norsk SuomiSvenska
viewing the back of the speaker.
Pass a thick cord (not provided) around the hooks and through the
metal catch so that the speaker is stabilized (make sure to test that
Speaker terminal
it supports the weight of the speaker).
Top
Nederlands
Metal catch
Bottom
Sufficiently thick
6 Attach speaker onto bracket (for wall).
cord (not provided)
Place the bottom left edge of the bracket (attached on the speaker)
on top of the guide of the bracket (for wall) from a diagonal angle
• Do not attach the metal catch directly to the wall. It should only
().
be used in conjunction with reinforced string to prevent the
speaker from falling.
Bring right side of both brackets together so that they become
horizontal to each other ( ).
Move slightly to the left and slide down until stops, while aligning
the left protruding section to the groove of the bracket (for wall)
().
• The following illustration does not show the speaker attached to
the bracket (for speaker) for description purposes.
2
3
1
Guide
5
En
01_S-LX70C_En.book 6 ページ 2007年9月12日 水曜日 午後2時48分
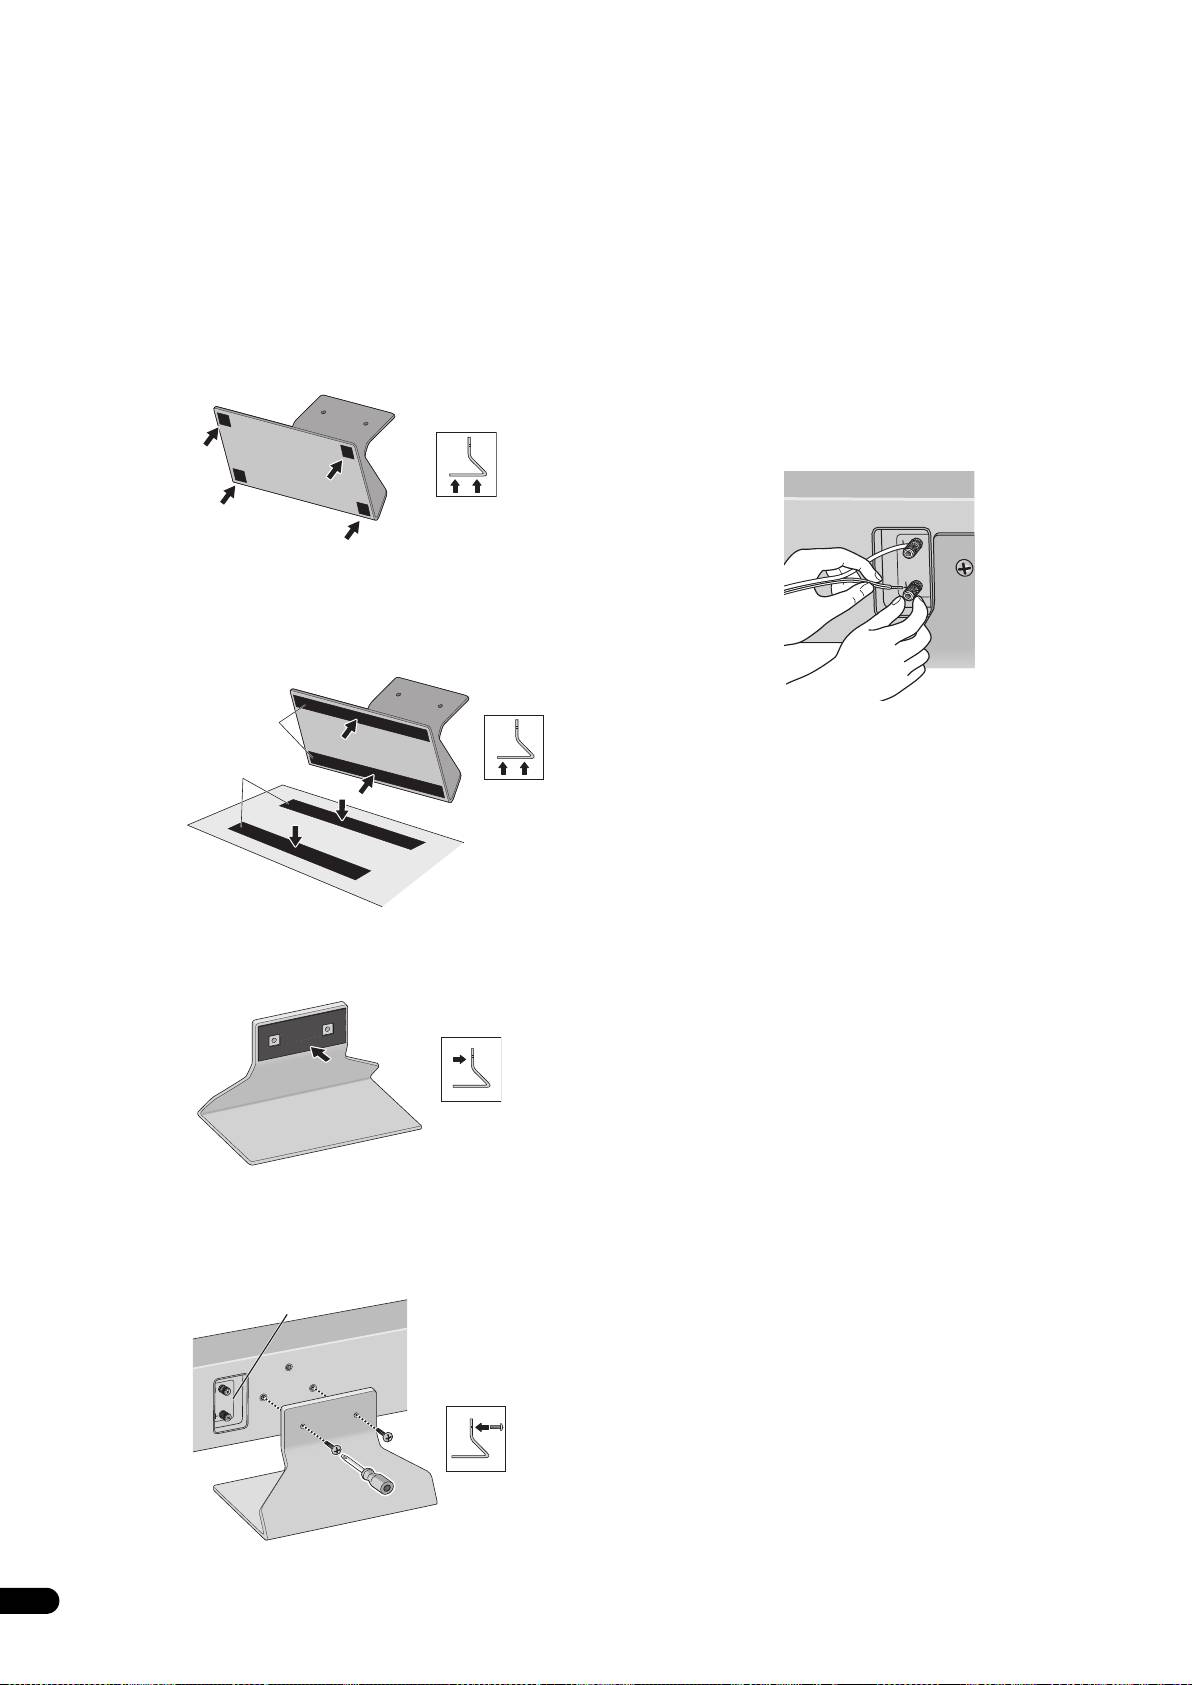
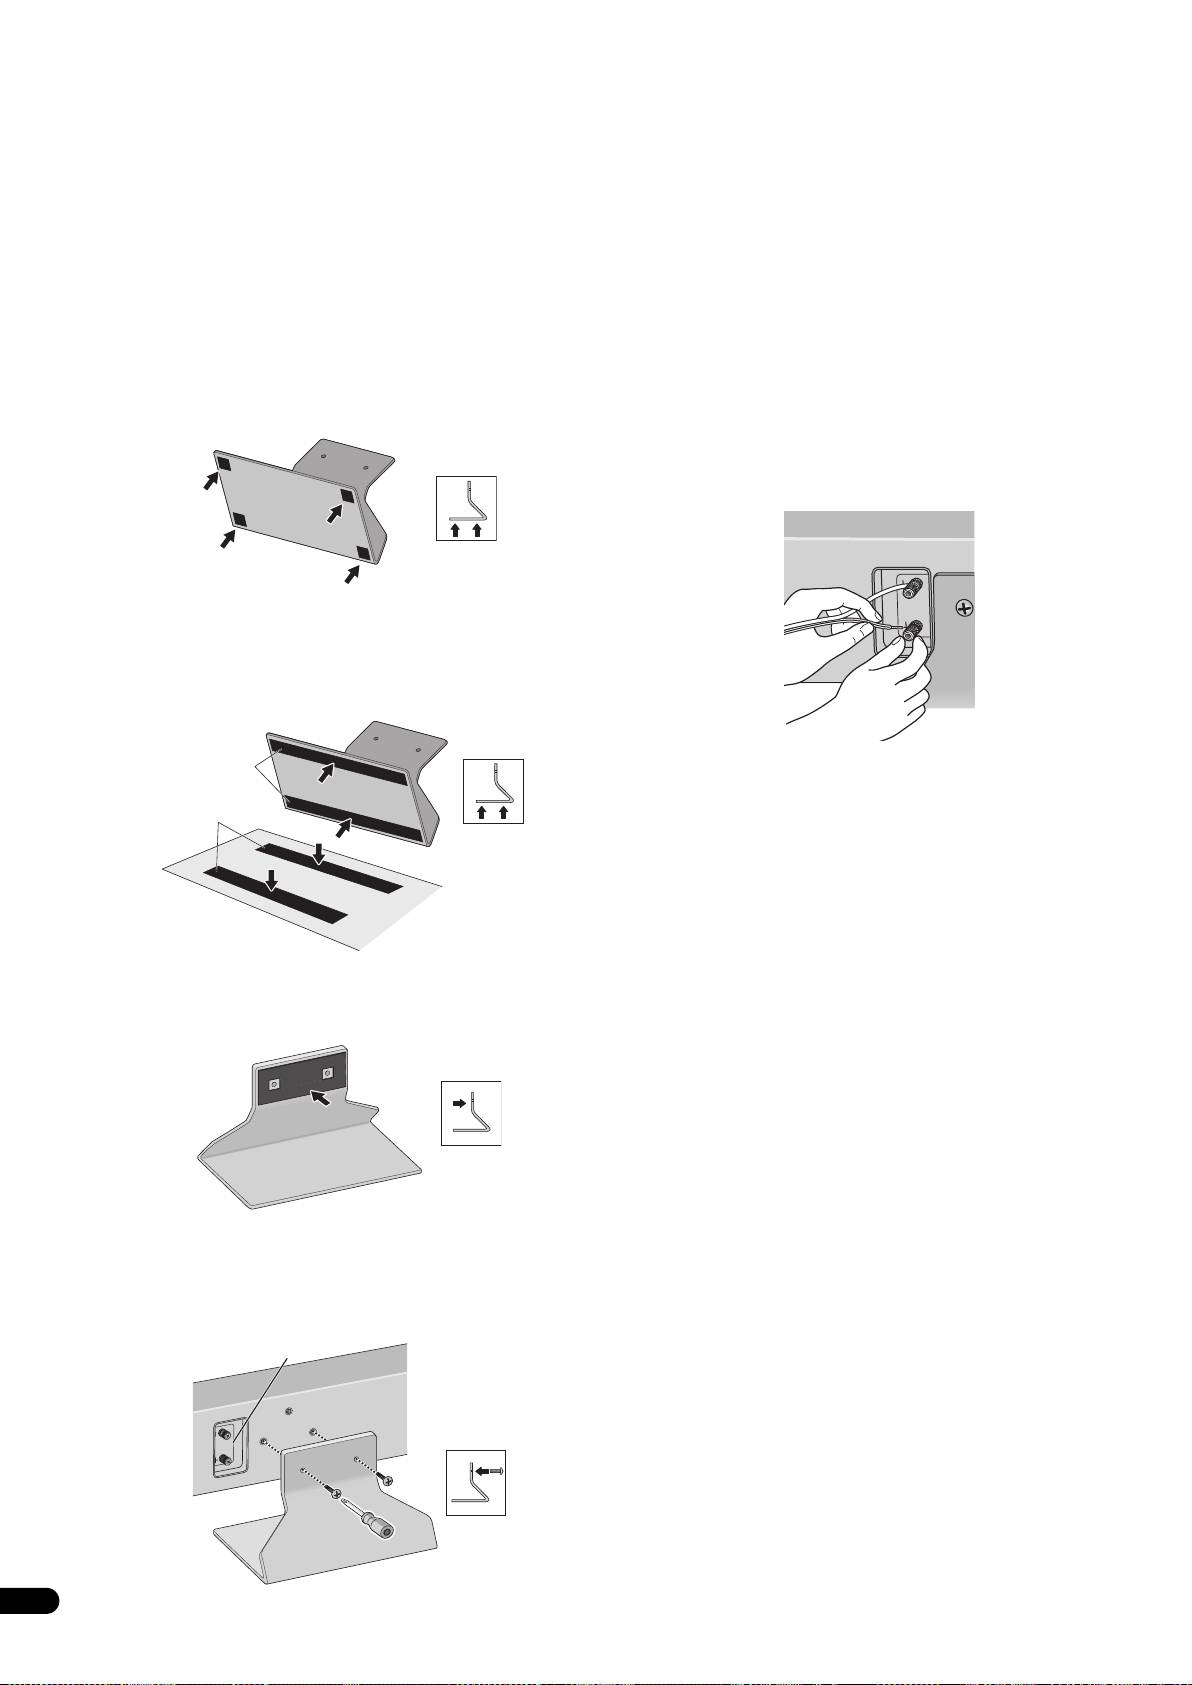
Placing on a shelves using the speaker stand
4 Connect the speaker cable.
This speaker system can be placed on surfaces such as shelves by
• Speaker cable is not included with this speaker system.
using the supplied speaker stand. Place on surfaces by using non-
This speaker does not include speaker cables used for connecting
skid pads or self-adhering fasteners on the speaker stand.
to an amplifier. Take the following factors into consideration when
Do not install speakers on slippery surfaces, as the strength of the
choosing speaker cables so that you can get the most from your
non-skid pads may be insufficient to prevent the speaker system
speaker system:
from sliding.
• Use heavy-gauge speaker cable if possible, and keep the cables
to the minimum necessary length.
1 Attach the non-skid pads or self-adhering fasteners on the
speaker stand.
• Cables have differing characteristics. Keep this in mind when
using any cable.
• When using the non-skid pads
• Connections at speaker and amplifier terminals should be
Paste the non-skid pads on each edge of the bottom of the speaker
made as tight and secure as possible to help reduce contact
stand.
resistance.
When mounting the speakers onto walls using the brackets,
connect the speaker cables before attaching speakers onto the
brackets.
• When using the self-adhering fasteners
Glue the self-adhering fastener (loop side) at two locations on the
bottom of the speaker stand.
Next, glue the self-adhering fastener (hook side) on the surface
where the speaker stand will be placed.
Self-adhering
fastener (loop)
• If the cables’ wires happen to be pushed out of the terminals,
allowing the wires to come into contact with each other, it
Self-adhering
places an excessive additional load on the amp. This may cause
fastener (hook)
the amp to stop functioning, and may even damage the amp.
• After connecting the plugs, pull lightly on the cables to make
sure that the ends of the cables are securely connected to the
terminals. Poor connections can create noise and interruptions
Speaker installation surface
in the sound.
• Be sure to connect wires to the correct terminal polarities
(+ , –) at the speaker and amplifier, or the proper surround
2 Affix the gasket to the speaker stand.
effect will not be produced.
Affix the gasket to the surface of the speaker stand where the
speaker will be mounted.
3 Attach the speaker stand to the speaker with screws.
Line up the screw holes in the speaker stand and the speaker, and
firmly screw in 2 of the supplied screws (long). Attach the speaker
stand so that the speaker terminal is on the left when viewing the
back of the speaker.
Speaker terminal
Top
Bottom
6
En
01_S-LX70C_En.book 7 ページ 2007年9月12日 水曜日 午後2時48分
English Français Deutsch
Specifications
Enclosure. . . . . . . . . . . . . . . . .Closed-box type (magnetically shielded)
Configuration. . . . . . . . . . . . . . . . . . . . . . . . . . . . . . . . . . . . . . . . . . .2-way
Woofer . . . . . . . . . . . . . . . . . . . . . . . . . . . . . . . . . . . . . . . . 13 cm cone x2
Tweeter. . . . . . . . . . . . . . . . . . . . . . . . . . . . . . . . . . . . . . . . . 2.5 cm dome
Nominal impedance . . . . . . . . . . . . . . . . . . . . . . . . . . . . . . . . . . . . . . 6 Ω
Frequency response . . . . . . . . . . . . . . . . . . . . . . . . . .40 Hz to 50 000 Hz
Sensitivity. . . . . . . . . . . . . . . . . . . . . . . . . . . . . . . . . . . . . . . . . . . . . .82 dB
Maximum input power . . . . . . . . . . . . . . . . . . . . . . . . . . . . . . . . . . 130 W
Crossover frequency. . . . . . . . . . . . . . . . . . . . . . . . . . . . . . . . . . . 1.7 kHz
Exterior dimensions . . . . . . . . 722 mm (W) x 175 mm (H) x 70 mm (D)
(Excluding protrusions)
Weight . . . . . . . . . . . . . . . . . . . . . . . . . . . . . . . . . . . . . . . . . . . . . . . 5.2 kg
Supplied accessories
Speaker stand . . . . . . . . . . . . . . . . . . . . . . . . . . . . . . . . . . . . . . . . . . . . . 1
Italiano Español Português Dansk Norsk SuomiSvenska
Bracket (for speaker/S). . . . . . . . . . . . . . . . . . . . . . . . . . . . . . . . . . . . . . 1
Bracket (for speaker/L). . . . . . . . . . . . . . . . . . . . . . . . . . . . . . . . . . . . . . 1
Bracket (for wall). . . . . . . . . . . . . . . . . . . . . . . . . . . . . . . . . . . . . . . . . . . 1
Screw (long) . . . . . . . . . . . . . . . . . . . . . . . . . . . . . . . . . . . . . . . . . . . . . . 4
Screw (short). . . . . . . . . . . . . . . . . . . . . . . . . . . . . . . . . . . . . . . . . . . . . . 2
Non-skid pad . . . . . . . . . . . . . . . . . . . . . . . . . . . . . . . . . . . . . . . . . . 1 (set)
Nederlands
Gasket (for speaker stand) . . . . . . . . . . . . . . . . . . . . . . . . . . . . . . . . . . . 1
Self-adhering fastener (hook) . . . . . . . . . . . . . . . . . . . . . . . . . . . . . . . . 2
Self-adhering fastener (loop) . . . . . . . . . . . . . . . . . . . . . . . . . . . . . . . . . 2
Cleaning cloth. . . . . . . . . . . . . . . . . . . . . . . . . . . . . . . . . . . . . . . . . . . . . 1
Wall mounting template. . . . . . . . . . . . . . . . . . . . . . . . . . . . . . . . . . . . . 1
Operating instructions
• Appearance and specifications are subject to change without
notice.
is a trademark placed on a product with Pioneer’s Phase
Control Technology.
The Technology enables high-grade 5.1ch with no delay in the bass
area.
If you want to dispose this product, do not mix it with general
household waste. There is a separate collection system for used
electronic products in accordance with legislation that requires
proper treatment, recovery and recycling.
Private households in the member states of the EU, in Switzerland and Norway
may return their used electronic products free of charge to designated
collection facilities or to a retailer (if you purchase a similar new one).
For countries not mentioned above, please contact your local authorities for
the correct method of disposal.
By doing so you will ensure that your disposed product undergoes the
necessary treatment, recovery and recycling and thus prevent potential
negative effects on the environment and human health.
Published by Pioneer Corporation.
Copyright © 2007 Pioneer Corporation.
All rights reserved.
7
En

02_S-LX70C_FR.book 2 ページ 2007年9月12日 水曜日 午後2時51分
Nous vous remercions d’avoir acheté ces enceintes acoustiques
Pioneer. Veuillez lire attentivement ce mode d'emploi de manière à
Attention
pouvoir utiliser votre modèle correctement. Après avoir lu ces
explications, conservez-les en lieu sûr pour éventuellement les
consulter plus tard.
Installation
• Ne placez pas l’enceinte sur une surface instable, car elle
pourrait tomber et provoquer des dégâts ou des blessures.
Avant de commencer
• Mettez votre système audiovisuel hors tension et débranchez-
le, puis consultez le mode d’emploi avant de brancher des
• L’impédance nominale de ces enceintes acoustiques est de 6
composants. Prenez soin d’utiliser correctement les cordons
Ω. Raccordez ces enceintes à un amplificateur dont
de raccordement.
l’impédance de charge est de 6 Ω (un modèle pour lequel “6 Ω“
est indiqué sur les bornes de sortie des enceintes).
• Lors de l’installation de l’appareil, évitez les endroits d’où il
pourrait tomber et provoquer des blessures lors d’une
Pour éviter d’endommager les enceintes par une surcharge à
catastrophe naturelle, telle qu’un séisme. Pour en savoir plus,
l’entrée, observez les précautions suivantes :
voir page 5.
• Ne fournissez pas aux enceintes acoustiques un courant
• Pioneer ne peut être tenu responsable pour tout accident ou
électrique dépassant l’entrée maximale autorisée.
dommage résultant d’une installation incorrecte, d’une
• Si vous utilisez un égaliseur graphique pour accentuer les sons
mauvaise utilisation, de modifications apportées au produit ou
dans la plage des hautes fréquences, n’élevez pas trop le
de désastres naturels.
volume de l’amplificateur.
• N’essayez pas de pousser un amplificateur à faible puissance
Utilisation des enceintes
à produire un puissant volume sonore, car la distorsion
• N’utilisez pas les enceintes pour produire des sons distordus
harmonique de l’amplificateur en serait distordue et vous
pendant une longue période. Cela pourrait endommager les
pourriez endommager les enceintes.
enceintes et créer des risques d'incendie.
• Ne montez pas et ne vous asseyez pas sur les enceintes et ne
Entretien des coffrets des enceintes
laissez pas des enfants jouer sur celles-ci. Cela pourrait
• Normalement, il suffit de frotter le coffret de ces enceintes avec
provoquer la chute des enceintes et entraîner des dommages
un chiffon doux pour maintenir leur propreté. Au besoin,
ou des blessures corporelles.
trempez le chiffon dans un détergent neutre dilué de 5 à 6 fois
son volume d’eau et essorez bien le chiffon avant de l’utiliser
ATTENTION
pour frotter le coffret. N’utilisez pas de cire ou de détergent
Les bornes des haut-parleurs sont sous une tension ACTIVE
pour mobilier. N’utilisez jamais d’alcool, de diluant, benzine,
DANGEREUSE. Pour éviter tout risque de décharge électrique
bombe insecticide ou autres produits chimiques à proximité de
lors du branchement et du débranchement des câbles de haut-
cet appareil car ces produits détérioreraient le fini de surface.
parleur, débranchez le cordon d’alimentation avant de toucher
Lors de l’utilisation d’un chiffon traité chimiquement, faites
des parties non isolées.
bien attention de lire le manuel d’instructions qui
l’accompagne.
Nettoyage du fini brillant des enceintes acoustiques
• Lors du nettoyage du fini des enceintes acoustiques, frottez
doucement avec un chiffon doux et sec; le chiffon de nettoyage
fourni.
• Si vous utilisez un chiffon poussiéreux ou dur ou si vous frottez
les enceintes trop fort, le fini du produit peut être rayé.
• Si vous nettoyez la surface des enceintes acoustiques avec un
chiffon mouillé, des gouttes d’eau à la surface peuvent pénétrer
dans le produit et entraîner un mauvais fonctionnement.
2
Fr

02_S-LX70C_FR.book 3 ページ 2007年9月12日 水曜日 午後2時51分
English Français Deutsch
Vérifiez vos accessoires
Installation de l’enceinte
•Socle d’enceinte x 1
Cette enceinte acoustique ne peuvent pas être placées directement
sur le sol ou sur des étagères. Fixez-la toujours sur un mur en
utilisant les supports fournis, ou posez-la sur une surface plate et
stable en utilisant le socle d'enceinte fourni.
• Ces enceintes acoustiques sont munies d’un blindage
magnétique. Cependant, selon l’endroit de leur installation,
une distorsion des couleurs peut se produire si ces enceintes
sont disposées tout près d’un téléviseur. Si ce phénomène se
produit, mettez le téléviseur hors tension et attendez 15 à 30
minutes avant de le remettre sous tension. Si le problème
• Support (pour l’enceinte/S) x 1
persiste, éloignez les enceintes acoustiques du téléviseur.
Fixation au mur
• Assurez-vous que le mur sur lequel vous avez l’intention de
Italiano Español Português Dansk Norsk SuomiSvenska
fixer l’enceinte est suffisamment solide pour la supporter.
• N’oubliez pas que ces enceintes acoustiques sont lourdes.
Une installation incorrecte de l’enceinte peut entraîner sa
• Support (pour l’enceinte/L) x 1
chute et causer des dommages ou des blessures corporelles
aux personnes se trouvant à proximité.
Nederlands
• Les vis de fixation ne sont pas fournies. Utilisez des vis qui
conviennent au matériau du mur et peuvent supporter le
poids des enceintes.
Si vous n’êtes pas sûr de la qualité et de la résistance des murs,
demandez conseil à un professionnel.
• Support (pour le mur) x 1
Une fois que l’emplacement de l’installation a été décidé (comme
par exemple, le pan de mur au-dessus ou au-dessous du
téléviseur), fixez l’enceinte en suivant les procédures ci-après.
Deux types de supports (pour l’enceinte) sont fournis. Lors d’une
utilisation conjointe avec un téléviseur plasma Pioneer, utilisez le
support de type L. Lors de leur fixation au ras du mur, utilisez le
support de type S.
1 Raccordez le câble d’enceinte.
• Le câble d’enceinte n’est pas fourni avec cette enceinte
•Vis (longue) x 4
acoustique.
Les câbles d’enceintes, nécessaires pour le branchement à un
amplificateur, ne sont pas fournis avec ces enceintes acoustiques.
•Vis (courte) x 2
Tenez compte des facteurs suivants lorsque vous choisissez les
câbles d’enceinte, de manière à obtenir des performances idéales
de vos enceintes acoustiques :
• Patins antidérapants x 1 (jeu)
• Si possible, utilisez des câbles d’enceinte de gros calibre et
• Joint (pour le socle d’enceinte) x 1
d’une longueur minimale.
• Attache velcro (crochets) x 2
• Chaque câble a des caractéristiques différentes. Tenez compte
de ce point lorsque vous les choisissez.
• Attache velcro (boucles) x 2
• Les branchements au niveau des bornes des enceintes et de
•Chiffon de nettoyage x 1
l'amplificateur doivent être aussi serrés et sûrs que possible
• Gabarit de fixation au mur x 1
pour aider à réduire la résistance de contact.
• Mode d’emploi
Lors de la fixation de l’enceinte au mur en utilisant le support,
raccordez le câble d’enceinte avant de fixer l’enceinte sur le
support.
Grille des enceintes acoustiques
Les grilles des enceintes acoustiques ne peuvent pas être retirées.
N’essayez pas de les retirer de force car cela pourrait les
endommager.
3
Fr
02_S-LX70C_FR.book 4 ページ 2007年9月12日 水曜日 午後2時51分
• S’il arrive que les fils des câbles soient sortis des prises et qu’ils
4 Fixez le support (mural).
entrent en contact les uns avec les autres, cela ajoutera une
Fixez le support avec les vis (des vis d’un diamètre de 6 mm sont
charge supplémentaire excessive à l’amplificateur. Et cela peut
recommandées) aux 4 emplacements [B] (recommandés). Serrez
entraîner un arrêt du fonctionnement de l’amplificateur et peut
aussi solidement la vis [A] qui a été utilisée pour la fixation
même l’endommager.
temporaire du support sur le mur. Pour éviter que l’enceinte pivote
ou se détache, fixez solidement le support en de multiples
• Après avoir branché les câbles sur les bornes, tirez légèrement
emplacements.
sur ceux-ci pour vous assurer que leur extrémité est
• Ensuite, retirez le gabarit en le déchirant le long des
parfaitement immobilisée sur les bornes. De mauvaises
perforations.
connexions sont la source de parasites, voire d’interruption des
sons.
• L’illustration suivante est un exemple de fixation du support
avec des vis en cinq emplacements: L’emplacement de la vis
• Assurez-vous de raccorder les fils aux bornes de polarité
[A] et l’emplacement des autres vis [B] (recommandées).
correcte (+ , –) au niveau de l’enceinte et de l’amplificateur, ou
l'effet Surround correct ne sera pas produit.
[B]
2 Collez le gabarit de montage au mur fourni sur la surface
d’installation.
Fixez le gabarit droit par rapport au sol en utilisant par exemple un
ruban adhésif. Assurez-vous que le gabarit est bien droit pour éviter
que l’enceinte soit montée de biais. Si vous collez le gabarit trop
près du téléviseur, il se peut que ce dernier soit gênant lors de
l'installation de l’enceinte. Assurez-vous que le gabarit et le
téléviseur ne se chevauchent pas.
[B]
5 Fixez le support (pour l’enceinte) sur l’enceinte.
Fixez le support avec les vis fournies (longues) aux 4 trous de vis.
Cette enceinte acoustique possède un design unique qui contrôle
la directionnalité du son. Grâce à cette fonctionnalité, cette
enceinte acoustique peut être montée de façon différente selon
qu’elle est installée au-dessus ou au-dessous du téléviseur. Fixez le
support dans la direction indiquée ci-dessous.
Gabarit
Lors de l’installation au-dessus du téléviseur
3 Fixez temporairement le support (mural) à l’endroit spécifié
sur le gabarit.
Alignez le support (mural) à l’endroit spécifié sur le gabarit, et fixez-
le temporairement avec une vis (une vis d'un diamètre de 6 mm est
recommandée) à l'emplacement [A].
Ajustez la position de fixation du support de façon qu’il soit aligné
Téléviseur
avec le gabarit.
[A]
Lors de l’installation au-dessous du téléviseur
4
Fr
02_S-LX70C_FR.book 5 ページ 2007年9月12日 水曜日 午後2時51分
• Lors de l’installation au-dessous du téléviseur
7 Fixez les supports ensemble avec des vis.
English Français Deutsch
Fixez le support de façon que la borne d’enceinte soit sur sa gauche
Fixez les supports ensemble en utilisant les vis fournies (courtes)
quand vous regardez le dos de l’enceinte.
dans les trous de vis situés en haut du côté gauche et droit des
supports.
Borne d’enceinte
Si vous ne pouvez pas fixer les deux côtés (à cause d’un manque
Haut
d’espace pour utiliser un tournevis, par exemple), assurez-vous
qu’un des côtés a été fixé avec une vis.
Bas
• Lors de l’installation au-dessus du téléviseur
8 Fixez l’enceinte au mur avec un cordon.
Fixez le support de façon que la borne d’enceinte soit sur sa droite
Vissez deux crochets à tableau ou similaires dans le mur au-dessus
Italiano Español Português Dansk Norsk SuomiSvenska
quand vous regardez le dos de l’enceinte.
de l’enceinte. Passez un cordon épais (non fourni) autour des
crochets et à travers la bague métallique de façon que l'enceinte
Borne d’enceinte
soit stabilisée (assurez-vous de vérifier qu'il supporte le poids de
Haut
l'enceinte).
Nederlands
Attache antichute
Bas
6 Fixez l’enceinte sur le support (mural).
Cordon suffisamment
Placez le bord inférieur gauche du support (fixé sur l’enceinte) en
épais (non fourni)
haut du guide du support (mural) avec un angle diagonal ( ).
• Ne fixez pas l’anneau métallique directement sur le mur, Elle
Amenez le côté droit des deux supports en contact l’un de l’autre
doit être utilisée uniquement avec un cordon renforcé pour
de façon qu’ils deviennent parallèles ( ).
prévenir la chute de l’enceinte.
Déplacez légèrement vers la gauche et faites glisser vers le bas
jusqu’à la butée, tout en alignant la partie protubérante gauche
dans la fente du support (mural) ( ).
• Pour facilité sa compréhension, l'illustration suivante ne
montre pas l'enceinte fixée sur le support (pour l'enceinte).
2
3
1
Guide
5
Fr
02_S-LX70C_FR.book 6 ページ 2007年9月12日 水曜日 午後2時51分
Utilisation sur une étagère en utilisant le socle
4 Raccordez le câble d’enceinte.
• Le câble d’enceinte n’est pas fourni avec cette enceinte
d’enceinte
acoustique.
Cette enceinte acoustique peut être placée sur une surface telle
qu'une étagère en utilisant le socle d'enceinte fourni. Placez
Les câbles d’enceintes, nécessaires pour le branchement à un
l’enceinte sur une surface en utilisant les patins antidérapants ou
amplificateur, ne sont pas fournis avec ces enceintes acoustiques.
les attaches autocollantes sur le socle d’enceinte.
Tenez compte des facteurs suivants lorsque vous choisissez les
câbles d’enceinte, de manière à obtenir des performances idéales
N’installez pas l'enceinte sur une surface glissante, car la
de vos enceintes acoustiques :
résistance des patins antidérapants risque de ne pas être
suffisante pour empêcher l’enceinte de glisser.
• Si possible, utilisez des câbles d’enceinte de gros calibre et
d’une longueur minimale.
1 Fixez les patins antidérapants ou les attaches autocollantes
• Chaque câble a des caractéristiques différentes. Tenez compte
sur le socle d’enceinte.
de ce point lorsque vous les choisissez.
• Lors de l’utilisation des patins antidérapants
• Les branchements au niveau des bornes des enceintes et de
Collez les patins antidérapants à chaque bord du dessous du socle
l'amplificateur doivent être aussi serrés et sûrs que possible
d'enceinte.
pour aider à réduire la résistance de contact.
Lors de la fixation des enceintes au mur en utilisant les supports,
raccordez les câbles d’enceinte avant de fixer les enceintes sur les
supports.
• Lors de l’utilisation des attaches autocollantes
Collez l’attache velcro (côté boucles) à deux emplacements sur le
dessous du socle d’enceinte.
Ensuite, collez l’attache velcro (côté crochets) sur la surface où le
socle d’enceinte doit être placé.
Attache velcro
• S’il arrive que les fils des câbles soient sortis des prises et qu’ils
(boucles)
entrent en contact les uns avec les autres, cela ajoutera une
charge supplémentaire excessive à l’amplificateur. Et cela peut
Attache velcro
(crochets)
entraîner un arrêt du fonctionnement de l’amplificateur et peut
même l’endommager.
• Après avoir branché les câbles sur les bornes, tirez légèrement
sur ceux-ci pour vous assurer que leur extrémité est
Surface d’installation de l’enceinte
parfaitement immobilisée sur les bornes. De mauvaises
connexions sont la source de parasites, voire d’interruption des
sons.
2 Fixez le joint sur le socle d'enceinte.
• Assurez-vous de raccorder les fils aux bornes de polarité
Fixez le joint sur la surface du socle d’enceinte où l’enceinte doit
correcte (+ , –) au niveau de l’enceinte et de l’amplificateur, ou
être montée.
l'effet Surround correct ne sera pas produit.
3 Fixez le socle d’enceinte sur l’enceinte avec les vis.
Alignez les trous de vis du socle d’enceinte et ceux de l'enceinte, et
vissez solidement 2 des vis fournies (longues). Fixez le socle
d’enceinte de façon que la borne d’enceinte soit sur la gauche
quand vous regardez le dos de l’enceinte.
Borne d’enceinte
Haut
Bas
6
Fr

02_S-LX70C_FR.book 7 ページ 2007年9月12日 水曜日 午後2時51分
English Français Deutsch
Fiche technique
Coffret . . . . . . . . . . . . Type à coffret fermé (blindée magnétiquement)
Configuration. . . . . . . . . . . . . . . . . . . . . . . . . . . . . . . . . . . . . . . . . .2 voies
Woofer . . . . . . . . . . . . . . . . . . . . . . . . . . . . . . . . . . . . . Cône de 13 cm x2
Tweeter. . . . . . . . . . . . . . . . . . . . . . . . . . . . . . . . . . . . . . Dôme de 2,5 cm
Impédance nominale . . . . . . . . . . . . . . . . . . . . . . . . . . . . . . . . . . . . . 6 Ω
Réponse de fréquence . . . . . . . . . . . . . . . . . . . . . .de 40 Hz à 50 000 Hz
Sensibilité . . . . . . . . . . . . . . . . . . . . . . . . . . . . . . . . . . . . . . . . . . . . .82 dB
Puissance d’entrée maximum. . . . . . . . . . . . . . . . . . . . . . . . . . . . 130 W
Fréquence de recouvrement . . . . . . . . . . . . . . . . . . . . . . . . . . . . 1,7 kHz
Dimensions extérieures . . . . . . 722 mm (L) x 175 mm (H) x 70 mm (P)
(sauf les protubérances)
Poids . . . . . . . . . . . . . . . . . . . . . . . . . . . . . . . . . . . . . . . . . . . . . . . . 5,2 kg
Accessoires fournis
Socle d’enceinte . . . . . . . . . . . . . . . . . . . . . . . . . . . . . . . . . . . . . . . . . . . 1
Italiano Español Português Dansk Norsk SuomiSvenska
Support (pour l’enceinte/S) . . . . . . . . . . . . . . . . . . . . . . . . . . . . . . . . . . 1
Support (pour l’enceinte/L) . . . . . . . . . . . . . . . . . . . . . . . . . . . . . . . . . . 1
Support (pour le mur). . . . . . . . . . . . . . . . . . . . . . . . . . . . . . . . . . . . . . . 1
Vis (longue) . . . . . . . . . . . . . . . . . . . . . . . . . . . . . . . . . . . . . . . . . . . . . . . 4
Vis (courte) . . . . . . . . . . . . . . . . . . . . . . . . . . . . . . . . . . . . . . . . . . . . . . . 2
Patins antidérapants . . . . . . . . . . . . . . . . . . . . . . . . . . . . . . . . . . . 1 (jeu)
Nederlands
Joint (pour le socle d’enceinte) . . . . . . . . . . . . . . . . . . . . . . . . . . . . . . . 1
Attache velcro (crochets). . . . . . . . . . . . . . . . . . . . . . . . . . . . . . . . . . . . 2
Attache velcro (boucles) . . . . . . . . . . . . . . . . . . . . . . . . . . . . . . . . . . . . 2
Chiffon de nettoyage. . . . . . . . . . . . . . . . . . . . . . . . . . . . . . . . . . . . . . . . 1
Gabarit de fixation au mur . . . . . . . . . . . . . . . . . . . . . . . . . . . . . . . . . . . 1
Mode d’emploi
• L’apparence et les spécifications sont sujettes à changement
sans notification.
est une marque de fabrique placée sur un produit
utilisant la “Phase Control Technology” de Pioneer.
Cette technologie permet une reproduction 5,1 voies de haute
qualité sans retard dans les graves.
Si vous souhaitez vous débarrasser de cet appareil, ne le mettez pas
à la poubelle avec vos ordures ménagères. Il existe un système de
collecte séparé pour les appareils électroniques usagés, qui doivent
être récupérés, traités et recyclés conformément à la législation.
Les habitants des états membres de l’UE, de Suisse et de Norvège peuvent
retourner gratuitement leurs appareils électroniques usagés aux centres de
collecte agréés ou à un détaillant (si vous rachetez un appareil similaire neuf).
Dans les pays qui ne sont pas mentionnés ci-dessus, veuillez contacter les
autorités locales pour savoir comment vous pouvez vous débarrasser de vos
appareils.
Vous garantirez ainsi que les appareils dont vous vous débarrassez sont
correctement récupérés, traités et recyclés et préviendrez de cette façon les
impacts néfastes possibles sur l’environnement et la santé humaine.
Publication de Pioneer Corporation.
Copyright © 2007 Pioneer Corporation.
Tous droits de reproduction et de traduction réservés.
7
Fr

03_S-LX70C_GE.book 2 ページ 2007年9月12日 水曜日 午後2時51分
Wir danken Ihnen dafür, dass Sie sich für dieses Produkt von
Pioneer entschieden haben. Bitte lesen Sie diese
Achtung
Bedienungsanleitung vor der Inbetriebnahme aufmerksam durch,
damit Sie die optimale Leistung von diesem Produkt erzielen
können. Bitte bewahren Sie diese Anleitung anschließend für
Aufstellung
spätere Bezugnahme griffbereit auf.
• Stellen Sie den Lautsprecher nicht auf einer unstabilen
Unterlage auf, da anderenfalls die Gefahr besteht, dass der
Lautsprecher umkippt und Verletzungen verursacht oder
beschädigt wird.
Vor der Inbetriebnahme
• Schalten Sie die AV-Anlage aus, und ziehen Sie alle
• Die Nennimpedanz dieses Lautsprechersystems beträgt 6 Ω.
Netzstecker ab, bevor Sie die Anschlüsse unter Bezugnahme
Schließen Sie dieses Lautsprechersystem ausschließlich an
auf die Bedienungsanleitungen der einzelnen Komponenten
einen Verstärker mit einer Lastimpedanz von 6 Ω an (die
herstellen. Achten Sie unbedingt darauf, die richtigen
Lautsprecher-Ausgangsklemmen des Verstärkers müssen mit
Anschlusskabel zu verwenden.
der Beschriftung „6 Ω“ gekennzeichnet sein).
• Vermeiden Sie unbedingt eine Aufstellung dieses
Um eine Beschädigung des Lautsprechersystems durch ein zu
Lautsprechers an einem Ort, an dem der Lautsprecher bei
starkes Eingangssignal zu vermeiden, sind die folgenden
Auftreten eines Erdbebens oder einer anderen
Vorsichtshinweise sorgfältig zu beachten:
Naturkatastrophe umkippen und Verletzungen verursachen
• Die zulässige Belastbarkeit (Eingangspegel) dieses
könnte. Weitere Informationen hierzu finden Sie auf Seite 5.
Lautsprechersystems darf auf keinen Fall überschritten
• Pioneer lehnt jegliche Haftung für Unfälle oder Schäden ab, die
werden.
durch eine unsachgemäße Aufstellung, zweckentfremdeten
• Wenn ein Grafik-Equalizer verwendet wird, um den hohen
Gebrauch, eine Nachgestaltung des Gerätes oder höhere
Frequenzbereich anzuheben, darf die Lautstärke am Verstärker
Gewalt entstehen.
nicht auf einen übermäßig hohen Pegel eingestellt werden.
• Versuchen Sie auf keinen Fall, einen sehr hohen
Verwendung der Lautsprecher
Lautstärkepegel von einem Verstärker mit niedriger
• Verwenden Sie den Lautsprecher auf keinen Fall zur
Ausgangsleistung zu erzielen (dies führt zu einer Erhöhung des
Wiedergabe von verzerrtem Klang über längere Zeiträume
Klirrfaktors des Verstärkers und kann eine Beschädigung des
hinweg. Anderenfalls besteht die Gefahr von Brandausbruch
Hochtöners verursachen).
und einer Beschädigung des Lautsprechers.
• Bitte sorgen Sie dafür, dass sich Personen nicht auf den
Reinigen der Lautsprechergehäuse
Lautsprecher setzen oder sich darauf stellen, und dass Kinder
• Unter normalen Bedingungen lassen sich Staub,
nicht auf den Lautsprechern spielen. Anderenfalls besteht die
Fingerabdrücke und leichte Verschmutzungen durch Abreiben
Gefahr, dass der Lautsprecher umkippt und Verletzungen
des Lautsprechergehäuses mit einem weichen Tuch entfernen.
verursacht oder beschädigt wird.
Falls hartnäckige Schmutzflecken an den Außenflächen
vorhanden sind, tauchen Sie einen sauberen Lappen in eine
ACHTUNG
Lösung aus 5–6 Teilen eines neutralen Haushaltsreinigers und
An den Lautsprecherklemmen dieses Gerätes liegt eine potentiell
1 Teil Wasser, wringen Sie ihn gründlich aus, und wischen Sie
GEFÄHRLICHE Spannung an. Zur Vermeidung von
die Schmutzflecken dann ab. Benutzen Sie dazu keine
Stromschlaggefahr ist unbedingt darauf zu achten, den
Möbelpolituren oder -reinigungsmittel. Verwenden Sie auf
Netzstecker beim Anschließen und Abtrennen der
keinen Fall Alkohol, Farbverdünner, Leichtbenzin, Insektizide
Lautsprecherkabel von der Netzsteckdose zu trennen, bevor
oder andere Chemikalien zur Reinigung des Gehäuses oder in
irgendwelche nicht isolierten Teile berührt werden.
der Nähe dieses Lautsprechers, da derartige Mittel das
Oberflächenfinish anlösen. Vor der Verwendung eines
chemisch behandelten Reingungstuchs lesen Sie bitte die
beiliegende Gebrauchsanweisung aufmerksam durch.
Pflege des Hochglanzfinish des Lautsprechersystems
• Reiben Sie das Finish des Lautsprechersystems sacht mit
einem weichen trockenen Tuch oder dem mitgelieferten
Reinigungstuch ab.
• Bei Verwendung eines staubigen oder harten Tuchs und durch
Kraftanwendung beim Abreiben wird das Oberflächenfinish
zerkratzt.
• Werden die Außenflächen des Lautsprechersystems mit einem
nassen Tuch abgewischt, besteht die Gefahr, dass
Wassertröpfchen in das Innere der Lautsprecher gelangen,
wodurch eine Funktionsstörung verursacht werden kann.
2
Ge
03_S-LX70C_GE.book 3 ページ 2007年9月12日 水曜日 午後2時51分
English Français Deutsch
Überprüfen des mitgelieferten
Frontverkleidung des
Lautsprechersystems
Zubehörs
• Lautsprecherständer x 1
Die Frontverkleidung dieses Lautsprechersystems kann nicht
abgenommen werden. Bitte versuchen Sie auf keinen Fall, die
Frontverkleidung gewaltsam vom Lautsprecher zu entfernen, da sie
dadurch beschädigt werden könnte.
• Halterung (für Lautsprecher/klein) x 1
Italiano Español Português Dansk Norsk SuomiSvenska
• Halterung (für Lautsprecher/groß) x 1
Nederlands
Montieren des Lautsprechers
Dieses Lautsprechersystem kann nicht direkt auf dem Boden oder
auf Regalen aufgestellt werden. Montieren Sie den Lautsprecher
entweder mit den mitgelieferten Halterungen an einer Wand, oder
verwenden Sie den mitgelieferten Lautsprecherständer zur
Aufstellung des Lautsprechers auf einer ebenen, stabilen
Unterlage.
• Dieses Lautsprechersystem ist mit einer magnetischen
• Halterung (für Wand) x 1
Abschirmung ausgestattet. Je nach Aufstellungsort kann es
jedoch vorkommen, dass Farbstörungen auftreten, wenn
dieser Lautsprecher in unmittelbarer Nähe eines
Fernsehgerätes platziert wird. In einem solchen Fall schalten
Sie das Fernsehgerät aus, warten Sie etwa 15 bis 30 Minuten
lang, und schalten Sie es dann erneut ein Falls sich die Störung
auf diese Weise nicht beseitigen lässt, stellen Sie das
Lautsprechersystem in einem größeren Abstand vom
Fernsehgerät auf.
•Schraube (lang) x 4
Wandmontage
• Schraube (kurz) x 2
• Vergewissern Sie sich, dass die zur Montage des
Lautsprechers vorgesehene Wand ein ausreichendes
Tragvermögen besitzt.
• Bitte beachten Sie, dass das Lautsprechersystem schwer ist.
• Rutschfreie Untersetzer x 1 (Satz)
Bei unsachgemäßer Montage besteht die Gefahr, dass der
• Dichtung (für Lautsprecherständer) x 1
Lautsprecher herunterfällt, Verletzungen verursacht und
• Klettband (Hakenteil) x 2
beschädigt wird.
• Klettband (Schlaufenteil) x 2
• Wandmontageschrauben gehören nicht zum Lieferumfang.
• Reinigungstuch x 1
Verwenden Sie Schrauben, die für den Werkstoff der Wand
geeignet sind und das Gewicht des Lautsprechers tragen
• Wandmontageschablone x 1
können.
• Vorliegende Bedienungsanleitung
Falls Sie sich über die Eigenschaften und das Tragvermögen der
zur Montage vorgesehenen Wand im Unklaren sind, lassen Sie
sich bitte von einem Fachmann beraten.
Nachdem Sie den Montageort ermittelt haben (z.B. eine Stelle an
der Wand ober- oder unterhalb des Fernsehgerätes), montieren Sie
den Lautsprecher anhand des nachstehend beschriebenen
Verfahrens.
Zwei Ausführungen von Halterungen (für Lautsprecher) gehören
zum Lieferumfang. Verwenden Sie die große Halterung, um den
Lautsprecher neben einem Plasma-Fernseher von Pioneer zu
montieren. Verwenden Sie die kleine Halterung, um den
Lautsprecher bündig an der Wand zu montieren.
3
Ge
03_S-LX70C_GE.book 4 ページ 2007年9月12日 水曜日 午後2時51分
1 Schließen Sie das Lautsprecherkabel an.
3 Befestigen Sie die Halterung (für Wand) provisorisch über der
• Ein Lautsprecherkabel gehört nicht zum Lieferumfang dieses
dazu in der Schablone vorgesehenen Stelle.
Lautsprechersystems.
Richten Sie die Halterung (für Wand) auf die dazu in der Schablone
vorgesehene Stelle aus, und befestigen Sie sie provisorisch mit
Lautsprecherkabel für den Anschluss an einen Verstärker gehören
einer Schraube (Empfehlung: 6 mm Durchmesser) an Stelle [A].
nicht zum Lieferumfang dieses Lautsprechers. Bitte beachten Sie
Justieren Sie die Befestigungsposition der Halterung, bis sie
die folgenden Hinweise bei der Auswahl des Lautsprecherkabels,
richtig auf die Schablone ausgerichtet ist.
damit Sie die optimale Leistung von Ihrem Lautsprechersystem
erhalten:
[A]
• Verwenden Sie ein möglichst dickes Lautsprecherkabel der
minimal erforderlichen Länge.
• Kabel besitzen unterschiedliche Eigenschaften. Verwenden Sie
daher stets zwei Kabel des gleichen Typs zum Herstellen eines
Anschlusses.
• Die Anschlüsse an den Lautsprecherklemmen an
Lautsprechern und Verstärker sollten so fest wie möglich
hergestellt werden, um den Kontaktwiderstand zu reduzieren.
Wenn der Lautsprecher mit der Halterung an einer Wand montiert
werden soll, schließen Sie das Lautsprecherkabel an, bevor Sie die
Halterung am Lautsprecher befestigen.
4 Befestigen Sie die Halterung (für Wand).
Befestigen Sie die Halterung mit Schrauben (Empfehlung: 6 mm
Durchmesser) an den vier Stellen [B] (empfohlen). Ziehen Sie die
Schraube [A], die zur provisorischen Befestigung der Halterung an
der Wand verwendet wurde, ebenfalls fest an. Achten Sie darauf,
die Halterung fest an allen fünf Stellen zu befestigen, um zu
vermeiden, dass der Lautsprecher wacklig ist oder herunterfällt.
• Entfernen Sie dann die Schablone, indem Sie sie an den
Perforationen abreißen.
• Die nachstehende Abbildung zeigt das Beispiel einer
Befestigung der Halterung mit Schrauben an fünf Stellen: eine
Schraube an Stelle [A] und vier Schrauben an den Ecken [B]
(empfohlen).
• Falls die blanken Leiter von zwei Lautsprecherkabeln so weit
aus den Klemmen hervorstehen, dass sie sich gegenseitig
[B]
berühren, kann dies eine Überlastung des Verstärkers
verursachen. In einem solchen Fall stellt der Verstärker
möglicherweise den Betrieb ein, und es kann sogar zu einer
Beschädigung des Verstärkers kommen.
• Ziehen Sie nach dem Herstellen der Anschlüsse sacht an
jedem Lautsprecherkabel, um sicherzustellen, dass die Drähte
fest in den Klemmen sitzen. Lose Anschlüsse können
Rauschen und Tonaussetzer verursachen.
• Achten Sie darauf, die Drähte des Lautsprecherkabels
polaritätsrichtig an die Klemmen (+ , –) an Lautsprecher und
Verstärker anzuschließen, da anderenfalls kein richtiger
[B]
Surround-Effekt erhalten wird.
5 Befestigen Sie die Halterung (für Lautsprecher) am
2 Kleben Sie die mitgelieferte Wandmontageschablone an die
Lautsprecher.
zur Montage vorgesehene Stelle.
Befestigen Sie die Halterung mit den mitgelieferten Schrauben
Befestigen Sie die Schablone mit Klebestreifen usw. lotrecht zum
(lang) in den vier Schraubenbohrungen.
Boden. Vergewissern Sie sich, dass die Schablone gerade
Die einzigartige Konstruktion dieses Lautsprechersystems ist
ausgerichtet ist, um eine schiefe Montage des Lautsprechers zu
darauf ausgelegt, die Richtwirkung des abgestrahlten Schalls zu
vermeiden. Wird die Schablone zu nah am Fernsehgerät an die
regeln. Daher muss dieses Lautsprechersystem je nachdem, ob es
Wand geklebt, kann die Montage des Lautsprechers durch das
ober- oder unterhalb des Fernsehgerätes aufgestellt werden soll,
Fernsehgerät behindert werden. Vergewissern Sie sich, dass sich
auf unterschiedliche Weise montiert werden. Befestigen Sie die
die Schablone nicht mit dem Fernsehgerät überschneidet.
Halterungen mit der nachstehend beschriebenen Ausrichtung.
Aufstellung oberhalb des Fernsehgerätes
Fernsehgerät
Schablone
Aufstellung unterhalb des Fernsehgerätes
4
Ge
03_S-LX70C_GE.book 5 ページ 2007年9月12日 水曜日 午後2時51分
• Aufstellung unterhalb des Fernsehgerätes
7 Sichern Sie die Halterungen mit Schrauben aneinander.
English Français Deutsch
Befestigen Sie die Halterung so, dass sich die
Verwenden Sie die mitgelieferten Schrauben (kurz), um die beiden
Lautsprecherklemmen von der Rückseite des Lautsprechers aus
Halterungen an den Schraubenbohrungen oben links und rechts
gesehen auf der linken Seite befinden.
an den Seiten aneinander zu sichern.
Falls sich die Halterungen nicht auf beiden Seiten aneinander
Lautsprecherklemme
sichern lassen (wenn z.B. auf einer Seite kein ausreichender
oben
Freiraum zum Gebrauch eines Schraubendrehers vorhanden ist),
achten Sie darauf, die Schraube auf der anderen Seite fest
anzuziehen.
unten
• Aufstellung oberhalb des Fernsehgerätes
Italiano Español Português Dansk Norsk SuomiSvenska
Befestigen Sie die Halterung so, dass sich die
8 Sichern Sie den Lautsprecher mit einer Schnur an der Wand.
Lautsprecherklemmen von der Rückseite des Lautsprechers aus
Schrauben Sie zwei Bildhaken o.Ä. in die Wand hinter dem
gesehen auf der rechten Seite befinden.
Lautsprecher ein. Führen Sie dann eine dicke Schnur (nicht
mitgeliefert) so durch die Haken und die Metallklaue, dass der
Lautsprecherklemme
Lautsprecher stabilisiert ist (vergewissern Sie sich vorher, dass das
Nederlands
Tragvermögen der Haken für das Gewicht des Lautsprechers
oben
ausreicht).
Metallarretierung
unten
6 Befestigen Sie den Lautsprecher an der Halterung (für Wand).
Setzen Sie die untere linke Kante der (am Lautsprecher
ausreichend starke Schnur
befestigten) Halterung diagonal in die Oberseite der Führung an
(nicht mitgeliefert)
der Halterung (für Wand) ein ( ).
• Befestigen Sie die Metallklaue nicht direkt an der Wand. Sie ist
Bringen Sie die rechte Seite beider Halterungen zusammen, so
ausschließlich zum gemeinsamen Gebrauch mit einer
dass sie waagerecht aufeinander ausgerichtet sind ( ).
verstärkten Schnur vorgesehen, um ein Herunterfallen des
Bewegen Sie die äußere Halterung geringfügig nach links, und
Lautsprechers zu verhindern.
schieben Sie sie in der Führung bis zum Anschlag nach unten,
während Sie den oberen Vorsprung auf die Nut in der Halterung
(für Wand) ausrichten ( ).
• Zum leichteren Verständnis wird der Lautsprecher in der
nachstehenden Abbildung nicht an der Halterung (für
Lautsprecher) befestigt dargestellt.
2
3
1
Führung
5
Ge
03_S-LX70C_GE.book 6 ページ 2007年9月12日 水曜日 午後2時51分
Regalaufstellung unter Verwendung des
3 Befestigen Sie den Lautsprecherständer mit Schrauben am
Lautsprecher.
Lautsprecherständers
Bringen Sie die Schraubenbohrungen jeweils im
Mit Hilfe des mitgelieferten Lautsprecherständers kann dieses
Lautsprecherständer und Lautsprecher miteinander zur Deckung,
Lautsprechersystem auf einem Regal oder einer ähnlichen
und schrauben Sie zwei der mitgelieferten Schrauben (lang) fest
Unterlage aufgestellt werden. Bei Verwendung des
ein. Befestigen Sie den Lautsprecherständer so, dass sich die
Lautsprecherständers bringen Sie die rutschfreien Untersetzer
Lautsprecherklemmen von der Rückseite des Lautsprechers aus
oder das Klettband daran an.
gesehen auf der linken Seite befinden.
Stellen Sie den Lautsprecherständer nicht auf einer glatten
Unterlage auf, da die Haftwirkung der rutschfreien Untersetzer
Lautsprecherklemme
möglicherweise nicht ausreicht, um ein Verrutschen des Ständers
oben
zu verhindern.
1 Befestigen Sie die rutschfreien Untersetzer oder das
Klettband am Lautsprecherständer.
• Verwendung der rutschfreien Untersetzer
Kleben Sie die rutschfreien Untersetzer an die vier Ecken an der
unten
Unterseite des Lautsprecherständers.
4 Schließen Sie das Lautsprecherkabel an.
• Ein Lautsprecherkabel gehört nicht zum Lieferumfang dieses
Lautsprechersystems.
Lautsprecherkabel für den Anschluss an einen Verstärker gehören
nicht zum Lieferumfang dieses Lautsprechers. Bitte beachten Sie
• Verwendung des Klettbands
die folgenden Hinweise bei der Auswahl des Lautsprecherkabels,
Kleben Sie das Klettband (Schlaufenteil) an zwei Stellen an die
damit Sie die optimale Leistung von Ihrem Lautsprechersystem
Unterseite des Lautsprecherständers.
erhalten:
Kleben Sie dann das Klettband (Hakenteil) auf die Oberfläche, auf
• Verwenden Sie ein möglichst dickes Lautsprecherkabel der
der der Lautsprecherständer aufgestellt werden soll.
minimal erforderlichen Länge.
• Kabel besitzen unterschiedliche Eigenschaften. Verwenden Sie
daher stets zwei Kabel des gleichen Typs zum Herstellen eines
Klettband
(Schlaufenteil)
Anschlusses.
• Die Anschlüsse an den Lautsprecherklemmen an
Klettband
Lautsprechern und Verstärker sollten so fest wie möglich
(Hakenteil)
hergestellt werden, um den Kontaktwiderstand zu reduzieren.
Wenn die Lautsprecher mit den Halterungen an einer Wand
montiert werden sollen, schließen Sie die Lautsprecherkabel an,
bevor Sie die Halterungen an den Lautsprechern befestigen.
Lautsprecher-Befestigungsfläche
2 Befestigen Sie die Dichtung am Lautsprecherständer.
Befestigen Sie die Dichtung an der zur Montage des Lautsprechers
verwendeten Oberfläche des Lautsprecherständers.
• Falls die blanken Leiter von zwei Lautsprecherkabeln so weit
aus den Klemmen hervorstehen, dass sie sich gegenseitig
berühren, kann dies eine Überlastung des Verstärkers
verursachen. In einem solchen Fall stellt der Verstärker
möglicherweise den Betrieb ein, und es kann sogar zu einer
Beschädigung des Verstärkers kommen.
• Ziehen Sie nach dem Herstellen der Anschlüsse sacht an
jedem Lautsprecherkabel, um sicherzustellen, dass die Drähte
fest in den Klemmen sitzen. Lose Anschlüsse können
Rauschen und Tonaussetzer verursachen.
• Achten Sie darauf, die Drähte des Lautsprecherkabels
polaritätsrichtig an die Klemmen (+ , –) an Lautsprecher und
Verstärker anzuschließen, da anderenfalls kein richtiger
Surround-Effekt erhalten wird.
6
Ge
03_S-LX70C_GE.book 7 ページ 2007年9月12日 水曜日 午後2時51分
English Français Deutsch
Technische Daten
Gehäuse. . . . . . . . . . . . .Geschlossene Box (magnetisch abgeschirmt)
Konfiguration. . . . . . . . . . . . . . . . . . . . . . . . . . . . . . . . . Zweiweg-System
Tieftöner. . . . . . . . . . . . . . . . . . . . . . . . . . 13-cm-Konuslautsprecher x 2
Hochtöner . . . . . . . . . . . . . . . . . . . . . . . . . 2,5-cm-Kalottenlautsprecher
Nennimpedanz . . . . . . . . . . . . . . . . . . . . . . . . . . . . . . . . . . . . . . . . . . 6 Ω
Frequenzgang . . . . . . . . . . . . . . . . . . . . . . . . . . . . . . 40 Hz bis 50 000 Hz
Empfindlichkeit . . . . . . . . . . . . . . . . . . . . . . . . . . . . . . . . . . . . . . . . .82 dB
Maximale Belastbarkeit . . . . . . . . . . . . . . . . . . . . . . . . . . . . . . . . . 130 W
Übernahmefrequenz. . . . . . . . . . . . . . . . . . . . . . . . . . . . . . . . . . . 1,7 kHz
Außenabmessungen . . . . . . . . 722 mm (B) x 175 mm (H) x 70 mm (T)
(ausschließlich vorstehender Teile)
Masse. . . . . . . . . . . . . . . . . . . . . . . . . . . . . . . . . . . . . . . . . . . . . . . . 5,2 kg
Mitgeliefertes Zubehör
Lautsprecherständer . . . . . . . . . . . . . . . . . . . . . . . . . . . . . . . . . . .1 Stck.
Italiano Español Português Dansk Norsk SuomiSvenska
Halterung (für Lautsprecher/klein) . . . . . . . . . . . . . . . . . . . . . . . .1 Stck.
Halterung (für Lautsprecher/groß) . . . . . . . . . . . . . . . . . . . . . . . .1 Stck.
Halterung (für Wand) . . . . . . . . . . . . . . . . . . . . . . . . . . . . . . . . . . .1 Stck.
Schraube (lang) . . . . . . . . . . . . . . . . . . . . . . . . . . . . . . . . . . . . . . .4 Stck.
Schraube (kurz). . . . . . . . . . . . . . . . . . . . . . . . . . . . . . . . . . . . . . . .2 Stck.
Rutschfreie Untersetzer . . . . . . . . . . . . . . . . . . . . . . . . . . . . . . . . . 1 Satz
Nederlands
Dichtung (für Lautsprecherständer) . . . . . . . . . . . . . . . . . . . . . . .1 Stck.
Klettband (Hakenteil) . . . . . . . . . . . . . . . . . . . . . . . . . . . . . . . . . . .2 Stck.
Klettband (Schlaufenteil) . . . . . . . . . . . . . . . . . . . . . . . . . . . . . . . .2 Stck.
Reinigungstuch. . . . . . . . . . . . . . . . . . . . . . . . . . . . . . . . . . . . . . . .1 Stck.
Wandmontageschablone. . . . . . . . . . . . . . . . . . . . . . . . . . . . . . . .1 Stck.
Vorliegende Bedienungsanleitung
• Änderungen der technischen Daten und äußeren Aufmachung
im Sinne der ständigen Produktverbesserung bleiben jederzeit
vorbehalten.
ist eine Marke, mit der Geräte gekennzeichnet sind, die
mit Pioneers Phase Control-Technologie ausgestattet sind.
Diese Technologie ermöglicht eine hochwertige Wiedergabe von
5.1-kanaligem Ton ohne Verzögerung der Bässe.
Mischen Sie dieses Produkt, wenn Sie es entsorgen wollen, nicht mit
gewöhnlichen Haushaltsabfällen. Es gibt ein getrenntes
Sammelsystem für gebrauchte elektronische Produkte, über das die
richtige Behandlung, Rückgewinnung und Wiederverwertung gemäß
der bestehenden Gesetzgebung gewährleistet wird.
Privathaushalte in den Mitgliedsstaaten der EU, in der Schweiz und in
Norwegen können ihre gebrauchten elektronischen Produkte an vorgesehenen
Sammeleinrichtungen kostenfrei zurückgeben oder aber an einen Händler
zurückgeben (wenn sie ein ähnliches neues Produkt kaufen).
Bitte wenden Sie sich in den Ländern, die oben nicht aufgeführt sind,
hinsichtlich der korrekten Verfahrensweise der Entsorgung an die örtliche
Kommunalverwaltung.
Auf diese Weise stellen Sie sicher, dass das zu entsorgende Produkt der
notwendigen Behandlung, Rückgewinnung und Wiederverwertung unterzogen
wird, und so mögliche negative Einflüsse auf die Umwelt und die menschliche
Gesundheit vermieden werden.
Veröffentlicht von Pioneer Corporation.
Urheberrechtlich geschützt © 2007 Pioneer Corporation.
Alle Rechte vorbehalten.
7
Ge

04_S-LX70C_IT.book 2 ページ 2007年9月12日 水曜日 午後2時52分
Vi ringraziamo per avere acquistato questo prodotto Pioneer. Prima
di usare il prodotto, leggere questo manuale d’istruzioni in modo da
Attenzione
saperlo utilizzare correttamente. Finito di leggerlo, conservarlo in
un luogo sicuro per poterlo riutilizzare in futuro.
Installazione
• Non posizionare il diffusore su una superficie instabile dato che
ciò può causare la caduta del diffusore e quindi danni o lesioni
Prima di cominciare
personali.
• L’impedenza nominale di questo diffusore è 6 Ω. Collegare il
• Prima di fare collegamenti, spegnere i propri componenti AV,
sistema di diffusori ad un amplificatore dotato di una
scollegarli e consultarne i manuali. Controllare di avere usato i
impedenza di carico di 6 Ω (un modello con l’indicazione “6 Ω“
cavi di collegamento corretti.
sui terminali di uscita dei diffusori).
• Nell’installare quest’unità, evitare le aree dove potrebbe cadere
Per evitare danni al diffusore dovuti al sovraccarico di segnale in
e causare ferimenti nel caso di disastri naturali (ad esempio un
ingresso, osservare le seguenti norme:
terremoto). Per ulteriori informazioni vedere pagina 5.
• Non alimentare il diffusore con potenza oltre il massimo
• Pioneer non è responsabile per qualsiasi incidente o danno
concesso.
risultante da installazione scorretta, uso inappropriato o
• Se si usa un equalizzatore grafico per enfatizzare forti suoni di
modifica del prodotto oppure disastri naturali.
alta frequenza, non usare volumi eccessivi dell’amplificatore.
• Non tentare di forzare un amplificatore di bassa potenza a
Uso dei diffusori
produrre alti volumi. La distorsione armonica dell’amplificatore
• Non fare emettere al diffusore suono distorto per lunghi
aumenterebbe e potreste danneggiare il diffusore.
periodi. Ciò potrebbe casuare danni al diffusore ed un
potenziale rischio di incendio.
Cura delle casse dei diffusori
• Non sedere o appoggiarsi al diffusore, e non lasciare che i
• Per mantenere pulito il diffusore dovrebbe normalmente essere
bambini ci giochino. Ciò potrebbe causare la caduta del
sufficiente strofinare con un panno morbido. Se necessario,
diffusore causando danni o lesioni personali.
passarlo con un panno inumidito con un detergente neutro
diluito sei o sette volte con acqua, quindi strizzarlo bene. Non
AVVERTENZA
usare cere o pulenti per mobilia. Non usare mai alcol, diluenti,
I terminali degli altoparlanti sono sotto tensione, alla stessa
benzina, spray insetticidi o altre sostanze chimiche su o vicino
PERICOLOSA tensione della corrente di rete. Per prevenire
a quest’unità, dato che essi ne corrodono la superficie. Quando
rischi di folgorazioni nel corso delle operazioni di collegamento o
si utilizzano dei panni trattati chimicamente, accertarsi di
di distacco dei cavi degli altoparlanti, staccare il cavo di
leggere con attenzione le istruzioni allegate.
alimentazione principale prima di toccare qualsiasi parte non
isolata.
Pulizia delle finiture lucide del sistema di diffusori
• Quando si esegue la pulizia delle finiture del sistema di
diffusori, strofinare leggermente con un panno morbido; il
panno morbido fornito in dotazione.
• Se si utilizza un panno polveroso o rigido oppure se si strofina
lo schermo con forza, le finiture del prodotto potrebbero subire
dei danni.
• Se si pulisce la superficie del sistema di diffusori con un panno
bagnato, le goccioline di acqua che rimangono sulla superficie
potrebbero entrare nel prodotto causando una disfuznione.
2
It
