Pioneer CP-81B-MK: instruction
Class: Household, kitchen appliances, electronics and equipment
Type: Home Theater System
Manual for Pioneer CP-81B-MK
Table of contents
CP-81B-K
CP-81B-MK
FRRD-235-A_CP-81_En.book 1 ページ 2008年7月24日 木曜日 午後2時15分
Thank you for buying this Pioneer product.
Please read through these operating instructions for proper assembly and use. After you have finished reading the instructions, put them
away in a safe place for future reference.
This speaker stand can be used only with the following Pioneer speaker systems: S-81B-LR-K, S-81B-LR-QL, or S-81B-LR-W.
Before you start
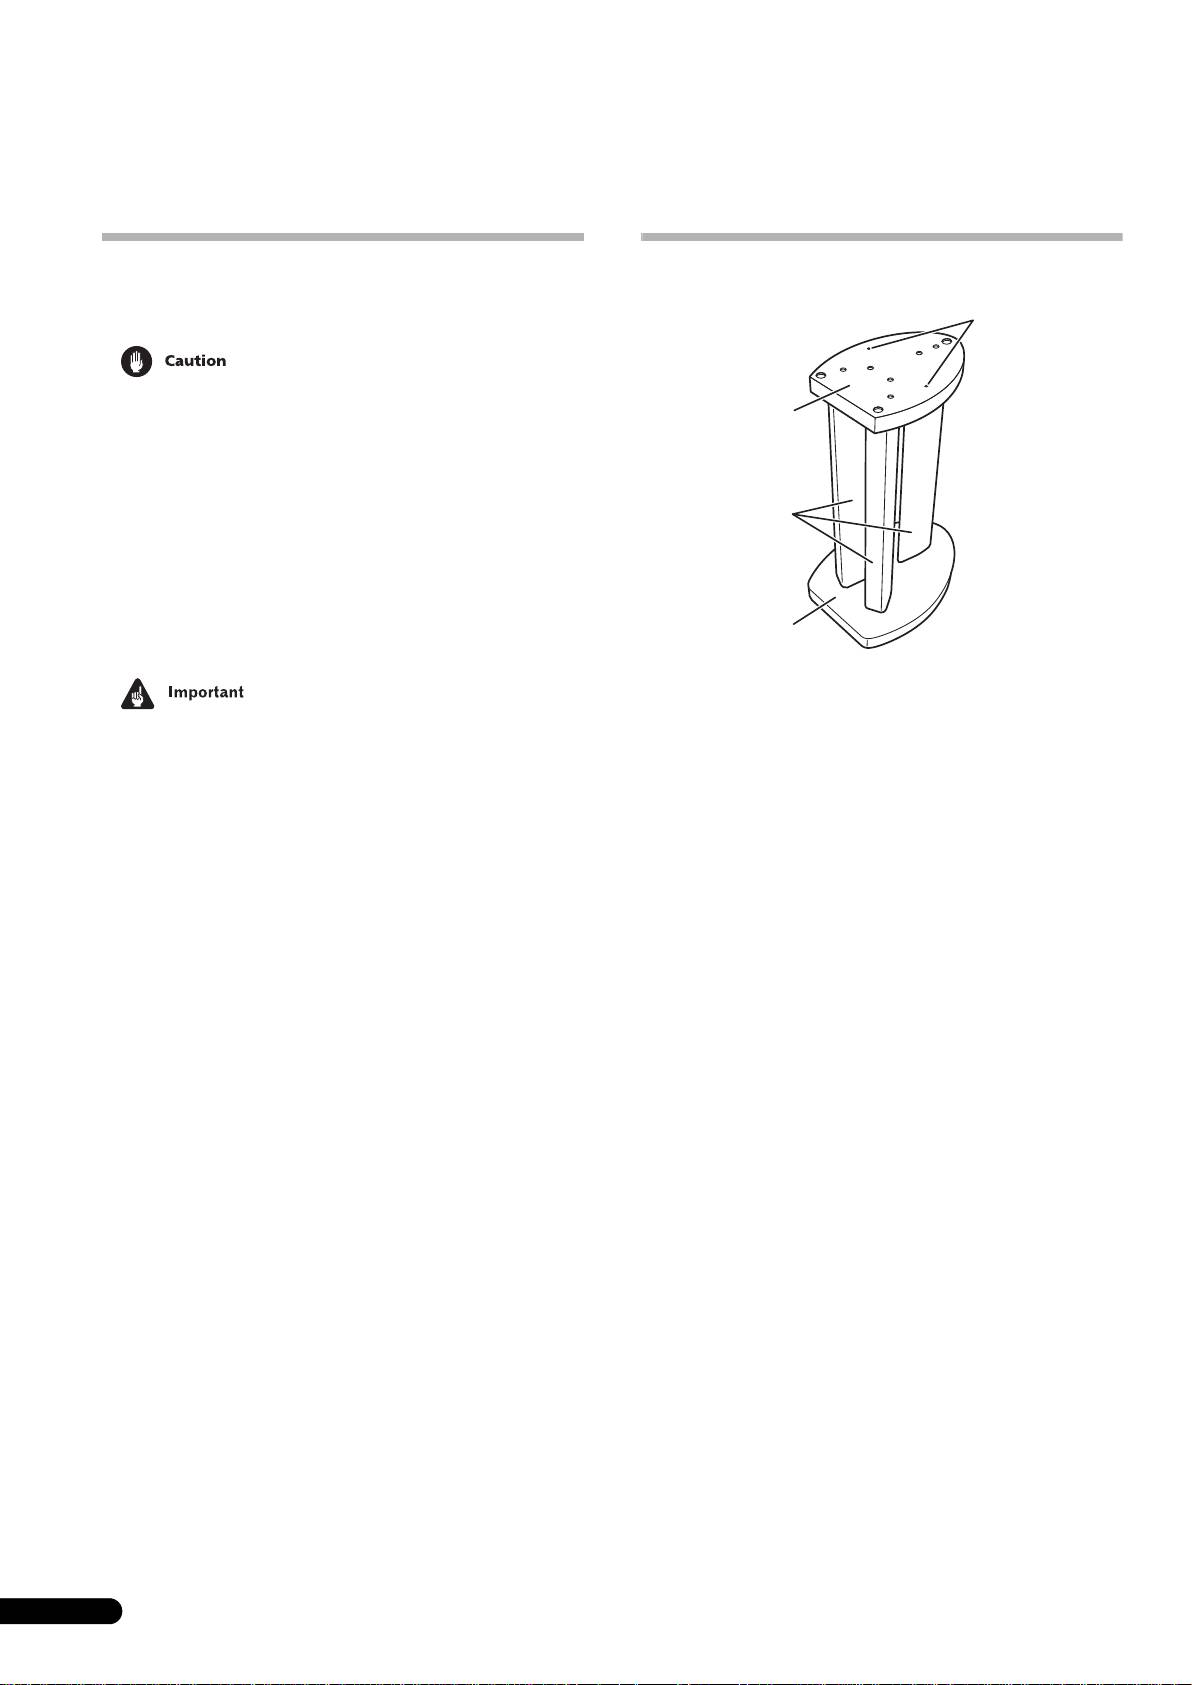
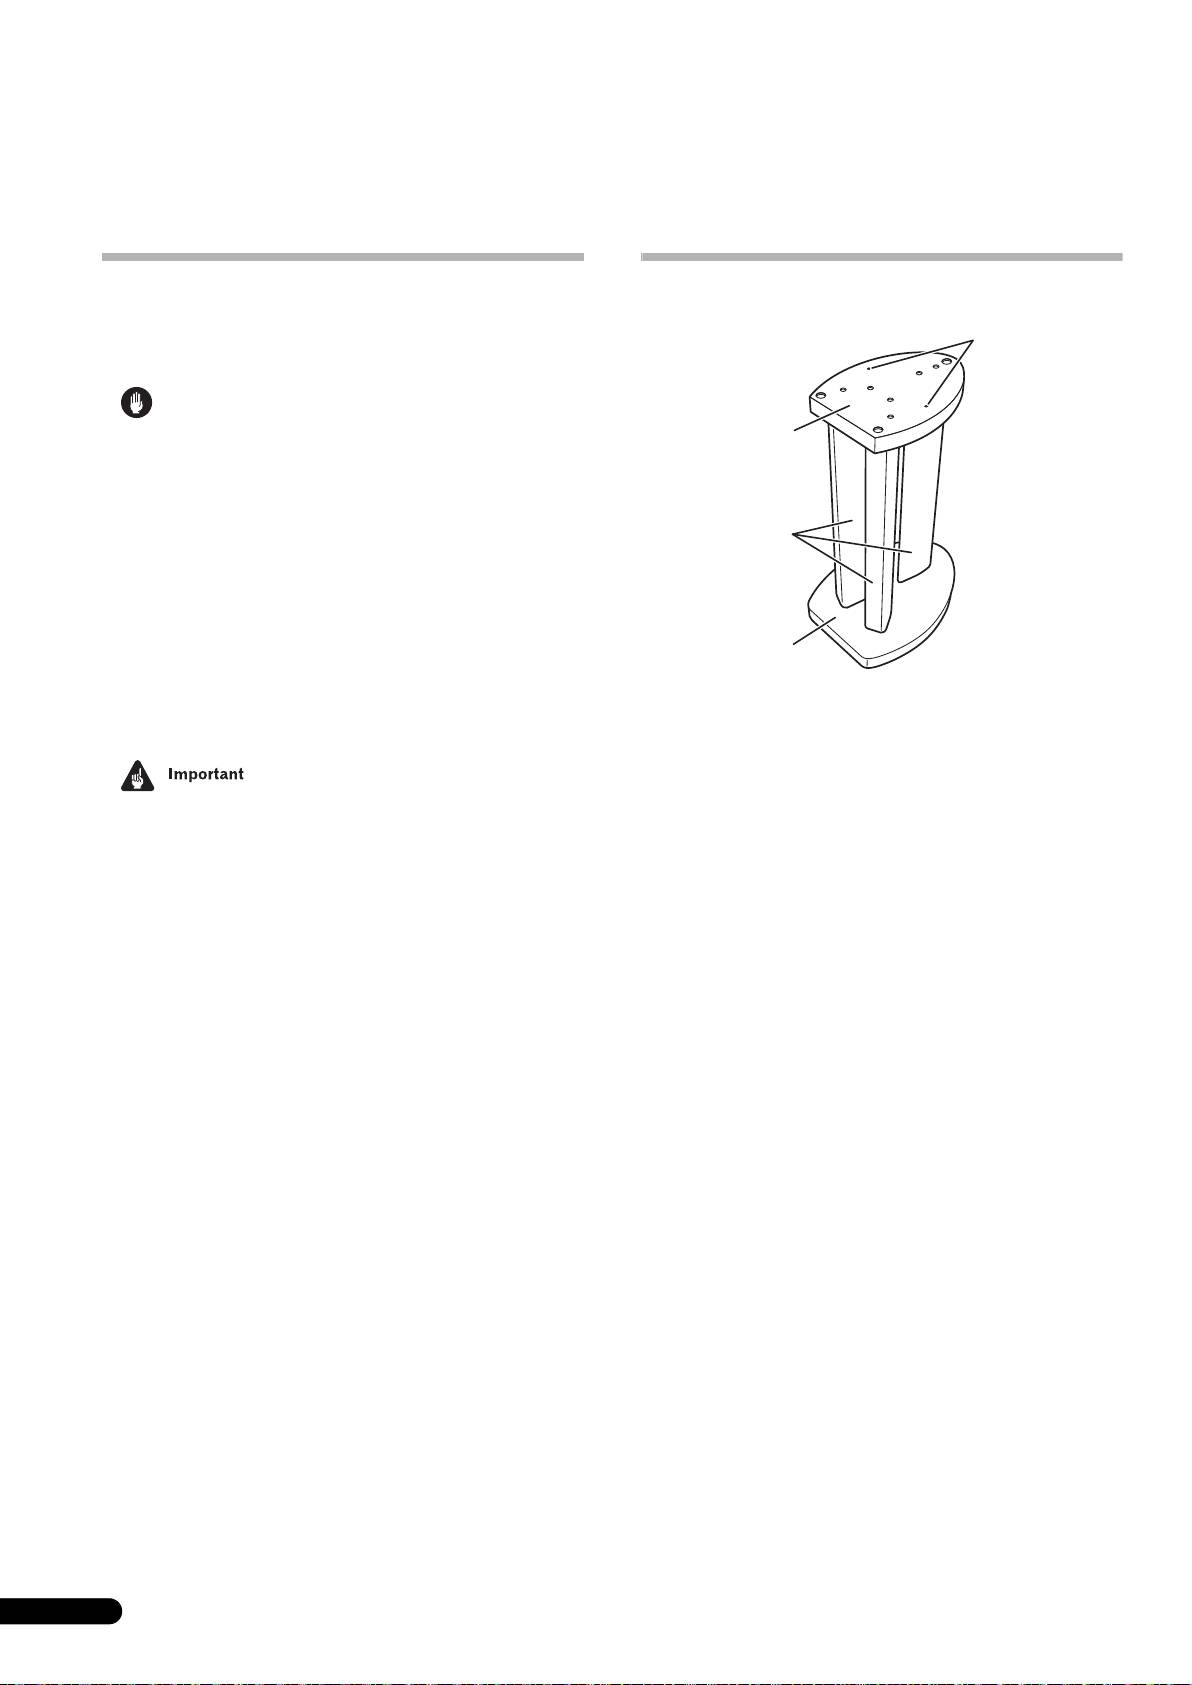
Names of Parts
Before setting up your speaker system, we recommend reading
the operating instructions for your system thoroughly.
• Only use the screws supplied when fixing the speaker to the
speaker stand.
• Do not place the stand on an unstable and/or sloping surface.
The stand and speaker may fall and cause injury.
• Do not use with any speaker system other than the one for
which the unit was designed. The stand may collapse and be
damaged and/or the speaker may fall and cause injury.
• When moving the speaker and stand, first remove the speaker
from the stand, and then move the stand, holding it by the
stems.
• Place the stand on a stable, level surface; placing the stand on
an unstable surface can be dangerous.
• Pioneer assumes no liability whatsoever for damages
resulting from assembly, improper mounting, insufficient
reinforcement, misuse of the product, acts of nature, etc.
2
En
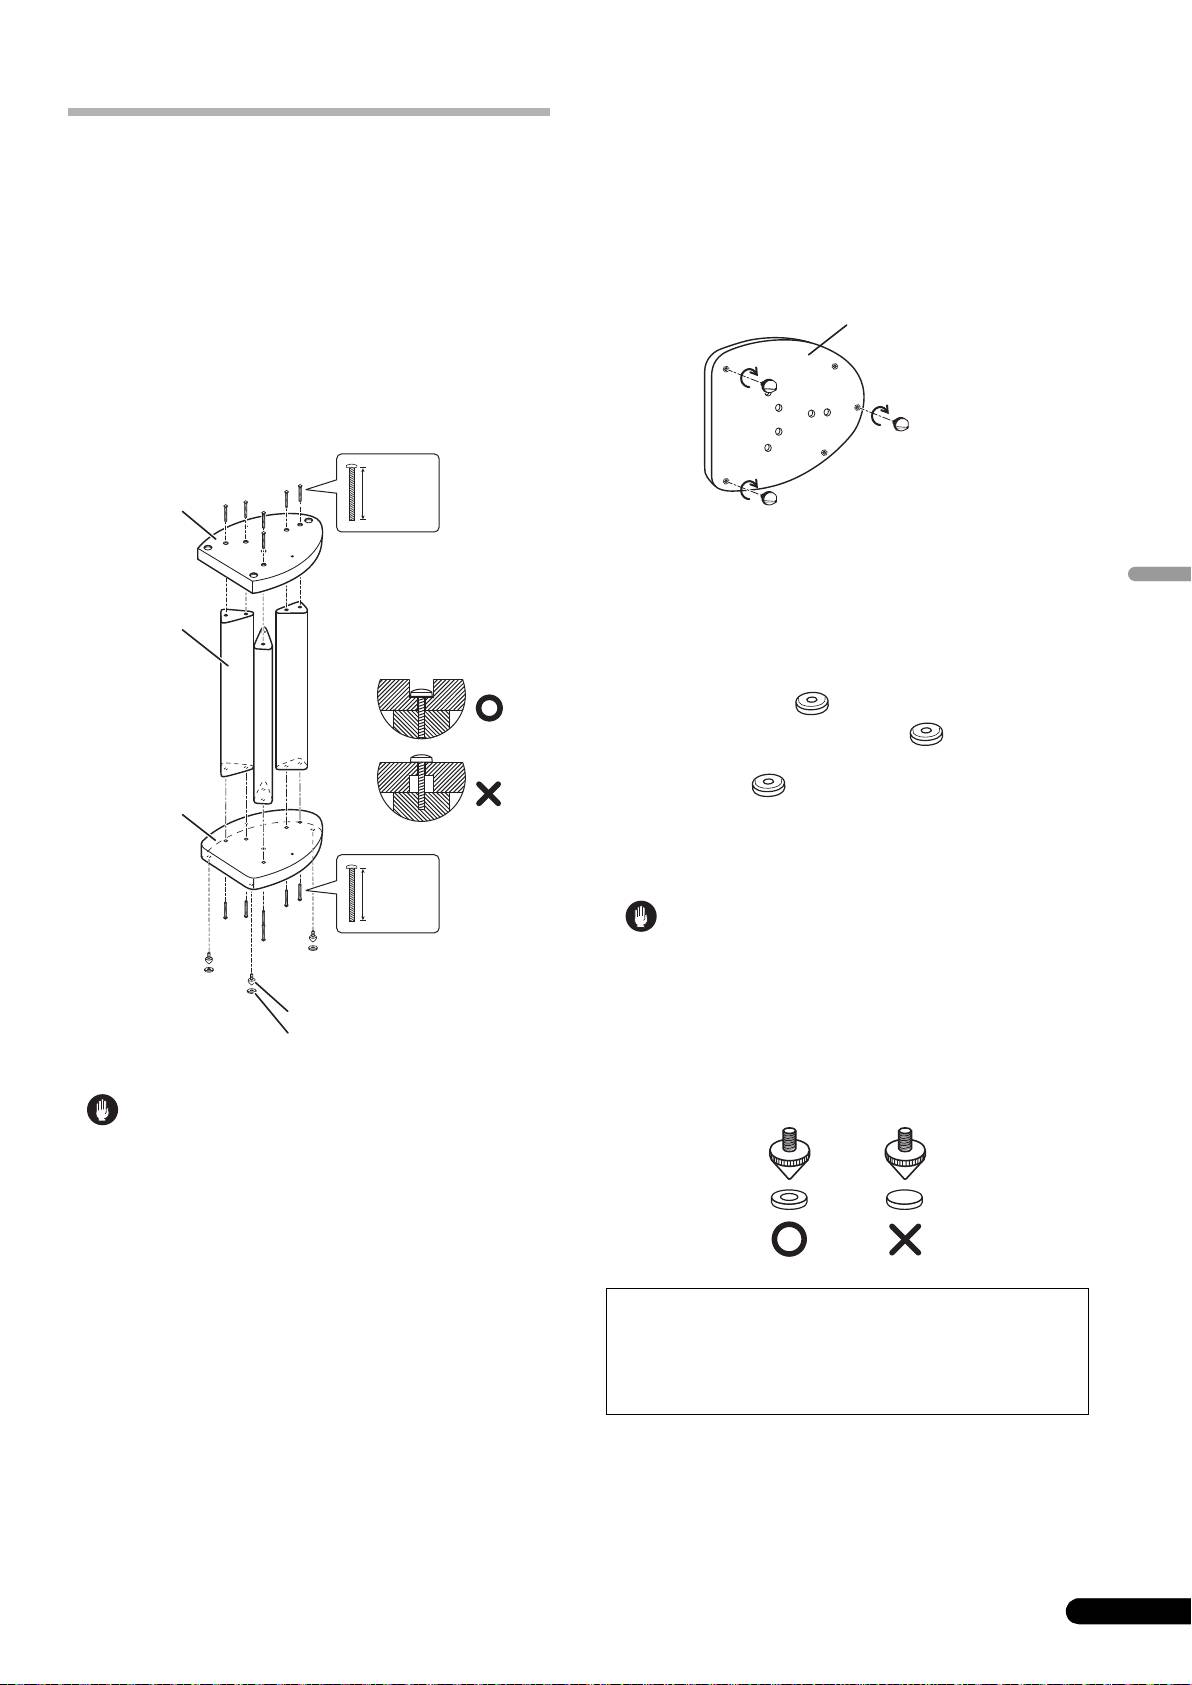
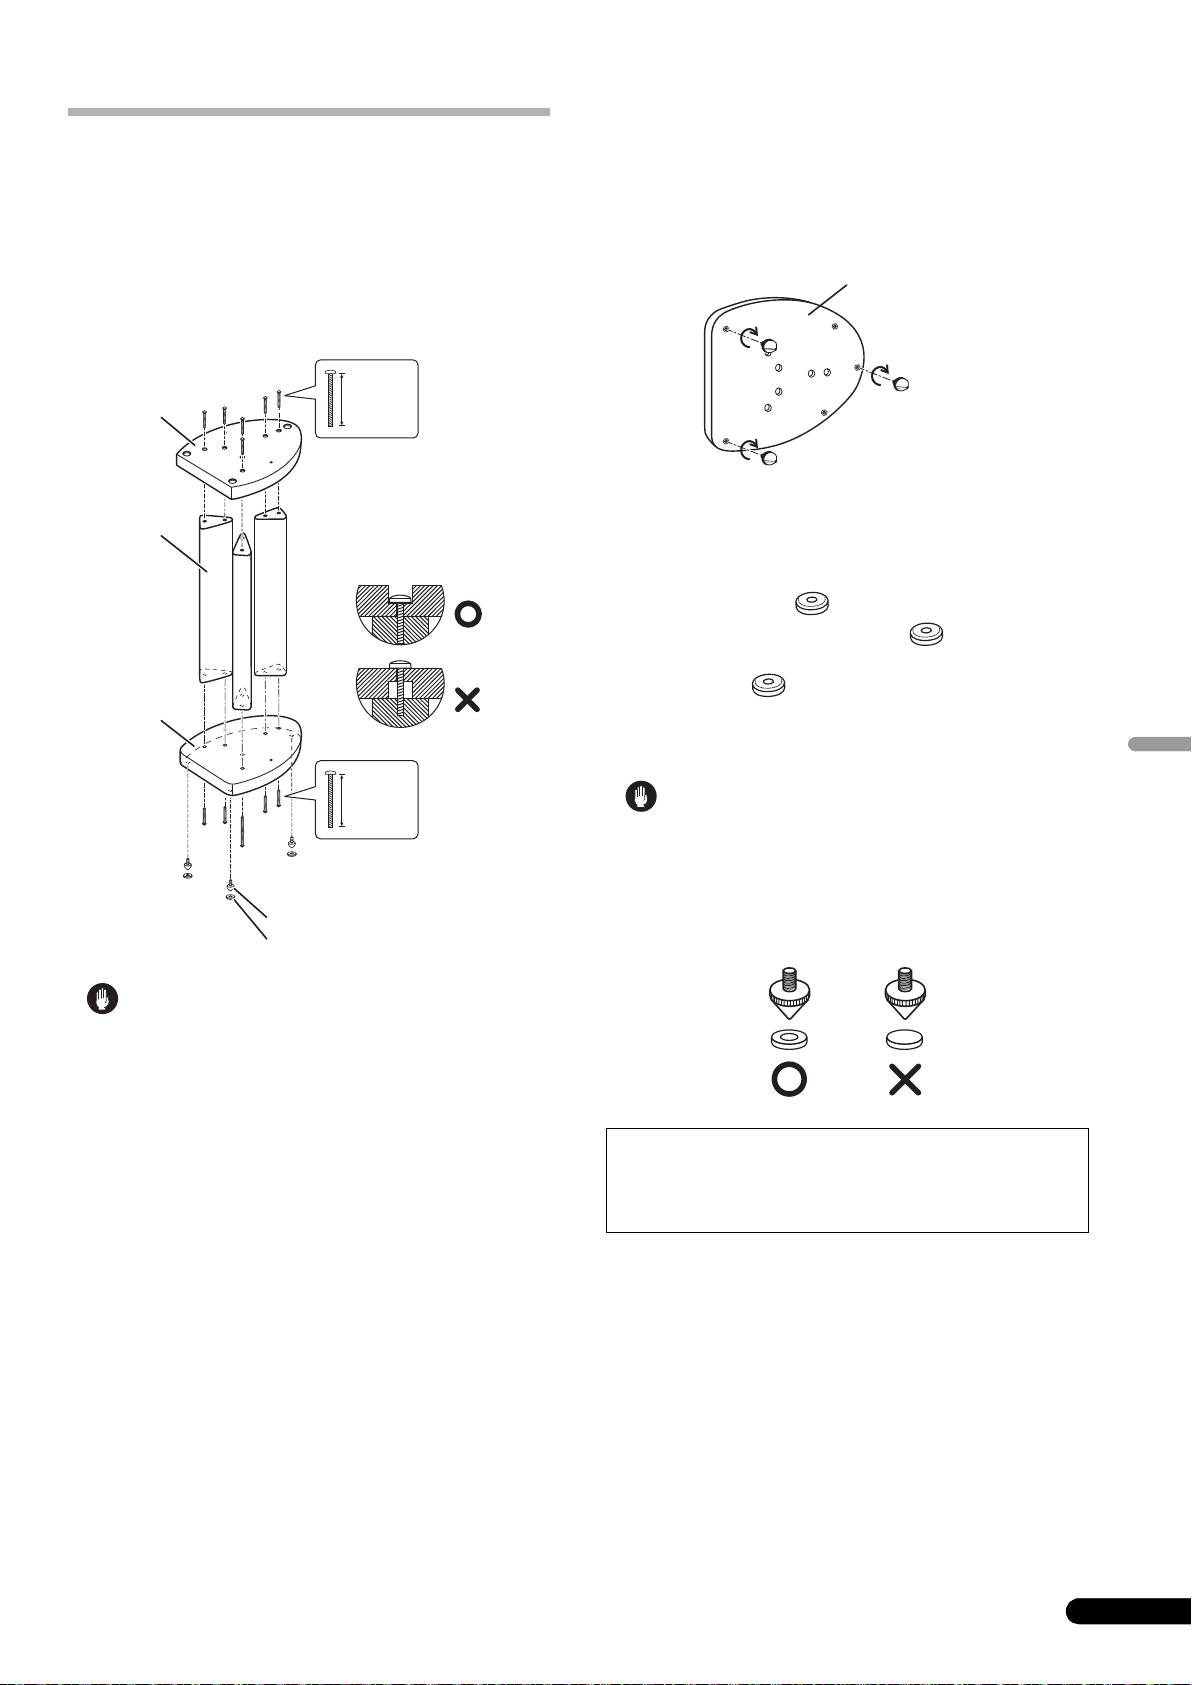
Screw holes for
securing speaker
Speaker support
Stand stems
Stand base
FRRD-235-A_CP-81_En.book 2 ページ 2008年7月24日 木曜日 午後2時15分
When using the spikes
This speaker stand includes spikes that you can use to isolate the
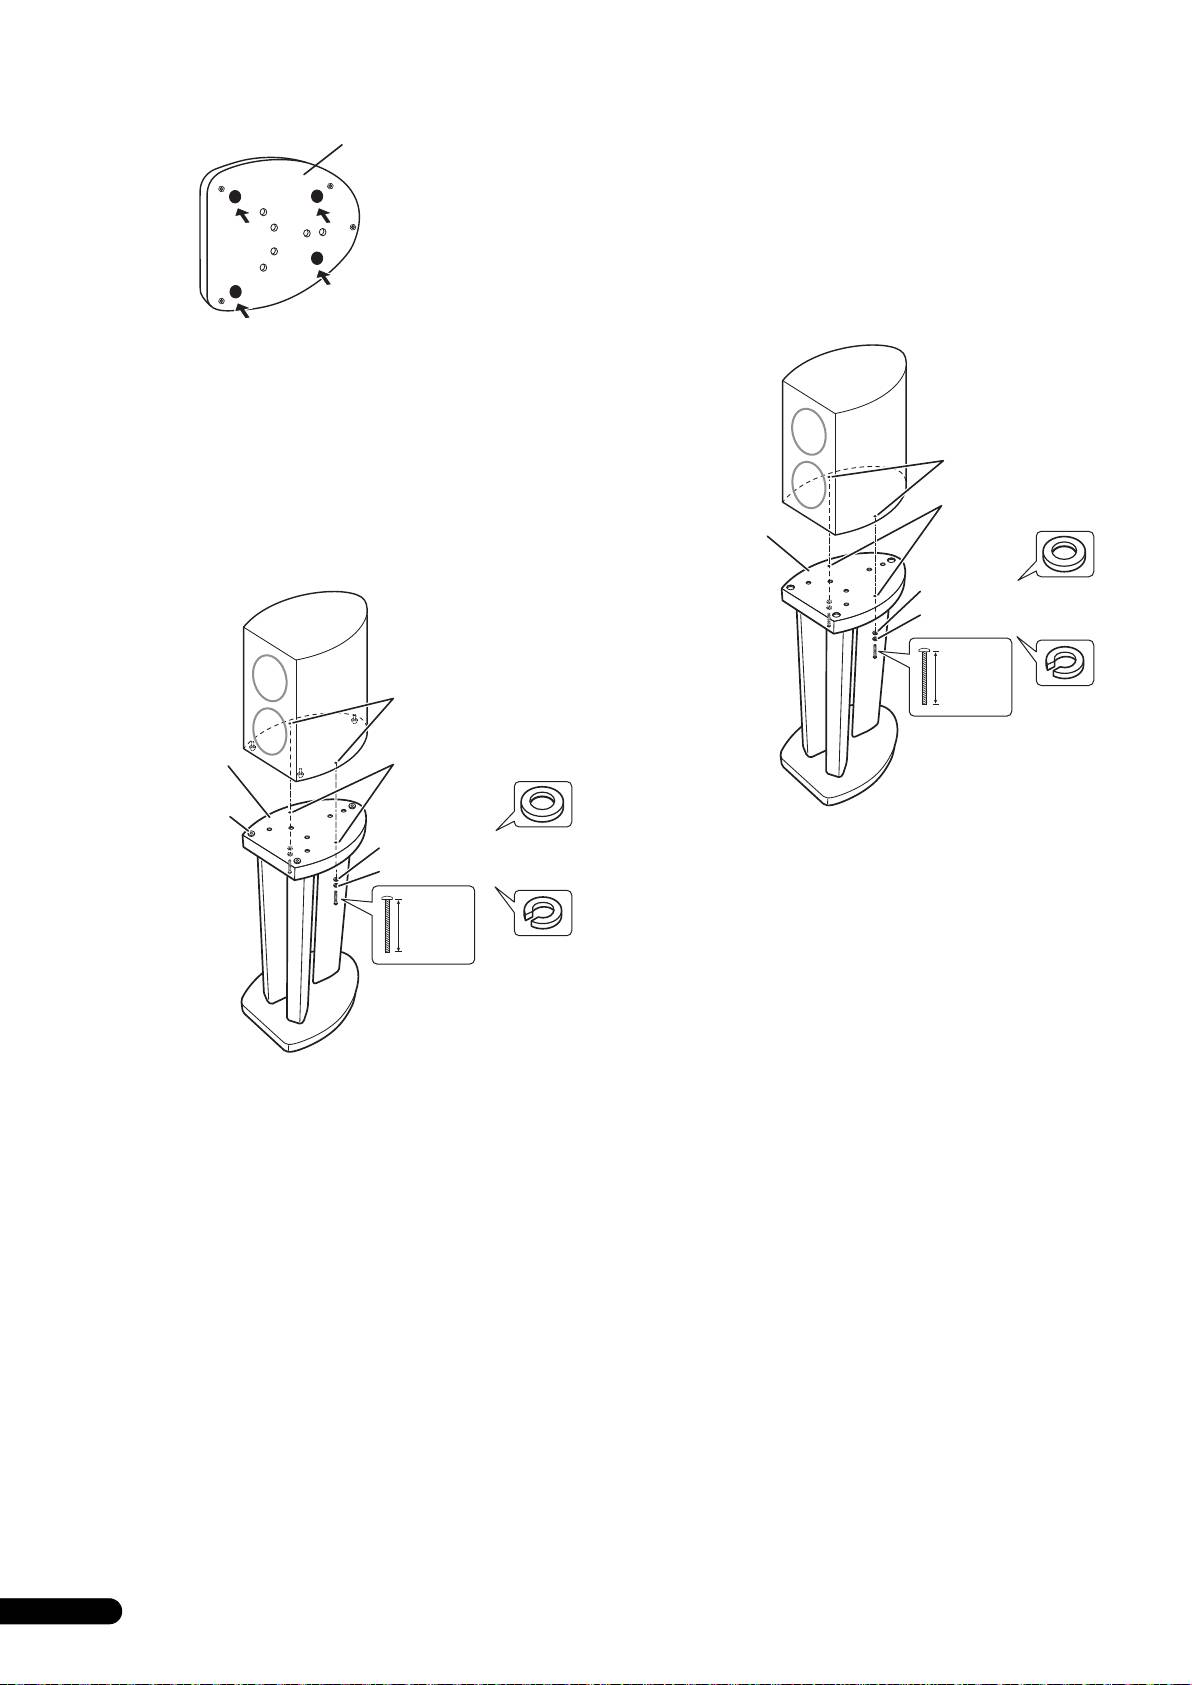
Attaching speakers to the stands
speaker from the floor. Spikes are recommended when placing
A medium Phillips screwdriver is required for assembling the
the stand on a thick carpet (for added stability), or for better sound
speaker stand and for attaching the speaker.
when placing the stand on a hard reverberant surface (such as a
concrete or wood floor). Use the supplied spike bases to avoid
Assembling the speaker stands
scratching the floor or other surface where the stand is placed.
English
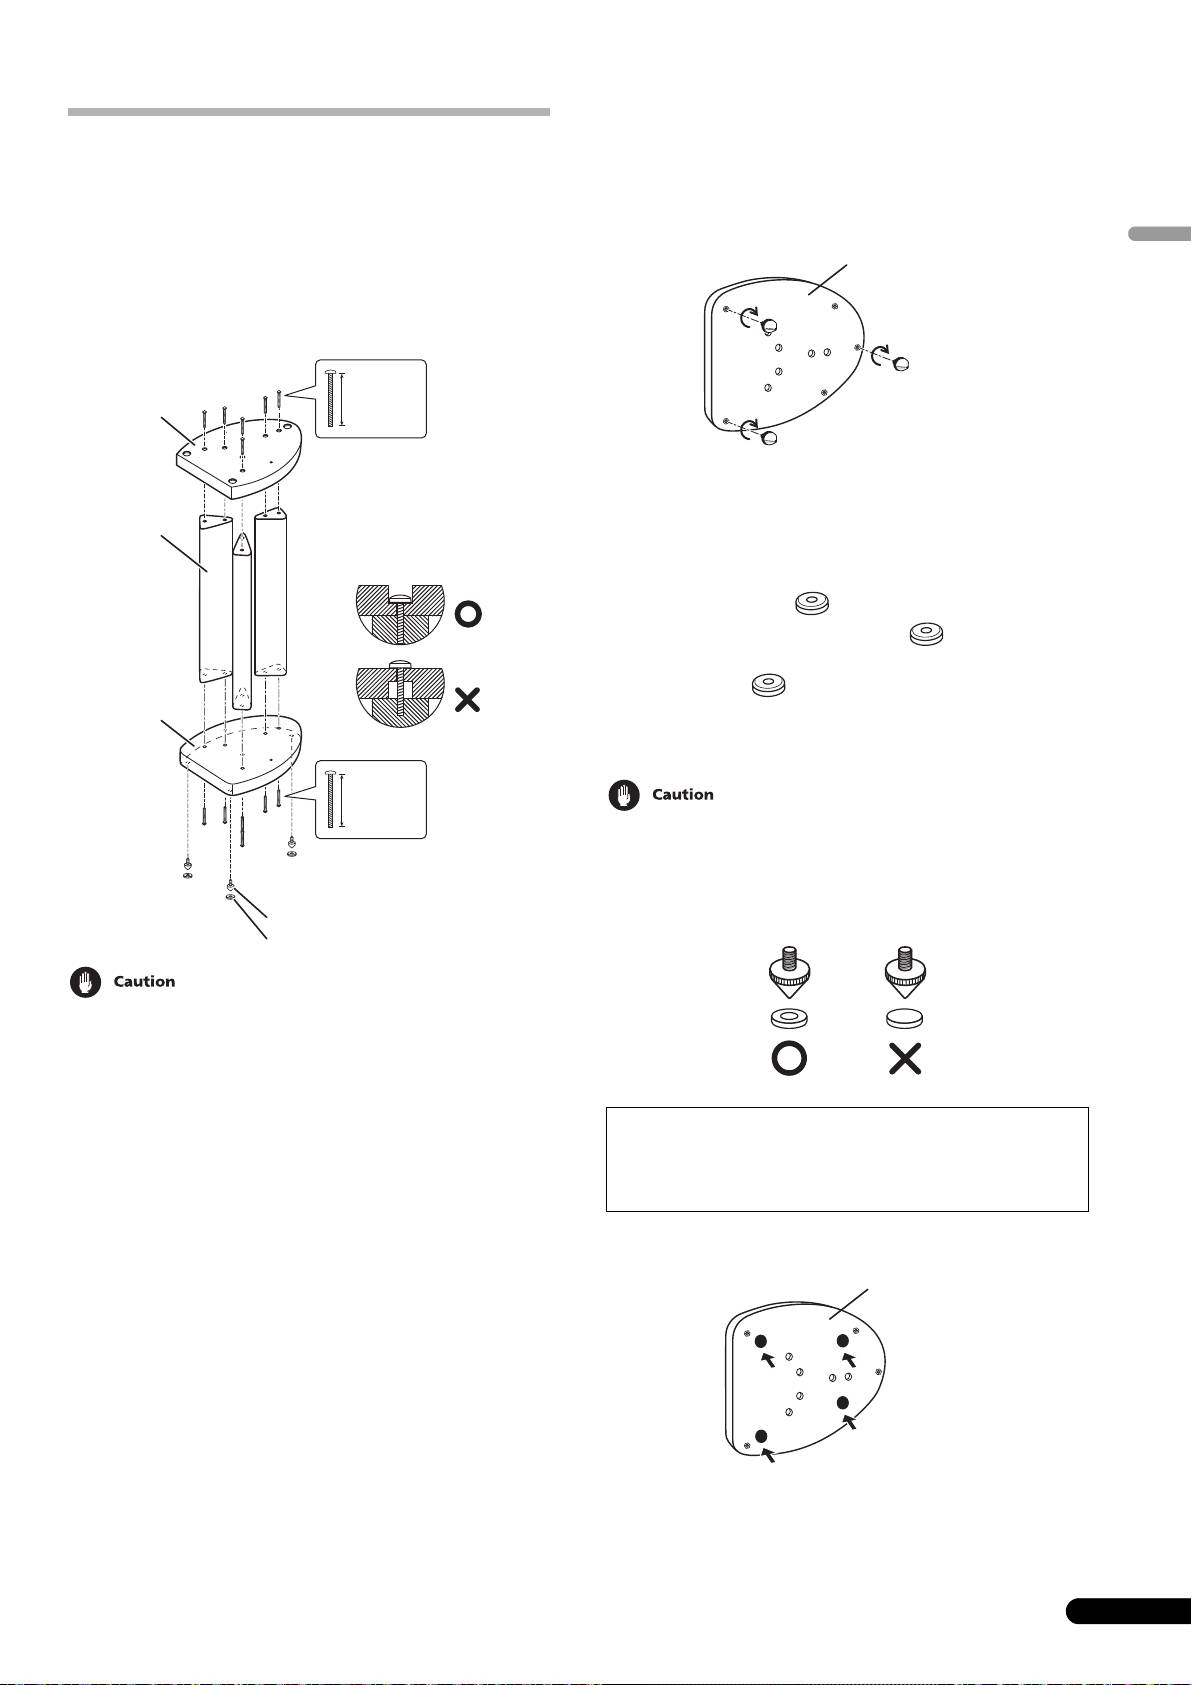
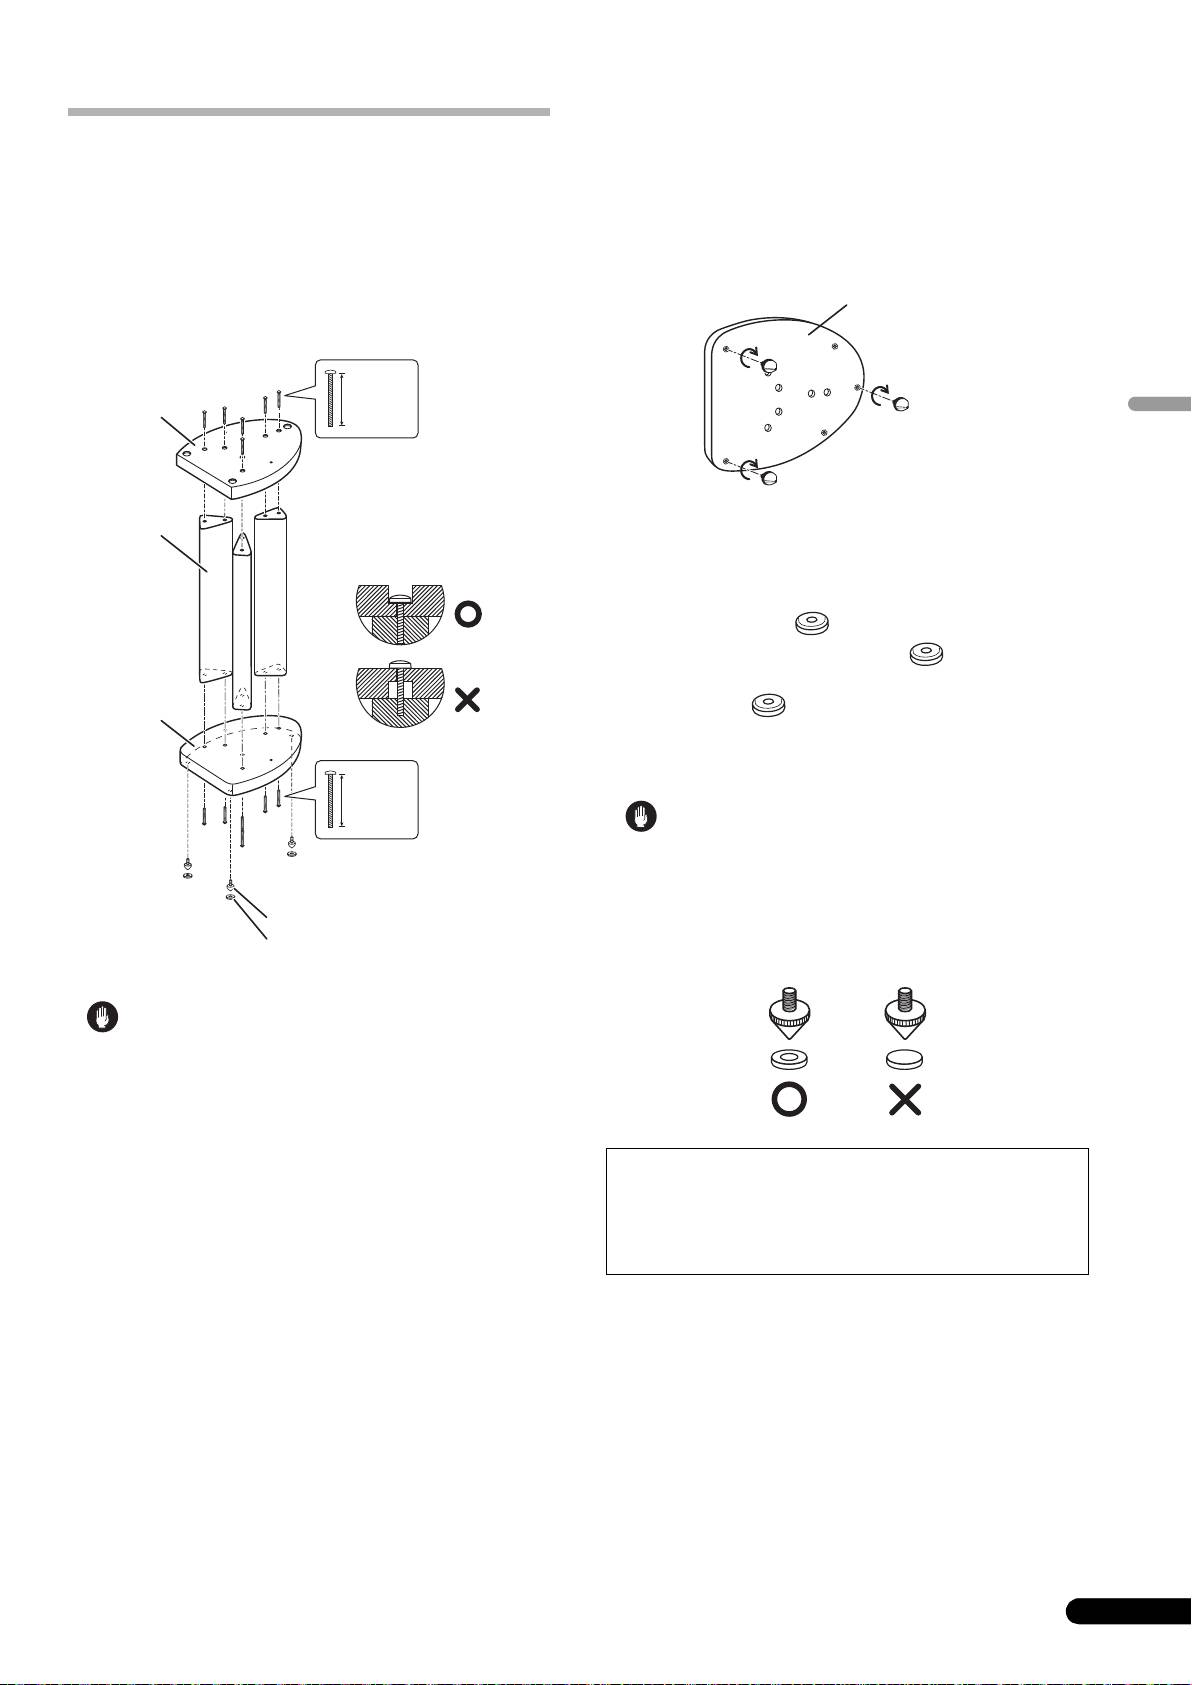
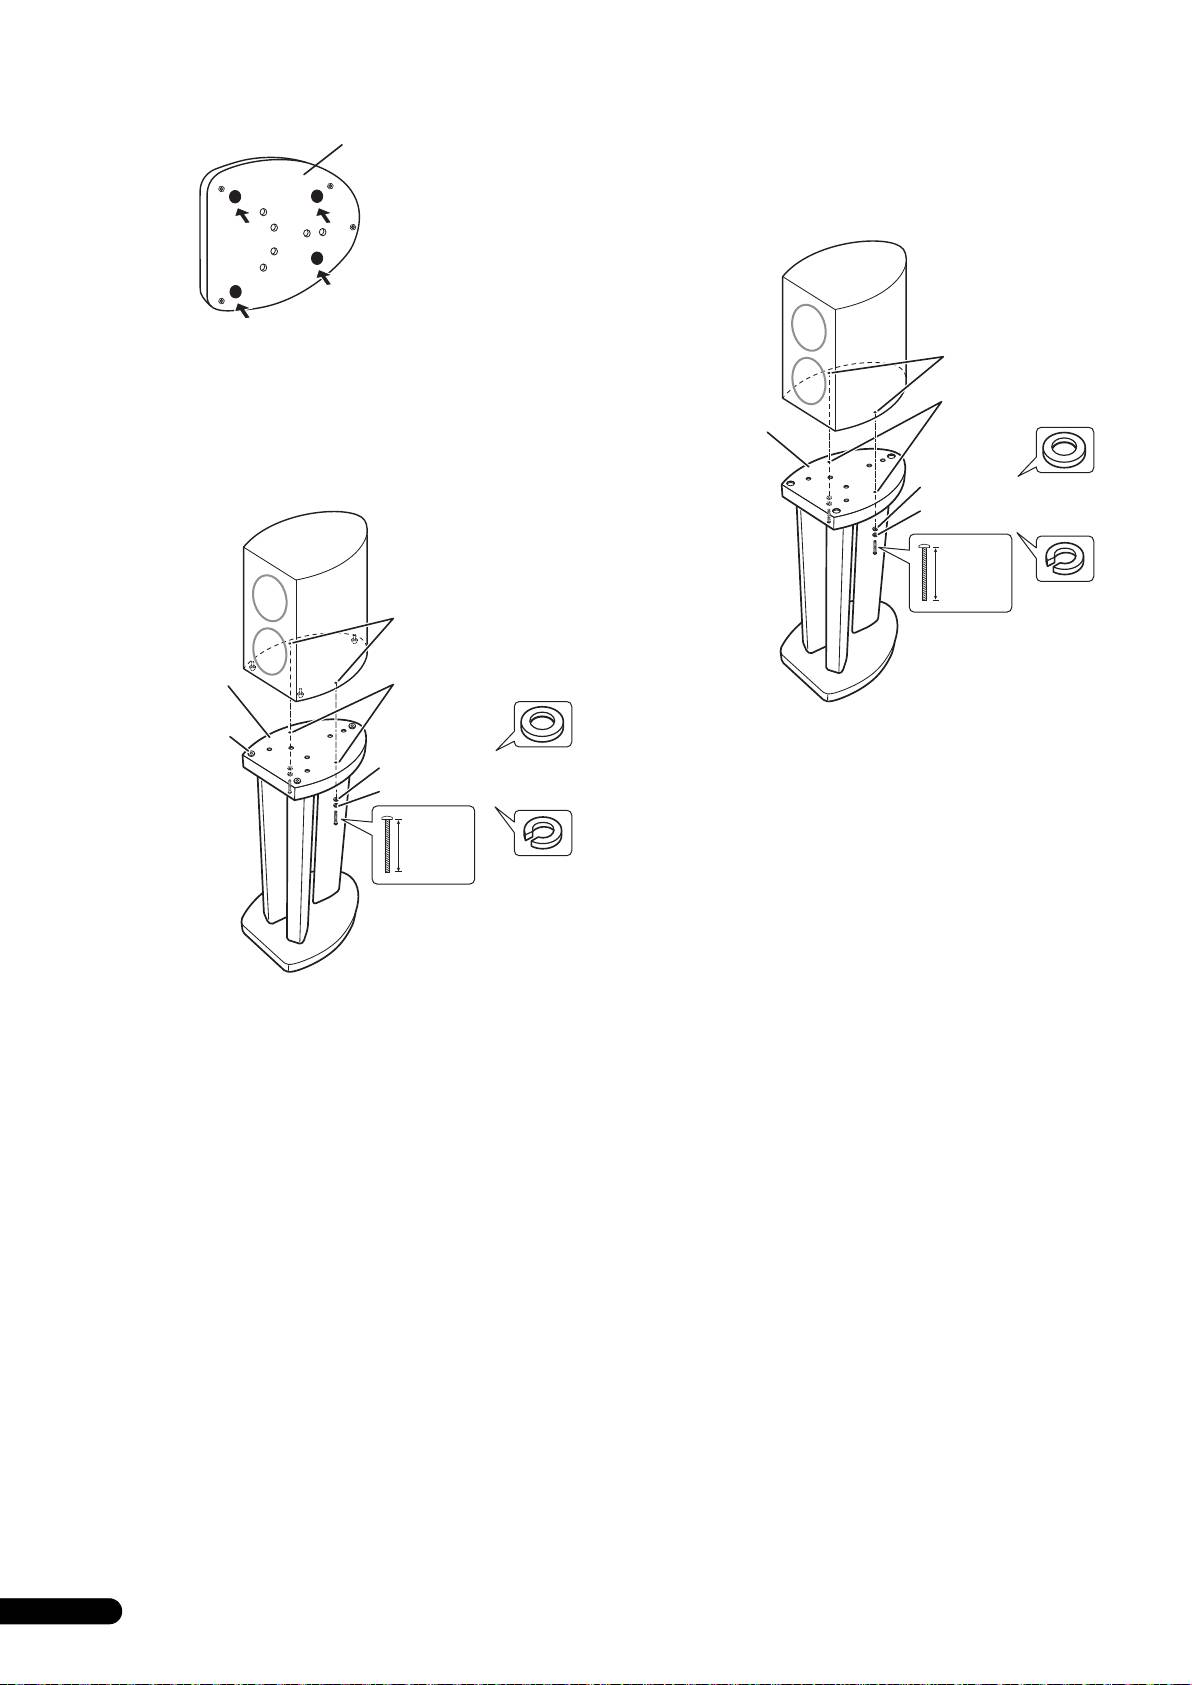
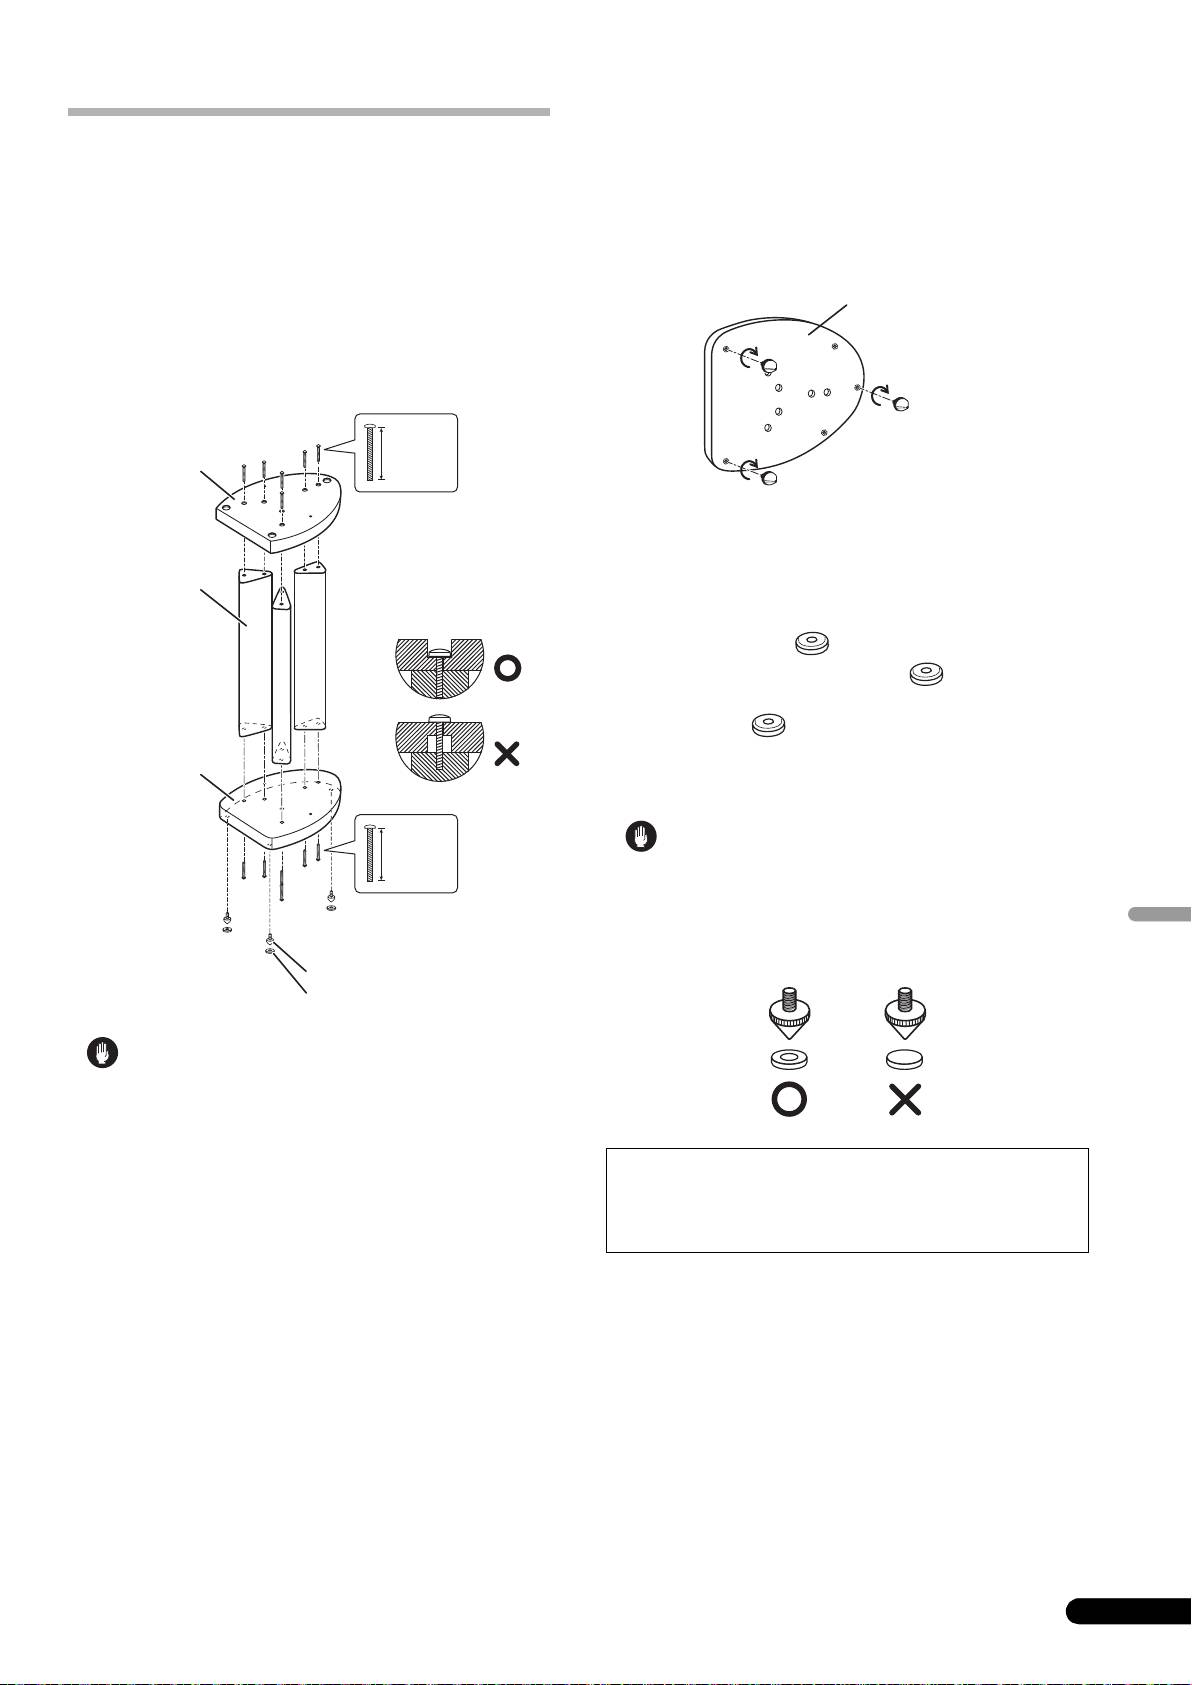
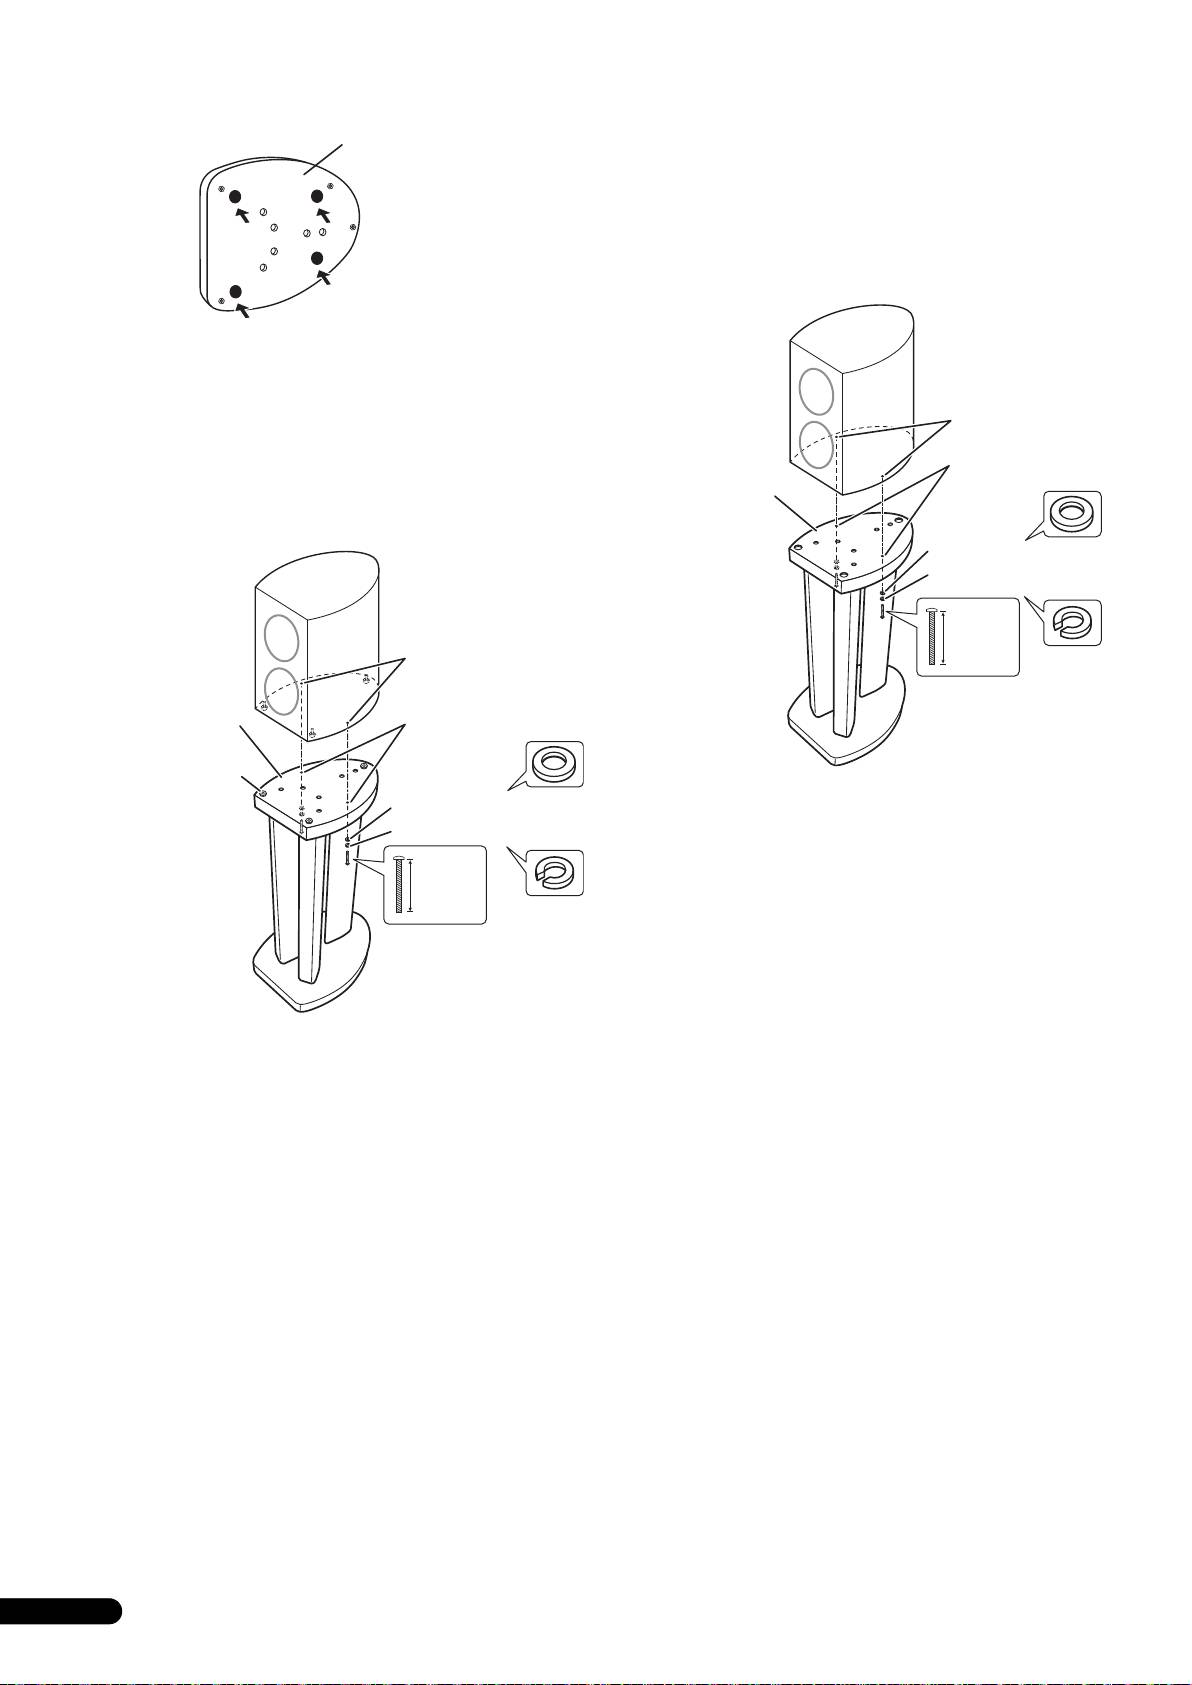
Assemble the speaker stands as illustrated below.
Align the screw holes on the stand base and speaker support
with the screw holes in the three stems, then insert the
screws and tighten.
1 Twist the spikes into the threaded metal inserts
embedded in the bottom of the stand base.
2 Set the spike bases in the positions where the points of
the three spikes will strike when the speaker stand is set
down.
3 Set the speaker stand on the spike bases and check to
confirm the speaker stand does not rock.
• Note that these spikes are sharp metal and can cause damage
to flooring. Make sure to lay down a cloth or suitable base
before setting up.
• Always use the spike bases as shown, with the indented
surface facing up to receive the spike point.
• Make sure you assemble the stand on a flat surface that is
relatively soft (such as a carpet).
• Make sure the screws are inserted in the screw holes as
shown above (with the screw head hidden) when securing the
speaker. Improper setup could result in damage or injury if the
speaker falls from the stand.
When using the non-skid pads
3
En
30 mm
3
(1
/16 in.)
Black
30 mm
3
(1
/16 in.)
Black
Speaker
support
Screws (Bind head, M6 x L30)
[SBA6089]
Stand
Please note that sunken
stems
screw holes are provided in
the speaker support.
Stand
base
Screws (Bind head, M6 x L30)
[SBA6089]
Spikes [SBA6080]
Spike bases [SBG6001]
If you do not use the spike bases when placing the
speakers, the spikes may cause damage to the floor. If
you plan on using the spikes we highly recommend to
use the spike bases.
Stand base
Stand base
FRRD-235-A_CP-81_En.book 3 ページ 2008年7月24日 木曜日 午後2時15分
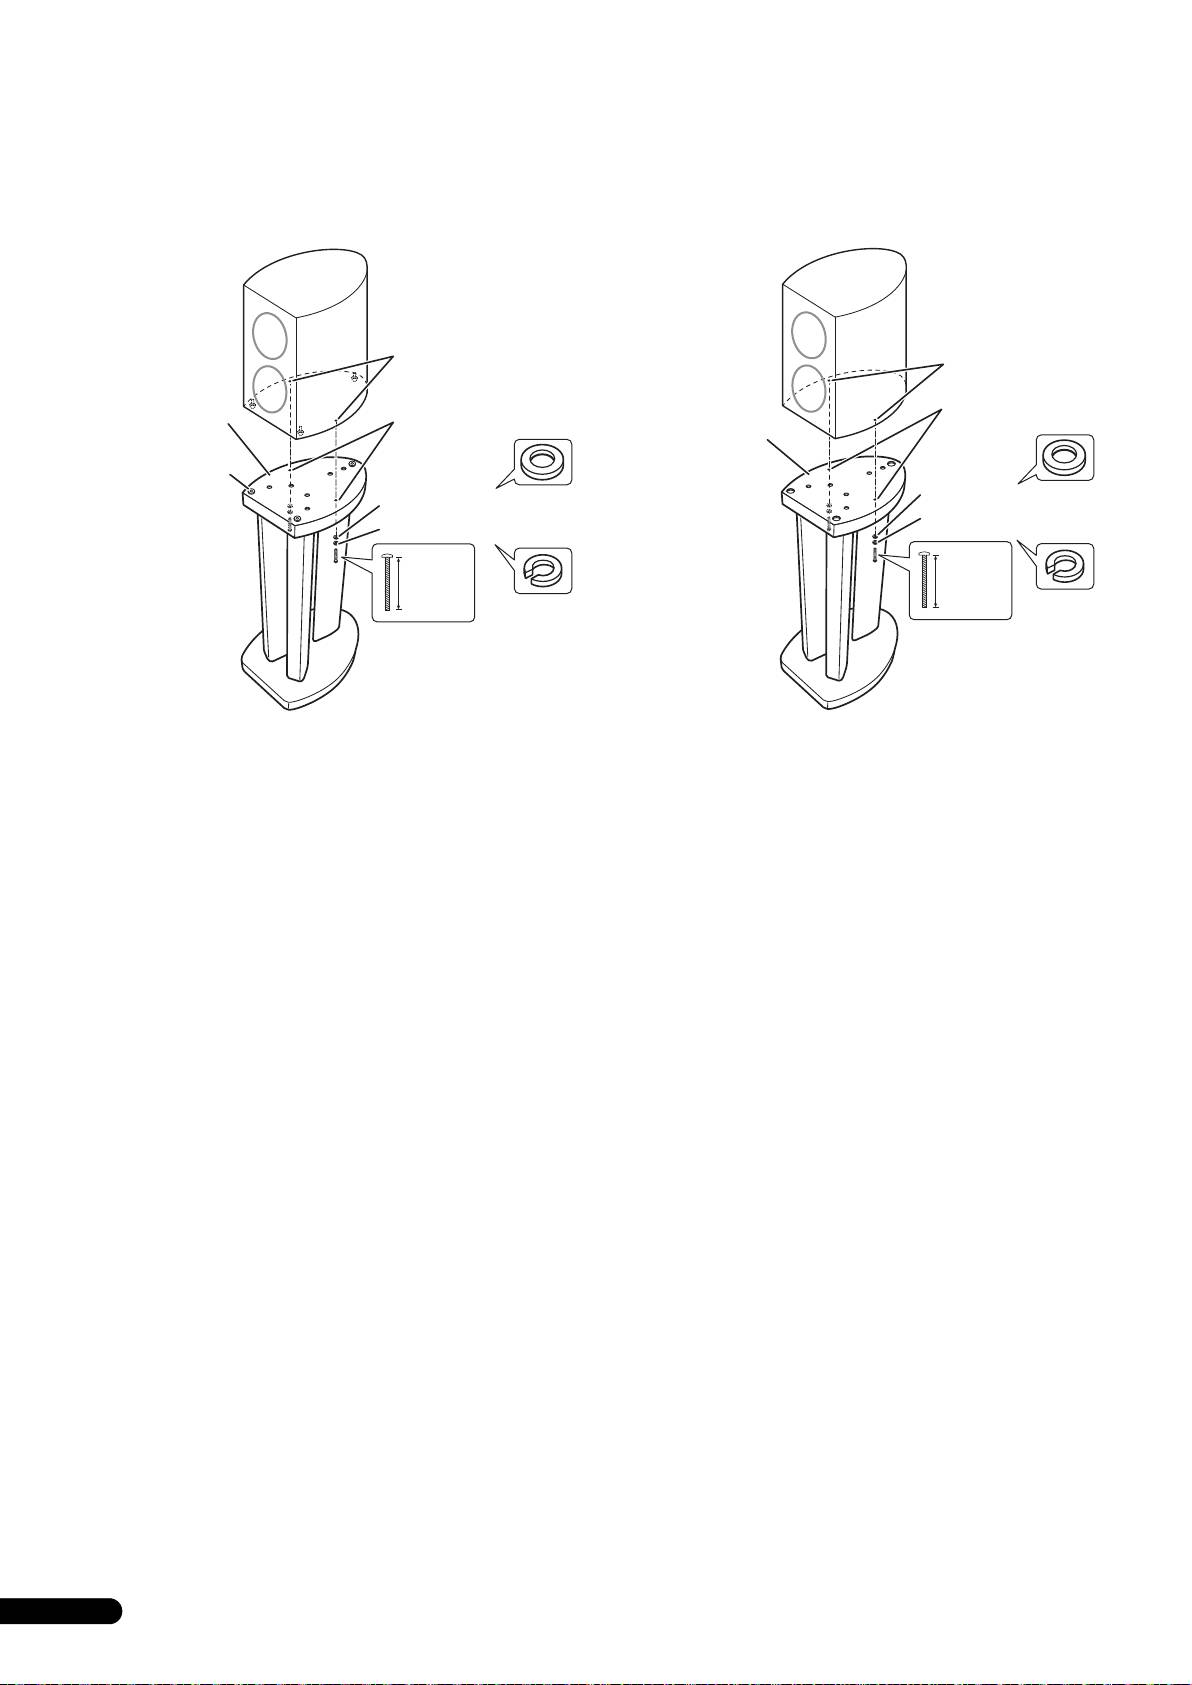
When using speaker spikes:
When not using speaker spikes:
To avoid accident or injury, please use screws to secure the
To avoid accident or injury, please use screws to secure the
speaker to the speaker stands. Note that there are fastening nuts
speaker to the speaker stands. Note that there are fastening nuts
provided on the speaker base (see below).
provided on the speaker base (see below).
Secure the speaker to the speaker support using the washer,
Secure the speaker to the speaker support using the washer,
spring washer and the 50 mm (2 in.) screws as shown below.
5
spring washer and the 40 mm (1
/
8
in.) screws as shown below.
50 mm
(2 in.)
Black
4
En
Fastening nut
Screw holes for
Speaker
securing speaker
support
Speaker
spike base
Washer [SBE1043]
Spring washer [SBE1042]
Screws (Bind head, M4 x L50)
[SBA6012]
40 mm
5
(1
/8 in.)
Black
Fastening nut
Screw holes for
securing speaker
Speaker
support
Washer [SBE1043]
Spring washer [SBE1042]
Screws (Bind head, M4 x L40)
[SBA6011]
FRRD-235-A_CP-81_En.book 4 ページ 2008年7月24日 木曜日 午後2時15分

FRRD-235-A_CP-81_En.book 5 ページ 2008年7月24日 木曜日 午後2時15分
Stand maintenance
Specifications
• Use a polishing cloth or dry cloth to wipe off dust and dirt.
External dimensions . . . . . . 310 (W) mm x 604 (H) mm x 404 (D) mm
1
13
15
• If the stand is very dirty, use a soft cloth dipped in some neutral
12
/4 (W) in. x 23
/16 (H) in. x 15
/16 (D) in.
cleanser diluted five or six times with water. Finally, wipe again
Weight . . . . . . . . . . . . . . . . . . . . . . . . . . . . . . . . . . . 6.5 kg /14 lbs. 6 oz.
using a dry cloth. Do not use furniture wax or cleaners.
English
• Never use thinners, benzine, insecticide sprays and other
Supplied accessories
chemicals on or near the stand, since these will corrode the
Stand base. . . . . . . . . . . . . . . . . . . . . . . . . . . . . . . . . . . . . . . . . . . . . . . . 2
surfaces.
Speaker support . . . . . . . . . . . . . . . . . . . . . . . . . . . . . . . . . . . . . . . . . . . 2
Stand stems . . . . . . . . . . . . . . . . . . . . . . . . . . . . . . . . . . . . . . . . . . . . . . 6
Spikes [SBA6080] . . . . . . . . . . . . . . . . . . . . . . . . . . . . . . . . . . . . . . . . . 6
Spike bases [SBG6001] . . . . . . . . . . . . . . . . . . . . . . . . . . . . . . . . . . . . . 6
Non-skid pads [FREC067] . . . . . . . . . . . . . . . . . . . . . . . . . . . . . . . . . . . 8
Screws (Bind head, M6 x L30) [SBA6089] . . . . . . . . . . . . . . . . . . . . . 24
Screws (Bind head, M4 x L40) [SBA6011] . . . . . . . . . . . . . . . . . . . . . . 4
Screws (Bind head, M4 x L50) [SBA6012] . . . . . . . . . . . . . . . . . . . . . . 4
Spring washers [SBE1042] . . . . . . . . . . . . . . . . . . . . . . . . . . . . . . . . . . 4
Washers [SBE1043] . . . . . . . . . . . . . . . . . . . . . . . . . . . . . . . . . . . . . . . . 4
Operating instructions [FRRD-235] . . . . . . . . . . . . . . . . . . . . . . . . . . . 1
• Specifications and design subject to possible modification
without notice, due to improvements.
• The product number are listed above in square brackets.
Replacement part numbers
Part name Part no.
• Protector (top) SHA6182
• Protector (middle) SHA6184
• Protector (bottom) SHA6183
• Protector (stand base) SHA6188
• Protector (speaker support) SHA6185
• Packing case (CP-81B-K only) SHG6402
• Packing case (CP-81B-MK only) SHG6403
• Polyethylene bag (stand base) SHL6092
• Polyethylene bag (speaker support) SHL6038
• Polyethylene bag (stand stems) SHL6093
• Protection sheet (stand base) SHC6087
• Protection sheet (speaker support) SHC6015
• Protection sheet (stand stems) SHC6088
Published by Pioneer Corporation.
Copyright © 2008 Pioneer Corporation.
All rights reserved.
5
En
Nous vous remercions d’avoir acheté ce produit Pioneer.
Veuillez lire attentivement ce mode d’emploi pour assembler et utiliser correctement le produit. Après avoir lu ces explications, conservez-
les en lieu sûr pour éventuellement les consulter plus tard.
Ce socle d’enceinte doit être utilisé uniquement avec les enceintes acoustiques suivantes de Pioneer : S-81B-LR-K, S-81B-LR-QL, ou
S-81B-LR-W.
Avant de commencer
Nomenclature des pièces
Avant d’installer ces enceintes acoustiques, nous vous
conseillons de lire attentivement le mode d’emploi qui les
accompagne.
Attention
• Utilisez uniquement les vis fournies pour fixer l’enceinte sur
son socle.
• Ne placez pas le socle sur une surface instable et/ou
glissante. Le socle et l’enceinte pourraient tomber et causer
des blessures.
• N’utilisez aucune enceinte autre que celles pour lesquelles ce
produit a été conçu. Le socle pourrait tomber et être
endommagé et/ou l’enceinte pourrait tomber et causer des
blessures.
• Lorsque vous déplacez l’enceinte et le socle, retirez d’abord
l’enceinte de son socle, puis déplacez le socle en le tenant par
ses montants.
• Posez le socle sur une surface stable et plate; il pourrait être
dangereux de le placer sur surface instable.
• Pioneer n’assume aucune responsabilité en cas de dégâts
causés par un assemblage et un montage inadéquats, un
renforcement insuffisant, une erreur d’utilisation, des
catastrophes naturelles, etc.
2
Fr
Trous de vis pour
fixation de
l’enceinte
Support d’enceinte
Montants du socle
Base du socle
02_CP-81_Fr.fm 2 ページ 2008年7月24日 木曜日 午後1時38分
A l’emploi des pointes de découplage
Ce socle d’enceinte fait appel à des pointes de découplage,
Fixation des enceintes sur les socles
permettant d’isoler l’enceinte par rapport au plancher. L’emploi
Un tournevis à pointe cruciforme de moyenne dimension est
des pointes de découplage est conseillé si le socle est posé sur un
nécessaire pour assembler le socleet y fixer l’enceinte.
tapis épais (par souci de stabilité) ou pour améliorer le son s’il est
posé sur une surface dure et répercutante (telle qu’un plancher en
Assemblage des socles d’enceinte
bois ou en béton). Utilisez les bases des pointes de découplage
Assemblez les socles d’enceinte comme illustré ci-dessous.
pour éviter de griffer le plancher ou la surface sur laquelle le socle
est placé.
Alignez les fentes de vis sur la base du socle et sur le support
d’enceinte avec les trous de vis prévus dans les trois
montants, puis insérez les vis et serrez-les.
30 mm
Noir
Français
1 Insérez les pointes dans les encastrements métalliques
filetés, prévus sur le fond du socle.
2 Fixez les bases des trois pointes aux positions ou elles
feront contact lorsque le socle d’enceinte sera posé à plat.
3 Posez le socle d’enceinte sur les bases des pointes de
découplage et assurez-vous que le socle est stable.
30 mm
Noir
• Sachez que les pointes de découplage sont fabriquées en
métal et qu’elles peuvent donc abîmer le plancher. Prenez
soin d’étendre un linge ou une base appropriée avant
d’effectuer l’assemblage.
• Utilisez toujours les bases de pointe de découplage comme
illustré, de sorte que le creux puisse recevoir la pointe.
• Veillez à assembler le socle sur une surface plate et
relativement douce, comme un tapis.
• Veillez à insérer les vis dans les trous comme illustré ci-dessus
(la tête de vis étant encastrée) lors de la fixation de l’enceinte.
Une installation inadéquate pourrait entraîner des dégâts ou
des blessures si l’enceinte devait tomber de son socle.
3
Fr
Support
d’enceinte
Vis (tête intégrée, M6 x L30)
[SBA6089]
Montants
Notez que des trous de vis
du socle
évidés sont prévus dans le
support d’enceinte.
Base du
socle
Vis (tête intégrée, M6 x L30)
[SBA6089]
Pointes de découplage [SBA6080]
Bases de pointe de découplage
[SBG6001]
Attention
Si vous n’utilisez pas de bases pour pointes de
découplage à l’installation des enceintes, les pointes
risquent d’âbimer le plancher. Si vous prévoyez
d’employer les pointes de découplage, nous
conseillons vivement d’utiliser leurs bases.
Base du socle
02_CP-81_Fr.fm 3 ページ 2008年7月24日 木曜日 午後1時38分
Attention
A l’emploi des coussinets antidérapants
Sans emploi des pointes de découplage des
enceintes :
Pour éviter tout accident ou blessure, utilisez des vis pour
immobiliser les enceintes sur les socles. Notez que des écrous de
fixation sont prévus sur la base de l’enceinte (voir ci-dessous).
Fixez l’enceinte sur le socle en utilisant la rondelle, la rondelle à
ressort et les vis de 40 mm comme illustré ci-dessous.
A l’emploi des pointes de découplage des enceintes :
Pour éviter tout accident ou blessure, utilisez des vis pour
immobiliser les enceintes sur les socles. Notez que des écrous de
fixation sont prévus sur la base de l’enceinte (voir ci-dessous).
Fixez l’enceinte sur le socle en utilisant la rondelle, la rondelle à
ressort et les vis de 50 mm comme illustré ci-dessous.
4
Fr
Base du socle
50 mm
Noir
Ecrou de fixation
Trous de vis pour
Support
fixation de l’enceinte
d’enceinte
Base de vis de
découplage
Rondelle [SBE1043]
d’enceinte
Rondelle à ressort [SBE1042]
Vis (tête intégrée, M4 x L50)
[SBA6012]
40 mm
Noir
Ecrou de fixation
Trous de vis pour
fixation de l’enceinte
Support
d’enceinte
Rondelle [SBE1043]
Rondelle à ressort [SBE1042]
Vis (tête intégrée, M4 x L40)
[SBA6011]
02_CP-81_Fr.fm 4 ページ 2008年7月24日 木曜日 午後1時38分

02_CP-81_Fr.fm 5 ページ 2008年7月24日 木曜日 午後1時38分
Entretien du socle
Fiche technique
• Utilisez un chffon à lustrer ou un linge sec pour enlever la
Dimensions extérieures . . . . . 310 (L) mm x 604 (H) mm x 404 (P) mm
poussière et la saleté.
Poids . . . . . . . . . . . . . . . . . . . . . . . . . . . . . . . . . . . . . . . . . . . . . . . . 6,5 kg
• Si le socle est très souillé, utilisez un linge doux trempé dans un
produit de nettoyage neutre, dilué dans cinq à six fois son volume
Accessoires fournis
d’eau. En dernier lieu, essuyez avec un linge sec. N’utilisez pas de
cire ou de détergent pour mobilier.
Base du socle . . . . . . . . . . . . . . . . . . . . . . . . . . . . . . . . . . . . . . . . . . . . . 2
Support d’enceinte . . . . . . . . . . . . . . . . . . . . . . . . . . . . . . . . . . . . . . . . . 2
• N’employez jamais de diluant, benzine, insecticide en
Montants du socle . . . . . . . . . . . . . . . . . . . . . . . . . . . . . . . . . . . . . . . . . 6
atomiseur ou autre produit chimique sur ou à proximité du
Pointes de découplage [SBA6080] . . . . . . . . . . . . . . . . . . . . . . . . . . . . 6
socle, car cela endommagerait ses surfaces.
Bases de pointe de découplage [SBG6001] . . . . . . . . . . . . . . . . . . . . 6
Coussinets antidérapants [FREC067] . . . . . . . . . . . . . . . . . . . . . . . . . . 8
Vis (tête intégrée, M6 x L30) [SBA6089] . . . . . . . . . . . . . . . . . . . . . . . 24
Vis (tête intégrée, M4 x L40) [SBA6011] . . . . . . . . . . . . . . . . . . . . . . . . 4
Vis (tête intégrée, M4 x L50) [SBA6012] . . . . . . . . . . . . . . . . . . . . . . . . 4
Français
Rondelles à ressort [SBE1042] . . . . . . . . . . . . . . . . . . . . . . . . . . . . . . . 4
Rondelles [SBE1043] . . . . . . . . . . . . . . . . . . . . . . . . . . . . . . . . . . . . . . . 4
Mode d’emploi [FRRD-235] . . . . . . . . . . . . . . . . . . . . . . . . . . . . . . . . . . 1
Remarque
• Spécifications et design sous réserve de modifications sans
préavis en raison d’améliorations éventuelles.
• Les numéros de produits sont indiqués ci-dessus entre
crochets.
Numéros de pièce de rechange
Nom de pièce No. de pièce
• Protecteur (Dessus) SHA6182
• Protecteur (Milieu) SHA6184
• Protecteur (Fond) SHA6183
• Protecteur (Base du socle) SHA6188
• Protecteur (Support d’enceinte) SHA6185
• Etui d’emballage
SHG6402
(CP-81B-K seulement)
• Etui d’emballage
SHG6403
(CP-81B-MK seulement)
• Sachet en polyéthylène (Base du socle) SHL6092
• Sachet en polyéthylène
SHL6038
(Support d’enceinte)
• Sachet en polyéthylène
SHL6093
(Montants du socle)
• Enveloppe de protection
SHC6087
(Base du socle)
• Enveloppe de protection
SHC6015
(Support d’enceinte)
• Enveloppe de protection
SHC6088
(Montants du socle)
Publication de Pioneer Corporation.
© 2008 Pioneer Corporation.
Tous droits de reproduction et de traduction réservés.
5
Fr
Wir danken Ihnen dafür, dass Sie sich für dieses Produkt von Pioneer entschieden haben.
Bitte lesen Sie diese Montageanleitung vor dem Gebrauch aufmerksam durch, damit ein fehlerfreier Zusammenbau und Betrieb
gewährleistet ist. Bitte bewahren Sie diese Anleitung anschließend für spätere Bezugnahme griffbereit auf.
Dieser Lautsprecherständer kann ausschließlich mit den folgenden Lautsprechersystemen von Pioneer verwendet werden: S-81B-LR-K,
S-81B-LR-QL und S-81B-LR-W.
Vor der Inbetriebnahme
Bezeichnung der Teile
Bitte lesen Sie vor der Aufstellung Ihres Lautsprechersystems
dessen Bedienungsanleitung vollständig durch.
Vorsichtshinweise
• Verwenden Sie ausschließlich die mitgelieferten Schrauben
zur Befestigung des Lautsprechers am Lautsprecherständer.
• Stellen Sie den Ständer auf keinen Fall auf einer unstabilen
und/oder schrägen Unterlage auf. Anderenfalls besteht die
Gefahr, dass Ständer und Lautsprecher umkippen und
Verletzungen verursachen.
• Verwenden Sie diesen Ständer auf keinen Fall mit einem
anderen Lautsprechersystem als dem für diesen Ständer
bestimmten Modell. Anderenfalls besteht die Gefahr, dass der
Ständer zusammenbricht und beschädigt wird und/oder der
Lautsprecher herunterfällt und Verletzungen verursacht.
• Wenn der Aufstellungsort des am Ständer montierten
Lautsprechers verändert werden soll, entfernen Sie diesen
zunächst vom Ständer, und tragen Sie den Ständer dann,
indem Sie ihn an den Pfeilern halten.
• Stellen Sie den Ständer auf einer stabilen, ebenen Unterlage
auf; die Aufstellung auf einer unstabilen Unterlage ist
potentiell gefährlich.
• Pioneer lehnt jegliche Haftung für Schäden ab, die durch
Fehler bei Zusammenbau oder Aufstellung, eine
unzureichende Verstärkung, zweckentfremdeten Gebrauch
oder höhere Gewalt entstehen.
2
Ge
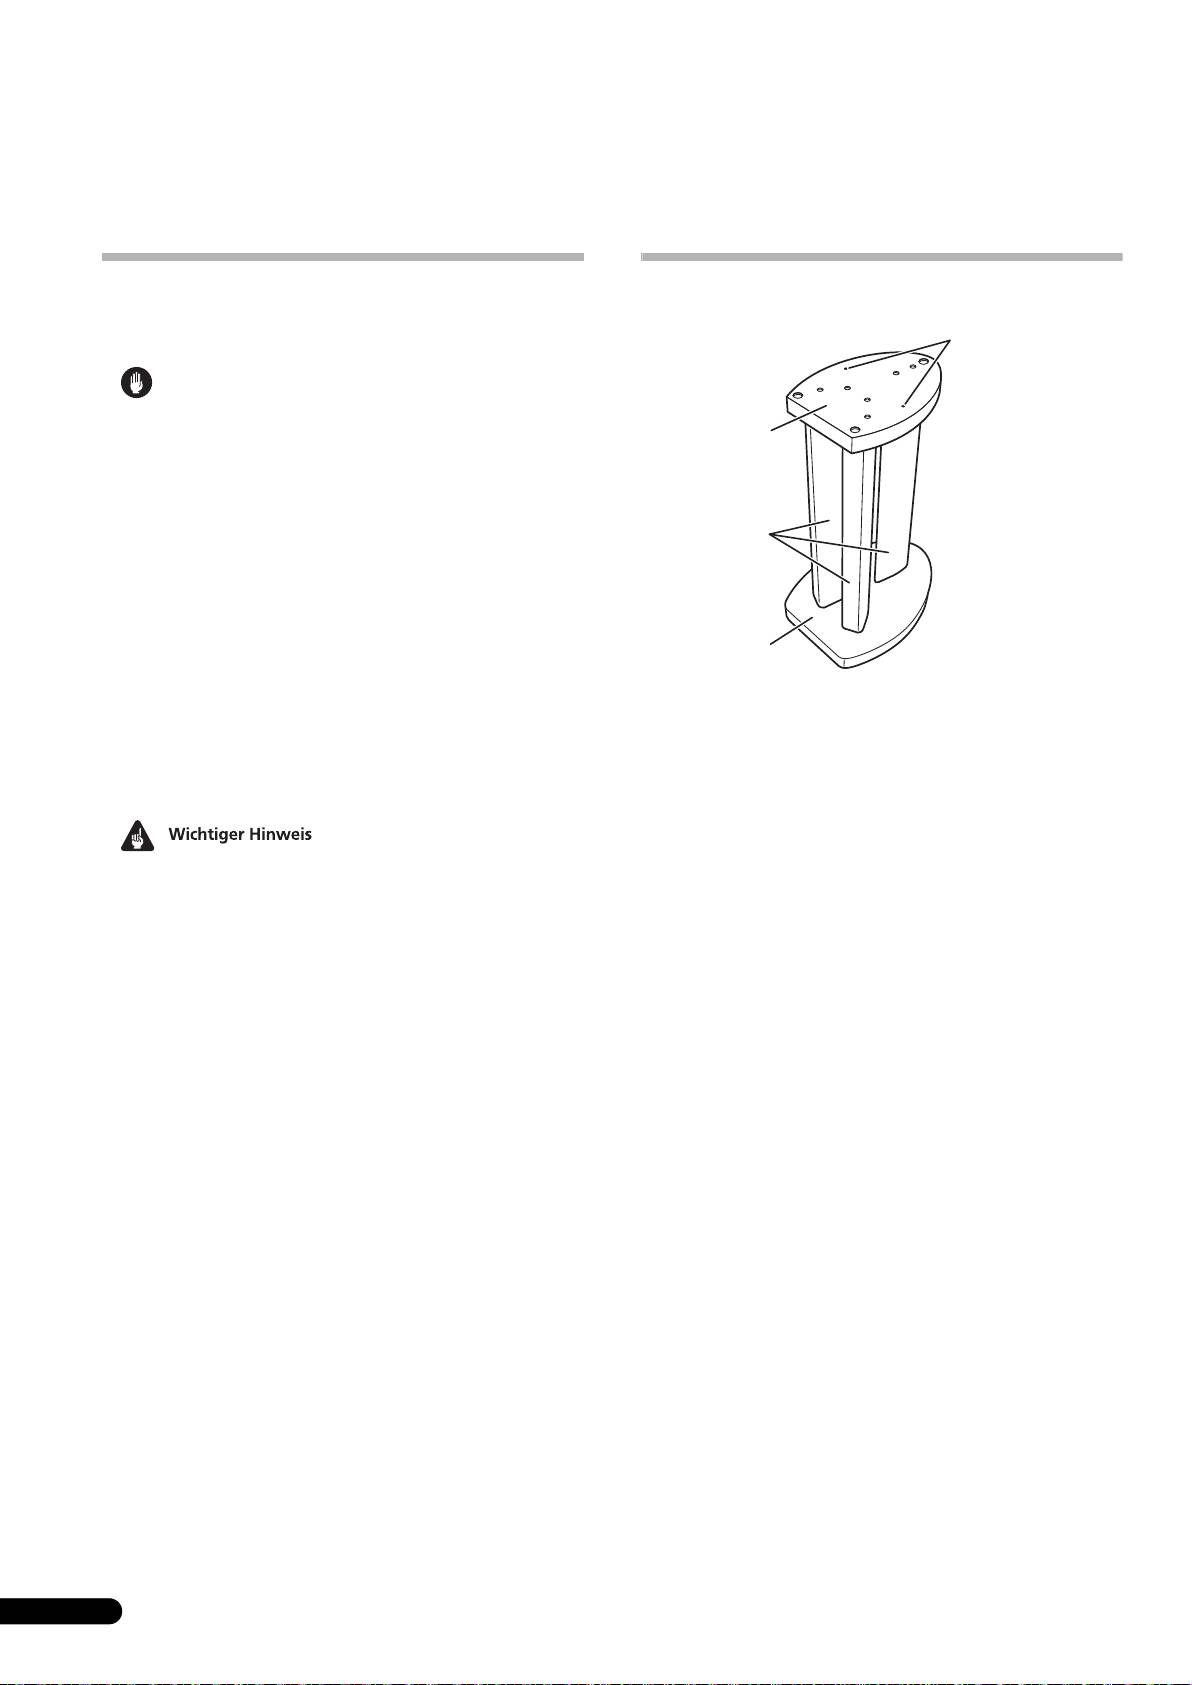
Schraubenlöcher für
Lautsprechermontage
Lautsprecher-
Trägerplatte
Ständerpfeiler
Ständer-
Bodenplatte
03_CP-81_Ge.fm 2 ページ 2008年7月24日 木曜日 午後1時39分
Verwendung der Stabilisatoren
Die Stabilisatoren im Lieferumfang dieses Lautsprecherständers
Montage der Lautsprecher an den
ermöglichen es, den Lautsprecher vom Boden zu isolieren. Der
Ständern
Gebrauch der Stabilisatoren empfiehlt sich bei Aufstellung des
Ständers auf einem dicken Teppich, um die Stabilität zu erhöhen,
Ein Kreuzschlitzschraubendreher mittlerer Größe wird für den
oder um die Klangqualität zu verbessern, wenn der Ständer auf
Zusammenbau des Lautsprecherständers und zur Befestigung
einer harten, halligen Oberfläche (z. B. auf einem Beton- oder
des Lautsprechers benötigt.
Holzboden) aufgestellt wird. Verwenden Sie die mitgelieferten
Untersetzer für die Stabilisatoren, um ein Zerkratzen des Bodens
Zusammenbau der Lautsprecherständer
bzw. der Unterlage am Aufstellungsort zu verhindern.
Bauen Sie die Lautsprecherständer wie nachstehend gezeigt
zusammen.
Bringen Sie die Schraubenlöcher in der Ständer-Bodenplatte
und der Lautsprecher-Trägerplatte mit den
Schraubenlöchern in den drei Pfeilern zur Deckung, setzen
Sie die Schrauben in die Löcher ein, und ziehen Sie sie fest an.
30 mm
Schwarz
1 Drehen Sie die Stabilisatoren in die mit einem Gewinde
versehenen Metalleinsätze in der Unterseite der Ständer-
Bodenplatte ein.
Deutsch
2 Platzieren Sie die Untersetzer für die Stabilisatoren an
den Positionen, an denen sich die Spitzen der drei
Stabilisatoren befinden werden, wenn der
Lautsprecherständer aufgestellt wird.
3 Stellen Sie den Lautsprecherständer auf die Untersetzer
der Stabilisatoren, und vergewissern Sie sich, dass er nicht
wackelt.
30 mm
Schwarz
• Bitte beachten Sie, dass die scharfen Metallspitzen dieser
Stabilisatoren den Fußboden beschädigen können. Es
empfiehlt sich daher, vor der Montage der Stabilisatoren eine
Decke auf den Boden zu legen oder eine andere geeignete
Unterlage zu verwenden.
• Platzieren Sie die Untersetzer wie in der nachstehenden
Abbildung gezeigt so, dass die Seite mit der Vertiefung nach
oben weist und die Spitze des Stabilisators aufnimmt.
• Bauen Sie den Ständer auf einer ebenen, relativ weichen
Unterlage (z. B. einem Teppich) zusammen.
• Achten Sie bei der Befestigung des Lautsprechers unbedingt
darauf, die Schrauben wie in der obigen Abbildung gezeigt (d.
h. mit versenktem Schraubenkopf) in die Schraubenlöcher
einzusetzen. Bei unsachgemäßer Montage besteht die Gefahr,
dass der Lautsprecher vom Ständer herunterfällt und
Verletzungen oder Sachschäden verursacht.
3
Ge
Lautsprecher-
Trägerplatte
Schrauben
(Flachkopf, M6 x L30)
[SBA6089]
Zur Beachtung: Die
Ständerpfeiler
Schraubenlöcher in der
Lautsprecher-Trägerplatte sind
versenkt.
Ständer-
Bodenplatte
Schrauben
(Flachkopf, M6 x L30)
[SBA6089]
Stabilisatoren [SBA6080]
Untersetzer für Stabilisatoren
[SBG6001]
Vorsichtshinweise
Wenn die Untersetzer nicht verwendet werden, können
die Spitzen der Stabilisatoren den Fußboden bzw. die
Unterlage am Aufstellungsort zerkratzen. Der
Gebrauch der Untersetzer in Verbindung mit den
Stabilisatoren wird daher empfohlen.
Ständer-Bodenplatte
03_CP-81_Ge.fm 3 ページ 2008年7月24日 木曜日 午後1時39分
Vorsichtshinweise
Verwendung der rutschfesten Kissen
Bei Nichtverwendung der Lautsprecher-
Stabilisatoren:
Bitte verwenden Sie zur Vermeidung von Unfällen und
Verletzungen unbedingt Schrauben zur Befestigung der
Lautsprecher an den Lautsprecherständern. Bitte beachten Sie,
dass Befestigungsmuttern an der Lautsprecher-Bodenplatte
vorgesehen sind (siehe nachstehende Abbildung).
Verwenden Sie die Unterlegscheiben, die Federscheiben und die
40-mm-Schrauben wie in der nachstehenden Abbildung gezeigt,
um den Lautsprecher an der Lautsprecher-Trägerplatte zu
befestigen.
Bei Verwendung der Lautsprecher-Stabilisatoren:
Bitte verwenden Sie zur Vermeidung von Unfällen und
Verletzungen unbedingt Schrauben zur Befestigung der
Lautsprecher an den Lautsprecherständern. Bitte beachten Sie,
dass Befestigungsmuttern an der Lautsprecher-Bodenplatte
vorgesehen sind (siehe nachstehende Abbildung).
Verwenden Sie die Unterlegscheiben, die Federscheiben und die
50-mm-Schrauben wie in der nachstehenden Abbildung gezeigt,
um den Lautsprecher an der Lautsprecher-Trägerplatte zu
befestigen.
4
Ge
Ständer-Bodenplatte
50 mm
Schwarz
Befestigungsmutter
Schraubenlöcher für
Lautsprecher-
Lautsprechermontage
Trägerplatte
Lautsprecher
Stabilisatorunte
Unterlegscheibe [SBE1043]
rsetzer
Federscheibe [SBE1042]
Schrauben
(Flachkopf, M4 x L50)
[SBA6012]
40 mm
Schwarz
Befestigungsmutter
Schraubenlöcher für
Lautsprechermontage
Lautsprecher-
Trägerplatte
Unterlegscheibe [SBE1043]
Federscheibe [SBE1042]
Schrauben
(Flachkopf, M4 x L40)
[SBA6011]
03_CP-81_Ge.fm 4 ページ 2008年7月24日 木曜日 午後1時39分
03_CP-81_Ge.fm 5 ページ 2008年7月24日 木曜日 午後1時39分
Reinigen des Ständers
Technische Daten
• Verwenden Sie ein Poliertuch oder ein trockenes Tuch, um Staub
Außenabmessungen . . . . . . 310 (B) mm x 604 (H) mm x 404 (T) mm
und Schmutzflecken abzuwischen.
Masse. . . . . . . . . . . . . . . . . . . . . . . . . . . . . . . . . . . . . . . . . . . . . . . . 6,5 kg
• Bei starker Verschmutzung des Ständers tauchen Sie ein weiches
Tuch in eine Lösung aus 5–6 Teilen eines neutralen
Mitgeliefertes Zubehör
Haushaltsreinigers und 1 Teil Wasser, wringen Sie es gründlich
aus, und wischen Sie die Schmutzflecken damit ab. Reiben Sie
Ständer-Bodenplatte . . . . . . . . . . . . . . . . . . . . . . . . . . . . . . . . . . . . . . . 2
anschließend mit einem trockenen Tuch nach. Benutzen Sie dazu
Lautsprecher-Trägerplatte . . . . . . . . . . . . . . . . . . . . . . . . . . . . . . . . . . . 2
keine Möbelpolituren oder -reinigungsmittel.
Ständerpfeiler . . . . . . . . . . . . . . . . . . . . . . . . . . . . . . . . . . . . . . . . . . . . . 6
• Verwenden Sie auf keinen Fall Farbverdünner, Leichtbenzin,
Stabilisatoren [SBA6080]. . . . . . . . . . . . . . . . . . . . . . . . . . . . . . . . . . . . 6
Insektizide und andere Chemikalien auf oder in der Nähe des
Untersetzer für Stabilisatoren [SBG6001]. . . . . . . . . . . . . . . . . . . . . . . 6
Rutschfeste Kissen [FREC067] . . . . . . . . . . . . . . . . . . . . . . . . . . . . . . . 8
Ständers, da derartige Mittel das Oberflächenfinish anlösen.
Schrauben (Flachkopf, M6 x L30) [SBA6089]. . . . . . . . . . . . . . . . . . . 24
Schrauben (Flachkopf, M4 x L40) [SBA6011]. . . . . . . . . . . . . . . . . . . . 4
Schrauben (Flachkopf, M4 x L50) [SBA6012]. . . . . . . . . . . . . . . . . . . . 4
Federscheiben [SBE1042] . . . . . . . . . . . . . . . . . . . . . . . . . . . . . . . . . . . 4
Unterlegscheiben [SBE1043]. . . . . . . . . . . . . . . . . . . . . . . . . . . . . . . . . 4
Bedienungsanleitung [FRRD-235] . . . . . . . . . . . . . . . . . . . . . . . . . . . . 1
Hinweis
• Änderungen der technischen Daten und äußeren
Aufmachung bleiben im Sinne der ständigen
Produktverbesserung jederzeit vorbehalten.
Deutsch
• Die Teilenummern sind oben jeweils in eckige Klammern
gesetzt.
Ersatzteilnummern
Teilebezeichnung Teile-Nr.
• Transportschutzstück (oben) SHA6182
• Transportschutzstück (Mitte) SHA6184
• Transportschutzstück (unten) SHA6183
• Transportschutzstück
SHA6188
(
Ständer-Bodenplatte)
• Transportschutzstück
SHA6185
(Lautsprecher-Trägerplatte)
• Verpackungskarton (Nur Modell CP-81B-K) SHG6402
•Verpackungskarton
SHG6403
(Nur Modell CP-81B-MK)
• Polyethylen-Beutel (Ständer-Bodenplatte) SHL6092
• Polyethylen-Beutel
SHL6038
(Lautsprecher-Trägerplatte)
• Polyethylen-Beutel (Ständerpfeiler) SHL6093
• Schutzfolie (Ständer-Bodenplatte) SHC6087
• Schutzfolie (Lautsprecher-Trägerplatte) SHC6015
• Schutzfolie (Ständerpfeiler) SHC6088
Veröffentlicht von Pioneer Corporation.
Urheberrechtlich geschützt © 2008 Pioneer Corporation.
Alle Rechte vorbehalten.
5
Ge

Vi ringraziamo per avere acquistato questo prodotto Pioneer.
Prima dell'installazione e dell'uso, leggere sempre queste istruzioni per l'uso. Finito di leggerle, conservarle in un luogo sicuro per poterle
riutilizzare in futuro.
Questa base per diffusori può venire usata solo con i seguenti diffusori Pioneer: S-81B-LR-K, S-81B-LR-QL o S-81B-LR-W.
Prima di cominciare
Nome delle varie parti
Prima di installare i diffusori, raccomandiamo di leggere bene le
istruzioni per l'uso del proprio sistema.
Attenzione
• Per fissare un diffusore alla sua base, usare solo le viti in
dotazione allo scopo.
• Non posare la base su di una superficie poco stabile e/o in
pendenza. La base ed il diffusore potrebbero cadere e causare
incidenti.
• Non usare alcun diffusore che non sia espressamente
costruito per questa unità. La base potrebbe cedere e
danneggiarsi e/o il diffusore potrebbe cadere, causando
incidenti.
• Se si spostano il diffusore e la base, per prima cosa togliere il
diffusore dalla base e poi spostare questa tenendola per i
gambi.
• Posare la base su di una superficie stabile ed in piano;
posandola su superfici poco stabili si rischiano incidenti.
Importante
• Pioneer non si assume alcuna responsabilità per danni
risultanti da una scorretta messa in posa, un insufficiente
rinforzo, un uso scorretto del prodotto, catastrofi naturali, ecc.
2
It
Fori delle viti di
fissaggio del
diffusore
Sostegno del
diffusore
Gambi della base
Basamento della
base
04_CP-81_It.fm 2 ページ 2008年7月24日 木曜日 午後1時40分
Se si usano le punte
Questa base per diffusori include punte utilizzabili per isolare il
Applicazione di diffusori alle basi
diffusore dal pavimento. Le punte sono raccomandate per
Il montaggio della base per diffusori e l'applicazione del diffusore
installare la base su tappeti folti (per renderlo stabile) o per
richiedono l'uso di un cacciavite Phillips medio.
migliorare il suono se la si installa su superfici che causano
riverbero (ad esempio pavimenti in cemento o legno). Usare le
Montaggio delle basi per diffusori
basi delle punte in dotazione per evitare graffi al pavimento o alla
Montare le basi nel modo visto di seguito.
superficie di installazione della base.
Allineare le fessure per le viti del basamento della base e del
sostegno del diffusore con i fori delle viti dei tre gambi,
quindi inserire le viti e stringerle.
30 mm
Nero
1 Girare le punte avvitandole negli inserti filettati del
fondo della base.
2 Mettere le basi delle punte nelle posizioni dove le tre
punte toccano quando la base viene messa in posizione.
3 Mettere la base sulle basi delle punte e controllare che
non oscilli.
Italiano
30 mm
Nero
• Notare che queste punte sono aguzze ed in metallo e possono
causare danni al pavimento. Prima dell'installazione, stendere
sempre a terra un panno o altro oggetto adatto.
• Usare le basi delle punte sempre nel modo mostrato, con la
superficie indentata rivolta in alto in modo da ricevere la cima
della punta.
• Controllare di avere montato la base su di una superficie in
piano e relativamente morbida (ad esempio un tappeto):
• Nel fissare il diffusore, controllare che le viti siano inserite nei
fori delle viti nel modo visto qui sopra (con la testa delle viti
nascosta). Un'installazione scorretta potrebbe causare la
caduta del diffusore dalla sua base, e quindi danni o ferimenti.
3
It
Sostegno
del
Viti (testa autobloccante, M6 x L30)
diffusore
[SBA6089]
Tenere presente che nel
Gambi
sostegno dei diffusori sono
della base
presenti dei fori per viti
incassati.
Basamento
della base
Viti (testa autobloccante, M6 x L30)
[SBA6089]
Punte [SBA6080]
Basi delle punte [SBG6001]
Attenzione
Se non si usano le basi delle punte nell'installare i
diffusori, queste possono causare danni al pavimento.
Raccomandiamo caldamente l'uso delle basi delle
punte a chi intende usare le punte.
Basamento della base
04_CP-81_It.fm 3 ページ 2008年7月24日 木曜日 午後1時40分
Attenzione
Se si usano i cuscinetti antiscivolamento
Se non si usano le punte per i diffusori:
Per evitare incidenti o ferite, non usare viti per fermare il diffusore
alla sua base. Tenere presente che la base per diffusori non ha in
dotazione dadi di fissaggio (vedi di seguito).
Fissare il diffusore al suo supporto usando le rondelle, le rondelle
elastiche e le viti da 40 mm nel modo visto di seguito.
Se si usano le punte per i diffusori:
Per evitare incidenti o ferite, non usare viti per fermare il diffusore
alla sua base. Tenere presente che la base per diffusori non ha in
dotazione dadi di fissaggio (vedi di seguito).
Fissare il diffusore al suo supporto usando le rondelle, le rondelle
elastiche e le viti da 50 mm nel modo visto di seguito.
4
It
Basamento della base
50 mm
Nero
Dado di fissaggio
Fori delle viti di
Sostegno del
fissaggio del diffusore
diffusore
Base delle punte
del diffusore
Rondella [SBE1043]
Rondella elastica [SBE1042]
Viti (testa autobloccante,
M4
x
L50) [SBA6012]
40 mm
Nero
Dado di fissaggio
Fori delle viti di
fissaggio del diffusore
Sostegno del
diffusore
Rondella [SBE1043]
Rondella elastica [SBE1042]
Viti (testa autobloccante,
M4
x
L40) [SBA6011]
04_CP-81_It.fm 4 ページ 2008年7月24日 木曜日 午後1時40分

04_CP-81_It.fm 5 ページ 2008年7月24日 木曜日 午後1時40分
Manutenzione della base
Dati tecnici
• Toglier via sporco e polvere con un panno per pulizie o un panno
Dimensioni esterne . . . . . . . . 310 (L) mm x 604 (A) mm x 404 (P) mm
asciutto.
Peso . . . . . . . . . . . . . . . . . . . . . . . . . . . . . . . . . . . . . . . . . . . . . . . . . 6,5 kg
• Se la base fosse molto sporca, usare un panno morbido imbevuto
di detergente neutro diluito in cinque o sei parti di acqua. Infine,
Accessori in dotazione
asciugare con un panno asciutto. Non usare cere o pulenti per
mobilia.
Basamento della base . . . . . . . . . . . . . . . . . . . . . . . . . . . . . . . . . . . . . . 2
Sostegno del diffusore . . . . . . . . . . . . . . . . . . . . . . . . . . . . . . . . . . . . . 2
• Mai usare diluenti, benzina, spray insetticidi o altre sostanze
Gambi della base . . . . . . . . . . . . . . . . . . . . . . . . . . . . . . . . . . . . . . . . . . 6
chimiche su o vicino alla base, dato che essi ne corrodono la
Punte [SBA6080] . . . . . . . . . . . . . . . . . . . . . . . . . . . . . . . . . . . . . . . . . . 6
superficie.
Basi delle punte [SBG6001] . . . . . . . . . . . . . . . . . . . . . . . . . . . . . . . . . 6
Cuscinetti antiscivolamento [FREC067] . . . . . . . . . . . . . . . . . . . . . . . . 8
Viti (testa autobloccante, M6 x L30) [SBA6089]. . . . . . . . . . . . . . . . . 24
Viti (testa autobloccante, M4 x L40) [SBA6011]. . . . . . . . . . . . . . . . . . 4
Viti (testa autobloccante, M4 x L50) [SBA6012]. . . . . . . . . . . . . . . . . . 4
Rondelle elastiche [SBE1042] . . . . . . . . . . . . . . . . . . . . . . . . . . . . . . . . 4
Rondelle [SBE1043] . . . . . . . . . . . . . . . . . . . . . . . . . . . . . . . . . . . . . . . . 4
Istruzioni per l'uso [FRRD-235] . . . . . . . . . . . . . . . . . . . . . . . . . . . . . . . 1
Nota
• I dati tecnici ed il design sono soggetti a modifiche senza
preavviso a causa di migliorie.
• Il numero del prodotto è dato qui sopra fra parentesi quadre.
Numeri di catalogo dei ricambi
Nome del pezzo N° pezzo
• Protezione (alto) SHA6182
• Protezione (intermedia) SHA6184
• Protezione (basso) SHA6183
Italiano
• Protezione (Basamento della base) SHA6188
• Protezione (Sostegno del diffusore) SHA6185
• Scatola di imballaggio (Solo CP-81B-K) SHG6402
• Scatola di imballaggio (Solo CP-81B-MK) SHG6403
• Sacca in polietilene (Basamento della base)
SHL6092
• Sacca in polietilene (Sostegno del diffusore)
SHL6038
• Sacca in polietilene (Gambi della base) SHL6093
• Foglio protettivo
(Basamento della base)
SHC6087
• Foglio protettivo
(Sostegno del diffusore)
SHC6015
• Foglio protettivo (Gambi della base) SHC6088
Pubblicato da Pioneer Corporation.
Copyright © 2008 Pioneer Corporation.
Tutti i diritti riservati.
5
It

Hartelijk dank voor de aanschaf van dit Pioneer product.
Lees de handleiding aandachtig door zodat u het product op de juiste wijze monteert en gebruikt. Bewaar de handleiding op een veilige
plaats voor eventuele naslag in de toekomst.
Deze luidsprekerstandaard kan alleen met de volgende Pioneer luidsprekers worden gebruikt: S-81B-LR-K, S-81B-LR-QL of S-81B-LR-W.
Voordat u begint
Benaming van de onderdelen
Alvorens de luidsprekers te gaan opstellen, raden wij u aan de
bijbehorende handleiding zorgvuldig door te lezen.
Let op
• Gebruik uitsluitend de bijgeleverde schroeven om de
luidspreker aan de luidsprekerstandaard te bevestigen.
• Zet de luidsprekerstandaard niet op een onstabiele en/of
schuine ondergrond. De standaard en de luidspreker zouden
kunnen vallen en letsel veroorzaken.
• Gebruik deze standaard uitsluitend met de luidspreker
waarvoor ze is ontworpen. Bij een andere luidspreker kan de
standaard beschadigd worden en/of de luidspreker kan vallen
en letsel veroorzaken.
• Wanneer de luidspreker en de standaard worden verplaatst,
moet u eerst de luidspreker van de standaard afnemen en dan
de standaard verplaatsen door deze bij de stelen vast te
pakken.
• Zet de standaard op een stabiele, horizontale ondergrond; het
is gevaarlijk wanneer de standaard op een onstabiele
ondergrond staat.
Belangrijk
• Pioneer kan niet aansprakelijk worden gesteld voor
beschadigingen als gevolg van een foutieve montage of
bevestiging, onvoldoende versteviging, verkeerd gebruik van
het product, natuurrampen enz.
2
Du
Schroefgaten voor
het vastmaken van
de luidspreker
Luidsprekersteun
Standaardstelen
Standaardvoet
05_CP-81_Du.fm 2 ページ 2008年7月24日 木曜日 午後1時42分
Wanneer de pennen worden gebruikt
Bij deze luidsprekerstandaard worden pennen geleverd die u kunt
Bevestigen van de luidsprekers aan
gebruiken om de standaard even boven de vloer te plaatsen.
de standaards
Gebruik deze pennen wanneer u de standaard op een dik tapijt zet
(voor extra stabiliteit), of voor een beter geluid wanneer u de
U hebt een middelgrote kruiskopschroevendraaier nodig om de
standaard op een harde ondergrond met veel nagalm zet (bijv. een
luidsprekerstandaard in elkaar te zetten en de luispreker aan de
betonnen of houten vloer). Gebruik de bijgeleverde penvoetjes om
standaard te bevestigen.
te voorkomen dat er krassen komen op de vloer of de andere
ondergrond waarop de standaard wordt gezet.
Montage van de luidsprekerstandaards
Monteer de luidsprekerstandaards zoals hieronder is aangegeven.
Lijn de schroefgaten in de standaardvoet en de
luidsprekersteun uit met de schroefgaten in de drie stelen,
steek de schroeven naar binnen en draai deze vast.
30 mm
Zwart
1 Draai de pennen in de metalen schroefdraadgaten die in
de onderkant van de standaardvoet zijn.
2 Leg de penvoetjes op de plaatsen waar de uiteinden van
de drie pennen terechtkomen wanneer de
luidsprekerstandaard wordt neergezet.
3 Plaats de standaard op de penvoetjes en controleer of de
standaard niet schommelt.
30 mm
Zwart
• De pennen zijn van scherp metaal vervaardigd en kunnen
beschadiging aan de ondergrond veroorzaken. Leg indien
nodig een matje of iets dergelijks onder de standaard.
Nederlands
• Gebruik de penvoetjes altijd op de afgebeelde wijze, met de
holle kant naar de penpunt gekeerd.
• Monteer de standaard op een vlakke en zachte ondergrond
(zoals een vloerkleed).
• Zorg dat de schroeven in de schroefgaten zijn gestoken zoals
hierboven is afgebeeld (met de schroefkop verborgen)
wanneer u de luidspreker vastmaakt. Verkeerde montage kan
resulteren in beschadigingen of letsel in geval de luidspreker
van de standaard zou vallen.
3
Du
Luidsprekersteun
Schroeven (drukkingskop,
M6 x L30) [SBA6089]
Standaardstelen
In de luidsprekersteun zijn
verzonken schroefgaten
aangebracht.
Standaardvoet
Schroeven (drukkingskop,
M6 x L30)[SBA6089]
Pennen [SBA6080]
Penvoetjes [SBG6001]
Let op
Als u de penvoetjes niet gebruikt bij de opstelling van
de luidsprekers, kunnen de pennen de vloer
beschadigen. Wij raden u aan de penvoetjes altijd te
gebruiken als u de pennen aanbrengt.
Standaardvoet
05_CP-81_Du.fm 3 ページ 2008年7月24日 木曜日 午後1時42分
Let op
Wanneer de antislipkussentjes worden gebruikt
Wanneer de luidsprekerpennen niet worden
gebruikt:
Om een ongeluk of letsel te voorkomen, moet u schroeven
gebruiken om de luidspreker aan de luidsprekerstandaard te
bevestigen. Er zijn bevestigingsmoeren aan de onderkant van de
luidspreker (zie hieronder).
Maak de luidspreker met de vulringen, veerringen en 40 mm
schroeven aan de luidsprekersteun vast, zoals hieronder is
afgebeeld.
Wanneer de luidsprekerpennen worden gebruikt:
Om een ongeluk of letsel te voorkomen, moet u schroeven
gebruiken om de luidspreker aan de luidsprekerstandaard te
bevestigen. Er zijn bevestigingsmoeren aan de onderkant van de
luidspreker (zie hieronder).
Maak de luidspreker met de vulringen, veerringen en 50 mm
schroeven aan de luidsprekersteun vast, zoals hieronder is
afgebeeld.
4
Du
Standaardvoet
50 mm
Zwart
Bevestigingsmoer
Schroefgaten voor het
Luidsprekersteun
vastmaken van de
luidspreker
Luidspreker-
penvoetje
Vulring [SBE1043]
Veerring [SBE1042]
Schroeven (drukkingskop,
M4 x L50) [SBA6012]
40 mm
Zwart
Bevestigingsmoer
Schroefgaten voor het
vastmaken van de
Luidsprekersteun
luidspreker
Vulring [SBE1043]
Veerring [SBE1042]
Schroeven (drukkingskop,
M4 x L40) [SBA6011]
05_CP-81_Du.fm 4 ページ 2008年7月24日 木曜日 午後1時42分
