Pioneer VSX-S500-S: Basic setup
Basic setup: Pioneer VSX-S500-S
Basic setup
Canceling the Auto Power Down
Canceling the demo display
When this receiver is not used over a period of several hours, it will power down
The display on the front panel shows various information (demo displays) when the
automatically. The automatic power-off timer is set to six hours under factory settings,
receiver is not operating.
and the timing can be changed or the power-off function switched off altogether.
You can turn off the demo display.
"The FL Demo Mode menu"
"The Auto Power Down menu"
• The demo mode is canceled automatically when the Auto MCACC setup is
performed (see below).
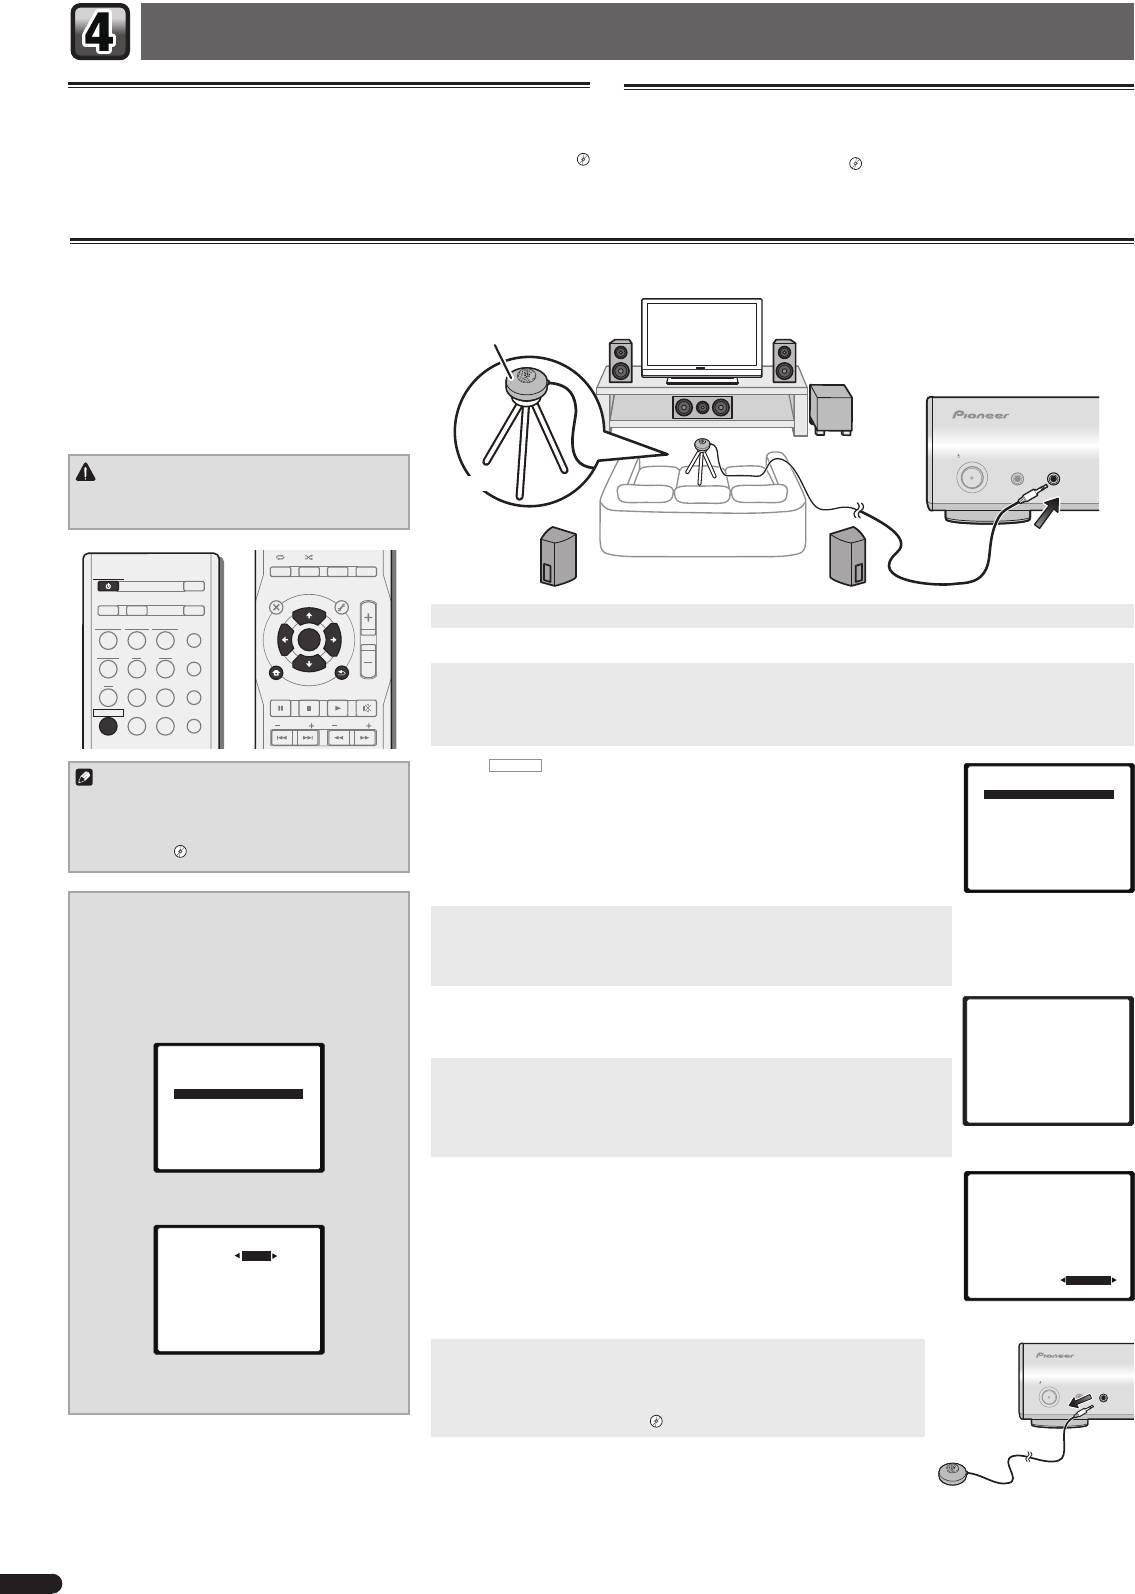
Automatically setting up for surround sound (MCACC)
The Auto Multi-Channel Acoustic Calibration (MCACC)
setup measures the acoustic characteristics of your
listening area, taking into account ambient noise,
Microphone
speaker size and distance, and tests for both channel
delay and channel level. After you have set up the
microphone provided with your system, the receiver
uses the information from a series of test tones to
optimize the speaker settings and equalization for your
particular room.
STANDBY/ON
MCACC
PORTABLE
SETUP
/
MICPHONES
CAUTION
Tripod
• The test tones used in the Auto MCACC setup are
output at high volume.
AUDIO DISP
SLEEP SP-AB
DIMMER
STATUS
STANDBY/ON
ECO
TOP
MENU
MENU
TOOLS
VOL
D AUX A AUX
S.RTRV
1
Switch on the receiver and your TV.
iPod
USB
NETWORK
ADAPTER
AUTO
/
DIRECT
ENTER
TUNER BD DVD
ALC
/
2
Switch the TV input so that it connects to the receiver.
STANDARD
iPod
CTRL
3
Connect the microphone to the MCACC SETUP MIC jack on the front panel.
CD
STB GAME
ADV
SURR
HOME MENU
RETURN
PTY
BAND MUTE
Make sure there are no obstacles between the speakers and the microphone.
RECEIVER
TV
PORTABLE
SOUND
WING
If you have a tripod, use it to place the microphone so that it’s about ear level at your normal listening position.
PRESET
TUNE
Otherwise, place the microphone at ear level using a table or a chair.
4
Press
RECEIVER
on the remote control, then press the HOME MENU button.
Note
Home Menu
The Home Menu appears on your TV. Use
and
ENTER
on the remote
1.Auto MCACC
• The subwoofer distance setting may be farther
control to navigate through the screens and select menu items. Press
RETURN
to exit
2.Manual SP Setup
than the actual distance from the listening
3.Pre Out Setting
the current menu.
4.Input Assign
position. If this is the case, perform settings
5.Video Parameter
• Since the S-HV600B/S-HV500-LR/S-SL100-LR/S-SL100CR are designed as compact
6.HDMI Setup
manually.
"Speaker Distance"
satellite speakers, it is recommended that they be used in combination with a
7.Auto Power Down
8.FL Demo Mode
subwoofer to provide full base sound. In this case, set the
X.OVER
to 200 Hz here
(see "Change the X.OVER setting" on this page).
Change the X.OVER setting
5
Select ’Auto MCACC’ from the Home Menu, then press ENTER.
For S-HV600B/S-HV500-LR/S-SL100-LR/S-SL100CR
•
Mic In!
blinks when the microphone is not connected to MCACC SETUP MIC jack.
speakers
Try to be as quiet as possible after pressing
ENTER
. The system outputs a series of
1
Select ‘Manual SP Setup’ from the
test tones to establish the ambient noise level.
Home Menu, then press ENTER.
2
Select ‘X.OVER’ from the Manual SP Setup
6
Follow the instructions on-screen.
1.Auto MCACC
menu, then press ENTER.
• When using a powered subwoofer, make sure the subwoofer is on and the volume
Now Analyzing
is turned up.
Environment Check
2.Manual SP Setup
Ambient Noise
7
Speaker YES/NO
a.Speaker System
Wait for the test tones to fi nish.
b.Speaker Setting
A progress report is displayed on-screen while the receiver outputs test tones to
c.X.OVER
d.Channel Level
determine the speakers present in your setup. Try to be as quiet as possible while it’s
Return
e.Speaker Distance
doing this.
• For correct speaker settings, do not adjust the volume during the test tones.
Return
8
Confi rm the speaker confi guration.
1.Auto MCACC
3
Choose ‘200 Hz’ for the frequency cutoff
The configuration shown on-screen should reflect the actual speakers you have.
Check!
point.
• With error messages (such as
Too much ambient noise
) select
RETRY
after
Front
[ YES ]
Center
[ YES ]
2c.X.OVER
checking for ambient noise.
Surr
[ YES ]
Surr. Back
[
---
]
Frequency 200Hz
If the speaker configuration displayed isn’t correct, use
to select the speaker and
Subwoofer
[ YES ]
to change the setting. When you’re finished, go to the next step.
OK
If you see an error message (
ERR
) in the right side column, there may be a problem
10:Next
Return
with the speaker connection. If selecting
RETRY
doesn’t fix the problem, turn off the
power and check the speaker connections.
Return
9
The Auto MCACC setup has fi nished! You return to the Home Menu.
Make sure the setup microphone is disconnected.
4
When you’re fi nished, press RETURN twice.
STANDBY/ON
The settings made in the Auto MCACC setup should give you excellent surround
MCACC
PORTABLE
SETUP
MICPHONES
/
You return to the Home Menu.
sound from your system, but it is also possible to adjust these settings manually
using the Manual speaker setup.
"Manual speaker setup"
4
En
VSX-S500SYXCNQSG設変book.indb4VSX-S500SYXCNQSG設変book.indb4 2012/04/2314:40:002012/04/2314:40:00
Оглавление
- Flow of settings on the receiver
- Connecting a TV and playback component
- Basic setup
- Basic playback
- Organigramme des réglages sur le récep-
- Raccordement d’un téléviseur et de périphériques de lecture
- Confi guration de base
- Lecture de base
- Порядок выполнения настроек на ресивере
- Подключение телевизора и компонентов воспроизведения
- Основная настройка
- Основные операции воспроизведения
- Flusso delle impostazioni del ricevitore
- Connettere una TV e componenti playback
- Impostazioni di base
- Riproduzione di base
- Stroomschema voor de instellingen op de
- Aansluiting van uw TV en weergave-apparatuur
- Basisinstellingen
- Basisbediening voor afspelen
- Organigrama de ajustes del receptor
- Conexión de componentes de reproducción y de un TV
- Confi guración básica
- Reproducción básica
- Ablauf der Einstellungen auf dem Receiver
- Anschließen eines Fernsehers und von Wiedergabe-Geräten
- Grundeinstellungen
- Standard-Wiedergabe
