Pioneer XC-HM70-K: Controls and Displays
Controls and Displays: Pioneer XC-HM70-K

X-HM70_En.fm 6 ページ 2011年8月2日 火曜日 午後4時46分
Controls and Displays
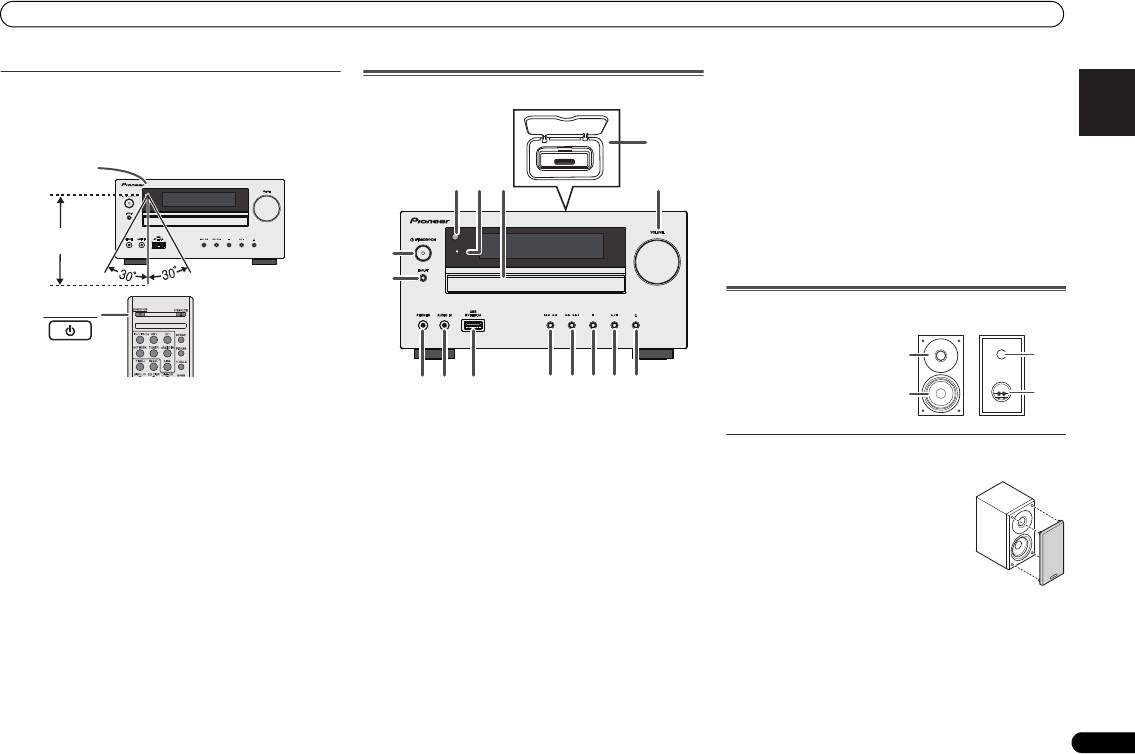
1 STANDBY/ON
9 OPEN/CLOSE
Controls and Displays
Switches the receiver between standby and on (page 11).
Use to open or close the disc tray (page 13).
2 Input function buttons
10 Sound control buttons
Use to select the input source to this receiver.
Adjust the sound quality (page 12).
Remote control
3 CD Receiver control buttons
11 Volume control buttons
DIMMER – Dims or brightens the display. The brightness
Use to set the listening volume (page 11).
can be controlled in four steps (page 11).
12 MUTE
1
9
SLEEP – Press to change the amount of time before the
Mutes/unmutes the sound (page 12).
receiver switches into standby (30 min. – 60 min. – 90
13 Tuner control buttons
min. – Off). You can check the remaining sleep time at
BAND – Switches between AM, FM ST (stereo) and FM
any time by pressing SLEEP once (page 26).
MONO radio bands (page 24).
2
TIMER – Use for setting the clock, as well as for setting
TUNER EDIT – Memorizes/names stations for recall
and checking the timers (page 11, 26).
(page 24).
10
DISPLAY – Display the MP3/WMA disc or RDS
14 Playback mode buttons
3
information.
REPEAT – Press to change repeat play setting from a CD,
CD DISP – Display the disc information (page 15).
iPod or USB (page 14).
4 CD Receiver control buttons
SHUFFLE – Press to change shuffle play setting from a
TOP MENU – Press to display the iPod Top menu
CD, iPod or USB (page 14).
(page 18).
O
PLAY MODE – Press to change the playback mode
4
iPod CONTROL – Switches between the iPod controls
between CD and MP3/WMA disc (page 14).
and the receiver controls (page 18).
5
15 CLEAR
11
SETUP – Press to access the receiver setup menu
Use to clear the programmed play (page 15).
(page 11, 24).
RETURN – Confirm and exit the current menu screen.
5
///
(TUNE
/
, PRESET
/
), ENTER
6
12
Use to select/switch system settings and modes, and to
confirm actions.
Use TUNE / can be used to find radio frequencies and
PRESET / can be used to select preset radio stations
(page 24).
13
6 Playback control buttons
The main buttons (, , etc.) are used to control each
7
function after you have selected it using the input function
14
buttons.
PTY – Use to search for RDS program types (page 25).
8
15
• AUTO TUNE button is not used with this receiver.
7 Numeric buttons
Use to enter the number (page 14).
8 FOLDER +/-
Use to select the folder of the MP3/WMA disc (page 15).
6
En
Controls and Displays
10 USB Terminal
English Français Español Italiano
Test of the remote control
Front Panel
Use to connect your USB mass storage device or Apple iPad
Check the remote control after checking all the connections.
as an audio source (page 19).
Point the remote control directly at the remote sensor on the
11 Tune Down, Skip Down Button
unit. The remote control can be used within the range shown
Selects the desired track or folder to be played back.
below:
12 Tune Up, Skip Up Button
Selects the desired track or folder to be played back.
13 Stop Button
TIMER
Use to stop the playback.
14 Play or Pause Button
Stops playback or resumes playback from the pause point.
15 Disc Tray Open/Close Button
Use to open or close the disc tray (page 13).
Speaker system (X-HM70 only)
STANDBY/ON
Deutsch
1 Remote Sensor
Receives the signals from the remote control.
2 Timer Indicator
Speaker grilles are removable
Lights when the timer is set (page 26).
Nederlands
3 Disc Tray
Place the disc, label side up (page 13).
4 iPod or iPhone Docking Station
Dock iPod/iPhone (page 17).
5 Volume Control
Use to set the listening volume (page 11).
6 STANDBY/ON Button
Switches the receiver between standby and on (page 11).
7 INPUT Button
Selects the input source (page 12).
8 Headphone Socket
Use to connect headphones. When the headphones are
connected, there is no sound output from the speakers
(page 12).
9 AUDIO IN Socket
Use to connect an auxiliary component using a stereo
minijack cable (page 12).
7
En
Remote sensor
7 m
4
1
3
52
6
TIMER
7
8 11 12 13 14 15
9
10
1 Dome-Tweeter
2 Woofer
3 Bass Reflex Duct
4 Speaker Terminal
1
3
2
4
Make sure nothing comes into contact
with the speaker diaphragms when you
remove the speaker grilles.
X-HM70_En.fm 7 ページ 2011年8月2日 火曜日 午後4時46分
Оглавление
- Contents
- Before you start
- Controls and Displays
- Connecting your equipment
- General control
- Listening to a CD or MP3/
- Listening to the iPod, iPhone or iPad
- Listening to USB mass storage device/MP3 player
- Playback with NETWORK feature
- Listening to the radio
- Using the Radio Data System (RDS)
- Timer and sleep operation
- Additional Information
- Table des matières
- Préparatifs
- Commandes et affichages
- Raccordement de votre équipement
- Commandes générales
- Écoute de disques MP3/
- Écoute de l’iPod, iPhone et iPad
- Lecture mémoire de grande capacité USB/ lecteur MP3
- Utilisation de la fonction de lecture réseau (NETWORK)
- Pour écouter la radio
- Utilisation du système RDS (Radio Data System)
- Utilisation des fonctions
- Informations
- Índice
- Antes de comenzar
- Controles e indicadores
- Conexión del equipo
- Control general
- Escuchando un CD o disco
- Escuchar el iPod, iPhone o iPad
- Escuchando a través del dispositivo de almacenamiento USB/
- Reproducción con opción NETWORK
- Recepción de radio
- Empleo del sistema de datos radiofónicos (RDS)
- Funcionamiento del
- Información adicional
- Inhalt
- Vor der Inbetriebnahme
- Bedienelemente und
- Anschluss der Geräte
- Generelle Bedienung
- CDs oder MP3/WMA-Discs
- iPod, iPhone oder iPad- Wiedergabe
- Hören von USB- Massenspeicher MP3- Player
- Wiedergabe mit der NETWORK- Funktion
- Radio hören
- Benutzen des Radio- Daten-Systems (RDS)
- Timer- und Sleep-
- Zusätzliche
- Indice
- Prima di cominciare
- Controlli e display
- Collegamento dell’apparecchio
- Comando generale
- Ascolto di un CD o disco
- Ascolto dell’iPod, iPhone o iPad
- Ascolto della periferica di memoria di massa USB/del lettore MP3
- Playback con caratteristica NETWORK
- Ascolto della radio
- Funzionamento di RDS (Radio Data System)
- Funzione di timer e
- Informazioni aggiuntive
- Inhoud
- Voordat u begint
- Bedieningselementen en
- De apparatuur aansluiten
- Algemene bediening
- Luisteren naar een CD of
- Luisteren naar de iPod, iPhone of iPad
- Luisteren naar USB massaopslagapparaat/ MP3-speler
- Weergave met NETWORK- functie
- Luisteren naar de radio
- Gebruiken van het Radio Data Systeem (RDS)
- Timer en inslaaptimer
- Overige informatie
- Содержание
- Перед началом работы
- Органы управления и
- Подключение оборудования
- Общее управление
- Прослушивание дисков CD
- Прослушивание iPod, iPhone или iPad
- Прослушивание запоминающего устройства большой
- Воспроизведение с функцией NETWORK
- Прослушивание
- Использование системы радиоданных (RDS)
- Работа с таймером и
- Дополнительная
