Pioneer SEP-C1: PARTS AND THEIR FUNCTIONS
PARTS AND THEIR FUNCTIONS: Pioneer SEP-C1
SEP-C1_EN.book 10 ページ 2008年3月24日 月曜日 午前10時52分
PARTS AND THEIR FUNCTIONS
PARTS AND THEIR FUNCTIONS
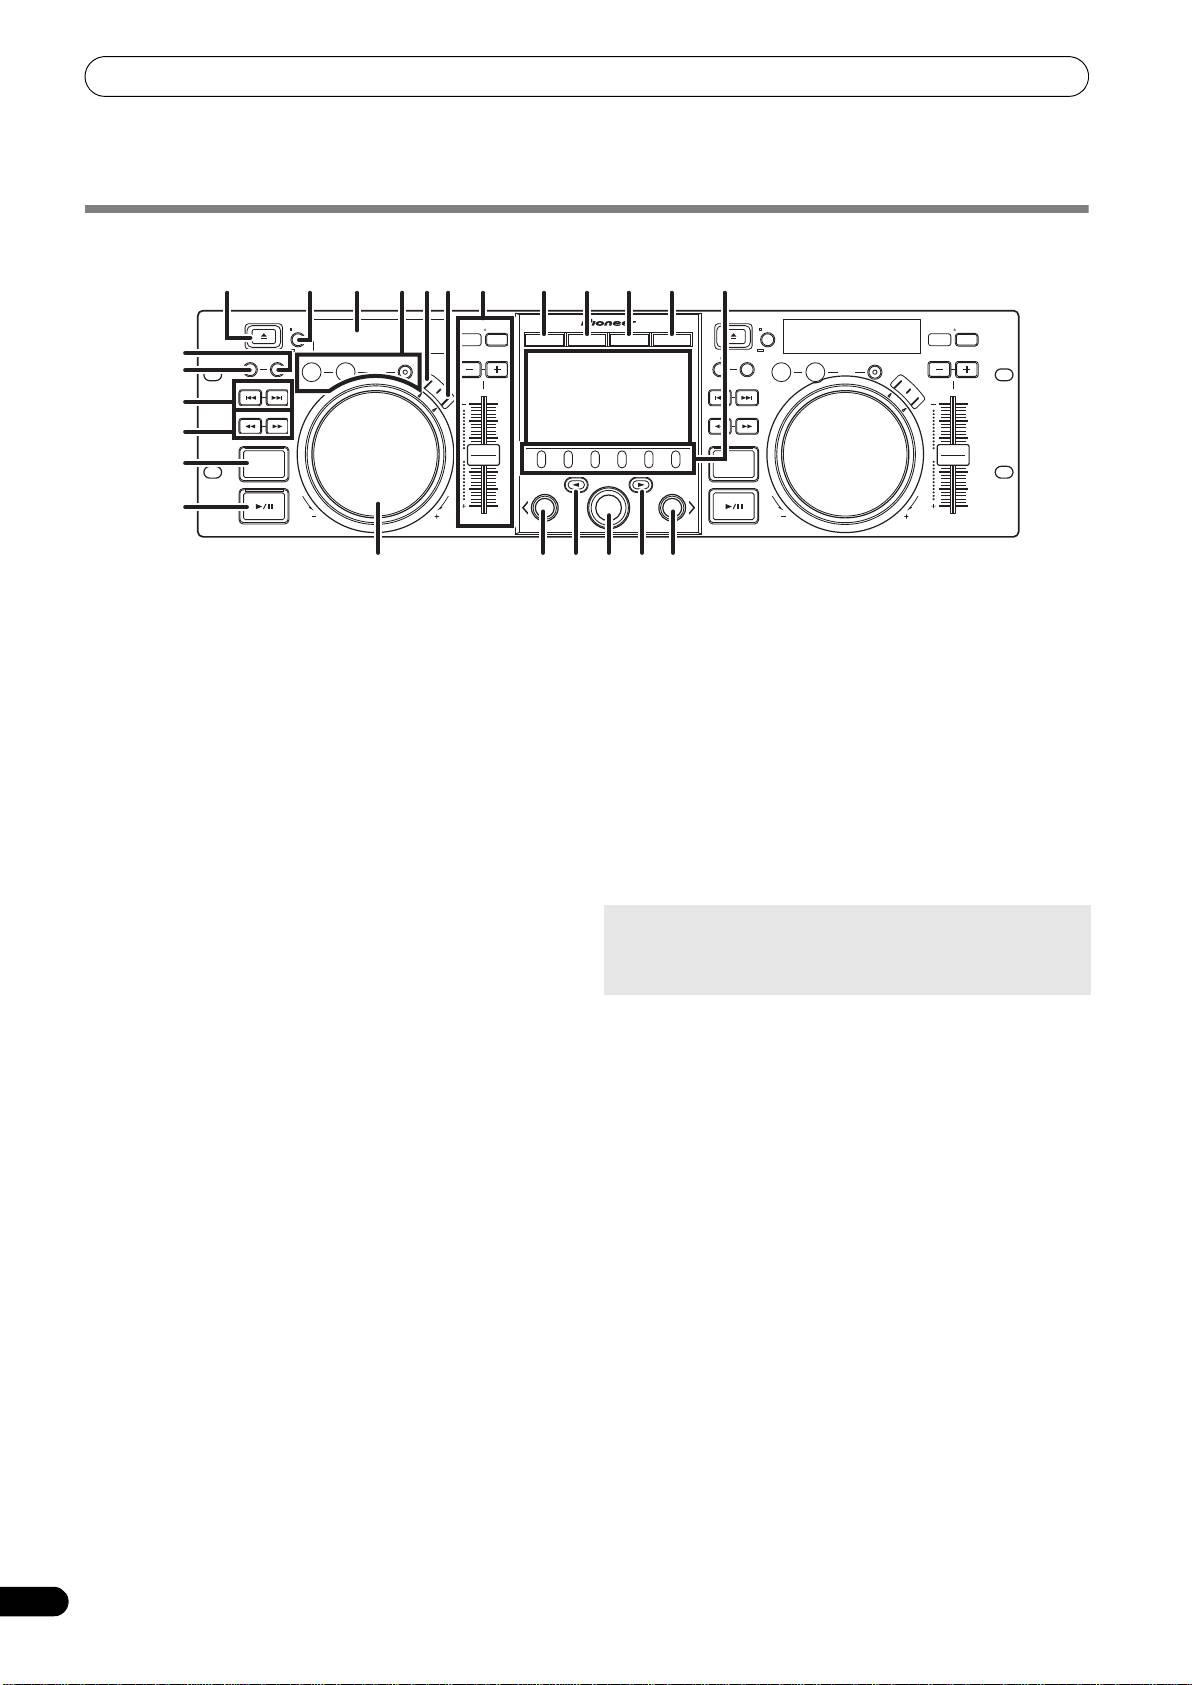
FRONT PANEL
1
8 23 2 3 11 12 13 14
18109
EJECT
MASTER
TEMPO
EJECT
MASTER
TEMPO
TIME
TEMPO
6/10/16WIDE
TIME
TEMPO
6/10/16WIDE
MT
BROWSE MIX EFFECT UTILITY
MT
17
CUE/LOOP
A.CUE
CUE/LOOP
A.CUE
MEMORY CALL
IN/CUE
OUT/ADJUST
RELOOP/EXIT
PITCH BEND
MEMORY CALL
IN/CUE
OUT/ADJUST
RELOOP/EXIT
PITCH BEND
LOOP
LOOP
16
TRACK SEARCH
HOT LOOP
S
C
R
A
T
S
C
TRACK SEARCH
HOT LOOP
C
H
R
A
T
C
H
4
22
SEARCH
J
O
G
J
B
SEARCH
O
G
R
E
B
A
R
K
E
A
K
5
0
0
QUE
QUE
6
A
B
LOAD
LOAD
7
FWD TEMPOREV
SEP-C1
FWD TEMPOREV
19 15 21
2024
19
This section explains the use of the unit when controlling DJS. Depending on the DJ software program used, some functions may not be
supported or may require different operations than those described in this manual.
1EJECT (
) button
7 Play/pause (
) button and indicator
Not used during DJS control.
Use to start and pause playback.
2 Loop control buttons
8 Time mode/auto cue button (TIME/A.CUE)
Loop-in button (IN/CUE)
TIME:
Use to set loop-in points. When this button is pressed during
Each time the button is pressed, the display’s time display
loop playback, playback returns to the loop-in point and
alternates between the current track’s elapsed playing time,
recommences.
and the remaining time (REMAIN).
Loop-out button (OUT/ADJUST)
A.CUE:
Use to set loop-out points. If this button is pressed during loop
When held depressed for one second or more, the AUTO CUE
playback, the jog dial or SEARCH buttons can be used to adjust
function alternates ON/OFF.
the position of the out point.
AUTO CUE function
RELOOP/EXIT button
Whenever a track is set or track search is performed, this
Press this button during loop playback to cancel loop play.
function automatically sets a cue point and cue standby
When the unit is not in loop play mode, pressing the button will
immediately before the point where music starts.
cause loop play to begin from the previously set loop-in point.
3 TEMPO control section
TEMPO control range button (±6/10/16/WIDE):
9 SCRATCH button
Press to set the scratch mode ON/OFF.
Each time the button is pressed, the variable range of the
TEMPO adjust slider changes.
10 JOG BREAK button
Not used during DJS control.
MASTER TEMPO button and indicator (MT):
11 BROWSE button
Each time the button is pressed, the master tempo function
Use to switch to the BROWSE screen.
alternates ON/OFF.
12 MIX button
TEMPO adjust slider:
Use to switch to the MIX screen.
From the center detent position, pull the slider towards you (+)
to increase the tempo, and push the slider away from you (–)
13 EFFECT button
to slow down the tempo.
Use to switch to the EFFECT screen.
PITCH BEND +/– buttons:
14 UTILITY button
Use to switch to the UTILITY screen (P. 25).
When pressed during play, the pitch bend function is enabled.
Pressing the “+” button accelerates the pitch bend speed, and
15 Rotary selector dial
pressing the “–” button decelerates the pitch bend speed.
When in the BROWSE and UTILITY screens, rotating the dial
allows track selection and movement of the cursor between
The speed of the pitch change can be modified by holding the
selection items. Press the dial to confirm the selection.
button depressed while rotating the jog dial.
For operations in the MIX and EFFECT screens, consult the
4 TRACK SEARCH (
,
) buttons
DJS Control Guide.
Use to perform track search.
16 CUE/LOOP MEMORY button
5SEARCH (
,
) buttons
Not used during DJS control.
Use to perform fast forward and reverse.
17 CUE/LOOP CALL button
6 CUE button and indicator
Not used during DJS control.
Use to set cue points. Also when a cue point has been set,
pressing the CUE button sets the unit to the cue standby mode.
10
En
SEP-C1_EN.book 11 ページ 2008年3月24日 月曜日 午前10時52分
PARTS AND THEIR FUNCTIONS
18 Function buttons (F1 to F6, from left)
Center Display
Use to select modes and categories.
Selectable items differ depending on the screen or menu.
For details, consult the DJS Control Guide.
19 LOAD A/B buttons
3
English
When in the BROWSE screen, press to set selected track in
controller A/B.
For operations in the MIX and EFFECT screens, consult the
1
DJS Control Guide.
20 Select up (
) button
2
When in the BROWSE and UTILITY screens, each time the
button is pressed the menu moves up (to left) one level in the
current menu hierarchy.
For operations in the MIX and EFFECT screens, consult the
DJS Control Guide.
21 Select down (
) button
When in the BROWSE and UTILITY screens, each time the
button is pressed the menu moves down (to right) one level in
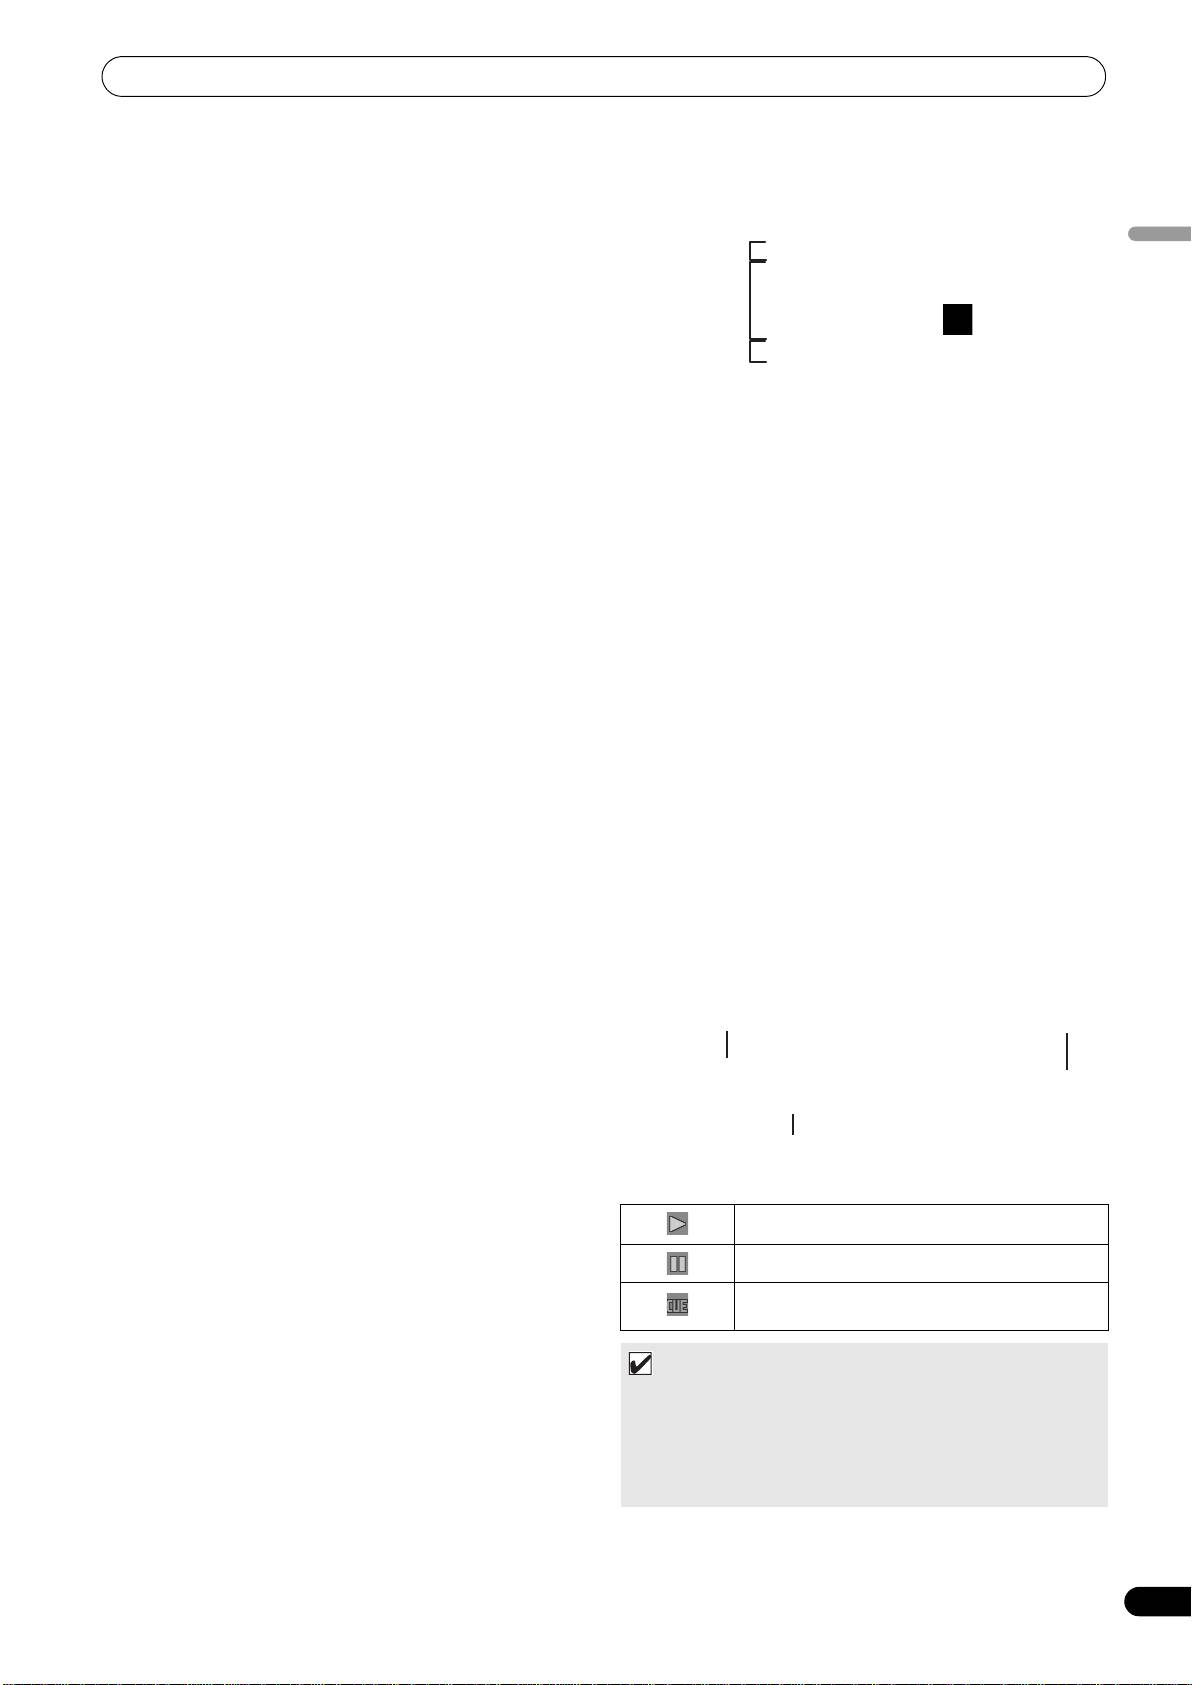
1 Main menu display
the current menu hierarchy.
The center display’s menus are changed by using the
For operations in the MIX and EFFECT screens, consult the
BROWSE button, MIX button, EFFECT button, and UTILITY
DJS Control Guide.
button. The function buttons, select up ()/down() buttons,
LOAD A/B buttons, and the rotary selector dial are used to
22 Center display (P. 11)
manipulate the contents of each menu.
23 Display A / Display B (P. 12)
BROWSE screen
24 Jog dial (+FWD / –REV)
Use to display DJS track lists or playlists and to select tracks.
When scratch mode is ON:
For details, consult the DJS Control Guide’s “Using DJS Lists.”
Touch the surface of the dial and rotate to perform scratch
MIX screen
play.
Use to perform DJS mixer operations. For details, consult the
When scratch mode is OFF:
DJS Control Guide’s “DJS Mixer Operations.”
Use to perform pitch bend. Acceleration (+FWD) and
EFFECT screen
deceleration (–REV) are performed in proportion to the amount
Use to perform DJS effecter operations. For details, consult the
of dial rotation. When rotation of the dial is stopped, playback
DJS Control Guide’s “DJS Effecter Operations.”
returns to its previous speed.
UTILITY
screen
Use to make unit settings (P. 25).
2 Function tab
Displays items that can be changed using the six function
buttons. Items displayed differ depending on the contents
shown on the main menu display.
3 A/B track information display
Displays track information and current status for tracks
playing on controller A/B.
Track name Play status
Artist name
Play status
Indicates track is currently playing.
Indicates track is currently paused.
Indicates track is currently in cue standby
condition.
MEMO
• This unit can display names of titles and artists in Western
European languages, Russian, Simplified Mandarin
Chinese, and Japanese, but some languages may not be
supported, depending on the DJ software program used.
Consult the operating instructions for your DJ software
program for more information about supported languages.
11
En
PARTS AND THEIR FUNCTIONS
Display A/Display B
5 Time display
Displays the current track’s elapsed time ([REMAIN] indicator
is off), or remaining time ([REMAIN] indicator is lighted), in
minutes [M], seconds [S], and frames [F].
6 Playing address display
To provide a quick intuitive grasp of the relative progress of a
track’s playback (either elapsed time or remaining time), a bar
graph is used to represent the full length of the track.
• Elapsed time display: Starts with all segments off, then
gradually lights from left to right.
• Remaining time display: Starts with all segments on, then
1 Track number display
gradually goes off from left to right.
“DJS” is displayed during DJS control.
• When 30 seconds of remaining playing time is reached, the
graph begins to flash slowly.
2 TEMPO control range display (±6, ±10, ±16, WIDE)
• When 15 seconds of remaining playing time is reached, the
Displays the selected variable range mode of the TEMPO
graph begins to flash quickly.
adjust slider.
7 BPM display
3 TEMPO change ratio display
Shows the currently playing track’s BPM (Beats Per Minute)
Displays the change in tempo produced by the operation of the
8 MEMO indicator
TEMPO adjust slider.
Not displayed during DJS control.
4 A.CUE indicator
9 REMAIN indicator
Lights when the Auto Cue function is ON.
Lights when the time display is set for remaining time.
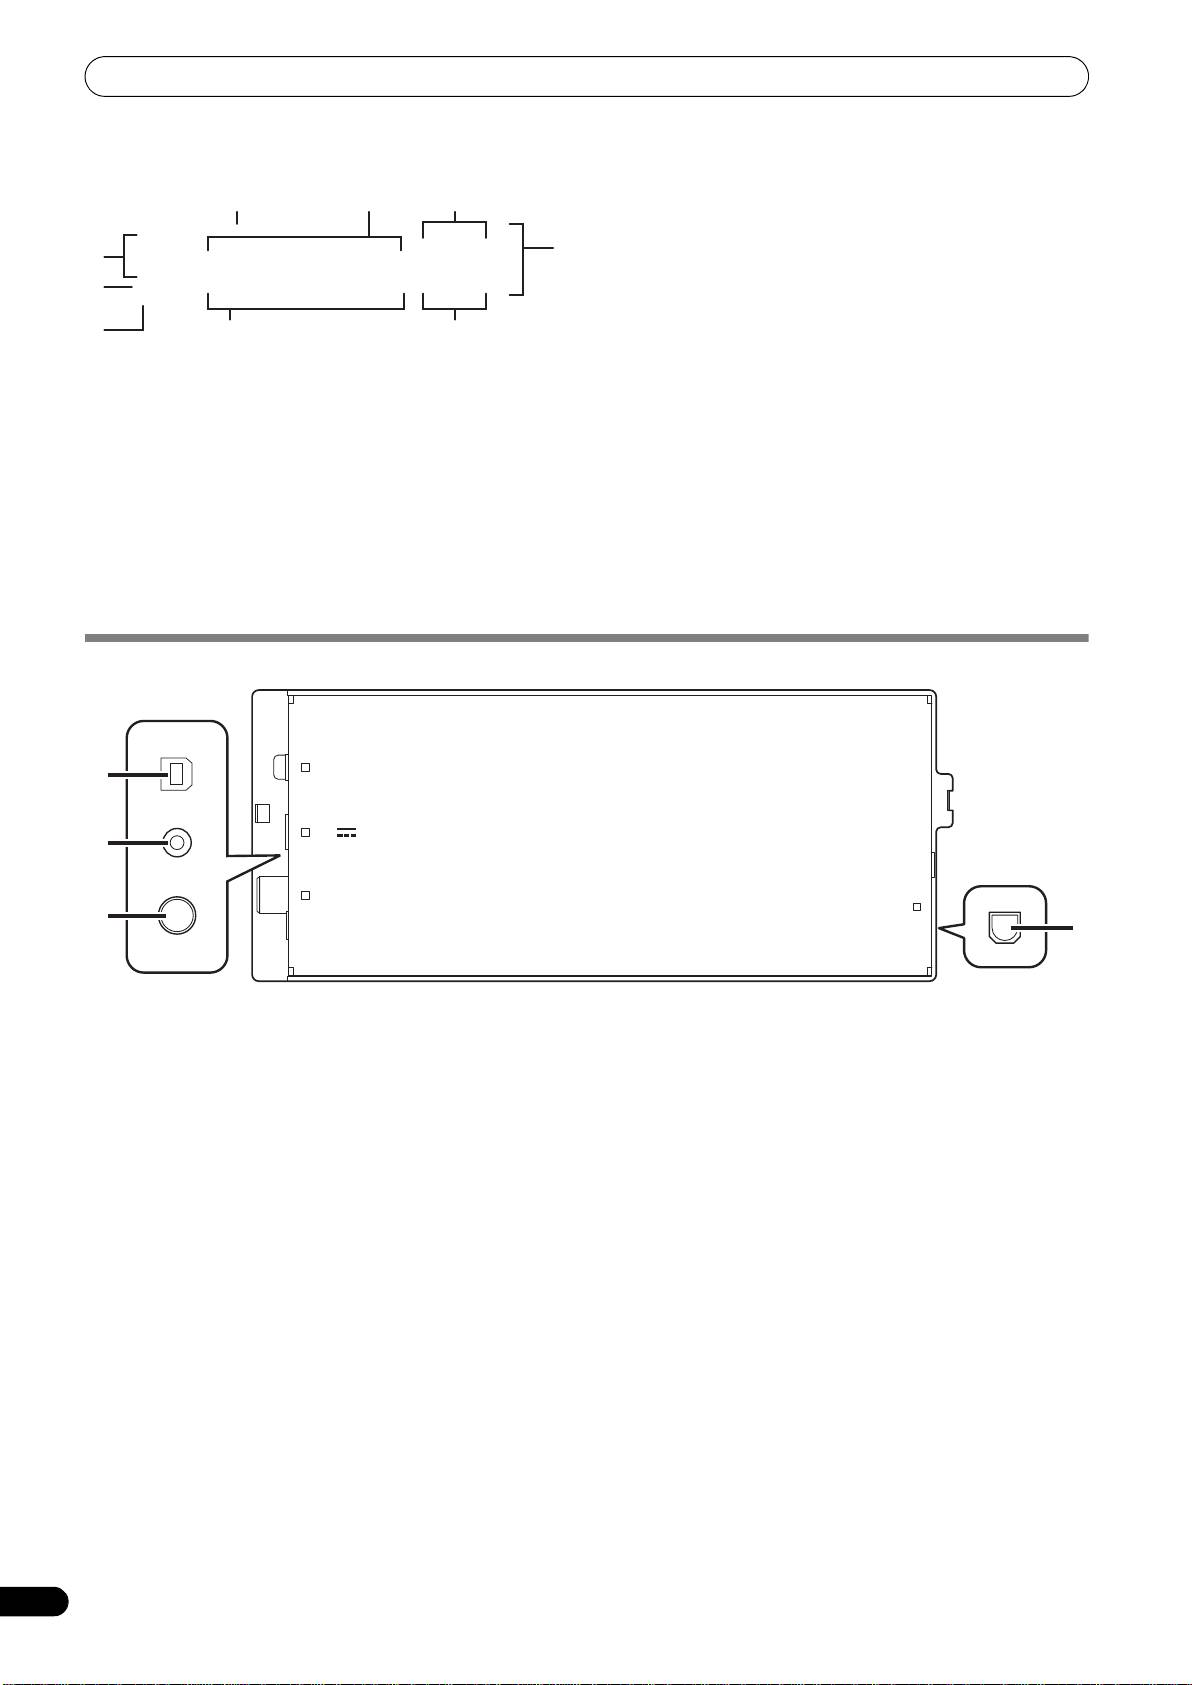
REAR PANEL
1 PC connector: USB port (type B)
3 Video output connector (MONITOR OUT)
Use the accessory USB cable to connect this port to a
Use a video cable to connect to an external display.
computer.
4 Remote control connector (REMOTE CONTROL)
2 5 V connector
Not used with this unit.
Use the accessory USB auxiliary power cable to connect to a
computer.
12
En
9
5
3
2
1
8
4
6
7
PC
1
5V
2
MONITOR OUT
REMOTE
3
CONTROL
4
SEP-C1_EN.book 12 ページ 2008年3月24日 月曜日 午前10時52分
Оглавление
- CONTENTS
- FEATURES
- SPECIFICATIONS
- INSTALLATION GUIDELINES
- CONNECTIONS
- PARTS AND THEIR FUNCTIONS
- ABOUT DJS SOFTWARE
- ABOUT THE DRIVER PROGRAM
- USING DJ SOFTWARE
- USING THE UTILITY
- TROUBLESHOOTING
- DISCLAIMER
- CONTENU
- CARACTÉRISTIQUES
- FICHE TECHNIQUE
- DIRECTIVES D’INSTALLATION
- CONNEXIONS
- LES ORGANES ET LEURS FONCTIONS
- À PROPOS DU LOGICIEL DJS
- À PROPOS DU PROGRAMME PILOTE
- UTILISATION DU LOGICIEL DJ
- UTILISATION DE L’ÉCRAN UTILITY
- GUIDE DE DÉPANNAGE
- DÉCHARGE DE RESPONSABILITÉ
- INHALTSVERZEICHNIS
- MERKMALE
- TECHNISCHE DATEN
- HINWEISE ZUR AUFSTELLUNG
- ANSCHLÜSSE
- LAGE UND FUNKTION DER TEILE
- HINWEISE ZUR DJS-SOFTWARE
- HINWEISE ZUM TREIBERPROGRAMM
- VERWENDUNG VON DJ-SOFTWARE
- GEBRAUCH DES UTILITY-BILDSCHIRMS
- STÖRUNGSBESEITIGUNG
- AUSSCHLUSSKLAUSEL
- INDICE
- CARATTERISTICHE
- CARATTERISTICHE TECNICHE
- NORME DI INSTALLAZIONE
- COLLEGAMENTI
- PARTI E LORO FUNZIONE
- IL SOFTWARE DJS
- IL DRIVER
- USO DI SOFTWARE DJ
- USO DI UTILITY
- DIAGNOSTICA
- DENUNCIA DI RESPONSABILITÀ
- INHOUD
- KENMERKEN
- TECHNISCHE GEGEVENS
- RICHTLIJNEN VOOR DE INSTALLATIE
- AANSLUITINGEN
- BENAMING EN FUNCTIE VAN DE BEDIENINGSORGANEN
- OVER DJS-SOFTWARE
- OVER HET STUURPROGRAMMA
- GEBRUIK VAN DJ-SOFTWARE
- GEBRUIK VAN DE UTILITY
- PROBLEMEN OPLOSSEN
- DISCLAIMER
- ÍNDICE
- CARACTERÍSTICAS
- ESPECIFICACIONES
- INDICACIONES PARA LA INSTALACIÓN
- CONEXIONES
- DISPOSITIVOS Y SUS FUNCIONES
- ACERCA DEL SOFTWARE DJS
- ACERCA DEL PROGRAMA DEL CONTROLADOR
- UTILIZACIÓN DEL SOFTWARE DE DJ
- UTILIZACIÓN DE UTILIDADES
- SOLUCIÓN DE PROBLEMAS
- LIMITACIÓN DE RESPONSABILIDADES
- СОДЕРЖАНИЕ
- ФУНКЦИОНАЛЬНЫЕ ОСОБЕННОСТИ
- ТЕХНИЧЕСКИЕ ХАРАКТЕРИСТИКИ
- ПРАВИЛА УСТАНОВКИ
- ПОДКЛЮЧЕНИЕ
- ЭЛЕМЕНТЫ УСТРОЙСТВА И ИХ ФУНКЦИИ
- О ПРОГРАММНОМ ОБЕСПЕЧЕНИИ DJS
- О ПРОГРАММНОМ ОБЕСПЕЧЕНИИ ДРАЙВЕРА
- ИСПОЛЬЗОВАНИЕ ДИДЖЕЙСКОГО ПРОГРАММНОГО ОБЕСПЕЧЕНИЯ
- ИСПОЛЬЗОВАНИЕ УТИЛИТЫ
- ПОИСК И УСТРАНЕНИЕ НЕИСПРАВНОСТЕЙ
- ЛИЦЕНЗИИ
- 目錄
- 特色
- 規格
- 安裝說明
- 連接
- 零件及其功能
- 關於 DJS 軟體
- 關於驅動程式
- 使用 DJ 軟體
- 使用 UTILITY
- 故障排除
- 免責聲明
- もくじ
- 本機の特長
- 仕 様 付属品の確認
- 設置上のご注意
- 接続のしかた
- 各部の名称と働き
- ソフトウェア DJS について
- ドライバソフトウェアについて
- DJ ソフトウェアを使用する
- UTILITY を使う
- 故障かな?と思ったら
- 保証とアフターサービス
- 免責事項について
