Vitek VT-1671: инструкция
Раздел: Бытовая, кухонная техника, электроника и оборудование
Тип: Мясорубка

Характеристики, спецификации
Инструкция к Мясорубке Vitek VT-1671

Vt-1671.qxd 10.01.05 11:28 Page 1
7
10
13
16
19
22
25
28
31
Forte
33
36
VT-1671 BK
39
42
VT-1671 W
45
Vt-1671.qxd 10.01.05 11:28 Page 2
Vt-1671.qxd 10.01.05 11:28 Page 3
Vt-1671.qxd 10.01.05 11:28 Page 4
Vt-1671.qxd 10.01.05 11:28 Page 5
Vt-1671.qxd 10.01.05 11:28 Page 6

ENGLISH
FIRST USE SAFETY RECOMMENDATION
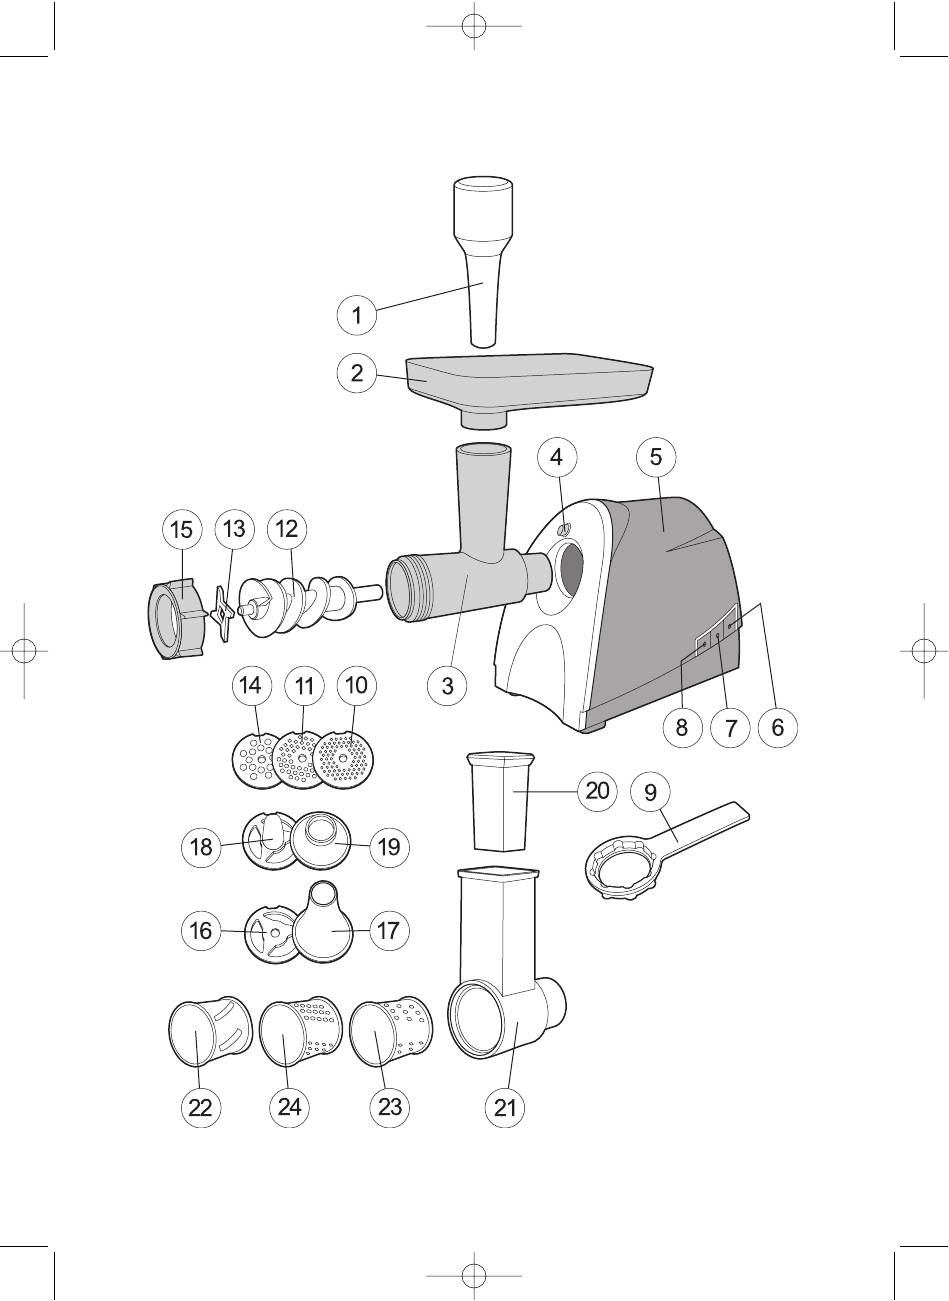
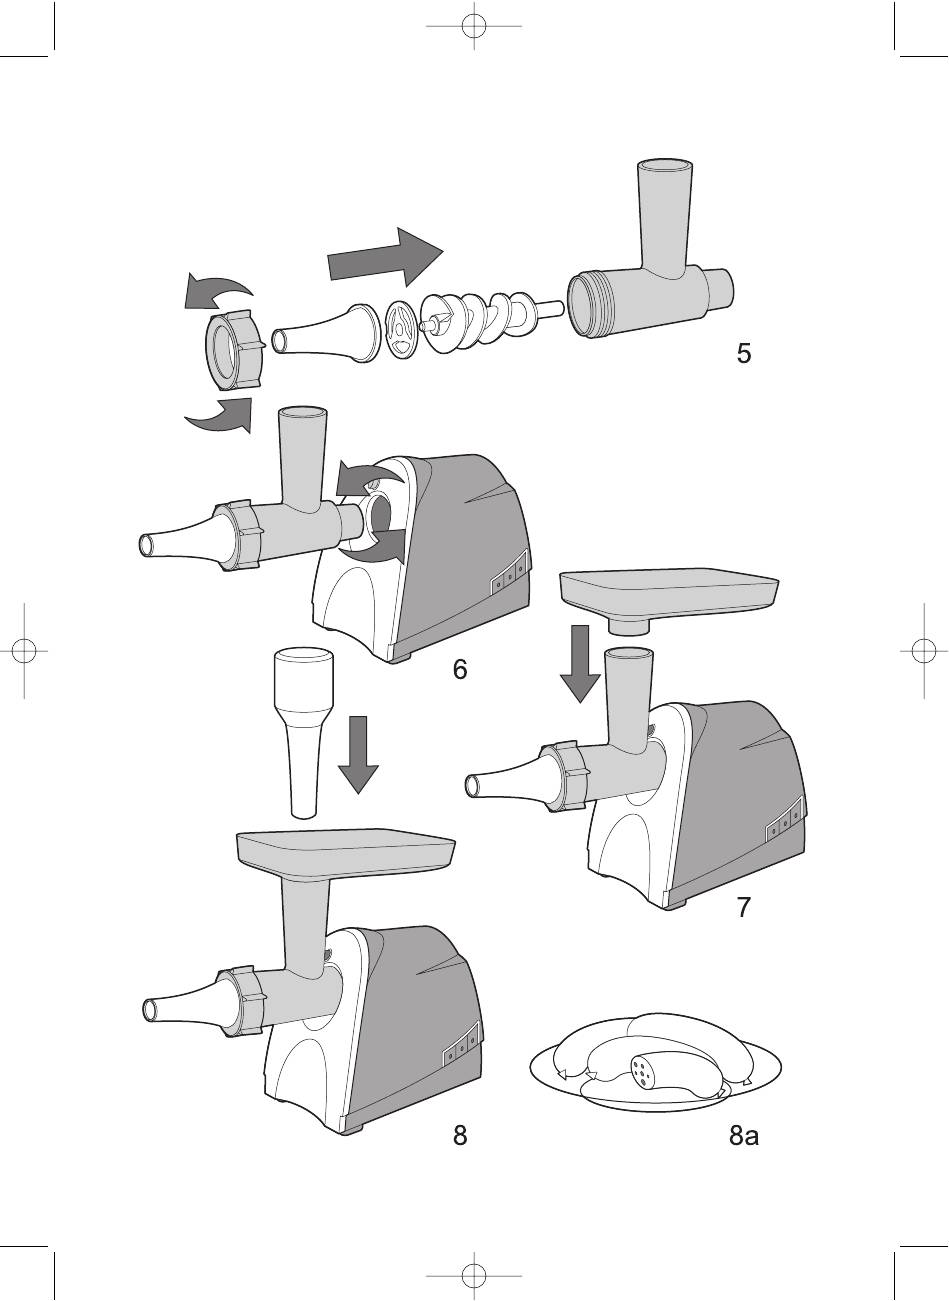
14. Medium-mincing screen plate
Please read through this booklet for safe and efficient
15. Ring nut
use of the appliance. We urge you to read the "impor-
16. 17. Sausage attachment.
tant Safeguards" section and also follow all detailed
18. 19. Kebbe attachment
instructions even if you are familiar with a similar appli-
20. Pusher for vegetable cutter
ance.
21. Vegetable cutter unit
Keep this guide handy for future reference.
22. Shredder
23. Coarse grater
IMPORTANT SAFEGUARDS
24. Fine grater
When using electrical appliances, in order to reduce the
risk of lire, electric shock, and/or injury to persons,
Y
our meat Mincer Features:
basic safety precautions should be followed, including
Primary and supplementary operating speed - pri-
the following:
mary operating speed for all types of meat mincing,
Read all instructions carefully, even if you are famil-
supplementary speed for processing of soft vegetables
iar with the appliance.
such as tomatoes.
Before using this appliance for the first time make
Reverse mode - to remove blocks while mincing.
sure that local mains voltage corresponds to the
Big metal food tray - provides convenient supply of
operational voltage of the appliance.
food in the course of processing.
To avoid the risk of electric shock, NEVER
Three screen plates with opening of various sizes -
IMMERSE the appliance, power cord or the mains
for various degrees of meat mincing.
plug in water or other liquids.
Special attachments - for making sausages and
Use a damp cloth to clean the appliance.
kebbes.
Close supervision is required when the appliance is
Overload protection system - prevents overload to
used near children.
protect and enhance motor life.
Never leave running appliance unattended.
Always unplug the appliance before using the appli-
IF THE MINCER SUDDENLY STOPPED:
ance for the first time, assembly, dismantling or
- switch it off by pressing ON/OFF button (5).
cleaning. Never pull on the cord, always hold the
- unplug the appliance.
plug.
- let the motor cool down for 60 minutes.
Do not operate the appliance with a damaged cord
- rerun the appliance.
or plug, or when the appliance malfunctions, or is
dropped or damaged in any other manner. Return
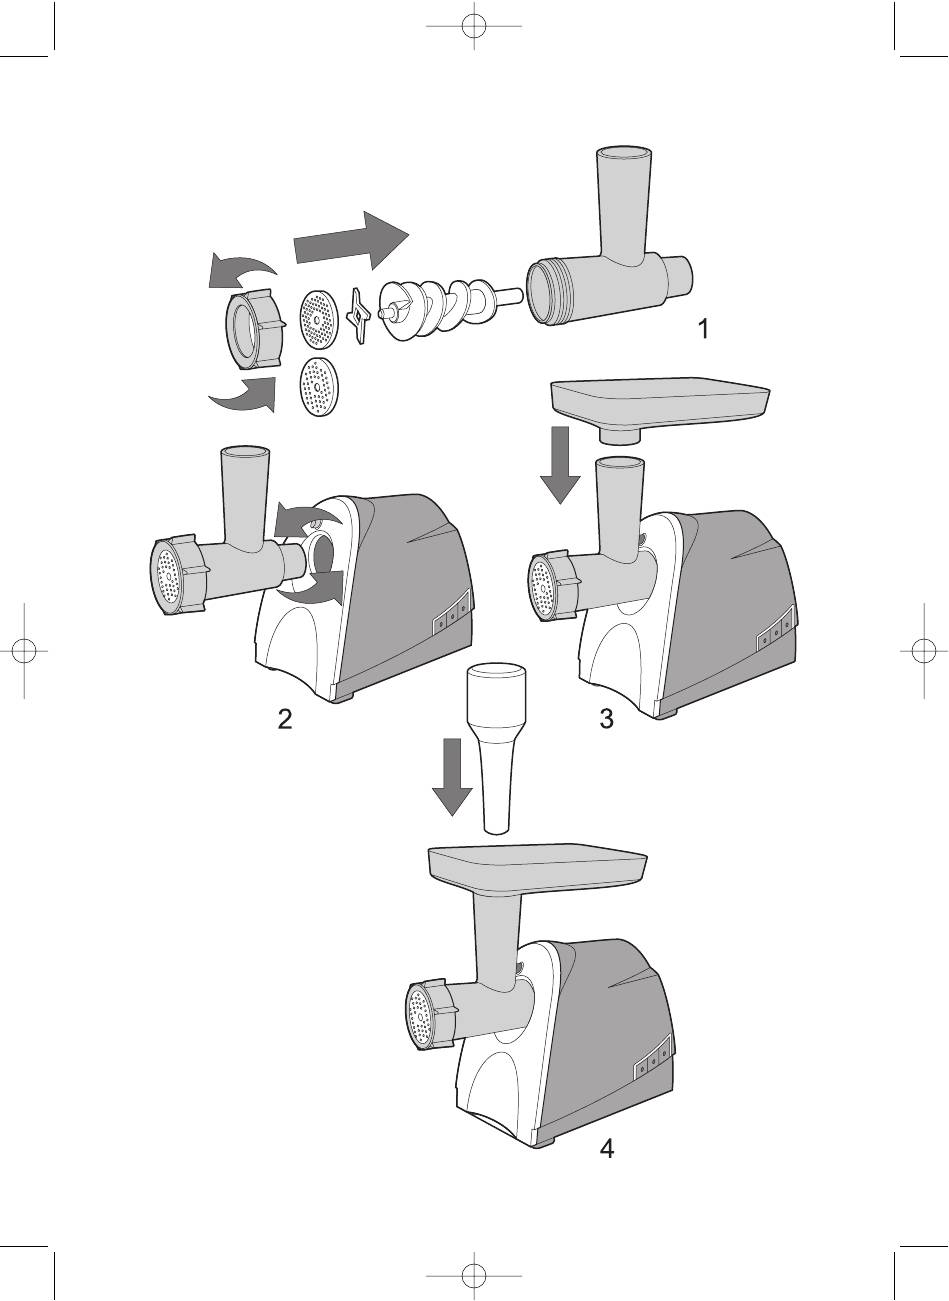
HOW TO ASSEMBLE YOUR MEAT MINCER
the complete appliance to your nearest authorized
Before first use, please remove all packaging materials
service center for examination, electrical repair or
from the unit and wipe it with a damp cloth. Wash the
mechanical repair or adjustment.
parts other than the base unit in warm soapy water and
Use only the accessories provided by the manufac-
allow drying.
turer.
See that the power cord never hangs over the edge
MEAT MINCING
of the table or touches hot surfaces.
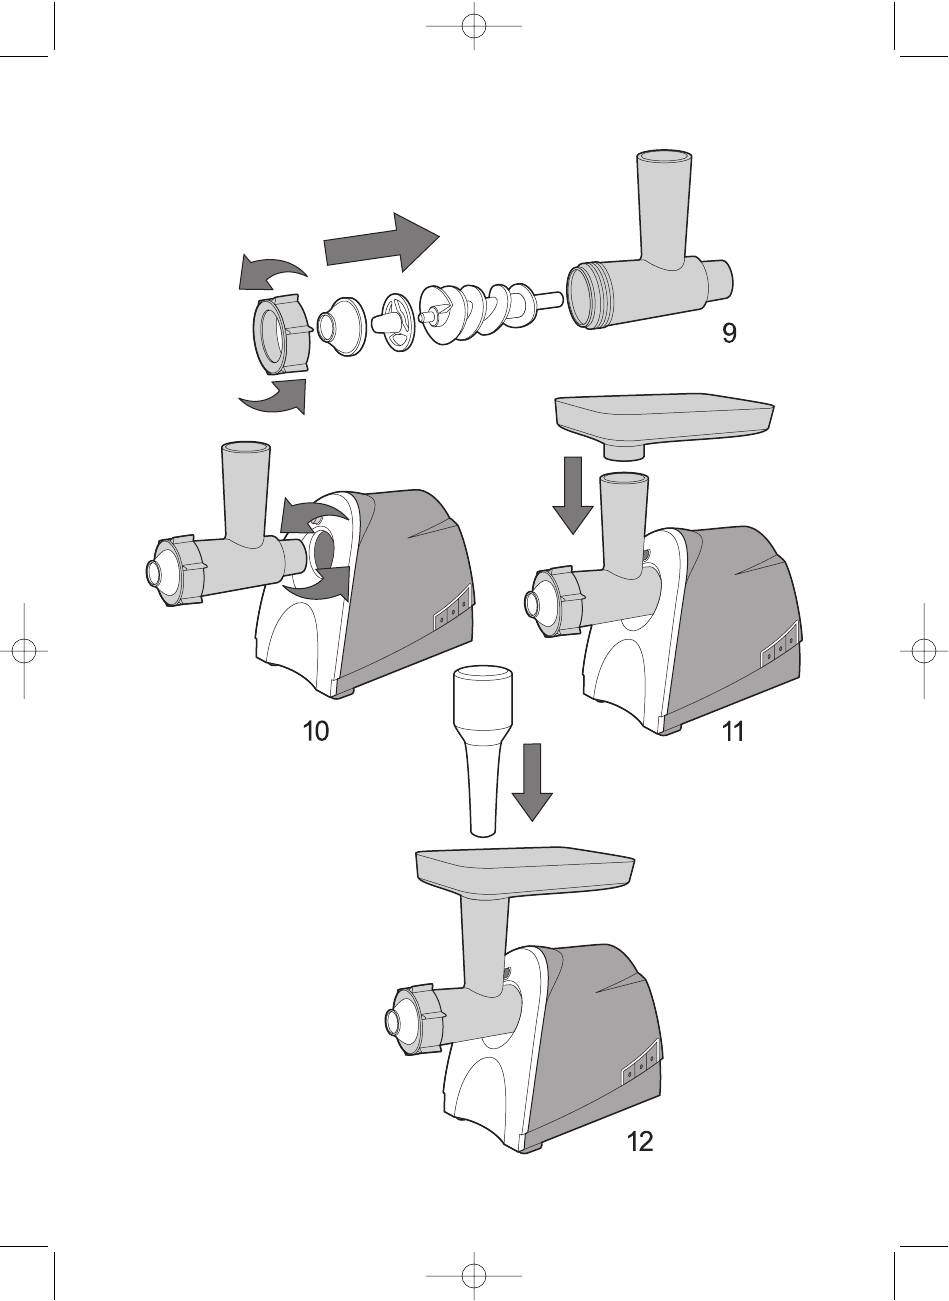
1. Insert the feeder screw (12) into the mincer head
Never place the appliance on or near a hot surface
(3), fix the crossed-knife blade (13), take the
(such as gas or electric Stove or heated oven).
required screen plate (10, 11, 14) and fix it above
Handle the power cord carefully. Never carry the
the knife by aligning the screen plate groove with
appliance by the cord.
the mincer head pin, tighten the nut lightly (15). Fig.
This appliance is intended for household use only.
1.
Do not attempt to repair the appliance yourself;
Attention:
instead, take it to the authorized service center.
the appliance with the knife improperly aligned
(cutter side toward the feeding screw) won't mince
IDENTIFICATION OF PARTS
when assembling the mincer head, do not tighten
1. Pusher
the nut (15) too strong, the nut (15) should be final-
2. Food tray
ly tightened only after mounting of the assembled
3. Mincer head
mincer head on the base unit.
4. Mincer button
2. Mount the assembled mincer head and turn it anti-
5. Base unit
clockwise to fix. Fig. 2.
6. Power switch (ON/OFF)
3. Place the food tray (2). Fig. 3.
7. Reverse button (REV)
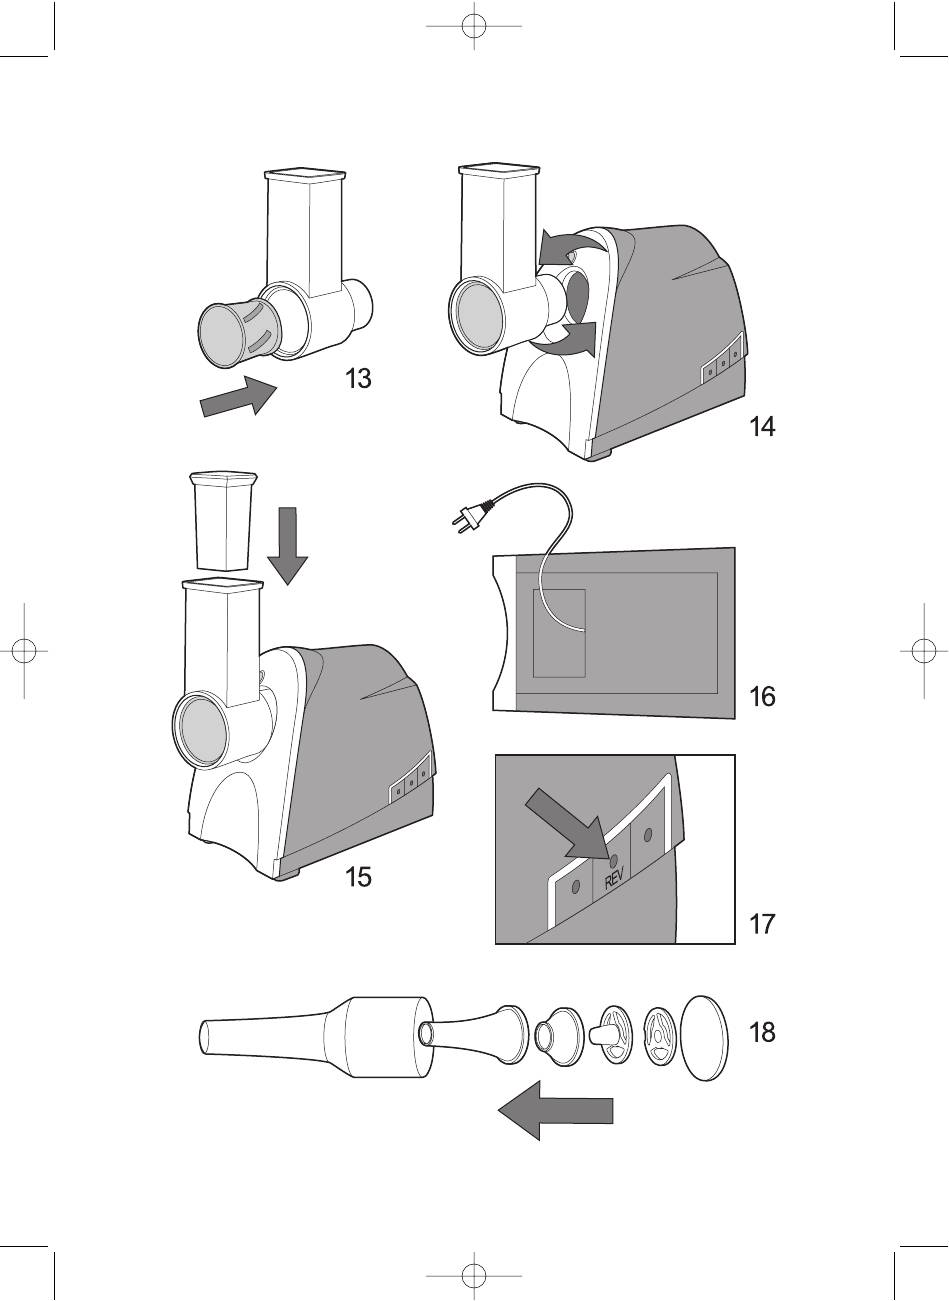
4. Connect the appliance to the mains.
8. Low speed button
5. Switch on the neat mincer by pressing ON/OFF but-
9. Key for ring nut
ton (5).
10. Fine-mincing screen plate
6. To process soft vegetables, such as tomatoes, use
11. Coarse-mincing plate
the low speed of rotation by pressing the low speed
12. Feeder screw
button(8).
13. Crossed-knife blade
7. Always use the pusher (1) only. Fig. 4.
7


