Vitek VT-3450 Black: инструкция
Раздел: Видео Аудио Фото Оборудование
Тип: Магнитола С Cd Плеером
Характеристики, спецификации
Инструкция к Магнитоле С Cd Плеером Vitek VT-3450 Black
MANUAL INSTRUCTION
ИНСТРУКЦИЯ ПО ЭКСПЛУАТАЦИИ
PORTABLE STEREO CD/CDR/MP3 DISC PLAYER
WITH RADIO CASSETTE RECORDER
ОДНОКАССЕТНАЯ МАГНИТОЛА
С CD/CDR/MP3 ПРОИГРЫВАТЕЛЕМ
МОДЕЛЬ VT3450
VT-3450.qxd 27.06.03 16:54 Page 2
Гарантийный талон
ENGLISH
Сведения о покупке
Модель:
Серийный №:
MS 345000000
Дата покупки:
Сведения о продавце
Название и адрес продающей организации
Телефон:
Подтверждаю получение исправного изделия, с условиями гарантии ознакомлен
П
одпись покупателя
М.П.
Внимание!
Гарантийный талон действителен только при наличии печати
продающей организации
Модель: Серийный №:
MS 345000000
Дата поступления в ремонт:
Дата выполнения ремонта:
Вид ремонта:
М.П.
Купон №3
Модель: Серийный №:
MS 345000000
Дата поступления в ремонт:
Дата выполнения ремонта:
Вид ремонта:
М.П.
Купон №2
Модель: Серийный №:
MS 345000000
Дата поступления в ремонт:
Дата выполнения ремонта:
Вид ремонта:
М.П.
Купон №1
2
VT-3450.qxd 27.06.03 16:54 Page 4
ENGLISH
INTRODUCTION
Thank you for buying this product.
Please read through these operating instructions so you will know how to operate your equipment prop
erly. After you have finished reading the instruction, put them away in a safe place for future reference.
WARNING
To prevent fire or shock hazard, do not expose this appliance to rain or moisture. To avoid electrical
shock, do not open the cabinet, refer servicing to qualified personnel only.
CAUTION
Use of controls or adjustments or performance of procedures other than those specified herein may
result in hazardous radiation exposure.
DANGER
Invisible laser radiation when open and interlock failed or defeated. Avoid direct exposure to beam.
This compact disc player is classified as a CLASS 1 LASER PRODUCT.
THE CLASS 1 LASER PRODUCT label is located on the rear exterior.
NOTE: The manufacturer is not responsible for any radio or TV interfer
ence caused by unauthorized modifications to this equipment. Such
modifications could void the user's authority to operate the equipment.
POWER SUPPLY
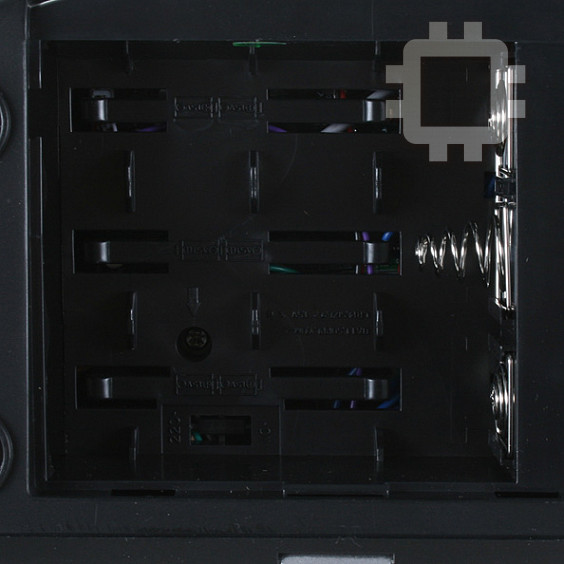
BATTERY OPERATION
1. Remove the Battery Compartment Cover by gently pushing the clips downward and outwards.
2. Install 6 x 'C' size batteries (UM2 or equivalent) and take care that the correct polarities are observed.
3. Replace the battery compartment cover (27).
NOTE:
• The AC line cord must be removed for battery operation.
• To avoid damage which may result from leaking batteries, remove the batteries when they become
exhausted or when the unit is not to be used for a long period of time.
AC MAINS OPERATION
1. Before making any connections, check that the voltage marked on the rating plate of the unit corre
sponds with your household supply.
2. Insert the AC line cord plug into the AC INPUT SOCKET (28) of the unit and plug the other end of the
cord into a standard household supply outlet.
22
3
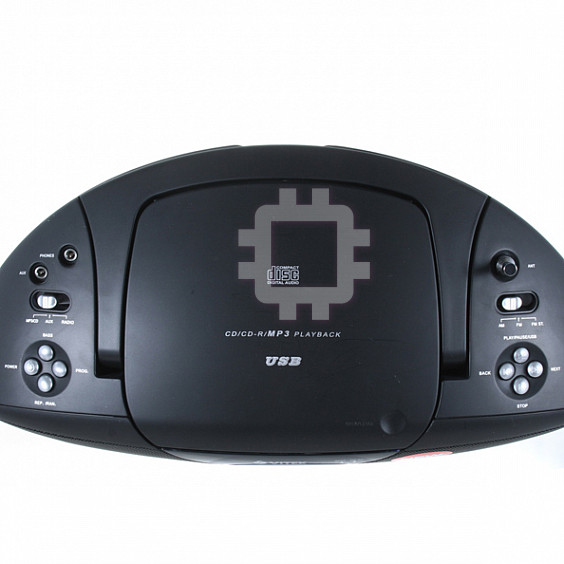
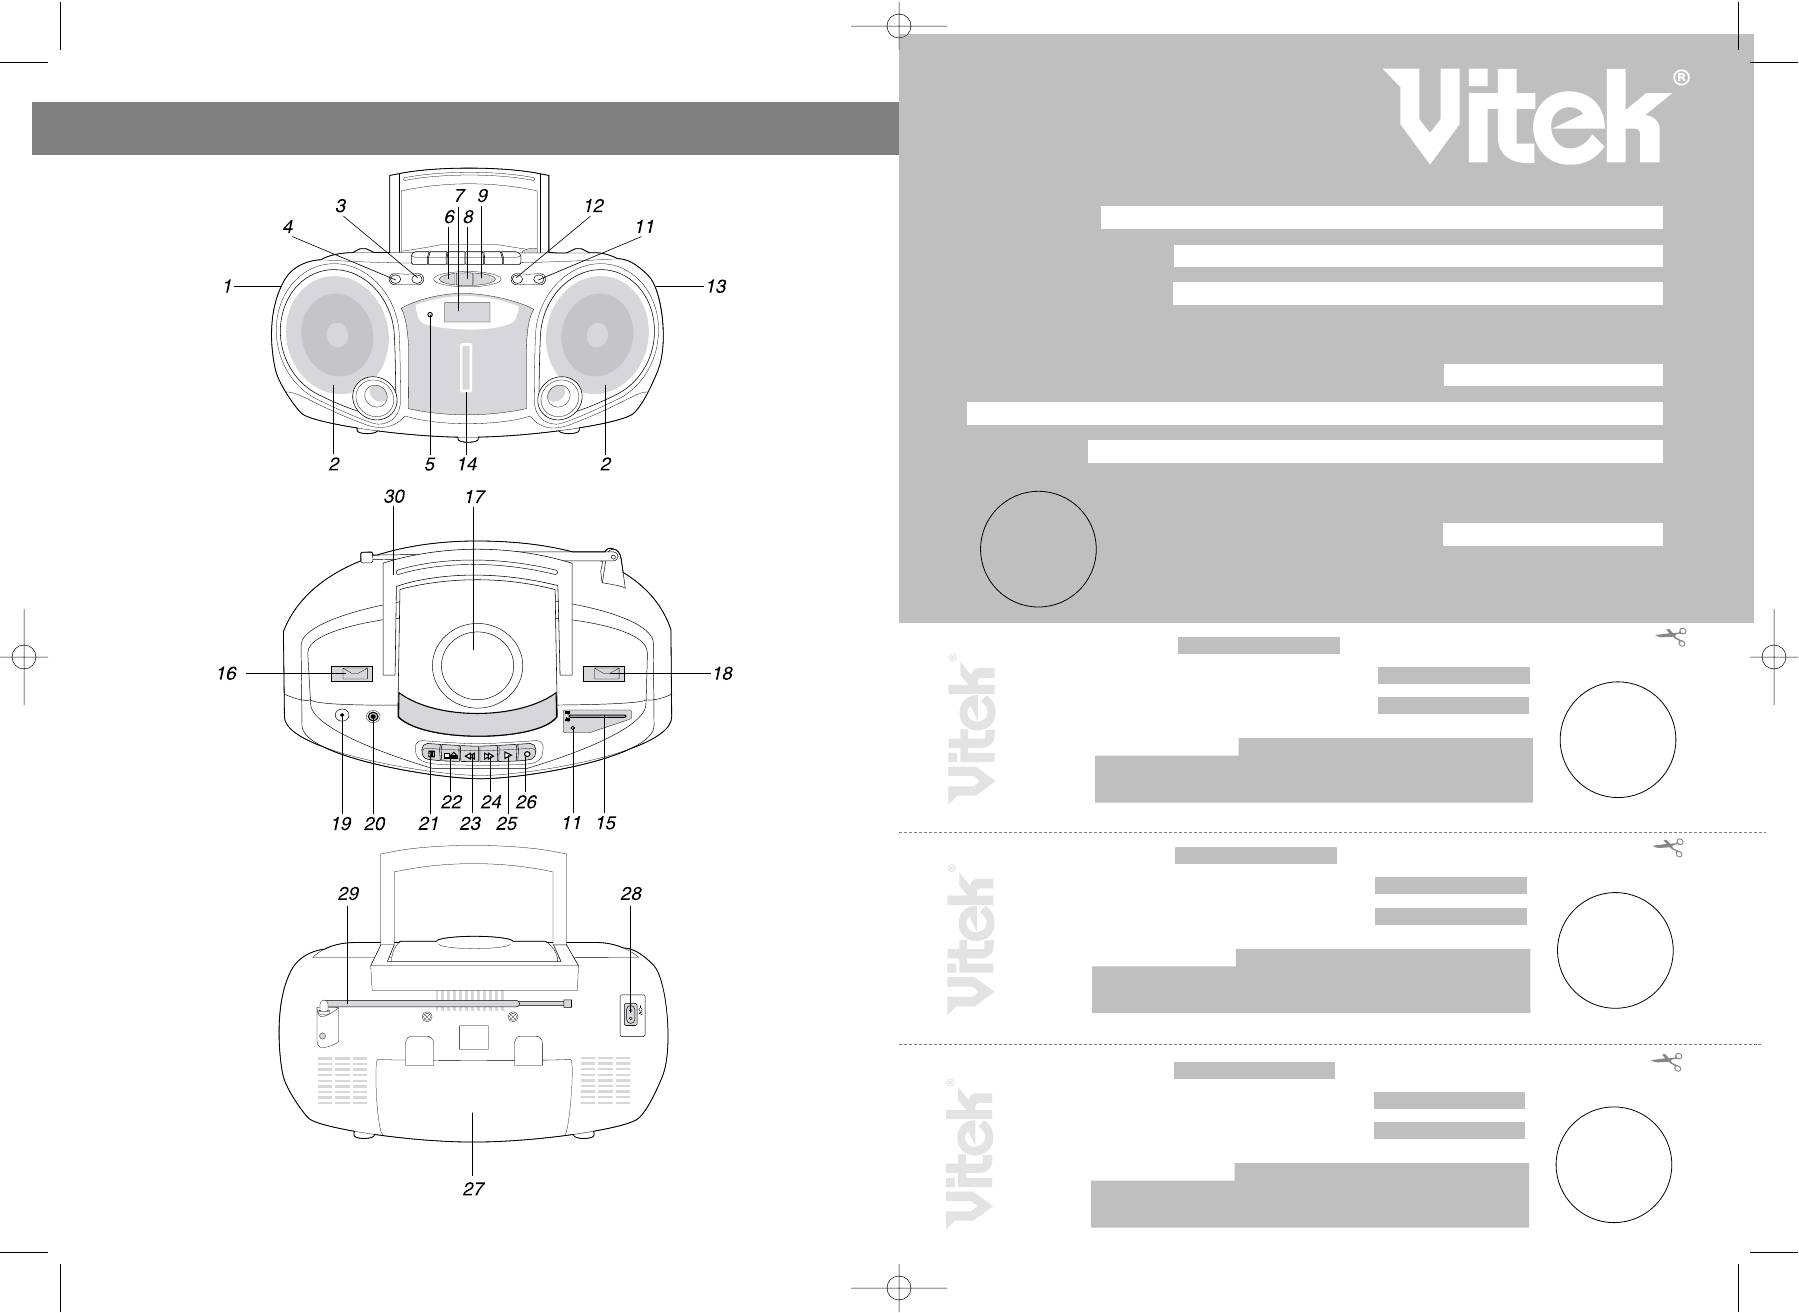
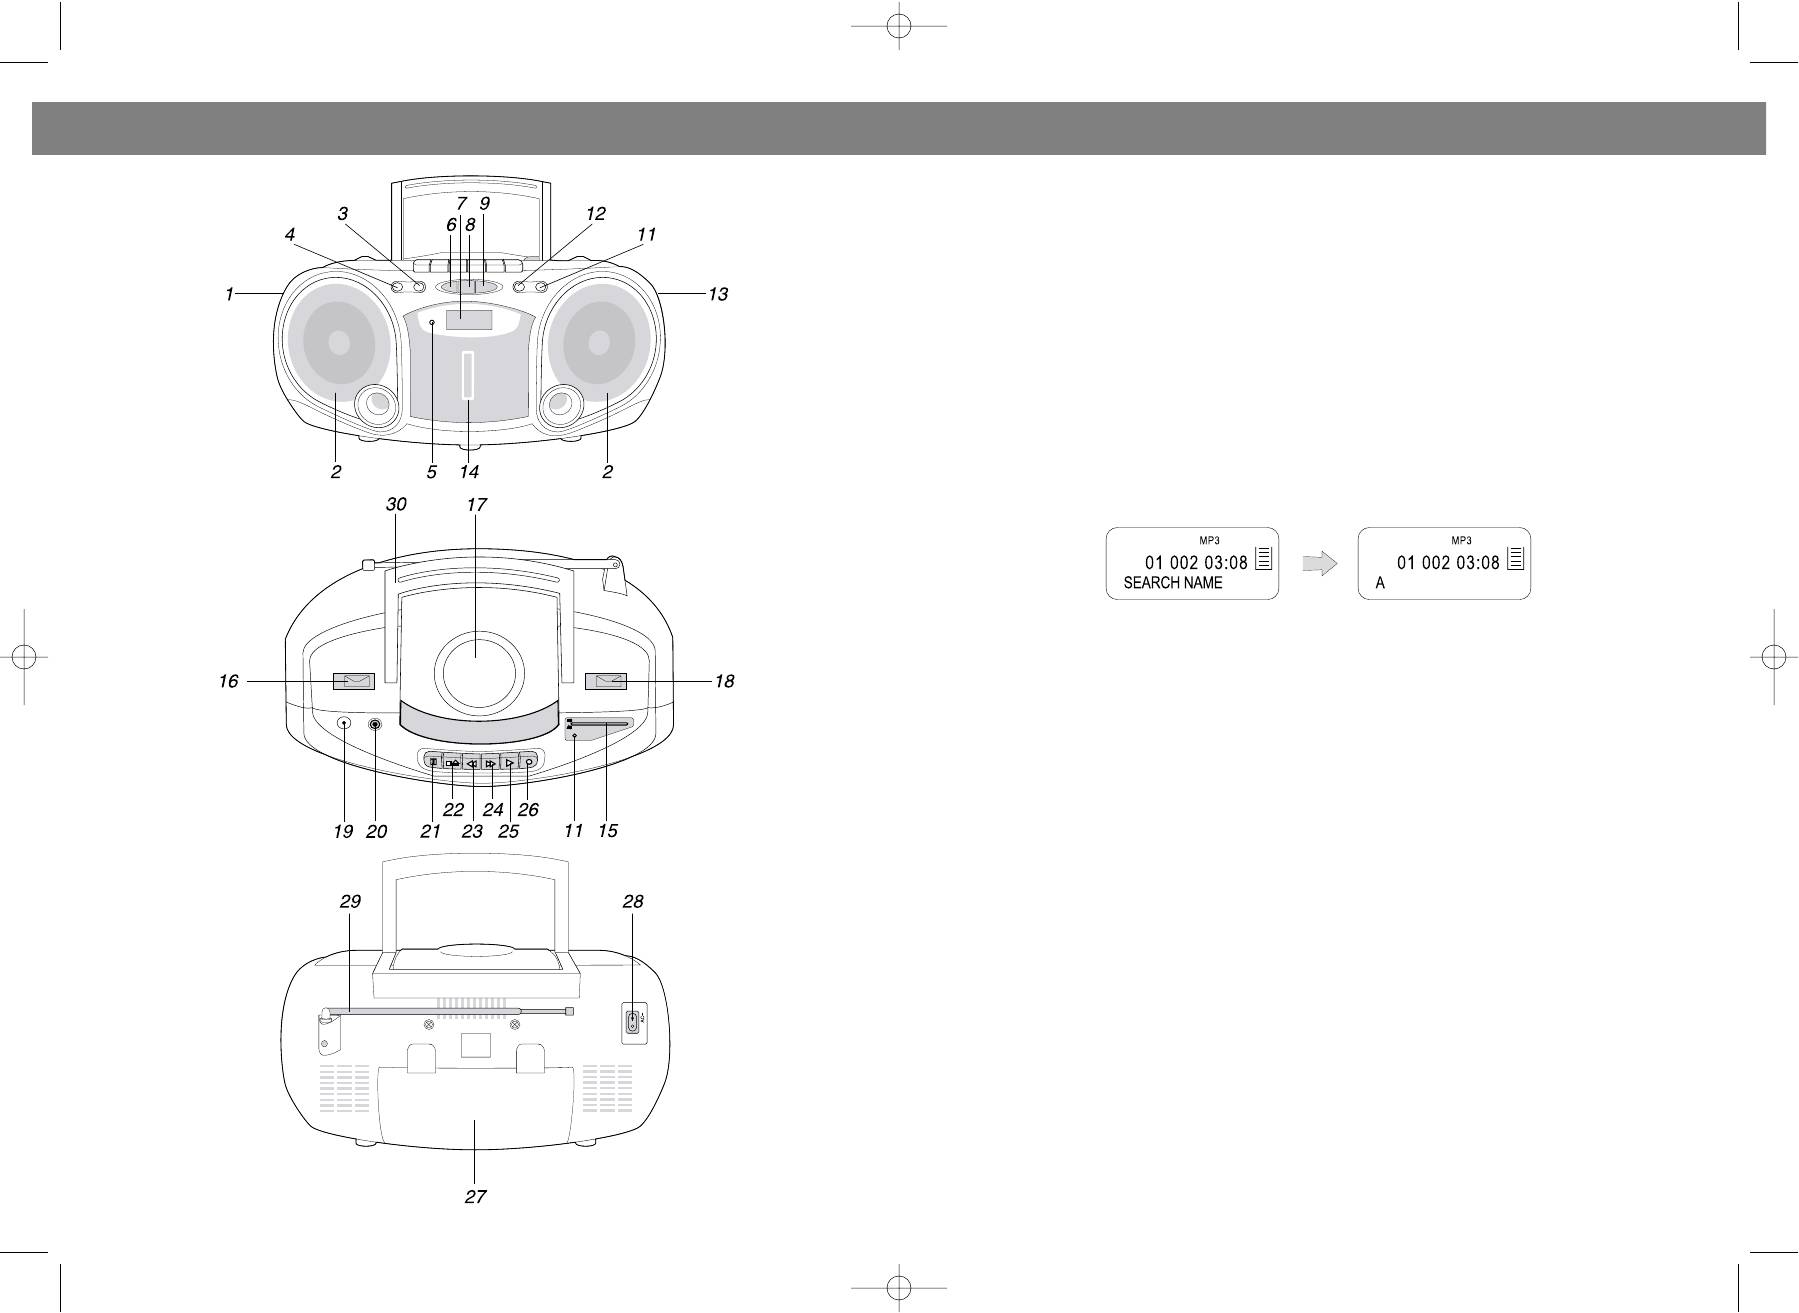
1. VOLUME CONTROL
16. FUNCTION SWITCH
2. SPEAKERS
17. CD DOOR
3. MODE BUTTON
18. BAND SWITCH
4. EQ/PROGRAM BUTTON
19. BUILTIN MICROPHONE
5. POWER INDICATOR
20. HEADPHONE JACK
6. CD STOP BUTTON
21. PAUSE BUTTON
7. LCD DISPLAY
22. STOP/EJECT BUTTON
8. CD ESP/10 + BUTTON
23. FAST FORWARD BUTTON
9. CD PLAY/PAUSE BUTTON
24. REWIND BUTTON
10. FORWARD SKIP/SEARCH BUTTON
25. PLAY BUTTON
11. FM STEREO INDICATOR
26. RECORD BUTTON
12. BACKWARD SKIP/SEARCH BUTTON
27. BATTERY COMPARTMENT COVER
13. TUNING CONTROL
28. AC INPUT SOCKET
14. CASSETTE DOOR
29. TELESCOPIC ANTENNA
15. DIAL SCALE
30. HANDLE
VT-3450.qxd 27.06.03 16:54 Page 6
ENGLISH
РУССКИЙ
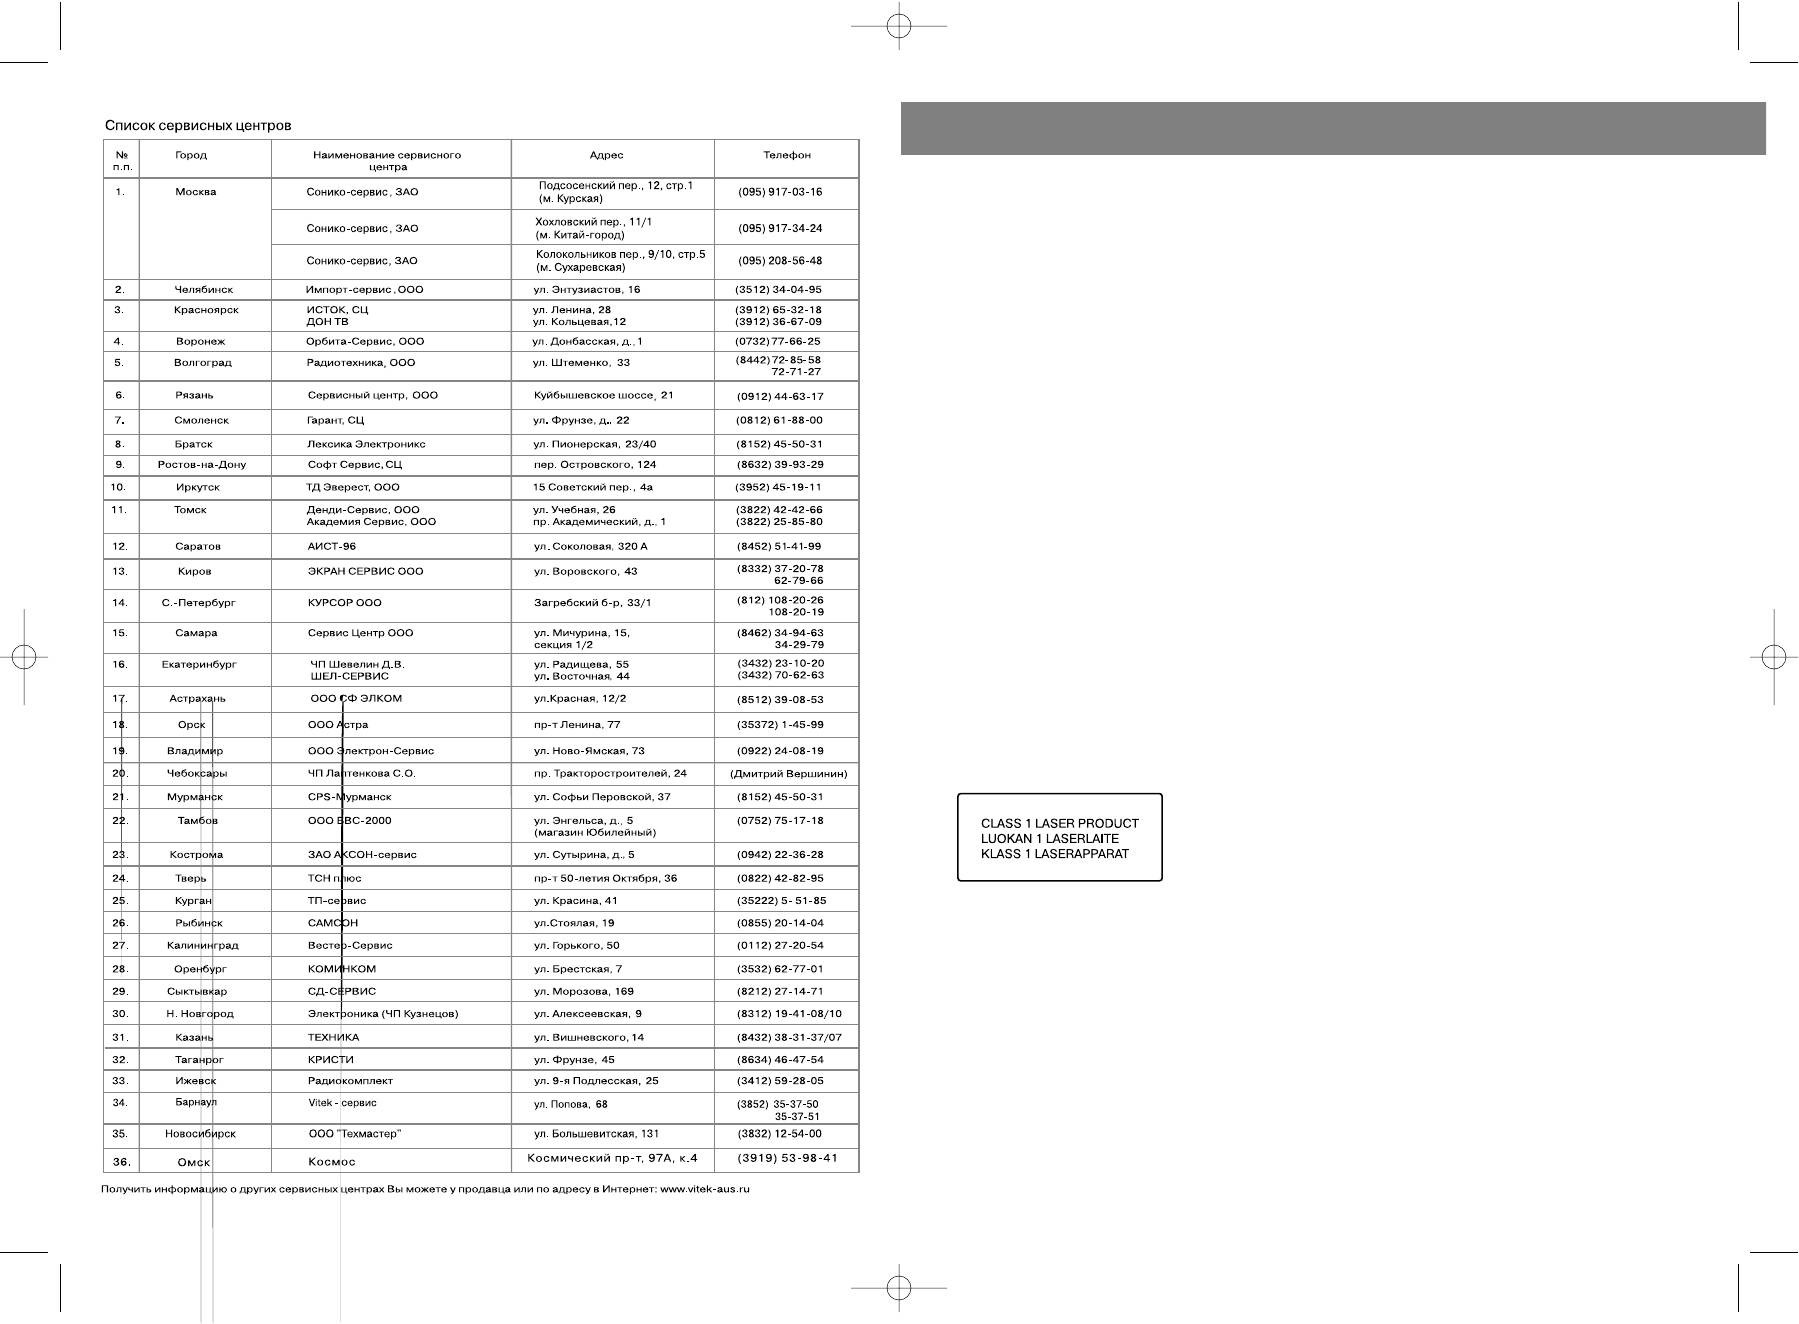
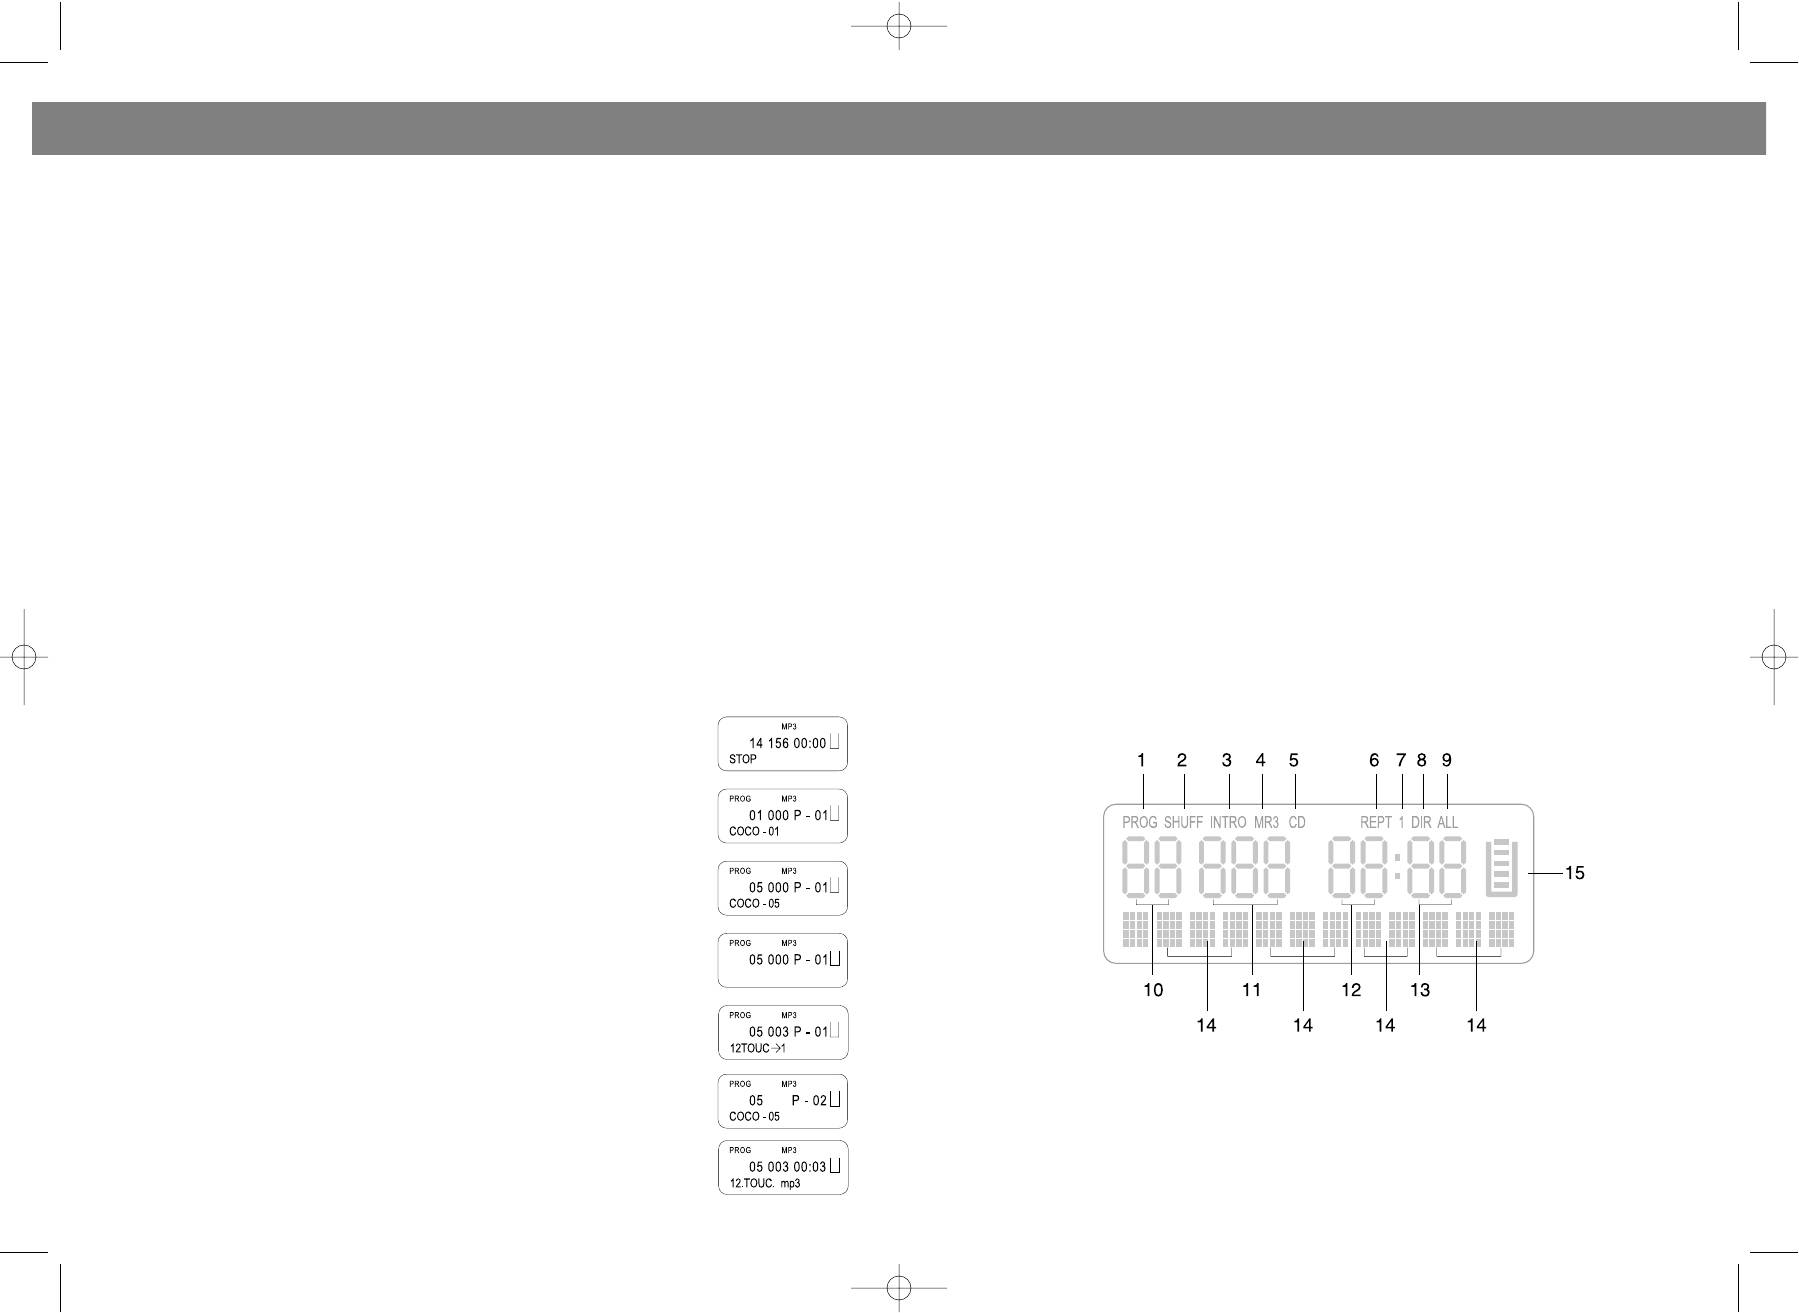
SIGNS IN LCD DISPLAY WINDOW
ТЕХНИЧЕСКОЕ ОБСЛУЖИВАНИЕ
КОМПАКТДИСК
Для обеспечения нормального воспроизведения компактдисков следует соблюдать следующие
требования.
• Нельзя писать на поверхностях диска, особенно на поверхности без лейбла. Сигналы
считываются с поверхности без лейбла.
• Следует оберегать диски от воздействия прямых солнечных лучей, тепла и чрезмерной
влажности. Если диск влажный, протрите его перед использованием мягкой сухой тканью.
• При обращении с диском следует держать его за края. Отпечатки пальцев, грязь или влага на
диске вызовут помехи или ошибку воспроизведения. Если диск загрязнен или его
воспроизведение неправильное, следует очистить его мягкой сухой тканью, стирая
загрязнения от центра к краям по радиусу.
КАССЕТНАЯ ЛЕНТА
• Прежде чем вставить кассету в кассетоприемник, следует натянуть ослабленную ленту
карандашом. Не касайтесь поверхности ленты.
• Для предотвращения случайного стирания записи удалите предохранительный язычок
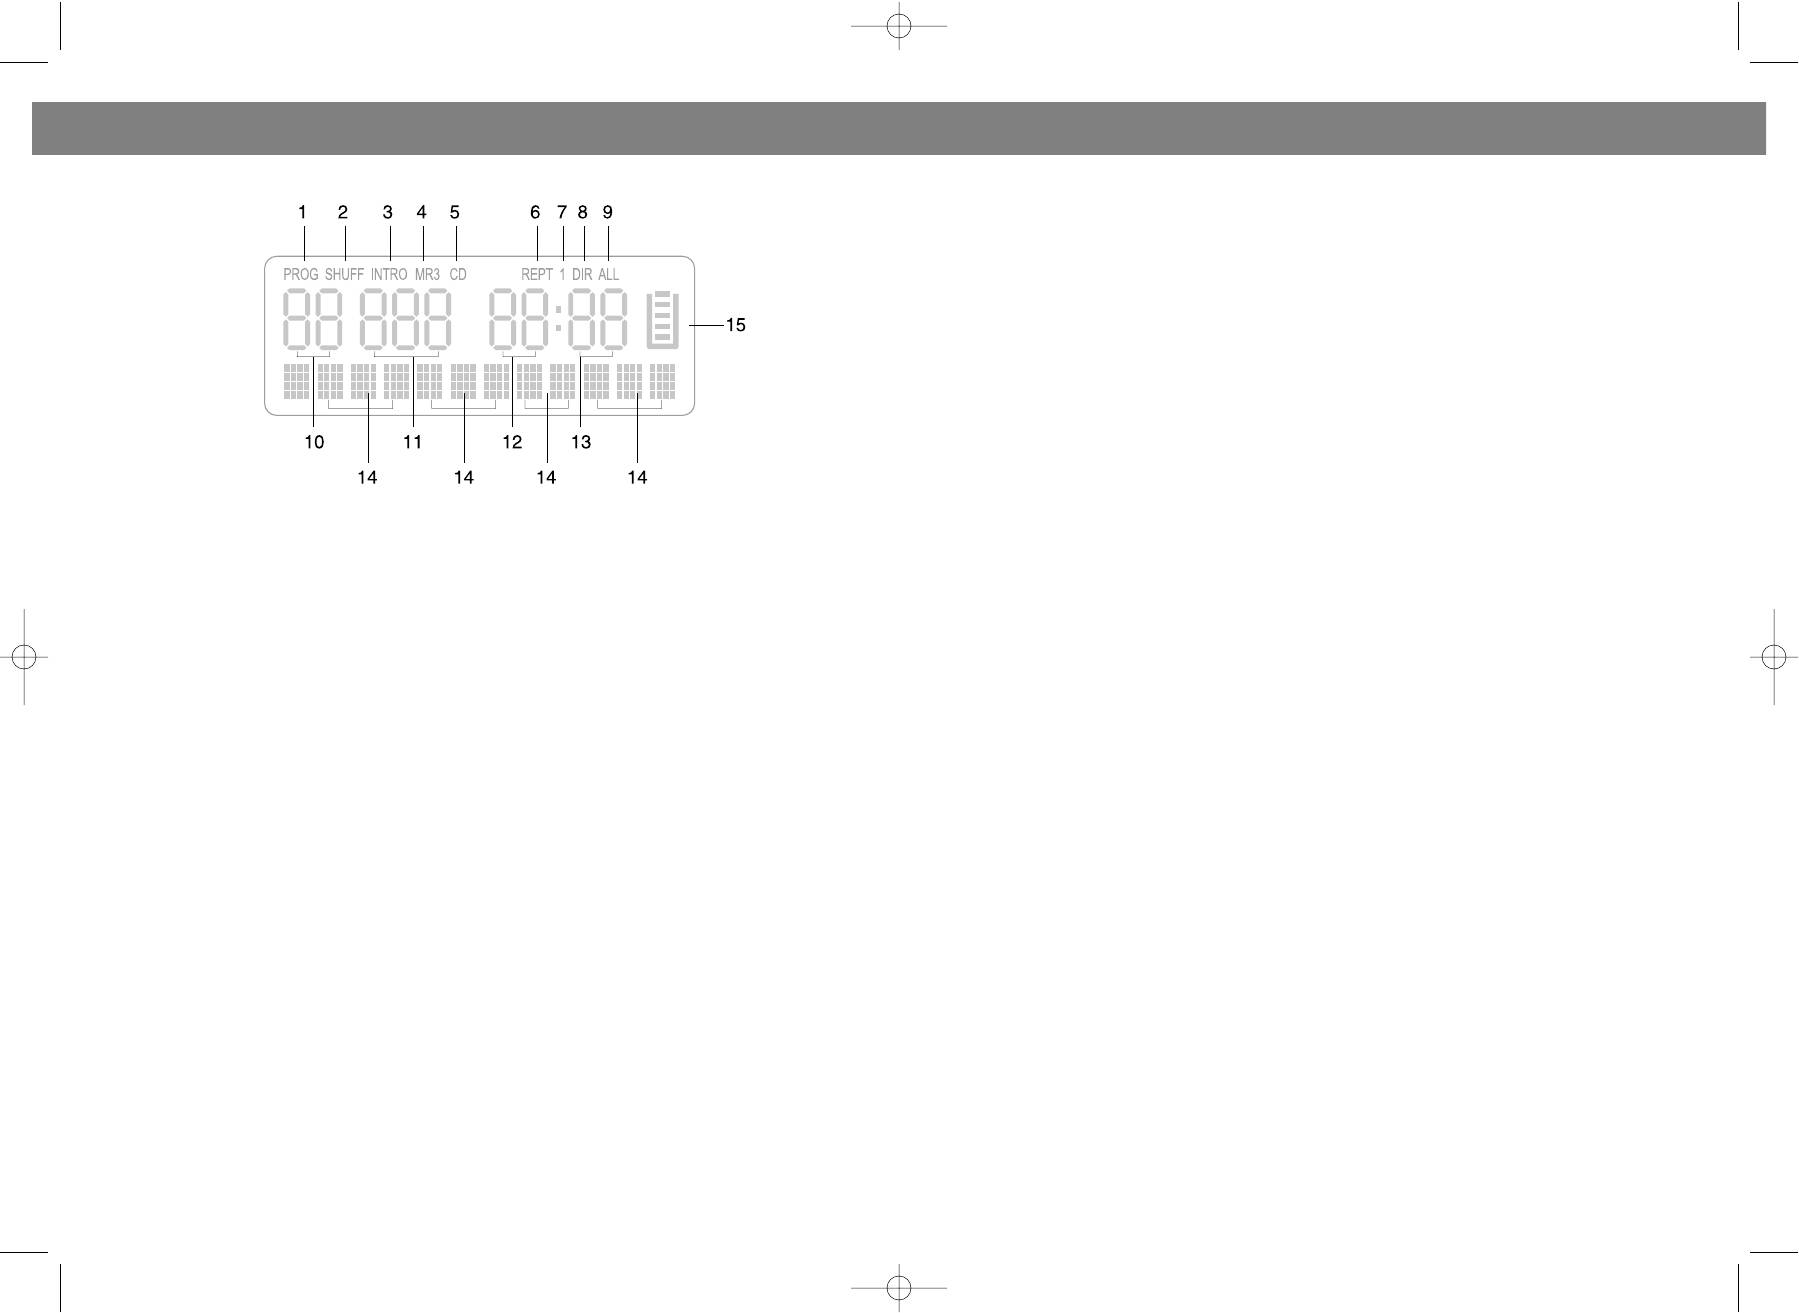
1. "PROG" shows during programmed playing.
кассеты. Заклеив скотчем отверстие от язычка, Вы можете снова осуществить запись на
2. "SHUFF" shows during random playing.
кассету.
3. "INTRO" shows during intro scan playing.
4. "MP3" shows when the disc being played is a MP3 disc.
СПЕЦИФИКАЦИЯ
5. "CD" shows when the disc being played is a CD.
Питание AC 230 В~50 Гц;
6. "REPT" shows during repeat playing.
DC9V (С) x 6
7. "REPT 1" shows during single track repeat playing.
Выходная мощность 2 Вт х 2 (RMS)
8. "REPT DIR" shows during single album tracks repeat playing (only for MP3 disc).
200 Вт (Р.М.Р.О.)
9. "REPT ALL" shows during the whole disc repeat playing.
Диапазон АМ 540 1600 КГц
10. This is the current album number during MP3 playing.
Диапазон FM 64 108 МГц
11. This is the number of the track being played.
Размер Примерно 610 х 230 х 240 мм
12. This is the elapsing minute of the track being played.
Вес Приблизительно 4,67 кг.
13. This is the elapsing second of the track being played.
Сопротивление динамиков 8 Ом
14. This is the status column. During MP3 playing, it also shows the playing information of the current
Сопротивление наушников 32 Ом
track.
15. The symbol shows when the ESP (Electronic Shock Protection) function is activated.
СРОК СЛУЖБЫ МАГНИТОЛЫ НЕ МЕНЕЕ 5ТИ ЛЕТ
TO PLAY THE RADIO
УСЛОВИЯ ГАРАНТИЙНОГО ОБСЛУЖИВАНИЯ
1. Slide the FUNCTION switch (16) to the RADIO position.
Уважаемый покупатель!
2. Select the desired wave band with the BAND switch (18).
Фирма VITEK выражает благодарность за Ваш выбор и гарантирует высокое качество и безупречное функционирование
приобретенного Вами изделия при соблюдении правил его эксплуатации.
3. Tune to the desired station by rotating the TUNING CONTROL (13). (Move the control back and for
Срок гарантии на все изделия - 12 месяцев со дня покупки. Данным гарантийным талоном VITEK подтверждает исправность
ward until you get the strongest clearest sound).
данного изделия и берет на себя обязательство по бесплатному устранению всех неисправностей, возникших по вине производителя.
4. The builtin AM antenna and external FM TELESCOPIC ANTENNA (29) are directional.
Гарантийный ремонт может быть произведен в авторизированном сервис-центре на территории России.
Условия гарантии:
• When receiving an FM broadcast, fully extend the FM TELESCOPIC ANTENNA (29) and position for the
1. Настоящая гарантия имеет силу при соблюдении следующих условий:
best reception.
- правильное и четкое заполнение гарантийного талона с указанием наименования модели, ее серийного номера, даты продажи и
печати фирмы-продавца в гарантийном талоне и отрывных купонах;
• For AM, rotate the whole set until the best reception is heard.
- наличие оригинала квитанции (чека), содержащего дату покупки.
5. Adjust the volume level to your personal listening taste.
2. VITEK оставляет за собой право на отказ в гарантийном обслуживании в случае непредоставления вышеуказанных документов,
6. To turn off the radio, slide the FUNCTION Switch (16) to the TAPE position.
или если информация в них будет неполной, неразборчивой, противоречивой.
3. Гарантия не включает в себя периодическое обслуживание, установку, настройку изделия на дому у владельца.
Note:
4. Не подлежат гарантийному ремонту изделия с дефектами, возникшими вследствие:
• If a particular FM (STEREO) station is weak, or you hear too much background noise, try moving the
- механических повреждений;
- несоблюдения условий эксплуатации или ошибочных действий владельца;
position of the band selector switch to the FM (MONO) position. This can often result in a much clear
- неправильной установки, транспортировки;
er reception.
- стихийных бедствий, а также других причин, находящихся вне контроля продавца и изготовителя;
• When the band selector switch is set to FM STEREO and a stereo broadcast is being received, the FM
- попадания внутрь изделия посторонних предметов, жидкостей, насекомых;
- ремонта или внесения конструктивных изменений неуполномоченными лицами;
STEREO indicator (11) on the top of the unit will be light up.
- использования аппаратуры в профессиональных целях;
- при выходе из строя деталей, обладающих ограниченным сроком службы.
5. Настоящая гарантия не ущемляет законных прав потребителя, предоставленных ему действующим законодательством.
4
21
VT-3450.qxd 27.06.03 16:54 Page 8
ENGLISHРУССКИЙ
6. Для программирования других треков, повторите шаги 35.
STEREO PHONES JACK
7. Для начала запрограммированного воспроизведения нажмите кнопку "PLAY/PAUSE" (9).
A Stereo Phone Jack (3.5mm) has been provided on the top of the cabinet, so that you can listen to the
set without disturbing others. To use this jack, plug in low impedance headphones/earphones and adjust
the VOLUME CONTROL (1) to a comfortable listening level.
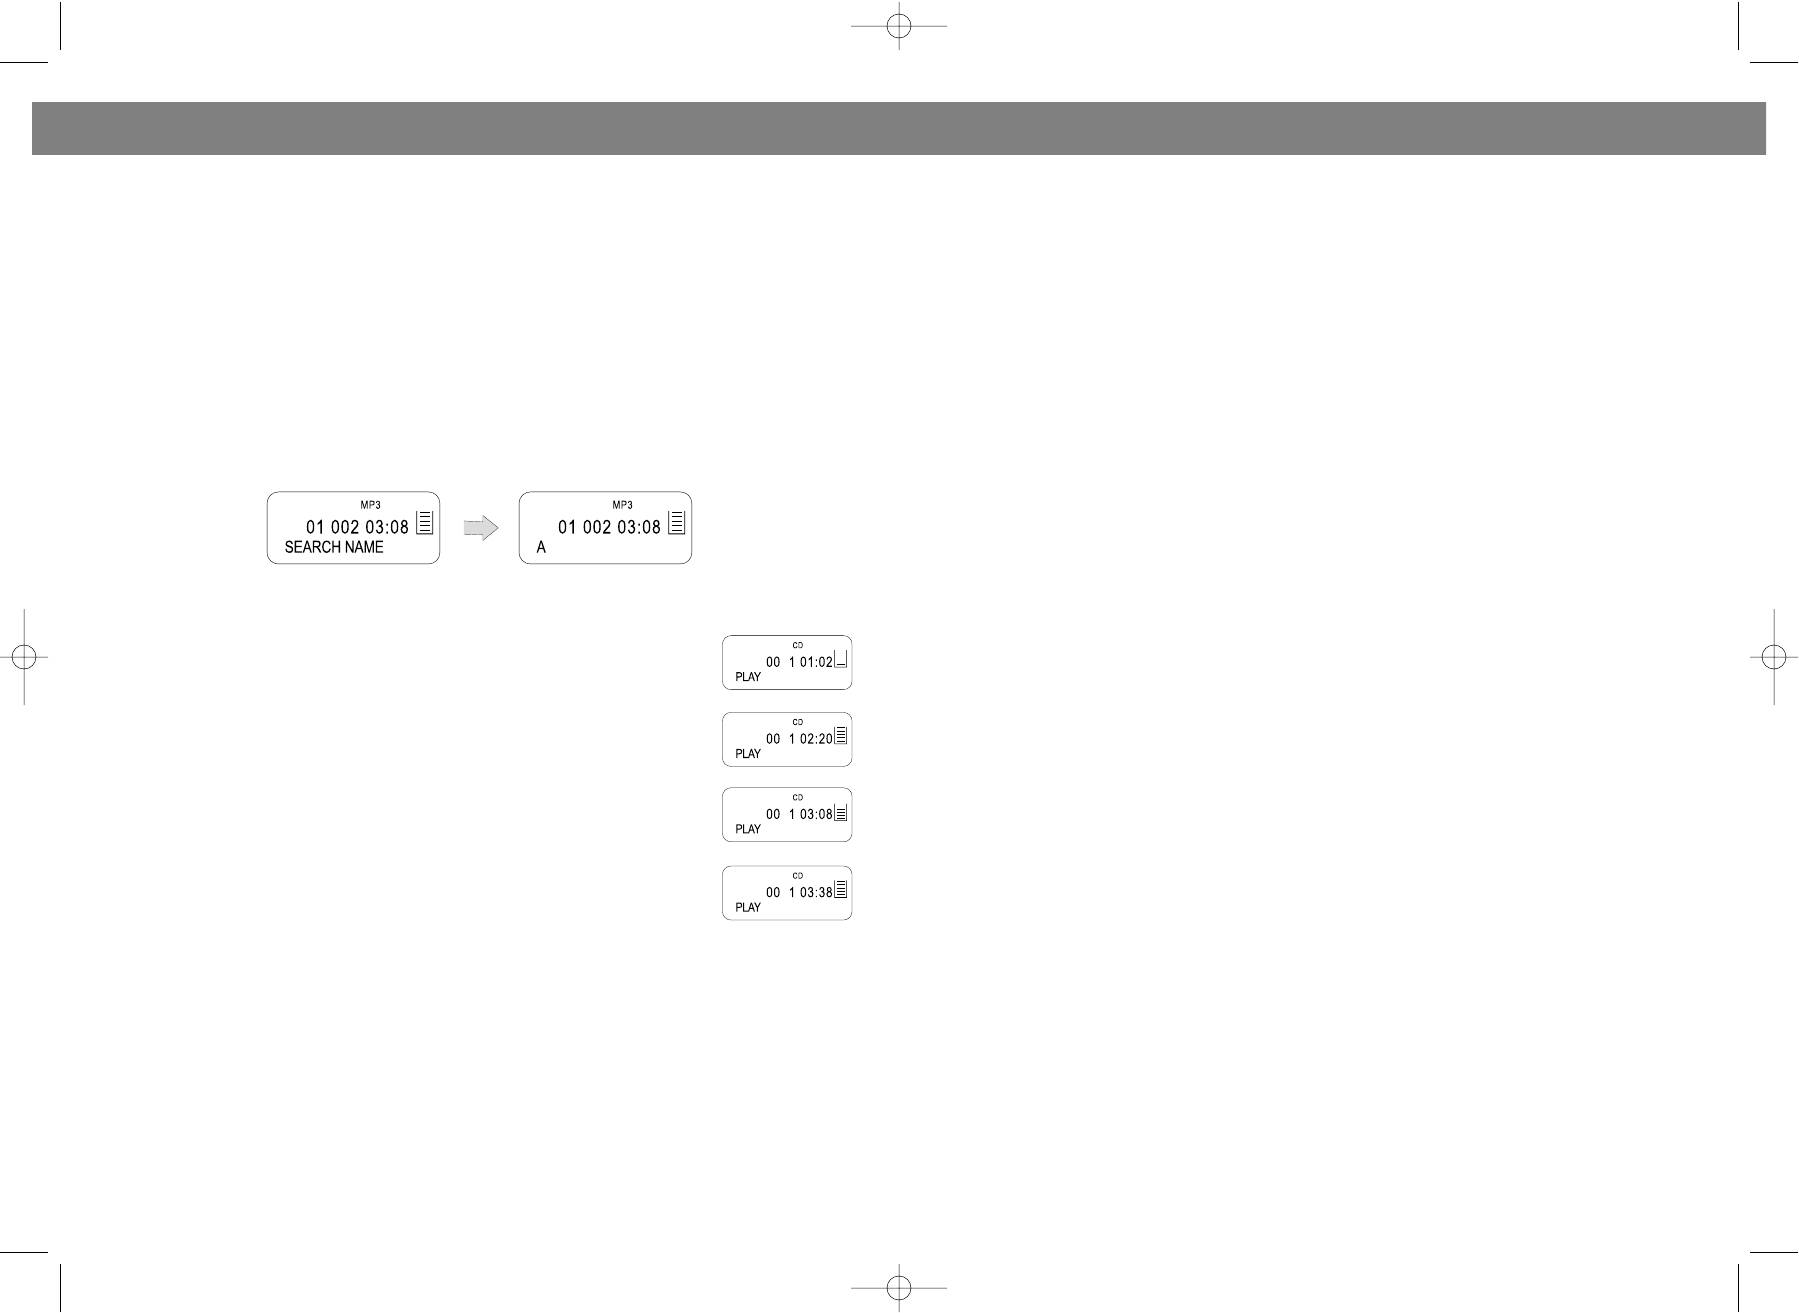
ПОИСК ТРЕКА ПО НАЗВАНИЮ ПЕСНИ
Note: When external headphones/earphones are connected, the sound from the unit of main speakers
Вы можете найти желаемый трек, написав название песни на английском языке на дисплее, для
will be muted.
этого:
Caution: Listening at high power for a long moment could damage users' ears.
В режиме остановки нажмите и удерживайте кнопку MODE (3) в течение нескольких секунд до
тех пор, пока на дисплее не появится надпись “SEARCH NAME”. После того как на дисплее
CASSETTE OPERATION
появится “А”, Вы можете писать название песни.
Для написания букв и цифр воспользуйтесь кнопками SKIP/SEARCH !/" (12, 10). После выбора
RECORD button (26)
нужного символа, нажмите кнопку MODE (3) для написания следующего. Для удаления символа,
Press to make a recording from either the CD or radio or internal microphone.
воспользуйтесь кнопкой STOP (6).
Note: If a recordable cassette is installed, when the RECORD button (26) is pressed, the PLAY button (25)
По окончании написания названия песни, для поиска и воспроизведения трека нажмите кнопку
will be depressed at the same time. The record key will not go down if the cassette is protected; see
"PLAY/PAUSE" (9). Если название песни написано неправильно, на дисплее появится надпись
' Protecting recordings from being erased'.
“NOT FOUND”. Максимальное число символов 8.
PLAY button (25)
Press the PLAY button (25) to start playing a cassette.
REWIND button (24)
Press the REWIND button (24) to rewind a tape quickly. Press STOP/EJECT button (22) to release the but
ton at the end of the tape.
АНТИШОК
FAST FORWARD button (23)
Функция “АНТИШОК” необходима для предотвращения порчи или остановки
Press the FAST FORWARD button (23) to advance the tape quickly. Press STOP/EJECT button (22) to
звука, когда прибор находится под влиянием тряски или вибрации во время
release the button at the end of the tape.
проигрывания.
• Когда плеер подвержен вибрации во время воспроизведения мелодий,
STOP/EJECT button (22)
данные, хранимые в памяти, продолжают расшифровываться. Это дает время
Press the STOP/EJECT button (22) to cancel a selection, i.e, press this button during cassette play to
для стабилизации и продолжения считывания новых данных.
stop the tape.
In stop mode, press the button to eject the cassette.
• Если прибор подвергается продолжительным вибрациям и вся
информация, хранимая в памяти, использована, то на дисплее высветится
PAUSE button (21)
знак, напоминающий об этом. В этом случае звук может остановиться на
The PAUSE button (21) can be used to interrupt a Recording or Playback temporarily and is useful for
мгновение.
editing the content of the recorded tracks. Press the button once to pause the recording, press the but
• Для того, чтобы включить функцию антишока при воспроизведении
ton again to continue the recording.
компактдиска, нажмите кнопку CD ESP/10+ (8). При воспроизведении МР3
Note: In Pause mode, the Cassette motor is still energized, therefore the feature should not be used for
диска функция включается автоматически.
long periods of time.
Примечание: Антишок для компактдиска 40 с., для МР3 80 с.
AUTOMATIC STOP
The Cassette mechanism has a builtin automatic stop. During Playing/Recording, the unit will automat
ГРАФИЧЕСКИЕ ЭКВАЛАЙЗЕРЫ
ically stop when the end of the tape is detected.
Вы можете выбрать различные звуковые эффекты с помощью переключателя EQ/PROG (4). В
режиме воспроизведения CD или МР3 диска нажмите кнопку EQ/PROG (4) один раз усиление
TO PLAY A CASSETTE TAPE
низких частот, два раза попэффект, три раза классический эффект музыки, четыре раза
1. Open the cassette door by pressing the cassette STOP/EJECT button (22).
эффект джаза, пять раз рокэффект, шесть раз обычное воспроизведение.
2. Insert a cassette with the exposed tape facing upwards and the full reel on the left (unit plays from left
to right) into the guides on the inside of the cassette door.
ПРОСЛУШИВАНИЕ ЧЕРЕЗ НАУШНИКИ
3. Close the cassette door.
Наушники (3.5 мм) подключаются в гнездо РНONE (20). При подключении наушников динамики
4. Set the FUNCTION switch (16) to the TAPE position.
мангитолы автоматически отключаются. Настройка звучания осуществляется при помощи тех же
5. Press the cassette PLAY button (25) to start the tape playing.
регуляторов, как и при обычном прослушивании.
6. Adjust the VOLUME CONTROL (1) to a comfortable listening level.
7. To stop the tape playing, press the STOP/EJECT button (22). Press the button again to open the cas
sette door and eject the tape.
Note: During play, when the end of the tape is reached the PLAY button (25) will pop up and play will stop.
20
5
VT-3450.qxd 27.06.03 16:54 Page 10

ENGLISH
РУССКИЙ
To play the other side of the tape, remove the cassette, turn the cassette over so that the full reel is on the
ПРОИГРЫВАНИЕ В РЕЖИМЕ “INTRO”
left, insert the cassette and press the PLAY button (25).
1. В режиме воспроизведения нажмите кнопку MODE (3) четыре раза, при этом на дисплее
появится индикатор “INTRO”.
CARE OF CASSETTE TAPES
2. Нажмите на кнопку "PLAY/PAUSE" (9) для сканированного воспроизведения треков МР3диска.
TO HELP AVOID TANGLES
Loose tape may jam or get tangled in the cassette recorder. With a hexagonal pencil or a similar tool, gen
ВОСПРОИЗВЕДЕНИЕ ДОРОЖЕК В ПРОИЗВОЛЬНОМ ПОРЯДКЕ
tly turn the pencil to tighten the tape.
Альбомы и треки МР3диска могут воспроизводиться в произвольном порядке (выбор
If the spool feels tight when taking up slack tape as described above, this may be due to ridges on the
последовательности проигрыватель осуществляет самостоятельно). Для этого в режиме
spool of tape. Tight spools can lead to uneven playback speed or tape tangling. In most cases the ridges
воспроизведения нажмите кнопку MODE (3) пять раз, при этом на дисплее появится индикатор
can be removed by fast winding the cassette from one end to the other and back again.
“SHUFF”, а затем кнопку "PLAY/PAUSE" (9).
Avoid the use of C120 tapes with this unit.
PROTECTING RECORDINGS FROM BEING ERASED.
ВОСПРОИЗВЕДЕНИЕ ВЫБРАННЫХ ТРЕКОВ
To prevent recordings from being erased accidentally, break out the tab(s) with a screwdriver. When the
• Для поиска желаемых треков одного альбома воспользуйтесь кнопками SKIP/SEARCH !/"
edge with the exposed tape is facing away from you, the tab that protects the side that is uppermost is on
(12, 10).
your right.
• Если Вы желаете выбрать треки, находящиеся в разных альбомах, для этого:
To record on a protected cassette, seal the open slots with adhesive tape.
1. Нажмите и, в течение нескольких секунд, удерживайте кнопку CD ESP/10+ (8),
MAINTENANCE
на дисплее замигает номер текущего альбома.
If the sound becomes muffled or in any case after every 15 hours of operation, clean the pinch roller, cap
2. Для выбора номера альбома воспользуйтесь кнопками SKIP/SEARCH !/" (12,10).
stan, erase head and record / play head. Open the cassette door and use a cotton bud moistened with
3. Нажмите кнопку "PLAY/PAUSE" (9), начнется воспроизведение первого трека в выбранном
special tape head cleaning fluid.
альбоме.
4. Для выбора конкретного трека данного альбома, воспользуйтесь кнопками SKIP/SEARCH !/"
CAUTION
(12, 10).
Never touch any of the parts described above with a metal object. Do not insert a cassette until the
Пример: Вы хотите прослушать 2 трек 9го альбома. Для этого:
cleaned parts are completely dry.
Нажмите и удерживайте кнопку CD ESP/10+ (8), на дисплее замигает номер альбома “01”.
AUTOMATIC LEVEL CONTROL (ALC)
Для поиска 9го альбома воспользуйтесь кнопками SKIP/SEARCH !/" (12, 10).
This set has the latest Automatic Level control circuitry, therefore, it is not necessary to adjust the Volume
Нажмите кнопку "PLAY/PAUSE" (9), начнется воспроизведение 1го трека 9го альбома.
Control when recording. This circuit automatically records at the correct level and prevents over loading.
Для выбора 2го трека воспользуйтесь кнопкой SKIP/SEARCH " (10).
Note: While recording you may adjust the VOLUME control (1) as you desire without affecting the record
ing operation.
ПРОГРАММИРОВАННОЕ ВОСПРОИЗВЕДЕНИЕ
TO RECORD FROM THE BUILTIN RADIO
Примечание: Программирование диска возможно только в режиме остановки диска. Вы можете
1. Slide the FUNCTION switch (16) to the RADIO position and tune to the desired station.
запрограммировать до 20 дорожек.
2. Load a cassette into the cassette compartment, with the full reel on the left.
1. В режиме остановки нажмите кнопку EQ/PROG (4).
3. Press the cassette RECORD button (26) until it locks in the down position (PLAY button (25) is
2. Для выбора номера каталога воспользуйтесь альбома SKIP/SEARCH !/" (12, 10).
depressed at the same time) and recording will start.
3. Нажмите кнопку EQ/PROG (4) еще раз.
4. To end the recording, press the cassette STOP/EJECT button (22). If this button is not pressed, the
recording will stop automatically when the end of the tape is reached.
4. Для выбора конкретного трека данного каталога, воспользуйтесь кнопками SKIP/SEARCH !/"
(12, 10). Для подтверждения номера выбранного трека нажмите кнопку EQ/PROG (4).
5. To listen to your recording, press the cassette REWIND button (24) until the start point of the recording
is reached and then press the PLAY button (25). Use the VOLUME control (1) to adjust the playback level
5. Повторите шаг 4 для программирования других треков.
to your personal taste.
6. Для начала запрограммированного воспроизведения нажмите кнопку "PLAY/PAUSE" (9).
Note: On each end of the tape, there is a tape leader and no recording will take place over this portion of
Пример: Вы хотите запрограммировать 3й трек 5го каталога.
the tape. If you wish recording to take place as soon as the RECORD button (26) is pressed, please
1. В режиме остановки нажмите кнопку EQ/PROG (4), при этом на дисплее появится “01” и “Р01”.
ensure that the leader is winded past the record head.
2. Для выбора 5го каталога воспользуйтесь кнопками SKIP/SEARCH !/" (12, 10),
при этом на дисплее появится “05”.
TO RECORD FROM A COMPACT DISC
1. Slide the FUNCTION switch (16) to the CD position.
3. Нажмите кнопку EQ/PROG (4), при этом на дисплее появится номер трека “000”.
2. Load a cassette into the cassette compartment with the full reel on the right.
4. Для выбора 3го трека воспользуйтесь кнопками SKIP/SEARCH !/" (12, 10),
3. Insert the compact disc from which you wish to record and close the CD door (17).
при этом на дисплее появится “003”.
4. Press the cassette PAUSE button (21) on the tape deck.
5. Снова нажмите кнопку EQ/PROG (4), при этом на дисплее появится “Р02” Вы можете
5. Press the cassette RECORD and PLAY buttons (26 & 25), so they lock in the down position. (The unit is
программировать следующие треки.
now in recording standby mode)
6
19
VT-3450.qxd 27.06.03 16:54 Page 12
ENGLISHРУССКИЙ
воспроизведения нажмите кнопку MODE (3) четыре раза, при этом на дисплее появится индикатор
6. Start the CD playing by pressing the CD PLAY/PAUSE button (9).
SHUFF, а затем кнопку "PLAY/PAUSE" (9).
7. Press the cassette PAUSE button (21) again and then recording begins.
8. To end the recording, press the cassette STOP/EJECT button (22).
ПРОГРАММИРОВАННОЕ ВОСПРОИЗВЕДЕНИЕ
9. Press the CD STOP button (6) and then move the FUNCTION switch (16) to the TAPE position.
10. To listen to your recording, press the REWIND button (24) to return to the point where the recording
Программированное воспроизведение позволяет прослушать мелодии в
started and then press the PLAY button (25).
желаемом порядке. Вы можете запрограммировать до 20 дорожек.
1. Поместите диск в отсек (17).
TO RECORD FROM THE BUILTIN MICROPHONE
2. В режиме остановки нажмите кнопку EQ/PROG (4) , при этом на дисплее
1. Set the FUNCTION Switch (16) to the TAPE position.
появится “P01” и индикатор PROG.
2. Load the cassette, which you wish to record on into the guides on the cassette door. (Full reel on the
left hand side).
3. Нажмите кнопку SKIP/SEARCH !/" (12, 10), чтобы выбрать нужную
3. Press the cassette RECORD button (26) and speak into the BUILTIN MICROPHONE (19) on the top
дорожку. Дисплей высветит ее номер.
left of the unit.
4. Нажмите кнопку EQ/PROG (4) еще раз.
4. Press the STOP/EJECT button (22) to end the recording.
5. Повторите шаги 34 для программирования других дорожек.
5. Rewind the tape and then press the PLAY button (25) to listen to your recording.
6. Для воспроизведения нажмите на кнопку PLAY/PAUSE $/%(9). По
окончании воспроизведения последней запрограммированной дорожки
TO ERASE A TAPE
магнитола автоматически остановится.
1. Set the FUNCTION switch (16) to the TAPE position.
2. Press the cassette RECORD button (26). Any recording, which was present on the tape will be erased.
7. Для отмены запрограммированного воспроизведения нажмите кнопку
(During this process, take care that ambient sound is not recorded through the builtin microphone).
“STOP”&(6) дважды или просто откройте крышку отсека для компакт
диска.
CD OPERATION AND HANDLING A DISC
CARE AND HANDLING OF COMPACT DISCS
MP3ДИСК
In order to achieve a long trouble free performance from your compact discs, please observe the follow
• Установите режим CD/МР3 при помощи функционального переключателя (16).
ing points.
• Установите регулятор громкости (1) в желаемое положение.
• When handling the CD, take care not to touch the playing surface, hold the disc by its outer edge.
• Откройте отсек для компактдиска (17). Загрузите компактдиск в отсек и закройте его.
• Do not expose the disc to direct sunlight, high temperature or dusty environments.
• Do not stick labels onto the disc or write on them with a ball point pen or anything not specifically suit
• Нажмите кнопку "PLAY/PAUSE" $/%(9).
На дисплее высветится следующая информация (Пример):
ed to the purpose.
• Clean the disc by wiping from the center outwards, never use a circular motion.
• Use a clean dry cloth. Do not use any type of cleaning agent or solvent.
• When not in use, store them in their original protective cases.
LOADING A DISC
1. Slide the FUNCTION switch to the CD position.
2. Open the CD door.
3. Insert a disc with the label side facing upward (if the disc is upside down, the display will show
"No disc ").
4. Close the CD door by hand.
Воспроизведение и остановка, поиск нужных треков для МР3 дисков осуществляется теми же
NOTE: Never touch the laser lens inside the CD compartment. If it ever gets dirty, clean it with a CD
кнопками, что и для компактдисков (см. раздел “Компактдиск”).
cleaner disc.
ПОВТОР ОДНОЙ ДОРОЖКИ
REMOVING A DISC
Во время воспроизведения МР3диска, нажмите кнопку MODE (3) один раз для повторного
1. Make sure the CD is not playing. If it is, press the CD STOP button.
воспроизведения текущего трека. При этом на дисплее появится REPT1.
2. Open the CD door.
3. Gently remove the disc.
4. Close the CD door by hand.
ПОВТОР ОДНОГО АЛЬБОМА
5. Replace the disc in its protective storage box.
Во время воспроизведения МР3диска, нажмите кнопку MODE (3) два раза для повторного
воспроизведения треков одного альбома. При этом на дисплее появится REPT DIR.
MUSIC APPRECIATE EFFECT SELECTION
In CD/MP3 playing mode, Pressing the EQ/PROGRAM button (4) different times gives you different
ПОВТОР ВСЕГО ДИСКА
sound effects. The music of dbb type appears by pressing the button one time, and two times pressing
Во время воспроизведения МР3диска, нажмите кнопку MODE (3) три раза для повторного
the button gives you the music of popular type, three times gives you the classic type, four times gives
воспроизведения всего диска. При этом на дисплее появится REPT ALL.
you the jazz type, five times gives you the rock type, and six times gives you the normal type.
18
7
VT-3450.qxd 27.06.03 16:54 Page 14
РУССКИЙENGLISH
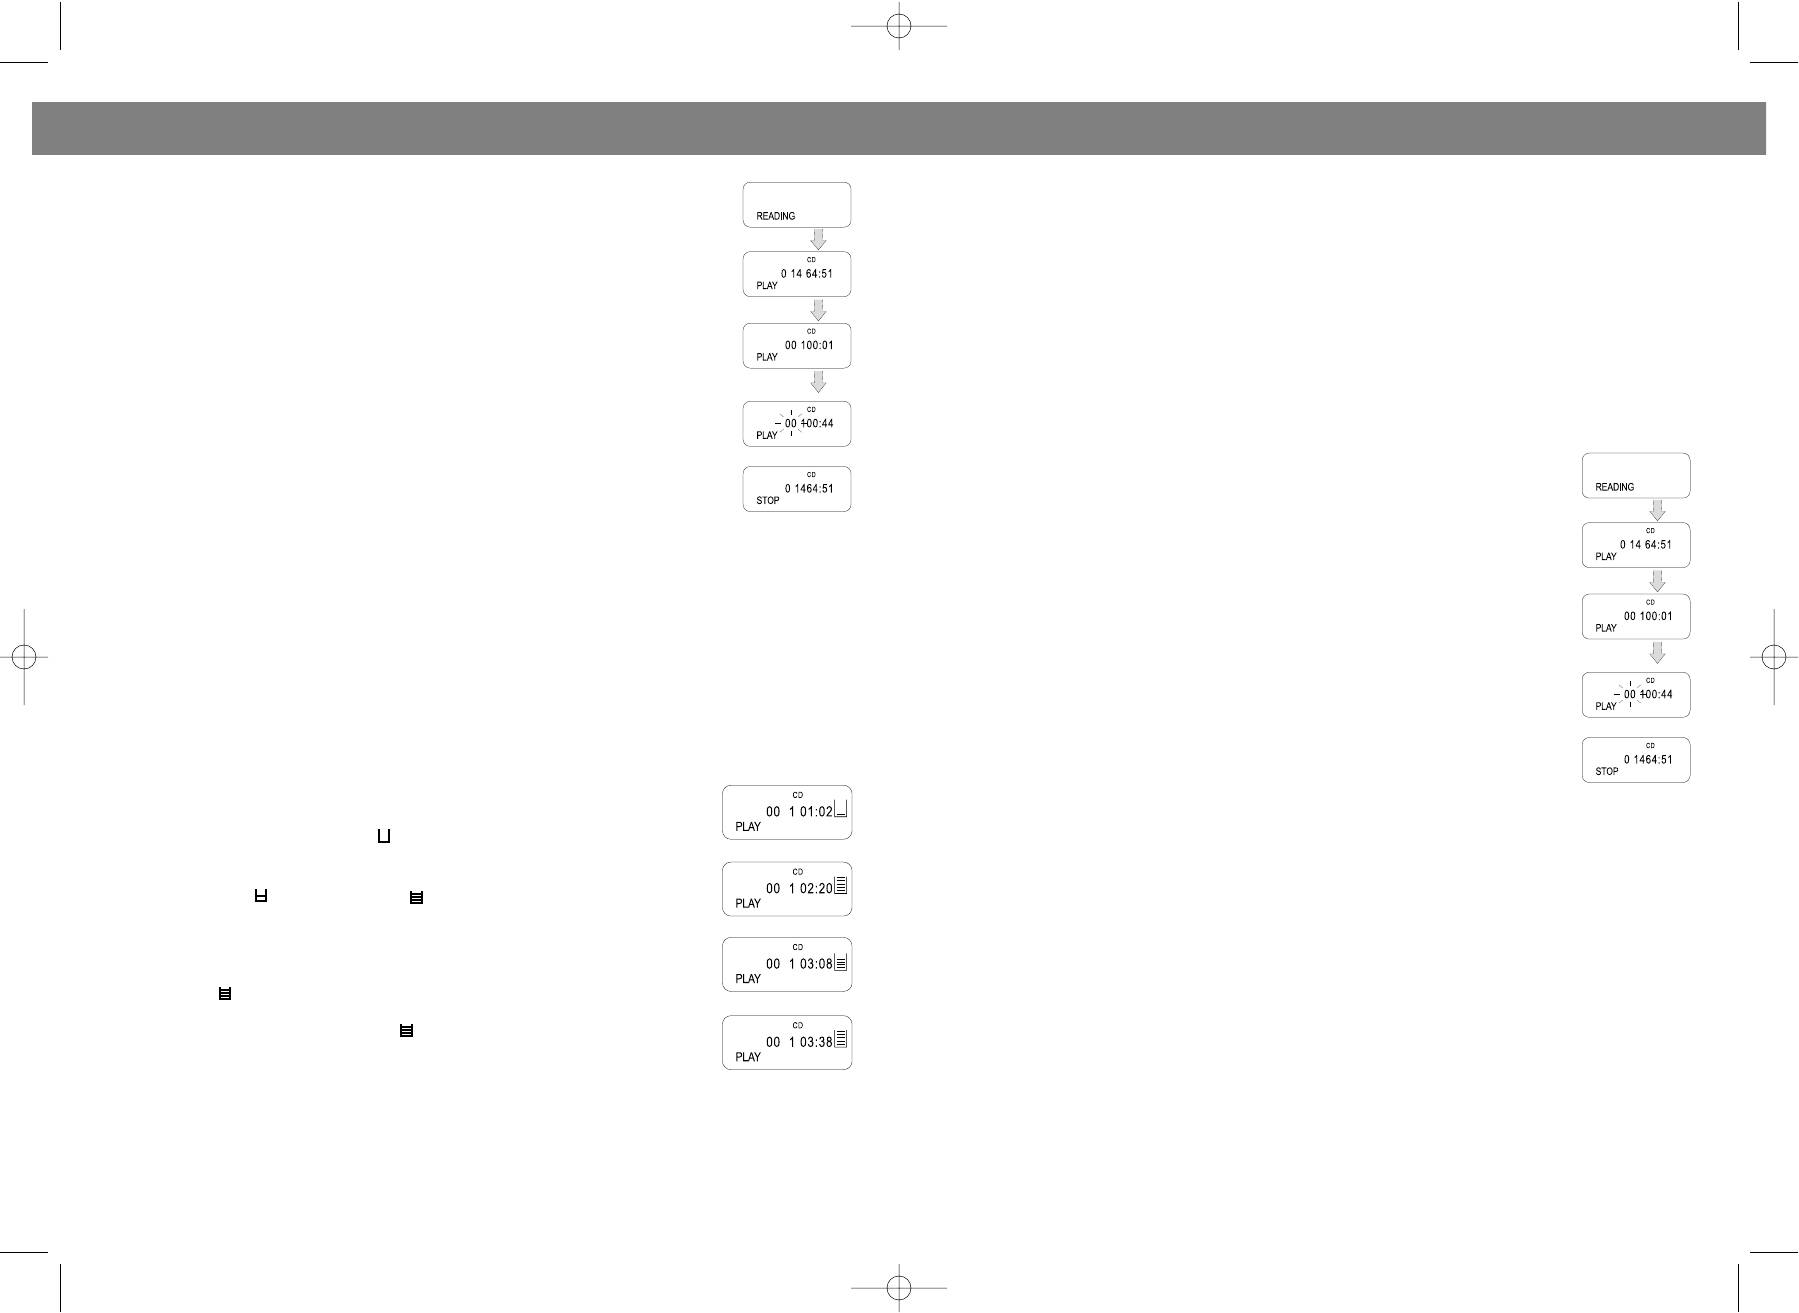
PLAYING A CD
РЕЖИМ "ПАУЗА"
1. Make sure the power is connected, slide the FUNCTION switch (16) to CD(MP3)
Вы можете остановить воспроизведение или запись в любое время, нажав на клавишу "PAUSE"%
position, POWER indicator will light.
(21). Лентопротяжный механизм в это время продолжает работать, поэтому используйте эту
2. Load a disc into the CD compartment. Close the CD door, the disc will begin to
функцию на короткое время. Повторное нажатие клавиши отменяет паузу.
spin,
Предостережение:
and " " appears on the display.
• Механизм "Автостоп" может не сработать в режиме воспроизведения, если магнитола
3. Adjust the VOLUME control (1) to the desired volume level.
работает от подсевших батареек.
4. To stop playing temporarily, press the CD PLAY/PAUSE button.
• Отключайте прибор от сети, если вы его не используете длительное время.
• The current playing track will flash on the display.
• Не оставляйте клавиши в нажатом положении на долгое время.
• Resume to normal play by pressing PLAY/PAUSE button (9) again.
5. To stop playing, press the STOP button (6). The total tracks' number and whole
СИСТЕМА "АВТОСТОП"
playing time (e.g. A disc contains 14 tracks) will be shown on the display.
Магнитола снабжена механизмом "Автостоп", который автоматически выключает
6. To turn off the player, slide the FUNCTION switch (16) to TAPE position.
воспроизведение или запись, если кассета заканчивается.
TRACKS SKIPPING
КОМПАКТДИСК
Press the BACK and FWD SEARCH buttons during play to skip to the desired track.
ВОСПРОИЗВЕДЕНИЕ КОМПАКТДИСКА
1. Press the " button to skip to the next track on the disc.
• Установите режим "Компактдиск"(CD/МР3) при помощи
2. Press the ! button once to skip to the beginning of the track currently playing.
функционального переключателя (16).
3. Press the " button twice or more to skip to previous tracks.
• Установите регулятор громкости (1) в желаемое положение.
• Откройте отсек для компактдиска (17).
FORWARD/REVERSE SEARCH
• Загрузите компактдиск в отсек и закройте его. Дисплей (7) высветит
Press and hold the BACK or FWD SEARCH buttons (12 or 10) during play to scan the disc at high speed.
общее количество дорожек.
When the desired section of the disc is found, release the button. Normal play will resume.
• Нажмите кнопку "PLAY/PAUSE" $/%(9). Начнется воспроизведение диска.
" FWD ........................................... FORWARD
Дисплей высвечивает номер каждой воспроизводимой дорожки.
! BACK ......................................... REVERSE
• Чтобы временно прервать воспроизведение, нажмите кнопку
1. If you press and hold the FWD button while playing, it will scan the disc forward from the current played
"PLAY/PAUSE" $/%(9).
track at high speed.
• Чтобы прервать воспроизведение, нажмите на кнопку “STOP”&(6), при
2. If you press and hold the BACK button while playing, it will scan the disc backward from the current
этом на дисплее отразится общее количество треков.
played track at high speed.
ПОИСК ЖЕЛАЕМОГО ТРЕКА
ELECTRONIC SHOCK PROTECTION SYSTEM
Нажмите и удерживайте кнопки SKIP/SEARCH !/" (12,10), пока не найдете
The digital ELECTRONICSHOCK PROTECTION function uses semiconductor
нужную дорожку или нужный момент записи.
memory to prevent the sound from skipping when the unit is subjected to shocks
and vibration during play.
ПОВТОРНОЕ ВОСПРОИЗВЕДЕНИЕ
• While the disc begins to play, the " " indicator appears in the display and the
Вы можете повторить воспроизведение одной или нескольких дорожек множество раз.
digital ELECTRONIC SHOCK PROTECTION function turns on automatically.
ПОВТОР ОДНОЙ ДОРОЖКИ: Нажмите кнопку MODE (3) один раз, при этом на дисплее появится
The digital data is stored in a "readahead" memory buffer before it is decoded
индикатор REPT 1. Для выбора желаемого трека воспользуйтесь кнопками SKIP/SEARCH ! (12)
and played. The " " mark changes to " " mark, indicating that the data buffer
или " (10). Когда номер желаемой дорожки отразится на дисплее, нажмите "PLAY/PAUSE" $/%
is full.
(9).
• When the unit is subjected to a shock during play, the data stored in memory
ПОВТОР ВСЕХ ДОРОЖЕК: Нажмите кнопку MODE (3) дважды, при этом на дисплее появится
continues to be decoded and played. This gives the pickup time to stabilize and
continue reading new data. As the data is read from memory the indicator
индикатор REPT ALL. Для начала воспроизведения нажмите "PLAY/PAUSE" $/% (9).
Для отмены запрограммированного воспроизведения нажимайте кнопку MODE (3) до тех пор,
changes to " ".
пока индикаторы не исчезнут с дисплея.
• Once the pickup returns to its original position, new data is stored in memory
and the display changes back to the " " mark.
Press the ESP button to turn the digital electronic shock protection function off.
ВОСПРОИЗВЕДЕНИЕ В РЕЖИМЕ “INTRO”
NOTE: Keep the digital electronic shock protection function off when using the unit
1. В режиме остановки или воспроизведения нажмите кнопку MODE (3) три раза, при этом на
in a stable location where it will not be subjected to shocks. The battery power
дисплее появится индикатор INTRO.
consumption is reduced when the electronic shock protection function is turned off.
2. Нажмите на кнопку "PLAY/PAUSE" (9) для воспроизведения первых 10 секунд каждой дорожки.
NOTE: When the digital electronic shock protection function is switched on or off, the sound will be inter
rupted for 1 to 2 seconds. This is normal (the interrupted time is used for the memory on or off).
ВОСПРОИЗВЕДЕНИЕ ДОРОЖЕК В ПРОИЗВОЛЬНОМ ПОРЯДКЕ
NOTE: When playing MP3, the ESP function could not be cancelled.
Дорожки диска могут воспроизводиться в произвольном порядке (выбор последовательности
проигрыватель осуществляет самостоятельно). Для этого в режиме остановки или
8 17
VT-3450.qxd 27.06.03 16:54 Page 16
РУССКИЙ
ENGLISH
РАДИОПРИЕМНИК
PROGRAMMED PLAY
• Установите функциональный переключатель (16) в положение "RADIO".
The tracks on the disc can be programmed for play in any order (Up to 20 tracks
• Выберите желаемый диапазон переключателем диапазонов (18).
can be programmed).
• Найдите нужную передающую станцию, вращая регулятор настройки (13).
1. Press the EQ/PROGRAM button (4) in stop mode , "PROG" and program num
• Установите регулятор громкости (1) в желаемое положение.
ber "P01" are shown in the display.
• Для наилучшего приема в диапазоне FM, выдвиньте полностью антенну (29) и сориентируйте
2. Press the FWD or BACK SKIP/SEARCH button (10or12) to select the first track
ее под нужным углом.
to be programmed.
• Для стереоприема установите частотный переключатель (18) в положение FM ST, при этом
3. Press the EQ/PROGRAM button (4). The first track number is now stored into
загорится индикатор FMстерео (11).
memory, program number changes to "P02" waiting for your next selection.
• Чтобы отключить радио, установите функциональный переключатель в положение TAPE.
4. Repeat steps 2 and 3 to program additional tracks.
5. After programming is finished, press the PLAY/PAUSE button (9).
МАГНИТОФОН
• Programmed play begins from the first programmed track.
• The player stops automatically after all programmed tracks have been played.
ВОСПРОИЗВЕДЕНИЕ КАССЕТЫ
To play the same programmed tracks again, press the PLAY/PAUSE button (9).
1. Установите функциональный переключатель (16) в положение TAPE.
• In stop mode, press the STOP button (6) once, "PROG" disappears from the
2. Нажмите кнопку STOP/EJECT&/' (22), чтобы открыть крышку кассетоприемника.
display and the programmed tracks in the memory will be cleared. The memo
ry will also be cleared if the disc compartment is opened, or power is turned off.
3. Вставьте кассету с записью в деку (14) и закройте крышку.
4. Для воспроизведения нажмите кнопку PLAY$(25).
INTRO SCAN PLAY
5. Чтобы остановить воспроизведение, нажмите клавишу STOP/EJECT&/' (22).
1. Press the MODE button (3) thrice in stop mode or playing mode.
6. Чтобы перемотать ленту вперед, нажмите кнопку F.FWD((23).
2. "INTRO" shows in the display, press the PLAY/PAUSE button (9). The first 10 seconds of each track
from track 1 will be played in order.
7. Чтобы перемотать ленту назад, нажмите кнопку REW )(24).
8. Чтобы временно остановить воспроизведение, нажмите кнопку PAUSE%(21).
RANDOM PLAY
9. Чтобы возобновить воспроизведение, нажмите кнопку PAUSE%(21) снова.
Press the MODE button (3) fourth in stop mode or playing mode. "SHUFF" shows in the display, press the
PLAY/PAUSE button (9). All tracks on the disc will be played in random order selected by CD player.
ЗАПИСЬ С РАДИОПРИЕМНИКА
SINGLE TRACK REPEAT
• Следуйте инструкциям из раздела "РАДИОПРИЕМНИК"; убедитесь, что прием радиосигнала
Press the MODE button (3) once in stop mode or playing mode, "REPT 1" appears in the display, press
устойчивый и без помех.
the SKIP/SEARCH buttons (10or12) to select your favourite song (In stopping mode pressing the
• Вставьте кассету в деку (14).
PLAY/PAUSE Button (9) again is required).
• Нажмите на клавиши "RECORD" (26) и “PLAY”$ (25).
This plays one song over and over till you press the STOP button (6) or press the MODE button (3) con
• Вы можете отрегулировать уровень звука, не опасаясь испортить качество записи.
tinuously to return to the normal play mode.
• Для остановки записи используйте кнопку “STOP/EJECT” &/'(22), для временного
прекращения записи нажмите кнопку “PAUSE”% (21).
ALL TRACKS REPEAT
Press the MODE button (3) twice in stop mode or playing mode, "REPT ALL" shows in the display (In
ЗАПИСЬ С КОМПАКТДИСКА
stopping mode pressing the PLAY/PAUSE Button (9) again is required.) .
• Установите функциональный переключатель (16) в положение "CD/МР3". Выберите
All songs will keep playing in sequence 1. 2. 3 etc. and all songs will repeat over again until you press the
желаемый трек и отрегулируйте уровень громкости.
STOP button (6) or press the MODE button (3) continuously to return to the normal play mode.
• Вставьте кассету в деку (14).
• Нажмите на клавиши "RECORD" (26) и “PLAY”$ (25) на деке.
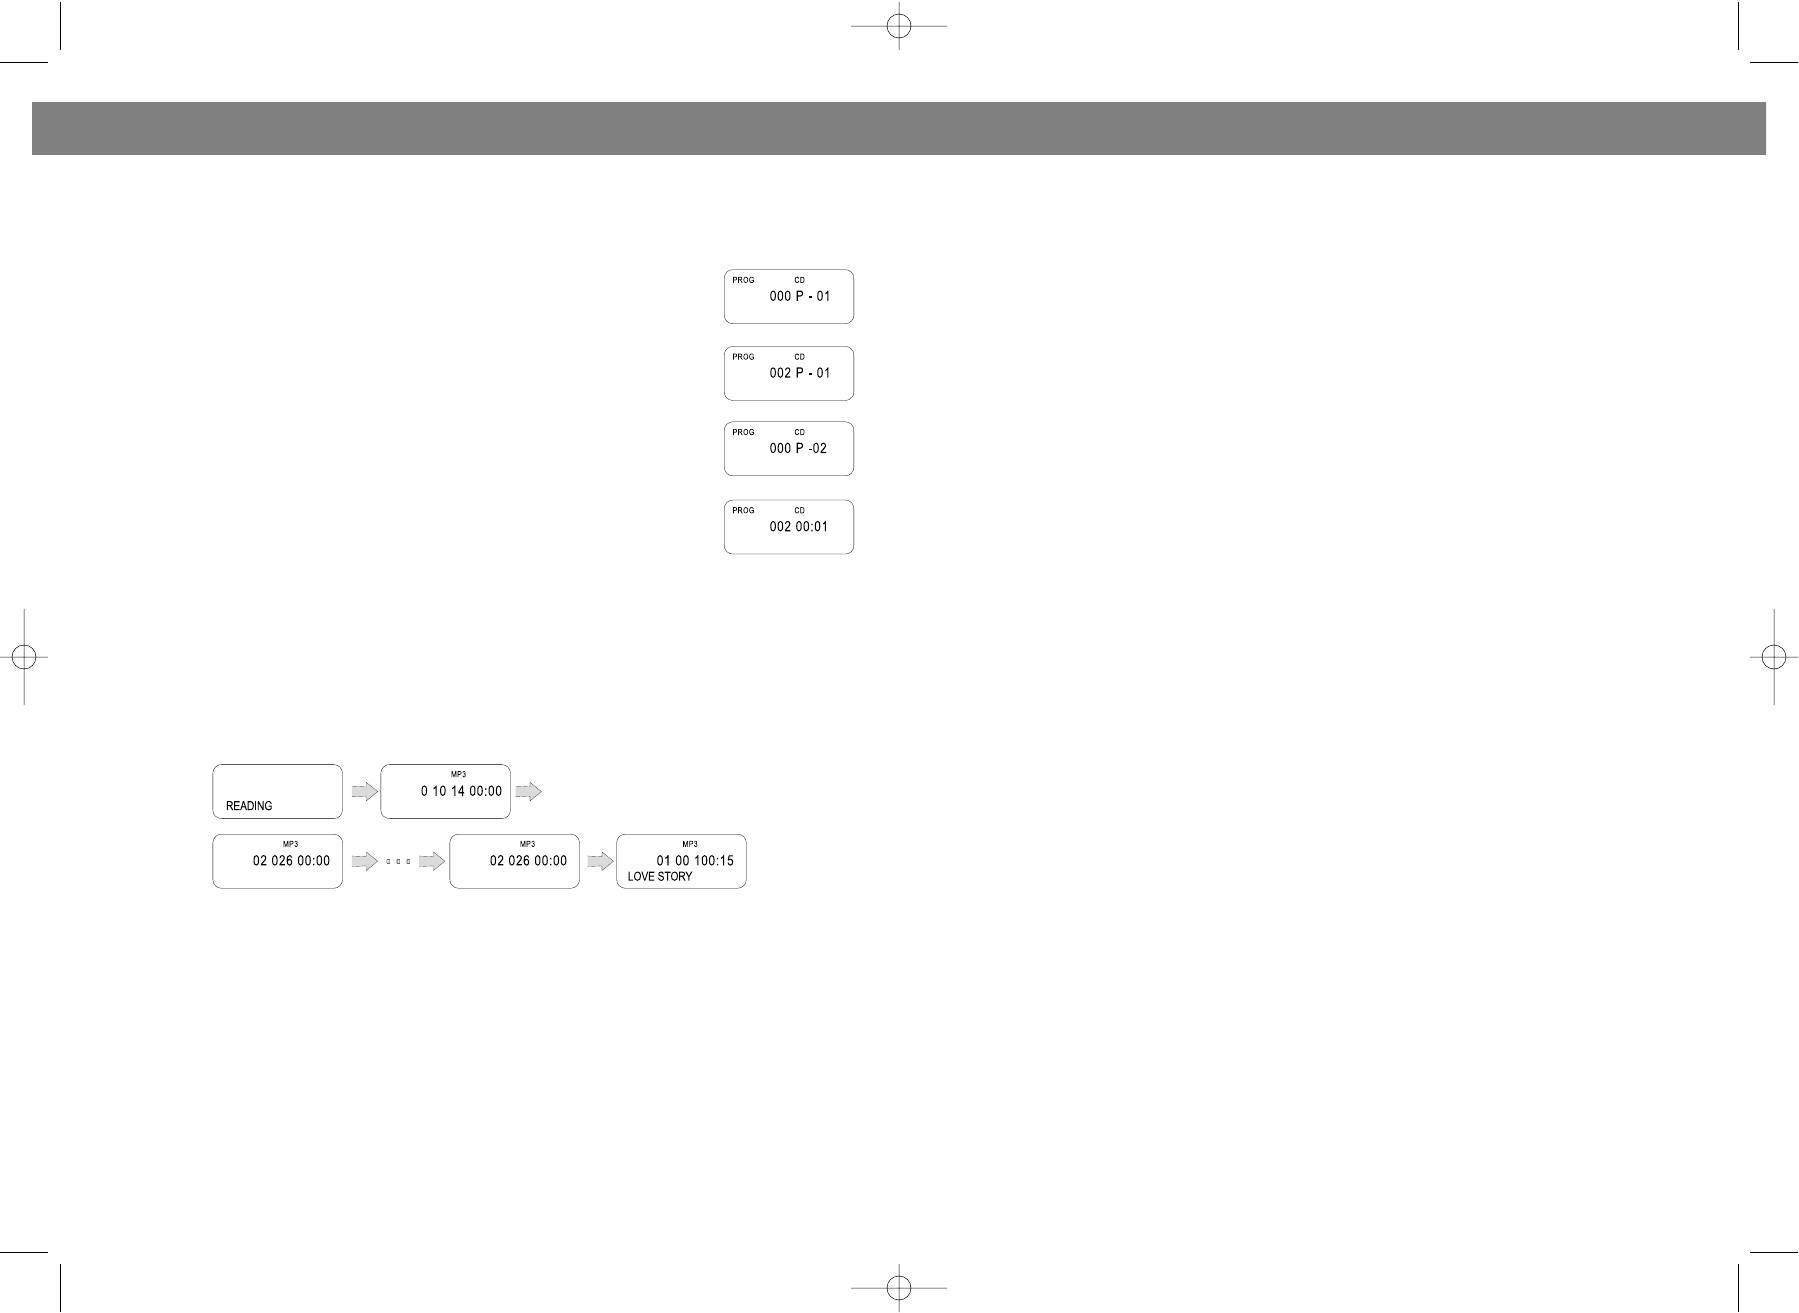
MP3 DISC SECTION
• Нажмите на клавишу "PLAY/PAUSE" $/%(9)на CD.
PLAYING A MP3 DISC
• Для остановки записи используйте кнопку “STOP/EJECT” &/'(22), для временного
Make sure the power is connected, slide the FUNCTION switch (16) to CD(MP3) position, POWER indi
прекращения записи нажмите кнопку “PAUSE”% (21).
cator will light. Load a disc into CD compartment, close the CD door, the disc will begin to spin, mean
while "Reading" appears on the display. The discreading orders are as following:
ЗАПИСЬ СО ВСТРОЕННОГО МИКРОФОНА (19)
• Вставьте кассету в деку (14).
• Установите функциональный переключатель (16) в положение “TAPE”.
• Нажмите на клавиши "RECORD"
*(26) и “PLAY”$(25) на деке.
• Вы можете отрегулировать звук, не опасаясь испортить качество записи.
• Для остановки записи используйте кнопку “STOP/EJECT” (22), для временного прекращения
записи нажмите кнопку “PAUSE” (21).
16
9
VT-3450.qxd 27.06.03 16:54 Page 18
ENGLISH
РУССКИЙ
Расположение элементов управления
16. Функциональный переключатель
The upper designs explain: the MP3 has 14 catalogs and 156 tracks altogether, but the tracks' number in
1. Регулятор громкости
17. Отсек для компактдиска
each catalog may be different.
2. Динамики
18. Частотный перключатель
For example: Catalogue 1 has 14 tracks, catalogue 2 has 12 tracks...... After the whole catalogs and
3. Кнопка MODE
19. Встроенный микрофон
tracks shown, the unit will enter playback from the first track.
4. Кнопка EQ/PROG
20. Гнездо для подключения наушников
5. Индикатор работы
Кассетоприемник:
TRACKSELECTING PLAYBACK
6. Кнопка “Стоп” (CD)
21. Кнопка “Пауза”
• You can press SKIP/ SEARCH buttons (10or12) to select the tracks you require, the concrete opera
7. Дисплей
22. Кнопка “Стоп/Выброс кассеты”
tions are as same as the operations on section of CD.
8. Кнопка “Антишок/+10” (CD)
23. Кнопка ускоренной перемотки вперед
• During Mp3 disc playing, press 10+ button once to select the track over +10, adding ten after press
9. Кнопка “Воспроизведение/Пауза” (CD)
24. Кнопка ускоренной перемотки назад
ing each time.
10. Кнопка перехода на следующую дорожку (CD)
25. Кнопка “Воспроизведение”
11. индикатор FMстерео
26. Кнопка “Запись”
REPEAT PLAYING FUNCTION
12. Кнопка перехода на предыдущую дорожку (CD)
27. Отсек для батареек
SINGLE TRACK REPEAT
13. Регулятор настройки
28. Гнездо для подключения сетевого шнура
In stop mode or playing mode press the MODE button (3) once to repeat current playing track, display
14. Отсек для кассеты
29. Антенна
shows "REPT 1" (In stopping mode pressing the PLAY/PAUSE Button (9) again is required.).
15. Шкала настройки радио
30. Ручка магнитолы
SINGLE CATALOG'S TRACKS REPEAT
In playing mode or stop mode, press the MODE button (3) twice, the whole tracks in the current playing
ПИТАНИЕ ОТ СЕТИ
track's catalog will be repeated, display shows "REPT DIR" (In stopping mode pressing the PLAY/PAUSE
• Перед включением в сеть убедитесь, что напряжение, указанное на маркировке магнитолы,
Button (9) again is required.) .
совпадает с напряжением в вашем доме.
• Подключите один конец сетевого шнура в гнездо (28) на задней панели магнитолы, а другой
WHOLE DISC REPEAT
в розетку.
In playing mode or stop mode, press the MODE button (3) thrice, the whole disc's tracks would be
• При длительном неиспользовании магнитолы отключите ее из сети полностью, а также
repeatedly playing, display shows "REPT ALL" (In stopping mode pressing the PLAY/PAUSE Button (9)
извлеките батарейки из отсека.
again is required.) .
ПИТАНИЕ ОТ БАТАРЕЕК
INTRO SCAN MODE
Откройте отсек для батареек (27) и вставьте 6 батареек UM2 или размера C, соблюдая указанную
Press the MODE button (3) four times in stop mode or playing mode, "INTRO"
полярность. Закройте отсек.
appears on the display. Press the PLAY/PAUSE button (9) again to enter intro scan
mode.
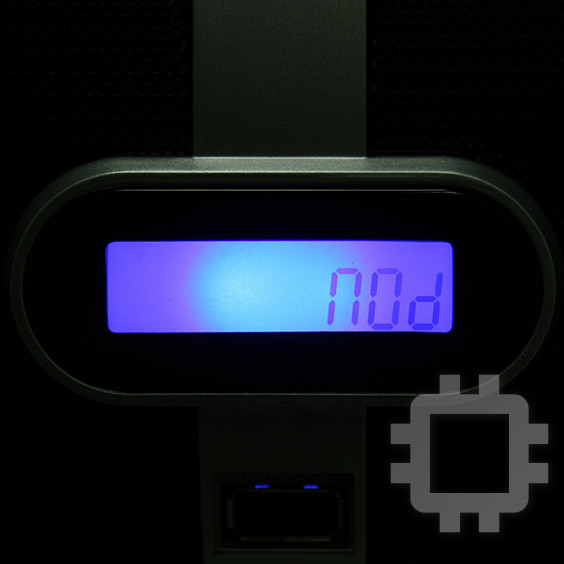
РАСПОЛОЖЕНИЕ ЭЛЕМЕНТОВ ДИСПЛЕЯ
RANDOM PLAY
Press the MODE button (3) five times in stop mode or playing mode, "SHUFF"
appears on the display. Press PLAY/PAUSE button (9) again to start the random
playback.
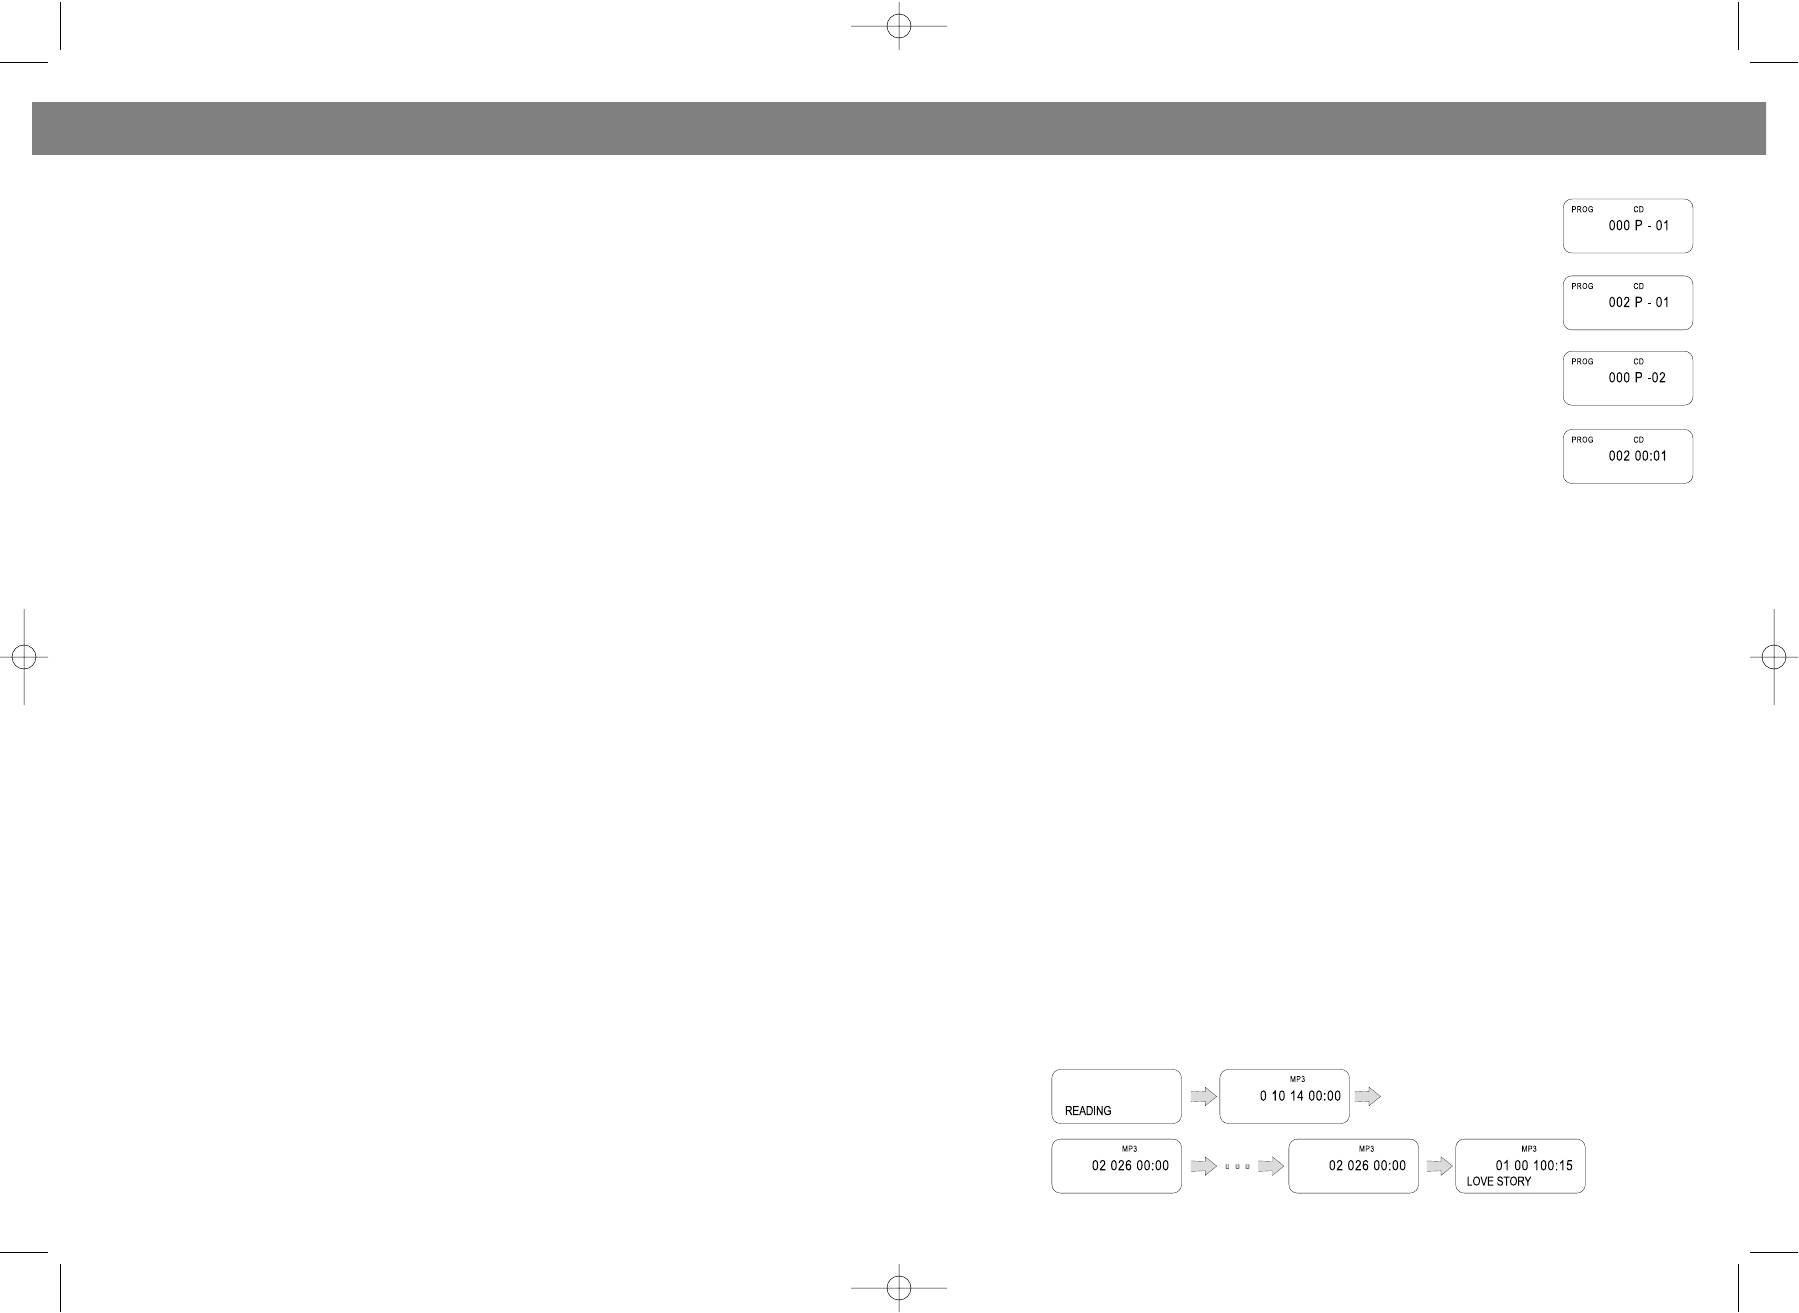
PROGRAM PLAY (up to 20 tracks can be edited)
NOTE: This can only be done during stop state.
1. While the unit being in stop mode, press EQ/PROGRAM button (4).
2. Press the SKIP/SEARCH buttons (10or12) to select catalog.
3. Press EQ/PROGRAM button (4) again.
4. Press the SKIP/SEARCH buttons (10or12) to select your required tracks.
5. Repeat the above steps to program the other tracks.
6. Press PLAY/PAUSE button (9) to enter program play.
Take the track 3 in catalog 5 as an example.
1. In stop mode, display shows "14 156 00:00".
2. Press the EQ/PROGRAM button (4), display shows "01 000 P01 " and the cat
1. Программированное воспроизведение
8. Повторное воспроизведение альбома
alog "01" will flash.
2. Произвольное воспроизведение
9. Повторное воспроизведение всего диска
3. Press the SKIP/SEARCH buttons (10or12) to select catalog 5, the display shows
3. Воспроизведение первых 10с. каждого трека
10. Номер текущего альбома
"05".
4. Обозначение MP3диска
11. Номер воспроизводимого трека
4. Press the EQ/PROGRAM button (4), the track number "000" will flash on the
5. Обозначение компактдиска
12. Индикация минут
display.
6. Повторное воспроизведение
13. Индикация секунд
5. Press the SKIP/SEARCH buttons (10or12) to select track 3, "003" appears on
7. Повторное воспроизведение трека
15. Индикатор функции “антишок”
the display.
10
15
VT-3450.qxd 27.06.03 16:54 Page 20
ENGLISHРУССКИЙ
6. Again press the EQ/PROGRAM button (4), "P02" appears on the display, waiting for editing the sec
ond track.
7. Repeat above steps to edit the required tracks, till the program finishes.
8. After finishing programming, press PLAY/PAUSE button (9) to enter program playing mode.
Note: ID3 information: For playing some MP3 disc with ID3 information, the LCD display can show the title
of the disc names of the artists and each song name.
SEARCHING SONG BY ENGLISH
During MP3 play, you can select songs by inputting English letters:
In stop mode, press and hold the MODE button for a few seconds until "Search name" is displayed on
the LCD, then the letter "A" appears, press the SKIP/SEARCH buttons to select letter (or digital number
or other symbol). Press the MODE button to confirm the letter (or digital number or other symbol), then
another letters (or digital number or other symbol) is displayed for you to select. Press STOP button to
return to the last letter (or digital number or other symbol). After selection, press PLAY/PAUSE button to
play the selected songs. If it can not find any song, "Not found" will appear. Press stop button to resume
normal mode. Maximum of 8 characters can be inputted. If more than 1 song match the first 8 charac
ters, it will select the first song.
SPECIFICATION
GENERAL
Power requirement AC 230 V~50 Hz
DC 9V UM2/"C" x 6pcs
Power consumption AC 20 Watts
Weight 4.67 Kg.
Dimensions Approx. 610 mm (L) x 230 mm (W) x 240 mm (H)
Operation temperature +5°C ~ + 35°C
RECEIVER SECTION
Receiving bands AM/FM
Tuning range/sensitivity AM 540 1600 KHz
FM 64 108.0 MHz
CD PLAYER SECTION
Playback system Compact Disc Digital Audio System
DAC 1 bit D/A converter
With 8 times over sampling digital filter
CASSETTE SECTION
Recording system 4 tracks 2 channel stereo
Biasing system Magnetic erase, DC Bias
Frequency response 1256300 Hz
Wow and flutter 0.35% WRMS (JIS)
AUDIO SECTION
Power output Maximum 2 Watts per channel
Speaker impedance 8 ohms
Headphones impedance 32 ohms
14
11
VT-3450.qxd 27.06.03 16:54 Page 22
ENGLISH
РУССКИЙ
ACCESSORIES
УВАЖАЕМЫЙ ПОКУПАТЕЛЬ!
Instruction booklet 1
Чтобы Ваша магнитола служила максимально долго, обратите внимание на следующие правила
AC cord 1
пользования:
• Перед включением прибора в сеть проверьте, соответствует ли напряжение, указанное на
Output Power 2 W x 2 (RMS)
магнитоле, напряжению в вашем доме.
Output Power 200 W (P.M.P.O)
• При подключении сетевого шнура к штекеру, расположенному на задней стенке аппарата,
вилка должна быть выключена из розетки. Необходимо строго соблюдать последовательность
CAUTION
подключения к сети 220В:
• To avoid electric shock, this unit must not be exposed to dripping water or water splash.
а) подключить сетевой шнур к аппарату,
• Minimum distances around the apparatus for sufficient ventilation.
б) подсоединить шнур к сети 220В.
• The ventilation should not be impeded by covering the ventilation openings with items, such as news
При несоблюдении последовательности трансформатор может выйти из строя.
papers, tablecloths, curtains, etc.
• При выключении сетевого шнура из розетки держитесь не за шнур, а за вилку.
• No naked flame sources, such as lighted candles, should be placed on the apparatus.
• Если Ваша магнитола оснащена переключателем напряжения, установите его в правильное
• The use of apparatus in tropical and/or moderate climates.
положение. При установке переключателя в положение, не соответствующее напряжению
• Before scrapping the appliance, remove the batteries and place them in the appropriate battery col
сети, аппарат может выйти из строя.
lection container.
• Если система долгое время не используется, отключите ее от электросети.
• При длительном неиспользовании аппарата извлеките батарейки из отсека.
SERVICE LIFE OF THE PORTABLE STEREO CD/MP3 DISC PLAYER NOT LESS THAN 5 YEARS
• Не устанавливайте систему в места, где она может быть подвержена действию воды,
влажности, тепла, прямого солнечного света. Держите магнитолу вдали от источников
магнитных полей (телевизор, акустические системы, намагниченные объекты).
• Не подвергайте систему резким перепадам температур.
• Следите за тем, чтобы металлические предметы или жидкости не попадали внутрь корпуса
системы. Если в корпус попал посторонний предмет или жидкость, отключите магнитолу,
извлеките батарейки и обратитесь в мастерскую по обслуживанию и ремонту аудиотехники.
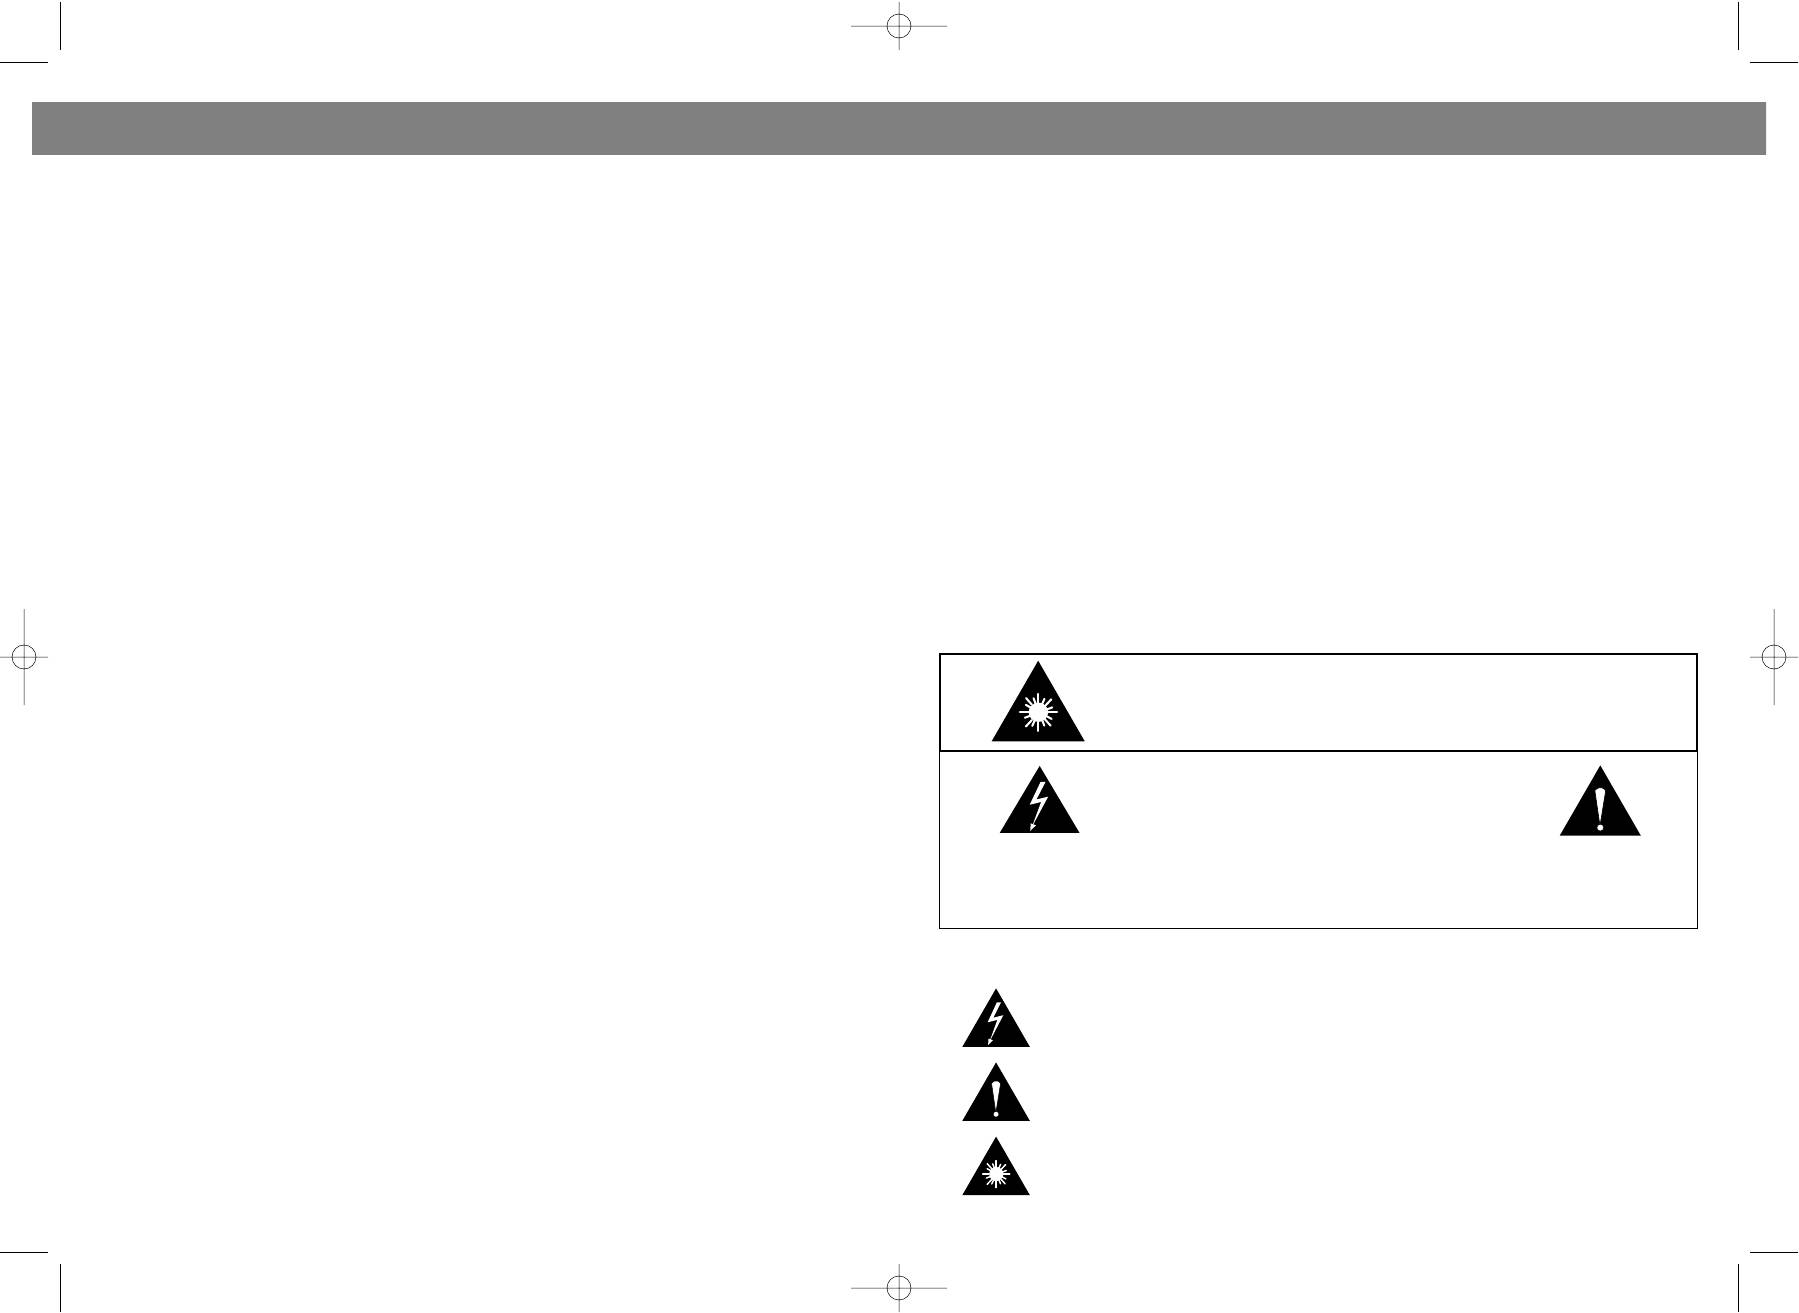
НЕ ОТКРЫВАТЬ!
ОПАСНОСТЬ ЛАЗЕРНОГО ИЗЛУЧЕНИЯ!
ОСТОРОЖНО!
РИСК ЭЛЕКТРИЧЕСКОГО УДАРА!
НЕ ОТКРЫВАТЬ!
ВО ИЗБЕЖАНИЕ ПОРАЖЕНИЯ ЭЛЕКТРИЧЕСКИМ ТОКОМ НЕ СНИМАЙТЕ ЗАДНЮЮ КРЫШКУ.
ВНУТРИ АППАРАТА НЕТ ДЕТАЛЕЙ, ТРЕБУЮЩИХ ОБСЛУЖИВАНИЯ ПОЛЬЗОВАТЕЛЕМ.
ОБСЛУЖИВАНИЕ ДОЛЖНО ВЫПОЛНЯТЬСЯ КВАЛИФИЦИРОВАННЫМИ СПЕЦИАЛИСТАМИ.
Графические символы, нанесенные на задней панели прибора, имеют следующее значение:
Опасное напряжение внутри прибора, которое может служить причиной
электрического удара.
Инструкция по эксплуатации содержит важные рекомендации, которых следует
придерживаться для вашей безопасности.
НЕ ОТКРЫВАТЬ! Опасность лазерного излучения!
12
13
VT-3450.qxd 27.06.03 16:54 Page 24


