Vitek VT-3794 SR: инструкция
Раздел: Бытовая, кухонная техника, электроника и оборудование
Тип: Плеер
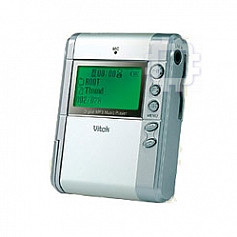
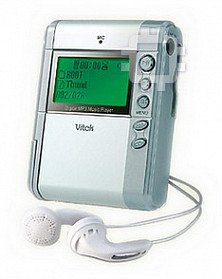
Инструкция к Плееру Vitek VT-3794 SR
Оглавление
- ОПИСАНИЕ РАЗЪЕМОВ И КНОПОК УПРАВЛЕНИЯ АКСЕССУАРЫ
- ИНФОРМАЦИЯ НА ЖКДИСПЛЕЕ
- ВОСПРОИЗВЕДЕНИЕ 1. ПИТАНИЕ ВКЛ/ВЫКЛ 9. ИНДИКАТОР РАЗРЯДКИ БАТАРЕИ
- 10. ИСПОЛЬЗОВАНИЕ КАРТЫ MMC/SD 11. УДАЛЕНИЕ ФАЙЛА РАБОТА FM РАДИО 1. ВХОД В РЕЖИМ FM РАДИО
- 6. ВЫХОД ИЗ РЕЖИМА FM ЗАПИСЬ С МИКРОФОНА И ЛИНЕЙНОГО ВХОДА 1. УСТАНОВКА ИСТОЧНИКА ЗАПИСИ
- 3. ЗАПИСЬ С ЛИНЕЙНОГО ВХОДА МЕНЮ НАСТРОЕК 1. КНОПКИ УПРАВЛЕНИЯ МЕНЮ НАСТРОЕК
- 4. УСТАНОВКИ РЕЖИМА ВОСПРОИЗВЕДЕНИЯ
- 5. УСТАНОВКА РЕЖИМА ЗАПИСИ A. ИСТОЧНИК ЗАПИСИ
- 6. УСТАНОВКА ТАЙМЕРА
- 7. СЕКУНДОМЕР ПОДКЛЮЧЕНИЕ К КОМПЬЮТЕРУ
- МЕРЫ ПРЕДОСТОРОЖНОСТИ ВЫЯВЛЕНИЕ И УСТРАНЕНИЕ НЕПОЛАДОК 1. ПЛЕЕР НЕ РАБОТАЕТ.
- 8. При нажатии клавиши REC в режиме Радио, сообщение на дисплее исчезает, и ТЕХНИЧЕСКИЕ ХАРАКТЕРИСТИКИ ИЗДЕЛИЯ

3794A.qxd 08.07.2005 9:04 Page 1
PORTABLE MP3/WMA PLAYER WITH FM RADIO
MODEL VT3794 SR
INSTRUCTION MANUAL
4
16
www.vitekaus.com
3794A.qxd 08.07.2005 9:04 Page 2
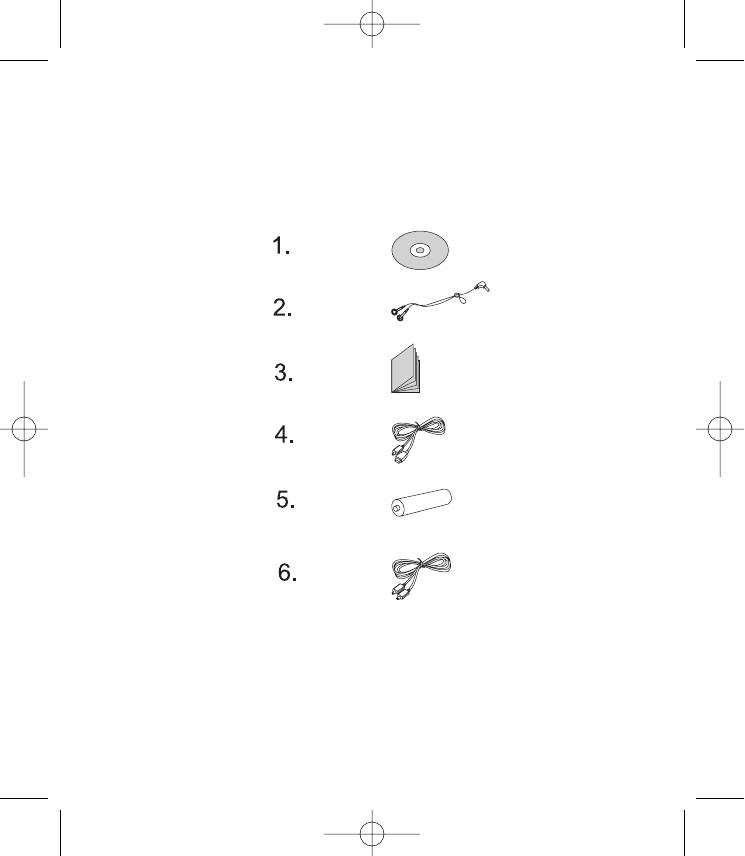
ACCESSORIES/АКСЕССУАРЫ
3794A.qxd 08.07.2005 9:04 Page 3

3794A.qxd 08.07.2005 9:04 Page 4
ENGLISH
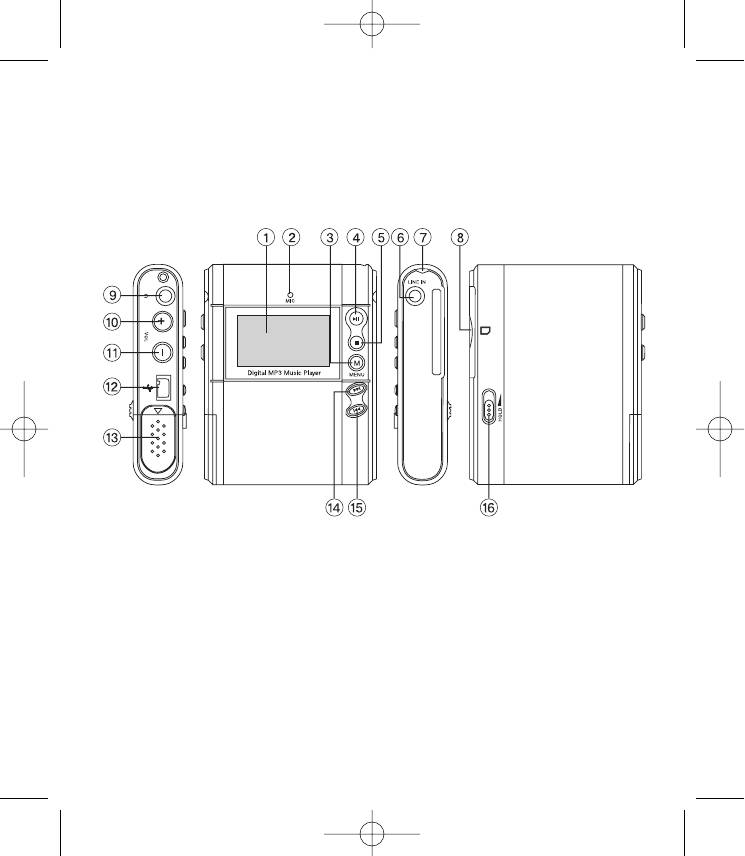
NAMES OF CONTROLS & INDICATORS
1 LCD WINDOWS LCD WINDOWS
2 MIC MIC
3 MENU Enter Menu to manage the player
4 PLAY/PAUSE Power On/Play/pause/power off
5 STOP Stop/exit
6 LINE IN JACK Connect to external audio source
7 STRAP HOLE Connect with the necklace
8 SD/MMC SLOT External SD/MMC Card
9 EARPHONE JACK Connect to Earphone
10 VOLUME + Increase the volume level
11 VOLUME Decrease the volume level
12 USB JACK Connect player to computer
13 BATTERY DOOR Place "AAA" Battery
14 NEXT Skip forward to next track
15 PREV Skip backward to previous track
16 HOLD Key Lock or Key Release
ACCESSORIES
1. Installation CD
2. Stereo Earphone
3. User Manual
4. USB Cable
5. "AAA" Battery (included)
Environment type battery
6. Linein Cable
4
3794A.qxd 08.07.2005 9:04 Page 5
ENGLISH
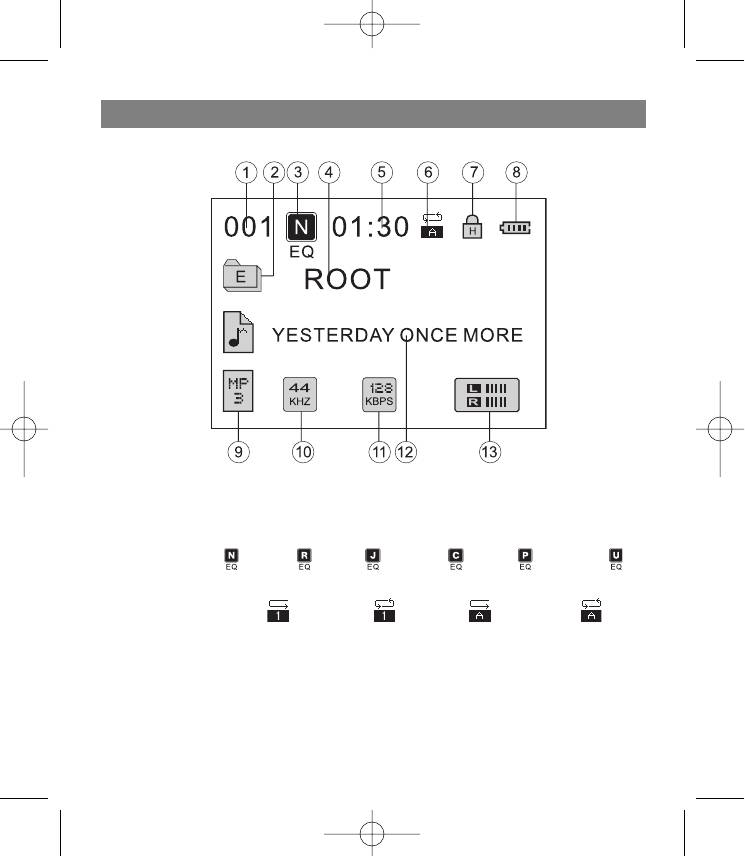
LCD DISPLAY INFORMATION
1. Track number
2. E: External memory card in used.
3. Equalizer: Normal Rock Jazz Classic POP User EQ
4. Folder Name
5. Time of current song
6. Play Mode Setting: Normal 1 Repeat 1 Normal Repeat all
7. Hold
8. Battery Status
9. File Format
10. File decoding sampling rate
11. File compress bits rate
12. Song title
13. Music level display bar
5
3794A.qxd 08.07.2005 9:04 Page 6
ENGLISH
GETTING PLAYBACK STARTED
1. POWER ON/OFF
POWER ON Press "PLAY/PAUSE" to switch on the power; the "MP3 Player" logo will be displayed on
the LCD.
POWER OFF Press and hold "PLAY/PAUSE" over 2 seconds to power off when the unit in stop mode.
CAUTION: Don' t remove the battery while the player is Power On, it will damage the firmware & the
Player.
2. PLAYING START
Press "PLAY/PAUSE" button once, it will play the track.
3. FAST TRACKING
While the track is being played, press and hold "PREV" or "NEXT" for fastforward or backward the
track.
4. SKIP / RETURN TRACKING
Press "NEXT" to skip forward to the next track.
Press "PREV" to skip backward to the previous track.
5. DIGITAL VOLUME CONTROL
To adjust the volume, press "VOLUME +" to increase the volume or press "VOLUME " to decrease the
volume.
6. PAUSING PLAYBACK
While the track is being played, press "PLAY / PAUSE" for pausing the playback.
Press "PLAY/PAUSE" button again to start playback.
7. STOPPING PLAYBACK
Press "STOP" button for stopping the playback.
8. HOLD FUNCTION
Slide "HOLD" button to key lock
9. LOW BATTERY INDICATOR
Indicates high battery level .
Indicates medium battery level .
Indicates low battery level .
Indicates that the battery level is empty and the player need to replace a new battery.
10. EXT.MMC/SD/CARD USAGE
Inserted MMC/SD Card to Card Slot.
"EXTERNAL DISK WAS INSERTED" indicated.
6

3794A.qxd 08.07.2005 9:04 Page 7
ENGLISH
Press "MENU" and hold for 2 second to change external memory card.
The total number of music file will be shown.
Press "PLAY/PAUSE" to start play, or press "MENU" with "+" / "" button to browse other folder.
Press "MENU" and hold 2 second return to internal memory.
"Chang drive NAND" will be shown in Display.
CAUTION
In case of using unqualified SD/MMC/USB device or by some electrical shock this unit may be locked.
Follow procedure described as below to settle:
1. Position LOCK switch ON
2. While press VOL-button, press POWER key shortly
3. Confirm message is displayed
4. By pressing PLAY button, formatting is start and all function will be normal
11. DELETE FILE
Press "STOP" to stop playback file.
Press "PREV" or "NEXT" to select file to delete.
Press "STOP" and hold 2 second until display "Delete YES: Play".
Press" PLAY/PAUSE" to confirmed other key to abort.
OPERATING THE FM RADIO
1. ENTER TO THE FM RADIO MODE
While playing in [Music Mod], press "MENU" and select the [FM Mode] with "+" or " ".
Press "MENU" to enter the Radio Mode.
Please make sure that the earphone is connected to the MP3
Player it is because the earphone wire is the antenna of FM radio.
2. AUTO SCANNING THE WHOLE FM BAND
While in [FM MODE] and press "MENU".
Press "PREV" or "NEXT" button for select [AUTOSCAN].
Press "PLAY/PAUSE" to start auto scan.
First 20 FM station detected will be stored in the preset memory.
3. How to save desired FM band in Memory Channel
While in [FM MODE], press "MENU" with "PREV" or "NEXT" button for selecting [CH SAVE].
Adjust the channel position by passing "NEXT" AND "PREV".
Save the Frequency into the memory channel by press "PLAY/PAUSE".
4. FM RECORDING
7

3794A.qxd 08.07.2005 9:04 Page 8
ENGLISH
In [FM MODE] Press the "STOP" button for FM Recording.
The file name "FMRCXXX" will be shown on the display.
The player will enter the "FM Recording Mode" and it will start recording automatically.
Press "STOP" button again for stopping the recording.
5. PLAYBACK THE RECORDED FILE
Press "STOP" button again for stopping the recording.
Press "MENU" button with "+" or "" button to select [MUSIC MODE] on the LCD display.
Press "MENU" button for confirming the selection.
The player will back to the "Music MODE".
Select the saved FM file with "PREV" or"NEXT".
Press "PLAY/PAUSE" for playback the saved FM file.
6. RETURN TO THE MUSIC MODE
Press "MENU" button with "PREV" or "NEXT" for select [EXIT FM MODE].
Press "PLAY/PAUSE"button for retuning to "Music Mode".
CAUTION: Please note that the better receiving audio will have better effect when saved FM band in
the memory channel.
REMARK: FM radio receiving quality will be affected by the location.
Make sure the location can be received FM broadcast signal.
VOICE RECORDING AND ENCODING SETTING
You can record the message by the builtin microphone. This player also includes WMA encoding
function.
1. RECORD SOURCING SETTING
Press "MENU" and select { REC MODE SET } with "PREV" or "NEXT".
Press "MENU" button again.
Select [ SOURCE ] with "+" or "" then press "MENU" button for confirming the selection.
Select [ MIC ] by recording the voice.
Select [ LINE IN ] to encode the audio signal to WMA format.
There are two functions that bring convenience to the user. User can record or encode the voice easy
by these two functions.
CAUTION: Files saved location depends on memory selected before recording.
8

3794A.qxd 08.07.2005 9:04 Page 9
ENGLISH
2. START RECORDING
Press "MENU" with "PREV" or "NEXT" to choose {MODE SELECT}
Press "+" or "" to choose [ RECORD MODE ].
Press "MENU" to confirm enter Record Mode.
Press "STOP" to start recording,Display will show "VORCXXX" file name.
Press "STOP" again to finishing recording file and saved.
3. WMA ENCODING
After select [ LINE IN ] and connect with external audio source by connecting cable (3.5 to 3.5mm jack
cable).
Press "MENU" with "PREV" or "NEXT" to choose {MODE SELECT}.
Press "+" or "" to choose "Record Mode".
Press "MENU" to confirmed enter record mode.
You can heard sound from earphone now. If earphone connected.
Press "STOP" to start WMA encoding, the file name show "AUDIXXX" in display.
Press "STOP" again for finishing recording and saved file.
ADJUSTING MENU MODE
1. ENTRY MENU MODE
Press "MENU" to enter Menu mode.
Press "NEXT" and "PREV" to select the required mode.
Press "MENU" to confirm the selected mode.
Press "+" or "" to select the desired.
Press "MENU" to confirm.
2. FILE BROWSER
If the file saved by folder format in the player, press "MENU" with "PREV" or "NEXT" for find [BROWS
ER] mode.
Press "MENU" to confirm selected.
Press "+" or "" to select the folder and press "MENU" .
Press "+" or "" to select the file or UDIR to the previous folder by press "MENU" confirm.
3. GENERAL SET
A. CONTRAST
Press "MENU" button and select { GENERAL SET } by "PREV" or "NEXT" and "+" or"" to select [ LCD
CONTRAST ].
Press "MENU" for confirming the selection.
9

3794A.qxd 08.07.2005 9:04 Page 10
ENGLISH
Display show the icon " LCD Contrast".
Press "+" or "" for increasing or decreasing the contrast.
Press "MENU" for confirming.
Press "STOP" will back to the "Music Mode".
B. ID3 LANGUAGE
Select [ ID3 LANGUAGE ] by pressing "+" or"" button.
It have 7 types of language for choosing ,"ENGLISH', "WEST EUROPE", "EAST EUROPE",
"CHINESES", "CHINESET", KOREAN", "JAPANESE".
Press "+" or "" buton for selecting the language.
Press "MENU" for confirming the selection.
CAUTION: The information of ID3 and the playing file should be matched. Otherwise, the player can-
not show the correct language information.
C. FORMAT
Select [ FORMAT ] by pressing "+" or "" button.
Press "MENU" to confirm.
Select "QUICK" or "NORMAL" by press "+" or "" button.
Press "MENU" to select choice.
Press "PLAY/PAUSE" to confirm, other to cancel.
D.FREE MEMORY
Select [ FREE MEMORY ] by pressing "+" or "" button.
Press "MENU" to confirm.
Total memory and Free Memory show in Display.
4. PLAY MODE SET
A. E Q
Press "MENU" button and select { PLAY MODE SET }.
Select [ SET EQ ] icon with "+" or "" button.
Press "MENU" for confirming the selection.
It have 6 type of EQ for choosing, "Normal", "Rock", "Jazz", "Classic", "POP" and "User EQ".
Press "MENU" for confirming the selection.
Press "STOP" to return to music mode.
B. REPEAT
Press "MENU" for entering the { PLAY MODE SET }.
Select [ REPEAT ] icon with "+" or "".
Press "MENU" for confirming the selection
It have 4 options for choosing, "Normal 1", "Repeat 1", "Normal", "Repeat All".
10

3794A.qxd 08.07.2005 9:04 Page 11
ENGLISH
Press "MENU" for confirming the selection.
Press "STOP" to return "Music Mode" .
C. PLAY SPEED
Press "MENU" for entering the {PLAY MODE SET}.
Select [PLAY SPEED ] icon with "+" or "" button.
Press "MENU"for confirming the selection.
It have 9 option for choosing play speed, there are "80", "85", "90", "95", "100", "105", "110", "115",
"120".
After finish playback,next file will back to 100 setting automatically.
5. REC MODE SET
A. RECORD SOURCE
Press "MENU" for entering {REC MODE SET}.
Pressing [ MIC ] or [ LINE IN ] for selecting the record source by "+" or"" button.
Press "MENU" for confirming the selection.
Select [MIC] by recording the voice.
Select [ LINE IN ] to encode the audio signal to WMA format.
B. CD SYNC(Only work when using Linein Encoding)
After switch on this function, the player will convert the audio signal to WMA format automatically when
switch on the external audio player. And the player will not convert to the WMA format when the exter
nal audio source stops.
CD SYNC ON
Select [CD SYNC] icon with "+" or "" button.
Press "MENU" for entering.
Select " ON" icon and press "MENU" for confirming.
This function can encode more than 1 songs.
The player will encode the audio signal to WMA format when switch on the external audio
source.
It will not stop encoding when it is no signal from the external audio source.
It will start encoding again when the sound signal detected.
It will divide the file automatically after encoding.
It will stop encoding if there is no signal for long time.
ENCODE MANUALLY(SYNC OFF)
Select [CD SYNC] icon with "PREV" or "NEXT" button.
Press "MENU" for entering.
Select [OFF] icon and press "MENU" for confirming.
11

3794A.qxd 08.07.2005 9:04 Page 12
ENGLISH
It will encode the audio signal to WMA format manually until press "STOP" button.
It will not divide the file when encoding.
C. RECORD QUALITY
Select [ RECORD SETTING ] icon with "PREV" or "NEXT" button.
Press "MENU" for entering the selection.
It have 6 types of quality to choose. (Low to High)
Press "MENU" for confirming the selection.
D. EXIT
Select "EXIT" icon with "+" or "" button.
Press "MENU" for confirming the selection.
The player will back to "Music Mode".
6. TIMER SET
Power Off For set up automatic power off time.
BL Time For set up backlight time.
Sleep Time For set up sleep timer.
Scroll Speed For set up song title scrolling speed.
Exit Exit to music mode.
A. POWER OFF
Press "MENU" with "PREV" or "NEXT" button to choose [TIMER SET].
Press "+" or "" to choose [ POWER OFF ].
Press "MENU" for confirming.
Press "+" or "" to select a auto power off time. (It have 5 types of time to choose: 1min, 2min, 5min,
10min, off)
B. BL TIME
Press "+" or "" to choose [ BL TIME ].
Press "MENU" for confirming.
Press "+" or "" to select backlight time. (It have 5 types of time to choose: OFF, 5sec, 10sec, 15sec,
20sec)
Press "MENU" to confirm.
C.SLEEP TIME
Press "+" or "" button to choose [ SLEEP TIME ].
Press "MENU" for confirming.
Press "+" or "" to select a sleep timer.(It have 5 choice of sleep timer for choose: off, 30min, 60min,
90min, 120min.)
Press "MENU" to confirm, the unit will be auto shut off when time up.
12

3794A.qxd 08.07.2005 9:04 Page 13
ENGLISH
D.SCROLL SPEED
Press "+" or "" button to choose [ SCROLL SPEED ].
Press "MENU" for confirming.
Press "+" or "" to select a text scrolling speed. (It have 3 types of speed for choose: slow, normal and
fast)
7. STOP WATCH
Press "MENU" select { MODE SELECT } by "PREV" or "NEXT" button.
Press "+" or "" select [ STOP WATCH ].
Press "MENU" for confirm.
Press "PLAY" to ON/OFF stop watch function.
Press "STOP" to exit stop watch mode.
OPERATING WITH THE COMPUTER
Windows 2000/ME/XP
The player does not need to install any driver if Window is 2000/ME/XP.
When the player connect to the computer, a removable driver (H:) will shown on My Computer, it repre
sents the flash memory of the player. Then, you can upload, download and manage the file(s) in the
player by computer.
Windows 98SE
The computer requires the users to install the driver if Windows is 98SE. User can install the driver by
enclosed installation CD.
SAFETY NOTICES
KEEP THE UNIT AWAY FROM DIRECT SUNLIGHT, STRONG MAGNETIC FIELDS, EXCESSIVE
DUST, HUMIDITY AND ELECTRONIC / ELECTRICAL EQUIPMENT WHICH GENERATE
ELECTRONIC NOISE.
USE OF CONTROL, ADJSTMENTS OR PERFORMANCE OF PROCEDURES OTHER THAN
HEREIN MAY RESULT IN A FIRE OR HAZARDOUS RADIATION EXPOSURE.
DO NOT DROP YOUR PLAYER OR LEAVE IT UNDER HEAVY OBJECTS.
TO AVOID ACCIDENT OF ELECTRIC SHOCK, PLEASE DO NOT ATTEMPT TO DETACH THE
COVER OF THE PLAYER,CUSTOMER SHOULD CONTACT A QUALIFIED TECHNICIAN REGARDING
ANY REPAIR JOB.
DO NOT REMOVE/REPLACE BATTERY DURING OPERATING
WARNING: To prevent fire or shock hazard, Do not expose this appliance to rain or moisture.
13

3794A.qxd 08.07.2005 9:04 Page 14
ENGLISH
TROUBLE SHOOTING
1. THE PLAYER DOES NOT WORK.
Check the capacity of the battery. One 1.5V "AAA" size battery is required.
Check the polarity(+ and ) of the battery.
Note: You may use any 1.5V "AAA" size battery, but alkaline battery tends to last longer. You can also
use a rechargeable "AAA" size 1.2V NiCid or NiMH battery.
2. THE BUTTONS ARE NOT FUNCTIONING.
Check the HOLD function setting. When the "HOLD" function is on. All buttons are locked.
Try reinstalling the battery to reinitialize the player.
3. UNABLE TO DOWNLOAD DATA
Ensure the USB cable is properly connected to your PC and the player.
Check that the USB driver is installed.
Ensure that there is enough memory to store music or data file(s).
4. LOST DATA
Occasionally some parts of a data stream may be damaged owing to instability of power while down
loading files. In such a case, format to initialize the memory in the player by the utility MP3 Player.
CAUTION: It is recommended to backup the data before moving from one place to the other.
5. How many minutes of MP3 files can this player hold?
It depends on the memory size of the player. A player with 128MB memory can hold approximately 120
minutes the near CD sound quality MP3 files.
6. Player is not recognized by the PC.
Check if the USB cable is connected properly, and if the player is on.
Check that the USB driver is installed.
14
3794A.qxd 08.07.2005 9:04 Page 15
ENGLISH
PRODUCT SPECIFICATION
Builtin Flash Memory: 128MB
LCD Supported ID3 tags
Download/Upload speed up to 4Mbps
WMA/MP3 decoding 32K~320Kbps
WMA encoding 32k~128Kbps
FM Frequency 87.5108MHz
Step Frequency 100KHz
FM stereo seperation 20dB
Earphone output 20mW/16 ohm
Signal VS Noise over 60dB (without filter)
Voice Recording Time 8 Hours 45min or more
(128M memory 32kbps encoding)
Line in recording Time 4 Hours 20min or more
(128M memory 64kbps encoding)
PC interface USB 1.1
Power 1.5V "AAA" Size battery or
1.2V "AAA" NiMH Rechargeable battery.
The manufacturer reserves the right to make changes to the technical characteristics of this device without
prior notice.
Service life – no less than 3 years.
Guarantee
Details regarding guarantee conditions can be obtained from the dealer from whom the appliance was pur
chased. The bill of sale or receipt must be produced when making any claim under the terms of this guarantee.
This product conforms to the EMCRequirements as laid down by the Council Directive 89/336/EEC
and to the Low Voltage Regulation (23/73 EEC)
15

3794A.qxd 08.07.2005 9:04 Page 16
РУССКИЙ
ОПИСАНИЕ РАЗЪЕМОВ И КНОПОК УПРАВЛЕНИЯ
1 ЖК ЭКРАН ЖК ЭКРАН
2 МИКРОФОН МИКРОФОН
3 MENU Вход в меню для управления плеером
4 PLAY/PAUSE Вкл. питание/Воспр./пауза/выкл. питание
5 STOP Стоп/выход и ЗАПИСЬ/Остановка ЗАПИСИ
6 РАЗЪЕМ ЛИНЕЙНОГО ВХОДА Соединение с внешним источником звука
7 ОТВЕРСТИЕ ДЛЯ РЕМЕШКА Соединение с ремешком
8 ГНЕЗДО SD/MMC Гнездо для SD/MMC карт
9 ГНЕЗДО ДЛЯ НАУШНИКОВ Подключение наушников
10 VOLUME+ Увеличение уровня громкости
11 VOLUME Уменьшение уровня громкости
12 USB РАЗЪЕМ Присоединение плеера к компьютеру
13 БАТАРЕЙНЫЙ ОТСЕК Установка "AAA" батареи
14 NEXT Переход к следующей дорожке
15 PREV Переход к предыдущей дорожке
16 HOLD Блокировка клавиш
АКСЕССУАРЫ
1. Установочный диск
2. Стерео наушники
3. Руководство пользователя
4. Кабель USB
5. Батарейка "ААА", 1.5В
6. Кабель линейного входа
Примечания: Комплект аксессуаров может изменяться
16
3794A.qxd 08.07.2005 9:04 Page 17
РУССКИЙ
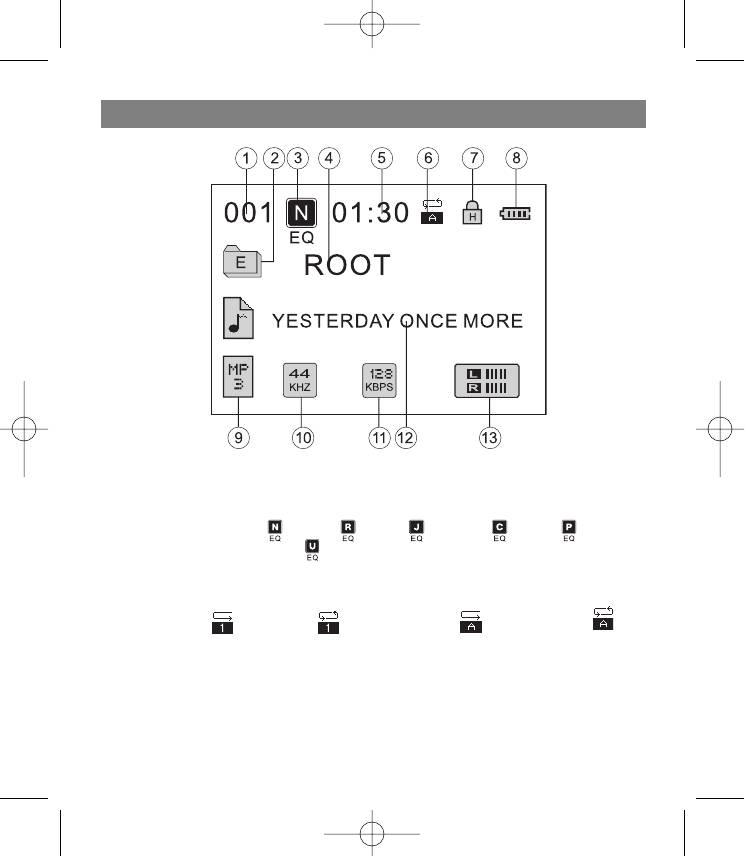
ИНФОРМАЦИЯ НА ЖКДИСПЛЕЕ
1. Номер дорожки
2. E: Индикатор установки карты памяти.
3. Эквалайзер: Нормально Рок Джаз Классика ПОП
Пользовательские установки EQ
4. Имя папки
5. Продолжительность текущей дорожки
6. Установки режима воспроизведения:
Нормальный 1 Повтор 1 Нормальный все Повторить все
7. Удержание
8. Состояние заряда батарейки
9. Формат файла
10. Частота дискретизации
11. Скорость передачи бит/сек.
12. Наименование дорожки
13. Индикатор уровня громкости
17
3794A.qxd 08.07.2005 9:04 Page 18
РУССКИЙ
ВОСПРОИЗВЕДЕНИЕ
1. ПИТАНИЕ ВКЛ/ВЫКЛ
ПИТАНИЕ ВКЛ Нажмите "PLAY/PAUSE" чтобы включить питание; на экране отобразится логотип
"MP3 Player".
ПИТАНИЕ ВЫКЛ Нажмите и удерживайте "PLAY/PAUSE" в течение 2 секунд для того, чтобы
выключить питание, когда устройство находится в режиме останова.
ВНИМАНИЕ: Не вынимайте батарею при включенном питании, это может повредить
программное обеспечение плеера.
2. ЗАПУСК ВОСПРОИЗВЕДЕНИЯ
Нажмите клавишу "PLAY/PAUSE" один раз, начнется воспроизведение.
3. БЫСТРАЯ ПЕРЕМОТКА ДОРОЖКИ
При воспроизведении дорожки, нажмите и удерживайте клавиши "PREV" или "NEXT" для
быстрой прокрутки дорожки назад или вперед, соответственно.
4. ПЕРЕХОД НА СЛЕДУЮЩУЮ ДОРОЖКУ/ВОЗВРАТ К ПРЕДЫДУЩЕЙ ДОРОЖКЕ
Для того чтобы перейти к следующей дорожке, нажмите "NEXT". Для того чтобы вернуться к
предыдущей дорожке, нажмите "PREV".
5. РЕГУЛИРОВКА ГРОМКОСТИ
С целью регулировки громкости, нажмите "VOLUME +" для увеличения громкости, или нажмите
"VOLUME " для уменьшения громкости.
6. ПАУЗА ВОСПРОИЗВЕДЕНИЯ
Во время воспроизведения нажмите "PLAY / PAUSE" для того, чтобы временно остановить
воспроизведение. Для того чтобы возобновить воспроизведение снова нажмите клавишу
"PLAY/PAUSE".
7. ОСТАНОВКА ВОСПРОИЗВЕДЕНИЯ
Для того чтобы остановить воспроизведение нажмите клавишу "STOP".
8. ФУНКЦИЯ БЛОКИРОВКИ КЛАВИШ
Передвиньте переключатель "HOLD" для блокировки всех клавиш.
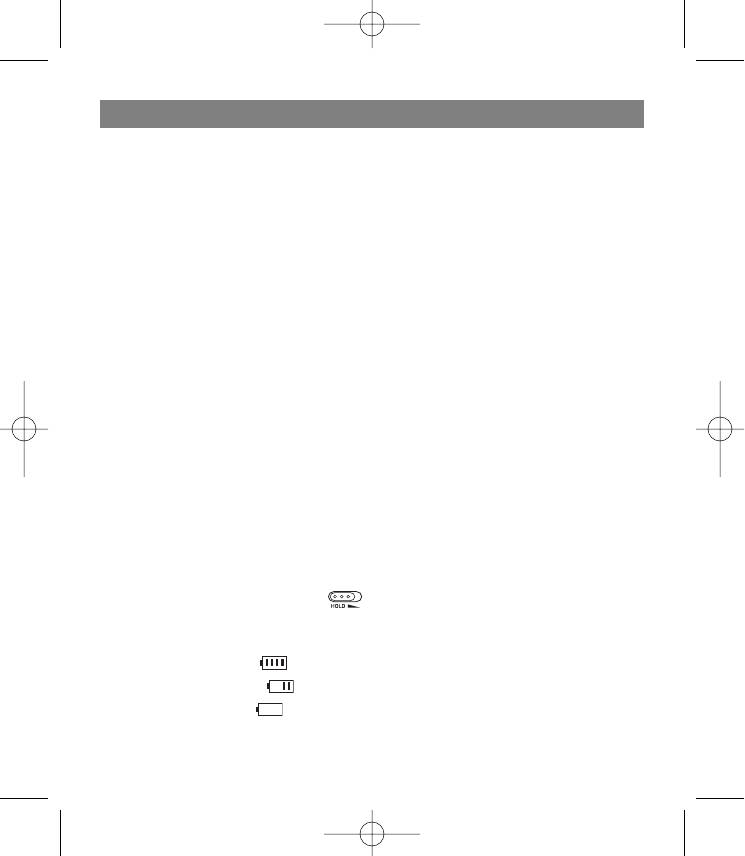
9. ИНДИКАТОР РАЗРЯДКИ БАТАРЕИ
Полная зарядка батареи .
Средняя зарядка батареи .
Низкая зарядка батареи .
Указывает на то, что батарея разряжена, и ее следует поменять.
18

3794A.qxd 08.07.2005 9:04 Page 19
РУССКИЙ
10. ИСПОЛЬЗОВАНИЕ КАРТЫ MMC/SD
Вставьте карту MMC/SD в гнездо для карты.
На дисплее высветится "EXTERNAL DISK WAS INSERTED" (ВСТАВЛЕН ВНЕШНИЙ ДИСК).
Нажмите "MENU" и удерживайте эту клавишу в течение 2 секунд для замены карты.
После этого появится общее количество музыкальных файлов.
Для начала воспроизведения нажмите "PLAY/PAUSE", или нажмите "MENU" с клавишей "+" / ""
для того, чтобы просмотреть другую папку.
Нажмите "MENU" и удерживайте в течение 2 секунд для возврата к встроенной памяти.
На дисплее появится "Chang drive NAND".
ВНИМАНИЕ
В случае использования не сертифицированных карт SD/MMC/USB, или в случае воздействия
электростатического заряда, данное устройство может быть заблокировано.
В этом случае выполните следующие действия:
1. Установите переключатель HOLD в положение ON (ВКЛ)
2. Нажимая и удерживая клавишу VOL+, быстро нажмите клавишу PLAY/PAUSE
3. На экране появится надпись подтверждения
4. Нажмите клавишу PLAY, начнется перезагрузка программного обеспечения плеера, и все
функции вернутся к нормальным установкам.
11. УДАЛЕНИЕ ФАЙЛА
Для остановки воспроизводимого файла нажмите "STOP".
Для того чтобы выбрать файл, который следует удалить, нажмите "PREV" или "NEXT".
Нажмите клавишу "STOP" и удерживайте ее в течение 2 секунд, пока на дисплее не появится
"Delete YES: Play".
Для подтверждения удаления нажмите клавишу "PLAY/PAUSE", для отмены любую другую
клавишу
РАБОТА FM РАДИО
1. ВХОД В РЕЖИМ FM РАДИО
При работе в режиме [Music Mod], нажмите "MENU" и выберите [FM режим] с помощью клавиш
"+" или "".
Для того чтобы войти в режим Радио, нажмите "MENU".
Проверьте, подключение наушников к плееру, так как провод наушников является антенной для
FM радио.
2. АВТОСКАНИРОВАНИЕ FM ДИАПАЗОНА
Находясь в режиме [FM MODE], нажмите "MENU".
19

3794A.qxd 08.07.2005 9:04 Page 20
РУССКИЙ
С помощью кнопок "PREV" или "NEXT" выберите функцию [AUTOSCAN] (АВТОСКАНИРОВАНИЕ).
Для начала автоматического сканирования FM диапазона нажмите "PLAY/PAUSE".
В памяти плеера сохраниться до 10 радиостанций.
3. УДАЛЕНИЕ РАДИОСТАНЦИИ ИЗ ПАМЯТИ
Находясь в режиме [FM MODE], нажмите "MENU".
С помощью клавиш "PREV" или "NEXT" выберите функцию [CH DELETE] (УДАЛЕНИЕ КАНАЛА).
Удалите радиостанцию из памяти плеера нажатием клавиши "PLAY/PAUSE".
4. ЗАПИСЬ FM РАДИО
Находясь в режиме [FM MODE], нажмите клавишу "STOP" для начала записи.
На дисплее отобразится надпись "FMRCXXX".
Для остановки записи снова нажмите клавишу "STOP".
Для выключения питания в режиме Радио, удерживайте в нажатом положении клавишу
"PLAY/PAUSE" более 2 секунд, после чего устройство выключится.
5. ВОСПРОИЗВЕДЕНИЕ ЗАПИСАННОГО ФАЙЛА
Выйдите из режима FM радио (см. пункт 6). Нажмите клавишу "MENU" и с помощью клавиш
VOLUME "+" или "" выберете [MUSIC MODE] (РЕЖИМ ВОСПРОИЗВЕДЕНИЯ МУЗЫКИ) на ЖК
дисплее. Для подтверждения выбора, нажмите клавишу "MENU". Плеер перейдет в режим
"Воспроизведения музыки".
Выберите записанный файл FMRCxxx.WMA с помощью клавиш "PREV" или "NEXT".
Нажмите клавишу "PLAY/PAUSE" для воспроизведения выбранного файла.
6. ВЫХОД ИЗ РЕЖИМА FM
Нажмите клавишу "MENU" с клавишами "PREV" или "NEXT" для выбора [EXIT FM MODE] (ВЫХОД
ИЗ FM РЕЖИМА). Нажмите клавишу "PLAY/PAUSE" для возврата в "Режим воспроизведения
музыки".
ВНИМАНИЕ: Качество записи повышается, если FM радиостанция сохранена в памяти плеера.
ПРИМЕЧАНИЕ: Качество приема FM радио зависит от определенной местности.
Убедитесь в том, что в данной местности может быть получен соответствующий FM сигнал.
ЗАПИСЬ С МИКРОФОНА И ЛИНЕЙНОГО ВХОДА
Вы можете сделать запись с помощью встроенного микрофона. Данный плеер также имеет
функцию кодирования с расширением WMA.
1. УСТАНОВКА ИСТОЧНИКА ЗАПИСИ
Нажмите клавишу "MENU" и выберите { REC MODE SET } (УСТАНОВКА РЕЖИМА ЗАПИСИ) с
помощью клавиш VOLUME "+" или "". Еще раз нажмите клавишу "MENU".
20


