Vitek VT-1656: инструкция
Раздел: Бытовая, кухонная техника, электроника и оборудование
Тип: Микроволновая Печь

Характеристики, спецификации
Инструкция к Микроволновой Печи Vitek VT-1656
Оглавление
- ВАЖНЫЕ УКАЗАНИЯ ПО МЕРАМ БЕЗОПАСНОСТИ Важная информация
- МЕРЫ БЕЗОПАСНОСТИ. Правила, о которых всегда следует помнить:
- ПРЕДОСТЕРЕЖЕНИЕ
- Материалы, и посуда пригодные для использования в микроволновой печи
- Материалы и посуда, не пригодные для использования в микроволновой печи Описание Панель управления
- Дисплей. Установка Сборка микроволновой печи Установка стеклянного поддона
- Инструкция по эксплуатации микроволновой печи 1. Установка часов 2. Приготовление в режиме Гриль 2. Приготовление в микроволновой печи 3. Конвекционное приготовление
- Установка температуры режима "CONVECTION" 5. Режим комбинированного приготовления "COM 4. Конвекционное приготовление
- Варианты комбинированного приготовления 1. Установка времени начала приготовления Таблица режимов разогрева продуктов. 1. Размораживание продуктов по времени "d1" 7. Разогрев продуктов
- 9. Размораживание продуктов по весу "d2" 12. Меню автоматического приготовления 10. Размораживание мяса "d3" 11. Размораживание морепродуктов "d4"
- Таблица меню автоматического приготовления продуктов
- 13. Память 16. Функция блокировки от детей 17. Функция автоматического уменьшения мощности 14. Режим быстрого приготовления 18. Показания на дисплее 19. Чистка и уход 15. Просмотр установленных режимов
- Устранение неисправностей Нормальная работа
- Технические характеристики
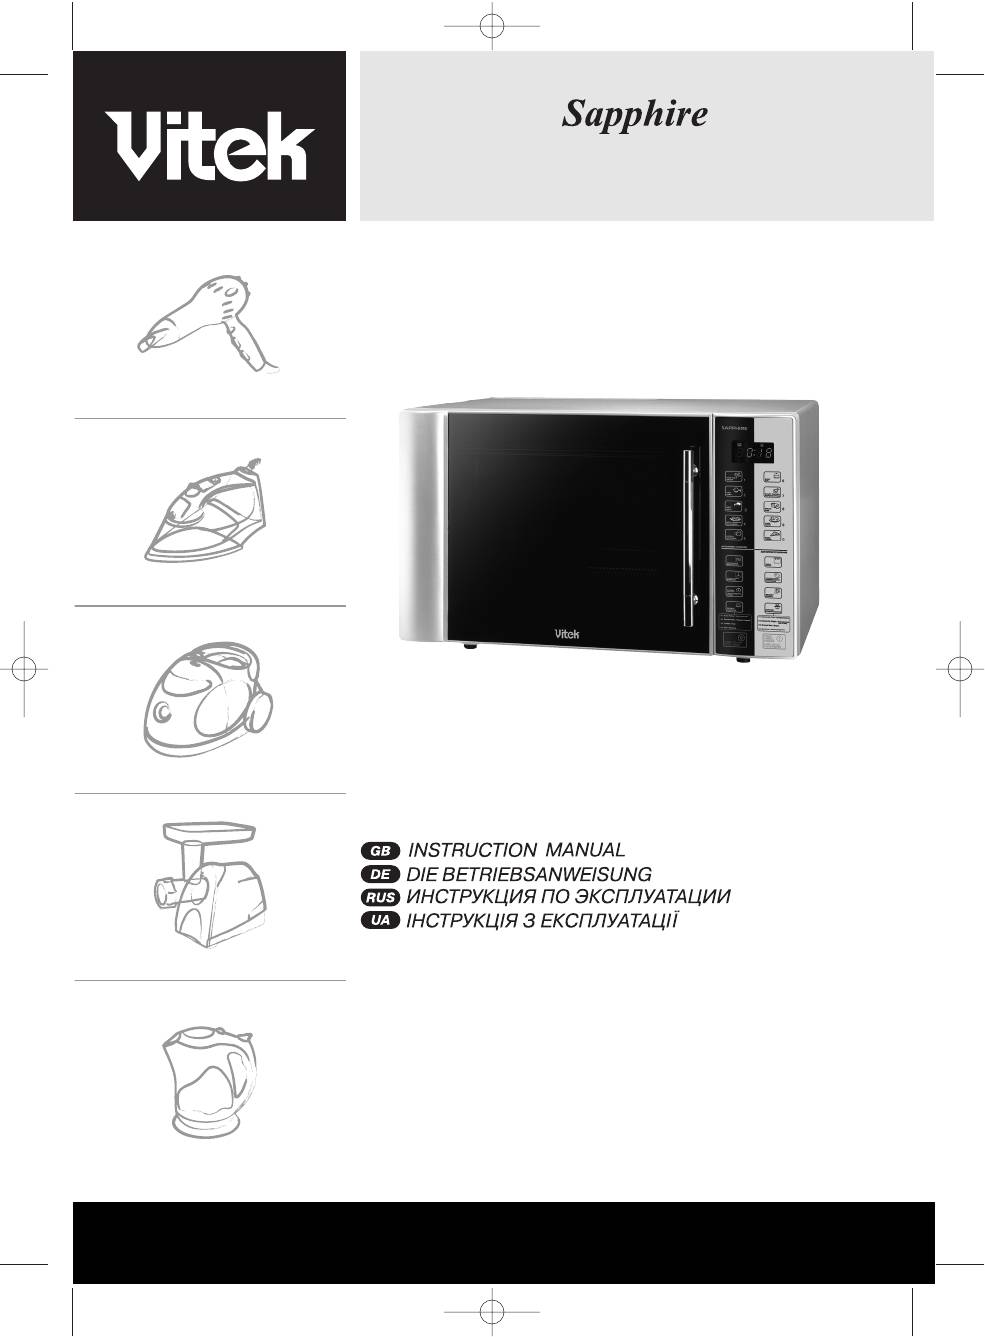
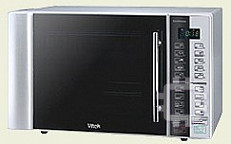
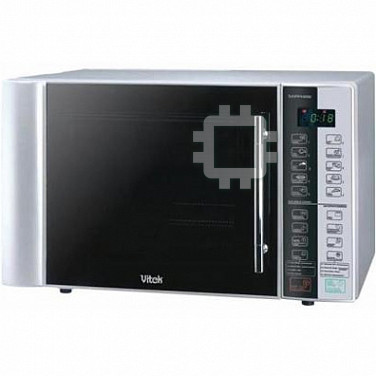
VT1656
MANUAL INSTRUCTION
3
14
28
42
www.vitekaus.com
1656.qxd 27.06.05 14:58 Page 1
2
1656.qxd 27.06.05 14:58 Page 2

ENGLISH
Please acquaint yourself with these instructions
by themselves after they have been acquainted with
before using your microwave oven.
these instructions and understand the dangers associ
If these instructions are strictly adhered to, your
ated with operating a microwave oven.
microwave oven will serve you troublefree for many
• Use only microwavesafe dishes. Do not use metallic
years.
dishes in the microwave oven as microwaves reflect
ed off the dish might cause sparks and fire.
Store these instructions in an easily accessible
• In order to avoid overheating and burning food, con
location
stantly supervise the microwave's operation if you
are heating food in disposable plastic, paper or
PRECAUTIONS, WHICH MUST BE
other similar containers or if the oven is heating only
a small amount of food.
FOLLOWED IN ORDER TO MINIMIZE
• If you notice smoke coming from the oven, quickly
THE RISK OF MICROWAVE ENERGY
turn it off and unplug it from the power outlet.
EXPOSURE
• When heating any kind of liquid (water, coffee, milk,
1. Do not attempt to use the microwave oven with the
etc.), keep in mind that it can suddenly start to boil
door open, as you will risk exposure to harmful
and splash on your hands while you are removing it
microwave energy. It is very important that you do
from the oven. To avoid this, place a heat resistant
not damage the internal latches and door blocking
plastic spoon or glass mixer in the container and stir
mechanism.
the liquid before removing it from the oven.
2. Do not place foreign objects between the door and
• Infant feeding bottles and jars of baby food should
the front of the microwave oven and do not allow
be heating without lids or nipples. Their contents
food or cleaning liquid remnants to build up on the
should be mixed or periodically shaken. Test the
screening grill or on the inside of the door.
temperature of the food before feeding in order to
3. Do not use the microwave oven if it is damaged or
prevent burns.
malfunctioning. It is especially important that the
door always be closed and that the following parts
Important information
are not damaged:
• ALWAYS check to make sure the food is not too hot
• door (bent)
before giving it to a child. We recommend shaking
• hinges and latches (broken or weakened)
the bottle or jar to make sure the heat is distributed
• screening grill on the inside of the door
evenly throughout the volume of the container.
• Do not cook an egg in its shell or reheat an egg in its
shell in MICROWAVE mode as they can break from
IMPORTANT SAFETY INSTRUCTIONS
the internal pressure.
WARNING: While the microwave oven is operating in
combination mode (MICROWAVE + GRILL) or being
operated by children, an adult should always be present
SAFETY MEASURES
to supervise in order to prevent the children from burn
ing themselves.
1. Install the oven on a flat, stable surface. Choose a
WARNING: Do not use the microwave oven if the
place that will not be accessible to small children.
screening grill on the door is damaged.
2. Install the oven so that the distance between the wall
WARNING: Repairing a microwave oven always pres
and the back of the oven is no less than 78 cm and
ents danger to any person conducting the repairs if it is
the free space above the microwave is no less than
necessary to remove the metal housing that provides
30 cm.
protections from microwave radiation. Do not repair the
3. The microwave door is equipped with a blocking
microwave oven yourself.
system that turns off the power when it is open. Do
WARNING: Do not forget to open products packaged
not make changes to the operation of the door
in hermetic or vacuum packaging before heating or
blocking mechanism.
cooking. Otherwise, pressure could grow within the
4. Do not turn on the microwave while empty; operating
package and cause it to explode, regardless of whether
the oven with no food inside can lead to malfunction.
or not the food was prepared earlier.
5. Preparing foods with extremely small moisture con
WARNING: Children may only use the microwave oven
tents can lead to burning and fire.
3
1656.qxd 27.06.05 14:58 Page 3

ENGLISH
If a fire occurs:
laboratory or industrial use.
• Do not open the door.
8. Pay special attention when children are using the
• Turn off the microwave oven and disconnect the
microwave oven.
plug from the electrical outlet.
9. Do not use the microwave oven if the power cord or
6. When preparing bacon, do not place it directly on
plug are damaged, or if the oven has been damaged
the glass tray; localized overheating of the glass tray
or dropped.
can cause it to crack.
10. Repair of the microwave oven should only be con
7. Do not heat liquids in containers with narrow open
ducted by qualified specialists at an authorized serv
ings.
ice center.
8. Do not attempt to heat products to a welldone
11. Do not block the ventilation openings on the
state.
microwave oven's housing.
9. Do not use the microwave for canning and preserv
12. Do not store or use the microwave oven outdoors.
ing food because there is no way of knowing if the
13. Do not use the microwave oven near water, immedi
contents of the jar reached boiling temperature.
ately near kitchen sinks, in damp basements or
10. In order to avoid prolonged rapid boiling of liquid
directly near swimming pools.
foods and drinks, and also to prevent burns, we rec
14. Do not submerse the power cord and plug in water.
ommend stirring the product before and in the mid
15. Avoid allowing the power cord and plug to come into
dle of the cooking process. To do this, start cooking,
contact with hot surfaces.
wait a while, remove the dish from the oven and stir,
16. Do not allow the power cord to hang off the edge of
then place it back in the oven to continue the cook
the table or counter.
ing process.
17. When cleaning the door and internal surfaces of the
11. Clean the microwave oven regularly. Irregular care
microwave oven, always use a soft, nonabrasive
for your oven can lead to poor outward appearance,
cleanser on a sponge or soft cloth.
negatively affects its operating ability, and also can
lead to danger during further exploitation.
CAUTION
Injury due to electric shock.
Rules that should always be remembered:
Touching the elements of the electrical circuits inside
1. Do not exceed product cooking times in the
the microwave oven can lead to serious trauma and
microwave oven. Always monitor the cooking
injury from electric shock. Do not take apart the
process when using dishes made from paper, plastic
microwave oven yourself.
and other flammable materials.
2. Never use the microwave oven to store things. Never
Grounding the Microwave Oven
store flammable materials and food in the
The microwave oven should be properly grounded. In
microwave like bread, cookies, paper packaging,
case of any kind of shortcircuit, grounding reduces the
etc., because during lightning storms, the
risk of electric shock, as the current will flow through the
microwave oven can turn on by itself.
ground wire.
3. Metal ties and wire handles must be removed from
The microwave oven uses a power cord with ground wire
paper and plastic bags and containers before plac
and a grounded plug. The plug should be connected to
ing them into the microwave oven.
an electrical outlet that also has a ground contact.
4. The microwave oven should be properly grounded.
WARNING: Connecting a grounded plug to an un
Only connect the microwave oven to an electrical
grounded outlet can lead to electric shock.
outlet that is properly grounded.
Consult with a qualified electrician if you do not under
5. Some food items, like eggs in their shells, liquid or
stand these grounding instructions or if you are not sure
hard fats, and also hermetically sealed jars and
that the microwave oven is properly grounded.
sealed glass containers can be explosive and should
• In order to avoid confusion, the microwave oven is
not be placed in your microwave oven.
equipped with a short power cord.
7. Use your microwave oven exclusively for the purpos
• If an extension cord is necessary, only use a 3wire
es for which it was designed and in strict adherence
extensions cord with ground contacts on the power
to the instructions explained herein.
plug and outlet(s).
8. The microwave oven in designed exclusively for
• The sectional markings on the microwave oven's power
heating and preparing food and is not designed for
cord should match those on the extension cord.
4
1656.qxd 27.06.05 14:58 Page 4
ENGLISH
• The extension cord should not hang off the edge of
Checking dishes before using them in the microwave
the table where children can pull on it; it should be
• Place the dish in the cooking chamber of the oven
placed where it will not be walked on.
(a plate, for example) and place a glass cup of water
Dishes for microwave ovens
in the center of the dish.
CAUTION!
• Set the microwave to maximum power and heat for
Tightly sealed containers heated in a microwave can be
no more than one minute.
explosive.
• Carefully touch the dish you are testing: if it heated
Sealed containers should be opened and plastic bags
up and the water in the cup is cold, than the dish
should be poked a few times with a fork in order to allow
should not be used in the microwave.
steam to escape before being placed in the microwave
• Avoid testing dishes for more than one minute.
oven.
If you are unsure about using a certain dish in the
microwave oven, then conduct a test.
Materials and dishes that are safe to use in your microwave oven
Aluminum Foil
Foil can only be used in grill mode. The distance between the foil and the walls of the
microwave oven should be no less than 2.5 cm.
Small pieces of foil can be used to cover thin pieces of meat or poultry to prevent over
cooking.
In microwave mode, if the foil is placed too close to the cooking chamber walls,
arcing, burning out of the screening grill on the door and oven malfunction can
occur. In this case, you void your free warranty service and repair.
Dishes for frying
Follow the manufacturer's instructions.
The bottom of the dish for frying should be 5 mm thicker than the rotating glass tray.
Improper use of dishes for frying can lead to cracks in the dishes themselves and in
the glass tray.
Dinner plates
Only those designed for use in microwave ovens. Follow the manufacturer's instruc
tions. Do not use cracked or chipped plates.
Glass containers
Only containers made from heatresistant glass and designed for use in microwave
ovens. Make sure there are no metal rims. Do not use cracked or chipped containers.
Glassware
Only containers made from heatresistant glass and designed for use in microwave
ovens. Make sure there are no metal rims. Do not use cracked or chipped containers.
The cooking process in
Follow the manufacturer's instructions. Do not close the bags, use metal ties or fas
microwave ovens using
teners. Several holes should be made in the bag to allow the release of steam.
special bags
Paper plates and cups
Use only for quick cooking/reheating. Do not leave the microwave oven unattended
during cooking/reheating in this type of container.
Paper towels
Food products may be covered with paper towels to keep warmth in and to prevent fat
from spraying out. Use only when supervised and only for quick cooking/reheating.
Parchment Paper
Use to prevent fat from spraying out or as a wrapper. Use only when supervised and
only for quick cooking/reheating.
Plastic
Only those plastic products that are labeled "Microwave Safe." Follow the manufactur
er's instructions.
Some plastic containers can soften as a result of the heating of their contents.
Hermetically sealed plastic bags must be poked with a fork or cut as directed on the
bags themselves.
Plastic wrapper
Only those plastic products that are labeled "Microwave Safe." Food may be covered
to keep moisture in.
Wax paper
Use to prevent fat from spraying out and also to keep moisture in.
5
1656.qxd 27.06.05 14:58 Page 5
ENGLISH
Materials and dishes that are NOT safe for microwave use
Aluminum trays
Can cause arcing.
Use only microwave safe dishes.
Cardboard cups with metal
Can cause arcing.
handles
Use only microwave safe dishes.
Metal dishes or dishes with
Metal reflects microwave energy. Metal rims can cause arcing.
metal rims or borders
Metal ties
Can cause arcing, and also start the packaging on fire during cooking/reheating.
Paper bags
Can cause fires in the microwave oven.
Soap
Soap can melt and make the cooking chamber dirty.
Wood
Wooden dishes can dryout, crack and break.
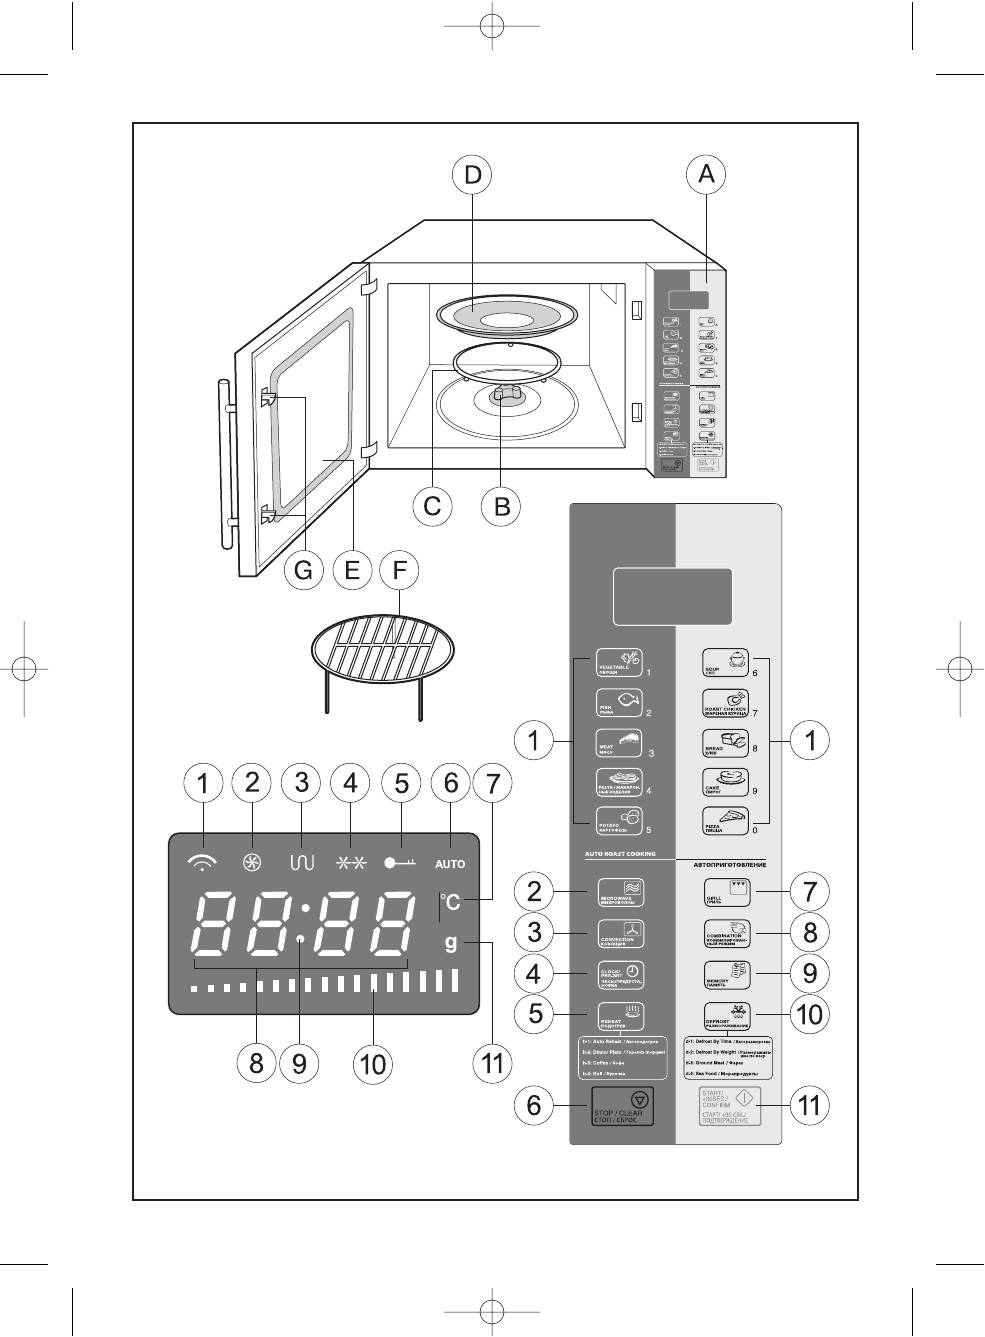
Description
Display
А) Control panel
1. "MICROWAVE" cooking mode symbol.
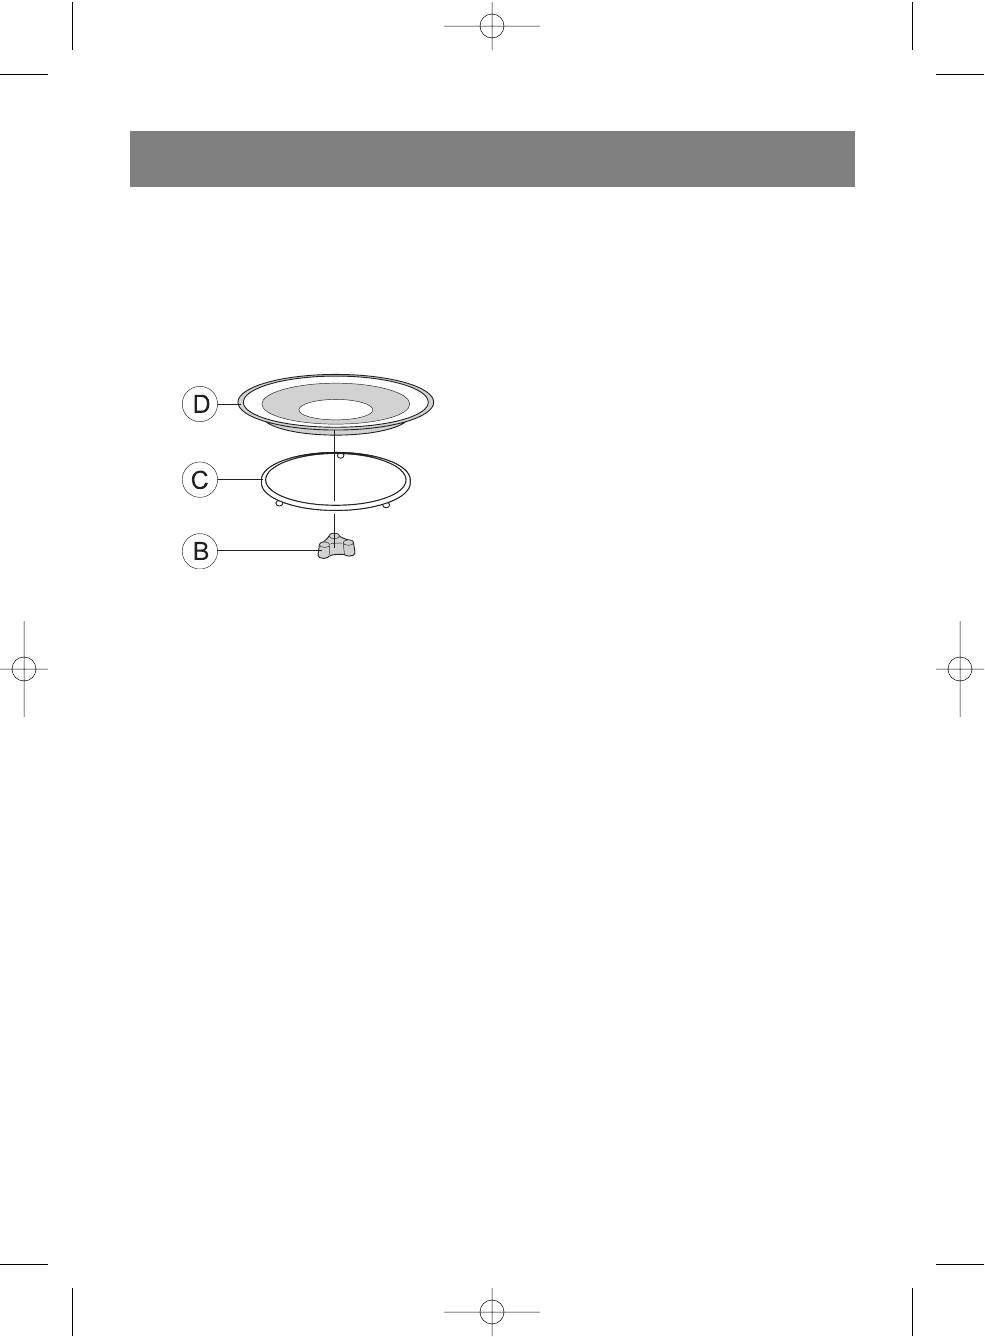
B) Rotating socket
2. "CONVECTION" mode symbol.
C) Roller base
3. "GRILL" mode symbol.
D) Glass tray
4. "DEFROST" mode symbol.
E) Looking window
5. Child lock activated symbol.
F) Emergency blocking system for disconnecting elec
6. Automatic cooking mode symbol.
tricity if the door is opened during oven operation
7. Temperature symbol.
G) Grill for grilling. Use only in "Grill" mode.
8. Food weight symbol.
9. Separation dots.
Control Panel
10. Temperature mode symbol.
1. Automatic food preparation functions/number but
Assembling the microwave oven
tons (VEGETABLE/1, FISH/2, MEAT/3, PASTA/4,
Remove the packing material and accessories from the
POTATO/5, SOUP/6, ROAST CHICKEN/7, BREAD/8,
cooking chamber of the oven. Inspect the microwave
CAKE/9, PIZZA/0).
oven for any deformities. Pay special attention to the
2. "MICROWAVE" button to activate microwave mode
operation of the oven door. If any defects are found, do
and select power level.
not install the oven and do no turn it on.
3. "CONVECTION" button to activate convection
Protective covering
mode/set the temperature.
Housing: Remove the protective film (if any) from the
4. "CLOCK/PRESET" button to set the current
microwave housing.
time/to set the cook start time.
5. "REHEAT" button to select reheating mode.
Do not remove the lightgray micaceous plate from
6. "STOP/CLEAR" button to stop any cooking
the inside of the cooking chamber; it protects the
mode/to clear incorrectly entered information.
magnetron.
7. "GRILL" button to activate grill mode.
8. "COMBINATION" button to activate combination
Installing the glass tray
mode cooking.
9. "MEMORY" button to save into memory/recall from
1. Install the base for the rotating tray (В) into the open
memory one of three saved cooking programs.
ing located in the floor of the cooking chamber.
10. "DEFROST" button to activate defrost mode.
2. Install the rolling ring (С) onto the floor of the cooking
11. "START/+30SEC./CONFIRM" button to start cook
chamber.
ing/start quickcook mode/confirm programmed
3. Carefully install the glass tray (D), aligning its lip with
functions.
the grooves on the base. Never install the glass tray
upsidedown.
• Do not block the rotation of the glass tray during the
cooking process.
6
1656.qxd 27.06.05 14:58 Page 6
ENGLISH
• During the cooking process, always use the glass
Instructions for using the microwave
tray, rolling ring and tray base.
oven
• Food and cooking dishes must always be placed
only on the glass tray.
1. Setting the time
• The glass tray may rotate clockwise or counter
Upon connecting the microwave oven to power, it will
clockwise. This is normal.
beep and the display will show "0:00".
• Replace the tray immediately if it becomes cracked
You can set the time from 0:00 23:59;
or chipped.
For example: To set the time as 12:12.
• Press the (4) "CLOCK/PRESET" button; the dis
play will show the current time format of 24Н; press
the button again to choose a 12H format.
• Press the number buttons "1", "2", "1", "2".
• Press the (4) "CLOCK/PRESET" button to finish
setting the time. The display will show the set time of
12:12 and the separation dots (9) will blink.
Note:
• If the time is not set, the current time will not be
shown on the display.
• If the time is set incorrectly, press the (6)
"STOP/CLEAR" button to clear the setting and
repeat steps 1, 2, and 3.
Installation
• Before connecting the microwave oven, make sure
2. Cooking in the microwave oven
that the operating voltage and power usage matches
Choose the power level and set the cooking time. Press
the parameters of your electrical system. Connect
the (2) "MICROWAVE" button several times to set the
the microwave oven to a grounded electrical outlet.
desired power level for the oven.
• Install the oven on a flat, stable surface. Choose a
location that will not be accessible to small children.
Number of key presses Display reading Oven power level
• Install the oven so that the distance between the wall
1 Р100 100%
and the back of the oven is no less than 78 cm and
2 Р80 80%
the free space above the microwave is no less than
3 Р50 50%
30 cm.
4 Р30 30%
• Do not remove the legs from the bottom of the
5Р1010%
microwave oven.
• Do not block the ventilation openings on the
For example: To start the oven for 10 minutes at an 80%
microwave oven's housing.
power level, complete the following steps:
• The microwave oven should be installed away from
• Open the oven door, place the food into the cooking
televisions and radios in order to prevent static inter
chamber, and then close the door.
ference of radio and television signals.
• Press the (2) "MICROWAVE" button; the indication
WARNING: Do not install the microwave oven on heat
"Р100" and symbol (1) will appear on the display.
ing surfaces (kitchen stoves) or other sources of heat
• Press the (4) "MICROWAVE" button again; the indi
waves.
cation "Р80" will appear on the display.
If the microwave oven malfunctions due to user error,
• Press the number buttons "1", "0", "0", "0"; the
the warranty for free service and repair is voided.
time "10:00" minutes will appear on the display.
• Press the (11) "START/+30SEC./CONFIRM" but
While operating, the top surface of the microwave oven
ton to begin cooking; the display will show the
and heat up significantly; avoid touching hot surfaces of
remaining cooking time as it counts down and the
the oven with bare skin in order to prevent burns.
symbol (1) will blink.
When the cooking process has finished, the oven will
turn off and beep five times.
7
1656.qxd 27.06.05 14:58 Page 7

ENGLISH
2. Cooking in Grill mode
4. Convection cooking (Without preheating)
For example: To turn on the grill at 100% power for 35
For example: to set convection cooking at 140°С for 40
minutes, complete the following steps:
minutes, complete the following steps:
• Open the oven door, place the food into the cooking
• Open the oven door, place the food into the cooking
chamber, and then close the door.
chamber, and then close the door.
• Press the (7) "GRILL" button; the display will indi
• Press the (3) "CONVECTION " button once; the
cate "G1" and the symbol (3) will appear.
temperature, "140°С", will appear on the display
• Press the number buttons "3", "5", "0", "0"; the
along with the symbol (2) and the temperature mode
time "35:00" minutes will appear on the display.
symbol (10) at the bottom of the display.
• Press the (11) "START/+30SEC./CONFIRM" but
• Press the number buttons "4", "0", "0", "0" to set
ton to start cooking; the display will show the
the cooking time, the display will show the time
remaining cooking time as it counts down and the
"40:00"minutes.
symbol (3) will blink.
• Press the (11) "START/+30SEC./CONFIRM" but
Note: When cooking in "Grill" mode the temperature in
ton to begin the cooking process.
the cooking chamber cannot be set.
The display will show the remaining cooking time, the
When the cooking process has finished, the oven will
blinking symbol (2) and the temperature mode symbol
turn off and beep five times.
(10) at the bottom of the display.
When the cooking process has finished, the oven will
3. Convection cooking (with preheating)
turn off and beep five times.
For example: To set the convectioncooking mode for
Note: In "CONVECTION" mode both heating elements
180°С for 40 minutes, complete the following steps:
are activated to heat the cooking chamber, after which,
• Press the (3) "CONVECTION" button several times
to sustain the cooking temperature, the heating ele
to choose the desired temperature "180" degrees.
ments activate alternately.
• The display will show the temperature, 180°С, and
the symbol (2), and also the temperature cooking
Setting the "CONVECTION" mode temperature
mode symbol (10) at the bottom of the display.
Number of key presses Temperature indication Symbol (2)
• Press the (11) "START/+30SEC./CONFIRM" but
on the display
ton; while the oven preheats, the display will show
1 140°С
the temperature symbol (10) and the blinking symbol
2 150°С
(2); when the preset temperature has been reached,
3 160°С
the oven will beep twice to remind you to put the
4 170°С
food into the oven; the temperature indication will
5 180°С
blink.
6 190°С
• Open the oven door, place the food into the cooking
7 200°С
chamber, and then close the door.
8 210°С
• Press the number buttons "4", "0", "0", "0" to set
9 220°С
the cooking time, the display will show the time
10 230°С
"40:00"minutes.
• Press the (11) "START/+30SEC./CONFIRM" but
5. "COMBINATION" Mode cooking
ton to begin the cooking process.
For example: To set combination mode cooking (С1)
The display will show the remaining cooking time, the
(see table) for 40 minutes, complete the following
blinking symbol (2) and the temperature mode symbol
steps:
(10) at the bottom of the display.
• Open the oven door, place the food into the cooking
When the cooking process has finished, the oven will
chamber, and then close the door.
turn off and beep five times.
• Press the (8) "COMBINATION" button once; the
Note: during the cooking process, the set temperature
display will show "С1" and the symbols (1 and 2).
will be maintained in the cooking chamber; the blinking
• Press the number buttons "4", "0", "0", "0" to set the
temperature symbol (10) at the bottom of the display
cooking time; the display will show the time
indicates that the oven is heating and the heating ele
"40:00"minutes.
ment is on.
• Press the (11) "START/+30SEC./CONFIRM" but
ton to begin the cooking process.
8
1656.qxd 27.06.05 14:58 Page 8
ENGLISH
The display will show the remaining cooking time and
• Press the "START/+30SEC./CONFIRM" button to
the blinking symbols (1 and 2).
start cooking.
When the cooking process has finished, the oven will
The reheating time will be determined automatically; the
turn off and beep five times.
display will show the remaining cooking time and the
symbols (1 and 6) will be shown.
"COMBINATION" cooking options
When the cooking process has finished, the oven will
turn off and beep five times.
Number Display Microwave oven Grill Convection
of key presses indication power level
Table of reheating modes.
1 С1 50% 50%
Menu Weight (g) Display
2 С2 50% 50%
h1(auto reheat) 150 150
3 С3
250 250
4 С4
350 350
450 450
1. Setting the cook start time "CLOCK/PRESET"
600 600
For example: To start cooking at 12:12, complete the
h2 (small plate)
250 250
following programming steps:
350 350
• Open the oven door, place the food into the cooking
450 450
chamber, and then close the door.
h3 (Coffee) 1 (approx 240g) 1
• Make sure that the current time is set properly and
2 (approx 480g) 2
then choose the cooking program that you desire.
3 (approx 720g) 3
• Press the (4) "CLOCK/PRESET" button; the indi
h4 (Roulette) 1 (approx 70g) 1
cation "0:00" will blink on the screen.
2 (approx 140g) 2
• Press the number keys "1", "2", "1", "2" to enter the
3 (approx 210g) 3
oven start time.
• Press the (4) "CLOCK/PRESET" button to confirm
8. Time defrost "d1"
your entry.
• Open the oven door, place the food into the cooking
The cooking process will begin when the programmed
chamber, and then close the door.
start time matches the current time.
• Press the (10) "DEFROST" button once; the display
The display will show the remaining cooking time and
will show the mode "d1" time defrost and the sym
the corresponding cooking mode symbols.
bols (1, 4).
The programmed cook start time can be verified by
• Use the number keys to enter the desired defrost
pressing the (4) "CLOCK/PRESET" button.
time.
When the cooking process has finished, the oven will
• Press the (11) "START/+30SEC./CONFIRM" but
turn off and beep five times.
ton to begin the defrosting process.
The screen will show the remaining defrost time and the
7. Reheating food
symbols (1, 4) will blink.
• Open the oven door, place the food into the cooking
When the defrosting process has finished, the oven will
chamber, and then close the door.
turn off and beep five times.
• Press the (5) "REHEAT" button; the indication "h1"
will appear on the display. (Press the (5) "REHEAT"
9. Weight defrost "d2"
button several times to choose the reheating pro
• Open the oven door, place the food into the cooking
gram that you desire). The symbols (1 and 6) will
chamber, and then close the door.
appear on the display.
• Press the (10) "DEFROST" button twice; the display
• Press the "START/+30SEC./CONFIRM" button to
will show the mode "d2" weight defrost and the
confirm the chosen mode, the symbol of the chosen
symbols (1, 4).
mode will appear.
• Use the number keys to enter the weight of the food
• Press the "REHEAT" button; the display will indicate
to be defrosted. The weight must be between 100
"150 g"; press the "REHEAT" button repeatedly to
2000g. If the weight is entered incorrectly, the oven
set the weight of the food.
will not operate.
9
1656.qxd 27.06.05 14:58 Page 9

ENGLISH
• Press the (11) "START/+30SEC./CONFIRM" but
For example: To prepare 350g of vegetables:
ton to begin the weight defrost process.
• Open the oven door, place the food into the cooking
The screen will show the remaining defrost time and
chamber, and then close the door.
the symbols (1, 4) will blink.
• Press the (1) "VEGETABLE" button; the symbols
When the defrosting process has finished, the oven
(1, 6) and the weight indication "150g" will appear on
will turn off and beep five times.
the display; press the (1) "VEGETABLE" button
again to set the desired product weight.
10. Defrosting meat "d3"
• Press the "START/+30SEC./CONFIRM" button to
• Open the oven door, place the food into the cooking
start the automatic cooking process.
chamber, and then close the door.
The cooking time will automatically be set; the display
• Press the (10) "DEFROST" button three times; the
will show the remaining cooking time and the symbols
display will show the mode "d3" meat defrost.
(1 and 6) will blink.
• Use the number keys to enter the weight of the food
When the cooking process has finished, the oven will
to be defrosted. The weight must be between 100
turn off and beep five times.
2000g. If the weight is entered incorrectly, the oven
will not operate.
• Press the (11) "START/+30SEC./CONFIRM" but
ton to begin the defrosting process.
The screen will show the remaining defrost time and the
symbols (1, 4) will blink.
When the defrosting process has finished, the oven will
turn off and beep five times.
11. Defrosting seafood "d4"
• Open the oven door, place the food into the cooking
chamber, and then close the door.
• Press the (10) "DEFROST" button four times; the
display will show the mode "d4" seafood defrost.
• Use the number keys to enter the weight of the food
to be defrosted. The weight must be between 100
2000g. If the weight is entered incorrectly, the oven
will not operate.
• Press the (11) "START/+30SEC./CONFIRM" but
ton to begin the defrosting process.
The screen will show the remaining defrost time and
the symbols (1, 4) will blink.
When the defrosting process has finished, the oven will
turn off and beep five times.
12. Automatic cooking process
The number keys 09 correspond to ten different food types:
1 Vegetables
2 Fish
3 Meat
4 Pasta
5 Potato
6 Soup
7 Fried chicken
8 Bread
9 Pie
0 Pizza
10
1656.qxd 27.06.05 14:58 Page 10
ENGLISH
Table of automatic cooking modes
Menu Weight (g) Number of key presses Indication on the display
(1)
VEGETABLE 150 Once 150
350 Twice 350
500 Three times 500
(2)
FISH 150 Once 150
250 Twice 250
350 Three times 350
450 Four times 450
650 Five times 650
(3)
MEAT 150 Once 150
300 Twice 300
450 Three times 450
600 Four times 600
(4)
PASTA 50 Once 50
100 Twice 100
150 Three times 150
(5)
POTATO 1 (approx 200g) Once 200
2 (approx 400g) Twice 400
3 (approx 600g) Three times 600
(6)
SOUP 200 ml Once 200
400 ml Twice 400
600 ml Three times 600
(7)
ROAST CHICKEN
500 Once 250
750 Twice 450
1000 Three times 650
1200 Four times 850
(8)
BREAD 50 g Once 50
100 g Twice 100
150 g Three times 150
(9) CAKE 475 g Once 475
(0)
PIZZA 200g Once 200
300 g Twice 300
400 g Three times 400
Note: In automatic cook programs 7, 8, 9, and 0, combination cooking mode is used.
13. Memory
You can save three frequently used cooking programs into memory.
• Press the (9) "MEMORY" button to choose the program number "1", "2" or "3".
• Set the desired cooking program.
11
1656.qxd 27.06.05 14:58 Page 11

ENGLISH
• Press the (9) "MEMORY" button for confirmation.
18. Indications on the display
• To recall the desired program from memory, press
• In standby mode, the display shows the current time
the (9) "MEMORY" button and choose the program
and the separation dots (9) blink.
number "1", "2" or "3".
• While entering information, the screen will display
• Press the "START/+30SEC./CONFIRM" button to
the corresponding information and symbols.
begin the cooking process.
• During the cooking process, the display will show
The display will show the remaining cooking time and
the remaining cooking time.
the corresponding symbols for set program.
• During the cooking process, the mode symbols will
When the cooking process has finished, the oven will
blink; when stopped, the symbols will stop blinking.
turn off and beep five times.
Note: "DEFROST" mode is not a food preparation pro
19. Care and cleaning
gram and cannot be saved into memory.
• Turn off the oven and disconnect from electrical
power before cleaning.
14. Quick cooking mode
• Do not allow moisture to contact the control panel.
Press the (11) "START/+30SEC./CONFIRM" button to
Clean it with a soft, lightly dampened paper towel.
begin cooking at full power for 30 seconds; each con
• Keep the oven's cooking chamber clean. If pieces of
secutive key press will add 30 seconds. The maximum
food or liquid sprays are left on the chamber walls,
time that can be set is 99 minutes and 99 seconds.
remove them with a damp paper towel.
Note: during the cooking process, time can be added
• A mild cleanser may be used if the chamber
by pressing the "START/+30SEC./CONFIRM" button.
becomes exceptionally dirty.
When cooking food in multistage mode and automatic
• Do not use abrasive cleaning instruments or wire
mode time cannot be added.
brushes to clean the inside or outside of the oven.
When the cooking process has finished, the oven will
Make sure that no water or cleanser gets in any of
turn off and beep five times.
the ventilation or steam release openings on the top
of the microwave oven.
15. Viewing the current cooking mode
• Do not use ammoniabased cleansers.
• During singlestage cooking, press the (2)
• The outer surfaces should be cleaned with a damp
"MICROWAVE" button once; for 2 or 3 seconds the
paper towel.
display will show the current power level setting.
• The oven door should always be clean. Do not allow
• During singlestage cooking, press the (4)
crumbs of food to buildup between the door and
"CLOCK/PRESET" button to view the cook start
the front panel of the oven; this may prevent normal
time. For 2 or 3 seconds, the display will show the
closure of the door.
programmed cook start time.
• Clean the ventilation openings on top of the oven
housing regularly keep them free of dust and dirt.
16. Child lock function
• Regularly remove and wash the glass tray and its
To lock: press and hold the (6) "STOP/CLEAR" button
base wipe the oven chamber floor clean.
for 3 seconds; the oven will beep and the symbol (5) will
• Wash the glass tray and rotating drive mechanism in
appear on the display.
water with a neutral soap solution. These parts are
To unlock: While locked, press and hold the
dishwasher safe.
"STOP/CLEAR" button for 3 seconds; the oven will
• Do not submerse the glass tray in cold water if it is
beep and the symbol (5) will disappear.
still hot: the sudden drop in temperature can cause
the glass tray to break.
17. Auto power level reduction function
During the cooking process if the oven operates for
more than 30 minutes at maximum power, it automati
cally reduces the power level to 80% of maximum.
Automatic power level reduction is necessary in order to
prevent overheating of the magnetron.
12
1656.qxd 27.06.05 14:58 Page 12
ENGLISH
Eliminating malfunctions
Description of malfunction
Possible reason
Method of elimination
The oven will not turn on
The power plug is not securely con
Remove the plug from the outlet. After 10
nected to the electrical outlet.
seconds, insert the plug back into the out
let.
Problem with electrical outlet
Try plugging another electrical device into
the same outlet to verify the problem
The oven does not heat
The door is not firmly closed
Close the door firmly
During operation, the glass
The rolling ring or oven floor is dirty
Remove the glass tray and rolling ring.
tray makes strange noises
Clean the rolling ring and the cooking
chamber floor.
Normal operation
The microwave oven causes Static interference in television and radio signals may occur while the oven is
static in television and radio operating. Similar static is caused by the operation of small electrical appliances like
signals. mixers, vacuum cleaners and hair dryers. This is a normal occurrence.
The backlight is very dim If the microwave is set to a low power level, then the backlight may be dim.
This is a normal occurrence.
Steam is collecting During the cooking process, steam may come from the food you are cooking.
on the door, hot air is venting Most of the steam will exit through the ventilation openings, but some may end up
from the ventilation openings. on the inside of the door. This is a normal occurrence.
The microwave oven was Turning on the microwave oven for a short period of time while empty will not result
turned on while empty in malfunction.Always make sure that there is something in the microwave before
turning it on.
Technical Characteristics
Power requirements: 220230 V ~50 Hz
Power usage in microwave mode: 1450 Wt
Nominal output power in microwave mode: 900 Wt
Operating frequency: 2450 MHz
Power usage in grill mode: 2500 Wt
Input power in convection mode: 3000 Wt
External dimensions: 520mm (H)x495mm (W)x355mm (D)
Oven volume: 28 l
Glass tray: 315mm
Weight: approx 20kg
The manufacturer reserves the right to make changes to the operational characteristics without prior notification.
Service life 5 years
Guarantee
Details regarding guarantee conditions can be obtained from the dealer from whom the appliance was purchased.
The bill of sale or receipt must be produced when making any claim under the terms of this guarantee.
This product conforms to the EMCRequirements as laid down by the Council Directive 89/336/EEC and to
the Low Voltage Regulation (23/73 EEC)
13
1656.qxd 27.06.05 14:58 Page 13

DEUTSCH
Vor der Nutzung des Gerätes lesen Sie die vor
muss. Reparieren Sie den Ofen selbständig nicht.
liegenden Gebrauchsanweisungen aufmerksam
WARNUNG: Vor Aufwärmen oder Zubereitung der
durch
Nahrungsmittel in dichtgeschlossener oder
Vakuumverpackung vergessen Sie nicht, sie zu öffnen.
Vorbehaltlich des genauen Beachtens von allen
Andernfalls wird in der Verpackung Druck entstehen,
Anweisungen der Anleitung, wird der Mikrowellenofen
der sie zerreißen kann, abgesehen davon, dass das
Ihnen viele Jahre tadellos dienen.
Nahrungsmittel vorher zubereitet worden war.
WARNUNG: Kinder können den Mikrowellenofen selb
Bewahren Sie die vorliegende Anleitung an einer
ständig nur vorbehaltlich des gehörigen
leicht zugänglichen Stelle auf
Kennenslernens der vorliegenden Anleitung, und auch
vorbehaltlich des Verständnisses der Gefahr bei der
VORSICHTEN, DIE MAN ÜBERN MUSS, UM DEM
Benutzung des Mikrowellenofens benutzen.
RISIKO DER EINWIRKUNG DER MIKROWELLENEN
• Verwenden Sie das Geschirr, das für
ERGIE NICHT UNTERGEZOGEN ZU WERDEN
Mikrowellenofen bestimmt ist. Stellen Sie in den
1. Versuchen Sie nicht, den Mikrowellenofen beim
Ofen Metallgeschirr nicht hinein, da die vom
geöffneten Türchen zu benutzen, da dabei das
Geschirre abgespiegelten UHF Wellen
Risiko der schädlichen Einwirkung der
Funkentladungen und das Entzünden herbeirufen
Mikrowellenenergie entsteht. Es ist sehr wichtig, die
können.
inneren Schlösser und den Mechanismus der
• Zur Vermeidung der Überwärmung und Entzündens
Blockierung des Türchens nicht zu beschädigen.
der Nahrungsmittel, beachten Sie die Arbeit des
2. Unterbringen Sie fremde Gegenstände zwischen
Ofens ununterbrochen, wenn darin Nahrungsmittel
dem Türchen und dem Frontteil des
in Einwegplast, Einwegplastpapierverpackung und
Mikrowellenofens nicht und lassen Sie Reste der
anderen ähnlichen untergebracht sind oder wenn in
Nahrung oder der Reinigungsmittel sich auf dem
den Ofen kleine Menge der Nahrungsmittel gelegt
Schirmgitter oder auf der inneren Seite des
ist.
Türchens nicht ansammeln.
• Wenn Sie Rauch bemerkt haben, der aus dem Ofen
3. Benutzen Sie den Mikrowellenofen bei
geht, schalten Sie den Ofen sofort aus und nehmen
Beschädigung oder Defekt nicht. Es ist besonders
Sie den Netzstecker aus der Steckdose heraus.
wichtig, dass das Türchen immer dicht
• Wenn Sie irgendwelche Flüssigkeit ( Wasser, Kaffee,
geschlossen, und nicht beschädigt ist:
Milch und usw.) aufwärmen, so seien Sie sich im
• Türchen (gebogen)
klaren, dass sie plötzlich aufkochen kann und sich
• Türbänder und Klinken (gebrochen oder
Ihnen auf die Hände in jenen Moment, wenn Sie den
geschwächt)
Behälter aus dem Ofen herausnehmen, ausschütten
• Schirmgitter von der inneren Seite des Türchens
kann. Damit dies nicht geschieht, unterbringen Sie
in den Behälter einen wärmebeständigen Plast
WICHTIGE ANWEISUNGEN ZUR SICHERHEIT
oder Glaslöffel, und bevor Sie den Behälter holen,
WARNUNG: Arbeit des Mikrowellenofens in kombiniert
rühren Sie die Flüssigkeit darin.
er Betriebsart (MIKROWELLEN +GRILL) und Nutzung
• Fläschchen fürs Füttern und Dosen mit
durch die Kinder soll immer unter Aufsicht der
Kinderernährung muss man in den Ofen ohne
Erwachsenen zur Vermeidung des Erhaltens der
Deckel und Sauger unterbringen. Den Inhalt muss
Brandwunde seitens der Kinder erfolgen.
man rühren oder periodisch aufschütteln. Vor dem
Füttern muss man die Temperatur des Inhalts
WARNUNG: Wenn auf dem Türchen das Schirmgitter
prüfen, um Brandwunden nicht zuzulassen.
beschädigt ist, so wird der Betrieb des
Mikrowellenofens untersagt.
Wichtige Information
• OBLIGATORISCH prüfen Sie, ob die Nahrung heiß
WARNUNG: Reparatur des Mikrowellenofens stellt
ist, bevor sie Ihrem Kind gegeben wird. Wir
immer eine Gefahr für beliebige Person dar, die die
empfehlen, den Inhalt der Dosen oder des
Reparatur verwirklicht, wenn man dabei den
Fläschchens durchzuschütteln, um die Wärme im
Metallmantel, der den Schutz vor
ganzen Umfang gleichmäßig zu verteilen.
Mikrowellenausstrahlung gewährleistet, abnehmen
• Es wird nicht zugelassen, Eier in Schale zu kochen
14
1656.qxd 27.06.05 14:58 Page 14

DEUTSCH
oder hartgekochte Eier unter Mikrowellenbetriebsart
und stellen Sie es in den Mikrowellenofen für
aufzuwärmen, da sie wegen der Erhöhung des
Fortsetzung des Prozesses der Zubereitung zurück.
inneren Drucks platzen werden.
11. Regelmäßig reinigen Sie den Mikrowellenofen.
Unregelmäßige Pflege des Ofens kann zur
SICHERHEITSMASSNAHMEN
Verschlechterung dessen Aussehens führen, sich
1. Stellen Sie den Ofen auf ebene, standfeste
auf dessen Arbeitsfähigkeit negativ auswirken, und
Oberfläche auf. Wählen Sie eine solche Stelle, die
auch zur Gefahr im weiteren Betrieb führen.
für kleine Kinder nicht zugänglich ist.
2. Stellen Sie den Ofen so auf, dass von der Wand bis
Regeln, die man immer beachten muss:
zu Hinter und Seitenwänden des Ofens eine
1. Übertreten Sie die Zeit der Zubereitung der
Entfernung nicht weniger als 78 cm, und freier
Nahrungsmittel im Mikrowellenofen nicht. Immer
Raum über dem Ofen nicht weniger als 30 cm bleibt.
achten Sie auf den Prozess der Zubereitung bei
3. Türchen des Mikrowellenofens ist mit einem
Nutzung des Papier , Plaststoffgeschirrs und des
Blockierungssystem ausgestattet, das für
Geschirrs aus anderen brennbaren Materialien.
Abschaltung der Stromversorgung bei Eröffnung
2. Niemals verwenden Sie den Mikrowellenofen
des Türchens sorgt. Nehmen Sie keine Änderungen
zwecks Aufbewahrung verschiedener Gegenstände
in der Arbeit des Schemas der Türchenblockierung
darin. Niemals bewahren Sie im Mikrowellenofen
vor.
brennbare Materialien und Nahrungsmittel, solche
4. Schalten Sie den Mikrowellenofen ohne
wie Brot, Gebäck, Papierverpackung und usw., da
Nahrungsmittel nicht ein, die Arbeit des Ofens ohne
sich der Mikrowellenofen während des Gewitters
Nahrungsmittel kann zu dessen Beschädigung
spontan einschalten kann.
führen.
3. Metallklemmen, übrige Klemmen, Drahtgriffe von
5. Zubereitung der Nahrungsmittel mit äußerst
Papier oder Plasttüten muss man vor
niedrigem Feuchtigkeitsgehalt kann zu deren
Unterbringung in einen Mikrowellenofen entfernen.
Anleuchten oder zum Entzünden führen .
4. Mikrowellenofen soll eine sichere Erdung haben.
Wenn das Entzünden geschehen ist:
Schalten Sie den Mikrowellenofen nur zur
• Öffnen Sie das Türchen nicht.
Steckdose, die eine sichere Erdung hat, an.
• Schalten Sie den Mikrowellenofen aus und nehmen
5. Einige der Nahrungsmittel, Eier in Schale, flüssige
Sie den Netzstecker aus der Steckdose heraus.
oder feste Fette, und auch dicht geschlossene
6. Bei Bacon Zubereitung legen Sie es unmittelbar auf
Dosen, geschlossene Glasbehälter sind explosions
die Glasschale nicht, lokale Überheizung der
gefährlich, deshalb ist deren Unterbringung in den
Glasschale kann zur Entstehung der Risse darin
Mikrowellenofen untersagt.
führen.
7. Verwenden Sie den gegebenen Mikrowellenofen
7. Es ist nicht erlaubt, Flüssigkeit in Behältern mit
ausschließlich für die Zwecke, für die er bestimmt ist
engen Flaschenhälsen aufzuwärmen.
und in strenger Übereinstimmung mit den hier
8. Versuchen Sie nicht, Nahrungsmittel im
dargelegten Anweisungen.
Mikrowellenofen bis zum Zustand des endgültigen
8. Der Mikrowellenofen ist ausschließlich für
Durchbratens zuzubereiten.
Aufwärmung und Zubereitung der Nahrung bes
9. Verwenden Sie den Mikrowellenofen für
timmt und ist für Labor oder industrielle Nutzung
Konservierung zu Hause nicht, da es keine
nicht bestimmt.
Sicherheit darüber gibt, dass der Inhalt der
8. Achten Sie besonders bei der Nutzung des
Konservengläser die Temperatur des Kochens erre
Mikrowellenofens auf die Kinder.
icht hat.
9. Benutzen Sie den Mikrowellenofen bei
10. Zur Vermeidung des dauerhaften stürmischen
Beschädigung des Netzkabels oder des Steckers
Kochens der flüssigen Nahrungsmittel und der
nicht, wenn der Mikrowellenofen infolge der
Getränke, und auch zur Verhütung der
Beschädigung oder des Fallens nicht wie es sich
Brandwunden, wird es empfohlen Nahrungsmittel
gehört arbeitet.
am Anfang und in der Mitte der Prozedur der
10. Reparatur des Mikrowellenofens soll seitens
Zubereitung zu rühren. Dafür schalten Sie die
qualifizierten Spezialisten des autorisierten
Aufwärmung aus, warten Sie einige Zeit ab, nehmen
Servicezentrums erfolgen.
Sie Geschirr mit Nahrungsmitteln heraus, rühren Sie
11. Schließen Sie Ventilationsöffnungen auf dem
15
1656.qxd 27.06.05 14:58 Page 15

DEUTSCH
Gehäuse des Mikrowellenofens nicht.
• Markierung des Leitungsquerschnittes des
12. Bewahren Sie nicht auf und verwenden Sie den
Netzkabels des Mikrowellenofens und Markierung
Mikrowellenofen außerhalb der Räume nicht.
auf dem Kabel der Verlängerungsleitung sollen
13. Verwenden Sie den Mikrowellenofen unweit des
übereinstimmen.
Wassers, in unmittelbarer Nähe von Küchenausguss, in
• Netzkabel der Verlängerungsleitung soll auf solche
feuchten Kellergeschossen oder in unmittelbarer Nähe
Weise verlegt werden, dass sein Herabhängen von
von Bassins nicht.
Tischrändern ausgeschlossen ist, wo daran Kinder
14. Tauchen Sie das Netzkabel und den Netzstecker ins
ziehen können, es soll auf solche Weise verlegt wer
Wasser nicht ein.
den, dass dessen Betreten ausgeschlossen wird.
15. Meiden Sie den Kontakt des Netzkabels und des
Netzsteckers mit heißen Oberflächen.
Geschirr für den Mikrowellenofen
16. Lassen Sie das Herunterhängen des Netzkabels
VORSICHTIG!
vom Tischrand nicht zu.
Dicht geschlossene Behälter, die in den
17. Beim Reinigen des Türchens und der inneren
Mikrowellenofen unterbracht sind, können explosions
Oberflächen des Mikrowellenofens verwenden Sie
gefährlich sein.
weiche Nichtschleifwaschmittel, die auf einen
Geschlossene Behälter sollen geöffnet werden, und in
Küchenschwamm oder auf weichen Stoff aufgetragen
Plastpaketen muss man einige Öffnungen für
werden.
Dampfaustritt vor Unterbringung in den Mikrowellenofen
machen.
WARNUNG
Wenn Sie Zweifeln bezüglich Nutzung des Geschirres im
Verletzung durch einen elektrischen Stromschlag.
Mikrowellenofen haben, so prüfen Sie es.
Berührung der Elemente des elektrischen Schemas des
Die Prüfung des Geschirres vor der Nutzung in den
Mikrowellenofens kann zu ernsten Verletzungen und
Mikrowellenofen:
auch durch einen elektrischen Stromschlag führen.
• Stellen Sie das zu prüfende Geschirr in die
Bauen Sie den Mikrowellenofen selbständig nicht aus.
Arbeitskammer des Ofens (zum Beispiel einen
Teller) hinein, stellen Sie darauf ein Glas mit kaltem
Erdung des Mikrowellenofens
Wasser.
Der Mikrowellenofen soll sicher geerdet werden. Im
• Schalten Sie den Mikrowellenofen auf maximale
Falle irgendeines Kurzschlusses, setzt die Erdung das
Leistung ein und wählen Sie die Arbeitszeit maximal
Risiko des Erhaltens des Elektroschocks herab, da der
eine Minute aus.
Strom durch den Ersatzleiter abfließt.
• Akkurat berühren Sie das zu prüfende Geschirr.
Im Gerät wird ein Netzkabel mit Erdungsleitung und ein
Wenn es erwärmt ist und das Wasser im Glas kalt
Netzstecker mit Erdungskontakt verwendet. Der
bleibt, so darf man dieses Geschirr für Zubereitung
Stecker soll an die Steckdose, die den Erdungskontakt
des Essens im Mikrowellenofen nicht benutzen.
hat, angeschlossen werden.
• Meiden Sie die Überschreitung der Dauer der
WARNUNG: Nutzung des Steckers mit
Prüfung mehr als 1 Minute.
Erdungskontakt, der in die Steckdose ohne Erdung
eingeschaltet ist, kann zum Risiko des elek
trischen Stromschlages führen .
Konsultieren Sie einen qualifizierten Elektriker, wenn
Ihnen die Anweisungen über die Erdung nicht klar sind
oder Zweifel in der sicheren Erdung des
Mikrowellenofens da sind.
• Zwecks Verhütung des Verwirrens des Netzkabels
ist der Mikrowellenofen mit einem kurzen Netzkabel
ausgestattet.
• Bei Notwendigkeit der Nutzung einer
Verlängerungsleitung verwenden Sie nur 3Leiter
Verlängerungsleitung mit Erdungskontakt bei
Netzstecker und Steckdose.
16
1656.qxd 27.06.05 14:58 Page 16
DEUTSCH
Materialien und Geschirr, die für die Nutzung in den Mikrowellenöfen brauchbar sind
Aluminiumfolie
Folie kann man nur in der Betriebsart der Arbeit des Grills benutzen. Die Entfernung
zwischen der Folie und den Wänden des Mikrowellenofens soll nicht weniger als 2,5
cm betragen.
Kleinere Foliestückchen kann man fürs Bedecken der dünnen Fleisch oder
Geflügelstückchen benutzen, um deren Verbraten zu meiden.
In der Mikrowellenbetriebsart, wenn die Folie allzu nahe an den Wänden des Ofens
liegt, kann Funkenbildung, Verleuchten des abschirmenden Gitters an der Tür und
Funktionsausfall des Ofens geschehen. In diesem Fall verlieren Sie das Recht der
Verwirklichung der kostenlosen Garantiewartung und der Reparatur.
Geschirr fürs Braten
Folgen Sie den Hinweisen des Produzenten.
Der Boden des Geschirrs fürs Braten soll um 5 mm dicker sein, als der beim
Drehglasteller. Der Missbrauch des Geschirrs fürs Braten kann zur Entstehung der
Risse im Geschirr selbst und im Drehglasteller führen.
Tafelgeschirr
Nur das, das für die Nutzung im Mikrowellenofen bestimmt ist. Folgen Sie den
Hinweisen des Produzenten des Geschirres. Verwenden Sie das Geschirr mit Rissen
oder Absplitterungen nicht.
Glasbehälter
Nur Behälter, die aus hitzebeständigem Glas hergestellt und für Nutzung im
Mikrowellenofen bestimmt sind. Vergewissern Sie sich im Fehlen der
Metallgeschirrrandbänder. Verwenden Sie Behälter mit Rissen oder Absplitterungen
nicht.
Glasgeschirr
Nur Geschirr, das aus hitzebeständigem Glas hergestellt und für Nutzung im
Mikrowellenofen bestimmt ist. Vergewissern Sie sich im Fehlen der
Metallgeschirrrandbänder. Verwenden Sie das Geschirr mit Rissen oder
Absplitterungen nicht.
Prozess der Zubereitung in
Folgen Sie den Anweisungen des Produzenten. Verschließen Sie die Säcke unter
den Mikrowellenöfen mit
Verwendung von Metallklemmen oder Verspannungen nicht. In den Säcken muss man
Nutzung spezieller Säcke
eine oder einige Öffnungen für Dampfaustritt machen.
Papierteller und –tassen
Verwenden Sie nur für kurzzeitige Zubereitung / Aufwärmen. Lassen Sie den
Mikrowellenofen ohne Aufsicht während der Zubereitung / des Aufwärmens der
Nahrungsmittel in solchem Geschirr nicht.
Papierhandtücher
Damit kann man zubereitende Nahrungsmittel für Verwahrung der Wärme darin und
für Vorbeugung des Fettspritzens bedecken. Verwenden Sie nur bei ständiger
Kontrolle und nur für kurzzeitige Zubereitung / Aufwärmen.
Pergamentpapier
Verwenden Sie zwecks Vorbeugung des Fettspritzens oder als Umschlag. Verwenden
Sie nur bei ständiger Kontrolle und nur für kurzzeitige Zubereitung / Aufwärmen.
Plaststoff
Nur jene Erzeugnisse aus Plaststoff, die entsprechende Markierung “ Ist für
Mikrowellenöfen brauchbar ” haben. Folgen Sie den Anweisungen des Produzenten.
Einige Plastbehälter können als Ergebnis der Erwärmung der darin enthaltenen
Nahrungsmittel aufgeweicht werden.
Dicht geschlossene Plastiktüten muss man durchstechen oder durchschneiden, wie
es auf Verpackungen selbst gezeigt ist.
Plastumschlag
Nur jene Erzeugnisse aus Plaststoff, die entsprechende Markierung haben. Man kann
die zubereitenden Nahrungsmittel zwecks Sicherung darin der Feuchtigkeit bedeck
en.
Wachspapier
Verwenden Sie für Vorbeugung des Fettspritzens und auch für Sicherung der
Feuchtigkeit.
17
1656.qxd 27.06.05 14:58 Page 17
DEUTSCH
Materialien und Geschirr, die für die Nutzung in Mikrowellenöfen nicht brauchbar sind
Aluminiumtabletts
Können Funkenbildung bedingen.
Benutzen Sie das Geschirr, das speziell für Nutzung in Mikrowellenöfen bestimmt ist.
Papptasse mit Metallgriff
Kann Funkenbildung bedingen.
Benutzen Sie das Geschirr, das speziell für Nutzung in Mikrowellenöfen bestimmt ist.
Metallgeschirr oder
Metall schirmt die Mikrowellenenergie ab. Das Metallgeschirrrandband kann
Geschirr mit
Funkenbildung bedingen.
Metallgeschirrrandband
Können Funkenbildung, und auch das Entzünden der Verpackung während der
Metallverdrehungen
Zubereitung / Aufwärmung der Nahrungsmittel bedingen.
Papierbeutel
Können das Entzünden in Mikrowellenöfen bedingen.
Seife
Seife kann schmelzen und Verschmutzung der Arbeitskammer des Mikrowellenofens
bedingen.
Holz
Holzgeschirr kann austrocknen, Risse bekommen und sich entzünden.
Beschreibung
7. Knopf “ GRILL “ (GRILL) Einschaltung der
A) Steuerungspaneel
Betriebsart der Zubereitung „Grill“.
B) Drehmuffe
8. Knopf “ COMBINATION “ (KOMBINIERTE BETRIEB
C) Rollenuntergestell
SART ) Auswahl der kombinierten Betriebsarten
D) Glasschale
der Zubereitung .
E) Schauglas
9. Knopf “ MEMORY “ (SPEICHER) Eintragung ins
G) System der Notblockierung für Abschaltung der
Gedächtnis / Entfernung aus dem Gedächtnis eines
Stromversorgung beim Öffnen des Türchens während
oder der drei eingestellten Programme der
der Arbeit des Ofens
Zubereitung.
F) Grillrost. Wird nur in der Betriebsart “Grill” verwen
10. Knopf “ DEFROST “ (AUFTAUEN) Auswahl der
det.
Betriebsart des Auftauens.
11. Knopf “ START / + 30SEC./CONFIRM ” (START / +
Steuerungspaneel
30 SEK/BESTÄTIGUNG) Einschaltung des Ofens /
1. Funktionen des Menüs der automatischen
Betriebsart der schnellen Zubereitung / Bestätigung
Zubereitung des Nahrungsmittels / Ziffernknöpfe
der eingeführten Funktion.
(VEGETABLE/ GEMÜSE /1, FISH/FISCH/2,
MEAT/FLEISCH/3, PASTA/ TEIGERZEUGNISSE / 4,
Display
POTATO/ KARTOFFEL /5, SOUP/ SUPPE /6, ROAST
1. Piktogramm der Betriebsart der
CHICKEN/ BRATHUHN / 7, BREAD/ BROT /8,
Mikrowellenzubereitung “MICROWAVE (MIKROW
CAKE/ KUCHEN /9, PIZZA/PIZZA/0).
ELLEN).
2. Knopf “ MICROWAVE “ (MIKROWELLEN)
2. Piktogramm der Betriebsart “CONVECTION
Einschaltung der Mikrowellenbetriebsart und
(WÄRMEKONVEKTION).
Auswahl der Leistung.
3. Piktogramm der Betriebsart “GRILL (GRILL).
3. Knopf “ CONVECTION “ (WÄRMEKONVEKTION)
4. Piktogramm der Betriebsart “DEFROST (AUF
Zubereitung in der Betriebsart die
TAUEN).
Wärmekonvektion / Einstellung der Temperatur.
5. Piktogramm der Einschaltung der Betriebsart des
4. Knopf “ CLOCK/PRESET “ (UHR / VOREIN
Schutzes gegen Kinder.
STELLEN) Einstellung der aktuellen Zeit /
6. Piktogramm der Betriebsart der automatischen
Einstellung der Zeit des Anfangs der Zubereitung.
Zubereitung.
5. Knopf “ REHEAT “ (AUFWÄRMUNG) Auswahl der
7. Piktogramm der Temperatur.
Betriebsart des Aufwärmens der Nahrungsmittel.
8. Piktogramm des Gewichts der Nahrungsmittel.
6. Knopf “ STOP/CLEAR “ (STOP / AUFHEBUNG)
9. Teilende Punkte.
Unterbrechung der beliebigen Betriebsart der
10. Piktogramm der Temperaturbetriebsart.
Zubereitung / Aufhebung der nicht richtig einge
führten Daten.
18
1656.qxd 27.06.05 14:58 Page 18

DEUTSCH
Montage des Mikrowellenofens
Installation
Entfernen Sie das Packmaterial und Zubehör aus der
• Vor Anschließen des Mikrowellenofens vergewissern
Arbeitskammer des Ofens. Beschauen Sie den
Sie sich, dass die Arbeitsspannung und die
Mikrowellenofen zwecks Vorhandenseins der
Aufnahmeleistung den Parametern des elektrischen
Deformationen. Besondere Aufmerksamkeit schenken
Netzwerkes entsprechen. Schließen Sie den
Sie der Intaktheit des Ofentürchens. Beim Entdecken
Mikrowellenofen an die Netzsteckdose an, die eine
der Defekte stellen Sie nicht auf und schalten Sie den
sichere Erdung hat.
Mikrowellenofen nicht ein.
• Stellen Sie den Ofen auf eine flache, standfeste
Oberfläche. Wählen Sie eine solche Stelle, die für
Schutzüberzug
kleine Kinder nicht zugänglich ist.
Gehäuse: bei Vorhandensein von Schutzfolie entfernen
• Stellen Sie den Ofen so auf, dass von der Wand bis
Sie sie von der Oberfläche des Gehäuses.
zu Hinter und Seitenwänden des Ofens eine
Entfernung nicht weniger als 78 cm, und freier
Entfernen Sie die hellgraue Glimmerplatte inner
Raum über dem Ofen nicht weniger als 30 cm bleibt.
halb der Arbeitskammer, die als Magnetronschutz
• Nehmen Sie Stützfüße vom Boden des
dient, nicht
Mikrowellenofens nicht ab.
• Schließen Sie die Ventilationsöffnungen auf dem
Installation der Glasschale
Gehäuse des Mikrowellenofens nicht.
1. Installieren Sie die Stütze der Drehschale (B) in die
• Man muss den Mikrowellenofen fern von Fernseh
Öffnung, die im Boden der Arbeitskammer angeordnet
und Radioapparaten zur Vermeidung des Auftretens
ist.
der Störungen beim Empfang der Fernseh und
2. Legen Sie das Rollenring (C) auf den Boden der
Rundfunksignale aufstellen.
Arbeitskammer.
WARNUNG: Es ist untersagt, den Mikrowellenofen auf
3. Akkurat legen Sie den Glasteller (D) hinein, dabei
eine Oberfläche mit Aufwärmung (Kochherd) und
vereinen Sie die Vorsprünge darauf mit den Falzen der
übrige Quellen der thermischen Ausstrahlung
Stütze. Niemals legen Sie den Glasteller mit dem
aufzustellen.
Unterteil nach oben hinein.
Im Falle des Funktionsausfalles des
• Behindern Sie das Drehen der Glasschale während
Mikrowellenofens durch Verschulden des Besitzers
der Arbeit des Ofens nicht
verliert er das Recht der kostenlosen
• Während der Zubereitung der Nahrungsmittel ver
Garantiewartung und der Reparatur.
wenden Sie immer Glasschale, Rollenring und
Schalenstütze.
Im Laufe der Arbeit kann die Oberfläche des
• Nahrungsmittel und Geschirr für
Mikrowellenofens stark erwärmt werden, meiden
Nahrungsmittelzubereitung muss man immer nur
Sie Berührung der offenen Stellen der Haut mit der
auf die Glasschale aufstellen.
heißen Oberfläche des Ofens für Vorbeugung des
• Glasteller kann sich im/ gegen Uhrzeigersinn
Erhaltens der Brandwunden.
drehen. Es ist normal
• Bei Entstehung der Risse oder der Absplitterungen
Gebrauchsanweisung des Mikrowellenofens
auf der Glasschale ersetzen Sie sie sofort.
1. Einstellung der Uhr
Beim Anschließen des Mikrowellenofens ans
Netzwerk ertönt ein Tonsignal und auf dem Display
werden “0:00” dargestellt.
Sie können die Zeit im Bereich von 0:00 23:59 ein
stellen.
Beispiel: man muss die Zeit 12:12 einstellen.
• Drücken Sie auf den Knopf (4) “CLOCK/PRESET” (
UHR / VOREINSTELLUNG), auf dem Display wird
das Stundenformat 24H erscheinen, mit nochma
ligem Druck kann man das Format 12H wählen.
• Drücken Sie auf die Ziffernknöpfe “1”, ”2”, ”1”, ”2”.
19
1656.qxd 27.06.05 14:58 Page 19

DEUTSCH
• Drücken Sie auf den Knopf (4) “ CLOCK/PRESET”
2. Zubereitung in der Betriebsart Grill
( UHR / VOREINSTELLUNG), um die Einstellung der
Beispiel: Schalten Sie den Grill auf 100 % Leistung im
Stunden zu beenden. Auf dem Display wird die
Laufe von 35 Minuten ein, dafür erfüllen Sie folgende
eingegebene Zeit 12:12 dargestellt und die teilenden
Schritte der Einstellung:
Punkte (9) blinken.
• Öffnen Sie das Türchen des Ofens, unterbringen
Anmerkung:
Sie Nahrungsmittel in die Arbeitskammer, schließen
Wenn die Uhr nicht eingestellt ist, so wird die
Sie das Türchen.
aktuelle Zeit auf dem Display nicht dargestellt.
• Drücken Sie auf den Knopf (7) “GRILL” (GRILL), auf
Bei falscher Einführung der aktuellen Zeit drücken
dem Display wird “G1” und das Piktogramm (3)
Sie auf den Knopf (6) “STOP/CLEAR” (STOP
dargestellt.
/AUFHEBUNG) fürs Abstellen der Anzeige und
• Drücken Sie auf die Ziffernknöpfe “3”, ”5”, ”0”, ”0”
wiederholen Sie die Punkte 1, 2, 3.
auf dem Display wird die Zeit “35:00” Minuten
dargestellt.
2. Zubereitung in Mikrowellenofen
• Drücken Sie auf den Knopf (11) “ START / +
Wählen Sie das Leistungsniveau des Mikrowellenofens
30SEC./CONFIRM ” (START / +
und stellen Sie die Arbeitszeit ein. Drücken Sie
30SEK/BESTÄTIGUNG), um die Zubereitung zu
mehrmals auf den Knopf (2)“MICROWAVE” (MIKROW
beginnen, auf dem Display beginnt das Abzählen
ELLEN) für Auswahl des notwendigen Leistungsniveaus
der restlichen Zeit und das Piktogramm (3) blinkt.
bei der Arbeit des Ofens.
Anmerkung: In der Betriebsart der Zubereitung “Grill”
Anzahl der Drucke Darstellung auf dem Display Leistung des Ofens
wird die Temperatur in der Arbeitskammer nicht
1 Р100 100%
eingestellt.
2 Р80 80%
Nach Abschluss des Prozesses der Zubereitung der
3 Р50 50%
Nahrungsmittel wird der Ofen abgeschaltet, und es
4 Р30 30%
werden fünf Tonsignale ertönen.
5Р1010%
3. Konvektionszubereitung (mit vorhergehenden
Beispiel: schalten Sie den Ofen für 10 Minuten mit
Durchwärmung)
Leistungsniveau von 80 % ein, dafür erfüllen Sie fol
Beispiel: stellen Sie die Betriebsart der
gende Schritte der Einstellung:
Konvektionszubereitung bei 180°C im Laufe von 40
• Öffnen Sie das Türchen des Ofens, unterbringen
Minuten ein, dafür erfüllen Sie folgende Schritte der
Sie die Nahrungsmittel in die Arbeitskammer,
Einstellung:
schließen Sie das Türchen.
• Drücken Sie auf den Knopf (3) “CONVECTION”
• Drücken Sie auf den Knopf (2) “MICROWAVE”
(WÄRMEKONVEKTION) mehrmals bis zu der
(MIKROWELLEN), auf dem Display leuchtet “P100”
Auswahl der notwendigen Temperatur von “180”
und das Piktogramm (1) auf.
Grad.
• Wiederholt drücken Sie auf den Knopf (4)
• Auf dem Display wird die Temperatur von 180°C und
“«MICROWAVE” (MIKROWELLEN), auf dem Display
das Piktogramm (2) dargestellt, und ebenso
leuchtet “P80” auf.
Piktogramme der Temperaturbetriebsart (10) unten
• Drücken Sie auf die Ziffernknöpfe “1”, ”0”, ”0”, ”0”,
am Displays.
auf dem Display wird die Zeit “10:00” Minuten
• Drücken Sie auf den Knopf (11) “ START / +
dargestellt.
30SEC./CONFIRM ” (START / + 30SEK/
• Drücken Sie auf den Knopf (11) “ START / +
BESTÄTIGUNG), während der vorhergehenden
30SEC./CONFIRM ” (START / + 30SEK/
Erwärmung wird das Piktogramm der Temperatur
BESTÄTIGUNG), um die Zubereitung zu beginnen,
(10) auf dem Display dargestellt, das blinkende
auf dem Display beginnt das Abzählen der
Piktogramm (2), wenn die eingestellte Temperatur
restlichen Zeit und das Piktogramm (1) blinkt.
erreicht wird, wird das Tonsignal als Erinnerung
Nach Abschluss des Prozesses der
zweimal daran ertönen, dass man Nahrungsmittel in
Nahrungsmittelzubereitung wird der Ofen abgeschaltet,
den Ofen unterbringen muss, und die
und es ertönen fünf Tonsignale.
Temperaturanzeigen blinken.
• Öffnen Sie das Türchen des Ofens, unterbringen
20
1656.qxd 27.06.05 14:58 Page 20


