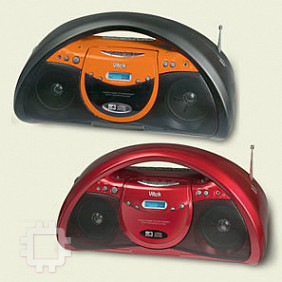
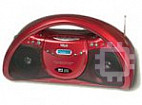
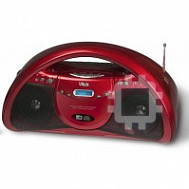
Vitek VT-3479 R: инструкция
Раздел: Бытовая, кухонная техника, электроника и оборудование
Тип: Магнитола
Характеристики, спецификации
Инструкция к Магнитоле Vitek VT-3479 R
Оглавление
- Руководство по эксплуатации
- ПУЛЬТ ДУ
- Верхняя и передняя панели ИСТОЧНИК ПИТАНИЯ Сеть переменного тока Элементы питания
- ВОСПРОИЗВЕДЕНИЕ КАССЕТЫ ОСНОВНЫЕ ФУНКЦИИ РАДИО ЗАПИСЬ ОБЩАЯ ИНФОРМАЦИЯ ПО ЗАПИСИ
- ПРОИГРЫВАТЕЛЬ CD/MP3 Воспроизведение CD/MP3 ОБСЛУЖИВАНИЕ Выбор другого трека
- Поиск нужного места в пределах одного ОБСЛУЖИВАНИЕ И ПРАВИЛА трека БЕЗОПАСНОСТИ Меры предосторожности и общее обслуживание Воспроизведение треков в произвольном порядке Повторное воспроизведение CD Повторное воспроизведение одного трека CD-проигрыватель и хранение CD-дисков Повторное воспроизведение всех треков
- УСТРАНЕНИЕ НЕИСПРАВНОСТЕЙ
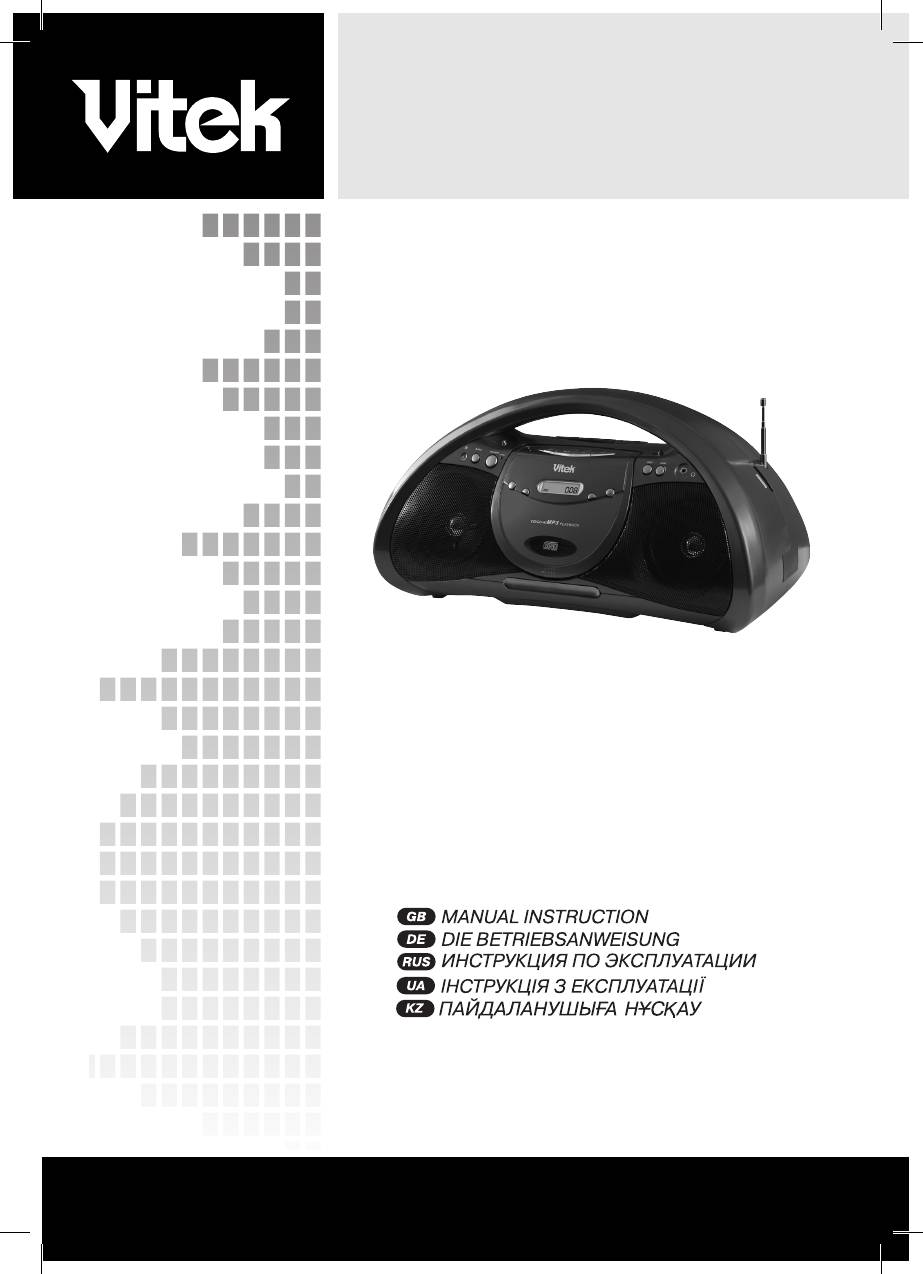
Radio cassette recorder
with CD/MP3 player
ENGLISH
MODEL VT-3479 R/BK
INSTRUCTION MANUAL
4
10
17
24
31
www.vitek-aus.com
1
3479.indd 13479.indd 1 11.04.2006 16:35:5111.04.2006 16:35:51
2
3479.indd 23479.indd 2 11.04.2006 16:36:1211.04.2006 16:36:12
3
3479.indd 33479.indd 3 11.04.2006 16:36:1311.04.2006 16:36:13
ENGLISH
Warning and inportance
Make sure to hold the isolated terminal of
Please do not expose the unit to rain or moist
the plug to operate when connecting or
environment in case of fire or electric shock
pulling out the power cord.
Turn off the power if you don’t use the unit,
Make sure to pull out the power plug if the
CAUTION
unit is not used for a long time or when
RISK OF ELECTRIC SHOCK
DO NOT OPEN
thundering or lightening.
Do not place the unit in high-temperatur
e,vibrating,stuffy,environment or directly
WARNING : TO REDUCE THE RISK OF ELECTRIC
expose to sunlight. Do not put this unit
SHOCK, DO NOT REMOVE COVER (OR BACK).
together with high-power electric appliance
NO USER - SERVICEABLE PARTS INSIDE. REFER
to ensure good ventilation.
SERVICING TO QUALIFIED SERVICE PERSONNEL.
Make sure the unit is far away from
fire,heating source and magnetic source.
Do not use alcohol, gasoline or any other
LASER SAFETY: This unit employs a laser. Only
chemical solvent to clean the unit.
qualified service personnel should attempt to
Don’t spray any liquid or insert any object
service this device due to possible eye injury.
into the unit,Don’t disassembly the unit.
CAUTION: USE OF CONTROLS,
Don’t use the unit in watery place or put
ADJUSTMENTS OR PERFORMANCE,
heavy objects on it.
PROCEDURE HEREIN MAY RESULT IN
Take out the disk before moving the unit.
HAZARDOUS RADIAT ION EXPOSURE.
Make sure to turn off the power and pull out
the plug when there is smoke or unusual
DANGEROUS VOLTAGE
The lightning flash with arrowhead symbol,
smell and make it serviced by professional
within an equilateral tri angle is intended
person.
to alert the user to the presence of
uninsulated dangerous voltage within the
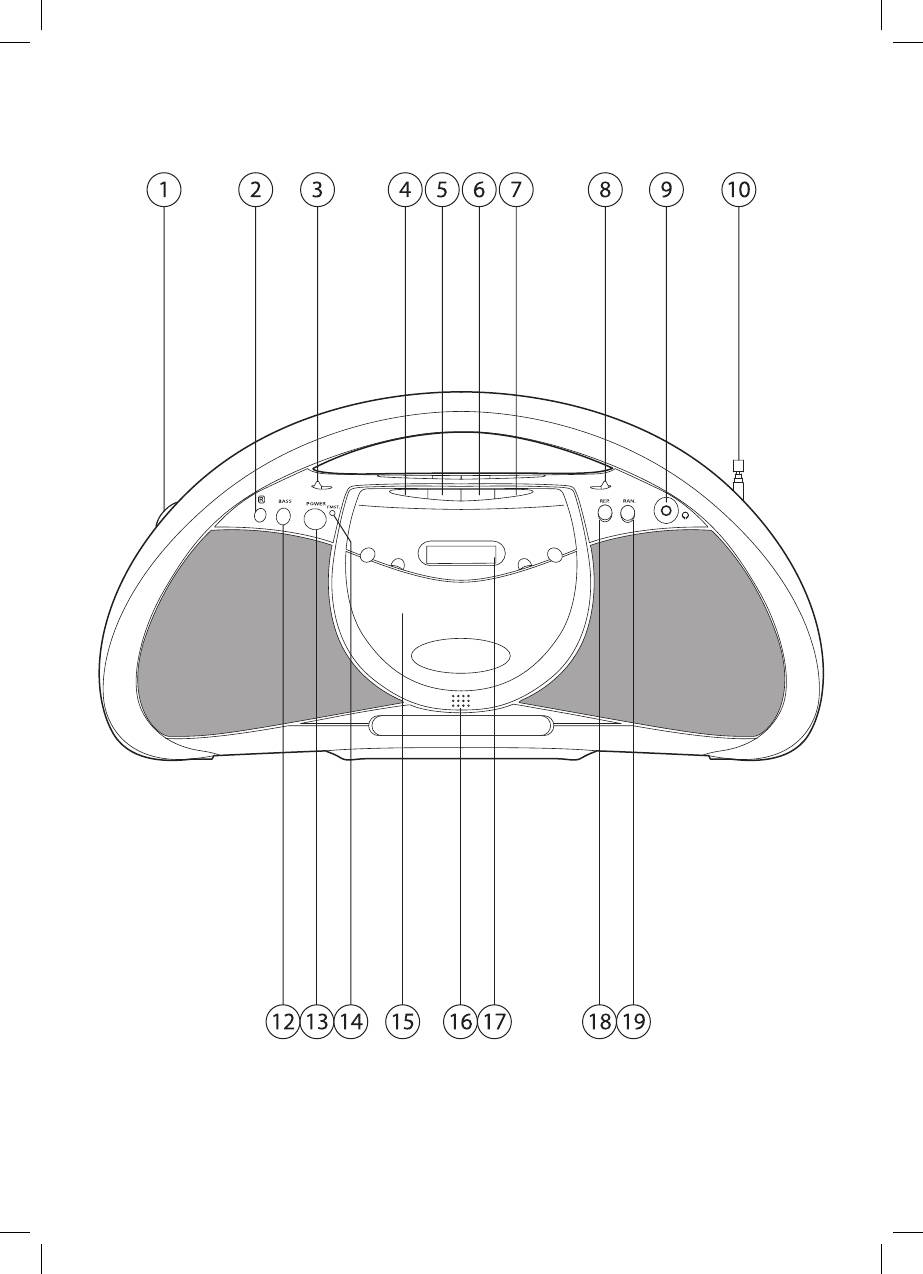
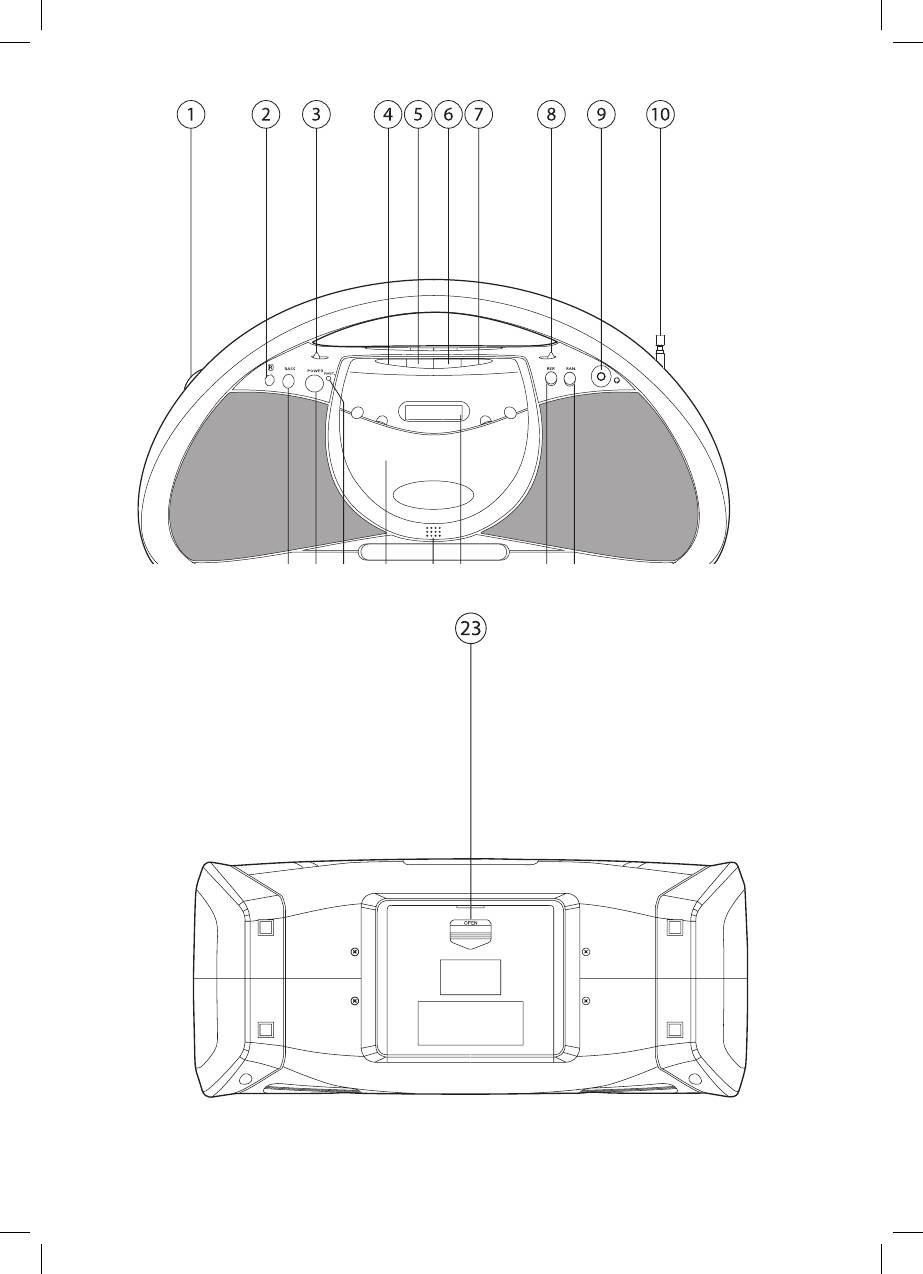
1. VOLUME CONTROL
product s enclosure that may be of
2. REMOTE SENSOR
sufficie nt magnitude to constitute a risk of
3. FUNCTION SWITCH
electri c shock to persons.
4. CD BACK BUTTON
ATTENTION
5. PLAY/PAUSE BUTTON
The exclamation point within an equilateral
6. STOP BUTTON
Triangle is intended to alert the used to
7. CD NEXT BUTTON
the Presence of important operating and
8. BAND SWITCH
maintenance (servicing) instructions in the
9. PHONES
literature accompanying the appliance.
10. TELESCOPIC ANTENNA
Danger:
11. TUNING BUTTON
Invisible and hazardous laser radiation
12. BASS BUTTON
when Open and interlock failed or
13. POWER BUTTON
defeated. Avoid direct exposure to beam.
14. FM STEREO INDICATOR
15. CD DOOR
Dripping warning:
16. CD DOOR OPEN BUTTON
Ventilation warning use.
17. LCD DISPLAY
The product shall not be exposed to dripping or
18. REPEAT BUTTON
splashing and that no
19. RANDOM BUTTON
objects filled with liquids, such as vases, shall
20. CASSETTE RECORDER KEYS
be placed on the product.
PAUSE KEY ( )
The normal ventilation of the product shall not
STOP/EJECT KEY( )
be impeded for intended
F. FWD KEY()
Notice:
F. REWKEY()
Please read through this manual before
PLAY KEY( )
using the unit
RECORDER()
The unit can only be used with the power
21. CASSETTE DOOR
source the manual and the unit itself
22. AC MAINS
specified
23. BATTERIES DOOR
4
3479.indd 43479.indd 4 11.04.2006 16:36:1311.04.2006 16:36:13
ENGLISH
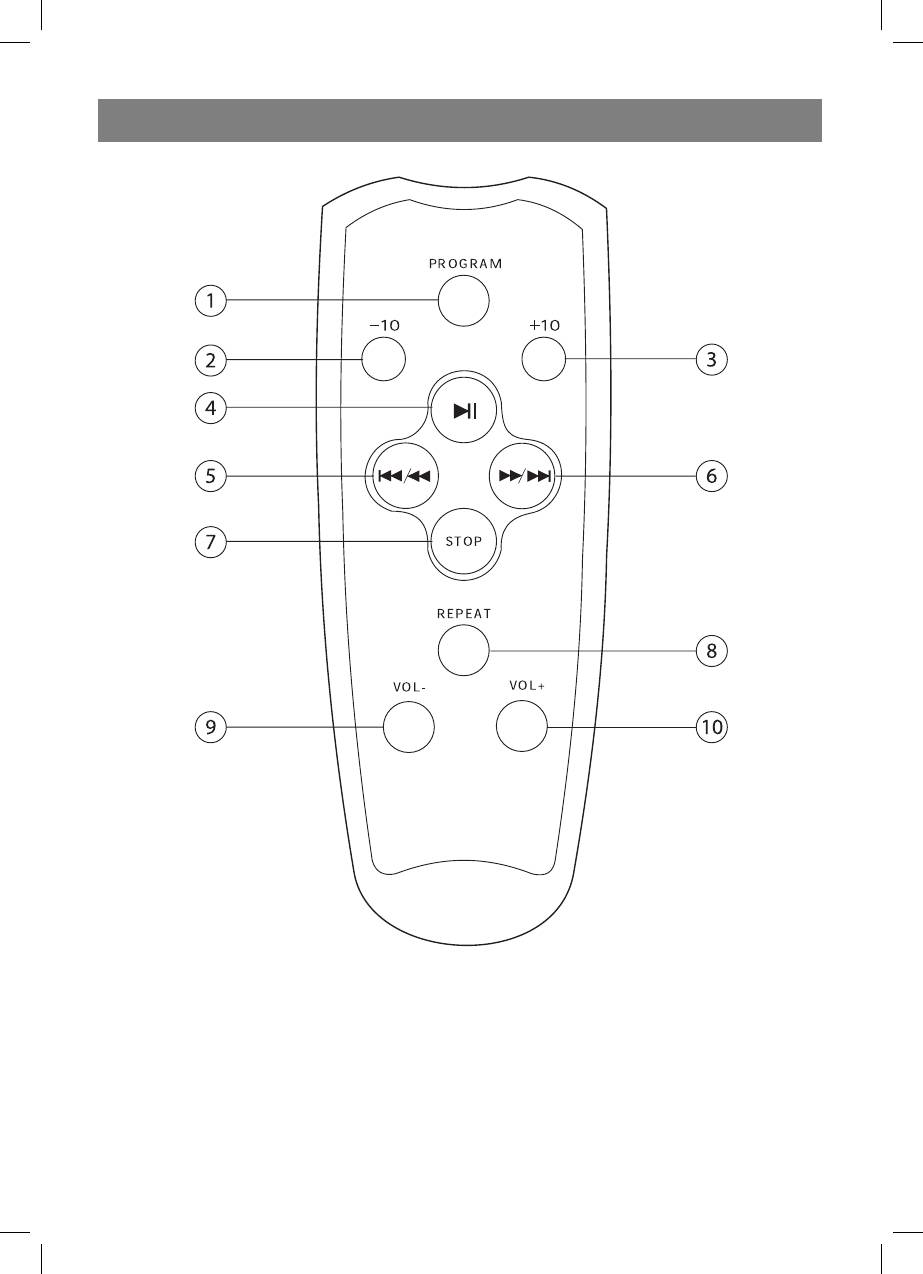
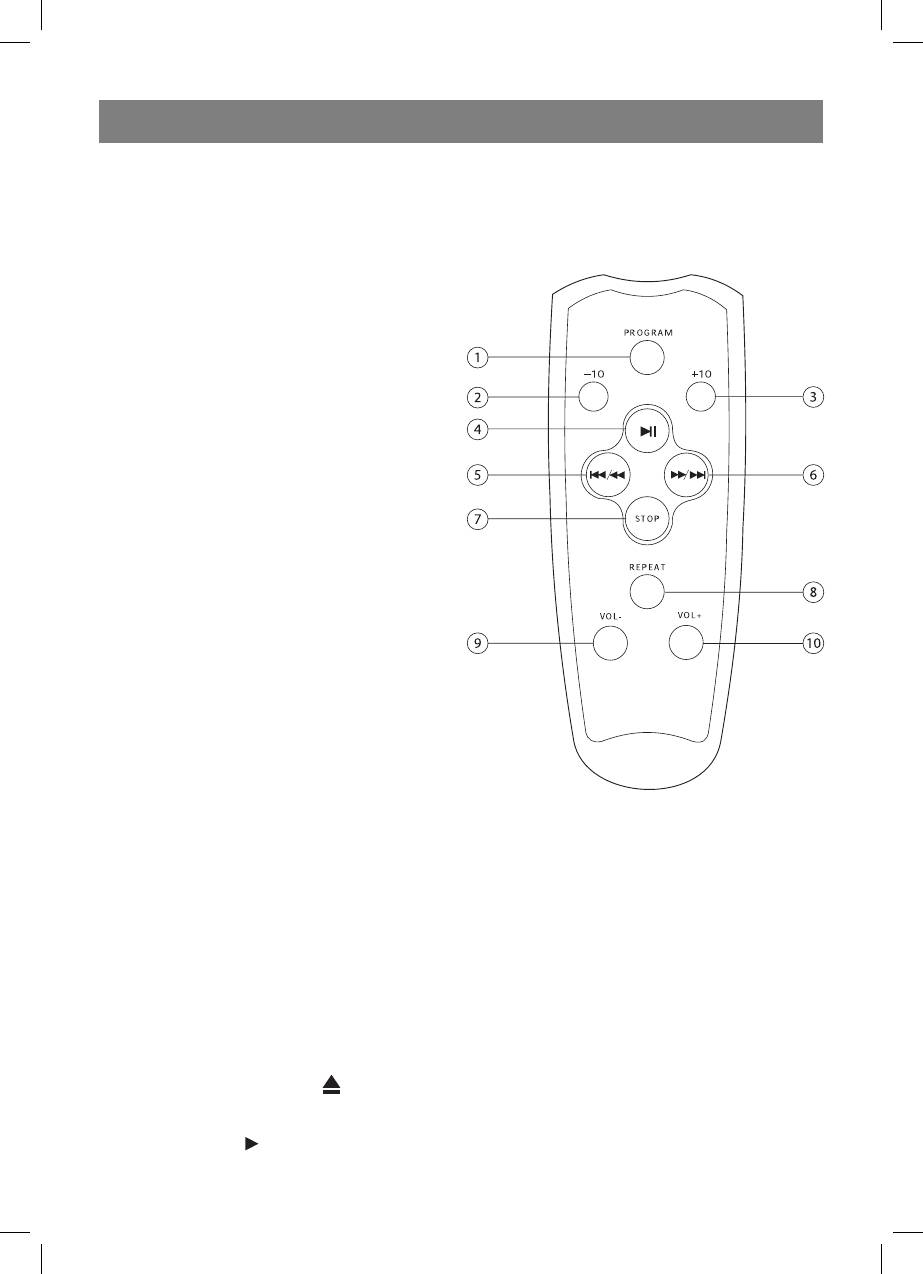
REMOTE CONTROL
1. PROGRAM-program and review programmed track numbers.
2-10.The remote control button s function is the same as the button of CD/MP3 section. Select the
CD tracks by (+10)/(-10) button.
INSTALL BATTERY
1. Open the battery cover to remote it.
2. Insert two (AAA) battery (not included) correctly so that the + and - polarities match the polarity
diagrams inside the battery compartment.
5
3479.indd 53479.indd 5 11.04.2006 16:36:1311.04.2006 16:36:13

ENGLISH
Top and front panels
-inlet for power cord
1. VOLUME
23. BATTERY DOOR
- adjust volume level.
-to open battery compartment.
2. REMOTE SENSOR
-remote control signal sensor
Power Supply
3. FUNCTION SELECT
Using AC Power
- select source of sound MP3/CD,
1. Check if the power voltage, as shown on the
TAPE or RADIO, also the power off switch.
type plate located on the bottom of the set,
4. CD BACK ()
corresponds to your local AC power supply.
CD: - Skip track backwards.
If it does not, consult your dealer or service
5. PLAY/PAUSE BUTTON ()
centre.
- start or pause MP3/CD play
2. Connect the power cord to the AC MAINS
6. STOP BUTTON
inlet and the wall outlet. The power supply
- stop CD playback; erase a CD program.
is now connected and ready for use.
7.
CD NEXT()
3. To switch off completely, unplug the power
CD: - Skip track forwards.
cord from the wall outlet.
8. BAND SELECTOR (AM FM FM ST.)
• Unplug the power cord from the wall
- select AM/FM/FM ST. Waveband.
outlet to protect your set during heavy
9. STEREO HEADPHONE JACK
thunderstorms.
- 3.5 mm stereo headphone jack.
10. TELESCOPIC ANTENNA
Batteries (not included)
- to improve FM reception
Open the battery compartment and insert
11. TUNING CONTROL
eight batteries, type R-14, UM-2 or C-cells,
- select AM/FM/FM ST. Stations.
(preferably Alkaline) with the correct polarity
12. BASS BUTTON
as indicated by the + a,,nd - s,,ymbols
- enhances bass response
inside the compartment.
13. POWER BUTTON
- Switch the system on or to standby mode.
Batteries contains chemical substances, so
14. FM STEREO INDICATOR
they should be disposed of properly.
- show the FM stereo indicator
Incorrect use of batteries can cause electrolyte
15. CD DOOR
leakage and will corrode the compartment
16. CD DOOR OPEN BUTTON
or cause the batteries to burst. Therefore:
- press here to open/close the CD door.
• Do not mix battery types: e.g. alkaline with
17. LCD DISPLAY
carbon Zinc. Only use batteries of the same
- show the AM/FM dial frequency
type for the set.
- show the number of tracks
• When inserting new batteries, do not try to
18. REPEAT BUTTON
mix old batteries with new ones.
- repeat a track CD/MP3 program
• Remove the batteries if the set is not be
19. RANDOM BUTTON
used for a long time.
CD: - play CD tracks in random order
20. CASSETTE RECORDER KEYS
BASIC FUNCTION
PAUSE KEY(- interrupt recording or STOP/
RADIO
EJECT KEYC
- stop the tape - open
Switching power on/off: Save energy Whether
the cassette compartment
you are using mains or battery supply, to avoid
F. FWD KEY (-ativance the tape toward the
unnecessary energy consumption always adjust
end).
the source selector to off.
F. REW KEY (-Rewind the tape toward the
For FM, pull out the telescopic antenna. Incline
beginning.
and turn the antenna. Reduce its length if the
PLAYKEY ( ) -start playback
signal is too strong (very close to a transmitter).
RECORDER () - start recording
For AM, the set is provided with a built-in
21. CASSETTE COMPARTMENT
antenna so the telescopic antenna is not
-put into the cassette
needed. Direct the antenna by turning the whole
22. AC MAINS
set.
6
3479.indd 63479.indd 6 11.04.2006 16:36:1311.04.2006 16:36:13
ENGLISH
General operation
seconds, when the leader tape passes the
1. To select your sound source adjust the
recorder heads.
source to MP3/CD/TAPE/RADIO.
• To protect a tape from accidental erasure,
2. Adjust the sound with the VOLUME.
have the tape in front of you and break out
3. To switch off the set, adjust the source
the left tab.
selector to TAPE/off position.
Recording on this side is no longer possible.
To record over this side again, cover the
RADIO
tabs with a piece of adhesive tape.
Radio reception
1. Slide the FUNCTION selector to RADIO.
2. Slide the BAND selector to a desired
setting - FM STEREO, FM, AM.
3. Rotate the TUNING control to find the
desired stations.
NOTE: If the BAND selector is set to the FM
stereo position and you have tuned to an FM
stereo station, the FM stereo LED indicator
Recording from the radio
will light.
I. Tune to the desired radio station (See
4. When you have finished listening, slide the
TUNING TO RADIOSTATIONS).
FUNCTION selector to the OFF position to
2. Press STOP/EJECT to open the cassette
shut the power off.
door.
3. Insert a suitable cassette into the cassette
PLAYING A CASSETTE
deck and close the cassette door.
1. Select TAPE source.
4. Press RECORD to start recording.
2. Press STOP/EJECT to open the cassette
5. For brief interruptions, press PAUSE. To
door.
resume recording, press PAUSE again.
3 Insert a recorded cassette and close the
6. To stop recording, press STOP/EJECT.
cassette door.
4 Press PLAY to start playback.
MAINTENANCE
5 To interrupt playback, press PAUSE. To
Tape deck maintenance
resume, press the key again.
5. By pressing m or on the set, fast
winding of the tape is possible in both
directions.
7. To stop the tape, press STOP/EJECT.
- The keys are automatically released at the
end of the tape, except if PAUSE has been
activated.
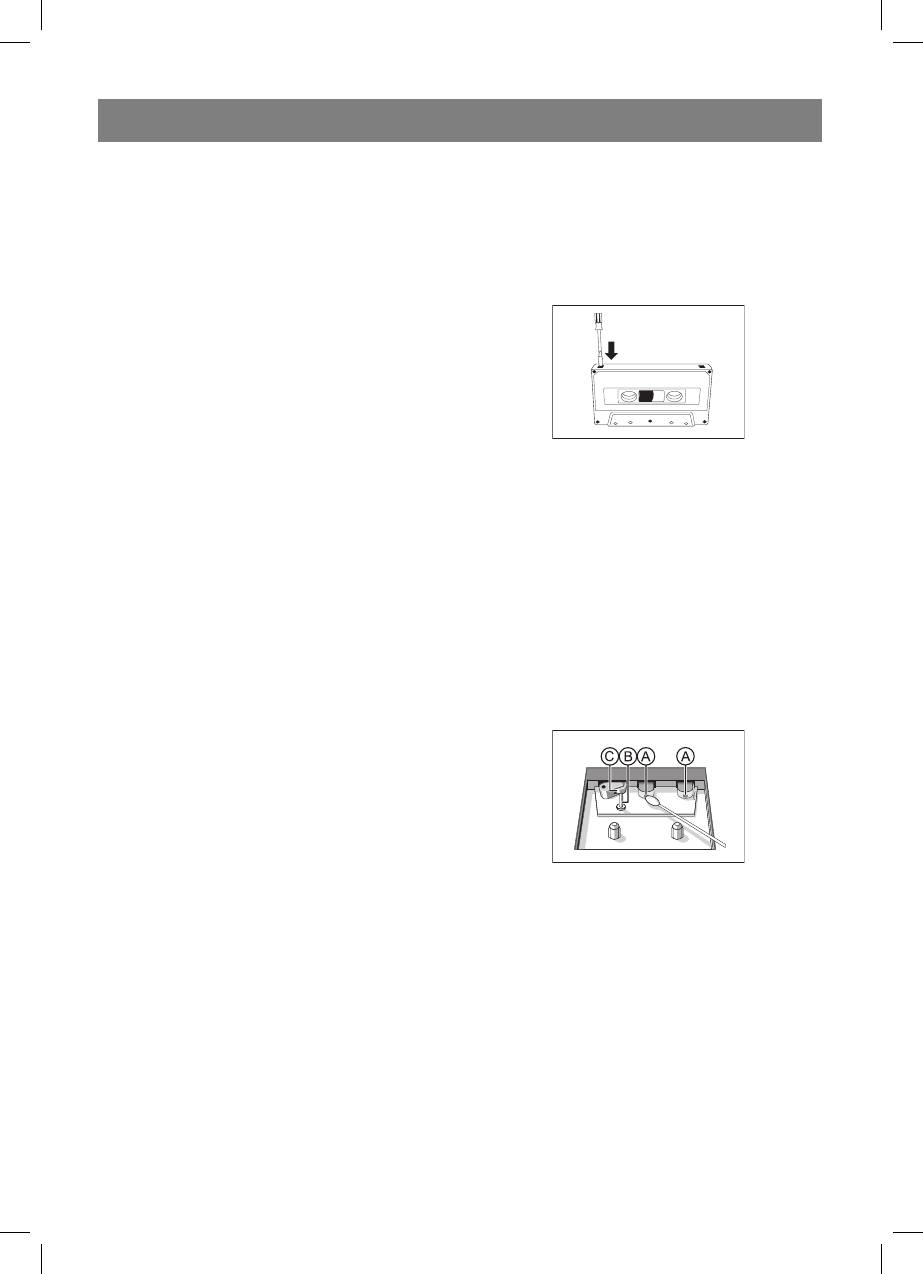
To ensure quality recording and playback of
the tape deck, clean parts A ,B andC shown in
GENERAL INFORMATION ON RECORDING
the diagram below, after approx. 50 hours of
• Recording is permissible in so far as
operation, or on average once a month. Use a
copyright or other rights of third parties are
cotton bud slightly moistened with alcohol or a
not infringed.
special head cleaning fluid to clean the deck.
• This deck is not suitable for recording on
I. Open the cassette door by pressing STOP/
CHROME (IEC II) orMETAL (IEC IV) type
EJECT.
cassettes. For recording, use NORMAL type
2. Press PLAY and clean the rubber pressure
cassettes (IEC I) on which the tabs have not
rollers C .
been broken.
3. Press PAUSE and clean the magnetic heads
• The best recording level is set automatically.
A and also the CapstanB.
Altering the VOLUME controls will not affect
4. After cleaning, press STOP/EJECT.
the recording in progress.
Note: Cleaning of the heads can also be done
• At the very beginning and end of the tape,
by playing a cleaning cassette through once.
no recording willtake place during the 7
7
3479.indd 73479.indd 7 11.04.2006 16:36:1311.04.2006 16:36:13

ENGLISH
CD/MP3 PLAYER
To Repeat All the Tracks
CD/MP3 Player Playing a CD/MP3
1. Press REPEAT button twice in play, CD RE-
ThisCD-playercan play Audio Discs,MP3 CD-R.
PEAT indicator on the display will be steady
Do not try to play CD-Rewritables,CD-ROM,
on in the display, all tracks on the disc will
CDi,VCD,DVD orcomputerCD.
be played over and over again till you press
1. Adjust the source selector to CD.
STOP button.
Display: shows - - Briefly.
2. To cancel repeat play, press REPEAT button
2. To open the CD door, press CD OPEN
once, CD REPEAT indicator goes off. Note:
button.
Repeat function also can be done in stop
3. Insert a CD or CD-R with the printed
mode.
side facing up and press CD Door
gently to close.
MAINTENANCE & SAFETY
4. To pause playback press . To resume,
Precautions & General Maintenance
press again.
• Place the set on a hard and flat surface so
5. To stop CD playback, press STOP .
that the system does not tilt.
Note:CD/MP3 play will also stop when:
• Do not expose the set, batteries or CDs to
- you open the CD compartment;
humidity, rain, sand or excessive heat
- you select RADIO sound source;
caused by heating equipment or direct
-the CD/MP3 has reached to the end.
sunlight.
• Do not cover the set. Adequate ventilation
Selecting a different track
with a minimum gap of 6 inches between the
During playback you can use or to select a
ventilation holes and surrounding surfaces
particular track.
is necessary to prevent heat build-up.
• If you have selected a track number in the
• The mechanical parts of the set contain self-
stop or pause position, press to start
lubricating bearings and must not be oiled
playback.
or lubricated.
• Press once briefly for the next track, or
• To clean the set, use a soft dry cloth. Do not
press repeatedly until the desired track
use any cleaning agents containing alcohol,
number appears in the display.
ammonia, benzene or abrasives as these
• Press once briefly to return to the
may harm the housing.
back track
CD player and CD handling
Finding a passage within a track
• The lens of the CD player should never be
1. Press and hold down or
touched!
• The CD is played at high speed and low vol-
• Sudden changes in the surrounding tem-
ume.
perature can cause condensation to form
2. When you recognize the passage you want
and the lens
release or .
of your CD player to cloud over. Playing a
Normal playback resumes.
CD is then not possible. Do not attempt to
Playing tracks in random order After press
clean the lens but leave the set in a warm
the random button, the tracks will be played
environment until the moisture evaporates.
in random order
• Always close the CD door to keep the CD
compartment dust-free. To clean, dust the
CD REPEAT
compartment with a soft dry cloth.
You can play one track or all tracks on the
• To clean the CD, wipe in a straight line from
disc repeatedly. To Repeat a single Track1.
the centre towards the edge using a soft,
Press REPEAT button once in play, CD RE-
lint-free cloth. Do not use cleaning agents
PEAT indicator on the display will be flashing
as they may damage the disc.
in the display.
• Never write on a CD or attach any stickers to
The current track will be played over and
over again till you press STOP button.
2. To cancel repeat play, press REPEAT button
twice, CD REPEAT indicator goes off.
8
3479.indd 83479.indd 8 11.04.2006 16:36:1311.04.2006 16:36:13
ENGLISH
TROUBLESHOOTING
- Laser lens steamed up
If a fault occurs, first check the points listed be-
• Wait until lens has adjusted to room
low before taking the set for repair.
temperature
Do not open the set as there is a risk of electric
shock.
The CD/MP3 skips tracks
If you are unable to remedy a problem by follow-
- CD/MP3 damaged or dirty
ing these hints, consult your dealer or service
• Replace or clean CD/MP3
center.
- Program is active
WARNING: Under no circumstances should you
• Quit Program mode(s)
try to repair the set yourself, as this will in-
validate the warranty.
Environmental information
We have done our best to reduce the packaging
-No sound /power
and make it easy to separate into 3 materials:
- Volume not adjusted
cardboard, paper pulp and expandable polyeth-
• Adjust the VOLUME
ylene.
Your set consists of materials which can be
- power cord not securely connected
recycled if disassembled by a specialized
• Connect the AC power cord properly
company. Please observe the local regulations
regarding the disposal of packaging, dead bat-
- Batteries dead/ incorrectly inserted
teries and old equipment..
• Insert (fresh) batteries correctly
The manufacturer reserves the right to make
Display does not function properly / No re-
changes to the characteristics of the device
action to operation of any of the controls
without prior notice.
- Electrostatic discharge
• Switch off and unplug the set. Reconnect
The service life of the device is no less
after a few seconds
than five years.
Poor cassette sound quality
Guarantee
- Dust and dirt on the heads, etc.
Details regarding guarantee conditions can
• Clean deck parts etc., see Maintenance
be obtained from the dealer from whom the
- Use of incompatible cassette types (METAL
appliance was purchased. The bill of sale or
or CHROME)
receipt must be produced when making any
• Only use NORMAL (IEC I) for recording
claim under the terms of this guarantee.
Recording does not work
This product conforms to the EMC-
- Cassette tab(s) may be broken
Requirements as laid down by the
• Apply a piece of adhesive tape over the
Council Directive 89/336/EEC and
missing tab space
to the Low Voltage Regulation
(23/73 EEC)
no disc indication
- No CD/MP3 inserted
• Insert a CD,MP3, CD-R.
- CD badly scratched or dirty
• Replace/ clean CD, see Maintenance
- Laser lens steamed up
• Wait until lens has cleared
- CD-R is blank or the disc is not finalized
• Use a finalized CD-R
CD/MP3 playback does not work
CD/MP3 badly scratched/dirty
• Replace/clean CD/MP3 (see maintenance)
9
3479.indd 93479.indd 9 11.04.2006 16:36:1411.04.2006 16:36:14
DEUTSCH
Gefahr:
Wir danken Ihnen für den Erwerb dieses CD/
Es kann zum Auftreten der gefährlichen
MP3-Spielers. Sie haben eine richtige und
unsichtbaren Laserstrahlung kommen, falls
sinnvolle Wahl getroffen. Wir werden Ihnen auch
am offenen Gerät die Sperrvorrichtungen
weiterhin Produkte von bester Qualität und
nicht angesprochen haben bzw.
ausgezeichneten Nachkaufservice anbieten.
abgeschaltet wurden. Meiden Sie die
Damit Sie Ihr Gerät mit voller Leistung benutzen
direkte Strahleinwirkung.
können, lesen Sie bitte diese Anleitung
aufmerksam durch, bevor Sie die Arbeit mit dem
Gerät beginnen. Bewahren Sie die Anleitung für
Gefahr des Flussigkeitseindringen:
weitere Benutzung auf.
Es dürfen keine Flüssigkeiten auf das Gerät
verschüttet werden bzw. auf das Gerät tropfen.
Warnungen und wichtige Informationen
Stellen Sie darauf keine Wasserbehälter, z.B.
Setzen Sie das Gerät keiner Einwirkung von
Blumenvasen.
Wasser oder von hoher Feuchtigkeit aus, um
eine Entzündung bzw. einen Stromschlag zu
Informationen zur Lüftung:
vermeiden.
Hindern Sie die normale Lüftung des Gerätes
während des Betriebs nicht.
Achtung
Stromschlaggefahr
Zur Kenntnisnahme:
Nicht öffnen
- Lesen Sie die vorliegende
Bedienungsanleitung bis zum Ende durch,
Vorsicht: Um die Stromschlaggefahr zu minimieren,
bevor Sie mit dem Benutzen des Gerätes
nehmen Sie den Deckel (bzw. die Rückwand) nicht
beginnen.
ab. Im Geräteinneren befinden sich keine Teile, die
- Das Gerät soll an so eine Speisequelle
vom Benutzer bedient werden können. Beauftragen
angeschlossen werden, deren Kennwerte
Sie qualifizierte Fachleute mit den Reparaturarbeiten.
in der Bedienungsanleitung oder am Gerät
angegeben sind.
Laserstrahlung: In diesem Gerät wird ein Laser
- Beim Stecken oder Ausziehen des
verwendet. Das Gerät soll nur von qualifizierten
Netzsteckers aus der Steckdose fassen Sie
Fachleuten repariert werden, da sonst Gefahr
ihn an der isolierten Fläche an.
der Augenschädigung entsteht.
- Schalten Sie die Speisung ab, falls das
Achtung: Durchführung von in der vorliegenden
Gerät für eine längere Zeit nicht benutzt
Anleitung beschriebenen Steuerungs-,
wird. - Ziehen Sie den Netzstecker aus
Einstellungs- und Bedienungsoperationen kann
der Steckdose aus, falls das Gerät für eine
zur Schädigung durch gefährliche Strahlung
längere Zeit nicht benutzt wird oder während
führen.
eines Gewitters.
Gefährliche Spannung
- Setzen Sie das Gerät keinen Einwirkungen
Das Blitzsymbol im gleichseitigen
von hohen Temperaturen, von Vibrationen,
Dreieck warnt den Benutzer vor dem
Staub oder direkter Sonneneinstrahlung
Vorhandensein von nichtisolierten
aus. Stellen Sie dieses Gerät neben keinen
Teilen im Geräteinneren, die unter
elektrischen Hochleistungsgeräten ab, um
der gefährlichen Spannung stehen,
eine Überhitzung zu vermeiden.
die ihrerseits Personengefahr durch
- Halten Sie das Gerät fern von Feuer-
Stromschlag darstellen kann.
und Wärmequellen und von Quellen der
elektromagnetischen Strahlung. Benutzen
Sie keinen Alkohol, kein Benzin und keine
Achtung
anderen Lösungsmittel zur Reinigung des
Das Ausrufezeichen im gleichseitigen
Gerätes.
Dreieck weist den Benutzer
- Verschütten Sie keine Flüssigkeiten
auf wichtige Betriebs- und
auf das Gerät und stecken Sie keine
Bedienungsvorschriften hin, die in
Fremdgegenstände darin. Nehmen Sie das
der mitgelieferten Dokumentation
Gerät nicht auseinander.
enthalten sind.
- Benutzen Sie das Gerät nicht in feuchten
10
3479.indd 103479.indd 10 11.04.2006 16:36:1411.04.2006 16:36:14

DEUTSCH
Orten und stellen Sie keine schweren
FERNBEDIENUNGSPULT
Gegenstände darauf.
- Bevor Sie das Gerät auf eine andere Stelle
bringen, nehmen Sie die CD aus.
- Falls Rauch oder ungewöhnliche Gerüche
aus dem Gerät auftreten, ziehen Sie
den Netzstecker aus der Steckdose aus
und übergeben Sie das Gerät an einen
Fachmann zur Reparatur.
1. LAUTSTÄRKENREGELUNG
2. FERNBEDIENUNGSPULT
3. FUNKTIONSUMSCHALTUNG
4. TASTE CD-BACK
5. TASTE PLAY/PAUSE
6. TASTE STOP
7. TASTE CD-NEXT
8. UMSCHALTEN DER BANDBEREICHE
9. KOPFHÖRER
10. AUSZIEHBARE ANTENNE
11. ABSTIMMUNGSTASTE
12. TASTE BASS
13. TASTE POWER
14. FM STEREOSENDUNG INDIKATOR
15. CD-FACH
16. TASTE CD DOOR OPEN
17. LCD-DISPLAY
18. TASTE REPEAT
19. TASTE RANDOM
20. TASTEN DER KASSETTENTHEKE
. TASTE PAUSE
. TASTE STOP/EJECT
. TASTE FFWD
(1) PROGRAM
. TASTE FREW
- Programmieren und Übersicht der
. TASTE PLAY
vorprogrammierten Tracknummern.
. TASTE RECORD
21. KASSETTENFACHTÜR
(2)-(10)
22. WECHSELSTROMNETZ
Die Funktionen der Tasten auf der
23. BATTERIEFACHDECKEL
Fernbedienung sind dieselben, wie die
Funktionen auf dem CD/MP3 Radiorecorder.
Wählen Sie den gewünschten CD-Track mit
der Taste (+10)/(-10).
Einlegen der Batterien
1. Öffnen Sie den Batteriefachdeckel.
2. Legen Sie zwei AAA Batterien ein (nicht
im Lieferumfang enthalten), beachten
Sie dabei die Polarität (siehe Schema im
Inneren des Batteriefachs).
11
3479.indd 113479.indd 11 11.04.2006 16:36:1411.04.2006 16:36:14

DEUTSCH
Obere und untere Fronttafel (siehe (1))
(20) TASTEN DES KASSETTENRECORDERS
(1) VOLUME
- TASTE PAUSE – Aufnahme oder
- Regelung der Lautstärke
Wiedergabe anhalten
(2) SENSOR DES FERNBEDIENUNGSPULTS
Taste STOP/EJECT
– Kassette stoppen
- Sensor für den Signalempfang vom
- Kassettenfach öffnen
Fernbedienungspult
- Taste FFWD – vorwärts spulen
(3) FUNKTIONSWAHL
- Taste FREW – rückwärts spulen
- Wahl der Tonsignalquelle – MP3/CD,
- Taste PLAY
– Wiedergabe beginnen
Kassette oder Radio, sowie Einschalten der
- RECORD – Aufnahme beginnen
Speisung
(21) KASSETTENFACH
(4) CD-BACK
- legen Sie hier die Kassette ein
CD: - Übergang zum vorangegangenen
(22) WECHSELSTROMNETZ
Track.
- Netzschnurbüchse
(5) Taste PLAY/PAUSE
(23) BATTERIEFACH
- MP3/CD Wiedergabe beginnen oder
- Batteriefach öffnen
anhalten
(6) Taste STOP
Speisequelle
- Wiedergabe stoppen; CD-Programm
Wechselstromnetz
löschen.
1. Prüfen Sie, ob die
(7) CD-NEXT
Wechselstromnetzspannung der Spannung
CD: - Übergang zum nächsten Track.
entspricht, die auf der Unterseite des
(8) BANDBEREICHUMSCHALTER (AM, FM,
Kassettenrecorders angegeben ist. Wenn
FMST.)
die Spannungen nicht gleich sind, wenden
- Bandbereichwahl AM/FM/FM Stereo.
Sie sich an den Händler oder an das
(9) STEREOKOPFHÖRER
Service-Center.
- 3,5 mm Büchse für Stereokopfhörer.
2. Schließen Sie die Netzschnur an
(10) AUSZIEHBARE ANTENNE
eine Wechselstromsteckdose und
- für den besseren Empfang des FM-
an die entsprechende Büchse am
Radiosignals
Kassettenrecorder an. Jetzt ist die Speisung
(11) TUNER
angeschlossen, der Kassettenrecorder ist
- Wahl der Radiosender im Bereich AM/FM/
betriebsbereit.
FMST.
3. Um den Kassettenrecorder vollständig
(12) TASTE BASS
abzuschalten, nehmen Sie das Speisekabel
- Wiedergabe der Tieffrequenzen verstärken
aus der Steckdose.
(13) TASTE POWER
• Nehmen Sie das Speisekabel aus der
- System EIN/AUS
Steckdose, um die Sicherheit des
(14) STEREOSENDUNGSINDIKATOR MIT
Kassettenrecorders bei Gewitter zu
FREQUENZAUSSTEUERUNG
gewährleisten.
- zeigt den Empfangsbetrieb FM-Stereo an
(15) CD-Fach
Speiseelemente (nicht im Lieferumfang
(16) Taste CD DOOR OPEN
enthalten)
- pressen Sie diese Taste, um das CD-Fach
Öffnen Sie das Batteriefach und legen Sie
zu öffnen/zu schließen.
acht Batterien Typ R-14, UM-2 oder C ein
(17) LCD-Display
(vorzugsweise Alkalibatterien), beachten Sie
- zeigt die Frequenz des AM/FM-
dabei die Polarität, wie sie mit „+“ und „-“ im
Radiosenders an
Inneren des Batteriefachs angegeben ist.
- zeigt die Tracknummer an
Die Speiseelemente enthalten Chemikalien,
(18) Taste REPEAT
deshalb müssen sie entsprechend entsorgt
- Wiederholung eines Tracks oder eines
werden.
CD/MP3 Programms
Bei falscher Anwendung der Speiseelemente
(19) taste RANDOM
kann Elektrolyt auslaufen und eine Korrosion im
CD: Wiedergabe von CD-Tracks in zufälliger
Inneren des Batteriefachs entstehen. Deshalb:
Reihenfolge
• Benutzen Sie keine Speiseelemente
12
3479.indd 123479.indd 12 11.04.2006 16:36:1411.04.2006 16:36:14

DEUTSCH
verschiedenen Typs: z.B., Salzbatterien
dem Display der entsprechende Indikator
zusammen mit Alkalibatterien. Verwenden Sie
aufleuchten.
Speiseelemente gleichen Typs.
4. Nach dem Anhören stellen Sie den Schalter
- Legen Sie keine neuen Batterien zusammen
FUNCTION in die Position OFF, um den
mit alten ein.
Radioempfänger auszuschalten.
- Nehmen Sie die Batterien aus dem
Batteriefach, wenn das Gerät innerhalb von
KASSETTENWIEDERGABE
einer längeren Zeitspanne nicht benutzt
1. Wählen Sie die Tonsignalquelle TAPE.
wird.
2. Pressen Sie die Taste STOP/EJECT, um das
Kassettenfach zu öffnen.
HAUPTFUNKTIONEN
3. Legen Sie eine Kassette mit Aufnahmen ein
RADIO
und schließen Sie das Kassettenfach.
4. Pressen Sie die Taste PLAY, um die
Speisung Ein/Aus: Sparen Sie Strom.
Wiedergabe zu beginnen.
Schalten Sie den Kassettenrecorder immer aus,
5. pressen Sie die Taste PAUSE, um
um Strom zu sparen, unabhängig davon, ob
die Wiedergabe anzuhalten. Um in
er an das Stromnetz angeschlossen oder von
den normalen Wiedergabebetrieb
Batterien gespeist wird.
zurückzuschalten, pressen Sie diese Taste
noch einmal.
Allgemeine Hinweise zur Anwendung
6. Pressen Sie die Taste oder , um die
1. Wählen Sie die Tonsignalquelle mit dem
Kassette schnell vorwärts oder rückwärts zu
MP3/CD/TAPE/RADIO Umschalter.
spulen.
2. Regeln Sie die Lautstärke mit dem Regler
7. Um die Kassette zu stoppen, pressen Sie
VOLUME.
die Taste STOP/EJECT. Die Taste schalten
3. Um den Kassettenrecorder einzuschalten,
sich am Ende des Tonbands automatisch
schalten Sie den Tonquellenumschalter in
aus, wenn die Taste PAUSE nicht gepresst
die Position TAPE/OFF.
ist.
Um das FM-Radiosignal zu empfangen, ziehen
AUFNAHME
Sie die Antenne aus. Heben Sie sie an und
ALLGEMEINE INFORMATIONEN ÜBER DIE
drehen Sie sie. Verkürzen Sie die Antenne, wenn
AUFNAHME
das zu empfangende Signal zu stark ist (wenn
- Aufnahmen können dann gemacht werden,
der Sender sich zu nah befindet).
wenn dadurch keine Autorenrechte oder
Um das AM-Radiosignal zu empfangen, ist
sonstige Rechte dritter Personen verletzt
der Kassettenrecorder mit einer eingebauten
werden.
Antenne ausgestattet, deshalb braucht man in
- Dieser Kassettenrecorder ist nicht für
diesem Fall sie ausziehbare Antenne nicht. Um
Aufnahmen auf Kassetten Tap CHROME
die eingebaute Antenne zu wenden, muss das
(IEC II) oder METAL (IEC IV) bestimmt.
Gerät selbst gewendet werden.
Benutzen Sie für Aufnahmen gewöhnliche
Kassetten Tap NORMAL (IEC I). Die
RADIO
Laschen auf den Kassetten dürfen nicht
Radiosignalempfang
abgebrochen sein.
1. Stellen Sie den Schalter FUNCTION in die
- Der Aufnahmepegel stellt sich automatisch
Position RADIO.
ein. Die Änderung der Lautstärke mit dem
2. Stellen Sie den Schalter BAND in die
Regler VOLUME wirkt sich nicht auf den
gewünschte Position - FM STEREO, FM,
Aufnahmeprozess aus.
AM.
- An Anfang und am Ende der Kassette wird
3. Drehen Sie den Griff TUNING, um den
innerhalb von 7 Sekunden keine Aufnahme
gewünschten Sender einzustellen.
erfolgen, da sich an diesen Stellen ein
Anmerkung: Wenn der Schalter BAND
technischer Abschnitt des Tonbands
in der Position FM stereo steht, und der
befindet.
Radioempfänger auf einen Stereosender
- Um die Kassette nicht zufällig zu löschen,
im Bereich FM eingestellt ist, wird auf
brechen Sie die Lasche ab (sie befindet sich
13
3479.indd 133479.indd 13 11.04.2006 16:36:1411.04.2006 16:36:14

DEUTSCH
auf der linken Kassettenseite).
Tonbandmechanismus (B).
Eine Aufnahme auf der Seite der Kassette,
4. Pressen Sie nach der Reinigung die Taste
auf der die linke Lasche abgebrochen
STOP/EJECT.
wurde, ist unmöglich. Um eine Aufnahme
Anmerkung: Die Tonbandköpfe
auf diese Kassettenseite zu machen,
können auch gereinigt werden, indem
müssen Sie die Stelle, an der die Lasche
Sie zur Wiedergabe eine spezielle
abgebrochen wurde, mit einem Klebeband
Reinigungskassette einlegen.
zukleben.
CD/MP3 SPIELER
Aufnahme eines Radiosignals
CD/MP3 Wiedergabe
1. Stellen Sie den Radioempfänger auf den
Dieser Spieler Audio-Disks, Disks mit Musik im
gewünschten Radiosender ein (siehe
Format MP3 oder CD-R-Disks wiedergeben.
„Einstellen der Radiosender“).
Versuchen Sie nicht Disks in den Formaten CD-
2. Pressen Sie die Taste STOP/EJECT, um das
RW, CD-ROM, CDi, VCD, DVD oder Computer-
Kassettenfach zu öffnen.
CDs wiederzugeben.
3. Legen Sie die passende Kassette ein und
schließen Sie das Kassettenfach.
1. Stellen Sie den Umschalter der
4. Pressen Sie die Taste RECORD, um die
Tonsignalquelle in die Position CD.
Aufnahme zu beginnen.
- Auf dem Display erscheint für kurze Zeit
5. Pressen Sie die Taste PAUSE, um die
die Aufschrift --
Aufnahme anzuhalten. Um die Aufnahme
2. Pressen Sie die Taste CD OPEN, um das
fortzusetzen, pressen Sie wiederholt die
CD-Fach zu öffnen /zu schließen.
Taste PAUSE.
3. Legen Sie eine CD oder eine CD-R mit der
6. Um die Aufnahme abzubrechen, pressen Sie
Arbeitsfläche nach unten ein und schließen
die Taste STOP/EJECT.
Sie das CD-Fach, indem Sie leicht darauf
pressen.
WARTUNG
4. Pressen Sie die Taste , um
Wartung der Kassettentheke des
die Wiedergabe anzuhalten. Um in
Radiorecorders
den normalen Wiedergabebetrieb
Damit die Aufnahme- und die
zurückzuschalten, pressen Sie wiederholt
Wiedergabequalität des Kassettenrecorders
die Taste .
stets hoch bleibt, müssen etwa alle 50
5. Pressen Sie die Taste STOP, um die
Arbeitsstunden oder einmal im Monat die Teile
Wiedergabe der CD zu stoppen.
(A), (B) und (C) gereinigt werden, die auf dem
Anmerkung: Die Wiedergabe einer CD/MP3
Diagramm unten gezeigt sind. Zum Reinigen
Disk kann in dem Fall abgestellt werden,
der Teile benutzen Sie ein Wattestäbchen,
wenn:
die in Alkohol oder in einer speziellen
- das CD-Fach geöffnet wird;
Reinigungsflüssigkeit für die Reinigung von
- der Radiorecorder auf RADIO
Tonbandköpfen angefeuchtet wurden.
umgeschaltet wird;
- die CD/MP3 Disk zu Ende gespielt wurde.
1. Pressen Sie die Taste STOP/EJECT, um das
Kassettenfach zu öffnen.
Wahl eines anderen Tracks
2. Pressen Sie die Taste PLAY, um die
Benutzen Sie während der Wiedergabe die
Andrückrollen aus Gummi zu reinigen (C).
Tasten oder für die Wahl des gewünschten
3. Pressen Sie die Taste PAUSE und
Tracks.
reinigen Sie die Magnetköpfe (A) und den
- Wenn die Tracknummer bei ausgeschalteter
14
3479.indd 143479.indd 14 11.04.2006 16:36:1411.04.2006 16:36:14

DEUTSCH
oder angehaltener Wiedergabefunktion gewählt
WARTUNG UND
wurde, muss die taste Play gepresst
SICHERHEITSVORSCHRIFTEN
werden, um die Wiedergabe zu starten.
- Pressen Sie einmal kurz die Taste , um zum
Vorsichtsmaßnahmen und allgemeine Wartung
nächsten Track umzuschalten, oder pressen Sie
- Stellen Sie den Radiorecorder auf einer
diese taste mehrmals, bis auf dem Display die
feste Oberfläche auf, damit er nicht gekippt
gewünschte Tracknummer erscheint.
wird.
- Pressen Sie einmal kurz die Taste , um zum
- Schützen Sie den Radiorecorder, die
vorangegangenen Track zurückzuschalten.
Speiseelemente und die CDs vor der
Einwirkung von Feuchtigkeit, Regen,
Suche einer bestimmten Stelle innerhalb
Sand oder zu hohen Temperaturen
eines Tracks
von Heizgeräten oder durch direkte
1. Pressen und halten Sie die Taste oder
Sonneneinstrahlung.
- Die CD wird in hoher Geschwindigkeit und
- Decken Sie den Radiorecorder nicht
bei niedriger Lautstärke wiedergegeben.
zu. Damit sich der Radiorecorder nicht
2. Wenn die Disk die gewünschte Stelle des
überhitzt, muss sich zwischen den
Tracks erreicht hat, lassen Sie die Taste
Lüftungsöffnungen des Radiorecorders und
der los.
den Nebenoberflächen ein Freiraum von
– Der Radiorecorder schaltet in den
mindestens 6 Zoll (15 cm) befinden.
normalen Wiedergabebetrieb zurück.
- Die mechanischen Teile des Radiorecorders
Wiedergabe der Tracks in zufälliger Reihenfolge
enthalten Lager mit automatischer
Damit die Tracks in zufälliger Reihenfolge
Schmierung; sie müssen nicht geschmiert
wiedergegeben werden, pressen Sie die Taste
werden.
RANDOM.
- Zum Reinigen des Radiorecorders benutzen
Sie ein trockenes weiches Stofftuch.
Wiederholte CD-Wiedergabe
Benutzen Sie keine Reinigungsmittel,
Ein Track oder alle Tracks der Disk können
die Alkohol, Ammoniak, Benzin oder
wiederholt wiedergegeben werden.
Schleifteilchen enthalten, da sie das
Gehäuse des Radiorecorders beschädigen
Wiederholte Wiedergabe eines Tracks
können.
1. Pressen Sie während der Wiedergabe
einmal die Taste REPEAT. Auf dem Display
CD-Spieler und Aufbewahrung von CD-Disks
leuchtet und blinkt der Indikator CD REPEAT.
- Berühren Sie nicht die Linse des CD-
Der laufende Track wird solange wiederholt
Spielers!
wiedergegeben, bis die Taste STOP
- Bei abruptem Wechsel der
gepresst wird.
Umgebungstemperatur kann sich auf der
2. Um den wiederholten Wiedergabebetrieb
Linse des CD-Spielers Kondensat bilden.
zu verlassen, pressen Sie zweimal die Taste
Die Diskwiedergabe wird dabei unmöglich
REPEAT. Der Indikator CD REPEAT erlischt.
sein. Versuchen Sie nicht die Linse zu
reinigen. Lassen Sie den Radiorecorder
Wiederholte Wiedergabe aller Tracks
in einem warmen Raum stehen, bis die
1. Pressen Sie während der Wiedergabe
Feuchtigkeit verdunstet.
zweimal die Taste REPEAT. Auf dem Display
- Schließen Sie immer das CD-Fach, damit
leuchtet der Indikator CD REPEAT auf.
kein Staub hineingelangt. Um das CD-
Alle Tracks werden solange wiederholt
Fach zu reinigen, wischen Sie es mit einem
wiedergegeben, bis die Taste STOP
trockenen weichen Stofftuch ab.
gepresst wird.
- Um eine CD zu reinigen, wischen Sie sie
2. Um den wiederholten Wiedergabebetrieb
von der Mitte zum Rand hin mit einem
zu verlassen, pressen Sie einmal die Taste
weichen faserlosen Stofftuch ab. Benutzen
REPEAT. Der Indikator CD REPEAT erlischt.
Sie keine Reinigungsmittel, da sie die Disk
Anmerkung: Die Funktion der wiederholten
beschädigen können.
Wiedergabe ist auch bei abgestellter
- Beschriften Sie niemals die CDs und kleben
Wiedergabe zugänglich.
Sie keine Sticker darauf.
15
3479.indd 153479.indd 15 11.04.2006 16:36:1411.04.2006 16:36:14

DEUTSCH
- Laserlinse angelaufen
• Abwarten, bis die Feuchtigkeit von der Linse
verdunstet
- CD-R Disk ohne Aufnahme oder nicht
STÖRUNGSBEHEBUNG
abgeschlossen
Beseitigung von Störungen
• Abgeschlossene CD-R Disk verwenden.
Beim Auftreten von Störungen lesen Sie zuerst
CD/MP3 Diskwiedergabe funktioniert nicht
die unten angeführten Punkte durch, bevor Sie
- CD/MP3-Disk stark zerkratzt oder
Ihren Radiorecorder in Reparatur aufgeben.
verschmutzt
Öffnen Sie den Radiorecorder nicht –
• CD/MP3 Disk auswechseln/reinigen, siehe
Stromschlaggefahr.
Abschnitt „Wartung“
Wenn sich der Fehler nicht selbstständig
- Laserlinse angelaufen
beheben lässt, indem Sie die angeführten
• Warten Sie, bis die Linse die
Anweisungen befolgen, wenden Sie sich an den
Raumtemperatur erreicht hat
Händler oder an das Service-Center.
Ausgelassene Stellen bei der Wiedergabe
WARNUNG: Versuchen Sie keinesfalls den
von CD/MP3 Disks
Radiorecorder selbstständig zu reparieren – in
- CD/MP3-Disk beschädigt oder verschmutzt
diesem Fall wird die Garantie ungültig.
• CD/MP3 Disk auswechseln/reinigen
- Ein Programm läuft
Kein Ton/Keine Speisung
• Programmbetrieb verlassen
- Lautstärke nicht eingestellt
• regeln Sie die Lautstärke mit der Taste
Umweltinformationen
VOLUME
Wir haben es versucht das Verpackungsmaterial
- Netzschnur nicht bis zum Ende eingesteckt
maximal zu vermindern und Trennung auf drei
• Schließen Sie die Netzschnur korrekt an
Materialarten zu vereinfachen: Karton, Zellulose
- Batterien leer/falsch eingesetzt
und schäumendes Polyäthylen.
• Legen Sie die (neuen) Batterien korrekt ein
Ihr Radiorecorder enthält Materiale, die
Display funktioniert fehlerhaft/reagiert
bei einer Zerlegung in einer spezialisierten
nicht auf Tastendruck
Werkstatt entsorgt werden können. Halten
- Elektrostatische Ladung
Sie die örtlichen regeln zur Entsorgung
• Schalten Sie den Radiorecorder aus
von Verpackungsmaterialen, leeren
und schalten Sie ihn vom Stromnetz ab.
Speiseelementen und alten Geräten ein.
Schließen Sie ihn nach einigen Sekunden
wieder an
Der Hersteller behält sich das Recht vor die techni-
Schlechte Qualität der
schen Charakteristiken des Gerätes ohne Vorbescheid
Kassettenwiedergabe
an den Kunden zu ändern.
- Tonköpfe verschmutzt
• Reinigen Sie die Elemente der
DIE LEBENSDAUER DES GERÄTES BETRÄGT
Kassettentheke. Siehe Abschnitt „Wartung“
NICHT WENIGER ALS 5 JAHRE
Gewährleistung
- Falscher Kassettentyp (METAL oder
Ausführliche Bedingungen der Gewährleistung kann
CHROME)
man beim Dealer, der diese Geräte verkauft hat,
• Benutzen Sie für Aufnahmen nur Kassetten
bekommen. Bei beliebiger Anspruchserhebung soll
Typ NORMAL (IEC I)
man während der Laufzeit der vorliegenden Gewähr-
Aufnahme funktioniert nicht
leistung den Check oder die Quittung über den Ankauf
Aufnahmeschutzlaschen abgebrochen
vorzulegen.
• Kleben Sie diese Stellen mit Klebeband zu
Das vorliegende Produkt entspricht den
Es wird keine Information über die Disk
Forderungen der elektromagnetischen
angezeigt
Verträglichkeit, die in 89/336/EWG -
- Keine CD/MP3 Disk eingelegt
Richtlinie des Rates und den Vorschriften
• Legen Sie eine CD, MP3, CD-R Disk in den
23/73/EWG über die Niederspannungsge
Radiorecorder ein.
räte vorgesehen sind.
- CD stark zerkratzt oder verschmutzt
• CD reinigen/auswechseln, siehe Abschnitt
„Wartung“
16
3479.indd 163479.indd 16 11.04.2006 16:36:1411.04.2006 16:36:14

РУССКИЙ
Руководство по эксплуатации
Внимание
Восклицательный знак в равностороннем
Благодарим Вас за приобретение нашей
треугольнике привлекает внимание
магнитолы с CD/MP3 плеером. Вы сделали
пользователя к важным инструкциям
правильный и разумный выбор. Мы и
по эксплуатации и обслуживанию,
в дальнейшем будем предлагать Вам
содержащимся в документации,
продукцию наивысшего качества с отличным
сопровождающей устройство.
послепродажным обслуживанием. Для того
чтобы максимально полно использовать
Опасность:
Появление невидимого опасного лазерного
устройство, внимательно прочитайте данное
излучения возможно, если на открытом
руководство перед началом работы с ним.
устройстве не сработали или были
Сохраните руководство для дальнейшего
отключены блокирующие устройства.
использования.
Избегайте прямого воздействия луча.
Предупреждения и важная информация
Не подвергайте устройство воздействию
Опасность попадания жидкости:
воды или высокой влажности, чтобы
На устройство не должна капать или
избежать возгорания или поражения
разливаться жидкость, поэтому на него
электрическим током.
запрещается ставить предметы с водой,
такие как вазы.
Внимание
Информация о вентиляции:
Опасность поражения
электрическим током
Запрещается препятствовать нормальной
Не открывать
вентиляции устройства во время его работы.
Осторожно: Чтобы снизить опасность поражения
К сведению:
электрическим током, не снимайте крышку (или
заднюю стенку). Внутри нет частей, которые
Прочитайте данное руководство до
могут обслуживаться пользователем. Поручите
конца перед началом использования
ремонт квалифицированному персоналу.
устройства.
Данное устройство должно быть
подключено к источнику питания,
Лазерное излучение: В данном устройстве
параметры которого указаны в
используется лазер. Из-за опасности
руководстве или на самом устройстве.
повреждения глаз это устройство должны
Держитесь за изолированную часть вилки
ремонтировать только квалифицированные
провода питания при вставлении или
специалисты.
извлечении ее из розетки.
Внимание: Выполнение операций по
Выключайте питание, если устройство
управлению, настройке или эксплуатации,
не используется в течение длительного
описанных в данном руководстве, может
времени.
привести к поражению опасным излучением.
Выключайте вилку из розетки, если
устройство не используется в течение
длительного времени или во время
Опасное напряжение
грозы.
Символ молнии в равностороннем
треугольнике предупреждает пользователя
Запрещается подвергать устройство
о наличии внутри корпуса устройства
воздействию высокой температуры,
неизолированных частей, находящихся
вибраций, пыли или прямого солнечного
под опасным напряжением, которое может
света. Не устанавливайте данное
представлять угрозу для человека при
устройство рядом с электроприборами
поражении его электрическим током.
высокой мощности, чтобы избежать
перегрева.
Держите устройство вдалеке
от источников огня, тепла и
электромагнитного излучения. Не
используйте для очистки устройства
17
3479.indd 173479.indd 17 11.04.2006 16:36:1511.04.2006 16:36:15
РУССКИЙ
спирт, бензин или другие растворители.
21. ДВЕРЦА КАССЕТНОГО ОТСЕКА
Не разливайте жидкость на устройство
22. СЕТЬ ПЕРЕМЕННОГО ТОКА
и не вставляйте в него посторонние
23. КРЫШКА ОТСЕКА ДЛЯ ЭЛЕМЕНТОВ
предметы. Не разбирайте устройство.
ПИТАНИЯ
Не используйте устройство во влажных
местах и не ставьте на него тяжелые
ПУЛЬТ ДУ
предметы.
Вынимайте диск перед тем, как
перемещать устройство.
При появлении дыма или необычного
запаха из устройства отключите питание,
выньте вилку из розетки и предоставьте
прибор для ремонта специалисту.
Подготовка к использованию
Распакуйте все части и удалите весь
защитный материал.
Вставьте батарейки в пульт
дистанционного управления.
Не подключайте устройство к сети, не
проверив ее напряжение и не выполнив
все остальные соединения.
Не закрывайте вентиляционные
отверстия и оставьте свободное
пространство размером несколько
сантиметров вокруг прибора для
вентиляции.
1. Регулировка громкости
2. ПУЛЬТ ДУ
3. ПЕРЕКЛЮЧЕНИЕ ФУНКЦИЙ
4. КНОПКА CD-BACK
5. КНОПКА PLAY/PAUSE
6. КНОПКА STOP
7. КНОПКА CD-NEXT
8. ПЕРЕКЛЮЧЕНИЕ ДИАПАЗОНОВ ЧАСТОТ
(1) PROGRAM
9. НАУШНИКИ
Программирование и просмотр
10. ВЫДВИЖНАЯ АНТЕННА
запрограммированных номеров треков.
11. КНОПКА НАСТРОЙКИ
12. КНОПКА BASS
(2)-(10)
13. Кнопка POWER
Функции кнопок на пульте ДУ такие же,
14. ИНДИКАТОР FM СТЕРЕОВЕЩАНИЯ
как и функции на самом магнитофоне
15. ЛОТОК ДЛЯ CD-ДИСКА
CD/MP3. Выберите нужный CD-трек с
16. КНОПКА CD DOOR OPEN
помощью кнопки (+10)/(-10).
17. ЖК-ДИСПЛЕЙ
18. Кнопка REPEAT
Установка аккумуляторов
19. Кнопка RANDOM
1. Откройте крышку отсека для элементов
20. КНОПКИ КАССЕТНОЙ ДЕКИ:
- КНОПКА PAUSE
питания.
- КНОПКА STOP/EJECT
2. Вставьте две батарейки ААА (в комплект
- КНОПКА FFWD
поставки не входят), соблюдая
- КНОПКА FREW
полярность (см. схему внутри отсека для
- КНОПКА PLAY
элементов питания).
- КНОПКА RECORD
18
3479.indd 183479.indd 18 11.04.2006 16:36:1511.04.2006 16:36:15

РУССКИЙ
Верхняя и передняя панели
(20) КНОПКИ КАССЕТНОГО МАГНИТОФОНА
(1) VOLUME
- кнопка PAUSE – приостановить запись
- регулировка уровня громкости.
или воспроизведение,
(2) ДАТЧИК ПУЛЬТА ДИСТАНЦИОННОГО
- кнопка STOP/EJECT
– остановить
УПРАВЛЕНИЯ
кассету, открыть отделение для кассеты,
- датчик для приема сигнала с пульта
- кнопка FFWD – перемотка вперед,
дистанционного управления (ДУ).
- кнопка FREW – перемотка назад,
(3) ВЫБОР ФУНКЦИИ
- кнопка PLAY
– начать
- выбор источника звукового сигнала
воспроизведение,
– MP3/CD, кассета или радио, а также
- RECORD – начать запись.
выключение питания.
(21) ОТДЕЛЕНИЕ ДЛЯ КАССЕТЫ
(4) CD-BACK
- вставьте сюда кассету.
CD: переход на предыдущий трек.
(22) СЕТЬ ПЕРЕМЕННОГО ТОКА
(5) Кнопка PLAY/PAUSE
- разъем для сетевого шнура.
- начать или приостановить
(23) ОТСЕК ДЛЯ АККУМУЛЯТОРОВ
воспроизведение MP3/CD.
- открыть отсек для элементов питания.
(6) Кнопка STOP
- остановить воспроизведение; стереть
ИСТОЧНИК ПИТАНИЯ
CD-программу.
Сеть переменного тока
(7) CD-NEXT
1. Проверьте, соответствует ли напряжение
CD: переход на следующий трек.
сети переменного тока напряжению,
(8) ПЕРКЛЮЧАТЕЛЬ ДИАПАЗОНОВ (AM, FM,
указанному на нижней стороне
FMST)
магнитофона. Если напряжения не
- выбор диапазона AM/FM/FM-стерео.
совпадают, обратитесь к продавцу
(9) СТЕРЕОФОНИЧЕСКИЕ НАУШНИКИ
магнитофона или в сервисный центр.
- гнездо 3,5 мм для стереофонических
2. Подключите сетевой шнур к розетке сети
наушников.
переменного тока и к соответствующему
(10) ВЫДВИЖНАЯ АНТЕННА
разъему на магнитофоне. Теперь
- для улучшенного приема
электропитание подключено, магнитофон
FM-радиосигнала.
готов к работе.
(11) РЕГУЛЯТОР НАСТРОЙКИ
3. Чтобы полностью отключить магнитофон,
- выбор радиостанций в диапазоне AM/
выньте сетевой шнур из розетки.
FM/FMST.
• Вынимайте сетевой шнур из розетки,
(12) КНОПКА BASS
чтобы обезопасить магнитофон во время
- усилить воспроизведение низких
грозы.
частот.
(13) Кнопка POWER
Элементы питания
- вкл./выкл. систему.
(в комплект поставки не входят).
(14) ИНДИКАТОР СТЕРЕОВЕЩАНИЯ С
Откройте отсек для элементов питания
ЧАТОТНОЙ МОДУЛЯЦИЕЙ
и вставьте восемь батареек типа R-14,
- показывает режим приема FM-стерео.
UM-2 или C (желательно алкалиновых),
(15) Лоток для диска СD
соблюдая полярность (см. символы “+” и
(16) КНОПКА CD DOOR OPEN
- нажмите эту кнопку, чтобы открыть/
“-” внутри отсека).
закрыть лоток для диска CD.
Элементы питания содержат
(17) ЖК-дисплей:
химические вещества, поэтому,
- показывает частоту AM/FM-
когда придет время, их необходимо
радиостанции,
утилизировать соответствующим
- показывает номер трека.
образом.
(18) Кнопка REPEAT
При неправильном использовании
- повтор трека или программы CD/MP3.
элементов питания может произойти
(19) Кнопка RANDOM
утечка электролита и, в связи с этим,
CD: воспроизведение CD-треков в
коррозия отсека. Поэтому:
произвольном порядке.
- Не используйте элементы питания
19
3479.indd 193479.indd 19 11.04.2006 16:36:1511.04.2006 16:36:15

РУССКИЙ
разных типов: например, солевые вместе
4. По окончании прослушивания
с алкалиновыми. Используйте элементы
переведите переключатель FUNCTION
питания только одного типа.
в положение OFF, чтобы выключить
- Не устанавливайте новые элементы
радиоприемник.
питания вместе со старыми.
- Вынимайте элементы питания из отсека,
ВОСПРОИЗВЕДЕНИЕ КАССЕТЫ
если устройство не будет использоваться
1. Выберите источник звукового сигнала
в течение длительного периода времени.
TAPE.
2. Нажмите кнопку STOP/EJECT, чтобы
ОСНОВНЫЕ ФУНКЦИИ
открыть отделение для кассеты.
РАДИО
3. Вставьте кассету с записью и закройте
Вкл./выкл. питание: экономьте
дверцу отделения для кассеты.
электроэнергию.
4. Нажмите кнопку PLAY, чтобы начать
Всегда выключайте магнитофон, чтобы
воспроизведение.
не тратить лишнюю электроэнергию, вне
5. Нажмите кнопку PAUSE, чтобы
зависимости от того, подключен ли он к
приостановить воспроизведение.
электросети или питается от батареек.
Чтобы вернуться в обычный режим
воспроизведения, еще раз нажмите эту
Общие указания по эксплуатации
кнопку.
1. Выберите источник звукового сигнала с
6. Нажмите кнопку или , чтобы быстро
помощью переключателя MP3/CD/TAPE/
перемотать кассету назад или вперед.
RADIO.
7. Чтобы остановить кассету, нажмите
2. Отрегулируйте уровень громкости с
кнопку STOP/EJECT. Кнопки
помощью регулятора VOLUME.
автоматически отключаются в конце
3. Чтобы включить магнитофон, переведите
кассеты, если не нажата кнопка PAUSE.
переключатель источника звукового
сигнала в положение TAPE/OFF.
ЗАПИСЬ
ОБЩАЯ ИНФОРМАЦИЯ ПО ЗАПИСИ
Чтобы принимать FM-радиосигнал,
- Запись можно осуществлять, если это
выдвиньте антенну. Поднимите ее и
не нарушает авторские или другие права
поверните. Уменьшите длину антенны, если
третьей стороны.
принимаемый сигнал слишком сильный
- Данный магнитофон не подходит для
(если радиопередатчик находится слишком
записи на кассеты типа CHROME (IEC
близко).
II) или METAL (IEC IV). Используйте для
Чтобы принимать АМ-радиосигнал,
записи обычные кассеты типа NORMAL
магнитофон оснащен встроенной антенной,
(IEC I). Язычки на кассетах не должны
поэтому в данном случае выдвижная антенна
быть сломаны.
не нужна. Чтобы повернуть встроенную
- Уровень записи выставляется
антенну, необходимо повернуть сам
автоматически. Изменение уровня
магнитофон.
громкости регулятором VOLUME не
влияет на процесс записи.
Прием радиосигнала
- В самом начале и самом конце кассеты
1. Переведите переключатель FUNCTION в
положение RADIO.
запись производиться не будет в течение
2. Переведите переключатель BAND в
7 секунд, т.к. в этом месте находится
нужное положение - FM STEREO, FM, AM.
технический участок ленты.
3. Поверните ручку TUNING, чтобы
- Чтобы не стереть случайно кассету,
настроиться на нужную радиостанцию.
отломите язычок (он находится на левой
Примечание: если переключатель
стороне кассеты).
BAND установлен в положение FM
Запись на стороне кассеты, левый язычок
stereo, а радиоприемник настроен на
которой отломан, невозможна. Чтобы
стереорадиостанцию в диапазоне FM, то
снова записать на эту стороны кассеты,
на дисплее загорится соответствующий
заклейте место, где был отломан язычок,
индикатор.
клейкой лентой.
20
3479.indd 203479.indd 20 11.04.2006 16:36:1511.04.2006 16:36:15
- 1
- 2


