Vitek VT-3788: инструкция
Раздел: Бытовая, кухонная техника, электроника и оборудование
Тип: Плеер


Характеристики, спецификации
Инструкция к Плееру Vitek VT-3788
Оглавление

Vt-3788.qxd 08.02.2005 10:26 Page 2
ÈÍÑÒÐÓÊÖÈß ÏÎ ÝÊÑÏËÓÀÒÀÖÈÈ
MANUAL INSTRUCTION
ÏÎÐÒÀÒÈÂÍÛÉ VCD/MP3/CD ÀÓÄÈÎ/ÂÈÄÅÎ ÏËÅÅÐ
PORTABLE VCD/MP3/CD AUDIO/VIDEO PLAYER
ÌÎÄÅËÜ VT-3788
Vt-3788.qxd 08.02.2005 10:26 Page 3
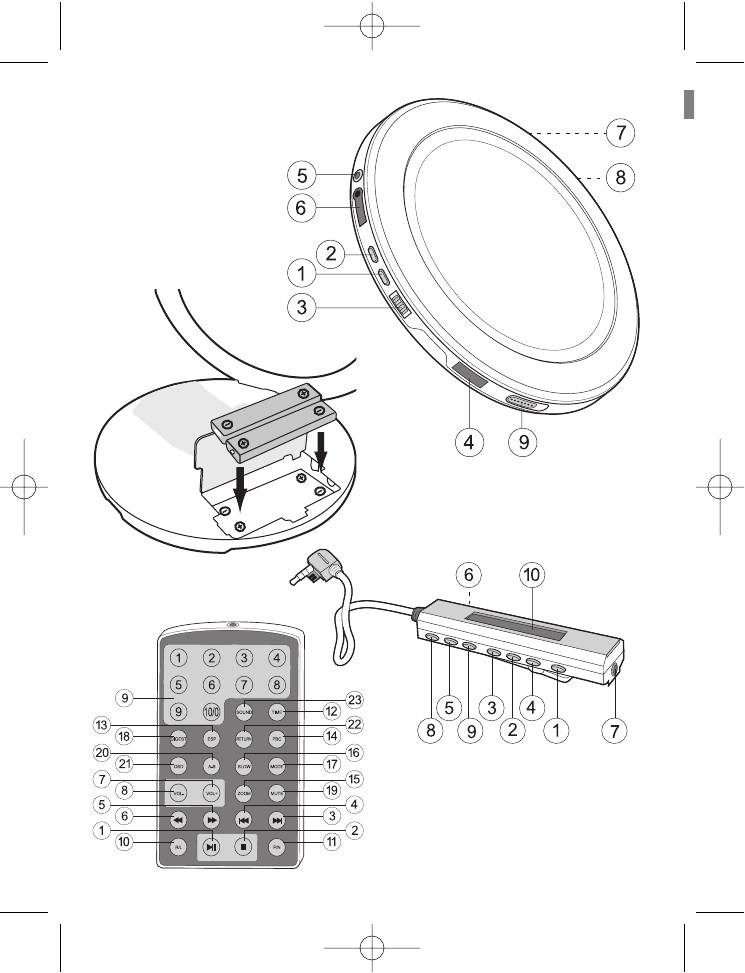
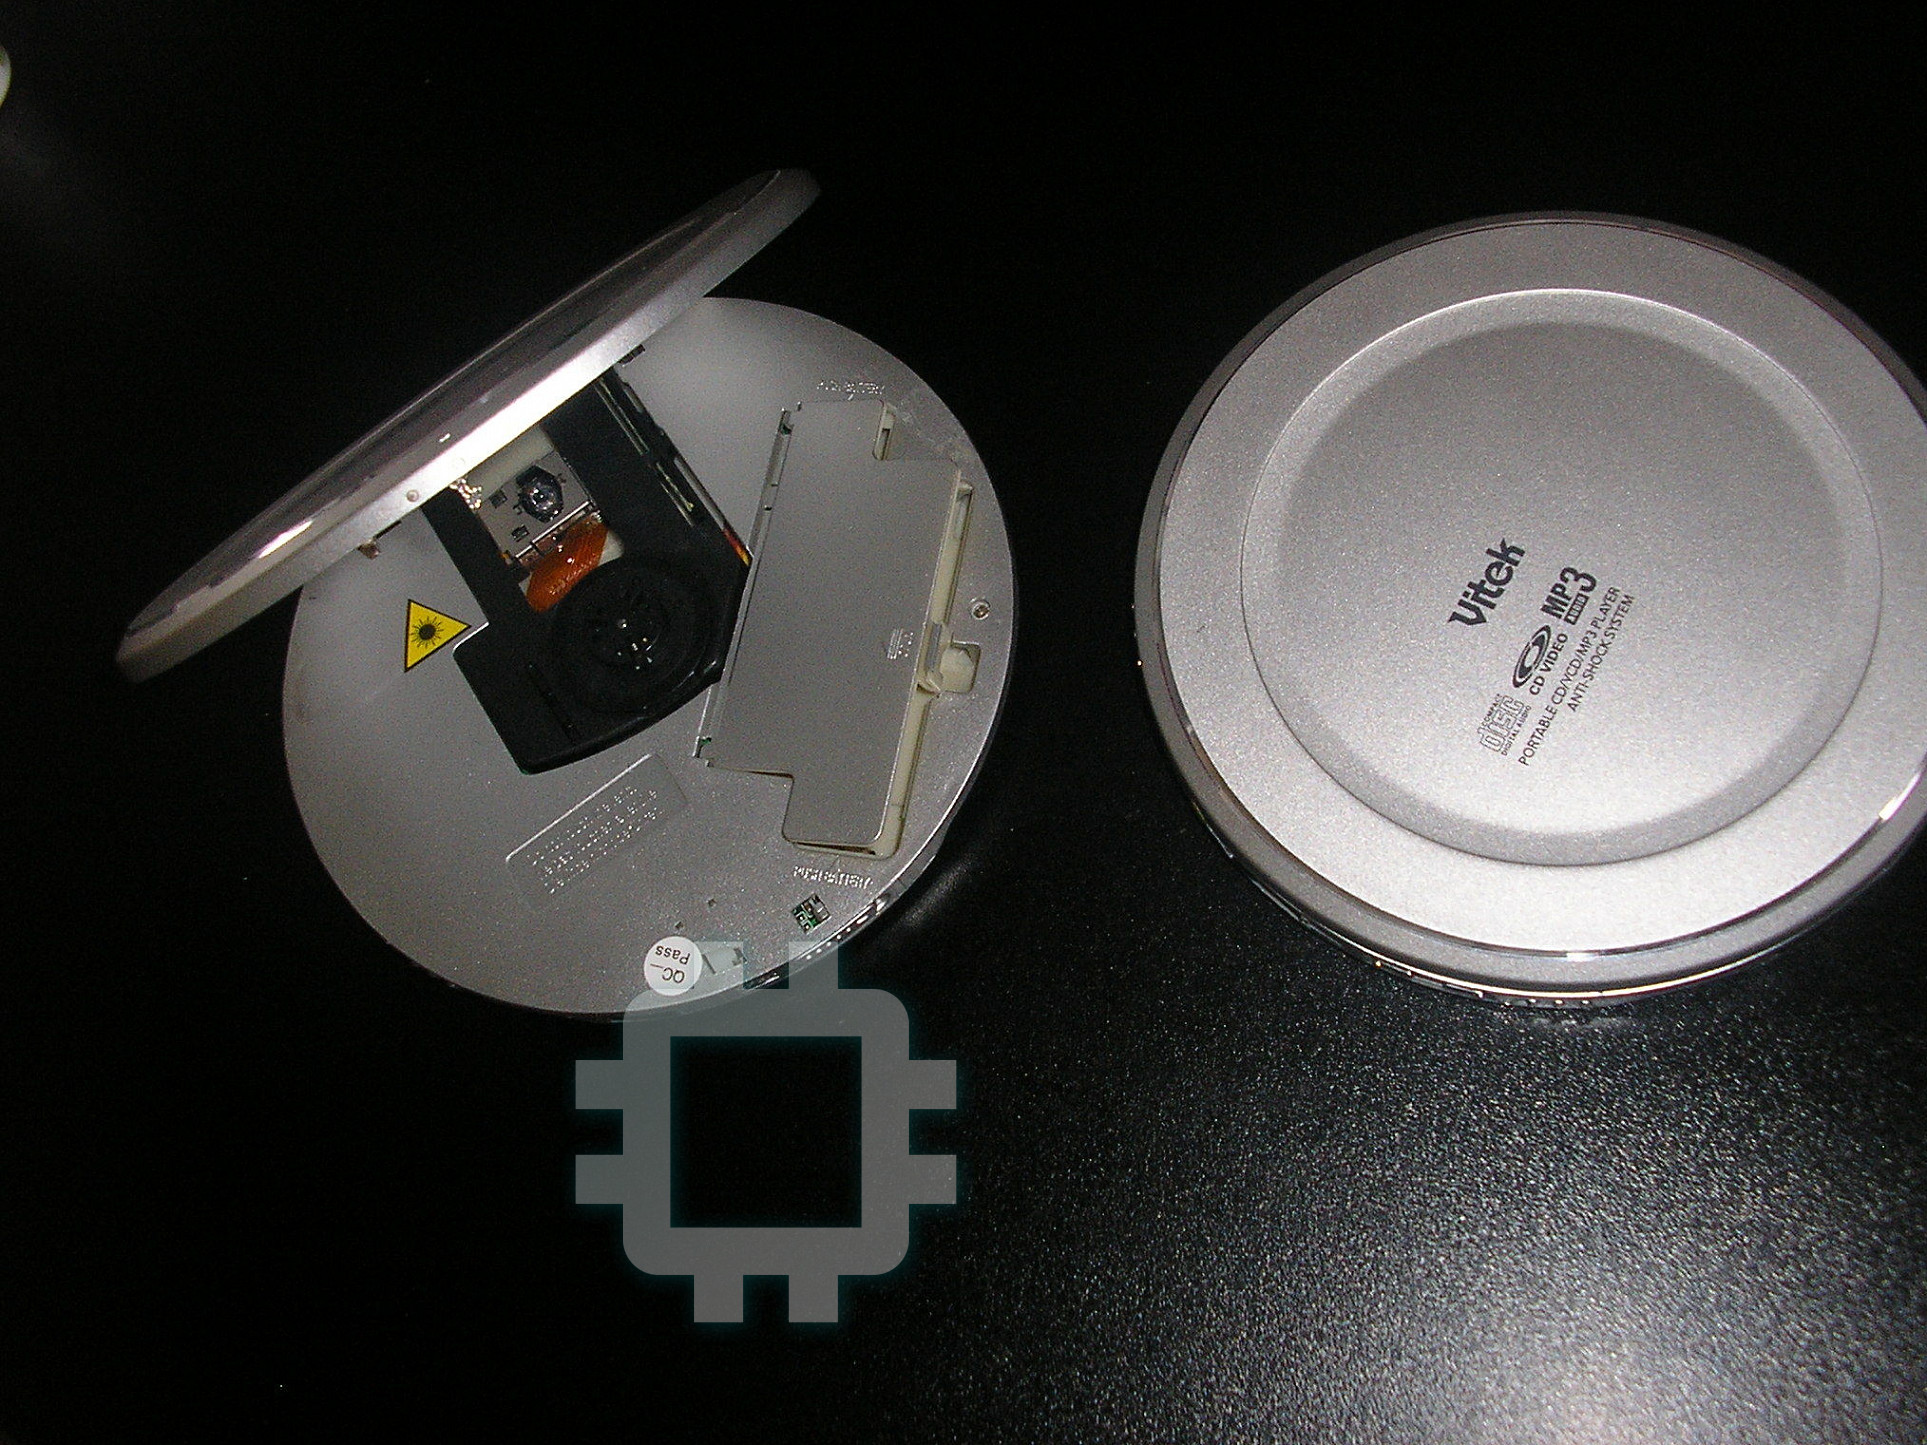
Pic.1
Pic.2
Pic.4
Pic.3
2
Vt-3788.qxd 08.02.2005 10:26 Page 2
ENGLISH
Dear user!
16.Mode switch (P/N)
Please read this manual instruc-
17.Audio channel switch (R/L)
tion carefully before first use.
18.Image zooming control
Make sure that available compo-
19.Slow motion
nents are as listed below:
20.Forward/backward disc search
Audio/video player 1
21.Current playback time indicator
AC adapter 1
22.Low voltage indicator
Wireless remote control 1
23.Automatic shutdown
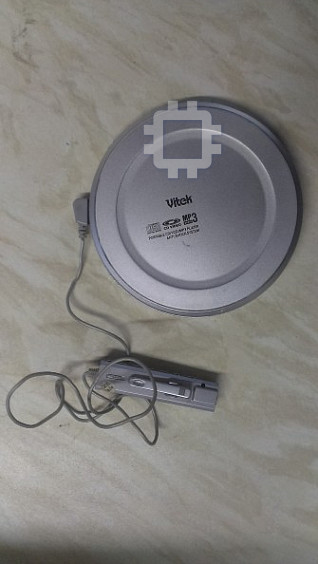
Liquid-crystal display (LCD)
24.Outer battery compartment jack
of the wireless remote control 1
25.Key lock
Headphones 1
26.MUTE
Manual instruction 1
27.Electronic volume control
Rechargeable batteries 2
(32-level)
Audio/video cable 1
28.Sound mode indicator
Outer battery compartment 1
29.Sound mode selection
Note: depending on condition or
FUNCTIONS
contents of a recorded disc, some
(see pic.1 on page 2)
CD-R/MP3 discs may not be played.
1. Types of playable discs
Power consumption in ESP status
CD/VCD/DVCD/MP3/CD-R
will be higher than in normal play-
2. Electronic playback interruption
back mode.
control
3. Correction of reader errors
USING THE FRONT PANEL
4. LCD wire remote control
FUNCTIONAL KEYS
5. Full-function wireless remote
1 On/Play/Pause key ( )
control
2 Stop/Off key ( )
6. Automatic battery recharging
3 Key locking button (HOLD)
7. Disc previewing (9 images)
4 Wireless remote control
8. Repeated disc playback
sensor (IR)
9. Playback menu
5 Video Out jack (OUT)
10.Disc playback resumption
6 LCD wire remote control jack
11.Playback from selected time
(REMOTE)
12.Repeated playback of selected
7 Outer battery compartment
fragment (A-B program)
jack (EXT BATT)
13.Programmed playback
8 DC input jack (DC IN 4.5 V)
14.Demonstration playback
9 Disc compartment door open
15.Random playback
button (OPEN)
3
Vt-3788.qxd 08.02.2005 10:26 Page 3
ENGLISH
USING THE FRONT-PANEL
(REMOTE)
FUNCTIONAL BUTTONS
Insert the LCD wire remote con-
trol supplied.
1. On/Playback/Pause key ( )
7. Outer battery compartment
1) Having connected the adapter,
jack (EXT BATT).
press this button to start play
1) Rechargeable batteries and
back.
outer battery compartment
2) Press this button during play
supply the unit with power and
back to make a pause. Press this
should be recharged separately.
button again to resume playback.
2) When the unit is supplied from
2. Stop/Off key ( )
the outer battery compartment,
1) Press this button during
the supply from rechargeable
playback to stop playback.
batteries will be shut down auto-
2) Press this button in the
matically.
playback-off state to turn the unit
8. DC input jack (DC IN 4.5 V)
off.
Connect the unit to the outer
3. Key locking key (HOLD)
power source using the AC
1) With this function activated
adapter (supplied).
during playback, the unit will be
9. Disc compartment door open
protected against undesirable
button (OPEN)
keystrokes.
Turn the key to the right and open
2) Turn the switch to the left to
the disc compartment to insert or
lock all the functional keys.
remove a disc.
3) Turn the switch to the right to
release a lock and activate all the
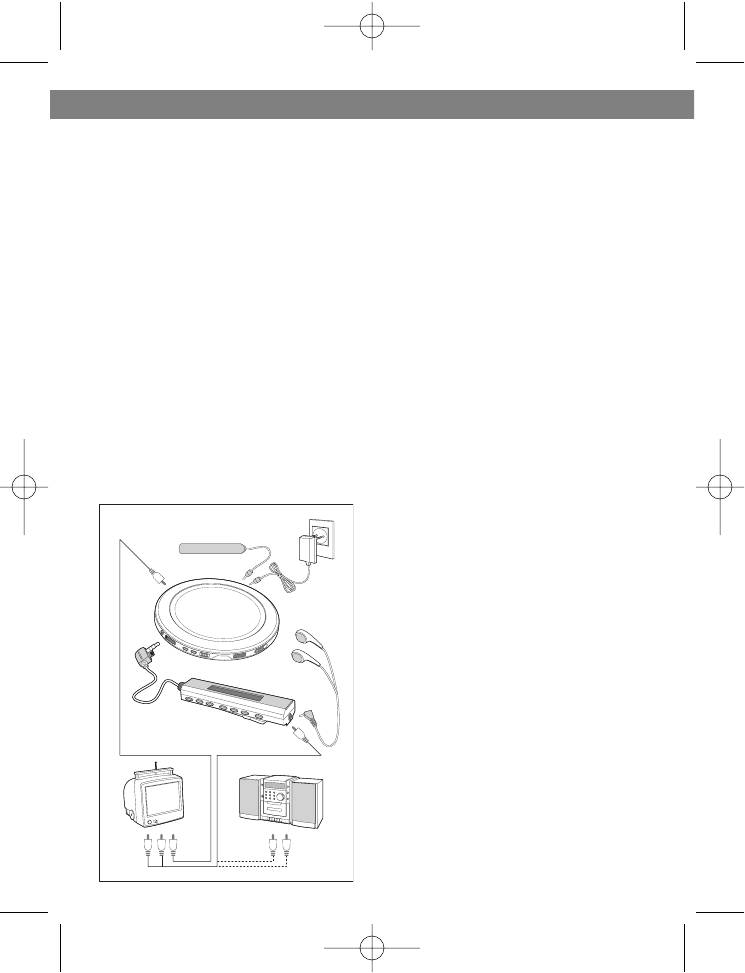
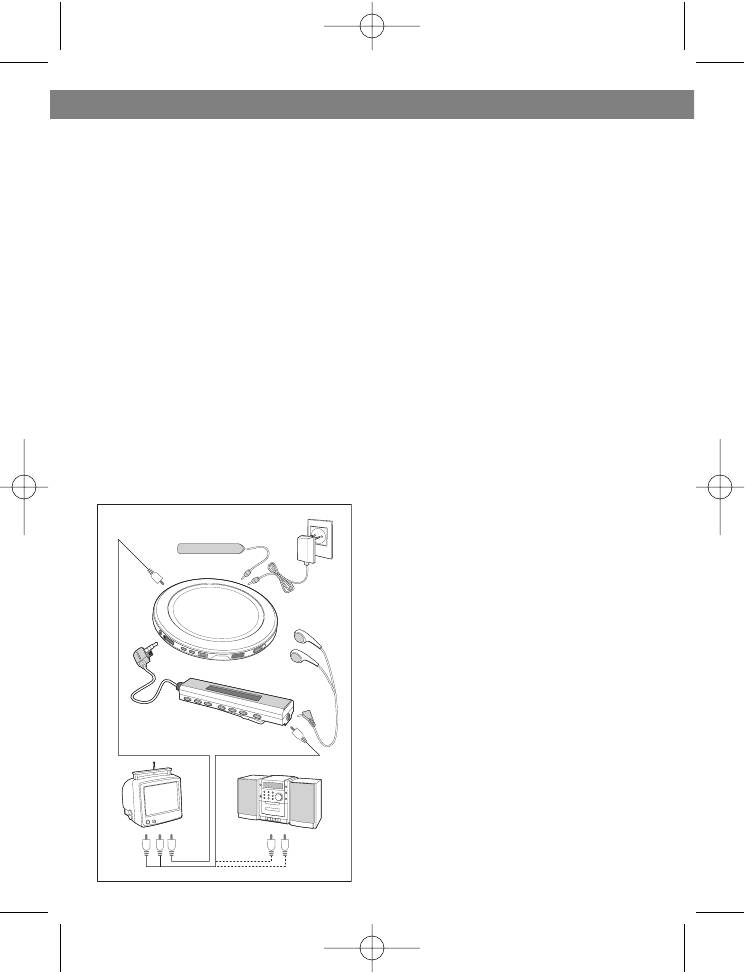
INSTALLATION
functional keys.
AND OPERATION
4) With this function activated,
1. Types of connection:
both wire and wireless remote
1) Connecting the AC adapter:
controls will continue working.
insert the adapter plug into the
4. Wireless remote control
DC input jack (DC IN 4.5V).
infrared sensor (IR)
2) Connecting to the TV set:
Receives signals from the wire-
insert the yellow plug of the video
less remote control.
cable into the Video Out jack
5. Video Out jack (OUT)
(OUT) of the unit, and connect
To be connected with the Video
the other end of the video cable
Out jack on the TV set.
to the Video Out jack
6. LCD wire remote control jack
of the TV set.
4
Vt-3788.qxd 08.02.2005 10:26 Page 4
ENGLISH
3) Connecting the wire remote
jack (EXT BATT).
control: as shown in the figure,
Notes:
insert the double plug of the wire
1) Always turn the unit off before
remote control into the wire
connecting or disconnecting the
remote control jack (REMOTE) of
wire remote control.
the unit, then insert the head-
2) All the plugs should be
phones plug into the headphones
connected to the jacks as shown
jack of the wire remote control.
in figures.
4) Connecting the audio cable:
2.Installation/removal
insert the green plug of the video
of the batteries
cable into the headphones jack of
1) In-system batteries: Open the
the wire remote control. Connect
door of the battery compartment
the other end of the cable to the
and insert two rechargeable
Audio Out jack of the TV set.
batteries (F6L-1.2V), as shown in
5) Connecting the outer battery
the figure. Press the battery on
compartment: insert the plug of
the polarity end "-" to remove.
the outer battery compartment to
2) Outer battery compartment:
the outer battery compartment
Open the door of the outer bat-
tery compartment. Insert two
rechargeable batteries (AA-1.5V)
or (AA-1.2V) into the
compartment, as shown
in the pic.2 on page 2.
3) You may choose one of the
three power sources - mains
supply through the AC adapter,
in-system batteries or outer
battery compartment.
Notes:
1) Improper installation
of batteries may result in damage
to the unit.
2) Please remove the batteries
when the unit is not used for a
long period as battery leaks may
damage the unit.
5
Vt-3788.qxd 08.02.2005 10:26 Page 5

ENGLISH
3. Operating instructions:
9 Numeric keys
1) Open the disc compartment
10Audio channel switch
door by turning the Open switch
11Video system switch
to the right, insert the disk with its
12Playback from selected time
label side up and close the door.
13Playback interruption memory/
Turn the locking key (HOLD) to
ESP function
the right to unlock the functional
14PBC menu
keys of the unit.
15Image zooming
2) Having properly connected the
16Slow playback
unit to the power source, the
17Playback mode switch
audio/video cable and the wire
18Disc previewing (9 images)
remote control, press the PLAY
19Mute function
button on the unit or on the wire
20Playback of selected fragment
remote control.
A-B
3) For the purpose to save
21Information displaying
battery power during playback of
22Return to the menu
CD/MP3 discs, video signal will
23Audio mode
not be transmitted to the TV set.
Note: If the unit does not operate or
NOTES ON THE FUNCTIONAL
the control of the unit is disrupted,
KEYS OF THE WIRELESS
please reset the unit (open the disc
REMOTE CONTROL
compartment door for 3-5 seconds).
1. Play/Pause
FUNCTIONAL KEYS OF THE
Press this key in the playback
WIRELESS REMOTE CONTROL
mode to make a pause/resume
playback.
1 Play/Pause
2. Stop/Off
2 Stop/Off
1)Press this key in the playback
3 Skip to the next program/track
mode to stop playback.
4 Skip to the previous
2)Press this key in the playback
program/track
stop mode to switch the unit off.
5 Fast forward the track /move the
3. Skip to the next program/track
image to the right
1)Press this key during playback
6 Rewind the track/ move the
to skip to the next program/track.
image to the left
2)Press this key in the Zoom-out
7 Volume up
mode to change the zooming
8 Volume down
level.
6
Vt-3788.qxd 08.02.2005 10:26 Page 6

ENGLISH
4. Skip to the previous
9. Numeric keys
program/track
1) Using these keys you may
1) Press this key during playback
select the required track.
to skip to the previous
2) When playing a MP3 disc: if
program/track.
you want to play, say, track No.
2. Press this key in the Zoom-in
103, press keys 1, 0 and 3 on the
mode to change the zooming
wireless remote control, then
level.
press PLAY to start playing the
5. Fast forward the track /move
selected track.
the image to the right
10. Audio channel switch
1) When viewing a VCD disc,
When viewing a VCD disc, press
press this button to select one of
this key to select one of the two
the four speeds of forward
reproducing channels: left chan-
searching for required disc frag-
nel/ right channel/ stereo sound.
ment. Press the PLAY key to
11. Video system switch
resume playback.
When viewing a VCD disc, press
2) Press this key in the Zoom
this key to switch between the
mode to move the image to the
video output systems
right.
(PAL/NTSC).
6. Rewind the track/ move the
12. Playback from selected time
image to the left
When viewing a VCD disc, press
1) When viewing a VCD disc,
this key and enter four digits, for
press this button to select one of
instance, 58:56. Your VCD disc
the four speeds of backward
will be played since the selected
searching for required disc frag-
moment (in this case, after 58
ment. Press the PLAY key to
min. 56 sec. of the total playback
resume playback.
time).
2) Press this key in the Zoom
13.Playback interruption memo-
mode to move the image to the
ry/ ESP function
left.
1) Press the STOP key in the
7. Volume up
playback mode to stop playback.
Press this key to increase the vol-
If you press this key again without
ume.
opening the disc compartment
8. Volume down
door, playback will resume since
Press this key to decrease the
the moment it was stopped.
volume.
2) When reproducing VCD/CD
discs, press this button to acti-
7
Vt-3788.qxd 08.02.2005 10:26 Page 7

ENGLISH
vate ESP function (playback
player repeats the current track;
interruption control). Press this
press this key twice, and the play-
key while playing a MP3 disc to
er repeats all the tracks on the
move to another 10 tracks .
disc; press this key three times,
14. PBS menu
and the unit switches to the
1) When viewing a VCD 2.0 disc,
demonstration mode; press this
press this key to go to the disc
key four times, and the unit
menu . This function is available
switches to the random playback
for VCD 2.0 discs only.
mode; press this key five times,
2) Using numeric keys on the
and the unit returns to the normal
wireless remote control you may
playback mode.
select the required program from
2) Press this key in the stop mode
the menu.
to program the playback of
3) Press this key to leave the
tracks. Select the desired track
playback menu and activate nor-
using one of the skip keys. Press
mal playback mode.
this key again to enter the select-
15. Image zooming
ed track No. to the program
1) When viewing a VCD disc,
memory. Repeat these steps and
press this key to enlarge the
press the PLAY key to start play-
image twice as much. By press-
ing the selected program.
ing this key again you will disable
18. Disc previewing (9 images)
zooming function
When viewing a VCD disc, press
2) Press the Skip to the next pro-
this key to preview the contents
gram/track key or Skip to the pre-
of the whole disc. During such a
vious program/track key in the
preview you may view any of the
zooming mode to move the
disc fragments from the menu.
image vertically or horizontally
19. Mute function
(upwards, downwards, to the left
Press this key during playback to
or to the right).
silence the sound. Press this key
16. Slow playback
again to resume the sound.
When viewing a VCD disc, press
this key. Disc playback will slow
20.Playback of selected frag-
down, and you can select one of
ment A-B
the four speeds of slow playback
When viewing a VCD disc, press
(1/2, 1/4, 1/8 and 1/16).
this key to preset the beginning of
17. Playback mode switch
the required fragment (A), then
1) Press this key once, and the
press it again to preset the end of
8
Vt-3788.qxd 08.02.2005 10:26 Page 8
ENGLISH
the required fragment (B). The A-
Press this key to skip to the previ-
B fragment will be played again.
ous program/track.
By pressing this key three times
4. Stop/Off ( )
you will disable playback of the
Press this key during playback to
selected fragment.
stop playback. Press this key
21. Information displaying
again to turn the unit off.
When viewing a VCD disc, press
5. Playback mode switch
this key to have the disc playback
1) Press this key once, and the
time shown on the LCD and/or
player repeats the current track;
audio indicator.
press this key twice, and the play-
22. Return to the menu
er repeats all the tracks on the
When viewing a VCD disc, press
disc; press this key three times,
this key to return to the disc
and the unit switches to the
menu mode.
demonstration mode; press this
23. Audio mode
key four times, and the unit
Using this key you may select one
switches to the random playback
of the following sound modes:
mode; press this key five times,
Gymnasium/Cinema/Church/Loc
and the unit returns to the normal
ale/Normal
playback mode. In the CD mode,
press and hold this button for a
INSTRUCTIONS AND NOTES
while, and the function of play-
ON THE FUNCTIONAL KEYS
back interruption control acti-
OF THE WIRE REMOTE CON-
vates (ESP).
TROL
2) In the MP3 mode, press and
1. On/Play/Pause ( )
hold this button for a while to skip
1) Connect the unit to the mains,
10 tracks ahead.
then press this key to turn the unit
3) Press this key in the stop mode
on.
to program the playback of
2) Press this key during playback
tracks. Select the desired track
to make a pause. Press this key
using one of the skip keys. Press
again to resume playback.
this key again to enter the select-
2. Skip to the next program/track
ed track No. to the program
( )
memory. Repeat these steps and
Press this key to skip to the next
press the PLAY key to start play-
program/track.
ing the selected program.
3. Skip to the previous
6. Key locking
program/track ( )
Turn the switch to the left to lock
9
Vt-3788.qxd 08.02.2005 10:26 Page 9

ENGLISH
all the functional keys of the wire
age it.
remote control. Turn the switch to
6) Disconnect the adapter from
the right to release a lock and
the mains after use.
activate all the functional keys.
2. Battery power supply
7. Headphones jack
(rechargeable batteries):
Connect the headphones (sup-
1) The unit may be recharged
plied) to this jack.
automatically; to ensure such
8. Volume up
recharge take the following steps:
Press this key to increase the vol-
•Insert the batteries into the unit
ume.
or outer battery compartment
9. Volume down
properly, then connect the AC
Press this key to decrease the
adapter and turn the unit on.
volume.
•To recharge the batteries in the
10. Liquid-crystal display (LCD)
outer battery compartment,
LCD shows current playback time
insert the plug of the outer bat-
and other information.
tery compartment into the corre-
sponding jack on the player (EXT-
MAINS AND BATTERY POWER
BATT). If you are going to
SUPPLY
recharge the in-system batteries,
please DISCONNECT the plug of
1. Mains power supply:
the outer battery compartment.
1) Make sure that the AC adapter
• Remove the disc from the unit,
is compatible to the local mains
then press the PLAY key to turn
voltage.
the unit on. "NO DISC" will
2) Always use only the AC
appear on the LCD of the wire
adapter supplied with the unit.
remote control. Then press the
Never use other adapters meant
PLAY key again, and "HOUR 10"
for different voltage and amper-
will appear on the LCD (10 hours
age - these may cause unit mal-
is the initial recharge time). Press
functioning.
the PLAY for the third time - the
3) Never touch the adapter with
batteries will start recharging and
wet hands - this is dangerous.
the LCD will show the time.
4) Always turn the unit off before
• Full recharge of the supplied
removing the adapter plug from
batteries takes 10 hours.
the jack.
• When the recharge time is off,
5) Never disassemble the AC
the unit will be shut down auto-
adapter yourself - you may dam-
matically.
10
Vt-3788.qxd 08.02.2005 10:26 Page 10
ENGLISH
Note: to ensure complete recharge
UNIT AND DISC
never press the STOP key.
MAINTENANCE
2) Full recharge of 1200 mA/h
batteries takes 10 hours.
1. Unit maintenance
When recharging the batteries of
1) Read this instruction manual
different capacitance, select the
carefully before using the unit for
required recharge time using the
the first time - improper operation
Skip to the previous/next track
may cause malfunctioning or
keys.
damage the player.
3) In the process of recharge the
2) Never touch the laser lens and
unit will be slightly heated - this is
make sure it never touches any
normal.
hard objects.
4) Never attempt to recharge fully
3) Never put heavy objects on the
charged batteries - this will
unit, this may cause damage.
reduce their lifetime.
4) Do not expose the unit to a
5) The symbol flashing on
continuous shaking or blows -
the LCD means that the batteries
this may reduce the service life of
are low and need recharging.
the reading mechanism.
6) Never use the batteries without
5) If there are any sound distor-
insulated housing - this may
tions while reproducing high-
cause short circuit and damage
quality discs, use special discs to
the player.
clean the laser lens.
7) Always use the batteries of the
6) Frequent reproduction of two-
same type and age.
in-one discs may also reduce the
8) Do not forget to remove the
service life of the laser head.
batteries if the unit is supplied
7) Do not use low-quality or
from another power source.
deformed discs - this may cause
9) Never attempt to recharge
damage to the laser lens.
common dry batteries. This may
8) Never try to reproduce dirty
cause explosion and battery leak-
discs.
age.
2. Disc maintenance:
10) Never use low-quality discs
1) Keep the disc clean. Hold it by
or batteries - this may reduce the
the edge and by the internal
service life of the player.
opening.
2) Never stick any paper or adhe-
sive type on the disc surface.
3) Do not expose the disc to
11
Vt-3788.qxd 08.02.2005 10:26 Page 11

ENGLISH
direct sunlight and keep it away
WARNING:
from sources of heat. This may
Manufacturer shall bear no responsi-
cause damage to the disc and
make its further use impossible.
bility in the following cases:
4) Make sure that the disc never
1) The unit is damaged when oper-
comes into contact with hard
ated without regard to recom-
objects. Do not scratch the disc.
mendations set forth in this
5) After reproducing, store the
instruction manual.
disc in its case.
2) The unit malfunctions due to
improper installation or battery
SAFETY PRECAUTIONS:
leakage.
3) The unit is damaged when con-
1) The unit employs a laser mecha-
nected to incompatible AC
nism producing invisible laser
adapter.
radiation. Avoid direct exposure
4) The unit has been disassembled
to beam.
and repaired by the user
2) If the unit malfunctions due to
5) Other mechanical damages to
some objects or liquid that got
the unit
inside, disconnect the unit from
the mains immediately. Never
open the top cover: there are no
user-serviceable parts inside.
Leave all servicing to qualified
personnel.
3) Do not insert any objects into
jacks or openings of the unit.
4) Make sure that the batteries or
AC adapter are removed or dis-
connected when not in use.
5) Do not operate the unit in the
bathroom or other rooms with a
high humidity/temperature.
12
Vt-3788.qxd 08.02.2005 10:26 Page 12
ENGLISH
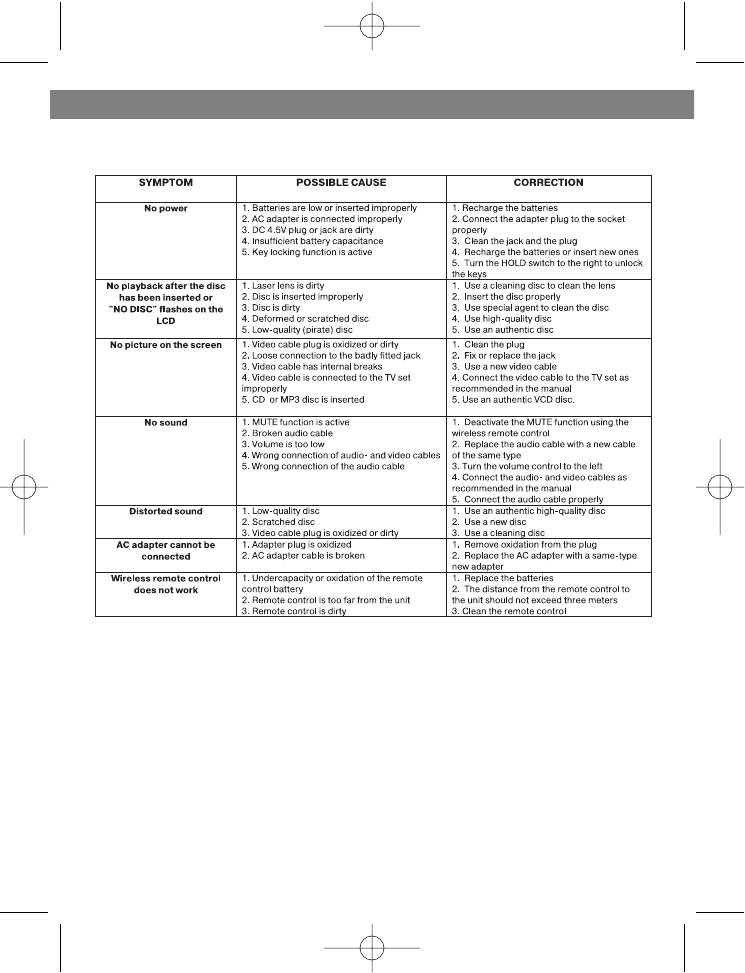
TROUBLESHOOTING
13
Vt-3788.qxd 08.02.2005 10:26 Page 13

ENGLISH
SPECIFICATIONS:
• Frequency range: 20-20000 Hz
• Harmonic distortion: < 0.01%
• Signal-to-noise ratio:>80 dB
• Headphones, output power: 15 mW + 15 mW (32 Ohm)
• Audio channeling: > 70 dB
• Video output level:1VP-P
• Audio output level:0.8 W +/- 0.2 W
• Image resolution: PAL: 352 x 288; NTSC: 352 x 240
• Compatible versions of VCD discs: 1.0 1.1 2.0
• Image definition: > 255
• Compatible disc formats: CD / CD-R / CD-RW / MP3 / VCD / DVCD
• Network AC adapter: AC 230 V ±10%, ~50 Hz (input), DC 4.5V 800 mA
(output)
• Rechargeable batteries: F6L.NI-MH 1.2V x 2
Outer compartment batteries: R06: AA-1.5V x 2 or AA-1.2 V x 2
(rechargeable).
• Power requirement: < 2 W
• Active period of ESP function: CD -120 sec/MP3 - 480 sec/VCD - 60 sec
• Operating temperature: 5°C to 40°C
• Operating humidity: 10% to 90% (freezing prohibited)
• Storage temperature: 10°C to 25°C
• Dimensions: 135 mm (W); 15.5 mm (D)
• Weight: approx. 158 g (without batteries)
DUE TO THE PROCESS OF COSTANT PRODUCT PERFECTION, THE MANU-
FACTURER RESERVES THE RIGHT TO MAKE CHANGES
TO THE TECHNICAL CHARACTERISTICS OF THIS PRODUCT WITH PRIOR
NOTICE TO THE CONSUMER.
SERVICE LIFE - NO LESS THAN 5 YEARS
14
Vt-3788.qxd 08.02.2005 10:26 Page 14

ÐÓÑÑÊÈÉ
Óâàæàåìûé ïîëüçîâàòåëü!
àêêóìóëÿòîðîâ
Ïîæàëóéñòà, âíèìàòåëüíî
7. Ôóíêöèÿ ïðåäâàðèòåëüíîãî
ïðî÷èòàéòå äàííóþ èíñòðóêöèþ
ïðîñìîòðà ñîäåðæèìîãî äèñêà
ïåðåä èñïîëüçîâàíèåì ïëååðà.
(9 ôðàãìåíòîâ)
Ïðîâåðüòå íàëè÷èå âñåõ
8. Ïîâòîð âîñïðîèçâåäåíèÿ äèñêà
êîìïëåêòóþùèõ â ñîîòâåòñòâèè
9. Ìåíþ âîñïðîèçâåäåíèÿ
ñ íèæåïðèâåäåííûì ïåðå÷íåì:
10.Âîçîáíîâëåíèå
âîñïðîèçâåäåíèÿ äèñêà
Àóäèî/âèäåî ïëååð 1
11.Âîñïðîèçâåäåíèå ïî
Àäàïòåð ÀÑ 1
óñòàíîâëåííîìó âðåìåíè
Áåñïðîâîäíîé ïóëüò
12.Ïîâòîðíîå âîñïðîèçâåäåíèå
äèñòàíöèîííîãî óïðàâëåíèÿ 1
âûáðàííîãî ôðàãìåíòà
Ïðîâîäíîé ïóëüò äèñòàíöèîííîãî
(ïðîãðàììà À-Â)
óïðàâëåíèÿ ñ ÆÊ-äèñïëååì 1
13.Ïðîãðàìíîå âîñïðîèçâåäåíèå
Íàóøíèêè 1
14.Îçíàêîìèòåëüíîå
Èíñòðóêöèÿ ïî ýêñïëóàòàöèè 1
âîñïðîèçâåäåíèå
Àêêóìóëÿòîðíûå áàòàðåè 2
15.Âîñïðîèçâåäåíèå â
Àóäèî/Âèäåî êàáåëü 1
ïðîèçâîëüíîì ïîðÿäêå
Âíåøíèé áàòàðåéíûé îòñåê 1
16.Âûáîð âèäåîðåæèìîâ
PAL/NTSC
ÔÓÍÊÖÈÈ
17.Âûáîð àóäèîêàíàëà
(ëåâûé/ïðàâûé)
1. Ïîääåðæêà äèñêîâ ôîðìàòà
18.Âûáîð ìàñøòàáà èçîáðàæåíèÿ
CD/VCD/DVCD/MP3/CD-R
19.Ôóíêöèÿ çàìåäëåííîãî
2. Ýëåêòðîííàÿ ôóíêöèÿ çàùèòû
âîñïðîèçâåäåíèÿ
îò ïðåðûâàíèÿ
20.Ôóíêöèÿ ïîèñêà ïî äèñêó
âîñïðîèçâåäåíèÿ (ESP)
âïåðåä/íàçàä
3. Êîððåêöèÿ îøèáîê ïðè
21.Èíäèêàòîð òåêóùåãî âðåìåíè
ñ÷èòûâàíèè
âîñïðîèçâåäåíèÿ
4. Ïðîâîäíîé ïóëüò
22.Èíäèêàòîð íèçêîãî íàïðÿæåíèÿ
äèñòàíöèîííîãî óïðàâëåíèÿ ñ
23.Àâòîìàòè÷åñêîå îòêëþ÷åíèå
æèäêîêðèñòàëëè÷åñêèì
ïèòàíèÿ
äèñïëååì
24.Ðàçúåì äëÿ ïîäêëþ÷åíèÿ
5. Ïîëíîôóíêöèîíàëüíûé
âíåøíåãî áàòàðåéíîãî îòñåêà
áåñïðîâîäíîé ïóëüò
25.Ôóíêöèÿ áëîêèðîâêè êëàâèø
äèñòàíöèîííîãî óïðàâëåíèÿ
26.Ôóíêöèÿ îòêëþ÷åíèÿ çâóêà
6. Àâòîìàòè÷åñêàÿ ïåðåçàðÿäêà
MUTE
15
Vt-3788.qxd 08.02.2005 10:26 Page 15
ÐÓÑÑÊÈÉ
27.Ýëåêòðîííûé ðåãóëÿòîð
8 Ðàçúåì äëÿ ïîäêëþ÷åíèÿ ê
ãðîìêîñòè (32-óðîâíÿ)
èñòî÷íèêó ïèòàíèÿ (DC IN 4.5Â)
28.Èíäèêàòîð ðåæèìà çâó÷àíèÿ
9 Êíîïêà îòêðûòèÿ äâåðöû
29.Âûáîð ðåæèìà çâó÷àíèÿ
îòñåêà äëÿ äèñêîâ (OPEN)
Ïðèìå÷àíèå: â çàâèñèìîñòè îò
ñîñòîÿíèÿ çàïèñàííîãî äèñêà
ÏÎßÑÍÅÍÈß ÏÎ
èëè åãî ñîäåðæàíèÿ íåêîòîðûå
ÈÑÏÎËÜÇÎÂÀÍÈÞ
äèñêè â ôîðìàòå CD-R/MP3
ÔÓÍÊÖÈÎÍÀËÜÍÛÕ ÊÍÎÏÎÊ
ìîãóò íå âîñïðîèçâîäèòüñÿ.
ÏÅÐÅÄÍÅÉ ÏÀÍÅËÈ
 ðåæèìå ESP ïðîèñõîäèò
áîëåå èíòåíñèâíîå
1. Êíîïêà Âêëþ÷åíèå/
ïîòðåáëåíèå ïèòàíèÿ, ÷åì â
Âîñïðîèçâåäåíèå/Ïàóçà ( )
ðåæèìå íîðìàëüíîãî
1) Ïîñëå ïîäñîåäèíåíèÿ àäàïòåðà
âîñïðîèçâåäåíèÿ.
íàæìèòå ýòó êíîïêó, ÷òîáû
íà÷àòü âîñïðîèçâåäåíèå.
ÔÓÍÊÖÈÎÍÀËÜÍÛÅ ÊÍÎÏÊÈ
2) Âî âðåìÿ ïðîèãðûâàíèÿ
ÏÅÐÅÄÍÅÉ ÏÀÍÅËÈ
íàæìèòå ýòó êíîïêó, ÷òîáû
(ñì. ðèñ.1 íà ñòð. 2)
ïðèîñòàíîâèòü
1 Êíîïêà Âêëþ÷åíèå/
âîñïðîèçâåäåíèå. Äëÿ
Âîñïðîèçâåäåíèå/Ïàóçà ( )
âîçîáíîâëåíèÿ
2 Êíîïêà Îñòàíîâêà
âîñïðîèçâåäåíèÿ ñíîâà
âîñïðîèçâåäåíèÿ/Îòêëþ÷åíèå
íàæìèòå ýòó êíîïêó.
( )
2. Êíîïêà Îñòàíîâêà
3 Êíîïêà áëîêèðîâêè (HOLD)
âîñïðîèçâåäåíèÿ
4 Äàò÷èê ïðèåìà ñèãíàëà
/Îòêëþ÷åíèå ( )
áåñïðîâîäíîãî ïóëüòà
1) Âî âðåìÿ ïðîèãðûâàíèÿ
äèñòàíöèîííîãî óïðàâëåíèÿ
íàæìèòå ýòó êíîïêó äëÿ
(IR)
îñòàíîâêè âîñïðîèçâåäåíèÿ.
5 Ãíåçäî âèäåîâûõîäà (OUT)
2)  ðåæèìå îòêëþ÷åííîãî
6 Ãíåçäî äëÿ ïîäêëþ÷åíèÿ
âîñïðîèçâåäåíèÿ íàæìèòå ýòó
ïðîâîäíîãî ïóëüòà
êíîïêó, ÷òîáû âûêëþ÷èòü
äèñòàíöèîííîãî óïðàâëåíèÿ ñ
ñèñòåìó.
æèäêîêðèñòàëëè÷åñêèì
3. Ôóíêöèÿ áëîêèðîâêè êíîïîê
äèñïëååì (REMOTE)
(HOLD)
7 Ðàçúåì äëÿ ïîäêëþ÷åíèÿ
1) Ïðè àêòèâàöèè ýòîé ôóíêöèè âî
âíåøíåãî äîïîëíèòåëüíîãî
âðåìÿ âîñïðîèçâåäåíèÿ
îòñåêà äëÿ áàòàðåé (EXT BATT)
ñèñòåìà áóäåò çàùèùåíà îò
16
Vt-3788.qxd 08.02.2005 10:26 Page 16

ÐÓÑÑÊÈÉ
ñëó÷àéíîãî íàæàòèÿ êíîïîê.
ñèñòåìó è çàðÿæàþòñÿ
2) Ïåðåìåùåíèå ïåðåêëþ÷àòåëÿ
îòäåëüíî.
âëåâî ïðèâîäèò ê áëîêèðîâêå
2) Ïðè ïèòàíèè îò âíåøíåãî
âñåõ ôóíêöèîíàëüíûõ êëàâèø.
áàòàðåéíîãî îòñåêà, ïèòàíèå îò
3) ×òîáû ñíÿòü áëîêèðîâêó è
àêêóìóëÿòîðîâ àâòîìàòè÷åñêè
àêòèâèðîâàòü âñå
îòêëþ÷àåòñÿ.
ôóíêöèîíàëüíûå êíîïêè,
8. Ðàçúåì äëÿ ïîäêëþ÷åíèÿ ê
ïåðåìåñòèòå ïåðåêëþ÷àòåëü
èñòî÷íèêó ïèòàíèÿ
âïðàâî.
(DC IN 4.5 Â)
4) Ïðè àêòèâàöèè ýòîé ôóíêöèè
Ïîäêëþ÷èòå ñèñòåìó ê
ïðîâîäíîé è áåñïðîâîäíîé
âíåøíåìó èñòî÷íèêó ïèòàíèÿ -
ïóëüòû äèñòàíöèîííîãî
AC àäàïòåðó (âõîäèò â
óïðàâëåíèÿ ïðîäîëæàþò
êîìïëåêò).
ôóíêöèîíèðîâàòü.
9. Êíîïêà îòêðûòèÿ äâåðöû
4. Èíôðàêðàñíûé äàò÷èê
îòñåêà äëÿ äèñêîâ (OPEN)
áåñïðîâîäíîãî ïóëüòà
Ïåðåìåñòèòå êíîïêó âïðàâî,
äèñòàíöèîííîãî óïðàâëåíèÿ
îòêðîéòå îòñåê äëÿ äèñêîâ,
(IR)
÷òîáû çàãðóçèòü èëè èçâëå÷ü
Ïðèíèìàåò ñèãíàëû îò
äèñê.
áåñïðîâîäíîãî ïóëüòà
äèñòàíöèîííîãî óïðàâëåíèÿ.
ÈÍÑÒÐÓÊÖÈß ÏÎ
5. Ðàçúåì âèäåîâûõîäà (OUT)
ÏÎÄÊËÞ×ÅÍÈÞ È
Ïîäêëþ÷àåòñÿ ê ðàçúåìó
ÝÊÑÏËÓÀÒÀÖÈÈ
âèäåîâõîäà òåëåâèçîðà
1. Ñïîñîáû ïîäêëþ÷åíèÿ:
6. Ðàçúåì äëÿ ïîäêëþ÷åíèÿ
1) Ïîäêëþ÷åíèå AC àäàïòåðà:
ïðîâîäíîãî ïóëüòà
âñòàâüòå øòåêåð àäàïòåðà â
äèñòàíöèîííîãî óïðàâëåíèÿ
ðàçúåì äëÿ ïîäêëþ÷åíèÿ ê
(REMOTE)
èñòî÷íèêó ïèòàíèÿ (DC IN 4.5Â).
Ïîäêëþ÷èòå ê íåìó ïðîâîäíîé
2) Ïîäêëþ÷åíèå ê òåëåâèçîðó:
ïóëüò äèñòàíöèîííîãî
âñòàâüòå æåëòûé øòåêåð
óïðàâëåíèÿ, êîòîðûé âõîäèò â
âèäåîêàáåëÿ â ãíåçäî âûõîäà
êîìïëåêò.
ñèñòåìû (OUT), à äðóãîé êîíåö
7. Ðàçúåì äëÿ ïîäêëþ÷åíèÿ
âèäåîêàáåëÿ â ðàçúåì
âíåøíåãî áàòàðåéíîãî
âèäåîâõîäà òåëåâèçîðà.
îòñåêà (EXT BATT).
3) Ïîäêëþ÷åíèå ïðîâîäíîãî
1) Àêêóìóëÿòîðû è âíåøíèé
ïóëüòà äèñòàíöèîííîãî
áàòàðåéíûé îòñåê ïèòàþò
óïðàâëåíèÿ: êàê ïîêàçàíî íà
17
Vt-3788.qxd 08.02.2005 10:26 Page 17
ÐÓÑÑÊÈÉ
ðèñóíêå, âñòàâüòå äâîéíîé
øòåêåð âíåøíåãî îòñåêà äëÿ
øòåêåð ïðîâîäíîãî ïóëüòà â
áàòàðåé â ðàçúåì äëÿ
ðàçúåì äëÿ ïðîâîäíîãî ïóëüòà
ïîäêëþ÷åíèÿ âíåøíåãî
äèñòàíöèîííîãî óïðàâëåíèÿ
áàòàðåéíîãî îòñåêà ñèñòåìû
ñèñòåìû (REMOTE), âñòàâüòå
(EXT BATT).
øòåêåð íàóøíèêîâ â ðàçúåì
äëÿ íàóøíèêîâ ïðîâîäíîãî
Ïðèìå÷àíèÿ:
ïóëüòà.
1) Ïåðåä ïîäêëþ÷åíèåì èëè
4) Ïîäêëþ÷åíèå àóäèî-êàáåëÿ:
îòêëþ÷åíèåì ïðîâîäíîãî
âñòàâüòå çåëåíûé øòåêåð
ïóëüòà äèñòàíöèîííîãî
àóäèî-êàáåëÿ â ðàçúåì
óïðàâëåíèÿ âûêëþ÷èòå ïèòàíèå
íàóøíèêîâ ïðîâîäíîãî ïóëüòà
ñèñòåìû.
äèñòàíöèîííîãî óïðàâëåíèÿ.
2) Âñå øòåêåðû äîëæíû áûòü
Äðóãîé êîíåö êàáåëÿ âñòàâüòå â
ïîäêëþ÷åíû ê ãíåçäàì òàê, êàê
ðàçúåì àóäèî âõîäà
ïîêàçàíî íà ðèñóíêàõ.
òåëåâèçîðà.
5) Ïîäêëþ÷åíèå âíåøíåãî
2. Óñòàíîâêà/îòêëþ÷åíèå
áàòàðåéíîãî îòñåêà: âñòàâüòå
áàòàðåé
1) Óñòàíîâêà àêêóìóëÿòîðîâ:
Îòêðîéòå êðûøêó îòñåêà äëÿ
àêêóìóëÿòîðîâ è óñòàíîâèòå
äâå àêêóìóëÿòîðíûå áàòàðåè
(F6L-1.2 Â),ñîáëþäàÿ
ïîëÿðíîñòü, êàê ïîêàçàíî íà
ðèñóíêå 2 ñòð.2. ×òîáû èçâëå÷ü
àêêóìóëÿòîð èç îòñåêà íàæìèòå
íà íåãî ñî ñòîðîíû ïîëÿðíîñòè
"-".
2) Âíåøíèé áàòàðåéíûé îòñåê:
Îòêðîéòå êðûøêó âíåøíåãî
áàòàðåéíîãî îòñåêà. Âñòàâüòå
äâå áàòàðåéêè (AA-1.5 Â) èëè
äâà àêêóìóëÿòîðà (AA-1.2Â) â
îòñåê òàê, êàê ïîêàçàíî íà
ðèñóíêå.
3) Ìîæíî âûáðàòü ðàçëè÷íûå
èñòî÷íèêè ïèòàíèÿ - ïèòàíèå îò
18
Vt-3788.qxd 08.02.2005 10:26 Page 18
ÐÓÑÑÊÈÉ
ýëåêòðîñåòè ïîñðåäñòâîì AC
3) Â öåëÿõ ýêîíîìèè ýíåðãèè
àäàïòåðà, îò àêêóìóëÿòîðîâ â
áàòàðåé âî âðåìÿ
ñèñòåìå èëè âíåøíåãî
âîñïðîèçâåäåíèÿ äèñêîâ â
áàòàðåéíîãî îòñåêà.
ôîðìàòàõ CD/MP3 ïåðåäà÷à
âèäåîñèãíàëà íà òåëåâèçîð íå
ÂÍÈÌÀÍÈÅ!
îñóùåñòâëÿåòñÿ.
• Íåïðàâèëüíàÿ óñòàíîâêà
Ïðèìå÷àíèå: Åñëè ñèñòåìà íå
áàòàðåé ìîæåò ïðèâåñòè ê
ôóíêöèîíèðóåò èëè íàðóøåíî
ïîâðåæäåíèþ ñèñòåìû.
åå óïðàâëåíèå, ïîæàëóéñòà,
• Ïîæàëóéñòà, âûíèìàéòå
ïåðåçàãðóçèòå åå (îòêðîéòå
áàòàðåè, åñëè âû íå
êðûøêó îòñåêà äèñêîâ íà 3-5
èñïîëüçóåòå èõ, òàê êàê
ñåêóíä).
"ïðîòå÷êà" áàòàðåé ìîæåò
ïðèâåñòè ê ïîâðåæäåíèþ
ñèñòåìû.
3. Èíñòðóêöèè ïî
ýêñïëóàòàöèè:
1) Îòêðîéòå êðûøêó îòñåêà äëÿ
äèñêîâ, ïåðåìåñòèâ
ïåðåêëþ÷àòåëü Open âïðàâî,
âñòàâüòå äèñê ýòèêåòêîé ââåðõ
è çàêðîéòå êðûøêó.
ïåðåìåñòèòå âïðàâî
ïåðåêëþ÷àòåëü áëîêèðîâêè
HOLD, ÷òîáû ðàçáëîêèðîâàòü
ôóíêöèîíàëüíûå êíîïêè
ñèñòåìû.
2) Ïîñëå ïðàâèëüíîãî
ïîäêëþ÷åíèÿ èñòî÷íèêà
ïèòàíèÿ, àóäèî/âèäåî-êàáåëÿ,
ïðîâîäíîãî ïóëüòà
äèñòàíöèîííîãî óïðàâëåíèÿ
íàæìèòå êíîïêó PLAY ( ) íà
ñèñòåìå èëè íà ïðîâîäíîì
ïóëüòå äèñòàíöèîííîãî
óïðàâëåíèÿ.
19
Vt-3788.qxd 08.02.2005 10:26 Page 19
- 1
- 2


