Vitek VT-3790: инструкция
Раздел: Мобильные, портативные устройства и аксессуары
Тип: Дискмен С Mp3
Характеристики, спецификации
Инструкция к Дискмену С Mp3 Vitek VT-3790
Оглавление
- ФУНКЦИИ И УПРАВЛЕНИЕ Питание от аккумуляторных батарей ПИТАНИЕ
- ПОДКЛЮЧЕНИЕ НАУШНИКИ ВОСПРОИЗВЕДЕНИЕ CD/MP3
- ПОИСК ТРЕКА ИЛИ ПОИСК ПО МУЗЫКАЛЬНОМУ ФРАГМЕНТУ (CD) ПОИСК ТРЕКА (MP3) РЕЖИМ ПОВТОРНОГО ВОСПРОИЗВЕДЕНИЯ
- ВОСПРОИЗВЕДЕНИЕ В СЛУЧАЙНОМ ПОРЯДКЕ ВОСПРОИЗВЕДЕНИЕ В РЕЖИМЕ ОЗНАКОМЛЕНИЯ ПРОГРАММИРОВАНИЕ ВОСПРОИЗВЕДЕНИЯ
- ПОИСК ТРЕКА ПО НАЗВАНИЮ (MP3)
- ОСОБЫЕ ФУНКЦИИ
- Разъем USB ОБСЛУЖИВАНИЕ Чистка устройства Блокировка кнопок управления (HOLD) Уход за компактдисками Разъем для карт памяти SD/MMC
- ТЕХНИЧЕСКИЕ ХАРАКТЕРИСТИКИ
PORTABLE CD/MP3 PLAYER
WITH USB/MMC SLOT
MODEL VT3790 BK
INSTRUCTION MANUAL
4
11
19
27
www.vitekaus.com
3790.qxd 15.08.05 17:15 Page 1
3790.qxd 15.08.05 17:15 Page 2
3790.qxd 15.08.05 17:15 Page 3

ENGLISH
PORTABLE CD/MP3 PLAYER
adapter operating voltage corresponds
WITH USB/MMC SLOT
to the voltage of the local power network.
• When there is no power in your supply
Before using the device, please, read these
network, disconnect the power adapter
instructions attentively.
from the outlet.
• Don't touch the adapter with wet hands.
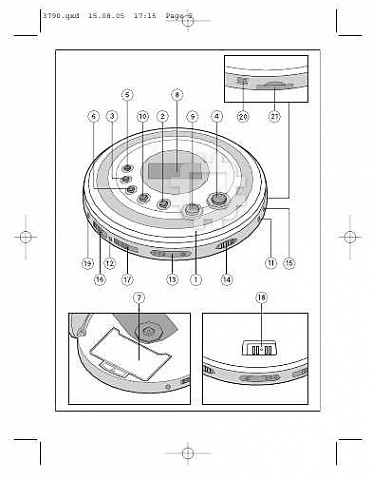
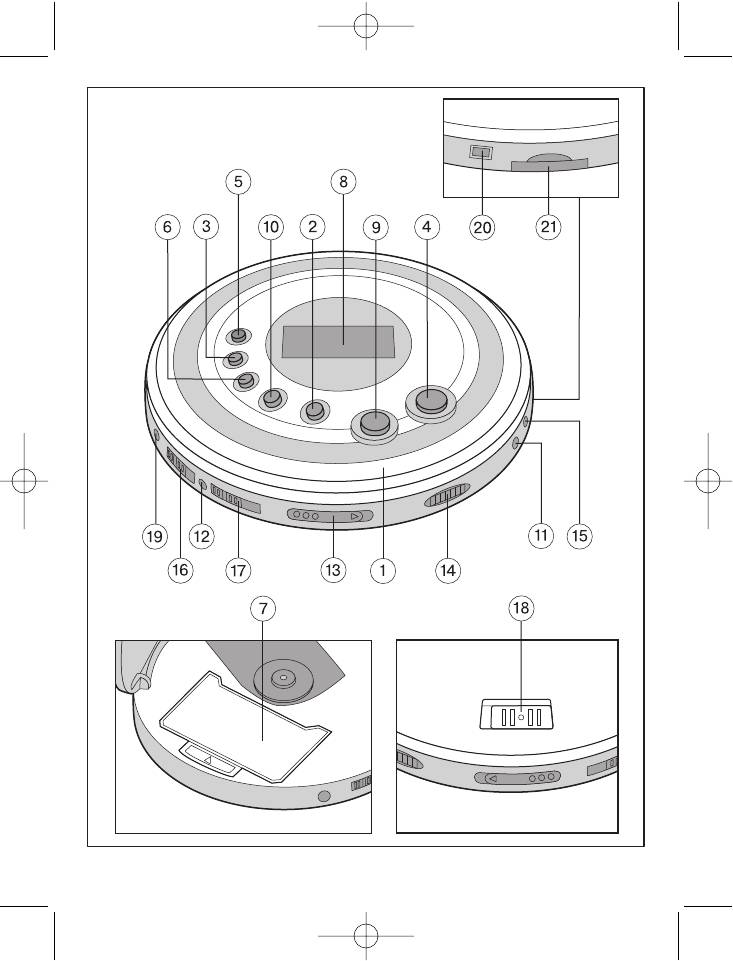
FUNCTIONS AND CONTROL
1. CD compartment door
Power supply from batteries
2. NEXT/SEARCH FORWARD button
1. Disconnect the power adapter both from
3. PLAY MODE button
the AC outlet and the player.
4. PLAY/PAUSE button
2. Open the battery compartment.
5. ASP/DIR/NEXT button
3. Insert two Ni?MH batteries (1.2V
6. PROGRAM button
1200mA/h) (supplied with the device),
7. Accumulator batteries compartment
observing their polarity.
8. LED Display
4. Close the battery compartment door.
9. STOP/FUNCTION button (power off)
5. Set the battery charge switch to the ON
10. PREVIOUS/SEARCH BACKWARD button
position to start charging, the red
11. Headphones jack
CHARGE indicator will light up.
12. Battery charge indicator
13. CD door open button
ATTENTION: to prevent damaging the
14. Volume control
device and batteries, the duration of one
15. Linear output jack
charging cycle should not exceed 12 hours.
16. Battery charge switch
17. Bass boost switch
CAUTION:
18. Control buttons locking switch
• Do not use (Ni?MH) and usual (for exam?
19. Power adapter jack
ple, zinc?carbon) batteries simultane?
20. USB jack
ously.
21. SD/MMC memory cards jack
• Do not charge the batteries for more than
12 hours.
POWER
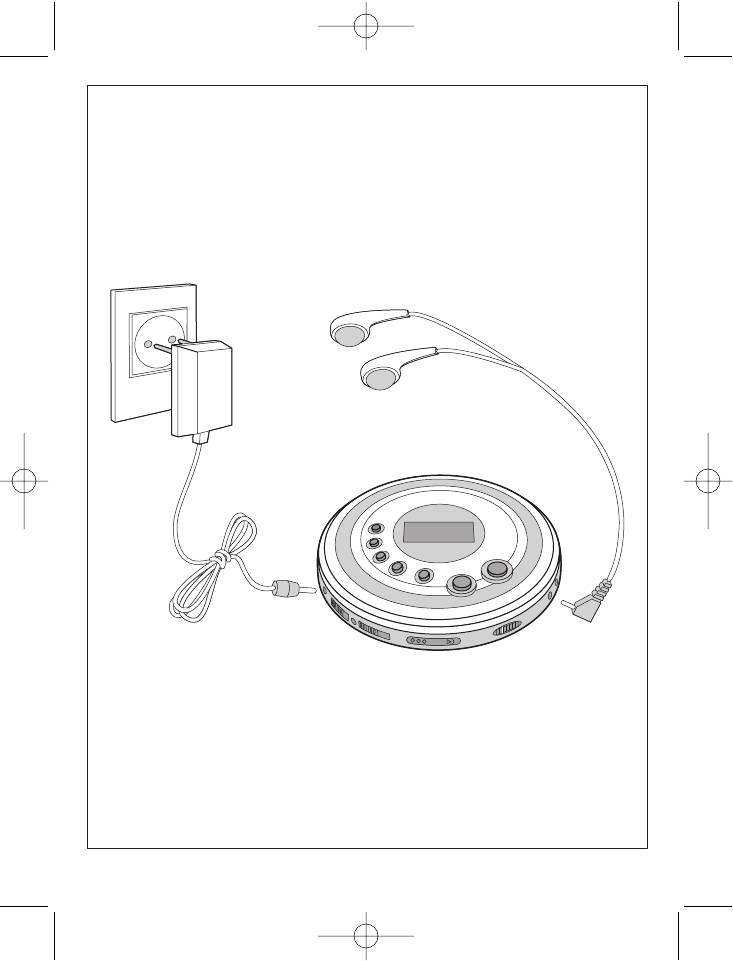
Power supply from the power adapter (sup?
Note:
plied with the device)
• When batteries are charged for the first
1. Insert the plug end of the power adapter
time, 15 hours are needed to fully charge
cord into the power adapter jack (19).
them.
2. Connect the power adapter to AC 220?
• If the batteries operation time has con
230V ~ 50 Hz power outlet.
siderably reduced, even when charged
properly, buy a new set of batteries.
Note:
• If batteries are installed inside the device
CONNECTION
when connecting the power adapter, the
Connection to audio system
device will automatically switch to the AC
Connect the stereo cable (not included with
power (adapter).
the device) to the linear output jack LINE
• Use only the adapter included with the
OUT (15) and to the audio system jack
player. Using other adapters can dam
CD/AUX.
age the device.
• Before connecting make sure that the
4
3790.qxd 15.08.05 17:15 Page 4

ENGLISH
Note: Before connecting the player to the
Total number of albums (folders) and total
audio system, disconnect both devices
number of tracks will be shown on the dis?
from the AC network.
play for a short time.
During playback, the LED display will show
HEADPHONES
the track related information (name of the
Insert the headphones plug (supplied with
artist, album, song).
the device) into the headphones jack on the
Note: Information on the current track will
player.
be displayed only if it is present on the disc.
CD / MP3 PLAYBACK
Note:
1. Insert the headphones plug (supplied
• If during playback the CD compartment
with the device) into the headphones
(1) door is open, LED display will show
jack on the player.
"OPEN".
2. Press the CD door open button (13).
• Press the STOP button (9) before press
3. Insert the CD with a label side up.
ing the CD door open button (13).
4. Close the CD door.
• The player can play 3inch (8 cm) discs
5. Set the VOLUME control (14) to the mini?
without using a special adapter.
mum level.
6. Press the PLAY/PAUSE (4;) button (4),
SELECTING TRACKS OR SEARH BY A
the device automatically turns on,
MUSIC FRAGMENT (CD)
"READING" appears on the LED display
1. Press the PREVIOUS/SEARCH BACK?
and playback starts.
WARD (9) button (4)
7. Set a desirable volume level.
2. Several times press the PREVIOUS/
8. To pause playback, press the
SEARCH BACKWARD (9) button (10) to
PLAY/PAUSE (4;) button (4). The track
select one of the previous tracks.
number and the elapsed playback time
3. Several times press the NEXT/SEARCH
will flash on the display. Once again press
FORWARD (:) button (2) to select one
PLAY/ PAUSE (4;) button (4) to resume
of the next tracks.
playback.
4. Press and hold the PREVIOUS/SEARCH
9. To stop playback, press the STOP button
BACKWARD (9) button (10) or the
(9).
NEXT/SEARCH FORWARD (:) button
10.To turn off the player, press and hold the
(2), to search by a music fragment of the
STOP button (9) for over 2 seconds.
track.
CD PLAYBACK
Note: When searching by a music fragment,
Press the PLAY /PAUSE (4;) button (4) to
the tracks will be played in accelerated
start playback.
mode at a low volume level.
Total number of tracks and total disc play?
back time will be shown on the display for a
SEARCHING TRACKS (MP3)
short time. During playback, the display will
1. Press the PREVIOUS/SEARCH BACK?
show the current track number and its
WARD (9) button (10) to go to the begin?
elapsing playback time.
ning of the current track.
2. Several times press the PREVIOUS/
MP3 PLAYBACK
SEARCH BACKWARD (9) button (10) to
Press the PLAY /PAUSE (4;) button (4) to
select one of the previous tracks.
start playback.
3. Several times press the NEXT/SEARCH
5
3790.qxd 15.08.05 17:15 Page 5
ENGLISH
FORWARD (:) button (2) to select one of
STOP button (9) or press the MODE but?
the next tracks.
ton (3) four times, after which the
" " symbol will disappear from the
REPEATED PLAYBACK MODE
display.
CD
4. To activate the repeated playback mode
1. Press the PLAY /PAUSE (4;) button (4)
for the entire disc, press the MODE but?
to start playback.
ton (3) three times. LED display will show
2. To activate the repeated playback mode
the " " symbol and all tracks on the
for a track, press the MODE button (3)
disc will be played repeatedly. To cancel
once. LED display will show the " "
the disc's Repeated Playback mode,
symbol and the track will be played
press the MODE button (3) three times,
repeatedly. To cancel the repeated play?
after which the " " symbol will disap?
back mode, press the STOP button (9) or
pear from the display.
press the MODE button (3) four times,
INTRO PLAY MODE
after which the " " symbol will disap?
CD
pear from the display.
1. Press the STOP button (9).
3. To activate the repeated playback mode
2. To activate the INTRO mode, press the
for the entire disc, press the MODE but?
MODE button (3) three times, "INTRO"
ton (3). LED display will show the " "
will appear on the display.
symbol and all tracks on the disc will be
3. Press the PLAY/PAUSE button (4), each
played repeatedly. To cancel the disc
track on the disc will be played for 10
repeated playback mode, press the
seconds.
MODE button (3) three times, after which
4. Press the MODE button (3) two times, to
the " " symbol will disappear from the
cancel the INTRO mode and return to the
display.
playback mode.
MP3
МР3
1. Press the PLAY/PAUSE (4;) button (4),
1. Press the STOP button (9).
the track playback starts.
2. To activate the INTRO mode, press the
2. To activate the repeated playback mode
MODE button (3) four times, "INTRO" will
for a track, press the MODE button (3)
appear on the display.
once. LED display will show the " "
3. Press the PLAY/PAUSE (4;) button (4),
symbol and the track will be played
each track on the disc will be played for
repeatedly. To cancel the repeated play?
10 seconds.
back mode, press the STOP button (9) or
4. Press the MODE button (3) two times, to
press the MODE button (3) five times,
cancel the INTRO mode and return to the
playback mode.
after which the " " symbol will disap?
pear from the display.
RANDOM PLAYBACK
3. To activate the album (folder) repeated
CD
playback mode, press the MODE button
1. Press the STOP button (9).
(3) twice. LED display will show the
2. To activate the RANDOM PLAYBACK
" " symbol and the album (folder)
mode, press the MODE button (3) four
will be played repeatedly. To cancel the
times, "RAND" will appear on the display.
repeated playback mode, press the
6
3790.qxd 15.08.05 17:15 Page 6
ENGLISH
Now press the PLAY/PAUSE button (4), to
edly, press the MODE button (3) until the
start random playback of the disc's
" " indicator appears on the display.
tracks.
3. Press the NEXT/SEARCH FORWARD (:)
МР3
button (2) to move to the next, randomly
1. Press the PROGRAM button (6). "PROG"
selected, track.
will appear on the LED display, where 00
4. Press the MODE button (3) once to return
? the track's number, P?01 ? the track's
to usual playback mode.
order number in the program.
2. The album number starts flashing in the
МР3
upper right corner of the LED display.
1. Press the STOP button (9).
Using the NEXT/SEARCH FORWARD (:)
2. To activate the RANDOM PLAYBACK
button (2) or PREV/SEARCH BACKWARD
mode, press the MODE button (3) five
(9) button (10), select the album/folder
times, "RAND" will appear on the display.
containing the desired track and press
Then press the PLAY/PAUSE (4;) but?
the PGM button (6).
ton (4), to start random playback of the
3. Using the NEXT/SEARCH FORWARD (:)
disc's tracks.
button (2) or PREV/SEARCH BACKWARD
3. Press the NEXT/SEARCH FORWARD (:)
(9) button (10), select the desired track
button (2) to move to the next, randomly
to be programmed.
selected, track.
4. By pressing the PGM button (6) once,
4. Press the MODE button (3) once to return
include the track into the program.
to usual playback mode.
5. Repeat the actions described on steps 2
?5, to program other tracks (up to 64
PROGRAM PLAYBACK
tracks).
CD
6. To start the program playback, press the
1. Press the PROGRAM button (6). "PROG"
PLAY/PAUSE (4;) button (4) once.
will appear on the LED display, where 00
7. To cancel the program playback, press
? the track's number, P?01 ? the track's
the STOP button (9).
order number in the program.
2. To select a track for the program, press
TRACK SEARCH BY ITS NAME (MP3)
the NEXT/SEARCH FORWARD (:) but?
Searching by the track (file) name
ton (2) or PREV/SEARCH BACKWARD
• Press the ASP/DIR/NEXT button (5), "A"
(9) button (10).
will appear in the upper right corner of
3. By pressing the PROGRAM button (6)
the LED display and the " " will start
once, include the track into the program.
flashing, indicating the Search by Track
4. Repeat the actions described on steps 2
Name mode.
and 3, to program other tracks (up to 64
• Using the NEXT/SEARCH FORWARD (:)
tracks).
button (2) or PREV/SEARCH BACKWARD
5. To start the program playback, press the
(9) button (10), select the needed letter.
PLAY/PAUSE (4;) button (4) once.
The LED display will show the track which
6. To cancel the program playback, press
name starts with this letter.
the STOP button (9).
• Press the PLAY/PAUSE (4;) button,
playback of the selected track starts.
Note: If, during the program playback, you
want to play all programmed tracks repeat
Note: Searching by the track name is possi
ble only if the track was assigned the name
7
3790.qxd 15.08.05 17:15 Page 7
ENGLISH
when recoding the MP3 disc. If the disc
and hold the MODE button for over 2 sec?
contains tracks designated only by order
onds.
numbers or other symbols, searching by
the track name will be impossible.
Automatic power turning off
If over 60 seconds have passed after press?
Search by album name
ing the STOP button (9), the automatic
• Press the ASP/DIR/NEXT button (5)
power turn off function is activated and the
twice, "A" will appear in the upper right
player is turned off automatically. At press?
corner of the LED display and the " "
ing and holding the STOP button (9) for over
symbol will start flashing, indicating the
3 seconds, the player will be turned off.
Search by Album Name mode.
• Using the NEXT/SEARCH FORWARD (:)
Automatic shock protection function
button (2) or PREV/SEARCH BACKWARD
(ASP)
(9) button (10), select the needed letter.
• During playback the player can be sub?
The LED display will show the album
jected to mechanical shocks and vibra?
which name starts with this letter.
tion (for instance, when walking, or inside
• Press the PLAY/PAUSE (4;) button (4),
the moving car). The automatic shock
playback of the selected album starts.
protection function (ASP) allows to pre?
vent the interruption of sound when the
Note: Searching by the album name is pos
player is subjected to shocks or vibra?
sible only if the album (folder) was assigned
tion.
the name when recoding the MP3 disc. If
• When the PLAY/PAUSE button (4) is
the disc contains albums (folders) desig
pressed, "ASP" starts flashing on the dis?
nated only by order numbers or other sym
play. Flashing of "ASP" sign will stop,
bols, searching by the album name will be
when the data buffer of the memory
impossible.
becomes full.
• If the player is under continuous impact
SPECIAL FUNCTIONS
of shocking or vibration for over 45 sec?
Bass boost
onds (when playing CD discs) or over 120
Set the bass boost switch (17) into the "ON"
seconds (when playing MP3?discs),
position, to boost the low frequency tone.
playback may be interrupted for several
seconds. The playback will be resumed,
Note: As the low frequency sound depends
as soon as the action of shocking or
on the volume level, at high volume levels
vibration stops.
the sound may be distorted. Decrease the
• To cancel the ASP function, press the
volume level or set the Bass Boost switch to
ASP button once (possible, only when
"OFF".
playing CD discs).
Changing the display mode (only for
Note:
MP3)
When the automatic shock protection func
When playing MP3 tracks, the LED display
tion (ASP) is activated, the disc rotates
can show information on the current track.
faster then at usual playback, because the
Press and hold the MODE button (3) for over
disc data are taken into the device's operat
2 seconds. The display will show the album
ing memory, so the batteries become dis
number, file number and playback time.
charged faster.
To return to the initial display mode, press
8
3790.qxd 15.08.05 17:15 Page 8

ENGLISH
Use the ASP function only when necessary,
Handling CDs
to save the batteries charge.
Handle the discs carefully. Hold discs only
by the edges. Never touch the polished disc
NOTE: When playing MP3 discs, the ASP
surface.
function is constantly turned on, and cannot
Do not stick scotch, stickers, etc., to the
be deactivated.
label side of the disc.
Periodically wipe discs with a soft (not fluffy)
Locking of control buttons (HOLD)
dry cloth. Never use cleaning aerosols or
The device is equipped with control buttons
antistatic agents for cleaning discs. If nec?
lock function ? HOLD (18) To lock the control
essary, buy a special kit for cleaning CDs.
buttons, set the lock switch (19) to "ON".
If the disc skips tracks or gets stuck in cer?
tain spots, then the disc may be dirty or
SD/MMC memory cards jack
damaged (scratched).
In the stop mode insert a SD/MMC card
Wipe discs from center to outer edges in
containing MP3 files into the memory card
straight movements. Never wipe discs in cir?
jack (21). When the STOP button (9) is
cular motion.
pressed for a short time, the "CARD?USB"
To remove the disc from its case, press the
will be shown on the display, and then the
center part of the case and remove the disc,
SD/MMC card contents will be read. The
holding it carefully by the edges.
LED display will show the total number of
Remove fingerprints and dust from the disc
MP3 files in the memory card. To start play?
surface with a soft cloth. Compact discs dif?
back, press the PLAY/PAUSE button (4). To
fer from traditional recordings in that they
activate again the disc playback mode,
do not have any grooves where dust can
press the STOP button (9) for a short time,
collect, so careful cleaning with a soft cloth
the "CD?DISC" mode will be activated.
should remove most of the particles.
USB jack
In the stop mode insert the USB cable (sup?
plied with the device) into the USB jack and
connect a USB flash card to it, containing
MP3 files. . When the STOP button (9) is
pressed for a short time, the "CARD?USB"
will be shown on the display, and then the
flash card contents will be read. The LED
display will show the total number of MP3
files in the memory card. To start playback,
press the PLAY/PAUSE button (4).
To activate again the disc playback mode,
press the STOP button (9) for a short time,
the "CD?DISC" mode will be activated.
MAINTENANCE
Cleaning the device
Wipe the device exterior with a soft cloth
dipped in soapy water.
9
3790.qxd 15.08.05 17:15 Page 9
ENGLISH
SPECIFICATIONS
Audio
Supported formats
CD/DA ?MP3
Supported data carriers
CD?R, CD?RW
Digital?analog conversion
1 bit D/A converter with 8 times over sampling.
Reproduced frequency band
20?20000 Hz
Automatic shock protection
45 sec.(CD), 120 sec. (МР3)
Detonation ratio
Above measuring limits
Number of channels
2 channels
Output signal
Linear output: 0.6 V (47 kOhm)
Headphones: 20 mW (32 Ohm)
Bass boost (100 Hz)
+10 dB
МР3
Data rate
23?384 Kbit/sec
MP3 playback
ISO9660 corresponding standard
General parameters
Power supply
? 2 X 1.2V/ Ni?MH batteries
? Power adapter 4.5V
Power consumption
0.8 W
Dimensions
~135 mm (L) х 135 mm (W) х 21 mm (H)
Weight (only the player, without batteries)
165 g.
Note: In the process of continuous product improvement, the manufacturer reserves the
right to change the product specifications without prior notice of the users.
Service life of the unit is not less than 3 years
GUARANTEE
Details regarding guarantee conditions can be obtained from the dealer from whom the
appliance was purchased. The bill of sale or receipt must be produced when making any
claim under the terms of this guarantee.
This product conforms to the EMCRequirements as laid down by the Council
Directive 89/336/EEC and to the Low Voltage Regulation (73/23 EEC)
10
3790.qxd 15.08.05 17:15 Page 10

DEUTSCH
Tragbarer CDSpieler mit MP3
• Verwenden Sie nur den mitgelieferten
Wiedergabe und USB/MMC
Netzadapter. Andere Netzadapter kön
Unterstützung
nen das Gerät beschädigen.
Lesen Sie vor Gebrauch des Geräts diese
• Vergewissern Sie sich vor dem anschal
Betriebsanweisung aufmerksam durch
ten des Netzadapters an die Steckdose,
dass die vorhandene Netzspannung der
FUNKTIONEN UND BEDIENUNG
Betriebsspannung des Netzadapters
1. CDFachdeckel
entspricht.
2. Taste VORWÄRTSSPRUNG/TITEL
• Stecken Sie den Netzadapter von der
VORWÄRTSSUCHE
Steckdose ab, wenn Sie keine
3. Taste WIEDERGABE
WechselstromSpeisung benötigen.
4. Taste WIEDERGABE/PAUSE
• Berühren Sie den Netzadapter mit
5. Taste ASP/DIR/NEXT
nassen Händen nicht.
6. Taste PROGRAMMIERUNG
7. BatterienFach
BatterienSpeisung
8. LCDDisplay
1. Stecken Sie den Netzadapter von der
9. Taste STOP/FUNKTION (Speisung Aus)
Steckdose und dem Gerät aus.
10. Taste RÜCKWÄRTSSPRUNG/TITEL
2. Öffnen Sie den BatterienFach.
RÜCKWÄRTSSUCHE
3. Stecken Sie zwei Batterien Typ NiMH
11. Anschluss Kopfhörer
(1.2 V 1200 mAh) ein (Lieferumfang),
12. Ladeanzeige für Batterien
beachten Sie dabei die Polarität.
13. Taste CDFachdeckel
4. Schließen Sie den BatterienFach.
14. Lautstärkeänderung
5. Schalten Sie den Umschalter Batterien
15. Anschluss linearer Eingang
Ladung auf “ON”, um das Laden zu
16. Umschaltung BatterienLadung
beginnen. Die Ladeanzeige für Batterien
17. Umschaltung Niederfrequenz
muss dabei rot brennen (CHARGE).
Verstärkung
18. Umschaltung Tastensperre
ACHTUNG: um eine Beschädigung des
19. Anschluss Netzadapter
Geräts und der Batterien zu vermeiden, darf
20. USBSchnittstelle
der Ladezyklus 12 Stunden nicht überschre
21. SpeicherplatteSlot Typ SD/MMC
iten.
SPEISUNG
Vorsicht:
Speisung mit Netzadapter (Lieferumfang)
• Stecken Sie gleichzeitig erlaubte (NiMH)
1. Schließen Sie den Adapterstecker am
und normale (z.B., KohlenZink
Adapterkabel an die Anschlussstelle für
Batterien) Batterien nicht.
den Netzadapter (19) an.
• Ein Ladezyklus darf 12 Stunden nicht
2. Schlißen Sie den Netzadapter an die
überschreiten.
WechselstromSteckdose (220230 V ~
50 Hz) an.
Anmerkungen:
• Der erste Ladezyklus der neuen Batterien
Anmerkungen:
bedarf ca. 15 Stunden.
• Wenn beim Anschluss des Netzadapters
• Wenn die Arbeitsdauer mit den Batterien
Batterien im BatterienFach vorhanden
deutlich nachgelassen hat, kaufen Sie
sind, schaltet das Gerät automatisch auf
neue Batterien.
WechselstromSpeisung um
(Netzadapter).
11
3790.qxd 15.08.05 17:15 Page 11

DEUTSCH
ANSCHLUSS
10. Drücken und behalten Sie min. 2 sec die
Anschluss an Audiosysteme
StopTaste (STOP) (9), um das Gerät
Verbinden Sie mit dem StereoKabel (kein
abzuschalten.
Lieferumfang) den linearen Ausgang des
Geräts (LINE OUT) (15) und den Anschluss
CD
des Audiosystems CD/AUX.
Drücken Sie die Taste WIEDERGABE (PLAY)
(4), um die CDWiedergabe zu beginnen.
Anmerkung: Schalten Sie vor jedem
Das LCDDisplay zeigt kurz die gesamte
Anschluss des Spielers an Audiosysteme die
TitelZahl und die gesamte CDSpielzeit an.
beiden Geräte spannungslos.
Bei der Wiedergabe zeigt das Display die
laufende TitelNummer und die abgelaufene
KOPFHÖRER
Spielzeit an.
Schließen Sie den KopfhörerStecker (die
Kopfhörer gehören zum Lieferumfang) an
MP3
den KopfhörerAnschluss an.
Drücken Sie die Taste WIEDERGABE (PLAY)
(4), um die CDWiedergabe zu beginnen.
WIEDERGABE CD/MP3
Das LCDDisplay zeigt kurz die gesamte
1. Schließen Sie den KopfhörerStecker
Album (Mappen) und TitelZahl an. Bei der
(die Kopfhörer gehören zum
Wiedergabe zeigt das Display Informationen
Lieferumfang) an den Kopfhörer
über den spielenden Titel an (SängerName,
Anschluss an.
AlbumName und TitelName).
2. Drücken Sie die Taste CDFachdeckel
Anmerkung: die Informationen über den
(13).
spielenden Titel werden nur dann angezeigt,
3. Legen Sie die CD mit dem nach oben
wenn diese auf der CD gebrannt sind.
gerichteten Bild ein.
4. Schließen Sie den CDFachdeckel.
Anmerkungen:
5. Stellen Sie den Drehgeber für
• Öffnen Sie bei der Wiedergabe den CD
Lautstärkeänderung (VOLUME) (14) auf
Fachdeckel (1), so erscheint am LCD
Minimum ein.
Display die Anzeige “OPEN”
6. Drücken Sie die Taste WIEDERGABE/
(“GEÖFFNET”).
PAUSE (PLAY/PAUSE) (4;) (4), das
• Drücken Sie die StopTaste (STOP) (9),
Gerät schaltet dabei automatisch ein, am
bevor Sie die Taste CDFachdeckel
LCDDisplay erscheint die Anzeige
drücken (13).
“READING” (“LESEN”) und die
• Das Gerät kann 3ZollCDs (8 cm) ohne
Wiedergabe beginnt.
speziellen Adapter abspielen.
7. Stellen Sie die gewünschte Lautstärke
ein.
TITELSUCHE ODER FRAGMENTSUCHE
8. Drücken Sie die Taste WIEDERGABE/
(CD)
PAUSE (PLAY/PAUSE) (4;) (4), um die
1. Drücken Sie die Taste
Wiedergabe anzuhalten. Die Titel
RÜCKWÄRTSSPRUNG/ TITEL
Nummer und die abgelaufene Spielzeit
RÜCKWÄRTSSUCHE (9) (10), um an
am Display beginnen zu blinken. Drücken
den TitelAnfang zu gelangen.
Sie wiederholt die Taste WIEDERGABE/
2. Drücken Sie mehrmals die Taste
PAUSE (PLAY/PAUSE) (4;) (4), um die
RÜCKWÄRTSSPRUNG/TITEL
Wiedergabe fortzusetzen.
RÜCKWÄRTSSUCHE (9) (10), um an
9. Drücken Sie die StopTaste (STOP) (9),
vorangehende Titel zu gelangen.
um die Wiedergabe abzubrechen.
3. Drücken Sie mehrmals die Taste
12
3790.qxd 15.08.05 17:15 Page 12
DEUTSCH
VORWÄRTSSPRUNG/TITEL
3. Drücken Sie zweimal die MODUSTaste
VORWÄRTSSUCHE (:) (2), um an näch
(MODE) (3), um die Funktion wiederholte
ste Titel zu gelangen.
Wiedergabe der CD zu aktivieren. Am
4. Drücken und behalten Sie die Taste
LCDDisplay erscheint die Anzeige “ “
RÜCKWÄRTSSPRUNG/ TITEL
und die Wiedergabe aller Titel wiederholt
RÜCKWÄRTSSUCHE (9) (10) bzw.
sich. Drücken Sie dreimal die MODUS
VORWÄRTSSPRUNG/ TITEL
Taste (MODE) (3), um die Funktion
VORWÄRTSSUCHE (:) (2), um den
wiederholte Wiedergabe der CD zu deak
Musikfragment des Titels zu finden.
tivieren, dabei erlöscht die Anzeige “ “
vom LCDDisplay.
Anmerkung: bei der FragmentSuche
beschleunigt sich die Wiedergabe, und die
MP3
Lautstärke lässt nach.
1. Drücken Sie die Taste WIEDERGABE/
PAUSE (PLAY/PAUSE) (4;) (4), um die
TITELSUCHE (MP3)
TitelWiedergabe zu beginnen.
1. Drücken Sie die Taste
2. Drücken Sie einmal die MODUSTaste
RÜCKWÄRTSSPRUNG/TITEL
(MODE) (3), um die Funktion wiederholte
RÜCKWÄRTSSUCHE (9) (10), um an
TitelWiedergabe zu aktivieren. Am LCD
den TitelAnfang zu gelangen.
Display erscheint die Anzeige “ “, und
2. Drücken Sie mehrmals die Taste
die TitelWiedergabe wiederholt sich.
RÜCKWÄRTSSPRUNG/TITEL
Drücken Sie die StopTaste (STOP) (9)
RÜCKWÄRTSSUCHE (9) (10), um an
oder drücken Sie fünfmal die MODUS
vorangehende Titel zu gelangen.
Taste (MODE) (3), um die Funktion
3. Drücken Sie mehrmals die Taste
wiederholte Wiedergabe zu deaktivieren,
VORWÄRTSSPRUNG/TITEL
dabei erlöscht die Anzeige “ “ vom
VORWÄRTSSUCHE (:) (2), um an näch
LCDDisplay.
ste Titel zu gelangen.
3. Drücken Sie zweimal die MODUSTaste
(MODE) (3), um die Funktion wiederholte
WIEDERHOLTE WIEDERGABE
Wiedergabe des Albums (der Mappe) zu
CD
aktivieren. Am LCDDisplay erscheint die
1. Drücken Sie die Taste WIEDERGABE/
PAUSE (PLAY/PAUSE) (4;) (4), um die
Anzeige “ “, und die Wiedergabe
TitelWiedergabe zu beginnen.
des Albums (der Mappe) wiederholt sich.
2. Drücken Sie einmal die MODUSTaste
Drücken Sie die StopTaste (STOP) (9)
(MODE) (3), um die Funktion wiederholte
oder drücken Sie viermal die MODUS
Wiedergabe zu aktivieren. Am LCD
Taste (MODE) (3), um die Funktion
wiederholte Wiedergabe zu deaktivieren,
Display erscheint die Anzeige “ “, und
die TitelWiedergabe wiederholt sich.
dabei erlöscht die Anzeige “ “ vom
Drücken Sie die StopTaste (STOP) (9)
LCDDisplay.
oder drücken Sie viermal die MODUS
4. Drücken Sie dreimal die MODUSTaste
Taste (MODE) (3), um die Funktion
(MODE) (3), um die Funktion wiederholte
wiederholte Wiedergabe zu deaktivieren,
Wiedergabe der CD zu aktivieren. Am
dabei erlöscht die Anzeige “ “ vom
LCDDisplay erscheint die Anzeige “ ”
LCDDisplay.
und die Wiedergabe aller Titel wiederholt
sich. Drücken Sie dreimal die MODUS
Taste (MODE) (3), um die Funktion
13
3790.qxd 15.08.05 17:15 Page 13
DEUTSCH
wiederholte Wiedergabe der CD zu deak
(4), um die TitelWiedergabe in der freien
tivieren, dabei erlöscht die Anzeige “ “
Reihenfolge zu beginen.
vom LCDDisplay.
3. Drücken Sie die Taste
VORWÄRTSÜBERGANG/TITEL
INTROMODUS
VORWÄRTSSUCHE (:) (2), um an den
CD
nächsten zufällig gefundenen Titel zu
1. Drücken Sie die StopTaste (STOP) (9).
gelangen.
2. Drücken Sie dreimal die MODUSTaste
4. Drücken Sie einmal die MODUSTaste
(MODE) (3), um den IntroModus zu
(MODE) (3), um die normale Wiedergabe
aktivieren, dabei erscheint am Display die
wieder zu aktivieren.
Anzeige “INTRO” (“ANSICHT”).
3. Drücken Sie die Taste WIEDERGABE/
MP3
PAUSE (PLAY/PAUSE) (4), die
1. Drücken Sie die StopTaste (STOP) (9).
WiedergabeZeit jedes Titels von der CD
2. Drücken Sie fünfmal die MODUSTaste
dauert 10 sec.
(MODE) (3), um den RandModus zu
4. Drücken Sie zweimal die MODUSTaste
aktivieren, dabei erscheint am Display die
(MODE) (3), um den IntroModus zu
Anzeige “RAND” (“FREIE REIEHEN
deaktivieren und den normalen
FOLGE”).
WiedergabeModus zu aktivieren.
Drücken Sie anschließend die Taste
WIEDERGABE/PAUSE (PLAY/PAUSE)
MP3
(4;) (4), um die TitelWiedergabe in der
1. Drücken Sie die StopTaste (STOP) (9).
freien Reihenfolge zu beginnen.
2. Drücken Sie viermal die MODUSTaste
3. Drücken Sie die Taste VORWÄRT
(MODE) (3), um den IntroModus zu
SSPRUNG/TITELVORWÄRTSSUCHE
aktivieren, dabei erscheint am Display die
(2), um an den nächsten zufällig gefun
Anzeige “INTRO” (“ANSICHT”).
denen Titel zu gelangen.
3. Drücken Sie die Taste WIEDERGABE/
4. Drücken Sie einmal die MODUSTaste
PAUSE (PLAY/PAUSE) (4; ) (4), die
(MODE) (3), um die normale Wiedergabe
WiedergabeZeit jedes Titels von der CD
wieder zu aktivieren.
dauert 10 sec.
4. Drücken Sie zweimal die MODUSTaste
PROGRAMMIERBARE WIEDERGABE
(MODE) (3), um den IntroModus zu
CD
deaktivieren und den normalen
1. Drücken Sie die Taste PROGRAM
WiedergabeModus zu aktivieren.
MIERUNG (PROGRAM) (6). Am LCD
Display erscheint dabei die Anzeige
WIEDERGABE IN DER FREIEN REIEHEN
“PROG”. 00 – TitelNummer, P01 –
FOLGE
Titelfolgenummer im Programm.
CD
2. Drücken Sie vor der Speicherung die
1. Drücken Sie die StopTaste (STOP) (9).
Taste VORWÄRTSSPRUNG/TITEL
2. Drücken Sie viermal die MODUSTaste
VORWÄRTSSUCHE (:) (2) bzw.
(MODE) (3), um den RandModus zu
RÜCKWÄRTSSPRUNG/TITEL
aktivieren, dabei erscheint am Display
RÜCKWÄRTSSUCHE (9) (10), um die
die Anzeige “RAND” (“FREIE REIEHEN
entsprechende TitelNummer zu wählen.
FOLGE”).
3. Drücken Sie anschließend einmal die
Drücken Sie anschließend die Taste
Taste PROGRAMMIERUNG (PROGRAM)
WIEDERGABE/ PAUSE (PLAY/PAUSE)
(6), um die TitelNummer im Wiedergabe
Programm zu speichern.
14
3790.qxd 15.08.05 17:15 Page 14
DEUTSCH
4. Wiederholen Sie das in den Pkt. 2 und
beschriebene Verfahren, um alle Titel im
Pkt. 3 beschriebene Verfahren, um alle
WiedergabeProgramm zu speichern
Titel im WiedergabeProgramm zu spe
(max. 64 Speicherplätze).
ichern (max. 64 Speicherplätze).
6. Drücken Sie einmal die Taste WIEDER
5. Drücken Sie einmal die Taste WIEDER
GABE/PAUSE (PLAY/PAUSE) (4;) (4),
GABE/PAUSE (PLAY/PAUSE) (4;) (4),
um die Wiedergabe der gespeicherten
um die Wiedergabe der gespeicherten
Titel zu beginnen.
Titel zu beginnen.
7. Drücken Sie die StopTaste (STOP) (9),
6. Drücken Sie die StopTaste (STOP) (9),
um das WiedergabeProgramm
um das WiedergabeProgramm
abzubrechen.
abzubrechen.
TITELSUCHE NACH DEM NAMEN (MP3)
Anmerkung: Wollen Sie während der
Suche nach dem Titel/Dateinamen
ProgrammWiedergabe alle gespeicherten
• Drücken Sie die Taste ASP/DIR/NEXT (5),
Titel wiederholt abspielen lassen, drücken
dabei erscheint im oberen rechten Teil
Sie die MODUSTaste (MODE) (3) solange,
des LCDDisplays das Symbol “A” und die
bis am Display die Anzeige “ “ erscheint.
Anzeige “ “ beginnt zu blinken. Dies
entspricht der aktivierten Titel
MP3
Suchfunktion nach dem Namen.
1. Drücken Sie die Taste PROGRAM
• Wählen Sie mit der Taste
MIERUNG (PROGRAM) (6). Am LCD
VORWÄRTSSPRUNG/TITEL
Display erscheint dabei die Anzeige
VORWÄRTSSUCHE (2) bzw.
“PROG”. 00 – TitelNummer, P01 –
RÜCKWÄRTSSPRUNG/TITEL
Titelfolgenummer im Programm.
RÜCKWÄRTSSUCHE (9) (10) den
2. Im oberen rechten Teil des LCDDisplays
gewünschten Buchstaben. Am LCD
muss die AlbumNummer blinken.
Display erscheint der mit dem gewählten
Wählen Sie mit der Taste
Buchstaben beginnende Titelname.
VORWÄRTSSPRUNG/TITEL
• Drücken Sie die Taste WIEDERGABE/
VORWÄRTSSUCHE (2) bzw.
PAUSE (PLAY/PAUSE) (4), um die Titel
RÜCKWÄRTSSPRUNG/TITEL
Wiedergabe zu beginnen.
RÜCKWÄRTSSUCHE (9) (10) das
gewünschte Album bzw. die gewünschte
Anmerkung: Die TitelSuchfunktion nach
Mappe mit dem gesuchten Titel und
dem Namen ist möglich nur in dem Fall,
drücken Sie anschließend die Taste
wenn bei dem Brennen des MP3 CDDisks
PROGRAMMIERUNG (PROGRAM) (6).
dem Titel der Name gegeben worden ist.
3. Wählen Sie mit der Taste
Wenn die Titel nur mit laufenden Nummern
VORWÄRTSSPRUNG/TITEL
bzw. anderen Symbolen bezeichnet sind, so
VORWÄRTSSUCHE (2) bzw.
ist die TitelSuchfunktion nach dem Namen
RÜCKWÄRTSSPRUNG/TITEL
unmöglich.
RÜCKWÄRTSSUCHE (9) (10) den
gewünschten Titel.
Suche nach dem Album/Mappenamen
4. Speichern Sie mit dem einmaligen
• Drücken Sie zweimal die Taste
Tastendruck der Taste PROGRAM
ASP/DIR/NEXT (5), dabei erscheint im
MIERUNG (PROGRAM) (6) den gewün
oberen rechten Teil des LCDDisplays das
schten Titel im WiedergabeProgramm.
Symbol “A” und die Anzeige “ “ begin
5. Wiederholen Sie das in den Pkt. 2 5
nt zu blinken. Dies entspricht der
15
3790.qxd 15.08.05 17:15 Page 15

DEUTSCH
aktivierten AlbumSuchfunktion nach
MODUSTaste (MODE) (3) länger als 2
dem Namen.
Sekunden, um an die Ureinstellungen zu
• Wählen Sie mit der Taste
gelangen.
VORWÄRTSSPRUNG/TITEL
VORWÄRTSSUCHE (2) bzw.
Automatische Abschaltung
RÜCKWÄRTSSPRUNG/TITEL
60 Sekunden nach dem einmaligen Drücken
RÜCKWÄRTSSUCHE (9) (10) den
der Taste STOP (9) wird die Funktion
gewünschten Buchstaben. Am LCD
automatische Abschaltung der Speisung
Display erscheint der mit dem gewählten
aktiviert, und das Gerät wird automatisch
Buchstaben beginnende Albumname.
abgeschaltet. Drücken und behalten Sie die
• Drücken Sie die Taste WIEDERGABE/
Taste STOP (9) länger als 2 Sekunden, um
PAUSE (PLAY/PAUSE) (4;) (4), um die
die Speisung abzuschalten.
AlbumWiedergabe zu beginnen.
Digitales Abtastersprung
Anmerkung: Die TitelSuchfunktion nach
Verhütungssystem (ASP)
dem Namen ist möglich nur in dem Fall,
• Bei der Wiedergabe kann das Gerät
wenn bei dem Brennen des MP3 CDDisks
Erschütterungen oder Vibrationen ausge
dem Album bzw. der Mappe der Name
setzt werden (z.B. beim Gehen oder
gegeben worden ist. Wenn die
Autofahren). Das Abtastersprung
Alben/Mappen nur mit laufenden Nummern
Verhütungssystem (ASP) kann
bzw. anderen Symbolen bezeichnet sind, so
Abtastersprünge bei der Wiedergabe
ist die TitelSuchfunktion nach dem Namen
wegen Erschütterungen und Vibrationen
unmöglich.
ausschließen.
• Drücken Sie die Taste WIEDERGABE/
SONDERFUNKTIONEN
PAUSE (PLAY/PAUSE) (4;) (4), und die
NiederfrequenzVerstärkung
ASPAnzeige am LCDDisplay beginnt zu
(BASS BOOST)
blinken. Die ASPAnzeige hört auf zu
Schalten sie die Niederfrequenz
blinken, wenn der Speicher voll ist.
Verstärkung (17) auf “ON”, um die
• Wenn das Gerät 45 Sekunden (bei der
Niederfrequenzen zu verstärken.
Wiedergabe der CDDisks) / 120
Anmerkung: Da der NiederfrequenzKlang
Sekunden (bei der Wiedergabe der MP3
von der Lautstärke abhängig ist, kann der
CDDisks) lang ununterbrochen
Klang bei einer hohen Lautstärke verfälscht
Erschütterungen oder Vibrationen ausge
werden. Reduzieren Sie in diesem Fall die
setzt wird, so ist eine Unterbrechung der
Lautstärke oder schalten Sie die
Wiedergabe während weniger Sekunden
NiederfrequenzVerstärkung (17) auf “OFF”
möglich. Die Wiedergabe fängt wieder an
um.
wenn Erschütterungen oder Vibrationen
zu Ende sind.
Änderung der DisplayEinstellungen (bei
• Drücken Sie einmal die ASPTaste, um
MP3Betrieb)
das AbtastersprungVerhütungssystem
Bei der MP3 TitelWiedergabe kann am
zu deaktivieren (nur bei Wiedergabe der
LCDDisplay die TitelInformation des jew
CDs).
eiligen Titels angezeigt werden. Drücken
und behalten Sie die MODUSTaste (MODE)
Anmerkungen:
(3) länger als 2 Sekunden. Das Display zeigt
Wenn das Abtastersprung
die Album und DateiNummer sowie die
Verhütungssystem (ASP) aktiv ist dreht sich
Spielzeit an. Drücken und behalten Sie die
die CD schneller, als bei der normalen
16
3790.qxd 15.08.05 17:15 Page 16

DEUTSCH
Wiedergabe, weil die Daten von der CD im
Speicherkarte werden abgelesen. Am LCD
Gerätespeicher gespeichert werden. Dabei
Display wird die Gesamtzahl der auf der
werden die Batterien schneller leer.
Speicherkarte gespeicherten MP3 Dateien
Aktivieren Sie das Abtastersprung
angezeigt. Drücken Sie die Taste WIEDER
Verhütungssystem (ASP) nur wenn Sie es
GABE/PAUSE (PLAY/PAUSE) (4;) (4), um
wirklich brauchen, um die Arbeitsdauer der
die Wiedergabe zu beginnen. Drücken Sie
Batterien nicht zu verkürzen.
die Taste STOP/FUNKTION (9), um die CD
Wiedergabe wieder zu aktivieren, das Gerät
ACHTUNG: bei der Wiedergabe der MP3
schaltet dabei in den Betrieb “CDDISC” um.
Disks ist das Abtastersprung
Verhütungssystem (ASP) immer aktiv und
BEDIENUNG
nicht abschaltbar.
Reinigung des Geräts
Wischen Sie die Oberfläche des Geräts mit
Tastensperre (HOLD)
einem weichen mit dem Seifenwasser ange
Das Gerät besitzt eine Tastensperre
feuchten Lappen aus.
Funktion HOLD (18). Um die Tastensperre zu
aktivieren schalten Sie den Umschalter (18)
CDPflege
auf “ON” um.
Gehen Sie mit den CDs sorgsam um. Fassen
Sie die CDs nur an den Rändern. Berühren
SpeicherkarteSlot SD/MMC
Sie nie die glänzende Unterseite der CDs.
Stecken Sie im StandbyBetrieb die
Kleben Sie keine Klebebänder, Aufkleber
Speicherkarte Typ SD oder MMC mit den
oder Sonstiges an die Oberseite der CDs.
MP3 MusikDateien in den Speicherkarte
Wischen Sie die CDs regelmäßig mit einem
Slot (21) ein. Drücken Sie kurz auf die Taste
weichen trockenen Lappen aus (verwenden
STOP (9), dabei zeigt das Display die
Sie keine Wolllappen). Verwenden Sie beim
Anzeige “CARDUSB” an und die Daten von
CDReinigen keine ReinigungsSprühmittel
der Speicherkarte Typ SD oder MMC werden
oder antistatische Mittel. Besorgen Sie sich
abgelesen. Am LCDDisplay wird die
bei Bedarf ein spezielles CD
Gesamtzahl der auf der Speicherkarte
Reinigungsmittel. Gibt es bei der
gespeicherten MP3 Dateien angezeigt.
Wiedergabe der CD Ausfälle oder Pausen,
Drücken Sie die Taste WIEDERGABE/ PAUSE
kann die CD beschmutzt oder beschädigt
(PLAY/PAUSE) (4), um die Wiedergabe zu
(geritzt) sein. Wischen Sie die CDs in der
beginnen.
Richtung von der Mitte zum Rand aus.
Drücken Sie die Taste STOP/FUNKTION (9),
Wischen Sie die CDs nie mit
um die CDWiedergabe wieder zu aktivieren,
Kreisbewegungen aus. Um die CD aus der
das Gerät schaltet dabei in den Betrieb “CD
Box herauszunehmen drücken Sie auf die
DISC” um.
Mitte der CDBox, fassen Sie die CD an die
Ränder und nehmen Sie sie heraus.
USBSchnittstelle
Fingerabdrücke und Staub an der Unterseite
Schließen Sie im StandbyBetrieb das USB
der CDs sind mit einem weichen Stoff
Kabel (Lieferumfang) an die USB
sorgsam zu beseitigen. Im Unterschied zu
Schnittstelle (20) des Geräts an und
traditionellen Speichermitteln besitzen die
schließen Sie an das Kabel die USB
CDs keine Rillen, die Staubpartikeln oder
Speicherkarte mit den MP3 MusikDateien
Schmutz sammeln könnten, deswegen
an. Drücken Sie kurz auf die Taste STOP (9),
reicht ein weicher Lappen, um diese von der
dabei zeigt das Display die Anzeige “CARD
CDFläche auszuwischen.
USB” an und die Daten von der
17
3790.qxd 15.08.05 17:15 Page 17
DEUTSCH
TECHNISCHE DATEN
Audio
Wiedergabeformat
CD/DA –MP3
CDTyp
CDR, CDRW
DigitalAnalogUmformer
1bit DAU mit 8facher Digitalisierung
Frequenzbereich
2020000 Hz
AbtastersprungVerhütungssystem
45 sec (CD), 120 sec (??3)
Wobbelfaktor
außer Messbereich
Zahl der Wege
2Weg
Ausgangssignal
linearer Ausgang: 0,6 Volt (47 kOhm)
Kopfhörer: 20 mW (32 Ohm)
NiederfrequenzVerstärkung (100 Hz)
+10 dB
MP3
DatenaustauschGeschwindigkeit
23384 kB/s
MP3Standard
gemäß ISO 9660
Allgemeine Parameter
Speisung
2 Batterien 1,2 V / NiMH
Netzadapter 4,5 V
Aufnahmeleistung
0,8 W
Abmessungen
~135 mm (L) ? 135 mm (B) ? 21 mm (H)
Gewicht (Hauptgerät ohne Batterien)
165 g
Anmerkung: technische Änderungen des Geräts im Rahmen der ProduktVerbesserung ohne
vorherige Benachrichtigung der Kunden vorbehalten.
Benutzungsdauer der Teekanne nicht weniger als 3 Jahre
Gewährleistung
Ausführliche Bedingungen der Gewährleistung kann man beim Dealer, der diese Geräte
verkauft hat, bekommen. Bei beliebiger Anspruchserhebung soll man während der Laufzeit
der vorliegenden Gewährleistung den Check oder die Quittung über den Ankauf vorzulegen.
Das vorliegende Produkt entspricht den Forderungen der elektromagnetischen
Verträglichkeit, die in 89/336/EWG Richtlinie des Rates und den Vorschriften
73/23/EWG über die Niederspannungsgeräte vorgesehen sind.
18
3790.qxd 15.08.05 17:15 Page 18

РУССКИЙ
Портативный CD/MP3плеер
Примечания
с поддержкой USB/ММС
• Если при подключении сетевого
адаптера в устройстве установлены
Перед использованием устройства
аккумуляторные батареи, прибор
внимательно прочитайте данную
автоматически переключится на
инструкцию
питание от источника переменного тока
(сетевой адаптер).
ФУНКЦИИ И УПРАВЛЕНИЕ
• Используйте только тот сетевой
1. Крышка отсека CD
адаптер, который входит в комплект.
2. Кнопка ПЕРЕХОД ВПЕРЕД/ПОИСК ПО
Использование других сетевых
ТРЕКУ ВПЕРЕД
адаптеров может повредить
3. Кнопка РЕЖИМ ВОСПРОИЗВЕДЕНИЯ
устройство.
4. Кнопка ВОСПРОИЗВЕДЕНИЕ/ПАУЗА
• Перед включением сетевого адаптера
5. Кнопка ASP/DIR/NEXT
в розетку убедитесь, что напряжение в
6. Кнопка ПРОГРАММИРОВАНИЕ
домашней электросети соответствует
7. Отсек для аккумуляторных батарей
рабочему напряжению сетевого
8. ЖК?дисплей
адаптера.
9. Кнопка СТОП/ ФУНКЦИЯ (Выключение
• Если отсутствует питание от
питания)
переменного тока, выключите сетевой
10. Кнопка ПЕРЕХОД НАЗАД/ПОИСК ПО
адаптер из розетки.
ТРЕКУ НАЗАД
• Не прикасайтесь к сетевому адаптеру
11. Разъем для наушников
влажными руками.
12. Индикатор зарядки аккумуляторных
батарей
Питание от аккумуляторных батарей
13. Кнопка крышки отсека CD
1. Отключите сетевой адаптер от розетки
14. Ручка регулировки громкости
и от устройства.
15. Разъем линейного выхода
2. Откройте отсек для аккумуляторных
16. Переключатель зарядки
батарей.
аккумуляторных батарей
3. Установите две аккумуляторных
17. Переключатель усиления низких
батареи Ni?MH (1,2 В 1200 мА/ч)
частот
(входят в комплект поставки),
18. Переключатель блокировки кнопок
соблюдая полярность.
управления
4. Закройте отсек для аккумуляторных
19. Разъем для сетевого адаптера
батарей.
20. Разъем USB
5. Установите переключатель режима
21. Разъем для карт памяти SD/MMC
зарядки батарей в положение ON для
начала зарядки, при этом загорится
ПИТАНИЕ
красный индикатор зарядки
Питание от сетевого адаптера (входит в
аккумуляторных батарей (CHARGE).
комплект поставки)
1. Вставьте штекер, расположенный на
ВНИМАНИЕ! Во избежание повреждения
конце шнура сетевого адаптера, в
устройства и аккумуляторных батарей
разъем для подключения сетевого
продолжительность одного цикла зарядки
адаптера (19).
не должна превышать 12 часов.
2. Включите сетевой адаптер в
электрическую розетку с напряжением
Осторожно!
переменного тока 220?230В ~ 50 Гц.
• Не устанавливайте в устройство
одновременно аккумуляторные (Ni?MH)
19
3790.qxd 15.08.05 17:15 Page 19

РУССКИЙ
и обычные (например, угольно?
8. Для паузы воспроизведения нажмите
цинковые) батареи.
кнопку ВОСПРОИЗВЕДЕНИЕ/ПАУЗА
• Не заряжайте аккумуляторы течение 12
(PLAY/PAUSE) (4;) (4). Номер трека и
и более часов.
истекшее время звучания замигают на
экране. Еще раз нажмите кнопку
Примечания
ВОСПРОИЗВЕДЕНИЕ/ПАУЗА (PLAY/
• Если аккумуляторы заряжаются в
PAUSE) (4;) (4) для возобновления
первый раз, для их полной зарядки
воспроизведения.
потребуется около 15 часов.
9. Чтобы остановить воспроизведение,
• Если время работы аккумуляторов
нажмите кнопку СТОП (STOP) (9).
значительно сократилось даже при их
10.Чтобы выключить устройство, нажмите
правильной зарядке, приобретите
и удерживайте кнопку СТОП (STOP) (9)
новый комплект аккумуляторов.
более двух секунд.
ПОДКЛЮЧЕНИЕ
CD
Подключение к аудиосистеме
Нажмите кнопку ВОСПРОИЗВЕДЕНИЕ
Подключите стереокабель (не входит в
(PLAY) (4;) (4) для начала
комплект поставки) к разъему линейного
воспроизведения диска.
выхода устройства LINE OUT (15) и к
На короткое время на ЖК?дисплее
разъему аудиосистемы CD/AUX.
отобразится общее число треков и общее
время звучания диска. Во время
Примечание: перед любым
воспроизведения на дисплее будет
подключением плеера к аудиосистеме
появляться номер текущего трека и
отключите оба устройства от сети
отображаться отсчет времени его
переменного тока.
воспроизведения.
НАУШНИКИ
MP3
Подключите штекер наушников (входят в
Нажмите кнопку ВОСПРОИЗВЕДЕНИЕ/
комплект поставки) к гнезду для
ПАУЗА (PLAY/PAUSE) (4;) (4) для начала
наушников.
воспроизведения диска.
На короткое время на ЖК?дисплее
ВОСПРОИЗВЕДЕНИЕ CD/MP3
отобразится общее количество альбомов
1. Подключите штекер наушников
(папок) и треков. При воспроизведении на
(входят в комплект поставки) к гнезду
ЖК?дисплее будет отображаться
для наушников.
информация о воспроизводимом треке
2. Нажмите кнопку крышки CD (13).
(название исполнителя, альбома, трека).
3. Установите диск этикеткой вверх.
4. Закройте крышку отсека CD.
Примечание: информация о текущем
5. Установите ручку регулировки
треке отобразится только в случае ее
громкости (VOLUME) (14) на
присутствия на воспроизводимом диске.
минимальный уровень.
6. Нажмите кнопку ВОСПРОИЗВЕДЕНИЕ/
Примечания
ПАУЗА (PLAY/PAUSE) (4;) (4) ?
• Если во время воспроизведения
устройство автоматически включится,
отрыть крышку отсека CD (1), на ЖК
на ЖК?дисплее появится надпись
дисплее появится надпись OPEN
READING (СЧИТЫВАНИЕ) и начнется
(ОТКРЫТО).
воспроизведение.
• Нажмите кнопку СТОП (STOP) (9),
7. Установите желаемый уровень
прежде чем нажать кнопку крышки CD
громкости.
(13).
20
3790.qxd 15.08.05 17:15 Page 20
- 1
- 2


