Vitek VT-1270: инструкция
Раздел: Бытовая, кухонная техника, электроника и оборудование
Тип: Ростер
Характеристики, спецификации
Инструкция к Ростеру Vitek VT-1270
Оглавление

Vt-1270.qxd 08.12.04 11:12 Page 2
1
3
5
7
9
11
13
15
17
19
21
6=IJA
23
25
VT-1270 SR
27
Vt-1270.qxd 08.12.04 11:12 Page 3
Vt-1270.qxd 08.12.04 11:12 Page 4

ENGLISH
MINI TOASTER OVEN
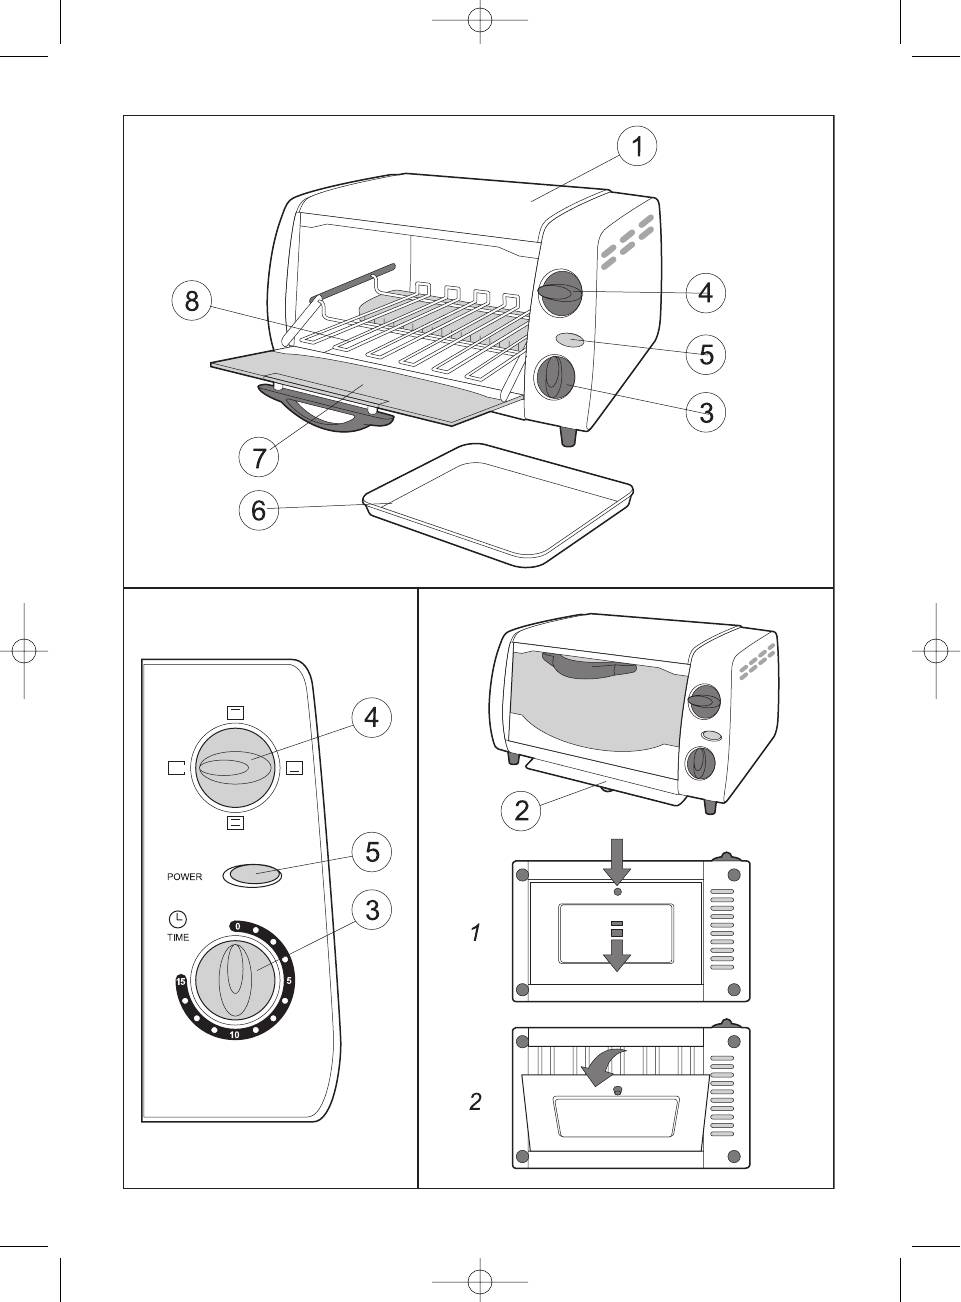
4. Mode Select Switch.
5. Power Indicator Light.
Read all Safety Instructions and User's
6. Baking Tray.
Manual carefully. Always keep the User's
7. Glass Door.
Manual at hand.
8. Toasting Rack.
Low Power Consumption Multi-Purpose Mini
PREPARATION FOR USE
Toaster Oven
Remove the mini toaster oven from the
package.
Mode select switch serves to select the
Wipe the case and the cooking chamber
required cooking or heating mode. The timer
with a damp cloth and wash the baking
will automatically switch the oven off after the
tray.
set time has expired.
Prior to switching the unit on for the first
time, make sure the voltage in power out-
Glass door allows for visual control of cook-
let is the same as marked on the unit case.
ing.
SWITCHING THE MINI TOASTER OVEN
SAFETY INSTRUCTIONS
ON
Read all instructions carefully before
Peculiar odor and a slight smoke may
using this unit.
occur upon switching the unit on for the
Make sure the voltage in power outlet is
first time, as the surface of heating ele-
the same as marked on the unit case.
ments begins to burn. This is normal. The
Never leave the operating appliance unat-
odor and the smoke will disappear as the
tended.
unit reaches the maximum temperature.
Operate the unit in places well out of reach
For proper cooking, add 3-5 minutes to
of children and/or incapacitated persons.
the cooking time, to allow the oven heat
Check the power cable for damages on a
up.
regular basis. Never use the appliance, if
you detect any damage to the unit or the
OPERATION OF THE MINI TOASTER OVEN
power cable.
Open the door and set Baking Tray (6) on
For repairs of the unit or replacement of
Toasting Rack (8).
the power cable refer to the authorized
Arrange products on Baking Tray (6). Low
service center.
fat products may be laid directly on the
This appliance is intended for household
tray. Wrap greasy products in aluminum
purposes only and shall be operated in full
foil to prevent burning of fat and the
compliance with the User's Manual.
smoke.
Never operate the appliance near hot sur-
Turn Mode Select Switch (4) to the
faces.
required cooking mode.
Always unplug the unit before cleaning.
- Heating elements are "Off".
Never use outdoors.
Never carry the unit by the power cable.
Be careful during the operation of the unit.
- Upper heating element in "On" (roast-
The oven case may get very hot.
ing).
Use protective gloves or mitts to retrieve
- Lower heating element in "On" (heating).
the tray.
DESCRIPTION
- Both heating elements are "On" (baking
1. Case.
or cooking).
2. Drip Tray Handle.
3. Timer.
1
Vt-1270.qxd 08.12.04 11:12 Page 1
ENGLISH
Switch the Mini Toaster Oven on by turn-
ing, make sure to wipe the cooking cham-
ing the Timer (3) clockwise and select the
ber dry.
required cooking time.
Maximum cooking time is 15 minutes.
Cleaning the Tray
Upon completion of cooking, the bell will
Make sure the Mini Toaster Oven is cold,
ring and the unit will switch off automati-
then lift it, push the plastic tray handle
cally.
outwards and open (see Fig. 1). Remove
To switch the oven off in the process of
crumbs, push the tray handle down and
cooking, turn the Timer (3) counter-
close (see Fig. 2). The Crumb Tray should
clockwise to "0" - the oven will switch off.
be cleaned on a regular basis.
After use, turn the Mode Select Switch (4)
into "Off" position; set the Timer to "0"
SPECIFICATIONS
and unplug the unit.
Cooking chamber capacity: 10 L
Power requirement: 220-230 V, ~50-60 Hz
WARNING
Max. power: 600 W
Always unplug before cleaning.
Avoid any contact with operating oven and
Specifications subject to change without
the glass door to prevent burns.
prior notice.
Never immerse the unit, the power cable
or the plug into water or any other liquids.
MINIMUM SERVICE LIFE - 5 YEARS
Install the unit on an even and heat-resist-
ant surface.
GUARANTEE
To avoid fire in the cooking chamber,
Details regarding guarantee conditions can
make sure the products are not in direct
be obtained from the dealer from whom the
contact with the heating elements.
appliance was purchased. The bill of sale or
Make sure the Glass Door does not con-
receipt must be produced when making any
tact with cold items or liquids. The abrupt
claim under the terms of this guarantee.
change of temperature may cause dam-
age to the glass.
This product conforms to the
Let the oven cool down before removing
EMC-Requirements as laid down
the crumb tray.
by the Council Directive
89/336/EEC and to the Law
CLEANING AND MAINTENANCE
Voltage Regulation (73/23 EEC)
Cleaning is recommended after each use
of the oven. Prior to cleaning, make sure
the unit is unplugged.
Wash the tray in hot, soapy water, rinse
and allow to dry.
Wipe the case with clean, soft cloth,
slightly soaked in warm, soapy water.
Never let the water get inside the unit.
After cleaning, make sure to wipe the case
dry.
Cleaning the Cooking Chamber
Use clean, soft cloth slightly soaked in
warm, soapy water to remove greasy
spots. Extreme caution is required when
cleaning the heating element. Make sure
the heating element is cold. After clean-
2
Vt-1270.qxd 08.12.04 11:12 Page 2

DEUTSCH
MINI-OFEN
BESCHREIBUNG
1. Gehäuse
Lesen Sie alle Sicherheitshinweise und
2. Öffnungsgriff für die Palette
Bedienungsanleitungen des Mini-Ofens
3. Timer
aufmerksam durch, bewahren Sie
4. Betriebsstufenschalter
Gebrauchsanweisung an einem zugänglichen
5. Betriebsanzeigelicht
Platz auf.
6. Backblech
7. Glastür
Der Mini-Ofen ist sparsam im Stromverbrauch
8. Gitter
und universell im Gebrauch. Der
Betriebsstufenschalter erlaubt es die gewün-
VORBEREITUNG ZUM BETRIEB
schte Zubereitungsstufe oder die
Nehmen Sie den Ofen aus der Verpackung.
Aufwärmungsstufe wählen, und der Timer
Wischen Sie das Gehäuse und die
schaltet den Ofen nach Ablauf der eingegebe-
Betriebskammer mit einem feuchten
nen Zeit aus.
Stofflappen ab und waschen Sie das
Backblech.
Die Glastür erlaubt es den Prozess der
Überzeugen Sie sich vor dem Anschalten
Speisenzubereitung visuell zu kontrollieren.
davon, dass die elektrische Stromspannung
der Betriebsspannung des Mini-Ofens
SICHERHEITSVORKEHRUNGEN
entspricht.
Lesen Sie vor der Anwendung diese
Gebrauchsanweisung aufmerksam durch.
EINSCHALTEN DES MINI-OFENS
Überzeugen Sie sich davon, dass die elek-
Bei dem ersten Einschalten des Geräts sind
trische Stromspannung der auf dem
das Auftreten eines spezifischen Geruches
Gehäuse des Gerätes angegebenen
und ein leichtes Rauchen möglich. Das ist
Spannung entspricht.
eine normale Erscheinung, die mit dem
Lassen Sie das angeschaltete Gerät nicht
Abbrennen der Heizelementoberflächen
ohne Aufsicht.
zusammenhängt; sobald die
Stellen Sie das Gerät während der
Höchsttemperatur erreicht ist, gehen diese
Anwendung an Orten auf, die für Kinder und
Erscheinungen wieder zurück.
behinderte Personen nicht zugängig sind.
Für die qualitative Lebensmittelzubereitung
Überprüfen Sie das Stromkabel regelmäßig,
ist es notwendig die Kochzeit auf 3-5
im Fall einer Beschädigung des Gerätes
Minuten zu erhöhen, die für das Erhitzen
oder des Stromkabels ist die Anwendung
des Ofens notwendig sind.
des Gerätes verboten.
Wenden Sie sich an ein autorisiertes
ANWENDUNG DES MINI-OFENS
Service-Center, um das Stromkabel
Öffnen Sie die Ofentür und stellen Sie das
auszuwechseln oder um Reparaturarbeiten
Backblech (6) auf das Gitter (8).
durchführen zu lassen.
Legen Sie die Lebensmittel auf das
Verwenden Sie dieses Gerät nur in
Backblech (6), fettlose Lebensmittel kön-
Haushaltszwecken und entsprechend der
nen auf das Backblech gelegt werden, fette
Gebrauchsanweisung.
Lebensmittel müssen in Alufolie gewickelt
Benutzen Sie das Gerät nie in der Nähe von
werden, da das aus den Lebensmitteln aus-
erhitzten Oberflächen.
tretende Fett ansonsten verbrennt und
Schalten Sie das Gerät vor der Reinigung
Rauchbildung auslöst.
immer vom Stromnetz ab.
Wählen Sie mit dem Schaltergriff für die
Benutzen Sie das Gerät niemals im Freien.
Betriebsstufen (4) die gewünschte
Benutzen Sie das Stromkabel beim
Lebensmittelzubereitungsstufe.
Transport des Gerätes nie als Tragegriff.
Um den Mini-Ofen anzuschalten drehen Sie
Seien Sie vorsichtig, da sich das Gehäuse
den Timergriff (3) im Uhrzeigesinn und
des Mini-Ofens während des Betriebs
stellen Sie die gewünschte Zubereitungszeit
erhitzt.
für dir Lebensmittel ein. Die Höchstzeit für
Benutzen Sie bei dem Entfernen des
die Arbeit des Timers beträgt 15 Minuten,
Backblechs Topflappen oder spezielle
nach Ablauf der Zubereitungszeit erklingt
Schutzhandschuhe.
ein Tonsignal und das Gerät schaltet sich
automatisch aus.
3
Vt-1270.qxd 08.12.04 11:12 Page 3
DEUTSCH
- Die Heizelemente sind ausgeschaltet.
Gehäuses einen sauberen weichen
Stofflappen, der leicht von Seifenwasser
durchtränkt ist. Lassen Sie kein Gelangen
- Das obere Heizelement ist angeschaltet
von Wasser in das Innere des Gehäuses zu.
(Braten).
Reiben Sie das Gehäuse nach der
Reinigung unbedingt trocken.
- Das untere Heizelement ist angeschaltet
(Aufwärmen).
Reinigung der Betriebskammer
- Beide Heizelemente sind angeschaltet
Um Fettflecken zu entfernen sollten Sie einen
(Backen oder Lebensmittelzubereitung).
sauberen weichen Stofflappen verwenden, der
leicht von warmem Seifenwasser durchtränkt
Um den Ofen während der Zubereitung von
ist. Seien Sie bei der Reinigung des
Lebensmitteln abzuschalten, drehen Sie
Heizelementes besonders vorsichtig, überzeu-
den Timergriff (3) gegen den Uhrzeigersinn
gen Sie sich davon, das es vollständig
und stellen Sie ihn in die Position 0 der
abgekühlt ist. Reiben Sie die Betriebskammer
Ofen schaltet sich aus.
nach der Reinigung unbedingt trocken.
Stellen Sie den Betriebsstufenschalter nach
der Anwendung des Ofens in die Position
Reinigung der Palette
Ausgeschaltet, den Timergriff in die
Überzeugen Sie sich davon, dass der Mini-
Position 0 und nehmen Sie die Steckgabel
Ofen vollständig abgekühlt ist, heben Sie ihn
aus der Dose.
an, pressen Sie auf den Plastikgriff der Palette
in der Ihnen entgegengesetzten Richtung und
WARNUNGEN
öffnen Sie sie (Abb. 1). Entfernen Sie die
Schalten Sie den Ofen vor der Anwendung
Krümel, pressen Sie auf den Palettengriff und
immer von der Stromzufuhr ab.
schließen Sie sie (Abb. 2). Reinigen Sie die
Fassen Sie den Ofen und die Glastür
Palette regelmäßig.
während des Betriebs nicht mit den Händen
oder mit anderen Körperteilen an, um
TECHNISCHE KENNWERTE
Verbrennungen zu vermeiden.
Betriebskammerkapazität: 10 Liter
Tauchen Sie das Gerät, das Stromkabel
Speisespannung: 220V-230V ~ 50-60 Hz
oder die Steckgabel niemals in Wasser oder
Leistungsaufnahme: 600 Watt
in andere Flüssigkeiten.
Stellen Sie das Gerät auf einer ebenen und
Der Hersteller behält sich das Recht vor die
hitzefesten Oberfläche auf.
Charakteristiken des Gerätes ohne
Um eine Feuerentfachung in der
Vorbescheid zu ändern.
Betriebskammer zu vermeiden sollten Sie
keinen Kontakt zwischen den Lebensmitteln
Die Lebensdauer des Gerätes beträgt nicht
und den Heizelementen zulassen.
weniger, als 5 Jahre
Lassen Sie keinen Kontakt der Glastür mit
kalten Gegenständen oder Flüssigkeiten zu,
Gewährleistung
da bei einem schlagartigen
Ausführliche Bedingungen der Gewährleistung
Temperaturabsturz das Glas beschädigt
kann man beim Dealer, der diese Geräte
werden könnte.
verkauft hat, bekommen. Bei beliebiger
Öffnen Sie die Palette, um die Krümel zu
Anspruchserhebung soll man während der
entfernen, nur nachdem der Ofen aus-
Laufzeit der vorliegenden Gewährleistung den
gekühlt ist.
Check oder die Quittung über den Ankauf
vorzulegen.
REINIGUNG UND PFLEGE
Es wird empfohlen den Ofen nach jeder
Das vorliegende Produkt entspricht
Anwendung zu reinigen. Überzeugen Sie
den Forderungen der elektromag-
sich vor der Reinigung davon, dass der Ofen
netischen Verträglichkeit, die in
von der Stromzufuhr abgeschaltet ist.
89/336/EWG -Richtlinie des Rates
Waschen Sie das Backblech in heißem
und den Vorschriften 73/23/EWG
Seifenwasser aus, waschen Sie es ab und
über die Niederspannungsgeräte
lassen Sie es trocknen.
vorgesehen sind.
Verwenden Sie für die Reinigung des
4
Vt-1270.qxd 08.12.04 11:12 Page 4

ÐÓÑÑÊÈÉ
ÌÈÍÈ-ÏÅ×Ü
Äëÿ èçâëå÷åíèÿ ïðîòèâíÿ ïîëüçóéòåñü
Âíèìàòåëüíî îçíàêîìüòåñü ñî âñåìè
ïðèõâàòêàìè èëè ñïåöèàëüíûìè
èíñòðóêöèÿìè ïî ìåðàì ïðåäîñòîðîæíîñòè
çàùèòíûìè ïåð÷àòêàìè.
è ïðàâèëàì ýêñïëóàòàöèè ìèíè-ïå÷è,
õðàíèòå èíñòðóêöèþ â äîñòóïíîì ìåñòå.
ÎÏÈÑÀÍÈÅ
1. Êîðïóñ
Ìèíè-ïå÷ü - ýêîíîìè÷íà â ïîòðåáëåíèè
2. Ðó÷êà îòêðûòèÿ ïîääîíà
ýëåêòðîýíåðãèè è óíèâåðñàëüíà â
3. Òàéìåð
èñïîëüçîâàíèè.
4. Ïåðåêëþ÷àòåëü ðåæèìîâ ðàáîòû
5. Ñâåòîâîé èíäèêàòîð ðàáîòû.
Ïåðåêëþ÷àòåëü ðåæèìîâ ðàáîòû ïîçâîëÿåò
6. Ïðîòèâåíü
âûáðàòü íåîáõîäèìûé ðåæèì
7. Ñòåêëÿííàÿ äâåðöà
ïðèãîòîâëåíèÿ èëè ðàçîãðåâà ïðîäóêòîâ, à
8. Ðåøåòêà
òàéìåð îòêëþ÷èò ïå÷ü ïî èñòå÷åíèè
çàäàííîãî âðåìåíè.
ÏÎÄÃÎÒÎÂÊÀ Ê ÈÑÏÎËÜÇÎÂÀÍÈÞ
Âûíüòå ïå÷ü èç óïàêîâêè.
Ñòåêëÿííàÿ äâåðöà ïå÷è ïîçâîëÿåò
Ïðîòðèòå êîðïóñ è ðàáî÷óþ êàìåðó ïå÷è
âèçóàëüíî êîíòðîëèðîâàòü ïðîöåññ
âëàæíîé òêàíüþ, à ïðîòèâåíü ïðîìîéòå.
ïðèãîòîâëåíèÿ ïðîäóêòîâ.
Ïåðåä âêëþ÷åíèåì óáåäèòåñü, ÷òî
íàïðÿæåíèå ýëåêòðè÷åñêîé ñåòè
ÌÅÐÛ ÁÅÇÎÏÀÑÍÎÑÒÈ
ñîîòâåòñòâóåò ðàáî÷åìó íàïðÿæåíèþ
Ïåðåä èñïîëüçîâàíèåì âíèìàòåëüíî
ìèíè-ïå÷è.
ïðî÷èòàéòå äàííûå èíñòðóêöèè.
Óáåäèòåñü, ÷òî íàïðÿæåíèå
ÂÊËÞ×ÅÍÈÅ ÌÈÍÈ-ÏÅ×È
ýëåêòðè÷åñêîé ñåòè ñîîòâåòñòâóåò
Ïðè ïåðâîì âêëþ÷åíèè ïðèáîðà
íàïðÿæåíèþ, óêàçàííîìó íà êîðïóñå
âîçìîæíî ïîÿâëåíèå ñïåöèôè÷åñêîãî
óñòðîéñòâà.
çàïàõà è ïîÿâëåíèå íåáîëüøîãî äûìêà.
Íå îñòàâëÿéòå âêëþ÷åííîå óñòðîéñòâî
Ýòî íîðìàëüíîå ÿâëåíèå, ñâÿçàííîå ñ
áåç ïðèñìîòðà.
îáãîðàíèåì ïîâåðõíîñòè íàãðåâàòåëüíûõ
Âî âðåìÿ ðàáîòû ðàñïîëàãàéòå
ýëåìåíòîâ; êàê òîëüêî áóäåò äîñòèãíóòà
óñòðîéñòâî â ìåñòàõ, íåäîñòóïíûõ äëÿ
ìàêñèìàëüíàÿ òåìïåðàòóðà, ýòè ÿâëåíèÿ
äåòåé èëè ëèö ñ îãðàíè÷åííûìè
èñ÷åçíóò.
âîçìîæíîñòÿìè.
Äëÿ êà÷åñòâåííîãî ïðèãîòîâëåíèÿ
Ðåãóëÿðíî ïðîâåðÿéòå ñåòåâîé êàáåëü,
ïðîäóêòîâ íåîáõîäèìî óâåëè÷èòü âðåìÿ
ïðè îáíàðóæåíèè äåôåêòîâ â óñòðîéñòâå
ïðèãîòîâëåíèÿ íà 3 -5 ìèíóò, êîòîðûå
èëè ñåòåâîì êàáåëå èñïîëüçîâàòü
íåîáõîäèìû äëÿ ðàçîãðåâà ïå÷è.
óñòðîéñòâî çàïðåùàåòñÿ.
Äëÿ çàìåíû ñåòåâîãî êàáåëÿ èëè ðåìîíòà
ÈÑÏÎËÜÇÎÂÀÍÈÅ ÌÈÍÈ-ÏÅ×È
óñòðîéñòâà îáðàòèòåñü â àâòîðèçîâàííûé
Îòêðîéòå äâåðöó ïå÷è è óñòàíîâèòå
ñåðâèñíûé öåíòð.
ïðîòèâåíü (6) íà ðåøåòêó (8).
Èñïîëüçóéòå äàííîå óñòðîéñòâî òîëüêî â
Ïîëîæèòå ïðîäóêòû íà ïðîòèâåíü (6),
áûòîâûõ öåëÿõ è â ñîîòâåòñòâèè ñ
íåæèðíûå ïðîäóêòû ìîæíî êëàñòü íà
èíñòðóêöèåé ïî ýêñïëóàòàöèè.
ïðîòèâåíü, à æèðíûå ïðîäóêòû
Íèêîãäà íå èñïîëüçóéòå óñòðîéñòâî
íåîáõîäèìî çàâîðà÷èâàòü â
âáëèçè íàãðåòûõ ïîâåðõíîñòåé.
àëþìèíèåâóþ ôîëüãó, ïîñêîëüêó æèð,
Âñåãäà îòêëþ÷àéòå óñòðîéñòâî îò
âûäåëÿþùèéñÿ èç ïðîäóêòîâ, áóäåò
ýëåêòðè÷åñêîé ñåòè ïåðåä ÷èñòêîé.
ãîðåòü, âûçûâàÿ îáðàçîâàíèå äûìà.
Íèêîãäà íå èñïîëüçóéòå óñòðîéñòâî âíå
Ðó÷êîé ïåðåêëþ÷àòåëÿ ðåæèìîâ ðàáîòû
ïîìåùåíèÿ.
(4) âûáåðèòå íåîáõîäèìûé ðåæèì
Íèêîãäà íå èñïîëüçóéòå ñåòåâîé êàáåëü â
ïðèãîòîâëåíèÿ ïðîäóêòîâ.
êà÷åñòâå ðó÷êè äëÿ ïåðåíîñêè äàííîãî
óñòðîéñòâà.
Âî âðåìÿ ðàáîòû ïðèáîðà êîðïóñ ìèíè-
ïå÷è íàãðåâàåòñÿ, áóäüòå îñòîðîæíû.
5
Vt-1270.qxd 08.12.04 11:12 Page 5
ÐÓÑÑÊÈÉ
- Íàãðåâàòåëüíûå ýëåìåíòû îòêëþ÷åíû.
Îòêðûâàéòå ïîääîí äëÿ óäàëåíèÿ êðîøåê
òîëüêî ïîñëå òîãî, êàê ïå÷ü îñòûíåò.
- Âêëþ÷åí âåðõíèé íàãðåâàòåëüíûé
×ÈÑÒÊÀ È ÓÕÎÄ
ýëåìåíò (çàæàðèâàíèå ïðîäóêòîâ)
Ðåêîìåíäóåòñÿ ïðîèçâîäèòü ÷èñòêó ïå÷è
ïîñëå êàæäîãî èñïîëüçîâàíèÿ. Ïåðåä
- Âêëþ÷åí íèæíèé íàãðåâàòåëüíûé
÷èñòêîé óáåäèòåñü, ÷òî ïå÷ü îòêëþ÷åíà îò
ýëåìåíò (ïîäîãðåâ ïðîäóêòîâ).
ýëåêòðè÷åñêîé ñåòè.
- Âêëþ÷åíû îáà íàãðåâàòåëüíûõ
Ïðîìîéòå ïðîòèâåíü â ãîðÿ÷åé ìûëüíîé
ýëåìåíòà (âûïå÷êà èëè ïðèãîòîâëåíèå
âîäå, îïîëîñíèòå è âûñóøèòå.
ïðîäóêòîâ).
Äëÿ ÷èñòêè êîðïóñà èñïîëüçóéòå ÷èñòóþ
ìÿãêóþ òêàíü, ñëåãêà ñìî÷åííóþ â òåïëîé
Äëÿ âêëþ÷åíèÿ ìèíè-ïå÷è ïîâåðíèòå
ìûëüíîé âîäå. Íå äîïóñêàéòå ïîïàäàíèÿ
ðó÷êó òàéìåðà (3) ïî ÷àñîâîé ñòðåëêå è
âîäû âíóòðü êîðïóñà. Ïîñëå ÷èñòêè
óñòàíîâèòå íåîáõîäèìîå âðåìÿ
êîðïóñà îáÿçàòåëüíî ïðîòðèòå åãî
ïðèãîòîâëåíèÿ ïðîäóêòîâ. Ìàêñèìàëüíîå
íàñóõî.
âðåìÿ ðàáîòû òàéìåðà ðàâíî 15 ìèíóòàì,
ïî îêîí÷àíèè âðåìåíè ïðèãîòîâëåíèÿ
×èñòêà ðàáî÷åé êàìåðû
ðàçäàñòñÿ çâóêîâîé ñèãíàë è óñòðîéñòâî
Äëÿ óäàëåíèÿ æèðîâûõ ïÿòåí èñïîëüçóéòå
àâòîìàòè÷åñêè îòêëþ÷èòñÿ.
÷èñòóþ ìÿãêóþ òêàíü, ñëåãêà ñìî÷åííóþ â
Äëÿ âûêëþ÷åíèÿ ïå÷è âî âðåìÿ
òåïëîé ìûëüíîé âîäå. Îñîáóþ
ïðèãîòîâëåíèÿ ïðîäóêòîâ ïîâåðíèòå
îñòîðîæíîñòü ïðîÿâëÿéòå ïðè ÷èñòêå
ðó÷êó òàéìåðà (3) ïðîòèâ ÷àñîâîé ñòðåëêè
íàãðåâàòåëüíîãî ýëåìåíòà, óáåäèòåñü, ÷òî
è óñòàíîâèòå åå â ïîëîæåíèå "0" - ïå÷ü
îí ïîëíîñòüþ îñòûë. Ïîñëå ÷èñòêè ðàáî÷åé
âûêëþ÷èòñÿ.
êàìåðû îáÿçàòåëüíî ïðîòðèòå åå íàñóõî.
Ïîñëå èñïîëüçîâàíèÿ ïå÷è óñòàíîâèòå
ïåðåêëþ÷àòåëü ðåæèìîâ ðàáîòû (4) â
×èñòêà ïîääîíà
ïîëîæåíèå "âûêëþ÷åíî", à ðó÷êó òàéìåðà
Óáåäèòåñü, ÷òî ìèíè-ïå÷ü ïîëíîñòüþ
- â ïîëîæåíèå 0 è îòêëþ÷èòå ñåòåâóþ
îñòûëà, ïðèïîäíèìèòå åå, íàæìèòå (ïî
âèëêó èç ðîçåòêè.
íàïðàâëåíèþ îò ñåáÿ) íà ïëàñòìàññîâóþ
ðó÷êó ïîääîíà è îòêðîéòå åãî (ðèñ. 1).
Ïðåäîñòåðåæåíèÿ
Óäàëèòå êðîøêè, íàæìèòå íà ðó÷êó ïîääîíà
Âñåãäà îòêëþ÷àéòå ïå÷ü îò ñåòè ïåðåä åå
è çàêðîéòå åãî (ðèñ. 2). Ðåãóëÿðíî î÷èùàéòå
÷èñòêîé.
ïîääîí.
Âî âðåìÿ èñïîëüçîâàíèÿ ïå÷è íå
ïðèêàñàéòåñü ðóêàìè èëè äðóãèìè
ÒÅÕÍÈ×ÅÑÊÈÅ ÄÀÍÍÛÅ
÷àñòÿìè òåëà ê ïîâåðõíîñòè êîðïóñà è
Îáúåì ðàáî÷åé êàìåðû: 10 ëèòðîâ
ñòåêëÿííîé äâåðöå âî èçáåæàíèå
Íàïðÿæåíèå ïèòàíèÿ: 220-230 Â ~ 50-60 Ãö
ïîëó÷åíèÿ îæîãîâ.
Ïîòðåáëÿåìàÿ ìîùíîñòü: 600 Âò
Íèêîãäà íå ïîãðóæàéòå ïðèáîð, ñåòåâîé
êàáåëü èëè ñåòåâóþ âèëêó â âîäó èëè èíûå
Ïðîèçâîäèòåëü îñòàâëÿåò çà ñîáîé ïðàâî
æèäêîñòè.
èçìåíÿòü õàðàêòåðèñòèêè ïðèáîðà áåç
Óñòàíàâëèâàéòå ïðèáîð íà ðîâíîé è
ïðåäâàðèòåëüíîãî óâåäîìëåíèÿ.
òåðìîñòîéêîé ïîâåðõíîñòè.
Âî èçáåæàíèå âîçãîðàíèÿ â ðàáî÷åé
Ñðîê ñëóæáû ïðèáîðà íå ìåíåå 5-òè ëåò
êàìåðå ïðèáîðà íå äîïóñêàéòå
íåïîñðåäñòâåííîãî êîíòàêòà ïðîäóêòîâ ñ
Äàííîå èçäåëèå ñîîòâåòñòâóåò
íàãðåâàòåëüíûìè ýëåìåíòàìè.
âñåì òðåáóåìûì åâðîïåéñêèì
Íå äîïóñêàéòå êîíòàêòîâ ñòåêëÿííîé
è ðîññèéñêèì ñòàíäàðòàì
äâåðöû ñ õîëîäíûìè ïðåäìåòàìè èëè
áåçîïàñíîñòè è ãèãèåíû.
æèäêîñòÿìè, òàê êàê èç-çà ðåçêîãî
ïåðåïàäà òåìïåðàòóðû âîçìîæíî
Ïðîèçâîäèòåëü: ÀÍ-ÄÅÐ ÏÐÎÄÀÊÒÑ ÃìáÕ,
ïîâðåæäåíèå ñòåêëà.
Àâñòðèÿ
Éåíåâàéíãàññå, 10/10, 1210, Âåíà, Àâñòðèÿ
6
Vt-1270.qxd 08.12.04 11:12 Page 6

FRANÇAIS
MINI FOUR
DESCRIPTION
1. Corps de lappareil
Veuillez lire attentivement toutes les notices et
2. Poignée douverture de la lèchefrite
les consignes de sécurité avant de commencer
3. Minuterie
lexploitation du mini four, gardez le mode
4. Sélecteur des régimes de fonctionnement
demploi dans un endroit accessible pour de
5. Témoin de fonctionnement.
futures références.
6. Rôtissoire
7. Porte en verre
Le mini four est économe en énergie et uni-
8. Grille
verselle à lutilisation.
Le sélecteur des régimes de fonctionnement
PRÉPARATION À LUTILISATION
permet le choix du régime nécessaire pour la
Déballez le four.
cuisson ou réchauffage des aliments et la
Essuyez le corps de lappareil et la chambre
minuterie débranchera lappareil à lissus du
de fonctionnement avec un chiffon humide
temps de préparation.
et lavez la rôtissoire.
Avant le branchement de lappareil vérifiez
La porte en verre permet de contrôler le
que sa tension dalimentation correspond à
processus de cuisson.
la tension de votre installation.
CONSIGNES DE SÉCURITÉ
BRANCHEMENT DU MINI FOUR
Veuillez lire attentivement ce mode demploi
A la première utilisation de lappareil peut
avant de commencer lexploitation de lap-
apparaître un peut de fumée.
pareil.
Cest un effet normal causé par le grillage
Avant le branchement de lappareil vérifiez
de la surface des résistances de chauffage;
que la tension indiquée sur lappareil corre-
cet effet disparaîtra après que les résis-
spond à la tension de votre installation.
tances auront atteint la température maxi-
Ne laissez pas lappareil en utilisation sans
male.
surveillance.
Pour la cuisson de bonne qualité il faut aug-
Pendant lutilisation de lappareil placez-le
menter le temps de cuisson pour 3 -5 min-
dans les endroits inaccessibles pour les
utes, pour laissez le four se réchauffer.
enfants et les personnes aux capacités lim-
itées.
UTILISATION DU MINI FOUR
Contrôlez régulièrement létat du cordon
Ouvrez la porte du four et placez la rôtissoire
dalimentation, en cas dendommagement
(6) sur la grille (8).
du cordon ou de lappareil lutilisation de
Mettez les aliments sur la rôtissoire (6),
lappareil est interdite.
enveloppez les aliments gras dans une
Pour remplacer le cordon dalimentation ou
feuille daluminium puisque la graisse sor-
réparer lappareil adressez-vous au centre
tant des aliments sera brûlé ce qui provo-
de service agréé.
quera lapparition de la fumée.
Utilisez le présent appareil uniquement aux
Choisissez le régime de fonctionnement
fins domestiques conformément au présent
désiré avec le sélecteur du régime de fonc-
mode demploi.
tionnement.
Nutilisez jamais lappareil à proximité des
- Les résistances de chauffage sont
surfaces chauffées.
débranchées.
Noubliez pas de déconnecter lappareil du
secteur avant de commencer le nettoyage.
- La résistance supérieure est branchée
Nutilisez jamais lappareil dehors.
(grillage des aliments).
Nutilisez jamais le cordon dalimentation
en guise dune poignée pour porter lap-
- La résistance inférieure est branchée
pareil.
(réchauffage des aliments).
Pendant le fonctionnement de lappareil son
corps se chauffe soyez prudent.
- Les deux résistances sont branchées
Pour sortir la rôtissoire utilisez des gants de
(cuisson ou étuvage).
cuisine.
7
Vt-1270.qxd 08.12.04 11:12 Page 7
FRANÇAIS
Pour brancher le mini four tournez la
Nettoyage de la chambre de fonction-
poignée de la minuterie (3) dans le sens
nement
dune aiguille dune montre et réglez le
Pour enlever des taches grasses utilisez un
temps nécessaire à la cuisson. Le temps
chiffon propre doux trempé dans leau
maximal de la minuterie est égal à 15 min-
savonneuse tiède. Soyez particulièrement
utes, à lissus du temps de cuisson lap-
prudent en nettoyant la résistance de
pareil sera automatiquement débranché et
chauffage, assurez-vous quelle est com-
un signal sonore vous en avertira.
plètement refroidie. Après le nettoyage de
Pour débrancher le four pendant la cuisson
la chambre de fonctionnement noubliez
de nourriture tournez la poignée de la minu-
pas de lessuyer à sec.
terie (3) dans le sens contraire dune aiguille
dune montre et mettez-la à la position «0» -
Nettoyage de la lèchefrite
ce four sera débranché.
Vérifiez que le four est complètement refroi-
Après lutilisation du four mettez le
di, soulevez-le, appuyez sur la poignée en
sélecteur des régimes de fonctionnement
plastique de la lèchefrite et ouvrez-la (fig.
(4) à la position «arrêt», et la poignée de la
1). Enlevez les miettes, appuyez sur la
minuterie à la position «0» et déconnectez
poignée pour fermer la lèchefrite (fig. 2).
lappareil du secteur.
Nettoyez la lèchefrite régulièrement.
PRÉCAUTIONS
DONNÉES TECHNIQUES
Noubliez pas de déconnecter lappareil du
Volume de la chambre de fonctionnement: 10 l
secteur avant de commencer le nettoyage.
Tension dalimentation: 220-230 V~50-60 Hz
Pendant lutilisation de lappareil au risque
Puissance consommée: 600 W
de brûlures ne touchez pas avec des mains
ou autres membres à la surface du corps du
Le fabricant se réserve le droit de modifier les
four ni à la porte en verre.
caractéristiques de lappareil sans préavis.
Nimmergez jamais lappareil, le cordon
dalimentation ni la fiche dans leau ou tout
Le délai de service est pas moins de 5 ans.
autre liquide. Placez lappareil sur une sur-
face plane et résistante à la chaleur.
Garantie
Au risque dinflammation dans la chambre
Pour des conditions de garantie plus détail-
de fonctionnement évitez le contact direct
lées adressez-vous au distributeur qui vous a
des aliments avec des résistances de
vendu lappareil. En cas de toute sorte de pré-
chauffage.
tention pendant la période de la présente
Evitez le contact de la portière en verre avec
garantie il faudra présenter le ticket quittance
des objets ou des liquides froids, puisque la
de lachat.
chute brusque de température risque
causer lendommagement du verre.
Nouvrez la lèchefrite quaprès que lap-
Le présent appareil satisfait aux
pareil sera refroidi.
exigences de compatibilité élec-
tromagnétique en vertu de la
NETTOYAGE ET ENTRETIEN
directive 89/336/EEC du conseil
Il est recommandé de nettoyer lappareil
de lEurope et la préscription
après chaque utilisation. Avant de com-
73/23 EEC pour lappareillage de
mencer le nettoyage assurer-vous que le
bas voltage.
four est déconnecté du secteur.
Lavez la rôtissoire dans leau tiède savon-
neuse, rincez et séchez-le.
Utilisez pour le nettoyage du corps de lap-
pareil un chiffon doux trempé dans leau
savonneuse tiède. Evitez la pénétration de
leau à lintérieur de lappareil. Après le net-
toyage du corps noubliez pas de lessuyer
à sec.
8
Vt-1270.qxd 08.12.04 11:12 Page 8

ITALIANO
MINIFORNO
Per togliere il vassoio usate le presine
oppure i guanti speciali di protezione.
Leggete attentamente tutte le istruzioni sulle
misure di sicurezza e sulle regole duso del
DESCRIZIONE GENERALE
miniforno, conservate le istruzioni in un
1. Corpo
posto accessibile.
2. Maniglia apertura vasoio
3. Timer
Il miniforno è a basso consumo dekkenergia
4. Manopola regolazione regimi di funziona-
elettrica ed universale nelluso.
mento
Linterruttore dei regimi di funzionamento
5. Spia luminosa di funzionamento
permette di scegliere un regime desiderato
6. Vasoio
di preparazione dei cibi oppure di riscalda-
7. Sportello di vetro
mento dei prodotti ed il timer spegnerà il
8. Griglia
forno alla scadenza del tempo programmato.
PREPARAZIONE PER LUSO
Lo sportello del forno in vetro permette di
Togliete limballaggio dal forno.
controllare il processo di preparazione dei
Pulite il corpo e la camera di lavoro del
prodotti visualmente.
forno con un panno umido, lavate il
vasoio.
MISURE DI SICUREZZA
Prima dellaccensione assicuratevi che la
Prima delluso leggete attentamente
tensione della rete di alimentazione cor-
queste istruzioni.
risponda alla tensione di funzionamento
Assicuratevi che la tensione della rete di
del miniforno.
alimentazione corrisponda a quella indi-
cata sul corpo dellapparecchio.
SPEGNIMENTO DEL MINIFORNO
Non lasciate lapparecchio acceso senza
Allaccensione del forno per la prima volta
sorveglianza.
è possibile la fuoriuscita di un odore
Apoggiate lapparecchio durante il fun-
specifico e apparizione di piccolo fumo. E
zionamento nei luoghi non accessibili ai
una cosa normale collegato alla bruciatu-
bambini e le persone con capacità limi-
ra della superficie di un impianto di risval-
tate.
damento; appena sarà raggiunta la tem-
Controllate il cavo di alimentazione rego-
peratura massima, questi fenomeni
larmente, nel caso se riscontraste i difetti
spariscono.
dellapparecchio oppure del cavo di ali-
Per la preparazione dei prodotti di qualità
mentazione è vietato usare lapparecchio.
è necessario aumentare il tempo di
Rivolgetevi al centro di assistenza tecnica
preparazione di 3-5 minuti i quali servono
autorizzato per la sostituzione del cavo di
per far riscaldare il forno.
alimentazione oppure per riparazione del-
lapparecchio.
LUSO DEL FORNO
Utilizzate questo apparecchio solamente
Aprite lo sportello del forno ed inserite il
per luso domestico ed in conformità alle
vasoio (6) sulla griglia (8).
istruzioni duso.
Apoggiate i prodotti sul vasoio (6), potete
Non usate mai lapparecchio vicino alle
mettere i prodotti senza grassi sul vasoio
superfici riscaldate.
ed i prodotti con alto contenuto dei grassi
Staccate sempre lapparecchio dalla rete
vengono avvolti nel foglio di alluminio per-
di alimentazione prima di pulizia.
chè i grassi che escono dai prodotti
Non usate mai lapparecchio fuori casa.
bruceranno causando formazione del
Non usate mai il cavo di alimentazione
fumo.
come una maniglia per trasporto di
Scegliete un regime desiderato di
questo apparecchio.
preparazione dei cibi con la manopola di
State attenti, il corpo di questo miniforno
regolazione dei regimi di funzionamento
si riscalda durante il funzionamento.
(4).
9
Vt-1270.qxd 08.12.04 11:12 Page 9
ITALIANO
- Limpianto di riscaldamento è spento.
Il periodo di utilizzo dellapparecchio è
non meno di 5 anni
- Limpianto di riscaldamento superiore è
Garanzia
acceso (friggitura dei prodotti).
Le condizioni dettagliate della garanzia si
- Limpianto di riscaldamento inferiore è è
possono richiedere al rivenditore dellap-
acceso (riscaldamento dei prodotti).
parecchio. Qualsiasi reclamo deve essere
richiesto prima della scadenza della
- Gli entrambi impianti di riscaldamento
garanzia e deve essere accompagnato dallo
sono accesi (per cuocere oppure
scontrino fiscale oppure da un altro docu-
preparare i prodotti).
mento che attesti lacquisto.
PULIZIA E MANUTENZIONE
Questo prodotto corrisponde ai
E consigliato effettuare pulizia del forno
requisiti di compatibilità elettro-
dopo ogni utenza. Prima di pulizia assicu-
magnetica stabiliti dalla direttiva
ratevi che il forno sia staccato dalla rete di
89/336/EEC del Consiglio
alimentazione.
Europeo e dalla Direttiva 73/23
Lavate il vasoio nellacqua calda sapona-
CEE sugli apparecchi di bassa
ta, risciacquate ed asciugate.
tensione.
Usate un panno pulito morbido legger-
mente bagnato nellacqua tiepida
saponata per pulizia del corpo. Non per-
mettete la penetrazione dellacqua dentro
il corpo. Dopo pulizia del corpo asciu-
gatelo bene obbligatoriamente.
Pulizia della camera di lavoro
Usate un panno pulito morbido legger-
mente bagnato nellacqua tiepida
saponata per togliere le macchie di gras-
so. State particolarmente attenti mentre
pulite limpianto di riscaldamento, assicu-
ratevi che sia raffreddato completamente.
Dopo pulizia della camera di lavoro asciu-
gatela bene obbligatoriamente.
Assicuratevi che il miniforno sia raffredda-
to completamente, sollevatelo, premete
la maniglia di plastica del vasoio (spingen-
dola) ed apritelo (fig. 1). Togliete le brici-
ole, premete la maniglia del vasoio e chi-
udetelo (fig. 2). Pulite il vasoio regolar-
mente.
CARATTERISTICHE TECNICHE
Capacità della camera di lavoro: 10 litri
Tensione dellalimentazione:
220 -230 V ~ 50 -60 Hz
Potenza di consumo: 600 Watts
Il produttore si riserva il diritto di cambiare le
caratteristiche dellapparecchio senza ulte-
riore avviso.
10
Vt-1270.qxd 08.12.04 11:12 Page 10

ESPAÑOL
HORNO
DESCRIPCIÓN
1. Cuerpo
Lea atentamente todas las instrucciones y
2. Asa para extraer la bandeja
precauciones referentes al uso de este
3. Temporizador
horno, y guárdelas en un lugar accesible.
4. Selector de funciones
5. Luz piloto de funcionamiento
Este horno de uso universal es de bajo con-
6. Bandeja
sumo eléctrico.
7. Puerta de cristal
8. Rejilla
Su selector de funciones, permite al usuario
establecer la función deseada de cocción o
ANTES DE PONER EN MARCHA
calentamiento de alimentos, y su tempo-
Quite el horno del embalaje.
rizador, apaga el horno al finalizar el tiempo
Limpie el cuerpo y el interior del horno
establecido.
con un paño húmedo y lave la bandeja.
Antes de encender el horno, cerciórese
Su puerta de cristal permite seguir de cerca
que la tensión de la red eléctrica de su
la cocción de los alimentos.
hogar coincida con la del horno.
PRECAUCIONES
ENCENDIDO DEL HORNO
Antes de usar este horno lea atenta-
Al encender el horno por primera vez es
mente estas instrucciones.
posible que surja un olor específico y un
Cerciórese que la tensión de la red eléc-
poco de humo. Esto es normal, y se debe
trica de su hogar coincida con la indicada
a que los elementos calentadores se
en el cuerpo del artefacto.
queman; luego, al alcanzar la temperatu-
No deje el artefacto en funcionamiento
ra máxima, el olor y el humo desapare-
desatendido.
cerán. Para lograr mejores resultados
Durante el funcionamiento disponga el
aumente el tiempo de cocción entre 3 y 5
artefacto fuera del alcance de los niños y
minutos para que el horno se caliente
discapacitados.
más.
Revise sistemáticamente el cable de ali-
mentación; se prohíbe usar el horno o su
USO DEL HORNO
cable de alimentación si estos están
Abra la puerta del horno y coloque la ban-
deteriorados.
deja (6) en la rejilla (8).
Para reemplazar el cable de alimentación
Disponga los alimentos en la bandeja (6),
o reparar el horno diríjase a un centro de
de la siguiente forma: coloque los ali-
servicio técnico autorizado.
mentos magros en la bandeja, mientras
Use este artefacto sólo en el hogar, sigu-
que los grasos envuélvalos en papel de
iendo estas instrucciones de uso.
aluminio, para evitar que la grasa que
Nunca use el artefacto cerca de superfi-
despiden estos alimentos se queme
cies calientes.
provocando humo.
Siempre desenchufe el horno de la red
Con el selector de funciones (4) selec-
eléctrica antes de limpiarlo.
cione la función deseada de cocción de
No use el artefacto a la intemperie.
los alimentos.
No use el cable de alimentación como
Para encender el horno gire la manecilla
asa de transporte del artefacto.
del temporizador (3) en sentido de las
Tenga cuidado: el cuerpo del
agujas del reloj y establezca el tiempo
artefacto se calienta durante su fun-
necesario de cocción. El tiempo máximo
cionamiento.
de funcionamiento del temporizador es
Use manoplas especiales de protección
de 15 minutos, al finalizar el tiempo de
para extraer la bandeja.
cocción sonará una señal acústica y el
horno se apagará automáticamente.
11
Vt-1270.qxd 08.12.04 11:12 Page 11
ESPAÑOL
- Los elementos calentadores están apa-
paño limpio suave, y ligeramente
gados.
humedecido en agua tibia jabonosa.
Evite que el agua penetre en el horno.
- Está encendido el elemento calentador
superior (para asar los alimentos).
Una vez finalizada su limpieza, seque
cuidadosamente el cuerpo del horno.
- Está encendido el elemento calentador
inferior (para calentar los alimentos).
Limpieza del interior del horno
Para eliminar las manchas de grasa use
- Están encendidos ambos elementos
un paño limpio suave, ligeramente
calentadores (para asar y/o cocer los
alimentos).
humedecido en agua tibia jabonosa.
Tenga mucho cuidado al limpiar el ele-
mento calentador, compruebe que esté
Para apagar el horno en plena cocción,
totalmente frío. Después de limpiar el
gire la manecilla del temporizador (3) en
interior del horno, séquelo bien.
sentido contrario a las agujas del reloj y
posiciónela en «0». De esta forma, el
Limpieza de la bandeja
horno se apagará.
Compruebe que el horno esté totalmente
Después de finalizar el uso del horno
frío, levántelo un poco, presione hacia
posicione el selector de funciones (4) en
delante el asa de plástico de la bandeja y
«apagado», y la manecilla del tempo-
retírela (dib. 1). Quite las migas, presione
rizador, en «0»; luego desenchufe el
el asa de la bandeja y vuelva a colocarla
horno del tomacorriente.
en su lugar. (dib.2). Limpie regularmente
la bandeja.
ADVERTENCIAS
Siempre desconecte el horno de la red
FICHA TÉCNICA
eléctrica antes de limpiarlo.
Capacidad: 10 litros
Evite quemaduras: no toque con las
Voltaje y frecuencia: 220-230 V ~50-60 Hz
manos u otras partes del cuerpo tanto el
Potencia de consumo: 600 W
horno como la puerta de cristal.
No sumerja el artefacto, el cable de ali-
El fabricante se reserva el derecho de mod-
mentación o el enchufe en agua u otros
ificar las características de los aparatos sin
líquidos. Disponga el artefacto sobre una
previo aviso.
superficie plana y resistente al calor.
Para evitar un incendio en el interior del
La vida útil del artefacto es no menor de
horno trate que los alimentos no rocen
5 años
los elementos calentadores.
Evite que la puerta de cristal entre en
Garantía
contacto con objetos o líquidos fríos,
La garantía detallada es entregada por el
pues por la gran diferencia de temperat-
vendedor de este aparato. Para efectuar
uras puede dañar el cristal.
cualquier reclamo, dentro del plazo de
Retire la bandeja para migas sólo
vigencia de la presente garantía, se debe
después de que el horno se enfríe.
presentar el ticket o factura de compra de
este aparato.
CUIDADO Y LIMPIEZA
Se recomienda limpiar el horno después
Este producto cumple con las
de cada uso. Antes de limpiarlo, cer-
normas de compatibilidad elec-
ciórese que el horno esté desenchufado
tromagnética, de la directiva
de la red eléctrica.
89/336/EEC del Consejo de las
Lave la bandeja en agua caliente
Comunidades Europeas, y las
jabonosa, enjuáguela y séquela.
reglamentaciones 73/23 CEE,
Para limpiar el cuerpo del horno use un
para los aparatos de bajo voltaje.
12
Vt-1270.qxd 08.12.04 11:12 Page 12

ÁÚËÃÀÐÑÊÈ
ÌÈÍÈ-ÔÓÐÍÀ
ÎÏÈÑÀÍÈÅ
1. Êîðïóñ
Âíèìàòåëíî ïðî÷åòåòå âñè÷êè èíñòðóêöèè ïî
2. Äðúæêà çà îòâàðÿíå íà ïîäëîæêàòà
ïðåäïàçíèòå ìåðêè è ïðàâèëàòà çà
3. Òàéìåð
åêñïëîàòàöèÿ íà ìèíè-ôóðíàòà, ïàçåòå
4. Ïðåâêëþ÷âàòåë íà ðåæèìèòå íà ðàáîòà
èíñòðóêöèÿòà íà äîñòúïíî ìÿñòî.
5. Ñâåòëèíåí èíäèêàòîð íà ðàáîòà.
6. Òàâà
Ìèíè ôóðíàòà èêîíîìè÷íî êîíñóìèðà
7. Ñòúêëåíà âðàòè÷êà
åëåêòðîåíåðãèÿ è ïîäõîæäà çà óíèâåðñàëíî
8. Ðåøåòêà
èçïîëçâàíå.
Ïðåâêëþ÷âàòåëÿò íà ðåæèìèòå íà ðàáîòà
ÏÎÄÃÎÒÎÂÊÀ ÇÀ ÈÇÏÎËÇÂÀÍÅ
ïîçâîëÿâà èçáèðàíå íà íåîáõîäèìèÿ ðåæèì
Èçâàäåòå ôóðíàòà îò îïàêîâêàòà.
çà ïðèãîòâÿíå è ïðåòîïëÿíå íà ïðîäóêòè, à
Èçáúðøåòå êîðïóñà íà ðàáîòíàòà êàìåðà
ñëåä èçòè÷àíå íà óñòàíîâåíîòî âðåìå,
íà ôóðíàòà ñ âëàæåí ïëàò è èçìèéòå
òàéìåðúò èçêëþ÷âà ôóðíàòà.
òàâàòà.
Ñòúêëåíàòà âðàòè÷êà íà ôóðíàòà ïîçâîëÿâà
Ïðåäè âêëþ÷âàíå ñå óáåäåòå, ÷å
ïðîöåñúò íà ïðèãîòâÿíå íà ïðîäóêòè äà ñå
íàïðåæåíèåòî â åëåêòðîìðåæàòà
êîíòðîëèðà âèçóàëíî.
ñúîòâåòñòâà íà ðàáîòíîòî íàïðåæåíèå â
ìèíè-ôóðíàòà.
ÌÅÐÊÈ ÇÀ ÁÅÇÎÏÀÑÍÎÑÒ
Ïðåäè èçïîëçâàíå âíèìàòåëíî ïðî÷åòåòå
ÂÊËÞ×ÂÀÍÅ ÍÀ ÌÈÍÈ-ÔÓÐÍÀÒÀ
äàäåíèòå èíñòðóêöèè.
Ïðè ïúðâîòî âêëþ÷âàíå íà óðåäà å
Óáåäåòå ñå, ÷å íàïðåæåíèåòî â
âúçìîæíà ïîÿâàòà íà ñïåöèôè÷íà
åëåêòðè÷åñêàòà ìðåæà ñúîòâåòñòâà íà
ìèðèçìà è íåãîëÿìî êîëè÷åñòâî äèì. Òîâà
íàïðåæåíèåòî, ïîñî÷åíî íà êîðïóñà íà
å íîðìàëíî ÿâëåíèå, ñâúðçàíî ñ
óñòðîéñòâîòî.
îáãàðÿíåòî íà ïîâúðõíîñòòà íà
Íå îñòàâÿéòå âêëþ÷åíîòî óñòðîéñòâî áåç
íàãðåâàòåëíèòå åëåìåíòè; ñëåä êàòî ñå
íàäçîð.
óñòàíîâè ìàêñèìàëíà òåìïåðàòóðà, òåçè
Ïî âðåìå íà ðàáîòà ïîñòàâÿéòå
ÿâëåíèÿ ùå èç÷åçíàò. Çà êà÷åñòâåíîòî
óñòðîéñòâîòî íà ìåñòà, íåäîñòúïíè çà
ïðèãîòâÿíå íà ïðîäóêòèòå å íåîáõîäèìî
äåöà èëè ëèöà ñ îãðàíè÷åíè âúçìîæíîñòè.
äà ñå óâåëè÷è âðåìåòî íà ïðèãîòâÿíå ñ 3 -
Ðåäîâíî ïðîâåðÿâàéòå êàáåëà çà
5 ìèíóòè, êîèòî ñà íåîáõîäèìè çà
ìðåæàòà, ïðè îòêðèâàíå íà äåôåêòè â
çàãðÿâàíåòî íà ôóðíàòà.
óñòðîéñòâîòî èëè â êàáåëà çà ìðåæàòà ñå
çàáðàíÿâà èçïîëçâàíåòî íà óðåäà.
ÈÇÏÎËÇÂÀÍÅ ÍÀ ÌÈÍÈ-ÔÓÐÍÀÒÀ
Çà çàìåíÿíå íà êàáåëà çà ìðåæàòà ïðè
Îòâîðåòå âðàòè÷êàòà íà ôóðíàòà è
ðåìîíò íà óñòðîéñòâîòî ñå îáúðíåòå â
óñòàíîâåòå òàâàòà (6) âúðõó ðåøåòêàòà (8).
óïúëíîìîùåíèÿ ñåðâèçåí öåíòúð.
Ñëîæåòå ïðîäóêòèòå âúðõó òàâàòà (6),
Èçïîëçâàéòå äàäåíîòî óñòðîéñòâî ñàìî
ïðîäóêòèòå áåç ìàçíèíà ìîãàò äà ñå
çà áèòîâè öåëè è â ñúîòâåòñòâèå ñ
ñëàãàò âúðõó òàâàòà, à ïðîäóêòèòå,
èíñòðóêöèÿòà çà åêñïëîàòàöèÿ .
ñúäúðæàùè ìàçíèíà å íåîáõîäèìî äà ñå
Íèêîãà íå èçïîëçâàéòå óñòðîéñòâîòî â
çàâèâàò â àëóìèíèåâî ôîëèî, çàùîòî
áëèçîñò äî íàãðåòè ïîâúðõíîñòè.
ìàçíèíàòà, îòäåëÿùàòà ñå îò ïðîäóêòèòå,
Âèíàãè èçêëþ÷âàéòå óñòðîéñòâîòî îò
ùå ãîðè, ïðåäèçâèêâàéêè îáðàçóâàíåòî íà
åëåêòðîìðåæàòà ïðåäè ïî÷èñòâàíå.
äèì.
Íèêîãà íå èçïîëçâàéòå óñòðîéñòâîòî
- Íàãðåâàòåëíèòå åëåìåíòè ñà
èçâúí ïîìåùåíèåòî.
èçêëþ÷åíè.
Íèêîãà íå èçïîëçâàéòå êàáåëà çà ìðåæàòà
êàòî äðúæêà çà ïðåíàñÿíå íà äàäåíèÿ
- Ãîðíèÿò íàãðåâàòåëåí åëåìåíò å
óðåä.
âêëþ÷åí (çà ïúðæåíå íà ïðîäóêòè).
Ïî âðåìå íà ðàáîòà íà ïðèáîðà êîðïóñúò
íà ìèíè-ôóðíàòà ñå íàãðÿâà, áúäåòå
- Äîëíèÿò íàãðåâàòåëåí åëåìåíò å
âíèìàòåëíè.
âêëþ÷åí (çà ïðåòîïëÿíå íà ïðîäóêòè).
Çà èçâàæäàíå íà òàâàòà èçïîëçâàéòå
ðúêîõâàòêè èëè ñïåöèàëíè çàùèòíè
- È äâàòà íàãðåâàòåëíè åëåìåíòà ñà
ðúêàâèöè.
âêëþ÷åíè (çà èçïè÷àíå è ïðèãîòâÿíåòî
íà ïðîäóêòè).
13
Vt-1270.qxd 08.12.04 11:12 Page 13

ÁÚËÃÀÐÑÊÈ
Èçáåðåòå íåîáõîäèìèÿ ðåæèì çà
÷èñò ìåê ïëàò, ëåêî íàìîêðåí â òîïëà
ïðèãîòâÿíå íà ïðîäóêòèòå ñ ïîìîùòà íà
ñàïóíåíà âîäà. Íå äîïóñêàéòå ïîïàäàíå
äðúæêàòà íà ïðåâêëþ÷âàòåëÿ íà ðåæèìèòå
íà âîäà âúòðå â êîðïóñà. Ñëåä ïî÷èñòâàíå
íà ðàáîòà (4).
íà êîðïóñà å çàäúëæèòåëíî äîáðå äà ãî
Çà âêëþ÷âàíå íà ìèíè-ôóðíàòà çàâúðòåòå
èçòðèåòå.
äðúæêàòà íà òàéìåðà (3) ïî ïîñîêà íà
÷àñîâíèêîâàòà ñòðåëêà è óñòàíîâåòå
Ïî÷èñòâàíå íà ðàáîòíàòà êàìåðà
íåîáõîäèìîòî çà ïðèãîòâÿíå íà
Çà ïðåìàõâàíå íà ìàçíè ïåòíà èçïîëçâàéòå
ïðîäóêòèòå âðåìå. Ìàêñèìàëíîòî âðåìå
÷èñò ìåê ïëàò, ëåêî íàìîêðåí â òîïëà
íà ðàáîòà íà òàéìåðà å 15 ìèíóòè, ñëåä
ñàïóíåíà âîäà. Áúäåòå îñîáåííî âíèìàòåëíè
èçòè÷àíå íà âðåìåòî çà ïðèãîòâÿíå ùå
ïðè ïî÷èñòâàíå íà íàãðåâàòåëíèÿ åëåìåíò,
ïðîçâó÷è çâóêîâ ñèãíàë, è óñòðîéñòâîòî
óáåäåòå ñå, ÷å òîé å íàïúëíî èçñòèíàë. Ñëåä
àâòîìàòè÷íî ùå ñå èçêëþ÷è.
ïî÷èñòâàíåòî íà ðàáîòíàòà êàìåðà å
Çà èçêëþ÷âàíå íà ôóðíàòà ïî âðåìå íà
çàäúëæèòåëíî äîáðå äà ÿ èçòðèåòå.
ïðèãîòâÿíå íà ïðîäóêòèòå çàâúðòåòå
äðúæêàòà íà òàéìåðà (3) ïðîòèâ
Ïî÷èñòâàíå íà ïîäëîæêàòà
÷àñîâíèêîâàòà ñòðåëêà è ÿ óñòàíîâåòå â
Óáåäåòå ñå, ÷å ìèíè-ôóðíàòà å èçñòèíàëà,
ïîëîæåíèå 0 - ôóðíàòà ùå ñå èçêëþ÷è.
ïîâäèãíåòå ÿ, íàòèñíåòå (â ïîñîêà îò ñåáå
Ñëåä èçïîëçâàíå íà ôóðíàòà óñòàíîâåòå
ñè) ïëàñòìàñîâàòà äðúæêà íà ïîäëîæêàòà è ÿ
ïðåâêëþ÷âàòåëÿ íà ðåæèìèòå íà ðàáîòà
îòâîðåòå (ðèñ. 1). Ìàõíåòå òðîõèòå,
(4) â ïîëîæåíèå èçêëþ÷åíî, à äðúæêàòà
íàòèñíåòå äðúæêàòà íà ïîäëîæêàòà è ÿ
íà òàéìåðà - â ïîëîæåíèå 0 è èçêëþ÷åòå
çàòâîðåòå (ðèñ. 2). Ðåäîâíî ïî÷èñòâàéòå
ùåïñåëà çà ìðåæàòà îò êîíòàêòà.
ïîäëîæêàòà.
ÏÐÅÄÓÏÐÅÆÄÅÍÈß
ÒÅÕÍÈ×ÅÑÊÈ ÄÀÍÍÈ
Âèíàãè èçêëþ÷âàéòå ôóðíàòà îò ìðåæàòà
Îáåì íà ðàáîòíàòà êàìåðà: 10 ëèòðà
ïðåäè äà ÿ ïî÷èñòèòå.
Íàïðåæåíèå íà çàõðàíâàíåòî:
Ïî âðåìå íà èçïîëçâàíå íà ôóðíàòà íå
220Â-230 Â ~ 50-60 Õö
äîïèðàéòå ðúöå èëè äðóãè ÷àñòè íà òÿëîòî
Èçïîëçâàíà ìîùíîñò: 600 Âò
äî ïîâúðõíîñòòà íà êîðïóñà è ñòúêëåíàòà
âðàòè÷êà çà äà èçáåãíåòå ïîëó÷àâàíå íà
Ïðîèçâîäèòåëÿò ñè çàïàçâà ïðàâîòî äà
èçãàðÿíèÿ.
ïðîìåíÿ õàðàêòåðèñòèêèòå íà ïðèáîðà áåç
Íèêîãà íå ïîòàïÿéòå ïðèáîðà, êàáåëà çà
ïðåäâàðèòåëíî óâåäîìÿâàíå.
ìðåæàòà èëè ùåïñåëà âúâ âîäà èëè äðóãè
òå÷íîñòè.
Ñðîê íà èçïîëçâàíå íà ïðèáîðà - íàä 5
Óñòàíîâÿâàéòå ïðèáîðà âúðõó ðàâíà è
ãîäèíè
òåðìîóñòîé÷èâà ïîâúðõíîñò.
Çà äà èçáåãíåòå âúçïëàìåíÿâàíå â
Ãàðàíöèÿ
ðàáîòíàòà êàìåðà íà ïðèáîðà, íå
Ïîäðîáíè óñëîâèÿ íà ãàðàíöèÿòà ìîãàò äà
äîïóñêàéòå íåïîñðåäñòâåí äîïèð íà
áúäàò ïîëó÷åíè îò äèëåðà, êîéòî å ïðîäàë
ïðîäóêòèòå ñ íàãðåâàòåëíèòå åëåìåíòè.
òàçè àïàðàòóðà. Ïðè âñÿêà ðåêëàìàöèÿ ïî
Íå äîïóñêàéòå äîïèð íà ñòúêëåíàòà
âðåìå íà ñðîêà íà äåéñòâèå íà òàçè
âðàòè÷êà ñúñ ñòóäåíè ïðåäìåòè èëè
ãàðàíöèÿ å íåîáõîäèìî äà ñå ïðåäñòàâè
òå÷íîñòè, òúé êàòî ïðè ðÿçêà ïðîìÿíà íà
÷åêà èëè êâèòàíöèÿòà çà êóïóâàíå.
òåìïåðàòóðàòà ñòúêëîòî ìîæå äà ñå
ïîâðåäè.
Òîâà èçäåëèå ñúîòâåòñòâà íà
Îòâàðÿéòå ïîäëîæêàòà çà îòñòðàíÿâàíå íà
èçèñêâàíèÿòà çà
òðîõèòå ÷àê ñëåä êàòî ôóðíàòà èçñòèíå.
åëåêòðîìàãíèòíà ñúâìåñòèìîñò
íà äèðåêòèâà 89/336/ÅÅÑ íà
ÏÎ×ÈÑÒÂÀÍÅ È ÏÎÄÄÚÐÆÀÍÅ
Ñúâåòà íà Åâðîïà è íà
Ïðåïîðú÷âà ñå ôóðíàòà äà ñå ïî÷èñòâà
íàðåæäàíåòî 73/23 ÅÅÑ çà
ñëåä âñÿêî èçïîëçâàíå. Ïðåäè äà
àïàðàòóðàòà ñ íèçêî
çàïî÷íåòå ïî÷èñòâàíåòî ñå óáåäåòå, ÷å
íàïðåæåíèå.
ôóðíàòà å èçêëþ÷åíà îò åëåêòðîìðåæàòà.
Èçìèéòå òàâàòà â ãîðåùà ñàïóíåíà âîäà,
èçïëàêíåòå ÿ è èçñóøåòå.
Çà ïî÷èñòâàíå íà êîðïóñà èçïîëçâàéòå
14
Vt-1270.qxd 08.12.04 11:12 Page 14

MAGYAR
MINI-SÜTÕ
LEÍRÁS
1. Burkolat
Figyelmesen tanulmányozza át a biztonsági
2. Nyitófogantyú
utasítást és a mini sütõ használati útmu-
3. Idõzítõ
tatóját, tartsa az útmutatót könnyen
4. Üzemmódkapcsoló
elérhetõ helyen.
5. Mûködésjelzõ
A mini-sütõ villamosenergia-felhasználása
6. Tepsi
gazdaságos és a rendeltetése többcélú.
7. Üvegajtó
Az üzemmód-kapcsoló lehetõvé teszi a
8. Rács
szükséges elkészítési vagy ételmelegítési-
üzemmód kiválasztását, az idõzítõ pedig a
ELÕKÉSZÍTÉS A HASZNÁLATRA
beállított idõ lejárta után kikapcsolja a sütõt.
Vegye ki a sütõt a csomagolásból
Az üvegajtó lehetõvé teszi szemmelkísérni
Törölje le a burkolatot és a sütõkamra
az étel elkészítésének folyamatát.
felületét nedves ruhával, a tepsit mossa
ki.
BIZTONSÁGI ELÕÍRÁSOK
Bekapcsolás elõtt gyõzõdjön meg arról,
A használat elõtt figyelmesen olvassa el
hogy a villamoshálózat feszültsége meg-
ezeket az utasításokat.
egyezik a mini-sütõ üzemelési feszült-
Gyõzõdjön meg arról, hogy a villam-
ségével.
oshálózat feszültsége megegyezik a
készülék testén feltüntetett feszült-
A MINI-SÜTÕ BEKAPCSOLÁSA
séggel.
Az elsõ bekapcsoláskor lehetséges jel-
Ne hagyja a bekapcsolt készüléket felü-
legzetes szag és enyhe füst megje-
gyelet nélkül.
lenése. Ez normális jelenség, amely a
Mûködés közben a készüléket helyezze
melegítõelemek felületének kiégetésével
kisgyermekektõl és korlátolt képességû
függ össze; a maximális hõmérséklet
személyektõl távol.
elérésekor ezek a jelenségek megszün-
Rendszeresen vizsgálja meg a hálózati
nek.
kábelt, a készülék vagy a kábel meghibá-
A jó minõségû étel elkészítéséhez szük-
sodása esetében a készülék használata
ség van az elkészítési idõ meg-
tilos.
növeléséhez 3-5 percel, ami a sütõ
A hálózati kábel cseréjét vagy a készülék
elõmelegítéséhez szükséges.
javítását márkaszervizben végeztesse.
Az adott készüléket csak háztartási
A MINI-SÜTÕ HASZNÁLATA
célokra használja a használati utasítás-
Nyissa ki a sütõajtót és helyezze be a
nak megfelelõen.
sütõt (6) a rácsra (8).
Soha ne használja a készüléket
Helyezze az ételt a tepsire (6). A zsíros
felmelegedett felületek közelében.
ételeket teheti a tepsire, a zsíros
Tiszítás elõtt mindig kapcsolja ki a
élelmiszert tekerje be alufóliába, mivel a
készüléket a hálózatból.
kifolyó zsír égni fog, füstölést okozva.
Soha ne használja a készüléket helyisé-
Az üzemmódkapcsoló (4) fogantyúja
gen kívül.
segítségével állítsa be a kívánt
Soha ne használja a hálózati kábelt a
elkészítési módot.
készülék hordására.
A mini-sütõ bekapcsolásához fordítsa el
A készülék mûködése közben a mini-
az idõzítõ fogantyúját (3) az óramutató
sütõ burkolata felmelegszik, legyen
járása szerint és állítsa be a szükséges
óvatos.
elkészítési idõt. Az idõzítõn beállítható
A tepsi kivételekor használjon edény-
maximális idõ 15 perc, az idõ lejártakor
fogó- vagy speciális védõkesztyût.
hangjelzés hallatszik és a készülék
automatikusan kikapcsol.
15
Vt-1270.qxd 08.12.04 11:12 Page 15
MAGYAR
- a melegítõelemek kikapcsolva
belsejébe. A burkolatot tisztítása után
feltétlenül törölje le szárazra.
- a felsõ melegítõelem bekapcsolva
(sütéshez)
A sütõkamra tisztítása
A zsírfoltok eltávolításához használjon
- az alsó melegítõelem bekapcsolva (az
meleg mosószeres vízbe mártott tiszta
ételek melegítéséhez)
puha textiliát. A melegítõelem
- mind a két melegítõelem bekapcsolva
tisztításakor legyen különösen óvatos,
(kisütés vagy az étel elkészítése)
gyõzõdjön meg arról, hogy teljesen
lehûlt. A sütõkamrát tisztítása után
Az mini-sütõ az elkészítés közben
feltétlenül törölje ki szárazra.
történõ kikapcsolásáhozfordítsa az
idõzítõ fogantyúját (3) az óramutató
Az alátét tisztítása
járása ellen és állítsa 0 állásba a sütõ
Gyõzõdjön meg arról, hogy a mini-sütõ
kikapcsol.
teljesen lehûlt, emelje meg és nyomja
A sütõ használata után állítsa az üzem-
meg a mûanyag nyitófogantyút, nyissa ki
módkapcsolót (4) kikapcsolt állsába,
az alátétet (1.ábra). Távolítsa el a
az idõzítõ fogantyúját pedig 0 állásba
morzsákat, nyomja meg a fogantyút és
és húzza ki a hálózati villát az aljzatból.
zárja be az alátétet (2.ábra).
Rendszeresen tisztítsa az alátétet.
FIGYELMEZTETÉS
Mindig kapcsolja ki a sütõt a hálózatból
MÛSZAKI ADATOK
tisztítás elõtt.
A sütõkamra térfogata: 10 l
A sütõ használata közben égési sérülés
Tápfeszültség: 220-230 V ~50-60 Hz
elkerülése érdekében ne érintse kézzel
Felvett teljesítmény: 600 W
vagy más testrésszel a burkolat felületét
és az üvegajtót.
A gyártó fenntartja a jogát a készülékek
Soha ne merítse a készüléket, a hálózati
mûszaki adatainak megváltoztatására külön
kábelt vagy a hálózati villát vízbe vagy
értesítés nélkül.
más folyadékba.
A készüléket egyenes és hõálló felületre
A készülék legalább 5 évig szolgál.
állítsa.
A készülék sütõtérében történõ
Garancia
kigyúlásának elkerülése érdekében ne
A garancia részletes feltételeit megkaphatja
engedje az élelmiszerek közvetlen
a készüléket eladó márkaképviselõtõl. A
érinkezését a melegítõelemekkel.
garancia idõtartama alatt, bármilyen kifogás
Ne engedje az üvegajtó érintkezését
benyújtásakor, fel kell mutatni a számlát
hideg tárgyakkal vagy folyadékokkal,
vagy a vételi igazolást.
mert a hirtelen hõmérsékletváltozástól az
üveg megrongálódhat.
Az adott termék megfelel a
A morzsagyûjtõ alátétet csak akkor nyis-
89/336/EEC Európai Közösség
sa ki, ha a sütõ teljesen lehûlt.
direktíva az elektromágneses
összeférhetõséghez támasztott
TISZTÍTÁS ÉS KARBANTARTÁS
követelményeinek valamint a
Ajánlatos a sütõ tisztítását minden
73/23 EEC kisfeszültségû
használat után elvégezni.
berendezésekre vonatkozó
Forró mosószeres vízben mossa meg a
rendeletnek.
tepsit, öblítse le és szárítsa meg.
A burkolat tisztításához használjon meleg
mosószeres vízbe mártott tiszta puha
textiliát. Kerülje a víz bejutását a sütõ
16
Vt-1270.qxd 08.12.04 11:12 Page 16

SRBSKI
MINI PEÆ
OPIS
1. Kuæite
Paljivo se upoznajte sa svim pravilima o
2. Drka za otvaranje podmetaèa
merama bezbednosti i upustu o koritenju
3. Tajmer
mini-peæi, èuvajte upustvo na dostupnom
4. Prekidaè reima rada
mestu.
5. Naponski indicator rada
6. Tepsija
Mini-peæ je ekonomièna u koritenju elek-
7. Staklena vrata
triène energije i univerzalna za koritenje.
8. Reetka
Prekidaè reima rada dozvoljava izabrati
neophodni reim pripremanja ili podgreja-
PRIPREMANJE ZA KORITENJE
banja hrane, a tajemr æe iskljuèiti peæ kada
Izvadite peæ iz pakovanja.
proe nameteno vreme za pripremanje.
Obriite kuæite I radnu kameru peæi
vlanom krpom, a tepsiju operite.
Staklena vrata peæi dozvoljava vizuelno
Pre nego to ukljuèite, uverite se da
kontrolisati process pripremaja namernica.
napon u elektriènoj mrei odgovara
naponu mini-peæi.
MERE BEZBEDNOSTI
Pre koritenja paljivo proèitajte ovo
UKLJUÈIVANJE MINI-PEÆI
upustvo.
Kod prvog ukljuèivanja pribora moguæi
Uverite se da napon naveden na kuæitu
su specifièni mirisi I mali dim. To je nor-
pribora odgovara naponu u elektriènoj
malna pojava, vezana za sagorevanje
mrei.
povrinskog dela zagrevajuæeg elemen-
Ne ostavljajte ukljuèen pribor bez nad-
ta; kada se dostigne maksimana tem-
zora.
peratura, te pojave æe nestati.
U vreme rada pribor stavite na mesta
Za kvalitetno pripremanje namernica
nedostupna za decu ili bolesnih osoba.
treba uveæati vreme pripremanja na 3-5
Regularno proveravajte naponski kabel,
minuta, koje je neophodno da se peæ
ako primetite oteèenje pribora ili kabla
zagreje.
zabranjuje se koritenje pribora.
Za zamenu naponskog kabla ili
KORITENJE MINI-PEÆI
popravak obratute se u autorizovani
Otvorite vrata peæi i stavite podmetal (6)
ser5visni centar.
na reetku (8). Stavite namernice na
Koristite ovaj pribor samo za domaæin-
tepsiju (6), namernice koje nisu masne
stvo I u skladu sa upustvom za upotre-
moete staviti na tepsiju, a masne
bu.
namernice treba umotati u aluminijsku
Nikada ne koristite pribor blizu zagre-
foliju, jer masnoèe koje izlaze iz namer-
janih povrina.
nica mogu da gpre I izazivaju dim.
Uvek iskljuèite pribor pre èiæenja.
Drkoj prekidaèa reima rada (4)
Nikada ne koristite pribor van prostorije.
izaberite neophodni reim pripremanja
Nikada ne koristir naponski kabel kao
namernica.
drku za prenoenje pribora.
Za ukljuèivanje mini-peæi okrenite drku
U vreme rada pribpra kuæite mini-peæi
tajmera (3) u smeru kazaljke na satu I
se zagrejava, budite oprezni.
namestite potrebno vreme pripremanja
Za vaðenje podmetaèa koristite
namernica. Maksimalno vreme rada
hvataljke ili specalne zatitne rukavice.
tajmera je 15 minuta, kada vreme
istekne èut æe se zvuèni signal I pribor
se automatski iskljuèi.
17
Vt-1270.qxd 08.12.04 11:12 Page 17
- 1
- 2


