Vitek VT-1260: инструкция
Раздел: Бытовая, кухонная техника, электроника и оборудование
Тип: Утюг


Характеристики, спецификации
Инструкция к Утюгу Vitek VT-1260
Оглавление
- ОПИСАНИЕ МЕРЫ БЕЗОПАСНОСТИ
- НАПОЛНЕНИЕ РЕЗЕРВУАРА ДЛЯ ВОДЫ ВЫБОР ВОДЫ ФУНКЦИЯ «АВТОМАТИЧЕСКОЕ ОТКЛЮЧЕНИЕ» ТЕМПЕРАТУРА ГЛАЖЕНИЯ ПЕРЕД ПЕРВЫМ ИСПОЛЬЗОВАНИЕМ
- РАЗБРЫЗГИВАТЕЛЬ ВОДЫ СУХОЕ ГЛАЖЕНИЕ ПАРОВОЕ ГЛАЖЕНИЕ (рис.5) УСТАНОВКА ТЕМПЕРАТУРЫ ГЛАЖЕНИЯ
- ВЕРТИКАЛЬНОЕ ОТПАРИВАНИЕ ОЧИСТКА ПАРОВОЙ КАМЕРЫ ДОПОЛНИТЕЛЬНАЯ ПОДАЧА ПАРА
- ТЕХНИЧЕСКИЕ ХАРАКТЕРИСТИКИ УХОД И ЧИСТКА ХРАНЕНИЕ
1260.indd 11260.indd 1 24.08.2010 10:02:2824.08.2010 10:02:28
2
1260.indd 21260.indd 2 24.08.2010 10:02:3124.08.2010 10:02:31
3
1260.indd 31260.indd 3 24.08.2010 10:02:3124.08.2010 10:02:31

ENGLISH
STEAM IRON
• Before unplugging/plugging the unit, set the
temperature control to the “MIN” position.
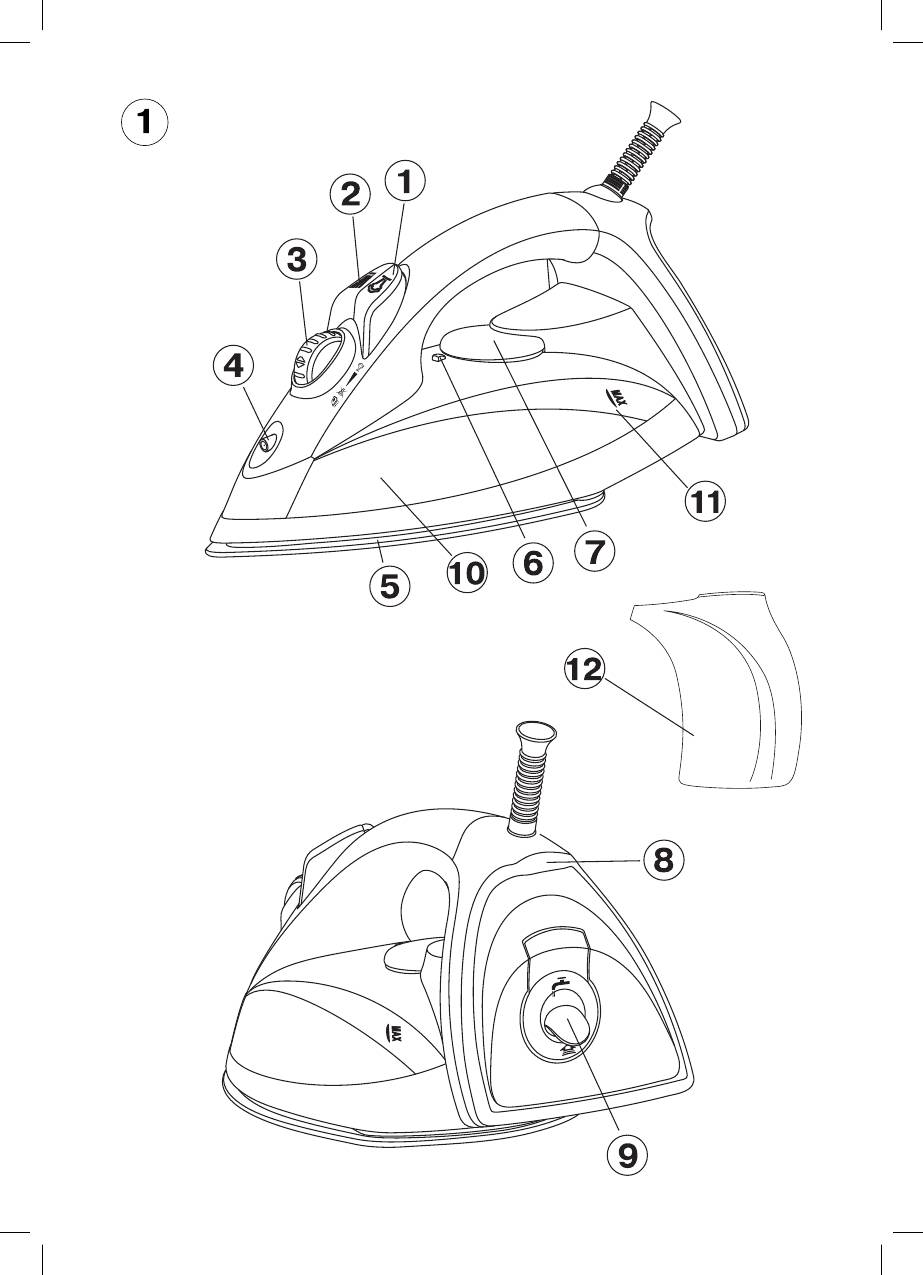
DESCRIPTION
• To unplug the unit always take its plug, do not
1. Additional steam supply button
pull the power cord.
2. Spray button
• In order to avoid electric shock do not im-
3. Steam supply control / self clean mode but-
merse the unit into water or other liquids.
ton
• Before taking the unit away for keeping, pour
4. Water spray nozzle
out the remaining water and let the unit cool
5. Iron soleplate
down.
6. Temperature indicator
• Pour out water only after unplugging the unit.
7. Temperature Control Knob with power on in-
• Do not use the unit if the plug or the power
dicator
cord is damaged or if there are other damages
8. Iron base
in the unit.
9. Water filling opening lid
• Do not use the unit after it fell, if there are vis-
10. Water tank
ible damages in the unit or in case of leakage.
11. Maximal water level indicator
• In order to avoid electric shock do not repair
12. Measuring cup
the unit yourself. If there are some damages in
the unit apply to the authorized service cent-
SAFETY MEASURES
er.
Before using the unit, please read the instruc-
• Do not allow children to use the unit as a toy.
tions carefully and pay attention to the illustra-
• Keep the unit out of reach of children and dis-
tions.
abled persons. Do not allow them to use the
• Before switching on the unit, make sure that
unit without supervision.
your home electricity supply corresponds to
• The iron is not intended for usage by children
the voltage of current specified on the unit.
or disabled persons unless they are given all
• The power cord is equipped with a euro plug; in-
the necessary instructions on safety meas-
sert it into the socket, with a secure grounding.
ures and information about danger, which can
• In order to avoid risk of fire do not use adapt-
be caused by improper usage of the unit.
ers while connecting the appliance to the out-
• Keep the unit vertically in a dry cool place, out
let.
of reach of children.
• In order to avoid overloading of the power net-
work do not switch on several appliances with
FOR HOUSEHOLD USAGE
high power consumption simultaneously.
• Use the unit only for the intended purposes.
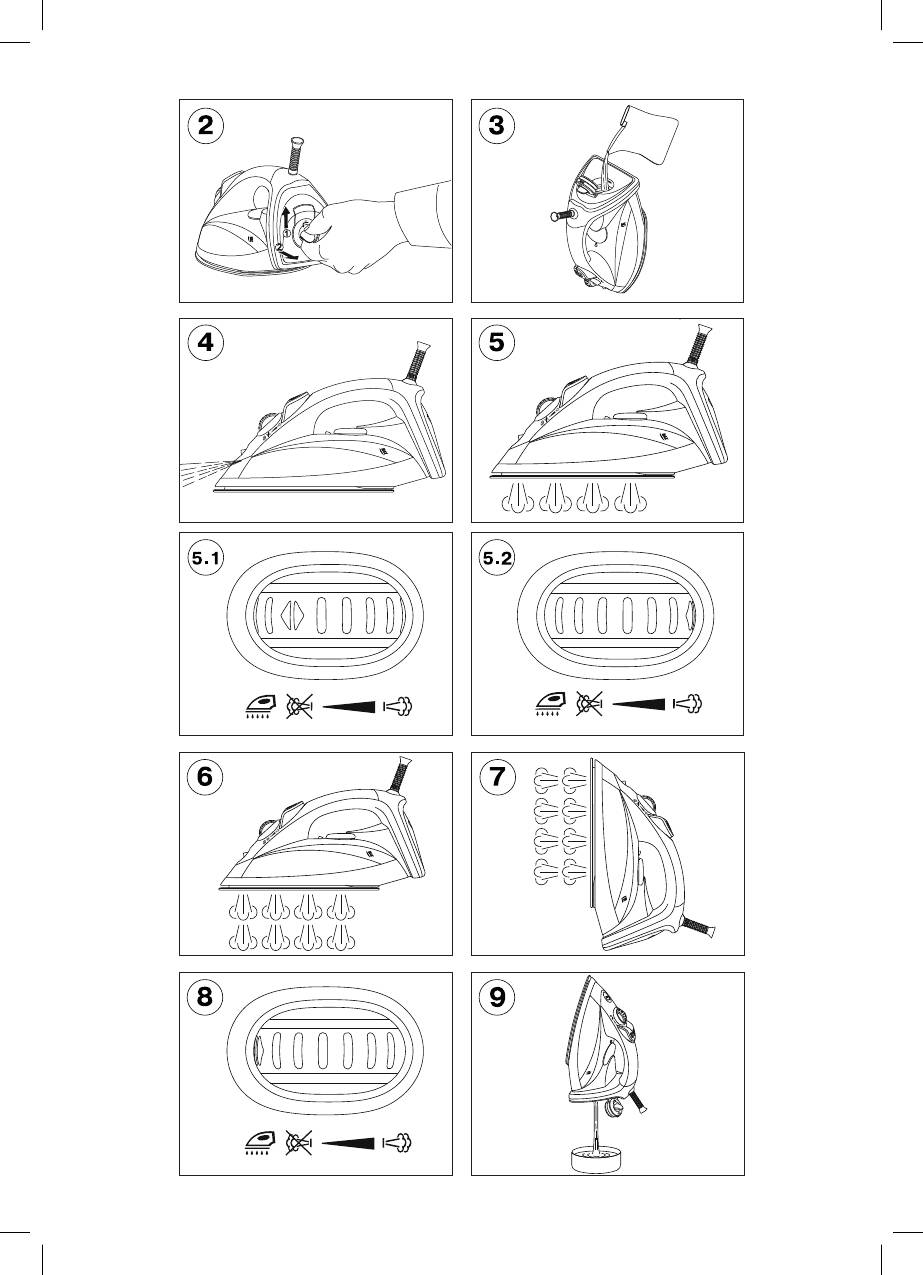
FILLING THE WATER TANK (pic. 2, 3)
• Do not use the unit outdoors.
• Place and use the iron on a flat stable surface
CHOICE OF WATER
or the ironing board.
To fill the water tank use regular tap water. If wa-
• Never leave the operating unit unattended.
ter is hard then it is recommended to mix it with
• Always unplug the unit if you do not use it.
distilled water at a ratio of 1:1, if water is very
• When filling the water tank with water, always
hard, mix it with distilled water at a ratio of 1:2 or
unplug the unit.
use only distilled water.
• The water tank opening should be closed dur-
• Make sure that the iron is disconnected from
ing the ironing.
electrical power before filling it with water.
• Do not fill the water tank with scented liquids,
• Set the constant steam supply regulator (3) to
vinegar, starch solution, descaling reagents,
the “
” position (steam supply is off).
chemical agents etc.
• Open the water filling opening lid (9).
• Avoid contact with hot surfaces or outgo-
• Use the measuring cup (12); fill the water
ing steam of the iron in order to avoid getting
tank (10) with water, holding the unit vertically
burns.
(pic.3) till the maximal level (11).
• Provide that the power cord is not hanging
• Close the filling opening lid (9).
over the edge of the ironing board and make
sure that it does not touch hot surfaces.
4
1260.indd 41260.indd 4 24.08.2010 10:02:3124.08.2010 10:02:31
ENGLISH
Note:
time, depending on the position of the tem-
• Do not fill it with water above the MAX.
perature control (7).
mark.
• If you need to refill the water tank during
IRONING TEMPERATURE
ironing, turn off the iron and unplug the
• Always check the recommended iron temper-
power cord from the outlet.
ature indicated on the tag before ironing.
• After you finish ironing, switch off the iron,
• If the tag does not list the recommended iron-
wait until it cools down completely, open
ing temperature, but you know the type of fab-
the filling opening lid (9) hold the unit in its
ric, then use the following table to determine
upright position and drain the remaining
the proper temperature.
water.
Signs Fabric type (temperature)
BEFORE FIRST USAGE
Synthetics, nylon, acryl, polyester
• Unpack the iron; remove the protection (if any)
•
(low temperature)
from the iron soleplate (5).
•• Silk/wool (medium temperature)
• Make sure that the electrical supply voltage
corresponds to the iron’s operating voltage.
••• Cotton/flax (high temperature)
• Fill the water tank with water (10).
• Insert the plug into the socket.
• This table is only for smooth materials. Fabrics
• Set the temperature control (7) to the “МАХ”
of other types (crimped, raised etc.) are best
position, the indicator in the temperature con-
ironed at low temperature.
trol (7) will light up.
• Firstly sort items by ironing temperature: wool
• When the soleplate temperature (5) reaches
with wool, cotton with cotton etc.
the desired temperature value, the indicator
• The iron heats up faster than is cools down.
will go out.
For this reason it is recommended to begin
• Set the steam supply control (3) to the “
”
ironing at low temperature (for instance syn-
position (steam supply is on), steam will start
thetic fabrics).
going out of the openings on the iron soleplate
• After that, move to higher temperature iron-
(5).
ing (silk/wool). Cotton and linens should be
• Before operating test the heated iron on the
ironed last.
old cloth to be sure that the iron soleplate (5)
• If an item is made from a mix of fabrics, then
and the water tank (10) are clean.
the iron should be set for the fabric with the
• The unit is ready to operate.
lowest ironing (for instance if an item is made
from 60% polyester and 40% cotton, it should
Note:
be ironed at the temperature used for ironing
When using the unit for the first time, the
polyester “•”).
heating element of the unit burns that is why
• If you cannot define the fabric the item is
some smoke or foreign odor can appear. It
made from, find a place on it that is hidden
is normal.
while wearing and, on practice select the iron-
ing temperature (always start at the lowest
“AUTOMATIC OFF” FUNCTION
and gradually raise it until you get the desired
If the iron is motionless during 30 seconds in
result.)
horizontal position or about 8 minutes in verti-
• Corduroy and other fabrics that start glossy
cal position, it will switch off automatically. The
quickly should be ironed strictly in one direc-
indicator in the temperature control (7) will be
tion (along the lines) with slight pressure.
flashing.
• To avoid appearance of glossy spots on the
To switch on the unit, just start ironing, the iron
synthetic and silk fabrics, iron them back-
will switch on and the indicator will stop flashing.
side.
Note:
SETTING THE IRONING TEMPERATURE
After the iron is switched on, the previously
• Place the iron on the base (8).
set soleplate temperature will be set in some
• Insert the power plug into the socket.
5
1260.indd 51260.indd 5 24.08.2010 10:02:3124.08.2010 10:02:31
ENGLISH
• Set the temperature control (7) to the re-
• Insert the power plug into the socket.
quired ironing temperature: “•”, “••”, “•••”
• Set the temperature control (7) to the required
or “MAX”, depending on the type of fabric,
ironing temperature: to steam using zone
the indicator in the temperature control (7) will
“•••” or “MAX”, the indicator in the tempera-
light up.
ture control (7) will light up.
• When the soleplate temperature (5) reaches
• When the soleplate temperature (5) reaches
the desired temperature value, the indicator
the desired temperature value, the indicator
will go out.
will go out, you can start ironing.
• Turn the constant steam supply regulator (3)
Note: While steam ironing set the tempera-
to set the intensity of steaming, steam will
ture to steam using zone, “•••” or “MAX”,
start outgoing from the openings of the sole-
plate (5). (pic.5.2.)
WATER SPRAYER
• After you finish ironing set the (7) temperature
• You can dampen the fabric by pressing the
control to the “MIN” position and the constant
spray button (2) several times (pic. 4).
steam supply control (3) to the “ ” position
• Make sure that there is enough water in the
(steam supply is off).
water tank.
• Pull the plug out of the socket and let the iron
cool down completely.
DRY IRONING
• Open the filling opening lid (9), turn over the
• Place the iron on the base (8).
unit and drain the remaining water (10). Close
• Set the constant steam supply control (3)
the lid (9) (pic.9).
to the “
” position (steam supply is off).
(pic.5.1)
ATTENTION!
• Set the temperature control (7) to the re-
If during the operation steam is not constantly
quired ironing temperature: “•”, “••”, “•••”
supplied, check whether the temperature con-
or “MAX”, depending on the type of fabric,
trol (7) is set properly and whether there is water
the indicator in the temperature control (7) will
in the water tank.
light up.
• When the soleplate temperature (5) reaches
ADDITIONAL steam supply
the desired temperature value, the indicator
Additional steam supply function is useful when
will go out, you can start ironing.
ironing folds and can only be used at high ironing
• After you finish ironing set the temperature
temperatures (when the iron temperature control
control (7) to the “MIN” position.
(7) is set to “•••” or “MAX”).
• Pull the plug out of the socket and let the iron
When the additional steam supply button (1) is
cool down completely.
pressed, steam will be vigorously released from
the openings in the iron soleplate (pic.6).
STEAM IRONING (pic.5)
For steam ironing set the temperature control to
Note:
steam using zone “•••” or “MAX”.
In order to avoid leakage of water from steam
The iron has an anti-drip valve, which stops wa-
openings, press the additional steam supply
ter supply, when the sole temperature is too low
button (1) with a 4-5 sec. interval.
it prevents the appearance of drops out of the
soleplate openings (5). While heating or cooling
VERTICAL STEAMING
down of the sole (5), you will hear clicks of open-
For vertical steaming can be used only when the
ing/closing of the anti-drip valve; it means that
high temperature mode is used (set the temper-
the valve works normally.
ature control (7) to the “•••” or “MAX” position.
• Make sure that there is enough water in the
Hold the iron vertically at the distance 15-30 cm
water tank.
from the clothes press the additional steam sup-
• Place the iron on the base (8).
ply button (1) with a 4-5 seconds interval, steam
• Set the constant steam supply control (3)
will be released from the openings in the iron
to the “ ” position (steam supply is off).
soleplate (5) (pic. 7).
(pic.5.1)
6
1260.indd 61260.indd 6 24.08.2010 10:02:3124.08.2010 10:02:31
ENGLISH
Important information
• After removing sediment, polish the soleplate
• Vertical steaming is not recommended for
with a dry cloth.
synthetic fabrics.
• Do not use abrasive substances to clean the
• To avoid melting the fabric, do not touch the
soleplate and body of the iron.
iron soleplate to the item while steaming.
• Avoid touching the iron soleplate with sharp
• Never steam iron clothes on a person as the
metal objects.
steam temperature is very high and it can
cause burns. Use a coat-hanger or a stand.
STORAGE
• Turn the temperature control (7) anticlockwise
STEAM CHAMBER CLEANING
till the “MIN” position.
To prolong lifetime of the iron we recommend
• Unplug the unit.
cleaning the steam chamber, especially in the
• Set the iron vertically and allow it to cool com-
regions with “hard” water.
pletely.
• Fill the water tank (10) with water.
• Set the constant steam supply control (3) to
• Put the iron on the base (8).
the “
” position (steam supply is off).
• Insert the power plug into the socket.
• Open the filling opening lid (9), turn over the
• Set the constant steam supply control (3) to
unit and drain the remaining water (10). Close
the “
” position (steam supply is off).
the lid (9) (pic.9).
• Set the temperature control (7) to the “MAX”
• Store the iron vertically in a dry cool place out
temperature of the iron soleplate, the indicator
of reach of children.
in the temperature control (7) will light up.
• When the soleplate temperature (5) reaches
Delivery set
the desired temperature value, the indicator
Iron – 1 pc.
will go out, you can start cleaning.
• Switch off the unit, by setting the temperature
TECHNICAL CHARACTERISTICS
control (7) to the “MIN” position.
Power supply: 220-240 V ~ 50 Hz
• Unplug the unit.
Maximal power consumption: 2200 W
• Hold the iron above the sink horizontally; set
and hold the control to the
position (pic 8).
Specifications subject to change without prior
• Boiling water together with scale will be throw-
notice.
ing out from the openings in the iron soleplate
(5).
Service life of appliance - 3 years
• Slightly sway the iron back and forth, until wa-
ter goes out of the water tank.
GUARANTEE
• Place the iron on the base (8) and let it cool
Details regarding guarantee conditions can be
down completely.
obtained from the dealer from whom the appli-
• Set the constant steam supply control (3) to
ance was purchased. The bill of sale or receipt
the “ ” position (steam supply is off).
must be produced when making any claim under
• When the soleplate (5) cools down completely,
the terms of this guarantee.
wipe it with a dry cloth.
• Before you take the iron for storing, make sure
This product conforms to the EMC-
that there is no water in the water tank and that
Requirements as laid down by the
the iron soleplate (5) is completely dry.
Council Directive 89/336/EEC and
to the Low Voltage Regulation (73/23
CLEAN AND CARE
EEC)
• Before cleaning the iron, make sure that it is
turned off and has cooled completely.
• Wipe the iron's outer surface with a damp cloth
to dry.
• Sediment on the iron soleplate can be removed
with a cloth soaked in vinegar-water solution.
7
1260.indd 71260.indd 7 24.08.2010 10:02:3124.08.2010 10:02:31

DEUTSCH
DAMPFBÜGELEISEN
Entfernung von Kalkstein, chemische
Lösungen usw. ins Wasserbehälter einzugie-
BESCHREIBUNG
ßen.
1. Taste der zusätzlichen Dampfzufuhr
• Vermeiden Sie die Berührung der Haut mit
2. Sprühtaste
heißen Oberfl ächen des Bügeleisens oder
3. Regler der konstanten Dampfzufuhr/
austretendem Dampfes, um Verbrennungen
Einschaltung des Selbstreinigungsbetriebs
zu vermeiden.
4. Sprühdüse
• Achten Sie darauf, dass das Gerät vom
5. Gleitsohle
Bügeleisenbrett nicht frei hängt oder heiße
6. Temperaturanzeige
Oberfl äche nicht berührt.
7. Temperaturregler mit Einschaltindikator
• Stellen Sie den Temperaturregler in die Position
8. Bügeleisenfußplatte
„MIN“ vor dem Abschalten/Einschalten des
9. Deckel der Wassereinfüllöffnung
Bügeleisens ins Stromnetz.
10. Wasserbehälter
• Es ist nicht gestattet, das Gerät beim
11. Wasserstandgrenzlinie
Abschalten vom Stromnetz am Netzkabel
12. Messbecher
zu ziehen, halten Sie und ziehen Sie es am
Stecker.
SICHERHEITSMAßNAHMEN
• Tauchen Sie das Gerät nie ins Wasser oder
Lesen Sie vor der Inbetriebnahme des Geräts di-
andere Flüssigkeiten, um Stromschlagrisiko
ese Betriebsanleitung aufmerksam durch, ach-
zu vermeiden.
ten Sie auch auf die Abbildungen.
• Schalten Sie das Gerät vor der Wegpacken
• Vergewissern Sie sich vor der ersten
vom Stromnetz ab, gießen Sie das Wasser ab
Inbetriebnahme, ob die Spannung des Geräts
und lassen Sie es abkühlen.
mit der Netzspannung übereinstimmt.
• Gießen Sie das Wasser nur nach dem
• Das Netzkabel ist mit einem „Eurostecker“
Abschalten des Bügeleisens vom Stromnetz
ausgestattet; schalten Sie diesen in die
ab.
Steckdose mit sicherer Erdung ein.
• Es ist nicht gestattet, das Gerät zu nutzen,
• Verwenden Sie keine Verlängerungen beim
wenn das Netzkabel oder der Netzstecker be-
Anschließen des Geräts an das Stromnetz, um
schädigt oder bei anderen Störungen.
Brandrisiko zu vermeiden.
• Es ist nicht gestattet, das Gerät bei seinem
• Es ist nicht gestattet, mehrere Geräte mit hoher
Sturz, sichtbaren Beschädigungen oder dem
Verbrauchsleistung gleichzeitig einzuschal-
Wasserauslauf zu nutzen.
ten, um die Überlastung des Stromnetzes zu
• Es ist nicht gestattet, das Gerät selbständig zu
vermeiden.
reparieren, um Stromschläge zu vermeiden.
• Nutzen Sie das Gerät nur gemäß der
Bei der Feststellung von Beschädigungen
Bedienungsanleitung.
wenden Sie sich an einen autorisierten
• Es ist nicht gestattet, das Gerät außerhalb der
Kundenservicedienst.
Räumlichkeiten zu benutzen.
• Es ist nicht gestattet, das Gerät als
• Stellen Sie das Bügeleisen auf eine gerade
Kinderspielzeug zu nutzen.
stabile Oberfl äche auf oder nutzen Sie das
• Bewahren Sie das Gerät in einem für Kinder
Bügelbrett.
oder behinderte Personen unzugänglichem
• Lassen Sie das eingeschaltete Gerät nie un-
Ort auf.
beaufsichtigt.
Lassen Sie das eingeschaltete Gerät nie un-
• Schalten Sie das Gerät nach dem Gebrauch
beaufsichtigt.
vom Stromnetz immer ab.
• Dieses Gerät darf von Kindern und behinder-
• Ziehen Sie den Netzstecker aus der Steckdose
ten Personen nicht genutzt werden, es sei
beim Auffüllen des Wasserbehälters immer
denn ihnen eine angemessene und verständ-
heraus.
liche Anweisung über die sichere Nutzung
• Der Deckel der Einfüllöffnung soll beim Bügeln
des Geräts und die Gefahren seiner falschen
dicht geschlossen sein.
Nutzung durch die Person, die für ihre
• Es ist nicht gestattet, Aromafl üssigkeiten,
Sicherheit verantwortlich ist.
Essig, Stärkelösung, Reagenzien für die
• Bewahren Sie das Gerät in einem kühlen, tro-
8
1260.indd 81260.indd 8 24.08.2010 10:02:3124.08.2010 10:02:31

DEUTSCH
ckenen und für Kinder unzugänglichem Ort
Geräts mit der Netzspannung übereinstimmt.
auf.
• Gießen Sie das Wasser in den Wasserbehälter
(10) ein.
DAS GERÄT IST NUR FÜR DEN GEBRAUCH IM
• Stecken Sie den Netzstecker des Netzkabels
HAUSHALT GEEIGNET.
in die Steckdose.
• Stellen Sie den Temperaturregler (7) in die
AUFFÜLLEN DES WASSERBEHÄLTERS (Abb.
Position „MAX“ ein, es wird dabei der Indikator
2, 3)
im Griff des Temperaturreglers (7) aufl euch-
ten.
WASSERAUSWAHL
• Wenn die Temperatur der Gleitsohle (5) auf
Zum Auffüllen des Wasserbehälters des
die gewünschte Temperatur steigt, wird der
Bügeleisens nutzen Sie Leitungswasser. Wenn
Indikator erlöschen.
das Leitungswasser hart ist, wird empfohlen,
• Stellen Sie den Regler der konstanten
es mit destilliertem Wasser im Verhältnis 1:1 zu
Dampfzufuhr (3) die Position „
“ (Dampfzufuhr
mischen, bei der Nutzung des Wassers mit sehr
eingeschaltet) ein, dabei fängt der Dampf an,
hoher Härte wird empfohlen, es mit destilliertem
aus den Öffnungen der Gleitsohle (5) des
Wasser im Verhältnis 1:2 oder nur destilliertes
Bügeleisens auszutreten.
Wasser zu nutzen.
• Prüfen Sie vor der Inbetriebnahme das auf-
• Vergewissern Sie sich vor dem Auffüllen
geheizte Bügeleisen auf einem Tuch, ob die
des Bügeleisens mit Wasser, dass es vom
Gleitsohle (5) und der Wasserbehälter (10)
Stromnetz abgeschaltet ist.
sauber sind.
• Stellen Sie den Regler der Dampfzufuhr (3) in
• Das Gerät ist betriebsbereit.
die Position „
“ (Dampfzufuhr ausgeschal-
tet).
Anmerkung:
• Öf fnen Sie den Deckel der Wassereinfüllöf fnung
Beim ersten Einschalten des Bügeleisens ver-
(9).
brennt das Heizelement, es kann zur Entstehung
• Nutzen Sie den Messbecher (12), gießen Sie
des Rauches oder eines fremden Geruchs füh-
das Wasser in den Behälter (10) bis zum maxi-
ren – es ist normal.
malen Wasserfüllstand (11) ein, indem Sie das
Bügeleisen senkrecht halten (Abb.3).
FUNKTION „AUTOMATISCHE
• Öf fnen Sie den Deckel der Wassereinfüllöf fnung
ABSCHALTUNG“
(9).
Wenn sich das Bügeleisen ca. 30 Sekunden
in horizontaler oder ca. 8 Minuten in senk-
Anmerkungen:
rechter Position befi ndet, so schaltet es sich
• Es ist nicht gestattet, das Gerät mit Wasser
automatisch ab. Dabei wird der Indikator des
über die Grenzlinie „MAX“ zu füllen.
Temperaturreglers (7) aufl euchten.
• Wenn sie während des Bügelns das Wasser
Für das Einschalten des Bügeleisens beginnen
nachgießen müssen, schalten Sie das
Sie mit dem Bügeln, das Bügeleisen schaltet
Bügeleisen aus, ziehen Sie den Netzstecker
sich ein.
aus der Steckdose und füllen Sie es mit
Wasser auf.
Anmerkung: Nach dem Einschalten des
• Schalten Sie das Gerät nach dem Bügeln aus,
Bügeleisens wird die vorher eingestell-
lassen Sie es abkühlen, danach öffnen Sie den
te Temperatur der Gleitsohle nach ei-
Deckel der Einfüllöffnung (9), drehen Sie das
niger Zeit abhängig von der Position des
Bügeleisen um und gießen Sie Restwasser
Temperaturreglers (7) eingestellt.
aus.
TEMPERATUR BEIM BÜGELN
VOR DER ERSTNUTZUNG DES GERÄTS
• Vor dem Bügeln sollen Sie die Überschriften
• Nehmen Sie das Bügeleisen aus der
auf dem Etikett der Kleidung beachten, wor-
Verpackung heraus und entfernen Sie das
auf die empfohlene Temperatur angegeben
Schutzmaterial von der Gleitsohle (5).
ist.
• Vergewissern Sie sich, ob die Spannung des
• Wenn das Etikett mit den Hinweisen nach dem
9
1260.indd 91260.indd 9 24.08.2010 10:02:3124.08.2010 10:02:31
DEUTSCH
Bügeln fehlt, kennen Sie aber den Stofftyp,
EINSTELLEN DER BÜGELTEMPERATUR
so können Sie die Temperaturangaben fürs
• Stellen Sie das Bügeleisen auf die
Bügeln der folgenden Tabelle entnehmen:
Bügeleisenfußplatte (8) auf.
• Stecken Sie den Netzstecker des Netzkabels
Bezeichnungen des Stofftyps (Temperatur)
in die Steckdose.
Synthesefaser, Nylon, Acryl,
• Stellen Sie die gewünschte Bügeltemperatur
•
Polyester (niedrige Temperatur)
mit dem Regler (7) ein: „•“, „••“, „•••“ oder
•• Seide/Wolle (mittlere Temperatur)
„MAX“ (abhängig vom Stofftyp), dabei wird
Baumwolle/Leinen (hohe
der Indikator des Temperaturreglers (7) auf-
•••
Temperatur)
leuchten.
• Wenn die Temperatur der Gleitsohle (5) auf
• Die Tabelle ist nur für das Bügeln von glatten
die gewünschte Temperatur steigt, wird der
Stoffen verwendbar. Wenn Sie den Stoff
Indikator erlöschen und Sie können mit dem
eines anderen Typs verwenden (gaufriert,
Bügeln beginnen.
geriffelt usw.), dann soll es bei der niedrigen
Temperatur gebügelt werden.
Anmerkung: Beim Bügeln mit Dampf soll die
• Zuerst sollen Sie die Sachen entsprechend der
Bügeltemperatur im Dampfbereich, auf „•••“
Bügeltemperatur aussortieren: Synthesefaser
oder „MAX“ eingestellt werden.
zu Synthesefaser, Wolle zu Wolle, Baumwolle
zu Baumwolle usw.
WASSERSPRÜHER
• Das Bügeleisen wird schneller aufgeheizt als
• Sie können den Stoff anfeuchten, indem Sie
abgekühlt. Aus diesem Grund wird es emp-
auf den Sprühknopf (2) einige Male drücken
fohlen, Sachen bei der niedrigen Temperatur
(Abb. 4).
zu bügeln (z.B. synthetische Stoffe).
• Vergewissern Sie sich, ob es genug Wasser im
• Danach können Sie auch zum Bügel bei hö-
Wasserbehälter vorhanden ist.
heren Temperaturen übergehen (Seide,
Wolle). Erzeugnisse aus Baumwolle und
TROCKENES BÜGELN
Leinen sollen zuletzt gebügelt werden.
• Stellen Sie das Bügeleisen auf die
• Wenn das Kleidungsstück aus Mischfasern
Bügeleisenfußplatte (8) auf.
ist, soll die Bügeltemperatur auf die niedrigs-
• Stellen Sie den Regler der Dampfzufuhr (3) in
te Stufe eingestellt werden (z.B. wenn das
die Position „
“ (Dampfzufuhr ausgeschal-
Kleidungsstück zu 60% aus Polyester und zu
tet). (Abb. 5.1)
40% aus Baumwolle Besteht, so soll es bei
• Stellen Sie die gewünschte Bügeltemperatur
der Temperatur gebügelt werden, die für das
mit dem Regler (7) ein: „•“, „••“, „•••“ oder
Bügeln von Polyester geeignet ist "•“)
„MAX“ (abhängig vom Stofftyp), dabei wird
• Wenn Sie den Stofftyp nicht feststellen kön-
der Indikator des Temperaturreglers (7) auf-
nen, woraus das Kleidungsstück hergestellt
leuchten.
ist, fi nden Sie darauf ein unbemerkbare Stelle
• Wenn die Temperatur der Gleitsohle (5) auf
beim Tragen, und wählen Sie durch das Prüfen
die gewünschte Temperatur steigt, wird der
die Temperatur des Bügelns aus (fangen Sie
Indikator erlöschen und Sie können mit dem
immer von der niedrigsten Bügeltemperatur
Bügeln beginnen.
an und erhöhen Sie diese, bis das gewünsch-
• Schalten Sie das Bügeleisen aus, indem Sie
te Ergebnis nicht erreicht wird).
den Temperaturregler (7) in die Position „MIN“
• Kordstoffe und andere Stoffe, die sehr schnell
stellen.
beginnen zu glänzen, sollen unter leichtem
• Schalten Sie das Gerät vom Stromnetz ab und
Druck streng in einer Richtung gebügelt wer-
warten Sie ab, bis dieses komplett abgekühlt
den (in Richtung des Strichs).
wird.
• Um die Entstehung von Glanzfl ecken auf den
synthetischen und seidenen Stoffen zu ver-
BÜGELN MIT DAMPF (Abb. 5)
meiden, bügeln Sie diese von der Innenseite
Beim Bügeln mit Dampf soll die Bügeltemperatur
aus.
im Dampfbereich, auf „•••“ oder „MAX“ einge-
stellt werden.
10
1260.indd 101260.indd 10 24.08.2010 10:02:3124.08.2010 10:02:31

DEUTSCH
Das Bügeleisen ist mit einem Antitropfventil aus-
ZUSÄTZLICHE DAMPFZUFUHR
gestattet, das die Wasserzufuhr bei einer sehr
Die Funktion der zusätzlichen Dampfzufuhr ist
niedrigen Temperatur der Gleitsohle unterbricht.
fürs Glätten der Falten nützlich und kann nur
Dies verhindert das Austreten der Tropfen
beim Hochtemperaturbetrieb des Bügelns ver-
aus den Öffnungen der Gleitsohle (5) des
wendet werden (Temperaturregler (7) in der
Bügeleisens. Beim Erhitzen und der Abkühlung
Position „•••“ oder „MAX“.
der Gleitsohle (5), ertönen typische Knacktöne
Bei Drücken der Taste der zusätzlichen
der Eröffnung/Schließung des Antitropfventils,
Dampfzufuhr (1) tritt der Dampf intensiver aus
was über seinen normalen Betrieb zeugt.
der Gleitsohle aus (Abb. 6).
• Vergewissern Sie sich, ob es genug Wasser im
Wasserbehälter vorhanden ist.
Anmerkung:
• Stellen Sie das Bügeleisen auf die
Um das Auslaufen des Wassers aus den
Bügeleisenfußplatte (8) auf.
Dampföffnungen zu vermeiden, drücken Sie
• Stellen Sie den Regler der Dampfzufuhr (3) in
den Knopf der zusätzlichen Dampfzufuhr (1) mit
die Position „
“ (Dampfzufuhr ausgeschal-
dem Intervall von 45 Sekunden.
tet). (Abb. 5.1)
• Stecken Sie den Netzstecker des Netzkabels
VERTIKALE ABDAMPFUNG
in die Steckdose.
Die Funktion der vertikalen Abdampfung kann
• Stellen Sie mit dem Regler (7) die gewünschte
nur beim Hochtemperaturbetrieb des Bügelns
Bügeltemperatur ein: im Dampfbereich, auf
verwendet werden, der Temperaturregler (7) in
„•••“ oder „MAX“, dabei wird der Indikator
der Position “•••“ oder „MAX“).
des Temperaturreglers (7) aufl euchten.
Halten Sie das Bügeleisen senkrecht 1530 cm
• Wenn die Temperatur der Gleitsohle (5) auf
von der Bekleidung entfernt und drücken Sie
die gewünschte Temperatur steigt, wird der
den Knopf der zusätzlichen Dampfzufuhr (5)
Indikator erlöschen und Sie können mit dem
mit Intervallen von 45 Sekunden, der Dampf
Bügeln beginnen.
wird aus der Gleitsohle des Geräts (5) austreten
• Stellen Sie die gewünschte Intensität der
(Abb. 7).
Dampfbildung mit dem Regler der konstanten
Dampfzufuhr (3) ein, dabei fängt der Dampf
Wichtige Information
an, aus den Öffnungen der Gleitsohle (5) des
• Es wird nicht empfohlen, die vertika-
Bügeleisens auszutreten. (Abb. 5.2)
le Abdampfung von synthetischen Stoffen
• Stellen Sie nach dem Bügeln den
durchzuführen.
Temperaturregler (7) in die Position „MIN“ und
• Es ist nicht gestattet, die Gleitsohle des
den Regler der konstanten Dampfzufuhr (3) in
Bügeleisens mit dem Stoff zu berühren, um
die Position „ “ (Dampfzufuhr ausgeschal-
seine Verschmelzung zu vermeiden.
tet).
• Es ist nicht gestattet, die Kleidung, die
• Schalten Sie das Gerät vom Stromnetz ab und
ein Mensch trägt, abzudämpfen, weil die
warten Sie ab, bis dieses komplett abgekühlt
Temperatur des austretenden Dampfes sehr
wird.
hoch ist, benutzen Sie Kleiderbügel oder
• Öffnen Sie den Deckel der Wassereinfüllöffnung
Aufhängebügel.
(9), drehen Sie das Bügeleisen um und gießen
Sie das Restwasser aus dem Wasserbehälter.
REINIGUNG DER DAMPFKAMMER
Schließen Sie den Deckel (9) zu (Abb. 9).
Für die Erhöhung der Nutzungsfrist des Geräts
wird empfohlen, die Reinigung der Dampfkammer
ACHTUNG!
regelmäßig durchzuführen, besonders in den
Wenn die konstante Dampfzufuhr während
Regionen mit hartem Leitungswasser.
des Betriebs des Geräts nicht erfolgt, prü-
• Füllen Sie den Wasserbehälter (10) mit dem
fen Sie die Richtigkeit der Positionierung des
Wasser auf.
Temperaturreglers (7) und das Vorhandensein
• Stellen Sie das Bügeleisen auf die
des Wassers im Wasserbehälter.
Bügeleisenfußplatte (8) auf.
• Stecken Sie den Netzstecker des Netzkabels
in die Steckdose.
11
1260.indd 111260.indd 11 24.08.2010 10:02:3124.08.2010 10:02:31
DEUTSCH
• Stellen Sie den Regler der Dampfzufuhr (3) in
einem trockenen Tuch nach der Entfernung
die Position „ “ (Dampfzufuhr ausgeschal-
der Kalkablagerungen.
tet).
• Es ist nicht gestattet, Abrasivmittel für die
• Stellen Sie die maximale Temperatur der
Reinigung der Gleitsohle und des Gehäuses
Gleitsohle des Bügeleisens „MAX“ mit dem
des Bügeleisens zu nutzen.
Temperaturregler (7), dabei wird der Indikator
• Vermeiden Sie den Kontakt der Gleitsohle mit
des Temperaturreglers (7) aufl euchten.
scharfen Metallgegenständen.
• Wenn die Temperatur der Gleitsohle (5)
auf die gewünschte Temperatur steigt und
AUFBEWAHRUNG
der Indikator (13) erlöscht, können Sie zur
• Drehen Sie den Regler der konstanten
Reinigung der Dampfkammer übergehen.
Dampfzufuhr (7) gegen Uhrzeigersinn in die
• Schalten Sie das Bügeleisen aus, indem Sie
Position „MIN“.
den Temperaturregler (7) in die Position „MIN“
• Ziehen Sie den Netzstecker aus der
stellen.
Steckdose.
• Ziehen Sie den Netzstecker aus der
• Stellen Sie das Bügeleisen senkrecht auf und
Steckdose.
lassen Sie es vollständig abkühlen.
• Stellen Sie das Bügeleisen in horizontaler
• Stellen Sie den Regler der Dampfzufuhr (3) in
Position über dem Waschbecken auf und stel-
die Position „
“ (Dampfzufuhr ausgeschal-
len Sie den Regler in die Position „
“. (Abb.
tet).
8).
• Öffnen Sie den Deckel der Wassereinfüllöffnung
• Kochendes Wasser und der Dampf werden
(9), drehen Sie das Bügeleisen um und gießen
zusammen mit dem Kalk aus den Öffnungen
Sie das Restwasser aus dem Wasserbehälter.
der Gleitsohle (5) austreten.
Schließen Sie den Deckel (9) zu (Abb. 9).
• Schaukeln Sie das Bügeleisen hin und zurück,
• Bewahren Sie das Gerät in einem kühlen, tro-
bis das ganze Wasser aus dem Wasserbehälter
ckenen und für Kinder unzugänglichem Ort
entfernt wird.
auf.
• Stellen Sie das Bügeleisen auf die Fußplatte
(8) und lassen Sie es vollständig abkühlen.
Lieferumfang
• Stellen Sie den Regler der Dampfzufuhr (3) in
Bügeleisen – 1 St.
die Position „ “ (Dampfzufuhr ausgeschal-
tet).
TECHNISCHE EIGENSCHAFTEN
• Wenn die Gleitsohle des Geräts (5) vollständig
Stromversorgung: 220240 V ~ 50 Hz
abgekühlt wird, wischen Sie diese mit einem
Maximale Leistung: 2200 W
Tuch ab.
Der Hersteller behält sich das Recht vor die
• Bevor Sie das Bügeleisen zur Aufbewahrung
Charakteristiken des Gerätes ohne Vorbescheid
wegpacken, vergewissern Sie sich, ob kein
zu ändern.
Wasser im Wasserbehälter übrig geblieben ist
und die Gleitsohle des Bügeleisens (5) voll-
Betriebslebensdauer des Geräts – 3 Jahre
ständig trocken ist.
Gewährleistung
Ausführliche Bedingungen der Gewährleistung
REINIGUNG UND PFLEGE
kann man beim Dealer, der diese Geräte
• Vergewissern Sie sich vor der Reinigung des
verkauft hat, bekommen. Bei beliebiger
Bügeleisens, dass es vom Stromnetz abge-
Anspruchserhebung soll man während der
Laufzeit der vorliegenden Gewährleistung den
schaltet und abgekühlt ist.
Check oder die Quittung über den Ankauf vor-
• Wischen Sie das Gehäuse des Bügeleisens
zulegen.
mit einem feuchten Tuch, danach trocknen
Sie es.
Das vorliegende Produkt entspricht
• Ablagerungen an der Gleitsohle des
den Forderungen der elektromagne-
tischen Verträglichkeit, die in 89/336/
Bügeleisens können Sie mit einem Stoff abwi-
EWG -Richtlinie des Rates und den
schen, der mit Wasser und Essiglösung an-
Vorschriften 73/23/EWG über die
gefeuchtet ist.
Niederspannungsgeräte vorgesehen
• Polieren Sie die Gleitsohle des Bügeleisens mit
sind.
12
1260.indd 121260.indd 12 24.08.2010 10:02:3124.08.2010 10:02:31

РУССКИЙ
ПАРОВОЙ УТЮГ
раствор крахмала, реагенты для удаления
накипи, химические вещества и т.п.
ОПИСАНИЕ
• Избегайте контакта открытых участков кожи
1. Кнопка дополнительной подачи пара
с горячими поверхностями утюга или выхо-
2. Кнопка разбрызгивателя воды
дящим паром, чтобы избежать получения
3. Регулятор постоянной подачи пара/вклю-
ожогов.
чение режима самоочистки
• Следите, чтобы сетевой шнур не свеши-
4. Сопло разбрызгивателя воды
вался с края гладильной доски, а также не
5. Подошва утюга
касался горячих поверхностей.
6. Указатель установленной температуры
• Перед отключением/подключением утюга
7. Регулятор температуры с индикатором
к электрической сети установите регулятор
включения
температуры в положение «MIN» (мини-
8. Подставка для утюга
мум).
9. Крышка заливочного отверстия
• Отключая утюг от электрической сети, всег-
10. Резервуар для воды
да держитесь за сетевую вилку, никогда не
11. Указатель максимального уровня воды
тяните за сетевой шнур.
12. Мерный стаканчик
• Чтобы избежать поражения электрическим
током, не погружайте утюг в воду или в лю-
МЕРЫ БЕЗОПАСНОСТИ
бую другую жидкость.
Перед эксплуатацией внимательно прочитай-
• Перед тем как убрать утюг, слейте остатки
те инструкцию, при этом обратите внимание
воды и дайте ему полностью остыть.
на иллюстрации.
• Сливайте воду только после отключения
• Перед включением убедитесь, что напря-
утюга от сети.
жение в сети соответствует рабочему на-
• Не используйте утюг с поврежденной сете-
пряжению утюга.
вой вилкой, поврежденным сетевым шну-
• Сетевой шнур снабжен «евровилкой»;
ром, а также с любыми другими неисправ-
включайте ее в розетку, имеющую надеж-
ностями.
ный контакт заземления.
• Не пользуйтесь утюгом после его падения,
• Во избежание риска возникновения пожа-
при наличии видимых повреждений или в
ра не используйте переходники при под-
случае протекания воды.
ключении прибора к электрической розет-
• Во избежание поражения электрическим
ке.
током никогда не разбирайте утюг само-
• Во избежание перегрузки электрической
стоятельно; при обнаружении неисправ-
сети не включайте одновременно несколь-
ности обращайтесь только в авторизован-
ко приборов с большой потребляемой
ный (уполномоченный) сервисный центр.
мощностью.
• Не разрешайте детям использовать утюг в
• Используйте утюг только в целях, предус-
качестве игрушки.
мотренных инструкцией.
• Храните утюг в месте, недоступном для
• Не используйте утюг вне помещений.
детей и людей с ограниченными возмож-
• Ставьте утюг на ровную, устойчивую по-
ностями. Не разрешайте им пользоваться
верхность, либо пользуйтесь гладильной
утюгом без присмотра.
доской.
• Утюг не предназначен для использова-
• Не оставляйте включенный утюг без при-
ния детьми и людьми с ограниченными
смотра.
возможностями, если только лицом, от-
• Всегда отключайте утюг от сети, если не
вечающим за их безопасность, не даны
пользуетесь им.
соответствующие и понятные инструкции
• Перед наполнением резервуара водой
о безопасном пользовании утюгом и тех
всегда вынимайте вилку из розетки.
опасностях, которые могут возникать при
• Отверстие для заполнения водой должно
его неправильном использовании.
быть закрыто во время глажения.
• Храните утюг в вертикальном положении
• В резервуар для воды запрещается зали-
в сухом, прохладном месте, недоступном
вать ароматизирующие жидкости, уксус,
для детей.
13
13
1260.indd 131260.indd 13 24.08.2010 10:02:3124.08.2010 10:02:31
РУССКИЙ
ДЛЯ ДОМАШНЕГО ИСПОЛЬЗОВАНИЯ
• Когда температура подошвы утюга (5) до-
стигнет установленной температуры, инди-
НАПОЛНЕНИЕ РЕЗЕРВУАРА ДЛЯ ВОДЫ
катор погаснет.
(рис. 2, 3)
• Установите регулятор постоянной пода-
чи пара (3) в положение « » (подача пара
ВЫБОР ВОДЫ
включена), пар начнет выходить из отвер-
Для наполнения резервуара используйте
стий на подошве утюга (5).
водопроводную воду. Если водопроводная
• Перед началом эксплуатации протестируй-
вода жесткая, то рекомендуется смешивать
те нагретый утюг на кусочке ткани, чтобы
ее с дистиллированной водой в соотношении
убедиться в том, что подошва утюга (5) и
1:1, при очень жесткой воде смешивайте ее с
резервуар для воды (10) чистые.
дистиллированной водой в соотношении 1:2
• Устройство готово к использованию.
или используйте только дистиллированную
воду.
Примечание:
• Прежде чем залить воду в утюг убедитесь,
При первом включении нагревательный
что он отключен от сети.
элемент утюга обгорает, поэтому воз-
• Установите регулятор постоянной подачи
можно появление небольшого количества
пара (3) в положение «
» (подача пара от-
дыма или постороннего запаха, это нор-
ключена).
мальное явление.
• Откройте крышку заливочного отверстия
(9).
ФУНКЦИЯ «АВТОМАТИЧЕСКОЕ
• Используя мерный стаканчик (12), налейте
ОТКЛЮЧЕНИЕ»
воду в резервуар (10), держа утюг в верти-
Если утюг находится неподвижно около 30
кальном положении (рис.3) до максималь-
секунд в горизонтальном положении или
ного уровня (11).
около 8 минут в вертикальном положении, он
• Закройте крышку заливочного отверстия
выключается автоматически. При этом ин-
(9).
дикатор в регуляторе температуры (7) будет
мигать.
Примечания:
Для включения утюга просто начните им гла-
• Не наливайте воду выше отметки «МАХ»
дить, утюг включится сам.
(максимум).
• Если во время глажения необходимо
Примечание: Через некоторое время
долить воду, то отключите утюг, выньте
после включения утюга ранее выбранная
сетевую вилку из розетки и залейте
температура подошвы будет достигнута
воду.
в соответствии с положением регулятора
• После того, как вы закончите гладить,
температуры (7).
следует выключить утюг, и лишь после
того, как он полностью остынет, откройте
ТЕМПЕРАТУРА ГЛАЖЕНИЯ
крышку заливочного отверстия (9), пере-
• Всегда перед глажением вещей смотрите
верните утюг и слейте остатки воды.
на ярлык изделия, где указана рекоменду-
емая температура глажения.
ПЕРЕД ПЕРВЫМ ИСПОЛЬЗОВАНИЕМ
• Если ярлык с указаниями по глажению от-
• Извлеките утюг из упаковки, при наличии
сутствует, но вам известен тип материала,
защиты на подошве (5) снимите защиту.
то для выбора температуры глажения не-
• Убедитесь, что напряжение в сети соот-
обходимо пользоваться следующей табли-
ветствует рабочему напряжению утюга.
цей.
• Налейте воду в резервуар (10).
• Вставьте вилку сетевого шнура в розетку.
Обозначения Тип ткани (температура)
• Установите регулятор температуры (7) в
Синтетика, нейлон, акрил, поли-
•
положение «МАХ» (максимум), при этом
эстер (низкая температура)
загорится индикатор в ручке регулятора
Шелк/шерсть (средняя темпера-
••
температуры (7).
тура)
14
1260.indd 141260.indd 14 24.08.2010 10:02:3224.08.2010 10:02:32

РУССКИЙ
Хлопок/лен (высокая темпера-
• Когда температура подошвы утюга (5) до-
•••
тура)
стигнет выбранной температуры, индика-
тор погаснет, и можно приступать к глаже-
• Таблица применима только для гладких
нию.
материалов. Если необходимо гладить ма-
териал другого типа (гофрированный, ре-
Примечание:
льефный и т.д.), то лучше всего его гладить
При паровом глажении необходимо уста-
при низкой температуре.
навливать температуру глажения в зоне
• Сначала отсортируйте вещи по тканям,
работы с паром, «•••» или «МАХ» (макси-
ориентируясь на рекомендуемую темпе-
мум).
ратуру глажения: синтетику к синтетике,
шерсть к шерсти, хлопок к хлопку и т.д.
РАЗБРЫЗГИВАТЕЛЬ ВОДЫ
• Утюг нагревается быстрее, чем остывает.
• Вы можете увлажнить ткань, нажав не-
Поэтому сначала рекомендуется браться
сколько раз на кнопку разбрызгивателя (2)
за те вещи, которые гладят при низкой тем-
(рис. 4).
пературе (например, вещи из синтетичес-
• Убедитесь, что в резервуаре достаточно
ких тканей).
воды.
• После этого переходите на глажение ве-
щей, которые гладят при более высоких
СУХОЕ ГЛАЖЕНИЕ
температурах (например, вещи из шелка,
• Поставьте утюг на подставку (8).
шерсти). Изделия из хлопка и льна обычно
• Установите регулятор постоянной подачи
гладят в последнюю очередь.
пара (3) в положение «
» (подача пара от-
• Если предстоит гладить вещи из смесовых
ключена) (рис.5.1).
тканей, следует установить самую низкую
• Поворотом регулятора температуры (7)
температуру глажения (например, если
установите требуемую температуру глаже-
состав ткани обозначен как 60% полиэстер
ния: «•», «••», «•••» или «MAX» (максимум),
и 40% хлопок, то её следует гладить при
в зависимости от типа ткани, при этом за-
температуре, подходящей для полиэстера
горится индикатор в регуляторе темпера-
«•»).
туры (7).
• Если вы не можете определить состав тка-
• Когда температура подошвы утюга (5) до-
ни, то найдите на изделии место, которое
стигнет установленной температуры, инди-
не бросается в глаза при носке, и опытным
катор погаснет, можно приступать к глаже-
путём выберите температуру глажения
нию.
(всегда начинайте с самой низкой темпе-
• После использования утюга установите
ратуры и постепенно повышайте её, пока
регулятор температуры (7) в положение
не добьётесь желаемого результата).
«MIN» (минимум).
• Вельветовые и другие ткани, которые быс-
• Выньте вилку сетевого шнура из розетки и
тро начинают лосниться, следует гладить
дождитесь полного остывания утюга.
строго в одном направлении (в направле-
нии ворса) с небольшим нажимом.
ПАРОВОЕ ГЛАЖЕНИЕ (рис.5)
• Чтобы избежать появления лоснящихся пя-
При паровом глажении необходимо устанав-
тен на синтетических и шелковых тканях, их
ливать температуру глажения в зоне работы с
следует гладить с изнаночной стороны.
паром, «•••» или «МАХ» (максимум).
Утюг снабжен противокапельным клапаном,
УСТАНОВКА ТЕМПЕРАТУРЫ ГЛАЖЕНИЯ
который закрывает подачу воды при слиш-
• Поставьте утюг на подставку (8).
ком низкой температуре подошвы утюга, это
• Вставьте вилку сетевого шнура в розетку.
предотвращает появление капель из отвер-
• Поворотом регулятора температуры (7)
стий подошвы утюга (5). При нагревании и
установите требуемую температуру глаже-
остывании подошвы утюга (5) вы услышите
ния: «•», «••», «•••» или «MAX» (максимум),
характерные щелчки открывания/закрыва-
в зависимости от типа ткани, при этом за-
ния противокапельного клапана, что свиде-
горится индикатор в регуляторе темпера-
тельствует о его нормальной работе.
туры (7).
15
1260.indd 151260.indd 15 24.08.2010 10:02:3224.08.2010 10:02:32

РУССКИЙ
• Убедитесь, что в резервуаре достаточно
ВЕРТИКАЛЬНОЕ ОТПАРИВАНИЕ
воды
Функция вертикального отпаривания может
• Поставьте утюг на подставку 8).
быть использована только при высокотемпе-
• Установите регулятор постоянной подачи
ратурном режиме глажения, когда регулятор
пара (3) в положение «
» (подача пара от-
температуры находится в положении (7) в по-
ключена). (рис.5.1.)
ложении «•••» или «МАХ» (максимум).
• Вставьте вилку сетевого шнура в розетку.
Держите утюг вертикально на расстоянии
• Поворотом регулятора (7) установите тем-
15 -30 см от одежды и нажимайте кнопку до-
пературу глажения: в зоне работы с паром,
полнительной подачи пара (1) с интервалом
«•••» или «МАХ» при этом загорится инди-
в 4 -5 секунд, пар будет выходить из подошвы
катор в регуляторе температуры (7).
утюга (5) (рис. 7).
• Когда температура подошвы утюга (5) до-
стигнет установленной температуры, инди-
Важная информация
катор погаснет, можно приступать к глаже-
• Не рекомендуется выполнять вертикаль-
нию.
ное отпаривание синтетических тканей.
• Регулятором постоянной подачи пара (3)
• При вертикальном отпаривании не прика-
установите необходимую интенсивность
сайтесь подошвой утюга к материалу, что-
парообразования, пар начнет выходить из
бы избежать его оплавления.
отверстий подошвы утюга (5). (рис.5.2.)
• Никогда не отпаривайте одежду, уже наде-
• После использования утюга установите
тую на человека, это опасно для человека,
регулятор температуры (7) в положение
т.к. температура выходящего пара очень
«MIN» (минимум), а регулятор постоянной
высокая, пользуйтесь плечиками или ве-
подачи пара (3) в положение « » (подача
шалкой.
пара выключена).
• Выньте вилку сетевого шнура из розетки и
ОЧИСТКА ПАРОВОЙ КАМЕРЫ
дождитесь полного остывания утюга.
Для увеличения срока службы утюга рекомен-
• Откройте крышку заливочного отверстия
дуется регулярно выполнять очистку паровой
(9), переверните утюг и слейте оставшуюся
камеры, особенно в регионах с «жесткой» во-
воду из резервуара (10). Закройте крышку
допроводной водой.
(9) (рис.9).
• Наполните резервуар (10) водой.
• Поставьте утюг на подставку (8).
ВНИМАНИЕ!
• Вставьте вилку сетевого шнура в розетку.
Если во время работы не происходит посто-
• Установите регулятор постоянной подачи
янной подачи пара, проверьте правильность
пара (3) в положение « » (подача пара от-
положения регулятора температуры (7) и на-
ключена).
личие воды в резервуаре.
• Поворотом регулятора (7) установите мак-
симальную температуру нагрева подошвы
ДОПОЛНИТЕЛЬНАЯ ПОДАЧА ПАРА
утюга «MAX» (максимум), при этом заго-
Функция дополнительной подачи пара полез-
рится индикатор в регуляторе температуры
на при разглаживании складок и может быть
(7).
использована только при высокотемператур-
• Когда температура подошвы утюга (5) до-
ном режиме глажения, когда регулятор тем-
стигнет установленной температуры, и ин-
пературы (7) находится в положении «•••»
дикатор погаснет, можно проводить очист-
или «МАХ» (максимум).
ку паровой камеры.
При нажатии кнопки дополнительной подачи
• Выключите утюг, установив регулятор тем-
пара (1) пар из подошвы утюга будет выхо-
пературы (7) в положение «MIN» (мини-
дить более интенсивно (рис. 6).
мум).
• Выньте вилку сетевого шнура из розетки.
Примечание: Во избежание вытекания
• Расположите утюг горизонтально над рако-
воды из паровых отверстий нажимайте
виной, установите регулятор в положение
кнопку дополнительной подачи пара (1) с
. (рис. 8).
интервалом в 4 -5 секунд.
• Кипящая вода и пар вместе с накипью бу-
16
1260.indd 161260.indd 16 24.08.2010 10:02:3224.08.2010 10:02:32
РУССКИЙ
дут выбрасываться из отверстий подошвы
ТЕХНИЧЕСКИЕ ХАРАКТЕРИСТИКИ
утюга (5).
Напряжение питания: 220-240 В ~ 50 Гц
• Слегка покачивайте утюг (вперед-назад),
Потребляемая максимальная мощность:
пока вся вода не выйдет из резервуара.
2200 Вт
• Поставьте утюг на подставку 8) и дайте ему
полностью остыть.
Производитель сохраняет за собой право
• Установите регулятор постоянной подачи
изменять дизайн и технические характерис-
пара (3) в положение «
» (подача пара от-
тики прибора без предварительного уведом-
ключена).
ления.
• Когда подошва утюга (5) полностью осты-
нет, протрите ее кусочком сухой ткани.
Срок службы прибора - 3 года
• Прежде чем убрать утюг на хранение, убе-
дитесь, что в резервуаре нет воды, и по-
Данное изделие соответствует всем
дошва утюга (5) сухая.
требуемым европейским и россий-
ским стандартам безопасности и
УХОД И ЧИСТКА
гигиены.
• Прежде чем чистить утюг убедитесь, что он
отключен от сети и уже остыл.
АН-ДЕР ПРОДАКТС ГмбХ, Австрия
• Протирайте корпус утюга слегка влажной
Нойбаугюртель 38/7А, 1070 Вена, Австрия
тканью, после этого протрите его насухо.
• Отложения на подошве утюга могут быть
удалены тканью, смоченной в водно-уксус-
ном растворе.
• После удаления отложений отполируйте
поверхность подошвы сухой тканью.
• Не используйте для чистки подошвы и кор-
пуса утюга абразивные чистящие средс-
тва.
• Избегайте контакта подошвы утюга с ост-
рыми металлическими предметами.
ХРАНЕНИЕ
• Поверните регулятор температуры (7) про-
тив часовой стрелки до положения «MIN»
(минимум).
• Выньте вилку сетевого шнура из розетки.
• Поставьте утюг вертикально и дайте ему
полностью остыть.
• Установите регулятор постоянной подачи
пара (3) в положение « » (подача пара от-
ключена).
• Откройте крышку заливочного отверстия
(9), переверните утюг и слейте оставшуюся
воду из резервуара (10). Закройте крышку
(9) (рис.9).
• Храните утюг в вертикальном положении
в сухом, прохладном месте, недоступном
для детей.
Комплект поставки
Утюг – 1 шт.
17
1260.indd 171260.indd 17 24.08.2010 10:02:3224.08.2010 10:02:32

ҚАЗАҚ
БУЛЫ ҮТІК
сұйықтықтарды, сірке суды, крахмал
ерітіндісін, қақты жоюға арналған
СИПАТТАМАСЫ
реагенттерді, химиялық заттарды жəне
1. Қосымша бу беру батырмасы
т.с.с.-ларды құюға тыйым салынады.
2. Су бүріккішінің батырмасы
• Күйікке шалдығуды болдырмау үшін
3. Тұрақты бу берудің реттегіші/өздігінен
терінің ашық жерлерінің үтіктің ыстық
тазалану режимінінің қосылуы
беттерімен немесе шығып жатқан бумен
4. Су бүріккішінің шүмегі
түйісуін болдырмаңыз.
5. Үтіктің табаны
• Үтіктейтін тақтаның жиегінен желілік
6. Белгіленген температура көрсеткіші
баудың салбырамауын, ыстық беттерге
7. Іске қосылу көрсеткіші бар температура
тимеуін бақылаңыз.
реттегіші
• Үтікті электр желісіне қосу/ажырату
8. Үтіктің негізі
алдында температура реттегішін «MIN»
9. Құятын саңылаудың қақпағы
күйіне белгілеңіз.
10. Суға арналған сауыт
• Үтікті электр желісінен сөндірген кезде
11. Судың максималды деңгейінің
əрқашан желілік айыр тетіктен ұстаңыз,
көрсеткіші
ешқашан желілік баудан тартпаңыз.
12. Өлшейтін стаканша
• Электр тоғы соққысын болдырмау үшін,
үтікті суға немесе кез-келген басқа
САҚТАНДЫРУ ШАРАЛАРЫ
сұйықтыққа батырмаңыз.
Пайдалану алдында нұсқаулықты зейін
• Үтікті жинап қоюға дейін судың қалдығын
қойып оқып шығыңыз, сонымен қатар
төгіңіз жəне оған толық салқындауға
бейнелерге назар аударыңыз.
уақыт беріңіз.
• Қосу алдында, желідегі кернеу үтіктің
• Үтікті желіден ажыратқаннан кейін ғана
жұмыс кернеуіне сəйкес келуіне көз
суды төгіңіз.
жеткізіңіз.
• Үтікті зақымдалған желілік айыр тетікпен,
• Желілік бау «евроайыртетікпен»
желілік баумен, сонымен қатар кез-келген
жабдықталған; оны сенімді жерлендіргіш
басқа ақаулықпен пайдаланбаңыз.
түйіспесі бар ашалыққа қосыңыз.
• Үтік құлағаннан кейін, көзге көрінетін
• Аспапты электр ашалығына қосу кезінде,
бұзылулар болғанда немесе судың ағуы
өрттің пайда болу тəуекелін болдырмау
жағдайында оны пайдаланбаңыз.
үшін ауыстырғыштарды пайдаланбаңыз.
• Электр тоғы соққысын болдырмау үшін
• Электр желісінің артық жүктелуін
үтікті өздігімен ашпаңыз, ақаулықты
болдырмау үшін, үлкен қуатты тұтынатын
тапқан кезде тел туындыгерлес қызмет
бірнеше аспапты бір уақытта қоспаңыз.
көрсету орталығына хабарласыңыз.
• Үтікті нұсқаулықта көзделген мақсаттарда
• Үтікті балаларға ойыншық ретінде
ғана пайдаланыңыз.
пайдалануғк рұқсат етпеңіз.
• Үтікті бөлмелерден тыс пайдаланбаңыз.
• Үтікті балалардың жəне мүмкіндіктері
• Үтікті жазық тұрақты бетке қойыңыз
шектеулі адамдардың қолы жетпейтін
немесе үтіктеу тақтасында
жерде сақтаңыз.
пайдаланыңыз.
Оларға құрылғыны қараусыз пайдалануға
• Қосылған үтікті қараусыз қалдырмаңыз.
рұқсат етпеңіз.
• Егер үтікті пайдаланбасаңыз, оны
• Үтік балалардың немесе мүмкіндікдері
əрқашан желіден ажыратыңыз.
шектеулі адамдардың қолдануына,
• Сауытты суға толтырған кезде, əрқашан
егер оларға құрылғыны қауіпсіз
айыртетікті ашалықтан ажыратыңыз.
пайдалану жəне олардың қауіпсіздігі
• Суды толтыруға арналған саңылау
үшін жауап беретін тұлғаның оны
үтіктеу уақытында жабық болуы керек.
дұрыс пайдаланбаған кездегі пайда
• Суға арналған сауытқа хош иісті
бола алатын қауіптер туралы оларға
18
18
1260.indd 181260.indd 18 24.08.2010 10:02:3224.08.2010 10:02:32

ҚАЗАҚ
түсінікті нұсқаулықтар берілген болмаса
• Желідегі кернеудің үтіктің жұмыс
арналмаған.
кернеуіне сəйкес келетініне көз жеткізіңіз.
• Үтікті тік күйінде құрғақ, салқын,
• Сауытқа (10) суды құйыңыз.
балалардың қолы жетпейтін жерде
• Желілік баудың айыртетігін ашалыққа
сақтаңыз.
салыңыз.
• Температура реттегішін (7) «МАХ»
ҮЙДЕ ПАЙДАЛАНУҒА АРНАЛҒАН
күйіне белгілеңіз, сол кезде температура
реттегішінің (7) сабында көрсеткіш
СУҒА АРНАЛҒАН САУЫТТЫ ТОЛТЫРУ
жанады.
(сур. 2, 3)
• Үтік табанының (5) температурасы
белгіленген температураға жеткенде,
СУДЫ ТАҢДАУ
көрсеткіш сөнеді.
Сауытты толтыру үшін құбырдағы суды
• Тұрақты бу беру реттегішің (3) « » (бу
пайдаланыңыз. Егер құбырдағы су қатты
беру сөндірілген) күйіне белгілеңіз, бу үтік
болса, оны 1:1 қатынасында дистильденген
табанындағы саңылаулардан (5) шыға
сумен араластыру ұсынылады, өте қатты
бастайды.
су болған жағдайда оны 1:2 қатынасында
• Қолдану алдында, үтіктің табаны (5) жəне
дистильденген сумен араластырыңыз
суға арналған сауыт (10) таза екеніне
немесе тек дистильденген суды
көз жеткізу үшін қызған үтікті матаның
пайдаланыңыз.
кішкентай бөлігінде тексеріңіз.
• Суды үтікке құю алдында, оның желіден
• Құрылғы пайдалануға дайын.
ажыратылғанына көз жеткізіңіз.
• Тұрақты бу беру реттегішін (3) «
» (бу
Ескерту
беру сөндірілген) күйіне орнатыңыз.
Бірінші қосқан кезде үтіктің қыздыратын
• Құю саңылауының қақпағын (9) ашыңыз.
элементі күйеді, сондықтан аз көлемдегі
• Өлшейтін стаканшаны (12) пайдаланып,
түтіннің немесе бөтен иістің пайда
үтікті тік күйінде ұстап тұрып (сур.3)
болуы – бұл қалыпты құбылыс.
сауытқа (10) суды максималды деңгейге
дейін (11) құйыңыз.
«АВТОМАТТЫ СӨНУ» ҚЫЗМЕТІ
• Құятын саңылаудың қақпағын (9)
Егер үтік 30 секундқа таяу көлденең
жабыңыз.
күйінде немесе 8 минутқа таяу тік күйінде
қозғалмай тұрса, ол автоматты сөнеді.
Ескерту:
Сол кезде температура реттегішінде (7)
• Суды MAX белгісінен жоғары
көрсеткіш жанып-сөнеді.
толтырмаңыз.
Үтікті іске қосу үшін жай онымен үтіктей
• Егер үтіктеу кезінде суды толтыру
бастаңыз, үтік іске қосылады.
қажет болса, онда үтікті сөндіріңіз
жəне желілік айыр тетікті ашалықтан
Ескерту: Үтік іске қосылғаннан кейін,
ажыратыңыз жəне суды құйыңыз.
дейін белгіленген табан температурасы
• Үтіктеп болғаннан кейін үтікті
температура реттегішінің (7) күйіне
сөндіріңіз, оның толық салқындауын
байланысты біршама уақыттан кейін
күтіңіз, одан кейін құятын саңылаудың
орнайды.
қақпағын (9) ашыңыз, үтікті төңкеріңіз
жəне қалған суды төгіңіз.
ҮТІКТЕУ ТЕМПЕРАТУРАСЫ
• Əрқашан үтіктеу алдында үтіктеудің
АЛҒАШҚЫ ПАЙДАЛАНУ АЛДЫНДА
ұсынылған температурасы көрсетілген
• Үтікті қабынан шығарыңыз, табанында
бұйымның жапсырмасын қараңыз.
(5) қорғаныс болған кезде оны алып
• Егер үтіктеу бойынша нұсқаулары
тастаңыз.
бар жапсырма болмаса, бірақ сіз
19
1260.indd 191260.indd 19 24.08.2010 10:02:3224.08.2010 10:02:32
ҚАЗАҚ
матаның түрін білсеңіз, онда үтіктеу
ҮТІКТЕУ ТЕМПЕРАТУРАСЫН БЕЛГІЛЕУ
температурасын таңдау үшін кестеге
• Үтікті негізіне (8) қойыңыз.
қараңыз.
• Желілік баудың айыр тетігін ашалыққа
қосыңыз.
Белгілеулер Матаның түрі (температура)
• Реттегішті (7) бұрап, қажетті үтіктеу
температурасын матаның түріне
синтетика, нейлон, акрил, полиэс-
•
байланысты белгілеңіз: «•», «••», «•••»
тер (төмен температура)
•• жібек/жүн (орташа температура)
немесе «MAX», сол кезде көрсеткіш (7)
••• мақта/зығыр (жоғары температура)
жанады.
• Үтік табанының (5) температурасы
• Кесте тек біртегіс маталарға
белгіленген температураға жеткенде,
қолданылады. Егер мата басқа түрлі
көрсеткіш сөнеді, үтіктеуге кірісуге
болса (бүктелген, бедерлі жəне т.с.с.),
болады.
онда оны төмен температурада үтіктеген
дұрыс болады.
Ескерту:
• Əуелі заттарды үтіктеу темперетурасы
Булы үтіктеу кезінде үтіктеу
бойынша сұрыптаңыз: синтетиканы
температурасын бумен жұмыс істеу, «•••»
– синтетикаға, жүнді - жүнге, мақтаны
немесе «MAX» аймағына орнату қажет.
– мақтаға жəне т.с.с.
• Үтік салқындауға қарағанда тезірек
СУ БҮРІККІШ
қызады. Сондықтан əуелі төмен
• Сіз бүріккіштің (2) батырмасына бірнеше
температура кезінде үтіктеу ұсынылады
рет басып, матаны ылғалдай аласыз.
(мысалы, синтетикалық маталар).
• Сауытта (11) жеткілікті су бар екеніне көз
• Содан кейін анағұрлым жоғары
жеткізіңіз.
температура кезіндегі үтіктеуге көшіңіз
(жібек, жүн). Мақтадан немесе зығырдан
ҚҰРҒАҚ ҮТІКТЕУ
жасалған заттарды соңында үтіктеңіз.
• Үтікті негізіне (8) қойыңыз.
• Егер матаның құрамына аралас талшықтар
• Тұрақты бу беру реттегішін (3) «
»(бу
енсе, онда ең төмен температураны
беру сөнідірілген) күйіне белгілеңіз.
белгілеу қажет (мысалы, егер бұйым
(сур.5.1)
60% полиэстерден жəне 40% мақтадан
• Реттегішті (7) бұрап, қажетті үтіктеу
құралса, онда оны полиэстерге сəйкес
температурасын матаның түріне
температурада үтіктеу қажет «•»).
байланысты белгілеңіз: «•», «••», «•••»
• Егер сіз матаның құрамын анықтай
немесе «MAX», сол кезде көрсеткіш (7)
алмасаңыз, онда бұйымды киген
жанады.
кезде көрінбейтін жерді табыңыз, жəне
• Үтік табанының (5) температурасы
тəжірибелік жолмен температураны
белгіленген температураға жеткенде,
таңдаңыз (əрқашан ең төменгі
көрсеткіш сөнеді, үтіктеуге кірісуге
температурадан бастаңыз жəне оны
болады.
қажетті нəтижеге жеткенге дейін біртіндеп
• Үтікті пайдаланып болғаннан кейін
көтеріңіз.).
температура реттегішін (7) «MIN» күйіне
• Тез сетінейтін шибарқыт жəне басқа да
орнатыңыз.
маталарды тек бір бағытта сəл ғана басып
• Желілік баудың айыр тетігін ашалықтан
(түктің бағытымен) үтіктеу керек.
ажыратыңыз жəне үтіктің толық
• Синтетикалық жəне жібек маталардағы
салқындауын күтіңіз.
сетінейтін дақтардың пайда болуын
болдырмау үшін, оларды ішкі жағынан
БУМЕН ҮТІКТЕУ (СУР.5)
үтіктеңіз.
Бумен үтіктеген кезде үтіктеу
температурасын бумен жұмыс істеу, «•••»
20
1260.indd 201260.indd 20 24.08.2010 10:02:3224.08.2010 10:02:32


