Vitek VT-3542 SR: инструкция
Раздел: Бытовая, кухонная техника, электроника и оборудование
Тип: Часы
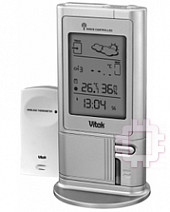
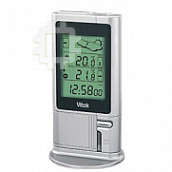
Инструкция к Часам Vitek VT-3542 SR
Оглавление
- МНОГОФУНКЦИОНАЛЬНЫЕ ЧАСЫ Инструкция по эксплуатации ОПИСАНИЕ: МНОГОФУНКЦИОНАЛЬНЫЕ ЧАСЫ
- ОПИСАНИЕ: ДИСТАНЦИОННЫЙ ДАТЧИК ТЕМПЕРАТУРЫ
- Установка батареек: Дистанционный датчик температуры Установка батареек: Многофункциональные часы Замена батареек Использование отверстий крепления к стене и съемной подставки Работа многофункциональных часов Чтение показаний температур и влажности
- Символы дисплея Максимальная и минимальная температуры и влажность Отсутствие сигнала данных
- Влияние помех Индикация изменения температур и влажности Прогноз погоды Примечание
- Атмосферное давление Показания календаря Установка календаря и текущего времени Установка будильника
- Установка оповещения о низкой температуре воздуха Выключение звукового сигнала будильника
- Технические характеристики

ALARM CLOCK/WIRELESS WEATHER STATION
MODEL VT3542 SR
INSTRUCTION MANUAL
3
12
20
28
www.vitekaus.com
3542.qxd 15.07.05 10:37 Page 1
3542.qxd 15.07.05 10:37 Page 2

ENGLISH
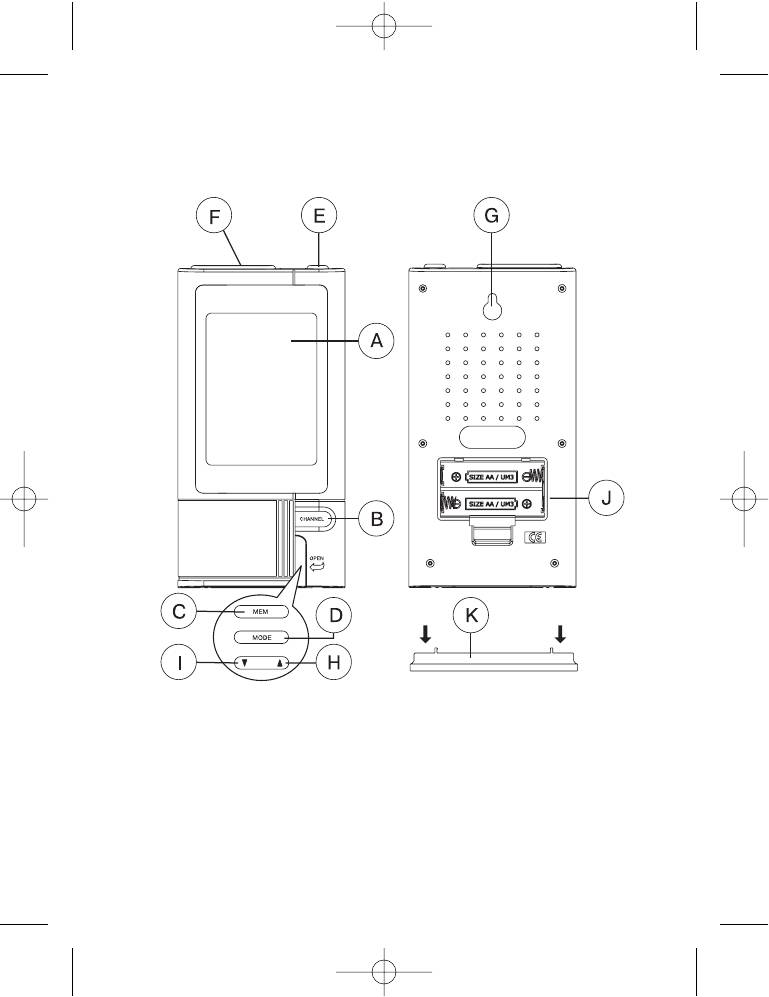
A. FOURLINE DISPLAY
Facilitates easy reading of weather forecast, remote and indoors temperatures and calendar
clock
B. CHANNEL BUTTON
Display different sensor temperature
C. MEMORY [MEM] BUTTON
Recalls the maximum or minimum temperature of main and remote unit.
D. MODE BUTTON
Toggles the display modes and confirms entry while setting the values for display
E. ALARM BUTTON
Displays the alarm time or sets the alarm status
F. SNOOZE/LIGHT BUTTON
Activate the snooze function and backlight
G. WALLMOUNT RECESSED HOLE
For mounting the main unit on a wall
H. UP (
#
) BUTTON
Advances the value of a setting
I. DOWN (
$
) BUTTON
Decreases the value of a setting
J. BATTERY COMPARTMENTS
Accommodates two UM#3 or “AA” size 1.5V batteries
K. REMOVABLE TABLE STAND
For standing the main unit on a flat surface
3
3542.qxd 15.07.05 10:37 Page 3
ENGLISH
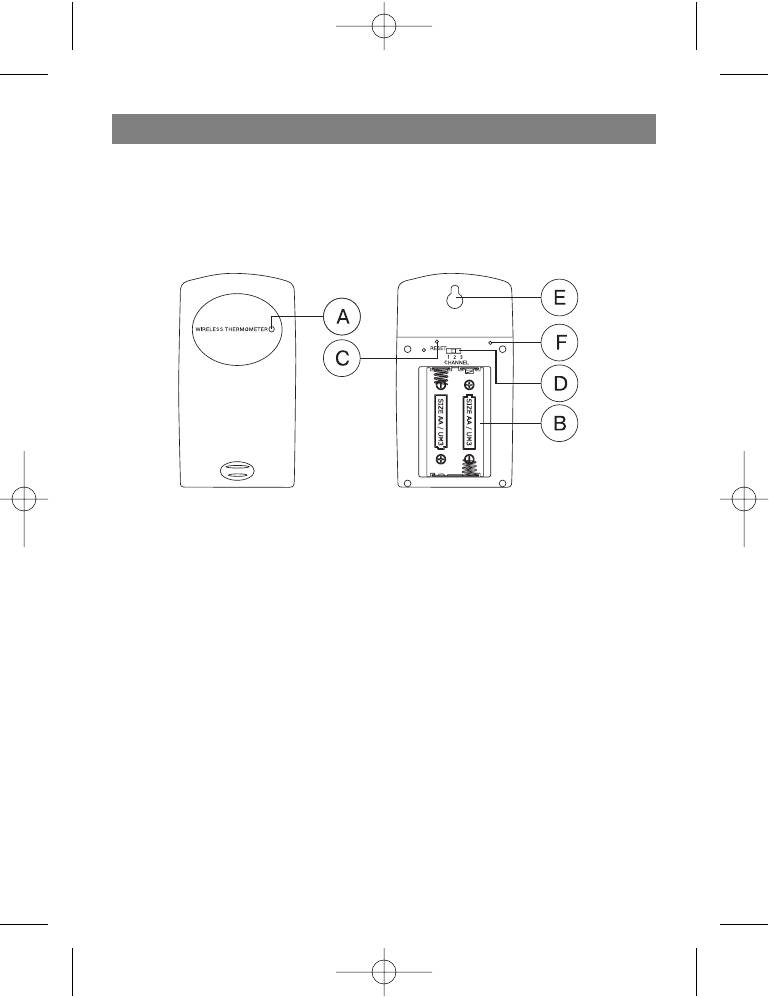
MAIN FEATURES: REMOTE UNIT
A. LED INDICATOR
Flashes once when the remote unit transmits a reading
Flashes twice when low battery is detected on sensor unit
B. BATTERY COMPARTMENT
Accommodates two AA#size batteries
C. RESET BUTTON
Press to reset all setting if you have selected different channel.
D. CHANNEL SELECTOR
Select the channel before you install batteries.
E. WALLMOUNT RECESSED HOLE
Supports the remote until in wall#mounting
F. °C/ °F BUTTON
4
3542.qxd 15.07.05 10:37 Page 4
ENGLISH
BEFORE YOU BEGIN
For best operation,
1. Insert batteries for remote units before doing so for the main unit.
2. Position the remote unit and main unit within effective transmission range, which, in usual cir#
cumstances, is 20 to 30 meters.
Note: that the effective range is vastly affected by the building materials and where the main
and remote units are positioned.
Try various set#ups for best result.
Though the remote units are weather proof, they should be placed away from direct sunlight,
rain or snow.
BATTERY INSTALLATION: REMOTE UNIT
1. Remove the screws on the battery compartment.
2. Select the channel
3. Install 2 batteries (UM#3 or “AA” size 1.5V) strictly according to the polarities shown.
4. Replace the battery compartment door and secure its screws.
BATTERY INSTALLATION: MAIN UNIT
1. Open the battery compartment door.
2. Install 2 batteries (UM#3 or “AA” size 1.5V) strictly according to the polarities shown.
3. Replace the battery compartment door.
LOW BATTERY WARNING
When it is time to replace batteries, the respective low#battery indicator [ ] will show up on
the indoor or outdoor temperature.
HOW TO USE THE TABLE STAND OR WALL MOUNTING
The main unit has a removable table stand, which when connected, can support the unit on a
flat surface. Or you can remove the stand and mount the unit on a wall using the recessed
screw hole.
GETTING STARTED
Once batteries are in place for the remote unit, they will start transmitting temperature readings
at around 45 seconds intervals. The main unit will also start searching for signals for about two
minutes once batteries are installed. Upon successful reception, the outdoors temperatures will
be displayed. The main unit will automatically update its readings at about 45#second intervals.
If no signals are received, blanks “ ” will be displayed. Hold [
$
] for 2 seconds to enforce
another search for about 2 minutes. This is useful in synchronizing the transmission and recep#
tion of the remote and main units. Repeat this step whenever you find discrepancies between
the reading shown on the main unit and that on the remote unit.
5
3542.qxd 15.07.05 10:37 Page 5
ENGLISH
HOW TO CHECK REMOTE AND INDOOR TEMPERATURES
The wave display on the outdoors temperature indicates the reception of the remote unit is in
good order. If no readings are received from the remote unit for more than two minutes, blanks
“ ” will be displayed until further readings are successfully searched. Check the remote
unit is sound and secure. You can wait for a little while or Hold [
$
] for 2 seconds to enforce an
immediate search. If the temperature goes above or below than the temperature measuring
range of the main unit or the remote unit (stated in specification), the display will show “ ”.
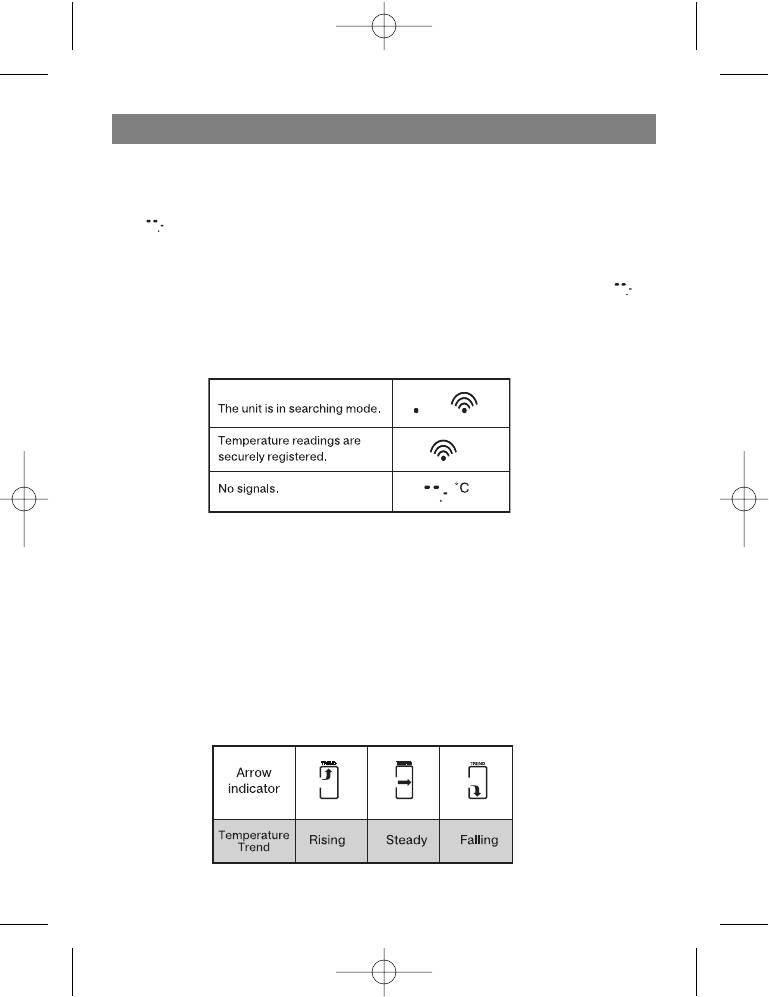
HOW TO READ THE KINETIC WAVE DISPLAY
The kinetic wave display shows the signal receiving status of the main unit. There are three pos#
sible forms:
MAXIMUM AND MINIMUM TEMPERATURES
The maximum and minimum recorded indoor temperature, outdoor temperatures will be auto#
matically stored in memory. To display them, Press [ MEM ] once to display the maximum read#
ings and again the minimum readings. The respective indicators, [ MAX ] or [ MIN ] will be dis#
played. To clear the memory, hold down [ MEM ] for two seconds. The maximum and minimum
readings will be erased.
If you press [ MEM ] now, the maximum and minimum readings will have the same values as the
current ones until different readings are recorded.
TEMPERATURE TREND
The trend indicator shows the trend of temperatures collected at that particular remote sight.
Three trends: rising, steady, and falling will be shown.
6
3542.qxd 15.07.05 10:37 Page 6
ENGLISH
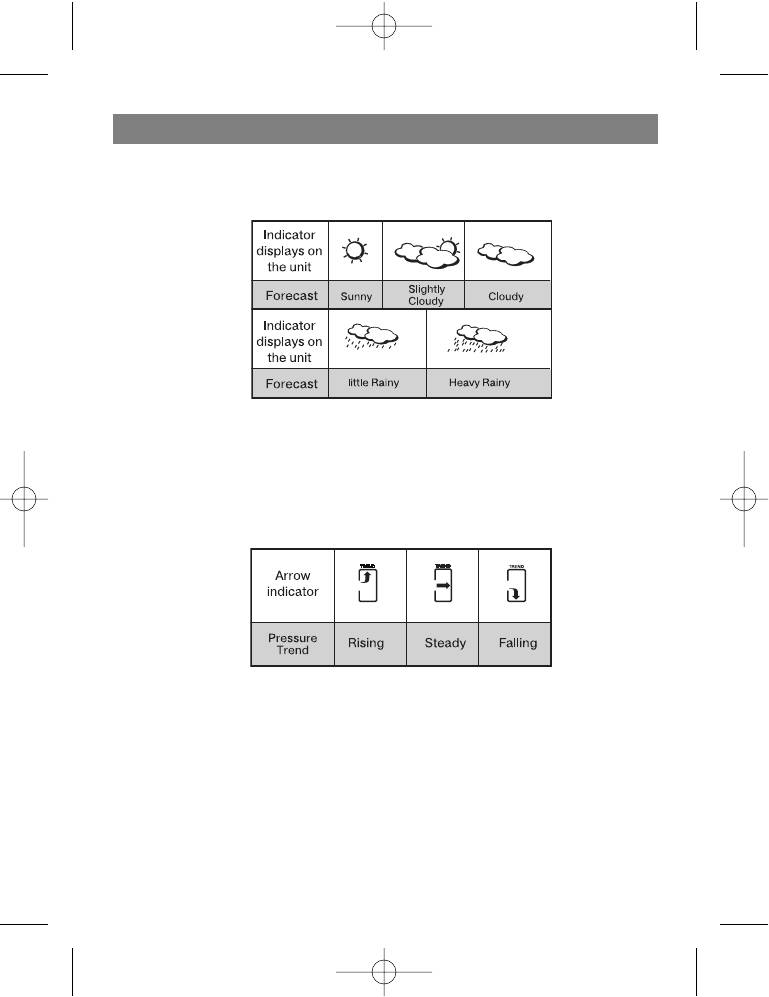
WEATHER FORECAST
The unit is capable of detecting atmospheric pressure changes. Based on collected data, it can
predict the weather for the forthcoming12 to 24 hours.
NOTE:
1. The accuracy of a general pressure#based weather forecast is about 70%.
2. The weather forecasts. It may not necessarily reflect the current situation.
3. The “Sunny” icon, as applies to night time, implies clear weather.
ATMOSPHERIC PRESSURE
The atmospheric pressure indicator, in the weather forecast window, uses arrows to indicate if
the atmospheric pressure is increasing, remaining stable, or decreasing.
DISCONNECTED SIGNALS
If without obvious reasons the display of the outdoor temperature goes blank, Hold [
$
] for 2
seconds to enforce an immediate search.
If that fails, check:
1. The remote unit is still in place.
2. The batteries of both the remote unit and main unit.
Replace as necessary.
Note: When the temperature falls below freezing point, the batteries of outdoor units will
freeze, lowering their voltage supply and the effective range.
3. The transmission is within range and path is clear of obstacles and interference. Shorten the
distance when necessary.
7
3542.qxd 15.07.05 10:37 Page 7
ENGLISH
TRANSMISSION COLLISION
Signals from other household devices, such as door bells, home security systems and entry
controls, may interfere with those of this product and cause temporarily reception failure. This
is normal and does not affect the general performance of the product. The transmission and
reception of temperature readings will resume once the interference recedes.
CALENDAR CLOCK DISPLAY MODES
The clock and the calendar share the same section of the display. The calendar is displayed in
a day#month format.
Each press on the MODE button will change the display between clock with second, clock with
day of week, zone time with day of week. zone time with second and day#month.
HOW TO SET THE CLOCK
To set the clock manually, hold MODE for two seconds it will show the year. Use [
$
] or [
#
] to
change it. Press MODE to confirm. Repeat the same procedure to set the month, date, date#
month format, 12/24, hour, minute, display language, zone time offset and °C/°F.
During the setting, press and hold [
$
] or [
#
] will increase or decrease the value rapidly.
For display language, you can choose among English (EN), German (DE), French (FR), Italian
(IT) and Spanish (SP) # in that order. If there is an item you do not wish to change, simply press
[ MODE ] to bypass the item. When you finished the change, press [ MODE ] to exit. The display
will return to the clock mode.
HOW TO SET AND ARM THE ALARM
To set an alarm,
1. Press [ALARM] once to display alarm time. If the alarm is disarmed, the time will be dis#
played as “ OFF ”.
2. Hold [ALARM] for two seconds. The hour digits will blink.
3. Enter the hour using [
$
] or [
#
].
4. Press [ALARM]. The minute digits will blink.
5. Enter the minutes using [
$
] or [
#
].
6. Press [ALARM] to exit.
7. Repeat the same procedure to set single alarm.
The alarm “ ” “ ” and “ PreAL” icons will be displayed indicating which alarm is
armed. You can also arm or disarm an alarm by pressing the [
$
],[
#
] button at alarm display
mode.
Press ALARM to return to clock display mode.
SNOOZE FEATURE
When the alarm sound is on, press the snooze key enter snooze mode. After 8 minutes, alarm
sound will be wake up automatically. The snooze cycle will be restarted if you press the snooze
key again.
If you leave the alarm sound on for 2 minutes, it will enter snooze mode automatically with max#
imum 3 times.
8
3542.qxd 15.07.05 10:37 Page 8

ENGLISH
HOW TO STOP AN ALARM
Press [ALARM] on the unit to stop an alarm.
ALARM FEATURE
* Weekday Alarm
The alarm sound will be activated and the icon will be flashed on weekday when it is armed and
the alarm time is reach.
* Single Alarm
The alarm sound will be activated and the icon will be flashed once when it is armed and the
alarm time is reach. Once it finished, it will be disabled automatically.
* Pre#Alarm
The pre#alarm sound will be activated and the icon will be flashed if outdoor temperature under
or equal zero degree. Which is programmable 15, 30, 45, 60 or 90 minutes earlier than the
weekday alarm or single alarm time.
* The pre#alarm can be armed only one of the weekday alarm or single alarm is armed.
*During the pre#alarm mode, hold [ALARM] for two seconds the minute digits will blink press
[
#
] or [
$
] to change the settings.
Press [ALARM] to exit.
PRECAUTIONS
This product is engineered to give you years of satisfactory service if you handle it carefully.
Here are a few precautions:
1. Do not immerse the unit in water.
2. Do not clean the unit with abrasive or corrosive materials. They may scratch the plastic parts
and corrode the electronic circuit.
3. Do not subject the unit to excessive force, shock, dust, temperature or humidity, which may
result in malfunction, shorter electronic life span, damaged battery and distorted parts.
4. Do not tamper with the unit's internal components. Doing so will invalidate the warranty on
the unit and may cause unneces sary damage. The unit contains no user#serviceable parts.
5. Only use fresh batteries as specified in the user's manual. Do not mix new and old batteries
as the old ones may leak.
6. Always read the user's manual thoroughly before operating the unit.
9
3542.qxd 15.07.05 10:37 Page 9

ENGLISH
SPECIFICATIONS
Temperature Measurement
Main unit
Indoor Temperature measurement
Proposed operating range : #5.0°C to +50.0°C
Temperature resolution : 0.1°C
Remote unit
Proposed operating range : #15°C to + 60°C
Temperature resolution : 0.1°C
RF Transmission Frequency : 433 MHz
Maximum No. of Remote unit : 3
RF Transmission Range : Maximum 30 meters (open area)
Temperature sensing cycle : around 43~47 seconds
Calendar Clock
12/24 h display with hh : mm
Date Format : Day # Month or Month#Day.
Day of week selectable in 5 language (E, F, D, I, S)
Dual 2#minute crescendo alarm with snooze
Pre#alarm for ice alert
Power
Main unit : use 2 pcs UM#3 or
”AA” 1.5V battery
Remote sensing unit : use 2 pcs UM#3 or
“AA” 1.5V battery
Weight
Main unit : 231g (without battery)
Remote sensing unit : 60g (without battery)
Dimension
Main unit : 95(L) x 174(H) x 30(D) mm
Remote sensing unit : 55.5(L) x 101(H) x 24(D) mm
The manufacturer reserves the right to make changes to the technical charac
teristics of this device without prior notice.
10
3542.qxd 15.07.05 10:37 Page 10
ENGLISH
FAULTS AND TROUBLESHOOTING
The antenna symbol has disappeared
There is interference to the radio reception of the time signal.
The time is not received
As with all radio receivers, the base station can also experience certain reception restrictions
and transmitter interference. Fault sources include thunderstorm, metallic structural elements
in buildings, TVs, PCs, mobile phones or cordless phones. Transmitters can also be deactivated
for a time.
If the base station does not receive the time, move it to a different location. To switch the sta#
tion to reception, press the [
#
] button for at least one second. By pressing [
#
] button user
can search or stop searching the radio signal immediately.
Service life – no less than 3 years.
Guarantee
Details regarding guarantee conditions can be obtained from the dealer from whom the appliance
was purchased. The bill of sale or receipt must be produced when making any claim under the
terms of this guarantee.
This product conforms to the EMC#Requirements as laid down by the Council Directive
89/336/EEC and to the Low Voltage Regulation (23/73 EEC)
11
3542.qxd 15.07.05 10:37 Page 11

DEUTSCH
Multifunktionsuhr
Bedienungsanleitung
Einleitung
Zum Lieferumfang gehören die Multifunktionsuhr und der Temperaturferngeber.
Die Multifunktionsuhr zeigt die aktuelle Uhrzeit, den Kalender, die Raumlufttemperatur und
Feuchtigkeitsgrad des Raumes, die durch den Temperaturferngeber gemessenen Temperaturwerte
sowie auch Wetterprognose und den Atmosphärendruck an.
Die Multifunktionsuhr können auch die Angaben der Maximal' und Minimaltemperaturwerte und
Feuchtigkeitswerte speichern. Die Datenübertragung vom Temperaturferngeber erfolgt auf der
Frequenz 433 MHz.
Die Multifunktionsuhr verfügt über ein fünfsprachiges Display und zwei Wecker – den Hauptwecker
und den einmaligen Wecker.
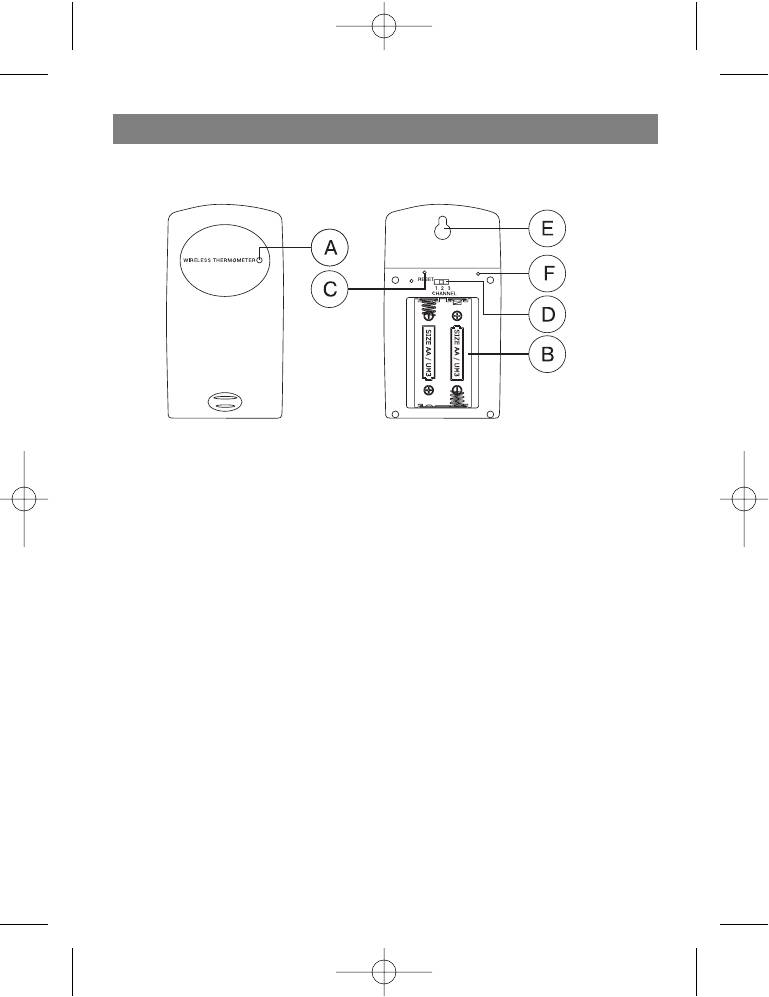
BESCHREIBUNG
Multifunktionsuhr
A. LCDISPLAY
Zeigt die Angaben über die Wetterprognose, den Atmosphärendruck, die
innerräumlicheLuftfeuchtigkeit, innerräumliche Temperatur und die Temperatur in den entfern'
ten Meßbereichen, sowie auch die Anzeige der Uhrzeit, des Kalenders und der
Weckereinstellungen.
B. KANALWÄHLERTASTE (CHANNEL)
Die Umschaltung der Datenübernahmekanäle von dem Temperaturferngeber.
C. SPEICHERTASTE (MEM)
Datenübersicht der Maximal'und Minimaltemperaturwerte, die vom Hauptgeber der
Multifunktionsuhr und dem Temperaturferngeber erhalten worden sind.
D. BETRIEBSUMSCHALTERTASTE (MODE)
Die Umstellung der Betriebsarten der Multifunktionsuhr und die Bestätigung der
Einstellungseingabe.
E. WECKERDRUCKKNOPF (ALARM ON/OFF)
Ablesung der Uhrzeit der Weckereinstellung, Lenkung des Tonsignals des Weckers.
F. KURZSCHLAFTASTE/EINSCHALTUNG DER AUSLEUCHTUNG (SNOOZE/LIGHT)
Einschaltung der Kurzschlaffunktion und der Ausleuchtung des LC'Displays.
G. BEFESTIGUNGSLOCH DES WECKERS
H. TASTE NACH OBEN
Änderung der Einstellungen
I. TASTE NACH UNTEN
Änderung der Einstellungen
J. BATTERIENRAUM
Einstellung der Batterien UM '3 oder „AA“
K. ABNEHMBARER HALTER
Wird bei der Befestigung des Weckers an die Wand abgenommen.
12
3542.qxd 15.07.05 10:37 Page 12
DEUTSCH
BESCHREIBUNG TEMPERATURFERNGEBER
A. LEDANZEIGE
Blinkt einmal, wenn die Datenübertragung des Gerätes erfolgt. Blinkt zweimal, als Signal zur
Batterieauswechselung
B. BATTERIENRAUM
Fasst 2 Batterien „AA“
C. RESETTASTER (RESET)
Rücksetzen der Geräteinstellungen zur Werkseinstellung
D. KANALWÄHLER (CHANNEL)
Wählen Sie den Übertragungskanal vor der Anstellung der Batterien ins Gerät.
F. BEFESTIGUNGSLOCH DES WECKERS
F. UMSCHALTERTASTE ZWISCHEN CELSIUS UND FARENHEITSTHEMPERATURSKALEN
Vor dem Betriebsanfang
Für den einwandfreien Betrieb des Gerätes:
1. Durch den Umschalter CHANNEL wählen sie den Übertragungskanal, nachdem stellen sie
die Batterien in den Batterienraum ein.
2. Stellen sie den Temperaturferngeber in den Grenzen des Datenübertragungsradiuses und
möglichst näher zur Multifunktionsuhr ein.
3. Stellen sie die Multifunktionsuhr und den Temperaturferngeber in den Orten mit
Minimalstörungen zum Zweck der besseren Datenübertragung auf.
Beachten sie dabei, dass der Datenübertragungsradius des Temperaturferngebers (in der
Regel 10'15 Meter) vom Baustoff der Raumscheidewände und ihrer Anzahl abhängig ist.
Probieren sie einige Varianten der Einstellung. Unabhängig davon, dass der
Temperaturferngeber von der Einwirkung der Wetterbedingungen geschützt ist, er soll so
aufgestellt werden, um die Einwirkung der direkten Sonnenstrahlen, Regentropfen oder des
Schnees zu vermeiden.
13
3542.qxd 15.07.05 10:37 Page 13

DEUTSCH
Batterieeinstellung: Temperaturferngeber
1. Drehen sie die Deckelschrauben des Batterienraumes los.
2. Wählen sie den Übertragungsdatenkanal mit Hilfe des Umschalters CHANNEL.
3. Stellen sie 2 Batterien (UM'3 oder „AA“ 1.5 V) ein, die Polarität ist dabei zu beachten.
4. Stellen sie den Batterienraumdeckel ein und drehen sie die Schrauben zu.
Batterieeinstellung: Multifunktionsuhr
1. Öffnen sie den Deckel des Batterienraumes.
2. Stellen sie 2 Batterien (UM'3 oder „AA“ 1.5 V) ein, die Polarität ist dabei zu beachten.
3. Schliessen sie den Deckel des Batterienraumes zu.
Batteriewechsel
Wechseln sie die Batterien bei der Anzeige der Batterieentladung oder beim nicht stabilen
Betrieb der Geräte.
Benutzung der Befestigungslöche und des abnehmbaren Halters.
Zum Liefersatz der Multifunktionsuhr gehört der abnehmbare Halter für die Aufstellung des
Gerätes auf die Oberfläche. Um die Multifunktionsuhr an die Wand zu befestigen, nehmen sie
den Halter ab und benutzen sie den Loch auf der Rückseite des Gerätes.
Betrieb der Multifunktionsuhr
Der Temperaturferngeber beginnt die Datenübertragung der Temperaturmessung mit
Intervallen von 45 Sekunden (sofort nach der Einstellung der Batterien). Multifunktionsuhr
beginnen die Signalsuche des Temperaturferngebers im Laufe von 2 Minuten (sofort nach der
Einstellung der Batterien).
Nach Erhalt der Daten vom Temperaturferngeber wird der Wert der ausserräumlichen
Temperatur in der oberen Displayzeile und der Wert der innenräumlichen Temperatur in der
zweiten (von oben) Displayzeile angezeigt. Multifunktionsuhr werden die Temperatur' und
Feuchtigkeitsangaben mit dem Intervall von 45 Sekunden automatisch erneuern.
Wenn das Signal vom Temperaturferngeber nicht empfangen wird, so erscheint in der oberen
Displayzeile der Multifunktionsuhr das Symbol « ». Für die Einschaltung der wiederholten
Suche des Signals vom Temperaturferngeber drücken sie die Taste
$
(nach unten) und halten
sie die Taste im Laufe von 2 Sekunden gedruckt. Führen sie diese Operation bei dem Ausfall
der Datenübernahme vom Temperaturferngeber aus.
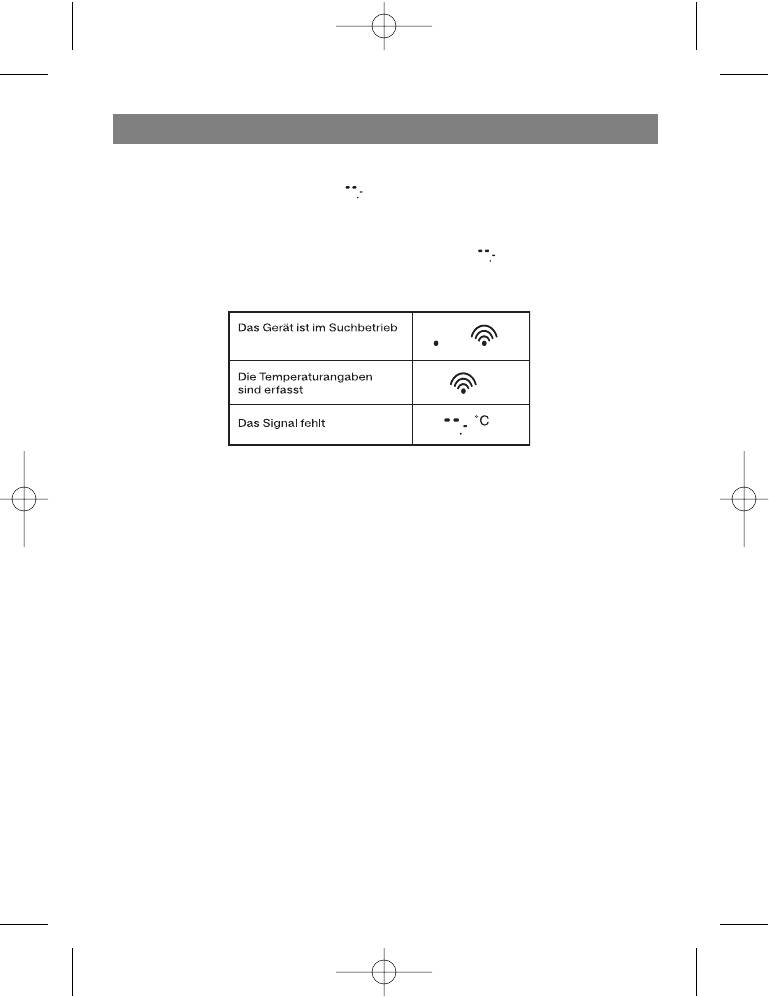
Ablesung der Temperaturund Feuchtigkeitsangaben
Innerräumliche Temperatur' und Feuchtigkeitswerte werden in der dritten (von oben)
Displayzeile angezeigt. Die vom Temperaturferngeber gemesene Temperatur wird in der zweit'
en (von oben) Displayzeile angezeigt. Das Zeichen in der linken oberen Zeile bedeutet
Suche/Empfang des Datensignals vom Temperaturferngeber (jede 45 Sekunden). Wenn im
14
3542.qxd 15.07.05 10:37 Page 14
DEUTSCH
Laufe von 2 Minuten das Signal vom Temperaturferngeber nicht empfangen wird, erscheint in
der oberen Displayzeile das Symbol « ». Wenn es der Fall ist, warten sie einige Minuten ab
oder drücken sie und halten sie die Taste
$
(nach unten) im Laufe von 2 Sekunden gedruckt.
Wenn die gemessenen Temperaturen ausserhalb des Meßbereiches der Geräte liegen,
erscheint auf dem Display der Multifunktionsuhr das Symbol « ».
Displayanzeiger
Maximale und minimale Temperaturen und Feuchtigkeitsgrad
Die gemessenen max.'minimale Temperaturen und die innenräumliche Feuchtugkeir werden
automatisch im Speicherplatz des Hauptgerätes gespeichert. Drücken sie die Taste (MEM)
einmal für die Anzeige der gemessenen minimalen Lufttemperatur, drücken sie die Taste
(MEM) das zweite Mal für die Anzeige der gemessenen innenräumlichen maximalen
Lufttemperatur und der Feuchtigkeit. Für die Löschung des Speicherplatzes der
Multifunktionsuhr halten sie die Taste (MEM) im Laufe von 2 Sekunden gedruckt. Die Angaben
der maximalen/minimalen Temperaturen und der Luftfeuchtigkeit werden damit gelöscht.
Fehlen des Datensignals
Wenn die aussenräumlichen Temperaturangaben auf dem Display fehlen, drücken und halten
sie die Taste
$
(nach unten) im Laufe von 2 Sekunden gedruckt, um die Suche des
Datensignals vom Temperaturferngeber anfangen.
Wenn die Suche des Datensignals erfolgslos war, prüfen sie folgendes:
1. Ob der Temperaturferngeber im Betriebsbereich liegt. Falls es notwendig ist, verkürzen sie
den Abstand zwischen der Multifunktionsuhr und dem Temperaturferngeber.
2. Wechseln sie die Batterien des Temperaturferngebers.
Anmerkung: bei der Messung durch den Temperaturferngeber der Temperatur niedriger als 0°
Celsium kann die Batterienspannung niedergehen, damit wird der Betriebsbereich des
Gerätesenders verkürzt.
Auswirkung der Störungen
Hausgeräte (Türklingel, Alarmanlage, u.s.w.) können die Störungen beim Empfang durch die
Multifunktionsuhr des Datensignals vom Temperaturferngeber verursachen. Das ist
15
3542.qxd 15.07.05 10:37 Page 15
DEUTSCH
Normalerscheinung und beeinflusst die normale Funktion des Gerätes nicht. Die Übertragung
und der Empfang des Signals wird sich sich sofort nach Verschwindung der zeitlichen
Fremdstörungen erneuern. Der Wechsel des Datenübertragungskanals kann die Auswirkung
der Fremdstörungen reduzieren.
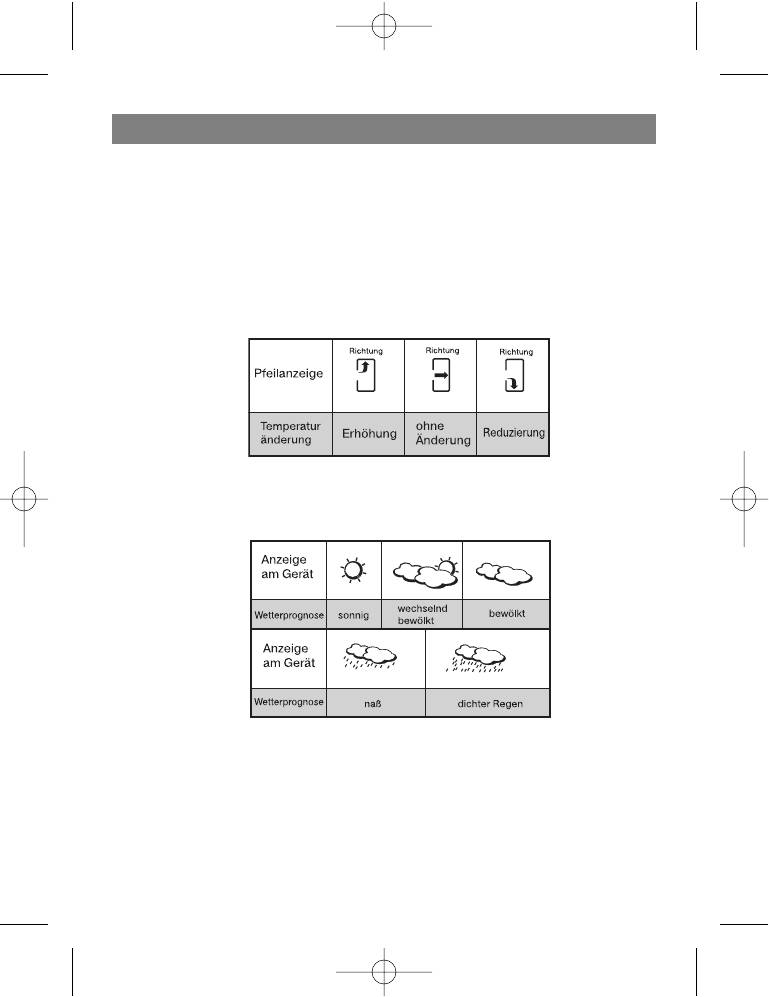
Anzeige der Temperatur und Feuchtigkeitsänderung
Die Indikatoren der Temperatur' und Feuchtigkeitsänderung (innenräumlich) TREND in der
zweiten und in der dritten Zeilen der Multifunktionsuhr stellen die Änderung der Temperaturen
und der Feuchtigkeit gemäß den Angaben des Temperaturferngebers sowie des
Multifunktionsuhrgebers dar.
Wetterprognose
Das Gerät ist imstande das Wetter für die nächsten 12'24 Stunden zu prognosieren, während
es die Angaben vom Temperaturferngeber und vom Multifunktionsgeber analysiert.
Anmerkung
1. Die Genauigkeit der aufgrund der Druckänderung gemachten Wetterprognose beträgt 70%
2. Die Wetterprognose kann mit dem Wetter in der gegenwärtigen Zeit nicht übereinstimmen.
3. Das Symbol „sonnig“ hinsichtlich der Nachtzeit bedeutet unbewölkter Himmel.
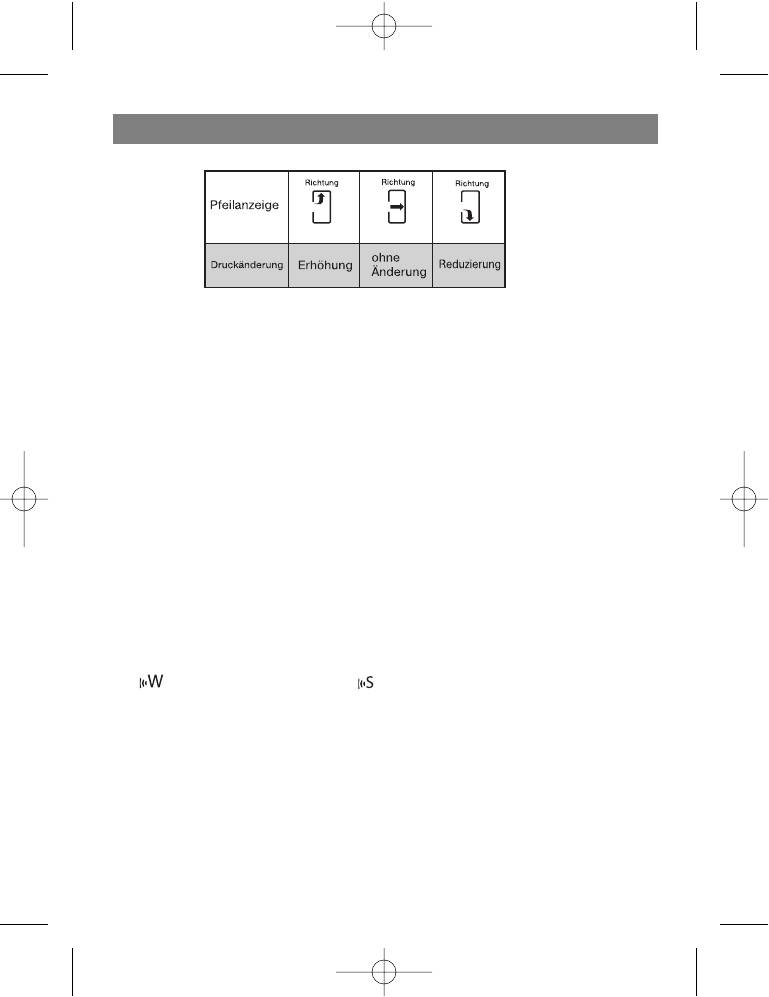
Atmosphärendruck
Der Anzeiger auf der linken Seite der ersten Displayzeile stellt den Stand des
Atmosphärendruckes dar.
16
3542.qxd 15.07.05 10:37 Page 16
DEUTSCH
Anzeige des Kalenders
Die Kalenderangaben werden in der vierten Displayzeile (von oben) angezeigt. Drücken sie die
Taste MODE bis zur Erscheinung der Anzeige des Datums und des Monates des laufenden
Jahres, sowie auch des Wochentages an der Stelle der Sekunden der laufenden Uhrzeit.
Einstellung des Kalenders und der aktuellen Zeit
Drücken sie und halten sie die Taste MODE im Laufe von 2 Sekunden gedruckt – das Symbol
der Displaysprache beginnt zu blinken. Durch die Betätigung der Tasten
$/#
(nach
oben/nach unten) stellen sie die Displaysprache ein (englisch, deutsch, französisch, italienisch
oder spanisch). Nach dem folgenden Drücken der Taste MODE und der Betätigung der Tasten
$/#
(nach oben/nach unten) stellen sie die Temperaturskala (nach Celsium oder nach
Farenheit), das Jahr, den Monat, das Datum, Format der Darstellung des Kalenders
(Datum/Monat oder Monat/Datum), das Zeitformat (12 oder 24 Stunden), Stunde der Uhrzeit,
Minuten der Uhrzeit, ein.
Für die Einstellung der Zonenzeit drücken sie die Taste MODE bis die Anzeige der Zeit mit dem
Symbol ZONE erscheint, danach drücken sie und halten sie die Taste MODE im Laufe von 2
Sekunden gedruckt. Stellen sie den Zeitunterschied zwischen der Haupt' und Zonenuhr
(Ortsuhr).
Weckereinstellung
Die Multifunktionsuhr verfügen über zwei Wecker Hauptwecker, bezeichnet durch das Symbol
, und einmaliger Wecker, ' Symbol .
1. Drücken sie die Taste ALARM ON/OFF für die Anzeige der eingestellten Uhrzeit eines der
beiden Wecker Wenn der Wecker nicht eingestellt worden ist, zeigt das Display das Symbol OFF
2. Wenn sie den nötigen Wecker durch die Betätigung der Taste ALARM ON/OFF gewählt hat'
ten, drücken sie und halten sie die Taste ALARM ON/OFF im Laufe von 2 Sekunden gedruckt,
nachdem die Ziffern für die Einstellung der Stunde des Weckers blinken werden.
3. Durch die Betätigung der Tasten
$/#
(nach oben/nach unten), stellen sie die Stunde der
Uhrzeit des Weckers und drücken sie die Taste ALARM ON/OFF, nachdem die Minutenzeiger
blinken werden.
4. Durch die Betätigung der Tasten
$/#
(nach oben/nach unten) stellen sie die Minuten der
Uhrzeit des Weckers und drücken sie die Taste ALARM ON/OFF.
17
3542.qxd 15.07.05 10:37 Page 17

DEUTSCH
Anmerkung: Bei der Einschaltung des Weckers wird sich das Tempo des Tonsignals verstärken
und wird sich in 2 Minuten ausschalten. Falls das Tonsignal des Weckers durch die Betätigung
der Taste ALARM ON/OFF nicht ausgeschaltet worden ist, wiederholt sich das Tonsignal in 10
Minuten. Falls das Signal durch die Betätigung der Taste ALARM ON/OFF ausgeschaltet wor'
den ist, wiederholt sich die Einschaltung des Weckers in 24 Stunden.
Einstellung der Meldung über die niedrige Lufttemperatur
Die Multifunktionsuhr verfügen über die Funktion der Vorbenachrichtigung über die niedrige
Lufttemperatur vor der Einschaltung des Tonsignals des Weckers. Falls die durch den
Temperaturferngeber gemessene Temperatur bis zum 0 Grad Celsium oder niedriger sinkt,
geben die Multifunktionsuhr das Tonsignal vor 15, 30, 45, 60 und
90 Minuten vor der Einschaltung des Hauptweckers.
1. Drücken sie die Taste ALARM ON/OFF für die Auswahl der
Benachrichtigungsfunktionseinstellungen, bezeicheten durch das Symbol PreAL.
2. Drücken sie und halten sie die Taste ALARM ON/OFF im Laufe von 2 Sekunden gedruckt,
nachdem die Ziffern der Minuteneinstellung der Benachrichtigungsfunktion blinken werden.
3. Durch die Betätigung der Tasten
$/#
(nach oben/nach unten) wählen sie die Zeit der
Benachrichtigung (15, 30, 45, 60 und 90 Minuten vor der Einschaltung des Hauptweckers.
Anmerkung: Die Einstellung der Benachrichtigungsfunktion ist nicht möglich, wenn die
Weckerfunktion nicht eingeschaltet worden ist.
Ausschalten des Tonsignals des Weckers
Während der Einschaltung des Tonsignals des Weckers drücken sie die Taste ALARM ON/OFF
für die Ausschaltung des Tonsignals. Für die Vollausschaltung des Weckers drücken sie kurz
die Taste
$
(nach unten), nachdem das Symbol OFF auf dem Display erscheint.
Vorsichtsmaßnahmen
1. Vor dem Betrieb der Geräte lesen sie aufmerksam die Betriebsanleitung
2. Versenken sie die Geräte ins Wasser nicht
3. Gebrauchen sie nicht beim Putzen der Geräte die Schleifmittel und Stoffe, die die Verletzung
der Gehäuse'und Gerätebaugruppen verursachen können.
4. Unterziehen sie die Geräte der starken physischen Beeinflussung nicht, Schlägen (Staub und
Feuchtigkeit sind auch schädlich). Das kann Störungen verursachen und dementsprechend die
Gerätelebensdauer verkürzen, Batterien verletzen und die Deformierung der
Gehäusekomponente ausrufen.
5. Nehmen sie die Gerätedeckel nicht ab. Es gibt in den Geräten keine Bauteile, die die
Aufmerksamkeit des Benutzers anfordern.
6. Verwenden sie nur die neuen Batterien und nur diejenigen, die in der Betriebsanleitung ange'
führt sind. Stellen sie nicht gleichzeitig die alte und die neue Batterie ein.
18
3542.qxd 15.07.05 10:37 Page 18

DEUTSCH
Technische Kenndaten
Temperaturmessung
Multifunktionsuhr
Innenräumliche Temperaturmessung
Betriebsbereich: von '5 bis +60°C (von 23 bis 122°F)
Teilung: 0.1°C (0.2°F)
Temperaturferngeber: von'15 bis +60°C (von 5 bis 140°F)
Teilung: 0.1° C (0.2°F)
Datenübertragungsfrequenz des Temperatur'Ferngebers: 433 MHz
Maximale Anzahl der Temperaturferngeber: 3
Die Temperaturmessungen: jede 43'47 Sekunden
Display und Ton
Zeitformat: 12' oder 24'stündig
Datum Format: Tag ' Monat oder Monat' Tag
Wochentag in 5 Sprachen: Englisch, französisch, Deutsch, Spanisch,
italienisch
Tonsignal: 2'Miniten mit Tempoverstärkung
Vorbenachrichtigung über Temperatursenkung bis zum 0°C oder niedriger
Speisung:
Multifunktionsuhr: 2 Batterien UM'3 oder «AA», 1.5 V
Temperaturferngeber: 2 Batterien UM'3 oder «AA», 1.5 V
Gewicht
Multifunktionsuhr: 231 g (ohne Batterien)
Temperaturferngeber: 60 g (ohne Batterien)
Abmessungen (mm)
Multifunktionsuhr: 95(L) x 174(H) x 30(B)
Temperaturferngeber: 55.5(L) x 101(H) x 24(B)
Der Hersteller behält sich das Recht vor die Charakteristiken des Gerätes ohne
Vorbescheid zu ändern.
Die Lebensdauer des Gerätes beträgt nicht weniger als 3Jahre
Gewährleistung
Ausführliche Bedingungen der Gewährleistung kann man beim Dealer, der diese Geräte verkauft
hat, bekommen. Bei beliebiger Anspruchserhebung soll man während der Laufzeit der vorliegen'
den Gewährleistung den Check oder die Quittung über den Ankauf vorzulegen.
Das vorliegende Produkt entspricht den Forderungen der elektromagnetischen
Verträglichkeit, die in 89/336/EWG 'Richtlinie des Rates und den Vorschriften 23/73/EWG
über die Niederspannungsgeräte vorgesehen sind.
19
3542.qxd 15.07.05 10:37 Page 19

РУССКИЙ
МНОГОФУНКЦИОНАЛЬНЫЕ ЧАСЫ
Инструкция по эксплуатации
Введение
Комплект поставки включает в себя многофункциональные часы и дистанционный датчик
температуры.
Многофункциональные часы отображают текущее время, календарь, температуру и
влажность воздуха в помещении, температуру, измеренную дистанционным датчиком
температуры, прогноз погоды и атмосферное давление.
Многофункциональные часы могут сохранять показания максимальных и минимальных
температур и влажности воздуха. Передача данных с дистанционного датчика
температуры осуществляется на частоте 433 МГц.
Многофункциональные часы имеют дисплей на пяти языках и два будильника # основной
и разовый.
ОПИСАНИЕ: МНОГОФУНКЦИОНАЛЬНЫЕ ЧАСЫ
A. ЖКДИСПЛЕЙ
Отображает данные о прогнозе погоды, атмосферном давлении, влажности воздуха
внутри помещения, температуры внутри помещения и на удаленных участках измерения,
а также показания времени, календаря и установок будильника.
B. КНОПКА ПЕРЕКЛЮЧЕНИЯ КАНАЛОВ (CHANNEL)
Переключение каналов приема данных от дистанционного датчика температуры.
C. КНОПКА ПАМЯТИ (MEM)
Просмотр данных по максимальным и минимальным температурам, полученным от
датчика многофункциональных часов и дистанционного датчика температуры.
D. КНОПКА ПЕРЕКЛЮЧЕНИЯ РЕЖИМОВ (MODE)
Переключение режимов работы многофункциональных часов и подтверждение ввода
настроек.
E. КНОПКА БУДИЛЬНИКА (ALARM ON/OFF)
Просмотр времени установки будильника, управление звуковым сигналом будильника.
F. КНОПКА КОРОТКОГО СНА/ВКЛЮЧЕНИЕ ПОДСВЕТКИ (SNOOZE/LIGHT)
Включение функции короткого сна и включение подсветки экрана.
G. ОТВЕРСТИЕ ДЛЯ КРЕПЛЕНИЯ ЧАСОВ К СТЕНЕ
H. КНОПКА ВВЕРХ
#
Изменение настроек.
I. КНОПКА ВНИЗ
$
Изменение настроек.
J. ОТСЕК ДЛЯ БАТАРЕЕК
Установка батареек питания UM#3 или "АА".
K. СЪЕМНАЯ ПОДСТАВКА
Снимается при креплении многофункциональных часов к стене.
20
3542.qxd 15.07.05 10:37 Page 20
- 1
- 2


