Vitek VT-4086 SR: инструкция
Раздел: Видео Аудио Фото Оборудование
Тип: Бытовая Техника
Инструкция к Бытовой Технике Vitek VT-4086 SR
DVD PLAYER
MODELVT-4086 SR
I
■
I
■
I
I
■
I
■
■
I
■
■
I
■
INSTRUCTION MANUAL
I
■
MANUAL INSTRUCTION 3
■
DIE BETRIEBSANWEISUNG 15
CUB ИНСТРУКЦИЯ no ЭКСПЛУАТАЦИИ 29
■
1НСТРУКЦ1Я 3 ЕКСПЛУАТАЦ11 42
ПАЙДАЛАНУШЫЕА Н¥СКАУ 55
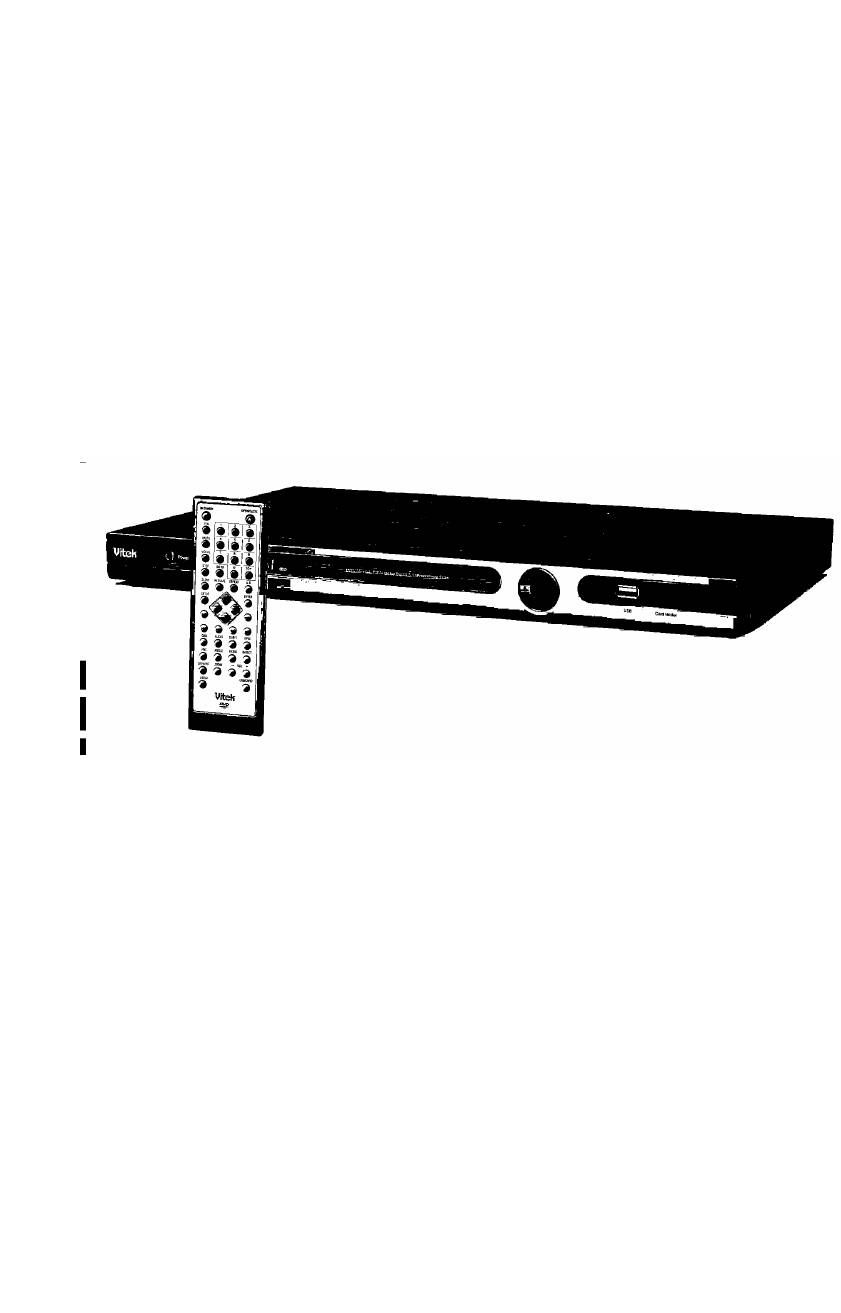
ENGLISH
DVD PLAYER
on the wall, do not use a liquid detergent or aerosol cleanser, use
soft clean cloth to wipe for cleaning.
Model VT-4086
Operating manual
5. Intrusion of foreign matters or liquid
Never let foreign matters or liquid fall into the unit from any opening
ACCESSORIES
or gap, for this might get in contact with dangerous high voltage or
1. Remote control
cause short-circuit among parts inside, which might cause an elec
2. User’s manual
tric shock or fire. Do not splash any similar liquid into the unit, either.
Warranty card
3. Audlo/video cables
6. Overload
Batteries
Do not overload the power supply on socket and be doubly careful in
extending power wire, integrated socket for this may cause an elec
Inserting the batteries in remote controller
tric shockorfire.
Remove the battery compartment lid
Insert 2x’AAA’ batteries in the direction shown
7. Video disc
Replace the battery compartment lid
Do not use broken, distorted or repaired videodiscs, which is break
able and maycause bodilyinjuryor malfunction ofthe unit.
Disc Compatibility
Some DVD discs may have special requirements for playing, with which
8. Load
this player may not be compatible. Please refer to specifications on indi
Do not placed heavy objects or trample on the unit, nor place other
vidual disc.
objects on the power wire, pay special attention to the plug, socket
and power wire.
Disc type Disc size Playtime Interactive Functions
CD 12cm/8cm 74 min.* Without PBC function
9. Protection of power wire
VCD1.1:Without
The power wire should be placed out of the reach of feet.
Do not put other articles on the power wire.
PBC function
VCD 12cm/8cm 74 min.*
VCD2.0:with PBC
10. Repair
function
Do not attempt to repair the unit by yourself, because the dangerous
high voltage electric shock might cause injure when the enclosure
is opened. Therefore, all repair work shall be entrusted to qualified
Super VCD 12cm/8cm 45 min.* With PBC function
technicians.
MP3 12cm/8cm ~600 min.* With PBC function
Kodak picture CD,
12cm/8cm N/A N/A
JPEG
~133min.
(SS/SL)*
-242 min.
With Directory menu
(SS/SL)*
With Directory Menu
DVD 12cm/8cm
-266 min.
With Directory Menu
(DS/SL)*
With Directory Menu
-484 min.
(DS/SL)*
*Playtime refers to 12cm discs only.
Important Safety Measures
Note: Please read the instructions on this page carefully for the
sake of safety.
The exclamation mark is to remind users with important
instructions attached with the unit.
The lightning arrow inside the equilateral triangle is to re
mind users of dangerous voltage with the unit.
Ventilation
To guarantee lasting, stableand reliable operation ofthe unit, do not
place it on bed, sofa, piece goods or other similar materialsto en
sure good ventilation and heat emission.
Heat source
The unit should be placed away from heat sources, such as warming
machine, heat regulator, heating furnace or other exothermic prod
ucts.
Moisture, Oil Smoke
Operate the unit away from a place with much moisture or oil smoke,
such as bathtub, washing pool and kitchen, etc. to avoid reduction in
disc reading.
4. Cleaning
Do not clean until the plug is disconnected from the supply socket
ENGLISH
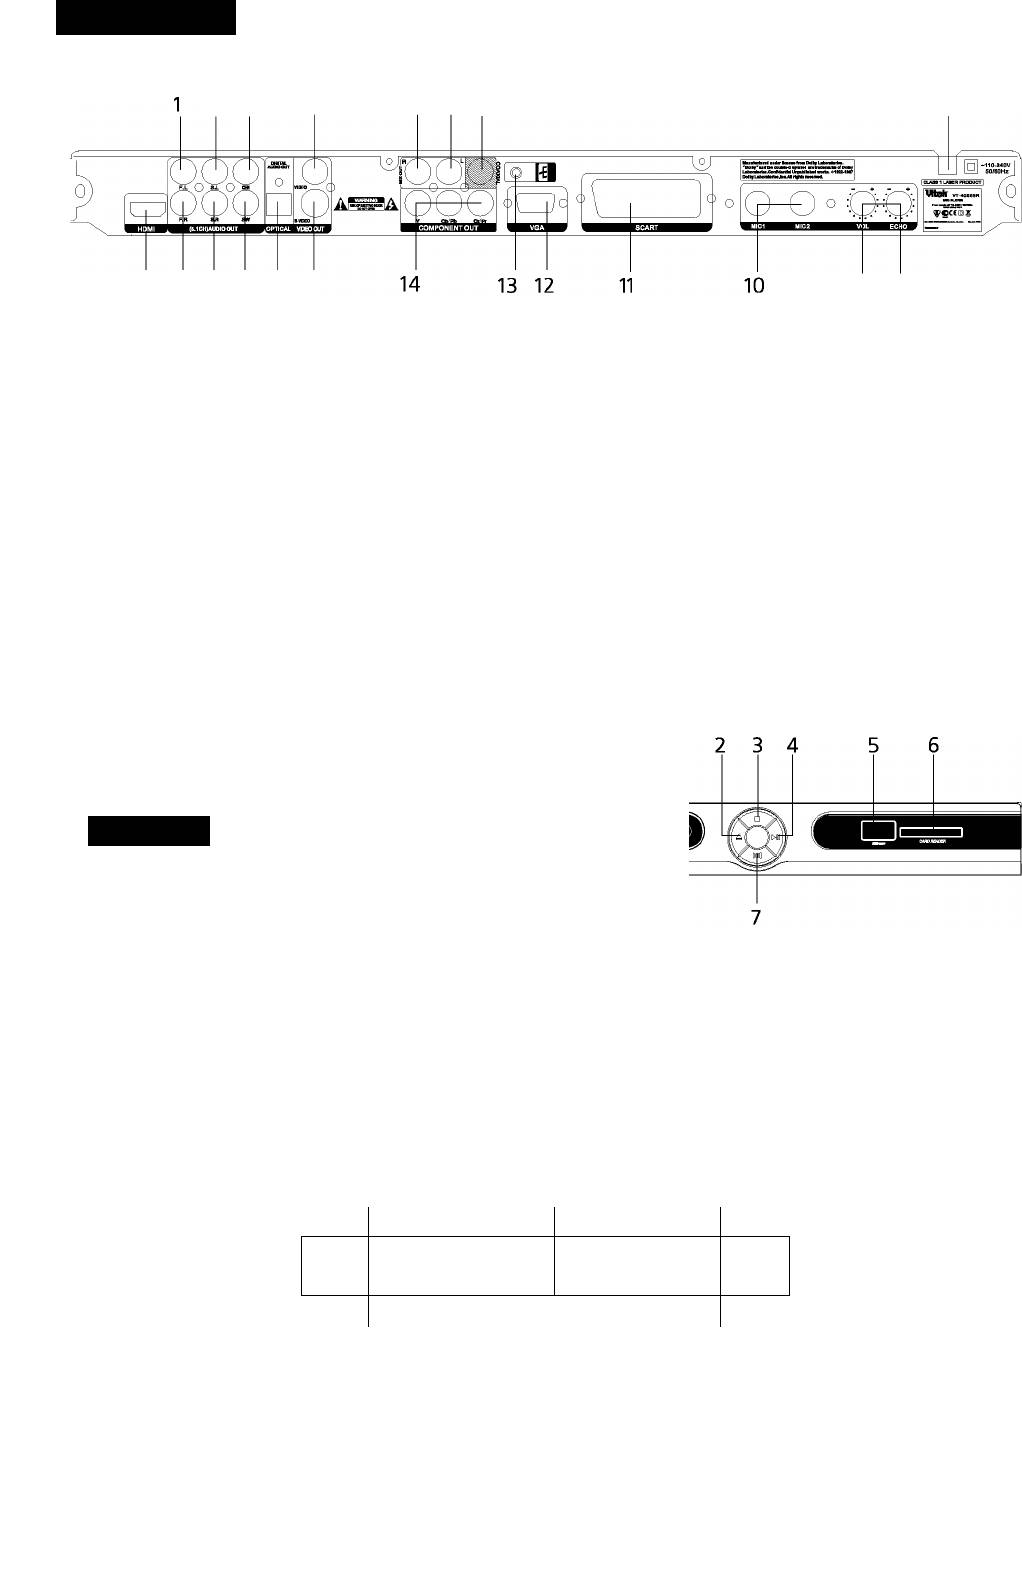
Rear panel/Front panel/Display information
Rearpanel
20 19 18 17 16 15
21 9
1. 5.1CHF.L.audiooutput
12. VGAterminai
2. 5.1CHS.L.audiooutput
13. Grounding
3. 5.1CHcenteraudiooutput
14. Componentvideooutput
4. Composite video output
15. S-video
5. Mix-outrightaudiooutput
16. Digitaiopticaiaudiooutput
6. Mix-outieftaudiooutput
17. 5.1 CHS.Waudiooutput
7. Digitai coaxiai audio output
18. 5.1 CH S. R audio output
8. ACpowerwire
19. 5.1 CH F. Raudiooutput
9. Mie Echo controi knob
20. HDMi terminai
10. Microphonesocket
21. Mie voiume controi knob
11. SCARTterminai
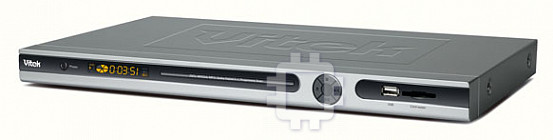
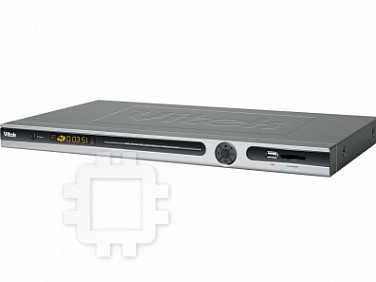
Front panel
1. Disc/tray
6. Card reader
2. Open/Ciose
7. Vocai
3. Stop
8. Dispiayscreen
4. Piay/ Pause
9. Remote control receiver window
5. USB
10. Power switch
Display information
DV D 1
^3 dts
VC D 1
O / 88- 88--00M
^4 □□□
8 7
DVD indicator
Piay
Playtime display
MP3 indicator
Dolby indicator
MP4 indicator
Pause
8. VCD indicator
ENGLISH
38. USB/CARD
Preparation before using
Remote control
0- 0-5m
■ SO"
23
0-/m
24
Remark: The remote control must point at the remote sensor in order
for the DVD player to function.
1. The distance may vary according to the brightness of ambient light.
2. Do not leave the remote in an extremely hot or humid place.
3. Ifthe remote unit is not used for an extended period, pleases remove
25
the batteries to avoid any possible damage from battery leakage and
26
corrosion.
4. The batteries normally last for about a year, depending on how often
27
the remote unit is used. Ifthe remote control does not work even if it
28
is operated near the DVD player. Please replace both batteries with
29
the new non rechargeable AAA Alkaline batteries.
30
Progressive Scan
The DVD player is built-in with high performance Progressive Scan video
31
output.You can switch the video output to progressive scan or interlace
32
scan via the system setup.You can operate as follows:
33
1. Press SETUP key on the remote control the system setup menu will
34
be showed on the TV screen.
35
2. Usethe RIGHT arrowkeyto selectVIDEO SETUP PAGE, Press
36
ENTER key into the video setup options.
37
3. Movethe cursorto COMPONENT option and press ENTER keyenter
38
into itto selectYUV option and confirm.
4. Use arrow keys to select TV MODE and press ENTER into it to select
TV mode (Progressive or interlace).
Remarks: Make sure your TV set supports progressive scan and con
nected correctly before you switch to progressive scan video output.
1. STANDBY
2. TV setstyleconversion
3. Mute
4. Accompanying Sound Play
5. Search Play
6. Frame by frame play
7. Memorized play
8. Slow Play
9. Direction Up
10. Setup
11. DirectionLeft
12. Play/Pause
13. Direction Down
14.
Previous
15.
Next
16. On Screen Display
17. Audio Channel Selection
18.
Menu play
19.
Multi-Angle Play
20. Reset Default
21. Picture Zoom
22
HD modeswitch
23
Tray Open/Close
24. Number Keys
25. Repeat
26
A-B Repeat
27
Enter
28. Direction Right
29. Stop/Return
30
Fast Forward
31
Fast Backward
32. Title
33. Subtitle
34
Program play
35
Video
36. Volume+
37. VolumeO-
ENGLISH
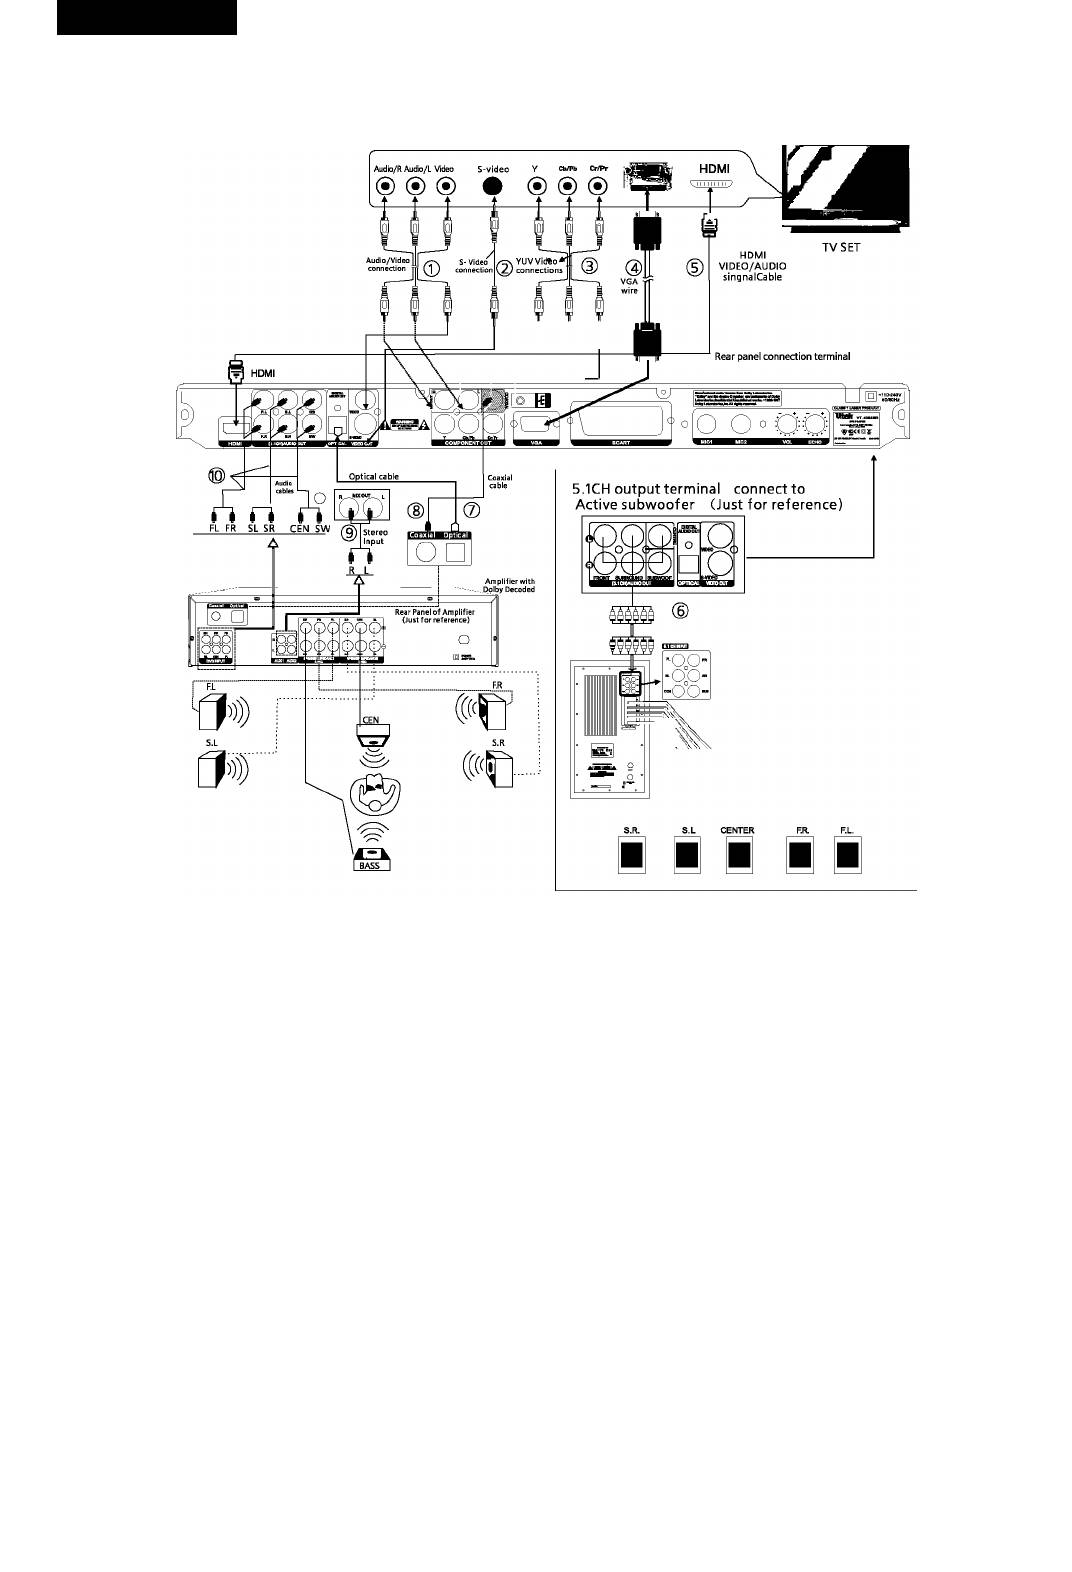
Connections
ConnecttoTVset and Dolby Digital 5.1CH Surround Sound System or Dolby Digital Acoustics
Please connect the home theater surround sound system and TV set according to the following diagram and instructions:
Connection terminal of TV SET
Note:
1. When connectingthe playertoTVset onlyselect one group from fivevideo groupsconnection.
2. Selectthecorresponding output mode ofTVsetand DVD player according tothevideo connection method.
1) AV
2) S-VIDEO
3) YUV
4) VGA
5) HDMI
Please refer to the TV set manual when connecting.
Dolby, “Pro Logic and double D marks are trademarks of
DolbyLab. Production authorized by Dolby Lab.
Confidential works notpermitted to issue. Dolby Lab 1992-1997. All rights reserved.
5.1CH output terminal connect to Active subwoofer
1. ConnectS.I channels(6channelstotally)oftheDVDanalogaudiooutputto theS.I channelinputportoftheactivesubwoofer.
2. Selectthe OFF option ofdownmix menu.
3. See the instruction manuals for active subwoofer at the same time.
• When connecting Power Amplifier via coaxial or optical cable, please select the “Spdif/Raw” of digital output.
• See instruction manual for power amplifier of Dolby digital at the same time.
• The standard configuration ofthe Dolby hometheater is5.1 channel loudspeaker replay. Ifyou have notconnected the middle and bass
loudspeakers, setthem at “OFF” mode with the loudspeaker setting function, their signal will be replayed bysuperposing on left/right tracks.
Remark: According your need, just select one group audio connection among 1,6,7,8,9, 10.
1. Before connecting, be sure to disconnect all equipment power supply.
2. All loudspeakers should be placed at the same distance to the audience.
3. Do not connect the coaxial output of the unit to the analog signal input port.
4. Do notturn on/offthe unitfrequently(the interval should be 10 secondsat least).
ENGLISH
Operating instructions for functions
Direct select by numeric button:
Turn the unit on
10+
1. Before starting the unit, make sure the connection among the unit
OMD
and other acoustics is correct and reiiabie. After confirmation,
connectthe power piug ofthis unit into AC 110~240V, 50~60Hz
• Press the^AT buttons, to enter the desired page.
suppiy socket.
• Press the m button to select and start the playing.
2. Pressthe “POWER” keyon panei toturn the unit on, when theTV
• Pressthe TITLEbuttontoreturntotheTitlemenujifthereisaTitle
screen dispiay the defauit interface.
menu).
3. Press Open/Ciose button on the remote controi or panei to eject the
• Press the PBC button to return to the root menu.
disc tray. Piace a disc onto it. Note: the iettered side upward.) Press
the key again cióse disc tray.
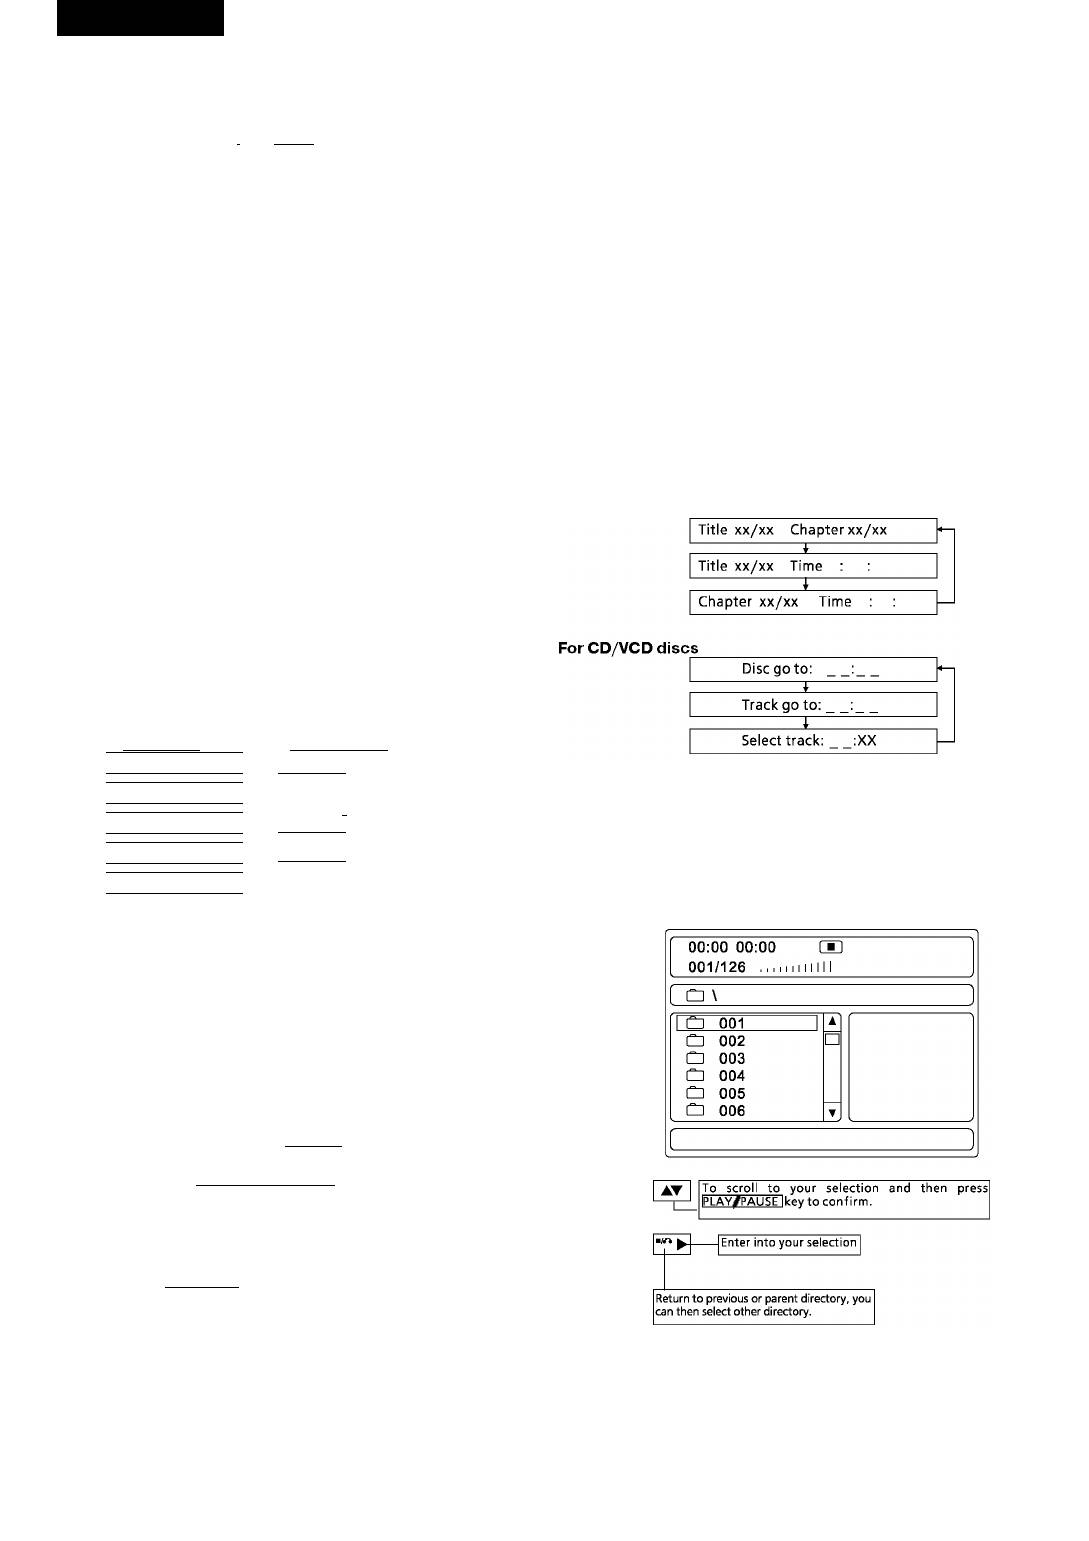
Audio VCD/CD disc track selection
4. Do not push the disc tray when ciosing it. Aiways use the OPEN/
Load an audio VCD, upon reading the disc; you can select/playsongs
CLOSE button to cióse the disc tray.
with numeric button. Ifthetrack number is lessthan 10, press numeric
button 1-9toselect.
USB READER FUNCTION
For example: To select the 8th song press number button 8. The TV
When open the card reader door, you can insert the USB. Then press
screen will show:
DVD/USB key on the remote controi to switch to DVD reading mode. The
Select Track: 08
TVscreenwiii be showed: “Read USBXXX%”, afterawhiie, the content
bO
of USB wiii be show on the screen.
Note:
To selectsong number beyond 10, press 10+ button, followed bythe
1. Aiiof the content that the piayer are compatibie, the card reader can
number 0~9.
distinguish and piaying.
2. The piaying interface and operation methods are aiike MP3, MP4,
For example: To selectthe 12th song press 10+ and then press button 2.
DiVX, and JPEG etc. fiies. The piaying interface is according to the
The TV screen will show:
content ofyour saving.
10+ 2 ^____________________________^
Select track : 12
0-0
TV System Setting
Adjust the DVD piayer output such that it matches the supported TV sys
Fast Forward and Fast Backward
tem on your TV. For exampie, if your TV uses PAL, you have to program
When playing DVD other discs, press the^^ button to enter fast forward
your DVD receiver to piay in PAL mode; otherwise you wiii not be abie to
mode. There are 5 different speeds available and depends on how many
view on your TV screen when piaying TV programs or movie discs. Press
time ofthe button pressed.
the P/N button continuousiyto seiectAUTO, NTSC or PAL.
® I
Video Output Mode Selection
i Pla^
According to your need, press the Video key continuousiy to seiect the
video output mode:
Pressing« will enter fast rewind mode. Select fast rewind speed by
MIX VIDE^ -»YUVOnterlace^YUViP-Scan) -,
using the« button.
c:
RG^ —►VG.
1"
Volume Control
Press the VOL+ or VOL- button continuously to decrease or increase the
To resume to normal play mode press thewi button.
master volume ofthe system. All ofthe 6 channels volume will be ad
justed at the same time.
Slow Motion
When playing DVD discs, press SLOW button to playvideo in slow mo
Press the MUTE button to mute the audio output.
tion. This feature is available in both DVD discs forward and backward.
The screen will show: MUTE OFF.
By pressing the SLOW button 1-4 times, video is played in slow motion
forward in different speed.
Play/Pause
SLOW
When playing DVD and CD discs.
Whenwi button is pressed forthe first time, playwill be stoppedtempo-
rary.
Presswi button to release pause state and resume playing.
PressM button to resume normal play at any speed.
Menu play for DVD discs
When playing DVD discs, some discs contain title menus or chapter
Frame by Frame play
menus, press PBC button to access this feature.
Press STEP key on remote control to create a still image, press it again to
TheTVscreenwillshowmenupictureandusethe buttonsto
create the next still image. Presswi button to resume normal play.
scroll. To confirm the selection, presswior ENTER button. Alternatively,
use the Numeric button to select.
Track or Chapter Skip
Menu
WhenplayingaDVDdisc,pressthe « buttontoskiptothepervi-
ous chapter. When other types of disc played, press this button to skip to
previous track.
II.
Note: This function works depends on the disc type in used.
For example: To select the 13 song.
Repeat
Menu
When playing DVD and other discs, the player can play a specified title,
chapter, track or other content repeatedly or repeat the whole disc or
repeat play from pointAtopointB.
Alternatively, you can also select directly by using the numeric buttons.
For DVD discs, when the REPEAT button is pressed continuously, the
For example: To select the 13 song.
screen will be showed:
Repeat the
Menu
(Rspsat) current Repeat the Repeat the
chapter current title whole disc
T T T To cancel
|Chapter|—H Title]—*\ AH|—► repeat
ENGLISH
Repeat appointed part
^ Sub titie 01/03: Fre nch^
This function for you to piaythe desired part.
Set point A Set points
(A-B)
JL JL
• To disable subtitle display, press SUB-T button until Subtitle off is
I
------
►! ¿3AB I
--------
► repeatfinrtion
shown on TV screen.
Remarks:
Note: others discs operation methods are aiike DVD discs.
The function of subtitle is only available for discs with multi subtitles. The
subtitle language varies as per discs.
Picture Zoom
The feature is used to zoom in or zoom out the motion picture or stiii im
Memory Play
ages when piaying Video Discs.
This player can memorize the last stop point and play from this point
• The feature is used to zoom in or zoom out the motion picture or stiii
onwards when PLAY/PAUSE is pressed again.
imageswhen piayingVideo Discs.
• When playing, press STOP/RETURN once to stop playback. The
(ZOOM)
player will memorize the current point. In this state. Press PLAY/
PAUSEor RESUME button to resume playfrom that point.
• Press STOP/RETURN twice will clear the memory that if play is re
sumed, the disc will be played from the beginning.
• And there are aiso 3 ieveis of zoom out mode, press ZOOM button
NOTE: MP3 discs have no this function.
4-6 times to choose.
Search play
(ZOOM)
When playing avideo or audio disc, you can go to your desired position
directlyviathis function.
For DVD discs:
• To return to normai size, press ZOOM for the seventh time.
Press the GOTO key to display on screen as follows:
Multi angle DVD play
Some DVD discs may contain scenes shot from different angies; in this
case the ANGLE key may be used to viewthe same scene from different
angies.
This function is oniy appiicabie to discs recorded with scenes shot at
different angies.
OSD-On Screen Display
On screen display can be displayed to check the playing time and re
maining time for each title, chapter, track or the whole discs. Press OSD
keyto check.
For DVD discs
For VCD/CD discs
I Title Elapsed
I Single Elapsed
Itt m /10 rH 10/40 0:74:40 \
I Track 02/18 01:20
____________
1
1 Title Remain
1
I Single Remain
Using the direction keys, digit keys to enter the chapter, title or time’s
Itt 01/10 ch 10/40 1:29:33 1
Track 02/18 03:40
1
I
value, then press ENTER start playing.
1 Chapter Elapsed
1
Total Elapsed
|tT 01/10 ch 10/40 0:01:00 |
I Track 02/18 06:32
____________
1
1 Chapter Remain
1
I Total Remain ^
MP3 Playback
Itt 01 /10 CH 10/40 0:04:00 1
I Track 02/18 55:30
____________
The DVD player can playback discs, including CDROM, CD-R, CD-RW,
Display Off L
DVD-ROM, DVD-Retc. recordedwithMP3 audio files. Multiple andmul-
tilevel directories are supported.
For DVD disc, you select ‘displayoff’ option will stop OSD function.
ForVCD/CD disc, ifyou press OSD key, the OSD mode ofyour selection
will displayon screen till you stop the playing.
Audio Channel Selection
When playing DVD discs, press the AUDIO button to select your desired
audio channel.Thisisonly applicable if the disc has a different audio
channel function incorporated.
For example: Ifamovie discwith English, French and Spanish, you can
press the AUDIO button continuouslyto select and confirm.
(AUDIO)
Audio 1/3:AC-3 5.1CH English
--------
1
Audio 2/3:AC-3 5.1CH French
-
-------
I
I Auido3/3:AC-3 5.1CH Spanish
When playing VCD disc, press the VOCAL Key to switch between human
sound and audio track and remove the effect of human sound.
(VOCAL),
________
, ,
_________
,
»|Mono Left
--------------
»¡Mono Right|-
Stereo ] Mix-Mono
In playofamoviedisc, ifit hastwo languages, pressthe VOCAL keyto
Play mode
select between the two languages.
There are four play modes available, when playing, press REPEAT button
to choose the MP3 play mode.
SelectSubtitle Language
When playing a DVD disc with multi subtitles, you can choose a desired
SINGLE
subtitle with the SUB-T button:
A file will be played only once.
For example: There are 3 different language subtitles available on the
DVD disc.
REPEATONE
• Press the SUB-T button to select a subtitle with desired language as
Piaythe selected file repeatedly.
shown on the TV screen.
ENGLISH
REPEAT FOLDER
1) To stop playing press the STOP/RETURN button at any time.
All files In the selected folder will be played repeatedly.
2) Return to the parent directory. Press left arrow to select another
directory.
FOLDER
All files In the selected folder wlllbe played only once.
General Setup Page
The setup menu is used to configure the home theater system.
Other Functions
• Press SETUP button and enter into the general setup page, the page
Functions such as MUTE, VOLUME, PAUSE, PREVIOUS, NEXTetc. are
setup structure as below:
__________________________
also available for MP3 discs and the function same as playing audio CD.
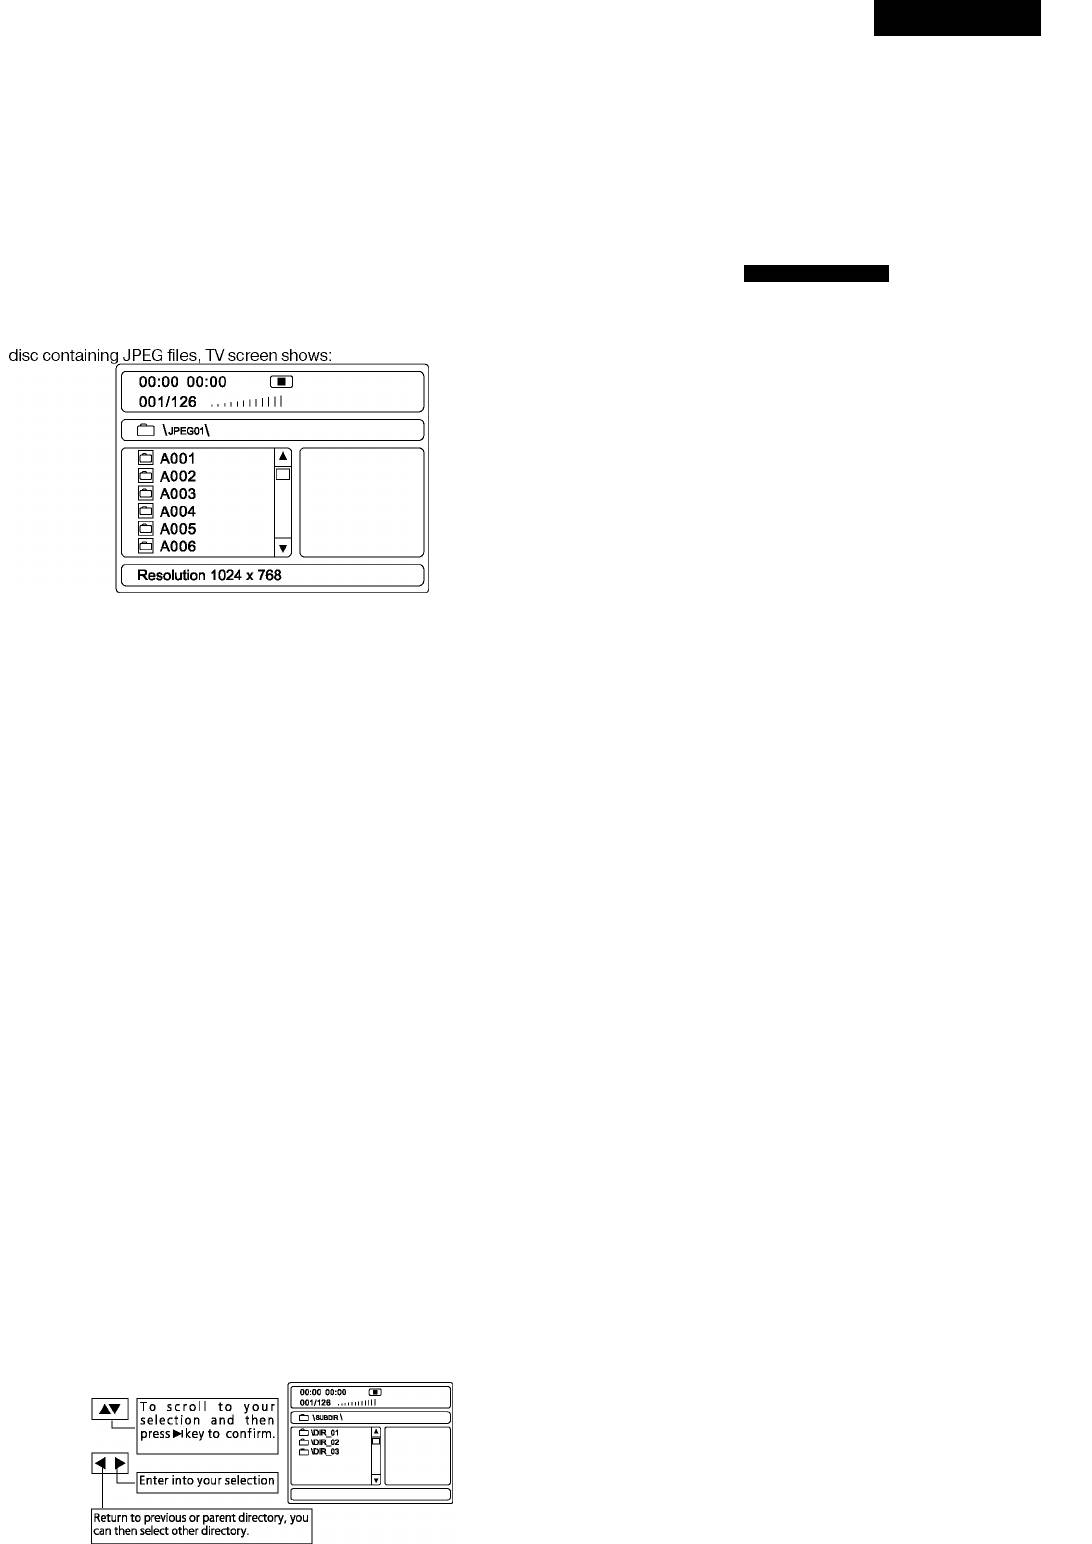
Playing Picture CD or JPEG files
-General Setup Page-
The DVD player Is compatible to Picture CD and The player will automati
cally play pictures In slide discs containing JPEG Image files (with .JPG
TV Display
PS Normal/ps
flleshow mode Ifthedisc containing morethan one extension). This
Normal/LB
function Is similar to MP3 picture. Upon loading a Kodak Picture CD or
Wide
Angle Mark ON On
Off
OSD Lang
ENG ENGLISH
RUSSIAN
Captions
Off
On
Off
Screen Saver
ON On
Off
Last Memory Off On
Off
Operations:
Press arrow buttons to select, and then press the ENTER button to con
Picture selection and Preview:
firm.
Press arrow buttons to select the target picture MPEG-4, DIVX disc Play-
Press SETUP button again to cancel the system setup.
backand presswi buttontoshow. Ifyoudon’tpressNi keytheplayerwill
show the picture In preview area once the cursor stops.
TV Display
NORMAL/PS (Pan Scan)
Rotate Picture:
Select this option when the player is connected to a standard 4:3 aspect
You can use the arrow buttons^AT to rotate,
invert, mirrorthecurrent
ratio TV set. 16:9Wide screen source picture shown on the screen with
showing picture.
some part cut off automatically.
NORMAL/LB (Letter Box)
Previous and Next selection:
Select this option when the player is connected to a standard 4:3 aspect
You can pressM^ Prev button to show previous picture
ratio TV set. The full 16:9 wide screen source pictures will be shown on
or Next^l button to show next picture manually.
the screen, but with black bars on the top and bottom.
Wide
Zoom in and Zoom out:
Select this option when the player is connected to a wide screen TV.
You can press ZOOM button then followed with<^^^ (Fast Reverse
/ Fast Forward) to zoom out or button at anytime. There are following
Angle
zooming levels available: 50%, 75%, 100%, 125%, 150%, and 200%.
• ON: when the playing DVD disc having multi-angle option available,
When the picture is zoomed in you can use arrow buttons to shift and
an angle mark will be shown on the TV screen.
pan to viewthedesired part ofthe picture.
• OFF: NO angle markwill be showon the screen when multi-angle
option available.
Slide show
The DVD player is compatible to Picture CD and the player will automati
OSD Lang (On screen display language)
cally play pictures in slide discs containing JPEG image files (with .JPG
To selectthe On-Screen-Displaylanguage, default setting is English
flleshow mode ifthedisc containing morethan one extension). There
(RUSSIAN).
are 16 available modes to wide the TV screen when displaying a new
picture.
Captions
• ON:To display captions on TV screen when available.
Stop Playing
• OFF: To disable captions display.
When in normal play, press key to cancel play and return to the menu
NOTE: Only when the TV set supports captions display that the feature
interface and then you can select other directory or files.
can function well.
Karaoke Singing
Screen saver
Inset the microphone into the microphone plug hole; adjust the micro
When there is no activityofthe player for about several minutes, screen
phone volume knob to proper position. Please turn the amplifier volume
saver will be displayed to prevent potential damage to the TV screen.
down before inserting the microphone and turn up after inserting to
• ON:To activate screen saver.
avoid high frequency self-excitation before the unit is well adjusted.
• OFF: To disable screen saver.
MPEG-4, DIVXdiscpIayback
Last Memory
The DVD player can memorize the playing time when player turned to
standby mode so thatwhen itturned on again, the same disc will resume
playfrom the point.
• ON: Enable last memory function.
• OFF: Disablelastmemoryfunction.
ENGLISH
Audio Setup Page
properly and try out the sound field balance.
The setup structure is as below:
Warning: Although the white noise is in lowvolume, please make sure
system master volume is adjusted to a low level before active the test
tone function to avoid any potential damage.
-- AUDIOSETUP P AGE--
Dialog
Speaker Setup
When DOWNMIXoption is setto LT/RT or STEREO mode, adjustingthe
SPDIE Setup
value ofthis item to control the volume of the player. Preset valueisO.
DIoby Digital Setup
Channel Delay
SPDIFOutput
Equalizer
This function is for user to select right SPDIF
3D Processing
Digital Audio output for external Audio decoder.
Press arrow buttons to select, and press PLAY/PAUSE button to confirm. The setup menu structure is as below:
Speaker setup page
a
SPDIF Setup Page
a
© K
SPDIFOutput RAW SPDIF/Off
SPDIF/RAW
--Speaker Setup Page--
SPDIF/PCM
Downmlx STR Lt/RT
PCM Channel L/R SPDIF L/R
Stereo
SPDIF LS/RS
VSURR
SPDIF C/LFE
Off
LPCM Out 48K 48K
Front Speaker
LRG Large
96K
Small
Center Speaker SML Large
Small
SPDIF output
Off
There are three SPDIF output modes: SPDIF/OFF, SPDIF/RAW, SPDIF/
Rear Speaker SML Large
PCM.
Small
Off
• SPDIF/OFF: Close up coaxial output.
• SPDIF/RAW: To output not decoded raw data for all audio source.
Subwoofer
On On
• SPDIF/PCM: To output decoded digital PCM data for all audio
Off
sources.
Test Tone
Off
On
Off
PCM Channel
Dialog
00
In the Manual SPDIF output setting mode, setthe SPDIF outputfor each
of the different source.
Downmlx
LPCM out
LT/RT: Selectthis option when the DVD player is connectto external
48 K: To selectthe highest SPDIF/PCM output sampling rateat48KHz.
amplifier with Pro-Logic decoding function.
Higher sampling rate audio source will be down sampled to 48 KHz or
STEREO: Select this option when you want to use onlythe front-left
lower rate.
& front-right speakers with normal sound effect.
96 K: To selectthe highest SPDIF/PCM output sampling rate at96KHz.
Surround: Select this option when you want to use onlythe front-left
Down sampling function will not be implemented.
& front-right speakers with Virtual Surround Sound effect
NOTE: Not all AV Receiver can support 96 KHz sampling rate.
Off: Default setting, to output full decoded 5.1- channel surround
sound.
Dolby Digital Setup
Front Speaker
a
• Large: Default setting, Selectthis option onlywhen the DVD player is
connected to external amplifier with full range front speakers.
-Dolby Digital Setup-
• Small: To usethe original satellitefront speakers.
Dual Mono STR
Stereo
L-Mono
Central speaker
R-Mono
• Small: Default setting. To use the original satellite centre speaker.
Mix-Mono
• Large: Select this option onlywhen the DVD player is connected to
Dynamic
external amplifier with full range centre speaker.
• Off: Select thisoptiononlyif there is no centre speaker connected.
Rearspeaker
• Small: Default setting. To use the original satellite rear speakers.
Dual Mono
• Large: Select this option onlywhen the DVD player is connected to
Stereo: The player will output Left channel and Right channel audio.
external amplifier with full range rear speakers.
L-mono: The player will output left channel audio only from the 2 front
• Off: Select thisoptiononlyif there is no rear speaker connected.
channels.
R-mono: The player will output rightchannel audio onlyfrom the 2 front
Subwoofer
channels.
• On: Default setting. To usetheoriginal activesubwooferspeaker.
Mix-mono: The player will output the average signal ofthe mixed Left
• Off: Select this option only when the DVD player is connected to
channel and Right channel audio from the 2 front channels.
external amplifier with full range front speakers and no subwoofer
speaker connected.
Dynamic
This isto setup the Dynamic compression ration. Press rightarrow but
Test Tone
ton to enter the setup column; adjust the rate ofthe dynamic range by
When test tone function is activated, the player will generate white noise
pressing up or down arrow button. Default setting is off.
channel by channel for user to test, if the 5 satellite speakers positioned
m

ENGLISH
Channel Delay Setup
PRO LOGIC
Set the delay of each channel according to your room layout.
Byselecting DOWNMIXyou can perform the following settings.
1. .1
o 1 1 o
LJ
Sub
i
Woofer
1^ nn
PRO-LOGIC II Config
PRO Logic II Off On
Off
Use up or down arrow button to scroll to Channel delay item and
Auto
press PLAY/PAUSE or ENTER button enter into setup option.
Mode Mus Music
Use left or right arrow button to select a channel and adjust delay
Movie
PRO Logic
volume with up or down arrow buttons.
Auto
When all channels delayvolume adjusted press PLAY/PAUSEto
Panorama Off
On
confirm and press left arrow button return to parent page.
Off
Dimension 00 Size -3
Equalizer Setup
Size -2
Size -1
Size 0
a
a X
Size 1
Size 2
-- Equalizer Page-
Size 3
Center Width 03 Level 0
EQ TYPE NONE
NONE
Level 1
Rock
Level 2
Pop
Level 3
Live
Level 4
Dance
Level 5
Techno
Level 6
Classic
Level 7
Soft
BASS BOOST OFE ON
OFF
SUPER BASS OFE ON
Simulate 2-channel audio source to5.1- channel audio output.
OFF
Disablethis function. Pro-logic II isamatrixdecoder. ItcreatesaS.I-
TREBLE BOOST OFF ON
channel surround sound experience from a stereo or even mono
OFF
input, such as audio from the built-in radio tuner or 2-channel audio
playback from the discs.
Select preferred sound mode, and enable or disable Bass Boost, Super
AUTO: When you selectthisoption, you can activate the mode,
Bass, and Treble Boostto achieve bestsound effectoryour liking.
panorama, dimension, center width menu.
3 D processing
Mode
The setup structure is as below:
Music mode: use for stereo music programs
Movie Mode: Itsupports:
10ms surround delay added for Haas effect.
^ ^ m
' (?) X
Auto balance enabled
--3D PROCESSING PAGE --
• PRO LOGIC mode
PRO LOGIC II
Thisconvertstwochannel recordingtoS.I audio output.
REVERB MODE OFF OFF
Concert
Living Room
• Auto mode: Lettheplayertodecidewhichmodetouseaccording
Hall
to the source automatically.
Bathroom
Cave
Arena
Panorama
Church
In music mode this allows to extend the front stereo to include surround
speaker for an exciting “Wraparound” effect with side wall imaging.
REVERB mode
Dimension
Select different surround effect to suit your personal hearing require
In music mode this allows to gradually adjust sound field either towards
ment. Availableeffects include Concert, Living Room, Hall, Bathroom,
the front or towards the rear.
Cave, Arena and Church.
Center Width
In music mode this allows to balance the front speakers.
Video Setup Page
Q ^
a K
Video Setup Page
Component Off
Off
YUV
RGB
TV mode
P-Scan
Interlace
Quality
HDMI Setup
Video output
This menu is to set the component video output format.
• Off is to disable component video output. DVD player will output
Video signal and S-Video signal only.
• YUV is to set component video output format inY-Cb-Cr for
11
ENGLISH
interlaced scan mode orY-Pb-Pr for progressive scan mode.
RESOLUTION
• RGBistooutputSCARTsignal.
1.
According to your TV set’s resolution to select the corresponding
• VGA is to set PC-VGA signal output. When you connect the TV set via
option to obtain the best vision effect.
the VGA terminal.
2.
HDCPSetup
ON/OFF
TV Mode
3.
VIDEO FORMAT/AUDIO SOURCE/ HDMI
This item is to set the DVD player video output format in normal interlace
To selectthe HDMI’svideo/audio output mode, or close/offthe
mode or high performance progressive scan mode.
HDMI source.
NOTE: Make sure the connected TV set can support progressive scan
TV signals and theY-Pb-Pr cables connected correctly before switch
Preference page
to progressive scan mode. In progressive scan mode, there willbeNO
TVtype PAL PAL/AUTO/NTSC
Video signal and S-Video signal
English/French/Spanish/Chinese/
output.
Audio English
Japanese/Korean/Russian/Thai/others
Video Quality Setup
English/French/Spanish/Chinese/
Subtitle English
Japanese/Korean/Russian/Thai/OFF
English/French/Spanish/Chinese/
a m>
Disc menu English
Japanese/Korean/Russian/Thai/others
Video Setup Page
1 KID SAF/2 G/3 PG/4 PG13/5 PRG
Parental Control
Sharpness
MID High
6R/7NC17/8 ADULT
Medium
Low
Default Reset
Brightness
00
Contrast 00
Gamma NONE High
TV System
Medium
The output ofTVsystem can be set to PAL/AUTO/NTSC.
Low
None
Hue 00
AUDIO/SUBTITLE/DISC MENU
Saturation
00
Choose the default language you would prefer to for DVD titles, audio,
Luma Delay IT OT
IT
disc menu.
Note: Not all DVD discs are recorded with multiple languages.
Sharpness Gamma Luma-delay
PARENTAL CONTROL
Select different options according to the connected TV set and the video
Allows the user to set a maximum rating of movie that can be laid (e.g.
source to get best picture quality or your liking.
PG rating). Movies rated higherthan the level setwill not be played. The
parental lock can only be changed after input the correct password.
Brightness Contrast Hue Saturation
Note: This function is available only when the disc has rating encoded
Set to different values according to the connected TV set and the video
on.
source to get best picture quality or your liking.
To changevalues, scroll to the item and press ENTER button to enter,
CHANGETHERATING
and change setting values with left/right button, press ENTER button to
1. Press UPor DOWN button to select the desire level.
confirm new value and return to the setup menu parent page.
2. PressENTERbuttontoconfirm.
3. Input parental control password. The factory setting of the password
HDMI
is 31680.
When you connectto theTVsetvia HDMI wire, selectthis option to get
4. Press ENTER button to active the new setting.
the high vivid picture quality.
Characteristics:
Default
To restore all setup parameters to the factory settings EXCEPT the pass
Q (TO ^ ^
' a K
word. Note:
You can restore all setup parameters by pressing the DEFAULT key on
HDMI SETUIP
the remote controller.
HDMI
ON
ON
OFF
Resolution
480i
Password Setup Page
480P(720)
480P(1440)
a
720P(60Hz)
«(Q), 3 ^
1080I(60Hz)
576i
--PASSWORD SETUP PAGE --
576P(720)
PASSWORD MODE ON
On
576P(1440)
720P(50Hz)
Off
1080P(50Hz)
PASSWORD CHANGE
HDCP Setup ON ON
OFF
Video Format YUV RGB 4:4:4
PASSWORD MODE
YCbCr 4:4:4
To enable or disable password protection when parental level is
AUDIO Source
SPDIF SPDIF
12S
changed.
HDMI SRC OFF ON
Default setting is password mode ON.
OFF
Before setting changed, you need to inputthe proper password.
PASSWORDCHANGE
Just needing one connection cord can deliver high definition both
To changethe password, you need to:
audio and video signal.
1. Input old password.
It supports standard, enhance or high definition digital video modes
2. Input a 6-digit new password.
ofTVset, and supports standard stereo, multi-channel surround
3. Inputthe new password again to confirm.
sound or digital stereo audio styles.
NOTE: Ifyou forget the new password, you can always use the factory
It supports uncompressed digital video signal so that it can get a
setting password 316800.
high fidelity video effect.
It supports HDCP (High-band with digital contain protection)
decoded technique so that itwill not be limited by signal encrypt.
1?
ENGLISH
How to handle, protect and clear discs
Avoid scratching the disc and aiways repiace in the box after use
Ciean the disc by wiping it outwards fromthe centre gentiywith aciean, soft, iint free cioth.
Do not use aicohoi, detergent or other chemicais to ciean the disc.
Do not heat, bend or attach adhesive paper (e.g. ‘Post it’ notes) to the disc.
Oniy use proper disc pens for writing on the iabei side of the disc otherwise disc damage may occur.
DVD player
Power Suppiy 110-240 V, 50-60 Hz
Power Consumption 20 W
Weight 2.05 kg
430 (W) mm x 33(H) mm x 230(D) mm
Dimensions
Signai System PAL/AUTO/NTSC
Laser Semi-conductor iaser, wave iength 650nm, 780nm
DVD iinear sound: 48KHz puise moduiation 20Hz~20KHz
Frequency Range
96KHz puise moduiation 20Hz~20KHz
CD Audio frequency: 20Hz~20KHz
S/N 90dB
Audio Dynamic Range 85dB
Fiicker Rate Smaiier than detectabie range
Operation Condition Temp: 0 ~40 , Operation state: Levei surface
Output
Video output 1.0 0.2V(P-P),750hm
(Y) 1.0V(P-P),75Ohm
S-Video output
(C)286mV(P-P),75 0hm
2 0+0 2 V
Anaiog audio output
-1.0
(Y) 1.0V(P-P),75Ohm
Component video output
(C)0.7V(P-P),75Ohm
Copyright
According tothe reiated iaw, DVD discswithout proper authorization are notaiiowedto be copied andto be piayed pubiiciy. As DVD discsare anti-pi
racy, the copied content is aiways distorted.
TV System
Connect this piayer to a PAL/NTSC compatibie TV.
1.T

ENGLISH
Maintenance and Troubleshooting
Probiem Cause Soiution
No power Power piug is not connected. Piug the power cord into the power suppiy
Set correct TV video input format for receiving
TV has not been set to the correct video input.
the piayer’s output signais.
No picture
Video cabie is not firmiy connected.
Firmiy insert the video cabie ends to the
reiated terminais.
Firmiy insert the audio cabie ends to the
Audio cabie is not connected tightiy.
reiated terminais.
No sound
Power of audio apparatus is off.
Turn on the power of audio apparatus.
Audio output setting is incorrect.
Setup audio output correctiyvia the setup
menu.
Take out the disc and ciean.
Disc is dirty.
Picture distortion
The picture may be distorted during
Fast forward/backward is activated.
fast-forward /backward piayback.
Brightness unstabie or noisy Affected byanti-piracycircuit. Connect the piayer directiy to TV.
Load adisc.
No disc
Load a compatibie disc (Check the disc format
Disc not compatibie
and its coior system).
The disc is piaced upside down
Load a compatibie disc (Check the disc
The piayer does not work
The disc not put in the tray correctiy
format and its coior system).
Disc is dirty
Check the disc is put in correctiy.
Piayer setting are incorrect
Ciean the disc.
Patentai iock is in effect
Change the setting via the setup menu.
Disabie this function or reset the rating ievei.
interference of power wave or other
Turn offthe main switch or puii out the power
No response to key press
factors such as static interference
piug, piug it in and turn on the power again.
The remote controi not pointed at the remote
Point the remote controi at the remote sensor.
sensor on the front panei ofthe piayer
Make sure the remote controi is directed within 7 meters to
Remote controi does not work
The remote controi is out of specified range
the remote sensor.
Battery power exhausted
Repiace new batteries.
Due to the continuous enhancement of the product the company reserves the right to make design changes without any prior notice.
The service life of the device is no less than five years.
Guarantee
Detaiis regarding guarantee conditions can be obtained fromthe deaier from whom the appiiancewas purchased. The biii ofsaie or receipt must be
produced when making any ciaim under the terms of this guarantee.
This product conforms to the EMC-Requirements as iaid down bythe Councii Directive
C€
89/336/EEC and to the Low Voitage Reguiation (23/73 EEC)
14
DEUTSCH
Bedienungsanleitung
3. Feuchtigkeit, Öldampf
DVD PLAYER
Benutzen Sie das Gerät nicht in den Räumen mit erhöhter
VT-4086
Feuchtigkeit und vorhandenem Öidampf, zum Beispiei, im
Badezimmer, in der Dusche, in der Küche und so weiter, da es zur
Zubehör:
Minderung der Lesequaiität der Disken führen kann.
Die Fernbedienung
Bedienungsanieitung
4. Reinigung
Garantieschein
Führen Sie keine Reinigung am Gerät nicht, soiange Sie den Stecker
Audio-/Videokabei
aus der Steckdose nicht gezogen haben. Benutzen Sie keine
Batterien
fiüssige Reinigungsmittei oder Aerosoireiniger. Wischen Sie das
Gerät mit einem weichen trockenen Stofftuch ab.
Batterien in die Fernbedienung einsetzen
Nehmen Sie den Deckei vom Batteriefach ab
5.
Hinweise bezüglich fremde Gegenstände und Flüssigkeiten
Setzen Sie zwei Batterien Typ AAA ein, achten Sie auf Poiarität so, wie
Keinesfaiis lassen Sie fremde Gegenstände oder Flüssigkeiten
abgebiidet
ins Innere des Geräts durch irgendwelche Öffnungen im Gehäuse
Setzen Sie den Deckei des Batteriefachs zurück ein
geraten. Das kann zum Kurzschluss führen und als Folge, zum
Stromschlag oder zum Brand führen. Zerstäubern Sie keine
Unterstützte Disktypen
Flüssigkeiten in der Nähe des Gerätes.
Einige DVDs fordern spezifische Eigenschaften der Ausstattung für
dieWiedergabeder Daten. Deswegen unterstützt dieser Spieier die
6. Überlastung
Wiedergabe von manchen Disken nicht. Bitte iesen Sie aiie Hinweise, die
Überlasten Sie die Steckdose nicht. Seien Sie doppelt so vorsichtig,
auf der Disk ausgewiesen sind, durch.
wenn Sie ein Verlängerungskabel oder eine gemeinsame Steckdose
benutzen. Überlastung dieser Vorrichtungen kann zum Stromschlag
oder zum Brand führen.
Größe der
Zeit der
Disktyp
Interaktive Funktionen
Disk
Wiedergabe
Videodisk
12 cm/
Die PBC-Funktion wird
Gewöhnliche Disk
74 Min*
8 cm
nicht unterstützt
Benutzen Sie keine beschädigten, deformierten oder selbständig
wiederherstellten Disken, die wieder kaputt gehen könnten sowie
VCD1.1:die
eine Störung, Beschädigung oder falschen Betrieb des Spielers
PBC-Funktion wird nicht
unterstützt
verursachen können.
12 cm/
VCD
74 Min*
8 cm
VCD2.0:die
8. Schwere Gegenstände
PBC-Funktion wird
unterstützt
Legen Sie keine schweren Gegenstände auf das Gerätgehäuse auf,
drücken Sie darauf nicht. Belasten Sie mit schweren Gegenständen
12 cm/
die PBC-Funktion wird
SuperVCD
45 Min*
keine Verknüpfungskabel, achten Sie besonders auf die Steckdose,
8 cm
unterstützt
den Stecker und das Netzkabel.
12 cm/
8 cm
die PBC-Funktion wird
9. Schutz des Netzkabels
MP3
~600 Min*
unterstützt
Das Netzkabel muss man möglichst weit von Durchgängen und den
Stellen, wo jemand darüber stolpern könnte, positionieren. Legen
Sie keine fremden Gegenstände auf das Netzkabel, achten Sie
Kodak picture
12 cm/
besonders auf die Steckdose, den Stecker und das Netzkabel.
- -
CD,JPEG
8 cm
~133 Min
10. Reparaturen
(SS/SL)*
Versuchen Sie nicht, das Gerät selbständig zu reparieren, bedenken
-242 Min
Menü mit Steuerung
Sie, dass die Teile, die sich im Inneren des Geräts befinden, unter
12 cm/
(SS/SL)*
Menü mit Steuerung
DVD
einer hohen Spannung sind. Beim Öffnen des Gehäuses können
8 cm
-266 Min
Menü mit Steuerung
(DS/SL)*
Menü mit Steuerung
Sie einen starken Stromschlag erleiden, deswegen wenden Sie sich
-484 Min
lieber an einen entsprechen qualifizierten Fachmann, um das Gerät
(DS/SL)*
reparieren zu lassen.
*die Zeit der Wiedergabe ist für die Disken mit der Größe von 12 cm
ausgewiesen.
Wichtige Vorsichtsmaßnahmen:
Anmerkungen: Bitte iesen Sie aufmerksam die Hinweise, die Sie auf
dieser Seite finden, um Unfäiie zu vermeiden.
Dieses Zeichen erinnert Sie, dass in diesem Paragraphen
wichtige Hinweise zu finden sind.
Dieses Zeichen erinnert den Benutzer, dass hohe
Spannung in dem beschriebenen Gerätteii zu finden ist.
1. Ventilierung
Um eine iängere, stabiie und sichere Nutzungsdauer des Geräts zu
erreichen, steiien Siees nicht auf das Bett oder das Sofa, iegen
Sie keine Stofftücher oder andere Stoffe darunter, da das Gerät
ständige Lüftung und Kühiung beim Betrieb braucht.
2. Wärmequellen
Steiien Sie das Gerät nicht in der Nähe der Wärmequeiien, soichen
wie Heizkörper, Temperaturregier, andere Heizgeräte oder
isothermischeAusstattung.
1.R
DEUTSCH
Hinterplatte/Vorderplatte/Bildschirm
Die Hinterplatte
2 3 4 5 6 7
20 19 18 17 16 15
21 9
1
5.1 CH F. der vordere linke Audioausgang
2,
5.1 CHS. der hintere linke Audioausgang
3,
5.1 CH der zentrale Audioausgang
4,
Komposit-Videoausgang
5,
Gemischter rechter Audioausgang
6,
Gemischter linker Audioausgang
7,
Digitaler Koaxial-Audioausgang
8,
Netzkabel
9,
Reglelr der Echoeffektsteuerung
10
Buchse zum Anschluss des Mikrophons
11. SCART Ausgang
12. VGAAusgang
13. Erdung
14. Komponenten-Videoausgang
15. S-Videoausgang
16. Optischer digitaler Ausgang
17. 5.1 CH S.W Subwoofer Audioausgang
18. 5.1 CH S. hinterer rechter Audioausgang
19. 5.1 CH E vorderer rechter Audioausgang
20. HDMI Anschluss
21. Regler der Steuerung der Lautstärke des Mikrophons
Die Vorderplatte
ViteK ©
10
1. Diskladeschale
2. Öffnen/Schließen
3. Stop
4. Wiedergabe/ Pause
5. USB
6. Kartenleser
7. Vokalbetrieb
8. Bildschirm
9. Infrarotsensor
10. Netzschalter
Der Bildschirm
DV D 1
^3 dts
VC D 1
188-ee-ee:
^4 □□□
8 7
1. Wiedergabezeichen für die DVD
Wiedergabezustand
Wiedergabezeit
4. Wiedergabezeichen für die MP3-Disk
Zeichen der Technologieanwendung von Dolby digital
Wiedergabezeichen für die MP4-Disk
Pausezeichen
8. Wiedergabezeichen fürdieVCD
Ifi

DEUTSCH
Vorbereitung zur Inbetriebnahme
36. Volume+ - Lautstärke steigern
Die Fernbedienung
37. VolumeO- - Lautstärke mindern
38. USB/CARD Anschluß von USB/Card
0
- 0-5m
.60°
0-7m
ANMERKUNG: Die Fernbedienung soll auf den Infrarotsensor gerichtet,
damit der Spieler funktioniert.
Die Distanz kann sich ändern, anhängig von der Naturbeleuchtung.
Lassen Sie die Fernedienung nicht an sehr heißen oder sehr
feuchten Stellen.
Wenn die Fernbedienung während längerer Zeit nicht benutzt wird,
nehmen Sie die Batterien heraus, um die Beschädigungen der
Fernbedienungen wegen des Ausfluss der Flüssigkeit oder der
Korrosion zu vermeiden.
Normalerweise reicht ein Satz für ungefähr ein Jahr, abhängig
von der Frequenz der Anwendung der Fernbedienung. Wenn
die Fernbedienung sogar in der unmittelbaren Nähe von dem
DVD-Spieler nicht funktioniert, wechseln Sie bitte beide Batterien
durch neue, gewöhnliche (keine Akkubatterien) Basebatterien Typ
AAAaus.
Fortschreitende Abtastung
Der gegebene Spieler verfügt über eingebaute fortschreitende
Abtastung hoher Bildqualität. Um den Videoausgang auf fortschreitende
Abtastung oder Abtastung mit Zeilensprung umzuschalten, können Sie
folgenderweise verfahren:
1. Drücken Sie dieTaste SETUP auf der Fernbedienung, auf dem
Bildschirm erscheint das Menü der Systemeinstellungen.
Benutzen Sie die rechte Pfeilentaste RIGHT für die Auswahl von
Videoeinstellungen, drücken Sie die Taste ENTER, um in die
Videoeinstellungen zu gelangen.
I. STANDBY-der Schlafbetrieb
Wählen Sie COMPONENT, drücken Sie die Taste ENTER, um in die
2.TV set style conversion - Einstellungen des Umwandlungstyps für das
Option zu gelangen, wählen SieYUV aus und bestätigen Sie.
Fernsehgerät (PAL/NTSC)
Benutzen Sie die Pfeilentasten, um TV Modus (TV MODE)
S.Mute - Ton abschalten
auszuwählen und drücken Sie dieTaste ENTER, um den TV Modus
4.Accompanying Sound Play - Tonbegleitung
der fortschreitenden Abtastung oder Abtastung mit Zeilensprung
S.Search Play - Suche der Wiedergabe
auszuwählen.
e.Frame by frame play - Schrittweise Wiedergabe
y.Memorized play - eingespeicherte Wiedergabe
Anmerkungen: Vergewissern Sie sich, das Ihr Fernsehgerät
8.SI0W Play - verzögerte Wiedergabe
fortschreitende Abtastung unterstützt und richtig angeschlossen ist,
Q.Direction Up - die Taste mit dem Pfeil, der nach oben gerichtet ist
bevor sie den Modus der fortschreitende Abtastung einschalten.
lO.Setup - Einstellungen
II. Direction Left - die Taste mit dem Pfeil, der nach links gerichtet ist
12.Play/Pause - Start/Pause
IS.Direction Down - dieTaste mit dem Pfeil, der nach unten gerichtet ist
14. Previous - vorherige
15. Next - nächste
16,On Screen Display - Bildschirmmenü
IT.Audio Channel Selection - Wahl des Audiokanals
IS.Menu play - Wiedergabemenü
19. Multi-Angle Play - Wiedergabe von verschiedenen Blickwinkeln
20. Reset Default - Werkeinstellungen wiederherstellen
21. Picture Zoom - Steigerung der Bildgröße
22. HD mode switch - Umschaltung des Modus HDMI
23. Tray Open/Close - Öffnen/Schließen des Laufwerks
24. Number Keys - Zahlentasten
25. Repeat - Wiederholung
26. A-B Repeat - Ausschnittwiederholung (von dem Punkt bis zum
Punkt B)
27. Enter - Eingabe
28. Direction Right - die Taste mit dem Pfeil, der nach rechts gerichtet ist
29.Stop/Return - Stopp/Zurück
50. Fast Forward - schnelles Spulen vorwärts
51. Fast Backward - schnelles Spulen rückwärts
32.Title - Wahl des Titels
33.Subtitle - Wahl des Untertitels
34. Program play - programmierteWiedergabe
35. Video - Wahl der Betriebsstufe der Videoeingabe
17
DEUTSCH
Systemanschluss
Anschluss an das Fernsehgerät und akustisches System Dolby Digital 5.1CH., Sound surround oder Dolby Digital
Folgen Sie beim Anschließen Sie des akustischen Systems des Heimkinos und des Fernsehgeräts das Schema und Instruktionen:
Connection terminal of TV SET
Anmerkung:
1.
Beim Anschließen des Spielers an das Fernsehgerät wählen Sie einevon fünf Anschlussmöglichkeiten.
2.
Wählen Sie den Ausgang des Spielers und des Fernsehgeräts, der dem vorhandenen Videoanschluss entspricht.
1)
AV
2)
S-VIDEO
3)
YUV
4)
VGA
5)
HDMI
Beim Anschließen folgen Sie die Bedienungsanleitung des Fernsehgerätes.
Anschlüsse aufderhinterer Platte
Audio cables - Audiokabel
Optical cable - optisches Kabel
Coaxial cable - Koaxialkabel
Stereo input - Stereo Ausgang
Amplifier with Dolby decoder - der Leistungsverstärker mit dem Effekt Dolby Digital
Rear panel of amplifier - die hintere Platte des Verstärkers
‘Dolby’, ‘Pro Logic’ und ‘DD’ sind Brandmarken der Gesellschaft “Dolby Laboratories” («Dolby-Labore»)
die für die Bezeichnung der autorisierten
Produkte von “Dolby Laboratories” benutzt werden.
Vertraulich, darf nicht erläutert werden. Dolby Lab 1992-1997. Alle Rechtesind Vorbehalten.
Anschließen von 5.1.CH an den Subwoofer
1. Schließen Sie die analogen Audioausgänge 5.1 DVD (insgesamt 6 Kanäle) an entsprechende Eingänge des aktiven Subwoofer an.
2. Wählen Sie die Option “OFF” (ausgeschaltet) des Mischen-Menüs.
3. Sehen Sie auch die Bedienungsanleitung des Subwoofers durch, um die Einzelheiten des Anschlusses von der Peripherie nachzuschlagen.
1. Beim Anschluss des Verstärkers über das koaxiale oder optische Kabel, wählen Sie “Spdif/Raw” des digitalen Ausgangs.
2. Lesen Siedie Bedienungsanleitung des Verstärkers Dolby Digital.
3. In einer Standardkonfiguration (6-Kanal-Ausgang 5.1,5+1 Niedrigfrequenz-Lautsprecher) sind alle sechs Audiokanäle miteinbezogen. Falls
der zentrale oder der Niedrigfrequenz-Lautsprecher nicht angeschlossen sind, schalten Sie diese an (stellen Sie den Wert “OFF” ein) in den
Einstellungen des entsprechenden Lautsprechers. Auf solche Weise wird das Signal, das zu den fehlenden Lautsprechern geführt werden soll,
zwischen zwei seitlichen Lautsprechern geteilt.
Anmerkung: wählen Sie nur eine Anschlussmethode von Audio des Videospielers.
IR

DEUTSCH
Vor dem Anschluss der Ausstattung vergewissern Sie sich, dass
Bei der wiederholten Betätigung der Taste t
I fängt die Wiedergabe von
sowohl das Fernsehgerät, als auch der Spieler ausgeschaltet sind.
der Stelle an, wo sie angehalten wurde.
Stellen Sie die Lautsprecher auf den gleichen Abstande von der
Stelle auf, wo sich der Zuschauer befindet.
Wiedergabemenü der DVDs
Keinesfalls schließen Sie digitale oder optische Ausgänge an
Einige DVD unterstützen die Funktionen Uberschriftenmenü oder
analoge Eingänge des Verstärkers an, das kann Beschädigungen
Leitermenü. Um den Zugang zu dieser Option zu bekommen, drücken
der Ausstattung verursachen.
SiedieTaste “PBC” (Wiedergabekontrolle).
Beachten Sie den zeitlichen Abstand zwischen den Anschalt- und
Am Bildschirm des Fernsehgeräts erscheint das Diskmenü. Benutzen
Ausschaltvorgängen: sie sind nicht weniger als 10 Sekunden, das
Sie die Tasten mit den Pfeilen ^at, um zwischen den Menüpunkten zu
ist für einen korrekten Start und Abschluss des Systembetriebs
wechseln. Um dieWahl zu bestätigen, drücken SiedieTaste wieder die
erforderlich
Taste “ENTER” (Eingabe).
Sie können auch die Zahlentasten für eine direkte Eingabe der
Betriebsanleitung
Titelnummer benutzen:
.
Anschluss des Geräts
Menu
Bevor Sie das Gerät anschalten überprüfen Sie die Richtigkeit und
Sicherheit der Anschlüsse des Geräts an die Peripherie. Nachdem
Sie alles Uberprüft haben, setzen Sie den Stecker in die Steckdose
11.
mit der Wechselspannung von 110-240 V und der Frequenz 50/60
Hz ein.
Zum Beispiel, wählen Siefür Track 13
Drücken Sie die Taste “POWER” (Stromversorgung) an der
Menu
Vorderplatte, um das Gerät anzuschalten, am Bildschirm des
Fernsehgeräts erscheint das Hauptmenü des Systems
Drücken Sie die Taste “Open/Close” (Offnen/Schließen) auf
Sie können auch die Nummer 13 mit Hilfe der Zahlentasten
der Fernbedienung oder an der Vorderplatte des Geräts, um die
eingeben.
Diskladeschale zu öffnen. Legen Sie die Disk in die Diskladeschale
Zum Beispiel, wählen Siefür Track 13
ein (Anmerkung: mit dem Bild nach oben) ein. Erneut drücken Sie
.
Menu
die Taste, um das Laufwerk zu schließen.
Keinesfalls schieben Sie die Ladevorrichtung des Spielers selbst, um
es zu schließen. Benutzen Sie dafür immer dieTaste “Open/Close”.
11.
Ablesen von USB Geräten
Direkte Auswahl mitZahlentasten
Sie können ein USB Gerät anschließen. Drücken Sie danach die Taste
10+ 3
DVD/USB auf der Fernbedienung, um den Speiler in Abelesemodus
umzuschalten. Auf dem Bildschirm erscheint folgende Anzeige: Ablesen
von USBXXX%», nach einiger Zeit wird der Inhalt von USB auf dem
Bildschrim wiedergegeben.
Drücken Sie die Tasten at, in die benötigten Menüpunkte zu
Anmerkung:
gelangen.
1. Alle Inhalte, die mit dem Spieler kompatibel sind, kann erkannt und
Drücken Sie die Taste wi um auszuwählen und die Wiedergabe
vom Kartenleser abgelesen werden.
anzufangen.
Das Interface der Wiedergabe stimmt mit Dateien MP3, MP4,
Drücken Sie die Taste “TITLE”, um ins Hauptmenü der Disk
DIVX, JPEG überein. Das Interface der Wiedergabe stimmt mit dem
zurückzukommen, (wenn solche existiert)
gespeicherten Inhalt überein.
Drücken Sie dieTaste “PBC”, um zum Katalogleiter der Disk
zurückzukommen.
Einstellung des TV Systems
Stellen Sie das System des Spielers entsprechend dem System des
Wahl des Video-Trecks der VCD
Fernsehgeräts ein. Zum Beispiel, wenn das System PAL verwendet
Legen Sie eine VCD das Laufwerk. Wenn der Lesevorgang an der Disk
wird, sollen Sie DVD Spieler auf Modus PAL einprogrammieren,
abgeschlossen ist, führen Sie die Nummer des gewünschten Trecks mit
sonst bekommen Sie auf dem Bildschirm bei der Wiedergabe der TV
Hilfe der Zahlentasten ein. Falls die Nummer des Trecks kleiner ist als 10,
Programme oder Disken mit Filmen kein Bild. Drücken Sie mehrmals die
drücken Sie eine der Tasten mit den Zahlen von 1 bis 9.
• Zum Beispiel, um den achten Treck zu wählen, drücken Siedie
Taste P/N, um AUTO, NTSC, PAL auszuwählen.
Taste mit der Zahl 8. Am Bildschirm des Fernsehgeräts erscheint die
Abbildung: AUSWAHL TRACK 8
Wahl der Betriebsstufe des Videoausgangs
Für die Wahl der Betriebsstufe des Videoausgangs drücken Sie die
Um den Treck mit der Nummer 10 und mehr zu wählen, drücken Sie die
Taste “VIDEO” (Video) einige Male. Wählen Sie den erforderlichen
Taste “10+”, und danach eine der Tasten mit den Zahlen von 0 bis 9.
Wert entsprechend dem Typ des Videoeingangs, an denen der Spieler
• Zum Beispiel, um den Treck Nummer 12 zu wählen, drücken Siedie
angeschlossen wurde.
Taste “10+”, und danach dieTaste “2”. Am Bildschirm des Fernsehgeräts
erscheint die Abbildung: AUSWAHLTRACK 12
MIX VIDE^ -►YUV(interlace^YUV(P-Scan)
Schnelles Spulen vorwärts/rückwärts
RG^ —»VGA
________I
Um das schnelle Spulen vorwärts anzuschalten, drücken Sie die
Taste^^ während der Wiedergabe der Disk. Das Spulen erfolgt in fünf
Einstellung des Lautstärkegrades
verschiedenen Geschwindigkeiten. Die Spulgeschwindigkeit können Sie
Um die Lautstärke zu steigern oder zu mindern drücken und halten Sie
durch die erneute Betätigung folgender Tasten ►► verändern:
die Taste “VOL+” oder “VOL-“. Der Grad der Lautstärke verändert sich
gleichzeitig für alle 6 Tonkanäle. Wenn Sie auf die Tasten + oder - für
^ ^ ^ ►► 2x U ►► 4x ^ 8x ^ ^ I
t32xl
die Einstellung der Lautstärke drücken, wird die Lautstärke nach dem
Ausschalten des Geräts gespeichert.
i Pla^
Drücken Siedie Taste “MUTE” (den Ton abschalten), um den
• Drücken Sie die Taste<^ , um schnelles Spulen rückwärts
Audioausgang abzuschalten. Am Bildschirm erscheint das
anzuschalten. Wählen Sie die Spulgeschwindigkeit mit Hilfe der
ZeichenMUTE.
wiederholten Betätigung der Taste<^
Um den Ton wieder anzuschalten, drücken Sie die Taste erneut, am
Bildschirm erscheint das Zeichen MUTE OFF.
Start/Pause
-J PlajJ-
Bei der Wiedergabe von DVD und CD.
Bei der ersten Betätigung der Tastew wird dieWiedergabe angehalten
Um zur normalen Wiedergabe zurück zu gelangen, drücken Sie die
(Pause).
Taste WI.
IQ

DEUTSCH
Verzögerte Wiedergabe
Wiedergabe von verschiedenen Blickwinkeln
Während der Wiedergabe DVD oder anderer Disken, drücken Sie die
Einige DVDs unterstützen die Funktion der Wiedergabe des inhaites
Taste “SLOW” (verzögerte Wiedergabe), um die Betriebsstufe der
von verschiedenen Biickwinkein (Aufnahmewinkein). Um zwischen
verzögerten Wiedergabe anzuschaiten. Diese Option ist nur beim Spuien
verschiedenen Winkein zu wechsein, drücken Sie die Taste “ANGLE”
vorwärts mögiich. Um die Geschwindigkeit der verzögerten Wiedergabe
(Winkei). Diese Funktion wird nur von denen Disken unterstützt, auf
zu ändern, drücken Sie die Taste “SLOW” einige Maie. Dabei verändert
denen die Biider in verschiedenen Aufnahmewinkein eingespeichert
sich die Geschwindigkeit:
sind.
SLOW
Bildschirmmenü
Mit Hüte des Biidschirmmenüs können Sie dieWiedergabezeit, die Zeit
bis zu Ende des Titeis, des Kapiteis, des Trecks oder der gesamten Disk
anschauen. Um das Biidschirmmenü hervorzurufen, drücken Siedie
Taste “OSD”.
Um zur normaien Wiedergabe zurück zu geiangen, drücken Sie die Taste
For DVD discs
For VCD/CD discs
Piaywi.
Title Elapsed
Single Elapsed
ItT 01/10 CH 10/40
I Track 02/18 01:20
Title Remain
Single Remain
Schrittweise Wiedergabe
|tT 01/10 CH 10/40
I Track 02/18 03:40
Drücken Sie die Taste “STEP” (Schritt) auf der Fernbedienung, um das
I Chapter Elapsed
Total Elapsed
I TT 01/10 CH 10/40
I Track 02/18 06:32
erstarrte Biid anzeigen zu iassen, drücken Sie dieTasteM4, um zum
Chapter Remain
Total Remain
nächsten Biid zu wechsein. Um zur normaien Wiedergabe zurück zu
I TT 01/10 CH 10/40
I Track 02/18 55:30
geiangen, drücken Sie die Taste Piay.
Wechsei zwischen den Trecks und den Kapitein
Während der Wiedergabe von DVD drücken SiedieTaste « , um zum
Titie eiapsed - abgeiaufene Wiedergabezeit des Titeis
vorherigen Kapitei zu wechsein. Bei der Wiedergabe von Disken anderen
Titie remain - gebiiebene Wiedergabezeit des Titeis
Typs drücken Sie dieTaste^l, um zum ietzten Treck zu geiangen.
Chapter eiapsed - abgeiaufene Wiedergabezeit des Kapiteis
Anmerkung: Diese Funktion hängt vom Programm und vom Typ der
Chapter remain - gebiiebene Wiedergabezeit des Kapiteis
Disk ab.
Dispiay off - Biidschirm abschaiten
Singie eiapsed - abgeiaufene Wiedergabezeit der Komposition
Wiederholung
Singie remain - gebiiebene Wiedergabezeit der Komposition
Während der Wiedergabe von DVD oder der Disk eines anderen Typs
Totai eiapsed - gesamte abgeiaufene Wiedergabezeit
können Sie die Wiederhoiung des gewünschten Titeis, Kapiteis Trecks
Totai remain - gesamte gebiiebeneWiedergabezeit
oder eines anderen Eiements des Diskinhaits anschaiten. Sie können
Bei der Wiedergabe von DVD Disken, wenn man die Option “dispiay off”
auch die Wiederhoiung der ganzen Disk oder eines Fragments der
wähit, wird keine info auf dem Biidschirm wiedergegeben.
Videoreihe (vom PunktA bis zum Punkt B) anschaiten.
Bei der Wiedergabe von VCD/CD Disken, wenn man dieTaste OSD
Bei der Wiedergabe von DVDs verändert sich dieWiederhoiung bei der
drückt, wird info auf dem Biidschirm wiedergegeben, bis Sie die
wiederhoiten Betätigung der Taste “REPEAT” (Wiederhoiung):
Wiedergabe nicht anhaiten.
Repeat the
(Repeat)
current Repeat the Repeat the
Wahl des Audiokanals
chapter current title whol^riisc
To cancel
Während derWiedergabevon DVD drücken SiedieTaste “AUDiO”, um
|chapter|—^ Titie|—>\ All|—► repeat
den erforderiichen Tonkanai zu wähien. Diese Funktion ist nur für die
function
Disken mögiich, die mehr ais einen Tonkanai unterstützen.
Repeat the current chapter - Wiederhoiung des aktueiien Kapiteis
Zum Beispiei, wenn der Fiim in Engiisch, Französisch und Spanisch
Repeat the current titir - Wiederhoiung des aktueiien Titeis
synchronisiert wurde, können Sie mit Hüte der Taste “AUDiO” die
Repeat the whoie disc - Wiederhoiung der gesamten Disk
Begieitung in jeder der angebotenen Sprachen wähien.
(AUDIO)
Wiederholung des markierten Fragments
Audio 1/3:AC-3 5.1CH English
Diese Funktion eriaubt, das markierte Fragment der Videodatei zu
--------
1
wiederhoien. Um den Anfang und da Ende des Fragments zu wähien,
Audio 2/3:AC-3 5.ICH French
drücken Sie die Taste “A-B”.
r
I Auido3/3:AC-3 5.1CH Spanish
Set point A Set point B
(A-B)
*' repeat function
Während der Wiedergabe von VCD drücken Sie die Taste “VOCAL”
Set point A - den Fragmentanfang wähien, PunktA
(Stimme), um zwischen dem Klingen der menschlichen Stimme und
Set point B - das Fragmentende wähien, Punkt B
der Musikbegleitung zu wechseln oder um die menschliche Stimme
To cancei repeat function - Wiederhoiungsfunktion verwerfen
abzuschalten.
(VOCAL) ^^ ^^
Anmerkung: Für die Disken anderen Typs (keine DVD) ist die Funktion
►[Mono Lefj
---
»|Mono Right|-
ebenso güitig.
Stereo \ Mix-Mono
Funktion der Bildvergrößerung
Die Funktion wird zur Vergrößerung oder Verkieinerung des Maßstabs
Bei der Wiedergabe eines Films, der in zwei Sprachen synchronisiert
des Videobiides am Biidschirm oder eines erstarrten Biides angewandt.
wurde, benutzen Sie die Taste “VOCAL”, um zwischen verschiedenen
• Es existieren sechs Grade der Vergrößerung, um den gewünschten
Sprachen zu wechseln.
Grad zu wähien, drücken Sie die Taste “ZOOM” (Vergrößern) einige
Maie:
Wahl der Untertitelsprache
(ZOOM) ^^ ^^ ^^
Während derWiedergabevon DVD, die Untertitel in verschiedenen
Sprachen unterstützt, benutzen Sie die Taste “SUB-T”, um erforderliche
Untertitel zu wählen.
Es existieren sechs Grade der Verkieinerung, um den gewünschten
Zum Beispiel, sei es, auf einer DVD sind Untertitel in drei Sprachen
Grad zu wähien, drücken Sie die Taste “ZOOM” (Verkieinerung)
eingespeichert.
einige Maie:
• Drücken Sie dieTaste “SUB-T”, um die Untertitel in erforderlicher
Stimme zu wählen, am Bildschirm des Fernsehgeräts erscheint die
gewählte Sprache:
• Um die Untertitel zu verwerfen, drücken die Taste SUB-T, “SUB-T”,
so lange, bis am Bildschirm die Anzeige SUBTITLE OFF erscheint.
Um zum normaien Biidmaßstab zurück zu geiangen, drücken Sie die
Taste “ZOOM” zum siebten Mai.
?n


