Vitek VT-1554: инструкция
Раздел: Бытовая, кухонная техника, электроника и оборудование
Тип: Пароварка
Инструкция к Пароварке Vitek VT-1554
ИНСТРУКЦИЯ ПО ЭКСПЛУАТАЦИИ
MANUAL INSTRUCTION
ПАРОВАРКА
FOOD STEAMER
МОДЕЛЬ VT$1554
1554.qxd 01.07.03 14:25 Page 2

ENGLISH
Гарантийный талон
IMPORTANT
For safety purpose you should read the instructions carefully before using
Сведения о покупке
the appliance for the first time.
Модель:
DO'S
Серийный №:
PC 155400000
1. Save these instructions.
Дата покупки:
2. Unplug from the outlet when not in use and before cleaning. Allow
Сведения о продавце
cooling before putting on or taking off parts and before cleaning or storing the
appliance.
Название и адрес продающей организации
3. Use the appliance on a level, stable work surface.
4. Close supervision is necessary when any appliance is used by or near children.
5. Extreme caution must be used when moving an appliance containing hot food, water or
other hot liquids. Avoid reaching over the steamer when operating.
Телефон:
6. To disconnect, press button "Start/Stop", then remove plug from wall outlet.
Подтверждаю получение исправного изделия, с условиями гарантии ознакомлен
7. Be sure handles are properly assembled to basket and locked in place.
8. Lift and open cover carefully to avoid scalding and allow water to drip into
Подпись покупателя
steamer.
М.П.
Внимание!
Гарантийный талон действителен только при наличии печати
DO NOT'S
продающей организации
1. Do not touch hot surfaces. Use handles or knobs. Use pot holders when
Модель: Серийный №:
PC 155400000
removing cover or handling hot containers to avoid steam burns.
Дата поступления в ремонт:
2. Do not reach into the appliance while steaming. If you need to check on the
Дата выполнения ремонта:
cooking progress or to stir, use a utensil with a long handle.
Вид ремонта:
3. To protect against a risk of electrical shock, do not immerse the appliance,
М.П.
cord or plug in water or other liquids.
Купон №3
4. Do not use outdoors.
5. Do not place on or near a hot gas or electric burner or in a microwave or
heated oven or directly under cabinet.
Модель: Серийный №:
PC 155400000
6. Do not operate the appliance with a damaged cord or plug or after the appli
Дата поступления в ремонт:
ance malfunctions or has been damaged in any manner. Return the appliance
Дата выполнения ремонта:
to an authorized service center for examination, repair or adjustment in order
Вид ремонта:
to avoid a hazard.
М.П.
7. Do not use appliance for other than intended household use.
Купон №2
8. Do not operate in a presence of explosive and/or flammable fumes.
9. The use of accessory attachments not recommended by the appliance man
Модель: Серийный №:
PC 155400000
ufacturer may cause injuries.
Дата поступления в ремонт:
10. Do not let cord hang over the edge of table or touch hot surface.
11. Do not attempt to open the cabinet or dismantle any parts from the appli
Дата выполнения ремонта:
ance; there is no serviceable part inside.
Вид ремонта:
М.П.
Купон №1
2
1554.qxd 01.07.03 14:25 Page 4
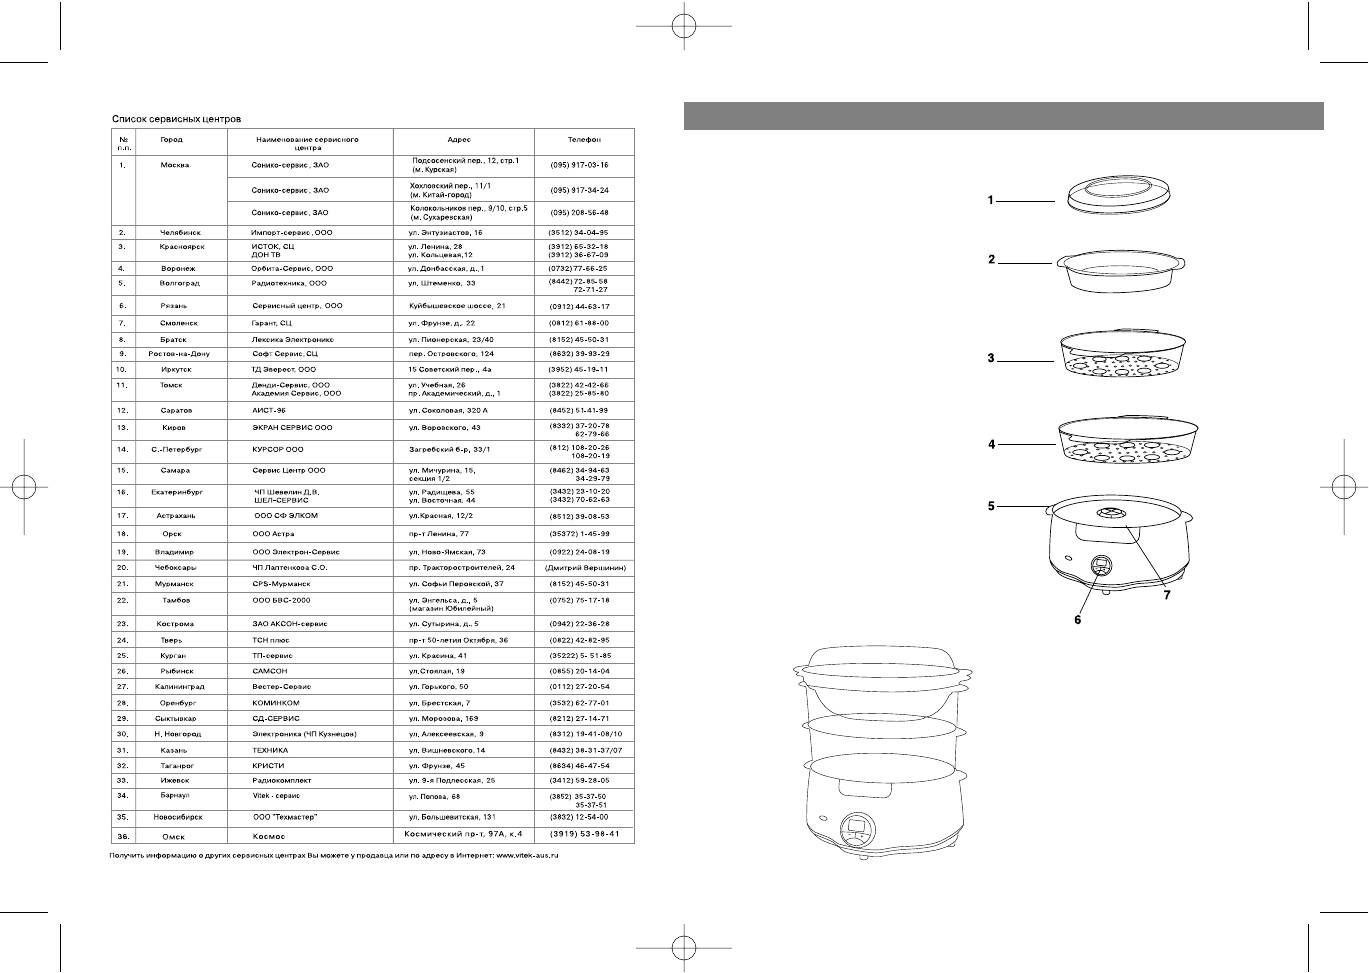
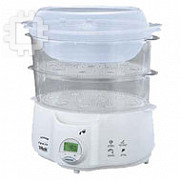
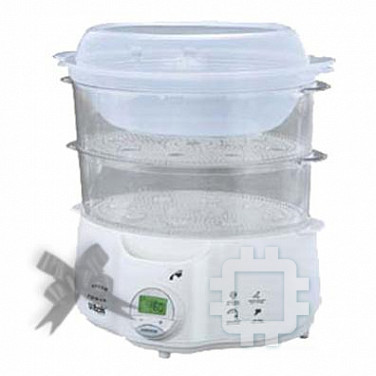
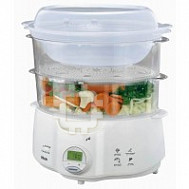
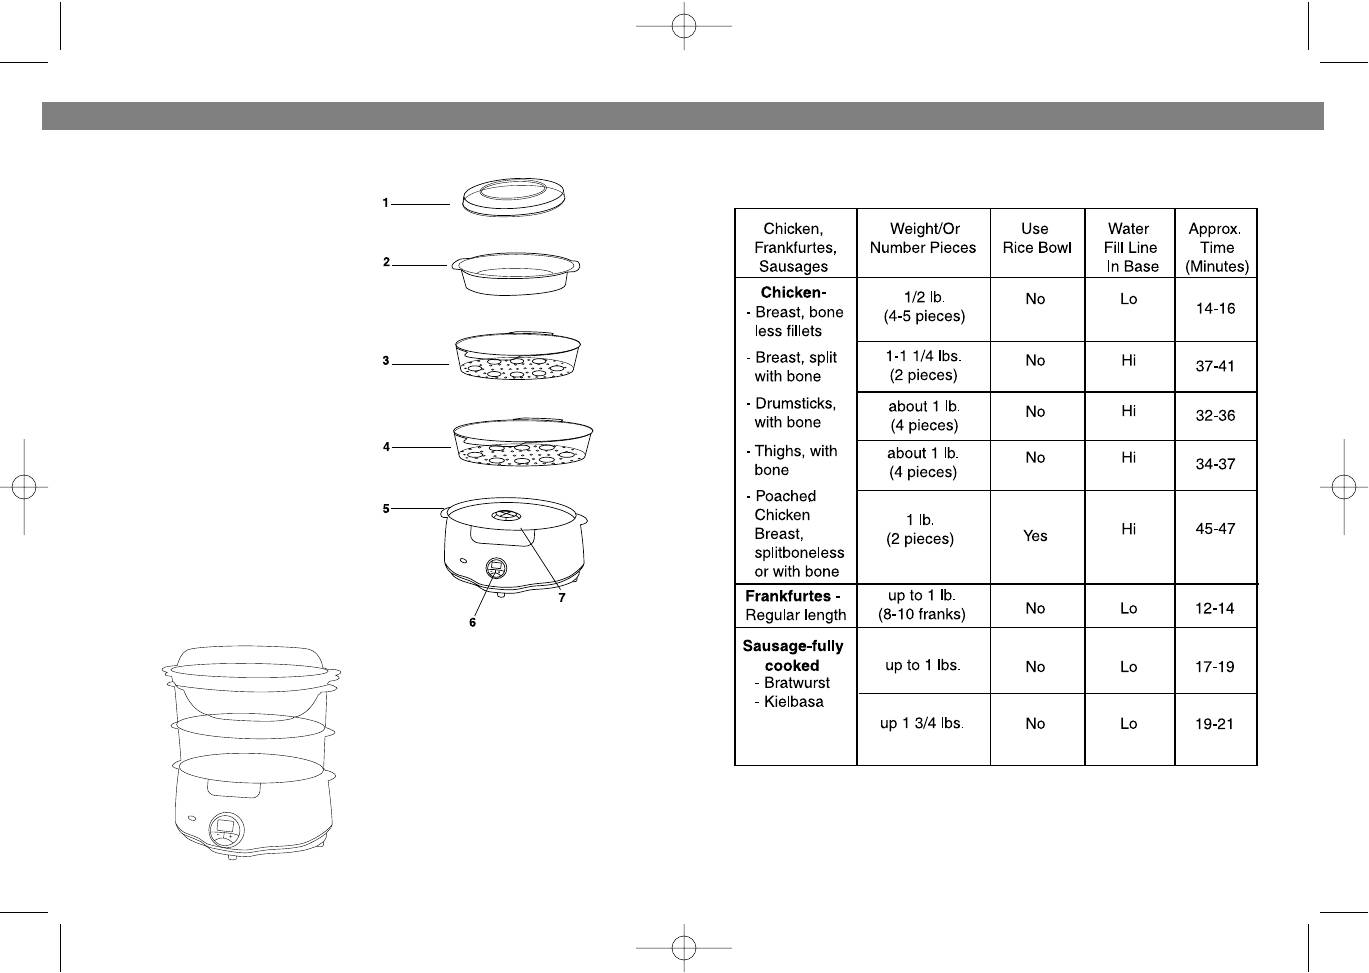
GET TO KNOW YOUR FOOD STEAMER
1. Lid with steam vents
2. Foodricesoup bowl
3. Top steaming bowl
4. Bottom steaming bowl
5. Drip tray (with flavor
scenter screen)
6. Backlit 90 min. large
LCD digital timer
8. Water basin
322
ENGLISH
1554.qxd 01.07.03 14:25 Page 6

ENGLISH РУССКИЙ
BEFORE THE FIRST USE
УСЛОВИЯ ГАРАНТИЙНОГО ОБСЛУЖИВАНИЯ
1. Remove the appliance and all accessories from the packaging.
2. Peel off any adhesive labels, if any.
Уважаемый покупатель!
3. Wash the lids, rice bowl, steaming bowls, steam diffuser and flavor
Фирма VITEK выражает благодарность за Ваш выбор и гарантирует
высокое качество и безупречное функционирование приобретенного Вами
scenter screen and drip tray in warm, soapy water before use.
изделия при соблюдении правил его эксплуатации.
4. Rinse and dry thoroughly.
Срок гарантии на все изделия - 12 месяцев со дня покупки. Данным
5. Wipe the inside of the water basin with a damp cloth.
гарантийным талоном VITEK подтверждает исправность данного изделия и
берет на себя обязательство по бесплатному устранению всех
HOW TO USE
неисправностей, возникших по вине производителя.
1. Place the appliance on a stable, level surface, away from any objects,
Гарантийный ремонт может быть произведен в авторизированном
which could be damaged by steam. Such as walls and overhanging cup
сервис-центре на территории России.
boards.
2. Fill the water basin with cold tap water to the appropriate fill line (food
Условия гарантии:
steamer has a large 1000 ml. water tank with filter).
1. Настоящая гарантия имеет силу при соблюдении следующих условий:
Warning: Do not add any salt, pepper, seasonings, herbs, wine, stock or
- правильное и четкое заполнение гарантийного талона с указанием
any liquid other than tap water to the water basin.
наименования модели, ее серийного номера, даты продажи и печати
3. Place the Drip tray on the base and be sure it sits flat.
фирмы-продавца в гарантийном талоне и отрывных купонах;
4. Place herbs or spices in the Flavor Scenter Screen for add flavor. You
- наличие оригинала квитанции (чека), содержащего дату покупки.
may use Drip trap without adding herbs to the Flavor scenter if you prefer.
2. VITEK оставляет за собой право на отказ в гарантийном обслуживании в
случае непредоставления вышеуказанных документов, или если
Flavor scenter tips:
информация в них будет неполной, неразборчивой, противоречивой.
3. Гарантия не включает в себя периодическое обслуживание, установку,
Add fresh or dried herbs to the Flavor Scenter Screen to spice up the
настройку изделия на дому у владельца.
healthy foods. Thyme, cilantro, basil, dill, curry and tarragon are just a few
4. Не подлежат гарантийному ремонту изделия с дефектами, возникшими
herbs and spice along with garlic, caraway or horseradish that enhance
вследствие:
flavor with no need to add salt. When using the Flavor Scenter Screen.
- механических повреждений;
a. Try the suggested flavoring listed in the steaming Guide or use your
- несоблюдения условий эксплуатации или ошибочных действий владельца;
favorite herbs to create new combinations.
- неправильной установки, транспортировки;
b. Flavor suggestions are for 1/2 to 3 teaspoons of dried herbs or spices.
- стихийных бедствий (молния, пожар, наводнение и т. п.), а также других
If using fresh herbs, chop leaves and triple the amount.
причин, находящихся вне контроля продавца и изготовителя;
c. To prevent small herbs or ground spices from falling through the Flavor
- попадания внутрь изделия посторонних предметов, жидкостей,
Scenter Screen, rinse or wet the screen before adding seasoning.
насекомых;
5. Depending on version, your food steamer may be fitted with 1, 2 or 3 bowls.
- ремонта или внесения конструктивных изменений неуполномоченными
6. Depending on user's choice, steaming bowls can be assembled in sev
лицами;
eral different positions.
- использования аппаратуры в профессиональных целях;
7. Put the food in the bowls. We recommend that you put largest pieces of
- отклонений от Государственных Технических Стандартов питающих,
food, requiring a longer cooking time, in the bottom bowl .
телекоммуникационных и кабельных сетей;
8. Put the bowl on the base and lid on top.
- при выходе из строя деталей, обладающих ограниченным сроком службы.
9. Plug into wall outlet, set timer for the recommended time, pressing
5. Настоящая гарантия не ущемляет законных прав потребителя,
knob “” and “+”, steaming will begin within 25 seconds after pressing
предоставленных ему действующим законодательством.
knob “Start/Stop”.
4
21
1554.qxd 01.07.03 14:25 Page 8

ENGLISHРУССКИЙ
РЕКОМЕНДАЦИИ ПО ПРИГОТОВЛЕНИЮ РИСА
NOTE: The timer operates regardless of whether the unit is plugged into
the electrical outlet or not.
WARNING: Do not touch the base, steaming bowls, or lid during use, as
they get very hot.
10. When steaming is complete, the timer will give a ring and automati
cally shut off the steaming function. The food steamer has 20 minute
keep warm.
Warning: To prevent burns, use a mitt or potholder when removing the lid or steam
ing bowls, as hot steam will escape. Remove the lid slowly with the inside of the lid
СПЕЦИФИКАЦИЯ
pointing away from you and let steam escape gradually. Hold the lid over unit to allow
Питание 230 В ~ 50 Гц ~ 825 Вт
the condensation to drain into the steamer.
Do not reach into the unit while steaming. If you need to check on the
СРОК СЛУЖБЫ ПАРОВАРКИ НЕ МЕНЕЕ 3Х ЛЕТ
cooking progress or to stir, use a utensil with a long handle.
11. In order to prevent food from being overcooked, remove the steaming
bowl immediately using a potholder, and place it on a plate or on the
reversed lid. If you use the rice container, remove this carefully, holding it
by the sides and if necessary use a kitchen utensil with a long handle.
12. When you have finished using the appliance, unplug from the wall
socket and leave to cool completely before removing the drip tray and
storing.
WARNING:
1. Use caution when removing the drip tray, while other parts of the unit
may be cool, the water in the water basin and the drip may still be very
hot.
2. Do not operate the appliance without steaming bowl and lid in place.
COOKING EGGS
1. Set up the food steamer as described in "How to use".
2. Place the eggs into the steaming bowl, which integrated with eggs
holder.
3. Place the lid on top.
4. Set the timer for the desired or recommended cooking time.
COOKING RICE
1. Set up the food steamer as describes in "How to use".
2. Place a steaming bowl on the base.
3. Place 1 cup of rice and 1,5 cup of water in the rice container
20
5
1554.qxd 01.07.03 14:25 Page 10
ENGLISH
РУССКИЙ
(Maximum 250grams of rice).
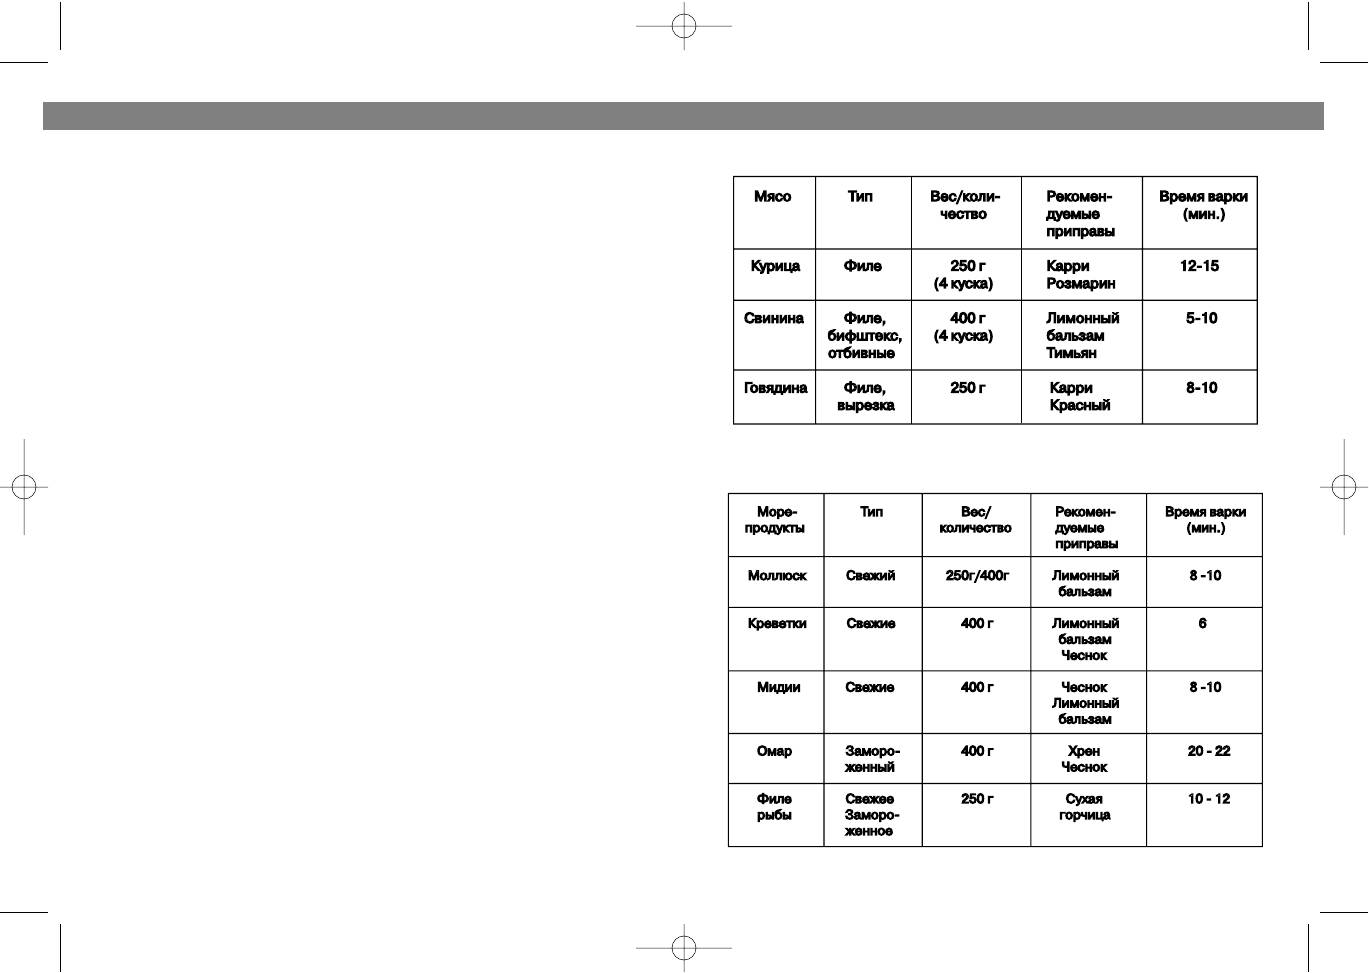
РЕКОМЕНДАЦИИ ПО ПРИГОТОВЛЕНИЮ МЯСА
4. Cover the steaming bowl with lid.
5. Set the timer for the desired or recommended cooking time.
REFILL WATER DURING COOKING
For recipes with long cooking time:
1. Check the water level;
2. Check the timer;
3. Refill water through the water inlet opening;
4. Set the timer for the desired cooking time.
USEFUL HINTS AND TIPS
1. For high altitude cooking, steaming times may need to be increased.
Exact times vary by location.
2. Steaming times stated in the charts are only a guide. Times may very
depending on the size of food pieces, spacing of the food in the steaming
bowl. Freshness of food, and personal preference. As you become famil
iar with the steamer, adjust cooking times.
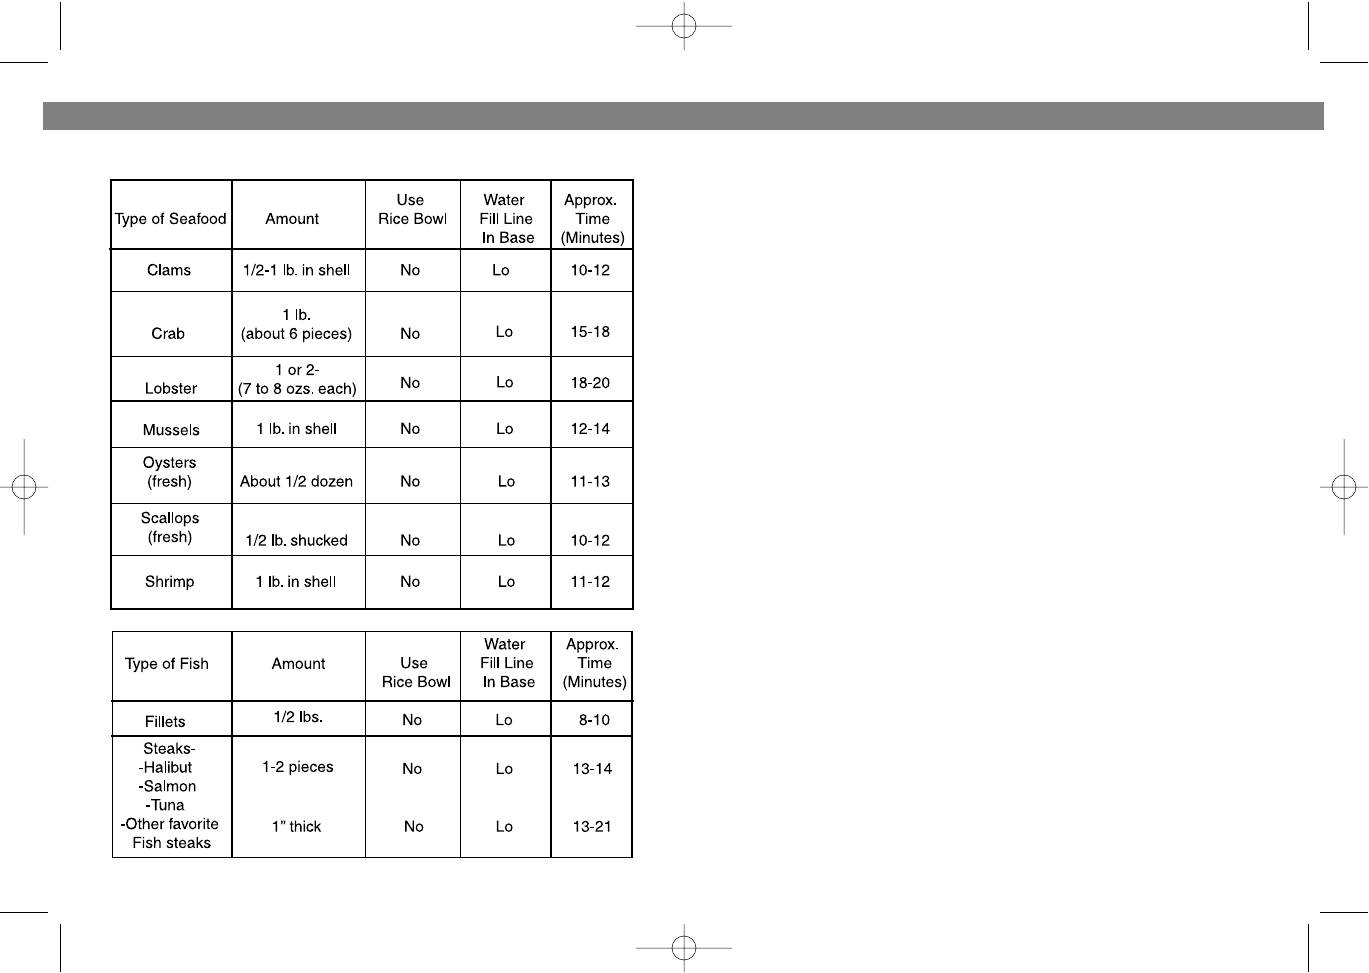
РЕКОМЕНДАЦИИ ПО ПРИГОТОВЛЕНИЮ МОРЕПРОДУКТОВ
3. A single layer of food steams faster than several layers.
Therefore, the cooking time for a large quantity of food will be increased.
4. For best results, be sure pieces of food are similar in size. If pieces vary
in size and layering is required, place smaller pieces on top.
5. Do not crowd food in the steaming bowl or food container.
Arrange the food with spaces between pieces to allow for maximum
steam flow.
6. When steaming large quantities of food, remove lid about halfway
through the steaming time and stir using a long handled utensil, protect
ing your hands from the steam with oven mitts.
7. Do not add salt and seasoning to the steaming bowl until after cooking.
This is to avoid possible damage to the heating element located in the
water basin.
8. Save liquid in drip tray to use in soups, sauces, and gravies.
9. Never steam meat, poultry or seafood from frozen. Always thaw com
pletely first .
10. All the times stated in the 'steaming Guide' are based on the use of
cold water in the water basin.
11. The food container is an ideal container for steaming other foods such
as fruit, vegetables, puddings, quick snacks, etc.
12. Using three steaming bowls:
a. Always place the largest pieces of food with the longest cooking time in
6
19
1554.qxd 01.07.03 14:25 Page 12
РУССКИЙ
ENGLISH
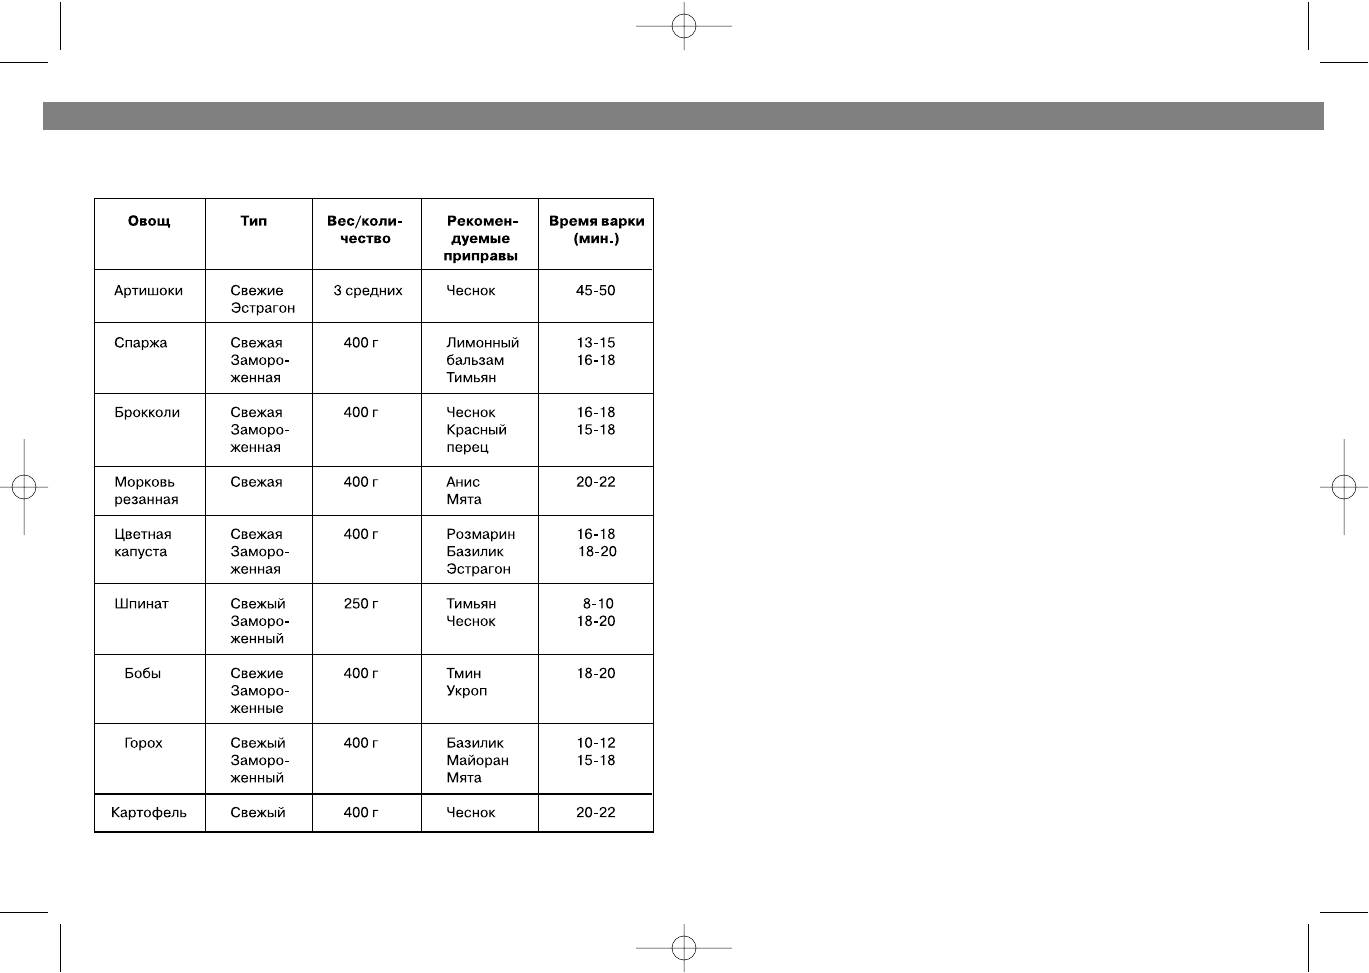
РЕКОМЕНДАЦИИ ПО ПРИГОТОВЛЕНИЮ ОВОЩЕЙ
the lower bowl.
b. You may place a different food in the upper and lower bowls, but as
condensation will drip from the upper bowl be sure the flavors compliment
each other.
c. If steaming meat or poultry and vegetables, always place the meat or
poultry in the lower bowl so that juices from raw or partially cooked meat
cannot drip onto other foods.
d. Steaming times for food in the upper bowl are usually slightly longer so
allow an extra 5 minutes.
e. If foods with different cooking times are being steamed, start the food
with the longest cooking time in the lower bowl. Then when the remaining
time reaches that of food with the shortest cooking time, carefully remove
the lid with oven mitts and place the upper bowl on top. Cover with lid and
continue steaming.
CARE AND MAINTENANCE
CLEANING
1. Never immerse the base, cord or plug in water.
2. Unplug at the wall socket and leave the appliance to cool completely
before cleaning.
3. Do not clean any part of the unit with abrasive cleaners e.g. scouring
powders, steel wool or bleach.
4. Do not clean clear plastic bowls and baskets with abrasive side of a
sponge or pad.
5. We recommend washing the lid, rice container, baskets in hot water
and dishwashing liquid. Rinse and dry thoroughly.
6. Alternatively, all those parts can be cleaned in a dishwasher in the
upper basket on the light cycle. However, continual cleaning in a dish
washer may result in a slight loss of exterior gloss and dulling.
7. Empty the water basin and change the water after each use.
8. Do not immerse the base in water. Fill the water basin with warm, soapy
water and wipe with a cloth. Rinse thoroughly.
9. Wipe the base with a damp cloth.
10. Clean the unit on a regular basis.
DESCALING THE WATER BASIN
After 23 months of consistent usage, chemical deposits may build up in
the water basin and heating element. This is a normal process and the
buildup will depend on the degree of water hardness in your area. It is
essential the appliance is descaled regularly to maintain steam production
18
7
1554.qxd 01.07.03 14:25 Page 14

ENGLISH РУССКИЙ
and extend the life of the unit.
• Если вам нужно приготовить продукты, требующие разного времени
1. Fill the water basin to the MAX level with white vinegar.
приготовления, начните с продуктов более длительного
приготовления (в нижней емкости), а затем установите верхнюю
IMPORTANT: Do not use any other chemical or commercial descaler.
емкость с продуктами быстрого приготовления.
2. Plug in a wall socket. Drip tray, steaming bowl and lid should be in place
during this procedure.
ЧИСТКА И УХОД
3. Set timer for 25 minutes to begin steaming.
Предостережение: перед чисткой дайте пароварке остыть. Отключите
прибор от сети.
WARNING: If vinegar begins to boil over the edge of base, unplug the
Емкости и крышка
unit and switch the timer off. Reduce the quantity of vinegar slightly.
• Погрузите емкости, крышку в теплую мыльную воду.
4. When the timer rings, unplug from the wall socket and allow cooling
completely before pouring out vinegar.
• Тщательно промойте и просушите все части.
5. Rinse the water basin several times with cold water.
Резервуар для воды
• Налейте горячую мыльную воду в резервуар для воды. Не используйте
STEAMING CHART AND RECIPES
абразивы и металлические щетки для чистки.
1. Steaming times stated in the guide and recipes are only a guide. Time
• Промойте в чистой воде, чтобы смыть остатки чистящего средства.
may vary depending on the size of the food piece, spacing of the food in
Уход за нагревательным элементом
the steaming bowl, freshness of food and personal preference. As you
• Сильная накипь удаляется при нагревании уксуса в резервуаре для
become familiar with the steamer, adjust cooking time.
воды. Не используйте хозяйственный отбеливатель!
2. Steaming times are for the quantity stated in the guide or recipe. For
• Налейте раствор уксуса в резервуар до верхней отметки.
larger or smaller quantities adjust the time accordingly.
• Включите в сеть и установите таймер на 20 мин.
3. The steaming times are all based on the food cooked in the lower bowl,
• Следите, чтобы жидкость не кипела.
unless specifically stated otherwise. Food cooked in the upper bowl may
• После звонка отключите прибор, вылейте раствор и при помощи
take slightly longer to cook.
мягкой щетки очистите нагревательный элемент.
4. All times stated in the guide and recipes are based on the use of cold water.
• Промойте внутреннюю поверхность чистой водой.
Наружняя поверхность
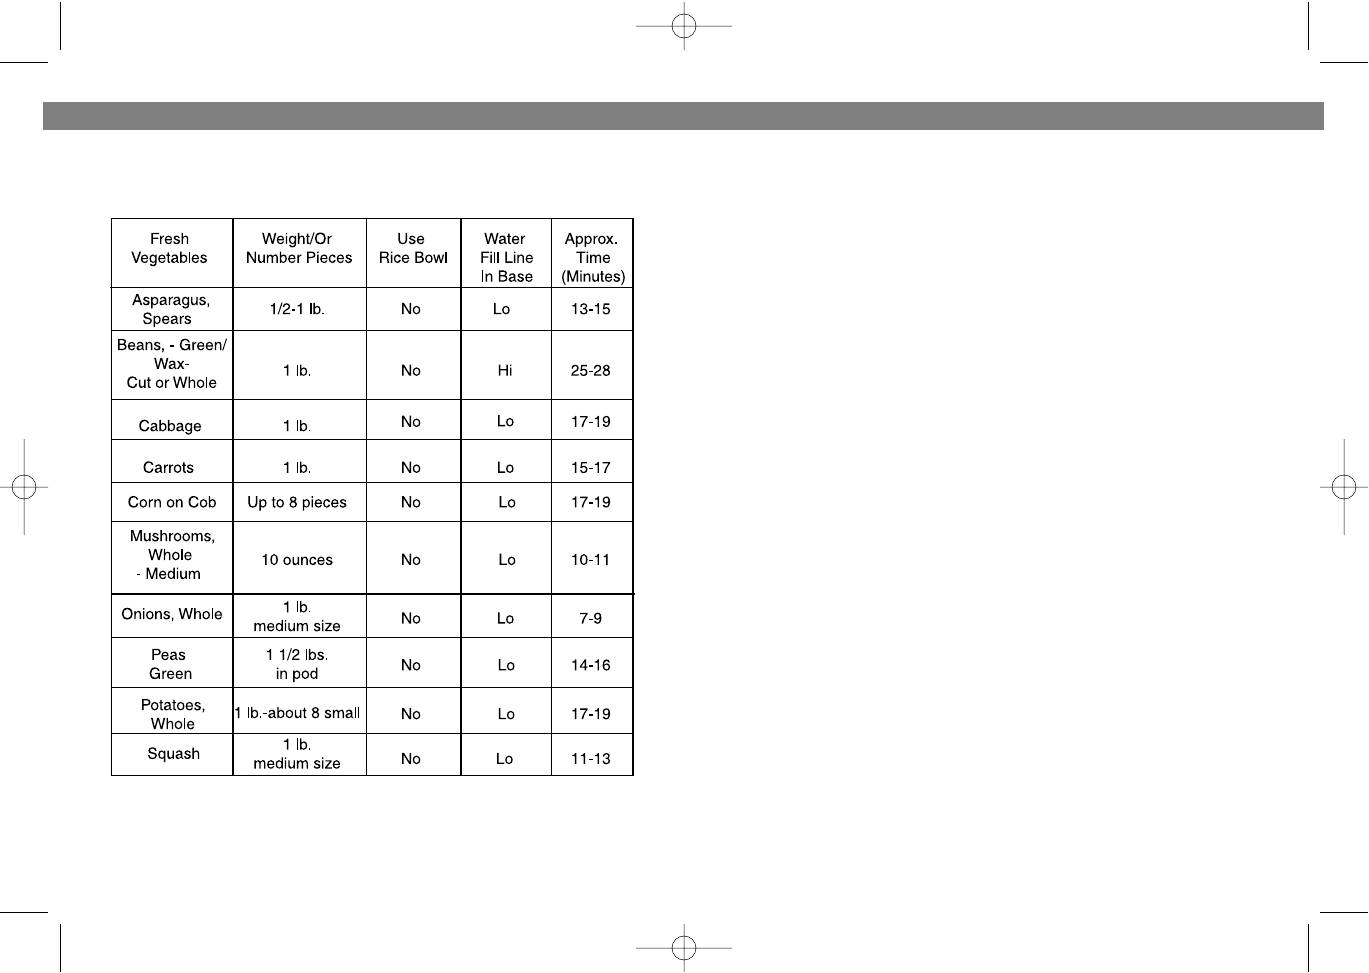
VEGETABLES (SUPPLEMENT 1)
1. Cut off thick stems from broccoli, cauliflower and cabbage.
• Протрите наружнюю поверхность и шнур влажной тканью и
2. Steam leafy, green vegetables for the shortest possible time as they
просушите. Не погружайте основу в жидкость и не помещайте ее в
loose color easily.
посудомоечную машину.
3. Salt and season vegetables after steaming for best results.
Помните: часть продуктов готовится менее, чем за 90 минут. Если
4. Frozen vegetables should not be thawed before steaming.
требуется больше времени, не забудьте добавить воду в емкость.
MEAT AND POULTRY (SUPPLEMENT 2)
ПРИГОТОВЛЕНИЕ ПОД ФОЛЬГОЙ
1. Steaming has the advantage of allowing all the fat to drip away during
Для приготовления некоторых блюд необходимо использование
cooking. Due to the gentle heat only choose tender, lean cuts of meat and
алюминиевой фольги в качестве крышки. Накройте емкость фольгой,
trim off all fat. Meat suitable for grilling is ideal for steaming.
оставив немного места между фольгой и стенками емкости.
2. Serve steamed meat and poultry with flavorsome sauces or marinade
before steaming.
3. Thoroughly cook all foods before serving. Pierce with a knife or skewer
8
17
1554.qxd 01.07.03 14:25 Page 16

РУССКИЙ
ENGLISH
2. Поместите яйца в емкость.
to check that the center is cooked and juices run clear.
3.
Установите таймер на нужное время.
4. Sausage must be completely cooked before steaming.
5. Use fresh herbs while steaming to add flavor.
ПРИГОТОВЛЕНИЕ РИСА
1. Наполните резервуар для воды чистой холодной водой до линии
FISH AND SEAFOOD (SUPPLEMENT 3)
наполнения.
1. Fish is cooked when it is opaque flakes easily with a fork.
2. Установите паровую емкость на основу.
2. Frozen fish may be steamed without thawing if separated before
steaming and the cooking time is extended.
3. Поместите рис в емкость и добавьте в нее воды.
3. Add lemon wedges and herbs while steaming to improve flavor.
4. Установите емкость с рисом и водой вовнутрь паровой емкости.
5. Закройте емкость крышкой. Включите прибор.
RICE
6. Установите таймер на нужное время.
Use the rice bowl and add the required quantity of water together with
7. Когда приготовление закончится, прибор автоматически отключится.
rice.
Осторожно снимите емкость с основы и отключите пароварку от сети.
Емкость для риса также может быть использована для
SPECIFICATIONS
приготовления овощей с соусом, дичи, рыбы.
Power Requirement 230 V ~ 50 Hz ~ 825 W
ПОЛЕЗНЫЕ СОВЕТЫ
SERVICE LIFE OF THE FOOD STEAMER NOT LESS THAN 3 YEARS
• Время приготовления может варьироваться в зависимости от
размера кусочков продуктов, свободного места в паровой емкости,
свежести продуктов и т.д.
• Время приготовления большого количества продуктов необходимо
увеличивать.
• Для достижения наилучшего результата нарезайте продукты на
одинаковые кусочки. Если кусочки разные по размеру, поместите
более мелкие сверху.
• По прошествии половины времени, установленного на таймере, вы
можете сдвинуть крышку и перемешивать еду при помощи кухонного
приспособления с длинной ручкой.
• Не закладывайте в пароварку замороженные мясо, дичь,
морепродукты. Сначала их разморозьте.
ИСПОЛЬЗОВАНИЕ ДВУХ ПАРОВЫХ ЕМКОСТЕЙ
• Самые большие куски продуктов закладывайте в нижнюю емкость.
• Если вы готовите одновременно мясо или дичь с овощами, кладите
мясо или дичь вниз, а овощи в верхнюю емкость, чтобы сок из мяса
не попал на продукты.
• Время приготовления продуктов в верхней емкости увеличивается на 5 минут.
16
9
1554.qxd 01.07.03 14:25 Page 18
ENGLISH РУССКИЙ
SUPPLEMENT 1
ПРИГОТОВЛЕНИЕ
Чтобы избежать ожогов, пользуйтесь варежкой или прихваткой, снимая
крышку пароварки. Поворачивайте внутреннюю часть крышки от себя так,
чтобы пар выходил постепенно. Подержите крышку недолго над
пароваркой, пока не стечет конденсат.
В процессе приготовления не пытайтесь открыть пароварку.
1. Наполните резервуар для воды чистой холодной водой до линии
наполнения. Не разрешается использовать вино, бульон или другие
жидкости.
2. Держа поддон для стекающей жидкости за ручки, установите его на
основу.
3. Поместите продукты в паровую емкость. В комплект входят 2 паровые
емкости. Вы можете готовить в одной емкости, а можете использовать
2 одновременно, установив их друг на друга. Это зависит от
количества приготавливаемой пищи.
Для большого количества пищи установите более долгий режим приготовления.
Не добавляйте специи и травы, пока не закончится приготовление.
4. Закройте паровую емкость крышкой.
5. Укрепите емкости на основе.
6. Подключите прибор к сети.
7. Установите таймер на желаемое время с помощью кнопок “” и “+”.
Пароварка начнет работать в течение 25 секунд после того, как нажать на
кнопку “Start/Stop”. Когда время истечет, прозвенит сигнал, и прибор
будет поддерживать температуру еще в течение 20 минут, после чего
пароварка автоматически отключится.
8. Отключите прибор от сети и снимите емкости с основы.
9. Не убирайте поддон для стекающей жидкости, пока он полностью не
остынет.
УРОВЕНЬ ВОДЫ
На стенке внутри основы указаны два уровня воды. Верхний уровень
“MAX” используется для длительного приготовления, низкий “MIN” для
более короткого периода готовки.
ПРИГОТОВЛЕНИЕ ЯИЦ
1.
Наполните резервуар для воды чистой холодной водой до линии
наполнения.
10
15
1554.qxd 01.07.03 14:25 Page 20
ENGLISHРУССКИЙ
ОПИСАНИЕ ЧАСТЕЙ ПАРОВАРКИ
SUPPLEMENT 2
1. Крышка
2. Емкость для риса
3. Верхняя емкость
4. Нижняя емкость
5. Основа
6. Жидкокристаллический
цифровой таймер на
90 мин с подсветкой
7. Резервуар для воды на
1000 мл. с фильтром
14
11
1554.qxd 01.07.03 14:25 Page 22
ENGLISH
РУССКИЙ
SUPPLEMENT 3
ВАЖНЫЕ ПРЕДОСТЕРЕЖЕНИЯ
•
Не касайтесь горячих поверхностей пароварки. Используйте
прихватки для того, чтобы снять крышку или горячие емкости.
•
Не погружайте шнур, вилку или основу с мотором в воду.
• Не оставляйте включенный прибор вблизи детей без присмотра.
• Если вы не пользуетесь прибором длительное время, отключайте его
от сети.
• Отключайте прибор перед чисткой.
• Не используйте прибор с поврежденным электрическим шнуром, а
также с любыми другими неисправностями. Для предотвращения по
ражения электрическим током не разбирайте прибор. При неисправ
ности отнесите его квалифицированным специалистам для ремонта.
• Используйте только те приспособления, которые входят в комплект.
• Не используйте прибор вне помещения.
• Следите, чтобы шнур не касался горячих поверхностей.
• Не ставьте прибор возле газовой и электроплиты.
• Соблюдайте осторожность, когда вы переносите пароварку,
содержащую горячее блюдо.
• Открывайте крышку осторожно, чтобы не обжечься паром.
• Не ставьте пароварку под какимилибо предметами, так как во время
ее работы выделяется большое количество пара.
• После отключения пароварки в резервуаре остается немного воды,
это нормально.
• Не используйте части пароварки в микроволновой печи и не ставьте
их на горячую поверхность.
• Перед включением пароварки в сеть наполните ее водой. В
противном случае вы можете ее испортить.
• Строго следуйте всем инструкциям.
12
13
1554.qxd 01.07.03 14:25 Page 24


