Vitek VT-3522: инструкция
Раздел: Бытовая, кухонная техника, электроника и оборудование
Тип: Часы


Характеристики, спецификации
Инструкция к Часам Vitek VT-3522
Оглавление
3522.qxd 16.03.05 14:23 Page 2
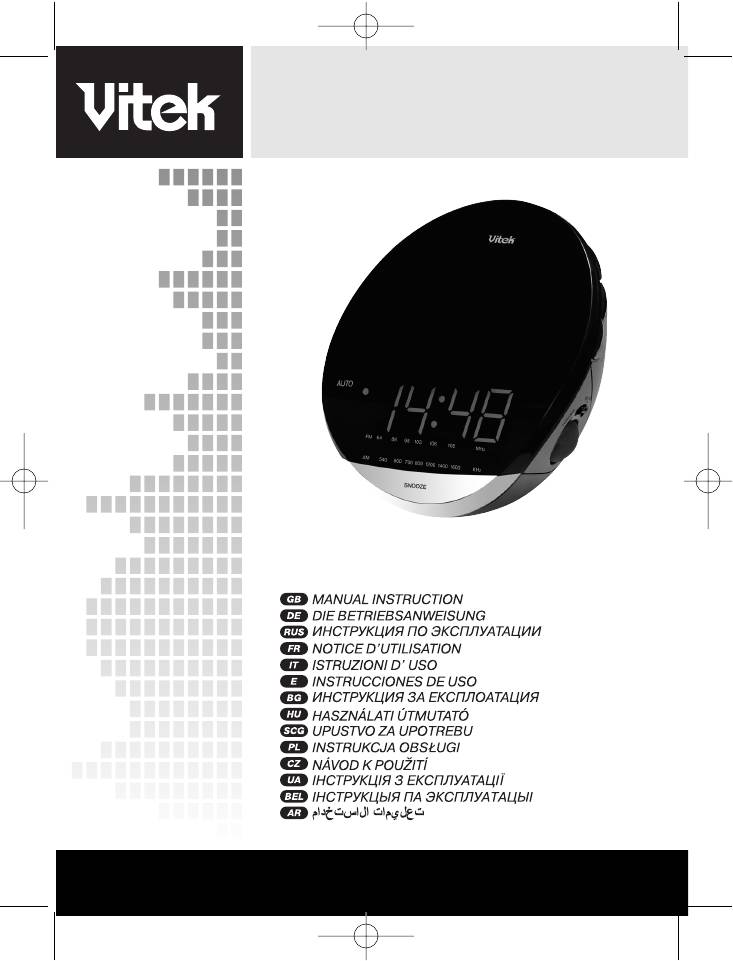
CLOCK RADIO WITH ALARM
MODEL VT-3522
MANUAL INSTRUCTION
3
6
10
14
18
22
25
29
32
35
38
41
45
49
www.vitek-aus.com
3522.qxd 16.03.05 14:23 Page 3

3522.qxd 16.03.05 14:23 Page 2

ENGLISH
CLOCK RADIO WITH ALARM
Do not obstruct the natural
MODEL VT-3522
ventilation of the device; do
not place it in closed book-
DESCRIPTION
shelves or on shelves were
1. ON/ OFF/AUTO SELECTOR
there is not good ventilation.
2. HOUR SET BUTTON
Do not place sources of open
3. MINUTE SET BUTTON
flames, like candles, on the
4. ALARM SET BUTTON
device.
5. ALARM OFF BUTTON (AL
In case of malfunction, con-
OFF)
tact an authorized service
6. TIME SET BUTTON
center.
7. SLEEP MODE BUTTON
8. LED DISPLAY
CLOCK
9. SNOOZE TIMER BUTTON
Open the battery compart-
10.BAND SELECTOR (FM/AM)
ment (13) and install one 6F-
11.TUNING DIAL
22 type 9V battery (not
12.BUZZER/VOLUME CONTROL
included). The battery is used
DIAL
to save information regarding
13.BACKUP BATTERY COM-
the current time and alarm
PARTMENT
settings in case of AC power
interruption.
AC POWER SUPPLY
Set the Auto/Off/On (1)
Before connecting, make
selector to the Off position
sure that the electrical supply
and plug the power plug into
voltage is compatible with the
the outlet; the display will
devices voltage require-
start to blink.
ments.
To set the current time, press
and hold the TIME (6) button,
CAUTION
then use the HOUR (3) and
Remove the AC plug from the
MIN (2) buttons to set the
outlet if the device will not be
current time.
used for a long period of
time.
SETTING THE ALARM TIME
Do not attempt to repair this
Press and hold the ALARM
device yourself; there are no
(4) button; use the HOUR (2)
user-serviceable parts inside.
and MIN (3) buttons to set
Do not allow water to splash
the desired alarm time.
or spill onto the device in
order to avoid fire and electric
shock.
3
3522.qxd 16.03.05 14:23 Page 3

ENGLISH
WAKING UP TO THE RADIO
SNOOZE FUNCTION
Set the alarm time as
You can temporarily silence
instructed above.
the alarm (buzzer or radio) by
Set the Auto/Off/On (1)
pressing the Snooze (9) but-
selector to the On position.
ton; the alarm will automati-
Set the band selector to the
cally activate again in 9 min-
desired band - AM/FM, use
utes.
the TUNING dial to tune to
the desired radio station and
SLEEP TIMER
make sure that the volume is
Set the Auto/Off/On (1)
set properly.
selector to the Auto position.
Set the Auto/Off/On (1)
Press the SLEEP (7) button;
selector to Auto. At the set
the radio will activate and the
alarm time the radio will auto-
timer will begin counting
matically activate.
down from 59 minutes until
radio shut-off.
WAKING UP TO BUZZER
To change the shut-off time,
ALARM
press and hold the SLEEP (7)
Set the alarm time as indicat-
button and then use the MIN
ed above.
(3) button to set the desired
Rotate the VOLUME (12) dial
shut-off time from 59 to 1
counter-clockwise until it
min.
clicks in order to activate the
Press the Snooze (4) button
BUZZ alarm mode.
to deactivate this function.
Set the Auto/Off/On (1)
selector to Auto. The buzzer
RADIO
alarm will activate at the set
AM band reception uses an
alarm time.
internal antenna; when tuning
a radio station, turn the radio
TURNING OFF THE ALARM
itself in order to achieve opti-
To turn off the alarm, press
mal reception.
the AL OFF (5) button once;
For best reception in the FM
the alarm will turn off and the
band, make sure that the FM
set alarm time is saved for
antenna wire is fully extend-
the next day.
ed.
To turn the alarm off com-
Set the ON/OFF/AUTO (1)
pletely, set the Auto/Off/On
button to the ON position.
(1) selector to the Off posi-
Set the desired volume using
tion.
the VOLUME (12) dial.
4
3522.qxd 16.03.05 14:23 Page 4
ENGLISH
Set the band selector (10) to
receipt must be produced when
the desired band (FM/AM).
making any claim under the
Rotate the TUNING (11) dial
terms of this guarantee.
to tune to the desired radio
station.
This product conforms
Set the Auto/Off/On (1) to the
to the EMC-
Off position to turn the radio
Requirements as laid
off. If the radio does not turn
down by the Council
off, then its possible the
Directive 89/336/EEC
Snooze mode is activate; in
and to the Low Voltage
this case, press the Snooze
Regulation (23/73 EEC)
(9) button.
TECHNICAL CHARACTERIS-
TICS
Frequency band
AM 540 1600 kHz
FM 88 108 MHz
Backup power
9 V 6F-22 battery
(not included)
Power requirements
AC 230V ~ 50 Hz
The manufacturer reserves
the right to make changes to
the technical characteristics
of this device without prior
notice.
Service life no less than five
years.
GUARANTEE
Details regarding guarantee con-
ditions can be obtained from the
dealer from whom the appliance
was purchased. The bill of sale or
5
3522.qxd 16.03.05 14:23 Page 5

DEUTSCH
UHRENRADIO / WECKER
Einschalten davon, dass die
MODELL VT-3522
Netzstromspannung der
Betriebsspannung des
BESCHREIBUNG
Gerätes entspricht.
1. UMSCHALTER
AN/AUS/AUTO (ON/
VORSICHT
OFF/AUTO)
Nehmen Sie die Steckgabel
2. TASTE FÜR STUNDENEIN-
aus der Steckdose, wenn Sie
STELLUNG (HOUR)
das Gerät für längere Zeit
3. TASTE FÜR MINUTENEIN-
nicht benutzen.
STELLUNG (MIN)
Nehmen Sie das Gerät nicht
4. EINSTELLEN DER ALAR-
selbstständig auseinander, im
MZEIT DES WECKERS
Inneren befinden sich keine
(ALARM)
Teile, die vom Benutzer bedi-
5. TASTE ZUM ABSTELLEN DES
ent werden müssten.
WECKERS (AL OFF)
Um Feuerentfachung und
6. TASTE ZUM EINSTELLEN
Stromschlaggefahr
DER UHRZEIT (TIME)
vorzubeugen, lassen Sie kein
7. EINSTELLEN DES SLEEP-
Wasser in das Innere des
MODUS (SLEEP)
Gehäuses gelangen.
8. LED-DISPLAY
Es ist verboten die natür-
9. EINSCHALTEN DES
lichen Lüftungsbedingungen
SCHLUMMERMODUS
des Gerätes zu beeinträchti-
/ABSTELLEN DES TIMERS
gen, stellen Sie es nicht in
(SNOOZE)
geschlossenen
10.BANDUMSCHALTER
Bücherschränken oder auf
(FM/AM)
Regalen auf, wo die Lüftung
11.RADIOABSTIMMUNG (TUN-
unzureichend ist.
ING)
Es ist verboten das Gerät auf
12.EINSTELLEN DES SUM-
offene Flammenquellen, z.B.
MERS
auf brennende Kerzen zu
(BUZZ)/LAUTSTÄRKENREGE
stellen.
LUNG (VOLUME)
Beim Auffinden von Fehlern
13.FACH FÜR NOTPEISUNGS-
wenden Sie sich an ein
BATTERIE
autorisiertes Service-Center.
WECHSELSTROMNET-
UHR
ZSPEISUNG
Öffnen Sie den Deckel des
Überzeugen Sie sich vor dem
Batteriefachs (13) und legen
6
3522.qxd 16.03.05 14:23 Page 6

DEUTSCH
Sie eine Batterie Typ 6F-22
ON/OFF/AUTO (1) in die
mit Spannung 9 V ein. Die
Position ON.
Batterie wird für die
Stellen Sie das Radio auf die
Speicherung von
gewünschte Station ein und
Informationen in der Echtzeit
überzeugen Sie sich, dass
und der eingestellten
die richtige Lautstärke
Alarmzeit des Weckers ver-
eingestellt ist.
wendet, wenn die
Stellen Sie den Schalter
Netzstromzufuhr unter-
AUTO/ON/OFF (1) in die
brochen wird.
Position AUTO. Wenn die
Stellen Sie den Schalter
laufende Uhrzeit mit der vor-
ON/OFF/AUTO (1) in die
eingestellten Uhrzeit zusam-
Position OFF und stecken Sie
menfällt, wird sich das
die Steckgabel in die
Gerätautomatisch im
Steckdose, dabei werden die
Radiobetrieb einschalten.
Angaben auf dem Display
blinken.
EINSTELLEN DES WECKERS
Um die aktuelle Uhrzeit
ZU ERWACHEN BEI ALARM-
einzustellen, pressen und
SIGNAL
halten Sie die Taste TIME (6),
Stellen Sie die Alarmzeit des
stellen Sie mit den Tasten
Weckers ein, wie es oben
MIN (3) und HOUR (2) die
beschrieben wurde.
aktuelle Uhrzeit ein.
Drehen Sie den
Lautstärkenregler VOLUME
EINSTELLEN DER ALARMZEIT
(12) gegen den Uhrzeigersinn
DES WECKERS
bis zum Klickgeräusch, um
Pressen und halten Sie die
das Summersignal BUZZ
Taste ALARM (4), stellen Sie
einzuschalten.
mit den Tasten HOUR (2) und
Stellen Sie den Schalter
MIN (3) die gewünschte
ON/OFF/AUTO (1) in die
Alarmzeit des Weckers ein.
Position AUTO. Wenn die
laufende Uhrzeit mit der vor-
EINSTELLEN DER ALARMZEIT
eingestellten Alarmzeit des
ZUM ERWACHEN BEI
Weckers zusammenfällt, wird
RADIOMUSIK
sich ein sich unterbrechen-
Stellen Sie die Alarmzeit des
des Klangsignal einschalten.
Weckers ein, wie es oben
beschrieben wurde.
ABSTELLEN DES WECKERS
Stellen Sie den Schalter
Zum Abstellen des Weckers
7
3522.qxd 16.03.05 14:23 Page 7

DEUTSCH
pressen Sie einmal die Taste
Um die Abstellzeit zu ändern,
AL OFF (5), der Wecker
pressen und halten Sie die
schaltet sich ab und die
Taste SLEEP (7), und stellen
eingestellte Alarmzeit wird für
Sie mit der Taste MIN (3) die
den nächsten Tag gespe-
gewünschte Abstellzeit von
ichert.
59 bis 1 Minute ein.
Wenn der Wecker vollständig
Um den Timerbetrieb
abgestellt werden soll, stellen
abzustellen, berühren Sie die
Sie den Schalter
Taste SNOOZE (4).
ON/OFF/AUTO (1) in die
Position OFF.
RADIO
Für den Empfang im AM-
SCHLUMMERFUNKTION
Bereich wird die innere
Das Alarmsignal des Weckers
Antenne verwendet, stellen
kann vorläufig durch das
Sie den optimalen Empfang
Berühren der Taste SNOOZE
ein, indem Sie während der
(9) abgestellt werden; das
Abstimmung das Gehäuse
Signal schaltet sich automa-
des Gerätes drehen.
tisch nach 9 Minuten wieder
Für den optimalen Empfang
ein.
im FM-Bereich einzustellen,
Beim Erwachen bei
sollten Sie sich davon
Radiomusik kann durch das
überzeugen, dass die Schnur
Berühren der Taste SNOOZE
der FM-Antenne vollständig
(9) der Klang abgestellt wer-
ausgezogen wurde.
den; die Musik schaltet sich
Stellen Sie den Schalter
nach 9 Minuten automatisch
ON/OFF/AUTO (1) in die
wieder ein.
Position ON.
Stellen Sie die gewünschte
ABSTELLTIMER
Lautstärke mit dem
Stellen Sie den Schalter
Lautstärkenregler VOLUME
ON/OFF/AUTO (1) in die
(12) ein.
Position OFF oder AUTO.
Stellen Sie den Umschalter
Pressen Sie die Taste SLEEP
der Bandbereiche FM/AM
(7), das Radio schaltet sich
(10) auf den gewünschten
ein und der Timer beginnt die
Bereich ein.
Rückzählung der Zeit bis zum
Stellen Sie mit dem
Ausschalten, die Zeitspanne
Abstimmungsregler TUNING
kann bis zu 59 Minuten betra-
(11) den gewünschten
gen.
Radiosender ein.
8
3522.qxd 16.03.05 14:23 Page 8
DEUTSCH
Zum Abstellendes Radios
Das vorliegende Produkt
stellen Sie den Schalter
entspricht den
ON/OFF/AUTO (1) in die
Forderungen der elek-
Position OFF. Wenn sich das
tromagnetischen
Radio nicht ausschaltet, kann
Verträglichkeit, die in
89/336/EWG -Richtlinie
es sein, das der Abstelltimer
des Rates und den
eingestellt ist, in diesem Fall
Vorschriften 23/73/EWG
berühren Sie einfach die
über die
Taste SNOOZE (9).
Niederspannungsgeräte
vorgesehen sind.
TECHNISCHE KENNDATEN
Frequenzbereich:
AM 540 1600 kHz
FM 88 108 MHz
Reservespeisung:
9 V Batterie 6F-22
(nicht im Lieferumfang
enthalten)
Speisespannung:
AC 230 V ~ 50 Hz
Der Hersteller behält sich das
Recht vor die Charakteristiken
des Gerätes ohne
Vorbescheid zu ändern.
Die Lebensdauer des Gerätes
beträgt nicht weniger als 5
Jahre
Gewährleistung
Ausführliche Bedingungen der
Gewährleistung kann man beim
Dealer, der diese Geräte verkauft
hat, bekommen. Bei beliebiger
Anspruchserhebung soll man
während der Laufzeit der vor-
liegenden Gewährleistung den
Check oder die Quittung über
den Ankauf vorzulegen.
9
3522.qxd 16.03.05 14:23 Page 9

ÐÓÑÑÊÈÉ
ÐÀÄÈÎ×ÀÑÛ / ÁÓÄÈËÜÍÈÊ
ýëåêòðè÷åñêîé ñåòè,
ÌÎÄÅËÜ VT-3522
ñîîòâåòñòâóåò ðàáî÷åìó
íàïðÿæåíèþ óñòðîéñòâà.
ÎÏÈÑÀÍÈÅ
1. ÏÅÐÅÊËÞ×ÀÒÅËÜ
ÎÑÒÎÐÎÆÍÎ
ÂÊË./ÂÛÊË./ÀÂÒÎ (ON/
Âûíèìàéòå ñåòåâóþ âèëêó
OFF/AUTO)
èç ðîçåòêè, åñëè íå
2. ÊÍÎÏÊÀ ÓÑÒÀÍÎÂÊÈ
ïîëüçóåòåñü óñòðîéñòâîì
×ÀÑΠ(HOUR)
äëèòåëüíîå âðåìÿ.
3. ÊÍÎÏÊÀ ÓÑÒÀÍÎÂÊÈ
Íå ðàçáèðàéòå óñòðîéñòâî
ÌÈÍÓÒ (MIN)
ñàìîñòîÿòåëüíî, âíóòðè íåò
4. ÓÑÒÀÍÎÂÊÀ ÂÐÅÌÅÍÈ
äåòàëåé, êîòîðûå
ÂÊËÞ×ÅÍÈß ÁÓÄÈËÜÍÈÊÀ
îáñëóæèâàþòñÿ
(ALARM)
ïîëüçîâàòåëåì.
5. ÊÍÎÏÊÀ ÎÒÊËÞ×ÅÍÈß
Äëÿ ïðåäîòâðàùåíèÿ
ÁÓÄÈËÜÍÈÊÀ (AL OFF)
ïîæàðà è îïàñíîñòè
6. ÊÍÎÏÊÀ ÓÑÒÀÍÎÂÊÈ
ïîðàæåíèÿ òîêîì íå
ÂÐÅÌÅÍÈ (TIME)
äîïóñêàéòå ïîïàäàíèÿ âîäû
7. ÓÑÒÀÍÎÂÊÀ ÑÏßÙÅÃÎ
â êîðïóñ óñòðîéñòâà.
ÐÅÆÈÌÀ (SLEEP)
Çàïðåùàåòñÿ íàðóøàòü
8. ÑÂÅÒÎÄÈÎÄÍÛÉ
óñëîâèÿ åñòåñòâåííîé
ÄÈÑÏËÅÉ
âåíòèëÿöèè óñòðîéñòâà, íå
9. ÂÊËÞ×ÅÍÈÅ ÊÎÐÎÒÊÎÃÎ
ñòàâüòå óñòðîéñòâî â
ÑÍÀ/ÎÒÊËÞ×ÅÍÈÅ
çàêðûòûå êíèæíûå øêàôû
ÒÀÉÌÅÐÀ (SNOOZE)
èëè íà ïîëêè, ãäå íåò
10.ÏÅÐÅÊËÞ×ÀÒÅËÜ
äîñòàòî÷íîé âåíòèëÿöèè.
ÄÈÀÏÀÇÎÍ (FM/AM)
Çàïðåùàåòñÿ ñòàâèòü íà
11.ÍÀÑÒÐÎÉÊÀ ÐÀÄÈÎ (TUN-
óñòðîéñòâî èñòî÷íèêè
ING)
îòêðûòîãî ïëàìåíè, òàêèå
12.ÂÊËÞ×ÅÍÈÅ ÇÓÌÌÅÐÀ
êàê ãîðÿùèå ñâå÷è.
(BUZZ)/ÐÅÃÓËÈÐÎÂÊÀ
Ïðè îáíàðóæåíèè
ÃÐÎÌÊÎÑÒÈ (VOLUME)
íåèñïðàâíîñòè
13.ÎÒÑÅÊ ÁÀÒÀÐÅÈ
îáðàùàéòåñü â
ÀÂÀÐÈÉÍÎÃÎ ÏÈÒÀÍÈß
àâòîðèçîâàííûé ñåðâèñíûé
öåíòð.
ÏÈÒÀÍÈÅ ÎÒ ÑÅÒÈ
ÏÅÐÅÌÅÍÍÎÃÎ ÒÎÊÀ
×ÀÑÛ
Ïåðåä âêëþ÷åíèåì
Îòêðîéòå êðûøêó
óáåäèòåñü, ÷òî íàïðÿæåíèå
áàòàðåéíîãî îòñåêà (13) è
10
3522.qxd 16.03.05 14:23 Page 10

ÐÓÑÑÊÈÉ
óñòàíîâèòå áàòàðåéêó òèïà
ïîëîæåíèå ON.
6F-22 íàïðÿæåíèåì 9 Â.
Íàñòðîéòå ðàäèî íà
Áàòàðåéêà èñïîëüçóåòñÿ
æåëàåìóþ ðàäèîñòàíöèþ è
äëÿ ñîõðàíåíèÿ
óáåäèòåñü, ÷òî óñòàíîâëåíà
èíôîðìàöèè î òåêóùåì
íåîáõîäèìàÿ ãðîìêîñòü.
âðåìåíè è âðåìåíè
Óñòàíîâèòå ïåðåêëþ÷àòåëü
óñòàíîâêè áóäèëüíèêà, ïðè
AUTO/ON/OFF (1) â
ïðîïàäàíèè ñåòåâîãî
ïîëîæåíèå AUTO. Êîãäà
íàïðÿæåíèÿ.
òåêóùåå âðåìÿ ñîâïàäåò ñ
Óñòàíîâèòå ïåðåêëþ÷àòåëü
ïðåäóñòàíîâëåííûì
ON/OFF/AUTO (1) â
âðåìåíåì âêëþ÷åíèÿ
ïîëîæåíèå OFF è âñòàâüòå
áóäèëüíèêà, òî óñòðîéñòâî
ñåòåâóþ âèëêó â ðîçåòêó,
àâòîìàòè÷åñêè âêëþ÷èòñÿ â
ïðè ýòîì ïîêàçàíèÿ íà
ðåæèìå ðàäèî.
äèñïëåå áóäóò ìèãàòü.
Äëÿ óñòàíîâêè òåêóùåãî
ÓÑÒÀÍÎÂÊÀ ÏÐÎÁÓÆÄÅÍÈÅ
âðåìåíè íàæìèòå è
ÏÎÄ ÑÈÃÍÀË ÁÓÄÈËÜÍÈÊÀ
óäåðæèâàéòå êíîïêó TIME
Óñòàíîâèòå âðåìÿ
(6), êíîïêàìè MIN (3) è
âêëþ÷åíèÿ áóäèëüíèêà êàê
HOUR (2) óñòàíîâèòå
îïèñàíî âûøå.
òåêóùåå âðåìÿ.
Ïîâåðíèòå ðåãóëÿòîð
ãðîìêîñòè VOLUME (12)
ÓÑÒÀÍÎÂÊÀ ÂÐÅÌÅÍÈ
ïðîòèâ ÷àñîâîé ñòðåëêè äî
ÂÊËÞ×ÅÍÈß ÁÓÄÈËÜÍÈÊÀ
ùåë÷êà äëÿ âêëþ÷åíèÿ
Íàæìèòå è óäåðæèâàéòå
ñèãíàëà çóììåðà BUZZ.
êíîïêó ALARM (4), êíîïêàìè
Óñòàíîâèòå ïåðåêëþ÷àòåëü
HOUR (2) è MIN (3)
ON/OFF/AUTO (1) â
óñòàíîâèòå íåîáõîäèìîå
ïîëîæåíèå AUTO. Êîãäà
âðåìÿ âêëþ÷åíèÿ
òåêóùåå âðåìÿ ñîâïàäåò ñ
áóäèëüíèêà.
âûáðàííûì
ïðåäóñòàíîâëåííûì
ÓÑÒÀÍÎÂÊÀ ÁÓÄÈËÜÍÈÊÀ
âðåìåíåì âêëþ÷åíèÿ
ÍÀ ÏÐÎÁÓÆÄÅÍÈÅ ÏÎÄ
áóäèëüíèêà, âêëþ÷èòüñÿ
ÐÀÄÈÎ
ïðåðûâèñòûé çâóêîâîé
Óñòàíîâèòå âðåìÿ
ñèãíàë.
âêëþ÷åíèÿ áóäèëüíèêà êàê
ñêàçàíî âûøå.
ÎÒÊËÞ×ÅÍÈß ÁÓÄÈËÜÍÈÊÀ
Óñòàíîâèòå ïåðåêëþ÷àòåëü
Äëÿ îòêëþ÷åíèÿ
ON/OFF/AUTO (1) â
áóäèëüíèêà, îäèí ðàç
11
3522.qxd 16.03.05 14:23 Page 11

ÐÓÑÑÊÈÉ
íàæìèòå êíîïêó AL OFF (5),
âðåìÿ îòêëþ÷åíèÿ â
áóäèëüíèê îòêëþ÷èòüñÿ, à
èíòåðâàëå îò 59 äî 1 ìèí.
óñòàíîâëåííîå âðåìÿ
Äëÿ âûêëþ÷åíèÿ ðåæèìà
âêëþ÷åíèÿ áóäèëüíèêà
òàéìåðà äîòðîíüòåñü
ñîõðàíèòüñÿ äëÿ
êíîïêè SNOOZE (4).
ñëåäóþùåãî äíÿ.
Åñëè íåîáõîäèìî
ÐÀÄÈÎ
âûêëþ÷èòü áóäèëüíèê, òî
Äëÿ ïðèåìà â äèàïàçîíå
óñòàíîâèòå ïåðåêëþ÷àòåëü
AM èñïîëüçóåòñÿ
ON/OFF/AUTO (1) â
âíóòðåííÿÿ íàïðàâëåííàÿ
ïîëîæåíèå OFF.
àíòåííà, âî âðåìÿ
íàñòðîéêè íà
ÔÓÍÊÖÈß ÊÎÐÎÒÊÎÃÎ ÑÍÀ
ðàäèîñòàíöèþ, ïîâîðîòîì
Ñèãíàë áóäèëüíèêà ìîæíî
êîðïóñà óñòðîéñòâà,
âðåìåííî îòêëþ÷èòü
äîáåéòåñü íàèëó÷øåãî
êàñàíèåì êíîïêè SNOOZE
ïðèåìà.
(9); ñèãíàë àâòîìàòè÷åñêè
Äëÿ íàèëó÷øåãî ïðèåìà â
âêëþ÷èòñÿ ÷åðåç 9 ìèíóò.
äèàïàçîíå FM óáåäèòåñü,
Ïðè ïðîáóæäåíèè ïîä
÷òî ïðîâîä FM àíòåííû
ðàäèî, çâóê ìîæíî
ïîëíîñòüþ ðàçâåðíóò.
âðåìåííî îòêëþ÷èòü
Óñòàíîâèòå ïåðåêëþ÷àòåëü
êàñàíèåì êíîïêè SNOOZE
ON/OFF/AUTO (1) â
(9); çâóê àâòîìàòè÷åñêè
ïîëîæåíèå ON.
âêëþ÷èòñÿ ÷åðåç 9 ìèíóò.
Óñòàíîâèòå íåîáõîäèìûé
óðîâåíü ãðîìêîñòè
ÒÀÉÌÅÐ ÎÒÊËÞ×ÅÍÈß
ðåãóëÿòîðîì VOLUME (12).
Óñòàíîâèòå ïåðåêëþ÷àòåëü
Óñòàíîâèòå ïåðåêëþ÷àòåëü
ON/OFF/AUTO (1) â
äèàïàçîíîâ FM/AM (10) íà
ïîëîæåíèå OFF èëè AUTO.
íóæíûé äèàïàçîí.
Íàæìèòå êíîïêó SLEEP (7),
Ïîâîðîòîì ðó÷êè íàñòðîéêè
âêëþ÷èòüñÿ ðàäèî è òàéìåð
TUNING (11) íàñòðîéòåñü íà
íà÷íåò îòñ÷åò âðåìåíè äî
ïåðåäàþùóþ
îòêëþ÷åíèÿ, âðåìÿ
ðàäèîñòàíöèþ.
îòêëþ÷åíèÿ 59 ìèíóò.
Äëÿ âûêëþ÷åíèÿ ðàäèî
Äëÿ èçìåíåíèÿ âðåìåíè
óñòàíîâèòå ïåðåêëþ÷àòåëü
îòêëþ÷åíèÿ íàæìèòå è
ON/OFF/AUTO (1) â
óäåðæèâàéòå êíîïêó SLEEP
ïîëîæåíèå OFF. Åñëè ðàäèî
(7), à êíîïêîé MIN (3)
íå îòêëþ÷àåòñÿ, òî
óñòàíîâèòå íåîáõîäèìîå
âîçìîæíî âêëþ÷åí òàéìåð
12
3522.qxd 16.03.05 14:23 Page 12
ÐÓÑÑÊÈÉ
îòêëþ÷åíèÿ, â ýòîì ñëó÷àå
ïðèêîñíèòåñü ê êíîïêå
SNOOZE (9).
ÒÅÕÍÈ×ÅÑÊÈÅ
ÕÀÐÀÊÒÅÐÈÑÒÈÊÈ
×àñòîòíûé äèàïàçîí:
AM 540 1600 êÃö
FM 88 108 ÌÃö
Ðåçåðâíîå ïèòàíèå:
9 Â áàòàðåéêà 6F-22
(íå âõîäèò â êîìïëåêò)
Íàïðÿæåíèå ïèòàíèÿ:
AC 230 Â ~ 50 Ãö
Ïðîèçâîäèòåëü îñòàâëÿåò çà
ñîáîé ïðàâî èçìåíÿòü
õàðàêòåðèñòèêè ïðèáîðà áåç
ïðåäâàðèòåëüíîãî
óâåäîìëåíèÿ.
Ñðîê ñëóæáû ïðèáîðà íå
ìåíåå 5-òè ëåò
Äàííîå èçäåëèå
ñîîòâåòñòâóåò âñåì
òðåáóåìûì
åâðîïåéñêèì è
ðîññèéñêèì
ñòàíäàðòàì
áåçîïàñíîñòè è
ãèãèåíû.
Ïðîèçâîäèòåëü:
ÀÍ-ÄÅÐ ÏÐÎÄÀÊÒÑ ÃìáÕ, Àâñòðèÿ
Éåíåâàéíãàññå, 10/10, 1210, Âåíà,
Àâñòðèÿ
13
3522.qxd 16.03.05 14:23 Page 13

FRANÇAIS
RADIO-HORLOGE/ REVEIL
du secteur correspond à la
MODELE VT-3522
tension de fonctionnement
de lappareil.
DESCRIPTION
1. INTERRUPTEUR
ATTENTION
Sortez la fiche dalimentation
MARCHE/ARRET./AUTO
de la prise de courant si vous
(ON/ OFF/AUTO)
nutilisez pas lappareil pen-
2. TOUCHE DE REGLAGE DES
dant une longue période.
HEURES (HOUR)
Ne démontez pas lappareil,
3. TOUCHE DE REGLAGE DES
lappareil ne contient pas de
MINUTES (MIN)
détails nécessitant lentretien
4. REGLAGE DU TEMPS DE
de la part dutilisateur.
REVEIL (ALARM)
Au risque dincendie et
5. TOUCHE DE DEBRANCHE-
délectrocution évitez que
MENT DU REVEIL (AL OFF)
leau pénètre à lintérieur du
6. TOUCHE DE REGLAGE DU
corps de lappareil.
TEMPS (TIME)
Il est interdit de violer la venti-
7. ACTIVATION DU REGIME DE
lation naturelle de lappareil,
SOMMEIL (SLEEP)
ne placez pas lappareil dans
8. AFFICHEUR EN DIODES
des armoires fermés ou à
LUMINESCENTES
dautres endroits nayant pas
9. BRANCHEMENT DU COURT
de ventilation nécessaire.
SOMMEIL /DEBRANCHE-
Il est interdit de placer sur
MENT DE LA MINUTERIE
lappareil des sources de
(SNOOZE)
flamme et notamment des
chandelles allumées.
10.SELECTEUR DES BANDES
En cas de découverte des
DE FREQUENCES (FM/AM)
défaillances adressez-vous
11.SYNTONISATION (TUNING)
au centre de service agréé.
12.BRANCHEMENT DU RON-
FLEUR (BUZZ)/REGLAGE DU
HORLOGE
VOLUME (VOLUME)
Ouvrez le couvercle du com-
13.COMPARTIMENT A PILE
partiment à piles (13) et
DALIMENTATION DE
installez-y une pile de type
RESERVE
6F-22 de la tension de 9 V. La
pile est utilisée pour sauveg-
ALIMENTATION PAR LE
arder linformation sur les
SECTEUR DU COURANT
temps courant en cas de
ALTERNATIF
manque dalimentation
Avant de brancher lappareil
secteur.
assurez-vous que la tension
14
3522.qxd 16.03.05 14:23 Page 14

FRANÇAIS
Mettez linterrupteur
la radio sera automatique-
ON/OFF/AUTO (1) à la posi-
ment allumée.
tion OFF et insérez la fiche
dalimentation dans la prise
REGLAGE DU REVEIL POUR
de courant secteur, les indi-
ETRE REVEILLE PAR LE SIG-
cation de lafficheur com-
NAL DU REVEIL
menceront à clignoter.
Réglez le temps de branche-
Pour régler le temps courant
ment du réveil en suivant les
appuyez et maintenez enfon-
indications présentées ci-
cée la touche TIME (6), avec
dessus.
les touches MIN (3) et HOUR
Tournez le régulateur du vol-
(2) réglez le temps courant.
ume VOLUME (12) dans le
sens contraire dune aiguille
REGLAGE DU TEMPS DE
dune montre jusquun clic
REVEIL
pour activer le ronfleur BUZZ.
Appuyez et gardez enfoncée
Mettez linterrupteur
la touche ALARM (4), avec les
ON/OFF/AUTO (1) à la posi-
touches HOUR (2) et MIN (3)
tion AUTO. Quand le temps
réglez le temps de branche-
courant coïncidera avec le
ment du réveil.
temps programmé du réveil,
le signal du ronfleur retentira
REGLAGE DU REVEIL POUR
automatiquement.
ETRE REVEILLE PAR LA RADIO
Réglez le temps de branche-
DEBRANCHEMENT DU REVEIL
ment du réveil en suivant les
Pour débrancher le réveil
indications présentées ci-
appuyez une fois sur la
dessus.
touche AL OFF (5), le réveil
Mettez le linterrupteur
sera débranché et le temps
ON/OFF/AUTO (1) à la posi-
programmé du réveil sera
tion ON.
mémorisé pour le lendemain.
Réglez la radio à la station
Sil faut débrancher le réveil
désirée et assurez-vous que
mettez linterrupteur
le volume est réglé au niveau
ON/OFF/AUTO (1) à la posi-
nécessaire.
tion OFF.
Mettez linterrupteur
AUTO/ON/OFF (1) à la posi-
FONCTION DU COURT SOM-
tion AUTO. Quand le temps
MEIL
courant coïncidera avec le
Vous pouvez désactiver le
temps programmé du réveil,
signal du réveil pour un cer-
15
3522.qxd 16.03.05 14:23 Page 15

FRANÇAIS
tain temps en appuyant sur la
une station radio tournez le
touche SNOOZE (9); le signal
corps de lappareil pour avoir
sera éteint mais il retentira
la meilleure réception.
automatiquement 9 minutes
Pour améliorer la réception
après.
dans la bande FM assurez-
Si vous avez été réveillé par la
vous que le câble de lan-
radio, vous pouvez éteindre le
tenne FM est complètement
son en appuyant sur la
dévidée.
touche SNOOZE (9); le son
Mettez linterrupteur
éteint mais il sera branché 9
ON/OFF/AUTO (1) à la posi-
minutes après.
tion ON.
Réglez le requis niveau du
MINUTERIE DE DEBRANCHE-
volume avec le régulateur
MENT
VOLUME (12).
Mettez linterrupteur
Mettez le sélecteur des ban-
ON/OFF/AUTO (1) à la posi-
des de fréquence FM/AM
tion OFF ou AUTO.
(10) à la bande de fréquence
Appuyez sur la touche SLEEP
désirée.
(7), la radio sera allumée et la
En tournant la manche de
minuterie commencera le
syntonisation TUNING (11)
compte à rebours du temps
réglez lappareil sur la station
de débranchement qui est
désirée.
égal à 59 minutes.
Pour éteindre la radio mettez
Pour changer le temps de
linterrupteur ON/OFF/AUTO
débranchement automatique
(1) à la position OFF. Si la
appuyez et maintenez enfon-
radio ne séteint pas ça peut
cée la touche SLEEP (7), et
signifier que la minuterie de
réglez le temps désiré de
débranchement est activée.
débranchement par la touche
Dans ce cas pour éteindre la
a MIN (3) de 59 à 1 minutes.
radio appuyez sur la touche
Pour débrancher le régime
SNOOZE (9).
de la minuterie appuyez sur la
touche SNOOZE (4).
RADIO
Pour la réception dans la
bande AM est utilisée lan-
tenne directionnelle incor-
porée, pendant le réglage sur
16
3522.qxd 16.03.05 14:23 Page 16
FRANÇAIS
CARACTERISTIQUES
TECHNIQUES
Gamme de fréquence:
AM 540 1600 kHz
FM 88 108 MHz
Alimentation de réserve:
pile de 9 v du type 6F-22
(nest pas livrée avec lap-
pareil)
Tension dalimentation:
AC 230 V ~ 50 Hz
Le fabricant se réserve le
droit de modifier les carac-
téristiques de lappareil sans
préavis.
Le délai de service de lap-
pareil est pas moins de 5 ans.
Garantie
Pour des conditions de garantie
plus détaillées adressez-vous au
distributeur qui vous a vendu
lappareil. En cas de toute sorte
de prétention pendant la période
de la présente garantie il faudra
présenter le ticket quittance de
lachat.
Le présent appareil sat-
isfait aux exigences de
compatibilité électro-
magnétique en vertu de
la directive 89/336/EEC
du conseil de lEurope
et la préscription 23/73
EEC pour lappareillage
de bas voltage.
17
3522.qxd 16.03.05 14:23 Page 17

ITALIANO
LOROLOGIO CON LA RADIO
ALIMENTAZIONE DALLA RETE
/LA SVEGLIA
DELLA CORRENTE ALTERNA-
MODELLO VT-3522
TA
Prima dellaccensione assi-
DESCRIZIONE
curatevi che la tensione della
1. INTERRUTORE ON/
rete elettrica corrisponde alla
OFF/AUTO
tensione del dispositivo.
2. PULSANTE DELLIM-
POSTAZIONE DELLE ORE
ATTENZIONE
(HOUR)
Staccate la spina dalla presa
3. PULSANTE DELLIM-
se il dispositivo non viene
POSTAZIONE DEI MINUTI
usato per molto tempo.
(MIN)
Non cercate di smontare il
4. IMPOSTAZIONE DEL TEMPO
dispositivo, dentro non ci
DELLACCENSIONE DELLA
SVEGLIA (ALARM)
sono dei dettagli che ven-
5. PULSANTE DELLO SPEGNI-
gono serviti dallutente.
MENTO DELLA SVEGLIA (AL
Per la prevenzione dellincen-
OFF)
dio e del pericolo della scos-
6. PULSANTE DELLIM-
sa elettrica non lasciate lac-
POSTAZIONE DEL TEMPO
qua penetrare nel corpo del
(TIME)
dispositivo.
7. IMPOSTAZIONE DEL REGIME
E vietato violare le condizioni
DORMIENTE (SLEEP)
della ventilazione naturale del
8. VISUALIZZATORE A DIODI
dispositivo, non posizionate il
LUMINOSI
dispositivo nelle librerie
9. ACCENSIONE DEL SONNO
chiuse o sui ripiani dove
CORTO/SPEGNIMENTO DEL
manca la ventilazione.
TEMPORIZZATORE
E vietato mettere sul disposi-
(SNOOZE)
10.SELETTORE DELLE BANDE
tivo le fonti della fiamma
(FM/AM)
aperta, come le candele
11.SINTONIZZAZIONE DELLA
accese.
RADIO (TUNING)
Se scoprite i guasti, rivol-
12.ACCENSIONE DEL BUZZER
getevi al centro riparazione
(BUZZ)/REGOLAZIONE DEL
autorizzato.
VOLUME (VOLUME)
13.SCOMPARTIMENTO PILA
OROLOGIO
DELLALIMENTAZIONE DI
Aprite il coperchio dello
EMERGENZA
scompartimento pila (13) e
inserite una pila del tipo 6F-
18
3522.qxd 16.03.05 14:23 Page 18

ITALIANO
22 con la tensione di 9 V. Si
desiderata e assicuratevi che
usa la pila per la memoriz-
il volume necessario e
zazione dellinformazione del
messo.
tempo corrente e del tempo
Mettete linterrutore
dellimpostazione della sveg-
ON/OFF/AUTO (1) in
lia in caso della sparizione
posizione AUTO. Quando il
della tensione di rete.
tempo corrente coincide al
Mettete linterrutore
tempo prestabilito dellac-
ON/OFF/AUTO (1) in
censione della sveglia, il dis-
posizione OFF e inserite la
positivo si accende automati-
spina nella presa, le indi-
camente nel regime della
cazioni sul visualizzatore
radio.
cominciano a tremolare.
Per impostare il tempo cor-
IMPOSTAZIONE DEL RISVEG-
rente premete e trattenete
LIO CON IL SEGNALE DELLA
premuto il pulsante TIME (6),
SVEGLIA
tramite i pulsanti MIN (3) e
Impostate il tempo dellac-
HOUR (2) impostate il tempo
censione della sveglia, come
corrente.
sopra.
Girate il regolatore del volume
IMPOSTAZIONE DEL TEMPO
VOLUME (12) in direzione
DELLACCENSIONE DELLA
antioraria fino allo scatto per
SVEGLIA
laccensione del segnale del
Premete e trattenete premuto
buzzer BUZZ.
il pulsante ALARM (4), tramite
Mettete linterrutore
i pulsanti HOUR (2) e MIN (3)
ON/OFF/AUTO (1) in
impostate il tempo desiderato
posizione AUTO. Quando il
dellaccensione della sveglia.
tempo corrente coincide al
tempo prestabilito dellac-
IMPOSTAZIONE DELLA SVEG-
censione della sveglia, si
LIA PER IL RISVEGLIO CON LA
accende il segnale acustico
RADIO
discontinuo.
Impostate il tempo dellac-
censione della sveglia, come
SPEGNIMENTO DELLA SVEG-
sopra.
LIA
Mettete linterrutore
Per spegnere la sveglia,
ON/OFF/AUTO (1) in
premete per una volta il pul-
posizione ON.
sante AL OFF (5), la sveglia si
Sintonizzate la radiostazione
spegne, il tempo impostato
19
3522.qxd 16.03.05 14:23 Page 19


