Vitek VT-1510 SR: инструкция
Раздел: Приготовление кофе
Тип: Кофемашина
Инструкция к Кофемашине Vitek VT-1510 SR
Оглавление
- ОПИСАНИЕ ПРАВИЛА ТЕХНИКИ БЕЗОПАСНОСТИ Панель управления Дисплей
- ПРИГОТОВЛЕНИЕ КОФЕ «ЭСПРЕССО»), ПРИГОТОВЛЕНИЕ КОФЕ «ЭСПРЕССО» ПОДГОТОВКА К РАБОТЕ
- ИНДИВИДУАЛЬНОЕ ПРОГРАММИРОВАНИЕ
- ПРОГРАММИРОВАНИЕ ПРИГОТОВЛЕНИЕ «КАППУЧИНО»
- ФУНКЦИЯ АВТОМАТИЧЕСКОГО ОТКЛЮЧЕНИЯ УДАЛЕНИЕ НАКИПИ КИПЯЧЕНИЕ ВОДЫ
- УХОД
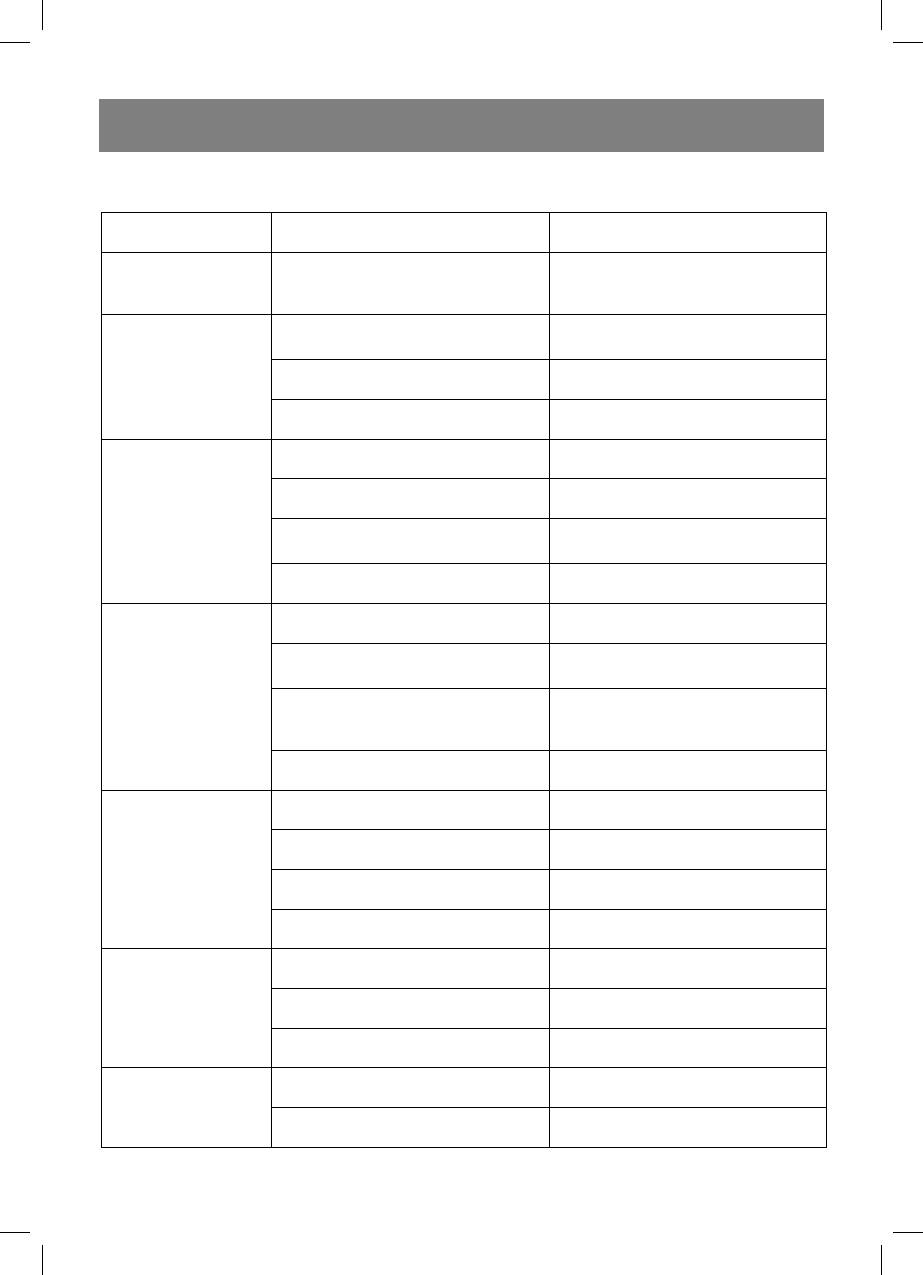
- Неисправности, их причины и методы устранения: Неисправность Причина Метод
- ТОЛЬКО ДЛЯ ДОМАШНЕГО ИСПОЛЬЗОВАНИЯ Комплект поставки Технические данные
VT-1510 SR
MANUAL INSTRUCTION
4
11
20
28
37
45
52
61
70
www.vitek-aus.com
1510.indd 11510.indd 1 02.04.2008 15:43:5702.04.2008 15:43:57
2
1510.indd 21510.indd 2 02.04.2008 15:43:5902.04.2008 15:43:59
3
1510.indd 31510.indd 3 02.04.2008 15:43:5902.04.2008 15:43:59

ENGLISH
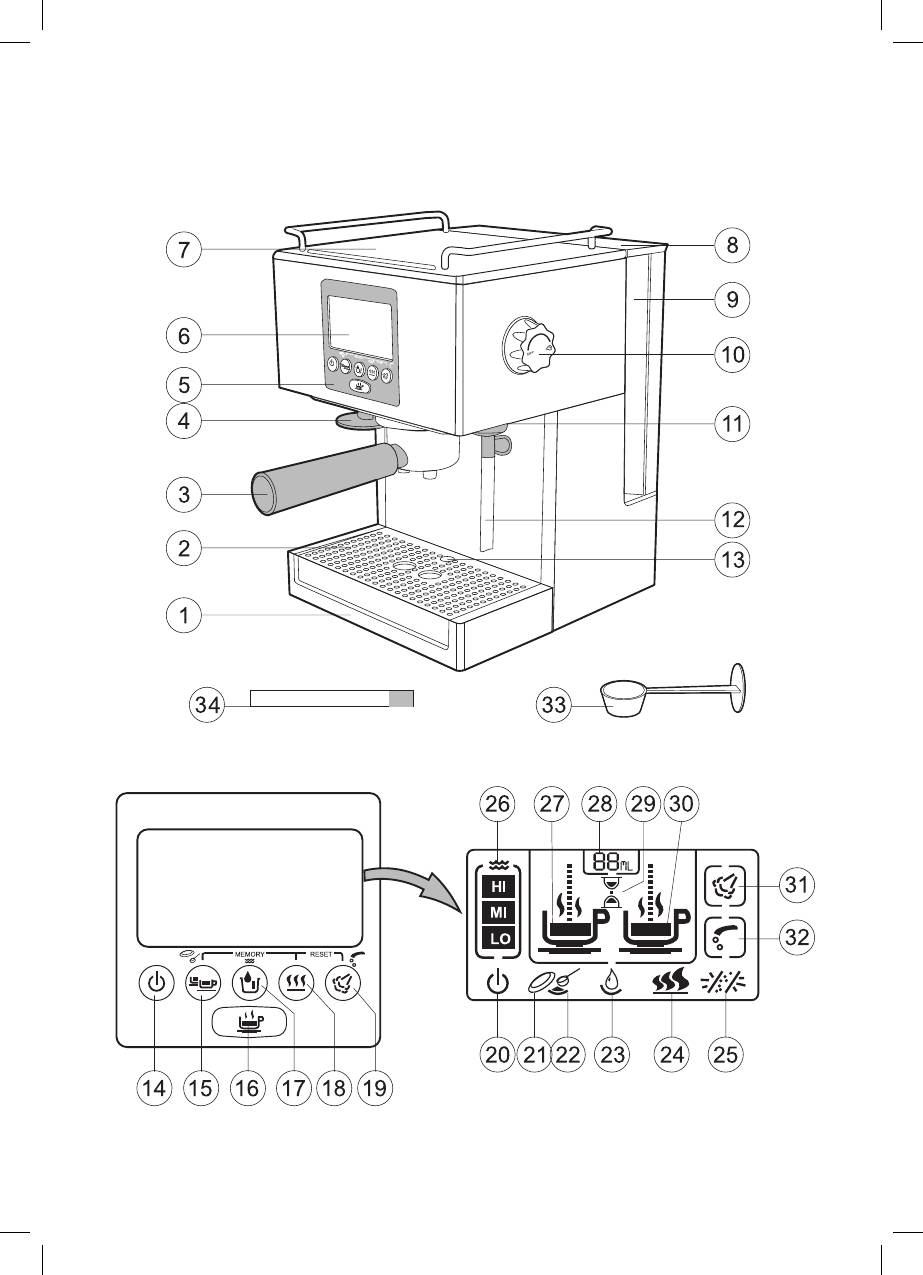
DESCRIPTION
SAFETY PRECAUTIONS
1. Removable tray for water
Please read the instruction carefully before
2. Tray grid
using the coffee maker.
3. Filter holder with a built-in valve
Improper usage of the unit can lead to its
4. Coffee sealer
damage; can cause financial damage or
5. Control panel
injuries to persons.
6. Display
• Use the coffee maker for intended pur-
7. Cup support base
poses.
8. Water tank cover
• Do not use the unit outdoors.
9. Water tank
• Use only the accessories supplied.
10. Steam/hot water supply handle
• Before switching on the unit, make sure
11. Backlight
that voltage and frequency of your home
12. Cappuccinator tube
electric main correspond to those speci-
13. Water tray filling indication
fied on the unit.
• To connect the coffee maker, use a wall
Control panel
socket with grounding contacts.
14. On/Off button
• In order to reduce risk of fire, do not use
15. One or two cups/coffee in pods /
adapters while connecting the unit to the
(ground coffee in the form of a pill in a
wall outlet.
paper wrapping)/ground coffee selec-
• Before using the coffee maker, make sure
tion button
that all removable parts are set properly.
16. Coffee making button
• Never switch on the coffee maker with-
17. Refill/P1, P2 auto modes/water hard-
out water. Use only cold water to make
ness (HI, MI, LO) selection button
coffee.
18. Temperature setting mode button
• Do not touch hot surfaces.
19. Steam/hot water supply button
• In order to avoid fire, electric shock, do
not immerse the power cord or the cof-
Display
fee maker into water or other liquids.
20. On/Off indication
• Place the unit on the flat stable surface.
21. Coffee in pods indication
• Never leave the unit unattended, be es-
22. Ground coffee indication
pecially careful when children or disabled
23. Empty water tank indication
persons are near the appliance.
24. Temperature setting mode indications
• Always unplug the unit before filling the
25. Scale removal mode indication
water tank with water, when you do not
26. Hard water indication
use the unit or before cleaning.
27. One cup indication
• Do not use the coffee maker when the
28. Refill water indication (30-40-50-60
power cord, the plug are damaged, in
ml.)/auto modes Р1, Р2 indication
case of malfunction or after damages.
29. Standby mode indication
• Apply to the nearest authorized service
30. Second cup indication
center for repair.
31. Steam supply mode indication
• Make sure that the power cord does not
32. Hot water supply mode indication
hang over the table, and does not touch
33. Measuring spoon
hot surfaces.
34. Test strip for water hardness measure-
• Do not place the coffee maker on hot
ment
surfaces.
• Use the On/Off button to switch off the
4
1510.indd 41510.indd 4 02.04.2008 15:43:5902.04.2008 15:43:59

ENGLISH
coffee maker and then pull the plug out
• Insert the plug into the socket, a sound
of the socket.
signal will be heard and the (29) indica-
• Do not keep the unit at the temperature
tion will appear on the display (6), the
below 0°C.
pump will switch on and the coffee maker
The coffee maker is intended for house-
will switch to the standby mode in 5 sec-
hold usage only.
onds.
• Press the On/Off (14) button, the display
KEEP THIS INSTRUCTION
(6) will light up, the boiler heating will
start, and you will see the rotating indica-
PREPARATION TO USE
tion (29) on the display (6).
• Unpack the coffee maker.
• Set the water hardness level, corre-
• Before using the unit for the first time,
sponding to your region, on the display,
wash all removable parts with warm wa-
to do it, press and hold the (17) button
ter and wipe them with a dry cloth.
for 3 sec., a sound signal will be heard
• Set all removable parts on their place and
and the flashing indication (26) will ap-
make sure that they are set properly.
pear, press the (17) button again to set
• Before switching on the unit, make sure
water hardness (HI-high, MI-medium,
that voltage and frequency of your home
LO-low).
electric main correspond to those speci-
Notice: you can measure hardness of
fied on the unit.
pipe water using test strip.
Attention! Before using the coffee maker,
- unpack the strip (do not throw the pack-
steam system should be washed, by set-
ing out)
ting max. water supply mode (60 ml) and
- hold the strip under water jet for 1 sec-
repeat the procedure for 2-3 times (see the
ond
Making “ESPRESSO” chapter), but do
- wait for 15 seconds
not fill the filter holder with a built-in valve
- compare changed color on the test strip
(3) with ground coffee.
with color diagram on the packing
If water hardness indicated on coffee
Making “ESPRESSO”
machine display differs from result of
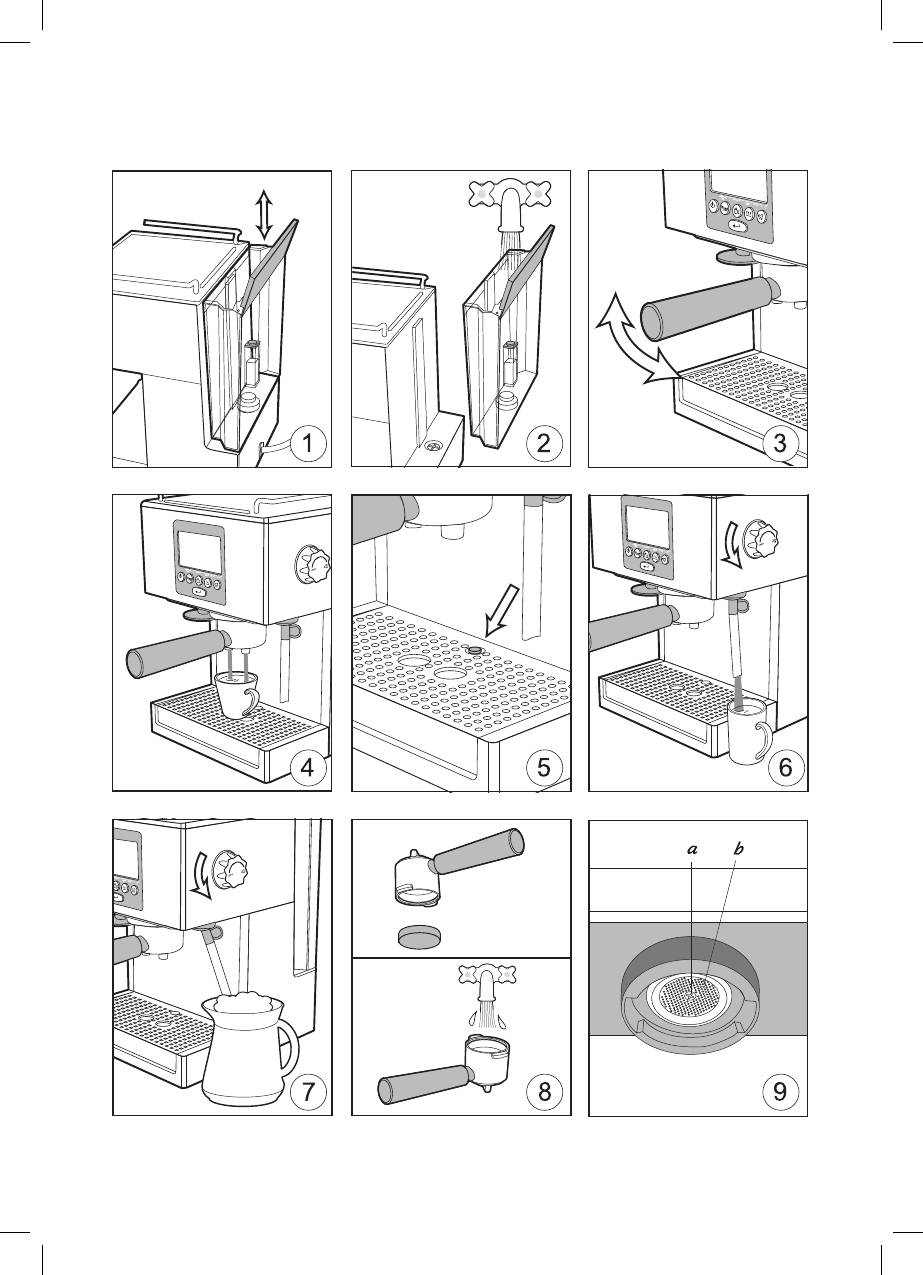
• Place the unit on the flat stable surface.
measurement, set up new value of hard-
• Remove the water tank (9) by moving it
ness.
upwards and fill it with cold water to the
• Select coffee in pods or ground coffee
MAX mark and then set it on its place
mode. Press and hold the (15) button for
(pic. 1, 2).
3 sec., a sound signal will be heard and
• You can fill the water tank (9) with water
one of the indications (21 or 22) will be
without removing it from the coffee maker
lighting, press and hold the (15) button
and using the corresponding bowl for it.
again to select the required indication (21
Note: If the water level in the water tank
or 22).
(9) falls below the required level you will
• Select the number of cups, pressing the
hear a sound signal, and the (23) indica-
(15) button, a sound signal will be heard
tion will be flashing on the display. In this
and the second cup indication (30) will
case you should fill the water tank (9)
be on.
with water to the max. mark.
• Set the amount of water to refill, pressing
• Make sure that steam supply is inactive.
the (17) button, 30-40-50 or 60 ml, wa-
To do it, turn the handle (10) clockwise
ter amount values will be indicated by the
until bumping.
(28) indication on the display (6).
5
1510.indd 51510.indd 5 02.04.2008 15:43:5902.04.2008 15:43:59

ENGLISH
• Set the required temperature for mak-
- Switch coffee machine on using button
ing coffee by pressing the (18) button,
(14).
the (24) indications will appear on the
- Depending on the type of used coffee,
display (6). One indication corresponds
put coffee in pods or grinded coffee into
to the low temperature; three indications
filter holder (3) using measuring spoon
correspond to the maximal temperature
(33), ram grinded coffee down a little to
(24).
the sealer (4).
• Depending on the coffee using type, put
- Set filter holder (3) to its place and turn it
coffee in pods in the filter holder (3) or
to right up to stop (picture 3).
put ground coffee using the measuring
- Put one or two cups under filter holder
spoon (33), slightly tamp ground cof-
(3) depending on preset type of making
fee against the sealer (4). Heat the filter
coffee (picture 4).
holder (3) before using, by placing it on
the cup support base (7).
Programming
• Set the filter holder (3) on its place and
• Press button (17) and select mode P1 or
turn it to the right until bumping (pic.3).
P2. Selected function will be indicated on
• Put one or two heated cups according to
display (6) by symbol (28).
the coffee using variant under the filter
• Press and hold buttons (15) and (18) si-
holder, and press coffee making button
multaneously for 3 seconds. Symbol P1
(16). After you have made coffee, two
or P2 (28) will be blinking on display (6).
sound signals will be heard (pic.4).
• Select one or two cups of coffee (sym-
• After you have made coffee, remove the
bols (27) and (30) on display) using but-
filter holder (3), by turning it to the left
ton (15).
(pic.3). Remove the remaining coffee
• Press and hold for 3 seconds button (15),
(pic.8) and wash the filter holder (3) un-
select variant of using coffee in pods or
der tapping water.
grinded coffee (symbols (21) and (22) on
Note: at the end of coffee making proc-
display (6)).
ess you will hear sound of outputting
• Select temperature mode for making cof-
steam, it is normal.
fee by pressing button (18). Temperature
- Check water tray filling indication (13),
values are displayed as symbols (24) on
when it appears in the hole of the grid
display (6). One symbol indicates low
(2), remove the grid (2) from the tray (1),
temperature; three symbols indicate
remove the tray (1) from the base and
maximal temperature (24).
pour out water from the tray (1), set the
• Press and hold button (16). When you get
tray (1) on its place, set the grid (2) on
necessary amount of coffee, release the
the tray (1).
button (16).
• After symbols P1 or P2 (28) stop blinking
Individual programming
on display (6), the modes will be memo-
You can program two modes of preparing
rized.
coffee on your own taste taking into ac-
• Switch coffee machine off by pressing
count temperature mode, making one or
button (14), remove filter holder (3) by
two cups of coffee simultaneously, using
rotating it to the left (picture 3). Remove
grinded coffee or coffee in pods, and also
coffee remnants (picture 8) and wash the
depending on volume of coffee to be made.
holder under water jet.
In order to save modes of preparation, it is
necessary to make coffee one time:
6
1510.indd 61510.indd 6 02.04.2008 15:43:5902.04.2008 15:43:59

ENGLISH
Using programmed operating modes
appropriate container (mind that either
- Switch coffee machine on using button
container, milk or creams should be very
(14).
well cooled).
- Depending on the type of used coffee,
• Put container with milk or creams under
put coffee in pods or grinded coffee into
cappuccinator-pipe (12) and open steam
filter holder (3) using measuring spoon
supply by rotating steam supply handle
(33), ram grinded coffee down a little to
(10) anticlockwise up to stop (picture 7).
the sealer (4)
• After required amount of foam is reached,
- Set filter holder (3) to its place and turn it
rotate steam supply regulator handle (10)
to right up to the stop (picture 3).
clockwise up to stop.
- Put one or two cups under filter holder
• In order to avoid obstruction of cappucci-
(3) depending on the preset type of mak-
nator-pipe (12), put appropriate contain-
ing coffee (picture 4).
er with some water inside under the pipe
- Select one or preprogrammed operating
(12) and open steam supply for several
modes (P1 or P2) using button (17).
seconds by turning steam supply handle
- Press button (16).
(10) anticlockwise up to stop, afterwards
- On completion of work, witch coffee ma-
lock steam supply by turning handle (1)
chine off by pressing button (14), detach
clockwise up to stop.
filter holder (3) by rotating it to the left
Attention! Be aware of burns by hot
(picture 3). Remove coffee remnants
steam.
(picture 8) and wash the holder under
Notice: During the process of steam
water jet.
generation, flips or clicks are heard.
These flips appearance is result of peri-
Preparing “Cappuccino”
odical turning the pump on, this is nor-
You can whip up creams or milk for mak-
mal.
ing “cappuccino” coffee or warm up other
beverages by hot steam using this coffee
Boiling water
machine.
You can warm some water for making tea
• Fill reservoir (9) with cold water up to
using this coffee machine.
«МАХ» mark (pictures 1, 2).
• Fill reservoir (9) with cold water up to
• Make sure steam supply is locked by ro-
«МАХ» mark (pictures 1, 2).
tating handle (10) clockwise up to stop.
• Make sure steam supply is locked by ro-
• Switch coffee machine on using button
tating handle (10) clockwise up to stop.
(14).
• Switch coffee machine on using button
• Select steam supply mode by pressing
(14).
button (19), at that symbol (31) and rotat-
• Select hot water supply mode by press-
ing symbol (29) is flashed, when steam
ing button (19) and select symbol (32) on
supply temperature is reached, rotating
the display (6).
symbol (20) will be deemed.
• Put appropriate container for collecting
• Put appropriate container for collecting
water under cappuccinator-pipe (12)
water under cappuccinator-pipe (12)
and turn steam supply handle (10) anti-
and slightly turn steam supply handle
clockwise up to stop (picture 6).
(10) anticlockwise to release condensate
• After necessary amount of water is
(picture 6). Drain condensate out of the
poured into the container, turn off water
container.
supply by turning team supply handle
• Pour about 100 ml of milk or creams into
(10) clockwise up to stop.
7
1510.indd 71510.indd 7 02.04.2008 15:43:5902.04.2008 15:43:59

ENGLISH
Attention! Water is hot. Be careful.
• Prepare citric acid solution: 2 teaspoons
Note:
of citric acid and 1 liter of water and pour
- During water boiling the pump switches
this solution in the water tank (9). Set the
on periodically, it is normal.
tank (9) on its place.
- To switch to the “ESPRESSO” mode from
• Select a corresponding bowl with capac-
the “CAPPUCCINO” mode or the “WATER
ity not less than 0,6 l and put it on the wa-
BOILING” mode, press the On/Off (14)
ter tray grid (2) (1). Place the bowl in a
button once.
way that the cappuccinator tube (12) is in
the bowl.
AUTO-OFF button
• Insert the plug into the socket and press
If you have not been using the coffee mak-
the On/Off (14) button to switch on the
er for 1 hour, it will switch off automatical-
coffee maker.
ly. You can switch on the coffee maker by
• Wait until the coffee maker warms up, the
pressing the On/Off (14) button.
(29) indication will disappear.
• Press the (17), (19) buttons simultane-
SCALE REMOVAL
ously, the pump will switch on and water
When you see the flashing (25) indication
supply will start, the scale removal (26)
on the display (6) you should perform scale
indication will be lighting, the heating el-
removal in the heating element of the cof-
ement will switch on as well and the (29)
fee maker using citric acid. While scale
indication will light up.
removal, make sure not to damage the
• To wash the cappuccinator tube (12) sup-
tabletop with acids, be especially careful
ply steam, by turning the steam supply
if the tabletop is made of marble or stone.
handle (10) anti clockwise until bumping
Put a tissue, a dry cloth under the coffee
for 8-10 sec. Stop steam supply, by turn-
maker or place the coffee maker in the cor-
ing the steam supply handle (10) clock-
responding tray.
wise until bumping.
Note: The appearance of the (25) indica-
• When about 0,5 l of water passes, the
tion on the display (6) depends on water
pump will switch off and the coffee mak-
hardness in your region and is about:
er will switch to the standby mode.
- HI-high water hardness – 30 liters
• Detach installed container, at that sound
- MI- medium water hardness - 45 liters
signal is heard, and symbol (23) starts
- LO- low water hardness - 60 liters
blinking on display (6), pour water out of
container and put it again on the grill (2)
When you see the flashing (25) indication
of water tray (1). Install the container thus
on the display (6), perform scale removal.
the cappuccinator-pipe (12) is inside it.
• Unplug the coffee maker and wait until it
• Detach and clean water reservoir (9), fill it
cools down completely.
with water up to maximal mark and install
• Turn the filter holder to the left and re-
it to the former place.
move it.
• Pump is on, and cleaning mode is start-
• Use a corresponding cross screwdriver
ed. In order to clean cappuccinator-pipe
to remove the mounting screw (a), by
(12), open steam supply by turning team
turning it clockwise, and remove the filter
supply handle (10) clockwise up to stop
– strainer (b) (pic.9).
for 2-3 seconds.
• When there is scale deposit on the filter
• After completion of cleaning mode, cof-
(b), put the filter in citric acid solution,
fee machine is switched off automati-
and then wash it.
cally.
8
1510.indd 81510.indd 8 02.04.2008 15:43:5902.04.2008 15:43:59
ENGLISH
• Unplug power cord from wall outlet and wait until coffee machine is cooled down com-
pletely.
• Install percolator-filer (b) to its place, and tighten fastening screw (a) by screwdriver
rotating it anticlockwise.
CLEANING
Wipe the body of the coffee maker with a damp soft cloth. Do not use abrasives and metal
sponges.
Do not immerse the body of the coffee maker into water or other liquids
Wash the removable parts of the coffee maker in warm water with a soft detergent, rinse
and dry.
Water tray (1)
• Remove the grid (2) from the tray (1), remove the tray (1) from the base and pour water
from the tray (1) set the tray (1) on its place, set the grid (2) on the tray (1). If necessary
you can wash the tray (1) and the grid (2) in warm water with a soft detergent, rinse and
dry.
PROBLEMS, THEIR CAUSES AND SOLUTIONS:
Problem Cause Solution
Heat the accessories preliminary
Cups, and the filter holder (3) were
(Cups and the filter holder). See
“Espresso”
cold.
the “Making espresso” chapter
Is not hot enough
The filter holder (3) is set improp-
See the “Making espresso” chap-
erly and not until bumping.
ter
Coffee grouts on the sides of the
Clean the filter sides.
filter.
Coffee leakage
Apply to the authorized service
from the filter holder
The gasket (3) is damaged.
center.
(3)
No water in the water tank (9). Fill the water tank (9) with water.
The water tank (9) is set improp-
Press on the tank (9) above to set
erly.
it on its place.
Ground coffee is too dry, and the
When water supply
pump can not produce necessary
Use freshly ground coffee.
is switched on, the
pressure
pump produces
No water in the water tank (9). Fill the water tank (9) with water.
noise
The water tank (9) is set improp-
Press on the tank (9) above to set
erly.
it on its place.
9
1510.indd 91510.indd 9 02.04.2008 15:43:5902.04.2008 15:43:59
ENGLISH
The filter is obstructed in the hold-
Wash the holder (3).
er (3). Too fine-ground coffee or
Use coarser-ground coffee.
strongly tamped.
Remove the filter-strainer (b) and
The filter-strainer is obstructed (b)
immerse it in citric acid solution to
(pic.9).
remove scale. Then wash it and set
Water does not pass
on its place.
Scale appearance. See the “Scale removal” chapter
Too coarse-ground coffee. Use finer-ground coffee.
Ground coffee is not enough. Use a measuring spoon.
Water falls down too
Ground coffee is tamped not
Tamp ground coffee
fast
enough.
Too coarse-ground coffee. Use finer-ground coffee
Ground coffee is tamped not
Tamp ground coffee
enough.
Espresso does not
Not fresh or too dry coffee Use fleshly ground coffee.
have cream
Cappuccino attachment is ob-
See the “Scale removal” chapter.
structed.
Milk is not fresh. Use fresh milk
Not enough cream
on milk
Milk is warm. Cool down milk in a fridge.
FOR HOUSEHOLD USAGE ONLY
Specifications subject to change without
The unit does not contain replaceable
prior notice.
parts.
Attention: Warranty does not cover dam-
MINIMUM SERVICE LIFE - 3 YEARS
ages caused by the scale deposit.
Supply set
GUARANTEE
The body – 1 pc.
Details regarding guarantee conditions can
Water tank – 1 pc.
be obtained from the dealer from whom
Water tray (with the grid) – 1 pc.
the appliance was purchased. The bill of
Filter holder – 1 pc.
sale or receipt must be produced when
Measuring spoon – 1 pc.
making any claim under the terms of this
Test strip for water hardness measurement
guarantee.
– 1 item
This product conforms to the
Specifications
EMC-Requirements as laid down
Power supply: 220 - 240 V ~ 50 Hz
by the Council Directive 89/336/
Power consumption: 1100 - 1300 W
EEC and to the Law Voltage
Removable water tank, capacity 1500 ml
Regulation (73/23 EEC)
10
1510.indd 101510.indd 10 02.04.2008 15:43:5902.04.2008 15:43:59

DEUTSCH
BESCHREIBUNG
27. Indikation des fertigen Kaffee für eine
1. Abnehmbare Wasserauffangschale
Tasse
2. Sieb der Auffangschale
28. Indikation des Wasserstandes
3. Filterhalter mit dem eingebauten Ventil
(30405060 ml)/ der automatischen
4. Kaffeepresse
Betriebsstufen P1, P2
5. Steuerungsplatte
29. Symbol des Wartebetriebs
6. Bildschirm
30. Indikation Fertiger Kaffee für die zweite
7. Aufheizboden
Tasse
8. Deckel des Wasserbehälters
31. Symbol der Dampfzufuhr
9. Wasserbehälter
32. Symbol der Heißwasserzufuhr
10. Wasserzufuhr Dampf/Heißwasser
33. Messlöffel
11. Beleuchtung
34. Teststreifen für die Feststellung der
12. Rohr für die Capuccinozubereitung
Wasserhärte
13. Indikation des Wasserfüllstandes der
Auffangschale
SICHERHEITSMAßNAHMEN
Vor der ersten Inbetriebnahme der
Steuerungsplatte
Kaffeemaschine lesen Sie aufmerksam
14. Ein/Ausschalttaste
diese Betriebsanleitung durch. Nicht ord-
15. Taste der Auswahl der Zubereitung
nungsgemäße Nutzung des Geräts kann
einer oder zwei Tassen Kaffee/
zu seiner Störung führen, einen materiellen
Kaffeezubereitung in Pads/der
Schaden und gesundheitlichen Schaden
Nutzung des gemahlenen Kaffee
hervorrufen.
16. Einschalttaste für Kafeezubereitung
• Verwenden Sie die Kafeemaschine be-
17. Taste der Wassernachfüllung/
stimmungsgemäß.
der Auswahl von automatischen
• Es ist nicht gestattet, das Gerät außer-
Betriebsstufen P1, P2/der Auswahl
halb der Räumlichkeiten zu benutzen.
der Wasserhärte (HOCH, MITTEL,
• Benutzen Sie nur Geräteteile, die zum
NIEDRIG)
Lieferungsumfang gehören.
18. Taste der Einstellung der
• Vor der ersten Inbetriebnahme verge-
Temperaturstufen
wissern Sie sich, dass die Netzspannung
19. Taste der Wasserzufuhr Dampf/
und Frequenz mit der Markierung des
Heißwasser
Geräts übereinstimmen.
• Nutzen Sie für das Anschließen der
Bildschirm
Kaffeemaschine den Netzstecker mit der
20. Symbol Ein/Aus
Kontakterdung.
21. Symbol der Kaffeezubereitung mit
• Verwenden Sie keine Verlängerungen
Kafeepads
beim Anschließen des Geräts an das
22. Anzeige der Zubereitung eines
Stromnetz, um Brandrisiko zu vermei-
Getränkes aus dem gemahlenen
den.
Kaffee
• Vor dem Einschalten des Geräts verge-
23. Indikator des mangelhaften
wissern Sie sich, dass alle abnehmbaren
Wasserstandes im Wasserbehälter
Ersatzteile nicht richtig aufgestellt sind.
24. Symbole der Einstellung der
• Es ist nicht gestattet, die Kaffeemaschine
Temperaturstufen
ohne Wasser einzuschalten.
25. Symbol der Entkalkung
• Berühren Sie nie heiße Stellen des
26. Symbol der Wasserhärte
Geräts.
11
11
1510.indd 111510.indd 11 02.04.2008 15:43:5902.04.2008 15:43:59

DEUTSCH
• Tauchen Sie nie das Kabel in die
• Vor der ersten Nutzung des Geräts spü-
Kaffeemaschine oder andere
len Sie abnehmbare Teile mit warmem
Flüssigkeiten, um Stromschlagrisiko zu
Wasser ab und wischen Sie diese mit
vermeiden.
einem trockenem Tuch ab.
• Stellen Sie das Gerät auf eine gerade
• Stellen Sie abnehmbare Teile in das Gerät
stabile Oberfl äche auf.
zurück und vergewissern Sie sich, dass
• Lassen Sie das Gerät nie unbeaufsich-
alles richtig aufgestellt ist.
tigt, besondere Vorsichtsmaßnahmen
• Vor der ersten Inbetriebnahme verge-
sind in den Fällen angesagt, wenn sich
wissern Sie sich, dass die Netzspannung
Kinder oder behinderte Personen wäh-
und Frequent mit der Markierung des
rend der Nutzung des Geräts in der Nähe
Geräts übereinstimmt.
aufhalten.
• Schalten Sie das Gerät vor dem Auffüllen
Achtung! Bevor Sie die Kaffeemaschine
des Wassers, wenn die Kaffeemaschine
nutzen, führen Sie die Druchspülung des
nicht benutzt wird oder vor ihrer Reinigung
Dampfsystems durch, stellen Sie die
immer ab.
Betriebsstufe der maximalen Wasserzufuhr
• Es ist nicht gestattet, das Gerät zu nut-
(60 ml) und wiederholen Sie die Prozedur
zen, wenn das Netzkabel oder der
zweimal oder dreimal (Siehe den Abschnitt
Netzstecker beschädigt ist, und auch
ZUBEREITUNG VON "ESPRESSO"),
beim nicht ordnungsgemäßen Betrieb
aber füllen Sie den Filterhalter mit dem ein-
oder beliebigen Störungen.
gebauten Ventil (3) mit dem gemahlenen
Um das Gerät zu reparieren, wen-
Kaffee nicht auf.
den Sie sich an ein autorisiertes
Kundenservicedienst.
ZUBEREITUNG VON KAFFEE
• Achten Sie darauf, dass das Netzkabel
„ESPRESSO“
an den Stellen frei nicht hängt oder mit
• Stellen Sie das Gerät auf eine gerade
heißen Gegenständen nicht in Berührung
stabile Oberfl äche auf.
kommt.
• Nehmen Sie den Wasserbehälter (9)
• Es ist nicht gestattet, die Kaffeemaschine
nach oben ab und füllen Sie ihn mit
auf heiße Oberfl ächen aufzustellen.
kaltem Wasser bis zur maximalen
• Nach dem Abschlaten der
Füllstandsgrenze MAX auf und stellen Sie
Kaffeemaschine schalten Sie diese mit
diesen zurück (Abb. 1, 2).
der Ein/Ausschalttaste, und danach
• Der Wasserbehälter (9) kann mit Wasser
ziehen Sie den Netzstecker aus der
gefüllt werden, ohne dass er abgenom-
Steckdose.
men wird, nutzen Sie dabei passendes
• Es ist nicht gestattet, die Kaffeemaschine
Geschirr.
bei der Temperatur unter 0°C aufzube-
Anmerkung: Wenn der Wasserstand im
wahren.
Wasserbehälter (9) unter die Grenzlinie
Die Kaffeemschine ist nur für den
MIN sinkt, ertönt ein Tonsignal und auf
Gebrauch im Haushalt geeignet.
dem LCDBildschirm wird das Symbol
(23) aufl euchten. Füllen Sie in diesem
BEWAHREN SIE DIESE BEDIENUNGSANLEITUNG
Falle den Wasserbehälter (9) mit Wasser
SORGFÄLTIG AUF.
bis zur maximalen Füllstandsgrenze MAX
auf.
VORBEREITUNG ZUR INBETRIEBNAHME
• Vergewissern Sie sich, dass die
Nehmen Sie die Kaffeemaschine aus der
Dampfzufuhr geschlossen ist. Drehen
Verpackung heraus.
12
1510.indd 121510.indd 12 02.04.2008 15:43:5902.04.2008 15:43:59

DEUTSCH
Sie dazu den Hebel (10) im Uhrzeigesinn
• Wählen Sie die Anzahl der Tassen, drü-
bis zum Einrasten.
cken Sie die Taste (15), dabei ertönt ein
• Stecken Sie den Stecker des Netzkabels in
Tonsignal und es wird das Symbol für die
die Steckdose, dabei ertönt ein Tonsignal
zweite Tasse (30) aufl euchten.
und auf dem Bildschirm erscheint das
• Stellen Sie die notwendige Menge des
Symbol (29), die Pumpe schaltet sich
nachgefüllten Wassers ein, drücken Sie
ein und in 5 Sekunden schaltet sich das
die Taste (17), 304050 oder 60 ml, da-
Gerät in den Wartungsbetrieb.
bei wird die Anzeige der Menge durch
• Drücken Sie die Ein/Ausschalttaste
Symbole (28) auf dem Bildschirm darge-
(14), dabei leuchtet der Bildschirm (6)
stellt.
auf, und der Boiler wird aufgeheizt, dabei
• Stellen Sie die notwendige Temperatur
erscheint ein drehendes Symbol (29) auf
der Kaffeezubereitung ein, drücken
dem Bildschirm (6).
Sie die Taste (18), die Anzeige der
• Stellen Sie auf dem Bildschirm die
Temperatur wird durch Symbole (24)
Wasserhörte ein, die für ihr Region üb-
auf dem Bildschirm (6) dargestellt.
lich ist, dazu drücken Sie und halten Sie
Ein Symbol entspricht der niedrigen
3 Sekunden die Taste (17), dabei ertönt
Temperatur, drei Symbole (24) entspre-
ein Tonsignal und erscheint ein blin-
chen der maximalen Temperatur.
kendes Signal (26), stellen Sie durch
• Abhängig von der Variante der
das wiederholte Drücken der Taste (17)
Kaffeenutzung, legen Sie die Kaffeepads
die Wasserhärte (HIHoch, MIMittel,
in den Filterhalter (3) ein und geben
LONiedrig) ein.
Sie den gemahlenen Kaffee zu, nutzen
Anmerkung: Die Wasserhärte können
Sie dabei den Messlöffel (33), pres-
Sie mit einem Teststreifen feststellen.
sen Sie den gemahlenen Kaffee mit
- Nehmen Sie den Teststreifen aus der
dem Verdichter (4) zusammen. Es wird
Verpackung (die Verpackung nicht weg-
empfohlen, den Filterhalter (3) vor der
werfen!) heraus
Nutzung aufzuwärmen, legen Sie es auf
- Halten Sie den Teststreifen 1 Sekunde
den Aufheizboden.
unter Wasserstrom
• Stellen Sie den Filterhalter (3) zurück und
- Warten Sie 15 Sekunden ab
drehen Sie ihn nach rechts bis zu Ende
- Vergleichen Sie die Ergebnisse auf dem
(Abb.3).
Teststreifen mit dem Farbendiagramm
• Stellen Sie unter den Filterhalter (3) eine
auf der Verpackung
oder zwei Tassen abhängig von der einge-
Wenn sich die Wasserhärte, die auf dem
stellten Variante der Kaffeezubereitung,
Bildschirm der Kaffeemaschine darge-
die vorläufi g auf dem Aufheizboden
stellt ist, von dem erhaltenen Ergebnis
(7) aufgewärmt wurden, und drücken
unterscheidet, stellen Sie eine andere
Sie die Einschalttaste (16). Nach der
Wasserhärte ein.
Beendigung der Kaffeezubereitung mit
• Wählen Sie die Nutzungsvariante:
der eingestellten Menge, ertönen zwei
Kaffeepads oder gemahlener Kaffee.
Tonsignale (Abb.4).
Drücken Sie und halten Sie 3 Sekunden
• Nach der Beendigung der
die Taste (15), dabei ertönt ein Tonsignal
Kaffeezubereitung nehmen Sie den
und es wird einer des Symbole (21 oder
Filterhalter (9) ab, drehen Sie ihn nach
22) aufl euchten, durch das wiederholte
links (Abb.3). Entfernen Sie Kaffeereste
Drücken und Halten der Taste (15) wählen
(Abb.8) und spülen Sie den Halter (3) un-
Sie ein notwendiges Symbol (21 oder 22).
ter dem Wasserstrom ab.
13
1510.indd 131510.indd 13 02.04.2008 15:43:5902.04.2008 15:43:59

DEUTSCH
Anmerkung: Nach der Beendigung
einprogrammierten Betriebsstufen P1
der Kaffeezubereitung hören Sie das
und P2 aus. Das Symbol (28) der ge-
Geräusch des austretenden Dampfes,
wählten Betriebsstufe leuchtet auf dem
es ist normal.
Bildschirm (6) auf.
Passen Sie auf den Indikator der
• Drücken Sie und halten Sie gleichzeitig
Nachfüllung der Auffangschale (13),
die Tasten (15) und (18) innerhalb drei
beim Austreten des Wassers aus der
Sekunden. Auf dem Bildschirm (6) er-
Öffnung des Siebes (2), nehmen Sie den
scheint das Symbol P1 oder P2 (28).
Sieb (2) von der Auffangschale (1) ab,
• Wählen Sie mit der Taste (15) eine
nehmen Sie die Auffangschale (1) von
oder zwei zubereiteten Tassen Kaffee
der Kaffeemaschineeinheit ab und gie-
- Symbole (27) (30) auf dem Bildschirm
ßen Sie Wasser von der Auffangschale
(6).
(1) ab, setzen Sie die Auffangschale (1)
• Drücken Sie und halten Sie innerhalb drei
zurück, danach den Sieb (2).
Sekunden die Taste (15) und wählen Sie
die Variante der Nutzung der Kaffeepads
INDIVIDUELLE PROGRAMMIERUNG
oder des gemahlenen Kaffees - Symbole
Sie können zwei Betriebsstufen der
(21), (22) auf dem Bildschirm (6).
Kaffeezubereitung nach Ihrem Geschmack
• Wählen Sie die Temperaturstufe der
unter Berücksichtigung der Temperatur,
Kaffeezubereitung, drücken Sie dafür die
der Zubereitung einer Tasse Kaffe oder
Taste (18), die Temperaturanzeige wird
von zwei Tassen Kaffee gleichzeitig, der
durch Symbole (24) auf dem Bildschirm
Zubereitung der Kaffe aus gemahlenen
(6) dargestellt. Ein Symbol entspricht der
Bohnen oder mit Kaffeepads und die
niedrigen Temperatur, drei Symbole (24)
Menge des zubereitenden Getränkes ein-
entsprechen der maximalen Temperatur.
programmieren.
• Drücken Sie und halten die Taste (16),
Um die Betriebsstufen einzuspeichern, soll
wenn Sie die notwendigen Mengen des
der Kaffee einmal zubereitet werden:
Getränkes gewählt haben, lassen Sie die
- Schalten Sie die Kaffeemaschine mit der
Taste (16) los.
Taste (14) ein.
• Nachdem Symbole P1 und P2 (28) auf
- Abhängig von der Variante der
dem Bildschirm (6) erlöschen, werden
Kaffeenutzung, legen Sie die Kaffeepads
Betriebsstufen eingespeichert.
in den Filterhalter (3) ein und geben
• Schalten Sie die Kaffeemaschine aus,
Sie den gemahlenen Kaffee zu, nutzen
drücken Sie dafür die Taste (4), nehmen
Sie dabei den Messlöffel (33), pressen
Sie den Filterhalter (3) ab, drehen Sie
Sie den gemahlenen Kaffee mit dem
ihn nach links (Abb. 3). Entfernen Sie
Verdichter (4) zusammen.
Kaffeereste (Abb. 8) und spülen Sie den
- Stellen Sie den Filterhalter (3) zurück und
Halter (3) unter dem Wasserstrom ab.
drehen Sie ihn nach rechts bis zu Ende
(Abb. 3).
Nutzung der einprogrammierten
- Stellen Sie unter den Filterhalter (3) eine
Betriebsstufen
oder zwei Tassen abhängig von der einge-
- Schalten Sie die Kaffeemaschine mit der
stellten Variante der Kaffeezubereitung
Taste (14) ein.
(Abb. 4).
- Abhängig von der Variante der
Kaffeenutzung legen Sie die Kaffeepads
SPEICHERUNG VON BETRIEBSSTUFEN
in den Filterhalter (3) ein und geben Sie
• Wählen Sie mit der Taste (17) eine der
den gemahlenen Kaffee zu, nutzen Sie
14
1510.indd 141510.indd 14 02.04.2008 15:43:5902.04.2008 15:43:59

DEUTSCH
dabei den Löffel (33), pressen Sie den
hen Sie den Hebel der Dampfzufuhr
gemahlenen Kaffee mit der Verdichter
(10) gegen Uhrzeigesinn, um die das
(4) zusammen.
Kondenswasser abzuleiten (Abb. 6).
- Stellen Sie den Filterhalter (3) zurück und
Gießen Sie das Wasser aus dem Behälter
drehen Sie ihn nach rechts bis zu Ende
ab.
(Abb. 3).
• Gießen Sie ca. 100 ml Milch oder
- Stellen Sie eine oder zwei Tassen unter
Milchsahne in einen passenden Behälter
den Filterhalter (3) abhängig von der ein-
ein (der Behälter, Milch oder Milchsahne
gestellten Variante der Kaffeezubereitung
sollen gut abgekühlt sein).
(Abb. 4).
• Stellen Sie den Behälter mit Milch oder
- Wählen Sie mit der Taste (17) eine der
Milchsahne unter das Rohr für die
einprogrammierten Betriebsstufen: P1
Capuccinozubereitung und öffnen Sie die
oder P2.
Dampfzufuhr, drehen Sie den Hebel der
- Drücken Sie die Taste (16).
Dampfzufuhr (10) gegen Uhrzeigesinn
- Nach der Beendigung der
bis zum Einrasten(Abb. 7).
Kaffeezubereitung schalten Sie die
• Sobald die notwendige Menge des
Kaffeemaschine aus, drücken Sie da-
Schaums erreicht wird, drehen Sie
für die Taste (14), nehmen Sie den
den Hebel der Dampfzufuhr (10) im
Filterhalter (3) ab, drehen Sie ihn nach
Uhrzeigesinn bis zum Einrasten.
links (Abb. 3). Entfernen Sie Kaffeereste
• Um die Verschmutzung der Rohröffnung
(Abb. 8) und spülen Sie den Halter (3)
für Capuccinovorbereitung zu vermei-
unter dem Wasserstrom ab.
den, stellen Sie den passenden Behälter
mit wenig Wasser unter das Rohr (12)
ZUBEREITUNG VON „CAPUCCINO“
und öffnen Sie die Dampfzufuhr für eini-
Mit der Kaffeemaschine kann Milch für die
ge Sekunden, drehen Sie den Hebel (10)
Zubereitung von Capuccino aufgeschäumt
bis zum Einrasten (Abb. 6).
werden oder andere Getränke mit heißem
Achtung! Seien Sie vor Verbrühungen
Dampf aufgewärmt.
mit heißem Dampf vorsichtig.
• Füllen Sie den Wasserbehälter (9) mit
Anmerkung: Im Prozess der
kaltem Wasser bis zum maximalen
Dampfbildung entstehen verschiedene
Grenzlinie MAX auf (Abb.. 1, 2).
Knackgeräusche. Diese Knackgeräusche
• Vergewissern Sie sich, dass die
entstehen infolge der periodische
Dampfzufuhr blockiert ist. Drehen Sie
Einschaltung der Pumpe, es ist normal.
dazu den Hebel (10) im Uhrzeigesinn bis
zum Einrasten.
WASSERKOCHEN
• Schalten Sie die Kaffeemaschine mit der
Mit der Kaffeemaschine kann Wasser für
Taste (14) ein.
die Teezubereitung aufgewärmt werden.
• Wählen Sie die Betriebsstufe der
• Füllen Sie den Wasserbehälter (9) mit
Dampfzufuhr mit der Taste (19), dabei
kaltem Wasser bis zum maximalen
wird Indikator (31) und das drehende
Grenzlinie MAX auf (Abb.. 1, 2).
Symbol (29) aufl euchten, das erlöscht,
• Vergewissern Sie sich, dass die
wenn die gewünschte Temperatur der
Dampfzufuhr blockiert ist. Drehen Sie
Dampfzufuhr erreicht wird.
dafür den Hebel (10) im Uhrzeigesinn bis
• Stellen Sie ein passendes Geschirr für
zum Einrasten.
den Wasserauffang unter das Rohr für
• Schalten Sie die Kaffeemaschine mit der
Capuccinozubereitung (12), und dre-
Taste (14) ein.
15
1510.indd 151510.indd 15 02.04.2008 15:43:5902.04.2008 15:43:59

DEUTSCH
• Wählen Sie die Betriebsstufe der
nen Papiertuch, einen trockenen Stoff un-
Heißwasserzufuhr, indem Sie die Taste
ter die Kaffeemaschine, oder stellen Sie
(19) drücken), wählen Sie das Symbol
die Kaffeemaschine auf eine passende
(32) auf dem Bildschirm (6).
Auffangsschale.
• Stellen Sie ein passendes Geschirr
Anmerkung: Das Erscheinen des Symbols
für den Wasserauffang unter das Rohr
(25) auf dem Bildschirm hängt von der
(12) und drehen Sie den Hebel der
Wasserhärte in ihrem Region ab und be-
Dampfzufuhr (10) gegen Uhrzeigesinn,
trägt:
um die den Dampf abzuleiten (Abb. 6).
HI – Hohe Wasserhärte 30 Liter
• Sobald die notwendige Menge Wasser
MI – Mittlere Wasserhärte 45 Liter
im Behälter erreicht wird, schalten Sie die
LO – Niedrige Wasserhärte 60 Liter
Wasserzufuhr ab, drehen Sie den Hebel
der Wasserzufuhr (10) im Uhrzeigesinn
Wenn auf dem Bildschirm (6) ein blinken-
bis zum Einrasten.
des Symbol (25) erscheint, führen Sie die
Achtung! Seien Sie vor Verbrühungen
Entkalkung der Kaffeemaschine aus.
mit heißem Dampf vorsichtig.
• Schalten Sie das Gerät vom Stromnetz
Anmerkung:
ab, warten Sie es ab, bis sie komplett ab-
Im Prozess des Wasseraufkochens
gekühlt wird.
wird periodisch die Pumpe einge-
• Drehen Sie den Filterhalter nach links
schaltet, es ist normal.
und nehmen Sie ihn ab.
Für den Übergang in die Betriebsstufe
• Drehen Sie die Befestigungsschraube
"ZUBEREITUNG VON ESPRESSO"
(a) mit einem passenden
aus der Betriebsstufe „ZUBEREITUNG
Kreuzschraubendreher, drehen Sie ihn
VON CAPUCCINO“ oder
dabei im Uhrzeigesinn, hehmen Sie den
„WASERAUFKOCHEN“ drücken Sie ein-
Filtersieb (b) ab (Abb.9).
mal die Ein/Ausschalttaste (14).
• Bei der Ablagerung des Kalks auf
dem Filter (b) stecken Sie ihn in die
FUNKTION DER AUTOMATISCHEN
Zitronensäure zum Entkalken ein.
ABSCHALTUNG
• Bereiten Sie die Lösung mit der
Wenn Sie die Kaffeemaschine innerhalb
Zitronensäure: 2 Teelöffel für 1 Liter
von 1 Stunde nicht betätigen, schaltet sich
Wasser und gießen Sie die Lösung in den
diese automatisch aus.
Behölter (9) ein. Stellen Sie den Behälter
Schalten Sie die Kaffeemaschine mit der
wieder auf.
Taste (14) aus.
• Nehmen Sie einen passenden
Behälter für die Flüssigkeit, mit dem
ENTKALKUNG
Vassungsvermögen ca. 0,6 l und
Wenn Sie auf dem Bildschirm (6) ein blinken-
stellen Sie ihn auf den Sieb (2) der
des Symbol (25) sehen, soll die Operation
Wasserauffangschale (1). Stellen Sie
nach der Entkalkung des Heißelementes
den gewählten Behälter so auf, dass
der Kaffeemaschine mit Hilfe der
das Rohr für Capuccinozubereitung (12)
Zitronensäure ausgeführt werden. Bei der
auch ins Wasser getaucht wird.
Entkalkung treffen Sie Massnahmen, um
• Stecken Sie den Netzstecker in die
die Reste der Säure vom Tischöberfl äche
Steckdose ein und schalten Sie die
zu entfernen, seien Sie besonders vorsich-
Kaffeemaschine mit der Taste (14) ein.
tig, wenn die Tischoberfl äche aus Marmor
• Warten Sie, bis sich die Kaffeemaschine aufge-
oder Stein hergestellt ist. Legen Sie ei-
wärmt wird, es leuchtet das Symbol (29) auf.
16
1510.indd 161510.indd 16 02.04.2008 15:43:5902.04.2008 15:43:59

DEUTSCH
• Drücken Sie gleichzeitig die Tasten (17),
• Schalten Sie das Gerät vom Stromnetz
(19), dabei schaltet sich die Pumpe ein,
ab und warten Sie ab, bis es abgekühlt
die Wasserzufuhr startet, das Symbol der
wird.
Entkalkung (26) wird stets aufl euchten,
• Stellen Sie den Filtersieb (b) zurück und
es schaltet sich auch das Heizelement
schrauben Sie die Befestigungsschraube
ein und das Symbol (29) leuchtet auf.
(a) mit einem Kreuzschraubendreher zu,
aufl euchten.
drehen Sie ihn dabei im Uhrzeigesinn.
Zum Durchspülen des Rohrs für die
Capuccinozubereitung (12) öffnen Sie
WARTUNG
die Dampfzufuhr, drehen Sie für 8ß10
Wischen Sie das Gehäuse der
Sekunden den Hebel der Dampfzufuhr
Kaffeemaschine mit einem feuchten Tuch
(10) gegen Uhrzeigesinn. Unterbrechen
ab. Es ist nicht gestattet, Metallbürsten und
Sie die Dampfzufuhr, drehen Sie dazu
Abrasivmittel für die Reinigung des Geräts
den Hebel (10) im Uhrzeigesinn bis zum
zu benutzen. Es ist nicht gestattet, das
Einrasten.
Gerät ins Wasser oder andere Flüssigkeiten
• Nach dem Durchlauf von ca, 0,5 l
zu tauchen. Spülen Sie abnehmbare Teile
Wasser, schaltet sich die Pumpe aus und
der Kaffeemaschine mit warmem Wasser
die Kaffeemaschine schaltet sich in den
mit einem weichen Reinigungsmittel, wi-
Wartebetrieb um.
schen Sie und trocknen Sie diese ab.
• Nehmen Sie den aufgestellten Behälter
ab, dabei ertönt ein Tonsignal, und auf
Wasserauffangsschale (1)
dem Bildschirm leuchtet das Symbol (23)
• Nehmen Sie den Sie (2) von der
auf, gießen Sie Wasser aus dem Behälter
Auffangschale (1) ab, nehmen Sie die
ab und stellen Sie diesen wieder auf den
Auffangschale (1) von der Haupteinheit
Sieb (2) der Wasserauffangschale (1).
der Kaffeemaschine ab und gießen Sie das
Stellen Sie den gewählten Behälter so auf,
Wasser von der Auffangschale weg, stel-
dass das Rohr für Capuccinozubereitung
len Sie die Auffangschale (1) zurück, stel-
(12) auch in den Behälter getaucht wird.
len Sie den Sieb (2) auf die Auffangschale
• Nehmen Sie und spülen Sie den
(1) auf. Bei der Notwendigkeit spü-
Wasserbehälter (9) ab, füllen Sie
len Sie die Auffangschale (1) und den
ihn mit Wasser bis zur maximalen
Sieb (2) mit Wasser mit einem weichen
Füllstandgrenze und stellen Sie diesen
Reinigungsmittel, spülen Sie und trock-
zurück.
nen Sie diese ab.
Die Pumpe schaltet sich ein und
der Durchlaufbetrieb startet. Zum
Durchspülen des Rohrs für die
Capuccinozubereitung (12) öff-
nen Sie die Dampfzufuhr, drehen
Sie für 2-3 Sekunden den Hebel der
Dampfzufuhr (10) gegen Uhrzeigesinn
bis zum Einrasten. Unterbrechen Sie die
Dampfzufuhr, drehen Sie dafür den Hebel
(10) im Uhrzeigesinn bis zum Einrasten.
• Nachdem das Wasser aufkocht, schaltet
sich die Kaffeemaschine automatisch
ab.
17
1510.indd 171510.indd 17 02.04.2008 15:43:5902.04.2008 15:43:59
DEUTSCH
Störungen, ihre Ursachen und Beseitigungsmethoden:
Störung Ursache Beseitigung
Fertiger Kaffee
Wärmen Sie vorher das Zubehör
«Espresso» ist
Tassen und Filterhalter (3)
(Tassen und Filterhalterung) auf.
nicht ausrechend
Waren kalt.
Siehe den Abschnitt „Zubereitung von
heiß
„Espresso“.
Filterhalter (3) ist nicht ordnungsgemäß
Siehe Abschnitt „Zubereitung von
aufgesetzt oder nicht bis zum Einrasten
„Espresso“.
gedreht.
Ausfl ießen von Kaffee
An den Rändern hat sich der Kaffeesatz
Reinigen Sie Ränder des Filters.
aus Filterhalter (3).
gesammelt.
Die Dichtung an der Stelle der Aufsetzung
Wenden Sie sich an ein autorisiertes
des Halters (3) ist beschädigt.
Servicezentrum.
Gießen Sie das Wasser in den
Im Behälter (9) ist kein Wasser vorhanden.
Wasserbehälter (9) ein.
Der Behälter (9) wurde nicht richtig auf-
Drücken Sie auf den Behälter (9) von
gesetzt.
oben, damit er richtig sitzt.
Beim Anschalten der
Gemahlener Kaffee ist zu trocken, die
Wasserzufuhr lärmt die
Pumpe kann den notwendigen Druck nicht
Nutzen Sie den frisch gemahlenen Kaffee.
Pumpe
bilden.
Gießen Sie das Wasser in den
Im Behälter (9) ist kein Wasser vorhanden.
Wasserbehälter (9) ein.
Der Behälter (9) wurde nicht richtig auf-
Drücken Sie auf den Behälter (9) von
gesetzt.
oben, damit er richtig sitzt.
Im Filterhalter (3) ist der Filter ver-
Spülen Sie den Filterhalter (3).
schmutzt. Grobgemahlener oder zu stark
Nutzen Sie grobgemahlenen Kaffee.
zusammengepresster Kaffee
Wasser läuft nicht durch.
Nehmen Sie den Filtersieb (b)ab und
Der Filtersieb (b)wurde verschmutzt
stecken Sie ihn in die Zitronensäure zum
(Abb.9)
Entkalken. Danach spülen Sie und setzen
Sie ihn wieder zurück.
Im Gerät bildete sich der Kalk. Siehe den Abschnitt „Entkalkung“.
Kaffee ist zu grob gemahlen Nutzen Sie feingemahlenen Kaffee.
Nicht ausreichende Menge des gemahle-
Nutzen Sie einen Dosierlöffel.
Wasser läuft zu schnell
nen Kaffee.
aus.
Gemahlener Kaffee ist nicht ausreichend
Pressen Sie gemahlenen Kaffee.
zusammengepresst.
Kaffee ist zu grob gemahlen. Nutzen Sie feingemahlenen Kaffee.
Gemahlener Kaffee ist nicht ausreichend
Pressen Sie gemahlenen Kaffee zusam-
zusammengepresst.
men.
Bei Kaffee „Espresso“
Gemahlener Kafee ist nicht frisch oder zu
Nutzen Sie frischgemahlenen Kaffee.
bildet sich kein Schaum
trocken.
Der Aufsatz für Capuccino ist verschmutzt. Siehe den Abschnitt „Entkalkung“.
Milch ist nicht frisch. Nutzen Sie frische Milch.
Milch schäumt sich
schlecht auf.
Milch ist warm. Kühlen Sie Milch im Kühlschrank.
18
1510.indd 181510.indd 18 02.04.2008 15:43:5902.04.2008 15:43:59
DEUTSCH
DAS GERÄT IST NUR FÜR DEN
Die Lebensdauer des Gerätes beträgt
GEBRAUCH IM HAUSHALT GEEIGNET
nicht weniger, als 3 Jahre
Enthält keine ersetzbare Teile.
Achtung: Die Garantie erstreckt sich auf
Gewährleistung
die Kaffeemaschine nicht, die infolge der
Ausführliche Bedingungen der
Kalkablagerung nicht richtig läuft.
Gewährleistung kann man beim Dealer,
der diese Geräte verkauft hat, bekom-
Lieferumfang
men. Bei beliebiger Anspruchserhebung
Gehäuse der Kaffeemaschine – 1 St.
soll man während der Laufzeit der vorlie-
Wasserbehälter – 1 St.
genden Gewährleistung den Check oder
Wasserauffangschale (mit Sieb) – 1 St.
die Quittung über den Ankauf vorzulegen.
Filterhalterung – 1 St.
Messlöffel – 1 St.
Das vorliegende Produkt ent-
Teststreifen für die Feststellung der
spricht den Forderungen
Wasserhärte – 1 St.
der elektromagnetischen
Verträglichkeit, die in
Technische Eigenschaften
89/336/EWG -Richtlinie des
Stromversorgung: 220 240 V ~ 50 Hz
Rates und den Vorschriften
Leistung: 1100 1300 W
73/23/EWG über die
Abnehmbarer Wasserbehälter mit
Niederspannungsgeräte vorge-
Fassungsvermögen 1500 ml
sehen sind.
Der Hersteller behält sich das Recht vor
die Charakteristiken des Gerätes ohne
Vorbescheid zu ändern.
19
1510.indd 191510.indd 19 02.04.2008 15:43:5902.04.2008 15:43:59

РУССКИЙ
ОПИСАНИЕ
воды (30-40-50-60 мл)/автоматичес-
1. Съемный поддон для воды
ких режимов Р1, Р2
2. Решетка поддона
29. Символ ожидания готовности к работе
3. Держатель фильтра со встроенным
30. Индикация второй приготовляемой
клапаном
чашки
4. Уплотнитель кофе
31. Символ режима подачи пара
5. Панель управления
32. Символ режима подачи горячей воды
6. Дисплей
33. Мерная ложка
7. Площадка для подогрева чашек
34. Тестовая полоска для определения
8. Крышка резервуара для воды
жесткости воды
9. Резервуар для воды
10. Ручка подачи пара/горячей воды
ПРАВИЛА ТЕХНИКИ БЕЗОПАСНОСТИ
11. Подсветка
Прежде чем начать пользоваться кофе-
12. Трубка-каппучинатор
варкой, внимательно прочитайте инструк-
13. Индикатор заполнения поддона для
цию по эксплуатации. Неправильное обра-
воды
щение с прибором может привести к его
поломке, нанести материальный ущерб и
Панель управления
причинить вред здоровью пользователя.
14. Кнопка включения/выключения
• Используйте кофеварку только по ее
15. Кнопка выбора режима приготовления
прямому назначению.
одной или двух чашек кофе/приготов-
• Не используйте кофеварку вне помеще-
ления кофе в капсулах (молотый кофе
ний.
в виде таблетки в бумажной упаков-
• Используйте только те принадлежности,
ке)/использования молотого кофе
которые входят в комплект поставки.
16. Кнопка включения приготовления
• Перед включением кофеварки убеди-
кофе
тесь, что напряжение и частота в элек-
17. Кнопка количества доливаемой воды/
тросети соответствуют маркировке на
выбора автоматических режимов Р1,
приборе.
Р2/выбора жесткости воды (HI, MI, LO)
• Для подключения кофеварки исполь-
18. Кнопка установки температурного ре-
зуйте сетевую розетку с контактами за-
жима
земления.
19. Кнопка выбора подачи пара/горячей
• Во избежание риска возникновения
воды
пожара не пользуйтесь переходниками
при подключении прибора к электри-
Дисплей
ческой розетке.
20. Символ включения/выключения
• Перед включением кофеварки убеди-
21. Символ режима приготовления кофе в
тесь, что все съемные детали установ-
капсулах
лены правильно.
22. Символ режима приготовления напит-
• Не включайте кофеварку без воды. Для
ка из молотого кофе
варки кофе используйте только холод-
23. Индикация малого количества воды в
ную воду.
резервуаре
• Не дотрагивайтесь до горячих поверх-
24. Символы установки температурного
ностей.
режима
• Чтобы избежать пожара, удара элект-
25. Символ режима удаления накипи
рическим током, не погружайте сетевой
26. Индикация жесткости воды
шнур или кофеварку в воду или другие
27. Индикация одной приготовляемой
жидкости.
чашки
• Устанавливайте устройство на ровную
28. Индикация количества доливаемой
устойчивую поверхность.
20
1510.indd 201510.indd 20 02.04.2008 15:43:5902.04.2008 15:43:59


