Vitek VT-4060 SR: инструкция
Раздел: Бытовая, кухонная техника, электроника и оборудование
Тип: Домашний кинотеатр
Инструкция к Домашнему кинотеатру Vitek VT-4060 SR
Оглавление
- Инструкция по эксплуатации VT-4060SR Домашний кинотеатр ВАЖНЫЕ ЗАМЕЧАНИЯ
- ВАШ DVDПРОИГРЫВАТЕЛЬ НАИЛУЧШЕЕ МЕСТО ДЛЯ УСТАНОВКИ ЧИСТОТА ИЗОБРАЖЕНИЯ ВОСПРОИЗВОДИМЫЕ ДИСКИ ЦИФРОВОЙ АУДИОВЫХОД АНАЛОГОВЫЙ АУДИОВЫХОД СИСТЕМА ПРЕДОХРАНЕНИЯ ЛАЗЕРНОЙ ГОЛОВКИ ОТ ПЕРЕПАДОВ НАПРЯЖЕНИЯ ДИСКИ ИСПОЛЬЗОВАНИЕ ДИСКОВ
- ПЕРЕДНЯЯ ПАНЕЛЬ ЗАДНЯЯ ПАНЕЛЬ ОБРАЩЕНИЕ С ПУЛЬТОМ ДИСТАНЦИОННОГО УПРАВЛЕНИЯ
- БАТАРЕЙКИ
- КОЛОНКИ РАЗМЕЩЕНИЕ КОЛОНОК
- GENERAL SETUP PAGE (страница общих настроек) ПОДСОЕДИНЕНИЕ КОЛОНОК ПОДСОЕДИНЕНИЕ АНТЕННЫ
- ЗВУКОВЫЕ НАСТРОЙКИ НАСТРОЙКИ АНАЛОГОВОГО ЗВУКОВОГО КАНАЛА НАСТРОЙКИ ЦИФРОВОГО ЗВУКОВОГО КАНАЛА
- УСТАНОВКИ KARAOKE НАСТРОЙКИ ВИДЕО КОМПОНЕНТНОЕ ВИДЕО ПАРОЛЬ ЦВЕТОВЫЕ НАСТРОЙКИ
- ПРОСЛУШИВАНИЕ РАДИО ФУНКЦИИ
- КАК НАЙТИ НУЖНЫЙ ЗАГОЛОВОК
- Файлы JPEG
- Устранение неисправностей DVDпроигрыватель (характеристики)
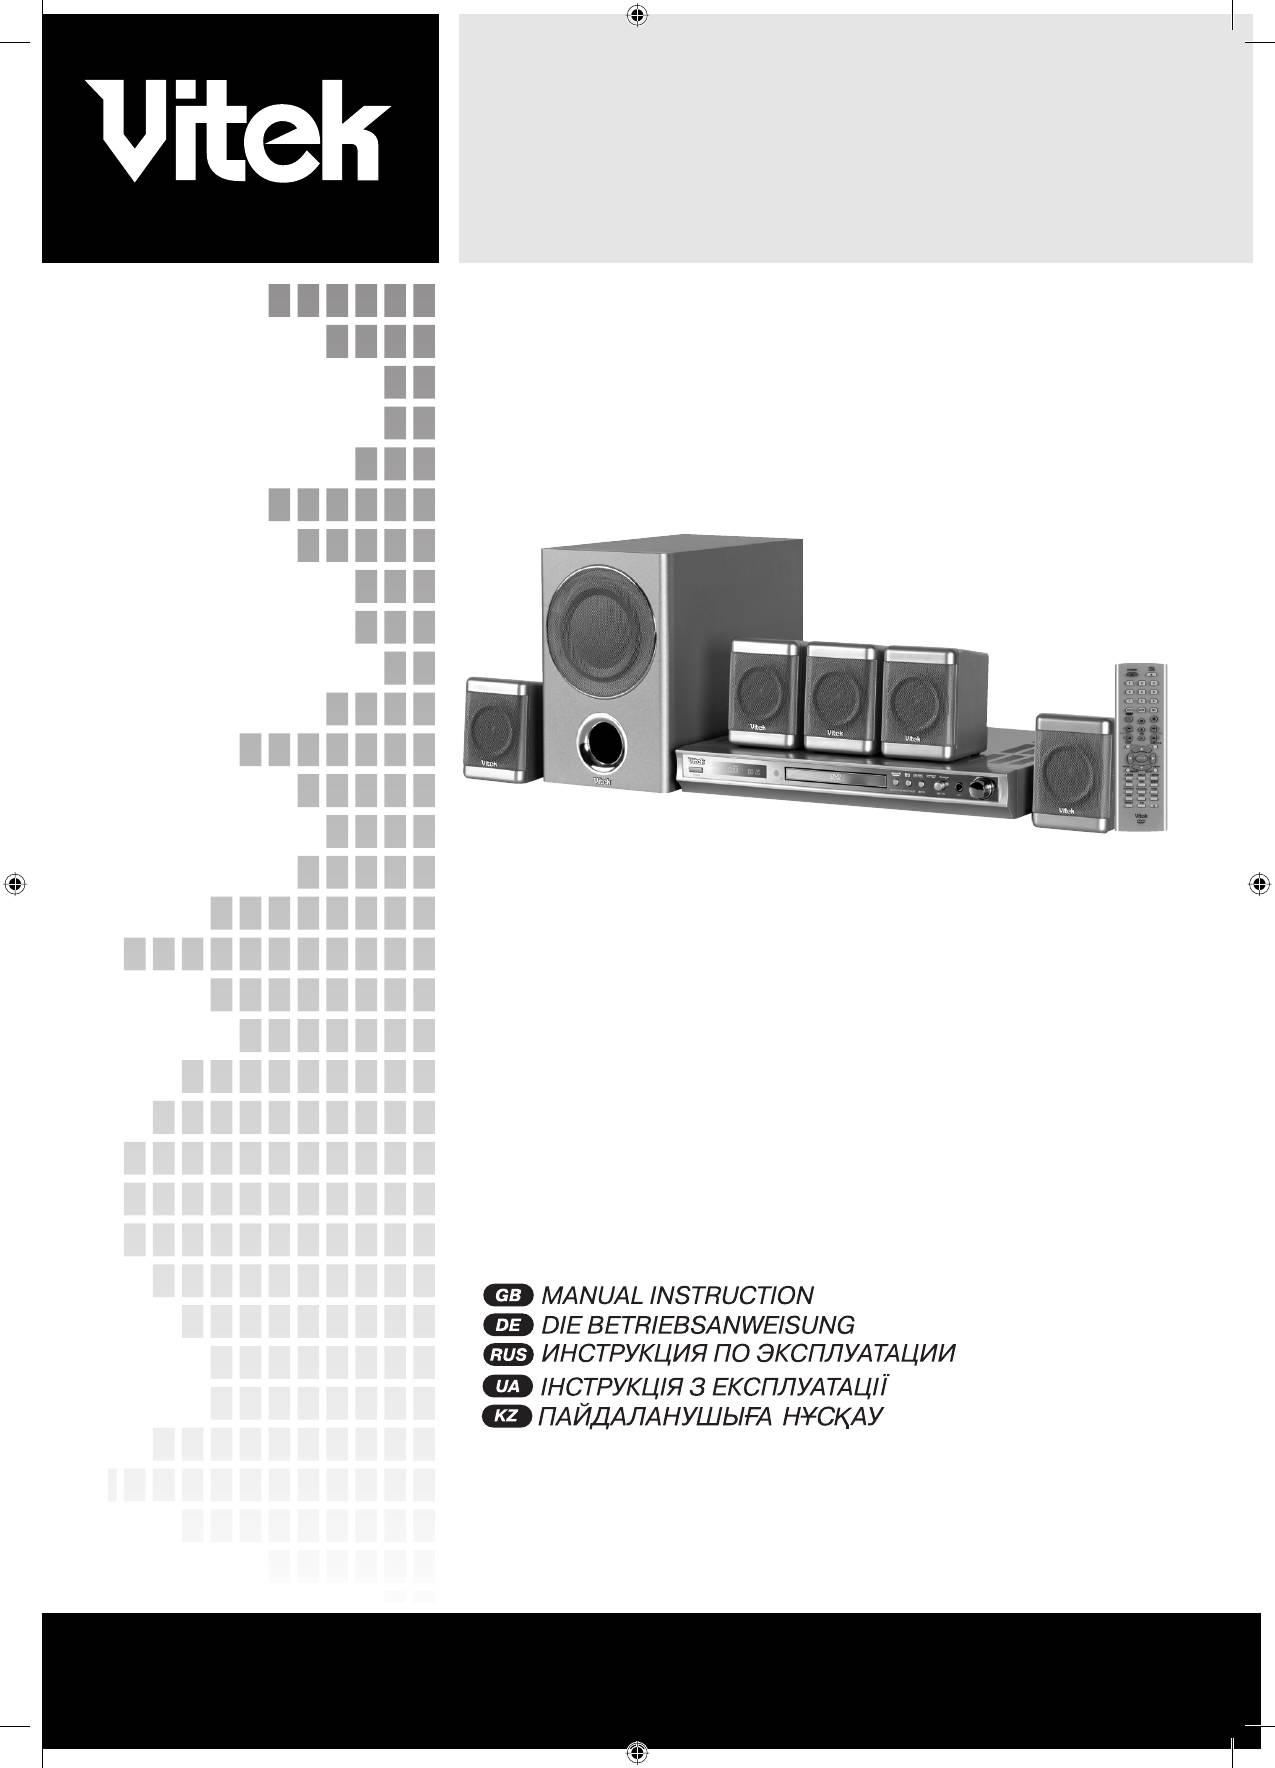
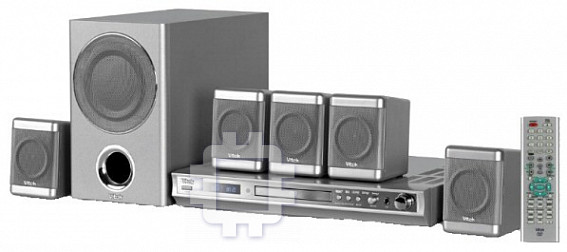
DVD 5.1 HOME THEATRE SYSTEM
MODEL VT-4060 SR
INSTRUCTION MANUAL
2
13
25
37
49
www.vitek.com
4060.indd 14060.indd 1 23.10.2006 9:24:5023.10.2006 9:24:50
ENGLISH
VT- 4060SR
Cleaning
DVD 5.1 HOME THEATRE SYSTEM
Always unplug this unit from the wall electrical outlet before cleaning. Do
not use liquid or aerosol cleaners; use a damp cloth for cleaning.
Lightning
CAUTION
For added product protection during a lightning storm or when it is left
Risk of electric shock
unattended and unused for long periods of time, unplug it from the wall
DO NOT OPEN
outlet and/or disconnect the antenna or cable system. This will prevent
WARNING: In order to reduce the risk of fire or electrical shock,
damage to the product due to lightning and powerline surge.
do not remove the device panels. Contact qualified personnel for
Object and Liquid Entry
service and repairs.
Never push objects of any kind into this product through openings as
they may touch dangerous voltage points or shortout parts that could
The lightning bolt in a triangle symbol indicates to the
result in a fire or electric shock. Never spill liquid of any kind on or into
user that there are dangerous voltages inside the device
the product.
that can result in electrical shock.
Outdoor Antenna Grounding
If an outside antenna or cable system is connected to the product,
The exclamation point in a triangle symbol indicates to
be sure the antenna or cable system is grounded so as to provide
the user important operating instructions and technical
protection against voltage surges and built up static charges. Article 810
service information in the accompanying literature.
of the National Electrical Code, ANSI/NFPA 70, provides information
with regard to proper grounding of the mast and supporting structure,
Indicates a device using a laser. This symbol
grounding of the leadin wire to an antenna discharge unit, size or
must be located on the rear panel of a
grounding conductors, location of antenna discharge unit, connection to
CLASS 1
device, indicating that the device contains a
grounding electrodes, and requirements for the grounding electrode.
LASER PRODUCT
Class 1 laser and that laser rays are in use.
Overloading
The possibility of laser exposure does not
Do not overload wall outlets, extension cords, or integral convenience
exist without opening the device.
receptacles, as this may result in a fire or electric shock.
Power
Cord Protection Power supply cords should be routed so that they
CAUTION! IN ORDER TO AVOID ELECTRICAL SHOCK, FIRST
are not likely to be walked on or pinched by items placed upon or
CONNECT THE CORD TO THE PLAYER, AND THEN INSERT PLUG
against them, paying particular attention to cords at plugs, convenience
INTO THE ELECTRICAL OUTLET.
receptacles, and the point where they exit from the product.
Power Lines
CAUTION! This device contains a DVD player that uses a laser system.
An outside antenna system should not be located in the vicinity of
Do not open the case in order to avoid exposure to laser radiation.
overhead power lines or other electric light or power circuits, or where
Invisible laser radiation is present when the case is open. DO NOT LOOK
it can fall into such power lines or circuits. When installing an outside
AT THE LASER RAYS. Furthermore, use of the control system or making
antenna system, extreme care should be taken to keep from touching
adjustments or completing operations, other than those described in
such power lines or circuits as contact with them might be fatal.
these instructions, can lead to dangerous exposure to radiation.
Power Sources
We urge you to carefully study these operating instructions and save
This product should be operated only from the type of power source
them for future use. Contact a service center (if necessary) for service
indicated on the marking label. If you are not sure of the type of power
and repairs.
supply to your home, consult your product dealer or local power
company. For products intended to operate from battery power or
CAUTION! DO NOT OPEN THE UPPER HOUSING OF THE DEVICE DUE
other sources, refer to the operating instruction. The DVD home theater
TO RISK OF ELECTRIC SHOCK. THERE ARE NO USER-SERVICEABLE
operates on 100240V~50/60Hz. Do not turn off unit immediately after
PARTS INSIDE. EMPLOY THE SERVICES OF QUALIFIED PERSONNEL.
turning on; wait at least 10 seconds.
Replacement Parts
ATTENTION
If replacement parts are required, be sure the service technician has
IN ORDER TO AVOID ELECTRICAL SHOCK, THE WIDE PRONG OF THE
used replacement parts specified or have the same characteristics as
PLUG SHOULD BE FIRMLY AND COMPLETELY INSERTED INTO THE
the original part. Unauthorized substitutions may result in fire, electric
OUTLET. WATER MUST NOT SPILL INTO THE DEVICE. DO NOT PLACE
shock, or other hazards.
CONTAINERS OF LIQUIDS, LIKE VASES, ONTO THE DEVICE.
Safety Check
Upon completion of any service or repairs to this product, ask the
Features
service technician to perform safety checks to determine that the
Thank you for purchasing our product. Please read this manual carefully
product is in proper operating condition.
before connection and operation. Please keep this manual for future
Servicing
reference. This DVD player is a new generation home player which can
Do not attempt to service this product yourself as opening or removing
produce high quality video and audio for your continued enjoyment.
covers may expose you to dangerous voltage or other hazards. Refer all
• built in Dolby D , LPCM, MPEG etc. digital audio decoder;
servicing to qualified service personnel.
• HiFi, 96kHz/24bit audio digital processor;
TV System
• COAXIAL digital audio output;
This unit is compatible with television sets featuring either the NTSC or
• compatible with DVD/VCD/CD/MP3/JPEG/ PICTURE CD/MPEG4
PAL color system.
etc.;
Ventilation
• AM/FM stereo digital tuning system;
Slots and openings in the cabinet are provided for ventilation and to
• high quality amplifier.
ensure reliable operation and protection from overheating. These
openings should never be blocked by placing the product on a bed,
IMPORTANT NOTICES:
sofa, rug, or other similar surface. The product should not be placed in a
CAUTION: Is it important that you read and follow all of the instructions
builtin installation such as a bookcase or rack unless proper ventilation
in this booklet and any marked on the unit itself. Retain this booklet
is provided. Never place this product near a heat source, such as heat
for future reference. Accessories Never place this product on an
registers, stoves, radiators, or any other product that produces heat.
unstable platform, stand, cart, wall mount, shelf or table. The product
Water and Moisture
may fall, causing serious personal injury to person and pet, as well as
Do not use this product near sources of water and moisture, such as
seriously damaging the product. Any mounting of the product should
bath tub, wash bowl, kitchen sink, or wash machine; in a wet, damp
follow the manufacturer s instruction, and use a mounting accessory
basement; or near a swimming pool or similar locations. If moisture
recommended by the manufacturer. This unit while positioned on some
condensation occurs, remove any disc, connect the unit power cord to
type of cart must be moved with care. Quick stops, excessive force,
a wall outlet, turn the unit on, and leave it on for two to three hours. By
and uneven surfaces may cause the product and cart combination to
then, the unit will have warmed up and evaporated any moisture.
overturn. The apparatus shall not be exposed to dripping or splashing
and that no object filled with liquids, such as vases, shall be placed on
the apparatus.
2
4060.indd 24060.indd 2 23.10.2006 9:25:1123.10.2006 9:25:11
ENGLISH
ABOUT YOUR DVD PLAYER
The following will help you get the most enjoyment from your DVD receiver system.
BEST LOCATION
The unit should be placed on a firm, flat surface, away from VCRs, stereos, radios, or large speakers, as the magnetic flux from these devices may
cause distortion in the sound and a poor picture. If placed in a cabinet, be sure there is at least 1 m
2
of free space completely around the unit for
proper ventilation.
TO OBTAIN A CLEAR PICTURE
A DVD receiver is a precision device. If the optical pickup lens and disc drive parts become dirty or worn down, picture quality will become poor. To
obtain a clear picture, regular inspection and maintenance are recommended every 1,000 hours of use, depending on the operating environment.
Contact dealer for details.
PLAYABLE DISCS
This DVD receiver system will play the following types of discs: DVD, MP3,CD, CDRand CDRW with supererror correction ability. It is also capable
of displaying picture CD and digital photo album. It supports eight languages, up to 32 subtitles, and multiangle viewing. It features easy setup and
operation with onscreen menus. It has full function CPU upgrade able capability.
DIGITAL AUDIO OUTPUT
The unit coaxial output capability enables you to connect an external sixchannel AV amplifier and processor with builtin Dolby Digital code and
MPEG modulating capacity with just one cord. This enables you to conveniently enjoy different DVD, CD, and Mp3 discs.
ANALOG AUDIO OUTPUT
Speaker system plugandplay convenience through the builtin sixchannel power amplifier eliminates the use of an external power amplifier.
LASERHEAD OVERCURRENT PROTECTION SYSTEM
To extend the service life of the laser head, the unit includes a unique laserhead over current protection system, ensuring a constant laser current.
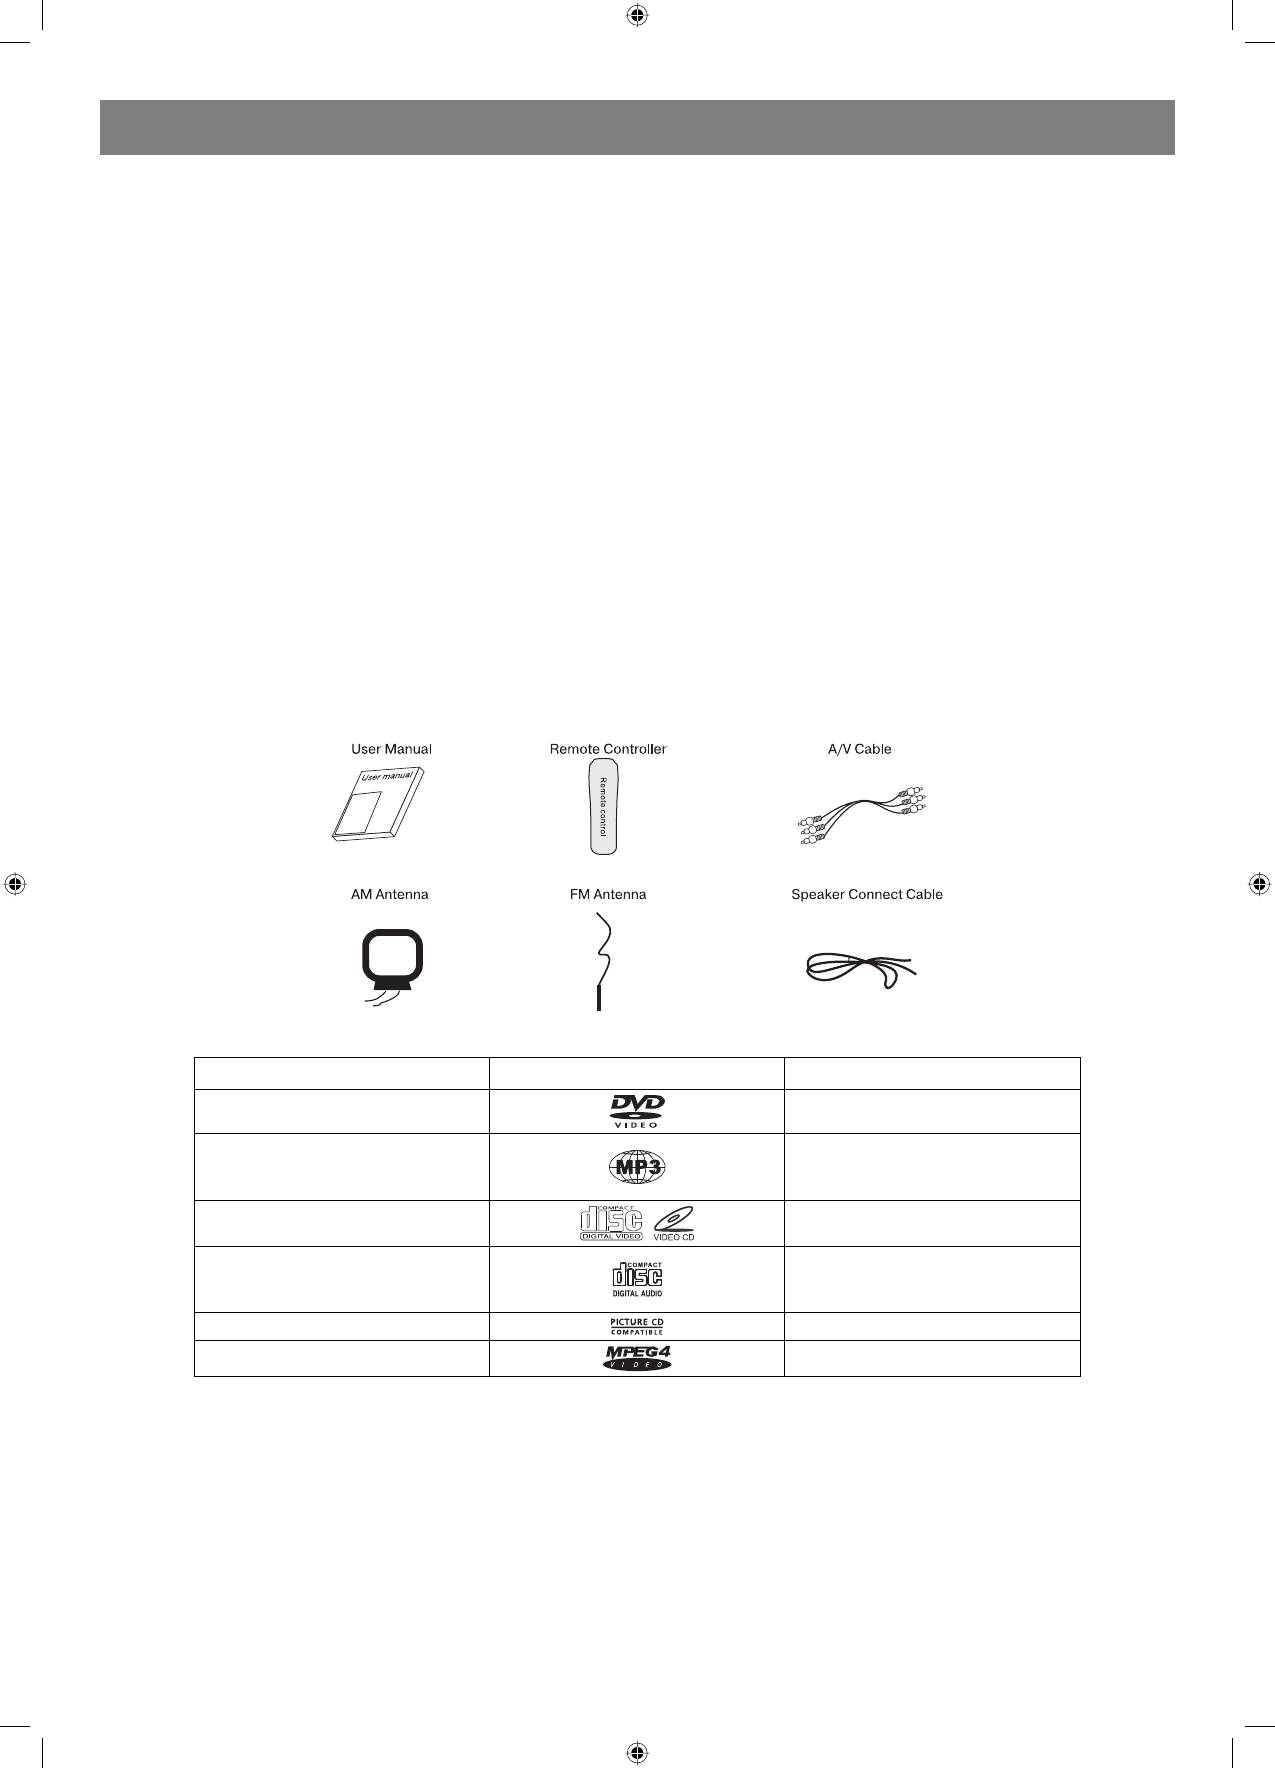
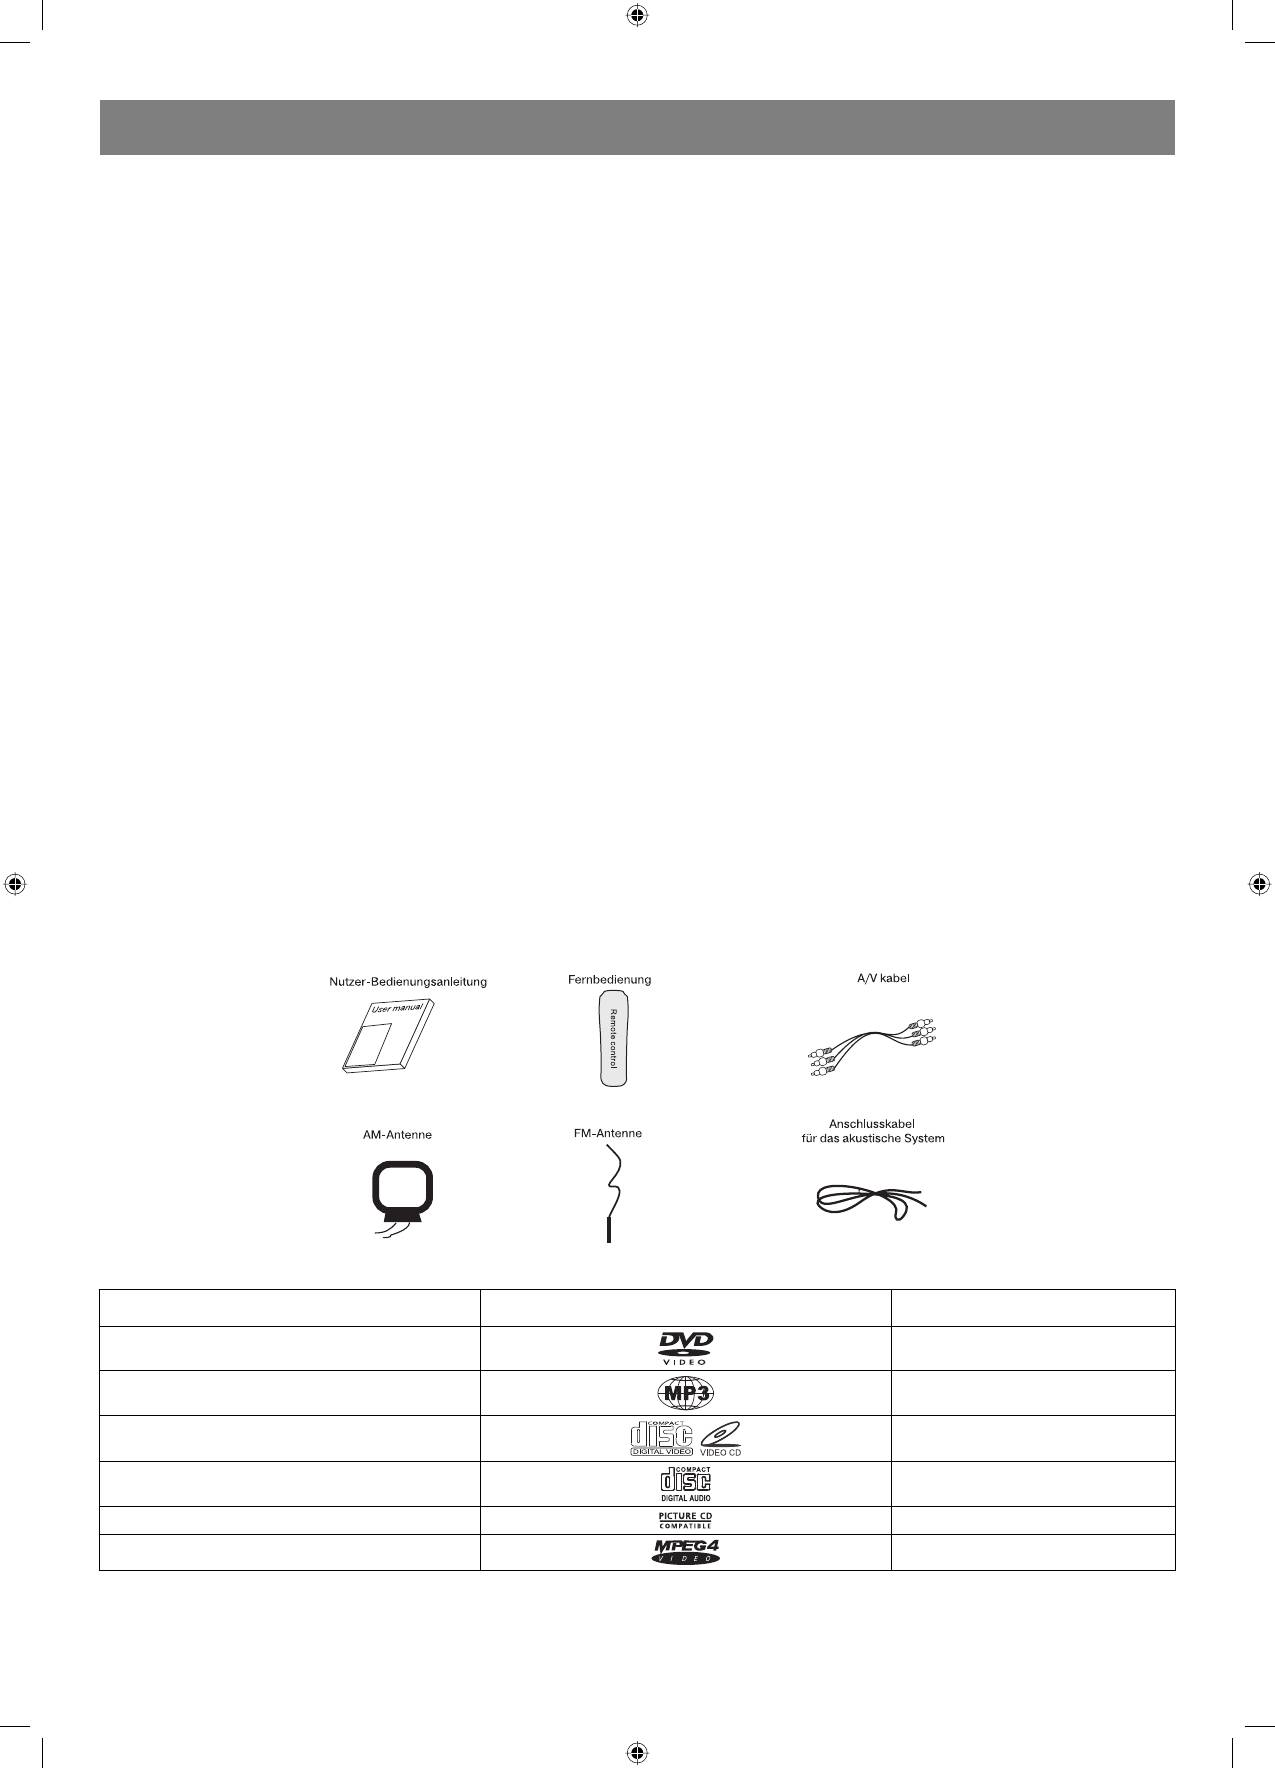
Accessories
This unit can play the following types of discs
Disc types Symbol Contents
DVD
Audio + Video
Audio
MP3
VideoCD (VCD)
Audio + Video
Audio
CDDA
Picture CD JPEG Photo CD
MPEG4
Audio + Video
DISCS
USE OF DISC
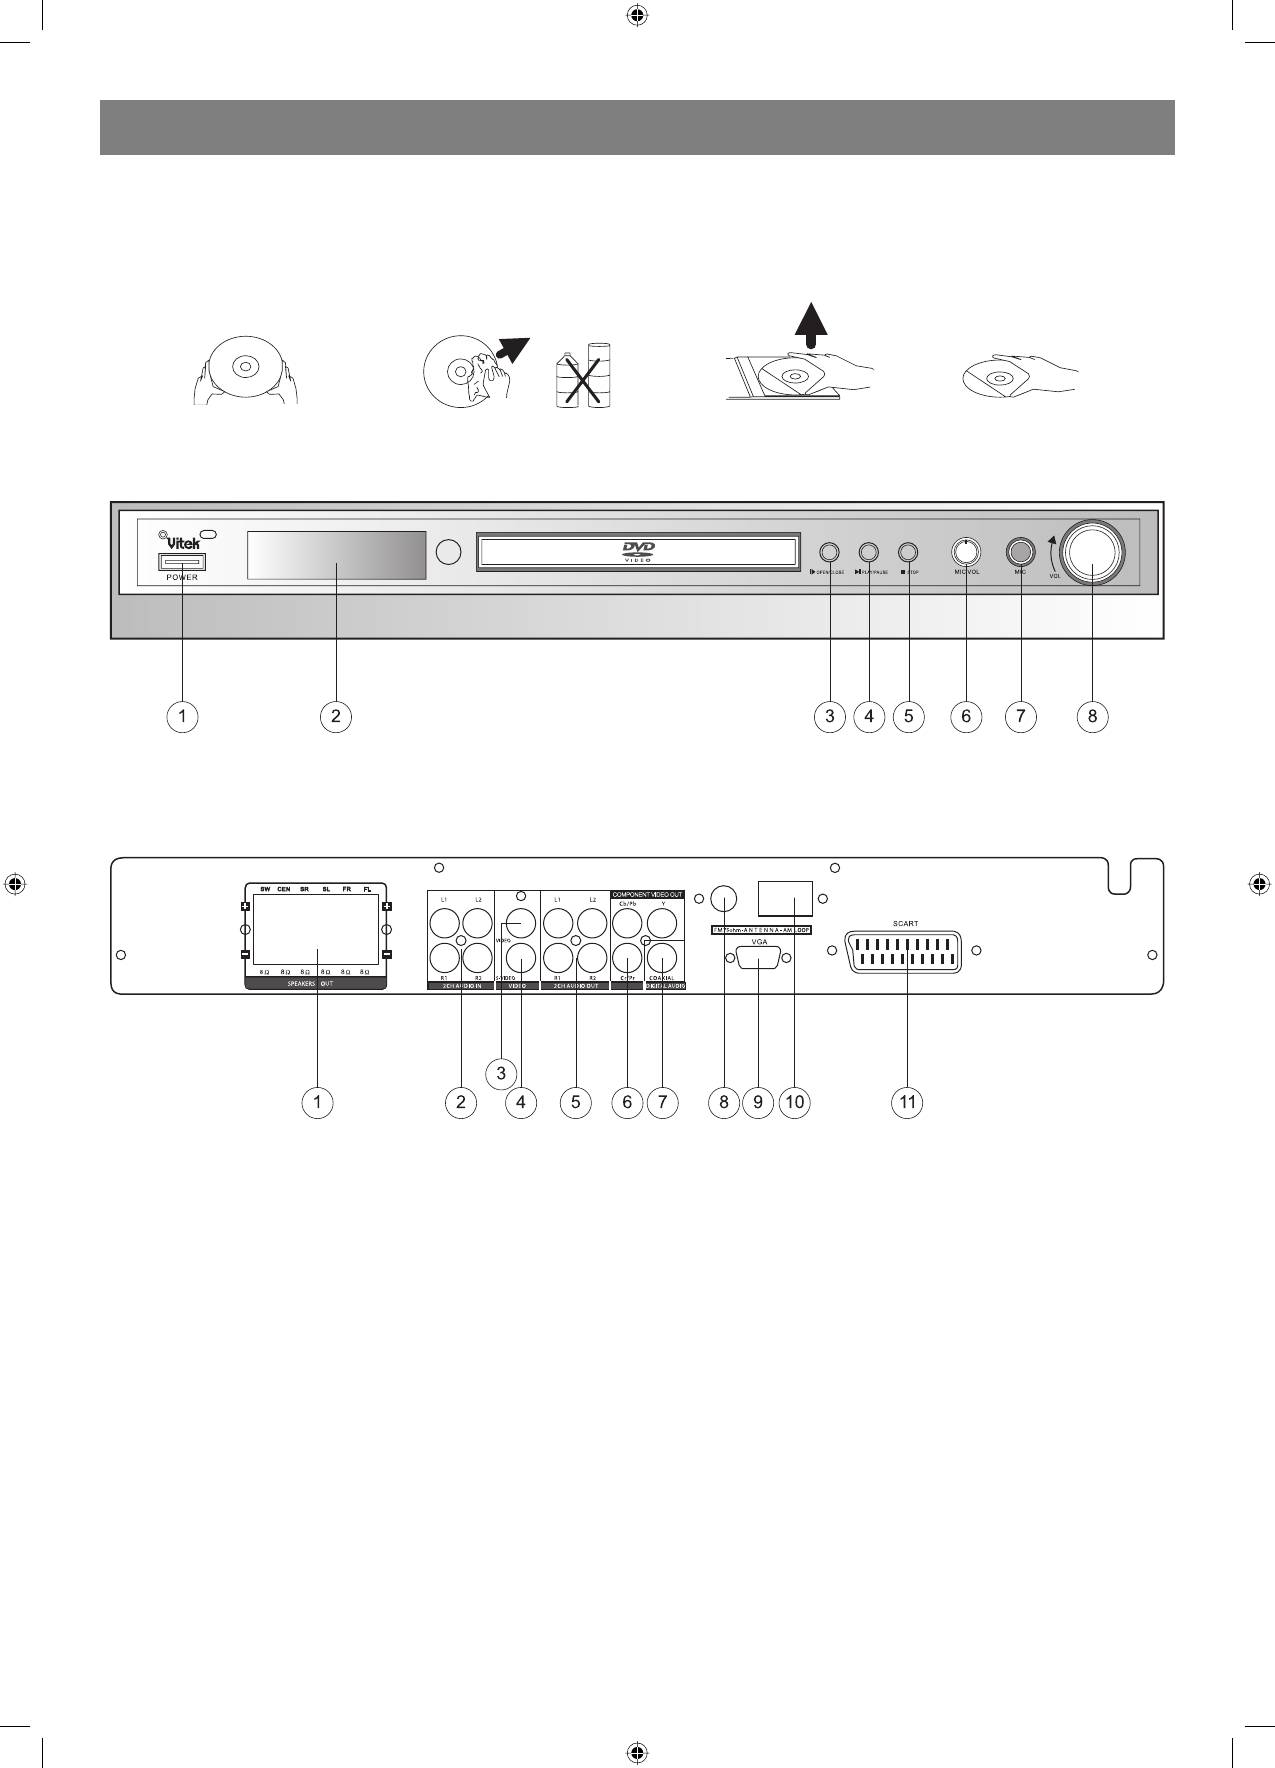
This page contains valuable information regarding the handling, cleaning, and storage of discs played in this unit.
Handling
Do not touch the playback side of the disc.
Do not attach paper or tape to discs, do not stick or write anything on the surface. Protect against fingerprints.
Always hold a disc by the center and edge portions.
Cleaning
Fingerprint and dirt on the disc may cause picture and/or sound deterioration. Wipe the disc from the center outward with a soft cloth. Always keep
the disc clean.
If you cannot wipe the dirt off, lightly use a slightly moistened soft cloth and finish with a dry cloth.
Do not use any type of solvent such as: Paint thinner, benzene, commercially available cleaners or antistatic spray for vinyl LPs.
3
4060.indd 34060.indd 3 23.10.2006 9:25:1123.10.2006 9:25:11
ENGLISH
Storing
Do not store discs in places subject to direct sunlight or near heat sources.
Do not store discs in places subject to moisture and dust.
Store discs vertically in a case. Stacking or placing objects on discs outside of their case may cause warping.
Handing and Caring for Discs Step:
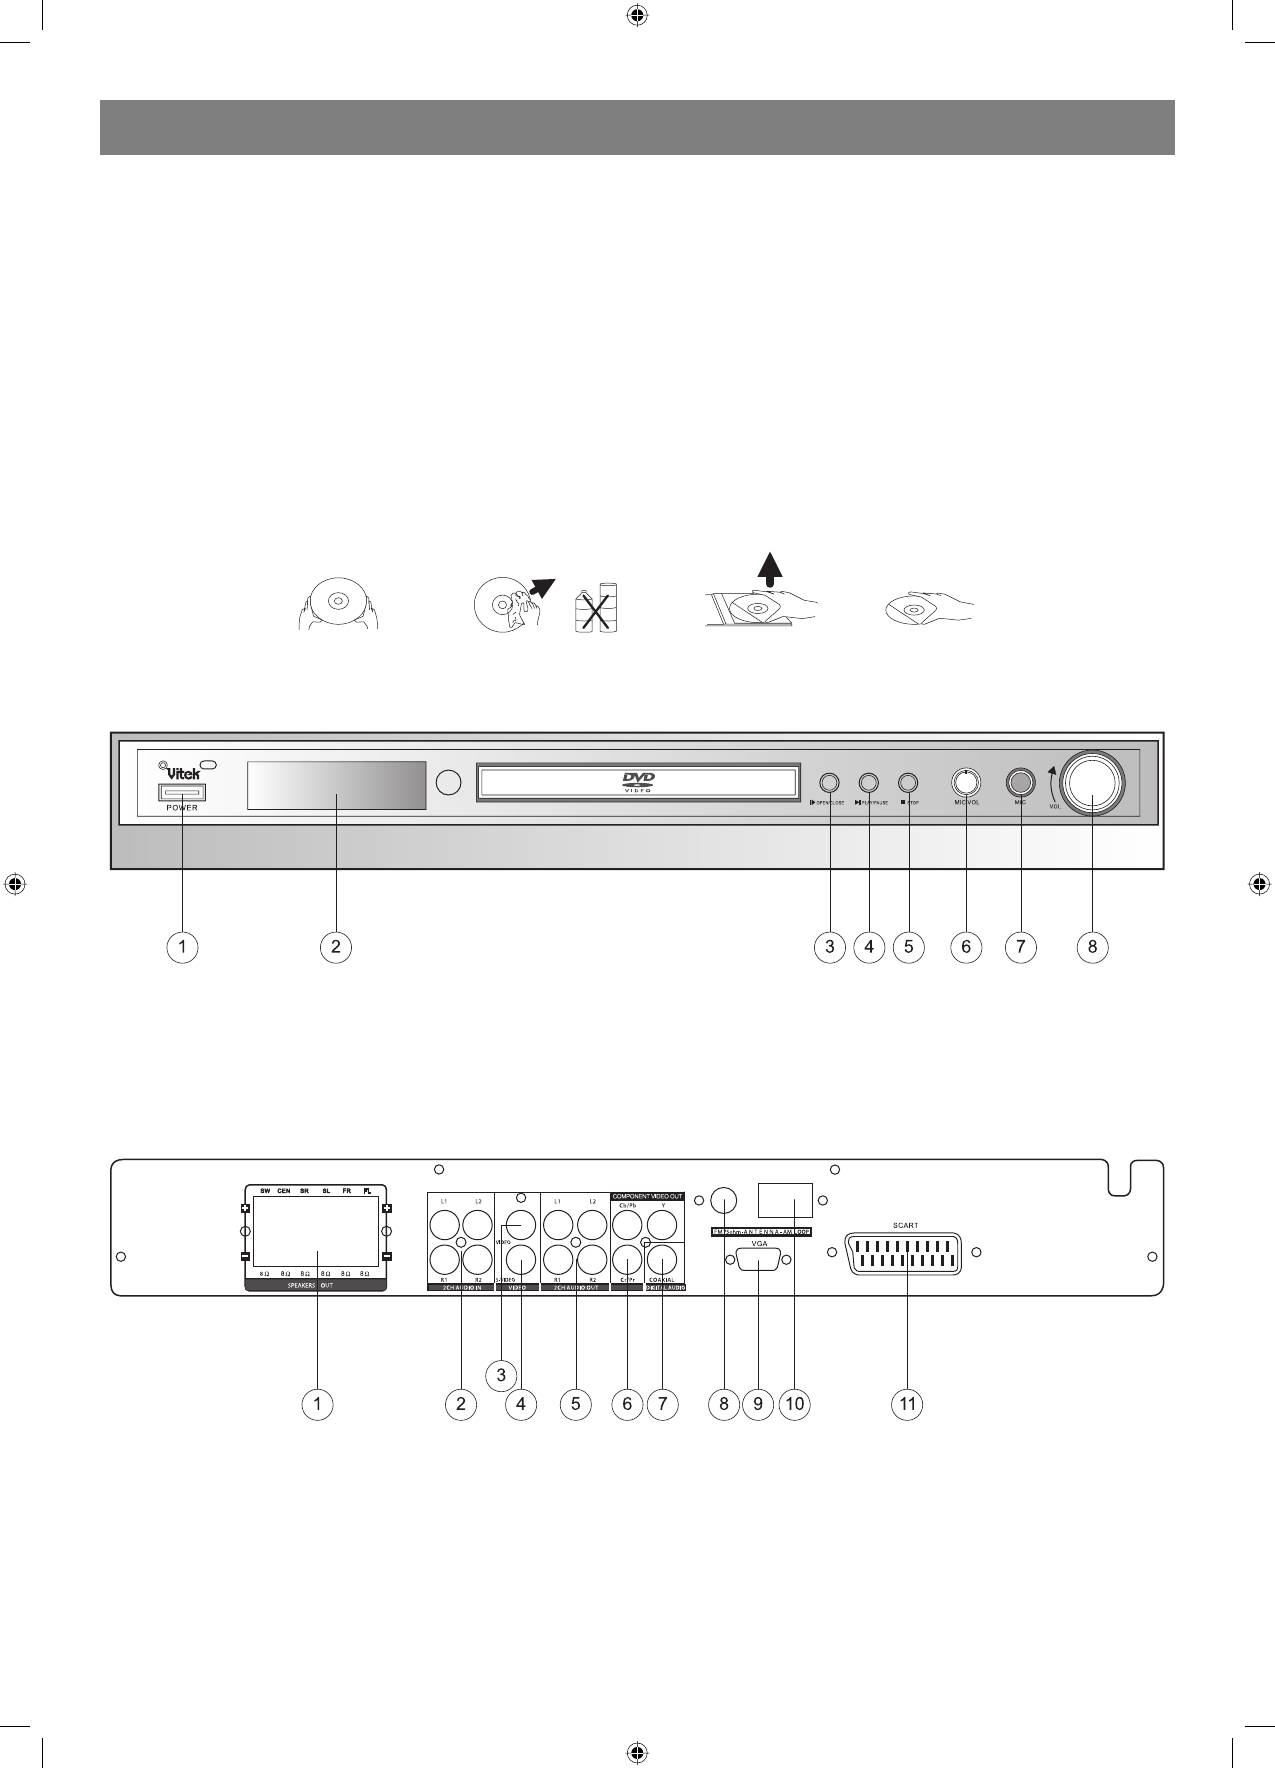
FRONT PANEL
1. Power
4. Play/Pause Button
7. Mic Jack
2. DVD Door
5. Stop Button
8. Volume Knob
3. Open/Close Button
6. Mic Volume
REAR PANEL
1. Speaker Output Terminals
5. 2CH Audio Output
9. VGA Jack
2 . 2CH Audio Input
6 . Component Y, Cb/Pb, Cr/Pr
10. AM Antenna Jack
3 . Video Output Jack
7. Coaxial Output Jack
11. Scart Jack
4 . SVideo Output Jack
8 . FM Antenna Jack
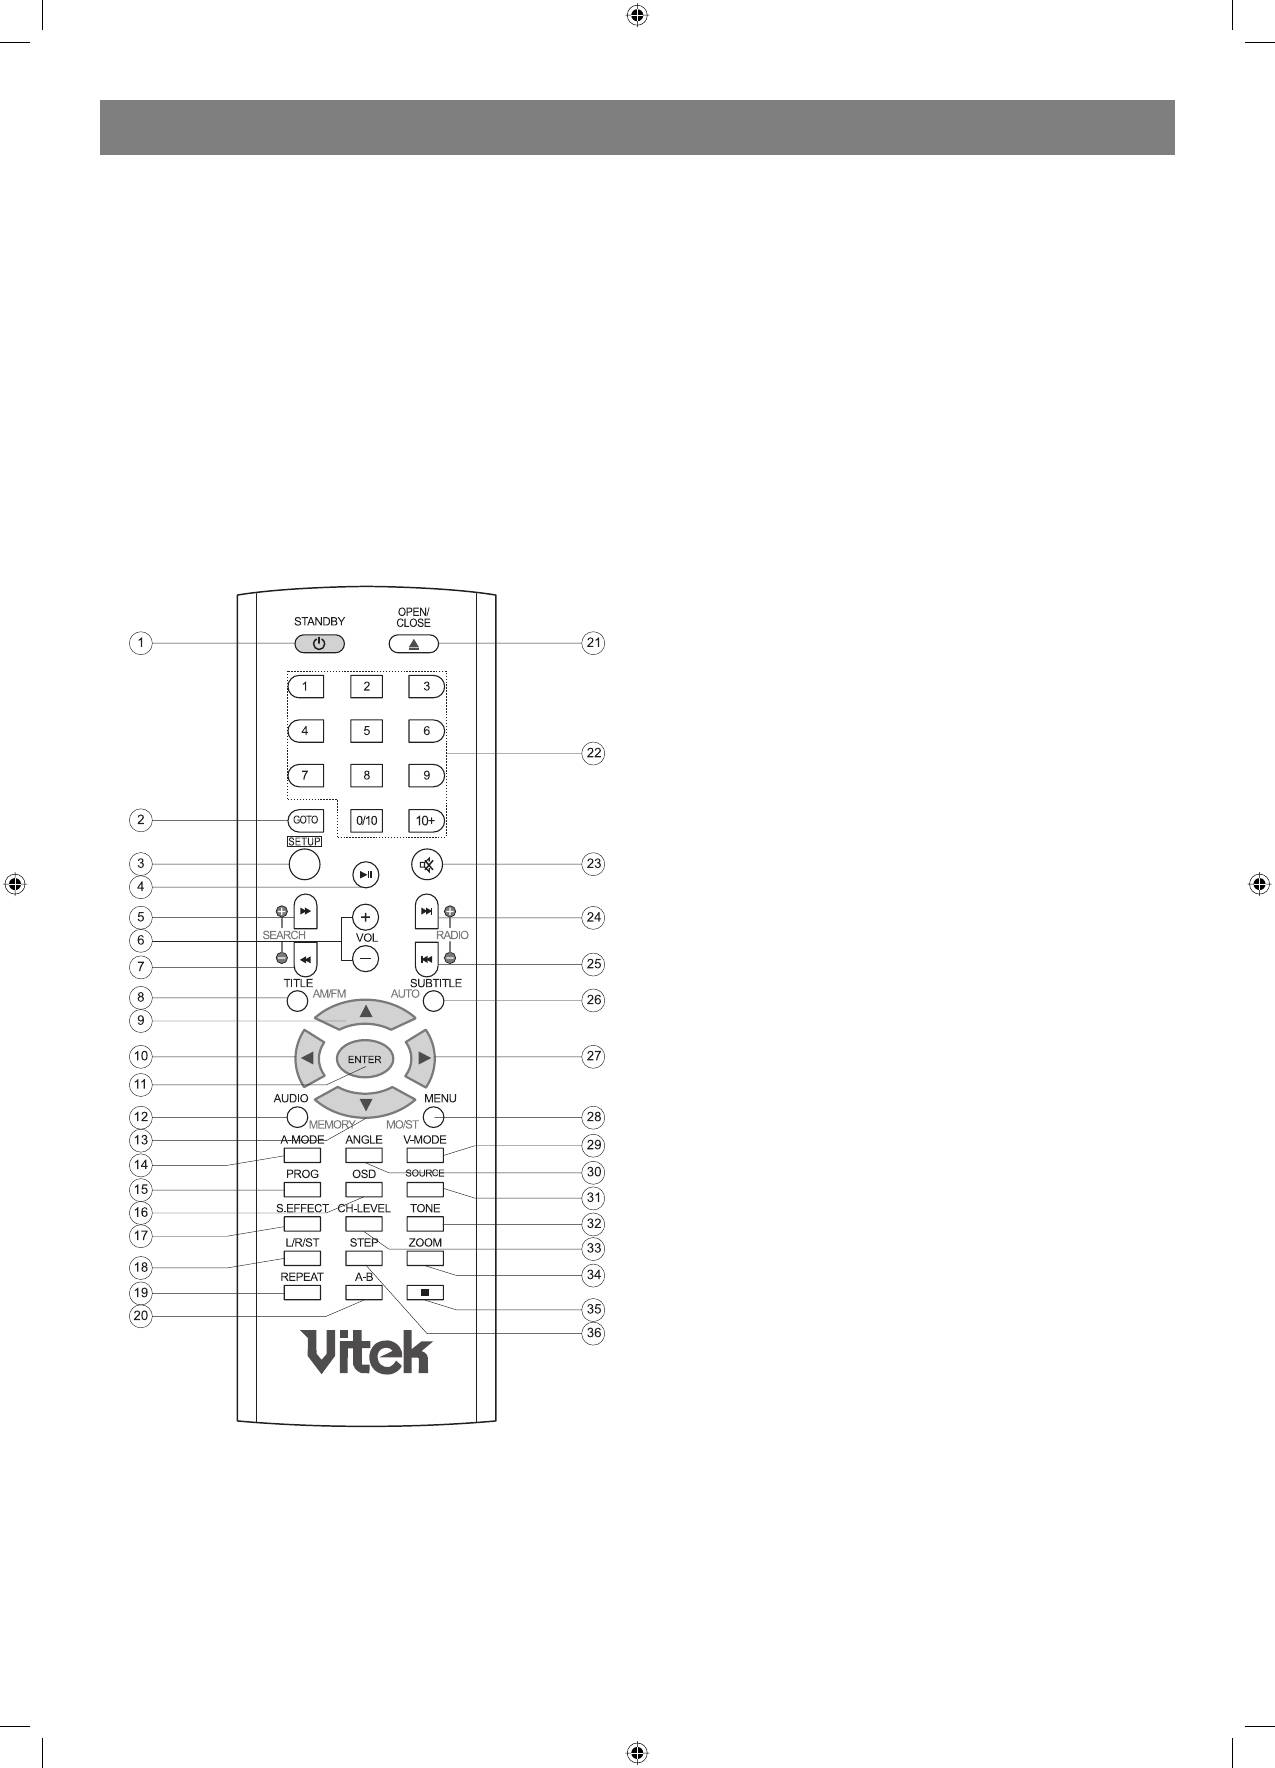
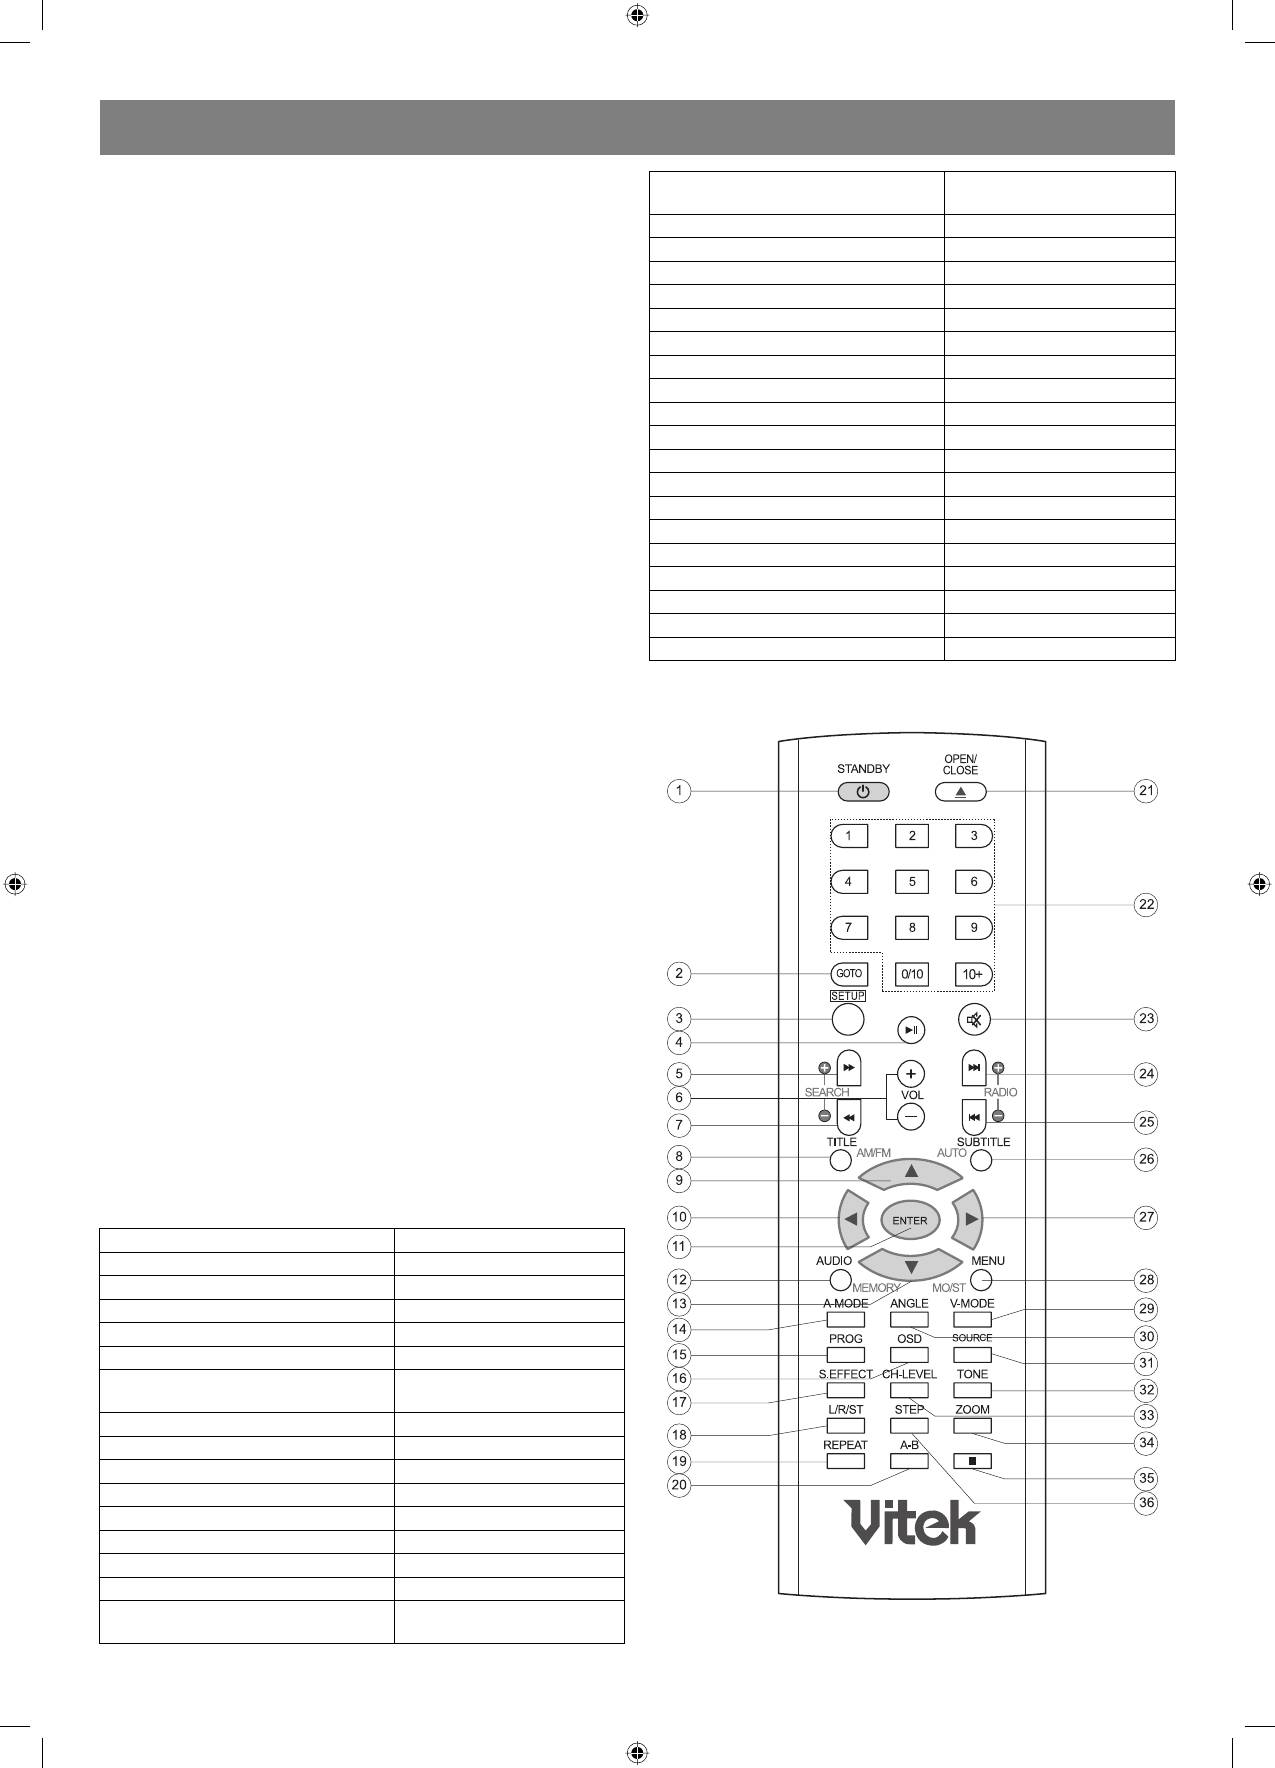
Remote control
OPERATING THE REMOTE CONTROL
Battery installation:
1. Push down and out on the battery Compartment cover to remove it.
2. Insert the two AAA batteries into the battery compartment of the remote control, and making sure the + and signs on the batteries and inside the
battery compartment match up.
3. Replace the battery compartment cover.
Notes:
1. Do not mix batteries from different manufacturers, nor old ones with new.
2. If the remote control will not be used for an extended period of time, remove the batteries to prevent damagecausing corrosion.
3. Remove dead batteries immediately to prevent damagecausing corrosion.
4. If battery leakage occurs, wipe the battery liquid from the battery compartment, then replace both batteries.
5. Always replace both batteries at the same time, using new, fully charged batteries.
6. Life expectancy of batteries may vary depending on amount of use.
Using the Remote Control
Point the remote control at the remote sensor on the DVD receiver. When the signal is received from the remote, the unit will function accordingly.
There mote will operate to approximately 16 from the remote sensor at an angle of around 30 degrees each direction.
Notes:
1. Do not direct the remote sensor toward any light source, such as direct sunlight or a strong fluorescent light, as it may cause the unit to not
operate correctly.
4
4060.indd 44060.indd 4 23.10.2006 9:25:1123.10.2006 9:25:11
ENGLISH
2. When other remote controls are used nearby or when the remote is
1. STANDBY
used near equipment using infrared rays, interference may occur.
2. GOTO
3. Placing an object on the remote control may cause it to inadvertently
3. SETUP
depress a button, changing a function and shortening battery life.
4. PLAY/PAUSE
4. Make sure there is no barrier between the remote control and
5. FAST FORWARD
remote sensor, as it could prevent the unit from receiving the signal.
6. VOLUME +/
5. Do not spill water or put wet items on the remote control.
7. FAST BACKWARD
6. Never disassemble remote control.
8. TITLE
9. UP
BATTERIES
10. LEFT
INCORRECT USE OF BATTERIES MAY CAUSE THEM TO LEAK,
11. ENTER
CORRODE OR EXPLODE.
12. AUDIO
13. DOWN
14. AMODE
15. PROG
16. OSD
17. S.EFFECT
18. L/R/ST
19. REPEAT
20. AB REPEAT
21. OPEN/CLOSE
22. NUMBER KEY
23. MUTE
24. NEXT
25. PREVIOUS
26. SUBTITLE
27. RIGHT
28. MENU
29. VMODE
30. ANGLE
31. SOURCE
32. TONE
33. CHLEVEL
34. ZOOM
35. STOP
36. STEP
Connection
Connection terminals for this DVD receiver are found on the rear panel.
Read carefully and follow the manufacture instructions of any video and
audio device being connected to this unit.
• Not connect the power until all connections have been properly
completed.
• Red terminal (marked R) is for connecting the right channel. The
white terminal (marked L) is for connecting the left channel. The
yellow terminal is for video connection. Make sure all connections
are securely made. Improper connections may cause noise, poor
performance, or cause damage to the equipment. An not tie the AV
cord with any other cords, such as the power cord or speaker wires,
as it may result in poor picture and/or sound quality.
Stereo Audio
• Use a pair of cable (red for right /white for left) to connect the stereo
audio output terminal of this unit to the other stereo audio input
terminal.
Coaxial Digital Audio
• Use the coaxial cable to connect the coaxial output terminal of this
unit to the coaxial input terminal of power amplifier.
Speaker Output
• Use the speaker cable to connect the speaker output of this unit to
the speakers' corresponding terminals.
Note: The physical connection should come with audio output setup of
this unit. Please refer to Audio Setup in System Setup.
5
4060.indd 54060.indd 5 23.10.2006 9:25:1223.10.2006 9:25:12
ENGLISH
Note:
• Real connection depends on the TV/monitor input terminal.
• Don't use the all connections at the same time, otherwise the picture
will be affected.
Only the physical connection conforms to the video setting can
it produce the normal picture (please refer to the Video Setup in
System Setup).
SPEAKERS
The configuration and arrangement of a surround sound system
speakers is critical. For maximum listening enjoyment, refer to the
arrangement of speakers section in this manual prior to connecting
speakers.
Surround Sound Speakers
Front or main right and left speakers; center speaker
These three speakers provide extensive sound imaging and augment the
dynamic effect of the audio. A movie principal dialogue comes through
these speakers.
Rear or surround sound speakers
Connection
These two speakers provide 3D dynamic sound effects, and create an
The following available video output for this unit.
enveloping atmosphere, as they add background sounds.
Composite Video
SubWoofer speaker
Use the AVc able (yellow terminal) to connect composite video output
Provides rich and powerful bass, adding a powerful dimension of
terminal of this unit to the TV/monitor video input terminal.
realism.
Note: Audio recorded for the center speaker and subwoofer will be
SVideo
assigned to the front and 3D rear speakers to obtain the optimum 3D
Use the Svideo cable to connect the svideo output terminal of this unit
surround sound effect.
to the TV/monitor Svideo input terminal.
ARRANGEMENT OF SPEAKERS
Component Video (YUV)
The ideal surround sound speaker configuration may vary according
Use core AV cable to connect the component output terminals of this
to room size and wall material. The figure below illustrates a typical
unit to 3 the corresponding TV/monitor input terminals.
arrangement.
VGA
Hints:
Use a VGA cable to connect the VGA output terminal to the TV/monitor
1. Front or main speakers and central speaker should be placed at the
VGA input terminal.
same level and in away that sound is oriented toward the listener
ears.
SCART
2. 3D surround sound or rear speakers should be placed 3’ higher than
Use a 21_pin SCART cable to connect the SCART output terminal to the
the height of listener ears.
TV/monitor SCART input terminal.
3. Subwoofer speaker may be placed anywhere within the room, as its
location produces little effect on a listener’s sensation to sound.
4. To obtain the optimum bass effect, a subwoofer is recommended in
home theater systems.
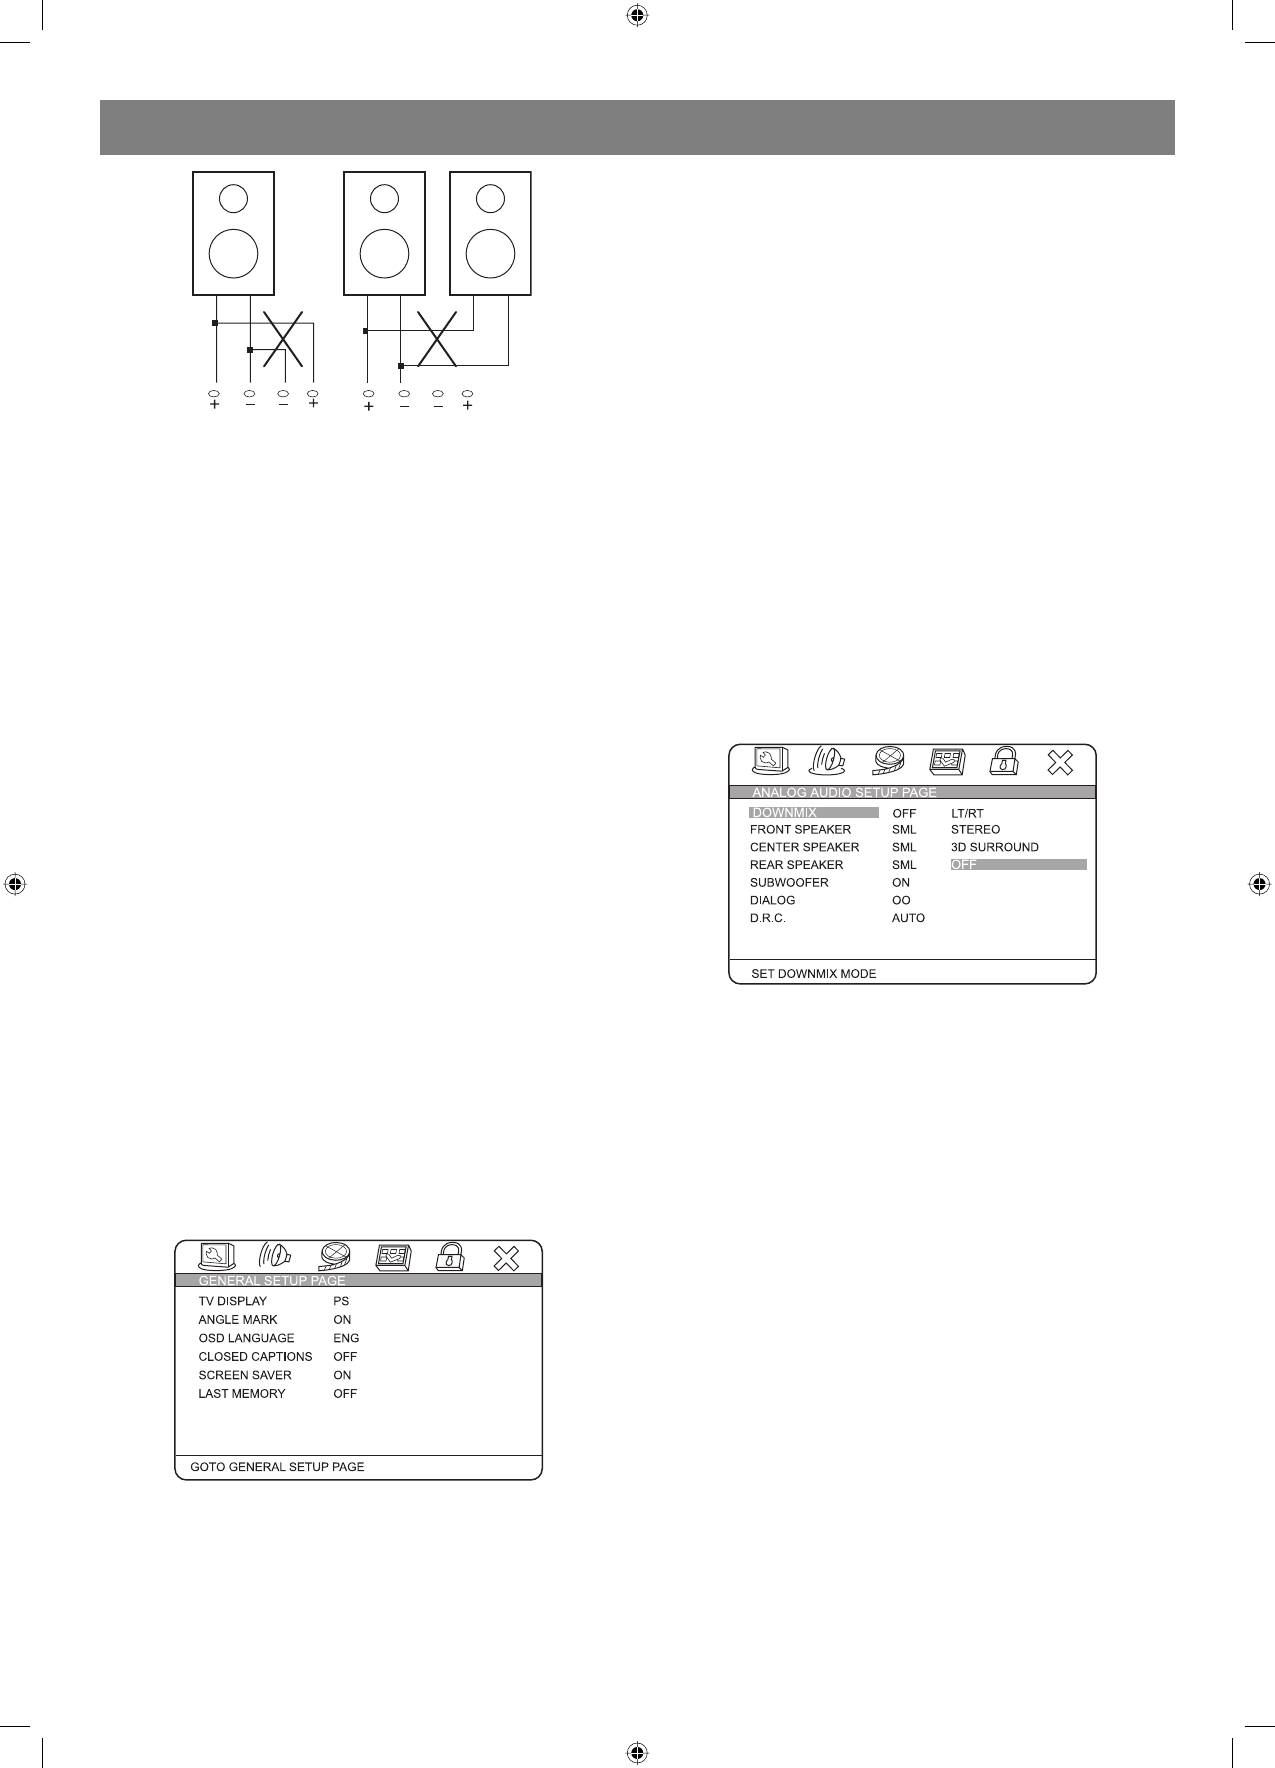
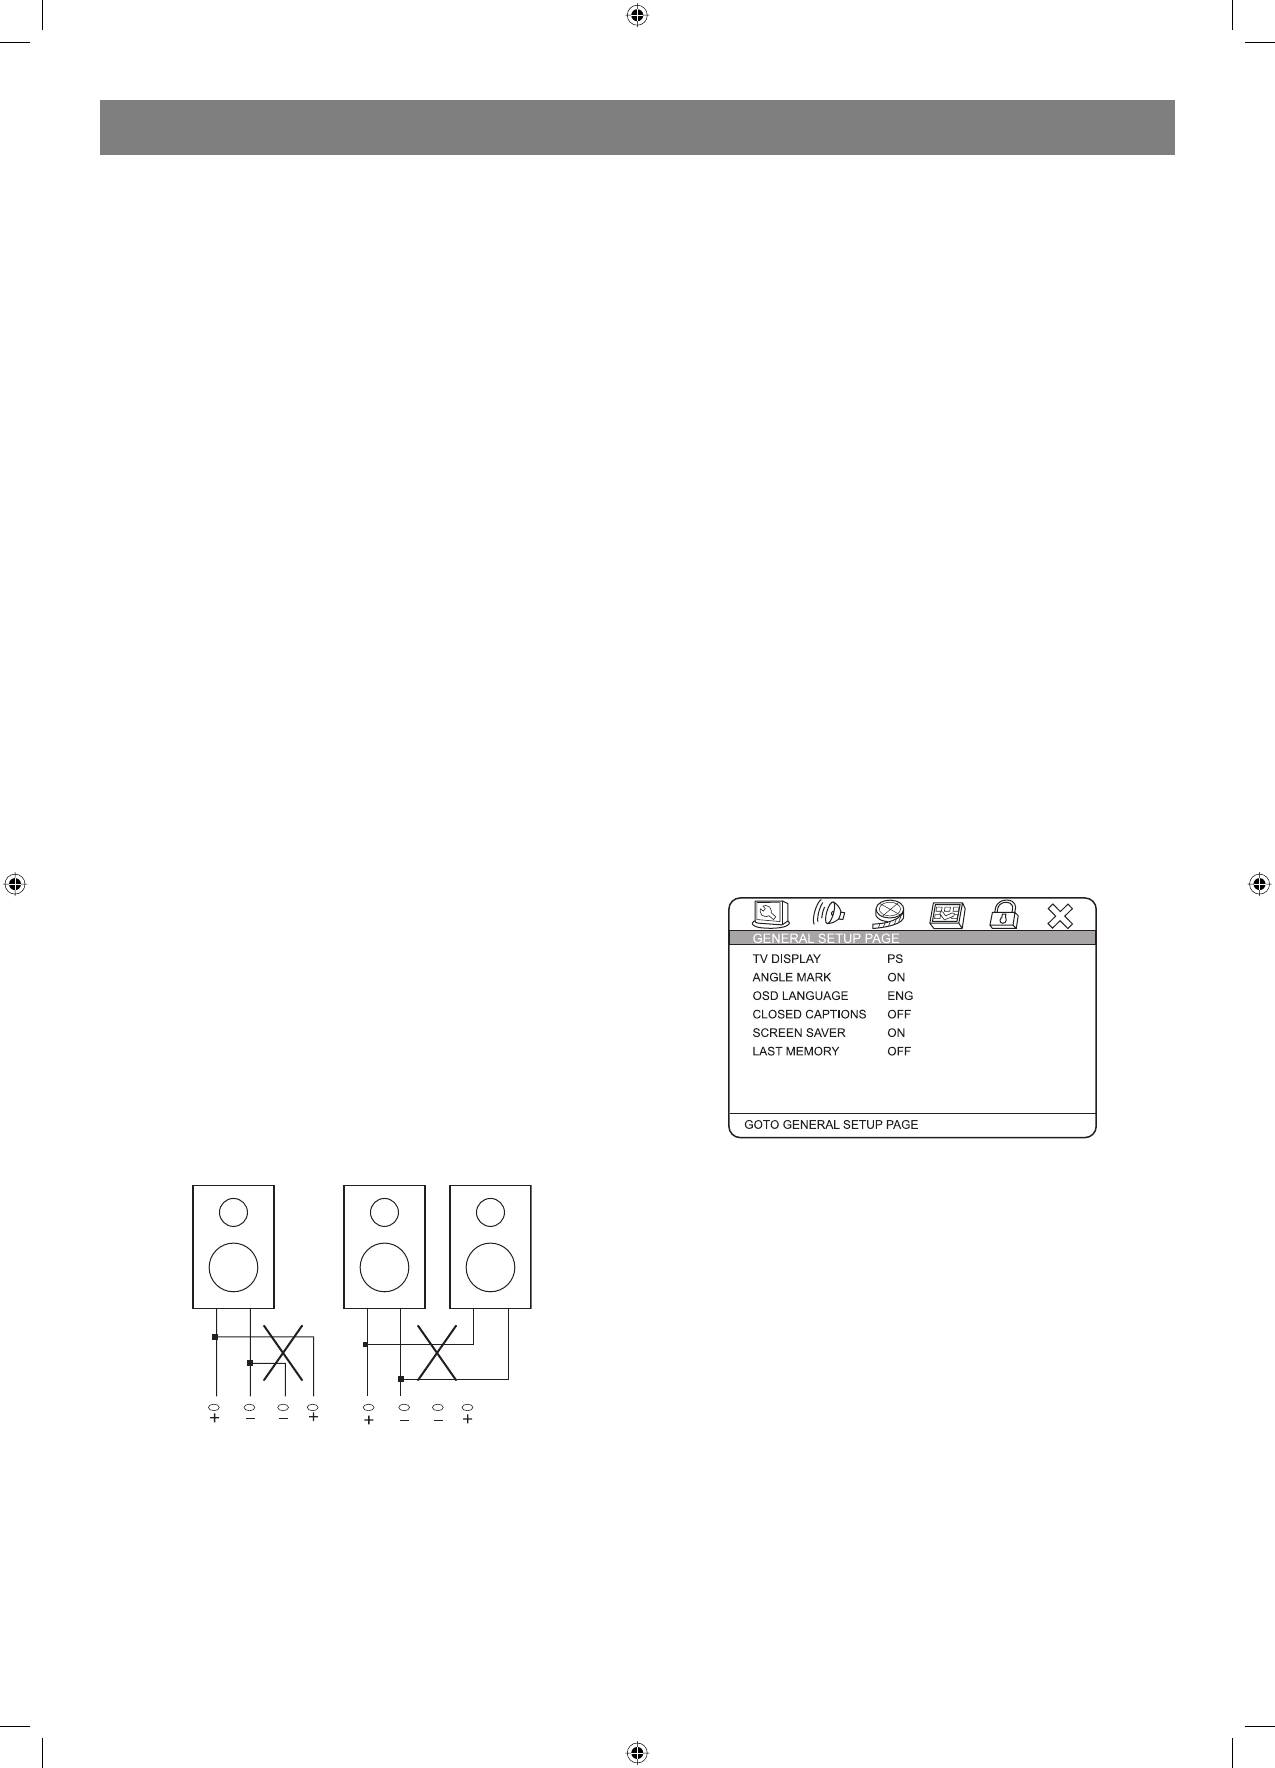
CONNECTING SPEAKERS
This welldesigned DVD receiver provides optimum sound quality when
the speakers used are within the range of their rated impedance.
Important
1. The minimum impedance of the five speaker terminals is 4ohm; for
the subwoofer, it is 8 ohm.
2. If you want to use only one speaker or listen to monophonic music,
do not parallel connect individual speakers to the left and right
channel terminals. See the figure on the below.
6
4060.indd 64060.indd 6 23.10.2006 9:25:1223.10.2006 9:25:12
ENGLISH
Use this item when the unit is connected with the wide screen TV set.
WideSqueeze:
Use this item when the unit is connected to the widescreen TV set.
ANGLE MARK:
It will show the ANGLE mark when playing DVD disc with multiangle view
if selection is ON.
OSD LANG:
Select onscreen display language.
CLOSED CAPTIONS:
This function doesn’t work when the disc is without captions. If the
caption is OFF, press [SUBTITLE] key on the remote controller to turn the
Connecting speaker cables
captions on.
1. Peel off approximately 1/2 of cable insulation
2. Tighten the wire end (#2 below)
SCREEN SAVER:
3. Open cable terminal by pressing back on tab
If the SCREEN SAVER is set ON and the unit is switched on without a
4. Insert wire end into terminal
disc playing for several minutes, a moving picture appears on the screen
5. Release tab; make sure wire is in terminal securely
and the unit will go to standby mode after 20 minutes. You can press the
Note: To prevent damage to the circuit, care should be taken
[STANDBY] key on the remote controller to activate.
to prevent short circuiting from occurring at the positive and
negative poles of the speaker cord.
LAST MEMORY:
When this function is ON, the unit can memorize the time elapsed from
CONNECTING ANTENNA
the last time you played the disc. When playing next time, it will resume
Radio signals may be difficult to receive in some buildings and under
playing from D.R.C: The D.R.C can control data record. You can chose
certain conditions. The provided antennas will help in their reception.
AUTO, ON and OFF in this mode.
They are intended for indoor use only.
AUDIO SETUP PAGE
AM Loop Antenna
ANALOG AUDIO SETUP:
The placement of the AM loop antenna should be in a direction that
provides the clearest reception. Keep as far as possible from DVD
receiver, TV set, and speaker and power cords. If reception remains
poor, an outdoor antenna may be necessary.
To connect the AM loop antenna:
Hold down handle, then insert wire end into hole. Search the handle
position for best reception.
FM Indoor Antenna
The FM antenna should be fully extended and in a direction that provides
the clearest signal. Secure the antenna ends in a location where
distortion is a minimum. If reception remains poor, an outdoor antenna
may be necessary.
System setup
DOWNMIX:
LT/RT:
MENU OPERATION:
The audio out is Left and Right channel formatting even if the original
Press [SETUP] key for the screen to show the setup page. In setup
sound is 5.1CH format.
mode, press [SETUP] key again to quit the setup page. Press direction
key to the desired item, and press [ENTER] to confirm.
STEREO:
(1) Some setup items are concerning the present modes. The items in
The audio out format is stereo even if the original sound is 5.1CH format.
gray can’t be set up.
3D SURROUND:
(2) The setup is memorized and will be kept after the power has been
The audio out is virtual surround sounds (only for 5.1CH player).
turned off.
OFF:
System Setup
Turn off DOWNMIX function. If playing 5.1CH discs or the unit is
GENERAL SETUP PAGE
connected with 5.1 channel amplifier, this item should be selected (only
for 5.1CH player).
FRONT, CENTER, REAR and SUBWOOFER SPEAKER: (No this
item in 2CH player)
If your speaker system includes the above speakers, you can set these
items according the real speaker status.
DIALOG:
The DIALOG mode is available, and you can press up and down direction
key to adjust it. (In the DOWNMIX mode, LT/RT or STEREO is selected).
D.R.C:
The D.R.C can control data record. You can chose AUTO, ON and OFF in
this mode.
TV Display:
4:3 PANSCAN:
When the unit connects to the normal TV set, the widescreen image
shows on the full screen, but some part is cut off.
4:3 LETTERBOX:
When the unit connects to the normal TV set, the widescreen image
shows and black bars appear on the top and bottom of screen.
16:9:
7
4060.indd 74060.indd 7 23.10.2006 9:25:1223.10.2006 9:25:12
ENGLISH
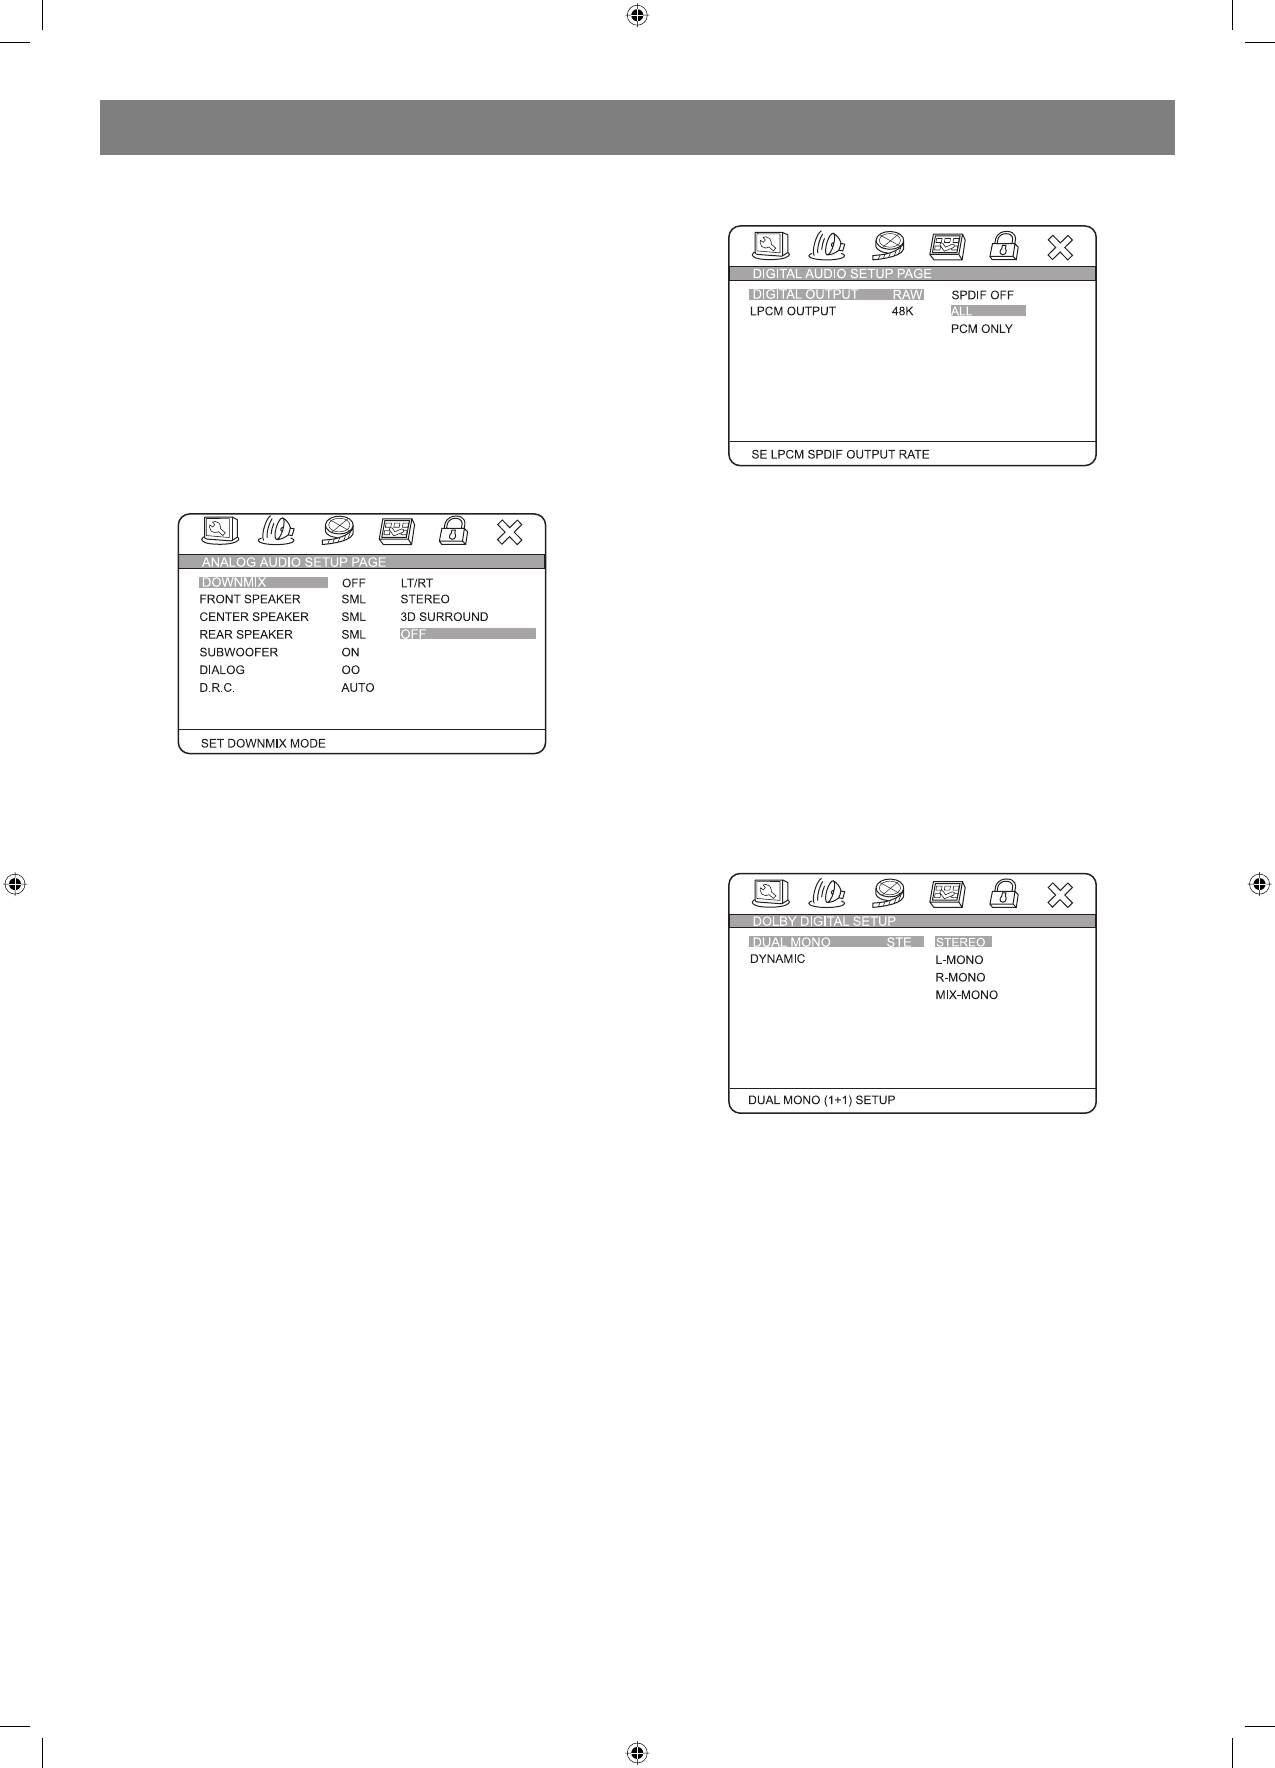
DIGITAL AUDIO SETUP PAGE
3D PROCESSING:
In PROLOGIC ON mode, the reverb mode setup is available.
DIGITAL OUTPUT:
SPDIF OFF:
HDCD SETUP:
No digital output (coaxial off), only analog audio output.
You can select the digital filter at off 1x and 2x.
ALL:
If this item is selected, you can set up RAW.
KARAOKE
PCM ONLY:
KARAOKE can be controlled to output by the setup menu. There are 2
In SPDIF/PCM mode, setup PCM channel according to your preference.
optional output modes: ON/OFF.
LPCM OUT:
Adjust microphone volume to the minimum level. Insert
Select PCM frequency at 48kHz or 96kHz.
microphone into the microphone jack.
Note: Some amplifiers don’t support 96kHz sampling, which will affect
the coaxial output.
Use the microphone volume knob to adjust the microphone
volume. Press up/down direction key to adjust the echo
DOLBY DIGITAL SETUP
level in the setup menu.
When playing karaoke disc, to eliminate the original singing, press [L/R/
ST] key on the remote controller to select left channel or right channel.
When playing DVD disc, press [AUDIO] to eliminate its original singing.
VIDEO SETUP PAGE
DUAL MONO:
Stereo: Set audio output to the stereo output.
Lmono: Set audio output to the monoleft channel.
Rmono: Set audio output to the monoright channel.
Mixmono: Set audio output to the mixmono channel.
DYNAMIC:
COMPONENT V IDEO:
Select this to reduce the overall volume and still keep defined audio
OFF:
sound.
Set video output to the composite.
YUV:
CHANNEL DELAY PAGE:
Set video output in analog component video format when connecting to
If the above setup is dissatisfying, you can set the speaker distances in
Y/U/V terminals.
the real conditions. Press up/down direction key to select the speaker,
PYUV:
and press left/right direction key to adjust the distance.
Set progressive YUV signals. Connection same as YUV.
RGB:
EQUALIZER:
Set video output in Red/Green/Blue format when connecting to SCART
terminal.
PRGB:
Progressive RGB signals. Connection same as RGB.
VGA:
Set to this item when connecting to VGA terminal.
Note: If the video setting differs with the physical connection, the TV set
may not have picture. In this case, you can RESET the machine, then
keep pressing key [V_MODE] until the picture returns again.
COLOR SETTING SETUP:
COLOR SETTING includes: SHARPNESS, BRIGHTNESS, CONTRAST,
GAMMA, HUE, SATURATION and LUMA DELAY.
SHARPNESS: There are three optional output modes: HIGH\MEDIUM\
In this item you can set sound mode, bass boost, super bass and treble
LOW.
boost. You can select one according to your preference and the disc
BRIGHTNESS: Use the left/right direction key to move the scroll and
content. You can press up and down direction key to adjust it.
adjust the brightness.
CONTRAST: Use the left/right direction key to move the scroll and adjust
8
4060.indd 84060.indd 8 23.10.2006 9:25:1323.10.2006 9:25:13
ENGLISH
the contrast. Set the left/right direction key to move the scroll and adjust
Note: The desired program source will not play unless it and the selected
the contrast.
signal button coincide with the active program source signal input.
GAMMA: There are four optional output modes: HIGH\MEDIUM\LOW\
NONE.
Volume Control
HUE: Use the left/right direction key to move the scroll and adjust the
The volume may be adjusted by either turning the large volume knob on
hue.
the front panel or using the appropriate volume button on the remote
SATURATION: Use the left/right direction key to move the scroll and
control.
adjust the saturation.
LUMA DELAY: In this item you can choose 0T or 1T.
Mute
Pressing the MUTE button temporarily mutes every speaker. To resume
PREFERENCES
audio, press MUTE button again.
PLAYING THE RADIO
1. Press SOURCE button to enter tuner mode, press TITLE/AM/FM
button to select the desired wave band (AM or FM).
2. Press SEARCH+/ button to find a station. The frequency will change
with each press. When a station signal is received, it will appear in
the display.
3. To lock onto a station quickly, hold the SUBTITLE/AUTO button, the
unit will start automatic tuning. When a station is found, automatic
tuning stops.
4. To add a station to memory, press the MEMORY button. The memory
storage number will blink for four seconds in the display. Press
MEMORY button again to store the station.
5. To reduce noise when an FMstereo program has been received,
press the MONO button. The word STEREO will disappear from the
TV system:
display. The program is now heard in monographic form, reducing
This unit is suitable for all kinds of TV systems. You can select one of the
the noise. To resume stereo play, press the MONO button again.
PAL, MULTI or NTSC.
PAL:
Automatic tuning
Set the output at PAL system.
This unit will store up to 40 individual AM or 40 individual FM radio
MULTI:
stations in its memory.
The TV system is auto switched according to the disc system.
1. Press the AUTO button. the automatic tuning mode is activated.
NTSC:
2. Stations will be stored in ascending order until 50 stations of that
Set the output at NTSC system.
particular wave band have been saved. When a station is stored the
memory storage number, as well as the station frequency, will flash
PBC:
for four seconds in the display.
There are 2 optional output modes: ON/OFF. If the PBC is set on, when
3. When the total number of stations reaches 40, in a particular wave
playing VCD, return to the main menu. If the PBC is set off, when playing
(AM or FM) memory, no further station in that wave band will be
VCD, return to the main sequence.
saved.
AUDIO, SUBTITLE and DISC MENU LANGUAGE PAGE:
To play preset stations
These are the initial settings by your preference. If a setting is supported
1. Press the SOURCE button to enter tuner mode, press TITLE/AM/FM
by disc content, it will work. Otherwise the disc default value works.
button to select the desired wave band.
These settings can be changed respectively by pressing key [AUDIO]
2. Press any of the numbered buttons to select the desired station
and [SUBTITLE] when playing.
Memory number. For example, to play the station at memory #5,
simply press the 0 and 5 buttons; for memory #17, press the 1
PARENTAL:
button followed by the 7 button.
The control level is for parents to control the content and protect children
3. Stations in the memory function may also be accessed by pressing
from violence and erotic. The disc, its level is higher than the setting level
the UP or DOWN button.
can not be played.
DEFAULT:
BASIC DVD OPERATION
Reset to the initial factory setups.
Once the unit is connected to a television set and any other accessory
equipment, you are ready to enjoy the excitement of DVD videos or your
PASSWORD PAGE:
favorite CDs and MP3 files.
To play a DVD videodisc:
Turn on the TV and select the A/V mode. If the set features a SCART
connection, be sure the SCART mode is selected from the TV menu.
Turn on amplifier, if connected. Select AC3 or DVD mode.
To play an audio disc:
Turn on the audio system and choose the input source that is connected
to the DVD player. Set the SPDIF output to SPDIF OFF from the SETUP
menu display if you do not have the proper equipment for Dolby Digital
surround sound.
1. Press the POWER key on front panel. DISC LOADING appears on
screen. If there is no disc, NO DISC shown on screen.
2. Press the OPEN/CLOSE key. The disc tray will open.
3. Place the disc on the disc tray. Be sure play side is face down on the
tray.
Change the password. The initial factory password is 136900. You can
4. Press OPEN/CLOSE key to close tray. The disc tray will close. The
disc type will appear in the upperlefthand corner of the screen.
set your own password. If you forget your own password, you can use
Once it has read the disc, the unit automatically will begin playback.
136900 as general password to decode.
When playing a DVD, the DVD title or menu will appear. CD tracks are
played in sequence.
Basic operation
Note:
Selecting sound source
1. It is possible to damage a disc, if it is not placed correctly on
1. Press any function button (DVD, TUNER and LINE) to select the
the guides the disc tray. This may also cause the DVD player to
desired sound source. The appropriate symbol will appear in the
malfunction. Do not force or place anything other than a 5 DVD or
display screen.
CD onto the disc tray.
9
4060.indd 94060.indd 9 23.10.2006 9:25:1323.10.2006 9:25:13
ENGLISH
2. Never move the DVD player during playback, as this may cause
2. Press the appropriate scroll key to select the desired title. A title may
damage to the disc as well as the player. To open and close the
also be located by pressing its assigned number with the number
disc tray, only use the OPEN/CLOSE key found on both the remote
buttons.
control and on the unit front panel.
3. Press the ENTER key. This will start playback from chapter 1 of the
selected title.
Note: Some discs do not respond to this function. If different instructions
PREV/NEXT playback
appear on the TV screen, follow those instructions. The instructions
Press
or key to play previous or next track when playing. To
given here describe the basic procedure. Procedures may vary
resume normal playback by pressing PLAY key.
depending on the content of the DVD disc. When playing a VCD2.0 disc,
TITLE key can be used to return to menu.
Fast Forward/Reverse Playback
The unit features both fast forward and fast reverse playback. Either
MENU: MENU/PBC
mode will speed up: 2X,4X,8X,16X and 32x.
With the PBC function on, choosing a song on a CD can only be done
when at the main menu. With the PBC function off, song selections can
To activate either function, simply press the key or key on the
be made by entering the relevant number keys. The menu content of the
remote control. The speed changes each time the key is pressed. To
disc will appear when the MENU button is pressed while a DVD disc is
resume normal playback by pressing the PLAY key.
playing.
Memory Playback
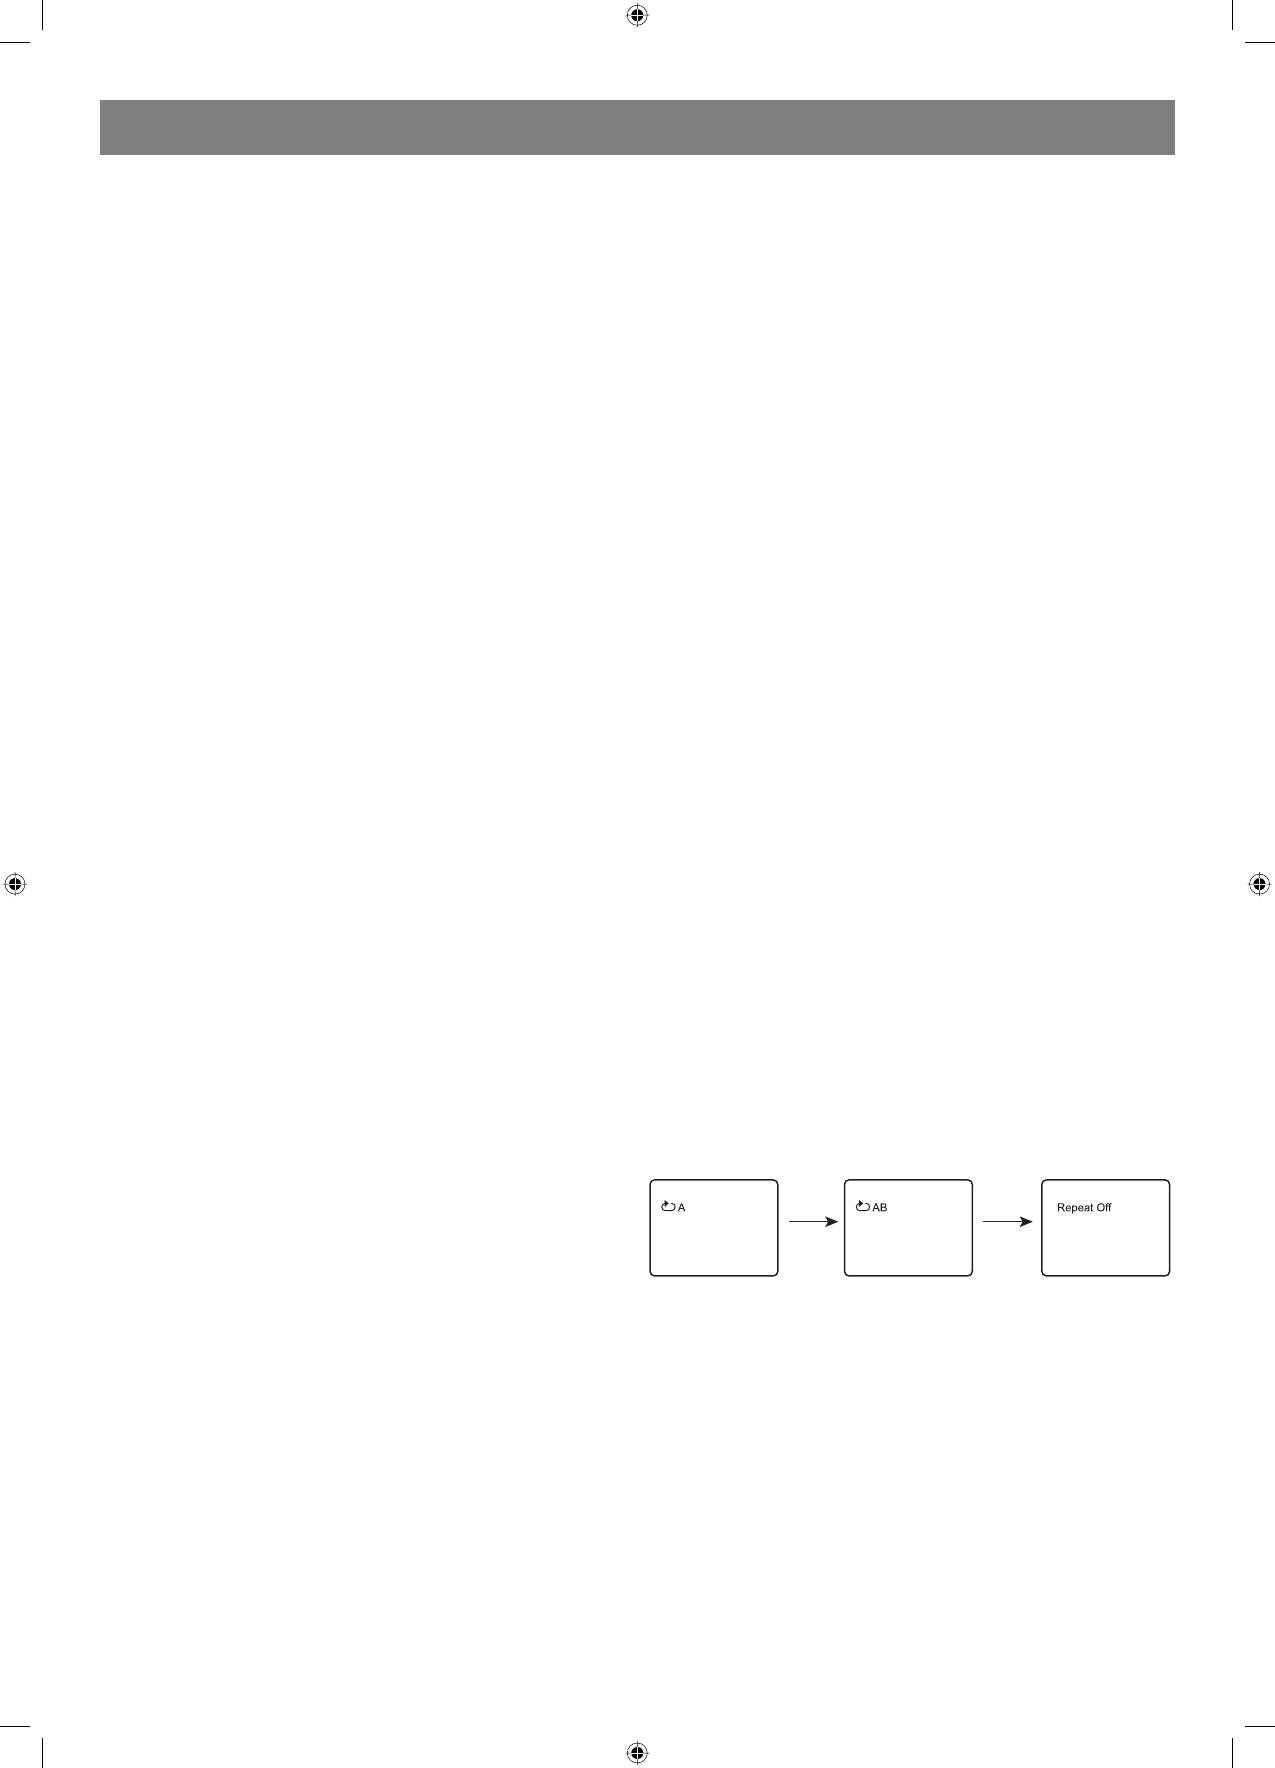
Repeat Play
This unit allows the viewer to stop playback, then later continue playback
This DVD receiver allows repeated playback of specific titles, chapters/
from that exact disc location. Press the STOP key to halt playback. The
tracks, or segment.
unit then will memorize the location where playback was stopped. To
1. Select the item to repeat.
resume watching, press the PLAY key and the unit will resume playback
2. Press the REPEAT key.
from the exact location where playback was stopped. (Exclude Mp3
The repeat mode changes each time the REPEAT key is pressed (i.e.
DISC) When you play DVD discs, press MENU or TITLE key return to root
from title repeat to chapter repeat, all repeat, to repeat off.)
menu and title menu, the unit then will memorize the location, To resume
Zoom
watching press the PLAY key and the unit will resume playback from the
A picture may be enlarged up to four times during either playback
exact location.
or slow motion through the unit zoom function. Press the ZOOM key
once and it enlarges the image 2x, press a second time and the image
FUNCTIONS
enlarges 3x. A third press enlarges the image 4x. A forth press the image
Screen display
1/2x, a fifth press the image 1/3x, a sixth press the image 1/4x .
While a disc is playing, the status of various functions may be checked,
In the zoom in mode, you can press the direction key to move the
such as the tile, track number, and several time categories.
picture.
1. Press the OSD key once and the title/chapter appears along with the
To return to normalsize playback, press the ZOOM key a seventh time.
chapter and how much time has played.
Enlargement takes place in the center of the picture.
2. Press the OSD key again and the remaining time for that particular
title/chapter appears.
Volume and mute
3. Press the OSD key again and the display turns off.
The volume on this DVD receiver is easily controlled with the remote
control by pressing either the VOL+key to raise the volume or the VOL
N/P
key to lower it. By pressing the MUTE key, no audio will be heard. To rein
state the audio, press the MUTE key again.
This DVD receiver supports video output of various systems, including
auto, NTSC, and PAL. The picture will blink and become colorless
Program
when the wrong system is selected. (NTSC for North America, PAL for
Allows you to program specific tracks in a desired order of play. Press
Europe). For more information on output format, refer to the TV se t
PROG key program menu well appear on the screen, setup the program
instruction.
play in number key. The scroll to the START, press ENTER key to program
play. To exit the Programmed play mode, press the PROG button again.
Subtitles
The unit has the capability to display subtitles in any of 32 different
AB Repeat
languages.
When playing DVD, VCD or CD disc, press [AB] button to repeat a
1. Press the SUBTITLE key. The subtitle menu will appear. Select the
certain contents.
desired language by pressing the SUBTITLE key.
Press [AB] key on the start point (A) and the ending point (B) to select
2. To remove the subtitles from view, press the SUBTITLE key until they
the repeat part.
disappear.
Press [AB] the third time, cancel AB repeat and return to normal play.
Note: The disc being played must be subtitle encoded.
Camera Angle
The ability to change the camera angle allows viewer to watch a movie
from different perspectives.
1. Press the ANGLE key on the remote control. With each press, the
camera angle changes.
2. The key may be pressed only when the flashing angle icon appears
Standby
in the unit display panel.
When playing, press [STANDBY] button, the machine will be poweroff
Note: Camera angle may be changed only in discs with multiangle
and go to standby state; press [STANDBY] again, the machine will be
capability encoded into them.
poweron and start to play.
Warning:
Language
The power is not fully cut off at standby state. If the machine will not be
The unit has the capability to show movies in one of eight languages.
used for a long time, turn off the power by pressing the [POWER] button
1. Press the AUDIO key. The language menu will appear. Select the
in the rear panel.
desired language by pressing the AUDIO key.
Note: The disc being played must be multilanguage encoded.
CHlevel
Press this key to select a channel then press VOLUME+/ to adjust its
LOCATING A TITLE
level.
DVD discs are normally divided into titles, which are then subdivided
into chapters. A specific title can be easily found with this unit. Specific
titles can be found using either the title menu function, if the DVD disc
Vmode Switch
contains a title menu, or through its unique title number.
Video output mode switch (if losing pictures or picture is abnormal, keep
switching until you reach a clear picture.)
Title Menu Function
1. Press the TITLE key. The title menu will appear on the TV screen.
10
4060.indd 104060.indd 10 23.10.2006 9:25:1323.10.2006 9:25:13
ENGLISH
Tone
Press [TONE], then press VOLUME+/ to control bass median and treble.
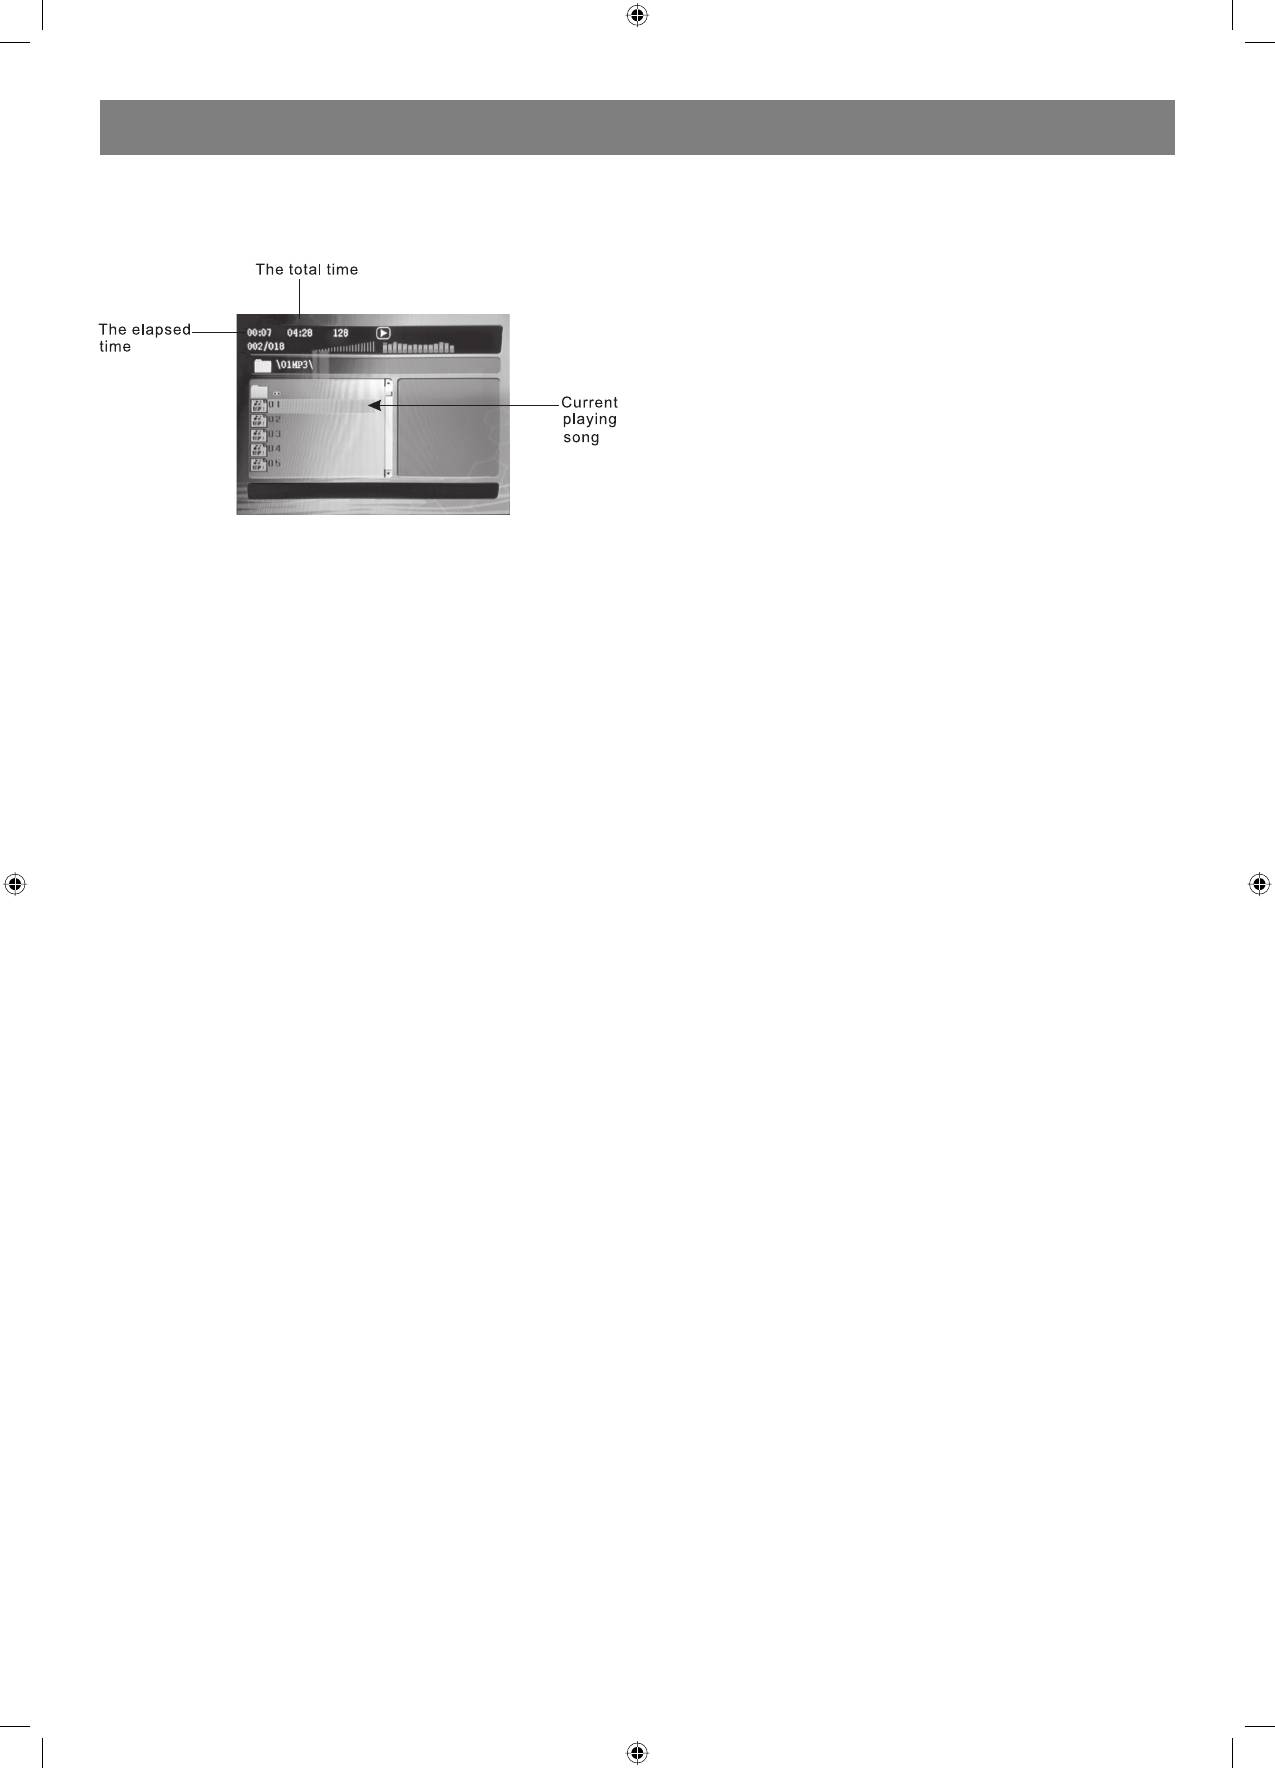
MP3 & MPEG FUNCTION
When a MPEG and a Mp3 disc is loaded, the screen will display as
follows:
Press up/down direction key to select the file when the cursor appears in
the file window.
Press PLAY key to play the current file select by the cursor.
Note:
During Mp3 playback, Forward Scan and Reverse Scan are not available.
Note:
The player will not identify or play a MP3 disc under the following
conditions:
• the recording format is not supported (make sure the files are in MP3
format);
• the disc is badly scratched, damaged or dirty;
• the disc is not finalized.
JPEG FILES
JPEG files contain picture information which can be encoded by micro
computer software and transmitted to the TV screen via a video output
interface. This function is useful in many contexts. For example teachers
can change pictures to be shown in the classroom to JPG files by means
of a digital camera or a scanner which are often used within the IT world
and transfer the pictures to CDR discs. This will make things easier
for the pupils when the teachers play the discs via a TV set or other
types of equipment in the classroom. It reduces the repetitive work for
the teachers, and the discs are easy to store (information on discs can
be stored for more than 100 years). By means of a digital camera or
scanner, families can transfer pictures to CDR discs. If, for example, a
picture requires 100K bytes, one disc will hold about 6000 pictures.
Manufacturers can show their customers pictures of their products one
by one.
Note: The actual contents vary from one type of disc to the other.
1. When a JPEG disc is loaded in the DVDplayer, an automatic slide
show will be launched. Each picture will be displayed and scaled to
fit the screen. Press STOP to enter the file library. Use the up/down
direction key to select the pictures, and press PL AY to display a
picture.
When the picture has been chosen, the slide show will resume with
the next picture in the library.
2. Press direction key to rotate the picture. These operations are
allowed only when a picture is being displayed normally and will be
cancelled automatically when a new picture is displayed.
3. Press ZOOM to execute the zoom function and select the zoom
enlarging scale by pressing in zoomin mode, press the
direction key buttons to move the picture on the screen.
With zoom mode off, the next picture will be scaled to fit the screen.
Press PLAY to cancel the zoom mode and resume the slide show.
JPEG limitations
• JPEG files containing CMYK colors is not supported by this DVD
player.
• The range of pixels should not be exceeding 3840 X 3840 pixels, in
order to achieve the best Performance.
11
4060.indd 114060.indd 11 23.10.2006 9:25:1423.10.2006 9:25:14
ENGLISH
Troubleshooting
Before resorting to maintenance service, please kindly check by yourself with the following chart.
Trouble shooting
Symptom Cause Solution
No power The power cord isn’t connected Connect the cord to player
Fuse melting Replace the cord with the same one
TV receiver setup is not correct Change TV receiver setup
No picture Video setup is not correct Change video setup
Video cable isn’t connected well Connect the cable properly
Distorted picture Dirty disc Clean the disc
In fast forward or fast rewind mode Sometimes, tiny distortion appears normally
Luminance unsteady
Anticopy circuit influence Connect the DVD unit to TV directly
or picture with noise
Unable to play Without disc Load the disc
Disc is damaged Clean or replace the disc
Disc is put upside down Load the disc properly
Dirty disc Clean the disc
There are menu on TV screen Use SETUP to turn off menu
Parental control is working Set up parental off or change the setup
Key malfunction Power wave or other static interference Turn on/off the power and try again.
Remote control doesn’t work Remote control is not directed properly Point the remote control at the sensor
Remote control is too far from DVD unit Come inside the remote control operation space
Batteries are weak Replace the batteries
No radio signal Antenna is not connected Connect antenna
Signal source is chosen improperly Switch source signal to tuner mode
Specification
DVD receiver
Power supply AC ~230V/50Hz
Power consumption 175W
Working environment Temperature 10°С - +40°С
Relative humidity 5%90%
Disc output TV System PAL, NTSC
Frequency response 20 Hz - 20kHz
S/N(A weight) > 80 dB (1 kHz)
THD+NOISE < 60 dB (1 kHz)
WOW FLUTTER Below the limit of apparatus measure
Tuner AM frequency Range 522 kHz – 1620 kHz
FM frequency Range 64 MHz – 108 MHz
Power output (Max) 25 W*5 + 50 W
Frequency response instability ±1.5 dB
The manufacturer reserves the right to make changes to the characteristics of the device without prior notice.
The service life of the device is no less than five years.
Guarantee
Details regarding guarantee conditions can be obtained from the dealer from whom the appliance was purchased. The bill of sale or receipt must be
produced when making any claim under the terms of this guarantee.
This product conforms to the EMC-Requirements as laid down by the Council Directive
89/336/EEC and to the Low Voltage Regulation (23/73 EEC)
A production date of the item is indicated in the serial number on the technical data plate. A serial number is an eleven-unit number, with the first four
figures indicating the production date. For example, serial number 0606ххххххх means that the item was manufactured in June (the sixth month)
2006.
12
4060.indd 124060.indd 12 23.10.2006 9:25:1423.10.2006 9:25:14
DEUTSCH
Bedienungsanleitung
Reinigung.
VT-4060SR
Vor der Reinigung schalten Sie den Spieler immer vom Netz ab.
Benutzen Sie keine flüssigen Waschmittel oder Aerosole, reinigen Sie
DVD 5.1 Heimkino
das Gerät mit einem weichen feuchten Stofftuch.
CAUTION
Während des Gewitters.
Sicherheitshalber schalten Sie während des Gewitters die
Risk of electric shock
DO NOT OPEN
Stromversorgung, die innere Antenne, das Kabel von der Außenantenne
ab. Falls Sie das Gerät während der längeren Zeit nicht benutzen, führen
WARNUNG: Um das Risiko von Feuerentfachung oder Stromschlag zu
Sie dieselben Aktionen durch.
vermeiden, sollten Sie die Tafeln des Gerätes nicht abnehmen. Wenden Sie sich
zur Wartung ausschließlich an qualifiziertes Fachpersonal
Fremde Gegenstände und Flüssigkeiten.
Lassen Sie keine fremden Gegenstände oder Flüssigkeiten ins
Das Blitzzeichen im gleichschenkligen Dreieck weit den Benutzer
auf eine gefährliche Spannung im Inneren des Gerätes hin, die
Innere des Geräts zukommen, das kann zum Stromkurzschluss oder
Stromschlag zeugen kann.
Stromschlag, Brandgefahr führen.
Erdung der Außenantenne.
Das Ausrufezeichen in gleichschenkligen Dreieck weist den Benutzer
auf wichtige Anweisungen hinsichtlich Betrieb und Wartung in der
Falls eine Außenantenne an den Spieler angeschlossen ist, vergewissern
Gebrauchsanweisung hin.
Sie sich, dass sie geerdet ist, um Stromspannungsdifferenz oder
Akkumulierung des statischen Stroms zu vermeiden.
Markierung eines Lasergerätes. Die Markierung muss sich
Überlastung.
auf der Hintertafel des Gerätes befinden und bedeutet,
Überlasten Sie Steckdosen, Kabelverlängerungen, andere
CLASS 1
dass das Gerät zur Klasse 1 gehört und Laserstrahlen
LASER PRODUCT
Spannungssplitter nicht, das kann zum Kurzschluss oder Brandgefahr
verwendet. Es ist keine Laserbestrahlungsgefahr
führen.
vorhanden, solange das Gerät nicht auseinander
genommen wird.
Stromversorgung.
Stromspeisekabel des Geräts muss so verlegt werden, um seine
SCHÜTZEN SIE SICH!
Beschädigungen zu vermeiden. Achten Sie besonders auf die Stellen in
Notieren Sie sich das Modell und die Seriennummer des Gerätes,
der Nähe der Steckdosen, Schalttafel und Austrittsstelle am Spieler.
solange sie noch gut sichtbar sind. Diese Nummern befinden sich
auf der Hinterwand des Gehäuses vom Gerät. Bewahren Sie diese
Elektroenergieübertragungsleitungen.
Informationen für die nachfolgenden Nutzung auf.
Die Außenantenne darf sich nicht in direkter Nähe der Hochspannungs
ACHTUNG:
elektroenergieübertragungsleitungen, sowie anderen Stromnetze. Bei
DER VIDEOPLAYER DER DVD-PLATTEN IST EIN LASERGERÄT
der Aufstellung der Außenantenne achten Sie besonders darauf, dass
DER A-KLASSE. DIE BENUTZUNG DER STEUERORGANE ODER
jede Möglichkeit des Kontakts mit den Elektroenergieübertragungsleit
EINSTELLUNGEN, DIE IN VORLIEGENDER BEDIENUNGSANLEITUNG
ungen vermieden wird(man muss auch die Zone des möglichen Sturzes
NICHT ANGEGEBEN SIND, DIE DURCHFÜHRUNG DER ABLÄUFE, DIE
berücksichtigen). Sie Störungen können fatale Folgen haben.
HIER NICHT BESCHRIEBEN SIND, KANN ZUR VERLETZUNG DURCH
DIE LASERSTRAHLUNG FÜHREN. DA DER LASERSTRAHL, DER IN
Speisungsquellen.
DIESEM GERÄT VERWENDET WIRD, FÜR DIE AUGEN GEFÄHRLICH
Das Gerät kann nur an die Stromspeisungsquellen angeschlossen
IST, VERSUCHEN SIE NICHT, DAS GEHÄUSE AUFZUMACHEN.
werden, dessen Parameter den auf dem Spezialetikett angegeben sind.
DIE BEDIENUNG DES GERÄTS SOLL AUSSCHLIESSLICH
Falls Sie sich nicht sicher sind, das die Parameter Ihres Netzes den
VON QUALIFIZIERTEN FACHLEUTEN DES SERVICE CENTERS
erforderlichen entsprechen, lassen Sie sich von den Fachleuten beraten.
VORGENOMMEN WERDEN.
Falls das Gerät an eine Akkumulatorbatterie angeschlossen werden
soll oder die Stromversorgung von den Batterien erfolgt, studieren
Besonderheiten
Sie die Bedienungsanleitung. Dieses DVDHeimkino arbeitet bei der
Wir danken Ihnen für den Kauf unserer Produkte. Vor dem Anschluss
Netzspannung zwischen 100 und 240 V und der Frequenz 5060 Hz.
und Anwendung des Geräts lesen Sie bitte aufmerksam diese
Schalten Sie den Spieler nicht sofort nach dem Anschalten aus, warten
Bedienungsanleitung. Bewahren Sie diese für die weitere Anwendung.
Sie mindestens 10 Sekunden ab.
Dieser Spieler gehört zur neuen Generation der DVDSpieler, die
hohe Bild und Tonqualität gewährleisten.
Ersatzteile.
• Die eingebauten Dolby Digital, LPCM, MPEG, digitaler
Falls Bedarf am Ersatz irgendeiner Einheit oder eines Teils des Gerätes
AudioDecoder;
besteht, vergewissern Sie sich, dass der technische Fachmann, der den
• HiFi, digitaler 24BitAudioprozessor mit der Frequenz 96 KHz;
Ersatz vorgenommen hat, die Ersatzteile benutz hat, die über dieselben
• Digitaler Audioausgang (Koaxialausgang);
technischen Eigenschaften verfügen, sowie auch die originellen.
• Unterstützt folgende Formate: DVD, VCD, CD, MP3, JPEG, PICTURE
Sonst kann die Benutzung der nicht lizenzierten Ersatzteile zum Brand,
CD, MPEG4;
Stromschlag, verschiedenen Gerätbeschädigungen führen.
• eingebauter AM/FMRadioempfänger mit dem Tuner;
• hochqualitativer Verstärker.
Sicherheitsüberprüfung.
Nachdem die Reparatur oder Ersatzarbeiten am Gerät beendet
WICHTIGE HINWEISE:
sind, bitten Sie den technischen Fachmann Überprüfung der
Betriebssicherheit am Gerät vorzunehmen.
ACHTUNG: Befolgen Sie streng die Richtlinien dieser
Bedienungsanleitung und allen Merkzeichen auf dem Spielergehäuse.
Pflege.
Bewahren Sie die Bedienungsanleitung für die weitere Benutzung
Versuchen Sie nicht, das Gerät selbständig zu reparieren. Beim
auf. Aufstellung: Stellen Sie nie den Spieler auf unsichere Ebenen,
Abnehmen der Schutzhauben oder Deckel besteht das Risiko, die
Untersetzer, Tische, Regale, eingebaute Halterungen. Der Spieler
offenen Teile der elektrischen Ketten des Geräts zu berühren. Das kann
kann stürzen und den Menschen oder Tieren Schaden zufügen oder
zum Stromschlagrisiko oder anderen Beschädigungen führen. Beim
selbst beim Hinfallen ernste Beschädigungen bekommen. Bei der
Reparaturbedarf wenden Sie sich an den entsprechend qualifizierten
Wahl des Aufstellungsplatzes für den Spieler befolgen Sie genau
Fachmann.
diese Bedienungsanleitung, benutzen Sie für die Aufstellung nur die
Hilfsgeräte, die vom Hersteller empfohlen sind. Nach der Aufstellung
Fernsehempfänger.
des Spielers seien Sie vorsichtig beim Platzwechsel. Scharfe Stöße,
Dieser Spieler ist mit beliebigen Typen der Fernsehempfänger
Druck, Überhang, Schrägung können zum Umkippen oder Stürzen des
kompatibel, die Standard NTSC oder PAL unterstützen.
Geräts führen.
Lassen Sie nicht zu, dass Tropfen oder Spritzer auf das Gerät geraten,
Ventilierung.
stellen Sie keine mit Flüssigkeiten gefüllten Gefäße auf (zum Beispiel
Schlitzen und Öffnungen im Gehäuse des Geräts sind für Ventilierung
Vasen).
und Überhitzungsschutz gedacht. Achten Sie darauf, dass diese
13
4060.indd 134060.indd 13 23.10.2006 9:25:1423.10.2006 9:25:14
DEUTSCH
Öffnungen nicht blockiert werden, stellen Sie den Spieler auf keine weichen lockeren Oberflächen (Betten, Sofas, Teppiche usw.)auf. Stellen Sie das
Gerät nicht an den Stellen, wo die erforderliche Luftzufuhr für die Ventilierung nicht besteht auf (in den Schränken, Nischen). Halten Sie das Gerät
fern von den Wärmequellen: Herden, Ofen, Heizkörper, Heizgeräte usw.
Wasser und Fuchtigkeit.
Stellen Sie das Gerät nicht an den Stellen mit erhöhter Feuchtigkeit (Bad, Duschkabine, Waschbecken, Waschmaschine) sowie auf den feuchten
Oberflächen, in der Nähe von Teichen, Wasserbehälter usw. auf. Falls sich auf den Gerätoberflächen Schwitzwasser niederschlägt, nehmen Sie die
Disk heraus, lassen Sie das angeschaltete Gerät für zwei bis drei Stunden, damit sich das Gerät in dieser Zeit erwärmen kann und der Schwitzwasser
verdampft.
IHR DVDSPIELER.
Die unten angegebene Bedienungsanleitung hilft Ihnen Maximum Spaß von der Benutzung Ihres DVDSpielers zu bekommen.
DIE BESTE STELLE ZUR AUFSTELLUNG.
Das Gerät muss auf einer sicheren, geraden Ebene aufgestellt werden, möglichst weit von den Videospielern, Radioempfängern, Lautsprechern,
da das Magnetfeld, das diese Geräte schaffen, zu Tonveränderungen oder Bildverzerrungen führen kann. Bei der Aufstellung des Geräts in den
verschlossenen Schränken, Nischen muss man freie Ventilation sichern – nicht weniger als 1 m2 freien Raum.
BILDREINHEIT.
Der DVDSpieler ist ein Spieler mit hoher Präzision. Bei Verschmutzung oder Verschleißung der optischen Speicherelemente oder des Disklaufwerks
kann sich die Bilddarstellungsqualität verschlechtern. Für das Erhalten der deutlichen Bilddarstellung wird es empfohlen, regelmäßige Prüfung und
technische Pflege des Geräts jede 1 000 Stunden vorzunehmen. Über die Einzelheiten fragen Sie beim Lieferer des Geräts nach.
WIEDERGABE DER DISKEN.
Dieser DVDSpieler gibt folgende DiskTypen wieder: DVD, MP3, CD, CDR und CDRW mit der Fehlerkorrekturmöglichkeit. Das Gerät gibt die
Möglichkeit die Disken mit Bildern oder digitale Fotoalben durchzusehen. Es unterstützt acht Sprachen, bis 32 Untertitelsprachen, vielfältigen
BlickwinkelDarstellungsmodus. Der Spieler zeichnet sich durch die Einstellungsleichtigkeit und einfaches Bildschirmmenü aus, ist auf der Basis des
Vollfunktionszentralprozessors mit der Modernisierungsmöglichkeit geschaffen.
DIGITALER AUDIOAUSGANG.
Der Koaxialausgang gewährt die Anschlussmöglichkeit für den äußerlichen AVSechskanalverstärker und des Prozessors, der Formate DOLBY
Digital und MPEG mit Hilfe nur eines Kabels unterstützt. Das erlaubt Ihnen, sich mit Komfort verschiedene DVD, CD und MP3Disken anzuschauen.
DER ANALOGE AUDIOAUSGANG.
Das akustische System, das über den eingebauten Sechskanalverstärker verfügt, fordert keinen Anschluss vom äußeren Verstärker.
SICHERUNGSSYSTEM FÜR DEN LASERKOPF GEGEN SPANNUNGSSPRÜNGE.
Um die Nutzungsfrist für den Laserkopf zu verlängern, enthält der Spieler das einzigartige Sicherungssystem gegen Spannungssprünge, das
Stromstabilisierung für den Laser gewährleistet.
Accessoires
Dieser Spieler ist für die Wiedergabe von folgenden Disktypen gedacht:
Disktyp Symbol Inhalt
DVD
Audio/Video
MP3 Audio
VideoCD (VCD)
Audio/Video
CDDA
Audio
Picture CD
JPEG BildDisk
MPEG4
Audio/Video
DISKEN
ANWENDUNG DER DISKEN
Dieser Bedienungsanleitungsabschnitt enthält Informationen über die Umgangsregeln mit den Disken, die in diesem Gerät verwendet werden, über
deren Reinigung und Aufbewahrung.
14
4060.indd 144060.indd 14 23.10.2006 9:25:1423.10.2006 9:25:14
DEUTSCH
Umgang mit den Disken
Berühren Sie die Arbeitsfläche der Disk nicht.
Befestigen Sie keine Papier oder andere Aufkleber, Sticker auf die Arbeitsfläche, machen Sie keine Aufschriften darauf. Achten Sie darauf, dass
keine Fingerabdrücke auf der Arbeitsfläche bleiben. Halten Sie die Disk an den Rändern und am Zentralteil.
Reinigung
Fingerabdrücke und andere Verschmutzungen auf der Arbeitsfläche der Disk können zur Ton oder BildVerzerrungen führen. Wischen Sie die Disk
mit einem weichen Stofftuch in der Richtung vom Zentrum zu den Rändern. Halten Sie die Disken sauber.
Falls sich der Schmutz mit einem trockenen Tuch nicht entfernen lässt, wischen Sie diese mit einem leicht feuchten Stofftuch und dann wiederum mit
einem trockenen Tuch.
Benutzen Sie keine Lösungsmittel, solche wie Azeton, Benzin, andere Reinigungsmittel oder Antistatikmittel für Vinyloberflächen, um den Schmutz
zu beseitigen.
Aufbewahrung.
Lassen Sie nicht zu, dass direkte Sonnenstrahlen auf die Disk geraten.
Bewahren Sie die Disken nicht in der Nähe der Wärmequellen, an den Stellen, wo sich Staub und Feuchtigkeit akkumulieren können auf.
Bewahren Sie die Disken senkrecht in entsprechenden Hüllen. Legen Sie keine schweren Gegenstände auf die Hüllen mit den Disken, die sich diese
verbiegen können.
Diskpflege und Reinigung:
DIE VORDERPLATTE
1 Stromversorgung (An/Ausschalten)
2 DVDLaufwerk
3 Taste «Öffnen/Schließen» 4 Taste «Start/Pause»
5 Taste «Stop»
6 Lautstärkeregler für das Mikrophon 7 Mikrofonanschluss
8 Lautstärkeregler
DIE HINTERPLATTE
1. Schalttafel für den Anschluss des akustischen Systems
2. 2CHAudioeingang
3. Schnittstelle des Videoausgangs
4. Schnittstelle des SVideoausgangs 5. 2CHAudioausgang
6. Komponente Y, Cb/Pb, Cr/Pr
7. Schnittstelle des Koaxialausgangs
8. FMAntenneAnschluss 9. VGAAnschluss
10. AMAntenneAnschluss
11. SCARTAnschluss
15
4060.indd 154060.indd 15 23.10.2006 9:25:1523.10.2006 9:25:15
DEUTSCH
UMGANG MIT DER FERNBEDIENUNG
17 S.EFFECT StereoEffekt (An/
Batterieeinsatz
Ausschalten)
1. Drücken Sie den Batteriefachdeckel nach unten und nehmen Sie ihn
18 L/R/ST Links/Rechts/Stereo
ab.
2. Setzen Sie zwei Batterien Typ AA , überprüfen Sie, ob die
19 REPEAT Wiederholung
Zeichen «+» und «–» an den Batterien und im Inneren des Fachs
20 AB REPEAT ABWiederholung
übereinstimmen.
21 OPEN/CLOSE Öffnen/Schließen
3. Setzen Sie den Deckel zurück an seinen Platz.
22 NUMBER KEY Zahlentaste
23 MUTE Ton anschalten
Anmerkungen:
1. Benutzen Sie nicht die Batterien von verschiedenen Herstellern,
24 NEXT Nächstes
mischen Sie keine neuen und alten Batterien.
25 PREVIOUS Vorheriges
2. Falls Sie die Fernbedienung längere Zeit nicht benutzen,
26 SUBTITLE Untertitel
entnehmen Sie die Batterien, um die Fernbedienung infolge der
27 RIGHT Nach rechts
Batteriekorrosion nicht zu beschädigen.
3. Die entladenen Batterien müssen sofort ausgewechselt werden,
28 MENU Menü
um die Beschädigungen an der Fernbedienung infolge der
29 VMODE VModus
Batteriekorrosion zu vermeiden.
30 ANGLE BLICKWINKEL
4. Falls aus den Batterien Flüssigkeit ausgetreten ist, wischen Sie das
31 SOURCE Quellenauswahl
Fach trocken und wechseln Sie die Batterien aus.
32 TONE Tonlage
5. Wechseln Sie die beiden Batterien zur gleichen Zeit, benutzen Sie
für den Ersatz nut die neuen, nicht benutzten Batterien.
33 CHLEVEL Kanalniveau
6. Nutzungsdauer der Batterien hängt von der Häufigkeit des
34 ZOOM Vergrößerung
Gebrauchs der Fernbedienung ab.
35 STOP Stopp
36 STEP Schritt
Anwendung der Fernbedienung
Richten Sie die Fernbedienung direkt auf den Sensor für die
Fernbedienung auf der Vorderplatte des DVDSpielers. Beim Empfang
eines bestimmten Signals von der Fernbedienung erfüllt das Gerät die
entsprechende Operation. Die Reichweite der Fernbedienung beträgt 7
m vom Sensor, Winkelreichweite beträgt 30 Grad in jeder Richtung.
Anmerkungen:
1. Richten Sie die Fernbedienung nicht auf die Lichtquellen, solche wie
die Sonne, Quellen der starken Fluoriszenzstrahlung, das es zu den
Funktionsstörungen des Geräts führen kann.
2. Bei der gleichzeitigen Anwendung der Fernbedienung mit den
Fernbedienungen von anderen Spielern oder bei der Anwendung
der Fernbedienung in der Nähe von anderen Geräten mit
Infrarotstrahlung können Funktionsstörungen auftreten.
3. Falls eine der Tasten auf der Fernbedienung zufällig gedrückt und
einige Zeit so gehalten wird, können Funktionsveränderungen oder
Verkürzung der Nutzungsdauer der Batterien auftreten.
4. Vergewissern Sie sich, dass zwischen der Fernbedienung und dem
Sensor keine Hindernisse bestehen, die Signalempfang stören
könnten.
5. Achten Sie darauf, dass kein Wasser oder nasse Gegenstände auf
die Fernbedienung gelangen.
6. Nehmen Sie die Fernbedienung nicht auseinander.
BATTERIEN
FALSCHE BENUTZUNG DER BATTERIEN KANN ZUM
FLÜSSIGKEITSAUSFLUSS, KORROSION ODER EXPLOSION
FÜHREN.
1 STANDBY Wartemodus
2 GOTO Übergang
3 SETUP Einstellungen (Menüeintritt)
4 PLAY/PAUSE Start/Pause
5 FAST FORWARD Schneller Übergang vorwärts
6 VOLUME +/ Lautstärkeregelung
7 FAST BACKWARD Schneller Übergang
rückwärts
8 TITLE Abschnitt
9 UP Nach oben
10 LEFT Nach links
11 ENTER Eintritt
12 AUDIO Audio (Ton)
13 DOWN Nach unten
14 AMODE Modus
15 PROG Programmierung
16 OSD Einstellungsmenü auf dem
Bildschirm
16
4060.indd 164060.indd 16 23.10.2006 9:25:1523.10.2006 9:25:15
DEUTSCH
Anschluss
Übersetzung der Überschriften auf dem Bild.
Anschlussstellen für Peripherie bei diesem Spieler befinden sich
Im Spieler sind folgende Ausgänge für das Videosignal vorgesehen.
an der hinteren Platte. Vor dem Anschluss der äußeren Ton oder
Videoperipherie lesen Sie aufmerksam alle zugehörige Informationen
KompositVideoSignal
und Bedienungsanleitungen.
Für die Ausführung des Videosignals vom Spieler zum
Schließen Sie den Spieler nicht ans Netz, solange Sie mit dem
Fernsehempfänger oder Bildschirm schließen sie mit Hilfe des
Anschluss von allen Geräten nicht abgeschlossen haben.
AVKabels den gelben Ausgang des KompositVideosignals des
Das rote Terminal (ist bezeichnet mit dem Buchstaben R) ist für
DVDSpielers an den entsprechenden Eingang der Peripherie.
den Anschluss des rechten Kanals gedacht, das weiße (bezeichnet
mit dem Buchstaben L) – für den linken Kanal. Das gelbe Terminal
SVideosignal
ist für den Anschluss des Videosignals vorgesehen. Überprüfen
Für die Ausführung des SVideosignals vom Spieler zum
sie, ob alle Anschlüsse sicher sind, da das locker angeschlossene
Kabel zur Geräuschbildung, Ton oder Bildverzerrung, sogar zur
Fernsehempfänger oder Bildschirm schließen Sie mit Hilfe des
Gerätbeschädigung führen kann. Achten Sie darauf, dass sich das
SVideokabels den SVideoausgang des DVDSpielers an den
AVKabel nicht mit anderen Kabeln verflechtet (Netzkabel oder Kabel
entsprechenden SEingang der Peripherie.
des akustischen Systems), das kann Ursache der Verschlechterung
der Bild und/oder Tonqualität sein.
Komponentvideosignal
Für die Ausführung des Videosignals vom Spieler zum
StereoTon
Fernsehempfänger oder Bildschirm schließen Sie mit Hilfe des
Für den Anschluss der Audioausgänge des Spielers an die
dreifachen AvKabels drei Videoausgänge des DVDSpielers (Y, Cb, Pb)
AudioStereoeingänge eines äußeren Geräts benutzen Sie das
an den entsprechenden SEingang der Peripherie.
doppelte Audiokabel (rot für den rechten Kanal, weiß für den linken
Kanal).
VGA
Für die Ausführung des Videosignals vom Spieler zum
Digitaler KoaxialAudiokabel
Fernsehempfänger oder Bildschirm schließen Sie mit Hilfe des
Benutzen Sie ein speziales Koaxialkabel für den Anschluss des
VGAKabels den VGAVideoausgang des DVDSpielers an den
KoaxialAusgangs des Spielers an den KoaxialEingang des
entsprechenden Eingang der Peripherie.
Verstärkers.
LautsprecherAusgang
SCART
Benutzen Sie die beigelegten Kabel für den Anschluss der Ausgänge
Für die Ausführung des SCARTVideosignals vom Spieler
des Spielers an die entsprechenden Schnittstellen der Lautsprecher.
zum Fernsehempfänger oder Bildschirm schließen Sie den
SCARTVideoausgang des DVDSpielers an den entsprechenden
Anmerkung
Eingang der Peripherie mit Hilfe des SCARTKabels.
Nach dem „physischen“ Anschluss muss man entsprechende
Einstellungen vornehmen. Siehe «Toneinstellungen» im Abschnitt
«Systemeinstellungen» dieser Bedienungsanleitung.
Anmerkung:
Wahl des Anschlusses wird durch die Eingangstypen des
Fernsehgeräts oder des Bildschirms bestimmt.
Benutzen Sie nicht alle vorhandene Anschlüsse gleichzeitig, das
kann sich negativ auf die Videosignalqualität auswirken.
Um eine hohe Videosignalqualität zu erreichen, ist es erforderlich,
dass die Parameter des physischen Anschlusses mit den
Parametern der Einstellungen des Videospielers übereinstimmen
(Siehe «Videoeinstellungen» im Abschnitt «Systemeinstellungen»
dieser Bedienungsanleitung.
LAUTSPRECHER
Es ist sehr wichtig, das System von Lautsprechern richtig zu bilden und
zu verteilen, die für die Schaffung des voluminösen Tons vorgesehen
17
4060.indd 174060.indd 17 23.10.2006 9:25:1523.10.2006 9:25:15
DEUTSCH
sind. Um die wirklich gute Tonqualität zu genießen, lesen Sie
ANTENNEANSCHLUSS.
aufmerksam alle Hinweise zur Platzierung der Lautsprecher durch, bevor
In manchen Räumen und in bestimmten Umständen lässt sich das
Sie diese an den Spieler anschließen.
Radiosignal nicht immer empfangen. Die Antennen, die mitgeliefert
werden, helfen dieses Problem zu lösen. Sie sind für die Anwendung nur
Dreidimensionale Lautsprecher
in den Räumen gedacht.
Die vorderen oder der linke und rechte Hauptlautsprecher; der
Zentrallautsprecher
AMRahmenantenne.
Diese drei Lautsprecher sind für die Schaffung des Raum, VolumenTon
Die Rahmenantenne muss so aufgestellt werden, um möglichst
sowie für die Verstärkung der Toneffekte vorgesehen. Die Hauptdialoge
reinen Signalempfang zu ermöglichen. Versuchen Sie die Antenne so
in den Filmen werden durch diese Lautsprecher wiedergegeben.
aufzustellen, dass sie sich möglichst weit weg vom DVDSpieler, den
Lautsprechern und Speisungskabeln befindet. Falls das Signal schwach
Hintere oder Peripherielautsprecher
bleibt, schließen Sie die Außenantenne an.
Diese zwei Lautsprecher sind für die Wiedergabe der dreidimensionalen
Toneffekte vorgesehen, sie schaffen die Atmosphäre des vollendeten
Wie Sie die Rahmenantenne anschließen:
Tons, da sie einen Tonhintergrund hinzufügen.
Ziehen Sie die Sperre nach unten, dann setzen Sie das Kabel in die
Buchse. Lassen Sie die Sperre frei. Finden sie die Stelle, wo das Signal
Subwoofer
am stärksten und am reinsten ist.
Verstärkt niedrige Frequenzen (Bass), schafft das Gefühl der Tonrealität.
FMAntenne.
Anmerkung: Audioaufnahme für den Zentrallautsprecher und den
FMAntenne muss vollständig ausgewickelt und in Richtung des
Niedrigfrequenzdynamik wird teilweise die vordere und hintere
stärksten Signals orientiert sein. Stellen Sie die Antenne so auf, dass die
Lautsprecher verteilt, um den dreidimensionalen Toneffekt zu schaffen.
Signalverzerrung minimal ist. Falls das Signal schwach bleibt, muss man
die Außenantenne anschließen.
LAUTSPRECHERPLATZIERUNG
Abhängig von der Raumgröße und Raumausstattung wird sich die
WIE SIE DAS MENÜ BENUTZEN
Aufstellung der Lautsprecher verändern. Auf der Abbildung unten ist die
Drücken Sie die Taste «SETUP», um das Systemeinstellungsmenü zu
Standardaufstellung der Lautsprecher dargestellt.
betreten. Um diesen Einstellungsmodus zu verlassen, drücken Sie
wieder die Taste «SETUP». Um von einem Menüpunkt zum anderen zu
Empfehlungen
wechseln, benutzen Sie die Navigationstasten, um den Punkt zu wählen,
1. Vordere oder Hauptlautsprecher und der Zentrallautsprecher
drücken Sie die Taste «ENTER».
müssen auf dem gleichen Niveau platziert werden, alle müssen auf
(1) Mit Grau sind die Menüpunkte ausgezeichnet, die nicht einstellbar
den Zuhörer gerichtet werden.
sind.
2. Die dreidimensionale oder Peripherielautsprecher sollte man besser
(2) Veränderungen, die in das Einstellungssystem eingeschlossen sind,
etwas höher über dem Ohrniveau des Zuhörers aufstellen.
sollen gespeichert werden und werden beim Spielerausschalten
3. Der Subwoofer kann man an jeder Stelle im Raum aufstellen, seine
behalten.
Lage wirkt sich auf der Tonwahrnehmung nicht aus.
4. Es wird empfohlen, den Subwoofer in das Heimkinosystem
GENERAL SETUP PAGE:
aufzunehmen, um optimalen Ton der niedrigen Frequenzen zu
gewährleisten.
LAUTSPRECHERANSCHLUSS
Hervorragende Konstruktion dieses DVDSpielers erlaubt optimale
Tonqualität, wenn alle Lautsprecher mit dem Nominalwiderstand benutzt
werden.
Wichtig
1 Minimaler vollständiger Widerstand jedes von fünf Lautsprechern ist
gleich 4 Ohm, für den Subwoofer – 8 Ohm.
2 Falls Sie nur einen Lautsprecher benutzen oder Musik im
MonoModus hören möchten, schließen Sie keine zusätzlichen
Lautsprecher parallel zu den Eingängen des linken und rechten
Kanals an. (Siehe Abbildung unten).
TV Display (Bildschirm des Fernsehempfängers):
4:3 PANSCAN (den Bildschirm vertikal ausfüllen): beim Anschluss
des Spielers an einen gewöhnlichen Fernsehempfänger erfüllt die
Breitwanddarstellung den Bildschirm vollständig vertikal, in der Breite
werden die Ränder von beiden Seiten abgeschnitten.
4:3 LETTERBOX (den Bildschirm horizontal ausfüllen): beim Anschluss
des Spielers an einen gewöhnlichen Fernsehempfänger erfüllt die
Breitwanddarstellung den ganzen Bildschirm vollständig horizontal,
oben und unten bleiben schwarze Streifen.
16:9: Wählen Sie diesen Punkt, falls der Spieler an den
Fernsehempfänger mit einem breiten Bildschirm angeschlossen wird.
WideSqueeze (breit komprimiert): Wählen Sie diesen Punkt, falls
der Spieler an den Fernsehempfänger mit einem breiten Bildschirm
angeschlossen ist.
Kabelanschluss an die Lautsprecher.
ANGLE MARK (Blickwinkel):
1. Nehmen Sie ungefähr 1,3 cm der Isolierbeschichtung des Kabels
Falls dieser Menüpunkt angeschaltet ist (ON) erscheint bei der
ab.
Wiedergabe einer DVDDisk mit der Wiedergabemöglichkeit von
2. Öffnen Sie den entsprechenden Anschluss, indem Sie die Sperre
verschiedenen Blickwinkelpositionen einsprechendes Piktogramm.
drücken.
3. Setzen Sie das Kabelende in den Anschluss
OSD LANG (Menüsprache):
4. Lassen Sie die Sperre frei, überprüfen Sie die Sicherheit des
Sprachwahl für das Bildschirmmenü.
Anschlusses.
Anmerkung: Um Beschädigungen der elektrischen Kette zu vermeiden,
CLOSED CAPTIONS (verdeckte Untertitel):
achten Sie darauf, dass sich die nicht beschützten Kabel des positiven
Funktion geht nicht, falls die Disk keine Titel enthält. Um diese
und negativen Kontakts nicht berühren.
Einstellung anzuschalten, drücken Sie auf der Fernbedienung die Taste
«SUBTITLE».
18
4060.indd 184060.indd 18 23.10.2006 9:25:1523.10.2006 9:25:15
DEUTSCH
SCREEN SAVER (Bildschirmschoner):
EINSTELLUNGEN FÜR DEN DIGITALEN TONKANAL:
Diese Funktion (falls angeschaltet) geht folgendermaßen vor: Der
Spieler ist angeschaltet und läuft einige Minuten ohne Disk, am
Bildschirm erscheint ein bewegliches Bild und nach 20 Minuten schaltet
der Spieler den Wartemodus an.
Um zum Arbeitsmodus zu wechseln, drücken Sie die Taste «STANDBY»
auf der Fernbedienung.
LAST MEMORY (letzte Aufnahme).
Falls die Funktion angeschaltet ist (ON), speichert der Spieler die Stelle,
an der Sie die Diskwiedergabe angehalten haben. Nächstes Mal, wenn
Sie dieselbe Disk einlegen, fängt er automatisch die Wiedergabe von
dem Anhaltepunkt, wo Sie aufgehört haben.
TONEINSTELLUNGEN:
EINSTELLUNGEN FÜR DEN ANALOGEN TONKANAL:
DIGITAL OUTPUT (Digitalausgang):
SPDIF OFF (SonyPhillips Digital Interface Format SonyPhillipsDigit
alformat)
Dieses Signal ist am Koaxialausgang abgeschaltet, nur der analoge
Audioausgang ist zugänglich.
ALL (ALLE): Falls diese Funktion ausgewählt ist, kann man die Funktion
«RAW» (unbearbeitetes Signal) anschalten.
PCM ONLY (nut ImpulsCodeSignalmodulierung): In diesem Modus
erfolgt die Einstellung des ICMKanals entsprechend dem Nutzerbedarf.
LPCM OUT (Ausgang mit der linearen ImpulsCodeSignalmodulie
rung): Stellen Sie die Frequenz der LICM 4896 KHz.
Anmerkung: Einige Verstärker unterstützen die Frequenz 96 KHz nicht,
DOWNMIX (TONMISCHUNG).
deswegen kann sich die Einstellung dieser Frequenz auf der Qualität des
LT/RT (Links/Rechts): Für die Tonausführung auf zwei Kanäle:
Ausgangssignals durch den Koaxialkabel auswirken.
links und rechts, sogar falls der Ton auf der CD im Format 5.1CH
aufgenommen ist (Aufnahmeformat für dreidimensionalen Ton mit
DOLBY DIGITAL SETUP:
Benutzung von fünf verschiedenen Kanälen).
STEREO (STEREO): Der Ton wird im Stereomodus wiedergegeben,
sogar wenn auf der Disk Ton im Format 5.1CH aufgenommen ist.
3D SURROUND (RAUMTON): Der ton wird im Raumtonmodus
wiedergegeben (Anwesenheitseffekt, nur für die Spieler, die Format
5.1CH unterstützen).
OFF (AUSGESCHALTET): Schaltet die Funktion für Kanalwiedergab
eanzahlkomprimierung aus. Für die Wiedergabe der Disken mit dem
Ton im Format 5.1CH, auch falls an den Spieler der 5.1CHVerstärker
angeschlossen ist, muss diese Funktion angeschaltet werden (ON).
Diese Funktion ist nur an den Spielern möglich, die Standard 5.1CH
unterstutzen.
DUAL MONO (zwei Monokanäle):
FRONT, CENTER, REAR and SUBWOOFER SPEAKER (vordere,
Stereo: Für die Stereowiedergabe einstellen.
Zentral und hintere Lautsprecher, Subwoofer) (Diese Funktion fehlt in
LMono: Für die Wiedergabe nur durch den linken Kanal einstellen.
den 2CHSpieler, d. h. in den Spielern mit ZweikanalTon).
RMono: Für die Wiedergabe nur durch den rechten Kanal einstellen.
Falls alle oder einige Lautsprecher an den Spieler angeschlossen sind,
MixMono: Für die gemischte Wiedergabe durch den linken und rechten
wählen Sie entsprechende Einstellungen.
Kanal einstellen.
DIALOG (Dialog): Schalten Sie den Dialogmodus und Sie können ihn
DYNAMYC (Dynamikbereich): Verwenden Sie diese Einstellung
mit Hilfe der Navigationstasten einstellen. Im Modus «DOWNMIX» sollen
für die Minderung der maximalen Lautstärke für alle Kanäle ohne die
«LT/RT» oder «STEREO» ausgewählt werden.
Qualität des Tons zu verschlechtern.
D.R.C. (Datenspeicherungskontrolle):
CHANNEL DELAY PAGE (Kanalzurückhaltung):
Sie können den Modus «AUTO» (automatisch)wählen und ihn an «ON»
Falls alle oben genannten Einstellungen für Sie nicht ausreichen, können
oder ausschalten «OFF».
Sie den Lautsprecherabstand entsprechend den realen Umständen
gestalten. Dafür können Sie mit den Navigationstasten den notwendigen
Lautsprecher wählen und den Abstand mit Hilfe der Tasten regeln.
19
4060.indd 194060.indd 19 23.10.2006 9:25:1623.10.2006 9:25:16
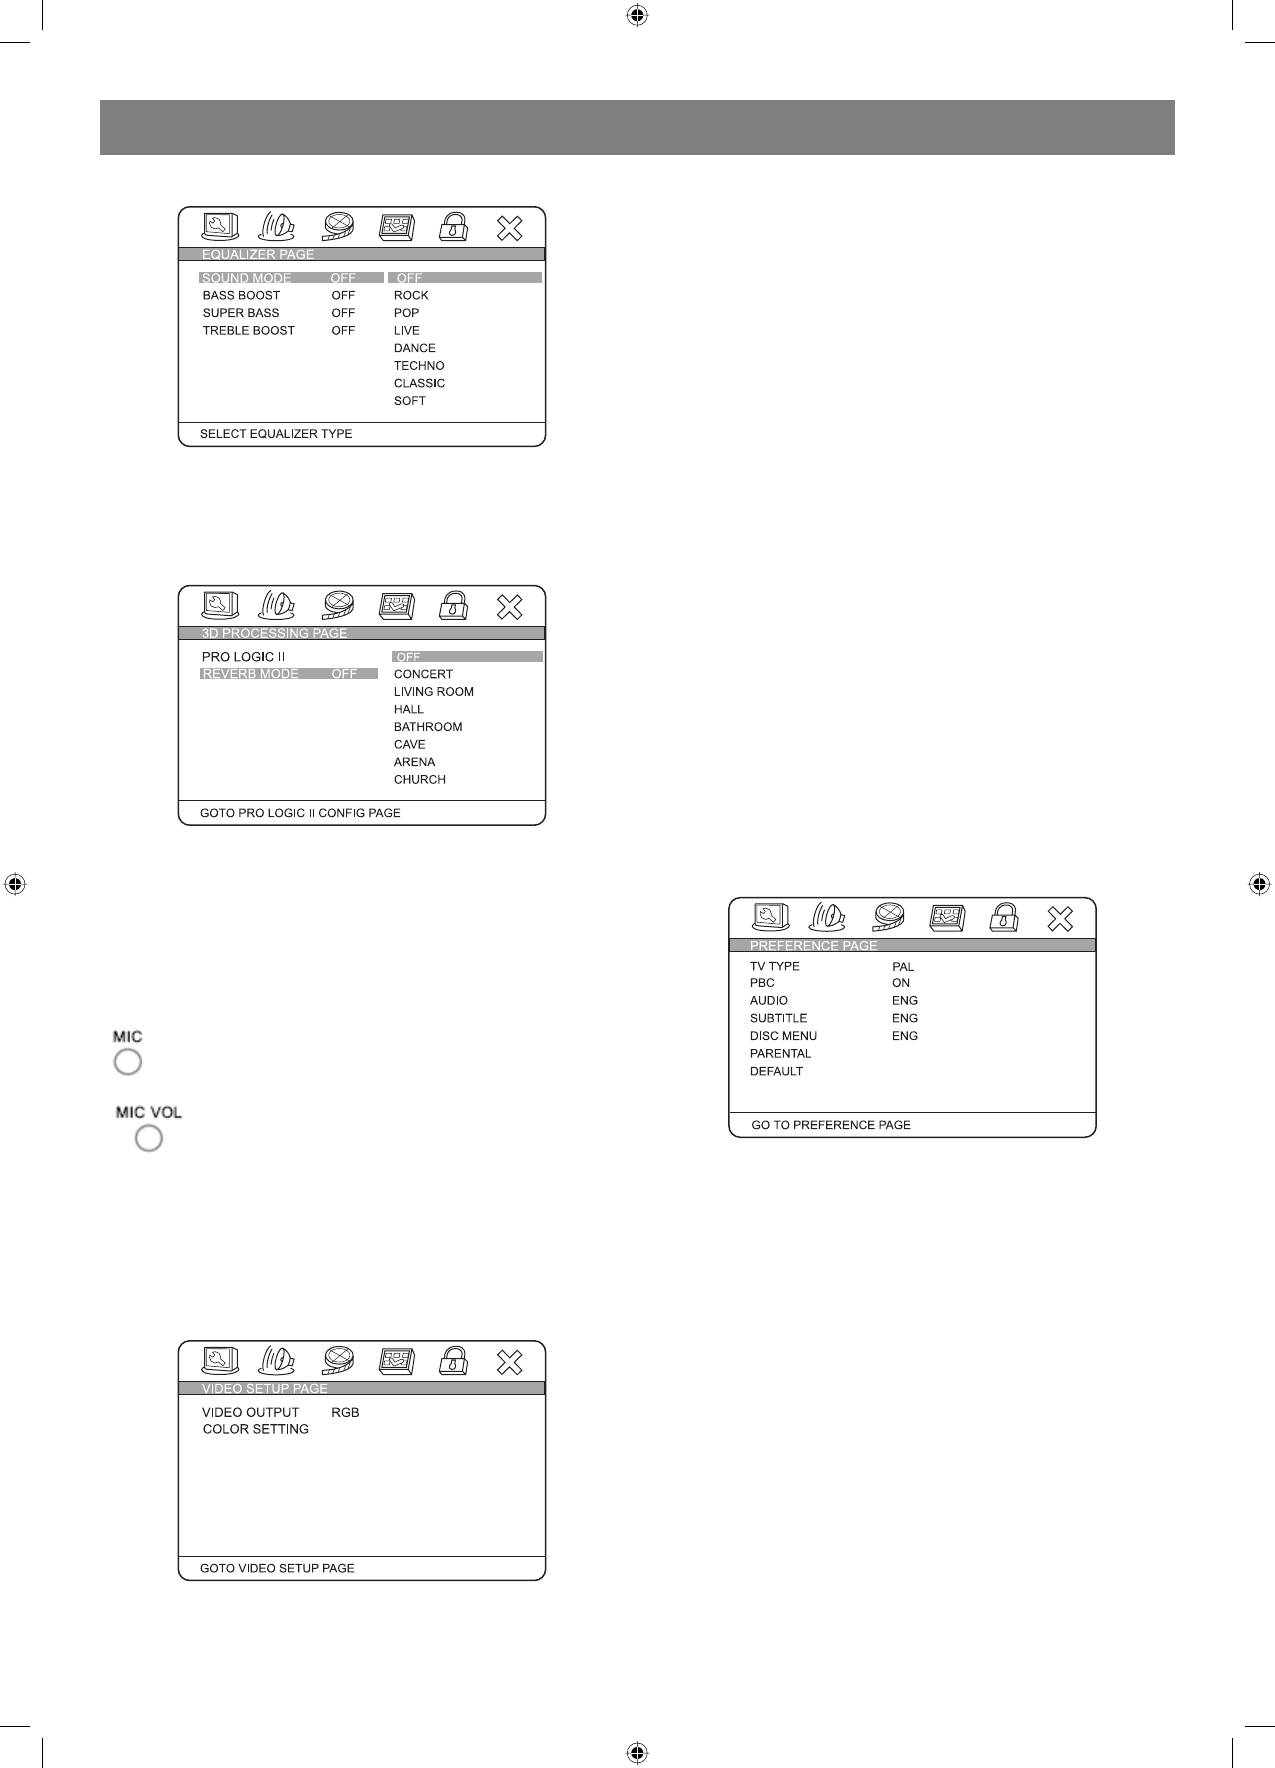
DEUTSCH
EQUALIZER (VERSTÄRKUNG DER EINZELNEN FREQUENZEN):
YUV: Wird für den Anschluss des Geräts über den
Komponentvideoausgang angewandt.
PYUV: Wird für das Anschalten der fortgeschrittenen Abtastung furch
den Komponentvideoausgang angewandt.
RGB: Wird beim Anschluss über die SCARTSchnittstelle angewandt.
PRGB: Wird für das Anschalten der fortgeschrittenen Abtastung über
die SCARTSchnittstelle angewandt. Der Anschluss ist genauso wie für
RGB.
VGA: Schalten Sie diese Funktion beim Anschluss an der VGAAusgang
an.
Anmerkung: Falls die Videosignaleinstellungen dem benutzten
physischen Anschluss nicht entsprechen, kann das Bild am Bildschirm
des Fernsehempfängers nicht wiedergegeben werden. In diesem Fall
müssen sie den Spieler noch einmal starten, drücken Sie die Taste
Diese Funktion erlaubt den Tonmodus zu wählen, Bass zu verstärken,
«V_MODE» und halten Sie diese solange, bis das Bild erscheint.
Superbass anzuschalten oder hohe Frequenzen zu verstärken,
abgesehen von Ihren Wünschen oder aufgrund der Empfehlungen für
FARBEINSTELLUNGEN:
die Diskwiedergabe.
Farbeinstellungen beinhalten unter anderem: SHARPNESS
(Schärfe), BRIGHTNESS (Helligkeit), CONTRAST (Kontrast), GAMMA
3D PROCESSING (Raumton):
(Farbpalette), HUE (Farbtöne), SATURATION (Sättigung), LUMA DELAY
(Verzögerung des Helligkeitssignals).
SHARPNESS (Schärfe): Dieser Parameter kann drei verschiedene Werte
annehmen, HOCH/MITTEL/NIEDRIG.
BRIGHTNESS (Helligkeit): Benutzen Sie die Navigationstasten für die
Regelung der Bildhelligkeit.
CONTRAST (Kontrast): Benutzen sie die Navigationstasten für die
Kontrastregelung für die Bilddarstellung.
GAMMA: Dieser Parameter kann vier Werte annehmen, HOCH/MITTEL/
NIEDRIG/FEHLT.
HUE (Farbe): Benutzen Sie die Navigationstasten für die Regelung des
Farbniveaus.
SATURATION: Benutzen Sie die Navigationstasten für die Regelung des
Farbsättigungsniveaus des Bildes.
LUMA DELAY (Verzögerung des Helligkeitssignals): kann zwei
Im «PROLOGIC ON»Modus kann man den Tonwiedergabemodus mit
verschiedene Werte annehmen: 0T oder 1T.
dem Widerhalleffekt anschalten und einstellen.
EINSTELLUNGEN
HDCD SETUP (Systemeinstellungen für die Tonkodierung der СD):
In diesem Modus gibt es Möglichkeit einen der zwei Filter 1X oder 2X an
oder auszuschalten.
KARAOKE
Diese Funktion sieht zwei KaraokeModi vor «ON/OFF» (An/
Ausgeschaltet).
(Mikrophon) Stellen Sie die Lautstärke des Signals, das auf das
Mikrophon geleitet wird, auf die niedrigste Stufe ein. Stecken
Sie das Mikrophonkabel in die entsprechende Buchse ein.
Mit Hilfe des Lautstärkereglers des Mikrophons stellen Sie
die gewünschte Lautstärke ein. In den Einstellungen finden
Sie mit Hilfe der Navigationstasten das gewünschte
Widerhallniveau.
TV SYSTEM (FERNSEHSYSTEM):
Dieser Spieler passt für alle Fernsehsysteme PAL, MULTI oder NTSC.
Während der Wiedergabe der KaraokeDisk drücken Sie auf der
Wählen Sie eins von denen.
Fernbedienung einer der Tasten „R“ – für rechts oder „L“ – für links, um
PAL: Stellen Sie den Ausgang im PALSystem ein.
den Kanal zu wählen und die Sängerstimme abzuschalten. Während der
MULTI: Das Fernsehsystem schaltet automatisch entsprechend der
Wiedergabe der DVDDisk drücken Sie auf der Fernbedienung die Taste
Kodierung der zu wiedergebenden Disk um.
«AUDIO», um die Sängerstimme abzuschalten.
NTSC: Stellen Sie den Ausgang im NTSCSystem ein.
VIDEOEINSTELLUNGEN:
PBC (PLAY BACK CONTROL – Wiedergaberegelung): Es sind zwei
Modi möglich – AN/AUS. Bei der angeschalteten Funktion kommt der
Spieler nach der Wiedergabe ins Hauptmenü zurück, falls diese Funktion
abgeschaltet ist, geht er zur nächsten Aufnahme über.
AUDIO, SUBTITLE, DISC MENU LANGUAGE PAGE (Wähl der Sprache
für Tonbegleitung, Untertitel, Diskmenü):
Diese Funktion erlaubt die Wahl nach Ihrem Wunsch (falls die Disk
diese Funktion unterstützt). Andererseits werden zwei Einstellungen
standardmäßig angewandt, d. h. die Einstellungen für eine bestimmte
Disk. Für die Veränderung der Einstellungen benutzen sie die Tasten
«AUDIO», «SUBTITLE» während der Diskwiedergabe.
PARENTAL (Elternkontrolle):
Es wird die Stufe für die Elternkontrolle entsprechend dem Diskinhalt
zwecks der Beschränkung der Schaumöglichkeit für Kinder der Szenen
mit Gewalt oder Erotikelementen eingestellt. Falls die Stufe der
KOMPONENTENVIDEO:
Elternkontrolle auf der Disk höher als von den Eltern eingegeben ist, wird
OFF (AUSGESCHALTET): Schaltet den Spieler in den Modus des
die Wiedergabe verhindert.
gewöhnlichen Video.
20
4060.indd 204060.indd 20 23.10.2006 9:25:1623.10.2006 9:25:16


