Vitek VT-1211: инструкция
Раздел: Бытовая, кухонная техника, электроника и оборудование
Тип: Утюг
Характеристики, спецификации
Инструкция к Утюгу Vitek VT-1211
Оглавление
ÈÍÑÒÐÓÊÖÈß ÏÎ ÝÊÑÏËÓÀÒÀÖÈÈ
MANUAL INSTRUCTION
ÏÀÐÎÂÎÉ ÓÒÞÃ
STEAM IRON
ÌÎÄÅËÜ VT-1211
1211.qxd 29.07.2004 15:56 Page 2
2
3
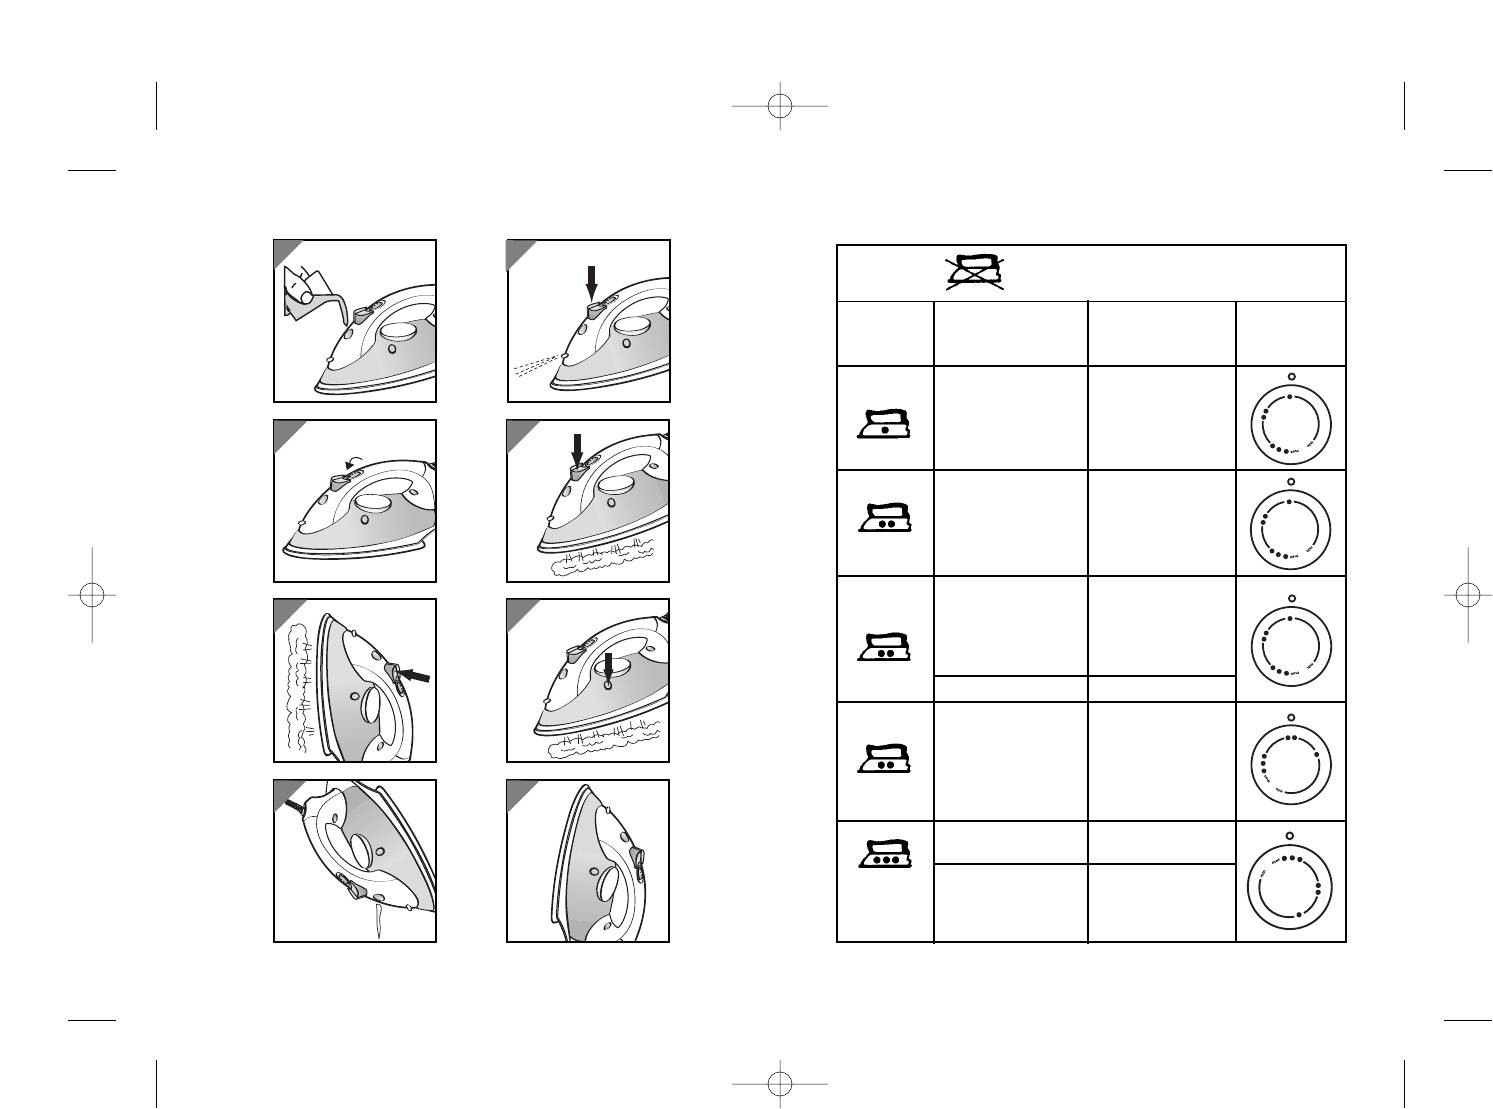
Ïðèìå÷àíèå:
Íà ÿðëûêå îçíà÷àåò: èçäåëèå íåëüçÿ ãëàäèòü!
(íàïðèìåð, ýëàñòèê)
ïîçèöèÿ
ÿðëûê
âèä òêàíè
âîëîêíî
òåðìîðåãóëÿòîðà
àêðèë
ïîëèïðîïèëåí
ïîëèýòàí
ñèíòåòèêà
4
5
ñèíòåòèêà
àöåòàòâîëîêíî
òðèàöåòàò
ñ ëþðåêñîì
ïîëèàìèä
6 7
(íåéëîí)
ñèíòåòèêà
ïîëèýñòåð
âèñêîçà
øåëê
øåëê
øåðñòü
øåðñòü
8
9
õëîïîê
õëîïîê
ëåí ëåí
2
1211.qxd 29.07.2004 15:56 Page 2
ÐÓÑÑÊÈÉ
ENGLISH
FEATURES OF YOUR IRON
ÕÐÀÍÅÍÈÅ
•
Âûêëþ÷èòå óòþã è îòñîåäèíèòå åãî îò ñåòè.
•
Âûëåéòå îñòàâøóþñÿ âîäó èç ðåçåðâóàðå (ðèñ.8).
•
Óñòàíîâèòå òåðìîðåãóëÿòîð â ïîëîæåíèå "
•
", à ðåãóëÿòîð ïàðà - â
ïîëîæåíèå "Áåç ïàðà".
•
Ïîñòàâüòå óòþã âåðòèêàëüíî è äàéòå åìó îñòûòü.
•
Ýëåêòðè÷åñêèé øíóð ìîæíî íàìîòàòü íà ñïåöèàëüíîå ïðèñïîñîáëåíèå
äëÿ åãî õðàíåíèÿ.
•
Õðàíèòå óòþã â âåðòèêàëüíîì ïîëîæåíèè (ðèñ.9).
ÓÕÎÄ È ×ÈÑÒÊÀ
•
Ïåðåä òåì êàê ÷èñòèòü óòþã, îòêëþ÷èòå åãî îò ñåòè è äàéòå åìó îñòûòü.
•
Çàãðÿçíåíèå íà ïîäîøâå ìîæåò áûòü óäàëåíî ãðóáîé òêàíüþ,
ñìî÷åííîé â ðàñòâîðå óêñóñà ñ âîäîé.
•
Êîðïóñ óòþãà ïðîòðèòå âëàæíîé òêàíüþ, èñïîëüçóÿ æèäêîå ìîþùåå
ñðåäñòâî, çàòåì ñóõîé òêàíüþ.
•
Äëÿ ÷èñòêè ïîäîøâû íå èñïîëüçóéòå îáäèðàþùèå ìàòåðèàëû è
àáðàçèâíûå âåùåñòâà.
•
Ñòàðàéòåñü ñîõðàíèòü ïîäîøâó óòþãà ãëàäêîé. Èçáåãàéòå ðåçêèõ
êîíòàêòîâ ñ ìåòàëëè÷åñêèìè îáúåêòàìè.
ÇÀÙÈÒÍÎÅ ÎÒÊËÞ×ÅÍÈÅ
 ñëó÷àå íåèñïðàâíîñòè òåðìîñòàòà ñðàáàòûâàåò ìåõàíèçì çàùèòíîãî
îòêëþ÷åíèÿ, ïðåäîõðàíÿþùèé óòþã îò ïåðåãðåâà. Íåèñïðàâíûé óòþã
íåîáõîäèìî ïîêàçàòü ñïåöèàëèñòó.
ÑÏÅÖÈÔÈÊÀÖÈß
Ïèòàíèå 230Â ~ 50Ãö
Ìàêñèìàëüíàÿ ìîùíîñòü 1800 Âò
Ïðîèçâîäèòåëü îñòàâëÿåò çà ñîáîé ïðàâî èçìåíÿòü õàðàêòåðèñòèêè
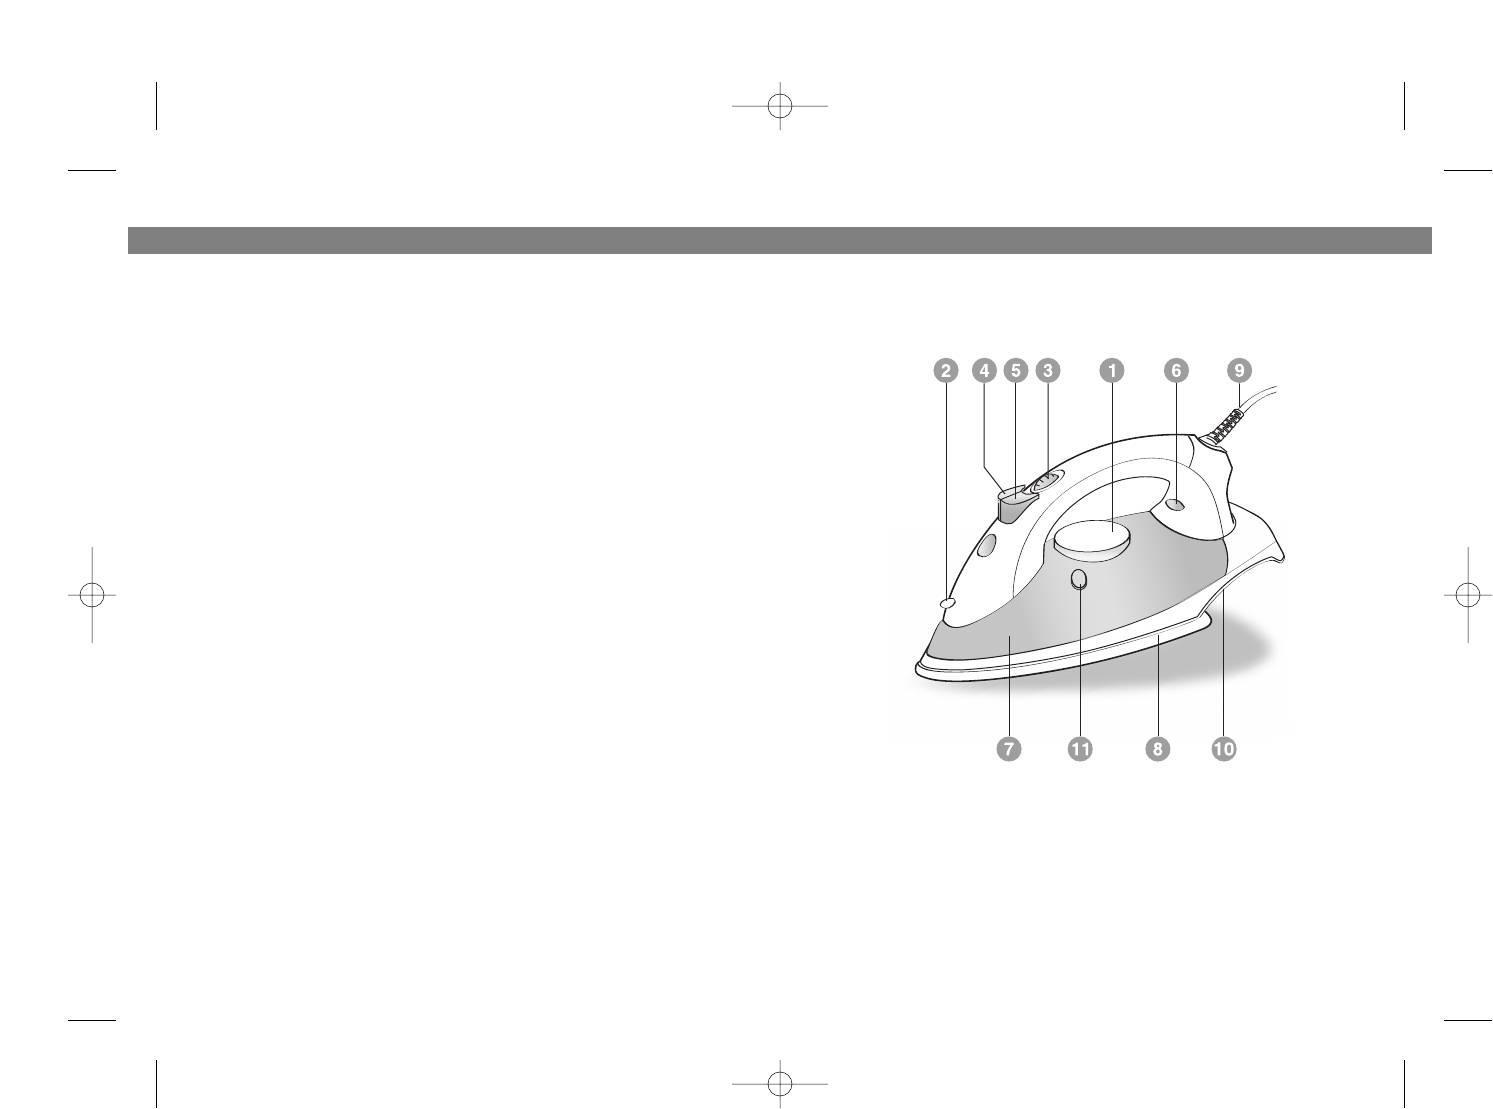
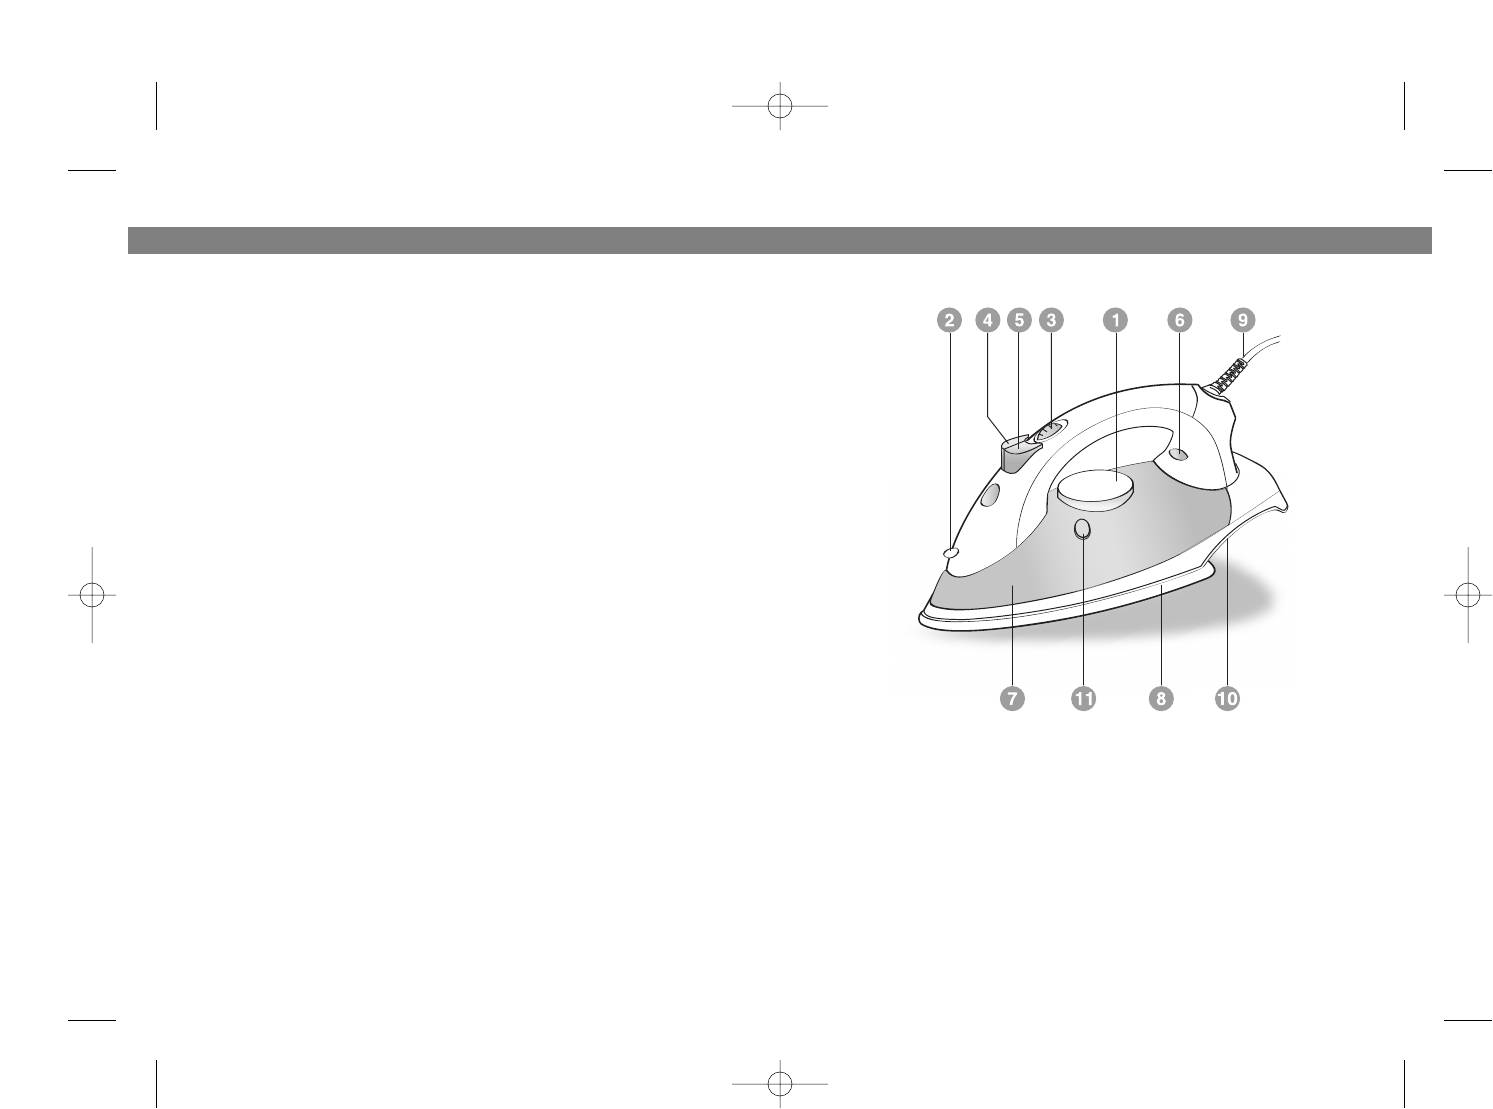
FIGURE 1
ïðèáîðîâ áåç ïðåäâàðèòåëüíîãî óâåäîìëåíèÿ.
ÑÐÎÊ ÑËÓÆÁÛ ÓÒÞÃÀ ÍÅ ÌÅÍÅÅ 3-Õ ËÅÒ
1. Temperature control dial
7. Water tank
2. Spray nozzle
8. Soleplate
3. Steam dial
9. Power cord
4. Spray button
10. Typeplate
5. Steam button
11. "Self clean" button
6. Indicator light
14
3
1211.qxd 29.07.2004 15:56 Page 4

ENGLISH ÐÓÑÑÊÈÉ
IMPORTANT SAFEGUARDS
ÂÅÐÒÈÊÀËÜÍÎÅ ÎÒÏÀÐÈÂÀÍÈÅ
1. Read all instructions before use.
Ýòà ôóíêöèÿ óäîáíà äëÿ îòïàðèâàíèÿ òîíêèõ òêàíåé, øòîð è îäåæäû,
2. Ensure the voltage on the Rating Label is the same as that in your home.
íàõîäÿùèõñÿ â âåðòèêàëüíîì ïîëîæåíèè (ðèñ.6).
3. Use the iron only for its intended use.
•
Ïîâåñüòå îäåæäó íà ïëå÷èêè.
4. The iron should always be turned to off before plugging or unplugging from the
•
Óñòàíîâèòå òåðìîðåãóëÿòîð (1) â ìàêñèìàëüíîå ïîëîæåíèå.
wall socket. Never yank the cord to disconnect from the wall socket; instead.
•
Äåðæèòå óòþã âåðòèêàëüíî íà ðàññòîÿíèè 15-30 ñì îò âåùè.
Grasp the plug and pull to disconnect.
•
Íàæìèòå íà êíîïêó (5), äâèãàÿ óòþãîì âäîëü ñêëàäêè.
5. Do not operate iron with a damaged cord/plug or if the iron has been dropped or
•
Ïîâòîðèòå ïðîöåäóðó íåñêîëüêî ðàç ñ íåáîëüøèìè ïðîìåæóòêàìè.
damaged. To avoid the risk of electric shock, do not disassemble the iron; take it
•
Èíîãäà íåîáõîäèìî íàæàòü íà êíîïêó ïîäà÷è ñòðóè (5) ïàðà íåñêîëüêî
to a qualified serviceman for examination and repair. Incorrect reassembly can
ðàç, ïðåæäå ÷åì ïàð íà÷íåò ïîñòóïàòü èç ïîäîøâû.
cause a risk of electric shock when the iron is used.
•
Ïîñëå òîãî êàê èíäèêàòîð ïîãàñ, íå èñïîëüçóéòå ôóíêöèþ ïîäà÷è ïàðà
6. Take care: If you are leaving the appliance momentarily, always switch it off,
áîëåå òðåõ ðàç.
remove the plug from the socket and stand the iron on its base.
7. Close supervision is necessary for any appliance being used by or near children.
ÔÓÍÊÖÈß ÑÀÌÎÎ×ÈÑÒÊÈ
Do not leave the iron unattended while connected or on an ironing board.
•
Âêëþ÷èòå ïðèáîð â ñåòü.
8. To protect against the risk of electric shock, do not immerse the iron in water or
•
Óñòàíîâèòå ðåãóëÿòîð ïàðà (3) â ïîçèöèþ "0".
other liquids.
•
Íà òåðìîðåãóëÿòîðå âûáåðèòå ïîäõîäÿùóþ äëÿ èçäåëèÿ òåìïåðàòóðó
9. Burns can occur from touching hot metal parts, hot water or steam. Use caution
ãëàæåíèÿ.
when you turn a steam iron upside down; there may be hot water in the reservoir.
•
Êîãäà ëàìïî÷êà èíäèêàòîðà ïîãàñíåò, ìîæåòå íà÷èíàòü ãëàäèòü.
10. Do not allow the cord to touch hot surfaces. Let the iron cool completely before
putting away, loop cord loosely around the iron when storing.
ÑÀÌÎÎ×ÈÑÒÊÀ
11. Always disconnect the iron from the electrical socket when filling with water or
Ðåæèì ñàìîî÷èñòêè ñëåäóåò ïðèìåíÿòü ðàç â ìåñÿö äëÿ óäàëåíèÿ íàêèïè,
emptying and when not in use.
âîðñèíîê è çàãðÿçíåíèé. Ýòà ïðîöåäóðà ïîìîæåò ïðîäëèòü ñðîê ñëóæáû
12. To avoid a circuit overload, do not operate another high wattage appliance on the
âàøåãî óòþãà.
same circuit.
•
Çàïîëíèòå ðåçåðâóàð äëÿ âîäû íàïîëîâèíó.
13. Prevent water over flow, do not fill water over the max level.
•
Ïîñòàâüòå óòþã âåðòèêàëüíî.
14. Save these instructions.
•
Óñòàíîâèòå òåðìîðåãóëÿòîð â ïîëîæåíèå "
•••
".
•
Âêëþ÷èòå óòþã â ñåòü.
NOTE:
•
Ïîäîæäèòå, ïîêà óòþã íàãðååòñÿ è ïîãàñíåò ëàìïî÷êà èíäèêàòîðà.
When using the iron for the first time, test on an old piece of fabric to ensure the
•
Îòêëþ÷èòå óòþã îò ñåòè è äåðæèòå åãî ãîðèçîíòàëüíî íàä ðàêîâèíîé.
Soleplate and water tank are completely clean. The iron may smoke slightly when
•
Íàæìèòå êíîïêó ñàìîî÷èñòêè (11) (ðèñ.7).
switched on for the first time. This is normal and will soon cease.
•
Ðàâíîìåðíî ïîêà÷èâàéòå óòþã äëÿ óäàëåíèÿ ÷àñòèö íàêèïè è ãðÿçè,
ïîÿâëÿþùèõñÿ èç îòâåðñòèé íà ïîäîøâå.
IRONING
•
Êîãäà ðåçåðâóàð î÷èñòèòñÿ, îòïóñòèòå êíîïêó (11).
Important: Have your read the section «Important safeguards?»
•
Âêëþ÷èòå óòþã.
•
Óñòàíîâèòå òåðìîðåãóëÿòîð â ïîëîæåíèå "
•••
". Ïðîãëàäüòå êàêóþ-
CHOICE OF WATER
íèáóäü íåíóæíóþ òêàíü. Îñòàòêè âîäû èñïàðÿòñÿ.
• The iron should be used with normal tap water.
•
Âûêëþ÷èòå óòþã è ïîñòàâüòå åãî íà õðàíåíèå.
• If, however, the water in your area is particularly hard (Hardness Higher than 17°
DH), it is advisable to use distilled or de-mineralized water to prolong the life of
your iron.
4
13
1211.qxd 29.07.2004 15:56 Page 6

ÐÓÑÑÊÈÉ
ENGLISH
• Do not use chemically de-scaled water.
×òîáû ýòîãî èçáåæàòü, óòþæüòå èçäåëèÿ ñ èçíàíî÷íîé ñòîðîíû.
• Turn off the iron and remove the plug from the wall socket before filling the iron.
•
Áàðõàò è òêàíè ñ áëåñêîì íåîáõîäèìî ãëàäèòü â îäíîì íàïðàâëåíèè.
• Fill water through the water-filling aperture (Fig. 2).
•
Íå çàäåðæèâàéòå óòþã íà îäíîì ó÷àñòêå èçäåëèÿ.
• Do not fill higher than the MAX indication on the water tank, in order to avoid
•
Øåëê è äðóãèå áëåñòÿùèå òêàíè íåîáõîäèìî ãëàäèòü ñ èçíàíî÷íîé
water spilling out.
ñòîðîíû. Äëÿ ïðåäîòâðàùåíèÿ ïîÿâëåíèÿ ïÿòåí íà øåëêå è äðóãèõ
• Do not fill with anything but water. If you have to refill while ironing, remove the
òîíêèõ òêàíÿõ íå èñïîëüçóéòå ðàñïûëåíèå.
electrical plug from the wall socket before filling.
• Pour out any remaining water after use.
ÂÛÁÎÐ ÒÅÌÏÅÐÀÒÓÐÛ
•
Âêëþ÷èòå ïðèáîð â ñåòü.
IRONING TEMPERATURE
•
Ïîñòàâüòå óòþã â âåðòèêàëüíîå ïîëîæåíèå.
• Always check first to see whether a label with ironing instructions is attached to
•
Óñòàíîâèòå òåðìîðåãóëÿòîð â íóæíîå ïîëîæåíèå.
the article to be ironed.
•
Ïîñëå òîãî êàê ëàìïî÷êà èíäèêàòîðà ïîãàñíåò è çàãîðèòñÿ ñíîâà, Âû
• Follow these ironing instructions in all cases.
ìîæåòå íà÷àòü ãëàäèòü. Ëàìïî÷êà áóäåò ïåðèîäè÷åñêè çàãîðàòüñÿ è
• If ironing instructions are missing but you do know the kind of fabric, then see the
ãàñíóòü. Åñëè Âû ïåðåêëþ÷èëè òåðìîðåãóëÿòîð ñ âûñøåé òåìïåðàòóðû
table below.
íà íèçøóþ, íå íà÷èíàéòå ãëàäèòü äî òåõ ïîð, ïîêà íå çàãîðèòñÿ
• The table is valid for the materials only and is not applicable to any applied finish,
ëàìïî÷êà.
gloss etc.
Textiles to which some kind of finish has been applied (gloss, wrinkle, relief etc.)
ÓÂËÀÆÍÅÍÈÅ
can best be ironed at lower temperatures.
Ïðè ëþáîé òåìïåðàòóðå ãëàæåíèÿ, ÷òîáû ñìî÷èòü òêàíü, íóæíî íàæàòü
• Sort the laundry out according to ironing temperature first: wool with wool, cot-
êíîïêó óâëàæíåíèÿ (4). Ïðè ýòîì â ðåçåðâóàðå âñåãäà äîëæíà íàõîäèòüñÿ
ton with cotton, etc.
âîäà (ðèñ.3).
• The iron heats up quicker than it cools down. Therefore, start ironing the articles
requiring the lowest temperature such as those made of synthetic fibres.
ÎÒÏÀÐÈÂÀÍÈÅ
• If the fabric consists of various kinds of fibres, you must always select the lowest
•
Óñòàíîâèòå òåðìîðåãóëÿòîð (2) â ïîçèöèþ "
•••
". Äëÿ íàèëó÷øåãî
ironing temperature of the composition of those fibres.
ðåçóëüòàòà íå èñïîëüçóéòå äëÿ îòïàðèâàíèÿ ðåæèìû "
•
" è "
••
".
(E.g. an article consisting of "60% polyester and 40% cotton" should be ironed
•
Íàïîëíèòå ðåçåðâóàð âîäîé.
at the temperature indicator for polyester (·) and without steam.)
•
Ïîñòàâüòå óòþã íà îñíîâàíèå.
If you do not know what kinds of fabrics the article has been made of, find a spot
•
Âêëþ÷èòå ïðèáîð â ñåòü.
that will be invisible when wearing or using the article. Test to find out the ironing
•
Ïîäîæäèòå, ïîêà ëàìïî÷êà èíäèêàòîðà (4) ïîãàñíåò.
temperature that is most suitable there.
•
Óñòàíîâèòå ðåãóëÿòîð ïàðà (3) â òðåáóåìîå ïîëîæåíèå (ðèñ.4).
(Start at a relatively low temperature.)
• Pure woolen fabric (100% wool) may be pressed with the iron set to a steam
ÀÍÒÈÊÀÏÅËÜÍÛÉ ÊËÀÏÀÍ
position. Preferably set the steam control to maximum position and use a dry
Ñèñòåìà ïðåäîòâðàùàåò âûòåêàíèå âîäû èç ïîäîøâû: óòþã àâòîìàòè÷åñêè
pressing cloth.
ïðåêðàùàåò îòïàðèâàíèå ïðè ñëèøêîì íèçêèõ òåìïåðàòóðàõ. Êîãäà ýòî
• When steam-ironing woolen fabrics, shining of the fabric may occur. This can be
ïðîèçîéäåò, Âû óñëûøèòå ùåë÷îê.
prevented by turning the article inside out and ironing the reverse side.
• Velvet and other textures which rapidly acquire shiny spots should be ironed in
ÓÑÈËÅÍÍÎÅ ÎÒÏÀÐÈÂÀÍÈÅ
one direction only (with the nap) applying light pressure.
Óñèëåííîå îòïàðèâàíèå ïîìîãàåò ïðè ðàçãëàæèâàíèè ãëóáîêèõ ñêëàäîê.
• Always keep the iron moving.
•
Óñòàíîâèòå òåðìîðåãóëÿòîð (2) â ìàêñèìàëüíîå ïîëîæåíèå "
•••
".
• Silk and other fabrics likely to become shiny should be ironed on the reverse
•
Ïðè íàæàòèè êíîïêè (5) ïðîèçîéäåò èíòåíñèâíîå âûäåëåíèå ïàðà èç
side. To prevent staining do not use the spray on silk or other delicate fabrics.
ïîäîøâû óòþãà (ðèñ.5).
12
5
1211.qxd 29.07.2004 15:56 Page 8

ENGLISH
ÐÓÑÑÊÈÉ
SETTING THE TEMPERATURE
•
Âêëþ÷èòå ïðèáîð â ñåòü.
• Insert the plug into the wall socket.
•
Óñòàíîâèòå òåðìîðåãóëÿòîð (1) â ìàêñèìàëüíîå ïîëîæåíèå ïîâîðîòîì
• Stand the iron upright.
ïî ÷àñîâîé ñòðåëêå.
• Set the temperature control dial to the correct ironing temperature as indicated
•
Ëàìïî÷êà èíäèêàòîðà çàãîðèòñÿ.
in the ironing instructions or in the table.
•
Ïîñòàâüòå ðåãóëÿòîð ïàðà (3) â ïîëîæåíèå "Ïàð", èç îòâåðñòèé â
• The correct temperature has been reached when the indicator light goes out.
ïîäîøâå íà÷íåò âûäåëÿòüñÿ ïàð.
The indicator light will go on and off from time to time, indicating that the select-
•
Ïðîãëàäüòå êàêóþ-íèáóäü íåíóæíóþ òêàíü.
ed temperature is being maintained.
•
Êîãäà âñÿ âîäà èñïàðèòñÿ, óòþã áóäåò ãîòîâ ê èñïîëüçîâàíèþ.
SPRAYING
ÂÛÁÎÐ ÂÎÄÛ
• At any temperature, the laundry can be dampened (fig. 3) by pushing the spray
Óòþã ìîæíî èñïîëüçîâàòü ñ îáû÷íîé ïèòüåâîé âîäîé.
button (4) a couple of times.
Åñëè â Âàøåì ðàéîíå âîäà æåñòêàÿ, ðåêîìåíäóåòñÿ èñïîëüçîâàòü
• Ensure that there is enough water in the water tank.
äèñòèëëèðîâàííóþ âîäó âî èçáåæàíèå çàñîðåíèÿ ïðèáîðà íàêèïüþ. Íå
èñïîëüçóéòå õèìè÷åñêè î÷èùåííóþ âîäó.
STEAM-IRONING
• Steam-ironing is only possible at higher ironing temperatures:
ÂÛÁÎÐ ÐÅÆÈÌÀ ÃËÀÆÅÍÈß
•• or ••• for moderate steam
•
Ïðî÷èòàéòå ÿðëûê íà èçäåëèè, êîòîðîå Âû ñîáèðàåòåñü ãëàäèòü, è
••• or MAX for maximum steam
âñåãäà âûïîëíÿéòå ïðàâèëà óõîäà çà èçäåëèåì.
• Ensure that there is enough water in the water tank.
•
Åñëè èíñòðóêöèÿ ïî óòþæêå èçäåëèÿ îòñóòñòâóåò è Âû çíàåòå âèä òêàíè,
• Stand the iron on its rear side.
îáðàòèòåñü ê òàáëèöå òåìïåðàòóð â êîíöå èíñòðóêöèè.
• Insert the plug into the wall socket.
•
Òàáëèöà ìîæåò áûòü èñïîëüçîâàíà òîëüêî äëÿ òêàíåé è íå ïîäõîäèò äëÿ
• Set the temperature control dial (1) at the required position within the "steam
îòäåëîê èçäåëèé (îáîðîê, áëåñòÿùèõ íàøèâîê è ò.ä.). Èçäåëèÿ ñ
area" (oo, ooo or MAX setting.)
ðàçëè÷íûìè âèäàìè îòäåëîê ðåêîìåíäóåòñÿ ãëàäèòü ïðè íèçêèõ
• Wait a little while for the indicator light (6) to go out to come on again.
òåìïåðàòóðàõ.
• Set the steam control dial (3) to the required position (fig. 4), then the steam will
•
Ñíà÷àëà ðàññîðòèðóéòå èçäåëèÿ ïî âèäàì òêàíè: øåðñòü ñ øåðñòüþ,
emerge from the vents in the soleplate.
õëîïîê ñ õëîïêîì è ò.ä.
•
Óòþã íàãðåâàåòñÿ áûñòðåå, ÷åì îñòûâàåò, ïîýòîìó ðåêîìåíäóåòñÿ
Notes:
Water may leak from the Soleplate if too low a temperature has been select-
íà÷èíàòü ãëàäèòü ñ òêàíåé, òðåáóþùèõ áîëåå íèçêîé òåìïåðàòóðû
ed. This will then cause stains. If this happens, set the temperature control to the
óòþæêè, òàêèõ, êàê ñèíòåòèêà.
advised position. Steaming will recommence as soon as the appropriate temperature
•
Åñëè èçäåëèå ñîñòîèò èç íåñêîëüêèõ âèäîâ òêàíåé, âûáèðàéòå
has been reached.
ìèíèìàëüíóþ òåìïåðàòóðó äëÿ ýòèõ êîìïîíåíòîâ. (Íàïðèìåð, èçäåëèå
ñîñòîèò èç 60% ñèíòåòèêè è 40% õëîïêà, äëÿ óòþæêè âûáèðàåòñÿ
BURST OF STEAM
ïîçèöèÿ äëÿ ñèíòåòè÷åñêèõ òêàíåé "
•
" è ïðîöåññ óòþæêè
• By pressing the steam button (5), an intense "shot" of steam is emitted from the
îñóùåñòâëÿåòñÿ áåç ïàðà).
Soleplate (fig.5). This can be very useful when removing stubborn creases.
•
Åñëè Âû íå çíàåòå ñîñòàâ èçäåëèÿ, íàéäèòå íà íåì ìåñòî, êîòîðîå
• The "shot" of steam function can only be used while ironing at a high ironing tem-
íåçàìåòíî ïðè íîñêå, è ïîïðîáóéòå ïîäîáðàòü ñîîòâåòñòâóþùóþ
perature (positions ••, •••or MAX ).
òåìïåðàòóðó ãëàæåíèÿ, íà÷èíàÿ ñ ìèíèìàëüíîé.
•
Ïðè óòþæêå ÷èñòîøåðñòÿíûõ òêàíåé (100% øåðñòü), óòþã íóæíî
VERTICAL STEAM
óñòàíîâèòü â ïîçèöèþ ïàðîâîãî ãëàæåíèÿ. Ðåêîìåíäóåòñÿ óñòàíîâèòü
This function provides an extra amount of steam to remove wrinkles on delicate gar-
ðåãóëÿòîð îòïàðèâàíèÿ â ìàêñèìàëüíóþ ïîçèöèþ è ãëàäèòü ÷åðåç
ments in a hanging position, hanging curtains, or other hanging fabrics.
òîíêóþ òêàíü. Øåðñòÿíûå èçäåëèÿ ìîãóò ëîñíèòüñÿ ïîñëå ãëàæåíèÿ.
6
11
1211.qxd 29.07.2004 15:56 Page 10

ÐÓÑÑÊÈÉ
ENGLISH
• Set the temperature control dial (1) to the position "MAX".
ÍÅÎÁÕÎÄÈÌÛÅ ÌÅÐÛ ÁÅÇÎÏÀÑÍÎÑÒÈ
• Hold the iron in vertical position between 20 and 40 centimeters from the gar-
•
Ïåðåä ýêñïëóàòàöèåé âíèìàòåëüíî ïðî÷èòàéòå âñþ èíñòðóêöèþ.
ment.
•
Èñïîëüçóéòå óòþã â öåëÿõ, ïðåäóñìîòðåííûõ èíñòðóêöèåé.
• Press the steam button (5) once (fig.6).
•
Óáåäèòåñü, ÷òî íàïðÿæåíèå, óêàçàííîå íà ïàíåëè óòþãà, ñîîòâåòñòâóåò
• An intense steam will penetrate into the garment removing the wrinkles.
íàïðÿæåíèþ â ñåòè âàøåãî äîìà.
• Wait a few seconds before pressing burst of steam button again.
•
Óáåäèòåñü â èñïðàâíîñòè ñåòè è õîðîøåì êîíòàêòå. Âàø óòþã îñíàùåí
åâðî-âèëêîé. Ðîçåòêà äîëæíà èìåòü íàäåæíîå çàçåìëåíèå.
DRY IRONING
•
×òîáû èçáåæàòü ïåðåãðóçêè ñåòè, íå âêëþ÷àéòå îäíîâðåìåííî
• Insert the plug in the wall socket.
íåñêîëüêî ïðèáîðîâ.
• Ensure that the steam dial (3) is in the "0" position.
•
Íå ïðèêàñàéòåñü ê ãîðÿ÷èì ïîâåðõíîñòÿì óòþãà, áåðèòåñü òîëüêî çà
• Select the setting on the temperature control dial best suited for the fabric to be
ðó÷êó.
ironed.
•
Ïðè îòêëþ÷åíèè ïðèáîðà îò ñåòè òÿíèòå çà âèëêó, à íå çà ýëåêòðè÷åñêèé
• When the indicator light has extinguished, ironing may commence.
øíóð.
•
Ðåãóëÿðíî ïðîâåðÿéòå øíóð è âèëêó. Íå ïîëüçóéòåñü óòþãîì, åñëè åñòü
MAINTENANCE
êàêèå-ëèáî ïîâðåæäåíèÿ êîðïóñà èëè øíóðà. Äëÿ ïðåäîòâðàùåíèÿ
S
elf-cleaning
ïîðàæåíèÿ ýëåêòðè÷åñêèì òîêîì íå ðàçáèðàéòå óòþã. Ïðè îáíàðóæåíèè
Important:
Your iron will give the best ironing results and last longest if you apply
íåèñïðàâíîñòè îòíåñèòå óòþã â ðåìîíò.
"self-cleaning" once a month to remove any scale, fluff etc.
•
Åñëè Âàì íåîáõîäèìî îòëó÷èòüñÿ, âñåãäà âûêëþ÷àéòå óòþã,
îòñîåäèíÿéòå åãî îò ñåòè è ñòàâüòå íà îñíîâàíèå.
• Fill the water reservoir up to 1/2 with water.
•
Âî èçáåæàíèå óäàðà ýëåêòðè÷åñêèì òîêîì, íå ïîãðóæàéòå ïðèáîð â
• Place the iron on its rear side.
âîäó èëè äðóãóþ æèäêîñòü.
• Set the steam dial (3) to the "0" position.
•
Íå îñòàâëÿéòå äåòåé áåç ïðèñìîòðà îêîëî âêëþ÷åííîãî ïðèáîðà.
• Set the temperature control dial (1) to the "MAX" position.
•
Ïðè ñîïðèêîñíîâåíèè ñ ãîðÿ÷èìè ïîâåðõíîñòÿìè óòþãà èëè ãîðÿ÷åé
• Insert the plug into the wall socket.
âîäîé âû ìîæåòå ïîëó÷èòü îæîã.
• Allow the iron to heat up until indicator light first goes out.
•
Ñëåäèòå, ÷òîáû ýëåêòðè÷åñêèé øíóð íå êàñàëñÿ ãîðÿ÷èõ ïîâåðõíîñòåé.
• Remove the plug from the wall socket.
•
Ïåðåä òåì êàê óáðàòü óòþã, äàéòå åìó ïîëíîñòüþ îñòûòü, çàòåì êðåïêî
• Hold the iron horizontally over the sink.
íàìîòàéòå ýëåêòðè÷åñêèé øíóð íà ñïåöèàëüíîå ïðèñïîñîáëåíèå.
• Press the "Self clean" button (fig. 7).
•
Îòêëþ÷àéòå ïðèáîð îò ñåòè, åñëè âû èì íå ïîëüçóåòåñü.
• Boiling water and steam will now emit from the holes in the Soleplate. Impurities
•
Îòñîåäèíÿéòå óòþã îò ñåòè, êîãäà íàïîëíÿåòå åãî âîäîé.
and scales (if any) are washed away with it.
•
Íå íàëèâàéòå âîäó âûøå îáîçíà÷åííîãî óðîâíÿ.
• Move the iron forwards and backwards while this happens. Go on letting steam
•
Íå çàëèâàéòå â ðåçåðâóàð äëÿ âîäû êàêèå-ëèáî õèìè÷åñêèå âåùåñòâà,
and water escape until the water reservoir is virtually empty.
ò.ê. ýòî ìîæåò ïîâðåäèòü óòþã.
• Stand the iron on it end.
•
 ñëó÷àå îáíàðóæåíèÿ íåïîëàäîê îáðàòèòåñü â ñåðâèñíûé öåíòð. Ïðè
• Insert the plug into wall socket.
ïðîâåäåíèè ïîêóïàòåëåì ðåìîíòà ñâîèìè ñèëàìè ïðàâî íà
• Set the temperature dial to the MAX position. Let the iron heat up again. The
ãàðàíòèéíîå îáñëóæèâàíèå àííóëèðóåòñÿ.
remainder of the water inside the steam chamber will now vaporize and leave the
•
Ýòîò ïðèáîð ïðåäíàçíà÷åí òîëüêî äëÿ áûòîâîãî èñïîëüçîâàíèÿ.
iron through the Soleplate.
•
Õðàíèòå ýòó èíñòðóêöèþ.
• During this process of dry-steaming, it is advisable to move the iron over an old
piece of cloth.
ÏÅÐÅÄ ÏÅÐÂÛÌ ÈÑÏÎËÜÇÎÂÀÍÈÅÌ
•
Óäàëèòå ýòèêåòêè ñ ïîäîøâû è êîðïóñà óòþãà.
•
Íàïîëíèòå ðåçåðâóàð âîäîé.
10
7
1211.qxd 29.07.2004 15:56 Page 12
ENGLISH
ÐÓÑÑÊÈÉ
ÑÕÅÌÀ È ÎÏÈÑÀÍÈÅ ÓÒÞÃÀ
ANTI-DRIP
1. The anti-drip system, which is designed to automatically prevent water from
escaping through the soleplate when the iron is too cold.
2. During use, the anti drip system may emit a loud clicking sound, particularly
during heat-up or whilst cooling down. This is perfectly normal and indicates
that the system is functioning correctly.
STORAGE
• Turn the temperature control dial (1) to "MIN" and set the steam dial to the "0"
position (= no steam).
• Turn off the iron and disconnect the plug from the wall socket.
• Pour any remaining water out of the water tank (fig.8)
• Stand the iron upright and let it cool down sufficiently (fig.9)
• The power cord can be wound around the cord storage.
• Always store the iron in an upright position.
CARE AND CLEANING
• Before cleaning the iron ensure it is disconnected from the power supply and has
completely cooled down.
• Deposits on the Soleplate may be removed with a rough cloth soaked in a vine-
gar/water solution.
• The casting may be wiped with a damp cloth and then polished with a dry one.
• Do not use abrasives on the Soleplate.
• Keep the Soleplate smooth: avoid hard contact with metal objects.
PROTECTIVE SAFETY CUT-OUT
In the unlikely event of the thermostat failing, the protective cut-out will operate to
prevent the iron from overheating.
Ðèñóíîê 1
The iron should then be taken to an authorized repair shop.
SPECIFICATION
Power requirement 230 V ~ 50 Hz
1. Òåðìîðåãóëÿòîð
7. Ðåçåðâóàð
Max. power 1800 W
2. Ðàñïûëèòåëü
8. Ïîäîøâà
3. Ðåãóëÿòîð ïàðà
9. Øíóð
The manufacturer reserves the right to change the characteristics of
4. Êíîïêà óâëàæíåíèÿ
10. Ìàðêèðîâêà
the device without prior warning.
5. Êíîïêà îòïàðèâàíèÿ
11. Êíîïêà ñàìîî÷èñòêè
6. Èíäèêàòîð
SERVICE LIFE OF THE IRON IS NOT LESS THAN 3 YEARS
8
9
1211.qxd 29.07.2004 15:56 Page 14


