Vitek VT-3497: инструкция
Раздел: Бытовая, кухонная техника, электроника и оборудование
Тип: Музыкальный Центр
Характеристики, спецификации
Инструкция к Музыкальному Центру Vitek VT-3497
Оглавление

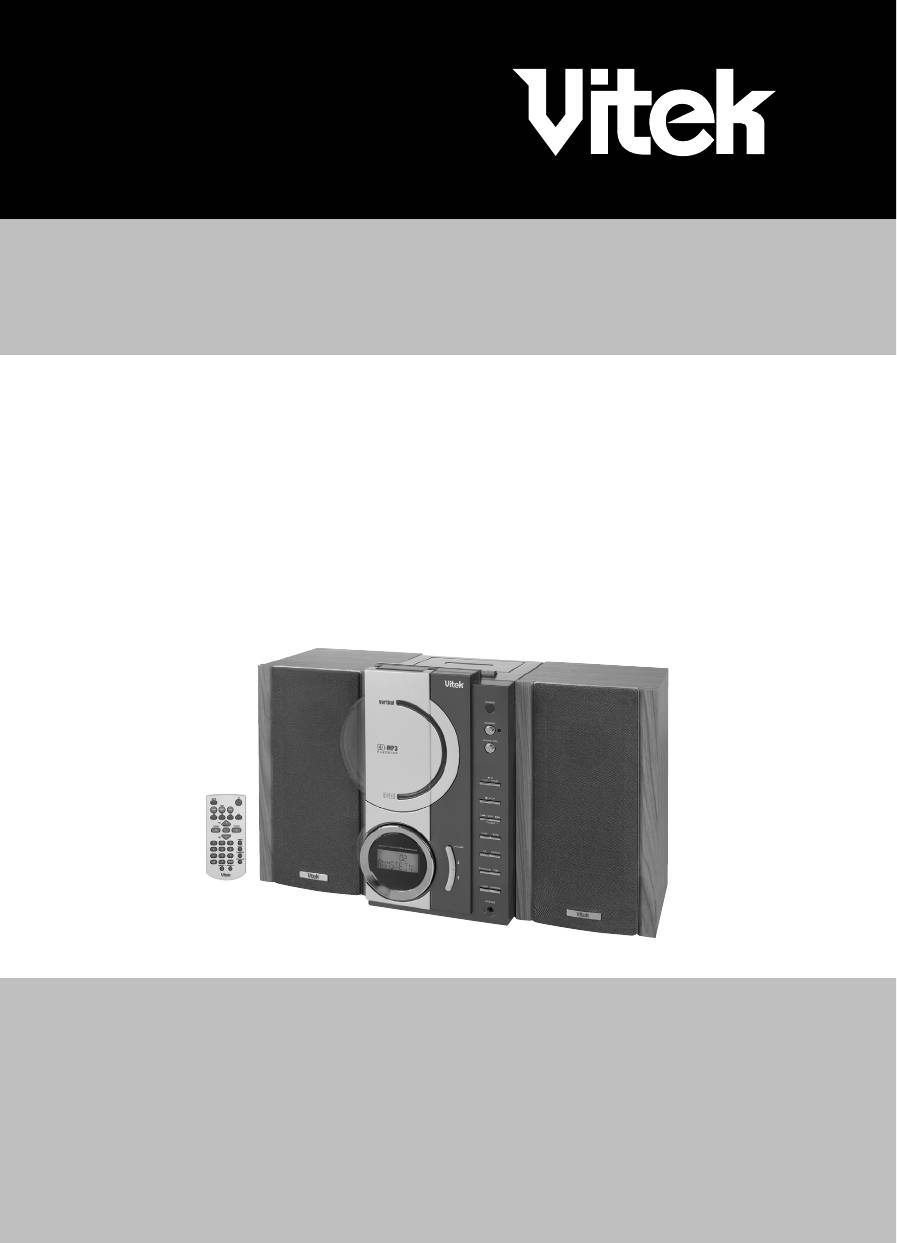
MANUAL INSTRUCTION
ÈÍÑÒÐÓÊÖÈß ÏÎ ÝÊÑÏËÓÀÒÀÖÈÈ
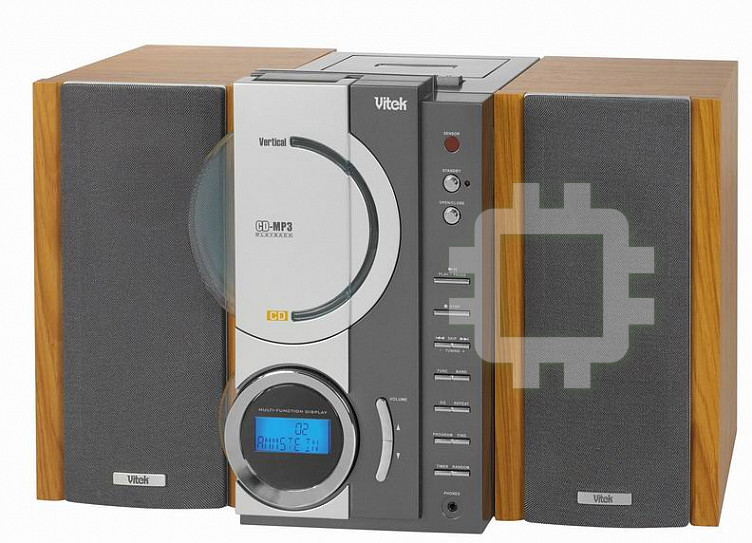
MINI SYSTEM WITH CD/MP-3
ÌÈÍÈÑÈÑÒÅÌÀ C CD/MP3
ÌÎÄÅËÜ VT-3497
ENGLISH
BEFORE USING, PLEASE READ THE INSTRUCTIONS CAREFULLY
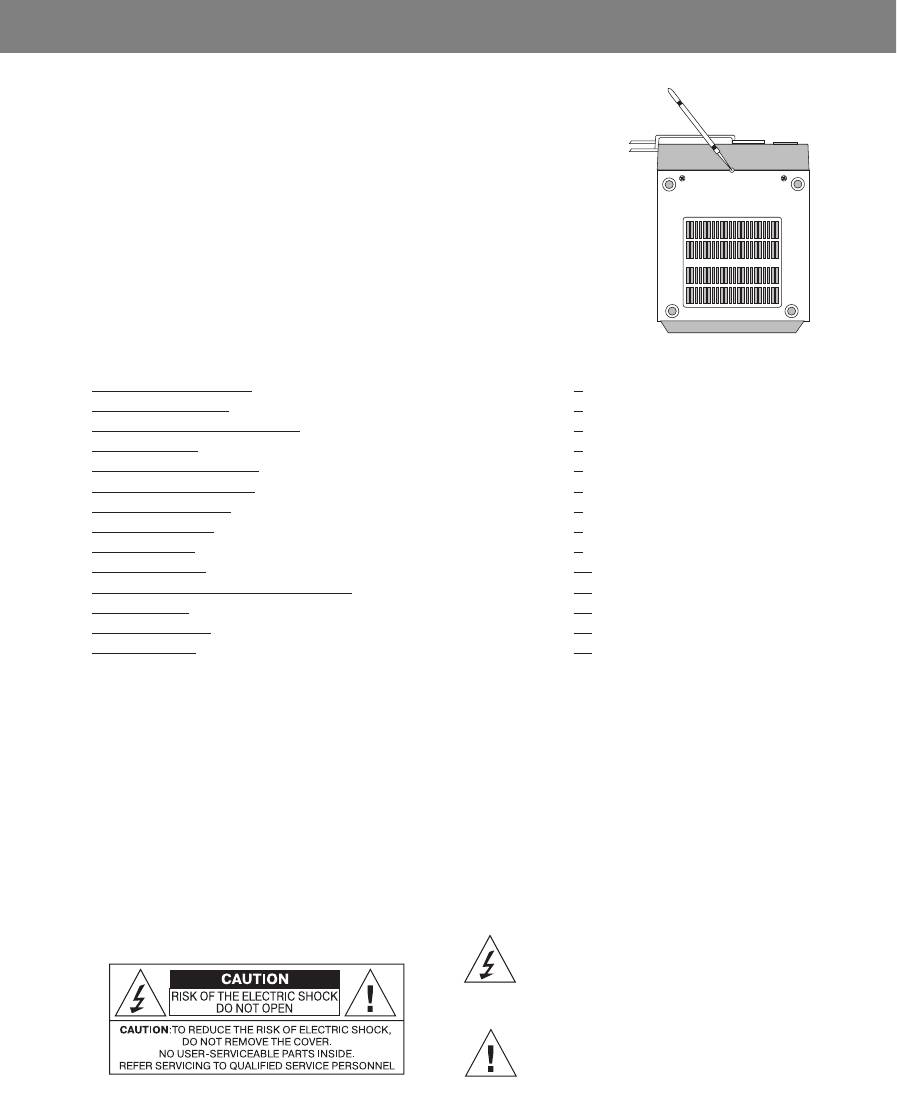
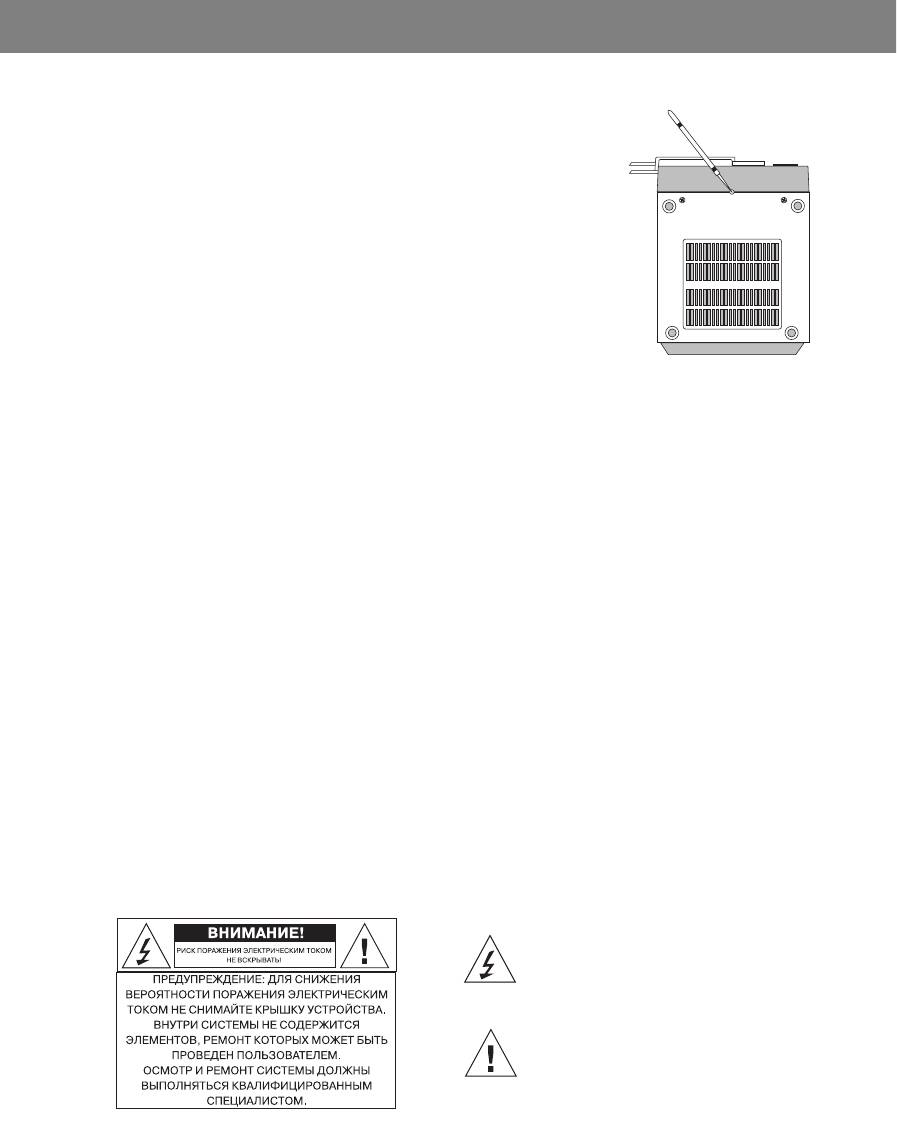
REBOOTING THE SYSTEM
• If the system doesn't turn on, crashes (freezes) or doesn't display infor-
mation properly, use a pointed object to press the system reboot button
(27) in the lower part of the housing to reboot the built-in microcomputer,
as shown in the drawing below.
• Unplug the microsystem from the power outlet and wait several sec-
onds while the built-in microcomputer reboots.
Note: Use a toothpick or pencil to press and hold the OFF button for
several seconds.
CONTENTS P. ¹
Rebooting the system 2
Safety precautions 2
Technical safety precautions 3
Control device 4
Tuning and connection 5
Digital clock and timer
6
The main functions
7
T
uner Functions 8
CD Functions
9
MP3 Functions 10
Cassette player/recorder functions 12
Use and care 13
Troubleshooting 14
Specifications
15
SAFETY PRECAUTIONS
Please note:
• Make sure to connect system to the circuit with voltage similar to the rating label information.
Otherwise it can result in system fire danger.
• Do not expose the system to heating over 35 degrees.
• Avoid installation near heaters and direct sunlight places
• Ensure good air circulation.
• Protect the system from dust, moisture and ingress of water.
• Avoid strong magnetic fields, for example, near TV sets and speakers of other devices.
• Do not use potent chemical agents when cleaning the device.
• Do not grease parts, movable system mechanisms. CD player does not require maintenance.
• Only use the authorized service centers for maintenance.
This sign indicates that the system is
unsafely stressed; there is electric
shock risk.
This sign indicates that there is impor-
tant information regarding system use
and service.
2
ENGLISH
Warning
• To prevent fire or electric shock, do not use the system in the rain or humid weather in a wide-open
place.
• Do not place dripping or flowing vessels (vases) with liquid on the system.
Ventilation
• When using the system for extended periods, normal ventilation is required.
CAREFUL
SAFETY
CLASS 1 LASER DEVICE
The system is equipped with a laser. Only quali-
Adjusting or performing functions other than
fied personnel can repair the system.
those indicated in the instructions may lead to
DANGEROUS: INVISIBLE LASER
risk of exposure to laser radiation.
RADIATION IS PRESENT WHEN THE
SYSTEM IS OPENED AND
CLASS 1 LASER DEVICE
UNBLOCKED. AVOID DIRECT CON-
LUOKAN 1 LASERLAITE
TACT WITH THE LASER BEAM.
KLASS 1 LASERAPPARAT
ATTENTION: DANGEROUS LASER RADIATION
UPON OPENING WHEN THE BLOCKER IS NOT
PRESENT.
TECHNICAL SAFETY PRECAUTIONS
• This equipment was created and manufactured according to European safety standards, but like
any electronic equipment demands care to ensure quality operation and safety.
• Read the usage instructions before using.
• Make sure that all electric connections (including the outlet, extension cord and connection between
the parts of the equipment) are performed according to the instructions. Unplug the plug from the
power outlet when replacing the power cord.
• If any questions arise with regard to the installation, operation or safety of your system - contact
your trade agent.
• Observe caution when using the glass panels and door of the system.
• Stop using the system if it works sporadically or is damaged. Unplug the system from the power
outlet and contact the trade agent.
• Do not remove any fastened panel, because components may be under voltage.
• Do not leave the system turned on if it is not being used.
• Do not listen with the headphones at high volume, because this can damage your hearing.
• Do not block the ventilation system, for example with curtain or upholstery material. Overheating can
lead to breakage or premature wear and tear on the components of the system.
• Do not use the system in the rain or humid weather in an unprotected place.
First and foremost
• Never allow anyone, especially children, to poke anything into the openings, slots or other open
parts of the system, because this can lead to electric shock.
• Never do any questionable actions when using electric equipment of any type.
• It is better to be safe than sorry!
Note: If the system is simultaneously used with fluorescence lamps in the same
premises then it can result in system faulty operation.
3
ENGLISH
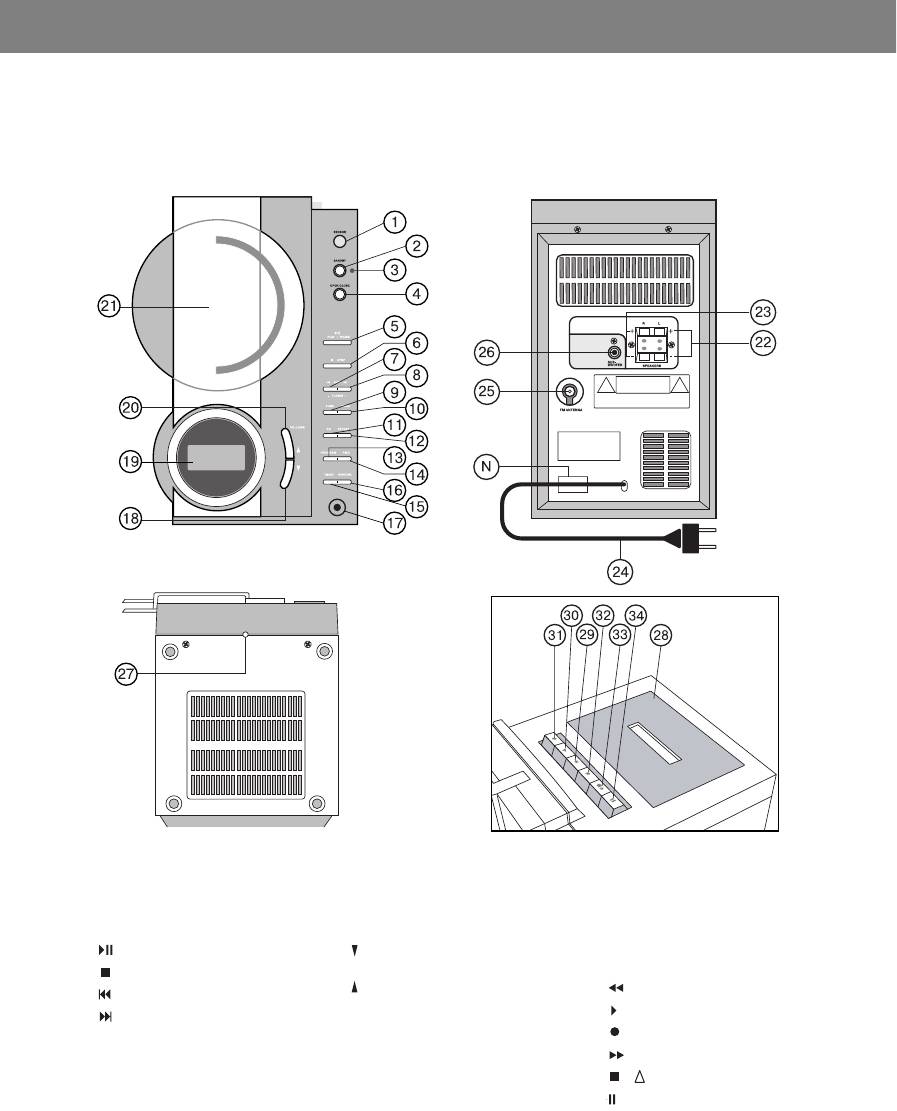
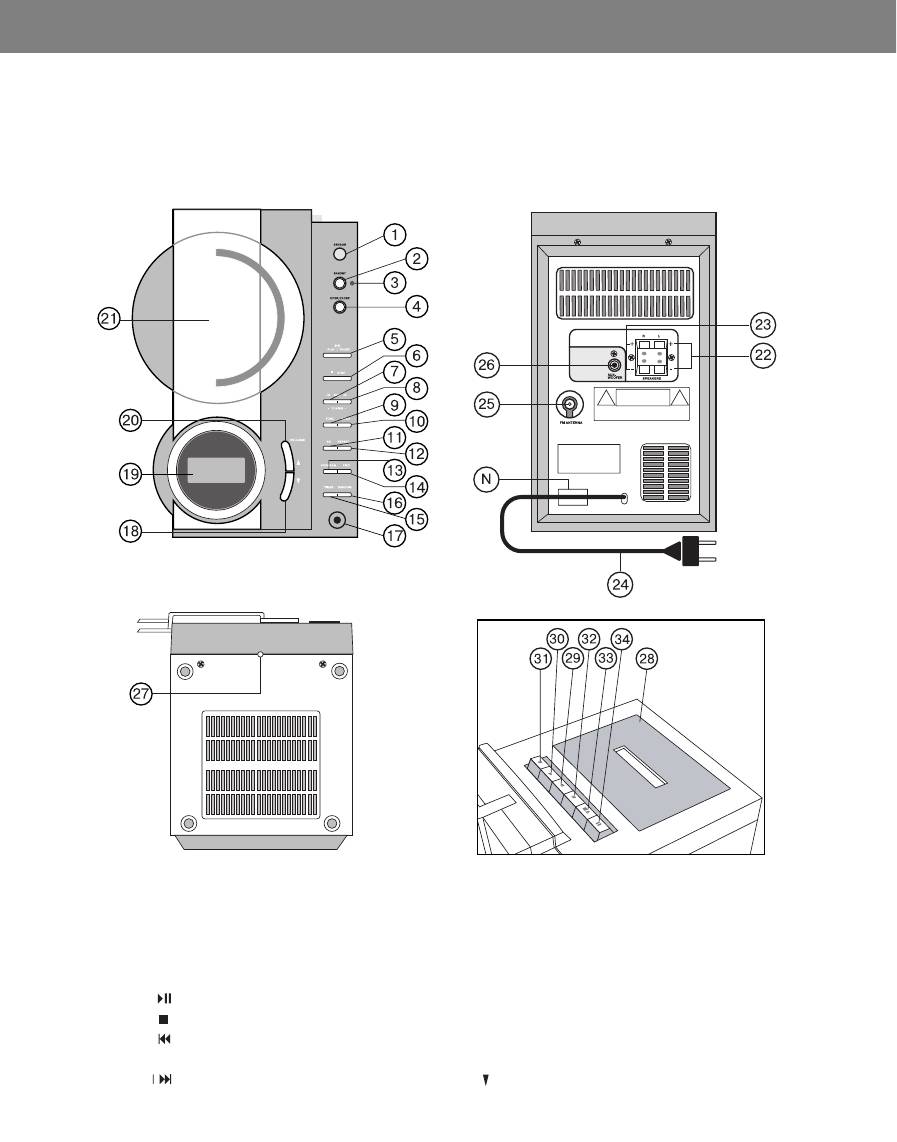
CONTROL DEVICE
MAIN SYSTEM
Front view
Rear view
Top viewBottom view
Front view
13. MEMORY Button
25.FM Antenna
1. Remote control sensor
14.FIND Button
26.Subwoofer Output
2. STANDBY MODE Button
15.TIMER Button
N Voltage selector (additional)
3. STANDBY MODE Indicator
16.RANDOM Button
Bottom view
4. OPEN / CLOSE Button
17.HEADPHONE Jack
27.System overload button
5. Play/pause Button
18. VOLUME Button
Top view
19.LCD display
28.Cassette Door
6. STOP Button
20. VOLUME Button
29. REVERSE Button
7. SEARCH/TUNE - Button
21.CD Door
30. Button PLAY
8. SEARCH / TUNE + Button
Rear view
9. FUNCTION Button
31. Button RECORD
22.Left speaker jack
10.RANGE Button
32. FORWARD Button
23.Right speaker jack
11.EQUALIZER Button
24.Power cord
33. / STOP / EJECT Button
12.REPEAT Button
34. PAUSE Button
4
ENGLISH
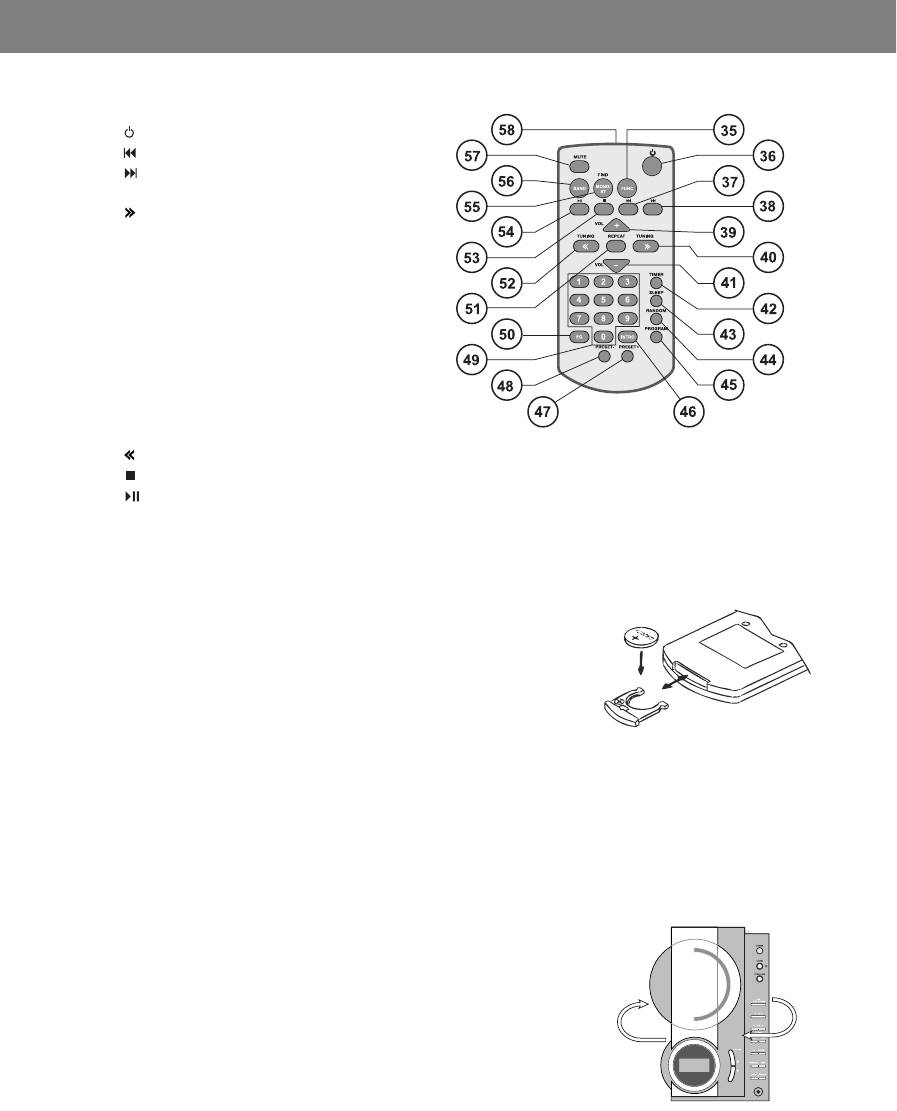
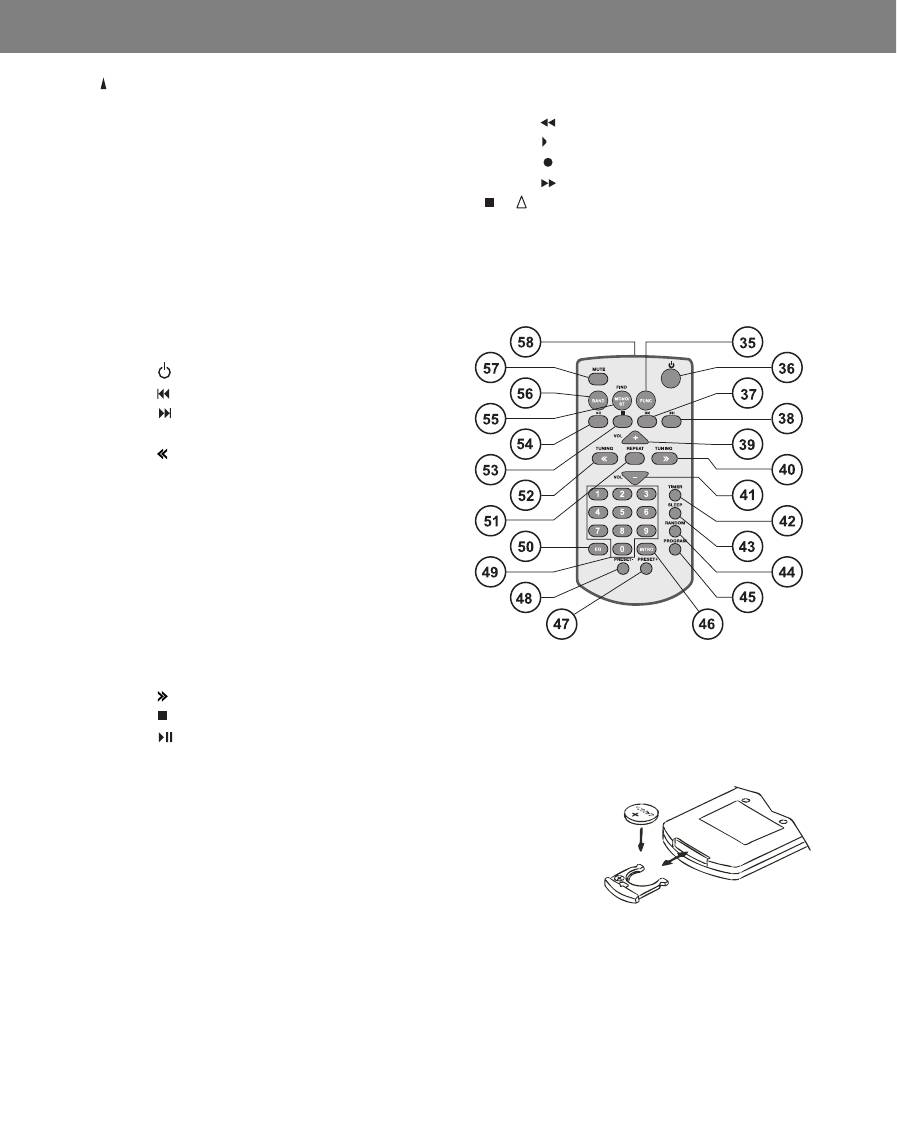
REMOTE CONTROL
35. FUNCTION Button
36. Button
37. SEARCH / TUNE - Button
38. SEARCH / TUNE + Button
39. VOLUME + Button
40. Button
41.VOLUME - Button
42.TIMER Button
43.STANDBY MODE Button
44.RANDOM Button
45.PROGRAM Button
46.INTRO Button
47.PRELIMINARY + Button
48.PRELIMINARY - Button
49.Digital 1-9 Buttons
50.EQUALIZER Button
51.REPEAT Button
52. Button
56. RANGE Button
53. Button
57. MUTE Button
54. Button
58. Infrared sensor
55. FIND / MONO / STEREO Button
TUNING AND CONNECTION
REPLACING THE BATTERIES OF THE REMOTE CONTROL
1. Turn over the remote and remove the lid of the battery compartment.
2. Insert one type "CR2025" lithium battery according to polarity as
shown on the battery compartment.
3. Close the lid of the battery compartment.
TECHNICAL SAFETY PRECAUTIONS
Comply with these technical safety precautions when using the batteries in device.
1. Only use the batteries of specified type and dimensions
2. Make sure of correct polarity when installing the batteries. Incorrect polarity can result in device
damage.
3. If this device has not been used for a long time, remove the battery to avoid damage if battery
leaked.
4. Do not try to charge a battery, it can overheat and explode. (Comply with battery manufacturers'
instructions).
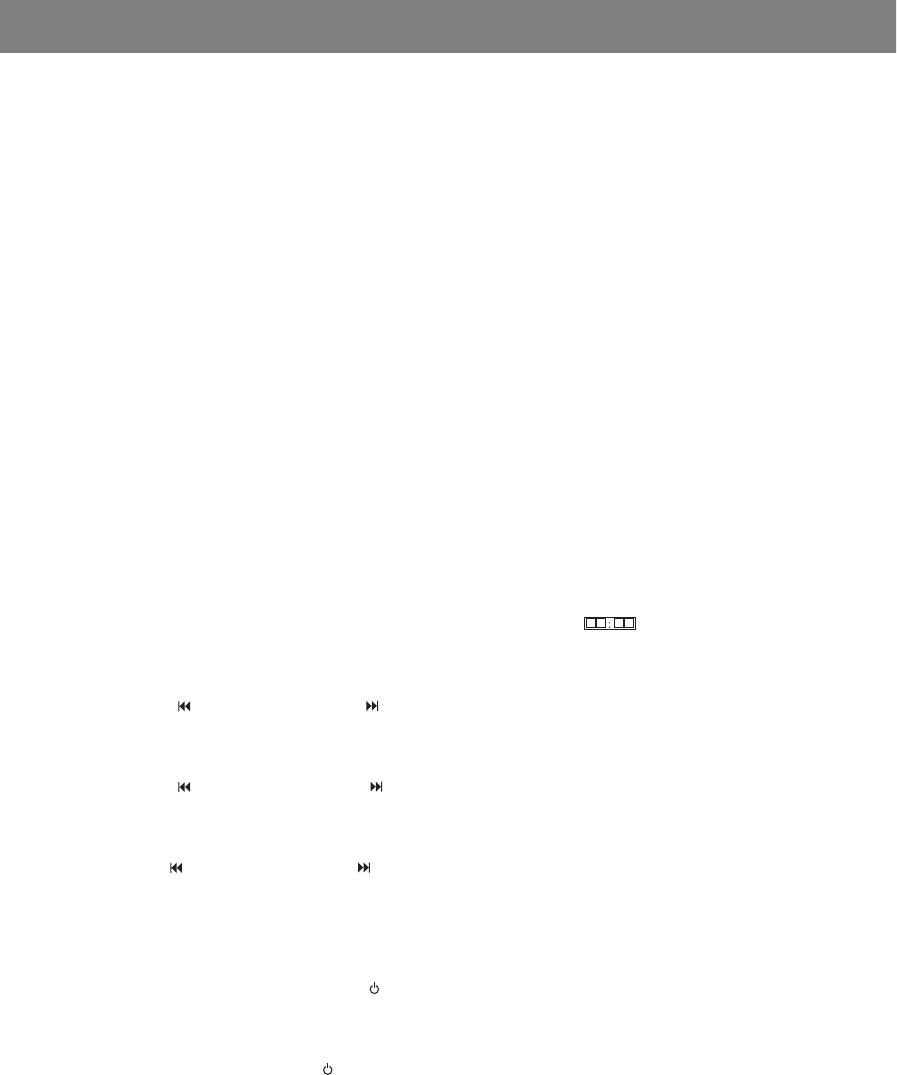
ANTENNA CONNECTION
FM: Completely extend the FM Antenna (25). If the reception is in
stereo mode, the symbol ((ST)) will light up on the LCD display (19).
AM: This system is equipped with a built-in ferritic antenna. To ensure
the best signal, rotate the housing of the system until you obtain the
best reception.
5
ENGLISH
CONNECTING THE SPEAKERS
1. To connect the speaker wires, press the Right speaker jack (23) and Left speaker jack (22) levers.
2. Make sure that the speaker wires are connected to the speaker jacks, observing polarity. Connect
the left speaker to the L jack and the right speaker to the R jack.
CONNECTING THE HEADPHONES
You can use headphones (not included in the set). Insert a 3.5 mm plug in the HEADPHONE jack (17).
Use an adapter if the plug of your headphones is a different size. When connecting headphones, the
speakers automatically disconnect.
Safety precautions To protect your hearing, follow these recommendations.
• Adjust the volume before listening. After you begin to listen, adjust them to a comfortable level.
• Do not listen through the headphones at very high volume. This can lead to hearing loss.
THE MAIN CONNECTIONS
This system is intended to be used at a voltage of 230 V / 50 Hz. Connecting this system to a grid with a
different voltage can lead to breakage and annul the warranty. If the plug of the power source does not
fit the outlet in your home, have a qualified electrician replace the outlet.
CONNECTING THE SYSTEM TO A POWER OUTLET
1. Completely extend the Power cord (24).
2. Insert the plug of the power cord into the nearest outlet.
3. As soon as you plug the system into a power outlet, its components are in standby mode.
To disconnect the system completely, pull the power cord from the outlet.
DIGITAL CLOCK AND TIMER
INSTALLING THE DIGITAL CLOCK
Insert the plug of the (24) Power cord into a power outlet. The symbol will appear on the LCD
display (19).
1. Press and hold the MEMORY (13) / PROGRAM (45) button for about 2 seconds to set the time
display format.
2. Press the SEARCH - (7) / (37) or SEARCH + (8) / (38) button to select the desired time
display format.
3. Press the MEMORY (13) / PROGRAM (45) button to save the selection. The LCD display (19) will
show two flashing symbols for setting the hour of the current time.
4. Press the SEARCH - (7) / (37) or SEARCH + (8) / (38) buttons to set the hour of the current
time.
5. Press the MEMORY (13) / PROGRAM (45) button to save the set hour. The LCD display (19) will
show two flashing symbols for setting the minutes of the current time.
6. Press the SEARCH - (7) / (37) or SEARCH + (8) / (38) buttons to set the minutes
of the current time.
7. Press the MEMORY (13) / PROGRAM (45) button to save the set minutes and immediately activate
the digital clock.
Note: The time-setting mode will stop if the MEMORY (13) / PROGRAM (45) button is not pressed
within 10 seconds.
After pressing the STANDBY MODE (2) / (36) button to turn off the system, the clock continues
to work.
SETTING THE TIMER
1. Press the STANDBY MODE (2)/ (36) button to turn on the system.
6

ENGLISH
2. Press and hold the TIMER (15) / (42) button for 2 seconds until the " ON" symbol appears.
The LCD display (19) will show two flashing symbols to set the time when you want the system to switch
on.
3. Press the SEARCH - (7) / (37) or SEARCH + (8) / (38) button to set the hour when you want
the system to switch on.
4. Press the TIMER (15) / (42) button to save the set hour. The LCD display (19) will show two flashing
symbols to indicate the minute when the system will switch on.
5. Press the SEARCH - (7) / (37) or SEARCH + (8) / (38) button to adjust the minutes of the
switch-on time.
6. Press the TIMER (15) / (42) button to cause the " OFF" symbol to appear. The LCD display (19) will
show two flashing symbols for setting the hour when you want the system to switch off.
7. Repeat points 3-5.
8. Press the TIMER (15) / (42) button to save the settings and cause the "TUNER" symbol to appear on
the LCD display (19).
9. Press the SEARCH - (7) / (37) or SEARCH + (8) / (38) buttons to select the playback mode.
10.Press the TIMER (15) / (42) button to save the playback mode. The LCD display (19) will show the
symbol "VOL 15" for setting the desired volume level.
11.Press the SEARCH - (7) / (37) or SEARCH + (8) / (38) buttons to select the desired volume
level.
12.Press the TIMER (15) / (42) button to turn on the TIMER and cause the " " symbol to appear on
the LCD display (19).
Note: Before setting the timer, the digital clock must first be set correctly.
The setting mode will stop if the MEMORY (13) / PROGRAM (45) buttons are not pressed within 10
seconds.
The timer can be set to turn the system on or off. For this, the digital clock must be correctly set.
If the system is in standby mode, it will automatically switch on at the programmed time in either CD
or TUNER mode.
For example:
For operation in the TUNER mode, there must be a CD inserted in the system.
SETTING STANDBY MODE (AUTOMATIC DISCONNECTION)
When the system is switched on, the automatic switch-off time can be set to 90 - 80 - 70 - 60 - 50 -
40 - 30 - 20 - 10 minutes. Press the Standby mode (43) button until the desired time appears on the
LCD display (19). The system will switch off after the selected period has elapsed.
Note: If the CD playback time is shorter than the selected period, the music will switch off before the
system disconnects.
THE MAIN FUNCTIONS
SWITCHING ON THE SYSTEM
Press the STANDBY MODE (2) / (36) button to switch on the system. Press the STANDBY MODE (2)
/ (36) button to disconnect the system. The current time will show on the LCD display (19).
SELECTING THE OPERATING MODE
Press the FUNCTION Button (9) / (35) to select the playback mode (CD, Cassette or TUNER).
VOLUME (20) / VOLUME + (39) Button: Press to increase the volume.
VOLUME (18) / VOLUME - (41) Button: Press to decrease the volume.
Note: There are a total of 40 volume levels. The volume level shows on the LCD display (19).
Attention! Listening at high volume can damage your hearing, especially when listening
through headphones.
7

ENGLISH
MUTE Button (57):
Switched on: Press to switch off the sound. The sound level appears on the LCD display (19).
Switched off: Press to switch on the sound. The sound level appears on the LCD display (19).
EQUALIZER Button (11) / (50)
Press to select the desired playback sound effect. It will appear on the LCD display (19).
This button allows you to choose the equalizer mode: CLASSICAL, ROCK, POP and JAZZ.
TUNER FUNCTIONS
CONTROLLING THE TUNER MODE
1. Press the STANDBY MODE button (2) / (36) to turn on the system.
2. Press the FUNCTION button (9) / (55) to select the TUNER mode.
3. Press the STANDBY MODE button (2) / (36) to switch off the system.
AUTOMATIC RADIO STATION SEARCH
1. Press and hold the TUNING - (7) / (52) or TUNING + (8) / (40) button to begin searching
for a radio station.
2. Press and hold the TUNING - (7) / (52) or TUNING + (8) / (40) button to begin searching
for the next radio station.
Note: While searching, the sound will be automatically turned off.
The automatic search will find only radio stations with sufficiently strong signals. For radio
stations with weak signals, you need to tune it manually.
MANUAL SEARCHING FOR RADIO STATIONS
1. Press the RANGE (10) / (56) button until the mode that you want appears.
2. Press the TUNING - (7) / (52) or TUNING + (8) / (40) button to tune to the approximate frequency
of the desired radio station. The LCD display (19) will show the current frequency.
3. Repeatedly press the TUNING - (7) / (52) or TUNING + (8) / (40) button to find the desired
frequency.
PROGRAMMING RADIO STATIONS
1. In TUNER mode, select FM or AM reception.
2. Choose a radio station using automatic search or manual tuning.
3. Press the MEMORY (13) / (45) button. The symbol PGM will highlight, and the LCD display (19)
will show a flashing 01.
4. Press the PRELIMINARY - (48) or PRELIMINARY + (47) button until the LCD display (19) shows the
desired memory cell.
5. Press the MEMORY (13) / (45) button once again to program the radio station into the selected
memory cell.
6. To program the next radio station in memory, repeat stages 2-5.
Note: The programming mode stops if the MEMORY (13) / PROGRAM (45) button is not pressed
within 10 seconds.It is possible to program up to 10 FM stations and 10 AM stations
into memory.
CHANGING THE MEMORY CELL POSITIONS
If you need to change the order of radio station memory cells, enter the frequency of the new radio sta-
tion into the cell. The position of the previous one will change accordingly.
MONO / STEREO Button
Press this button to switch between MONO and STEREO modes.
8
ENGLISH
• Stereo radio stations in FM mode will be shown by the ((ST)) symbol on the LCD display (19).
• If you hear unwanted noise when listening to FM stereo, try switching to MONO mode using the
MONO / STEREO (55) button. The ST symbol will disappear from the LCD display (19).
SELECTING A STATION IN THE PROGRAM MEMORY
The PRELIMINARY + (47) button: To select a station in ascending order
The PRELIMINARY - (48) button: To select station in descending order
Digital buttons 0-9: To select the desired station by pressing a number.
CD PLAYER FUNCTIONS
LOADING A COMPACT DISC
1. Press the OPEN / CLOSE (4) button to open the CD Door (21).
2. Insert a CD with the label up using the black CD holder until it comes firmly into place.
3. Press the OPEN / CLOSE (4) button to close the CD Door (21).
CAUTION: TO AVOID MOTORIZED CD DOOR MECHANISM DAMAGE, PLEASE, DON’T CLOSE
IT BY PRESSING ON THE DOOR BY HANDS.
PLAYING COMPACT DISCS
1. Turn on the system.
2. Press the FUNCTION (9) / (35) button to select CD mode.
3. Insert a disc and close the CD Door (21). The CD player will begin to read the data on the disc, then
the LCD display (19) will show the data about the disc time and number of tracks.
4. Press the Playback / Pause (5) / (54) button to begin playback.
5. Press the STOP (6) / (53) button to stop playback.
6. Press the STANDBY MODE (2) / (36) button to switch off the system.
Note: If the disc is properly loaded, the LCD display (19) will show the total number of tracks
and playback time of the disc.
If the disc is lacking or damaged, the LCD display (19) will show the symbol NO DISC
PLAYBACK / PAUSE (5) / (54) button
PLAYBACK: Press to begin playback.
PAUSE: Press to pause playback. The remaining playback time will show on the LCD display (19).
RESUME: If you press this button while the disc is paused, playback will resume with the time elapsed
showing on the LCD display (19).
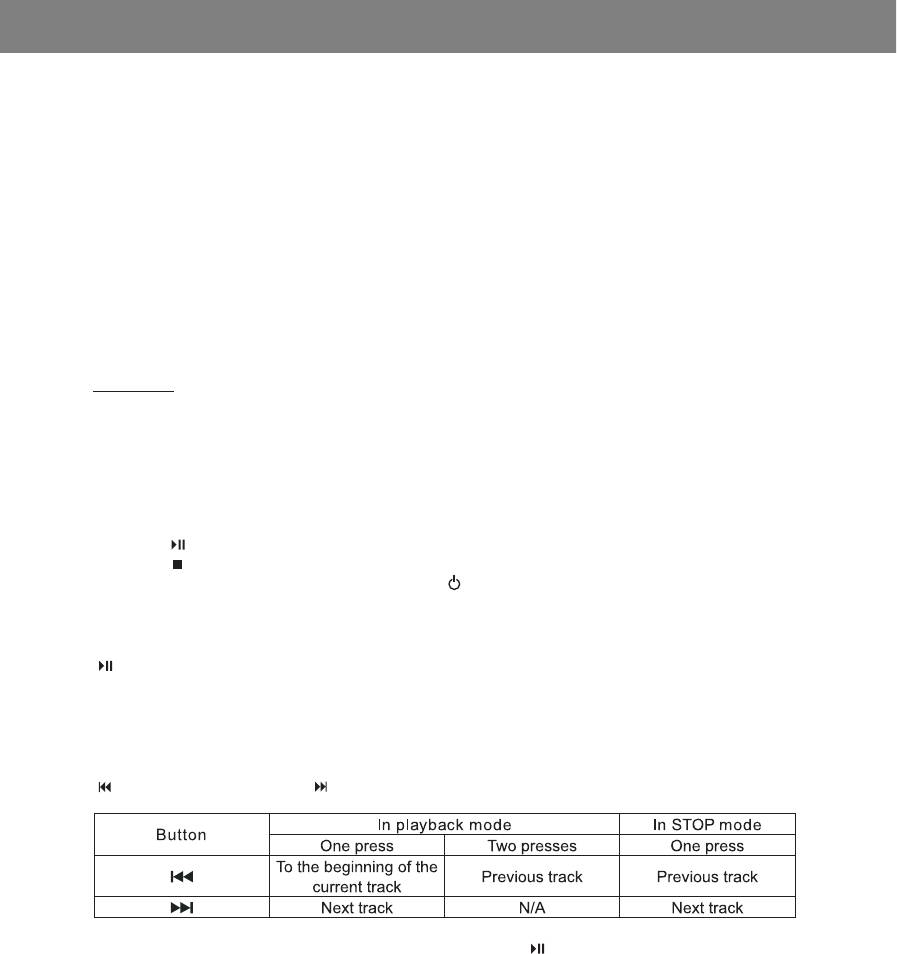
SEARCH - (7) / (37) and SEARCH + (8) / (38) buttons
Press the number of the track using buttons 0 - 9 (49) and the PLAYBACK / PAUSE (5) / (54) to play
the selected track.
REPEAT (12) / (51) button
Repeat track: Press once to play the current track again.
The LCD display (19) will show the REP 1 symbol
Repeat disc: Press twice to play all the tracks on the disc again.
The LCD display (19) will show the REP ALL symbol.
9

ENGLISH
Cancel: Press this button until the above-mentioned symbols disappear from the LCD display (19).
RANDOM (16) / (44) button
Beginning: Press once to play tracks in random order. The LCD display (19) will show the RND symbol.
Cancel: Press once again to cancel the function.
INTRO (48) button
Beginning: Press once to switch on the function that gives you a sample of every track on the disc.
The LCD display (19) will show the INTRO symbol.
Cancel: Press once again to return to normal playback mode.
PROGRAMMING PLAYBACK
This function allows you to program the playback sequence of up to 64 tracks.
1. Press the MEMORY (13) / PROGRAM (45) button in stop mode.
The LCD display (19) will show the PGM 00 P - 01 symbol.
2. Press the SEARCH - (7) / (37) and SEARCH + (8) / (38) button to select the desired track.
3. Press the MEMORY (13) / PROGRAM (45) button to enter the track into memory.
4. Repeat stages 2 and 3 to continue to enter tracks into memory.
5. Press the PLAYBACK / PAUSE (5) / (54) button to begin playback of the programmed tracks.
Note: The program will be automatically erased if you program more than 64 tracks.
Press the MEMORY (13) / PROGRAM (45) button to view the programmed tracks.
Clearing tracks from memory
• Press the STOP (6) / (53) button in programming mode.
• Open the CD door by pressing the OPEN / CLOSE (4) button.
ABOUT CD-R / RW DISCS
• Due to changes in the CD-R/RW standard formats, we do not guarantee high quality playback
of such discs.
• Do not label both sides of CD-R/RW discs. This can lead to malfunction in playback.
• Do not use blank CD-R/RW discs because they can be damaged in playback.
MP3 PLAYER FUNCTIONS
LOADING AN MP3 DISC
1. Press the OPEN / CLOSE (4) button to open the CD Door (21).
2. Insert an MP3 disc with the label up using the black-colored holder until it falls firmly into place.
3. Press the OPEN / CLOSE (4) button to close the CD Door (21).
PLAYING COMPACT DISCS
1. Turn on the system.
2. Press the FUNCTION (9) / (35) button to select CD mode.
3. Insert a disc and close the CD Door (21). The MP3 player will begin to read the data on the disc,
then the LCD display (19) will show the data on the playback time of the disc and the number of
tracks.
4. Press the Playback / Pause (5) / (54) button to begin playback.
5. Press the STOP (6) / (53) button to stop playback.
6. Press the STANDBY MODE (2) / (36) button to switch off the system.
Note:
• If the disc is loaded properly, the LCD display (19) will show the total number of tracks and
playback time of the disc.
10
ENGLISH
• If the disc is lacking or damaged, the LCD display (19) will show the NO DISC symbol. Playback of
MP3, CD-R/CD-RW depends on the quality of the disc recording.
PLAYBACK / PAUSE (5) / (54) button
Playback: Press once to begin playback.
Pause: Press once during playback to pause. The LCD display (19) will show the time elapsed.
Resume: If you press this button while the disc is paused, playback will resume with the time elapsed
showing on the LCD display (19).
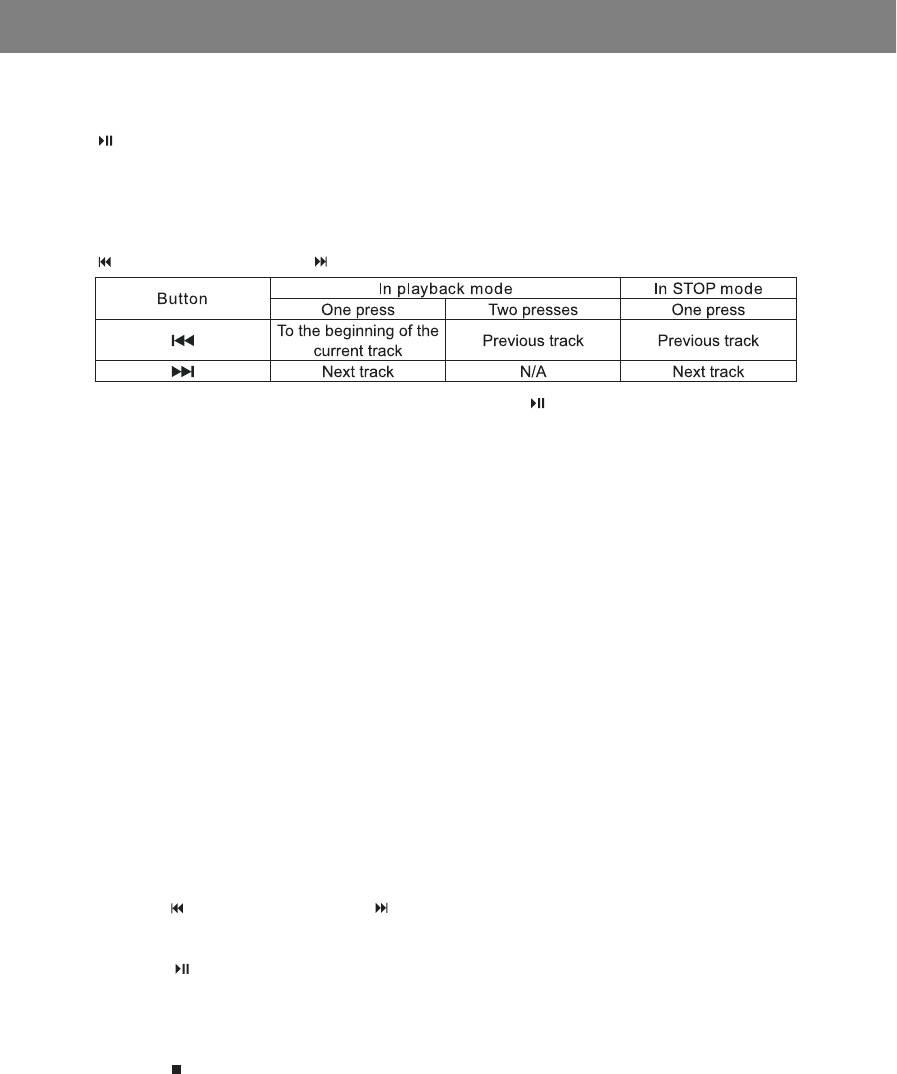
SEARCH - (7) / (37) and SEARCH + (8) / (38) buttons
Press the number of the track using buttons 0 - 9 (49) and the PLAYBACK / PAUSE (5) / (54)
to play the selected track.
REPEAT (12) / (51) button
Repeat track: Press once to play the current track again.
The LCD display (19) will show the REP 1 symbol
Repeat disc: Press twice to play all the tracks on the disc again.
The LCD display (19) will show the REP ALL symbol.
Repeat album: Press this button three times, and the current album will be played again and the
LCD display (19) will show the REPALBUM symbol.
Cancel: Press this button until the above-mentioned symbols disappear from the LCD display (19).
RANDOM (16) / (44) button
Begining: Press once to play tracks in random order. The LCD display (19) will show the RND symbol.
Cancel: Press once again to cancel the function.
INTRO (48) button
Begining: Press once to switch on the function that gives you a sample of every track on the disc.
The LCD display (19) will show the INTRO symbol.
Cancel: Press once again to return to normal playback mode.
PROGRAMMING PLAYBACK
This function allows you to program the playback order of up to 64 tracks.
1. Press the MEMORY (13) / PROGRAM (45) button in stop mode.
The LCD display (19) will show the PGM 00 P - 01 symbol.
2. Press the SEARCH - (7) / (37) and SEARCH + (8) / (38) button to select the desired track.
3. Press the MEMORY (13) / PROGRAM (45) button to enter the track in memory.
4. Repeat stages 2 and 3 to continue to enter tracks into memory.
5. Press the PLAYBACK / PAUSE (5) / (54) button to begin playback of the programmed tracks.
Note: The program will be automatically erased if you program more than 64 tracks.
Press the MEMORY (13) / PROGRAM (45) button to view the programmed tracks.
Clearing tracks from memory
• Press the STOP (6) / (53) button in programming mode.
• Open the CD door by pressing the OPEN / CLOSE (4) button.
11
ENGLISH
Searching according to symbol
1. Press the FIND (14) / (55) button. The LCD display (19) will show the and A symbols.
2. Press the SEARCH - (7) / (37) and SEARCH + (8) / (38) but-
tons to select the desired symbol.
3. Press the PLAYBACK / PAUSE (5) / (54) button to play the selected track.
Note: The list of symbols is from A-Z and 0-9
Searching by album title
1. Press the FIND (14) / (55) button twice. The LCD display (19) will show the MP3 ALBUM symbol.
2. Press the SEARCH - (7) / (37) and SEARCH + (8) / (38) button to select the desired album.
3. Press the PLAYBACK / PAUSE (5) / (54) button to begin playback of the first track
of the selected album.
About CD-R / RW discs
• Due to changes in the CD-R/RW standard format, we do not guarantee high quality playback of such
discs.
• Do not label both sides of CD-R/RW discs. This can lead to malfunction in playback.
• Do not use blank CD-R/RW discs because they can be damaged in playback.
CASSETTE PLAYER/RECORDER FUNCTIONS
SAFETY PRECAUTIONS
• To achieve high quality playback, you must use high-quality cassettes.
For best results use cassettes from well-known manufacturers.
• Use only C-30, C-60 and C-90 type cassettes.
• We do not recommend using type cassettes C-120, because their thin tape can cause mechanical
instability in the cassette mechanism.
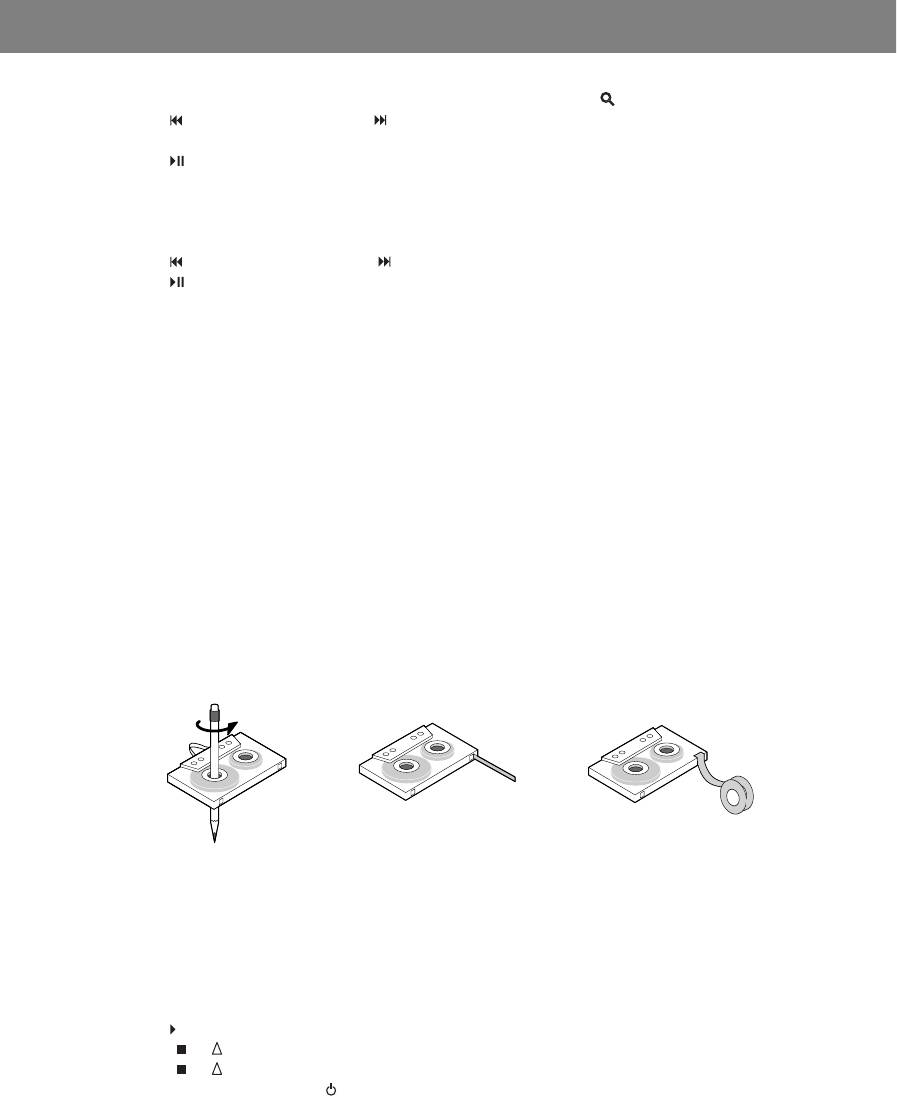
Checking the cassette
Before inserting a cassette in the system, make sure that the tape is tightly wound. Loose tape can wind
around the head mechanism and break it. Use a pencil to tighten the tape as shown in drawing A.
A B C
Protection against unwanted recording
• Remove the top tabs on the cassette (as shown in drawing B) to make the cassette unrecordable.
• To re-enable recording on the cassette, cover the hole with adhesive tape as shown in drawing C.
CASSETTE PLAYBACK
1. Turn on the system.
2. Press the FUNCTION (9) / (35) button to select the cassette mode.
The LCD display (19) will show the TAPE symbol.
3. Insert a recorded cassette in the cassette door (28).
4. Press the PLAYBACK (30) button to begin playback.
5. Press the / STOP / EJECT (33) button to stop playback.
6. Press the / STOP / EJECT (33) button to open the cassette door (28).
7. Press the STANDBY MODE (2) / (36) button to switch off the system.
12

ENGLISH
PLAYBACK (30) button
Activation: Press to begin playback of the cassette.
PAUSE (34) button
PAUSE: Press to pause playback.
RESUME: Press to resume playback.
/ STOP / EJECT (33) button
STOP: Press to stop playback.
EJECT: Press to open the cassette door (28).
REVERSE (29) and FORWARD (32) buttons.
Rewinding: Press to wind the tape backward or forward.
Note: When the winding is finished, press the / STOP / EJECT (33) button.
RECORD (31) button
Activation: Press to begin recording.
RECORDING FROM RADIO
1. Insert a blank cassette into the system and close the cassette door (28).
2. Press the FUNCTION (9) / (35) button and select TUNER mode.
3. Press the RANGE (10) / (56) button to select the desired range.
4. Press the TUNING - (7) / (52) or TUNING + (8) / (40) button to select a radio station.
5. Press the RECORD (31) and PLAYBACK (30) buttons to begin recording.
6. Press the / STOP / EJECT (33) button to stop recording.
RECORDING FROM A CD
1. Insert a blank cassette into the system and close the cassette door (28).
2. Press the FUNCTION (9) / (35) button and select CD mode.
3. Insert the disc and close the CD door (21). If necessary, select a track using the SEARCH - (7) /
(37) or SEARCH + (8) / (38) buttons.
4. Press the RECORD (31) and PLAYBACK (30) buttons to begin recording. The LCD display (19)
will show the "SYNC" symbol and playback of the disc will begin automatically.
5. Press the / STOP / EJECT (33) button to stop recording.
RECORDING FROM AN MP3 DISC
1. Insert a blank cassette into the system and close the cassette door (28).
2. Press the FUNCTION (9) / (35) button and select CD mode.
3. Insert the disc and close the CD door (21). If necessary, select a track using the SEARCH - (7) /
(37) or SEARCH + (8) / (38) buttons.
4. Press the RECORD (31) and PLAYBACK (30) buttons to begin recording. The LCD display (19)
will show the "SYNC" symbol and playback of the disc will begin automatically.
5. Press the / STOP / EJECT (33) button to stop recording.
Note: At the end of the tape, the cassette mechanism will automatically stop while playing or recording.
If you press a wrong combination of buttons, this will damage the tape in the cassette
player/recorder.
USE AND CARE
COMPACT DISC
• Handle discs carefully. Hold them only by the edges. Do not touch the recorded side of the disc with
your fingers.
• Do not stick or attach anything to a compact disc.
13
ENGLISH
• Periodically clean discs using a soft cloth. Never use aerosols or anti-static products. If necessary,
you can use a special product for cleaning compact discs.
• If you notice disruptions during compact disc playback, it is possible that the disc is dirty
of damaged (scratched).
• When cleaning a disc, wipe it from the center to its edges. Never use circular motion.
• To remove a disc from its box, press on the center of the box and remove the disc by holding
it by its edges.
• Use only a soft cloth to wipe away fingerprints and dust.
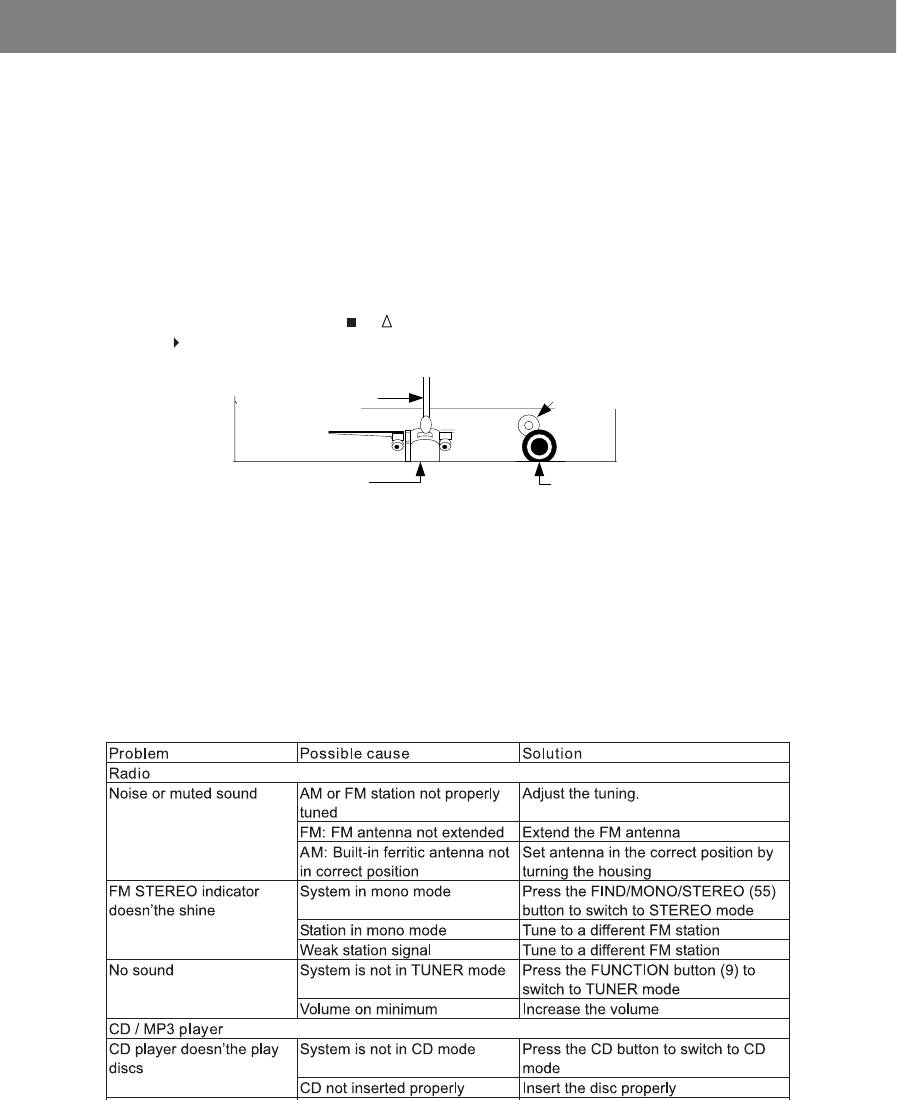
CLEANING THE MAGNETIC HEADS
• To avoid electric shock, unplug the system from the power outlet.
• The magnetic head, roller and capstan require periodic cleaning. Dirt, oxides, and metal residue
from the cassette tapes accumulate on these mechanisms, which worsens the quality of playback.
Turn on the system and press the / STOP / EJECT (33) button to open the cassette door (28),
press the PLAYBACK (30), button clean the head, roller and capstan using a soft cloth or cotton
swab soaked in alcohol as shown in the drawing below.
COTTON SWAB
CAPSTAN
MAGNETIC HEAD
PINCH ROLLER
ATTENTION: Never use metal objects next to the cassette
head. Don't let the cloth get entangled in the cassette mechanism.
CLEANING THE SYSTEM
• To avoid electric shock, unplug the system from the power outlet.
• If the housing gets dusty, wipe it with a soft cloth.
• If the housing gets dirty, clean it with a cloth slightly soaked in soapy water. Never use abrasive
materials or products for polishing, because this can damage the outer coating
ATTENTION: When cleaning, don't allow liquid to get inside the housing.
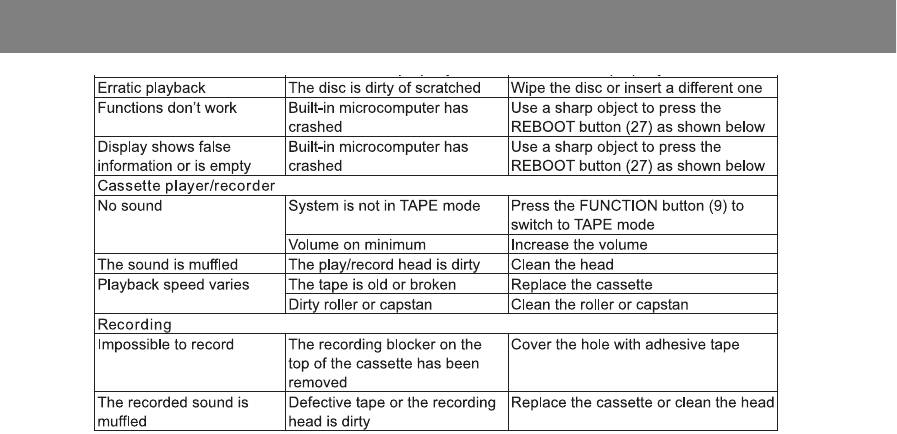
TROUBLESHOOTING
If problems arise, check the following before contacting a service center:
14
ENGLISH
SPECIFICATIONS
Radio
Frequency range: AM 522 - 1620 KHz, FM 87.5 - 108 MHz
CD player
System playback: Motorized vertical CD mechanism
Frequency response: 100 - 18000 Hz
Cassette player/recorder
Recording system: DC Bias
Erasing system: Magnetic
Autostop system: Playback / Recording
Audio
Output power: 2 x 5 W @ 10% THD
Headphone resistance: 8 - 32 Om
Speaker columns
Resistance: 4 Ohm
Speakers: 4" woofers + 2" tweeters
Housing: Wood
Front grating: Removable
General
Power source: AC 230V ~ 50Hz
DC 3V - 1 "CR2025" lithium battery (included)
for remote control
Power consumption: 28 W
Size (mm): System: 194(W) x 282(H) x 200(L) mm
Speakers: 150(W) x 273(H) x 170(L) mm
Accessories
Instructions Qty. 1
Remote control Qty. 1
Speaker wires 1 pair
IN ORDER TO DELIVER THE BEST QUALITY, THE SPECIFICATION OF THE UNIT MIGHT
CHANGE WITHOUT SUBJECT OF NOTICE
SERVICE LIFE OF THE UNIT NOT LESS 5 YEARS
15
ÐÓÑÑÊÈÉ
ÏÅÐÅÄ ÈÑÏÎËÜÇÎÂÀÍÈÅÌ, ÏÎÆÀËÓÉÑÒÀ, ÂÍÈÌÀÒÅËÜÍÎ ÏÐÎ×ÒÈÒÅ ÈÍÑÒÐÓÊÖÈÞ
ÏÅÐÅÇÀÃÐÓÇÊÀ ÑÈÑÒÅÌÛ
 ñëó÷àå íå âêëþ÷åíèÿ, çàåäàíèÿ èëè îòñóòñòâèÿ ïðàâèëüíîé
èíäèêàöèè íà äèñïëåå, èñïîëüçóéòå îñòðûé ïðåäìåò äëÿ íàæàòèÿ
êíîïêè. Ïåðåçàãðóçêà ñèñòåìû (27) â íèæíåé ÷àñòè êîðïóñà äëÿ
ïåðåçàãðóçêè âñòðîåííîãî ìèêðîêîìïüþòåðà, êàê ïîêàçàíî íà ðèñóíêå
íèæå. Îòêëþ÷èòå ìèêðîñèñòåìó îò ýëåêòðîñåòè è ïîäîæäèòå
íåñêîëüêî ñåêóíä, ïîêà âñòðîåííûé ìèêðîêîìïüþòåð ïåðåçàïóñòèòñÿ.
Ïðèìå÷àíèå: Èñïîëüçóéòå çóáî÷èñòêó èëè êàðàíäàø äëÿ íàæàòèÿ è
óäåðæèâàíèÿ íåñêîëüêî ñåêóíä êíîïêè ÂÛÊËÞ×ÀÒÅËß.
Ñîäåðæàíèå Ñòð. ¹
Ïåðåçàãðóçêà ñèñòåìû 16
Ìåðû ïðåäîñòîðîæíîñòè 16
Óñëîâèÿ òåõíèêè áåçîïàñíîñòè ïðè ýêñïëóàòàöèè 17
Óñòðîéñòâà óïðàâëåíèÿ 18
Íàñòðîéêà è ñîåäèíåíèå 19
Öèôðîâûå ÷àñû è òàéìåð 20
Îñíîâíûå ôóíêöèè 22
Ôóíêöèè òþíåðà 22
Ôóíêöèè CD 23
Ôóíêöèè MP3 25
Ôóíêöèè êàññåòíîãî ìàãíèòîôîíà 27
Ýêñïëóàòàöèÿ è óõîä 28
Óñòðàíåíèå íåèñïðàâíîñòåé 30
Ñïåöèôèêàöèè 31
ÌÅÐÛ ÏÐÅÄÎÑÒÎÐÎÆÍÎÑÒÈ
Ïîæàëóéñòà, îáðàòèòå âíèìàíèå íà ñëåäóþùóþ èíôîðìàöèþ:
• Ñèñòåìà äîëæíà áûòü ïîäêëþ÷åíà ê ñåòè ñ òåì æå íàïðÿæåíèåì, êîòîðîå óêàçàíî íà êîðïóñå
ñèñòåìû.  ïðîòèâíîì ñëó÷àå âîçíèêàåò óãðîçà âîçãîðàíèÿ ñèñòåìû
• Íå ïîäâåðãàéòå ñèñòåìó íàãðåâàíèþ ñâûøå 35 ãðàäóñîâ.
• Èçáåãàéòå óñòàíîâêè â ìåñòàõ âáëèçè îò îáîãðåâàòåëåé è ó÷àñòêîâ ñ ïðÿìûì ñîëíå÷íûì
ñâåòîì
• Îáåñïå÷üòå õîðîøóþ öèðêóëÿöèþ âîçäóõà.
• Ïðåäîõðàíÿéòå ñèñòåìó îò ïûëè, âëàæíîñòè è ïîïàäàíèÿ âîäû.
• Èçáåãàéòå ñèëüíûõ ìàãíèòíûõ ïîëåé, íàïðèìåð âîçëå ÒÂ è êîëîíîê äðóãèõ óñòðîéñòâ.
• Íå èñïîëüçóéòå ñèëüíîäåéñòâóþùèå õèìè÷åñêèå ðåàãåíòû ïðè ÷èñòêå óñòðîéñòâà.
• Íå ñìàçûâàéòå äåòàëè, ïîäâèæíûå ìåõàíèçìû ñèñòåìû. CD ïëååð íå òðåáóåò òåõíè÷åñêîãî
îáñëóæèâàíèÿ.
• Äëÿ òåõíè÷åñêîãî îáñëóæèâàíèÿ èñïîëüçóéòå òîëüêî ñåðòèôèöèðîâàííûå öåíòðû
îáñëóæèâàíèÿ.
Ýòîò çíàê óêàçûâàåò, ÷òî ñèñòåìà ïîä
îïàñíûì íàïðÿæåíèåì, åñòü ðèñê
ïîðàæåíèÿ ýëåêòðè÷åñêèì òîêîì.
Ýòîò çíàê óêàçûâàåò íà ñîäåðæàíèå
âàæíîé èíôîðìàöèè ïî ïîëüçîâàíèþ
è îáñëóæèâàíèþ ñèñòåìû.
16

ÐÓÑÑÊÈÉ
Ïðåäóïðåæäåíèå:
• Äëÿ ïðåäóïðåæäåíèÿ óãðîçû îãíÿ èëè ïîðàæåíèÿ ýëåêòðè÷åñêèì òîêîì, íå èñïîëüçóéòå
ñèñòåìó â äîæäü èëè âëàæíóþ ïîãîäó íà îòêðûòîì ìåñòå.
• Íå ïîìåùàéòå íà ñèñòåìó êàïàþùèå èëè ïðîòåêàþùèå ñîñóäû (âàçû) ñ æèäêîñòüþ.
• Ïðè äëèòåëüíîì èñïîëüçîâàíèè ñèñòåìû íåîáõîäèìà íîðìàëüíàÿ âåíòèëÿöèÿ.
Îñòîðîæíî!
ÁÅÇÎÏÀÑÍÎÑÒÜ
ÊËÀÑÑ 1 ËÀÇÅÐÍÎÅ ÓÑÒÐÎÉÑÒÂÎ
Ñèñòåìà ñíàáæåíà ëàçåðîì. Òîëüêî
Èñïîëüçîâàíèå ðåãóëèðîâîê, âûïîëíåíèå
êâàëèôèöèðîâàííûé ïåðñîíàë ìîæåò
èíûõ ôóíêöèé, íå óêàçàííûõ â èíñòðóêöèè,
ðåìîíòèðîâàòü ñèñòåìó.
ìîæåò ïðèâåñòè ê ðèñêó, ñâÿçàííîìó ñ
ÎÏÀÑÍÎ: ÍÅÂÈÄÈÌÎÅ ËÀÇÅÐÍÎÅ
èçëó÷åíèåì ëàçåðà.
ÈÇËÓ×ÅÍÈÅ ÏÐÈ ÎÒÊÐÛÒÈÈ È
ÎÒÑÓÒÑÒÂÈÈ ÁËÎÊÈÐÎÂÊÈ.
CLASS 1 LASER DEVICE
ÈÇÁÅÃÀÉÒÅ ÏÐßÌÎÃÎ
LUOKAN 1 LASERLAITE
ÏÎÏÀÄÀÍÈß ËÓ×À ËÀÇÅÐÀ. ÂÍÈÌÀÍÈÅ:
KLASS 1 LASERAPPARAT
ÎÏÀÑÍÎÅ ËÀÇÅÐÍÎÅ ÈÇËÓ×ÅÍÈÅ ÏÐÈ
ÎÒÊÐÛÒÈÈ È ÎÒÑÓÒÑÒÂÈÈ ÁËÎÊÈÐÎÂÊÈ.
ÓÑËÎÂÈß ÒÅÕÍÈÊÈ ÁÅÇÎÏÀÑÍÎÑÒÈ ÏÐÈ ÝÊÑÏËÓÀÒÀÖÈÈ
• Äàííîå îáîðóäîâàíèå áûëî ñîçäàíî è ïðîèçâåäåíî â ñîîòâåòñòâèè ñ åâðîïåéñêèìè
ñòàíäàðòàìè áåçîïàñíîñòè, íî, êàê è ëþáîå ýëåêòðîííîå îáîðóäîâàíèå òðåáóåò óõîäà äëÿ
îáåñïå÷åíèÿ êà÷åñòâà ðàáîòû è áåçîïàñíîñòè.
• Ïðî÷èòàéòå èíñòðóêöèþ ïî ýêñïëóàòàöèè ïåðåä èñïîëüçîâàíèåì.
• Óáåäèòåñü, ÷òî âñå ýëåêòðîñîåäèíåíèÿ (âêëþ÷àÿ ðîçåòêè, óäëèíèòåëè è ñîåäèíåíèÿ ìåæäó
÷àñòÿìè îáîðóäîâàíèÿ) âûïîëíåíû â ñîîòâåòñòâèè ñ èíñòðóêöèÿìè. Îòêëþ÷àéòå âèëêó
ñåòåâîãî øíóðà îò ýëåêòðîñåòè ïðè çàìåíå ñîåäèíèòåëüíûõ ïðîâîäîâ.
• Ïðè êàêèõ-ëèáî âîïðîñàõ ïî óñòàíîâêå, ðàáîòå èëè áåçîïàñíîñòè âàøåé ñèñòåìû - ñâÿæèòåñü
ñ âàøèì òîðãîâûì àãåíòîì.
• Ñîáëþäàéòå îñòîðîæíîñòü ïðè ðàáîòå ñî ñòåêëÿííûìè ïàíåëÿìè è äâåðöàìè ñèñòåìû.
• Ïðåêðàòèòå ýêñïëóàòàöèþ ñèñòåìû, åñëè îíà ôóíêöèîíèðóåò ñî ñáîÿìè ëèáî ïîâðåæäåíà,
îòêëþ÷èòå ñèñòåìó îò ýëåêòðîñåòè è ñâÿæèòåñü ñ òîðãîâûì àãåíòîì.
• Íå ñíèìàéòå êàêóþ-ëèáî çàêðåïëåííóþ ïàíåëü, ò.ê. êîìïîíåíòû ìîãóò íàõîäèòüñÿ ïîä
íàïðÿæåíèåì.
• Íå îñòàâëÿéòå ñèñòåìó âêëþ÷åííîé â ñëó÷àå åñëè îíà íå èñïîëüçóåòñÿ.
• Íå ïðîñëóøèâàéòå íàóøíèêè íà áîëüøîé ãðîìêîñòè, ò.ê. ýòî ìîæåò ïîâðåäèòü ñëóõ.
• Íå ïðåïÿòñòâóéòå âåíòèëÿöèè ñèñòåìû, íàïðèìåð çàíàâåñêîé èëè îáèâî÷íûì ìàòåðèàëîì.
Ïåðåãðåâ ìîæåò ïðèâåñòè ê ïîëîìêå ëèáî ïðåæäåâðåìåííûé èçíîñ êîìïîíåíòîâ ñèñòåìû.
• Íå ýêñïëóàòèðóéòå ñèñòåìó â äîæäü èëè âëàæíóþ ïîãîäó â íåçàùèùåííîì ìåñòå.
Ïðåæäå âñåãî:
• Íèêîãäà íå ðàçðåøàéòå, îñîáåííî äåòÿì, âñòàâëÿòü â îòâåðñòèÿ, ñëîòû èëè äðóãèå îòêðûòûå
÷àñòè ñèñòåìû êàêèå-ëèáî ïðåäìåòû, ò.ê. ýòî ìîæåò ïðèâåñòè ê ïîðàæåíèþ ýëåêòðè÷åñêèì
òîêîì.
• Íèêîãäà íå ïðèíèìàéòå ñîìíèòåëüíûõ ðåøåíèé ïðè ðàáîòå ñ ýëåêòðîîáîðóäîâàíèåì ëþáîãî
òèïà.
• Ëó÷øå áûòü â áåçîïàñíîñòè, ÷åì ïîòîì æàëåòü!
Ïðèìå÷àíèå: Åñëè â ïîìåùåíèè ñ äàííîé ñèñòåìîé îäíîâðåìåííî
èñïîëüçóåòñÿ ôëóîðåñöåíòíûå ëàìïû, òî âîçìîæíû ñáîè â ðàáîòå
ñèñòåìû.
17
ÐÓÑÑÊÈÉ
ÓÑÒÐÎÉÑÒÂÀ ÓÏÐÀÂËÅÍÈß
ÃËÀÂÍÀß ÑÈÑÒÅÌÀ
Âèä ñïåðåäè
Âèä ñçàäè
Âèä ñíèçó
Âèä ñâåðõó
Âèä ñïåðåäè
9. Êíîïêà ÔÓÍÊÖÈß (FUNCTION)
1. Ñåíñîð äèñòàíöèîííîãî óïðàâëåíèÿ
10.Êíîïêà ÄÈÀÏÀÇÎÍ(RANGE)
2. Êíîïêà ÐÅÆÈÌ ÎÆÈÄÀÍÈß (STANDBY)
11.Êíîïêà ÝÊÂÀËÀÉÇÅÐ (EQUALIZER)
3. Èíäèêàòîð ÐÅÆÈÌ ÎÆÈÄÀÍÈß (STANDBY)
12.Êíîïêà ÏÎÂÒÎÐ
4. Êíîïêà ÎÒÊÐÛÒÜ/ÇÀÊÐÛÒÜ Äèñêîïðèåìíèê
13.Êíîïêà ÏÀÌßÒÜ
5. Êíîïêà ÂÎÑÏÐÎÈÇÂÅÄÅÍÈÅ/ ÏÀÓÇÀ
14.Êîïêà ÍÀÉÒÈ
6. Êíîïêà ÑÒÎÏ (STOP)
15.Êíîïêà ÒÀÉÌÅÐ
7. Êíîïêà ÏÎÈÑÊ/ÍÀÑÒÐÎÉÊÀ-
16.Êíîïêà ÏÐÎÈÇÂÎËÜÍÎ
(SEARCH/TUNE -)
17.Ðàçúåì äëÿ ïîäêëþ÷åíèÿ íàóøíèêîâ
8. Êíîïêà ÏÎÈÑÊ/ÍÀÑÒÐÎÉÊÀ+
18. Êíîïêà ïîíèæåíèÿ ãðîìêîñòè
(SEARCH/TUNE +)
19.ÆÊ-äèñïëåé
18
ÐÓÑÑÊÈÉ
20. Êíîïêà óâåëè÷åíèÿ ãðîìêîñòè
Âèä ñâåðõó
21.Äâåðöà CD
28.Äâåðöà êàññåòû
Âèä ñçàäè
29.Êíîïêà ÏÅÐÅÌÎÒÊÀ ÍÀÇÀÄ (REVERSE)
22.Ðàçúåì Ëåâîé êîëîíêè
30.Êíîïêà ÂÎÑÏÐÎÈÇÂÅÄÅÍÈÅ (PLAY)
23.Ðàçúåì Ïðàâîé êîëîíêè
31.Êíîïêà ÇÀÏÈÑÜ (RECORD)
24.Øíóð ïèòàíèÿ
32.Êíîïêà ÏÅÐÅÌÎÒÊÀ ÂÏÅÐÅÄ (FORWARD)
25.FM Àíòåííà
33. / Êíîïêà ÑÒÎÏ/ÂÛÁÐÎÑ (STOP/EJECT)
26.Âûõîä Ñàáôóâåðà
34.Êíîïêà ÏÀÓÇÀ
N Âûáîð íàïðÿæåíèÿ (îïöèÿ)
Âèä ñíèçó
27.Êíîïêà ïåðåçàãðóçêè ñèñòåìû
ÏÓËÜÒ ÄÈÑÒÀÍÖÈÎÍÍÎÃÎ ÓÏÐÀÂËÅÍÈß
35.Êíîïêà ÔÓÍÊÖÈß (FUNCTION)
36.Êíîïêà
37.Êíîïêà ÏÎÈÑÊ / ÍÀÑÒÐÎÉÊÀ -
38.Êíîïêà ÏÎÈÑÊ / ÍÀÑÒÐÎÉÊÀ +
39.Êíîïêà ÃÐÎÌÊÎÑÒÜ +
40.Êíîïêà íàñòðîéêè ðàäèî
41.Êíîïêà ÃÐÎÌÊÎÑÒÜ -
42.Êíîïêà ÒÀÉÌÅÐ
43.Êíîïêà ÐÅÆÈÌ ÎÆÈÄÀÍÈß
44.Êíîïêà ÏÐÎÈÇÂÎËÜÍÎ
45.Êíîïêà ÏÐÎÃÐÀÌÌÀ
46.Êíîïêà ÈÍÒÐÎ
47.Êíîïêà ÏÐÅÄÂÀÐÈÒÅËÜÍÎ +
48.Êíîïêà ÏÐÅÄÂÀÐÈÒÅËÜÍÎ -
49.Êíîïêè Öèôðîâûå 1-9
50.Êíîïêà ÝÊÂÀËÀÉÇÅÐ
55.Êíîïêà ÍÀÉÒÈ / MOÍO / ÑÒÅÐÅÎ
51.Êíîïêà ÏÎÂÒÎÐ
56.Êíîïêà ÄÈÀÏÀÇÎÍ
52.Êíîïêà íàñòðîéêè ðàäèî
57.Êíîïêà ÍÅÒ ÇÂÓÊÀ
53.Êíîïêà
58.Èíôðàêðàñíûé ïåðåäàò÷èê
54.Êíîïêà
ÍÀÑÒÐÎÉÊÀ È ÑÎÅÄÈÍÅÍÈÅ
Çàìåíà áàòàðåè ïóëüòà äèñòàíöèîííîãî óïðàâëåíèÿ
1. Ïåðåâåðíèòå ïóëüò è âûäâèíüòå êðûøêó îòñåêà äëÿ áàòàðåè.
2. Óñòàíîâèòå îäíó ëèòèåâóþ áàòàðåþ òèïà "CR2025" ñîãëàñíî
ïîëÿðíîñòè èçîáðàæåííîé íà áàòàðåéíîì îòñåêå.
3. Çàêðîéòå êðûøêó îòñåêà äëÿ áàòàðåè.
ÌÅÐÛ ÏÐÅÄÎÑÒÎÐÎÆÍÎÑÒÈ
Ñëåäóéòå ýòèì ìåðàì ïðè èñïîëüçîâàíèè áàòàðåè â óñòðîéñòâå.
1. Èñïîëüçóéòå áàòàðåè òîëüêî óñòàíîâëåííîãî òèïà è ðàçìåðà
2. Óáåäèòåñü â ïðàâèëüíîñòè ïîëÿðíîñòè ïðè óñòàíîâêå áàòàðåè. Íåïðàâèëüíàÿ
ïîëÿðíîñòü ìîæåò ïðèâåñòè ê ïîëîìêå óñòðîéñòâà.
3. Åñëè óñòðîéñòâî íå èñïîëüóåòñÿ äîëãîå âðåìÿ, âûòàùèòå áàòàðåþ äëÿ ïðåäîòâðàùåíèÿ
ïîëîìêè â ñëó÷àå óòå÷êè áàòàðåè.
4. Íå ïûòàéòåñü çàðÿäèòü áàòàðåþ, îíà ìîæåò ïåðåãðåòüñÿ è âçîðâàòüñÿ (Ñëåäóéòå
èíñòðóêöèÿì ïðîèçâîäèòåëåé áàòàðåé).
19
- 1
- 2


