Vitek VT-3476: инструкция
Раздел: Бытовая, кухонная техника, электроника и оборудование
Тип: Магнитола
Характеристики, спецификации
Инструкция к Магнитоле Vitek VT-3476
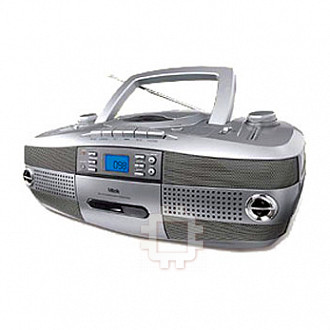
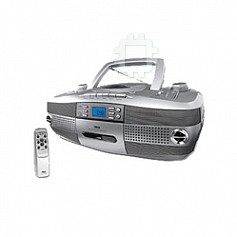
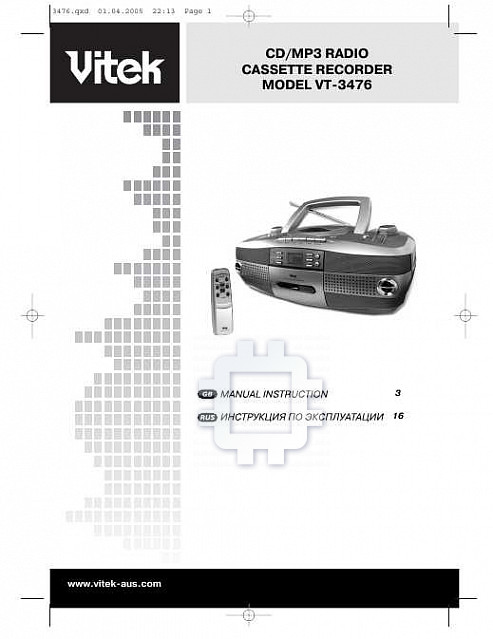
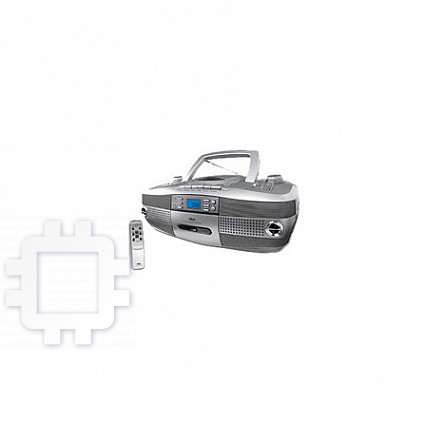
CD/MP3 RADIO
CASSETTE RECORDER
MODEL VT-3476
3
16
www.vitek-aus.com
3476.qxd 01.04.2005 22:13 Page 1
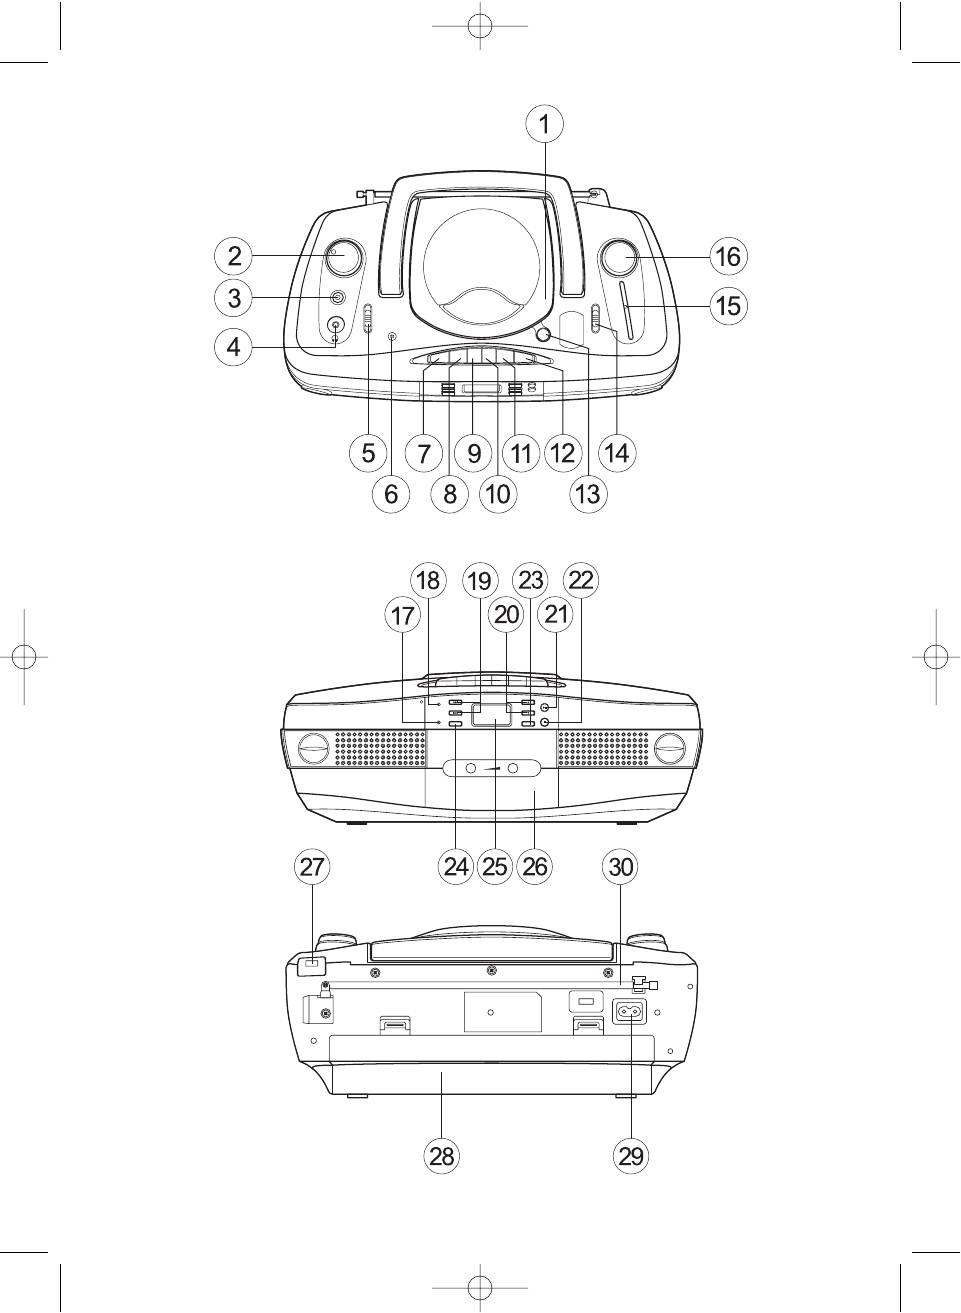
TOP
ÂÈÄ ÑÂÅÐÕÓ
FRONT
ÂÈÄ ÑÏÅÐÅÄÈ
REAR
ÂÈÄ ÑÇÀÄÈ
3476.qxd 01.04.2005 22:13 Page 2
ENGLISH
MP3 CD RADIO CASSETTE RECORDER
WARNING
MODEL VT-3476
SHOULD THIS DEVICE OPERATE INCOR-
RECTLY OR MALFUNCTION STOP USE
Please read these instructions carefully before
IMMEDIATELY.
using this product. After you have finished read-
Continuing use in the following circumstances
ing these instructions, store this device and the
may cause fire or electric shock. Switch off the
warranty in an easy to access place.
power to the device with the function switch,
unplug the power cord from the wall outlet and
IMPORTANT NOTES
bring the device to the point of purchase for
Save these instructions for future use.
repairs.
Do not install the device:
• Smoke, a strange odor or noise is emitted from
• In locations subjected to direct sunlight or near
the device. (Equipment malfunction)
electric heating devices.
Check that the smoke has stopped and bring
• On sound or video equipment that emit large
the device to the point of purchase for repairs.
amounts of heat.
Do not attempt to do the repairs yourself.
• In poorly ventilated or dusty rooms.
• Water gets into the device.
• In locations with constant vibrations.
• A foreign object gets into the device.
• In locations with a tendency for moisture.
• No sound can be heard. (Malfunction)
Make sure that the ventilation openings are not
• You drop the device or crack the case.
blocked by foreign objects.
Use the control buttons and remote control unit
• Do not disassemble.
according to the instructions. Before turning the
Do not disassemble or alter this device. Fire or
system on for the first time, make sure that the
electric shock may result. Ask the dealer where
power cord is connected according to these
you purchased the product to inspect, adjust or
instructions.
repair the interior of this device.
Store audiocassettes and compact discs in nor-
Do not place anything containing water on top of
mal conditions, avoiding excessive heat and
the device.
cold.
Water entering the device may result in fire or
electric shock.
For safety purposes, do not try to remove the
cover and reach into the device.
• Do not get the device wet.
Refer to an authorized service center for repair.
Avoid getting the device wet. Fire or electric-
There are no user-serviceable parts inside.
shock may result.
Do not use the device in or near the bath, near
In order to avoid the risk of electric shock, do
any water, or in the rain.
not place the device near sources of increased
humidity. Place the device in places with good
• Do not put foreign objects into the device.
ventilation.
Do not insert or force metal or flammable
objects into the vents, disc tray or cassette door.
DANGEROUS VOLTAGE
(Be especially watchful when children are
Dangerous voltage levels in the power cord may
around the device.) Fire or electric shock may
cause electrical shock.
result.
ATTENTION!
• Do not damage the power cord.
RISK OF ELECTRIC SHOCK
The power cord may be damaged if not used as
ATTENTION: IN ORDER TO AVOID
originally intended. Do not do any of the follow-
THE RISK OF ELECTRIC SHOCK,
ing.
DO NOT REMOVE THE LID OF REAR
Place heavy objects on top of the power cord.
PANEL OF THE SYSTEM.
Modify or extend the power cord.
Forcefully bend the power cord.
Attention
Twist or pull the power cord.
User instructions contain important information
Place the power cord near hot objects.
regarding the use and care of the device. Refer
If the power cord is damaged, replace it at
to these instructions if you have any questions
your local dealer. Continuing to use a dam-
regarding the use of the system.
aged power cord will result in fire or electric
Attention: to avoid sparks or short circuits, do not
shock.
place the device in locations where moisture
collects.
• Precautions when connecting the power
cord.
3
3476.qxd 01.04.2005 22:13 Page 3

ENGLISH
Always adhere to the below. Misuse of the
The batteries may rupture or leak fluid causing
power cord can cause it to heat up and cause a
fire, injury or damage.
fire.
• Do not use the device in the bath or shower.
• Securely connect the power cord to a wall out-
Do not use the device in highly humid places
let. Do not use the device when the power cord
such as the bath or shower. Fire or electric
is not securely connected.
shock may result.
• Do not use the power cord while it is wound.
• Do not use the power cord with other power
• Caution when unplugging the power cord.
cords in a multiple jack outlet.
Do not touch the power cord with wet hands.
• Regularly inspect the power cord prongs.
Electric shock may result.
Regularly remove the power cord from the outlet
Always hold the plug when unplugging the
and wipe any dust or dirt from the prongs.
power cord. Pulling the cord itself to unplug the
Accumulated dust can cause an electrical short
power cord may damage it and may also result
or overheating and a fire may result.
in fire or electric shock.
• Do not place the device flush against the
• Caution in placing the device.
wall.
Do not place the device in a humid or dusty
Always place the device at least 10 cm (4 in.)
environment, or in a place where smoke or
away from a wall. Additionally, leave some space
steam can enter the device. Fire or electric
between the device and other devices. When
shock may result.
placing the device on a shelf, leave a gap of at
Do not leave the device in a car with the win-
least 10 cm (4 in.) away from the wall or the ceil-
dows shut, in direct sunlight or in a place of high
ing. If there is no gap, the interior of the device
humidity. Fire or malfunction may result.
will overheat and may result in a fire.
• Do not place the device in an unsteady
• Do not look at the laser light.
place.
Looking directly into a laser may result in eye
Do not place the device in an unsteady place or
damage
on a high shelf. The device may fall and cause
injury.
• Do not obstruct the vents.
Do not place heavy objects on the device.
If you obstruct the vents, the device may over-
The object may topple over causing injury.
heat and may result in a fire. There are vents on
the back and bottom of the device. Avoid the
• Cautions when carrying the device.
following.
Remove the disc. Turn off the power, unplug the
Place the device facing upwards, on its side or
power cord from the outlet, and check that there
upside down.
are no external connections before carrying.
Place the device in an area with poor air circula-
Damaging the cord may result in fire or electric
tion such as in a closet or box.
shock.
Place a table cloth, rug or blanket over the
Fold down the rod antenna. Leaving the antenna
device.
extended while carrying may cause it to scratch
or hit someone causing injury.
• Use in thunderstorm conditions.
Do not put your hand in the disc or cassette
When using the device outside, fold down the
entry port.
antenna and move to a safe location. A lighten-
You may injure yourself. (Be especially watchful
ing strike may occur otherwise.
when children are around the machine.)
• Do not use at any voltage other than 110-
• Do not use deformed or cracked discs.
127V or 220-240 V.
Do not use any deformed or cracked discs, or
Do not use this device at any voltage other than
discs repaired with glue. Discs spin at high
the voltage displayed (110-127 V or 220-240 V).
speed inside the device.
Fire or electric shock may result.
Disc fragmentation may cause injury.
Additionally do not use discs with glue remaining
• Do not attempt to charge the batteries.
on them from cellophane tape or rental CD
The batteries may rupture or leak fluid causing
labels.
fire, injury or damage.
• Do not use different type of batteries together,
• Caution with headphone volume.
such as alkaline batteries and manganese dry
Avoid raising the volume too much. Listening to
batteries, or old and new batteries together.
loud sounds for extended periods of time can
damage your hearing.
4
3476.qxd 01.04.2005 22:13 Page 4
ENGLISH
Do not hold a credit card close to the speakers.
7. PAUSE button ( II )
The speakers produce a strong magnetic field.
8. STOP/EJECT button (/)
Do not place clocks, credit cards, magnetic
9. F.F button ()
commuting passes, cassette tapes and video
10.REW button ()
tapes near the speakers. The data on such
11.PLAY button ()
media may be lost.
12.RECORD button ()
13.OPEN button
CAUTION
14.BAND switch
• Cautions in maintenance after not using the
15.BAND/FREQUENCY display
device for a long time.
16.TUNER dial
To be safe unplug the power cord from the wall
outlet.
FRONT
• Cleaning the interior of the device.
17.FM STEREO lamp
Inquire to your local dealer regarding cleaning
18.POWER lamp
the interior of the device. When you allow dust to
19.SEARCH/SKIP buttons (/)
collect in the interior of the device for a long
20.FOLDER buttons (/)
time, fire or malfunction may result.
21.PLAY/PAUSE buttons (/II)
• Precautions for battery use.
22.STOP button ()
If you misuse the batteries they may rupture or
23.REPEAT button
leak fluid causing fire, injury or damage. Adhere
24.PROGRAM button
to the following.
25.Display
Do not use any battery size other than D-size.
26.Cassette door
Insert the batteries in the correct direction
• The display screen use here is for example pur-
according to the diagram on the device.
poses only and may differ from the actual dis-
• Do not use different types of batteries.
play screen.
Do not use old and new batteries in the device at
the same time.
REAR
Do not attempt to charge, heat or disassemble
27. BEAT CANCEL switch (1/2, FM ST/MONO)
the batteries. Do not place the batteries in fire or
28. Battery cover
water. Do not short circuit the battery.
29. AC power input terminal (AC INPUT)
Remove the batteries when not using the device
30. Rod antenna
for one month or longer.
If any fluid leaks from the batteries into the case,
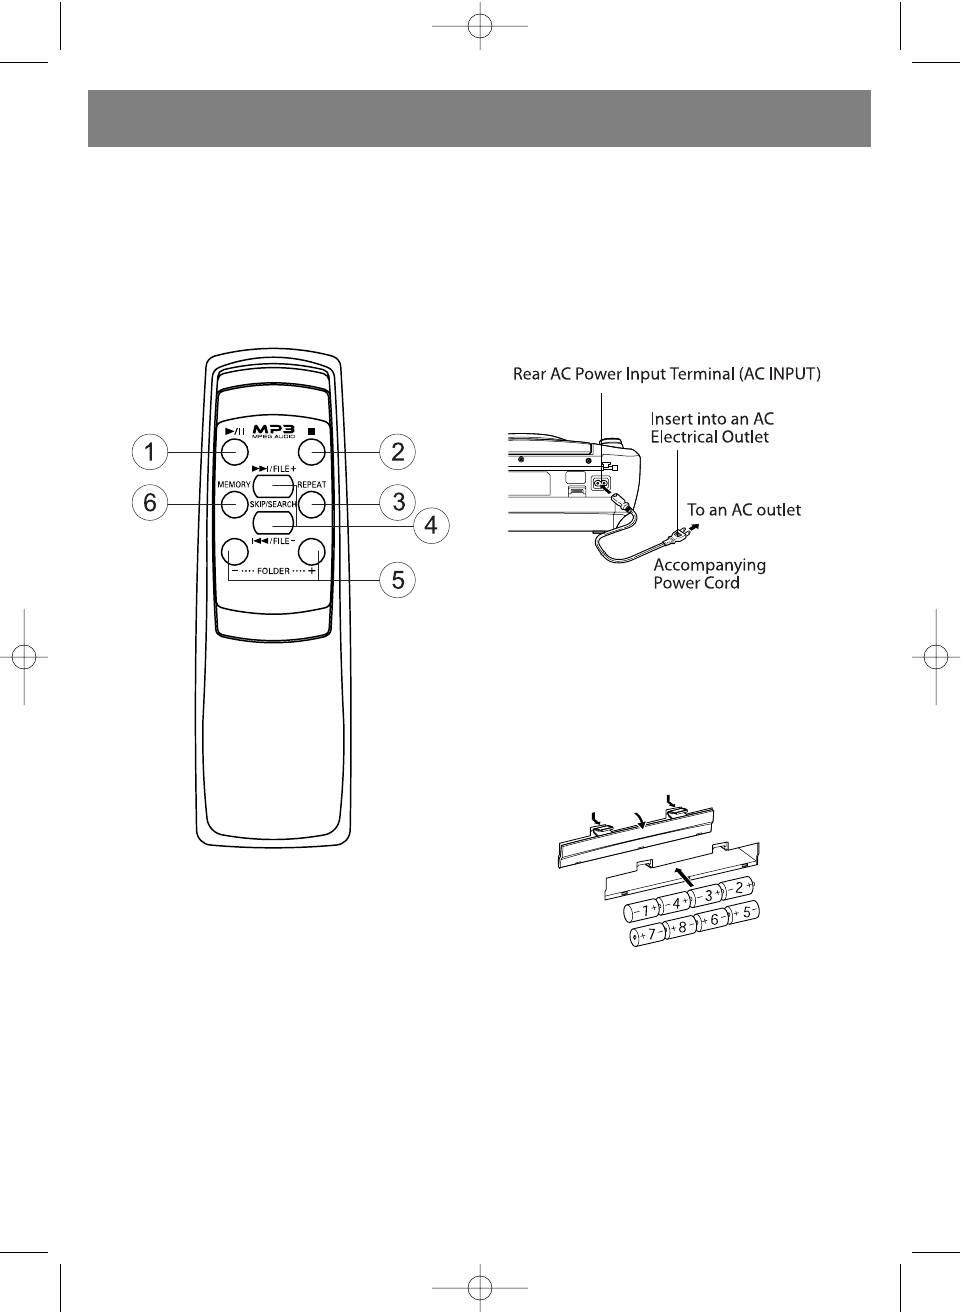
REMOTE CONTROL UNIT
wipe clean before inserting new batteries.
Should you get any fluid on your skin, wash
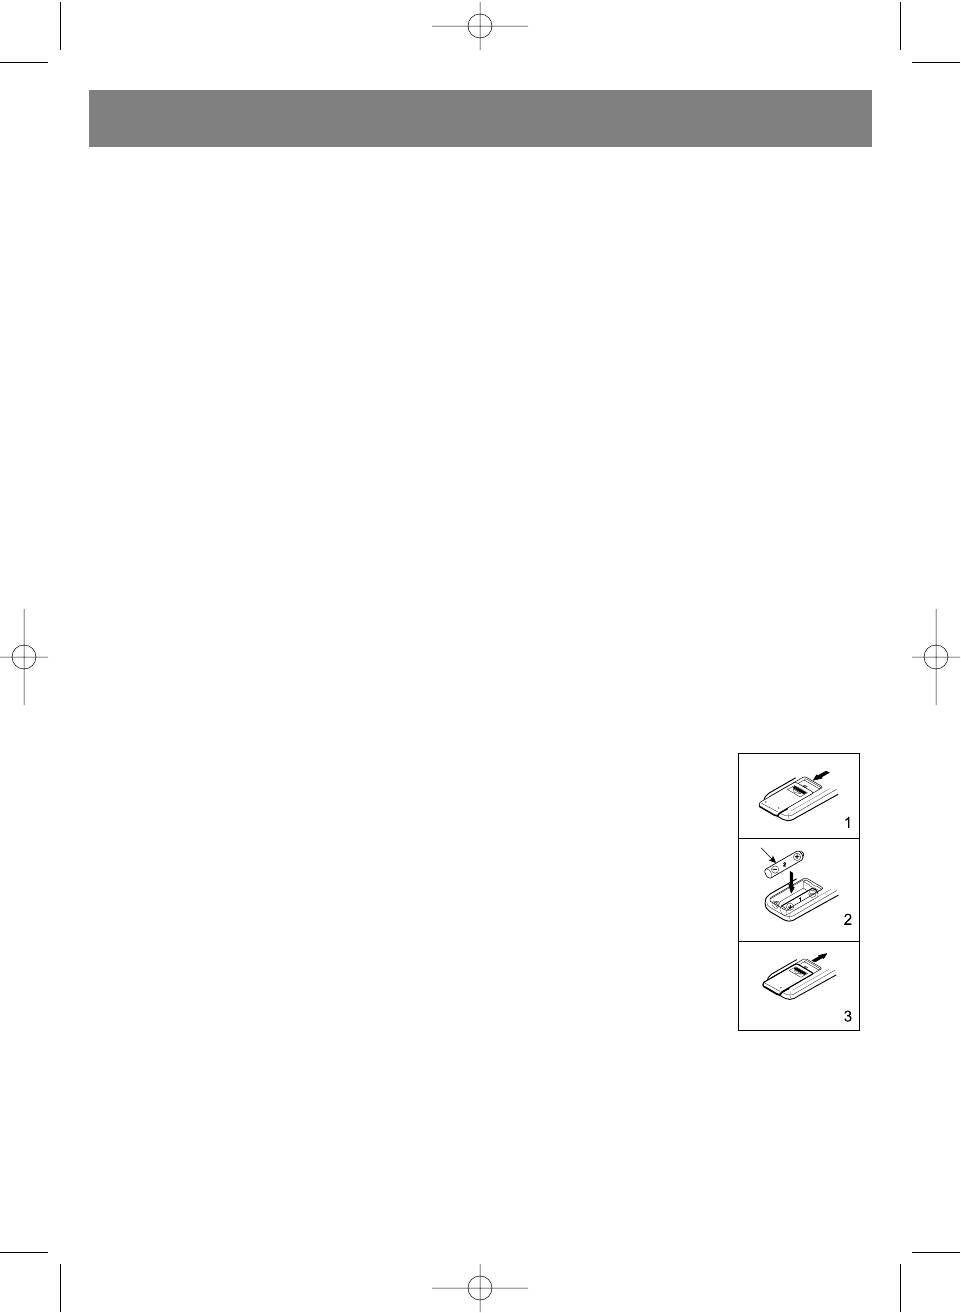
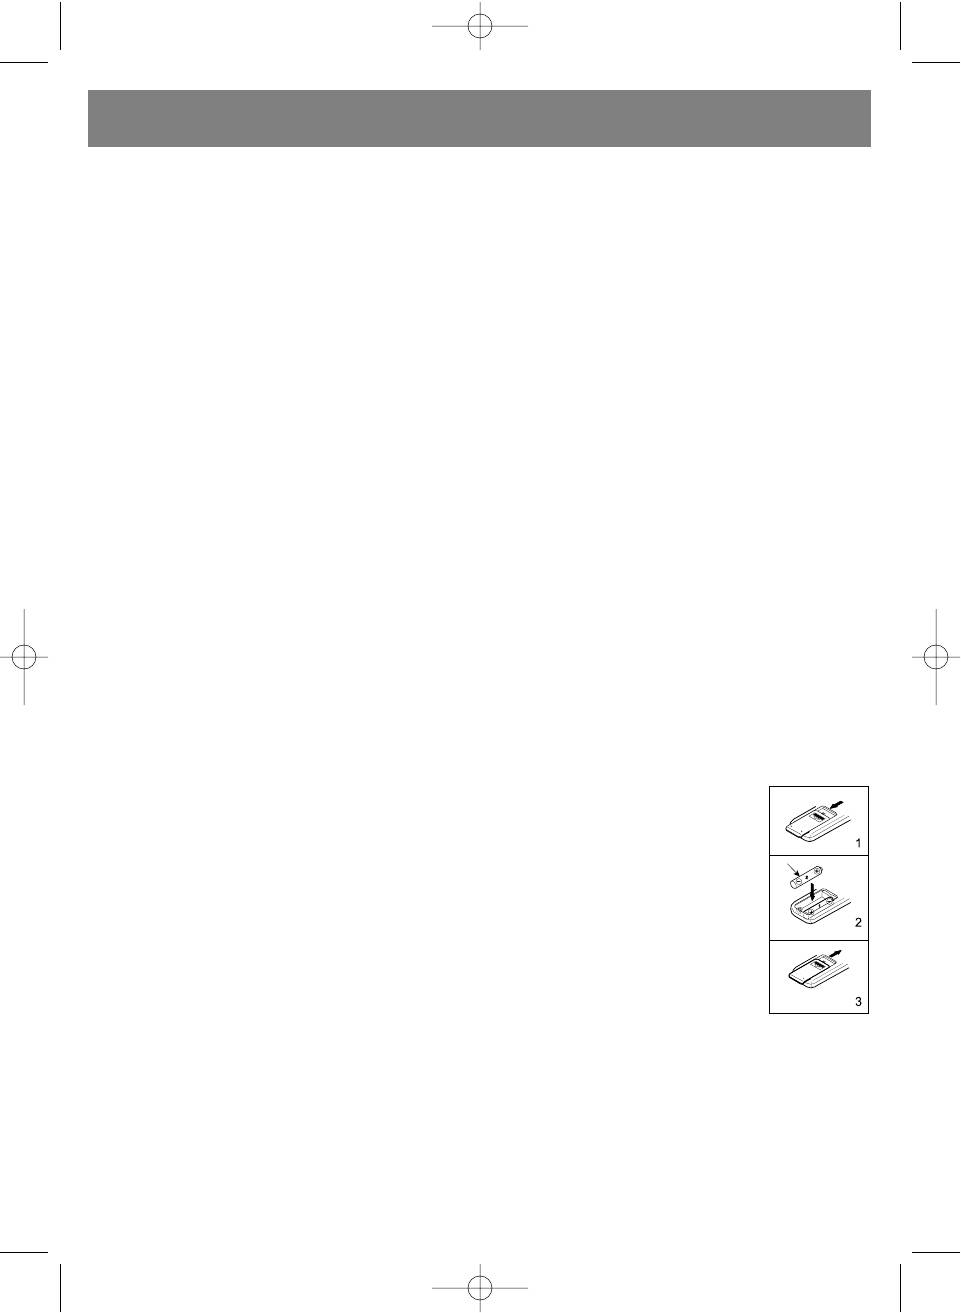
PREPARATION BEFORE USE
thoroughly with water.
• Installing batteries in the
remote control unit
Always Check!
1. Remove the battery cover
When recording or playing something important,
from the back of the remote
always check that you can record and play prop-
control unit.
erly before you start Copyright Issues
2. Insert two Ò R03 (UM-4)/AAA
Songs, lyrics and tunes broadcast, on CD,
(24F)Ó size batteries (not
records or other media (cassette tapes, karaoke
supplied).
tapes) are protected under copyright laws.
• Insert the batteries with the
Therefore, when selling, distributing, giving or
and terminals matching the
loaning to another, or using for the purpose of
indication inside the battery
sales (background music in a store) a tape you
compartment. Insert the
have recorded, the consent of the copyright
ends first.
holder must first be received.
3. Replace the cover.
DEVICE DIAGRAM
• Battery replacement
When the remote control operation becomes
TOP
unstable or the distance from which remote
1. CD door Push Close
control is possible becomes shorter, replace the
2. VOLUME dial
batteries with new ones.
3. BASS switch
4. Phones jack
• Using the remote control unit
5. FUNCTION switch
To use the remote control unit, point it at the
6. Internal Microphone
REMOTE sensor and press the buttons gently
5
3476.qxd 01.04.2005 22:13 Page 5
ENGLISH
and firmly. Remote control operation is possible
Caution
within about 7 m. However, since the remote
1. Use only the power cord provided with this unit
control range is less when the unit is used at an
to avoid malfunction or damage to the device.
angle, use directly in front of the REMOTE sen-
Remove the batteries from the device when
sor section, as far much possible.
using the power cord.
Do not expose the REMOTE sensor section to
2. When not using the device for a long period of
strong light (direct sunlight or artificial lighting)
time or when you take the device outside,
and make sure that there are no obstacles
remove the power cord.
between the REMOTE sensor section and the
3. When unplugging or plugging in the power cord
remote control unit.
move the function switch to the TAPE/OFF posi-
tion.
BATTERIES
• Open the battery cover and insert 8 D-size bat-
teries in the direction shown in the illustration
while making sure the poles are pointing in the
right direction.
• When the power cord is inserted into the AC
INPUT terminal, the batteries no longer supply
the power.
1. Play/Pause button (/)
2. Stop button ()
3. Repeat button (REPEAT)
4. Skip/Search/MP3 CD's file select buttons
(/FILE+, /FILE -)
5. MP3 CD's folder select buttons ( FOLDER )
Caution
6. Memory button (MEMORY)
1. When not using the device for one month or
longer, or when using an AC power source,
POWER SUPPLY AND CONNECTION
remove the batteries.
2. You can tell when battery power is low when the
POWER SUPPLY
following occur;
This MP3 CD Radio Cassette Recorder operates
• the sound lowers in volume or fluctuates,
from an AC power source or batteries.
• the tape speed slows,
AC POWER
• the radio can be used, but discs and tapes do
Insert one end of the accompanying power cord
not work properly.
into the AC power input terminal (AC INPUT) on
3. Using batteries intermittently extends their life.
the rear of this device and the other end into an
4. When recording something important or playing
AC power outlet.
an important disc it is recommended that you
6
3476.qxd 01.04.2005 22:13 Page 6
ENGLISH
replace the old batteries with fresh batteries or
PLAYABLE DISCS
use an AC power source.
This device can play the discs below. (Music
• Antenna
CDs, CD-Rs/CD-RWs created in music CD for-
Because the AM antenna is inside the device,
mat, or CD-Rs/CD-RWs recorded with data in
you can adjust the AM reception by positioning
MP3 format.)
the device itself. You can adjust FM reception by
extending and rotating the rod antenna on the
Important!
rear of the device.
Depending on the software used to make the
MP3 format data (encoding software), static
GENERAL CONTROLS
may be heard, some sounds may not be heard
and the data may not play correctly. For infor-
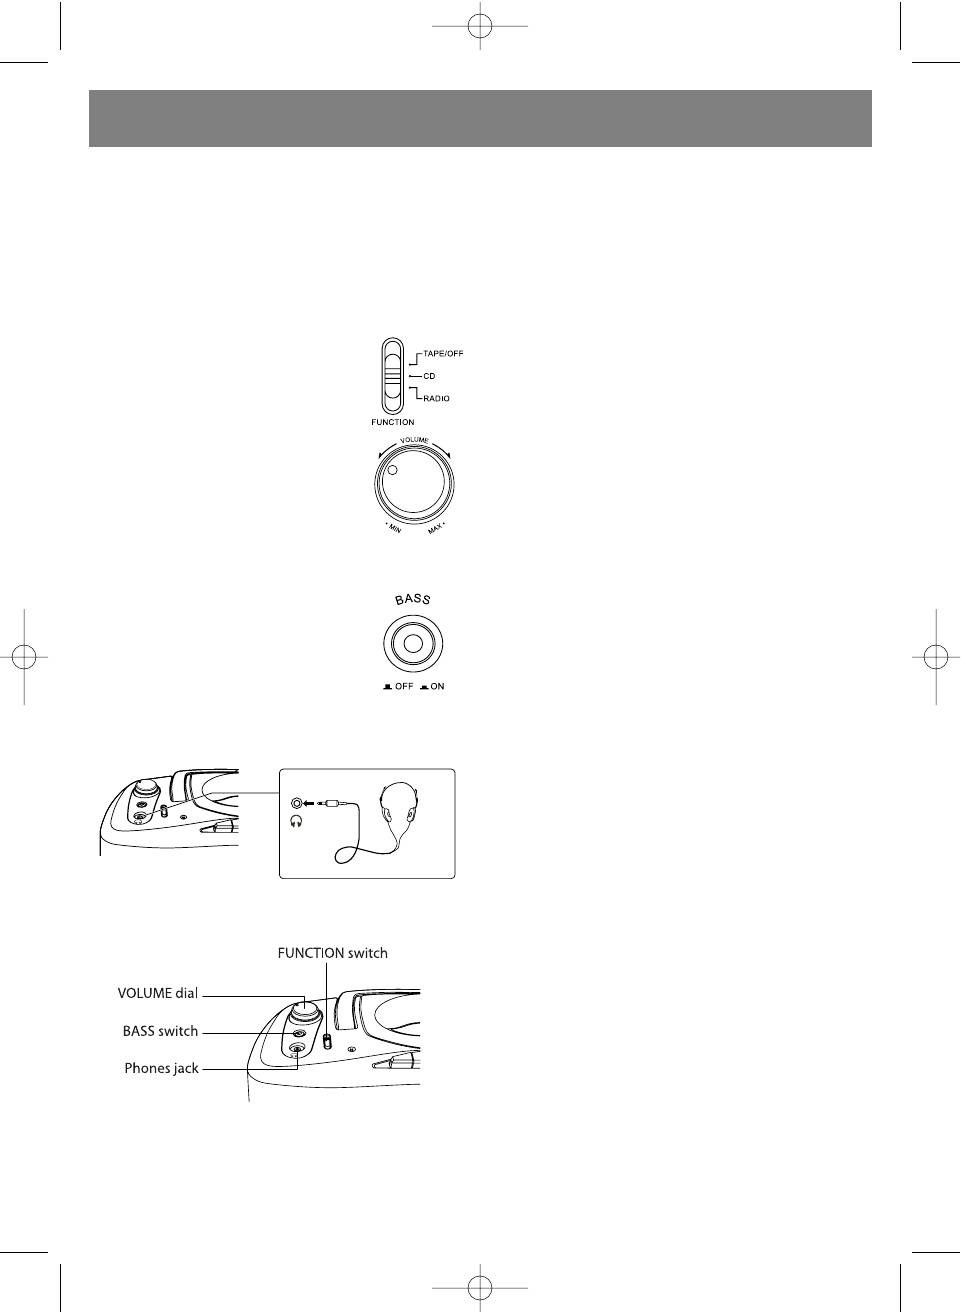
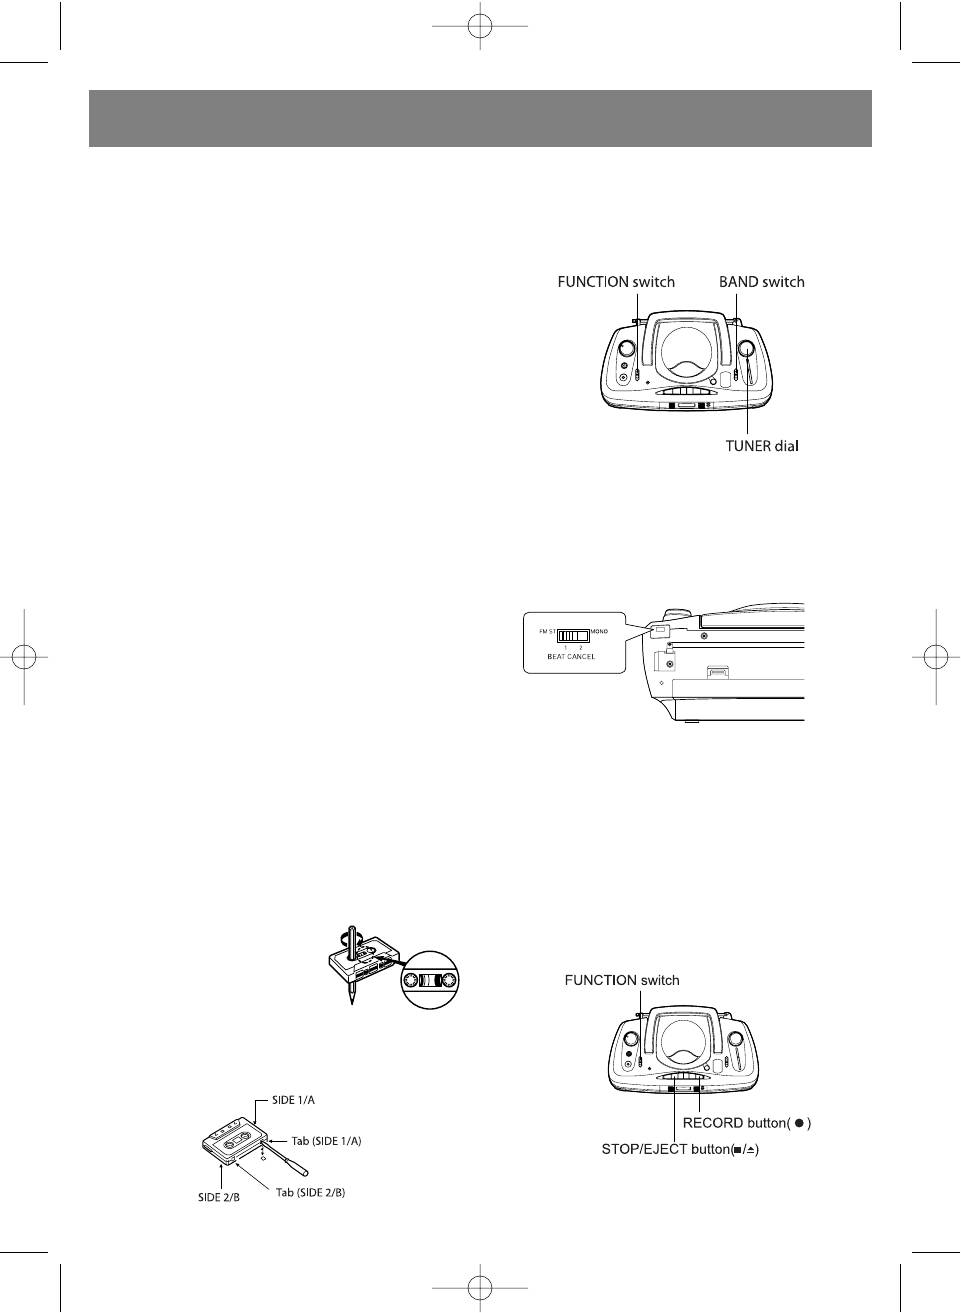
FUNCTION SWITCH
mation on how to make data or on how to use
Move the function switch to the
the computer see the encoding software
position of the function you want
instruction manual.
to use
Only MP3 format data can be played on CD-
R/CD- RWs (computer data CDs).
VOLUME
Only the MP3 format data of the first session of
Turn the volume dial to adjust the
a CD recorded in multi-session can be played.
volume.
(Windows Media Audio; files with .WMA or .wma
cannot be played.)
POWER OFF
A CD-R/CD-RW or HFS format CD-R/CD-RW
Turn the power off to the device
recordec with Packet Lite cannot be played.
by moving the function switch to TAPE/OFF
while no cassette tape buttons are pressed.
• Important points when creating a CD-R/CD-RW
to play on this device
BASS SWITCH
When recording data to a CD-R/CD-RW, the
Press to increase the bass.
software you use to record will require various
Press again to make the sound
settings. To play music (sound) on this device
normal.
select the recording methods that matches the
below settings.
HEADPHONES
CD Format
Connect stereo headphones (not supplied) with
Music CD, Computer Data CD (ISO9660 level 1
a mini-plug to the phones jack on the top of the
or level 2, Joliet)
device.
Recording Method
Single Session (All at once), Multi-Session (Only
first session playable)
Format of Music Data to be Recorded Music
CD:
16-bit/44.1 kHz/Stereo PCM Source
Computer Data CD:
MP3 Format (MPEG 1 layer 3 files with .MP3 or
.mp3., 32-320 kbps bit rate and 32 kHz and 44.1
Note: When the headphones are connected
kHz sampling frequencies)
sound no longer comes from the speaker.
• Number of Displayable Folders: 256
• Number of Displayable Files: 255
Important!
• A CD not placed correctly may be damaged or a
malfunction may occur.
• Placing a CD in upside down will cause [- - -] to
display, and the CD will not be playable.
• Do not touch the play side.
• If the CD is damaged or there are fingerprints or
dust on the surface it may not play.
• Do not stick paper or tape to the play side or the
label side.
Caution
CD-R/CD-RW
When you move the function switch, a faint pop-
Though you can play CD-R/CD-RW discs
ping sound can be heard. This is not a defect.
recorded with music, the discs may not be
playable depending on the content that was
7
3476.qxd 01.04.2005 22:13 Page 7
ENGLISH
recorded or the environment that it was record-
ed in.
Do not insert a blank CD-R/CD-RW disc.
Reading the disc will take time and removing the
disc while it is still spinning may cause damage
to it.
CDs with the mark "SUPER-AUDIO CDs" are not
playable.
• CDs with an imbedded copy control function
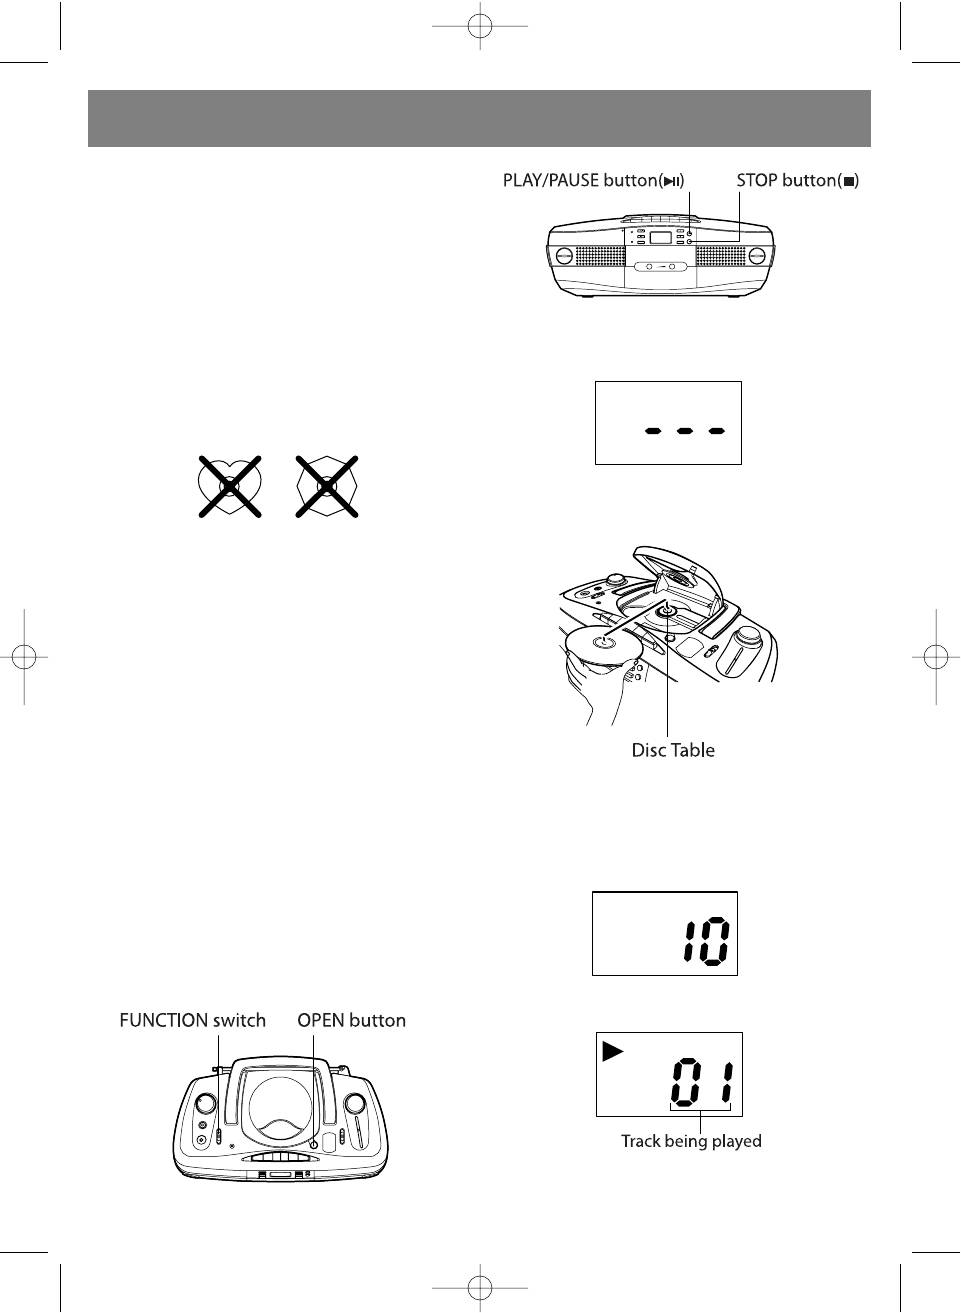
1. Move the FUNCTION switch to CD.
may not be playable.
When no disc is loaded [- - -] appears on the
• DVDs, VCDs (video CDs), photo CDs are not
display panel.
playable.
• WMA format discs are not playable.
• Do not use heart-shaped, octagonal-shaped or
other irregularly shaped CDs. The device may
malfunction.
If a CD is loaded the number of tracks on the CD
Is displayed.
2. Loading a CD.
• Cracked or deformed discs, or discs repaired
with glue or tape are dangerous and should not
be used.
STORING THE DISC
• Always store a disc in its proper case.
• Store out of direct sunlight and away from any
warm place such as near a heater.
DISC MAINTENANCE
Before playing a disc, remove any dust, dirt or
fingerprints from the play side by wiping from
the center outwards with a soft cloth. o Do not
use thinner, benzene, record cleaning agent or
static electricity suppressing agent when clean-
• Press the OPEN button to open the CD door.
ing the disc.
• Place the CD so the label faces Is up.
• You cannot load more than one CD at a time.
Cautions on Condensation
3. Close the CD door. o Press the CD door until
Should the ambient temperature change sud-
you hear It click shut.
denly, condensation (water droplets) may form
The number of tracks on the CD is displayed.
on the internal optic lens. You may not be able to
play a disc normally in this condition. If this
occurs, remove the disc, and allow the device to
sit unused for approximately one hour, then try
again.
LISTENING TO CDS
4. Press the PLAY/PAUSE button (/II). The CD
plays starting from track 1.
• When the last track is finished the CD automati-
cally stops.
8
3476.qxd 01.04.2005 22:13 Page 8

ENGLISH
Stopping the CD
ton () once while the CD is stopped.
Press the STOP button () while the CD is play-
ing.
REPEAT
Removing the CD
This repeats one or all tracks on the CD. This
Press the STOP button () and then press the
can also repeat play the tracks you have pro-
OPEN button.
grammed. Press the REPEAT button to change
Caution
the indicator light from REP to and then off.
• Do not press the OPEN button while the CD is
Repeat only 1 track
playing. The CD could be damaged.
Press the REPEAT button to display REP.
• To remove the CD, confirm that it has stopped
Repeat all tracks
spinning and press the OPEN button.
Press the REPEAT button to display .
Repeat programmed tracks
After you have finished programming the tracks
you want, press the REPEAT button to display.
To stop repeat
Press the REPEAT button until REP or have
turned off.
Caution
• Opening the CD door while the CD is piaying can
cause damage to the CD. Do not open the CD
door while a disc is playing.
• To remove the CD, confirm that it has stopped
spinning and press the OPEN button.
• Opening the CD door while repeat is set (REP or
is displayed) will cause the repeat function
Pausing during play
to stop.
Press the PLAY/PAUSE button () while the CD
is playing.
LISTENING TO MP3S
You can use this device to play MP3 format data
recorded on computer data discs.
Additionally, the folder names and files name are
not displayed on this device. Instead, folder
numbers and track numbers are displayed.
When you have saved MP3 format data into
• Press the button again to resume playing the
some folders, the data will play in the below
CD.
Searching for a song
Press the SKIP/SEARCH buttons (or) while
the CD is stopped until the track that you want to
hear is displayed, then press the PLAY/PAUSE
button (/ ).
You can play all tracks starting from that track.
FAST FORWARDING, REWINDING
Hold down the SKIP/SEARCH buttons (or)
during play to find the part of the song that you
want to hear. When you have reach it, release
the button.
PLAYING THE START OF A TRACK
You can play the start of a track while the CD is
stopped or playing.
Go to the start of the next track
Press the SKIP/SEARCH button ( ) once.
Return to the start of the track playing
Press the SKIP/SEARCH button () once.
Return to the start of the previous track
Press the SKIP/SEARCH button () twice while
the CD is playing. Press the SKIP/SEARCH but-
9
3476.qxd 01.04.2005 22:13 Page 9
ENGLISH
order.
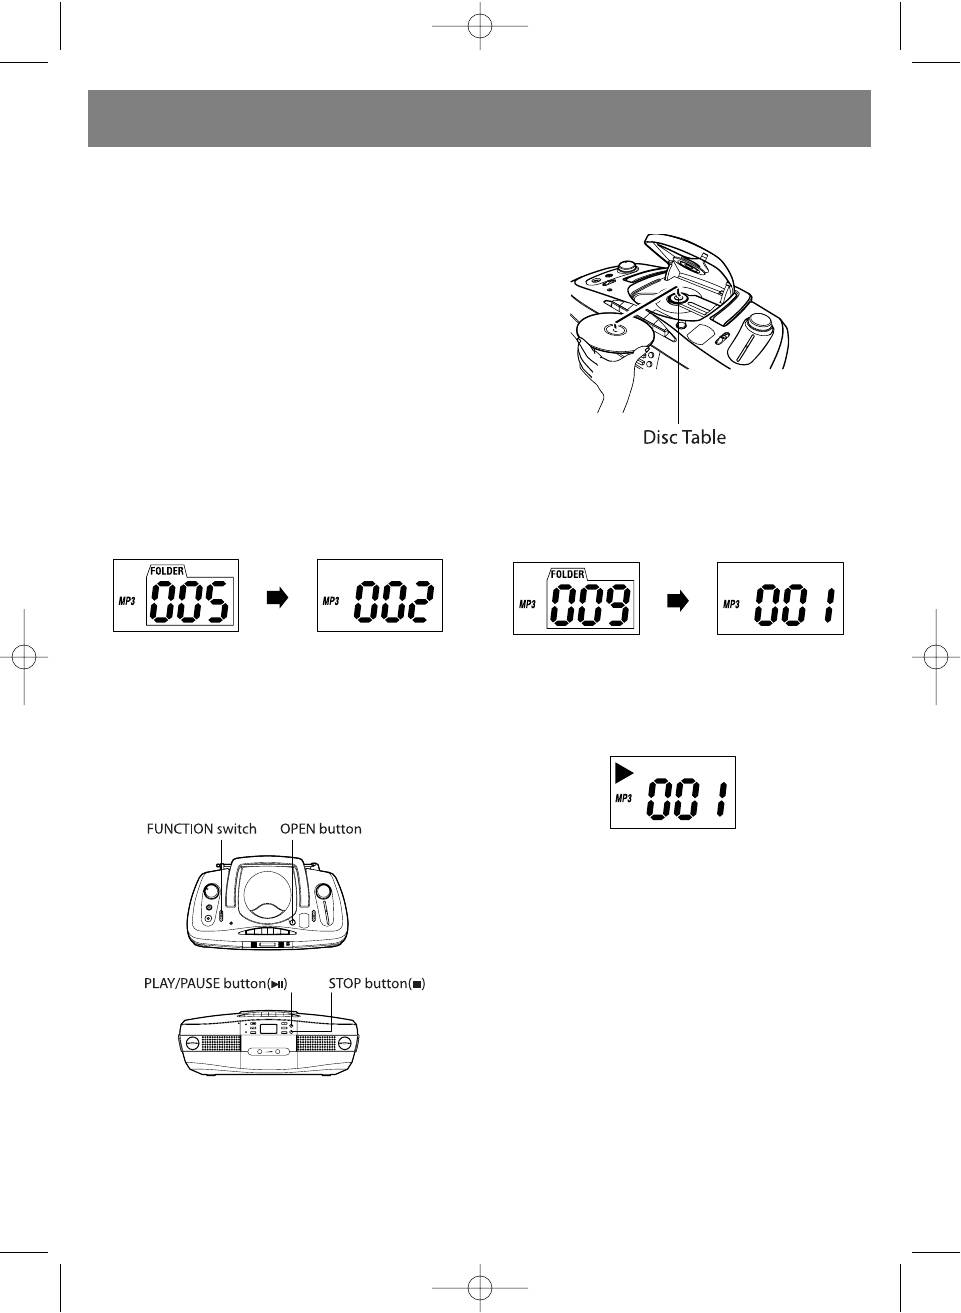
2. Loading a disc.
• Plays starting from session 1.
Press the OPEN button to open the CD door.
• Only session 1 is played from multi-session
• Place the disc so the label faces up.
recording.
• Only MP3 format data on a computer data CD is
displayed as a track.
Caution
• Although this device will play MP3 format data
within the range of 32-320 kbps bit rate and 32
kHz and 44.1 kHz sampling frequencies, we rec-
ommend 128 kbps or more at 44.1 kHz.
VIEWING FOLDERS
The folder number displayed represents the
entire disc as folder number 1. With CDs as illus-
trated above, A.mp3, B.mp3, C.mp3 are all fold-
er number 1. The folders created when record-
• You cannot load more than one disc at a time.
ing to the CD will appear as folders 2 and below.
3. Close the CD door.
Therefore, A.mp3, B.mp3 and C.mp3 are not in
• Press the CD door until you hear it click shut.
folders and are not playable. Ex.: K.mp3 is dis-
The number of folders on the MP3 disc is dis-
played as below.
played.
Folder number 5 is indicated.
Important!
When you select a folder, the number of tracks in
It takes time to display the number if a disc con-
the folder is displayed. To display K.mp3, select
tains a large volume of data (many tracks).
track 2.
4. Press the PLAY/PAUSE button (/II ). The disc
plays starting from track 1 in the first folder.
Caution
• The folder number may not be displayed cor-
rectly depending on the MP3 software or the
operating environment.
• When the last track is finished the disc automat-
ically stops.
STOPPING THE DISC
Press the STOP button () while the disc is
playing.
REMOVING THE DISC
Press the STOP button () and then press the
OPEN button.
Caution
• Do not press the OPEN button while the disc is
playing. The disc could be damaged.
• To remove the disc, confirm that it has stopped
1. Move the FUNCTION switch to CD.
spinning and press the OPEN button.
The display illuminates.
When no disc is loaded [- - -] appears on the
display panel.
If a disc is loaded the number of folders on the
MP3 disc is displayed.
10
3476.qxd 01.04.2005 22:13 Page 10
ENGLISH
Searching for a song
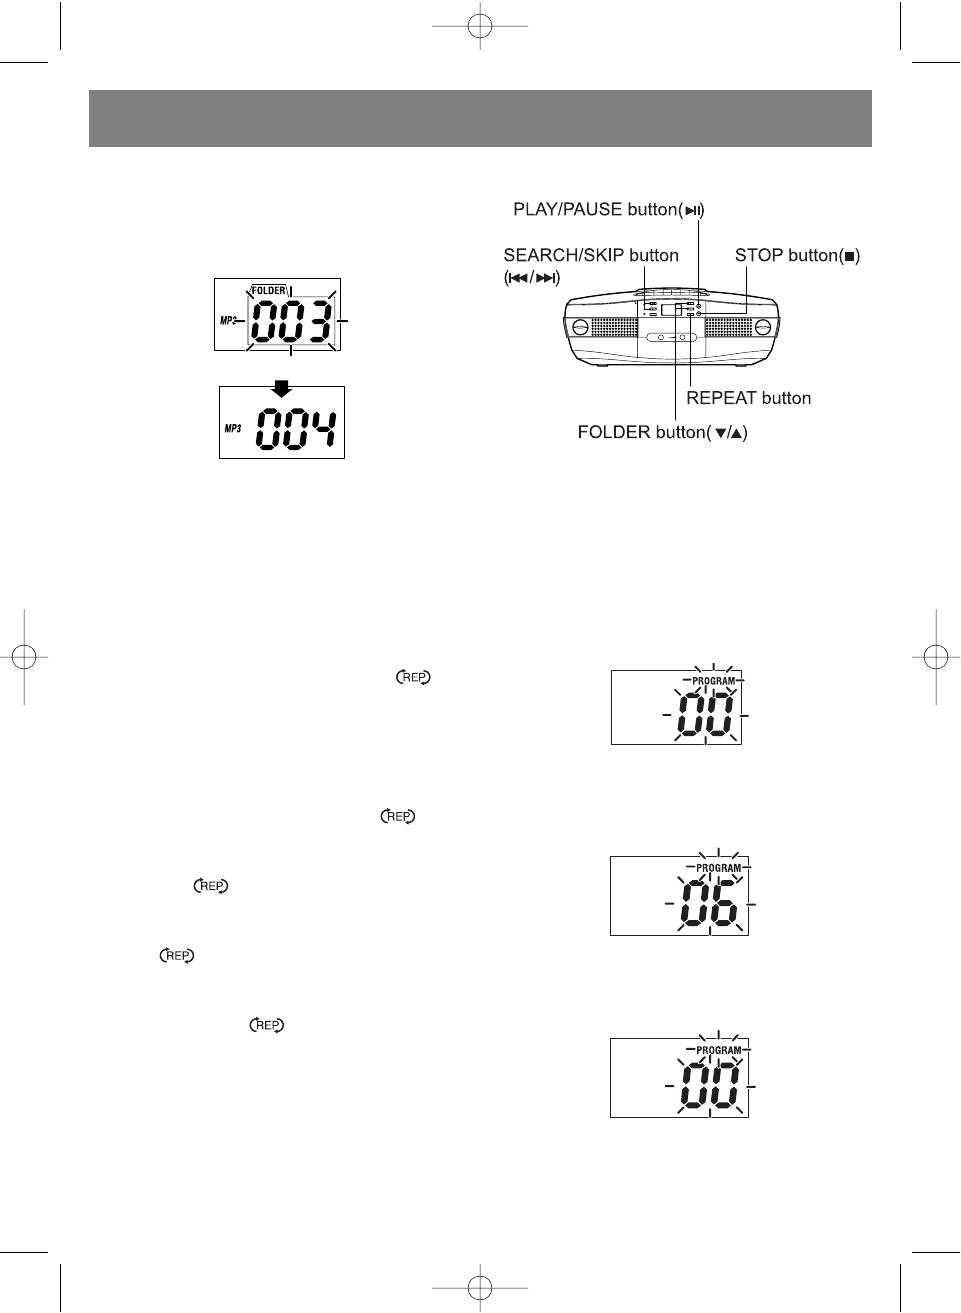
PROGRAM PLAY
1. Press the FOLDER buttons (or) and select
the folder you want.
The folder number will flash for two seconds and
then the number of tracks in the folder will be
displayed.
You can select up to 20 of your favorite tracks to
2. Press the SKIP/SEARCH buttons ( or) until
play in the order you want.
the track number that you want to hear is dis-
played, then press the PLAY/PAUSE button
Important!
(/).
• If a disc is not loaded, load a disc and close the
• You can only select tracks within a folder with the
CD door.
SKIP/SEARCH buttons ( or ).
• Press the STOP () button when the disc is
being played
REPEAT DURING PLAY
This repeats one or all MP3s on the disc. This
1. Press the PROGRAM button. PROGRAM and 00
can also repeat play all the tracks in a folder.
are displayed.
Press the REPEAT button to change the indica-
tor light from REP to REP + FOLDER to and
then off.
Repeat only 1 track
Press the REPEAT button to display REP.
Repeat tracks in a selected folder
Press the REPEAT button to display REP +
• When a program you set before is still stored,
FOLDER.
the first track of that program is displayed
Repeat all tracks
2 Press the SKIP/SEARCH button () repeatedly
Press the REPEAT button to display
until you select track 6.
Repeat programmed tracks
After you have finished programming the tracks
you want (see p. 18), press the REPEAT button
to display
To stop repeat
Press the REPEAT button until REP, REP+ FOLD-
ER or have turned off.
• With discs containing MP3s, press the FOLDER
buttons (or) to select the folder you want
Caution
and then select the track you want.
• Opening the CD door while repeat is set ( REP,
3. Press the PROGRAM button.
REP + FOLDER or is displayed) will cause
the repeat function to stop.
Important!
Depending on its file structure:
• During playing MP3, moving to the former track
is not allowed.
• Fast forward and reverse speeds for MP3
become slower than that of the normal music
CDs.
11
3476.qxd 01.04.2005 22:13 Page 11

ENGLISH
4. Press the SKIP/SEARCH button () repeatedly
display the track you want.
until you select track 2.
3. Press the PROGRAM button.
ADD A TRACK TO THE END OF PROGRAM
1. Press the PROGRAM button repeatedly to dis-
play 00.
5. Press the PROGRAM button.
• After you have programmed 20 tracks, [- -] or
[- - -] will display as the track, and you will not
be able to add any more tracks.
2. Press the SKIP/SEARCH button ( ) repeatedly,
to display the track you want.
3. Press the PROGRAM button.
• After you have programmed 20 tracks, [- -] or
[- - -] will display as the track, and you will not
be able to add any more tracks.
6. Press the PLAY/PAUSE button (/).
The program plays.
DELETE A STORED PROGRAM
Press the PROGRAM button while stopped and
press the STOP button ().
CAUTION: If you open the CD door any stored
program is deleted.
LISTENING TO TAPES
PLAY THE SAME PROGRAM
Press the PROGRAM button while stopped, then
press the PLAY/PAUSE button (/).
1. Move the FUNCTION switch to TAPE/OFF/
When you press the PROGRAM button while
2. Press the STOP/EJECT button () to open the
stopped, the number of the first track in the
cassette tape holder and insert a tape.
stored program flashes.
DISPLAY THE PROGRAM
Press the PROGRAM button while stopped.
Each time you press this button the tracks of the
program display in order.
CHANGING THE PROGRAM
1. Display the program you want to change.
3. Close the cassette tape holder. Close it until you
2. Press the SKIP/SEARCH button ( ) repeatedly, to
hear it click shut.
12
3476.qxd 01.04.2005 22:13 Page 12
ENGLISH
4. Press the PLAY button (). The tape starts to
If you mistakenly remove a tab and you would
play
like to record on the tape, cover the remaining
hole with cellophane tape.
Important!
When the tape runs to the end during playing or
LISTENING TO THE RADIO
recording, any depressed button pops up and
the tape stops.
STOP THE TAPE
Press the STOP/EJECT button (/).
• To remove the tape press the STOP/EJECT but-
ton (/) once more.
PAUSE
Press the PAUSE button (II) during playing or
recording.
• Press this button again to resume playing or
recording.
1. Move the FUNCTION switch to RADIO.
2. Move the BAND switch to AM or FM.
FAST FORWARD, REWIND
3. Turn the TUNER dial until you arrive at the sta-
Press the FF button () or the REW button ()
tion you want to hear.
while stopped.
FM: 88-108 MHz AM: 530-1600kHz
• When you have arrived at the place you want,
press the PLAY button ().
FM STEREO RECEPTION
Important!
• When the tape runs to the end during fast for-
ward or rewind, any depressed button pops up
and the tape stops.
• This device does not have the song search func-
tion (cue/review) in fast forward and rewind.
Cassette Tapes
Use only normal type tapes (type 1). Do not use
You can use the BEAT CANCEL switch on the
high position tapes (type 2) or metal tapes (type
rear of the device to switch between stereo [FM
4).
ST] and mono [MONO]. When the switch is posi-
• Do not use endless tapes.
tioned on FM ST you will automatically hear the
• Tapes 100 minutes or longer are very thin and
station in stereo when broadcast in stereo.
stretch easily. The tape can get tangled in the
• When the broadcast is in stereo the FM STEREO
machine. Do not use these tapes.
lamp will illuminate.
• You cannot record on the leader tape portion of
• When the reception is poor, switch to MONO to
the tape (the translucent portion). Move forward
hear the broadcast more clearly.
past this portion when recording.
• This device does not support AM stereo broad-
• When the tape becomes
casts.
loose, use a pencil to take
up the excess slack.
RECORDING
• Do not store tapes in the fol-
lowing locations: In dusty
areas Exposed to magnets
High temperature or high humidity areas
Prevent tape erasure
Use a screw driver to remove the tabs on the top
of the tape to prevent accidental tape erasure.
1. Press the STOP/EJECT button (/) to open
13
3476.qxd 01.04.2005 22:13 Page 13

ENGLISH
the cassette tape holder and insert a tape.
CARE AND MAINTENANCE
• Load the tape with the side you want to record
on facing you.
Cleaning the tape heads
2. Close the cassette tape holder until you hear it
When you play or record on a tape and;
click shut.
• the sound has degraded,
• Stop the tape in the position where you will start
• the recording is not clear,
recording.
• the tape has not been completely erased,
3. Selecting the recording function (source). When
• the tape gets caught in the device, most likely
recording a CD (CD synch record):
dirt has accumulated on the heads, pinch roller
Select the track you wish to record from.
or capstan. Purchase a cleaning kit (or cleaning
• To only record specific tracks, set a program,
tape) and clean the heads. You should clean the
To record the radio:
heads once every 10 hours of use.
Tune in to the station you want to record.
Press the STOP/EJECT button (/) to open
To record sound from an Internal micro-
the cassette tape holder and wipe the area
phone:
displayed in the illustration.
Move the FUNCTION switch to TAPE/OFF.
• After using the device for an extended period of
4. Press the RECORD button (). The PLAY button
time, the heads will magnetize and cause static
() is also depressed at the same time and the
or degraded sound. If this occurs, use a com-
recording starts.
mercial demagnetizer to demagnetize the heads
• When recording a CD (CD synch record), the
recording and the CD start at the same time.
Cleaning the device
• You can start recording from the middle of a
Use a soft cloth to lightly wipe dirt from the
song when you press the RECORD button ()
device. When the device is extremely dirty, use a
while the CD is paused.
cloth moistened with a diluted neutral cleaning
• When the tape comes to the end, tape recording
solution to wipe the dirt away and wipe again
automatically stops.
with a dry cloth.
• When in CD synch record, you can pause CD
• Do not use benzene or thinner on the device.
play by pressing the STOP/EJECT button
Additionally, do not pour volatile chemicals on
(/ ).
the device case such as insecticides.
Press the PLAY/PAUSE button (/) to contin-
ue CD play. Pressing the STOP button () to
TROUBLESHOOTING
stop CD play.
Confirm the following things before considering
repairs.
Important!
• CD synch record is the function which starts play
No sound
automatically when you press the RECORD but-
1. The power cord is loose.
ton ().
2. The batteries are misaligned.
• When you press the RECORD button (), the
3. The batteries are low.
play button is also depressed at the same time
4. The volume is down.
which may produce resistance more than nor-
5. The headphones are in.
mal. This is not a malfunction.
1. Securely plug it in.
STOP TAPE RECORDING
2. Align them.
Press the STOP/EJECT button (/).
3. Replace them.
• When in CD synch record, you can pause CD
4. Adjust the volume.
play by pressing the STOP/EJECT button
5. Remove them.
(/).
CD/MP3 Player
WHEN BEATS OCCUR DURING RECORDING
Will not play
When recording the radio, beats may occur. If
1 The disc format is incorrect.
this occurs, move the BEAT CANCEL switch on
2 The disc is upside down.
the rear of the device to a position in which the
3 The disc is dirty.
beats cannot be heard (1 or 2).
4 The disc is paused.
Note:
5 The function is not correct.
• What you have recorded is for your own personal
6 The lens is fogged up.
enjoyment. It is under copyright and cannot be
used for any other purpose without the permis-
1 Load the correct format disc.
sion of the copyright holder.
2 Turn label side up.
3 Clean it.
14
3476.qxd 01.04.2005 22:13 Page 14
ENGLISH
4 Press the PLAY/PAUSE button (14).
MP3
5 Move the FUNCTION switch to CD.
File System Compatibility Sampling Frequency
6 Wait one hour.
Bit rates
ISO 9660 (level 1), Joliet 32 kHz, 44.1 kHz 32-
The sound skips
320 kbps
1 The disc is severely damaged.
Tape Recorder
2 The device is being moved.
Track Motor Heads: 4-track 2-channel stereo
Electronic governor DC motor Magnetic head
1 Change discs.
for erasure, AC bias for recording
2 Stabilize the device.
Fast-wind Time: Approx. sec. (C-60 cassette)
Microphone
TAPE RECORDER
Omnidirectional microphone
Tape does not go in
Tape holder does not shut
GENERAL
The tape is upside down.
Speakers cm x 2 (4Q)
Put the tape right side up.
cm x 2 (8Q)
Max Output 2W + 2W(JEITA/DC)
The tape will not play
Output Terminals: Phone jack (Stereo mini jack)
1. The tape is defective.
mW (Ohm)
2. The PAUSE button (4) is pressed.
Power Supply: AC 230 V~50Hz
3. The batteries are low.
DC 12 V(D-sizex8)
4. The tape has grown slack.
Power Consumption: 15 W
Dimension: 432 (W) x 157 (H) x 231 (D) mm
1. Switch tapes.
2. Press the PAUSE button (4) again.
Technical characteristics may be changed by
3. Replace them.
the manufacturer without prior notice.
4. Use a pencil to take up the slack.
SERVICE LIFE – NO LESS THAN 5 YEARS
Cannot record
The tabs are removed on the tape.
GUARANTEE
Switch tapes.
Details regarding guarantee conditions can be
obtained from the dealer from whom the appliance
Sound is distorted
was purchased. The bill of sale or receipt must be
Erasure is incomplete
produced when making any claim under the terms of
• The heads are dirty.
this guarantee.
• You are using a high position, or metal tape.
• Clean them.
This product conforms to the EMC-
• Use a normal tape.
Requirements as laid down by the Council
Directive 89/336/EEC and to the Low
RAIDIO
Voltage Regulation (23/73 EEC)
Too much static
• Receive electrical interference.
• Receiving interference from motors, fluorescent
lights or television.
• Plug in the power cord securely.
• Move the device to a different place.
• Turn off the TV.
• Adjust the antenna.
SPECIFICATION
CD Player
Sampling Frequency Pick-up
44.1 kHz Non-contact optical pick-up (Semi-
conductor laser)
Radio
Reception Frequency
FM: 88-108 MHz AM: 530-1600 kHz
15
3476.qxd 01.04.2005 22:13 Page 15
ÐÓÑÑÊÈÉ
ÈÍÑÒÐÓÊÖÈß ÏÎ ÝÊÑÏËÓÀÒÀÖÈÈ
ÂÍÈÌÀÍÈÅ
1-ÊÀÑÑÅÒÍÀß ÌÀÃÍÈÒÎËÀ Ñ
CD/MP3 ÏËÅÅÐÎÌ
 ñëó÷àå âîçíèêíîâåíèÿ íåèñïðàâíîñòè
ñðàçó æå ïðåêðàòèòå ýêñïëóàòàöèþ
ÌÎÄÅËÜ VT-3476
àïïàðàòà.
îæàëóéñòà, âíèìàòåëüíî ïðî÷òèòå ýòó
Èñïîëüçîâàíèå àïïàðàòà ïðè ñëåäóþùèõ
èíñòðóêöèþ ïåðåä òåì, êàê íà÷àòü
îáñòîÿòåëüñòâàõ ìîæåò ñòàòü ïðè÷èíîé
ýêñïëóàòàöèþ äàííîãî àïïàðàòà. Ïîñëå òîãî,
ïîæàðà èëè ïîðàæåíèÿ ýëåêòðè÷åñêèì
êàê âû îçíàêîìèòåñü ñ ýòîé èíñòðóêöèåé,
òîêîì. Îòêëþ÷èòå ïèòàíèå àïïàðàòà ñ
ïîëîæèòå åå â äîñòóïíîå ìåñòî äëÿ òîãî,
ïîìîùüþ ïåðåêëþ÷àòåëÿ FUNCTION, âûíüòå
÷òîáû ýòîé èíñòðóêöèåé âû ìîãëè âñåãäà
øíóð èç ñåòè è îòäàéòå àïïàðàò â
âîñïîëüçîâàòüñÿ.
ãàðàíòèéíóþ ìàñòåðñêóþ.
• Äûì, ñòðàííûé çàïàõ èëè øóì, èçäàâàåìûé
Ìåðû ïî áåçîïàñíîñòè
àïïàðàòîì (íåïðàâèëüíàÿ ðàáîòà àïïàðàòà).
ÂÍÈÌÀÍÈÅ: ÄËß ÏÐÅÄÓÏÐÅÆÄÅÍÈß
Óáåäèòåñü â òîì, ÷òî äûìà áîëüøå íåò, è
ÂÎÇÍÈÊÍÎÂÅÍÈß ÏÎÆÀÐÀ ÈËÈ
îòíåñèòå àïïàðàò â ãàðàíòèéíóþ ìàñòåðñêóþ.
ÏÎÐÀÆÅÍÈß ÝËÅÊÒÐÈ×ÅÑÊÈÌ ÒÎÊÎÌ, ÍÅ
Íå ïûòàéòåñü îòðåìîíòèðîâàòü àïïàðàò
ÏÎÄÂÅÐÃÀÉÒÅ ÄÀÍÍÎÅ ÓÑÒÐÎÉÑÒÂÎ
ñàìîñòîÿòåëüíî.
ÂÎÇÄÅÉÑÒÂÈÞ ÄÎÆÄß È ÂËÀÃÈ.
• Âîäà ïîïàëà âíóòðü àïïàðàòà.
• Ïîñòîðîííèé ïðåäìåò ïîïàäàåò âíóòðü
ÂÍÈÌÀÍÈÅ:ÄËß ÏÐÅÄÓÏÐÅÆÄÅÍÈß
àïïàðàòà.
ÏÎÐÀÆÅÍÈß ÝËÅÊÒÐÎÒÎÊÎÌ ÍÅ
• Íåò çâóêà.
ÑÍÈÌÀÉÒÅ ÊÐÛØÊÓ (ÈËÈ
• Âû óðîíèëè è ñëîìàëè êîðïóñ àïïàðàòà.
ÇÀÄÍÞÞ ÏÀÍÅËÜ). ÂÍÓÒÐÈ ÍÅÒ
• Íå ðàçáèðàéòå àïïàðàò.  ïðîòèâíîì ñëó÷àå
×ÀÑÒÅÉ, ÒÐÅÁÓÞÙÈÕ ÂÍÈÌÀÍÈß
ñóùåñòâóåò îïàñíîñòü âîçíèêíîâåíèÿ ïîæàðà
ÏÎËÜÇÎÂÀÒÅËß. ÎÁÑËÓÆÈÂÀÍÈÅ
èëè ïîðàæåíèÿ ýëåêòðè÷åñêèì òîêîì.
ÄÎËÆÍÎ ÏÐÎÂÎÄÈÒÜÑß
ÊÂÀËÈÔÈÖÈÐÎÂÀÍÍÛÌ
• Íå ïîâðåæäàéòå ñåòåâîé øíóð.
ÏÅÐÑÎÍÀËÎÌ.
Ñåòåâîé øíóð ìîæåò áûòü ïîâðåæäåí â
ñëó÷àå åãî ýêñïëóàòàöèè íå ïî íàçíà÷åíèþ.
Îáúÿñíåíèå ãðàôè÷åñêèõ ñèìâîëîâ
Íå äåëàéòå òàêæå ñëåäóþùåå: Íå ïîìåùàéòå
Çíà÷îê ñòðåëîâèäíîé ìîëíèè âíóòðè
òÿæåëûå ïðåäìåòû íà ñåòåâîé øíóð. Íå
ðàâíîñòîðîííåãî òðåóãîëüíèêà èñïîëüçóåòñÿ
ãíèòå è íå ðàñòÿãèâàéòå ñåòåâîé øíóð.
äëÿ òîãî, ÷òîáû ïðåäóïðåäèòü ïîëüçîâàòåëÿ î
Íå ïîìåùàéòå ñåòåâîé øíóð âáëèçè
íàëè÷èè ”îïàñíîãî íàïðÿæåíèÿ” âíóòðè
íàãðåòûõ îáúåêòîâ.
êîðïóñà èçäåëèÿ, êîòîðîå ìîæåò áûòü
• Íå ñòàâüòå åìêîñòåé, íàïîëíåííûõ
äîñòàòî÷íî âûñîêèì è íåñòè â ñåáå óãðîçó
æèäêîñòüþ, íà ïîâåðõíîñòü àïïàðàòà. Åñëè
ïîðàæåíèÿ ýëåêòðè÷åñêèì òîêîì.
âîäà ïîïàäåò âíóòðü àïïàðàòà, òî ýòî ìîæåò
Âîñêëèöàòåëüíûé çíàê âíóòðè
ñòàòü ïðè÷èíîé ïîæàðà èëè ïîðàæåíèÿ
ðàâíîñòîðîííåãî òðåóãîëüíèêà èñïîëüçóåòñÿ
÷åëîâåêà ýëåêòðè÷åñêèì ðàçðÿäîì.
äëÿ òîãî, ÷òîáû ïðåäóïðåäèòü î íàëè÷èè â
• Åñëè ñåòåâîé øíóð ïîâðåæäåí, çàìåíèòå åãî
ëèòåðàòóðå, ïîñòàâëÿåìîé âìåñòå ñ
â àâòîðèçîâàííîì ñåðâèñíîì öåíòðå. Â
óñòðîéñòâîì, âàæíûõ óêàçàíèé ïî ðàáîòå ñ
ñëó÷àå äàëüíåéøåé ýêñïëóàòàöèè
íèì è ïî åãî îáñëóæèâàíèþ.
ïîâðåæäåííîãî ñåòåâîãî øíóðà ìîæåò
âîçíèêíóòü îïàñíîñòü âîçíèêíîâåíèÿ ïîæàðà
CLASS 1 LASER PRODUCT
èëè ïîðàæåíèÿ ýëåêòðè÷åñêèì òîêîì.
ÏÐÅÄÓÏÐÅÆÄÅÍÈÅ: ÍÅÂÈÄÈÌÎÅ
• Èçáåãàéòå íàìîêàíèÿ àïïàðàòà.
ËÀÇÅÐÍÎÅ ÈÇËÓ×ÅÍÈÅ ÏÐÈ ÎÒÊÐÛÒÈÈ
 ïðîòèâíîì ñëó÷àå ìîæåò âîçíèêíóòü
ÊÐÛØÊÈ ÎÒÑÅÊÀ CD
îïàñíîñòü âîçíèêíîâåíèÿ ïîæàðà èëè
ïîðàæåíèÿ ÷åëîâåêà ýëåêòðè÷åñêèì òîêîì.
Âíóòðè àïïàðàòà èìååòñÿ ëàçåðíîå
Íå èñïîëüçóéòå àïïàðàò â âàííîé, âáëèçè
óñòðîéñòâî íåáîëüøîé ìîùíîñòè. Äëÿ
âîäû èëè ïîä äîæäåì.
áåçîïàñíîé ýêñïëóàòàöèè â íîðìàëüíîì
• Íå ïîìåùàéòå âíóòðü àïïàðàòà ïîñòîðîííèå
ðåæèìå íå ñíèìàéòå êîæóõ è íå ïûòàéòåñü
ïðåäìåòû. Íå âñòàâëÿéòå â êàññåòíûé îòñåê
ïðîíèêíóòü âíóòðü àïïàðàòà.
ìåòàëëè÷åñêèå è ëåãêî âîñïëàìåíÿåìûå
ÎÁÑËÓÆÈÂÀÍÈÅ ÄÎËÆÍÎ ÏÐÎÂÎÄÈÒÜÑß
ïðåäìåòû. Ýòî ìîæåò ñòàòü ïðè÷èíîé ïîæàðà
ÊÂÀËÈÔÈÖÈÐÎÂÀÍÍÛÌ ÏÅÐÑÎÍÀËÎÌ.
èëè ïîðàæåíèÿ ÷åëîâåêà ýëåêòðè÷åñêèì
òîêîì.
16
3476.qxd 01.04.2005 22:13 Page 16

ÐÓÑÑÊÈÉ
Ìåðû ïðåäîñòîðîæíîñòè ïðè ïîäêëþ÷åíèè
• Íå ïîìåùàéòå ðóêó â îòñåê äëÿ êàññåòû èëè
ñåòåâîãî øíóðà.
êîìïàêò-äèñêîâ.
Âñåãäà ðóêîâîäñòâóéòåñü ñëåäóþùèì:
• Íå êàñàéòåñü ñåòåâîãî øíóðà âëàæíûìè
Íåïðàâèëüíîå îáðàùåíèå ñ ñåòåâûì øíóðîì
ðóêàìè. Ýòî ìîæåò ïðèâåñòè ê ïîðàæåíèþ
ìîæåò ïðèâåñòè ê åãî íàãðåâàíèþ è ñòàòü
ýëåêòðè÷åñêèì òîêîì.
ïðè÷èíîé ïîæàðà. Íå âêëþ÷àéòå àïïàðàò â
• Âñåãäà ïðèäåðæèâàéòå ðîçåòêó ðóêàìè,
òîì ñëó÷àå, åñëè âû íåïðàâèëüíî
âûíèìàÿ øíóð èç íåå. Íå âûäåðãèâàéòå øíóð
ïîäêëþ÷èëè ñåòåâîé øíóð. Íå èñïîëüçóéòå
èç ðîçåòêè ðåçêèìè äâèæåíèÿìè.
ñåòåâîé øíóð â ñëó÷àå åãî ïîâðåæäåíèÿ.
• Íå ðàñïîëàãàéòå àïïàðàò âî âëàæíûõ è
• Ðåãóëÿðíî ïðîâåðÿéòå âèëêó ñåòåâîãî øíóðà
ïûëüíûõ ïîìåùåíèÿõ, à òàêæå â ìåñòàõ, ãäå
íà íàëè÷èå íåèñïðàâíîñòåé. Ðåãóëÿðíî
ñóùåñòâóåò âîçìîæíîñòü ïðîíèêíîâåíèÿ â
âûíèìàéòå ñåòåâîé øíóð èç ðîçåòêè è
ïîìåùåíèå äûìà èëè ïàðà. Ýòî ìîæåò
ñòèðàéòå ïûëü ñ ïîâåðõíîñòè âèëêè.
ïðèâåñòè ê ïîæàðó èëè ê ïîðàæåíèþ
Íàêîïèâøàÿñÿ íà ïîâåðõíîñòè ñåòåâîãî
ýëåêòðè÷åñêèì òîêîì.
øíóðà ïûëü ìîæåò ñòàòü ïðè÷èíîé ïîæàðà
• Íå îñòàâëÿéòå àïïàðàò â ìàøèíå ñ
èëè ïîðàæåíèÿ ýëåêòðè÷åñêèì òîêîì.
çàêðûòûìè îêíàìè, â ìåñòàõ ñ âûñîêîé
• Íå ïîìåùàéòå àïïàðàò áëèçêî ê ñòåíå.
âëàæíîñòüþ èëè ìåñòàõ ïðÿìîãî ïîïàäàíèÿ
Âñåãäà ïîìåùàéòå àïïàðàò êàê ìèíèìóì íà
ñîëíå÷íûõ ëó÷åé.
10 ñì îò ñòåíû. Êðîìå òîãî, îñòàâüòå êàêîå-
• Íå ðàñïîëàãàéòå àïïàðàò â ìåñòàõ ñ
òî ðàññòîÿíèå ìåæäó àïïàðàòîì è äðóãèìè
íåðîâíîé ïîâåðõíîñòüþ.
ïðèáîðàìè.  ïðîòèâíîì ñëó÷àå àïïàðàò
• Íå ðàñïîëàãàéòå àïïàðàò â ìåñòàõ ñ
íàãðååòñÿ, ÷òî ìîæåò ñòàòü ïðè÷èíîé ïîæàðà.
íåðîâíîé ïîâåðõíîñòüþ èëè íà âûñîêîé
• Èñïîëüçîâàòü òîëüêî ïðè íàïðÿæåíèè 220-
ïîëêå. Àïïàðàò ìîæåò óïàñòü èëè íàíåñòè
240 V.  ïðîòèâíîì ñëó÷àå ìîæåò âîçíèêíóòü
òðàâìó.
óãðîçà âîçãîðàíèÿ.
• Íå ñòàâüòå íà àïïàðàò òÿæåëûå ïðåäìåòû.
• Íå ñìîòðèòå íà ëàçåðíûé ëó÷, â ïðîòèâíîì
Ïðåäìåò ìîæåò ïîâðåäèòü àïïàðàò.
ñëó÷àå âû ìîæåòå ïîëó÷èòü òðàâìó ãëàçà.
Âû ìîæåòå íàíåñòè ñåáå òðàâìó. (Áóäüòå
• Íå çàêðûâàéòå âåíòèëÿöèîííûå îòâåðñòèÿ
îñîáåííî àêêóðàòíû â òîì ñëó÷àå, êîãäà äåòè
àïïàðàòà.
íàõîäÿòñÿ ðÿäîì ñ àïïàðàòîì)
 ïðîòèâíîì ñëó÷àå àïïàðàò ìîæåò
• Íå èñïîëüçóéòå äåôîðìèðîâàííûå èëè
ïåðåãðåòüñÿ, ÷òî ìîæåò ïðèâåñòè ê ïîæàðó.
òðåñíóòûå äèñêè.
Âåíòèëÿöèîííûå îòâåðñòèÿ àïïàðàòà
• Íå èñïîëüçóéòå äåôîðìèðîâàííûå èëè
ðàñïîëîæåíû âíèçó è ñáîêó àïïàðàòà.
òðåñíóòûå äèñêè, à òàêæå ñêëååííûå äèñêè.
Èçáåãàéòå ñëåäóþùåãî. Íå ïîìåùàéòå
Äèñêè âðàùàþòñÿ âíóòðè àïïàðàòà ñ
àïïàðàò ëèöåâîé ñòîðîíîé ââåðõ. Íå
áîëüøîé ñêîðîñòüþ.
ïîìåùàéòå àïïàðàò â ìåñòà ñ ïëîõîé
• Ïîëîìêà äèñêà ìîæåò ñòàòü ïðè÷èíîé
öèðêóëÿöèåé âîçäóõà, íàïðèìåð, â çàêðûòîì
òðàâìû. Êðîìå òîãî, íå èñïîëüçóéòå äèñêè
ÿùèêå.
ñî ñëåäàìè êëåÿ îò öåëëîôàíîâûõ ïàêåòîâ
• Íå ïûòàéòåñü çàðÿæàòü îáû÷íûå áàòàðåéêè.
èëè öåííèêîâ.
Áàòàðåè ìîãóò òðåñíóòü, ýëåêòðîëèò èç íèõ
• Áóäüòå îñòîðîæíû ñ óðîâíåì ãðîìêîñòè â
âûòå÷åò, ÷òî ìîæåò ñòàòü ïðè÷èíîé ïîæàðà
íàóøíèêàõ.
èëè õèìè÷åñêîãî îæîãà. Íå èñïîëüçóéòå
• Èçáåãàéòå ïðîñëóøèâàíèÿ íà áîëüøîé
ðàçëè÷íûå òèïû áàòàðåé âìåñòå, íàïðèìåð
ãðîìêîñòè â íàóøíèêàõ. Ãðîìêîå
ùåëî÷íûå è ìàðãàíöåâûå áàòàðåè, èëè
ïðîñëóøèâàíèå ìóçûêè â íàóøíèêàõ â
ñòàðûå áàòàðåè ñ íîâûìè.
òå÷åíèå äëèòåëüíîãî ïåðèîäà âðåìåíè
• Èñïîëüçîâàíèå â óñëîâèÿõ ãðîçû.
ìîæåò ïðèâåñòè ê ïîâðåæäåíèþ ñëóõà.
Èñïîëüçóÿ àïïàðàò íà óëèöå, ïîìåñòèòå åãî â
• Íå ïîäíîñèòå êðåäèòíóþ êàðòó áëèçêî ê
áåçîïàñíîå ìåñòî è ñâåðíèòå àíòåííó.
ãðîìêîãîâîðèòåëÿì.
Îäíàêî âîçìîæíîñòü óäàðà ìîëíèè íå
Ãðîìêîãîâîðèòåëè èçëó÷àþò ñèëüíîå
èñêëþ÷åíà.
ìàãíèòíîå ïîëå. Íå êëàäèòå îêîëî
• Íå èñïîëüçóéòå àïïàðàò â âàííîé èëè äóøå.
ãðîìêîãîâîðèòåëåé àïïàðàòà ÷àñû,
Íå èñïîëüçóéòå àïïàðàò â ìåñòàõ ñ
êðåäèòíûå êàðòû, êàññåòíûå ïëåíêè è. ò.ä.
ïîâûøåííîé âëàæíîñòüþ, òàêèõ êàê âàííàÿ
Äàííûå íà òàêèõ íîñèòåëÿõ ìîãóò áûòü
êîìíàòà èëè äóø.  ïðîòèâíîì ñëó÷àå ìîæåò
ïîòåðÿíû.
âîçíèêíóòü óãðîçà ïîæàðà èëè ïîðàæåíèÿ
• Ñîáëþäàéòå îñòîðîæíîñòü, ïåðåíîñÿ
÷åëîâåêà ýëåêòðè÷åñêèì òîêîì.
àïïàðàò.
• Âûíüòå äèñê. Âûêëþ÷èòå ïèòàíèå, âûíüòå
• Áóäüòå âíèìàòåëüíû, âûíèìàÿ øòåïñåëü
ñåòåâîé øíóð èç ðîçåòêè è ïðîâåðüòå
ñåòåâîãî øíóðà èç ðîçåòêè.
àïïàðàò íà íàëè÷èå âíåøíèõ ïîäêëþ÷åíèé
17
3476.qxd 01.04.2005 22:13 Page 17
ÐÓÑÑÊÈÉ
ïåðåä òåì, êàê ïåðåíîñèòü åãî. Åñëè âû
7. Êíîïêà ïàóçû («PAUSE II»)
ïîâðåäèòå ñåòåâîé øíóð, ýòî ìîæåò
8. Êíîïêà îñòàíîâêè/îòêðûòèÿ îòñåêà («STOP/EJ
ïðèâåñòè ê âîçãîðàíèþ èëè óäàðó
/)
ýëåêòðè÷åñêèì òîêîì.
9. Êíîïêà áûñòðîé ïåðåìîòêè âïåðåä («F.F»)
• Ñâåðíèòå àíòåííó.  ïðîòèâíîì ñëó÷àå âî
10.Êíîïêà áûñòðîé ïåðåìîòêè íàçàä («REW »)
âðåìÿ ïåðåíîñêè àïïàðàòà åãî àíòåííà
11.Êíîïêà âîñïðîèçâåäåíèÿ («PLAY »)
ìîæåò áûòü ïîâðåæäåíà.
12.Êíîïêà çàïèñè («RECORD»)
13.Êíîïêà îòêðûòèÿ îòñåêà CD («OPEN»)
Ïðåäîñòîðîæíîñòè, ñâÿçàííûå ñ òåì, ÷òî
14.Ïåðåêëþ÷àòåëü äèàïàçîíîâ ðàäèî («BAND»)
àïïàðàò íå áóäåò èñïîëüçîâàòüñÿ â òå÷åíèå
15.Øêàëà íàñòðîéêè ðàäèî
äîëãîãî âðåìåíè.
16.Ðó÷êà íàñòðîéêè ðàäèî («TUNER»)
• Ðåêîìåíäóåòñÿ îòêëþ÷èòü àïïàðàò îò
ñåòåâîãî ïèòàíèÿ.
Ïåðåäíÿÿ ïàíåëü
• Î÷èñòêà âíóòðåííèõ äåòàëåé àïïàðàòà.
17. Èíäèêàòîð FM STEREO
Ïðîêîíñóëüòèðóéòåñü ó ìåñòíîãî äèëåðà
18. Èíäèêàòîð ïîäêëþ÷åíèÿ ê ñåòè («POWER»)
îòíîñèòåëüíî ÷èñòêè âíóòðåííèõ äåòàëåé.
19. Êíîïêè ïîèñê/ïåðåìîòêà
Åñëè ïûëü áóäåò ñêàïëèâàòüñÿ âíóòðè
(«SEARCH/SKIP/»)
àïïàðàòà â òå÷åíèå äîëãîãî âðåìåíè, ìîæåò
20. Êíîïêè âûáîðà ïàïîê («FOLDER/»)
âîçíèêíóòü ïîæàð èëè àïïàðàò áóäåò
21. Êíîïêà âîñïðîèçâåäåíèå/ïàóçà
íåêîððåêòíî ðàáîòàòü.
(«PLAY/PAUSE II »)
• Èñïîëüçîâàíèå áàòàðååê.
22. Êíîïêà îñòàíîâêè («STOP»)
Åñëè âû íåïðàâèëüíî èñïîëüçóåòå áàòàðåéêè,
23. Êíîïêà ïîâòîðà («REPEAT»)
îíè ìîãóò òðåñíóòü èëè ïðîòå÷ü, ÷òî ìîæåò
24. Êíîïêà ïðîãðàììèðîâàíèÿ («PROGRAM»)
ïðèâåñòè ê ïîæàðó, ÷åëîâå÷åñêîé òðàâìå èëè
25. ÆÊ-äèñïëåé
ïîâðåæäåíèþ àïïàðàòà. Ïðèäåðæèâàéòåñü
26. Äâåðöà êàññåòíîãî îòñåêà
ñëåäóþùèõ èíñòðóêöèé. Èñïîëüçóéòå
áàòàðåéêè òîëüêî D-ðàçìåðà.
ÇÀÄÍßß ÏÀÍÅËÜ
• Âñòàâëÿéòå áàòàðåéêè òîëüêî â ïðàâèëüíîì
27.Ïåðåêëþ÷àòåëü BEAT CANCEL (1/2, FM
íàïðàâëåíèè ñîãëàñíî äèàãðàììå íà
ST/MONO)
óñòðîéñòâå.
28. Êðûøêà îòñåêà äëÿ áàòàðååê
• Íå èñïîëüçóéòå ðàçíûå òèïû áàòàðååê.
29.Ðàçúåì äëÿ ïîäêëþ÷åíèÿ ñåòåâîãî øíóðà
• Íå èñïîëüçóéòå îäíîâðåìåííî ñòàðûå è
(AC INPUT)
íîâûå áàòàðåéêè â àïïàðàòå â îäíî è òî æå
30.FM àíòåííà
âðåìÿ. Íå ïûòàéòåñü çàðÿæàòü áàòàðåéêè èëè
ðàçáèðàòü èõ. Íå ïîìåùàéòå áàòàðåéêè â
ÏÓËÜÒ ÄÈÑÒÀÍÖÈÎÍÍÎÃÎ ÓÏÐÀÂËÅÍÈß
âîäó. Âûíüòå áàòàðåéêè â ñëó÷àå, åñëè âû íå
Ïîäãîòîâêà ê óñòàíîâêå
áóäåòå èñïîëüçîâàòü àïïàðàò â òå÷åíèå
áàòàðååê â ÏÄÓ.
ìåñÿöà èëè áîëåå äîëãîãî ñðîêà.
1. Ñíèìèòå êðûøêó áàòàðåéíîãî
• Åñëè êàêàÿ-òî æèäêîñòü âûòå÷åò èç áàòàðååê
îòñåêà ñ çàäíåé ïàíåëè ÏÄÓ.
â êîðïóñ, òùàòåëüíî ïðîòðèòå åãî ïåðåä òåì,
2. Âñòàâüòå äâå áàòàðåéêè
êàê âñòàâèòü íîâûå áàòàðåéêè. Åñëè æå
ðàçìåðà R03 (UM-4)/AAA (24F)
æèäêîñòü ïîïàäåò âàì íà ðóêè, ïðîìîéòå èõ
(íå âõîäÿò â êîìïëåêò
âîäîé.
ïîñòàâêè).
• Âñòàâüòå äâå áàòàðåéêè â
Âñåãäà ïðîâåðÿéòå!
îòñåê, ñîáëþäàÿ ïðè ýòîì
Ïðè çàïèñè èëè âîñïðîèçâåäåíèè âàæíîãî
ïîëÿðíîñòü (+ è- ).
ìàòåðèàëà, óáåäèòåñü, èìååòå ëè âû íà ýòî
3. Âñòàâüòå êðûøêó.
ëèöåíçèîííîå ïðàâî.
R03 (UM-4)/AAA (24F)
ÎÁÙÈÉ ÂÈÄ (ÑÌ. ÑÕÅÌÓ)
Çàìåíà áàòàðååê
Êîãäà ÏÄÓ íà÷íåò ðàáîòàòü íåñòàáèëüíî èëè
ÂÈÄ ÑÂÅÐÕÓ
ñîêðàòèòüñÿ ðàäèóñ åãî äåéñòâèÿ, çàìåíèòå
1. Êðûøêà îòñåêà CD
áàòàðåéêè íîâûìè.
2. Ðó÷êà ðåãóëèðîâêè ãðîìêîñòè («VOLUME»)
Èñïîëüçîâàíèå ÏÄÓ. ×òîáû èñïîëüçîâàòü
3. Ïåðåêëþ÷àòåëü óñèëåíèÿ áàñîâ («BASS»)
ïóëüò ÄÓ, íàïðàâüòå åãî íà äàò÷èê
4. Ðàçúåì äëÿ íàóøíèêîâ
äèñòàíöèîííîãî óïðàâëåíèÿ íà ïåðåäíåé
5. Ïåðåêëþ÷àòåëü ðåæèìîâ ðàáîòû («FUNC-
ïàíåëè óñòðîéñòâà. Ìàêñèìàëüíûé ðàäèóñ
TION»)
äåéñòâèÿ ÏÄÓ - îêîëî 7 ì. Ïðè ýòîì íàäî
6. Âñòðîåííûé ìèêðîôîí
ó÷åñòü, ÷òî ðàäèóñ äåéñòâèÿ ÏÄÓ
18
3476.qxd 01.04.2005 22:13 Page 18

ÐÓÑÑÊÈÉ
óìåíüøàåòñÿ, åñëè ÏÄÓ íàõîäèòñÿ ïîä óãëîì
Ðàçúåì ïîäêëþ÷åíèÿñåòåâîãî øíóðà
ïî îòíîøåíèþ ê ïåðåäíåé ïàíåëè
óñòðîéñòâà.
Ñåòåâîé øíóð
Íå ïîäâåðãàéòå äàò÷èê ÏÄÓ âîçäåéñòâèþ
ñîëíå÷íûõ ëó÷åé èëè èñêóññòâåííîãî ñâåòà è
óáåäèòåñü â òîì, ÷òî ìåæäó ÏÄÓ è äàò÷èêîì
Ê ýëåêòðè÷åñêîé
íåò ïðåäìåòîâ, ïðåïÿòñòâóþùèõ
ðîçåòêå
ïðîíèêíîâåíèþ èíôðàêðàñíûõ ëó÷åé.
ÂÍÈÌÀÍÈÅ
1. Èñïîëüçóéòå òîëüêî ñåòåâîé øíóð,
ïîñòàâëÿåìûé ïðîèçâîäèòåëåì, ÷òîáû
èçáåæàòü ïîëîìêè àïïàðàòà. Âûíüòå
áàòàðåéêè èç óñòðîéñòâà ïåðåä òåì, êàê
èñïîëüçîâàòü ñåòåâîé øíóð.
2. Åñëè âû íå ýêñïëóàòèðóåòå àïïàðàò â òå÷åíèå
äîëãîãî âðåìåíè, âûíüòå ñåòåâîé øíóð èç
ñåòåâîé ðîçåòêè.
3. Ïîäêëþ÷àÿ/îòêëþ÷àÿ ñåòåâîé øíóð îò
ñåòåâîé ðîçåòêè, ïåðåâåäèòå ïåðåêëþ÷àòåëü
Function â ïîçèöèþ TAPE/OFF.
ÁÀÒÀÐÅÉÊÈ
• Îòêðîéòå êðûøêó îòñåêà áàòàðååê è âñòàâüòå
8 áàòàðååê ðàçìåðà “D”, òàê, êàê ýòî ïîêàçàíî
íà ðèñóíêå, ñîáëþäàÿ ïðè ýòîì ïîëÿðíîñòü.
Ïðè ïîäêëþ÷åíèè ñåòåâîãî øíóðà ê
1. Êíîïêà âîñïðîèçâåäåíèå/ïàóçà
óñòðîéñòâó ïèòàíèå îò áàòàðååê
(«PLAY/PAUSE»)
àâòîìàòè÷åñêè îòêëþ÷àåòñÿ.
2. Êíîïêà îñòàíîâêè âîñïðîèçâåäåíèÿ (STOP)
Âíèìàíèå
3. Êíîïêà ïîâòîðà (REPEAT)
1. Åñëè âû íå èñïîëüçóåòå àïïàðàò â òå÷åíèå
ìåñÿöà è áîëåå èëè ïîëüçóåòåñü ïèòàíèåì îò
4. Êíîïêà ïåðåõîäà/ïîèñêà CD/MP3 òðåêîâ
ñåòåâîé ðîçåòêè, âûíüòå áàòàðåéêè èç
SKIP/SEARCH MP3 ( / FILE+, / FILE-)
áàòàðåéíîãî îòñåêà. Âû ìîæåòå îïðåäåëèòü
5. Êíîïêà âûáîðà ïàïêè MP3 (– - - - -FOLDER- -
ðàçðÿæåííîñòü áàòàðåè ïî ñëåäóþùèì
- -+ )
ïðèçíàêàì:
6. Êíîïêà çàïîìèíàíèÿ óñòàíîâîê («MEMORY»)
• Óðîâåíü ãðîìêîñòè ïîíèæàåòñÿ èëè
êîëåáëåòñÿ.
ÏÎÄÊËÞ×ÅÍÈÅ Ê ÑÅÒÈ
• Ïàäàåò ñêîðîñòü âðàùåíèå ïëåíêè êàññåòû.
ÏÈÒÀÍÈÅ ÓÑÒÐÎÉÑÒÂÀ
ÀÍÒÅÍÍÛ
Ýòîò àïïàðàò ðàáîòàåò îò ñåòè ïåðåìåííîãî
Òàê êàê AM àíòåííà íàõîäèòñÿ âíóòðè êîðïóñà
òîêà èëè îò áàòàðååê.
óñòðîéñòâà, âû ìîæåòå íàñòðîèòü ïðèåì AM
Èñòî÷íèê ïåðåìåííîãî òîêà
ðàäèîñòàíöèè, ìåíÿÿ ïîëîæåíèå êîðïóñà
Âñòàâüòå îäèí êîíåö ñåòåâîãî øíóðà â
óñòðîéñòâà. Âû ìîæåòå íàñòðîèòü ïðèåì FM
ñåòåâóþ ðîçåòêó, à äðóãîé êîíåö â ðàçúåì
ðàäèîñòàíöèè ïóòåì âûòÿãèâàíèÿ è
äëÿ ïîäêëþ÷åíèÿ ñåòåâîãî øíóðà (AC INPUT),
âðàùåíèÿ àíòåííû ðàñïîëîæåííîé íà çàäíåé
ðàñïîëîæåííûé íà çàäíåé ïàíåëè
ïàíåëè óñòðîéñòâà.
óñòðîéñòâà.
19
3476.qxd 01.04.2005 22:13 Page 19

ÐÓÑÑÊÈÉ
ÎÑÍÎÂÍÛÅ ÔÓÍÊÖÈÈ
Äèñêè CD-R/CD-RW çàïèñàííûå â ôîðìàòå
ÓÏÐÀÂËÅÍÈß
HFS, ñîçäàííûå ñ ïîìîùüþ Packet Lite íå
ìîãóò áûòü âîñïðîèçâåäåíû íà ýòîì
• Ïåðåêëþ÷àòåëü ðåæèìîâ
àïïàðàòå.
ðàáîòû («Function»)
• Âàæíûå çàìå÷àíèÿ êàñàòåëüíî ñîçäàíèÿ
Óñòàíîâèòå ïåðåêëþ÷àòåëü â
äèñêîâ CD-R/CD-RW äëÿ ïðîèãðûâàíèÿ íà
íóæíóþ âàì ïîçèöèþ.
ýòîì óñòðîéñòâå.
• Ãðîìêîñòü («VOLUME»)
Ïðè çàïèñè CD-R/CD-RW ïðîãðàììíîå
Ïîâåðíèòå ðó÷êó.
îáåñïå÷åíèå, ñ ïîìîùüþ êîòîðîãî âû
• Âûêëþ÷åíèå ïèòàíèÿ («Power
çàïèñûâàåòå äàííûå, ïîòðåáóåò ðàçëè÷íûõ
Off»)
íàñòðîåê.
Îòêëþ÷èòå ïèòàíèå àïïàðàòà,
Äëÿ âîñïðîèçâåäåíèÿ ìóçûêè/çâóêà íà
óñòàíîâèâ ïåðåêëþ÷àòåëü FUNCTION â
ýòîì óñòðîéñòâå âûáèðàéòå ñïîñîáû
ïîçèöèþ TAPE/OFF, íå àêòèâèðóÿ êíîïîê
çàïèñè íà ýòîì àïïàðàòå, êîòîðàÿ
êàññåòíîãî ìåõàíèçìà.
óäîâëåòâîðÿåò ñëåäóþùèì óñëîâèÿì:
• Êíîïêà óñèëåíèÿ áàñà
• Ìóçûêàëüíûå CD, CD ñ êîìïüþòåðíûìè
(«BASS»)
äàííûìè (óðîâåíü êà÷åñòâà ISO9660 1 èëè
Íàæìèòå äëÿ óâåëè÷åíèÿ óðîâíÿ
óðîâåíü 2, Joliet)
áàñîâ.
Ìåòîä çàïèñè
Íàæìèòå åùå ðàç äëÿ ïåðåâîäà
Îäíà ñåññèÿ (âñå ñðàçó), ìóëüòèñåññèîííûå
áàñîâ íà íîðìàëüíûé óðîâåíü.
(ïðîèãðûâàåòñÿ òîëüêî ïåðâàÿ ñåññèÿ).
Ôîðìàò ìóçûêàëüíûõ äàííûõ, çàïèñûâàåìûõ
ÍÀÓØÍÈÊÈ
íà ìóçûêàëüíûé CD - 16-bit/44.1 ÊÃö/Stereo
Ïîäêëþ÷èòå ñòåðåîíàóøíèêè (íå âõîäÿò â
PCM Source.
êîìïëåêò), âñòàâèâ øòåêåð íàóøíèêîâ â
CD ñ êîìïüþòåðíûìè äàííûìè - MP3 ôîðìàò
ñîîòâåòñòâóþùèé ðàçúåì ðàñïîëîæåííûé íà
(MPEG 1 layer 3 ôàéëû ñ ðàñøèðåíèåì .MP3
âåðõíåé ïàíåëè óñòðîéñòâà.
or .mp3, 32-320 kbps bit rate and 32 kHz and
• Ïðè ïîäêëþ÷åíèè íàóøíèêîâ çâóê â
44.1 kHz ÷àñòîòû)
äèíàìèêàõ àâòîìàòè÷åñêè îòêëþ÷àåòñÿ.
Êîë-âî îòîáðàæàåìûõ ïàïîê: 256
Êîë-âî îòîáðàæàåìûõ ôàéëîâ: 255
Âàæíî!
• CD íå ïðàâèëüíî ïîìåùåííûé â îòñåê äëÿ
ïðîèãðûâàíèÿ ìîæåò áûòü ïîâðåæäåí.
• Ïðè íåïðàâèëüíîì ðàçìåùåíèè CD íà
äèñïëåå âû óâèäèòå çíà÷îê [- - -], è
âîñïðîèçâåäåíèå äèñêà ïðîèñõîäèòü íå
Âíèìàíèå
áóäåò.
Êîãäà âû ìåíÿåòå ïîçèöèè ïåðåêëþ÷àòåëÿ, â
• Íå êàñàéòåñü ðàáî÷åé ïîâåðõíîñòè äèñêà
êîëîíêàõ ìîæíî ðàçëè÷èòü ñëàáûé
ðóêàìè.
õëîïàþùèé çâóê. Ýòî íå ÿâëÿåòñÿ äåôåêòîì.
• Åñëè CD ïîâðåæäåí èëè íà íåì èìåþòñÿ
ñëåäû îòïå÷àòêîâ ïàëüöåâ è ïûëè, âîçìîæíî,
ÂÎÑÏÐÎÈÇÂÎÄÈÌÛÅ ÄÈÑÊÈ
÷òî îí íå áóäåò âîñïðîèçâîäèòüñÿ.
Äàííûé àïïàðàò ìîæåò âîñïðîèçâîäèòü
• Íå ïðèêëåèâàéòå áóìàãó èëè ÿðëûê íà
äèñêè CD, CD-R/RW çàïèñàííûå â ôîðìàòàõ
âîñïðîèçâîäèìóþ ïîâåðõíîñòü äèñêà.
CD è MP3.
• CD-R/CD-RW
Ïðèìå÷àíèå
Íåñìîòðÿ íà òî, ÷òî âîçìîæíî
 çàâèñèìîñòè îò ïðîãðàììíîãî
âîñïðîèçâåäåíèå äèñêîâ CD-R/CD-RW ,
îáåñïå÷åíèÿ, èñïîëüçîâàííîãî äëÿ ñîçäàíèÿ
êà÷åñòâî èõ âîñïðîèçâåäåíèÿ áóäåò çàâèñåòü
ôàéëîâ â ôîðìàòå MP3 (êîäèðóþùåé
îò óñëîâèé èõ çàïèñè.
ïðîãðàììû), âîçìîæíî âîçíèêíîâåíèå
Íå âñòàâëÿéòå â îòñåê äëÿ êîìïàêò-äèñêîâ
ïðîáëåì ñ âîñïðîèçâåäåíèåì íåêîòîðûõ
÷èñòûé CD-R/CD-RW äèñê, òàê êàê âîçìîæíî
ôðàãìåíòîâ èëè íåêîððåêòíîãî
ïîâðåæäåíèå óñòðîéñòâà èç-çà ñèëüíîãî
âîñïðîèçâåäåíèÿ âñåãî äèñêà.
âðàùåíèÿ äèñêà. Êîìïàêò-äèñêè ñ îòìåòêîé
• Òîëüêî ôàéëû ôîðìàòà MP3 ìîãóò
“SUPER-AUDIO êîìïàêò-äèñê” íå
âîñïðîèçâîäèòüñÿ íà äèñêàõ CD-R/CD-RW.
âîñïðîèçâîäèòñÿ.
Ôàéëû ìóëüòèìåäèéíîé áèáëèîòåêè Windows
• Ìîãóò íå ïðîèãðûâàòüñÿ êîìïàêò-äèñêè ñ
Media Audio: íåâîçìîæíî âîñïðîèçâåäåíèå
âêëþ÷åííîé ôóíêöèåé çàùèòû îò
ôàéëîâ ôîðìàòà .wma.
êîïèðîâàíèÿ.
20
3476.qxd 01.04.2005 22:13 Page 20
- 1
- 2


