Vitek VT-1232: инструкция
Раздел: Бытовая, кухонная техника, электроника и оборудование
Тип: Утюг
Характеристики, спецификации
Инструкция к Утюгу Vitek VT-1232
Оглавление
Vt-1232-new.qxd 02.06.05 17:47 Page 1
MMaaggiicc
VT-1232
MANUAL INSTRUCTION
4
7
10
13
16
19
22
25
28
31
34
36
39
42
www.vitek-aus.com
2
Vt-1232-new.qxd 02.06.05 17:47 Page 2

3
Vt-1232-new.qxd 02.06.05 17:47 Page 3

ENGLISH
ELECTRONIC STEAM IRON
- red - the iron is heating to the set temperature
- green - the set temperature has been reached
OPERATING INSTRUCTIONS
- orange - the iron is changing to another tempera-
ture mode
SAFETY PRECAUTIONS
The flashing green indicator light (c) turns on when
Read the operating instructions carefully before
the iron is connected to electrical power and also
using; also pay attention to the illustrations.
alerts to automatic shutoff.
Before turning on the iron, make sure that the elec-
Automatic shutoff of the iron occurs:
trical supply voltage matches the iron's operating
- if the iron is in a horizontal position and is not moved
voltage.
for 30 ± 5 seconds
Only use the iron for the purposes outlined in these
- if the iron is in a vertical position and is not moved
instructions.
for 15min ±30sec
Only use the iron on an ironing board.
The steady red indicator light (d) indicates that the
Disconnect the iron from electrical power when
iron is heating up and the heating element is on; the
refilling the water tank.
flashing red indicator light (d) indicates that the
Do not leave the iron unattended while it is on.
heating element is off.
Always disconnect the iron from power when not in
All actions related to setting the temperature are
use.
accompanied by audible beeps:
In order to avoid the risk of electric shock, do no
- one beep occurs each time the temperature setting
submerse the iron in water or any other liquid.
button is pressed (a)
In order to avoid burns, do not allow bare skin to
- two beeps mean that the iron has reached the set
come into contact with the hot surfaces of the iron
temperature
or the steam released from the iron.
- one long beep is made upon automatic shutoff of
Make sure that the power cord does not hand off
the iron, irregardless of it being in the horizontal or
the end of the ironing board or comes into contact
vertical position.
with hot surfaces.
Always pull on the plug to disconnect the iron from
NOTE:
the power outlet - never pull on the power cord.
The iron's heating element is broken in during first use;
Allow the iron to cool completely before storing, and
it is normal for a small amount of smoke to be released.
then wind the power cord around the base.
Before using, first test the heated iron on a piece of old
In order to avoid overloading the electrical supply
fabric in order to make sure that the ironing sole and
circuit, do not operate multiple high-energy devices
water tank are clean.
at the same time.
Do not use the iron if the power plug or cord is dam-
CHOICE OF WATER:
aged, or if there are any other defects.
You can fill the iron with regular tap water.
In order to avoid electric shock, do not attempt to
If the water is hard, then it is recommended to mix it
take apart the iron yourself; if malfunction is detect-
with distilled water at a ratio of 1:1, if the water is
ed, contact an authorized service center.
very hard, mix it with distilled water at a ratio of 1:2,
this will prevent scale buildup.
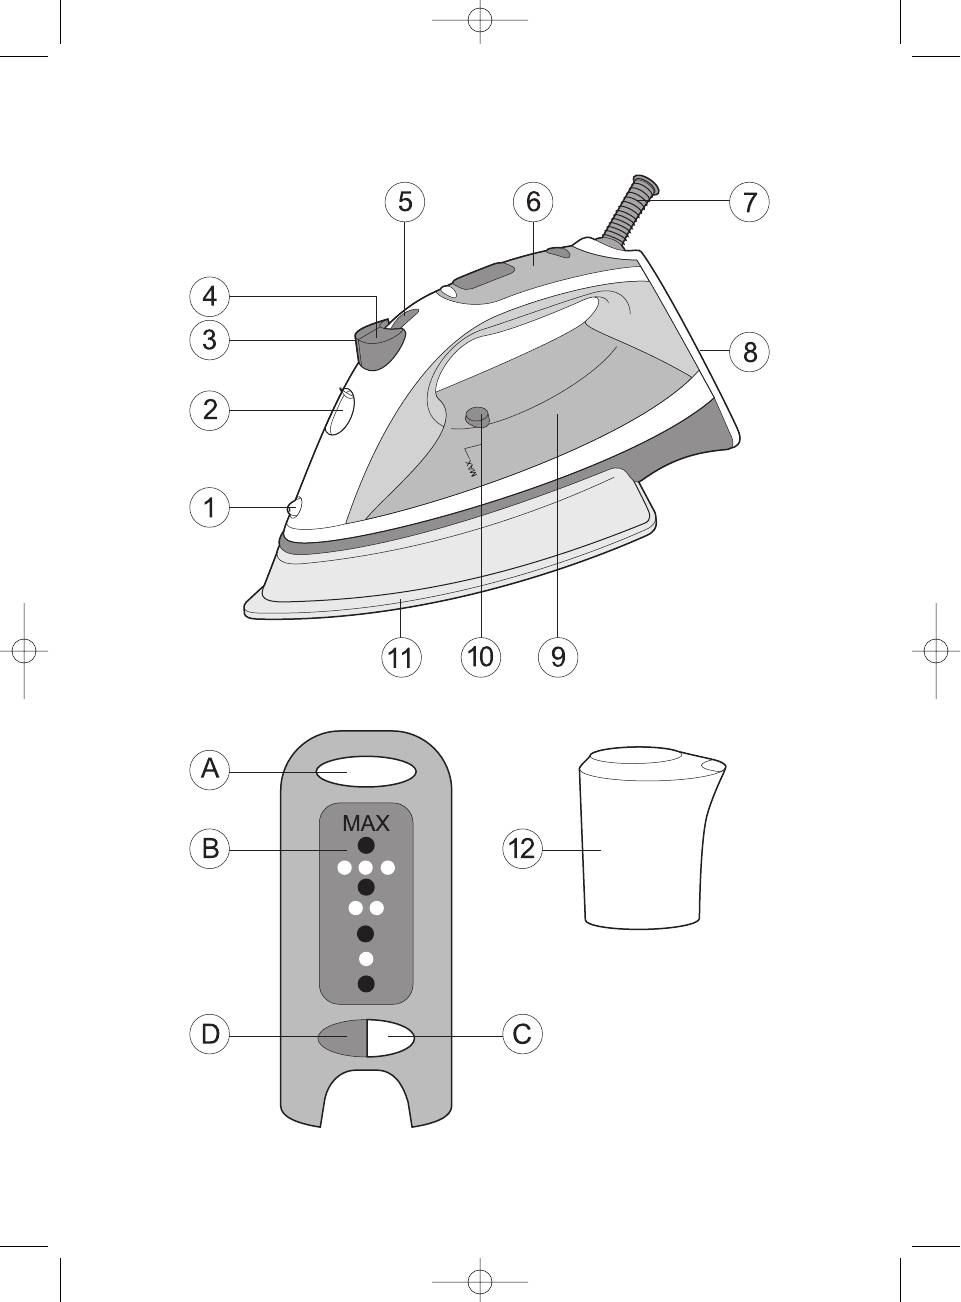
DESCRIPTION
1. water spray nozzle
NOTE: Do not fill the water tank with scented liquids,
2. water tank lid
vinegar, starch solutions, descaling reagents, chemical
3. spray button
substances or other liquids.
4. additional steam release button
5. steam release regulator
FILLING THE IRON WITH WATER (pic. 1, 2)
6. control panel
Make sure the iron is disconnected from electrical
7. power cord
power before filling with water.
8. base
Set the steam release regulator (5) to the "X" posi-
9. water tank
tion.
10. cleaning button
Open the water tank lid (2).
11. iron sole
Fill with water using the filling container (12).
12. container for filling water tank
NOTE:
CONTROL PANEL (6)
Do not fill past the "MAX" indication.
A. Temperature setting button
If you need to refill the water tank during ironing,
B. Temperature indication panel
turn off the iron and unplug the power cord from the
C. Green indicator light
outlet.
D. Red indicator light
After you finish ironing, turn the iron upside down
and drain the leftover water (pic. 8).
The temperature setting button (a) is used to set the
desired ironing temperature in the following order -
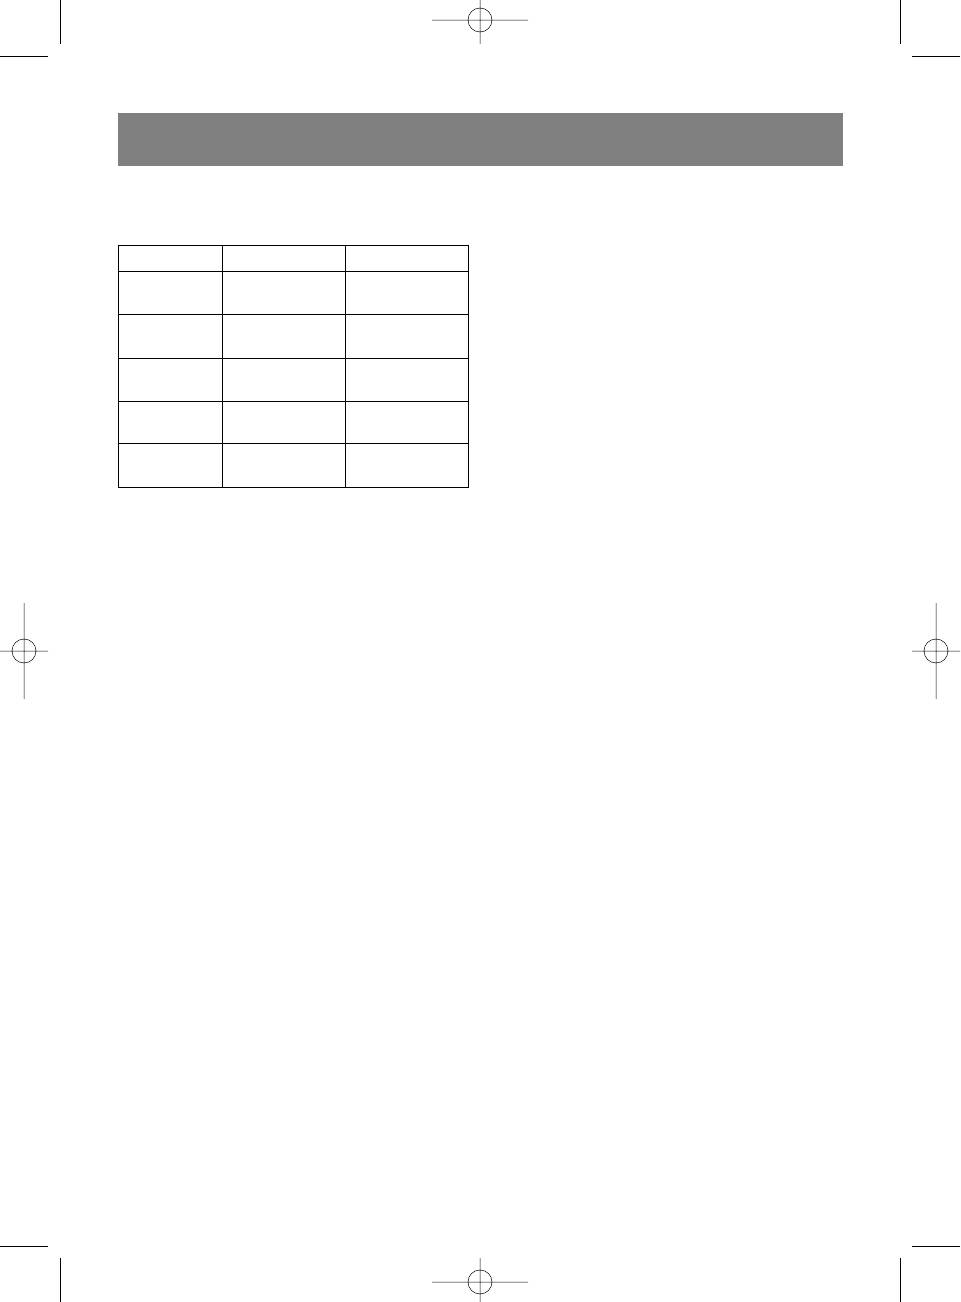
IRONING TEMPERATURE
MAX>>>>>>MAX.
Always check the recommended iron temperature
The lights on the indication panel (b) have three dif-
indicated on the tag before ironing.
ferent colored modes:
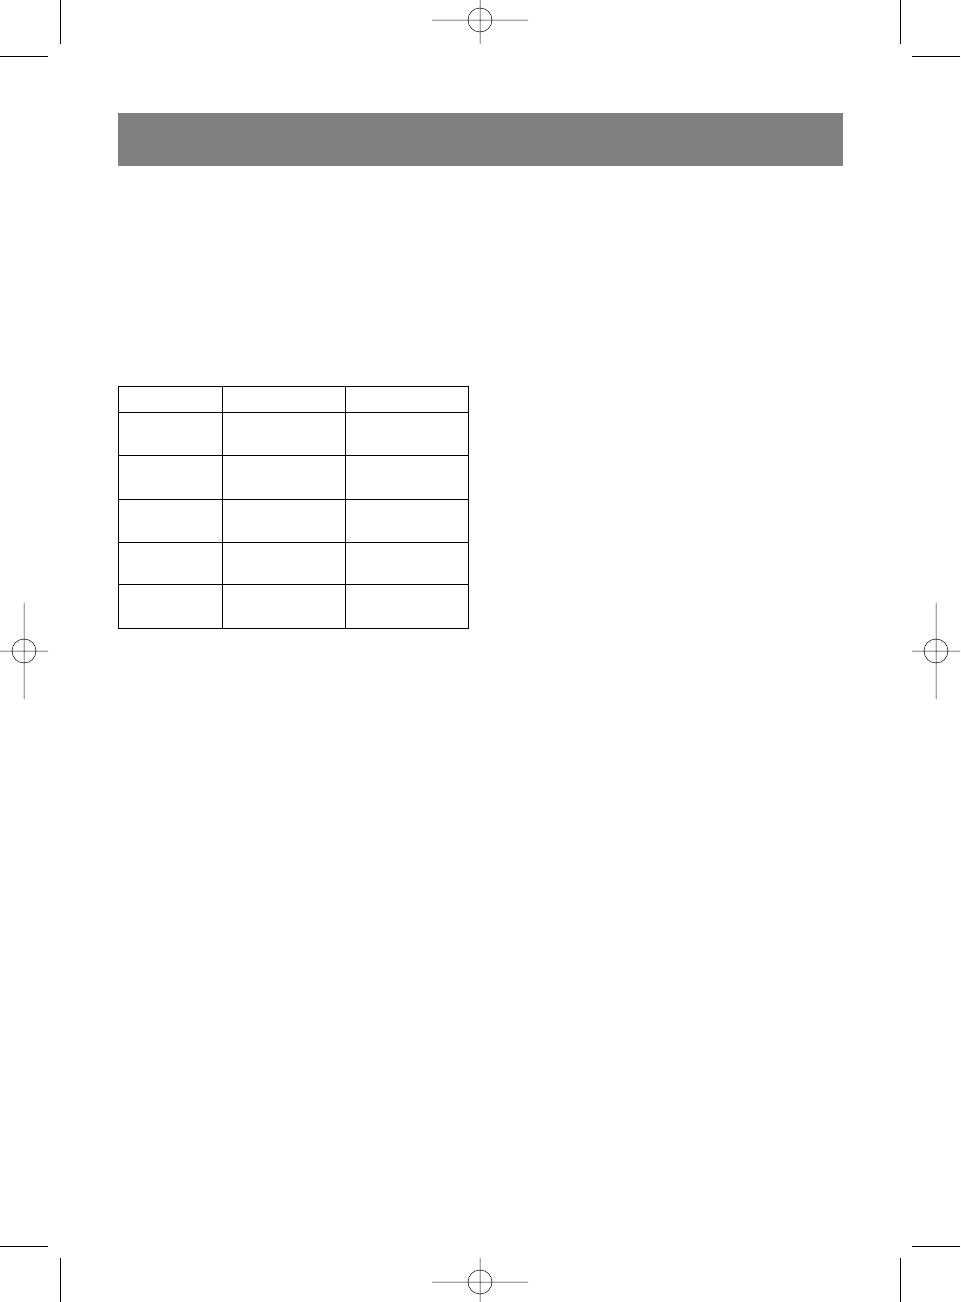
If the tag doesn't list a recommended ironing tem-
4
Vt-1232-new.qxd 02.06.05 17:47 Page 4
ENGLISH
perature, but you know the type of fabric, then use
When changing from a higher temperature mode to a
the following table to determine the proper temper-
lower one, a certain amount of time is required for the
ature.
iron to cool, so wait until the temperature indicator light
turns green.
Setting Type of fabric Fiber
WATER SPRAYER
(low tempera-
Acryl
You can dampen the fabric by pressing the spray
Synthetics
ture)
Polyester
button (3) several times (pic. 3).
Make sure that there is enough water in the water
(medium tem-
Acetate-fiber
Synthetics
tank.
perature)
Rayon
STEAM IRONING
(medium tem-
Silk
Silk
Steam ironing is only possible at high temperatures -
perature)
Wool
Wool
"," "" or "MAX."
(high tem-
Silk
Silk
Insert the power plug into the outlet.
perature)
Wool
Wool
Place the iron on its base (8).
Use the button (a) to set the desired temperature
Cotton
Cotton
level - "," "" or "MAX."
ÌÀÕ
Linen
Linen
Make sure there is enough water in the water tank.
Wait until the corresponding temperature indicator
This table is only for fibrous materials. Fabrics of
light turns green.
other types (crimped, raised, etc.) are best ironed
Set the steam release regulator (5) to the desired
at low temperature.
position (pic. 4), after that, the steam will begin to
First sort items by ironing temperature: wool with
flow from the openings in the iron' sole (11).
wool, cotton with cotton, etc.
The iron heats up faster than it cools down. For this
ATTENTION:
reason, it is recommended to begin ironing at low
Water can leak from the ironing sole if the temperature
temperature, for example, with synthetic fabrics.
is set to low; this can lead to stains. If this happens, set
After that, move to higher temperature ironing.
the temperature regulator (a) to a higher temperature.
Cottons and linens should be ironed last.
If an item is made from a mix of fabrics, then the iron
Steam release will resume as soon as the set ironing
should be set for the fabric with the lowest ironing
temperature is reached.
temperature (for example, if an item is made from
60% polyester and 40% cotton, it should be ironed
ADDITIONAL STEAM RELEASE
at the temperature used for ironing polyester, "").
Use the temperature adjustment button (a) to set
the ironing temperature to "," "" or the
SETTING THE TEMPERATURE
"MAX" position.
Place the iron on its base (8).
Wait until the corresponding temperature indicator
Insert the power plug into the outlet - the iron will
light turns green.
make a long beep and the indicator light (ñ) on the
When the additional steam release button (4) is
control panel (6) will blink.
pressed, steam will be vigorously released from the
Use the button (à) to set the desired temperature;
openings in the ironing sole (pic. 5).
your selection is made in the following order:
This function is useful when ironing folds.
MAX>>>>>>MAX.
The additional steam release function can only be
For example: to set the iron to low temperature ""
used at high ironing temperatures (when the iron
Press the button (à) 4 times; the temperature indi-
temperature regulator (13) is set to "," "" or
cator light "" will turn red; when the temperature
the "MAX" position).
reaches the one set, the temperature indicator light
will turn green and you will hear two beeps. When
VERTICAL STEAMING
pressing button (à) the red indicator light (d) will
Insert the power plug into an electrical outlet.
turn on and will stay on steady while the heating
Place the iron on its base (8).
element is on; it will begin to blink when the heating
Set the temperature regulator (a) to the "MAX" posi-
element is off.
tion.
To set the temperature to the "" position:
Make sure that there is enough water in the water
Press the button (à) once again; the "" tempera-
tank.
ture indicator light will turn red and the "" temper-
Wait until the corresponding temperature indicator
ature indicator light will turn orange, which means
light turns green.
the iron is changing to another temperature mode.
Hold the iron vertically and press the additional
When the "" temperature indicator light turns
steam release button (4), steam will be release from
green, that means that the desired temperature,
the openings in the ironing sole (11) (pic. 6).
"," has been reached.
Setting the temperature to other levels, like "" and
Important information:
"MAX," is accomplished in the same manner.
Vertical steaming is not recommended for synthet-
ic fabrics.
5
Vt-1232-new.qxd 02.06.05 17:47 Page 5
Vt-1232-new.qxd 02.06.05 17:47 Page 6
ENGLISH
To avoid melting the fabric, do not touch the ironing
Sediment on the ironing sole can be removed with a
sole to the item while vertically steaming.
cloth soaked in a vinegar-water solution.
Never steam iron clothing that is being worn, as the
After removing sediment, polish the sole with a dry
steam temperature is very high. Use a coat-hanger
cloth.
or stand.
Do not use abrasive items to clean the sole and iron
body.
DRY IRONING
Avoid touching the ironing sole with sharp metal
Insert the power plug into an electrical outlet.
objects.
Place the iron on its base (8).
Set the steam release regulator (5) to the "X" posi-
STORAGE
tion - steam release off.
Remove the power plug from the outlet.
Use the temperature regulator button (a) to select
Drain any remaining water from the water tank (pic.
the desired setting - "", "," "" or "MAX".
8).
Wait until the corresponding temperature indicator
Set the iron down vertically and allow it to cool com-
light turns green.
pletely.
The desired ironing sole temperature has been
Before storing the iron, the power cord should be
reached and you can begin the ironing process.
wound around the base (8).
Allow store the iron vertically.
CLEANING SYSTEM
To increase the service life of your iron, we recom-
Technical characteristics
mend cleaning it regularly (once or twice a month).
Power requirements: 220-230V ~50Hz
Set the steam release regulator (5) to the "X" posi-
Power rating: 2200 Wt
tion - steam release off.
Fill the water tank to "MAX."
The manufacture reserves the right to change the
Set the iron on its base.
product specifications without prior notice of the
Insert the power plug into an electrical outlet.
users.
Set the temperature regulator (a) to the "MAX" posi-
tion.
Service life of the iron is not less than 3 years
Wait until the corresponding temperature indicator
light turns green.
Guarantee
Unplug the power plug from the outlet and hold the
Details regarding guarantee conditions can be
iron horizontally above the sink.
obtained from the dealer from whom the appliance was
Press the cleaning button (10) (pic. 7).
purchased. The bill of sale or receipt must be produced
Boiling water and steam, together with scaling will
when making any claim under the terms of this guaran-
be forced out of the openings in the ironing sole.
tee.
You can lightly rock the iron forward and back until
all of the steam and water is released.
This product conforms to the EMC-
Release the cleaning button (10) after a minute or
Requirements as laid down by the Council
when the tank runs out of water.
Directive 89/336/EEC and to the Low
Place the iron on its base.
Voltage Regulation (23/73 EEC)
Insert the power plug into the outlet and allow the
iron to heat up again.
Iron a piece of unwanted fabric in order to allow the
remaining water to steam away.
AUTOMATIC SHUTOFF
This iron is equipped with two automatic shutoff modes.
1. If the iron is left in a horizontal position and is not
moved for 30 ± 5 seconds, it will beep and the green
indicator light (c) will beep. The iron automatically
turns on when the ironing process is resumed and
the previous temperature mode remains
unchanged.
2. If the iron is left in a vertical position and doesn't
move for 15 min ± 30 seconds. The iron automati-
cally turns on when the ironing process is resumed
and the previous temperature mode remains
unchanged.
CARE AND CLEANING
Before cleaning the iron, make sure that it is turned
off and has cooled completely.
Wipe the iron's outer surfaces with a damp cloth and
then wipe dry.
6

DEUTSCH
ELEKTRONISCHES DAMPFBÜGELEISEN
Reihenfolge eingestellt - MAX
MAX.
BEDIENUNGSANLEITUNG
Die Lichtanzeiger auf der Indikationstafel (b) haben drei
Leuchtfarben:
VORSICHTSMASSNAHMEN
- Rot er erfolgt die Erhitzung bis zur vorgegebenen
Lesen Sie vor der Anwendung die Bedienungsanleitung
Temperatur
aufmerksam durch und beachten Sie bitte die
- Grün die vorgegebene Temperatur wurde erreicht
Abbildungen.
- Orange Übergang zu einem anderen
Bevor Sie das Bügeleisen einschalten, sollten Sie sich
Temperaturbetrieb
davon überzeugen, dass die Netzstromspannung der
Der blinkende grüne Lichtindikator (c) leuchtet auf,
Betriebsspannung des Bügeleisens entspricht.
wenn das Bügeleisen an das Stromnetz angeschlossen
Verwenden Sie das Bügeleisen nur gemäß der in der
wird, und signalisiert das automatische Abschalten.
Anleitung vorgesehenen Bestimmung.
Das Bügeleisen schaltet sich automatisch aus, wenn:
Benutzen Sie das Bügeleisen nur auf einem Bügelbrett.
- wenn es sich innerhalb von 30 ± 5 Sekunden unbe-
Schalten Sie das Bügeleisen beim Einfüllen von Wasser
weglich in waagrechter Stellung befindet;
in den Behälter von der Stromzufuhr ab.
- wenn es sich innerhalb von 15Min ± 30Sek unbe-
Lassen Sie das eingeschaltete Bügeleisen nicht ohne
weglich in senkrechter Stellung befindet.
Aufsicht.
Der leuchtende rote Lichtindikator (d) zeigt an, dass
Schalten Sie das Bügeleisen immer vom Stromnetz ab,
das Bügeleisen erhitzt wird und das Heizelement
wenn Sie es nicht benutzen.
eingeschaltet ist, und der blinkende rote Lichtindikator
Tauchen Sie das Bügeleisen nicht in Wasser oder in
(d) zeigt an, dass das Heizelement ausgeschaltet ist.
andere Flüssigkeiten, um Stromschlag zu vermeiden.
Alle Temperatureinstellungen werden von Tonsignalen
Vermeiden Sie den Kontakt von ungeschützten
begleitet:
Hautoberflächen mit den heißen Oberflächen des
- ein Tonsignal ertönt beim Pressen der
Bügeleisens oder mit dem austretenden Dampf, um
Temperatureinstellungstaste (a)
Verbrennungen zu vermeiden.
- zwei Tonsignale signalisieren das Erreichen der
Achten Sie darauf, dass das Stromkabel nicht vom
vorgegebenen Temperatur des Bügeleisens
Rand des Bügelbretts runterhängt und keine heißen
- ein anhaltendes Tonsignal ertönt beim automatischen
Oberflächen berührt.
Abschalten des Bügeleisens, wie in waagrechter, sowie
Beim Abschalten des Bügeleisens vom Stromnetz hal-
in senkrechter Position.
ten Sie sich immer an der Steckgabel fest, ziehen Sie
niemals an der Netzschnur.
ANMERKUNG:
Bevor Sie das Bügeleisen wegräumen, lassen Sie es
Beim ersten Einschalten wird das Heizelement des
vollständig abkühlen, wickeln Sie danach die
Bügeleisens abgebrannt, deshalb kann ein leichter Rauch
Netzschnur um die Basis.
auftreten.
Um eine Stromnetzüberlastung zu vermeiden, sollten
Testen Sie das Bügeleisen vor der Anwendung auf einem
Sie nicht gleichzeitig mehrere Geräte mit hoher
alten Stofftuch, um sich davon zu überzeugen, dass die
Aufnahmeleistung einschalten.
Bügeleisensohle und der Wassertank absolut sauber sind.
Benutzen Sie das Bügeleisen nicht mit beschädigter
Steckgabel oder Netzschnur, sowie mit beliebigen
WAHL DES WASSERS:
anderen Schäden.
Sie können gewöhnliches Leitungswasser in das
Um Stromschlag zu vermeiden, sollten Sie das
Bügeleisen einfüllen.
Bügeleisen niemals auseinander nehmen, beim
Wenn das Leitungswasser hart ist, wird empfohlen es
Auffinden von Störungen wenden Sie sich an ein
mit destilliertem Wasser im Verhältnis 1 : 1 zu mischen,
autorisiertes Service-Center.
bei sehr hartem Wasser mischen Sie es mit destilliertem
Wasser im Verhältnis 1 : 2, um Wassersteinbildung zu
BESCHREIBUNG
vermeiden.
1. Wasserzersträubertrichter
2. Deckel der Einfüllöffnung
ANMERKUNG: Es ist verboten aromatisierte Flüssigkeiten,
3. Taste des Wasserzerstäubers
Essig, Stärkelösung, Wassersteinentferner, Chemikalien
4. Taste für zusätzliche Dampfzufuhr
oder andere Flüssigkeiten in den Wassertank einzufüllen.
5. Regler für kontinuierliche Dampfzufuhr
6. Bedientafel
EINFÜLLEN VON WASSER IN DAS BÜGELEISEN
7. Netzschnur
(Abb. 1, 2)
8. Basis
Bevor Sie das Wasser einzufüllen beginnen, sollten Sie
9. Wassertank
sich davon überzeugen, dass das Bügeleisen von der
10. Reinigungstaste
Stromzufuhr abgetrennt ist.
11. Bügeleisensohle
Stellen Sie den Regler der ständigen Dampfzufuhr (5)
12. Messbecher zum Wassereinfüllen
in die Position X.
Öffnen Sie den Deckel der Einfüllöffnung (2).
BEDIENTAFEL (6)
Füllen Sie das Wasser ein, indem Sie den Messbecher
A. Taste für Temperaturregelung
(12) benutzen.
B. Temperaturindikationstafel
C. Grüner Lichtindikator
ANMERKUNG:
D. Roter Lichtindikator
Gießen Sie das Wasser bis zur Markierung «MAX» ein.
Wenn während des Bügelns Wassernachgefüllt werden
Mit der Taste für die Temperaturregelung (a) wird die
soll, schalten Sie das Bügeleisen aus und nehmen Sie
gewünschte Bügeltemperatur in der folgenden
den Stecker aus der Steckdose.
7
Vt-1232-new.qxd 02.06.05 17:47 Page 7

DEUTSCH
Nachdem Sie das Bügeln beendet haben, drehen Sie
Temperaturindikator «» leuchtet rot auf, und der
das Bügeleisen um und lassen Sie die Wasserreste aus-
Temperaturindikator «» wird orange leuchten, was
laufen (Abb.8).
bedeutet, dass ein Übergang in einen anderen
Temperaturbetrieb erfolgt. Wenn der
BÜGELTEMPERATUR
Temperaturindikator «» grün leuchtet, bedeutet das,
Achten Sie vor dem Bügeln stets auf die empfohlene
dass die vorgegebene Temperatur «» erreicht wurde.
Temperatur, die auf der Etikette angegeben ist.
Das Einstellen der Temperaturbetriebe «» und
Wenn eine Etikette mit Bügelanweisungen fehlen sollte,
«MAX» erfolgt auf die gleiche Weise.
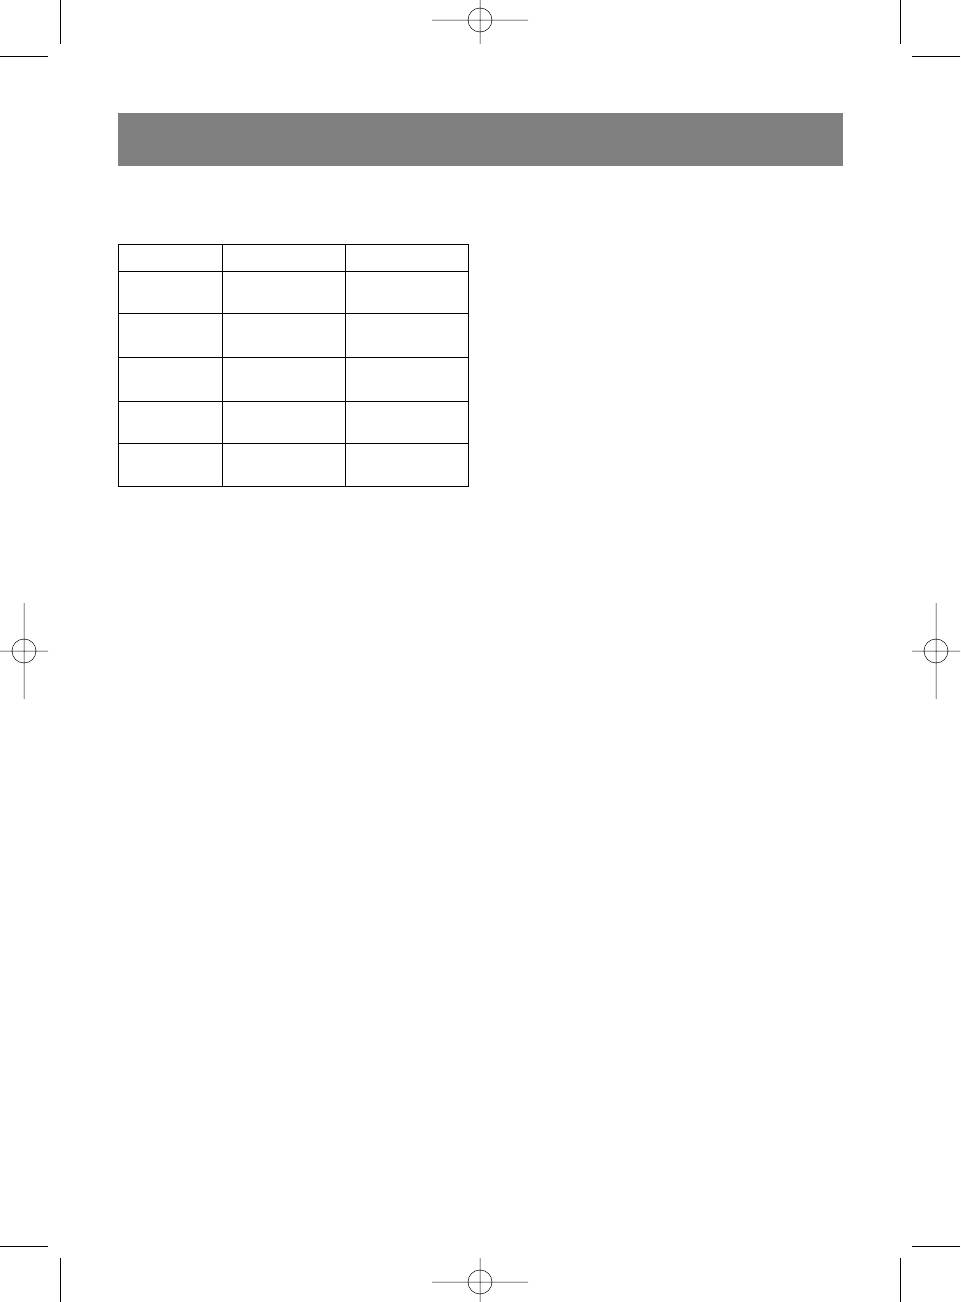
Sie jedoch den Stofftyp kennen, können Sie für die
Wahl der Bügeltemperatur die nachfolgende Tabelle
Der Übergang von einem höheren Temperaturbetrieb auf
verwenden.
einen niedrigeren erfordert einige Zeit, was mit de Abkühlen
des Bügeleisens zusammenhängt, warten Sie deshalb ab,
Markierung Stoffart Faser
bis der entsprechende Lichtindikator grün aufleuchtet.
(niedrige
Acryl
WASSERZERSTÄUBER
Synthetik
Temperatur)
Polyester
Sie können den Stoff anfeuchten, indem Sie mehrmals
die Zersträubertaste (3) pressen (Abb.3).
(mittlere
Azetatfaser
Überzeugen Sie sich davon, dass im Wassertank ausre-
Synthetik
Temperatur)
Viskose
ichend Wasser ist.
(mittlere
Seide
Seide
DAMPFBÜGELN
Temperatur)
Wolle
Wolle
Dampfbügeln ist nur bei hoher Temperatur der
Bügeleisensohle «», «» oder «MAX» möglich.
hohe
Baumwolle
Baumwolle
Stecken Sie die Steckgabel in die Steckdose.
Temperatur)
Leinen
Leinen
Stellen Sie das Bügeleisen auf die Basis (8).
Stellen Sie mit der Taste (a) die gewünschte
Baumwolle
Baumwolle
ÌÀÕ
Bügeltemperatur ein - «», «» oder «MAX».
Leinen
Leinen
Überzeugen Sie sich, dass der Wassertank ausreichend
Wasser enthält.
Diese Tabelle kann nur für Faserstoffe verwendet wer-
Warten Sie ab, bis der entsprechende
den. Bei einer anderen Stoffart (kreppartig, geprägt
Temperaturindikator grün aufleuchtet.
etc.) sollte sicherheitshalber bei niedriger Temperatur
Stellen Sie den Regler der kontinuierlichen
gebügelt werden.
Dampfzufuhr (5) in die gewünschte Position (Abb.4),
Sortieren Sie zuerst die Sachen nach ihrer
danach wird der Dampf beginnen aus den Öffnungen
Bügeltemperatur: Wolle zu Wolle, Baumwolle zu
auf der Bügeleisensohle (11) auszutreten.
Baumwolle etc.
Das Bügeleisen erhitzt sich schneller, als es sich
ACHTUNG:
abkühlt. Deshalb wird es empfohlen das Bügeln mit
Das Wasser kann aus der Bügeleisensohle auslaufen, wenn
einer niedrigen Temperatur anzufangen, zum Beispiel,
eine zu niedrige Temperatur eingestellt ist, was zu lästigen
synthetische Stoffe. Fahren Sie danach mit dem Bügeln
Flecken führen kann. Wenn das passiert ist, stellen Sie mit
bei höheren Temperaturen fort. Baumwolle und Leinen
der Taste (a) eine höhere Temperatur ein. Die Dampfzufuhr
sollten an letzter Stelle gebügelt werden.
wird fortgesetzt, sobald die eingestellte Temperatur erreicht
Wenn das Textilstück aus gemischten Stoffen besteht,
wird.
muss die niedrigste Temperatur eingestellt werden
(z.B., wenn ein Kleidungsstück zu 60% aus Polyester
ZUSÄTZLICHE DAMPFZUFUHR
und zu 40% aus Baumwolle besteht, sollte es bei einer
Stellen Sie mit der Taste (a) die gewünschte
Temperatur gebügelt werden, die für Polyester passt
Bügeltemperatur «», «» oder «MAX» ein.
«»).
Warten Sie, bis der entsprechende Temperaturindikator
grün aufleuchtet.
EINSTELLEN DER TEMPERATUR
Beim Pressen der Taste für die zusätzliche Dampfzufuhr
Stellen Sie das Bügeleisen auf die Basis(8).
(4) wird der Dampf intensiver aus der Bügeleisensohle
Stecken Sie die Steckgabel in die Steckdose, dabei
austreten (Abb.5).
erklingt ein langes Tonsignal und der Lichtindikator (c)
Diese Funktion ist sehr nützlich beim Glattbügeln von
auf der Bedienungstafel (6) fängt zu leuchten an.
Falten.
Stellen Sie mit der Taste (a) die gewünschte Temperatur
Die Funktion der zusätzlichen Dampfzufuhr kann nur im
ein, die Wahl erfolgt in der folgenden Reihenfolge:
Hochtemperaturenbetrieb «», «» oder «MAX»
MAXMAX.
angewendet werden.
Beispiel: niedrige Temperatur einstellen «»
Pressen Sie die Taste (a) viermal, der Lichtindikator für
SENKRECHTES ABDÄMPFEN
die Temperatur «» leuchtet rot auf, wenn die
Stecken Sie die Steckgabel in die Steckdose.
vorgegebene Temperatur erreicht ist, leuchtet der
Stellen Sie das Bügeleisen auf die Basis (8).
Lichtindikator für die Temperatur in grüner Farbe, und
Stellen Sie mit der Taste (a) die Bügeltemperatur «MAX»
es erklingen zwei Tonsignale. Beim Pressen der Taste
ein.
(a) leuchtet der rote Lichtindikator auf (d), der beim
Überzeugen Sie sich, dass der Wassertank ausreichend
Einschalten des Heizelements fortwährend leuchtet und
Wasser enthält.
blinkt, wenn das Heizelement ausgeschaltet ist.
Warten Sie ab, bis der entsprechende
Um die Temperatur in die Position «» einzustellen:
Temperaturindikator grün aufleuchtet.
Pressen Sie wiederholt die Taste (a), der
Halten Sie das Bügeleisen senkrecht und pressen Sie
8
Vt-1232-new.qxd 02.06.05 17:47 Page 8
Vt-1232-new.qxd 02.06.05 17:47 Page 9
DEUTSCH
die Taste für die zusätzliche Dampfzufuhr (4), der
Bügeleisen automatisch wieder einschalten, und der
Dampf wird aus der Bügeleisensohle(11) austreten
vorgegebene Temperaturbetrieb bleibt unverändert.
(Abb. 6).
2. Wenn sich das Bügeleisen innerhalb von 15 Min ± 30
Sekunden unbeweglich in senkrechter Position befind-
Wichtige Information:
et. Wenn der Bügelprozess fortgesetzt wird, wird sich
Es wird nicht empfohlen das Abdämpfen für synthetis-
das Bügeleisen automatisch wieder einschalten, und
che Stoffe zu verwenden.
der vorgegebene Temperaturbetrieb bleibt unverän-
Berühren Sie beim Abdämpfen mit der Bügeleisensohle
dert.
nicht den Stoff, um einen möglichen Schmelzeffekt zu
vermeiden.
REINIGUNG UND PFLEGE
Sie sollten niemals Kleidung an einem Menschenkörper
Vor der Reinigung des Bügeleisens sollten Sie sich
abdämpfen, da die Dampftemperatur sehr hoch ist.
davon überzeugen, dass es von der Stromzufuhr
Benutzen Sie einen Kleiderbügel.
abgeschaltet und bereits abgekühlt ist.
Wischen Sie das Gehäuse des Bügeleisens mit einem
TROCKENES BÜGELN
angefeuchteten Tuch ab, wischen Sie es danach trock-
Stecken Sie die Steckgabel in die Steckdose.
en.
Stellen Sie das Bügeleisen auf die Basis (8).
Ablagerungen auf der Bügeleisensohle können mit
Stellen Sie den Regler der ständigen Dampfzufuhr (5)
einem Tuch entfernt werden, das mit einer Essig-
in die Position «X» - die Dampfzufuhr ist ausgeschaltet.
Wasser-Lösung angefeuchtet wurde.
Stellen Sie mit der Taste (a) die gewünschte
Nach dem Entfernen der Ablagerungen polieren Sie die
Bügeltemperatur «», «», «» oder «MAX» ein.
Sohle mit einem trockenen Tuch.
Warten Sie ab, bis der entsprechende
Verwenden Sie keine Schleifmittel für die Reinigung des
Temperaturindikator grün aufleuchtet.
Sohle und des Gehäuses des Bügeleisens.
Die vorgegebene Temperatur des Bügeleisens wurde
Vermeiden Sie den Kontakt der Bügeleisensohle mit
erreicht, Sie können mit dem Bügeln beginnen.
spitzen Metallgegenständen.
REINIGUNGSSYSTEM
AUFBEWAHRUNG
Um die Lebensdauer des Bügeleisens zu verlängern,
Nehmen Sie den Stecker aus der Steckdose.
empfehlen wir Ihnen regelmäßig die Reinigung des
Entfernen Sie das übergebliebene Wasser aus dem
Bügeleisens durchzuführen (einmal oder zweimal pro
Wassertank (Abb.8).
Monat).
Stellen Sie das Bügeleisen senkrecht auf und lassen
Stellen Sie den Regler der ständigen Dampfzufuhr (5)
Sie es abkühlen. Bei der Aufbewahrung kann die
in die Position «X» - die Dampfzufuhr ist ausgeschaltet.
Netzschnur um die Basis (8) gewickelt werden.
Füllen Sie den Wassertank mut Wasser bis zu der
Bewahren Sie das Bügeleisen in senkrechter Stellung
Markierung «MAX».
auf.
Stellen Sie das Bügeleisen auf die Basis.
Stecken Sie die Steckgabel in die Steckdose.
Technische Kenndaten
Stellen Sie mit der Taste (a) die Bügeltemperatur «MAX»
Speisespannung: 220-230 V ~50Hz
ein.
Aufgenommene Leistung: 2200 W
Warten Sie, bis der entsprechende Temperaturindikator
grün aufleuchtet.
Der Hersteller behält sich das Recht vor die
Nehmen Sie die Steckgabel aus der Dose und halten
Charakteristiken des Gerätes ohne Vorbescheid zu ändern.
Sie das Bügeleisen waagrecht über ein Spülbecken.
Pressen Sie die Reinigungstaste (10) (Abb.7).
Benutzungsdauer des Bügeleisens nicht weniger als 3
Aus den Öffnungen auf der Sohle des Bügeleisens wird
Jahre
kochendes Wasser und Dampf zusammen mit Kalkstein
ausgestoßen.
Gewährleistung
Sie können das Bügeleisen leicht vor und zurück
Ausführliche Bedingungen der Gewährleistung kann man
schwenken, während der Dampf und das Wasser aus-
beim Dealer, der diese Geräte verkauft hat, bekommen. Bei
treten.
beliebiger Anspruchserhebung soll man während der
Lassen Sie die Reinigungstaste (10) nach einer Minute
Laufzeit der vorliegenden Gewährleistung den Check oder
oder wenn sich im Wassertank kein Wasser mehr
die Quittung über den Ankauf vorzulegen.
befindet los.
Stellen Sie das Bügeleisen auf die Basis.
Das vorliegende Produkt entspricht den
Stecken Sie die Steckgabel in die Steckdose und
Forderungen der elektromagnetischen
lassen Sie das Bügeleisen wieder erhitzen.
Verträglichkeit, die in 89/336/EWG -Richtlinie
Bügeln Sie ein altes Stoffstück, damit das verbliebene
des Rates und den Vorschriften 23/73/EWG
Wasser verdunsten kann.
über die Niederspannungsgeräte vorgese-
hen sind.
AUTOMATISCHES AUSSCHALTEN
In diesem Modell sind zwei Betriebsarten zum automatis-
chen Ausschalten des Bügeleisens vorgesehen.
1. Wenn sich das Bügeleisen innerhalb von 30 ± 5 unbe-
weglich in waagrechter Position befindet, erklingt ein
langes Tonsignal und der grüne Lichtindikator (c) fängt
zu blinken an.
Wenn der Bügelprozess fortgesetzt wird, wird sich das
9
ÐÓÑÑÊÈÉ
ÝËÅÊÒÐÎÍÍÛÉ ÏÀÐÎÂÎÉ ÓÒÞÃ
íåîáõîäèìàÿ òåìïåðàòóðà ãëàæåíèÿ â ñëåäóþùåì
ïîðÿäêå - MAX>>>>>>MAX.
ÈÍÑÒÐÓÊÖÈß ÏÎ ÝÊÑÏËÓÀÒÀÖÈÈ
Ñâåòîäèîäû íà èíäèêàòîðíîé ïàíåëè (B) èìåþò òðè
öâåòà ñâå÷åíèÿ:
ÌÅÐÛ ÏÐÅÄÎÑÒÎÐÎÆÍÎÑÒÈ
- êðàñíûé - ïðîèñõîäèò íàãðåâ äî çàäàííîé
Ïåðåä ýêñïëóàòàöèåé âíèìàòåëüíî ïðî÷èòàéòå âñþ
òåìïåðàòóðû,
èíñòðóêöèþ, à òàêæå îáðàòèòå âíèìàíèå íà
- çåëåíûé - çàäàííàÿ òåìïåðàòóðà äîñòèãíóòà,
èëëþñòðàöèè.
- îðàíæåâûé - îñóùåñòâëÿåòñÿ ïåðåõîä íà äðóãîé
Ïåðåä âêëþ÷åíèåì óòþãà óáåäèòåñü, ÷òî
òåìïåðàòóðíûé ðåæèì.
íàïðÿæåíèå â ñåòè ñîîòâåòñòâóåò ðàáî÷åìó
Ìèãàþùèé çåëåíûé ñâåòîâîé èíäèêàòîð (C)
íàïðÿæåíèþ óòþãà.
çàãîðàåòñÿ ïðè âêëþ÷åíèè óòþãà â ñåòü, à òàêæå
Èñïîëüçóéòå óòþã òîëüêî â öåëÿõ, ïðåäóñìîòðåííûõ
ñèãíàëèçèðóåò îá àâòîìàòè÷åñêîì îòêëþ÷åíèè.
èíñòðóêöèåé.
Àâòîìàòè÷åñêîå îòêëþ÷åíèå óòþãà ïðîèñõîäèò:
Ïîëüçóéòåñü óòþãîì òîëüêî íà ãëàäèëüíîé äîñêå.
- åñëè óòþã â ãîðèçîíòàëüíîì ïîëîæåíèè áóäåò
Ïðè íàïîëíåíèè ðåçåðâóàðà óòþãà âîäîé âñåãäà
íåïîäâèæíûì â òå÷åíèå 30 ± 5 ñåêóíä,
îòêëþ÷àéòå åãî îò ñåòè.
- åñëè óòþã â âåðòèêàëüíîì ïîëîæåíèè áóäåò
Íå îñòàâëÿéòå âêëþ÷åííûé óòþã áåç ïðèñìîòðà.
íåïîäâèæíûì â òå÷åíèå 15 ìèí.±30 ñåê.
Âñåãäà îòêëþ÷àéòå óòþã îò ñåòè, åñëè íå ïîëüçóåòåñü
Ñâåòÿùèéñÿ êðàñíûé ñâåòîâîé èíäèêàòîð (D)
èì.
ïîêàçûâàåò, ÷òî ïðîèñõîäèò íàãðåâ è
×òîáû èçáåæàòü ïîðàæåíèÿ ýëåêòðè÷åñêèì òîêîì, íå
íàãðåâàòåëüíûé ýëåìåíò âêëþ÷åí, à ìèãàþùèé
ïîãðóæàéòå óòþã â âîäó èëè â ëþáóþ äðóãóþ
êðàñíûé ñâåòîâîé èíäèêàòîð (D) ïîêàçûâàåò, ÷òî
æèäêîñòü.
íàãðåâàòåëüíûé ýëåìåíò îòêëþ÷åí.
Èçáåãàéòå êîíòàêòà îòêðûòûõ ó÷àñòêîâ êîæè ñ
Âñå äåéñòâèÿ ïî óñòàíîâêå òåìïåðàòóðû
ãîðÿ÷èìè ïîâåðõíîñòÿìè óòþãà èëè âûõîäÿùèì
ñîïðîâîæäàþòñÿ çâóêîâûìè ñèãíàëàìè:
ïàðîì, ÷òîáû èçáåæàòü îæîãîâ.
- îäèí çâóêîâîé ñèãíàë çâó÷èò ïðè íàæàòèè êíîïêè
Ñëåäèòå, ÷òîáû ñåòåâîé øíóð íå ñâåøèâàëñÿ ñ êðàÿ
óñòàíîâêè òåìïåðàòóðû (À),
ãëàäèëüíîé äîñêè, à òàêæå íå êàñàëñÿ ãîðÿ÷èõ
- äâà çâóêîâûõ ñèãíàëà ñèãíàëèçèðóþò î äîñòèæåíèè
ïîâåðõíîñòåé.
çàäàííîé òåìïåðàòóðû óòþãà,
Ïðè îòêëþ÷åíèè óòþãà îò ýëåêòðè÷åñêîé ñåòè âñåãäà
- îäèí ïðîäîëæèòåëüíûé çâóêîâîé ñèãíàë ïðîçâó÷èò
äåðæèòåñü çà ñåòåâóþ âèëêó, íèêîãäà íå òÿíèòå çà
ïðè àâòîìàòè÷åñêîì îòêëþ÷åíèè óòþãà, êàê â
ñåòåâîé øíóð.
ãîðèçîíòàëüíîì, òàê è â âåðòèêàëüíîì ïîëîæåíèè.
Ïåðåä òåì êàê óáðàòü óòþã, äàéòå åìó ïîëíîñòüþ
îñòûòü, çàòåì íàìîòàéòå ñåòåâîé øíóð âîêðóã
ÏÐÈÌÅ×ÀÍÈÅ
îñíîâàíèÿ.
Ïðè ïåðâîì âêëþ÷åíèè íàãðåâàòåëüíûé ýëåìåíò óòþãà
Âî èçáåæàíèå ïåðåãðóçêè ýëåêòðè÷åñêîé ñåòè íå
îáãîðàåò, ïîýòîìó âîçìîæíî ïîÿâëåíèå íåáîëüøîãî
âêëþ÷àéòå îäíîâðåìåííî íåñêîëüêî ïðèáîðîâ ñ
êîëè÷åñòâà äûìà - ýòî íîðìàëüíîå ÿâëåíèå.
áîëüøîé ïîòðåáëÿåìîé ìîùíîñòüþ.
Íå èñïîëüçóéòå óòþã ñ ïîâðåæäåííûìè ñåòåâîé
Ïåðåä ðàáîòîé ïðîòåñòèðóéòå íàãðåòûé óòþã íà êóñî÷êå
âèëêîé, ñåòåâûì øíóðîì, à òàêæå ñ ëþáûìè äðóãèìè
ñòàðîé òêàíè, ÷òîáû óáåäèòüñÿ, ÷òî ïîäîøâà óòþãà è
íåèñïðàâíîñòÿìè.
ðåçåðâóàð äëÿ âîäû àáñîëþòíî ÷èñòûå.
Âî èçáåæàíèå ïîðàæåíèÿ ýëåêòðè÷åñêèì
òîêîì íèêîãäà íå ðàçáèðàéòå óòþã ñàìîñòîÿòåëüíî.
ÂÛÁÎÐ ÂÎÄÛ
Ïðè îáíàðóæåíèè íåèñïðàâíîñòè îáðàùàéòåñü â
 óòþã âû ìîæåòå íàëèòü îáû÷íóþ âîäó èç-ïîä êðàíà.
àâòîðèçîâàííûé ñåðâèñíûé öåíòð.
Åñëè âîäîïðîâîäíàÿ âîäà æåñòêàÿ, òî
ðåêîìåíäóåòñÿ ñìåøèâàòü åå ñ äèñòèëëèðîâàííîé
ÎÏÈÑÀÍÈÅ
âîäîé â ñîîòíîøåíèè 1:1, ïðè î÷åíü æåñòêîé âîäå
1. Ñîïëî ðàçáðûçãèâàòåëÿ âîäû
ñìåøèâàéòå åå ñ äèñòèëëèðîâàííîé âîäîé â
2. Êðûøêà çàëèâî÷íîãî îòâåðñòèÿ
ñîîòíîøåíèè 1:2, ÷òîáû ïðåäîòâðàòèòü îáðàçîâàíèå
3. Êíîïêà ðàçáðûçãèâàòåëÿ âîäû
íàêèïè.
4. Êíîïêà äîïîëíèòåëüíîé ïîäà÷è ïàðà
5. Ðåãóëÿòîð ïîñòîÿííîé ïîäà÷è ïàðà
ÏÐÈÌÅ×ÀÍÈÅ: çàïðåùàåòñÿ çàëèâàòü â ðåçåðâóàð äëÿ
6. Ïàíåëü óïðàâëåíèÿ
âîäû àðîìàòèçèðóþùèå æèäêîñòè, óêñóñ, ðàñòâîð
7. Ñåòåâîé øíóð
êðàõìàëà, ðåàãåíòû äëÿ óäàëåíèÿ íàêèïè, õèìè÷åñêèå
8. Îñíîâàíèå
âåùåñòâà è ò.ä.
9. Ðåçåðâóàð äëÿ âîäû
10. Êíîïêà î÷èñòêè
ÍÀÏÎËÍÅÍÈÅ ÓÒÞÃÀ ÂÎÄÎÉ (ðèñ. 1, 2)
11. Ïîäîøâà óòþãà
Ïðåæäå ÷åì íà÷íåòå íàëèâàòü âîäó, óáåäèòåñü, ÷òî
12. Åìêîñòü äëÿ çàëèâêè âîäû
óòþã îòêëþ÷åí îò ñåòè.
Óñòàíîâèòå ðåãóëÿòîð ïîñòîÿííîé ïîäà÷è ïàðà (5) â
ÏÀÍÅËÜ ÓÏÐÀÂËÅÍÈß (6)
ïîëîæåíèå "Õ".
A. Êíîïêà óñòàíîâêè òåìïåðàòóðû
Îòêðîéòå êðûøêó çàëèâî÷íîãî îòâåðñòèÿ (2).
B. Èíäèêàòîðíàÿ ïàíåëü òåìïåðàòóðû
Çàëåéòå âîäó, èñïîëüçóÿ åìêîñòü (12).
C. Çåëåíûé ñâåòîâîé èíäèêàòîð
D. Êðàñíûé ñâåòîâîé èíäèêàòîð
ÏÐÈÌÅ×ÀÍÈÅ
Íå íàëèâàéòå âîäó âûøå îòìåòêè "MAX".
Êíîïêîé óñòàíîâêè òåìïåðàòóðû (À) óñòàíàâëèâàåòñÿ
Åñëè âî âðåìÿ ãëàæåíèÿ íåîáõîäèìî äîáàâèòü âîäó,
10
Vt-1232-new.qxd 02.06.05 17:47 Page 10
ÐÓÑÑÊÈÉ
òî îòêëþ÷èòå óòþã è âûíüòå ñåòåâóþ âèëêó èç
(D), êîòîðûé ãîðèò ïîñòîÿííî ïðè âêëþ÷åíèè
ðîçåòêè.
íàãðåâàòåëüíîãî ýëåìåíòà è ìèãàåò, êîãäà
Ïîñëå òîãî êàê âû çàêîí÷èòå ãëàäèòü, ïåðåâåðíèòå
íàãðåâàòåëüíûé ýëåìåíò îòêëþ÷åí.
óòþã è ñëåéòå îñòàòêè âîäû (ðèñ.8).
×òîáû óñòàíîâèòü òåìïåðàòóðó â ïîçèöèþ "":
Íàæìèòå åùå ðàç íà êíîïêó (A) - çàãîðèòñÿ êðàñíûì
ÒÅÌÏÅÐÀÒÓÐÀ ÃËÀÆÅÍÈß
öâåòîì èíäèêàòîð òåìïåðàòóðû "", à èíäèêàòîð
Âñåãäà ïåðåä ãëàæåíèåì âåùåé ïîñìîòðèòå íà
òåìïåðàòóðû "" áóäåò ãîðåòü îðàíæåâûì öâåòîì,
ÿðëûê, ãäå äîëæíà áûòü óêàçàíà ðåêîìåíäóåìàÿ
ýòî îçíà÷àåò, ÷òî îñóùåñòâëåí ïåðåõîä íà äðóãîé
òåìïåðàòóðà.
òåìïåðàòóðíûé ðåæèì. Êîãäà ñâåòîâîé èíäèêàòîð
Åñëè ÿðëûê ñ óêàçàíèÿìè ïî ãëàæåíèþ îòñóòñòâóåò,
òåìïåðàòóðû "" çàãîðèòñÿ çåëåíûì öâåòîì, ýòî
íî âû çíàåòå òèï ìàòåðèàëà, òî äëÿ âûáîðà
îçíà÷àåò, ÷òî çàäàííàÿ òåìïåðàòóðà "" äîñòèãíóòà.
òåìïåðàòóðû ãëàæåíèÿ ñìîòðèòå òàáëèöó.
Äàëüíåéøèé ïðîöåññ óñòàíîâêè òåìïåðàòóðû ""
è "MAX", àíàëîãè÷åí ïðåäûäóùèì.
Îáîçíà÷åíèÿ Âèä òêàíè Âîëîêíî
Ïðè ïåðåõîäå ñ áîëåå âûñîêîãî òåìïåðàòóðíîãî
ðåæèìà íà íèçêèé òðåáóåòñÿ íåêîòîðîå âðåìÿ, êîòîðîå
(íèçêàÿ
àêðèë
ñèíòåòèêà
íåîáõîäèìî, ÷òîáû óòþã îñòûë, ïîýòîìó äîæäèòåñü,
òåìïåðàòóðà)
ïîëèýñòåð
ïîêà ñîîòâåòñòâóþùèé ñâåòîâîé èíäèêàòîð
(ñðåäíÿÿ
àöåòàòâîëîêíî
òåìïåðàòóðû íå çàãîðèòñÿ çåëåíûì öâåòîì.
ñèíòåòèêà
òåìïåðàòóðà)
âèñêîçà
ÐÀÇÁÐÛÇÃÈÂÀÒÅËÜ ÂÎÄÛ
(ñðåäíÿÿ
øåëê
øåëê
Âû ìîæåòå óâëàæíèòü òêàíü, íàæàâ íåñêîëüêî ðàç íà
òåìïåðàòóðà)
øåðñòü
øåðñòü
êíîïêó ðàçáðûçãèâàòåëÿ (3) (ðèñ.3).
Óáåäèòåñü, ÷òî â ðåçåðâóàðå äîñòàòî÷íî âîäû.
(âûñîêàÿ
õëîïîê
õëîïîê
òåìïåðàòóðà)
ëåí
ëåí
ÏÀÐÎÂÎÅ ÃËÀÆÅÍÈÅ
Ïàðîâîå ãëàæåíèå âîçìîæíî òîëüêî ïðè âûñîêîé
õëîïîê
õëîïîê
ÌÀÕ
òåìïåðàòóðå ïîäîøâû óòþãà: "", "" èëè "MAX".
ëåí
ëåí
Âñòàâüòå ñåòåâóþ âèëêó â ðîçåòêó.
Ïîñòàâüòå óòþã íà îñíîâàíèå (8).
Êíîïêîé (A) óñòàíîâèòå íåîáõîäèìóþ òåìïåðàòóðó
Òàáëèöà ïðèìåíèìà òîëüêî äëÿ âîëîêíèñòûõ
ãëàæåíèÿ: "", "" èëè "MAX".
ìàòåðèàëîâ. Åñëè ìàòåðèàë äðóãîãî òèïà
Óáåäèòåñü, ÷òî â ðåçåðâóàðå äîñòàòî÷íî âîäû.
(ãîôðèðîâàííûé, ðåëüåôíûé è ò.ä.), òî åãî ëó÷øå
Ïîäîæäèòå, ïîêà ñîîòâåòñòâóþùèé ñâåòîâîé
âñåãî ãëàäèòü ïðè íèçêîé òåìïåðàòóðå.
èíäèêàòîð òåìïåðàòóðû çàãîðèòñÿ çåëåíûì öâåòîì.
Ñíà÷àëà îòñîðòèðóéòå âåùè ïî òåìïåðàòóðå
Óñòàíîâèòå ðåãóëÿòîð ïîñòîÿííîé ïîäà÷è ïàðà (5) íà
ãëàæåíèÿ: øåðñòü ê øåðñòè, õëîïîê ê õëîïêó è ò.ä.
òðåáóåìóþ ïîçèöèþ (ðèñ.4), ïîñëå ýòîãî, ïàð íà÷íåò
Óòþã íàãðåâàåòñÿ áûñòðåå, ÷åì îñòûâàåò, ïîýòîìó
âûõîäèòü èç îòâåðñòèé ïîäîøâû óòþãà (11).
ðåêîìåíäóåòñÿ íà÷èíàòü ãëàäèòü ñ íèçêîé
òåìïåðàòóðû, íàïðèìåð ñ ñèíòåòè÷åñêèõ òêàíåé.
ÂÍÈÌÀÍÈÅ!
Ïîñëå ÷åãî ïåðåõîäèòå íà ãëàæåíüå ïðè áîëåå
Âîäà ìîæåò âûòåêàòü èç ïîäîøâû óòþãà, åñëè
âûñîêèõ òåìïåðàòóðàõ. Õëîïîê è ë¸í ãëàäüòå â
óñòàíîâëåííàÿ òåìïåðàòóðà ñëèøêîì íèçêàÿ, ýòî
ïîñëåäíþþ î÷åðåäü.
ìîæåò ñòàòü ïðè÷èíîé ïîÿâëåíèÿ ïÿòåí. Åñëè ýòî
Åñëè âåùü èçãîòîâëåíà èç ñìåñîâîé òêàíè, òî
ñëó÷èëîñü, óñòàíîâèòå êíîïêîé (A) áîëåå âûñîêóþ
íåîáõîäèìî óñòàíîâèòü òåìïåðàòóðó ãëàæåíèÿ äëÿ
òåìïåðàòóðó. Ïîäà÷à ïàðà âîçîáíîâèòñÿ, êàê òîëüêî
òêàíè ñ ñàìîé íèçêîé òåìïåðàòóðîé (íàïðèìåð, åñëè
áóäåò äîñòèãíóòà óñòàíîâëåííàÿ òåìïåðàòóðà óòþãà.
âåùü ñîñòîèò íà 60% èç ïîëèýñòåðà è íà 40% èç
õëîïêà, òî å¸ ñëåäóåò ãëàäèòü ïðè òåìïåðàòóðå,
ÄÎÏÎËÍÈÒÅËÜÍÀß ÏÎÄÀ×À ÏÀÐÀ
ïîäõîäÿùåé äëÿ ïîëèýñòåðà "").
Êíîïêîé (A) óñòàíîâèòå íåîáõîäèìóþ òåìïåðàòóðó
ãëàæåíèÿ: "", "" èëè "MAX".
ÓÑÒÀÍÀÂËÈÂÀÅÌ ÒÅÌÏÅÐÀÒÓÐÓ
Ïîäîæäèòå, ïîêà ñîîòâåòñòâóþùèé ñâåòîâîé
Ïîñòàâüòå óòþã íà îñíîâàíèå (8).
èíäèêàòîð òåìïåðàòóðû çàãîðèòñÿ çåëåíûì öâåòîì.
Âñòàâüòå ñåòåâóþ âèëêó â ðîçåòêó - ïðè ýòîì
Ïðè íàæàòèè êíîïêè äîïîëíèòåëüíîé ïîäà÷è ïàðà (4)
ïðîçâó÷èò äëèííûé çâóêîâîé ñèãíàë è ñâåòîâîé
ïàð èç ïîäîøâû óòþãà áóäåò âûõîäèòü áîëåå
èíäèêàòîð (C) íà ïàíåëè óïðàâëåíèÿ (6) áóäåò
èíòåíñèâíî (ðèñ.5).
ìèãàòü.
Ýòà ôóíêöèÿ î÷åíü ïîëåçíà ïðè ðàçãëàæèâàíèè
Êíîïêîé (A) óñòàíîâèòå íåîáõîäèìóþ òåìïåðàòóðó,
ñêëàäîê.
âûáîð îñóùåñòâëÿåòñÿ â ñëåäóþùåì ïîðÿäêå:
Ôóíêöèÿ äîïîëíèòåëüíîé ïîäà÷è ïàðà ìîæåò áûòü
MAX>>>>>>MAX.
èñïîëüçîâàíà òîëüêî ïðè âûñîêîòåìïåðàòóðíîì
Ïðèìåð: óñòàíîâèòü íèçêóþ òåìïåðàòóðó ""
ðåæèìå ãëàæåíèÿ: "", "" èëè "MAX".
Íàæìèòå íà êíîïêó (A) 4 ðàçà, ñâåòîâîé èíäèêàòîð
òåìïåðàòóðû "" çàãîðèòñÿ êðàñíûì öâåòîì, êîãäà
ÂÅÐÒÈÊÀËÜÍÎÅ ÎÒÏÀÐÈÂÀÍÈÅ
òåìïåðàòóðà äîñòèãíåò çàäàííîé, ñâåòîâîé
Âñòàâüòå ñåòåâóþ âèëêó â ðîçåòêó.
èíäèêàòîð òåìïåðàòóðû çàãîðèòñÿ çåëåíûì öâåòîì,
Ïîñòàâüòå óòþã íà îñíîâàíèå (8).
è ïðîçâó÷àò äâà çâóêîâûõ ñèãíàëà. Ïðè íàæàòèè
Êíîïêîé (À) óñòàíîâèòå òåìïåðàòóðó ãëàæåíèÿ
êíîïêè (A) çàãîðàåòñÿ êðàñíûé ñâåòîâîé èíäèêàòîð
"MAX".
11
Vt-1232-new.qxd 02.06.05 17:47 Page 11
Vt-1232-new.qxd 02.06.05 17:47 Page 12
ÐÓÑÑÊÈÉ
Óáåäèòåñü, ÷òî â ðåçåðâóàðå äîñòàòî÷íî âîäû.
2. Åñëè óòþã â âåðòèêàëüíîì ïîëîæåíèè áóäåò
Ïîäîæäèòå, ïîêà ñâåòîâîé èíäèêàòîð òåìïåðàòóðû
íåïîäâèæíûì â òå÷åíèå 15 ìèí. ± 30 ñåêóíä. Ïîñëå
çàãîðèòñÿ çåëåíûì öâåòîì.
âîçîáíîâëåíèÿ ïðîöåññà ãëàæåíèÿ óòþã
Äåðæèòå óòþã âåðòèêàëüíî è íàæèìàéòå êíîïêó
àâòîìàòè÷åñêè âêëþ÷èòñÿ, à óñòàíîâëåííûé ðåæèì
äîïîëíèòåëüíîé ïîäà÷è ïàðà (4), ïàð áóäåò âûõîäèòü
òåìïåðàòóðû îñòàíåòñÿ íåèçìåííûì.
èç ïîäîøâû óòþãà (11) (ðèñ. 6).
ÓÕÎÄ È ×ÈÑÒÊÀ
Âàæíàÿ èíôîðìàöèÿ
Ïðåæäå ÷åì ÷èñòèòü óòþã, óáåäèòåñü, ÷òî îí îòêëþ÷åí
Íå ðåêîìåíäóåòñÿ âûïîëíÿòü âåðòèêàëüíîå
îò ñåòè è ïîëíîñòüþ îñòûë.
îòïàðèâàíèå ñèíòåòè÷åñêèõ òêàíåé.
Ïðîòèðàéòå êîðïóñ óòþãà ñëåãêà âëàæíîé òêàíüþ,
Ïðè îòïàðèâàíèè íå ïðèêàñàéòåñü ïîäîøâîé óòþãà ê
ïîñëå ýòîãî ïðîòðèòå åãî íàñóõî.
ìàòåðèàëó, ÷òîáû èçáåæàòü åãî îïëàâëåíèÿ.
Îòëîæåíèÿ íà ïîäîøâå óòþãà ìîãóò áûòü óäàëåíû
Íèêîãäà íå îòïàðèâàéòå îäåæäó, îäåòóþ íà ÷åëîâåêà,
òêàíüþ, ñìî÷åííîé â óêñóñíî-âîäíîì ðàñòâîðå.
òàê êàê òåìïåðàòóðà ïàðà î÷åíü âûñîêà. Ïîëüçóéòåñü
Ïîñëå óäàëåíèÿ îòëîæåíèé îòïîëèðóéòå ïîäîøâó
ïëå÷èêàìè èëè âåøàëêîé.
ñóõîé òêàíüþ.
Íå èñïîëüçóéòå àáðàçèâíûå âåùåñòâà äëÿ ÷èñòêè
ÑÓÕÎÅ ÃËÀÆÅÍÈÅ
ïîäîøâû è êîðïóñà óòþãà.
Âñòàâüòå ñåòåâóþ âèëêó â ðîçåòêó.
Èçáåãàéòå êîíòàêòà ïîäîøâû óòþãà ñ îñòðûìè
Ïîñòàâüòå óòþã íà îñíîâàíèå (8).
ìåòàëëè÷åñêèìè ïðåäìåòàìè.
Óñòàíîâèòå ðåãóëÿòîð ïîñòîÿííîé ïîäà÷è ïàðà (5) â
ïîëîæåíèå "Õ" - ïîäà÷à ïàðà âûêëþ÷åíà.
ÕÐÀÍÅÍÈÅ
Êíîïêîé (À) óñòàíîâèòå íåîáõîäèìóþ òåìïåðàòóðó
Âûíüòå ñåòåâóþ âèëêó èç ðîçåòêè.
ãëàæåíèÿ: "", "", "" èëè "MAX".
Âûëåéòå îñòàâøóþñÿ âîäó èç ðåçåðâóàðà äëÿ âîäû
Ïîäîæäèòå, ïîêà ñîîòâåòñòâóþùèé ñâåòîâîé
(ðèñ.8).
èíäèêàòîð òåìïåðàòóðû çàãîðèòñÿ çåëåíûì öâåòîì.
Ïîñòàâüòå óòþã âåðòèêàëüíî è äàéòå åìó îñòûòü.
Çàäàííàÿ òåìïåðàòóðà ïîäîøâû óòþãà äîñòèãíóòà,
Ïðè õðàíåíèè óòþãà ñåòåâîé øíóð ìîæíî
ìîæíî íà÷èíàòü ïðîöåññ ãëàæåíèÿ.
íàìàòûâàòü âîêðóã îñíîâàíèÿ (8).
Âñåãäà õðàíèòå óòþã â âåðòèêàëüíîì ïîëîæåíèè.
ÑÈÑÒÅÌÀ Î×ÈÑÒÊÈ
Äëÿ óâåëè÷åíèÿ ñðîêà ñëóæáû óòþãà ìû
Òåõíè÷åñêèå õàðàêòåðèñòèêè
ðåêîìåíäóåì ðåãóëÿðíî âûïîëíÿòü åãî î÷èñòêó (ðàç
Íàïðÿæåíèå ïèòàíèÿ: 220-230 Â~50 Ãö
èëè äâà ðàçà â ìåñÿö).
Ïîòðåáëÿåìàÿ ìîùíîñòü: 2200 Âò
Óñòàíîâèòå ðåãóëÿòîð ïîñòîÿííîé ïîäà÷è ïàðà (5) â
ïîëîæåíèå "Õ" - ïîäà÷à ïàðà âûêëþ÷åíà.
Ïðîèçâîäèòåëü îñòàâëÿåò çà ñîáîé ïðàâî èçìåíÿòü
Íàïîëíèòå ðåçåðâóàð âîäîé äî îòìåòêè "MAX".
õàðàêòåðèñòèêè ïðèáîðîâ áåç ïðåäâàðèòåëüíîãî
Ïîñòàâüòå óòþã íà îñíîâàíèå.
óâåäîìëåíèÿ.
Âñòàâüòå ñåòåâóþ âèëêó â ðîçåòêó.
Êíîïêîé (À) óñòàíîâèòå òåìïåðàòóðó ãëàæåíèÿ
Ñðîê ñëóæáû óòþãà íå ìåíåå 3-õ ëåò
"MAX".
Ïîäîæäèòå, ïîêà ñâåòîâîé èíäèêàòîð òåìïåðàòóðû
Äàííîå èçäåëèå ñîîòâåòñòâóåò âñåì
çàãîðèòñÿ çåëåíûì öâåòîì.
òðåáóåìûì åâðîïåéñêèì è ðîññèéñêèì
Âûíüòå ñåòåâóþ âèëêó èç ðîçåòêè è äåðæèòå óòþã
ñòàíäàðòàì áåçîïàñíîñòè è ãèãèåíû.
ãîðèçîíòàëüíî íàä ðàêîâèíîé.
Íàæìèòå êíîïêó î÷èñòêè (10) (ðèñ.7).
Ïðîèçâîäèòåëü: ÀÍ-ÄÅÐ ÏÐÎÄÀÊÒÑ
Êèïÿùàÿ âîäà è ïàð âìåñòå ñ íàêèïüþ áóäóò
ÃìáÕ, Àâñòðèÿ
âûáðàñûâàòüñÿ èç îòâåðñòèé ïîäîøâû óòþãà.
Éåíåâàéíãàññå, 10/10, 1210, Âåíà, Àâñòðèÿ
Ìîæíî ñëåãêà ïîêà÷èâàòü óòþã âïåðåä è íàçàä, ïîêà
âûõîäÿò ïàð è âîäà.
Îòïóñòèòå êíîïêó î÷èñòêè (10) ÷åðåç ìèíóòó èëè
êîãäà â ðåçåðâóàðå çàêîí÷èòñÿ âîäà.
Ïîñòàâüòå óòþã íà îñíîâàíèå.
Âñòàâüòå ñåòåâóþ âèëêó â ðîçåòêó è äàéòå óòþãó
ñíîâà íàãðåòüñÿ.
Ïðîãëàäüòå óòþãîì êóñî÷åê íåíóæíîé òêàíè, ÷òîáû
èñïàðèëàñü îñòàâøàÿñÿ âîäà.
ÀÂÒÎÌÀÒÈ×ÅÑÊÎÅ ÎÒÊËÞ×ÅÍÈÅ
 äàííîé ìîäåëè ïðåäóñìîòðåíû äâà ðåæèìà
àâòîìàòè÷åñêîãî îòêëþ÷åíèÿ óòþãà.
1. Åñëè óòþã â ãîðèçîíòàëüíîì ïîëîæåíèè áóäåò
íåïîäâèæíûì â òå÷åíèå 30 ± 5 ñåêóíä, òî ïðîçâó÷èò
äëèòåëüíûé çâóêîâîé ñèãíàë è çåëåíûé ñâåòîâîé
èíäèêàòîð (Ñ) áóäåò ìèãàòü. Ïîñëå âîçîáíîâëåíèÿ
ïðîöåññà ãëàæåíèÿ óòþã àâòîìàòè÷åñêè âêëþ÷èòñÿ, à
óñòàíîâëåííûé ðåæèì òåìïåðàòóðû îñòàíåòñÿ
íåèçìåííûì.
12

FRANÇAIS
FER A VAPEUR
Le clignotement du témoin vert (c) sallume après le
branchement du fer au secteur et signalise aussi le
NOTICE DEXPLOITATION
débranchement automatique.
Le fer se débranche dans les cas suivants:
MESURES DE SECURITE
- le fer reste immobile à la position horizontale plus de 30
Avant lutilisation lisez attentivement la notice dutilisa-
± 5 secondes
tion et faites aussi attention aux illustrations
- le fer reste immobile à la position verticale pendant
graphiques.
15min ±30sec
Assurez-vous que la tension de votre installation corre-
La diode lumineuse rouge allumée (d) témoigne le
spond à la tension de fonctionnement de lappareil.
chauffage et le branchement de la résistance de
Utilisez le fer à repasser à sa destination prévue par la
chauffage, et le clignotement du témoin
notice dutilisation.
rouge (d) signifie que la résistance de chauffage est
Utilisez le fer à repasser sur une planche à repasser.
débranchée.
Avant remplir le réservoir de lappareil déconnectez-le
Toutes les actions de réglage de température sont suiv-
du secteur.
ies des signaux sonores:
Ne laissez pas le fer branché sans surveillance.
- un signal sonore retenti à la pression de la touche de
Toujours débranchez lappareil si vous ne lutilisez pas.
réglage de la température ()
Au risque du choc électrique ne plongez pas lappareil
- deux signaux sonores témoignent lattente de la tem-
dans leau ou autre liquide.
pérature du fer
Au risque des brûlures évitez le contact de la peau avec
- un signal sonore continu vous avertira du débranche-
les surfaces chauffées de lappareil.
ment automatique du fer, à la position horizontale ou
Veillez à ce que le cordon dalimentation ne se pende
verticale.
pas du bord de la planche à repasser et ne touche pas
aux surfaces chaudes.
NOTE:
En déconnectant lappareil du secteur tirez-le par la
Au premier branchement la résistance de chauffage du fer
fiche et non pas par le cordon.
brûle ce qui peut provoquer lapparition dune petite fumée.
Avant de ranger lappareil laissez-le refroidir, ensuite
Avant lutilisation testez le fer chaud à un morceau dun
enroulez le cordon dalimentation autour du socle.
ancien tissu pour sassurer que la semelle et le réservoir du
Pour éviter des surcharges du secteur ne branchez pas
fer à repasser sont secs.
plusieurs appareils en même temps.
Nutilisez pas le fer à repasser avec le cordon endom-
COIX DE LEAU:
magé ou avec autres défaillances techniques.
Vous pouvez verser dans lappareil leau du robinet.
Pour éviter le risque délectrocution ne démontez pas le
Si leau du robinet est dure il est conseillé de la
fer à repasser, en cas de panne adressez-vous au cen-
mélanger avec leau distillée au rapport 1 : 1, si leau est
tre de service agréé.
très dure au rapport 1 : 2, pour éviter lapparition du
tartre.
DESCRIPTION
1. pulvérisateur
REMARQUE: Il est interdit de verser dans le réservoir des
2. couvercle de lorifice de remplissage
liquides aromatisés, vinaigre, solution damidon, des
3. bouton de pulvérisation
agents chimiques pour enlever le tartre, des agents chim-
4. bouton de projection supplémentaire de vapeur
iques ou autres liquides.
5. régulateur de projection permanente de vapeur
6. panneau de commande
REMPLISSAGE DU FER A REPASSER (fig. 1, 2)
7. cordon dalimentation
Assurez-vous que le fer à repasser est débranché du
8. socle
secteur.
9. réservoir pour leau
Mettez le régulateur de projection permanente de
10. bouton de nettoyage
vapeur (5) à la position « X ».
11. semelle du fer à repasser
Ouvrez le couvercle de lorifice de remplissage (2).
12. récipient pour le remplissage du réservoir
Versez leau dans le réservoir à laide du récipient de
remplissage (12)
PANNEAU DE COMMANDE (6)
A. Touche de réglage de la température
REMARQUE:
B. Panneau dindication de la température
Ne remplissez pas le réservoir au-dessus de la marque
C. Témoin lumineux vert
«MAX».
D. Témoin lumineux rouge
Si pendant le repassage vous voulez ajouter de leau,
débranchez le fer et sortez sa fiche dalimentation de la
Avec la touche de réglage de la température (a), vous
prise de courant.
pouvez régler la température de repassage
Après que vous avez terminé le repassage, renversez le
à lordre suivant - MAX
fer et videz-le des restes de leau (fig.8).
MAX.
Les diodes lumineuses du panneau dindication (b) ont
TEMPERATURE DE REPASSAGE
trois couleurs:
Toujours consultez létiquette de larticle à repasser
- rouge témoigne le chauffage pour atteindre la tem-
avant de commencer le repassage.
pérature réglée
Faute de létiquette mais si vous savez le type du
- vert la température requise est atteinte
matériel, consultez la table ci-dessous pour choisir la
- orange témoigne le passage à un autre régime de
température de repassage.
température
13
Vt-1232-new.qxd 02.06.05 17:47 Page 13

FRANÇAIS
Désignations Type de tissu Fibre
Attendez que le témoin approprié de la température sal-
lume de vert avant de continuer lutilisation de lappareil.
(basse tem-
acryle
synthétique
pérature)
polyester
PULVERISATEUR
Vous pouvez humecter le tissu en appuyant plusieurs
(température
fibre acétate
synthétique
fois sur le bouton de pulvérisateur (3) (fig.3).
moyenne)
viscose
Assurez-vous quil y a assez deau dans le réservoir.
(température
soie
soie
REPASSAGE A VAPEUR
moyenne)
laine
laine
Le repassage à vapeur est possible uniquement à la haute
température de la semelle du fer - «», «» ou «MAX».
(haute tem-
coton
coton
Insérez la fiche dalimentation de lappareil dans la prise
pérature)
lin
lin
de courant.
Placez le fer sur le socle (8).
coton
coton
ÌÀÕ
Avec la touche (a) réglez la température de repassage
lin
lin
«», «» ou «MAX».
Assurez-vous quil y a assez deau dans le réservoir.
La table est utilisable uniquement pour les matériaux
Attendez que le témoin lumineux approprié sallume de
fibreux. Si le matériel est dautre type (gaufré, en relief
vert. Mettez le régulateur de projection permanente de
etc.), il vaut mieux de la repasser avec une basse tem-
vapeur (5) à la position requise (fig.4), ensuite la
pérature.
vapeur commencera à sortir des orifices de la semelle
Dabord triez les vêtements en fonction de la tempéra-
du fer (11).
ture de repassage: laine avec laine, coton avec coton
etc.
ATTENTION:
Le fer prend plus de temps à se refroidir quà se chauf-
Leau peut couler des orifices de la semelle si la tempéra-
fer. Alors il est recommandé de commencer par le
ture réglée est trop basse, ça risque de causer lapparition
repassage à la plus basse température, par exemple
des taches. Si un tel effet cest passé, mettez le régulateur
des tissus synthétiques. Ensuite passez aux tissus
de température de repassage (13) à la position de la tem-
exigeant la température plus haute. Repassez le coton
pérature plus haute. La projection de la vapeur se recom-
et le lin le dernier moment.
mencera dès que la température réglée serait atteinte.
Si le vêtement est fabriqué du mélange des tissus, il
faut régler la plus basse température requise par les
PROJECTION SUPPLEMENTAIRE DE VAPEUR
composants (par exemple si le vêtement se compose
Avec la touche (a) réglez la température de repassage
de 60% de polyester et de 40% de coton il faut régler la
«» «» ou «MAX».
température requise pour le polyester «»).
Attendez que le témoin lumineux approprié sallume de
vert.
REGLAGE DE LA TEMPERATURE
A la pression du bouton de projection supplémentaire
Placez le fer sur le socle (8).
de vapeur (4), la vapeur sortira plus rapidement de la
Insérez la fiche dalimentation dans la prise de courant,
semelle (fig.5).
un signal sonore retenti et le témoin lumineux (c) sur le
Cette fonction est utile pour le défroissage.
panneau de commande (6) clignote.
La fonction de projection supplémentaire de vapeur
Avec la touche (a) réglez la température requise. Le
peut être utilisée uniquement à la haute température de
choix est effectué à lordre suivant : MAX
repassage (positions du régulateur de température
MAX.
(13) «» , «» ou «MAX»).
Exemple : pour régler une basse température «».
Appuyez sur la touche () 4 fois, le témoin lumineux de
DEFROISSAGE VERTICAL
température «», sallume de rouge, quand la tempéra-
Insérez la fiche dalimentation de lappareil dans la prise
ture requise est atteinte le témoin sallume de vert et
de courant.
deux signaux sonores retentissent. A la pression de la
Placez le fer sur le socle(8).
touche () le témoin lumineux rouge (d) sallume et
Avec la touche (a) réglez la température de repassage
reste allumé pendant que la résistance de chauffage
«MAX».
est en marche et clignote quand la résistance de
Assurez-vous quil a assez deau dans le réservoir.
chauffage est débranchée.
Attendez que le témoin lumineux approprié sallume de
Pour sélectionner la position «»:
vert.
Appuyez encore une fois sur la touche (),le témoin de
Tenez le fer verticalement et appuyez sur le bouton de
température sallume de rouge «», et lindicateur de
projection supplémentaire de vapeur (4), la vapeur sor-
température «» clignote dorange, cela témoigne le
tira des orifices du fer (11) (fig. 6).
passage à lautre régime de température.
Quand lindicateur de température «» sallume de
Information importante:
vert cela signifie que la température requise «» est
Il est déconseillé de procéder au défroissage vertical
attente.
des tissus synthétiques.
Le processus de sélection de la température «» et
Pendant le défroissage ne touchez pas le tissu par la
«MAX» et analogique aux exemples précédents.
semelle du fer pour ne pas lendommager.
Ne défroissez jamais le vêtement qui est sur lhomme,
Le passage dune haute température au régime de tem-
puisque la température de la vapeur est très élevée.
pérature plus basse exige plus de temps, ce qui est lié au
Utilisez les portes-habits ou des cintres.
temps nécessaire au refroidissement de lappareil.
14
Vt-1232-new.qxd 02.06.05 17:47 Page 14
Vt-1232-new.qxd 02.06.05 17:47 Page 15
FRANÇAIS
REPASSAGE A SEC
Après lenlèvement des dépôts polissez la semelle avec
Insérez la fiche dalimentation de lappareil dans la prise
un chiffon sec.
de courant.
Nutilisez pas des agents abrasifs pour le nettoyage de
Placez le fer sur le socle(8).
la semelle ou du corps de lappareil.
Mettez le régulateur de projection permanente de la
Evitez le contact de la semelle avec des surfaces
vapeur (5) à la position «X» - projection de la vapeur
métalliques.
désactivée.
Mettez le régulateur de température (13) à la tempéra-
RANGEMENT
ture requise «», «», «» ou «MAX».
Sortez la fiche de lappareil de la prise de courant.
Attendez que le témoin lumineux approprié sallume de
Videz le réservoir (fig.8).
vert.
Placez le fer verticalement et laissez-le refroidir.
Dès que la température réglée est attente vous pouvez
Pendant le rangement du fer vous pouvez enrouler le
commencer le repassage.
cordon dalimentation autour du socle (8).
Toujours rangez lappareil à la position verticale.
SYSTEME DE NETTOYAGE
Pour prolonger le délai de service de lappareil, nous
Caractéristiques techniques
conseillons de nettoyez régulièrement le fer (une ou
Tension dalimentation : 220-230V ~50Hz
deux fois par mois).
Puissance consommée : 2200W
Mettez le régulateur de projection permanente de la
vapeur (5) à la position «X» - projection de la vapeur est
Le fabricant se réserve le droit de modifier les caractéris-
désactivée.
tiques de lappareil sans préavis.
Remplissez le réservoir jusquà la marque «MAX».
Placez le fer sur le socle.
Durée demploi pas moins de 3 ans
Insérez la fiche dalimentation de lappareil dans la prise
de courant.
Garantie
Avec la touche (a) réglez la température de repassage
Pour des conditions de garantie plus détaillées adressez-
«».
vous au distributeur qui vous a vendu lappareil. En cas de
Attendez que le témoin lumineux approprié sallume de
toute sorte de prétention pendant la période de la présente
vert.
garantie il faudra présenter le ticket quittance de lachat.
Sortez la fiche dalimentation de lappareil de la prise de
courant et maintenez le fer horizontalement au-dessus
de lévier.
Le présent appareil satisfait aux exigences
Appuyez sur le bouton de nettoyage (10) (fig.7).
de compatibilité électromagnétique en vertu
Leau bouillante et la vapeur avec du tartre seront éjec-
de la directive 89/336/EEC du conseil de
tées à travers les orifices de la semelle.
lEurope et la préscription 23/73 EEC pour
Vous pouvez balancer légèrement le fer en avant et en
lappareillage de bas voltage.
arrière.
Libérez le bouton de nettoyage (10) une minute après
ou quand le réservoir sera vide.
Placez le fer sur le socle.
Insérez la fiche dalimentation de lappareil dans la prise
de courant et laissez le fer se chauffer.
Essayez le fer sur un morceau de tissu inutile pour laiss-
er sévaporer leau résiduelle.
DEBRANCHEMENT AUTOMATIQUE
Le présent modèle prévoit deux modes de débranchement
automatique.
1. Si le fer à la position horizontale reste immobile pen-
dant 30 ± 5 secondes, un long signal sonore retentit et
lindicateur vert () clignote. Après le recommence-
ment du repassage le fer se branche automatiquement
et le régime réglé de température reste inchangé.
2. Si le fer à la position verticale reste immobile pendant
plus du 15 min± 30 secondes. Après le recommence-
ment du repassage le fer se branche automatiquement
et le régime réglé de température reste inchangé.
ENTRETIEN ET NETTOYAGE
Avant de nettoyer le fer assurez-vous quil est
débranché du secteur et quil est refroidi.
Essuyez le corps de lappareil avec un chiffon légère-
ment humide et ensuite essuyez-le à sec.
Les dépôts sur la semelle du fer peuvent être enlevés
par un chiffon trempé de la solution de vinaigre avec
leau.
15

ITALIANO
FERRO DA STIRO ELETTRONICO A VAPORE
- arancione viene effettuato il passaggio ad un altro
regime della temperatura
ISTRUZIONI DI MANUTENZIONE
Indicatore luminoso verde lampeggiante (c) si accende
durante linserimento del ferro da stiro nella rete, e
NORME DI SICUREZZA
mostra anche lo spegnimento automatico.
Prima dellutilizzo leggete le presenti istruzioni e
Lo spegnimento automatico del ferro da stiro viene
prestate lattenzione anche ai disegni.
effettuato:
Prima dellaccensione del ferro da stiro, assicuratevi
- se il ferro da stiro si trova immobile in posizione orizzon-
che la tensione della vostra rete corrisponde alla ten-
tale per 30 ± 5 secondi
sione del ferro da stiro.
- se il ferro da stiro si trova immobile in posizione verticale
Usate il ferro da stiro solo con gli scopi previsti dalle
per 15minuti ±30secondi
istruzioni.
Indicatore luminoso rosso (d) mostra che viene effet-
Usate il ferro da stiro solo sullasse da stiro.
tuato il riscaldamento e che lelemento di riscaldamen-
Durante il riempimento del ferro da stiro con lacqua,
to e acceso, e lindicatore luminoso rosso lampeg-
staccatelo dalla rete.
giante (d) mostra che lelemento di riscaldamento e
Non lasciate il ferro da stiro acceso senza bada.
spento.
Staccate il ferro da stiro dalla rete se non lo usate.
Tutte le azioni dellimpostazione della temperatura ven-
Per evitare la scossa elettrica, non immergete il ferro da
gono accompagnate dai segnali acustici:
stiro nellacqua o in qualsiasi altro liquido.
- ce un segnale acustico durante la pressione del pul-
Evitate il contatto della pelle con le superfici calde del
sante dellimpostazione della temperatura (a)
ferro da stiro o con il vapore, per evitare le ustioni.
- due segnali acustici avvertiscono del raggiungimento
Badate che il cavo di rete non pendola dai margini del-
della temperatura impostata del ferro da stiro
lasse da stiro e non tocca le superfici calde.
- ce un segnale acustico prolungato durante lo spegni-
Quando staccate il ferro da stiro dalla rete elettrica, trat-
mento automatico del ferro da stiro sia in posizione
tenete la spina, non tirate il cavo di rete.
orizzontale, sia in posizione verticale.
Prima di mettere il ferro da stiro in custodia, lasciatelo
raffreddare completamente, avvolgete il cavo attorno
NOTA:
alla base.
Durante la prima accensione lelemento del riscaldamento
Per evitare il sovraccarico della rete elettrica, non
del ferro da stiro brucia, e possibile lapparizione della pic-
accendete qualche apparecchio con la grande potenza
cola quantita del fumo.
assorbita contemporaneamente.
Prima dellinizio dellutilizzo testate il ferro da stiro riscalda-
Non usate il ferro da stiro con la spina, il cavo danneg-
to sul pezzo del tessuto vecchio per assicurarvi che la suola
giati o con qualsiasi altro guasto.
del ferro da stiro e serbatoio per lacqua sono puliti.
Per evitare la scossa elettrica, non smontate mai il ferro
da stiro da se, se scoprite qualche guasto, rivolgetevi al
SCELTA DELL ACQUA:
centro riparazioni autorizzato.
Nel ferro da stiro si puo mettere lacqua normale dal
rubinetto.
DESCRIZIONE
Se lacqua e dura, si raccomanda mescolarla con lac-
1. ugello dello spruzzatore dellacqua
qua distillata in proporzione 1 : 1, se lacqua e molto
2. coperchio del foro del riempimento
dura, si raccomanda mescolarla con lacqua distillata in
3. pulsante dello spruzzatore dellacqua
proporzione 1 : 2 per evitare lapparizione dellin-
4. pulsante dellerogazione supplementare del vapore
crostazione.
5. regolatore dellerogazione costante del vapore
NOTA: E vietato mettere nel ferro da stiro i liquidi aromati-
6. pannello di comando
ci, laceto, la soluzione dellamido, i reagenti per lelimi-
7. cavo di rete
nazione dellincrostazione, le sostanze chimiche o gli altri
8. base
liquidi.
9. serbatoio per lacqua
10. pulsante della pulizia
RIEMPIMENTO DEL FERRO DA STIRO CON LACQUA
11. suola del ferro da stiro
(disegni 1,2)
12. serbatoio per il riempimento con lacqua
Prima di riempire il ferro da stiro con lacqua, assicurat-
evi che esso e staccato dalla rete.
PANNELLO DI COMANDO (6)
Mettete il regolatore dellerogazione costante del
A. Pulsante dellimpostazione della temperatura
vapore (5) in posizione X.
B. Pannello dindicazione della temperatura
Aprite il coperchio del foro del riempimento (2).
C. Indicatore luminoso verde
Mettete lacqua, usando il serbatoio (12).
D. Indicatore luminoso rosso
NOTA:
Mediante il pulsante dellimpostazione della temperatu-
Non superate la scritta MAX.
ra (a), viene impostata la temperatura desiderata della
Se avete bisogno di aggiungere lacqua mentre stirate,
stiratura in ordine seguente - MAX
staccate il ferro da stiro e staccate la spina dalla presa.
MAX.
Alla conclusione della stiratura, girate il ferro da stiro e
Diodi luminosi sul pannello dindicazione della temper-
versate via i residui dellacqua (disegno 8).
atura (b) hanno tre colori:
- rosso viene effettuato il riscaldamento fino alla tem-
TEMPERATURA DELLA STIRATURA
peratura impostata
Prima della stiratura, guardate la temperatura racco-
- verde la temperatura impostata e raggiunta
mandata indicata sulletichetta.
16
Vt-1232-new.qxd 02.06.05 17:47 Page 16
ITALIANO
Se non ce letichetta con le indicazioni per la stiratura,
peratura «» si accende con il colore verde, questo
ma voi conoscate il tipo del materiale, per la scelta della
significa che la temperatura impostata «» e raggiun-
temperatura guardate la tabella.
ta.
Lulteriore processo dellimpostazione della temperatu-
ra «» e «MAX sono simili a quelli precedenti.
Simboli Tipo del tessuto Fibra
(temperatura
acrilico
Il passaggio dal regime piu alto della temperatura al regime
materiale sintetico
bassa)
poliestere
piu basso della temperatura ha bisogno di qualche tempo,
dovuto al raffreddamento del ferro da stiro, aspettate finche
(temperatura
acetato
lindicatore luminoso della temperatura non si accende con
materiale sintetico
media)
viscosa
il colore verde.
(temperatura
seta
seta
SPRUZZATORE DELLACQUA
media)
lana
lana
Potete umidificare il tessuto, premendo per qualche
volta il pulsante dello spruzzatore (3) (disegno 3).
(temperatura
cotone
cotone
Assicuratevi che nel serbatoio ce la sufficiente quanti-
alta)
lino
lino
ta dellacqua.
cotone
cotone
ÌÀÕ
STIRATURA A VAPORE
lino
lino
E possibile effettuare la stiratura a vapore solo con la tem-
peratura alta della suola del ferro da stiro, «», «» o
La presente tabella e adatta ai materiali fibrosi. Se il
MAX.
materiale e di unaltro tipo (goffrato, rilevato ecc.), e
Attaccate la spina alla presa.
meglio stirarli con la temperatura bassa.
Mettete il ferro da stiro sulla base (8).
Prima selezionate le cose secondo la temperatura della
Mediante il pulsante (a) impostate la temperatura
stiratura: la lana insieme alla lana, il cotone insieme al
desiderata della stiratura: «», «» o MAX.
cotone ecc.
Assicuratevi che nel serbatoio ce la sufficiente quanti-
Il ferro da stiro si riscalda piu velocemente che esso si
ta dellacqua.
raffredda. Allora, si raccomanda di cominciare a stirare
Aspettate finche lindicatore luminoso della temperatu-
dalla temperatura bassa, per esempio dai tessuti sin-
ra non si accende con il colore verde.
tetici. Poi passate alla stiratura con le temperature piu
Mettete il regolatore dellerogazione costante del
alte. Stirate il cotone e il lino in ultimo turno.
vapore (5) in posizione desiderata (disegno 4), dopo di
Se la cosa e fatta dei tessuti mescolati, bisogna
che il vapore comincia ad uscire dai fori della suola del
inserire la temperatura della stiratura per il tessuto con
ferro da stiro (11).
la temperatura piu bassa (per esempio, se il tessuto e
composto al 60% di poliestere e al 40% del cotone,
ATTENZIONE:
bisogna stirarlo con la temperatura adatta al poliestere
Lacqua puo fuoruscire dalla suola del ferro da stiro, se la
«»).
temperatura e troppo bassa, questo puo provocare lap-
parizione delle macchie. Se questo e successo, mediante
IMPOSTIAMO LA TEMPERATURA
il pulsante (a) mettete la temperatura piu alta.
Mettete il ferro da stiro sulla base (8).
Lerogazione del vapore si riprende, appena viene raggiun-
Attaccate la spina alla presa, ci sara un segnale acusti-
ta la temperatura impostata del ferro da stiro.
co prolungato, lindicatore luminoso (c) sul pannello di
comando (6) lampeggiera.
EROGAZIONE SUPPLEMENTARE DEL VAPORE
Mediante il pulsante (a) impostate la temperatura
Mediante il pulsante (a) impostate la temperatura
desiderata, la scelta devessere effettuata secondo
desiderata della stiratura: «», «» o MAX.
lordine seguente: MAX
Aspettate finche lindicatore luminoso della temperatu-
MAX.
ra non si accende con il colore verde.
Esempio: bisogna impostare la temperatura bassa «»
Grazie alla pressione del pulsante dellerogazione sup-
Premete il pulsante (a) per quattro volte, lindicatore
plementare del vapore (4), il vapore dalla suola del ferro
luminoso della temperatura «» si accende con il colore
da stiro esce in modo piu intenso (disegno 5).
rosso, quando la temperatura viene raggiunta, lindica-
Questa funzione e molto utile durante la stiratura delle
tore luminoso della temperatura si accende con il colore
pieghe.
verde, ci sono due segnali acustici. Durante la pres-
La funzione dellerogazione supplementare del vapore
sione del pulsante (a), si accende lindicatore luminoso
puo essere usata solo con il regime della temperatura
rosso (d), il quale rimane acceso costantemente
alta della stiratura «», «» o MAX.
durante laccensione dellelemento del riscaldamento e
lampeggia quando lelemento del riscaldamento e
VAPORIZZAZIONE VERTICALE
spento.
Attaccate la spina alla presa.
Per impostare la temperatura in posizione «»:
Mettete il ferro da stiro sulla base (8).
Premete il pulsante (a) ancora per una volta, lindicatore
Mediante il pulsante (a) impostate la temperatura della
luminoso della temperatura «» si accende con il col-
stiratura MAX.
ore rosso, mentre lindicatore della temperatura «» si
Assicuratevi che nel serbatoio ce la sufficiente quanti-
accende con il colore arancione, questo significa che e
ta dellacqua.
stato effettuato il passaggio ad un altro regime della
Aspettate finche lindicatore luminoso della temperatu-
temperatura. Quando lindicatore luminoso della tem-
ra non si accende con il colore verde.
17
Vt-1232-new.qxd 02.06.05 17:47 Page 17
Vt-1232-new.qxd 02.06.05 17:47 Page 18
ITALIANO
Tenete il ferro da stiro in modo verticale e premete il pul-
processo della stiratura, il ferro da stiro si accende
sante dellerogazione supplementare del vapore (4), il
automaticamente, il regime impostato della temperatu-
vapore esce dalla suola del ferro da stiro (11)
ra rimane invariabile.
(disegno 6).
PULIZIA E CURA
Informazioni importanti:
Prima di pulire il ferro da stiro, assicuretevi che esso e
Non si raccomanda di usare la funzione della vaporiz-
staccato dalla rete e che si e raffreddato.
zazione verticale per i tessuti sintetici.
Strofinate il corpo del ferro da stiro con il tessuto leg-
Durante la vaporizzazione non toccate il materiale con
germente umido, asiugatelo bene.
la suola del ferro da stiro, per evitare la sua fusione.
Le deposizioni sulla suola del ferro da stiro possono
Non vaporizzate i vestiti messi sulluomo, perche la
essere eliminate mediante il tessuto inumidito nella
temperatura del vapore e molto alta. Usate la gruccia o
soluzione dellaceto e lacqua.
lattaccapanni.
Dopo leliminazione delle deposizioni, lucidate la suola
con il tessuto asciutto.
STIRATURA ASCIUTTA
Non usate le sostanze abrasive per effettuare la pulizia
Attaccate la spina alla presa.
della suola e del corpo del ferro da stiro.
Mettete il ferro da stiro sulla base (8).
Evitate il contatto della suola del ferro da stiro con gli
Mettete il regolatore dellerogazione costante del
oggetti metallici taglienti.
vapore (5) in posizione X lerogazione del vapore e
spenta.
CONSERVAZIONE
Mediante il pulsante (a) impostate la temperatura
Staccate la spina dalla presa.
desiderata della stiratura: «», «», «» o MAX.
Versate via lacqua rimasta dal serbatoio per lacqua
Aspettate finche lindicatore luminoso della temperatu-
(disegno 8).
ra non si accende con il colore verde.
Mettete il ferro da stiro in posizione verticale e lasciate-
La temperatura impostata della suola del ferro da stiro
lo raffreddarsi.
e raggiunta, si puo iniziare il processo della stiratura.
Durante la conservazione del ferro da stiro, si puo
avvolgere il cavo attorno alla base (8).
SISTEMA DELLA PULIZIA
Tenete il ferro da stiro in posizione verticale.
Per aumentare il periodo della durata del ferro da stiro,
si raccomanda di effettuare regolarmente la pulizia del
Caratteristiche tecniche
ferro da stiro (una o due volte al mese).
Tensione dellalimentazione: 220-230V ~50Hz
Mettete il regolatore dellerogazione costante del
Potenza assorbita: 2200 W
vapore (5) in posizione X .
Riempite il serbatoio con lacqua fino alla scritta MAX.
Il produttore si lascia il diritto di modificare le caratteristiche
Mettete il ferro da stiro sulla base (8).
dellapparecchio senza preavviso.
Attaccate la spina alla presa.
Mediante il pulsante (a) impostate la temperatura della
Il periodo di utilizzo del ferro è non meno di 3 anni
stiratura MAX.
Aspettate finche lindicatore luminoso della temperatu-
Garanzia
ra non si accende con il colore verde.
Le condizioni dettagliate della garanzia si possono
Staccate la spina dalla presa e tenete il ferro da stiro in
richiedere al rivenditore dellapparecchio. Qualsiasi
modo orizzontale sopra il lavandino.
reclamo deve essere richiesto prima della scadenza della
Premete il pulsante della pulizia (10) (disegno 7).
garanzia e deve essere accompagnato dallo scontrino fis-
Lacqua bollente e il vapore insieme alla incrostazione
cale oppure da un altro documento che attesti lacquisto.
escono dai fori della suola del ferro da stiro.
Si puo dondolare il ferro da stiro mentre stanno uscen-
Questo prodotto corrisponde ai requisiti di
so il vapore e lacqua.
compatibilità elettromagnetica stabiliti dalla
Lasciate il pulsante della pulizia (10) dopo un minuto dal
direttiva 89/336/EEC del Consiglio Europeo e
momento in cui nel serbatoio finisce lacqua.
dalla Direttiva 23/73 CEE sugli apparecchi di
Mettete il ferro da stiro sulla base.
bassa tensione.
Attaccate la spina alla presa, lasciate il ferro da stiro
riscaldarsi di nuovo.
Stirate un pezzo del tessuto di cui non avete bisogno
per lasciare lacqua rimasta vaporizzarsi.
SPEGNIMENTO AUTOMATICO
In questo modello del ferro da stiro sono previsti due regimi
dello spegnimento automatico del ferro da stiro.
1. Se il ferro da stiro si trova immobile in posizione oriz-
zontale per 30 ± 5 secondi, ci sara un segnale acustico
prolungato e lindicatore luminoso verde (c) lampeg-
giera. Dopo la ripresa del processo della stiratura, il
ferro da stiro si accende automaticamente, il regime
impostato della temperatura rimane invariabile.
2. Se il ferro da stiro si trova immobile in posizione verti-
cale per 15minuti ±30secondi. Dopo la ripresa del
18
ESPAÑOL
PLANCHA A VAPOR
- el verde, indica que la plancha ha alcanzado la temper-
atura seleccionada
INSTRUCCIONES DE USO
- el naranja, indica cambio de temperatura
El indicador luminoso centelleante verde (c) se
MEDIDAS DE SEGURIDAD
enciende con el encendido de la plancha, y también
Antes de usar la plancha lea atentamente todas las
indica su apagado automático.
instrucciones, así como preste atención a las ilustra-
La plancha se apaga automáticamente en los sigu-
ciones.
ientes casos:
Antes de encender la plancha cerciórese que la tensión
- si la plancha se encuentra inmóvil en posición horizon-
de su red coincida con la de la plancha.
tal durante 30 ± 5 seg.
Use la plancha sólo para los fines indicadas en estas
- si la plancha se encuentra inmóvil en posición vertical
instrucciones.
durante 15min. ±30seg.
Use la plancha tan sólo sobre la tabla de planchar.
El indicador luminoso rojo (d) indica que la plancha se
Siempre desenchufe la plancha de la red eléctrica
está calentando y el elemento calentador se encuentra
cuando deba llenar su depósito con agua.
encendido. Por su parte, el indicador luminoso rojo
No deja la plancha encendida sin atenderla.
centelleante (d) indica que el elemento calentador está
Siempre desenchufe la plancha si no la usa.
apagado.
Para evitar una descarga eléctrica no sumerja la plan-
Todas las operaciones de selección de temperatura van
cha en agua u otros líquidos.
acompañadas de señales acústicas:
Para no quemarse evite el contacto de las partes des-
- una señal acústica suena al presionar el botón de
cubiertas del cuerpo con la superficie caliente o el
selección de temperatura ()
vapor de la plancha.
- dos señales acústicas avisan que la plancha ha alcan-
Trate que el cable de alimentación no cuelgue del borde
zado la temperatura programada
de la tabla ni roce la superficie caliente.
- una señal acústica prolongada indica que la plancha se
No tire del cable para desconectarla la plancha del
ha apagado automáticamente, ya sea en posición hori-
tomacorriente, tome el enchufe de la plancha y tire para
zontal como vertical.
desconectarlo.
Antes de guardar la plancha espere a que se enfríe por
OBSERVACION:
completo, luego enrolle el cable en su base.
Al encender la plancha por primera vez su elemento calen-
Para evitar una sobrecarga eléctrica no encienda al
tador se quema. Por eso es posible que salga un poco de
mismo tiempo varios artefactos que tengan gran poten-
humo.
cia de consumo.
Antes de usar la plancha caliente planche un pedacito de
No use la plancha si tiene el enchufe o cable deteriora-
tela vieja para comprobar que la suela y el depósito de agua
dos o cualquier otra falla.
están totalmente limpios.
Para evitar una descarga eléctrica nunca desmonte la
plancha Usted mismo. Si descubre una falla recurra a
SELECCIÓN DEL AGUA:
un centro de servicio técnico autorizado.
Si desea puede llenar la plancha con agua común del
grifo.
DESCRIPCION
Si el agua del grifo resulta dura, le recomendamos
1. boquilla del spray
mezclarla con agua destilada en la proporción 1:1, y en
2. tapa de la boquilla de llenado
caso de agua muy dura, mézclela con agua destilada
3. botón del spray
en la proporción 1 : 2, para evitar la calcificación.
4. botón de vapor extra
5. regulador de vapor continuo
OBSERVACION: Se prohíbe llenar el depósito de agua con
6. panel de control
substancias aromáticas, vinagre, agua con almidón, pro-
7. cable de alimentación
ductos para descalcificación de agua, productos químicos
8. base
u otros líquidos.
9. depósito de agua
10. botón de limpieza
LLENADO DEL DEPOSITO CON AGUA (dib. 1, 2)
11. suela de la plancha
Antes de llenarlo con agua, cerciórese que la plancha
12. recipiente para cargar agua
esté desenchufada.
Posicione el regulador de vapor continuo (5) en X.
PANEL DE CONTROL (6)
Abra la tapa de la boquilla de llenado (2).
A. Botón de selección de temperatura
Vierta el agua, usando el recipiente (12).
B. Panel de índices de temperatura
C. Indicador luminoso verde
OBSERVACION:
D. Indicador luminoso rojo
No llene el depósito por encima del nivel MAX.
Si durante el planchado desea agregar agua, apague y
Empleando el botón de selección de temperatura (a),
desenchufe la plancha.
se selecciona la temperatura deseada de planchado en
Después de finalizar el planchado, déle vuelta a la plan-
el siguiente orden: MAX
cha y saque el agua que queda (dib.8).
MAX.
El panel de índices de temperatura (b) tiene diodos
TEMPERATURA DE PLANCHADO
luminosos de tres colores:
Antes de planchar siempre vea la temperatura
- el rojo, indica que la plancha se está calentando hasta
recomendada indicada en la etiqueta.
la temperatura deseada
Si la prenda no tiene etiqueta con las recomendaciones
19
Vt-1232-new.qxd 02.06.05 17:47 Page 19

ESPAÑOL
de planchado, pero Usted sabe el tipo de tela, para
Los pasos a seguir para seleccionar la temperatura de
seleccionar la temperatura de planchado, vea la tabla a
y «MAX», son semejantes a los anteriores.
continuación.
El pase a una temperatura más baja requiere de cierto tiem-
po, debido a que la plancha tiene que enfriarse. Por lo
Símbolos Tipo de tela Fibra
tanto, espere a que el indicador luminoso correspondiente
(temperatura
acrílica
se encienda con el color verde.
sintética
baja)
poliéster
FUNCION SPRAY
(temperatura
de acetato
Si desea puede humedecer el tejido presionando varias
sintética
media)
viscosa
veces el botón de spray (3) (dib.3).
Controle que el depósito tenga suficiente cantidad de
(temperatura
seda
seda
agua.
media)
lana
lana
PLANCHADO A VAPOR
(temperatura
algodón
algodón
El planchado a vapor se produce cuando la temperatura de
alta)
lino
lino
la suela de la plancha es elevada, es decir, que el selector
de temperatura (13) se encuentra en posicionado en ,
algodón
algodón
ÌÀÕ
o MAX.
lino
lino
Enchufe la plancha al tomacorriente.
Ponga la plancha sobre la base (8).
Esta tabla sirve sólo para las telas fibrosas. Si la tela es
Con el botón (a) seleccione la temperatura deseada de
de otro tipo (plizada, con relieves, etc.), mejor plan-
planchado , o MAX.
charla a poca temperatura.
Compruebe que el depósito contenga suficiente agua.
Antes de comenzar el planchado clasifique las prendas
Espere hasta que el indicador luminoso correspondi-
de acuerdo a la temperatura de planchado, reuniendo
ente se encienda con el color verde.
por un lado las de lana, por el otro, las de algodón, etc.
Posicione el regulador de vapor continuo (5) en la posi-
La plancha tarda más tiempo en enfriarse que en calen-
ción deseada (dib.4), y así la suela comenzará a des-
tarse. Por lo tanto se recomienda comenzar el plancha-
pedir vapor (11).
do con tejidos que requieran temperaturas más bajas,
como, por ejemplo, los sintéticos. Luego pase a plan-
ATENCION:
char a temperatura más alta. Por último, planche las
Si la temperatura es muy baja, la suela de la plancha puede
prendas de algodón y lino.
perder agua, manchando las prendas. Si es así, posicione
Si la prenda se compone de varios tipos de tejidos, elija
el botón (a) en la temperatura más alta. Al alcanzar la tem-
la temperatura menor de todos los componentes. (Por
peratura seleccionada, la plancha seguirá generando
ejemplo, la prenda contiene un 60% de poliéster y el
vapor.
40%, de algodón; para el planchado de toda la prenda
se elige la temperatura para el poliéster ).
VAPOR EXTRA
Con el botón () seleccione la temperatura de plancha-
SELECCIÓN DE TEMPERATURA
do deseada , o MAX.
Ponga la plancha sobre la base (8).
Espere a que el indicador luminoso correspondiente se
Enchúfela al tomacorriente, sonará una larga señal
encienda con el color verde.
acústica y en el panel de control (6) comenzará a cen-
Al presionar el botón de vapor extra (4), la suela de la
tellear el indicador luminoso (c).
plancha despedirá más vapor (dib.5).
Usando el botón (a) seleccione la temperatura desea-
Esta función es muy conveniente al tener que planchar
da. La selección se realiza en el siguiente orden: MAX
las arrugas.
MAX.
La función de vapor extra se puede usar sólo con el
Por ejemplo: si desea seleccionar la temperatura baja
planchado a temperaturas altas , o MAX.
?
Presione 4 veces el botón (), se encenderá el indi-
VAPOR VERTICAL
cador luminoso de temperatura de color rojo , y una
Enchufe la plancha en el tomacorriente.
vez alcanzada la temperatura seleccionada se encen-
Ponga la plancha sobre la base (8).
derá el indicador de temperatura de color verde y
Con el botón (a) seleccione la temperatura de plancha-
sonarán dos señales acústicas. Al presionar el botón
do MAX.
() se enciende el indicador luminoso rojo (d), el cual
Compruebe que el depósito contenga suficiente agua.
permanece encendido mientras esté encendido el ele-
Espere hasta que el indicador luminoso de temperatu-
mento calentador, pero al apagarse éste último, el indi-
ra se encenderá con el color verde.
cador comenzará a centellear.
Sostenga la plancha en posición vertical, presione el
Para posicionar el selector de temperatura en :
botón de vapor extra (4), y la suela de la plancha (11)
Presione una vez más el botón (?), se encenderá el indi-
despedirá vapor (dib. 6).
cador de temperatura de color rojo, mientras que
el indicador de temperatura seguirá encendido en
Información importante:
color naranja, lo que significa que el artefacto está
No se recomienda efectuar el planchado vertical a
pasando a otro nivel de temperatura. Cuando el indi-
vapor de tejidos sintéticos.
cador luminoso se enciende de color verde, sig-
Al planchar a vapor trate que la suela de la plancha no
nifica que la plancha ha alcanzado la temperatura .
entre en contacto con el tejido, pues puede quemarlo.
20
Vt-1232-new.qxd 02.06.05 17:47 Page 20


