Vitek VT-1508 R: инструкция
Раздел: Кофеварки и кофемашины
Тип: Кофе-Машина
Инструкция к Кофе-Машину Vitek VT-1508 R
Оглавление
Silky Red Collection
VT-1508 R
MANUAL INSTRUCTION
4
8
12
16
20
24
28
32
36
40
44
48
www.vitek-aus.com
1508.indd 11508.indd 1 15.05.2007 9:57:0815.05.2007 9:57:08
2
1508.indd 21508.indd 2 15.05.2007 9:57:0915.05.2007 9:57:09
3
1508.indd 31508.indd 3 15.05.2007 9:57:0915.05.2007 9:57:09

ENGLISH
COFFEE MAKER
• Special attention is required when the
children or invalids are near the operat-
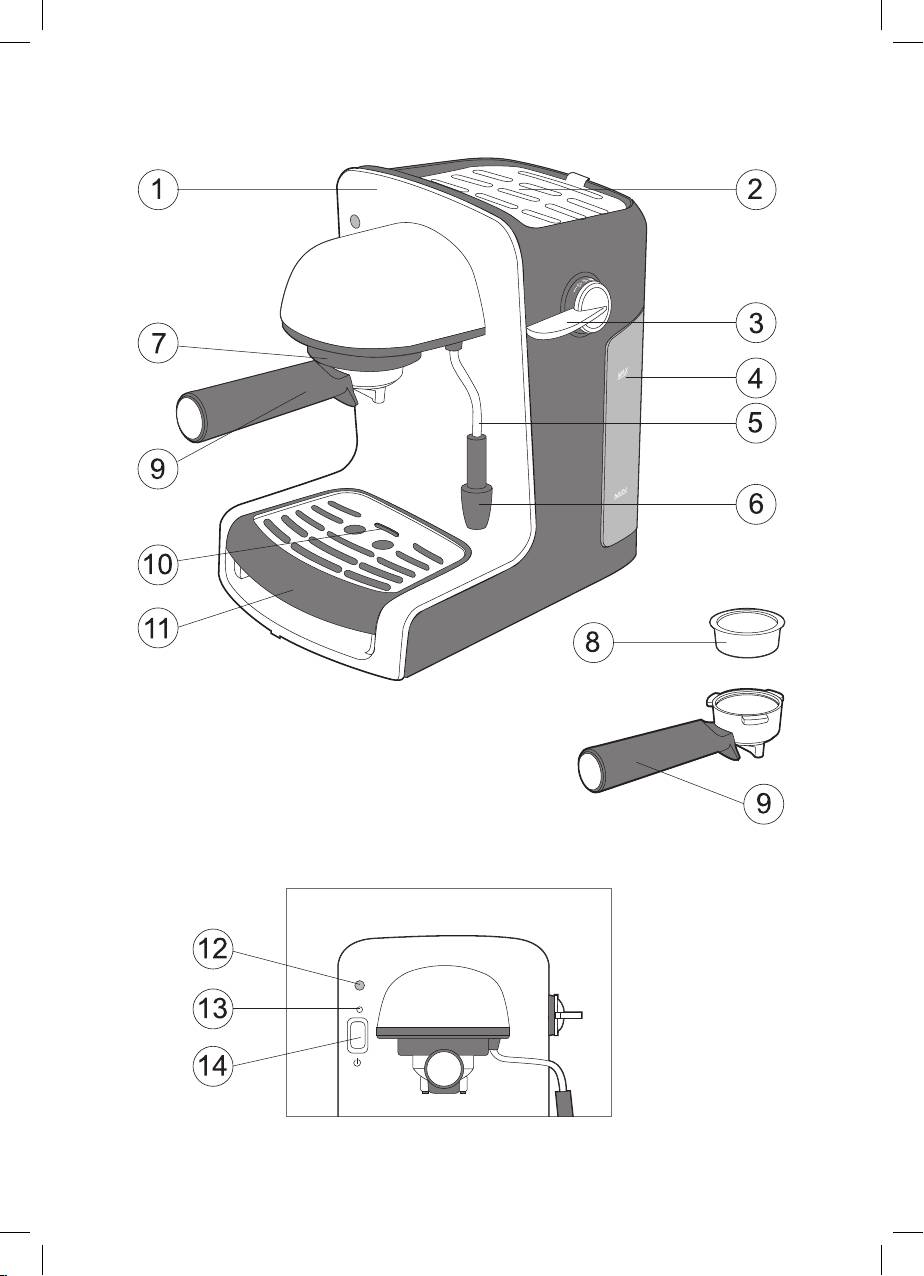
Description
ing coffee machine.
1. Housing
• Always unplug the coffee machine from
2. Platform for warming the cups
the wall outlet when not in use and before
3. Steam supply control handle
cleaning. Let the coffee machine cool
4. Water tank
down before installation, detaching any
5. Steam pipe
parts or cleaning.
6. Nozzle
• To switch the appliance off turn the ON/
7. Filter holder installation place
OFF switcher into OFF position, and only
8. Coffee filter
afterwards unplug the power cord from
9. Filter holder
the wall outlet.
10. Drops tray filling indicator
• Do not operate the coffee machine with
11. Detachable tray for drops
damaged power cord, power cord plug,
12. Readiness indicator
in case of malfunction or any other dam-
13. Power supply connection indicator
ages. Apply to the authorized service
14. Power ON/OFF switch
center for repair.
• Never put the coffee machine at the
Important safety guards
places with temperature below 0°С for
While using the electrical appliances the
storage.
basic safety guards should be followed in-
cluding the next:
For the household purposes only!
• Use the coffee machine for the intended
purposes only.
Preparations before operation
• Use only the accessories included into
• Unpack the coffee machine.
the delivery set.
• Before switching the coffee machine on
• Before switching on the coffee machine
make sure the supply line voltage meets
make sure the supply line voltage meets
the operating voltage of the appliance.
the operating voltage of the appliance.
• Before using for the first time wash all the
• Use the power supply socked equipped
detachable parts of the coffee machine
with the grounding contacts to plug in the
with warm water.
coffee machine.
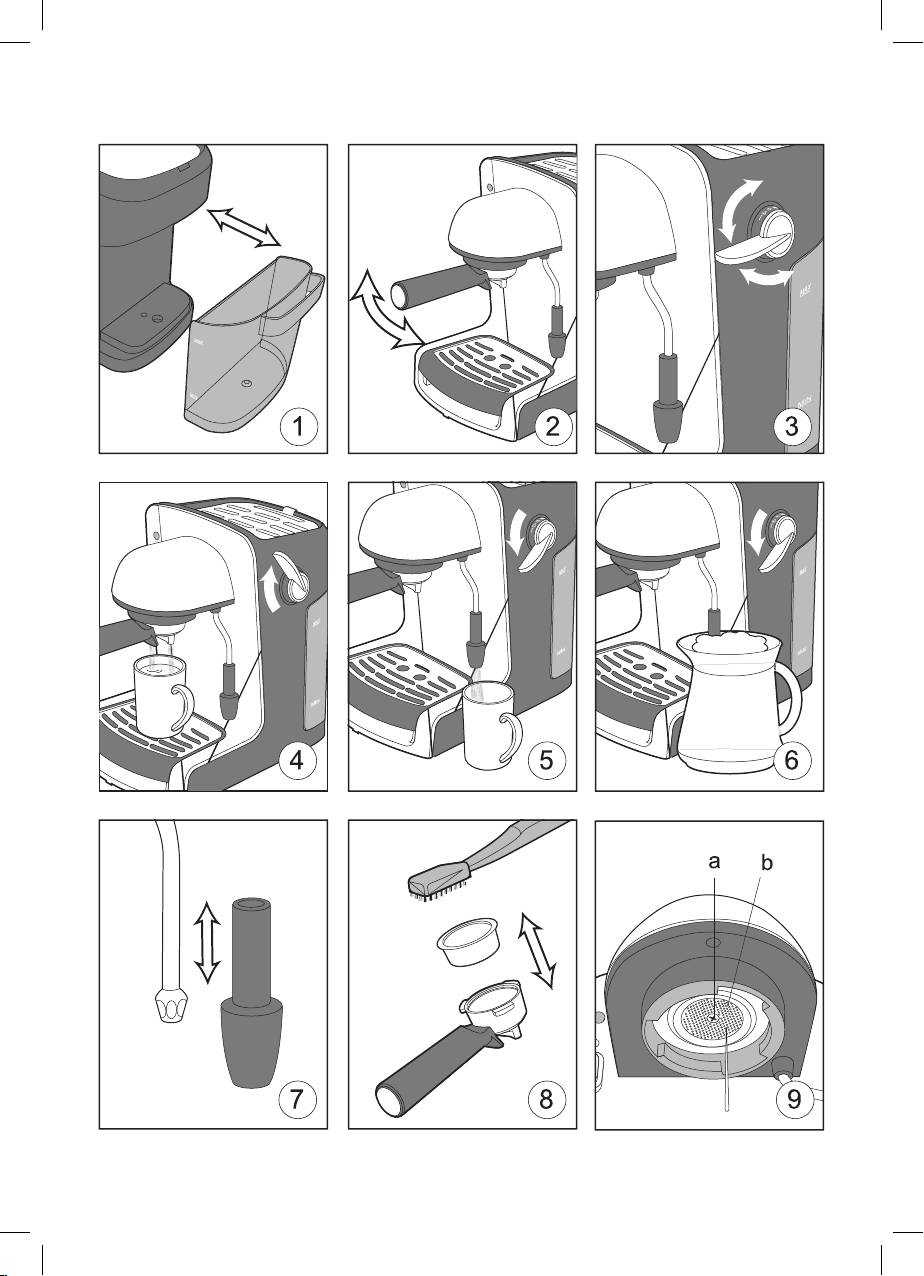
• Fill the tank (4) with water up to МАХ
• Do not switch on without water.
marc (see Pic. 1).
• Do not use outdoors.
• Turn the power switch (14) into OFF posi-
• Install the coffee machine on the dry lev-
tion.
el surface, at the safe distance from the
• To make sure the steam supply is blocked
walls, cupboards, bookcases, and the
turn the control handle (3) into OFF posi-
other furniture.
tion (see Pic. 2).
• Keep an eye on the power cord. It should
• Insert the coffee filter (8) into the holder
not hang other the edge of the table, and
(9). Do not fill the filter up with coffee.
get into a contact with the hot surfaces.
Install the holder (9) at the installation
• Do not touch the heated surfaces of the
place (7) by rotating it rightwards (see
appliance.
Pic. 2).
• Do not immerse the coffee machine or
• Put the cup of appropriate high on the
the power cord into the water or any oth-
tray (11).
er liquids to avoid electric shock.
• Insert the power plug into the wall outlet.
4
1508.indd 41508.indd 4 15.05.2007 9:57:0915.05.2007 9:57:09

ENGLISH
• Press the power ON/OFF button (14).
turn the steamer supply control handle
The indicator (13) will be lighted. The in-
(3) into OFF position (see Pic. 4).
dicator (12) keeps blinking until required
temperature is reached. Afterwards the
Attention!
indicator (12) will be deemed.
- Do not detach the filter holder (9) imme-
• Move the steam control handle (3) up-
diately after preparing coffee as there is
wards. When the cup is full turn the steam
redundant water vapor pressure inside.
control handle (3) into OFF position. Re-
peat the operation until the water tank (4)
Making cappuccino
is empty. The coffee machine is ready for
• You can whip cream or milk to make cap-
use (see Pic. 4).
puccino coffee, heat water to make some
tea or warm up any other beverages by
How to get good espresso
hot steam.
• Use the coffee powder intended special-
• Fill the tank (4) with water and install it
ly for the espresso coffee machines.
into the proper position (see Pic. 1).
• Ram the coffee powder in the filter slight-
• Switch the coffee machine on by press-
ly.
ing the button (14), and wait until the in-
• The strength and flavor of the coffee de-
dicator (12) is deemed.
pends upon sort and quality of the coffee
• Put the appropriate can for collecting the
beans, and also upon the grade of coffee
water under the steam outlet nozzle (5).
powder grinding. If coffee is pouring out
• Turn on the steam supply by rotating the
for too long this means the coffee powder
control handle (3) downwards to remove
is too fine or it is rammed too strongly.
the condensate out of the steam pipe.
After the condensate has been removed
Making espresso
set the control handle (3) into OFF posi-
• Insert the power cord plug into the wall
tion (see Pic. 5).
outlet.
• Fill the tank with cold milk (it is recom-
• Detach the tank (4), fill it with cold water
mended to use the milk containing 2% of
up to the MAX mark, and install the tank
fat) per one third.
into its former position (see Pic. 1).
• Put the steam nozzle (6) into the can
• Insert the filter (8) into the holder (9).
filled with milk, turn the control handle
• Fill the filter (8) with the coffee powder.
(3) downwards, the steam supply is on.
• Install the holder (9) into the installation
Several seconds are enough to make the
position (7) by rotating it to the right up to
thick foam. The steam nozzle (6) should
the stop (see Pic. 2).
not touch the bottom of the can. Other-
• Put the cup of the appropriate high on
wise the steam release would be blocked
the tray (11).
(see Pic. 6).
• Switch the coffee machine on by press-
ing the button (14). The indicator (13) is
Important: clean the steam pipe (5) imme-
lighted. The indicator (12) keeps blinking
diately after whipping the cream or milk:
until the set temperature is reached, af-
put any can for collecting the water under
terwards it will be deemed.
the steam nozzle, switch on the steam sup-
• The coffee machine is ready for prepar-
ply for several seconds by the control (3)
ing espresso.
(see Pic. 3).
• Turn the steamer supply control handle
Attention! Be aware of the hot steam go-
(3) upwards. After the cup has been filled
ing out to avoid skin burns.
5
5
1508.indd 51508.indd 5 15.05.2007 9:57:0915.05.2007 9:57:09

ENGLISH
Attention! Do not detach or install the noz-
sition and fasten the screw (a) (see Pic.
zle (6) from/at the steam pipe (5) when it
9).
is hot, wait until the steam supply pipe (5)
• Cleaning the detachable tray for col-
is cooled down completely (see Pic. 7). You
lecting the drops (11):
can wash the nozzle (6) under the water
- When the tray is filled with water com-
jet.
pletely, the indicator (10) is lighted. De-
tach the tray (11), remove the grill and
How to make tea or to warm up bever-
pour the water out.
ages
- Wash the grill and the tray with warm wa-
• Fill the tank (4) with water and install it
ter.
into the proper position (see Pic. 1)
- Install the tray into its former position.
• Install filter (8) (the filter should be free
from coffee powder) into the holder (9).
Removing the scale
• Put the cup of the appropriate high on the
To keep the faultless quality of your coffee
tray (11).
machine operations (specially, in the areas
• Switch the coffee machine on by press-
where the water is hard) it is recommend-
ing the button (14), and wait until the indi-
ed to remove the scale periodically by the
cator (12) is deemed.
citric acid solution (1/3 tea spoon per one
• Turn the steam supply control handle (3)
glass of water).
upwards, fill the cup with hot water, and
Normal water: once per 6-8 months
afterwards turn the handle (3) into OFF
Hard water: once per 6 months
position (see Pic. 4).
Very hard water: once per 3 months
• You can warm up beverages by steam
going out of the nozzle (5) using instruc-
• Remove the scale from the mesh filter
tions for making cappuccino coffee.
installed inside the housing of the coffee
machine and put it into the former posi-
Cleaning
tion (see description above).
• Cleaning filter (8):
• Pour the citric acid solution into the water
- If the holes of the filter (8) are blocked
tank (4).
with coffee powder deposit, you can
• Insert the filter (8) into the holder (9) and
clean it by small brush (see Pic. 8).
install it into the appropriate position (see
• Cleaning the mesh filter installed in-
Pic. 2).
side the housing of the coffee ma-
• Install the appropriate cup on the tray
chine (at the filter 7 holder installa-
(11).
tion place):
• Turn the coffee machine on by the switch-
- You can remove the coffee powder rem-
er (14).
nants out of the filter holes by the tooth-
• After the coffee machine has been
pick.
warned up turn the steam supply control
- Remove the mesh filter if required. Turn
handle (3) upwards, fill the cup and turn
off the fastening screw (a) by a screw-
the control handle (3) into OFF position.
driver rotating it anticlockwise, detach
Pour the liquid out of the cup. Repeat the
the mesh filter (b), and clean the filter
procedure several times.
holes by toothpick or needle.
• While the last procedure put the cup un-
- Second way: remove mesh filter (b) and
der the steam pipe (5) to clean it. Turn
immerse it into the vinegar or citric acid
on the steam supply rotating the control
(1/3 tea spoon per one glass of water).
handle (3) downwards. Afterwards turn
- Install the mesh filter into the proper po-
the control handle (3) into OFF position.
6
1508.indd 61508.indd 6 15.05.2007 9:57:0915.05.2007 9:57:09
ENGLISH
Be careful, the steam going out of the pipe is very hot.
• After removing the scale, clean the coffee machine with pure water for 2-3 times (see
section “Preparations before operation).
Trouble shooting
Malfunction Possible causes
- Make sure there is water in the tank (4).
- Switch the coffee machine on by the switcher (14), put the
cup under the steam nozzle (5), and turn on the steam sup-
ply by rotating the control handle (3) downwards to let the air
No hot water supply
out. When the steam starts going out of the nozzle (4), turn the
control handle (3) into OFF position (see Pic. 5).
- If after all these operations there is still no hot water supply, ap-
ply to the authorized service center.
- Depending on the grade of coffee powder grinding you can de-
termine from experience the degree of coffee powder ramming
in the filter (8).
- Check out whether the excessive amount of coffee powder is
Coffee is pouring over
blocking the appropriate position of the filter holder (9) while
the edges of the hold-
installation.
er (9)
- There are the crumbs of grinded coffee at the place of the hold-
er installation, remove them.
- If after all these operations coffee is still pouring over the filter
holder edges, apply to the authorized service center.
Technical specifications:
Power supply voltage: 220-230 V ~ 50 Hz
Power consumption: 1000 W
Water tank capacity: 1500 ml
Specifications subject to change without prior notice.
MINIMUM SERVICE LIFE - 3 YEARS
GUARANTEE
Details regarding guarantee conditions can be obtained from the dealer from whom the
appliance was purchased. The bill of sale or receipt must be produced when making any
claim under the terms of this guarantee.
This product conforms to the EMC-Requirements as laid down by the Council
Directive 89/336/EEC and to the Law Voltage Regulation (73/23 EEC)
7
1508.indd 71508.indd 7 15.05.2007 9:57:0915.05.2007 9:57:09

DEUTSCH
KAFFEEMASCHINE
ben dem laufenden Gerät Kinder oder behin-
derte Personen befinden.
BESCHREIBUNG
• Schalten Sie die Kaffeemaschine vom Elektro-
1. Gehäuse
netz ab, wenn sie nicht benutzt wird oder vor
2. Platz zum Tassenwärmen
der Reinigung. Die Kaffeemaschine muss vor
3. Griff des Reglers der Dampfzufuhr
der Einstellung oder Abnahme der Teile sowie
4. Wasserbehälter
vor der Reinigung vollständig abgekühlt sein.
5. Dampfrohr
• Um die Kaffeemaschine vom Netz abzuschal-
6. Aufsatz
ten, versetzen Sie den Schalter in die Aus-Po-
7. Platz der Einstellung der Filterhalterung
sition und ziehen Sie danach den Netzstecker
8 Kaffeefilter
aus der Steckdose heraus.
9. Filterhalterung
• Benutzen Sie die Kaffeemaschine nicht, wenn
10. Füllanzeige der Tropfauffangpfanne
ihr Netzkabel, Stecker beschädigt sind, im
11. Abnehmbare Tropfauffangpfanne
Fall, wenn die Maschine falsch funktioniert
12. Bereitschaftsanzeige
oder jegliche Beschädigungen aufweist. Um
13. Stromanzeige
die Kaffeemaschine reparieren zu lassen,
14. Schalter der Stromversorgung
wenden Sie sich an ein autorisiertes Service-
zentrum.
WICHTIGE VORSICHTSMASSNAHMEN
• Lagern Sie die Kaffeemaschine nie an den
Bei der Anwendung von elektrischen Geräten
Stellen mit der Temperatur niedriger als 0°C.
muss man immer grundsätzliche Vorsichtsmaß-
nahmen befolgen, insbesondere:
NUR FÜR HAUSGEBRAUCH
• Benutzen Sie die Kaffeemaschine nur ent-
sprechend ihrer direkten Vorbestimmung.
VORBEREITUNG AUF DEN BERIEB
• Wenden Sie nur das Zubehör an, das mitgelie-
• Packen Sie die Kaffeemaschine aus.
fert wurde.
• Bevor Sie die Kaffeemaschine anschalten,
• Bevor Sie die Kaffeemaschine anschalten,
vergewissern Sie sich, dass die Betriebsspan-
vergewissern Sie sich, dass die Spannung im
nung mit der Netzspannung übereinstimmt.
Netz mit der Betriebsspannung der Kaffee-
• Vor dem erneuten Einsatz der Kaffeemaschi-
maschine übereinstimmt.
ne spülen Sie alle abnehmbare Teile im war-
• Zum Anschalten der Kaffeemaschine benut-
men Wasser ab.
zen Sie die Netzsteckdose mit der Erdung.
• Befüllen Sie den Wasserbehälter (4) mit Was-
• Schalten Sie das Gerät nicht ohne Wasser an.
ser, nicht höher als die Bezeichnung MAX
• Benutzen Sie die Kaffeemaschine nie außer-
(Abb. 1).
halb der Räumlichkeiten.
• Versetzen Sie den Schalter (14) in die Position
• Stellen Sie die Kaffeemaschine auf einer gera-
«Aus».
den und trockenen Oberfläche auf, auf siche-
• Vergewissern Sie sich, dass die Dampfzufuhr
rem Abstand von den Wänden, Schränken und
abgestellt ist. Versetzen Sie dafür den Schal-
anderen Gegenständen.
tergriff (3) in die Position «OFF» (Abb. 3).
• Achten Sie darauf, dass das Netkabel nicht
• Setzen Sie den Filter für den Kaffee (8) in die
vom Tischrand hängt oder heiße Oberflächen
Halterung (9) ein, ohne den Kaffee reinzu-
berührt.
schütten, versetzen Sie den Schalter (9) an
• Berühren Sie keine heißen Teile und Oberflä-
die Stelle des Einsatzes (7), indem Sie ihn
chen des Geräts.
nach rechts drehen (Abb. 2).
• Um Brand oder Stromschlag zu vermeiden,
• Setzen Sie auf den Untersetzer (11) eine in
tauchen Sie das Netzkabel oder die Kaffee-
der Höhe passende Tasse ein.
maschine nicht ins Wasser oder andere Flüs-
• Setzen Sie den Stecker des Netzkabels in die
sigkeiten.
Steckdose ein.
• Achten Sie besonders darauf, wenn sich ne-
• Drücken Sie die Taste des Schalters (14), da-
8
8
1508.indd 81508.indd 8 15.05.2007 9:57:0915.05.2007 9:57:09

DEUTSCH
bei leuchtet die Anzeige (13), und die Anzeige
Achtung!
(12) blinkt. Wenn die notwendige Temperatur
- Nehmen Sie die Filterhalterung (9) nicht so-
erreicht wurde, erlicht die Anzeige (12).
fort nach der Zubereitung vom Kaffee ab, da
• Versetzen Sie den Griff des Schalters der
im Inneren der Kaffeemaschine zu starker
Dampfzufuhr (3) nach oben; wenn die Tasse
Wasser- und Dampfdruck herrscht.
gefüllt wurde, drehen Sie den Griff des Schal-
ters (3) in die Position «OFF» um. Wiederholen
ZUBEREITUNG VON CAPPUCCINO
Sie den Vorgang, bis das Wasser im Wasser-
• Mit Hilfe von der Kaffeemaschine kann man
behälter (4) aus ist. Danach ist die Kaffeema-
Sahne oder Milch für den Cappuccino-Kaffee
schine bereit zum Einsatz (Abb. 4).
aufschäumen, das Wasser zum Aufbrühen von
Tee zubereiten oder verschiedene Getränke
WIE BEKOMME ICH EINEN GUTEN ESPRESSO
mit Hilfe von heißem Dampf erwärmen.
• Benutzen Sie den gemahlenen Kaffee für die
• Befüllen Sie den Wasserbehälter (4) mit was-
«Espresso»-Kaffeemaschinen.
ser und setzen Sie ihn auf seine Stelle zurück
• Drücken Sie den gemahlenen Kaffee im Filter
auf (Abb. 1).
etwas an.
• Schalten Sie die Kaffeemaschine an, indem
• Stärke und Geschmack des zubereiteten
Sie die Taste (14) drücken, warten Sie ab, bis
Kaffee hängen von der Kaffeesorte, seiner
die blinkende Anzeige (12) erlischt.
Qualität und dem Mahlgrad der Kaffeebohnen
• Stellen Sie unter die Dampfdüse (5) einen
ab. Wenn der Kaffee zu lange tropft, bedeutet
passenden Behälter für das Auffangen von
es, dass der Kaffee zu fein gemahlen oder zu
Wasser auf.
stark zusammen gedrückt wurde.
• Öffnen Sie die Dampfzufuhr, indem Sie den
Griff des Schalters (3) in der Richtung nach
ZUBEREITUNG VOM ESPRESSO-KAFFEE
unten drehen, um den Niederschlag zu besei-
• Setzen Sie den Netzstecker in die Steckdose
tigen, der sich in dem Dampfrohr gesammelt
ein.
hat. Nachdem Sie den Wasserniederschlag
• Nehmen Sie den Behälter (4) heraus und be-
beseitigt haben, versetzen Sie den Griff des
füllen Sie ihn mit kaltem Wasser bis zum MAX-
Schalters (3) in die Position «OFF» (Abb. 5).
Zeichen, stellen Sie ihn zurück auf (Abb. 1).
• Befüllen Sie den Behälter mit kalter Milch
• Setzen Sie den Filter (8) in die Halterung (9)
(besser mit 2% Fettenthalt) auf 1/3 seines
ein.
Fassungsvermögens.
• Schütten Sie den gemahlenen Kaffee in den
• Richten Sie den Aufsatz der Dampfdüse (6) in
Filter (8) ein.
den Behälter mit Milch, drehen Sie den Griff
• Stellen Sie die Halterung (9) auf ihre Einsatz-
des Schalters (3) in der Richtung nach un-
stelle (7) ein, drehen Sie diese nach rechts bis
ten, die Dampfzufuhr ist geöffnet. Um einen
zum Anschlag um (Abb. 2).
dichten Schaum zu gewinnen, brauchen Sie
• Stellen Sie die in der Höhe passende Tasse
einige Sekunden. Der Aufsatz der Dampfdüse
auf den Untersetzer (11) auf.
(6) darf den Boden der Kanne nicht berühren,
• Schalten Sie die Kaffeemaschine mit der
sonst wird der Austritt vom Dampf erschwert
Schalttaste (14) an, dabei leuchtet die Leucht-
(Abb. 6).
anzeige (13) auf und die Anzeige (12) blinkt.
Wenn die erforderliche Temperatur erreicht
Wichtig: Reinigen Sie die Dampfdüse (5) sofort
wird, erlischt die Anzeige (12).
nach der Zubereitung der Sahne und der Milch:
• Die Kaffeemaschine ist zum Aufbrühen von
Stellen Sie unter die Dampfdüse einen beliebi-
Espresso-Kaffee bereit.
gen Wasserbehälter und schalten Sie für einige
• Versetzen Sie den Regler der Dampfzufuhr
Sekunden mit Hilfe des Schalters (3) die Dampf-
(3) nach oben. Wenn die Tasse befüllt wurde,
zufuhr an (Abb. 3).
drehen Sie den Griff des Schalters (3) in die
Position “OFF” um (Abb. 4).
9
9
1508.indd 91508.indd 9 15.05.2007 9:57:0915.05.2007 9:57:09

DEUTSCH
Achtung! Vermeiden Sie Brandwunden, die
drehen, nehmen Sie den Netzfilter (b) ab und
durch den austretenden heißen Dampf verur-
reinigen Sie alle Öffnungen mit Hilfe eines
sacht werden können.
Zahnstochers oder einer Nadel.
Achtung! Nehmen Sie nicht den Aufsatz ab und
- Die zweite Möglichkeit: Nehmen Sie den Netz-
setzen Sie ihn (6) nicht auf die Dampfdüse (5)
filter (b) ab und tauchen Sie ihn für einige Zeit
auf, wenn sie noch heiß ist, warten Sie ab, bis die
in den Essig oder eine Lösung mit Zitronen-
Dampfdüse (5) vollständig abgekühlt ist (Abb.
säure und Wasser (1/3 Teelöffel für ein Glas
7). Den Aufsatz (6) können Sie unter einem Was-
Wasser).
serstrahl abspülen.
- Setzen Sie den Netzfilter auf seine Stelle zu-
rück ein und drehen Sie die Schraube (a) wie-
WIE BRÜHEN SIE DEN TEE ODER ERWÄR-
der zu (Abb. 9).
MEN DIE GETRÄNKE
• Reinigung der abnehmbaren Auffangpfan-
• Befüllen Sie den Wasserbehälter (4) mit Was-
ne für Tropfen (11):
ser und setzen Sie ihn auf seine Stelle auf
- Wenn die Auffangpfanne mit Wasser befüllt
(Abb. 1).
wird, schwimmt der Indikator (10) auf, neh-
• Setzen Sie den Filter (8) (der Filter darf nicht
men Sie die Auffangpfanne (11) a b, nehmen
mit dem gemahlenen Kaffee befüllt sein) in die
Sie von das Gitter von der Pfanne und gießen
Halterung (9) ein.
Sie das Wasser ab.
• Stellen Sie in die Auffangpfanne (11) eine in
- Spülen Sie das Gitter und die Pfanne mit war-
der Höhe passende Tasse auf.
mem Wasser aus.
• Schalten Sie die Kaffeemaschine mit Hilfe der
- Setzen Sie die Auffangpfanne zurück an ihre
Schalttaste (14) an, warten Sie einige Zeit ab,
Stelle ein.
bis die Anzeige (12) erlischt.
• Versetzen Sie den Griff des Schalter der
ENTFERNUNG DES KALKS
Dampfzufuhr (3) in der Richtung nach oben,
Um die einwandfreie Betriebsqualität Ihrer Kaf-
befüllen Sie die Taste mit heißem Wasser, da-
feemaschine zu behalten, besonders in den Ge-
nach versetzen Sie den Griff des Schalters (3)
bieten mit hartem Wasser, wird es empfohlen,
in die Position «OFF» (Abb. 4).
regelmäßog den Kalk mit Hilfe der Lösung der
• Die Erhitzung der Getränke erfolgt durch den
Zitronensäure mit Wasser (1/3 Teelöffel für ein
heißen Dampf, der aus der Dampfdüse (5)
Glas Wasser) zu beseitigen.
austritt, benutzen Sie die Bedienungsanlei-
Wasser mit normalen Härte: ein Mal in 6-8 Mo-
tung zur Zubereitung des Capuccino-Kaffees.
naten
Hartes Wasser: ein Mal in 6 Monaten
REINIGUNG
Wasser mit erhöter Härte: ein Mal in 3 Monaten
• Reinigung des Filters (8):
- Wenn die Öffnungen des Filters mit Resten
• Entfernen Sie den Kalk vom Filter im Gehäu-
vom fein gemahlenen Kaffee verstopft sind,
se der Kaffeemaschine mit Hilfe der Lösund
können Sie diese mit Hilfe einer kleinen Bürste
der Zitronensäure und stellen Sie ihn zurück
reinigen. (Abb. 8).
an seine Stelle (Sehen Sie die Beschreibung
• Reinigung des Netzfilters im Gehäuse der
oben) auf.
Kaffeemaschine (an der Stelle des Einsat-
• Befüllen Sie den Wasserbehälter (4) mit der
zes der Filterhalterung 7):
Zitronensäurenlösung.
- Reste vom gemahlenen Kaffee können Sie
• Setzen Sie den Filter (8) in die Halterung (9)
aus den Öffnungen des Netzfilters können Sie
ein und setzen Sie ihn an seinen Platz zurück
mit Hilfe eines Zahnstochers entfernen.
ein (Abb. 2).
- Wenn es notwendig ist, nehmen Sie den Netz-
• Stellen Sie auf die Auffangpfanne (11) eine
filter ab. Mit Hilfe eines Schraubenziehers
passe nde Tasse auf.
drehen Sie eine Befestigungsschraube (a)
• Schalten Sie die Kaffeemaschine mit Hilfe des
aus, indem Sie diese gegen Uhrzeigerichtung
Schalter (14) an.
10
10
1508.indd 101508.indd 10 15.05.2007 9:57:0915.05.2007 9:57:09
DEUTSCH
• Nachdem die Kaffeemaschine erwärmt wurde, versetzen Sie den Griff des Schalters der Dampf-
zufuhr (3) in der Richtung nach oben, befüllen Sie die Tasse, danach versetzen Sie den Griff des
Schalters (3) in die Position «OFF». Gießen Sie die Flüssitgkeit aus der Tasse ab, wiederholen Sie
den Vorgang einige Male.
• Wärend des letzten Vorgangs stellen Sie eine Tasse unter die Dampfdüse (5) ein, um diese zu rei-
nigen, und öffnen Sie die Dampfzufuhr, indem Sie den Griff des Schalters (3) in der Richtung nach
unten drehen, danach versetzen Sie den Griff des Schalters (3) in die Position «OFF». Seien Sie
vorsichtig: Der austretende Dampf ist sehr heiß.
• Nach der Kalkentfernung spülen Sie die Kaffeemaschine 2-3 Mal mit reinem Wasser (Sehen Sie
den Abschnitt «Vorbereitung zum Betrieb»).
BESEITIGUNG DER STÖRUNGEN
STÖRUNG MÖGLICHE URSACHEN
- Überprüfen Sie, ob es Wasser im Wasserbehälter gibt (4).
- Schalten Sie die Kaffeemaschine mit Hilfe des Schalters (14) an, stellen
Sie die Tasse unter die Dampfdüse (5) auf, öffnen Sie die Dampfzufuhr,
Kein Austritt von hei-
indem Sie den Griff des Schalters (3) in der Richtung nach unten drehen,
ßem Wasser
um die Luft abzulassen. Wenn Dampf aus der Dampfdüse (4) austritt,
versetzen Sie den Griff des Schalters (3) in die Position «OFF» (Abb. 5).
- Wenn nach diesen Vorgängen immernoch kein Wasser austritt, wenden
Sie sich an ein autorisiertes Servicezentrum.
- Abhängig davon, wie fein oder grob der Kaffee gemahlen ist, stellen Sie
durch die Prüfung fest, wie dicht der Kaffe in dem Filter sein soll (8).
- Überprüfen Sie, ob die Kaffeemenge im Kaffeefilter die richtige Positio-
Der Kaffee läuft über
nierung des Filters (9) behindert, wenn er eingesetzt werden soll.
den Rand der Halte-
- An der Stelle des Einsatzes der Halterung sind Krümmel vom gemahle-
rung (9) über
nen Kaffee geblieben.
- Wenn der Kaffee nach allen diesen Vorgängen immernoch über den
Rand der Filterhalterung überläuft, wenden Sie sich an ein autorisiertes
Servicezentrum.
Technische Eigenschaften:
Spannung der Stromversorgung: 220-230 V ~ 50 Hz
Gespeiste Leistung: 1000 W
Fassungsvermögen für das Wasser: 1500 ml
Der Hersteller behält sich das Recht vor die Charakteristiken des Gerätes ohne Vorbescheid zu
ändern.
Die Lebensdauer des Gerätes beträgt nicht weniger, als 3 Jahre
Gewährleistung
Ausführliche Bedingungen der Gewährleistung kann man beim Dealer, der diese Geräte verkauft
hat, bekommen. Bei beliebiger Anspruchserhebung soll man während der Laufzeit der vorliegenden
Gewährleistung den Check oder die Quittung über den Ankauf vorzulegen.
Das vorliegende Produkt entspricht den Forderungen der elektromagnetischen
Verträglichkeit, die in 89/336/EWG -Richtlinie des Rates und den Vorschriften 73/23/EWG
über die Niederspannungsgeräte vorgesehen sind.
11
1508.indd 111508.indd 11 15.05.2007 9:57:0915.05.2007 9:57:09

РУССКИЙ
КОФЕВАРКА
ческим током не погружайте сетевой
шнур или кофеварку в воду или другие
ОПИСАНИЕ
жидкости.
1. Корпус
• Особое внимание проявляйте в том слу-
2. Площадка для подогрева чашек
чае, если рядом с работающим прибо-
3. Ручка переключателя подачи пара
ром находятся дети либо лица с ограни-
4. Емкость для воды
ченными возможностями.
5. Паровая трубка
• Всегда отключайте кофеварку от элек-
6. Насадка
трической сети, когда она не исполь-
7. Место установки держателя фильтра
зуется, или перед чисткой. Кофеварка
8. Фильтр для кофе
должна остыть перед установкой или
9. Держатель фильтра
снятием с нее частей, а также перед ее
10. Индикатор заполнения поддона для
чисткой.
капель
• Для отключения кофеварки от сети
11. Съемный поддон для капель
установите выключатель в положение
12. Индикатор готовности
"Выкл.", а затем выньте сетевую вилку
13. Индикатор включения в сеть
из розетки.
14. Выключатель питания
• Не пользуйтесь кофеваркой с повреж-
денным сетевым шнуром, сетевой вил-
ВАЖНЫЕ МЕРЫ ПРЕДОСТОРОЖНО-
кой, в случае неправильной работы или
СТИ
после любых ее повреждений. Для ре-
При пользовании электрическими при-
монта обратитесь в ближайший автори-
борами необходимо соблюдать основные
зованный сервисный центр.
меры предосторожности, в том числе:
• Никогда не храните кофеварку в местах
• Используйте кофеварку только по ее
с температурой ниже 0°С.
прямому назначению.
• Используйте только те принадлежности,
ТОЛЬКО ДЛЯ ДОМАШНЕГО ИСПОЛЬ-
которые входят в комплект поставки.
ЗОВАНИЯ
• Перед включением кофеварки убеди-
тесь, что напряжение в сети соответ-
ПОДГОТОВКА К РАБОТЕ
ствует рабочему напряжению прибора.
• Извлеките кофеварку из упаковки.
• Для подключения кофеварки исполь-
• Перед включением кофеварки убеди-
зуйте сетевую розетку с контактами за-
тесь, что напряжение в сети соответ-
земления.
ствует рабочему напряжению прибора.
• Не включайте прибор без воды.
• Перед первым использованием кофе-
• Не используйте кофеварку вне помеще-
варки промойте все съемные части в
ний.
теплой воде.
• Устанавливайте кофеварку на ровной
• Наполните емкость (4) водой, не выше
сухой поверхности, на безопасном рас-
отметки «МАХ» (Рис. 1).
стоянии от стен, шкафов и других пред-
• Установите выключатель питания (14) в
метов.
положение «Выкл.».
• Следите за тем, чтобы сетевой шнур не
• Убедитесь, что подача пара закрыта.
свешивался над краем стола и не сопри-
Для этого установите ручку переключа-
касался с горячими и острыми поверх-
теля (3) в положение «OFF» (Рис. 3).
ностями.
• Вставьте фильтр для кофе (8) в держа-
• Не дотрагивайтесь до горячих частей и
тель (9), не засыпая кофе, установите
поверхностей прибора.
держатель (9) на место установки (7),
• Во избежание пожара и удара электри-
повернув его вправо (Рис. 2).
12
1508.indd 121508.indd 12 15.05.2007 9:57:1015.05.2007 9:57:10

РУССКИЙ
• Установите на поддон (11) подходящую
• Кофеварка готова для варки кофе
по высоте чашку.
«эспрессо».
• Вставьте вилку сетевого шнура в розет-
• Переведите ручку переключателя пода-
ку.
чи пара (3) по направлению вверх, по-
• Нажните на кнопку выключателя питания
сле наполнения чашки переведите руч-
(14), при этом загорится индикатор (13),
ку переключателя (3) в положение «OFF»
а индикатор (12) будет мигать, по дости-
(Рис. 4).
жении заданной температуры индикатор
(12) погаснет.
Внимание!
• Переведите ручку переключателя пода-
Не снимайте держатель фильтра (9) сразу
чи пара (3) по направлению вверх; после
же после приготовления кофе, так как вну-
наполнения чашки переведите ручку пе-
три имеется избыточное давление воды и
реключателя (3) в положение «OFF». По-
пара.
вторите процедуру до окончания воды в
емкости (4). После этого кофеварка го-
ПРИГОТОВЛЕНИЕ «КАПУЧЧИНО»
това к использованию (Рис. 4).
• С помощью кофеварки можно взбить
сливки или молоко для приготовления
КАК ПОЛУЧИТЬ ХОРОШИЙ КОФЕ
кофе «каппуччино», подогреть воду для
«ЭСПРЕССО»
заваривания чая или подогревать дру-
• Используйте для кофеварок молотый
гие напитки горячим паром.
кофе «эспрессо».
• Наполните емкость кофеварки (4) водой
• Слегка утрамбуйте молотый кофе в
и установите ее на место (Рис. 1).
фильтре.
• Включите кофеварку, нажав кнопку (14),
• Крепость и вкус приготовленного кофе
дождитесь пока мигающий индикатор
зависят от сорта кофе, его качества и
(12) погаснет.
степени размола кофейных зерен. Если
• Подставьте под паровое сопло (5) под-
кофе наливается слишком долго, это
ходящую емкость для сбора воды.
означает, что кофе слишком мелко по-
• Откройте подачу пара, повернув ручку
молот или был очень сильно утрамбо-
переключателя (3) по направлению вниз
ван.
для удаления конденсата, оставшегося
в паровой трубке. После удаления кон-
ПРИГОТОВЛЕНИЕ КОФЕ «ЭСПРЕССО»
денсата установите ручку переключате-
• Включите сетевую вилку в розетку.
ля (3) в положение «OFF» (Рис. 5).
• Выньте емкость (4), наполните ее холод-
• Наполните емкость холодным молоком
ной водой до отметки «МАХ» и установи-
(лучше с 2%-ным содержанием жира)
те на место (Рис. 1).
на 1/3 ее вместимости.
• Вставьте фильтр (8) в держатель (9).
• Опустите насадку парового сопла (6) в
• Насыпьте молотый кофе в фильтр (8).
емкость с молоком, поверните ручку пе-
• Установите держатель (9) на место уста-
реключателя (3) по направлению вниз,
новки (7), повернув его вправо до упора
подача пара открыта. Для приготовле-
(Рис. 2).
ния густой пены понадобится несколько
• Установите на поддон (11) подходящую
секунд. Насадка парового сопла (6) не
по высоте чашку.
должна касаться дна емкости, иначе вы-
• Включите кофеварку нажатием кноп-
ход пара будет затруднен (Рис. 6).
ки включения (14) - при этом загорится
индикатор (13), а индикатор (12) будет
Важно: сразу после взбивания сливок или
мигать, по достижении заданной темпе-
молока прочистите паровое сопло (5):
ратуры индикатор (12) погаснет.
подставьте под паровое сопло любую ем-
13
1508.indd 131508.indd 13 15.05.2007 9:57:1015.05.2007 9:57:10

РУССКИЙ
кость для сбора воды и переключателем
против часовой стрелки, снимите сетча-
(3) на несколько секунд включите подачу
тый фильтр (b) и прочистите отверстия
пара (Рис. 3).
зубочисткой или иголкой.
Будьте осторожны! Опасайтесь ожогов
- Второй способ: снимите сетчатый
выходящим горячим паром.
фильтр (b) и опустите его на некоторое
Внимание! Не снимайте и не устанавли-
время в уксус или раствор лимонной
вайте насадку (6) на паровое сопло (5),
кислоты (1/3 чайной ложки на стакан
пока оно горячее, дождитесь, когда па-
воды).
ровое сопло (5) полностью остынет (Рис.
- Установите сетчатый фильтр на место и
7). Насадку (6) можно промыть под струей
закрутите крепежный винт (а) (Рис. 9).
воды.
Чистка съемного поддона для сбора
капель (11)
КАК ЗАВАРИВАТЬ ЧАЙ ИЛИ ПОДОГРЕ-
- При заполнении поддона жидкостью
ВАТЬ НАПИТКИ
всплывает индикатор (10), снимите под-
• Наполните резервуар (4) водой и уста-
дон (11), снимите с поддона решетку и
новите его на место (Рис. 1).
слейте воду.
• Установите фильтр (8) (фильтр не дол-
- Промойте решетку и поддон теплой во-
жен быть заполнен молотым кофе) в
дой.
держатель (9).
- Установите поддон на место.
• Установите на поддон (11) подходящую
по высоте чашку.
УДАЛЕНИЕ НАКИПИ
• Включите кофеварку нажатием кнопки
Для сохранения безупречного качества
включения (14), подождите некоторое
работы вашей кофеварки, особенно в
время, пока индикатор (12) погаснет.
районах с жесткой водой, рекомендуется
• Переведите ручку переключателя по-
периодически удалять накипь с помощью
дачи пара (3) по направлению вверх,
раствора лимонной кислоты (1/3 чайной
наполните чашку горячей водой, после
ложки на стакан воды):
этого переведите ручку переключателя
- вода нормальной жесткости - раз в 6-8
(3) в положение «OFF» (Рис. 4).
месяцев;
• Подогрев напитков производится го-
- жесткая вода - раз в 6 месяцев;
рячим паром, выходящим из парового
- вода высокой жесткости - раз в 3 меся-
сопла (5), пользуйтесь инструкцией по
ца.
приготовлению кофе «капуччино».
• Удалите накипь с фильтра в корпусе ко-
ЧИСТКА
феварки раствором лимонной кислоты
Чистка фильтра (8)
и установите его на место (см. описание
- Если отверстия фильтра забиты осад-
выше).
ком молотого кофе, вы можете прочи-
• Залейте раствор лимонной кислоты в
стить их небольшой щеткой (Рис. 8).
резервуар для воды (4).
Чистка сетчатого фильтра в корпусе
• Вставьте фильтр (8) в держатель (9) и
кофеварки (в месте установки дер-
установите его на место (Рис. 2).
жателя фильтра 7)
• Установите на поддон (11) подходящую
- Остатки молотого кофе из отверстий
по высоте чашку.
сетчатого фильтра можно удалить с по-
• Включите кофеварку выключателем
мощью зубочистки.
(14).
- При необходимости, снимите сетчатый
• После нагрева кофеварки переведите
фильтр. При помощи отвертки отверни-
ручку переключателя подачи пара (3) по
те крепежный винт (а), поворачивая его
направлению вверх, наполните чашку;
14
1508.indd 141508.indd 14 15.05.2007 9:57:1015.05.2007 9:57:10
РУССКИЙ
после этого переведите ручку переключателя (3) в положение «OFF». Вылейте жид-
кость из чашки, повторите процедуру несколько раз.
• Во время последней процедуры, чтобы очистить паровое сопло (5), подставьте под
него чашку и откройте подачу пара, повернув ручку переключателя (3) по направле-
нию вниз, после этого установите ручку переключателя (3) в положение «OFF». Будьте
осторожны, так как выходящий пар очень горячий.
• После удаления накипи промойте кофеварку 2-3 раза чистой водой (см. раздел «Под-
готовка к работе»).
УСТРАНЕНИЕ НЕИСПРАВНОСТЕЙ
НЕИСПРАВНОСТЬ ВОЗМОЖНЫЕ ПРИЧИНЫ
- Проверьте, есть ли вода в емкости (4).
- Включите кофеварку выключателем (14), поставьте чашку
под паровое сопло (5), откройте подачу пара, повернув
ручку переключателя (3) по направлению вниз для выпу-
Нет выхода горячей
ска воздуха. Когда из парового сопла (5) начнет выходить
воды
пар, установите ручку переключателя (3) в положение
«OFF» (Рис. 5).
- Если после выполнения этих действий подача горячей
воды не возобновилась, обратитесь в авторизованный
сервисный центр.
- В зависимости от степени помола кофе определите опыт-
ным путем степень уплотнения кофе в фильтре (8).
- Проверьте, не мешает ли чрезмерное количество молотого
кофе правильному положению держателя фильтра (9) при
Кофе высыпается
его установке.
через края держате-
- На месте установки держателя остались крошки молотого
ля (9)
кофе, удалите крошки.
- Если после выполнения этих действий кофе все равно вы-
сыпается через края держателя фильтра, то обратитесь в
авторизованный сервисный центр
Технические характеристики
Напряжение питания: 220-230 В ~ 50 Гц
Максимальная мощность: 1000 Вт
Максимальный объем резервуара для воды: 1500 мл
Производитель оставляет за собой право изменять характеристики приборов без
предварительного уведомления
Срок службы прибора не менее 3-х лет
Данное изделие соответствует всем требуемым европейским и российским
стандартам безопасности и гигиены.
Производитель: АН-ДЕР ПРОДАКТС ГмбХ, Австрия
Нойбаугюртель 38/7А, 1070 Вена, Австрия
15
1508.indd 151508.indd 15 15.05.2007 9:57:1015.05.2007 9:57:10

ҚАЗАҚ
КОФЕ ҚАЙНАТҚЫШ
болмаса басқа сұйықтықтарға батырмаңыз.
• Кофе қайнатқышты балалардың жəне
СИПАТТАМАСЫ
мүмкіндігі шектеулі адамдардың жанында
1. Корпус
пайдаланғанда аса сақ болған жөн.
2. Ыдыстарды қыздыруға арналған алаң
• Қолданып болғаннан кейін жəне
3. Бу беруді ауыстырып қосу тұтқасы
тазалаудың алдында кофе қайнатқышты
4. Суға арналған ыдыс
өшіріп қойыңыз жəне желіден ажыратыңыз.
5. Бу түтігі
Кофе қайнатқышқа оның бөлшектерін
6. Саптама
орнатудың немесе шешудің алдында,
7. Сүзгі ұстағышты орнату орны
сонымен қатар оны тазалаудың алдында
8. Кофеге арналған сүзгі
оның суығанын күтіңіз.
9. Сүзгі ұстағыш
• Кофе қайнатқышты желіден ажырату үшін
10. Тамшыларға арналған тұғырықтың
барлық батырмаларды өшірулі жағдайға
толғанын білдіретін индикатор
қойыңыз, содан кейін желілік ашаны
11. Тамшыларға арналған алмалы-салмалы
розеткадан шығарыңыз.
тұғырық
• Электр сымы немесе ашасы зақымданған
12. Дайындық индикаторы
кезде, не болмаса аспап дұрыс істемей
13. Желіге қосу индикаторы
тұрғанда оны пайдаланбаңыз. Жөндеу
14. Қорек сөндіргіш
үшін арнайы рұқсаты бар сервис
орталығына хабарласыңыз.
МАҢЫЗДЫ САҚТЫҚ ШАРАЛАРЫ
• Кофе қайнатқышты 0°C төмен
Электр аспаптарды пайдалану кезінде
температурада сақтамаңыз.
əрқашан негізгі сақтық шараларын сақтау
қажет, атап айтқанда:
ТЕК ҮЙ ЖАҒДАЙЫНДА ПАЙДАЛАНУҒА
• Кофе қайнатқышты тек оның тікелей
АРНАЛҒАН
арнауы бойынша ғана пайдаланыңыз.
• Тек жеткізу топтамасына кіретін
ЖҰМЫСҚА ДАЙЫНДЫҚ
жабдықтарды пайдаланыңыз.
• Кофе қайнатқышты қораптан шығарыңыз.
• Кофе қайнатқышты қосудың алдында
• Кофе қайнатқышты қосудың алдында
электр желісінің кернеуі құрылғы
электр желісінің кернеуі құрылғы
корпусында көрсетілген кернеуге сəйкес
корпусында көрсетілген кернеуге сəйкес
келетініне көз жеткізіңіз.
келетініне көз жеткізіңіз.
• Кофе қайнатқышты қосу үшін жерлендіруі
• Кофе қайнатқышты алғашқы
бар розетканы қолданыңыз.
пайдаланудың алдында барлық алмалы-
• Кофе қайнатқышты сусыз қоспаңыз.
салмалы бөлшектерді жылы суда жуып
• Кофе қайнатқышты жайдан тыс
алыңыз.
пайдаланбаңыз.
• Ыдысқа (4) су толтырыңыз, бірақ МАХ
• Кофе қайнатқышты тегіс құрғақ бетке,
белгісінен асырмаңыз (1-сурет).
қабырғалардан, шкафтан жəне басқа
• Қорек сөндіргішті (14) «Өшір.» жағдайына
заттардан қауіпсіз аралықта орнатыңыз.
орнатыңыз.
• Желілік сым үстел шетінен ілініп
• Бу беру жабық екеніне көз жеткізіңіз. Ол
тұрмауын, ыстық беттермен жанаспауын
үшін ауыстырыпқосқыш тұтқасын (3) «OFF»
қадағалаңыз.
жағдайына ауыстырыңыз (3-сурет).
• Ыстық беттерге қол тигізбеңіз.
• Кофеге арналған сүзгіні (8) ұстағышқа (9)
• Өрт туындау немесе электр тогына түсу
салыңыз, кофе салмай тұрып, ұстағышты
қатерлеріне жол бермеу үшін желілік
(9) оңға бұрап, арнайы орынға (7) орнатыңыз
сымды немесе кофе қайнатқышты суға не
(2-сурет).
16
1508.indd 161508.indd 16 15.05.2007 9:57:1015.05.2007 9:57:10

ҚАЗАҚ
• Биіктігі бойынша сəйкес келетін сапты аяқты
• Кофе қайнатқыш эспрессо кофесін пісіруге
тұғырыққа (11) қойыңыз.
дайын.
• Желілік сымның ашасын розеткаға
• Бу беруді ауыстырыпқосқыш тұтқасын (3)
орнатыңыз.
жоғары көтеріңіз, сапты аяқ толғаннан кейін
• Қорек сөндіргішті (14) басыңыз, бұл
ауыстырыпқосқыш тұтқасын (3) «OFF»
жағдайда индикатор (13) жанады, ал
жағдайына ауыстырыңыз (4-сурет).
индикатор (12) белгіленген температураға
жеткенге дейін жыпылықтайтын болады,
Назар аударыңыз!
содан кейін сөнеді.
- Кофені дайындап болғаннан кейін сүзгі
• Бу беруді ауыстырыпқосқыш тұтқасын (3)
ұстағышты (9) бірден шешпеңіз, өйткені
жоғары қаратып ауыстырыңыз, сапты аяқ
оның ішінде артық су жəне бу қысымы бар.
толғаннан кейін ауыстырыпқосқыш тұтқасын
(3) «OFF» жағдайына ауыстырыңыз.
КАПУЧЧИНО ДАЙЫНДАУ
Ыдыста (4) су біткеннен кейін процедураны
• Кофе қайнатқыштың көмегімен капуччино
қайталаңыз. Осыдан кейін кофе қайнатқыш
дайындау үшін кілегей немесе сүтті
пайдалануға дайын (4-сурет).
көпіршітуге, шай демдеу үшін су қайнатуға
не болмаса ыстық бумен басқа сусындарды
ЖАҚСЫ ЭСПРЕССО КОФЕСІН ҚАЛАЙ
қыздыруға болады.
ДАЙЫНДАУҒА БОЛАДЫ
• Кофе қайнатқыш ыдысын (4) суға
• «Эспрессо» кофе қайнатқыштары үшін
толтырыңыз жəне орнына қойыңыз (1-
ұнтақталған кофе пайдаланыңыз.
сурет).
• Кофені сүзгіде сəл нығыздаңыз.
• Батырманы (14) басып, кофе қайнатқышты
• Дайындалған кофенің күштілігі жəне
қосыңыз, жыпылықтап тұрған
дəмі кофе сортына, оның сапасына
индикатордың (12) сөнгенін күтіңіз.
жəне кофе дəндерінің ұнтақталу
• Бу соплосына (5) суды жинауға арналған
дəрежесіне байланысты. Егер кофе
кез келген ыдысты қойыңыз.
тым ұзақ құйылатын болса, кофе қатты
• Бу түтігінде қалған конденсатты кетіру
ұнтақталғанын не болмаса тым қатты
үшін ауыстырыпқосқыш тұтқасын (3) төмен
нығыздалғанын білдіреді.
бағыттап, бу беруді ашыңыз. Конденсатты
кетіргеннен кейін ауыстырыпқосқыш
ЭСПРЕССО КОФЕСІН ДАЙЫНДАУ
тұтқасын (3) «OFF» жағдайына
• Желілік ашаны розеткаға қосыңыз.
ауыстырыңыз (5-сурет).
• Ыдысты (4) шығарыңыз, МАХ белгісіне
• 1/3 мөлшерде ыдысқа салқын сүт құйыңыз
дейін суық су құйыңыз жəне орнына
(майлылығы 2% ).
орнатыңыз (1-сурет).
• Бу соплосын (6) сүт құйылған құмыраға
• Сүзгіні (8) ұстағышқа (9) қойыңыз.
салыңыз, ауыстырыпқосқыш тұтқасын (3)
• Ұнтақталған кофені сүзгіге (8) салыңыз.
төмен түсіріңіз, бу беру ашық. Қою көбіршік
• Ұстағышты (9) тірелгенге дейін оңға бұрап,
дайындау үшін бірнеше секунд қана қажет.
орнына (7) орнатыңыз (2-сурет).
Бу соплосының саптамасы (6) құмыраның
• Тұғырыққа (11) биіктігі бойынша сəйкес
түбіне тиіп тұрмауы қажет, себебі бұл
келетін сапты аяқты қойыңыз.
будың шығуына қиындық келтіреді (6-
• Қосу батырмасын (14) басып, кофе
сурет).
қайнатқышты қосыңыз, бұл жағдайда
индикатор (13) жанады, ал индикатор (12)
Маңызды: кілегей немесе сүтті
белгіленген температураға жеткенге дейін
көбіршіктегеннен кейін бу соплосын (5)
жыпылықтайтын болады, содан кейін
бірден тазалаңыз – ол үшін бу соплосының
сөнеді.
астына суы бар ыдыс қойыңыз жəне бірнеше
17
1508.indd 171508.indd 17 15.05.2007 9:57:1015.05.2007 9:57:10

ҚАЗАҚ
секундқа ауыстырыпқосқышпен (3) бу беруді
бұраңыз, торлы сүзгіні (b) шешіңіз жəне
қосыңыз (3-сурет).
тіс тазалағыштың немесе иненің көмегімен
Назар аударыңыз! Ыстық бу шыққанда күйіп
тесіктерді тазалаңыз.
қалмаңыз.
- екінші əдіс: торлы сүзгіні (b) шешіңіз жəне
Назар аударыңыз! Бу соплосы (5) ыстық
оны біраз уақытқа сірке қышқылының
болғанда, оған саптама орнатпаңыз
немесе лимон қышқылының ерітіндісіне
жəне шешпеңіз. Бу соплосының (5) толық
салыңыз (бір стакан суға 1/3 қасық).
суығанын күтіңіз (7-сурет). Саптаманы (6) су
- торлы сүзгіні орнына салыңыз жəне бекіткіш
астында жууға болады.
бұранданы (а) бұрап бекітіңіз (9-сурет).
• Тамшыларға арналған алмалы-салмалы
ШАЙ ДЕМДЕУ НЕМЕСЕ ЫСТЫҚ
тұғырықты (11) тазалау:
СУСЫНДАР ДАЙЫНДАУ
- тұғырыққа су толып кеткен жағдайда,
• Кофе қайнатқыш ыдысын (4) суға
индикатор (10) қосылады, ол жағдайда
толтырыңыз жəне орнына қойыңыз (1-
тұғырықты (11) шешіңіз, тұғырықтан
сурет).
торды шығарыңыз жəне ондағы суды төгіп
• Сүзгіні (8) ұстағышқа (9) орнатыңыз (сүзгіге
тастаңыз.
ұнтақталған кофе салмаңыз).
- тор мен тұғырықты жылы суда жуыңыз.
• Тұғырыққа (11) биіктігі бойынша сəйкес
- тұғырықты орнына орнатыңыз.
келетін сапты аяқты қойыңыз.
• Қосу батырмасын (14) басып, кофе
ҚАҚТЫ КЕТІРУ
қайнатқышты қосыңыз, жыпылықтап тұрған
Кофе қайнатқыштың мінсіз жұмыс істеуіне қол
индикатордың (12) сөнгенін күтіңіз.
жеткізу үшін, əсіресе, кермек су қолданылатын
• Бу беруді ауыстырыпқосқыш тұтқасын (3)
аудандарда, лимон қышқылы ерітіндісінің (бір
жоғары көтеріңіз, сапты аяққа ыстық су
стакан суға 1/3 шай қасық) көмегімен қақты
толғаннан кейін ауыстырыпқосқыш тұтқасын
жиі кетіріп тұру ұсынылады.
(3) «OFF» жағдайына ауыстырыңыз (4-
Қалыпты су: 6-8 айда бір рет
сурет).
Кермек су: 6 айда бір рет
• Сусындарды ысыту бу соплосынан (5)
Аса кермек су: 3 айда бір рет
шығатын ыстық бумен жүзеге асады,
«каппучино» кофесін дайындау нұсқаулығын
• Сүзгідегі қақты лимон қышқылы ерітіндісімен
басшылыққа алыңыз.
кетіріңіз жəне оны орнына салыңыз
(жоғарыда сипатталған).
ТАЗАЛАУ
• Лимон қышқылы ерітіндісін суға арналған
• Сүзгіні (8) тазалау:
ыдысқа (4) құйыңыз.
- Егер сүзгінің тесіктері ұнтақталған кофенің
• Сүзгіні (8) ұстағышқа (9) салыңыз жəне оны
тұнбаларымен бітеліп қалған болса, сіз
орнына орнатыңыз (2-сурет).
оларды кішігірім щетканың көмегімен
• Тұғырыққа (11) тиісті сапты аяқты қойыңыз.
тазалай аласыз (8-сурет).
• Кофе қайнатқышты қосу батырмасымен
• Кофе қайнатқыш корпусында торлы
(14) қосыңыз.
сүзгіні тазалау (сүзгіш ұстағышын орнату
• Кофе қайнатқыш қайнағаннан кейін бу
жерінде (7):
беруді ауыстырыпқосқыш тұтқасын (3)
- торлы сүзгінің тесіктеріндегі ұнтақталған
жоғары көтеріңіз, сапты аяқ толғаннан кейін
кофенің қалдықтарын тіс тазалағыштың
ауыстырыпқосқыш тұтқасын (3) «OFF»
көмегімен кетіруге болады.
жағдайына ауыстырыңыз. Сапты аяқтағы
- қажет болған жағдайда торлы сүзгіні
суды төгіп тастаңыз, процедураны бірнеше
шешіңіз: бұрауыштың көмегімен бекіткіш
рет қайталаңыз.
бұранданы (а) сағат тіліне қарсы бағытта
• Соңғы процедура кезінде бу соплосын
18
1508.indd 181508.indd 18 15.05.2007 9:57:1015.05.2007 9:57:10

ҚАЗАҚ
тазалау үшін оның астына ыдыс қойыңыз жəне бу беруді ауыстырыпқосқыш тұтқасын (3)
жоғары көтеріп, бу беруді ашыңыз, осыдан кейін ауыстырыпқосқыш тұтқасын (3) «OFF»
жағдайына ауыстырыңыз. Абай болыңыз – шығатын бу өте ыстық.
• Қақты кетіргеннен кейін кофе қайнатқышты 2-3 рет таза сумен жуыңыз («Жұмысқа дайындық»
тарауын қараңыз).
АҚАУЛЫҚТАРДЫ ЖОЮ
АҚАУЛЫҚ СЕБЕПТЕРІ
- Суға арналған ыдыста (4) судың бар-жоғын тексеріңіз.
- Кофе қайнатқышты қосу батырмасын (14) басып қосыңыз,
шыны аяқты бу соплосының (5) астына қойыңыз, жүйеде
қалған ауаны шығару үшін ауыстырыпқосқыш тұтқасын
(3) жоғары көтеріп, бу беруді ашыңыз. Бу соплосынан (4)
Ыстық су шықпайды
бу шыға бастаған кезде, ауыстырыпқосқыш тұтқасын (3)
«OFF» жағдайына ауыстырыңыз (5-сурет).
- Егер осы əрекеттерді орындағаннан кейін де ыстық
су беру қалпына келмесе, жөндеу орталығына
хабарласыңыз.
- Кофенің тартылу дəрежесіне байланысты сүзгіде (8)
кофенің нығыздалу дəрежесін анықтаңыз.
- Тым көп мөлшерде салынған кофе сүзгі ұстағышты (9)
орнату кезінде оның дұрыс жағдайда тұруына кедергі
Ұстағыштың (9) ернеуінен
келтіруі мүмкін.
кофе төгіледі
- Ұстағышты орнату орнында ұнтақталған кофенің
қалдықтары қалуы мүмкін, оларды алып тастаңыз.
- Егер осы əрекеттерді орындағаннан кейін де кофе сүзгі
ұстағыштың ернеуінен төгілетін болса, онда жөндеу
орталығына хабарласыңыз.
Техникалық сипаттамалары:
Қорек кернеуі: 220-230 В ~ 50 Гц
Тұтынылатын қуат: 1000 Вт
Суға арналған ыдыс: 1500 мл
Өндіруші алдын ала хабарламастан аспаптың сипаттамаларын өзгертуге құқылы.
Аспаптың қызмет мерзімі 3 жылдан кем емес
Гарантиялық мiндеттiлiгi
Гарантиялық жағдайдағы қаралып жатқан бөлшектер дилерден тек сатып алынған адамға
ғана берiледi. Осы гарантиялық мiндеттiлiгiндегi шағымдалған жағдайда төлеген чек немесе
квитанциясын көрсетуi қажет.
Бұл тауар ЕМС – жағдайларға сəйкес келедi негiзгi Мiндеттемелер 89/336/EEC
Дерективаның ережелерiне енгiзiлген Төменгi Ережелердiң Реттелуi (73/23 EEC)
19
1508.indd 191508.indd 19 15.05.2007 9:57:1015.05.2007 9:57:10

БЪЛГАРСКИ
КАФЕВАРКА
варката във вода или в други течности.
• Бъдете особено внимателни в случай,
ОПИСАНИЕ
ако в близост до работещия прибор има
1. Корпус
деца, или лица с ограничени възможнос-
2. Площадка за претопляне на чаши
ти.
3. Дръжка на превключвателя за подаване
• Винаги изключвайте кафеварката от
на пара
електромрежата, когато тя не се изпол-
4. Съд за вода
зва, или преди почистване. Кафеварката
5. Парна тръбичка
трябва да изстине преди установяването
6. Наставка
и или, когато от нея се снемат части, а
7. Място на установяване на държателя
също така преди почистването и.
на филтъра
• За изключване на кафеварката от мре-
8. Филтър за кафе
жата установете прекъсвача в изключено
9. Държател на филтъра
положение, а след това извадете щепсе-
10. Индикатор за напълването на подлож-
ла от контакта.
ката за капки
• Не използвайте кафеварката при пов-
11. Откачваща се подложка за капки
реда на кабела, щепсела за мрежата, в
12. Индикатор за готовност
случай на неправилна работа или след
13. Индикатор за включване в мрежата
каквито и да е нейни повреди. За ремонт
14. Прекъсвач на захранването
се обърнете в най-близкия упълномощен
сервизен център.
ВАЖНИ МЕРКИ ЗА БЕЗОПАСНОСТ
• Никога не съхранявайте кафеварката при
При използване на електроприборите е не-
температура под 0°С.
обходимо да спазвате основните Мерки за
безопасност, включително:
САМО ЗА ДОМАШНО ИЗПОЛЗВАНЕ
• Използвайте кафеварката само по пря-
кото и предназначение.
ПОДГОВКА ЗА РАБОТА
• Използвайте само принадлежностите,
• Извадете кафеварката от опаковката.
които влизат в комплекта на доставката.
• Преди включване на кафеварката се
• Преди включване на кафеварката се
убедете, че напрежението в мрежата съ-
убедете, че напрежението в мрежата съ-
ответства на работното напрежение на
ответства на работното напрежение на
прибора.
прибора.
• При първо използване на кафеварката
• За включване на кафеварката използвай-
измийте всички снемащи се части в топ-
те контакт за мрежата с контакти за зазе-
ла вода.
мяване.
• Напълнете съда (4) с вода, не по-високо
• Не включвайте прибора без вода.
от маркировката МАХ (Рис. 1).
• Не използвайте кафеварката извън по-
• Установете прекъсвача за захранването
мещението.
(14) в положение «Изкл.»
• Поставяйте кафеварката върху равна суха
• Убедете се, че подаването на пара е зат-
повърхност, на безопасно разстояние от
ворено. За тази цел нагласете дръжката
стени, шкафове и други предмети.
на превключвателя (3) в положение «OFF»
• Следете кабела за мрежата да не увисва
(Рис. 3).
над края на масата и да не докосва горе-
• Вкарайте филтъра за кафе (8) в държача
щи повърхности.
(9), без да сипвате кафе, установете дър-
• Не докосвайте горещите части и повърх-
жателя (9) на мястото за установяване
ности на прибора.
(7), като го завъртите надясно (Рис. 2).
• За да избегнете пожар и токов удар, не
• Установете върху подложката (11) подхо-
потапяйте кабела за мрежата или кафе-
дяща по височина чаша.
20
20
1508.indd 201508.indd 20 15.05.2007 9:57:1115.05.2007 9:57:11
