Vitek VT-1251: инструкция
Раздел: Бытовая, кухонная техника, электроника и оборудование
Тип: Утюг
Характеристики, спецификации
Инструкция к Утюгу Vitek VT-1251
Оглавление
- ОПИСАНИЕ МЕРЫ БЕЗОПАСНОСТИ
- ПЕРЕД ПЕРВЫМ ИСПОЛЬЗОВАНИЕМ ТЕМПЕРАТУРА ГЛАЖЕНЬЯ ВЫБОР ВОДЫ НАПОЛНЕНИЕ РЕЗЕРВУАРА ДЛЯ ВОДЫ (рис. 1, 2)
- РАЗБРЫЗГИВАТЕЛЬ ВОДЫ СУХОЕ ГЛАЖЕНЬЕ ПАРОВОЕ ГЛАЖЕНЬЕ УСТАНОВКА ТЕМПЕРАТУРЫ ГЛАЖЕНЬЯ
- ВЕРТИКАЛЬНОЕ ОТПАРИВАНИЕ ФУНКЦИЯ АВТОМАТИЧЕСКОГО ОТКЛЮЧЕНИЯ ДОПОЛНИТЕЛЬНАЯ ПОДАЧА ПАРА ОЧИСТКА ПАРОВОЙ КАМЕРЫ
- ХРАНЕНИЕ ТЕХНИЧЕСКИЕ ХАРАКТЕРИСТИКИ УХОД И ЧИСТКА
VT-1251
MANUAL INSTRUCTION
4
8
14
19
24
29
33
38
43
www.vitek-aus.com
1251.indd 11251.indd 1 02.06.2008 12:01:2702.06.2008 12:01:27
2
1251.indd 21251.indd 2 02.06.2008 12:01:2902.06.2008 12:01:29
3
1251.indd 31251.indd 3 02.06.2008 12:01:2902.06.2008 12:01:29

ENGLISH
IRON
• Close supervision is necessary when chil-
dren or disabled persons are near the unit.
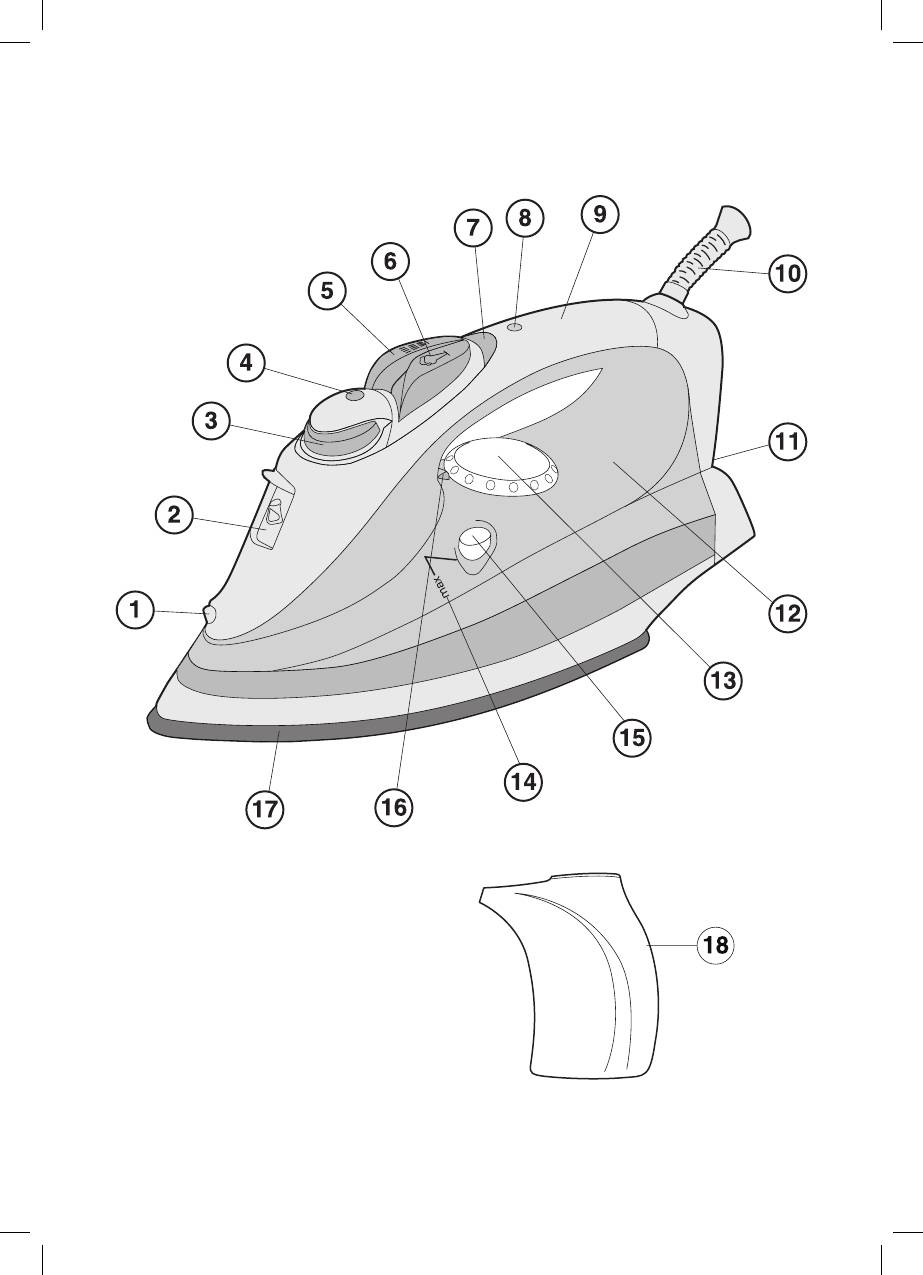
DESCRIPTION
• Never leave the operating unit unattend-
1 – Water spray nozzle
ed.
2 – Water tank lid
• Always unplug the unit if you do not use it.
3 – Steam supply regulator
• In order to avoid electric shock do not im-
4 – Steam supply indicator
merse the unit into water or other liquids.
5 – Spray button
• Do not fill the water tank with scented liq-
6 – Additional steam release button
uids, vinegar, starch solution, descaling
7 – Thermostat indicator
reagents, chemical agents etc.
8 – Auto switching off indicator
• Avoid contact with hot surfaces or outgo-
9 – Handle
ing steam of the iron in order to avoid get-
10 – Power cord protection
ting burns.
11 – Iron base
• Provide that the power cord is not hang-
12 – Water tank
ing over the edge of the ironing board and
13 – Temperature regulator
make sure that it does not touch heated
14 – Maximal water level indicator MAX
surfaces.
15 – SELF CLEAN button
• To unplug the unit always take it by the
16 – Temperature indicator
plug, do not pull by the power cord.
17 – Iron sole
• Before taking the unit away for keeping,
18 – Water bowl
pour out the remaining water and let the
unit cool down.
SAFETY MEASURES
• Pour out water only after you have un-
Before using the unit, please read the in-
plugged the unit.
structions carefully and pay attention to
• Do not use the unit if the plug or the power
the illustrations.
cord is damaged or if there are other dam-
• Before switching on the unit, make sure
ages in the unit.
that your home electricity supply corre-
• In order to avoid electric shock do not re-
sponds to the voltage of current specified
pair the unit yourself. If there are some
on the unit.
damages in the unit apply to the authorized
• Power cord is equipped with a euro plug; in-
service center.
sert it into the socket, with secure ground-
ing.
BEFORE USAGE
• In order to avoid risk of fire do not use
• Take out the iron from the package and re-
adapters while connecting the appliance to
move the protective covering from the iron
the outlet.
sole (17).
• In order to avoid overloading of the power
• Make sure that the electrical supply volt-
network do not switch on several appli-
age corresponds to the iron's operating
ances with high power consumption simul-
voltage.
taneously.
• Use the unit only for the intended purpos-
Note:
es.
The iron's heating element burns dur-
• Use the iron only on the ironing board.
ing the first use; it is normal for a small
• Place the iron on a flat stable surface.
amount of smoke to be released.
• Always unplug the unit while filling the wa-
ter tank with water.
CHOICE OF WATER
• While operating the unit, provide that the
To fill the water tank use regular tap water. If
water tank lid is firmly closed.
the water is hard then it is recommended to
mix it with distilled water at a ratio of 1:1, if the
4
1251.indd 41251.indd 4 02.06.2008 12:01:2902.06.2008 12:01:29
ENGLISH
water is very hard, mix it with distilled water at
• First sort items by ironing temperature:
a ratio of 1:2 or use only distilled water.
wool with wool, cotton with cotton etc.
• The iron heats up faster than is cools down.
Note:
For this reason it is recommended to be-
Do not fill the water tank (12) with scented
gin ironing at low temperature (for instance
liquids, vinegar, starch solutions, descal-
synthetic fabrics). After that, move to high-
ing reagents, chemical substances etc.
er temperature ironing. Cotton and linens
should be ironed last.
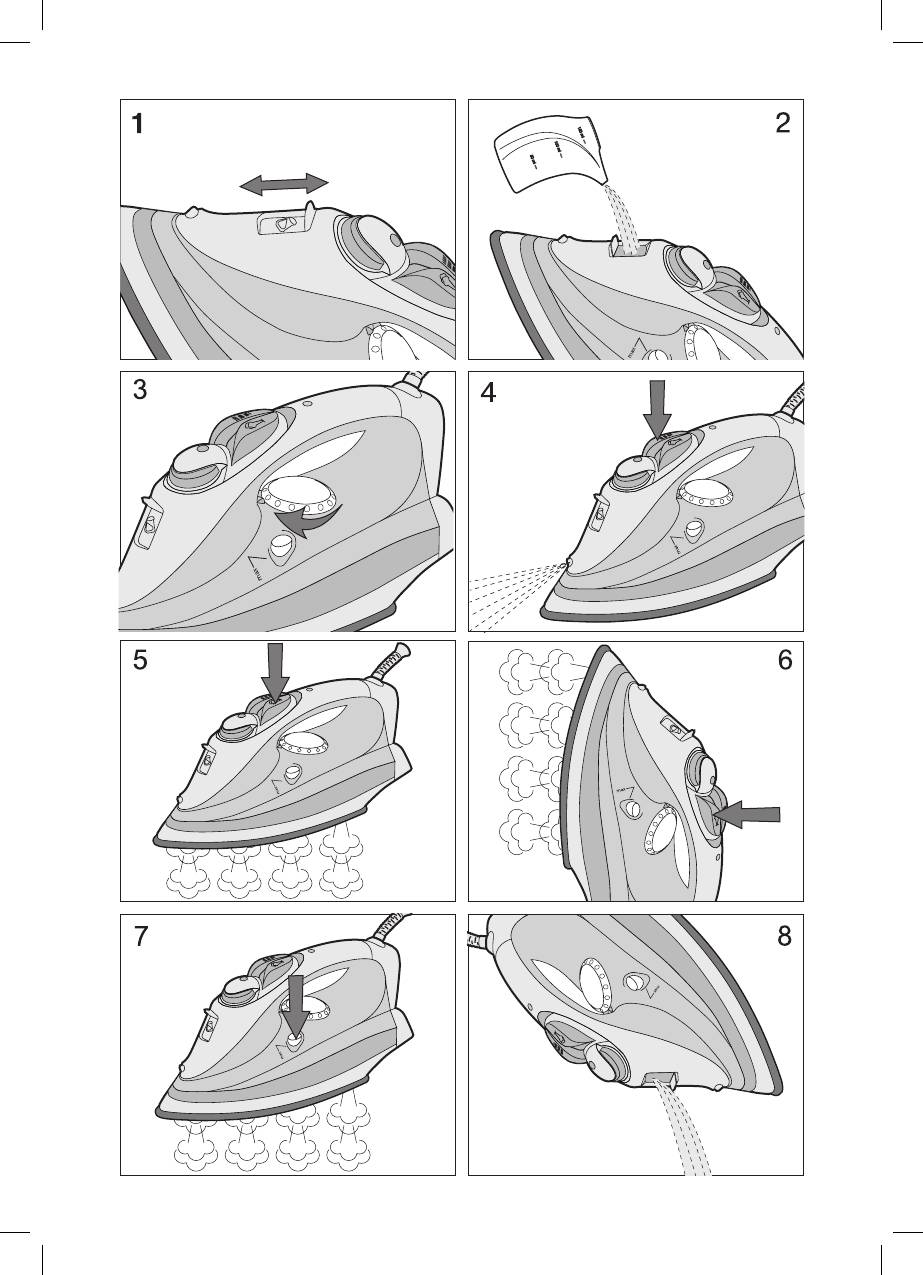
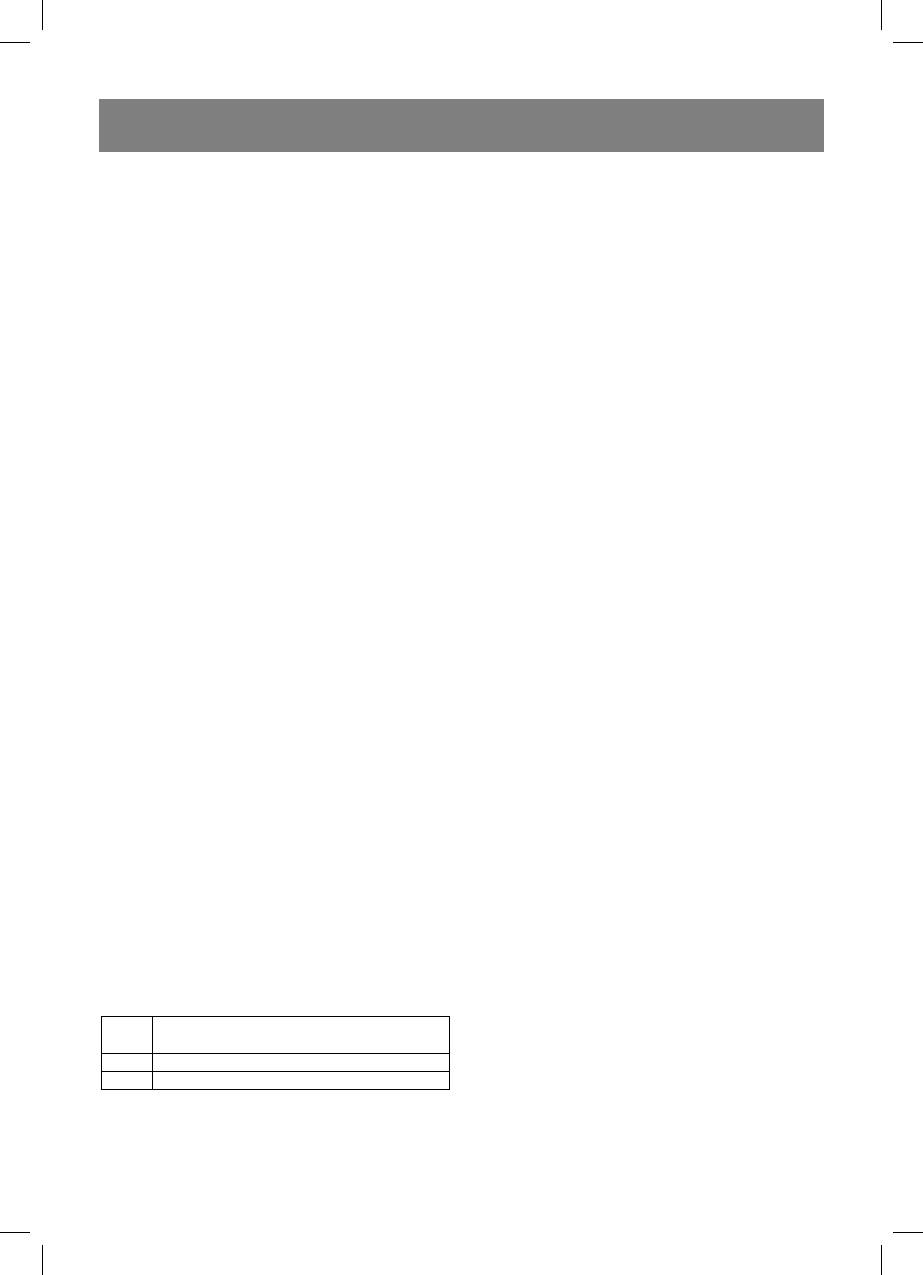
FILLING THE WATER TANK (pic. 1, 2)
• If an item is made from a mix of fabrics,
Make sure that the iron is disconnected from
then the iron should be set for the fabric
electrical power before filling it with water.
with the lowest ironing (for instance if an
• Turn the steam release regulator (3) anti-
item is made from 60% polyester and 40%
clockwise until bumping-steam supply is
cotton, it should be ironed at the tempera-
off.
ture used for ironing polyester “•”).
• Open the water tank lid (2).
• If you cannot define the fabric the item is
• Fill it with water using the water bowl (18).
made from, find a place on it that is hid-
Close the lid (2).
den while wearing and, on practice select
the ironing temperature (always start at the
Note:
lowest and gradually raise it until you get
• Do not fill it with water above MAX
the desired result.)
mark.
• Corduroy and other fabrics that start glossy
• If you need to refill the water tank dur-
quickly should be ironed strictly in one di-
ing ironing, turn off the iron and unplug
rection (along the lines) with slight pres-
the power cord from the outlet.
sure.
• After you finish ironing, open the water
• To avoid appearance of glossy spots on the
tank lid (2) and drain the remaining wa-
synthetic and silk fabrics, iron them back-
ter (pic.8).
side.
IRONING TEMPERATURE
Before operating test the heated iron on the
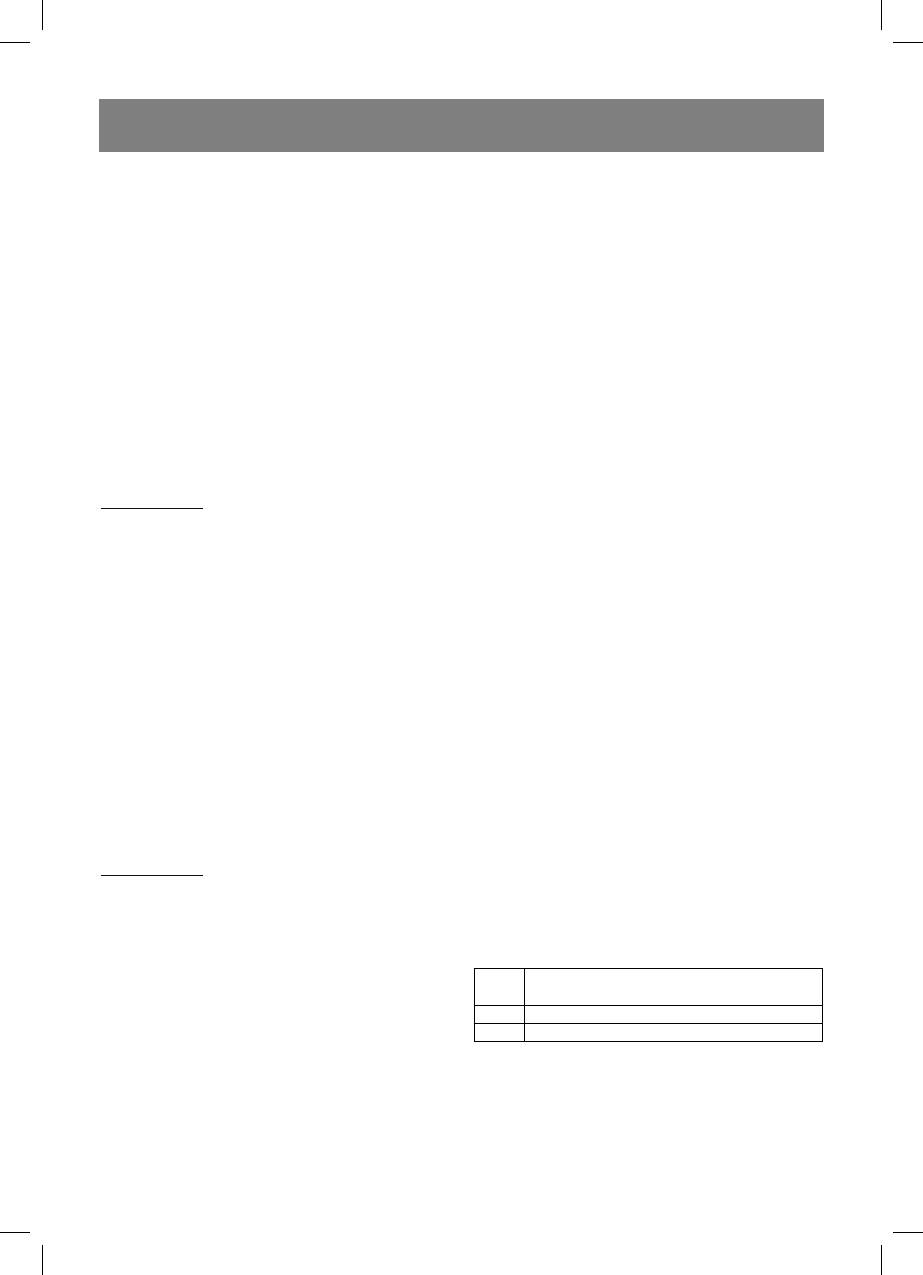
SETTING THE IRONING TEMPERATURE
old cloth to be sure that the iron sole (17) and
• Place the iron on the base (11).
the water tank (12) are clean.
• Insert the power plug into the outlet.
• Always check the recommended iron tem-
• Set the temperature regulator (13) to the
perature indicated on the tag before iron-
required ironing temperature: “•”, “••”,
ing.
“•••” or “max” (depending on the type
• If the tag does not list the recommended
of fabric), the (7) indicator will light up
ironing temperature, but you know the type
(Pic.3).
of fabric, then use the following table to
• When the sole temperature (17) reaches
determine the proper temperature.
the desired temperature value, the (7) indi-
cator will go out, you can start ironing.
Signs Fabric type/temperature
Synthetics, nylon, acryl, polyester (low
Note: While steam ironing set the tem-
•
temperature)
perature to «•••» or «МАХ».
••
Silk/wool (medium temperature)
•••
Cotton/flax (high temperature)
WATER SPRAYER
• You can dampen the fabric by pressing the
• This table is only for smooth materials.
spray button (5) several times (pic.4).
Fabrics of other types (crimped, raised
• Make sure that there is enough water in the
etc.) are best ironed at low temperature.
water tank (12).
5
1251.indd 51251.indd 5 02.06.2008 12:01:2902.06.2008 12:01:29

ENGLISH
DRY IRONING
ly supplied, check whether the temperature
• Place the iron on the base (11).
regulator (13) is set properly.
• Insert the power plug into the outlet.
• Set the temperature regulator (13) to the
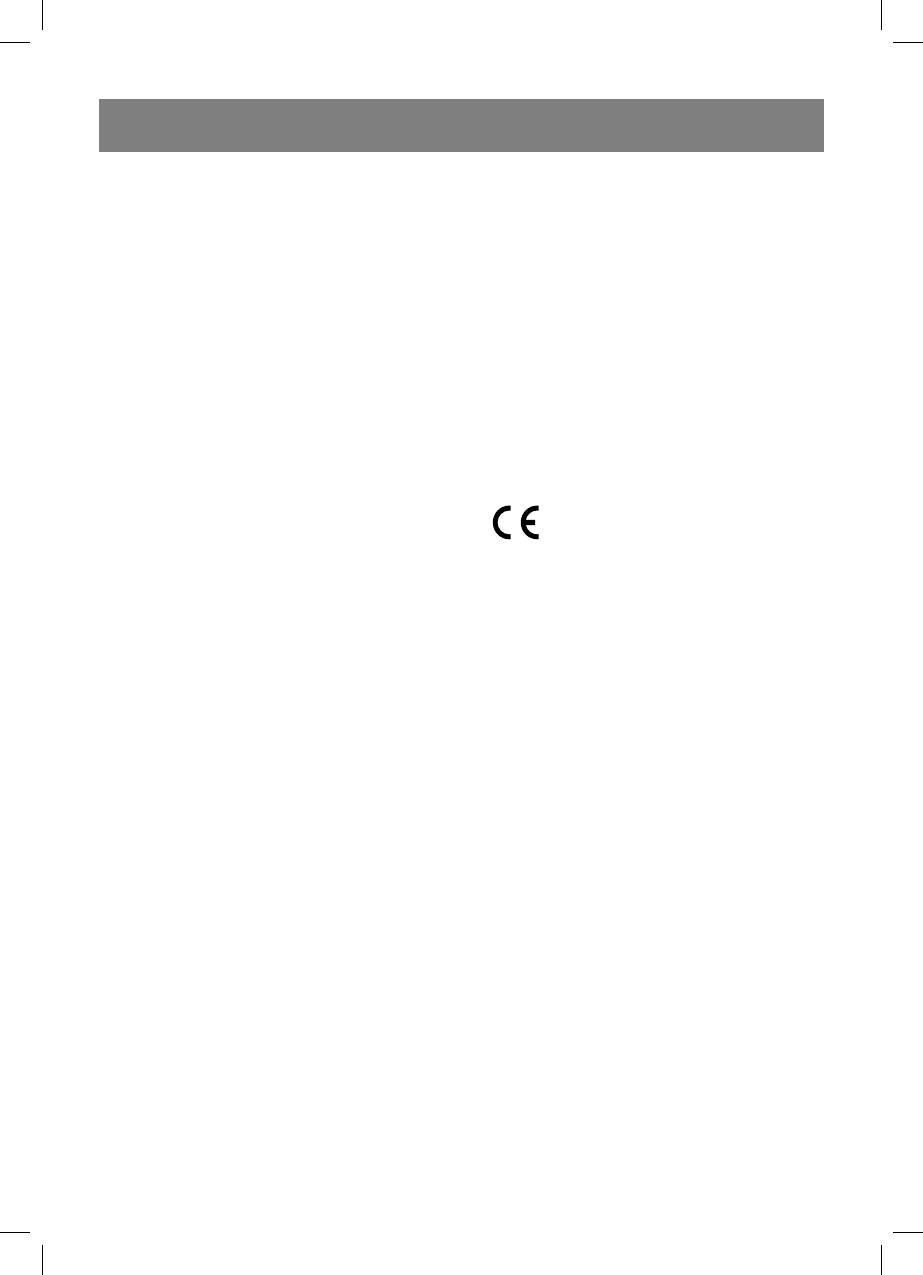
ADDITIONAL STEAM RELEASE
required ironing temperature: “•”, “••”,
Additional steam release function is use-
“•••” or “max” (depending on the type
ful when ironing folds and can only be used
of fabric), the (7) indicator will light up
at high ironing temperatures (when the iron
(Pic.3).
temperature regulator (13) is set to “•••” or
• When the sole temperature (17) reaches
“max”).
the desired temperature value, the (7) indi-
• When the additional steam release button
cator will go out, you can start ironing.
(6) is pressed, steam will be vigorously re-
• After you finish ironing set the (13) regula-
leased from the openings in the iron sole
tor to the “min” position.
(pic.5).
• Pull the plug out of the socket and let the
iron cool down completely.
Note: In order to avoid leakage of water
from steam openings, press the addition-
STEAM IRONING
al steam supply button (6) with 4-5 sec.
For steam ironing set the temperature regu-
interval.
lator to «•••» or «МАХ». The iron has an
anti-drop valve, which stops water supply,
VERTICAL STEAMING
when the sole temperature is too low it pre-
For vertical steaming can be used only when
vents the appearance of drops out of the sole
the high temperature mode is used (set
openings (17). While heating or cooling down
the temperature regulator (13) to «•••» or
of the sole (17), you will hear clicks of open-
«МАХ»).
ing/closing of the anti-drop valve it means
• Hold the iron vertically at the distance 15-
that the valve works normally.
30 cm from the clothes press the addition-
• Place the iron on the base (11).
al steam release button (6), steam will be
• Insert the power plug into the outlet.
released from the openings in the iron sole
• Make sure that there is enough water in the
(17) (pic. 6).
water tank (12).
• Set the temperature regulator (13) to the
Important information
required ironing temperature: “•••” or
• Vertical steaming is not recommended for
“max” (depending on the type of fabric),
synthetic fabrics.
the (7) indicator will light up (Pic.3).
• To avoid melting the fabric, do not touch
• When the sole temperature (17) reaches
the iron sole to the item while steaming.
the desired temperature value, the (7) indi-
• Never steam iron clothing that is being
cator will go out, you can start ironing.
worn as the steam temperature is very high
• Turn the steam supply regulator (3) to set
and it can cause burns. Use a coat-hanger
the intensity of steaming, steam will start
or a stand.
outgoing from the openings of the sole
(17).
AUTO-SWITCH OFF FUNCTION
• After you finish ironing set the (13) regula-
If the iron is about 30 seconds in the horizon-
tor to the “min” position and the steam
tal position or about 8 minutes in the vertical
supply regulator (3) to the left position.
position it will switch off automatically. The
• Pull the plug out of the socket and let the
(8) indicator will be flashing.
iron cool down completely.
To switch on the iron, just start ironing.
ATTENTION!
Note: After switching off of the iron the
If during the operation steam is not constant-
preset temperature of the iron sole will be
6
1251.indd 61251.indd 6 02.06.2008 12:01:2902.06.2008 12:01:29

ENGLISH
set after some time depending on the po-
• Do not use abrasive substances to clean
sition of the temperature regulator (13).
the sole and body of the iron.
• Avoid touching the iron sole with sharp
STEAM CHAMBER CLEANING
metal objects.
To prolong lifetime of the iron we recommend
cleaning the steam chamber, especially in
STORAGE
the regions with “hard” water.
• Turn the temperature regulator (13) anti-
clockwise till MIN position, set the steam
• Fill the water tank (12) till the MAX mark
release regulator (3) to the left position -
(14).
steam release OFF position.
• Put the iron on the base (11).
• Remove the power plug from the outlet.
• Insert the power plug into the outlet.
• Open the water tank lid (2), turn over the
• Set the temperature regulator (13) to the
iron and drain any remaining water from
MAX temperature: “max” the (7) indicator
the water tank (12) (pic. 8).
will light up (Pic.3).
• Close the lid (2).
• When the sole temperature (17) reaches
• Set the iron vertically and allow it to cool
the desired temperature value, the (7) indi-
completely.
cator will go out, you can start cleaning of
• Store the iron vertically.
the iron chamber.
• Unplug the iron, set the temperature regu-
Delivery set
lator (13) to the «MIN» position.
1. Iron – 1 pc.
• Pull the plug out of the socket.
2. Water bowl – 1pc.
• Hold the iron above the sink horizontally,
and hold the SELF CLEAN button (15)
TECHNICAL CHARACTERISTICS
(pic.7).
Power requirements: 240 V ~ 50 Hz
• Boiling water together with scale will be
Power consumption: 2000 W
throwing out from the openings in the iron
sole (17).
Specifications subject to change without
• Slightly sway the iron back and forth, until
prior notice.
water goes out of the water tank (12).
• Place the iron on the base (11) and let it
MINIMUM SERVICE LIFE - 3 YEARS
cool down completely.
• When the sole (17) cools down completely,
GUARANTEE
wipe it with a dry cloth.
Details regarding guarantee conditions can
• Before you take the iron for storing, make
be obtained from the dealer from whom the
sure that there is no water in the water tank
appliance was purchased. The bill of sale or
(12) and that the iron sole (17) is complete-
receipt must be produced when making any
ly dry.
claim under the terms of this guarantee.
CARE AND CLEANING
This product conforms to the EMC-
• Before cleaning the iron, make sure that it
Requirements as laid down by the
is turned off and has cooled completely.
Council Directive 89/336/EEC
• Wipe the iron's outer surface with a damp
and to the Law Voltage Regulation
cloth and then wipe dry.
(73/23 EEC)
• Sediment on the iron sole can be removed
with a cloth soaked in vinegar-water solu-
tion.
• After removing sediment, polish the sole
with a dry cloth.
7
1251.indd 71251.indd 7 02.06.2008 12:01:2902.06.2008 12:01:29

DEUTSCH
BÜGELEISEN
• Nutzen Sie das Gerät nur auf dem
Bügelbrett.
BESCHREIBUNG
• Stellen Sie das Bügeleisen auf eine gera-
1 – Sprühdüse
de stabile Oberfl äche auf.
2 – Deckel der Wassereinfüllöffnung
• Beim Auffüllen des Wasserbehälters
3 – Regler der konstanten Dampfzufuhr
schalten Sie das Bügeleisen vom
4 – Indikator der Dampfzufuhr
Stromnetz immer ab.
5 – Sprühknopf
• Der Deckel der Einfüllöffnung soll beim
6 – Knopf der zusätzlichen Dampfzufuhr
Bügeln dicht geschlossen sein.
7 – Indikator des Thermostatbetriebs
• Besondere Vorsichtsmaßnahmen sind in
8 – Indikator der automatischen
den Fällen angesagt, wenn sich Kinder
Abschaltung
oder behinderte Personen während der
9 – Handgriff
Nutzung des Geräts in der Nähe aufhalten.
10 – Netzkabelschutz
• Lassen Sie das eingeschaltet Gerät nie
11 – Bügeleisenfußplatte
unbeaufsichtigt.
12 – Wasserbehälter
• Schalten Sie das Gerät nach dem
13 – Temperaturregler
Gebrauch vom Stromnetz immer ab.
14 – Wasserstandgrenzlinie MAX
• Tauchen Sie das Gerät nie ins Wasser
15 – Taste des Selbstreinigungsbetriebs
oder andere Flüssigkeiten, um
SELF CLEAN
Stromschlagrisiko zu vermeiden.
16 – Temperaturanzeige
• Es ist nicht gestattet, Aromafl üssigkeiten,
17 – Gleitsohle
Essig, Stärkelösung, Reagenzien für die
18 – Wassereinfüllbehälter
Entfernung von Kalkstein, chemische
Lösungen usw. ins Wasserbehälter ein-
SICHERHEITSMAßNAHMEN
zugießen.
Vor der Inbetriebnahme des Geräts
• Vermeiden Sie die Berührung der Haut
lesen Sie aufmerksam diese
mit heißen Oberfl ächen des Bügeleisens
Betriebsanleitung durch, achten Sie
oder austretendem Dampfes, um
auch auf die Abbildungen.
Verbrennungen zu vermeiden.
Vor der ersten Inbetriebnahme verge-
• Achten Sie darauf, dass das Gerät vom
wissern Sie sich, dass die Spannung des
Bügeleisenbrett nicht frei hängt oder hei-
Geräts mit der Netzspannung überein-
ße Oberfl äche nicht berührt.
stimmt.
• Es ist nicht gestattet, das Gerät beim
• Das Netzkabel ist mit einem „Eurostecker“
Abschalten vom Stromnetz am Netzkabel
ausgestattet; schalten Sie diesen in die
zu ziehen, halten und ziehen Sie ihn am
Steckdose mit sicherer Erdung.
Stecker.
Verwenden Sie keine Übergangsstücke
• Vor der Reinigung schalten Sie das
beim Anschließen des Geräts an das
Gerät vom Stromnetz ab, gießen Sie das
Stromnetz, um Brandrisiko zu vermei-
Wasser ab und lassen Sie es abkühlen.
den.
• Gießen Sie das Wasser nur nach dem
• Es ist nicht gestattet, mehrere Geräte mit
Abschalten des Bügeleisens vom
hoher Verbrauchsleistung gleichzeitig
Stromnetz ab.
einzuschalten, um die Überlastung des
• Es ist nicht gestattet, das Gerät zu nut-
Stromnetzes zu vermeiden.
zen, wenn das Netzkabel oder der
• Nutzen Sie das Gerät nut gemäß der
Netzstecker beschädigt oder bei ande-
Bedienungsanleitung.
ren Störungen.
8
1251.indd 81251.indd 8 02.06.2008 12:01:2902.06.2008 12:01:29
DEUTSCH
• Es ist nicht gestattet, das Gerät selb-
Position in die Endposition, um den Dampf
ständig zu reparieren, um Stromschläge
auszuschalten.
zu vermeiden. Bei der Feststellung von
• Öffnen Sie den Deckel der
Beschädigungen wenden Sie sich an
Wassereinfüllöffnung (2).
den autorisierten Kundenservicedienst.
• Gießen Sie Wasser ein, nutzen Sie dabei
das Wasserbehälter (18), schließen Sie
VOR DER ERSTNUTZUNG DES GERÄTS
den Deckel (2) zu.
• Vor der ersten Nutzung nehmen Sie das
Bügeleisen aus der Verpackung heraus
Anmerkungen:
und entfernen Sie das Schutzmaterial
Es ist nicht gestattet, das Gerät mit Wasser
von der Gleitsohle (17).
über die Grenzlinie MAX zu füllen.
• Vergewissern Sie sich, ob die Spannung
• Wenn sie während des Bügelns Wasser
des Geräts mit der Netzspannung über-
nachgießen müssen, schalten Sie das
einstimmt.
Bügeleisen aus und ziehen Sie den
Netzstecker aus der Steckdose.
Anmerkung
• Nach dem Bügeln schalten Sie das Gerät
Beim ersten Einschalten des Bügeleisens
aus, lassen Sie es abkühlen, danach öff-
verbrennt das Heizelement, es kann zur
nen Sie den Deckel der Einfüllöffnung
Entstehung des Rauches oder eines frem-
(2), drehen Sie das Bügeleisen um und
den Geruchs führen – es ist normal.
gießen Sie Restwasser aus (Abb.8).
WASSERAUSWAHL
TEMPERATUR BEIM BÜGELN
Zum Auffüllen des Wasserbehälters des
Vor der Inbetriebnahme prüfen Sie das
Bügeleisens nutzen Sie Leitungswasser.
aufgeheizte Bügeleisen auf einem Tuch, ob
Wenn das Leitungswasser hart ist, wird
die Gleitsohle (17) und der Wasserbehälter
empfohlen, es mit destilliertem Wasser im
(12) sauber sind.
Verhältnis 1:1 zu mischen, bei der Nutzung
• Vor dem Bügeln sollen Sie die
des Wassers mit sehr hoher Härte wird
Überschriften auf dem Etikett der
empfohlen, es mit destilliertem Wasser im
Kleidung beachten, wo die empfohlene
Verhältnis 1:2 oder nur destilliertes Wasser
Temperatur angegeben ist.
zu nutzen.
• Wenn das Etikett mit den Hinweisen fehlt,
aber Sie kennen den Stofftyp, so kön-
Anmerkung
nen Sie die Temperaturangaben der fol-
Es ist nicht gestattet, Aromafl üssigkeiten,
genden Tabelle entnehmen:
Essig, Stärkelösung, Reagenzien für die
Entfernung von Kalkstein, chemische
Bezeichnungen des Stofftyps
Lösungen usw. ins Wasserbehälter (12)
(Temperatur)
einzugießen.
Synthesefaser, Nylon, Acryl, Polyester
•
(niedrige Temperatur)
AUFFÜLLEN DES WASSERBEHÄLTERS
••
Seide/Wolle (mittlere Temperatur)
•••
Baumwolle/Leinen (hohe Temperatur)
(Abb. 1, 2)
Vor dem Auffüllen des Bügeleisens mit
• Die Tabelle ist nur für glatte Stoffe ge-
Wasser, vergewissern Sie sich, dass es
eignet. Wenn Sie das Material eines an-
vom Stromnetz abgeschaltet ist.
deren Typs verwenden (gaufriert, gerif-
Drehen Sie den Regler der konstanten
felt usw.), dann soll es bei der niedrigen
Dampfzufuhr (3) gegen Uhrzeigesinn in die
Temperatur gebügelt werden.
9
1251.indd 91251.indd 9 02.06.2008 12:01:2902.06.2008 12:01:29

DEUTSCH
• Zuerst sollen Sie die Sachen nach
wünschte Bügeltemperatur ein: „•“,
der Bügeltemperatur aussortieren:
„••“, „•••“ oder "MAX" (abhängig
Synthesefaser zu Synthesefaser, Wolle
vom Stofftyp) (Abb. 3), dabei wird der
zu Wolle, Baumwolle zu Baumwolle usw.
Indikator (7) aufl euchten.
• Das Bügeleisen wird schneller aufgeheizt
• Wenn die Temperatur der Gleitsohle (17)
als abgekühlt. Aus diesem Grund wird
auf die gewünschte Temperatur steigt
empfohlen, die Sachen bei der niedrigen
und der Indikator (7) erlöscht, können
Temperatur zu bügeln (z.B. synthetische
Sie zum Bügeln übergehen.
Stoffe). Danach können Sie auch zum
Bügel bei höheren Temperaturen über-
Anmerkung: Beim Bügeln mit Dampf soll
gehen (Seide, Wolle). Erzeugnisse aus
die Temperatur in die Position „•••“oder
Baumwolle und Leinen sollen zuletzt ge-
„MAX“ eingestellt werden.
bügelt werden.
• Wenn das Kleidungsstück aus
WASSERSPRÜHER
Mischfasern ist, soll die Temperatur auf
• Sie können den Stoff anfeuchten, indem
die niedrigste Stufe eingestellt werden
Sie den Sprühknopf (5) einige Male drü-
(z.B. wenn das Kleidungsstück zu 60%
cken (Abb.4).
aus Polyester und zu 40% aus Baumwolle
• Vergewissern Sie sich, dass es genug
Besteht, so soll es bei der Temperatur
Wasser im Wasserbehälter (12) vorhan-
gebügelt werden, die für das Bügeln von
den ist.
Polyester geeignet ist „•“)
• Wenn Sie den Stofftyp nicht feststellen
TROCKENES BÜGELN
können, woraus das Kleidungsstück her-
• Stellen Sie das Bügeleisen auf die
gestellt ist, fi nden Sie darauf ein unbe-
Bügeleisenfußplatte (11) auf.
merkbare Stelle beim Tragen, und wählen
• Stecken Sie den Netzstecker des
Sie durch das Prüfen die Temperatur des
Netzkabels in die Steckdose.
Bügelns aus (fangen Sie immer von der
• Stellen Sie mit dem Regler (13) die ge-
niedrigsten Temperatur an und erhöhen
wünschte Bügeltemperatur ein: „•“,
Sie diese, bis das gewünschte Ergebnis
„••“, „•••“ oder "MAX" (abhängig
nicht erreicht wird).
vom Stofftyp) (Abb. 3), dabei wird der
• Kordstoffe und andere Stoffe, die sehr
Indikator (7) aufl euchten.
schnell beginnen zu glänzen, sollen
• Wenn die Temperatur der Gleitsohle (17)
unter leichtem Druck streng in einer
auf die gewünschte Temperatur steigt
Richtung gebügelt werden (in Richtung
und der Indikator (7) erlöscht, können
des Strichs).
Sie zum Bügeln übergehen.
• Um die Entstehung von Glanzfl ecken auf
• Schalten Sie das Bügeleisen aus, indem
den synthetischen und seidenen Stoffen
Sie den Temperaturregler (13) in die
zu vermeiden, bügeln Sie diese von der
Position „MIN“ stellen.
Innenseite aus.
• Schalten Sie das Gerät vom Stromnetz
ab und warten Sie ab, bis dieses abge-
EINSTELLEN DER BÜGELTEMPERATUR
kühlt wird.
• Stellen Sie das Bügeleisen auf die
Bügeleisenfußplatte (11) auf.
BÜGELN MIT DAMPF
• Stecken Sie den Netzstecker des
Beim Bügeln mit Dampf soll die Temperatur
Netzkabels in die Steckdose.
in die Position „•••“oder „MAX“ ein-
• Stellen Sie mit dem Regler (13) die ge-
gestellt werden. Das Bügeleisen ist mit
10
1251.indd 101251.indd 10 02.06.2008 12:01:2902.06.2008 12:01:29

DEUTSCH
einem Antitropfventil ausgestattet, das
ZUSÄTZLICHE DAMPFZUFUHR
die Wasserzufuhr bei einer sehr nied-
Die Funktion der zusätzlichen Dampfzufuhr
rigen Temperatur der Gleitsohle unter-
ist fürs Glätten der Falten nützlich und
bricht. Dies verhindert das Austreten der
kann nur beim Hochtemperaturbetrieb
Tropfen aus den Öffnungen der Gleitsohle
des Bügelns verwendet werden
(17) des Bügeleisens. Beim Erhitzen und
(Temperaturregler (13) in der Position
der Abkühlung der Gleitsohle (17), ertö-
„•••“ oder „MAX“.
nen typische Knacktöne der Eröffnung/
• Bei Drücken der Taste der zusätzlichen
Schließung des Antitropfventils, was über
Dampfzufuhr (6) wird der Dampf intensiver
seinen normalen Betrieb zeugt.
aus der Gleitsohle austreten (Abb. 5).
• Stellen Sie das Bügeleisen auf die
Bügeleisenfußplatte (11) auf.
Anmerkung: Um das Auslaufen des
• Stecken Sie den Netzstecker des
Wassers aus den Dampföffnungen zu ver-
Netzkabels in die Steckdose.
meiden, drücken Sie den Knopf der zu-
• Vergewissern Sie sich, dass es genug
sätzlichen Dampfzufuhr mit dem Intervall
Wasser im Wasserbehälter (12) vorhan-
von 45 Sekunden.
den ist.
• Stellen Sie mit dem Regler (13) die ge-
VERTIKALE ABDAMPFUNG
wünschte Bügeltemperatur ein: „•“,
Die Funktion der vertikalen Abdampfung
„••“, „•••“ oder "MAX" (abhängig
kann nur beim Hochtemperaturbetrieb
vom Stofftyp) (Abb. 3), dabei wird der
des Bügelns verwendet werden (der
Indikator (7) aufl euchten.
Temperaturregler (13) in der Position
• Wenn die Temperatur der Gleitsohle (17)
„•••“ oder „MAX“).
auf die gewünschte Temperatur steigt
• Halten Sie das Bügeleisen senkrecht
und der Indikator (7) erlöscht, können
1530 cm von der Bekleidung entfernt
Sie zum Bügeln übergehen.
und drücken Sie den Knopf der zusätz-
• Stellen Sie den Regler der konstan-
lichen Dampfzufuhr (6), der Dampf wird
ten Dampfzufuhr (3) die gewünschte
aus der Gleitsohle des Geräts (17) aus-
Intensität der Dampfbildung ein, dabei
treten (Abb. 6).
fängt der Dampf an, aus den Öffnungen
der Gleitsohle (17) des Bügeleisens aus-
Wichtige Information
zutreten.
• Es wird nicht empfohlen, die vertikale
Schalten Sie das Bügeleisen aus, in-
Abdampfung von synthetischen Stoffen
dem Sie den Temperaturregler (13) in
durchzuführen.
die Position „MIN“ und den Regler der
• Es ist nicht gestattet, die Gleitsohle des
konstanten Dampfzufuhr (3) in die linke
Bügeleisens mit dem Stoff zu berühren,
Endposition stellen.
die seine Verschmelzung zu vermeiden.
• Schalten Sie das Gerät vom Stromnetz
• Es ist nicht gestattet, die Kleidung, die
ab und warten Sie ab, bis dieses abge-
der Mensch trägt, abzudämpfen, weil die
kühlt wird.
Temperatur des austretenden Dampfes
sehr hoch ist, benutzen Sie Kleiderbügel
ACHTUNG!
oder Aufhängebügel.
Wenn konstante Dampfzufuhr während des
Betriebs des Geräts nicht passiert, prüfen
FUNKTION DER AUTOMATISCHEN
Sie die Richtigkeit der Positionierung des
ABSCHALTUNG
Temperaturreglers (13).
Wenn sich das Bügeleisen ca. 30 Sekunden
11
1251.indd 111251.indd 11 02.06.2008 12:01:2902.06.2008 12:01:29

DEUTSCH
in horizontaler Position oder ca. 8 Minuten
den zusammen mit dem Kalk aus den
in senkrechter Position befi ndet, so schal-
Öffnungen der Gleitsohle (17) austreten.
tet es sich automatisch ab, dabei wir der
• Schaukeln Sie das Bügeleisen hin und
Indikator (8) aufl euchten.
zurück, bis das ganze Wasser aus dem
Um das Bügeleisen einzuschalten, begin-
Wasserbehälter (12) entfernt wird.
nen Sie mit Bügeln.
• Stellen Sie das Bügeleisen auf die
Fußplatte (11) und lassen Sie es vollstän-
Anmerkung: Nach dem Einschalten des
dig abkühlen.
Bügeleisens wird die vorher eingestell-
• Wenn die Gleitsohle des Geräts (17) voll-
te Temperatur der Gleitsohle nach ei-
ständig abgekühlt wird, wischen Sie die-
niger Zeit abhängig von der Position des
se mit einem Tuch ab.
Temperaturreglers (13) eingestellt.
• Bevor Sie das Bügeleisen zur
Aufbewahrung wegpacken, vergewis-
REINIGUNG DER DAMPFKAMMER
sern Sie sich, dass im Wasserbehälter
Für die Erhöhung der Nutzungsfrist des
(12) kein Wasser übrig geblieben ist und
Geräts wird empfohlen, die Reinigung der
die Gleitsohle (17) des Bügeleisens voll-
Dampfkammer regelmäßig durchzuführen,
ständig trocken ist.
besonders in den Regionen mit hartem
Leitungswasser.
REINIGUNG UND PFLEGE
• Füllen Sie den Wasserbehälter (12) mit
• Vor der Reinigung des Bügeleisens
Wasser bis zum maximalen Füllstand
vergewissern Sie sich, dass es vom
MAX (14) auf.
Stromnetz abgeschaltet und abgekühlt
• Stellen Sie das Bügeleisen auf die
ist.
Bügeleisenfußplatte (11) auf.
• Wischen Sie das Gehäuse des
• Stecken Sie den Netzstecker des
Bügeleisens mit einem feuchten Tuch,
Netzkabels in die Steckdose.
danach trocknen Sie es.
• Stellen Sie mit dem Regler (13)
• Ablagerungen an der Gleitsohle des
die Temperatur der Gleitsohle des
Bügeleisens können Sie mit einem Stoff
Bügeleisens in die Position „MAX“, da-
abwischen, der mit Essiglösung ange-
bei wird der Indikator (7) aufl euchten
feuchtet ist.
(Abb. 3).
• Nach der Entfernung des
• Wenn die Temperatur der Gleitsohle (17)
Kalkablagerungen polieren Sie die
auf die gewünschte Temperatur steigt
Gleitsohle des Bügeleisens mit einem
und der Indikator (7) erlöscht, können
trockenen Tuch.
Sie zur Reinigung der Dampfkammer
• Es ist nicht gestattet, Abrasivmittel für
übergehen.
die Reinigung der Gleitsohle und des
Schalten Sie das Bügeleisen aus, indem
Gehäuses des Bügeleisens zu nutzen.
Sie den Temperaturregler (13) in die
• Vermeiden Sie den Kontakt der Gleitsohle
Position „MIN“ stellen.
mit scharfen Metallgegenständen.
• Ziehen Sie den Netzstecker aus der
Steckdose.
AUFBEWAHRUNG
• Stellen Sie das Bügeleisen in horizonta-
• Drehen Sie den Temperaturregler (13) ge-
ler Position über dem Waschbecken auf
gen Uhrzeigesinn in die Position „MIN“,
und halten Sie den Reinigungsknopf (15)
stellen Sie den Regler der Dampfzufuhr
(Abb.7) fest.
(3) in die Endposition, um den Dampf
• Kochendes Wasser und der Dampf wer-
auszuschalten
12
1251.indd 121251.indd 12 02.06.2008 12:01:2902.06.2008 12:01:29
DEUTSCH
• Ziehen Sie den Netzstecker aus der
Die Lebensdauer des Gerätes beträgt
Steckdose.
nicht weniger, als 3 Jahre
• Öffnen Sie den Deckel der
Wassereinfüllöffnung (2) und gießen Sie
Gewährleistung
das Restwasser aus dem Wasserbehälter
Ausführliche Bedingungen der
(12) (Abb. 8).
Gewährleistung kann man beim Dealer,
Schließen Sie den Deckel (2) zu.
der diese Geräte verkauft hat, bekom-
• Stellen Sie das Bügeleisen senkrecht auf
men. Bei beliebiger Anspruchserhebung
und lassen Sie es vollständig abkühlen.
soll man während der Laufzeit der vorlie-
• Bewahren Sie das Bügeleisen in der
genden Gewährleistung den Check oder
senkrechten Lage auf.
die Quittung über den Ankauf vorzulegen.
Lieferumfang
Das vorliegende Produkt
1. Bügeleisen – 1 St.
entspricht den Forderungen
2. Wassereinfüllbehälter – 1 St.
der elektromagnetischen
Verträglichkeit, die in
TECHNISCHE EIGENSCHAFTEN
89/336/EWG -Richtlinie des
Stromversorgung: 240 V ~ 50 Hz
Rates und den Vorschriften
Leistung: 2000 W
73/23/EWG über die
Niederspannungsgeräte vorge-
Der Hersteller behält sich das Recht vor
sehen sind.
die Charakteristiken des Gerätes ohne
Vorbescheid zu ändern.
13
1251.indd 131251.indd 13 02.06.2008 12:01:2902.06.2008 12:01:29

РУССКИЙ
УТЮГ
• Пользуйтесь утюгом только на гладиль-
ной доске.
ОПИСАНИЕ
• Ставьте утюг на ровную устойчивую по-
1 – Сопло разбрызгивателя воды
верхность.
2 – Крышка заливочного отверстия
• При наполнении резервуара водой
3 – Регулятор постоянной подачи пара
всегда отключайте утюг от сети.
4 – Индикатор подачи пара
• Крышка заливочного отверстия должна
5 – Кнопка разбрызгивателя воды
быть плотно закрыта, когда вы гладите.
6 – Кнопка дополнительной подачи
• Будьте особенно внимательны при
пара
использовании прибора в непосредс-
7 – Индикатор работы термостата
твенной близости от детей и людей с
8 – Индикатор автоматического отклю-
ограниченными возможностями.
чения
• Не оставляйте включенный утюг без
9 – Ручка
присмотра.
10 – Защита сетевого шнура
• Всегда отключайте утюг от сети, если
11 – Основание утюга
не пользуетесь им.
12 – Резервуар для воды
• Чтобы избежать поражения электри-
13 – Регулятор температуры
ческим током, не погружайте утюг в
14 – Указатель максимального уровня
воду или в любую другую жидкость.
воды (MAX)
• Запрещается заливать в резервуар для
15 – Кнопка режима самоочистки (SELF
воды ароматизирующие жидкости, ук-
CLEAN)
сус, раствор крахмала, реагенты для
16 – Указатель выбранной температуры
удаления накипи, химические вещест-
17 – Подошва утюга
ва и т.д.
18 – Емкость для заливки воды
• Чтобы не получить ожогов, избегайте
контакта открытых участков кожи с го-
МЕРЫ БЕЗОПАСНОСТИ
рячими поверхностями утюга или вы-
Перед эксплуатацией вниматель-
ходящим паром.
но прочитайте инструкцию, а также
• Следите, чтобы сетевой шнур не све-
обратите внимание на иллюстра-
шивался с края гладильной доски и не
ции.
касался горячих или острых поверхнос-
• Перед включением убедитесь, что на-
тей.
пряжение в сети соответствует рабо-
• При отключении утюга от электричес-
чему напряжению утюга.
кой сети всегда держитесь за сетевую
• Сетевой шнур снабжен "евровилкой";
вилку, никогда не тяните за сетевой
включайте ее в розетку, имеющую на-
шнур.
дежный контакт заземления.
• Перед тем как убрать утюг, слейте ос-
• Во избежание риска возникновения по-
татки воды и дайте ему полностью ос-
жара не используйте переходники при
тыть.
подключении прибора к электрической
• Сливайте воду только после отключе-
розетке.
ния утюга от сети.
• Чтобы избежать перегрузки электри-
• Не используйте утюг с поврежденной
ческой сети, не включайте одновре-
сетевой вилкой, сетевым шнуром, а
менно несколько приборов с большой
также с любыми другими неисправнос-
потребляемой мощностью.
тями.
• Используйте утюг только в тех целях,
• Во избежание поражения электричес-
которые предусмотрены инструкцией.
ким током никогда не разбирайте утюг
14
1251.indd 141251.indd 14 02.06.2008 12:01:2902.06.2008 12:01:29
РУССКИЙ
самостоятельно; при обнаружении не-
Примечание
исправности обращайтесь в авторизо-
• Не наливайте воду выше отметки
ванный сервисный центр.
«MAX».
• Если во время глаженья необходи-
ПЕРЕД ПЕРВЫМ ИСПОЛЬЗОВАНИЕМ
мо долить воду, то отключите утюг
• Извлеките утюг из упаковки, при нали-
и выньте сетевую вилку из розетки.
чии защиты на подошве (17) удалите ее.
• После того как вы закончите гла-
• Убедитесь, что напряжение в сети со-
дить, выключите утюг, дождитесь
ответствует рабочему напряжению
его полного остывания, после чего
утюга.
откройте крышку заливочного от-
верстия (2), переверните утюг и
Примечание
слейте остатки воды (рис. 8).
При первом включении нагреватель-
ный элемент утюга обгорает, поэтому
ТЕМПЕРАТУРА ГЛАЖЕНЬЯ
возможно появление небольшого ко-
Перед началом эксплуатации протести-
личества дыма или постороннего за-
руйте нагретый утюг на кусочке ткани,
паха - это нормальное явление.
чтобы убедиться в том, что подошва утю-
га (17) и резервуар для воды (12) чистые.
ВЫБОР ВОДЫ
• Всегда перед глаженьем вещей смот-
Для наполнения резервуара используй-
рите на ярлык изделия, где указана ре-
те водопроводную воду. Если водопро-
комендуемая температура глаженья.
водная вода жесткая, то рекомендуется
• Если ярлык с указаниями по глаженью
смешивать ее с дистиллированной водой
отсутствует, но вы знаете тип матери-
в соотношении 1:1, при очень жесткой
ала, то для выбора температуры вос-
воде смешивайте ее с дистиллированной
пользуйтесь таблицей.
водой в соотношении 1:2 или используй-
те только дистиллированную воду.
Обозначения Тип ткани (температу-
ра)
Примечание
синтетика, нейлон, акрил, полиэстер
•
Запрещается заливать в резерву-
(низкая температура)
ар для воды (12) ароматизирующие
••
шелк/шерсть (средняя температура)
•••
хлопок/лен (высокая температура)
жидкости, уксус, раствор крахмала,
реагенты для удаления накипи, хими-
• Таблица применима только для глад-
ческие вещества и т.д.
ких материалов. Если материал друго-
го типа (гофрированный, рельефный
НАПОЛНЕНИЕ РЕЗЕРВУАРА ДЛЯ
и т.д.), то лучше всего его гладить при
ВОДЫ (рис. 1, 2)
низкой температуре.
Прежде чем залить воду в утюг, убеди-
• Сначала отсортируйте вещи по тем-
тесь, что он отключен от сети.
пературе глаженья: синтетику – к син-
• Поверните регулятор постоянной по-
тетике, шерсть – к шерсти, хлопок – к
дачи пара (3) против часовой стрелки
хлопку и т.д.
до упора - подача пара выключена.
• Утюг нагревается быстрее, чем осты-
• Откройте крышку заливочного отверс-
вает. Поэтому сначала рекомендуется
тия (2).
гладить вещи, которые требуют низкой
• Залейте воду, используя емкость для
температуры (например, синтетичес-
заливки воды (18), закройте крышку
кие ткани). После чего переходите на
(2).
глаженье при более высоких темпера-
15
1251.indd 151251.indd 15 02.06.2008 12:01:2902.06.2008 12:01:29

РУССКИЙ
турах (шелк, шерсть). Изделия из хлоп-
РАЗБРЫЗГИВАТЕЛЬ ВОДЫ
ка и льна гладьте в последнюю оче-
• Вы можете увлажнить ткань, нажав не-
редь.
сколько раз на кнопку разбрызгивателя
• Если в состав ткани входят смесовые
(5) (рис. 4).
волокна, то необходимо установить
• Убедитесь, что в резервуаре (12) до-
температуру глаженья самую низкую
статочно воды.
(например, если изделие состоит на
60% из полиэстера и на 40% из хлопка,
СУХОЕ ГЛАЖЕНЬЕ
то её следует гладить при температуре,
• Поставьте утюг на основание (11).
подходящей для полиэстера «•»).
• Вставьте вилку сетевого шнура в розет-
• Если вы не можете определить состав
ку.
ткани, то найдите на изделии место, ко-
• Поворотом регулятора (13) установите
торое не заметно при носке, и опытным
требуемую температуру глаженья: «•»,
путём выберите температуру глаженья
«••», «•••» или «МАХ» (в зависимости
(всегда начинайте с самой низкой тем-
от типа ткани) (рис. 3), при этом заго-
пературы и постепенно повышайте её,
рится индикатор (7).
пока не добьётесь желаемого резуль-
• Когда температура подошвы утюга (17)
тата).
достигнет установленной температуры,
• Вельветовые и другие ткани, которые
индикатор (7) погаснет, можно присту-
быстро начинают лосниться, следует
пать к глаженью.
гладить строго в одном направлении (в
• После использования утюга установи-
направлении ворса) с небольшим на-
те регулятор температуры (13) в поло-
жимом.
жение «MIN».
• Чтобы избежать появления лоснящих-
• Выньте вилку сетевого шнура из ро-
ся пятен на синтетических и шелковых
зетки и дождитесь полного остывания
тканях, гладьте их с изнаночной сторо-
утюга.
ны.
ПАРОВОЕ ГЛАЖЕНЬЕ
УСТАНОВКА ТЕМПЕРАТУРЫ
При паровом глаженьи необходимо уста-
ГЛАЖЕНЬЯ
навливать температуру глаженья «•••»
• Поставьте утюг на основание (11).
или «МАХ». Утюг снабжен противокапель-
• Вставьте вилку сетевого шнура в розет-
ным клапаном, который закрывает пода-
ку.
чу воды, при слишком низкой темпера-
• Поворотом регулятора (13) установите
туре подошвы утюга это предотвращает
требуемую температуру глаженья: «•»,
появление капель из отверстий подошвы
«••», «•••» или «МАХ» (в зависимости
утюга (17). При нагревании и остывании
от типа ткани) (рис. 3), при этом заго-
подошвы утюга (17) вы услышите харак-
рится индикатор (7).
терные щелчки открывания/закрывания
• Когда температура подошвы утюга (17)
противокапельного клапана, что свиде-
достигнет установленной температуры,
тельствует о его нормальной работе.
индикатор (7) погаснет, можно присту-
пать к глаженью.
• Поставьте утюг на основание (11).
• Вставьте вилку сетевого шнура в розет-
Примечание: при паровом глаженьи
ку.
необходимо устанавливать темпера-
• Убедитесь, что в резервуаре (12) до-
туру глаженья «•••» или «МАХ».
статочно воды.
• Поворотом регулятора (13) установи-
16
1251.indd 161251.indd 16 02.06.2008 12:01:2902.06.2008 12:01:29

РУССКИЙ
те требуемую температуру глаженья:
ВЕРТИКАЛЬНОЕ ОТПАРИВАНИЕ
«•••» или «МАХ» (в зависимости от
Функция вертикального отпаривания мо-
типа ткани), при этом загорится инди-
жет быть использована только при высо-
катор (7) (рис. 3).
котемпературном режиме глаженья (ре-
• Когда температура подошвы утюга (17)
гулятор температуры (13) в положении
достигнет установленной температуры,
«•••» или «МАХ»).
индикатор (7) погаснет, можно присту-
пать к глаженью.
• Держите утюг вертикально на рассто-
• Регулятором постоянной подачи пара
янии 15-30 см от одежды и нажимайте
(3) установите необходимую интенсив-
кнопку дополнительной подачи пара
ность парообразования, пар начнет
(6), пар будет выходить из подошвы
выходить из отверстий подошвы утюга
утюга (17) (рис. 6).
(17).
• После использования утюга установи-
Важная информация
те регулятор температуры (13) в поло-
• Не рекомендуется выполнять верти-
жение «MIN», а регулятор постоянной
кальное отпаривание синтетических
подачи пара (3) в положение «Подача
тканей.
пара выключена».
• При отпаривании не прикасайтесь по-
• Выньте вилку сетевого шнура из ро-
дошвой утюга к материалу, чтобы избе-
зетки и дождитесь полного остывания
жать его оплавления.
утюга.
• Никогда не отпаривайте одежду, оде-
тую на человека, так как температура
ВНИМАНИЕ!
выходящего пара очень высокая, поль-
Если во время работы не происходит
зуйтесь плечиками или вешалкой.
постоянной подачи пара, проверьте пра-
вильность положения регулятора темпе-
ФУНКЦИЯ АВТОМАТИЧЕСКОГО
ратуры (13).
ОТКЛЮЧЕНИЯ
Если утюг находится неподвижно около
ДОПОЛНИТЕЛЬНАЯ ПОДАЧА ПАРА
30 секунд в горизонтальном положении
Функция дополнительной подачи пара
или около восьми минут в вертикальном
полезна при разглаживании складок и
положении, он выключается автомати-
может быть использована только при
чески, при этом индикатор (8) будет ми-
высокотемпературном режиме глаженья
гать.
(регулятор температуры (13) в положе-
Для включения утюга просто начните им
нии «•••» или «МАХ»).
гладить.
• При нажатии кнопки дополнительной
Примечание: после включения утюга
подачи пара (6) пар из подошвы утюга
ранее заданная температура подош-
будет выходить более интенсивно (рис.
вы будет восстановлена через неко-
5).
торое время, в зависимости от поло-
жения регулятора температуры (13).
Примечание: во избежание вытека-
ния воды из паровых отверстий нажи-
ОЧИСТКА ПАРОВОЙ КАМЕРЫ
майте кнопку дополнительной подачи
Для увеличения срока службы утюга ре-
пара (6) с интервалом в 4-5 секунд.
комендуется регулярно выполнять очист-
ку паровой камеры, особенно в регионах
с «жесткой» водопроводной водой.
17
1251.indd 171251.indd 17 02.06.2008 12:01:2902.06.2008 12:01:29
РУССКИЙ
• Наполните резервуар (12) водой до от-
• Избегайте контакта подошвы утюга с
метки «MAX» (14).
острыми металлическими предмета-
• Поставьте утюг на основание (11).
ми.
• Вставьте вилку сетевого шнура в розет-
ку.
ХРАНЕНИЕ
• Поворотом регулятора (13) установите
• Поверните регулятор температуры (13)
максимальную температуру нагрева
против часовой стрелки до положе-
подошвы утюга «МАХ», при этом заго-
ния «MIN», установите регулятор пос-
рится индикатор (7) (рис. 3).
тоянной подачи пара (3) в положение
• Когда температура подошвы утюга (17)
«Подача пара выключена».
достигнет установленной температу-
• Выньте вилку сетевого шнура из розетки.
ры, индикатор (7) погаснет, можно про-
• Откройте крышку заливочного отверс-
водить очистку паровой камеры.
тия (2), переверните утюг и слейте ос-
• Выключите утюг, установив регулятор
тавшуюся воду из резервуара для воды
температуры (13) в положение «MIN».
(12) (рис. 8).
• Выньте вилку сетевого шнура из розет-
• Закройте крышку (2).
ки.
• Поставьте утюг вертикально и дайте
• Расположите утюг горизонтально над
ему полностью остыть.
раковиной, нажмите и удерживайте
• Храните утюг в вертикальном положе-
кнопку SELF CLEAN (15) (рис. 7).
нии.
• Кипящая вода и пар вместе с накипью
будут выбрасываться из отверстий по-
Комплект поставки
дошвы утюга (17).
1. Утюг – 1 шт.
• Слегка покачивайте утюг вперед-на-
2. Емкость для заливки воды – 1шт.
зад, пока вся вода не выйдет из резер-
вуара (12).
ТЕХНИЧЕСКИЕ ХАРАКТЕРИСТИКИ
• Поставьте утюг на основание (11) и
Напряжение питания: 240 В ~ 50 Гц
дайте ему полностью остыть.
Потребляемая мощность: 2000 Вт
• Когда подошва утюга (17) полностью
остынет, протрите ее сухой тканью.
Производитель сохраняет за собой пра-
• Прежде чем убрать утюг на хранение,
во изменять дизайн и технические харак-
убедитесь, что в резервуаре (12) нет
теристики прибора без предварительно-
воды, а подошва утюга (17) сухая.
го уведомления.
УХОД И ЧИСТКА
Срок службы прибора не менее 3-х
• Прежде чем чистить утюг, убедитесь,
лет
что он отключен от сети и уже остыл.
• Протрите корпус утюга слегка влажной
Данное изделие соответствует
тканью, после чего вытрите его насухо.
всем требуемым европейским
• Отложения на подошве утюга могут
и российским стандартам безо-
быть удалены тканью, смоченной в ук-
пасности и гигиены.
сусно-водном растворе.
• После удаления отложений отполируй-
Производитель: АН-ДЕР ПРОДАКТС
те поверхность подошвы сухой тканью.
ГмбХ, Австрия
• Не используйте для чистки подошвы и
Нойбаугюртель 38/7А, 1070 Вена,
корпуса утюга абразивные чистящие
Австрия
средства.
18
1251.indd 181251.indd 18 02.06.2008 12:01:2902.06.2008 12:01:29

ҚАЗАҚ
ҮТІК
• Үтікті тегіс тұрақты беттерде
орналастырыңыз.
СИПАТТАМАСЫ
• Реезервуарға су толтырған кезде үтікті
1 – Су шашыратқыштың соплосы
үнемі желіден ажыратып қойыңыз.
2 – Су қую тесігінің қақпағы
• Үтікті қолдану барысында су қую
3 – Үнемі бу жіберу реттегіші
тесігінің қақпағы қатты жабылған болу
4 – Бу жіберу көрсеткіші
керек.
5 – Су шашыратқыш түймешігі
• Құрылғыны балалар мен мүмкіндігі
6 – Қосымша бу жіберу түймешігі
шектеулі адамдардың жанында
7 – Термостат жұмысының көрсеткіші
қолданған кезден аса сақ болыңыз.
8 – Өздігінен сөну көрсеткіші
• Қосылған үтікті қараусыз
9 – Тұтқа
қалдырмаңыз.
10 – Желілік шнур қорғанышы
• Үтікті қолданбасаңыз, желіден
11 – Үтіктің негізі
ажыратып қойыңыз
12 – Суға арналған резервуар
• Электр тоғының соғуын болдырмау
13 – Температура реттегіші
үшін үтікті суға немесе басқа да
14 – MAX судың ең көп деңгейінің
сұйықтықтарға батырмаңыз.
көрсеткіші
• Резервуар ішіне хош иістендіргіш
15 – SELF CLEAN өздігінен тазалану
сүйықтықтар, уксус, крахмал ерітіндісі,
түймешігі
қақ түсіргіш реагенттер мен басқа да
16 – Таңдалған температураның
химиялық заттарды қолдануға тыйым
көрсеткіші
салынады.
17 – Үтік табаны
• Күйіп қалмау үшін терінің ашық
18 – Су қуюға арналған ыдыс
беттерін үтіктің ыстық беттеріне
немесе шығып тұрған буға
САҚТЫҚ ШАРАЛАРЫ
жақындатпаңыз.
Қолдану алдыныда нұсқаулықты
• Желі шнуры үтіктегіш тақтайшаның
мұқият оқыңыз, сондай ақ,
үстінен салбырап жəне ыстық беттерге
суреттеріне назар аударыңыз.
тиіп тұрмағанын қадағалаңыз.
• Үтікті қосу алдында оның жұмыс
• Үтікті желіден ажыратқан кезде үнемі
кернеуі желінің кернеуіне сəйкес
тек желі ашасынан ұстаңыз, ешқашан
келетініне көз жеткізіңіз.
желі шнурынан тартпаңыз
• Желі шнуры "евровилкамен"
• Үтікті жинап қою алдында оның суын
жабдықталған; оны жерге қосылуы
түгел төгіп, суытыңыз.
сенімді розеткаға қосыңыз.
• Суды үтікті желіден ажыратқаннан кейн
• Өрт қаупінің алдын алу мақсатында
ғана төгіңіз.
құрылғыны электр розеткасына
• Желі ашасы немесе желі шнуры
қосқанда ауыстырғыштарды
бүлінген немесе басқа да ақаулары
қолданбаңыз.
бар үтікті қолданбаңыз.
• Электр желісіне ауырлық түсірмеу
• Тоқ соғуын болдырмау үшін ешқашан
мақсатында тұтыну қуаты жоғары
үтікті өз бетіңізше ашпаңыз, ақау пайда
құрылғыларды бірге қоспаңыз.
болса рұқсаты бар қызмет көрсету
• Үтікті нұсқаулықта көрсетілген
орталығына хабарласыңыз.
мақсаттарда ғана қолданыңыз.
• Үтікті тек үтіктеу тақтайшасында
АЛҒАШ РЕТ ҚОЛДАНАР АЛДЫНДА
қолданыңыз.
Үтікті қаптамадан шығарыңыз да
19
1251.indd 191251.indd 19 02.06.2008 12:01:2902.06.2008 12:01:29
ҚАЗАҚ
үтік табанындағы қорғанышын алып
суығанын күтіп, су қую қақпағын
тастаңыз (17).
(2) ашып, төңкеріп судың
• Үтікті жұмыс кернеуі желінің кернеуіне
қалдықтарын төгіп тастаңыз.
сəйкес келетініне көз жеткізіңіз.
(Сурет.8).
Ескерту: Алғаш рет қосқанда
ҮТІКТЕУ ТЕМПЕРАТУРАСЫ
үтіктің қыздыру элементі күйеді
Қолдану алдында қызып тұрған үтікті,
де аздаған түтін немесе бөтен иіс
оның табаны (17) мен резервуары (12)
шығуы мүмкін, ол қалыпты құбылыс.
таза екеніне көз жеткізу үшін бір қиық
матаға басып көріңіз.
Су таңдау
• Үтіктеу алдында заттардың
Резервуарға құбырдағы суды
жапсырмасында көрсетілген
пайдаланыңыз. Егер құбырдың суы
температураны үнемі қараңыз.
қатты болса, оны тазартылған сумен 1:1
• Егер үтіктеу нұсқаулығы жазылған
ретінде араластырып қолданыңыз, су өте
жапсырма болмай, бірақ сіз мата түрін
қатты болса, оны тазартылған сумен 1:2
білсеңіз, температураны таңдау үшін
арақатынасында араластырыңыз немесе
келесі кестені қолданыңыз.
тек тазартылған су қолданыңыз.
Белгілер Матаның түрі (температура)
синтетика, нейлон, акрил, полиэстер
Ескерту: Суға арналған
•
(төменгі температура)
резервуардың ішіне (12) хош
Жібек/жүн
••
иістендіргіш сұйықтықтар, сірке
(орташа температура)
суы, крахмал ерітіндісі, қақ түсіргіш
Мақта /зығыр
•••
реагенттер мен басқа да химиялық
(жоғары температура)
заттарды қуюға болмайды.
• Бұл кестені тек тегіс маталарға
қолдануға болады. Егер мата өзгеше
СУҒА АРНАЛҒАН РЕЗЕРВУАРДЫ
болса, мысалы, бүдір, жиырылған
ТОЛТЫРУ (сурет 1, 2)
болса, онда оларды төменгі
Су қую алдында үтіктің желіге
температурада үтіктеу керек.
қосылмағанын тексеріңіз.
• Алдымен, заттарды үтіктеу
• Үнемі бу жіберу реттегішін (3) сағат
температурасын қарай сұрыптап
тіліне қарсы түбіне дейі орнатыңыз
алыңыз: синтетиканы –синтетикаға,
– бу жіберу қызметі сөніп тұр.
жүнді – жүнге, мақтаны - мақтаға т.б.
• Су құю тесігінің қақапағын ашыңыз (2).
• Үтік тез қызады, бірақ баяу суиды.
• Су қую ыдысын қолданып (18) суды
Сондықтан, біріншіден төменгі
құйыңыз да, қақпақты жабыңыз (2)
температурада үтіктелетін заттарды
үтіктеңіз, мысалы синтетикалық
Ескерту:
маталарды. Содан кейін, орташа
• Суды MAX белгісінен асырып
температураны қажет ететін заттарды
құймаңыз.
үтіктеңіз, мысалы, жібек, жүн. Зығыр
• Егер үтіктеу барысында қосымша
мен мақтадан жасалған маталарды ең
су қую керек болса, үтікті
соңында үтіктеңіз.
сөндіріп, желі шнурын розеткадан
• Егер мата аралас жіптерден жасалған
суырыңыз.
болса, онда қажет температуралардың
• Үтіктеп болғаннан кейін, үтікті
ең төменгісін орнатыңыз, мысалы, мата
сөндіріңіз де, оның толық
60% полиэстерден жəне 40% мақтадан
20
1251.indd 201251.indd 20 02.06.2008 12:01:2902.06.2008 12:01:29


