Karcher Balayeuse KM 90-60 R Bp Pack Adv: Start up
Start up: Karcher Balayeuse KM 90-60 R Bp Pack Adv

-
6 몇
Warning
Regularly check the fluid level in acid-filled
batteries.
–
The acid in a fully charged battery has a
specific weight of 1.28 kg/l at a temper-
ature of 20 °C.
–
The acid in a partially discharged bat-
tery has a specific weight between 1.00
and 1.28 kg/l.
–
The specific weight of the acid must be
uniform in all cells.
Unscrew all cell caps.
Take a sample from each cell using the
acid tester.
Put the acid sample back into the same
cell.
Where fluid level is too low, top up cells to
the mark provided with distilled water.
Charge battery.
Screw in cell caps.
The appliance will brake electrically while
standing still, if one of the following condi-
tions is met.
–
Foot was removed from the pedal.
–
Operator's seat was left for more than 1
second.
–
Key switch was set to “0”.
The automatic emergency brake will only
work while the appliance is at a standstill.
Park the sweeper on an even surface.
Remove the key.
Check charging status of battery.
Check side brush.
Check the roller brush for wear and
wrapped belts.
Empty waste container.
Check tyre pressure.
Check function of seat contact switch.
Note:
For description, see section on Care
and maintenance.
Pull seat adjustment lever inwards.
Slide seat, release lever and lock in
place.
Check that the seat is properly locked in
position by attempting to move it back-
wards and forwards.
–
Indicator lamp glows green
Battery is charged (100...40%).
–
Indicator lamp glows yellow
Battery is discharged to 40 ... 20%.
–
Indicator lamp blinks red
Battery is almost discharged. The
sweeping mode will be shortly switched
off automatically.
–
Indicator lamp glows red
Battery is discharged. The sweeping
mode will be terminated automatically
(the sweeping aggregates cannot be
taken into operation until the battery is
charged).
Drive the machine directly to the charg-
ing station; avoid any steep gradients in
the process.
Charge battery.
Danger
Danger of accident. The immobilizing brake
must always be checked first on an even
surface before starting the machine.
Take the seating position.
Release emergency-stop button by
turning.
Set main switch to "1".
Activate the travel direction switch (for-
ward/reverse).
Gently depress drive pedal.
The break must unlock audibly and
smoothly start rolling on a level ground.
Release the drive pedal.
When the drive pedal is released, the
brake must brake in an audible manner.
Note
: If this is not the case, put the appli-
ance out of operation and call the customer
service.
Note:
The max. load of the storage area is
20 kg.
Ensure safe fastening of the cargo.
–
The appliance has an emergency OFF
switch. If this switch is pressed, the ap-
pliance will stop abruptly and the auto-
matic emergency brake will be
activated.
–
In order to restart the appliance, first un-
lock the emergency OFF switch, then
turn the key switch on and off.
1 Driving
Driving to the Place of Use.
Side brush and roller brush are raised.
2 Sweeping with sweep roller
Roller brush is lowered.
3 Sweeping using roller brush and
side brushes
Roller brush and side brushes are low-
ered.
Note
The machine is equipped with a seat con-
tact switch When you quit the driver seat,
the machine comes to a halt after a delay of
approx. 1.5 seconds and the activated
sweep function is switched off.
Sit on the driver's seat.
Do NOT press the accelerator pedal.
Set programme switch to step 1 (driv-
ing).
Set main switch to "1".
Danger
Danger of accident! If the machine does not
brake, then proceed as follows:
–
If the device does not come to a halt on
a ramp with a gradient of 2% when you
release the drive pedal, then the emer-
gency-stop button may be pressed for
safety reasons only if the mechanical
functioning of the immobilizing brake
has been checked properly before com-
missioning the device.
–
Switch off the machine only after it
comes to a complete halt (on an even
surface) and call up the aftersales ser-
vice!
–
Further, follow all warning instructions
for braking.
Release emergency-stop button by
turning.
Sit on the seat and set main switch to
"1".
Set the travel direction switch to "for-
ward".
Press accelerator pedal down slowly.
Check and correct the fluid level of the
battery (only for low-maintenance bat-
teries)
Start up
General notes
Prior to start/safety test
Operation
Adjusting driver's seat
Check charging status of battery
Check immobilizing brake
Storage area
Emergency-stop button
Programme selection
Turning on the Appliance
Drive the machine
Drive forward
20 EN
-
7
Danger
–
Risk of injury! While reversing, ensure
that there is nobody in the way, ask
them to move if somebody is around.
–
During reverse drive, a pulsing warning
sound will be heard.
–
The reverse drive speed is lower than
the forward speed for safety reasons.
Set the travel direction switch to "back-
wards".
Press accelerator pedal down slowly.
Note
The accelerator pedal can be used to
vary the driving speed infinitely.
Release the accelerator pedal, the ma-
chine brakes automatically and stops.
Caution
Objects or loose obstacles may not be run
over or pushed.
Stationary obstacles of up to 5 cm can
be run over slowly and carefully.
Stationary obstacles of more than 5 cm
may only be run over using a suitable
ramp.
In case of overloading, the drive motor au-
tomatically switches off after a certain peri-
od. The indicator lamp "Overlaod of the
drive motor" will illuminate red as soon as
the drive motor current is limited. If the con-
trol is overheated, all drives (except for the
horn and the filter cleaning) will be switched
off.
Allow machine to cool down at least for
15 minutes.
Turn the main switch to "0" and turn it
back to "1".
Danger
Risk of injury! If the bulk waste flap is open,
stones or gravel may be flung forwards by
the roller brush. Make sure that this does
not endanger persons, animals or objects.
Caution
Do not sweep up packing strips, wire or
similar objects as this may damage the
sweeping mechanism.
Caution
To avoid damaging the floor, do not contin-
ue to operate the sweeping machine in the
same position.
Note:
To achieve an optimum cleaning re-
sult, the driving speed should be adjusted
to take specific situations into account.
Note:
During operation, the waste contain-
er should be emptied at regular intervals.
Note:
When cleaning surfaces, only lower
the roller brush.
Note:
Also lower side brush when cleaning
along edges.
Set programme switch to step 2. Roller
brush is lowered.
Note:
Roller brush starts operating au-
tomatically.
Note:
To sweep up larger items up to a
height of 50 mm, e.g. cigarette packs, the
bulk waste flap must be raised briefly.
Raising bulk waste flap:
Press the pedal for the bulk waste flap
forwards and keep pressed down.
To lower it, take foot off pedal.
Note:
An optimum cleaning result can
only be achieved if the bulk waste flap
has been lowered completely.
Set programme switch to step 3. Side
brushes and roller brush are lowered.
Note:
Roller brush and side brush start
operating automatically.
Close wet/dry flap
Open wet/dry flap.
Note:
You can thus prevent the filter
system from getting blocked.
Open wet/dry flap.
Note:
This protects the filter from mois-
ture.
The appliance is equipped with an auto-
matic filter cleaning system.
The cleaning takes place automatically ap-
prox. every 15 seconds. In the process a
short blow-off sound can be heard.
Check the installed dust filter for con-
tamination every once in a while. Re-
place a heavily contaminated or
defective filter.
Note:
Wait until the automatic filter shaking
process is finished and the dust has settled
before you open or empty the waste con-
tainer.
Raise the waste container slightly and
pull it out.
Empty waste container.
Push in the waste container and lock it.
Empty opposite waste container.
Note:
After switching off the appliance, the
dust filter is automatically cleaned. Wait for
approx. 2 minutes before opening the appli-
ance cover.
Set programme switch to step 1 (driv-
ing). The side brush and roller brush are
raised.
Turn main key to "0" and remove it.
Note
The appliance has an automatic switch-off
function to protect the batteries from dis-
charging. If the appliance is not in use (with
the key switch turned on) for longer than 30
minutes, it will switch off automatically.
Danger
Risk of injury and damage! Observe the
weight of the appliance when you transport
it.
Turn main key to "0" and remove it.
Secure the wheels of the machine with
wheel chocks.
Secure the machine with tensioning
straps or cables.
When transporting in vehicles, secure
the appliance according to the guide-
lines from slipping and tipping over.
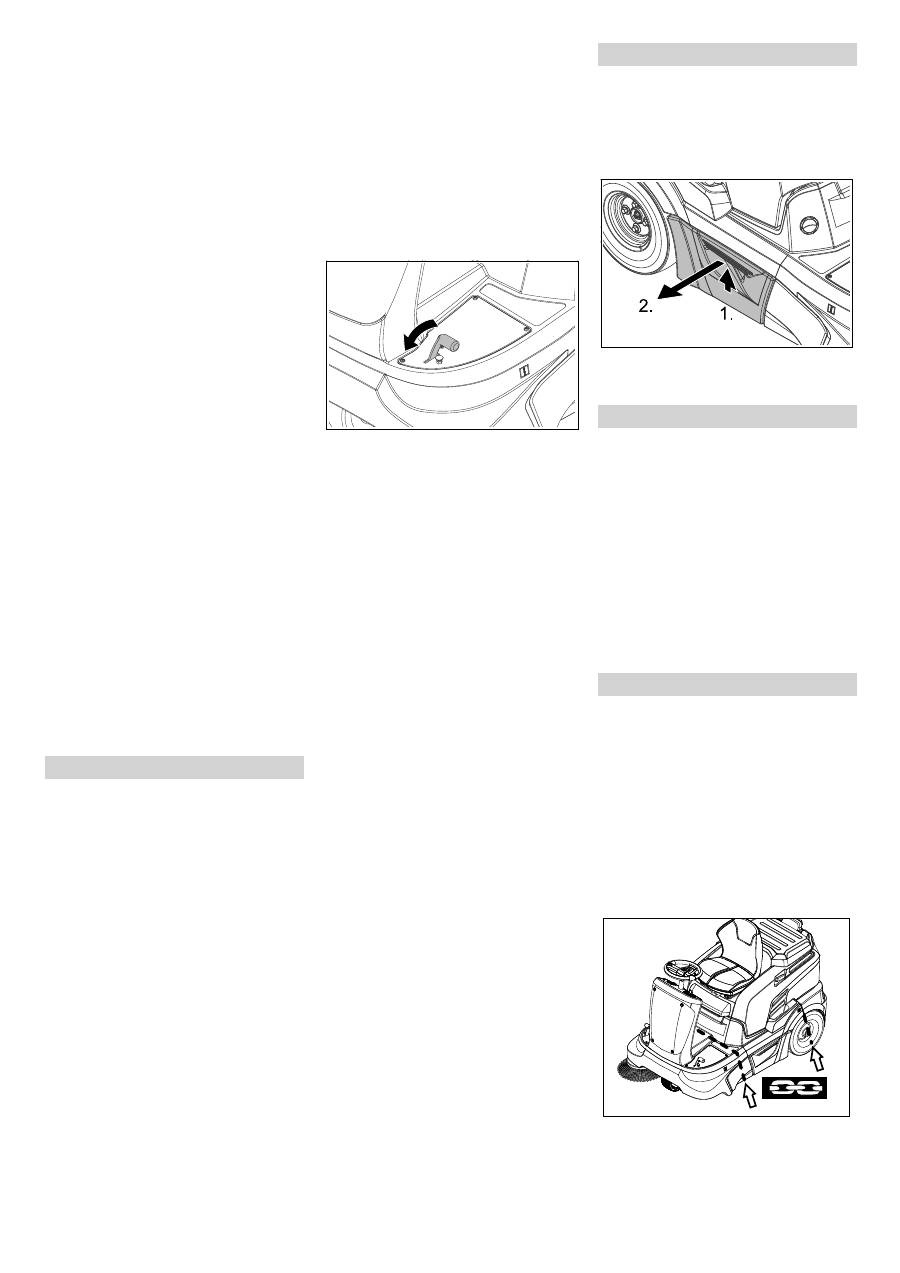
Note
Observe markings for fixing points on base
frame (chain symbols). When loading or
unloading the machine, it may only be op-
erated on gradients of max. 12%.
Reverse drive
Brakes
Driving over obstacles
Overlaod of the drive motor
Sweeping mode
Sweeping with sweep roller
Sweeping with bulk waste flap raised
Sweeping with side brushes
Sweeping dry floors
Sweep in fibrous and dry waste (such as
dry grass, hay)
Sweeping damp or wet floors
Filter dedusting
Emptying waste container
Turn off the appliance
Transport
21 EN
Оглавление
- Inhaltsverzeichnis
- Sicherheitshinweise
- Bedien- und Funktionselemente
- Vor Inbetriebnahme
- Inbetriebnahme
- Stilllegung
- Pflege und Wartung
- F 1 F 2
- Hilfe bei Störungen
- Technische Daten
- EG-Konformitätserklärung
- Contents
- Safety instructions
- Operating and Functional Elements
- Before Startup
- Start up
- Shutdown Maintenance and care
- F 1 F 2
- Troubleshooting
- Technical specifications
- EC Declaration of Conformity
- Table des matières
- Consignes de sécurité
- Eléments de commande et de fonction
- Avant la mise en service
- Mise en service
- Remisage Entretien et maintenance
- F 1 F 2
- Assistance en cas de panne
- Caractéristiques techniques
- Déclaration de conformité CE
- Indice
- Norme di sicurezza
- Elementi di comando e di funzione
- Prima della messa in funzione
- Messa in funzione
- Fermo dell'impianto Cura e manutenzione
- F 1 F 2
- Guida alla risoluzione dei guasti
- Dati tecnici
- Dichiarazione di conformità CE
- Inhoudsopgave
- Veiligheidsinstructies
- Elementen voor de bediening en de functies
- Voor de inbedrijfstelling
- Inbedrijfstelling
- Stillegging Onderhoud
- F 1 F 2
- Hulp bij storingen
- Technische gegevens
- EG-conformiteitsverklaring
- Índice de contenidos
- Indicaciones de seguridad
- Elementos de operación y funcionamiento
- Antes de la puesta en marcha
- Puesta en marcha
- Parada Cuidados y mantenimiento
- F 1 F 2
- Ayuda en caso de avería
- Datos técnicos
- Declaración de conformidad CE
- Índice
- Avisos de segurança
- Elementos de comando e de funcionamento
- Antes de colocar em funcionamento
- Colocação em funcionamento
- Desactivação da máquina Conservação e manutenção
- F 1 F 2
- Ajuda em caso de avarias
- Dados técnicos
- Declaração de conformidade CE
- Indholdsfortegnelse
- Sikkerhedsanvisninger
- Betjenings- og funktionselementer
- Inden ibrugtagning
- Ibrugtagning
- Drift
- Afbrydning/nedlæggelsePleje og vedligeholdelse
- F 1 F 2
- Hjælp ved fejl
- Tekniske data
- EU-overensstemmelses- erklæring
- Innholdsfortegnelse
- Sikkerhetsanvisninger
- Betjenings- og funksjonelementer
- Før den tas i bruk
- Ta i bruk
- Drift
- Sette bort Pleie og vedlikehold
- F 1 F 2
- Feilretting
- Tekniske data
- EU-samsvarserklæring
- Innehållsförteckning
- Säkerhetsanvisningar
- Manövrerings- och funktionselement
- Före ibruktagande
- Idrifttagning
- Drift
- Nedstängning Skötsel och underhåll
- F 1 F 2
- Åtgärder vid störningar
- Tekniska data
- Försäkran om EU-överens- stämmelse
- Sisällysluettelo
- Turvaohjeet
- Ohjaus- ja käyttölaitteet
- Ennen käyttöönottoa
- Käyttöönotto
- Seisonta-aika Hoito ja huolto
- F 1 F 2
- Häiriöapu
- Tekniset tiedot
- EU-standardinmukaisuu- stodistus
- Πίνακας περιεχομένων
- Υποδείξεις ασφαλείας
- Λειτουργία
- Στοιχεία χειρισμού και λειτουργίας
- Πριν τη θέση σε λειτουργία
- Έναρξη λειτουργίας
- Διακοπή της λειτουργίας Φροντίδα και συντήρηση
- F 1 F 2
- Αντιμετώπιση βλαβών
- Τεχνικά χαρακτηριστικά
- Δήλωση Συμμόρφωσης των Ε . Κ .
- İ çindekiler
- Güvenlik uyar ı lar ı
- Kullan ı m ve çal ı ş ma elemanlar ı
- Cihaz ı çal ı ş t ı rmaya ba ş lamadan önce
- İş letime alma
- Durdurma
- Koruma ve Bak ı m
- F 1 F 2
- Ar ı zalarda yard ı m
- Teknik Bilgiler
- AB uygunluk bildirisi
- Оглавление
- Указания по технике безопасности
- Назначение
- Описание элементов управления и рабочих узлов
- Перед началом работы
- Начало работы
- Вывод из эксплуатации Уход и техническое обслуживание
- F 1 F 2
- Помощь в случае неполадок
- Технические данные
- Заявление о соответствии ЕС
- Tartalomjegyzék
- Biztonsági tanácsok
- Kezelési- és funkciós elemek
- Üzembevétel el ő tt
- Üzembevétel
- Leállítás
- Ápolás és karbantartás
- F 1 F 2
- Segítség üzemzavar esetén
- M ű szaki adatok
- EK konformitási nyiltakozat
- Obsah
- Bezpe č nostní pokyny
- Ovládací a funk č ní prvky
- P ř ed uvedením do provozu
- Uvedení do provozu
- Provoz
- Odstavení Ošet ř ování a údržba
- F 1 F 2
- Pomoc p ř i poruchách
- Technické údaje
- Prohlášení o shod ě pro ES
- Vsebinsko kazalo
- Varnostna navodila
- Upravljalni in funkcijski elementi
- Pred zagonom
- Zagon
- Obratovanje
- Mirovanje naprave Nega in vzdrževanje
- F 1 F 2
- Pomo č pri motnjah
- Tehni č ni podatki
- ES-izjava o skladnosti
- Spis tre ś ci
- Wskazówki bezpiecze ń stwa
- Elementy urz ą dzenia
- Przed pierwszym uruchomieniem
- Uruchamianie
- Wy łą czenie z eksploatacji Czyszczenie i konserwacja
- F 1 F 2
- Usuwanie usterek
- Dane techniczne
- Deklaracja zgodno ś ci UE
- Cuprins
- M ă suri de siguran ţă
- Elemente de utilizare ş i func ţ ionale
- Înainte de punerea în func ţ iune
- Punerea în func ţ iune
- Scoaterea din func ţ iune Îngrijirea ş i între ţ inerea
- F 1 F 2
- Remedierea defec ţ iunilor
- Date tehnice
- Declara ţ ie de conformitate CE
- Obsah
- Bezpe č nostné pokyny
- Ovládacie a funk č né prvky
- Pred uvedením do prevádzky
- Uvedenie do prevádzky
- Odstavenie
- Starostlivos ť a údržba
- F 1 F 2
- Pomoc pri poruchách
- Technické údaje
- Vyhlásenie o zhode s normami EÚ
- Pregled sadržaja
- Sigurnosni napuci
- Komandni i funkcijski elementi
- Prije prve uporabe
- Stavljanje u pogon
- Stavljanje ure đ aja van pogona
- Njega i održavanje
- F 1 F 2
- Otklanjanje smetnji
- Tehni č ki podaci
- EZ izjava o uskla đ enosti
- Pregled sadržaja
- Sigurnosne napomene
- Komandni i funkcioni elementi
- Pre upotrebe
- Stavljanje u pogon
- Stavljanje ure đ aja van pogona
- Nega i održavanje
- F 1 F 2
- Otklanjanje smetnji
- Tehni č ki podaci
- Izjava o uskla đ enosti sa propisima EZ
- Съдържание
- Указания за безопасност
- Функция
- Обслужващи и функционални елементи
- Преди пускане в експлоатация
- Пускане в експлоатация
- Спиране от експлоатация Грижи и поддръжка
- F 1 F 2
- Помощ при неизправности
- Технически данни
- Декларация за съответствие на ЕО
- Sisukord
- Ohutusalased märkused
- Teenindus- ja funktsioonielemendid
- Enne seadme kasutuselevõttu
- Kasutuselevõtt
- Käitamine
- Seismapanek Korrashoid ja tehnohooldus
- F 1 F 2
- Abi häirete korral
- Tehnilised andmed
- EÜ vastavusdeklaratsioon
- Satura r ā d ī t ā js
- Droš ī bas nor ā d ī jumi
- Vad ī bas un funkcijas elementi
- Pirms ekspluat ā cijas uzs ā kšanas
- Ekspluat ā cijas uzs ā kšana
- Iekonserv ē šana
- Kopšana un tehnisk ā apkope
- F 1 F 2
- Pal ī dz ī ba darb ī bas trauc ē jumu gad ī jum ā
- Tehniskie dati
- EK Atbilst ī bas deklar ā cija
- Turinys
- Saugos reikalavimai
- Valdymo ir funkciniai elementai
- Prieš pradedant naudoti
- Naudojimo pradžia
- Naudojimas
- Laikinas prietaiso nenaudojimas Prieži ū ra ir aptarnavimas
- F 1 F 2
- Pagalba gedim ų atveju
- Techniniai duomenys
- EB atitikties deklaracija
- Перелік
- Правила безпеки
- Призначення
- Елементи управління і функціональні вузли
- Перед початком роботи
- Введення в експлуатацію
- Зберігання Догляд та технічне обслуговування
- F 1 F 2
- Допомога у випадку неполадок
- Технічні характеристики
- Заява при відповідність Європейського співтовариства
