Karcher WD 7.700 P: инструкция
Раздел: Бытовая техника
Тип: Пылесос С Контейнером Для Пыли
Характеристики, спецификации
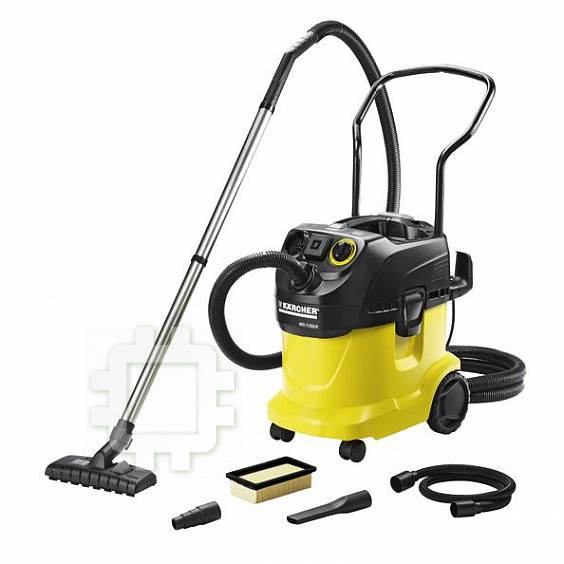
Инструкция к Пылесосу С Контейнером Для Пыли Karcher WD 7.700 P
WD 7.2xx
WD 7.3xx
WD 7.2xx
WD 7.5xx
WD 7.7xx
Register and win!
www.karcher.com
59647760 08/12
Δϳ
Deutsch 7
English 13
Français 19
Italiano 26
Nederlands 33
Español 40
Português 47
Dansk 54
Norsk 60
Svenska 66
Suomi 72
Ελληνικά 78
Türkçe 85
Русский 91
Magyar 99
Čeština 106
Slovenščina 112
Polski 118
Româneşte 125
Slovenčina 132
Hrvatski 138
Srpski 144
Български 150
Eesti 157
Latviešu 163
Lietuviškai 169
Українська 175
189
ΒήόϠ
2
3

4
5
WD 7.2xx
WD 7.3xx
WD 7.5xx
WD 7.7xx
1200 W
1400 W
1400 W
1600 W
25 l
[V~]
1600 W
1800 W
EU: 1800 W
GB: 1400 W
CH: 700 W
16 l
14 l
H 05VV-F2x1
H 05VV-F3G1,5
73 dB(A) 71 dB(A)
73 dB(A)
9,0 kg 10,0 kg 10,0 kg
11,0 kg
6
führen Sie diese einer Wiederverwertung
Inhaltsverzeichnis
zu.
Altgeräte enthalten wertvolle recyc-
Allgemeine Hinweise . . . . . DE . . .7
lingfähige Materialien, die einer Ver-
Sicherheitshinweise . . . . . . DE . . .8
wertung zugeführt werden sollten.
Gerätebeschreibung. . . . . . DE . . .8
Bitte entsorgen Sie Altgeräte deshalb über
Bedienung . . . . . . . . . . . . . DE . . .9
geeignete Sammelsysteme.
Pflege und Wartung . . . . . . DE . . 11
Entsorgung von Filter und Filterbeutel
Hilfe bei Störungen. . . . . . . DE . .12
Filter und Filterbeutel sind aus umweltver-
Technische Daten. . . . . . . . DE . .12
träglichen Materialien hergestellt.
Sofern sie keine eingesaugten Substanzen
enthalten, die für den Hausmüll verboten
Allgemeine Hinweise
sind, können sie über den normalen Haus-
Sehr geehrter Kunde,
müll entsorgt werden.
Lesen Sie vor der ersten Benut-
Hinweise zu Inhaltsstoffen (REACH)
zung Ihres Gerätes diese Origi-
Aktuelle Informationen zu Inhaltsstoffen fin-
nalbetriebsanleitung, handeln Sie danach
den Sie unter:
und bewahren Sie diese für späteren Ge-
www.kaercher.de/REACH
brauch oder für Nachbesitzer auf.
Garantie
Bestimmungsgemäße Verwendung
In jedem Land gelten die von unserer zu-
Das Gerät ist entsprechend der in dieser
ständigen Vertriebsgesellschaft herausge-
Betriebsanleitung gegebenen Beschrei-
gebenen Garantiebedingungen. Etwaige
bungen und den Sicherheitshinweisen zur
Störungen an Ihrem Gerät beseitigen wir
Verwendung als Nass-/Trockensauger be-
innerhalb der Garantiefrist kostenlos, so-
stimmt.
fern ein Material- oder Herstellungsfehler
Dieses Gerät wurde für den privaten Ge-
die Ursache sein sollte. Im Garantiefall
brauch entwickelt und ist nicht für die Bean-
wenden Sie sich bitte mit Kaufbeleg an Ih-
spruchungen des gewerblichen Einsatzes
ren Händler oder die nächste autorisierte
vorgesehen.
Kundendienststelle.
– Das Gerät vor Regen schützen. Nicht
(Adresse siehe Rückseite)
im Außenbereich lagern.
Kundendienst
– Achtung: Saugen von Asche und Ruß
nur mit Vorabscheider (Bestell-Nr.
Bei Fragen oder Störungen hilft Ihnen un-
2.863-139).
sere KÄRCHER-Niederlassung gerne wei-
Den Nass-/Trockensauger nur benutzen mit:
ter.
– Original-Filterbeutel.
(Adresse siehe Rückseite)
– Original-Ersatzteilen, -Zubehör oder -
Bestellung von Ersatzteilen und
Sonderzubehör.
Sonderzubehör
Der Hersteller haftet nicht für eventuelle
Eine Auswahl der am häufigsten benötig-
Schäden, die durch nicht bestimmungsge-
ten Ersatzteile finden Sie am Ende der Be-
mäßen Gebrauch oder falsche Bedienung
triebsanleitung.
verursacht werden.
Ersatzteile und Zubehör erhalten Sie bei ih-
Umweltschutz
rem Händler oder bei ihrer KÄRCHER-Nie-
Die Verpackungsmaterialien sind re-
derlassung.
cyclebar. Bitte werfen Sie die Verpa-
(Adresse siehe Rückseite)
ckungen nicht in den Hausmüll, sondern
– 7
7DE

Nachfolgende Stoffe niemals aufsaugen:
Sicherheitshinweise
– Explosive oder brennbare Gase, Flüs-
– Dieses Gerät ist nicht dafür bestimmt,
sigkeiten und Stäube (reaktive Stäube)
durch Personen (einschließlich Kinder)
– Reaktive Metall-Stäube (z.B. Alumini-
mit eingeschränkten physischen, sen-
um, Magnesium, Zink) in Verbindung
sorischen oder geistigen Fähigkeiten
mit stark alkalischen und sauren Reini-
oder mangels Erfahrung und/oder man-
gungsmitteln
gels Wissen benutzt zu werden, es sei
– Unverdünnte starke Säuren und Lau-
denn, sie werden durch eine für ihre Si-
gen
cherheit zuständige Person beaufsich-
– Organische Lösungsmittel (z.B. Benzin,
tigt oder erhielten von ihr Anweisungen,
Farbverdünner, Aceton, Heizöl).
wie das Gerät zu benutzen ist. Kinder
Zusätzlich können diese Stoffe die am Ge-
sollten beaufsichtigt werden, um sicher-
rät verwendeten Materialien angreifen.
zustellen, dass sie nicht mit dem Gerät
spielen.
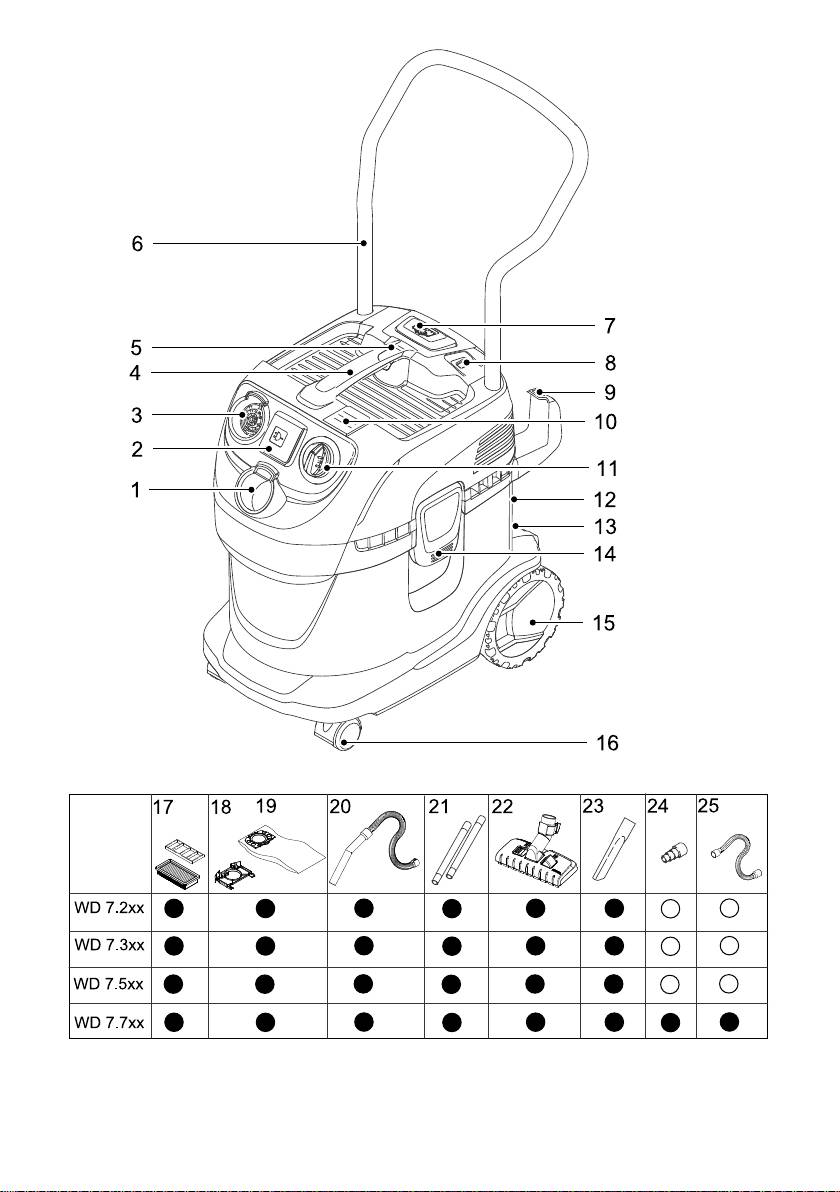
Gerätebeschreibung
– Verpackungsfolien von Kindern fernhal-
ten, es besteht Erstickungsgefahr!
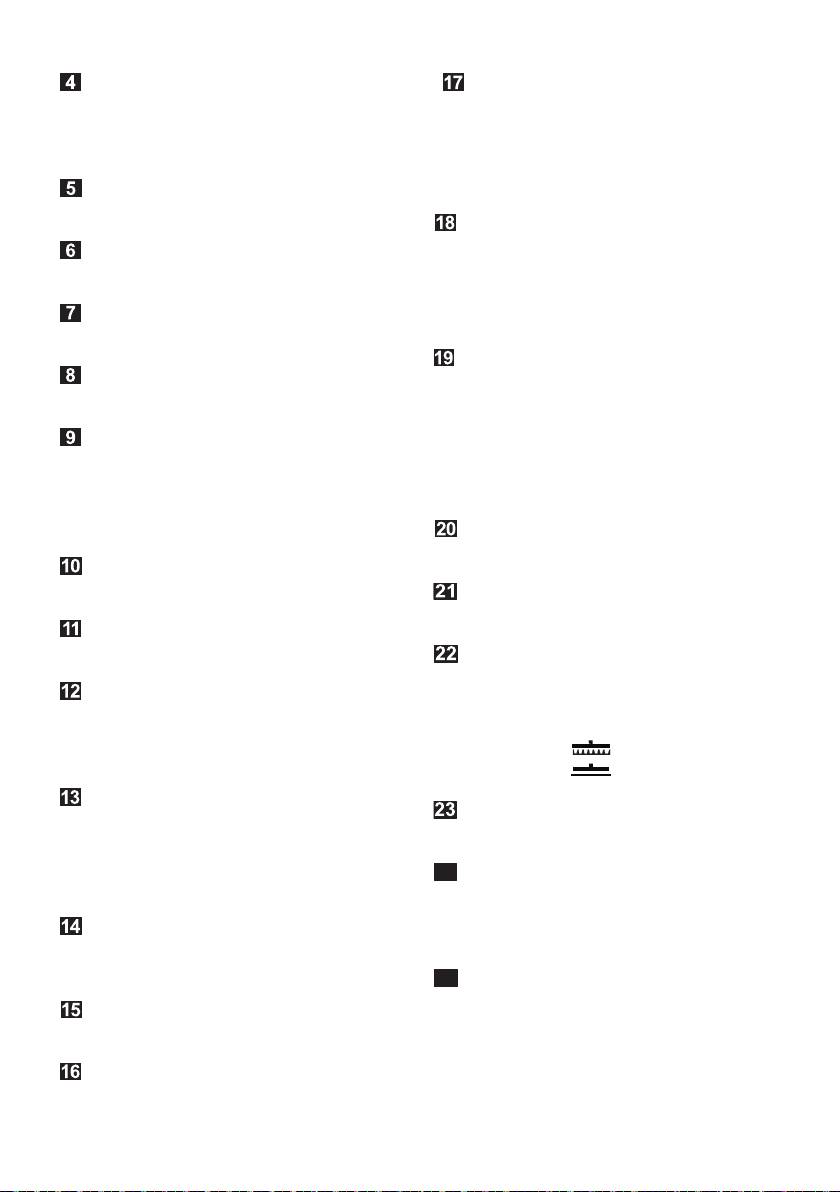
Abbildungen siehe Aus-
– Gerät nach jedem Gebrauch und vor je-
klappseiten!
der Reinigung/Wartung ausschalten.
– Brandgefahr. Keine brennenden oder
Diese Betriebsanleitung beschreibt die
glimmenden Gegenstände aufsaugen.
auf dem vorderen Umschlag aufgeführ-
– Der Betrieb in explosionsgefährdeten
ten Nass-/Trockensauger.
Bereichen ist untersagt.
Je nach Modell gibt es Unterschiede in
몇 Elektrischer Anschluss
Ausstattung und mitgeliefertem Zube-
hör.
Das Gerät nur an Wechselstrom anschlie-
Prüfen Sie beim Auspacken den Pa-
ßen. Die Spannung muss mit dem Typen-
ckungsinhalt auf fehlendes Zubehör oder
schild des Gerätes übereinstimmen.
Beschädigungen. Benachrichtigen Sie bei
Stromschlaggefahr
Transportschäden bitte Ihren Händler.
Netzkabel und Steckdose niemals mit
im Lieferumfang enthalten
feuchten Händen anfassen.
mögliches Zubehör
Netzanschlussleitung nur am Netzstecker
anfassen, nicht an der Leitung aus Steck-
Saugschlauchanschluss
dosen ziehen.
Zum Anschließen des Saugschlauches
Netzkabel mit Stecker vor jedem Betrieb
beim Saugen.
auf Schäden prüfen. Beschädigtes Netz-
Hinweis: Zum Entnehmen des Saug-
kabel unverzüglich durch autorisierten
schlauches Raste mit Daumen drücken
Kundendienst/Elektro-Fachkraft austau-
und Saugschlauch herausziehen.
schen lassen.
Zur Vermeidung von Elektrounfällen emp-
Gerätesteckdose
fehlen wir, Steckdosen mit vorgeschalte-
Zum Anschluss eines Elektrowerkzeuges.
tem Fehlerstrom-Schutzschalter (max.
Hinweis: Maximale Anschlussleistung be-
30 mA Nennauslöse-Stromstärke) zu be-
achten (siehe Kapitel „Technische Daten“).
nutzen.
Blasanschluss
몇 Achtung
Bestimmte Stoffe können durch die Verwir-
Saugschlauch in Blasanschluss einste-
belung mit der Saugluft explosive Dämpfe
cken, die Blasfunktion ist damit aktiviert.
oder Gemische bilden!
8 DE
– 8

Tragegriff
Filterbeutel
Zum Tragen des Gerätes oder zum Abneh-
Hinweis: Zum Nasssaugen darf kein Filter-
men des Gerätekopfs nach dem Entrie-
beutel eingesetzt werden!
geln.
Empfehlung bei Geräten ohne Filterrei-
nigung: Zum Saugen von Feinstaub den
Entriegelungstaste Filterklappe
Filterbeutel einsetzen.
Schubbügel
Saugschlauch mit Handgriff
ExPress Filterreinigungstaste
Saugrohre 2 x 0,5 m
Filterreinigungsanzeige
Bodendüse
(mit Umschalthebel)
Zubehöraufnahme Haken
Zum Saugen von Hartflächen und Teppich-
böden:
Diese Zubehöraufnahme ermöglicht die
Hebel auf Symbol für Teppichböden
Aufbewahrung von Saugschlauch, Saug-
Hebel auf Symbol für Hartflächen
düsen und Netzkabel.
Fugendüse
Taste Netzkabeleinzug
Adapter
24
Drehschalter (EIN/AUS)
Zum Verbinden des Saugschlauches mit
Parkposition
einem Elektrowerkzeug.
Zum Abstellen der Bodendüse bei Arbeits-
Flexibler Werkzeugschlauch
25
unterbrechungen.
Für mehr Flexibilität beim Arbeiten mit
Zubehöraufnahme Behälter
Elektrowerkzeugen.
Diese Zubehöraufnahme ermöglicht die
Hinweis: Kann auch mit Adapter verwen-
Aufbewahrung von Saugrohren oder sons-
det werden.
tigem Zubehör.
Bedienung
Behälterverschluss
몇 Immer mit eingesetztem Flachfalten-
Zum Öffnen nach außen ziehen, zum Ver-
filter arbeiten, sowohl beim Nass- als
riegeln nach innen drücken.
auch beim Trockensaugen!
Räder
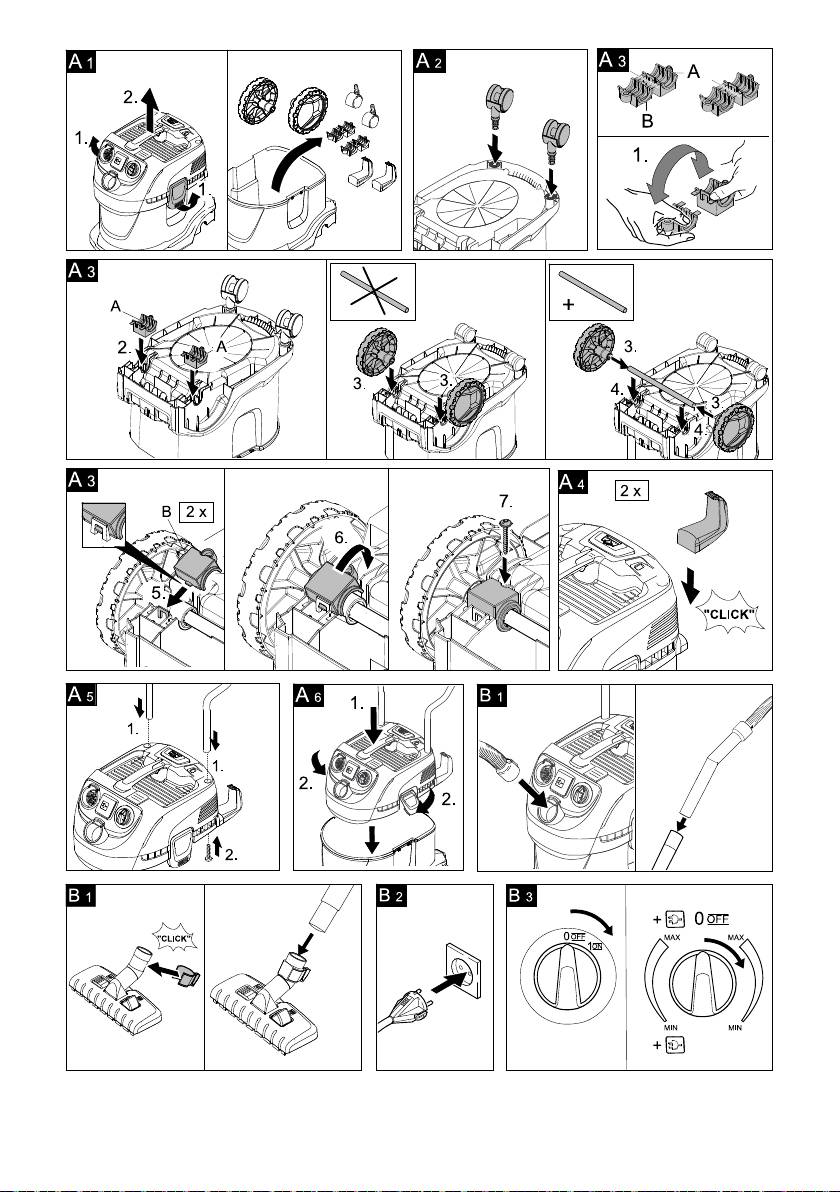
Vor Inbetriebnahme
Lenkrollen
Abbildung
Flachfaltenfilter mit Rahmen
Gerätekopf abnehmen, Inhalt aus dem
(bereits im Gerät eingesetzt)
Behälter nehmen.
몇 Achtung
Abbildung
Behälter umdrehen, Lenkrollen in die
Filter und zugehöriger Rahmen müssen bei
Öffnungen am Behälterboden bis zum
der Anwendung immer eingesetzt sein.
Anschlag eindrücken.
Filterbeutelaufnahme
Abbildung
몇 Achtung: Bitte nicht wegwerfen!
Hinterräder montieren: Lagerschalen
auseinanderbrechen und große Scha-
Wird im Innern des Behälters eingehängt,
len in Radaufnahme eindrücken.
dient zur Aufnahme des Filterbeutels.
– 9
9DE

Bei Geräten ohne Achse: Räder in
Trockensaugen
Radaufnahme legen.
Bei Geräten mit Achse: Räder auf
몇 Nur mit trockenem Flachfaltenfilter
Achse stecken und in Radaufnahme le-
arbeiten!
gen.
Abbildung
Abschließend kleine Schalen in große
Empfehlung bei Geräten ohne Filterrei-
Schalen einhängen und verschrauben.
nigung: Zum Saugen von Feinstaub den
Abbildung
Filterbeutel einsetzen.
Haken montieren.
Der Füllgrad des Filterbeutels ist ab-
Bei Geräten mit Schubbügel:
hängig vom aufgesaugten Schmutz.
Abbildung
Zugesetzte Filterbeutel können platzen,
Schubbügel von oben in die 2 vorgese-
deshalb den Filterbeutel rechtzeitig
henen Öffnungen am Gerätekopf ein-
wechseln!
führen und bis zum Anschlag nach
Bei Feinstaub, Sand usw... sollte der
unten drücken. Mit 2 Schrauben von
Filterbeutel häufiger ausgetauscht wer-
unten sichern.
den.
Hinweis: Wird der Schubbügel nach-
Bei Geräten mit ExPress Filterreinigung:
träglich abmontiert, müssen die unteren
Beim Saugen ohne Filterbeutel zeigt die
Öffnungen aus Funktionsgründen wie-
Filterreinigungsanzeige rot wenn der
der mit den 2 Schrauben verschlossen
Flachfaltenfilter gereinigt werden soll.
werden.
Filterreinigung anwenden.
Abbildung
A 6
ExPress Filterreinigung
Gerätekopf aufsetzen und verriegeln.
Die ExPress Filterreinigung ist für das Sau-
Inbetriebnahme
gen von großen Mengen Feinstaub ohne
Abbildung
eingesetzten Filterbeutel vorgesehen.
Zubehör anschließen.
Bei roter Filterreinigungsanzeige Flachfal-
Abbildung
tenfilter abreinigen:
Netzstecker einstecken.
Abbildung
Abbildung
Filterreinigungstaste bei eingeschalte-
Gerät einschalten.
tem Gerät 3 x drücken, dabei ca.
4 Sekunden zwischen den einzelnen
Bei Geräten ohne eingebaute Steckdose
Betätigungen warten.
Stellung I: Saugen oder Blasen.
Hinweis: Nach mehrmaliger Filterreini-
Stellung 0: Gerät ist ausgeschaltet.
gung oder einer roten Filterreinigungs-
Bei Geräten mit eingebauter Steckdose
anzeige den Behälter auf sein
Stellung MAX: Saugen oder Blasen.
Füllvolumen überprüfen. Bei Bedarf Be-
Stellung MAX: Saugen mit ange-
hälter entleeren.
schlossenem Elektrowerkzeug
Nasssaugen
Leistungsregulierung: Bei Bedarf beim
Saugen, Blasen oder beim Arbeiten mit
Zum Aufsaugen von Feuchtigkeit bzw.
einem Elektrowerkzeug Saugleistung
Nässe gewünschtes Zubehör auf Saug-
reduzieren.
rohre bzw. direkt auf den Handgriff auf-
stecken.
Stellung 0: Gerät ausgeschaltet. Elekt-
rowerkzeug ist mit Spannung versorgt.
몇 Achtung
Keinen Filterbeutel verwenden!
Bei Schaumbildung oder Flüssigkeitsaus-
tritt das Gerät sofort ausschalten!
10 DE
– 10

Hinweis: Ist der Behälter voll, schließt ein
Betrieb unterbrechen
Schwimmer die Saugöffnung und das Ge-
rät läuft mit erhöhter Drehzahl. Gerät sofort
Gerät ausschalten.
ausschalten und Behälter entleeren.
Abbildung
Bodendüse in die Parkposition einhän-
Arbeiten mit Elektrowerkzeugen
gen.
Adapter bei Bedarf mit einem Messer
Betrieb beenden
an den Anschlussdurchmesser des
Elektrowerkzeuges anpassen.
Gerät ausschalten und Netzstecker zie-
Abbildung
hen.
A) Beiliegenden Adapter auf den Hand-
Behälter entleeren
griff des Saugschlauchs stecken und
Abbildung
mit dem Anschluss des Elektrowerk-
Gerätekopf abnehmen, mit Nass- oder
zeugs verbinden.
Trockenschmutz gefüllten Behälter ent-
oder
leeren.
B) Für mehr Flexibilität beim Arbeiten
Gerät aufbewahren
den flexiblen Werkzeugschlauch ver-
Abbildung
H
2
wenden. Diesen mit Saugschlauch und
Zubehör und Netzkabel am Gerät ver-
ggfs. mit Adapter verbinden und am An-
stauen und Gerät in trockenen Räumen
schluss des Elektrowerkzeugs an-
aufbewahren.
schließen.
Abbildung
Pflege und Wartung
Bei Geräten mit eingebauter Steck-
dose: Netzstecker des Elektrowerk-
Gefahr
zeugs am Sauger einstecken.
Vor allen Pflege– und Wartungsarbeiten
Gerät einschalten (Drehschalter nach
das Gerät ausschalten und den Netzste-
links auf Stellung MAX) und mit
cker ziehen.
der Arbeit beginnen.
Reparaturarbeiten und Arbeiten an elektri-
schen Bauteilen dürfen nur vom autorisier-
Hinweis: Sobald das Elektrowerkzeug
ten Kundendienst durchgeführt werden.
eingeschaltet wird, läuft die Saugturbi-
ne 0,5 Sekunden verzögert an. Wird
몇 Achtung
das Elektrowerkzeug ausgeschaltet,
Keine Scheuermittel, Glas- oder Allzweck-
läuft die Saugturbine noch ca. 5 Sekun-
reiniger verwenden! Gerät niemals in Was-
den nach, um den Restschmutz im
ser tauchen.
Saugschlauch einzusaugen.
Gerät und Zubehörteile aus Kunststoff
mit einem handelsüblichen Kunst-
Blasfunktion
stoffreiniger pflegen.
Reinigung von schwer erreichbaren Stellen
Behälter und Zubehör bei Bedarf mit
oder wo das Saugen nicht möglich ist, z.B
Wasser ausspülen und vor der Weiter-
Laub aus dem Kiesbeet.
verwendung trocknen.
Abbildung
Flachfaltenfilter reinigen
Saugschlauch in Blasanschluss einste-
cken, die Blasfunktion ist damit akti-
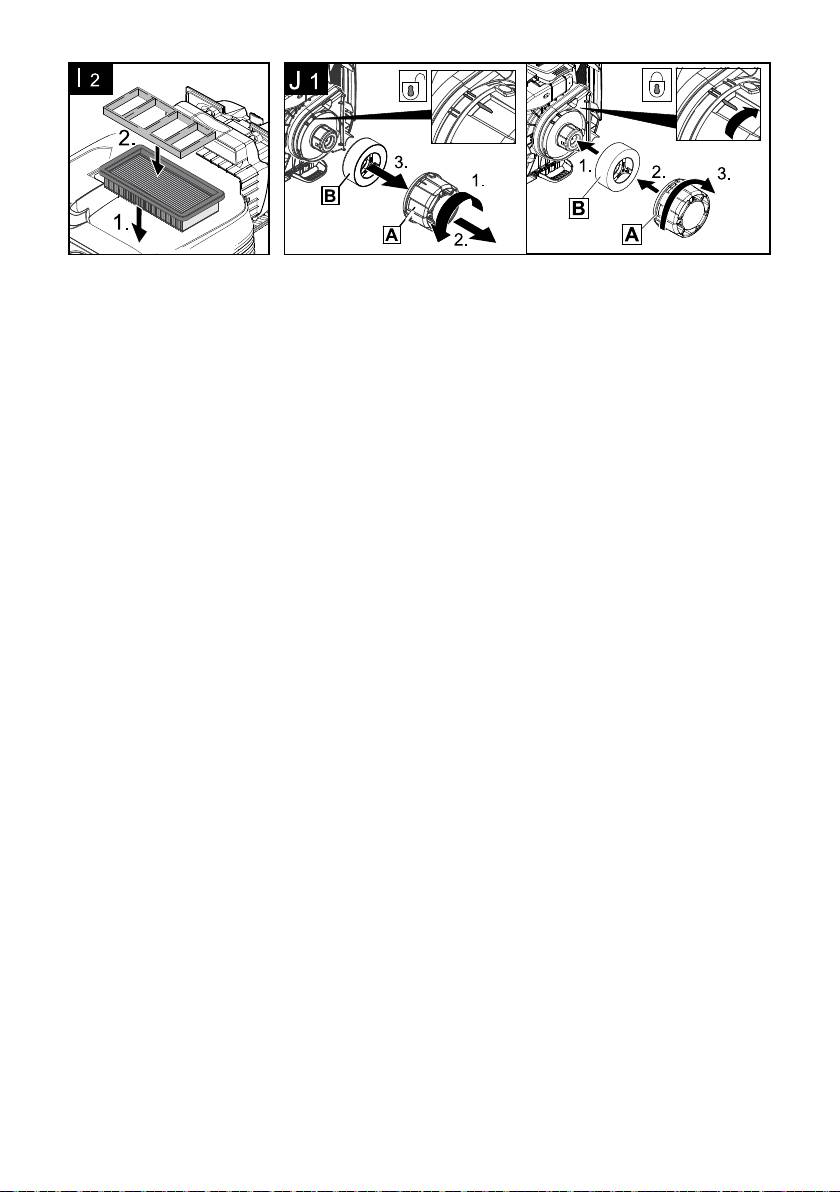
Abbildung
I
1
viert.
Bei Geräten ohne Filterreinigung:
Filterklappe entriegeln und öffnen. Rah-
men und Filter entnehmen und Filter
abklopfen. Bei Bedarf Filter unter flie-
– 11
11DE
ßendem Wasser reinigen. Filter nicht
Bei Geräten mit ExPress Filterreini-
abreiben oder abbürsten.
gung: Filterreinigungstaste 3 x betäti-
Vor dem Einbau vollständig trocknen
gen, ggfs. mit geschlossenem
lassen.
Saugschlauch die Abreinigung wieder-
holen (siehe Kapitel „Flachfaltenfilter
Abbildung
I
2
reinigen“).
Anschließend zuerst Filter und danach
Rahmen wieder einsetzen.
Bei Bedarf Filter unter fließendem Was-
ser reinigen.
Bei Geräten mit ExPress Filterreini-
gung: Filterreinigung betätigen (siehe
Beschädigten Flachfaltenfilter austau-
Kapitel „ExPress Filterreinigung“).
schen.
Hinweis: Ist trotz Abreinigung die
Filterbeutel ist voll: Neuen Filterbeutel
Saugleistung noch nicht zufriedenstel-
einsetzen (Bestell-Nr. siehe Ersatzteil-
lend, Saugschlauch von den Rohren
liste am Ende dieser Anleitung).
trennen, Öffnung des Saugschlauches
몇 Achtung
zuhalten/verschließen und bei ge-
Filterbeutelaufnahme nicht wegwerfen!
schlossenem Saugschlauch nochmal
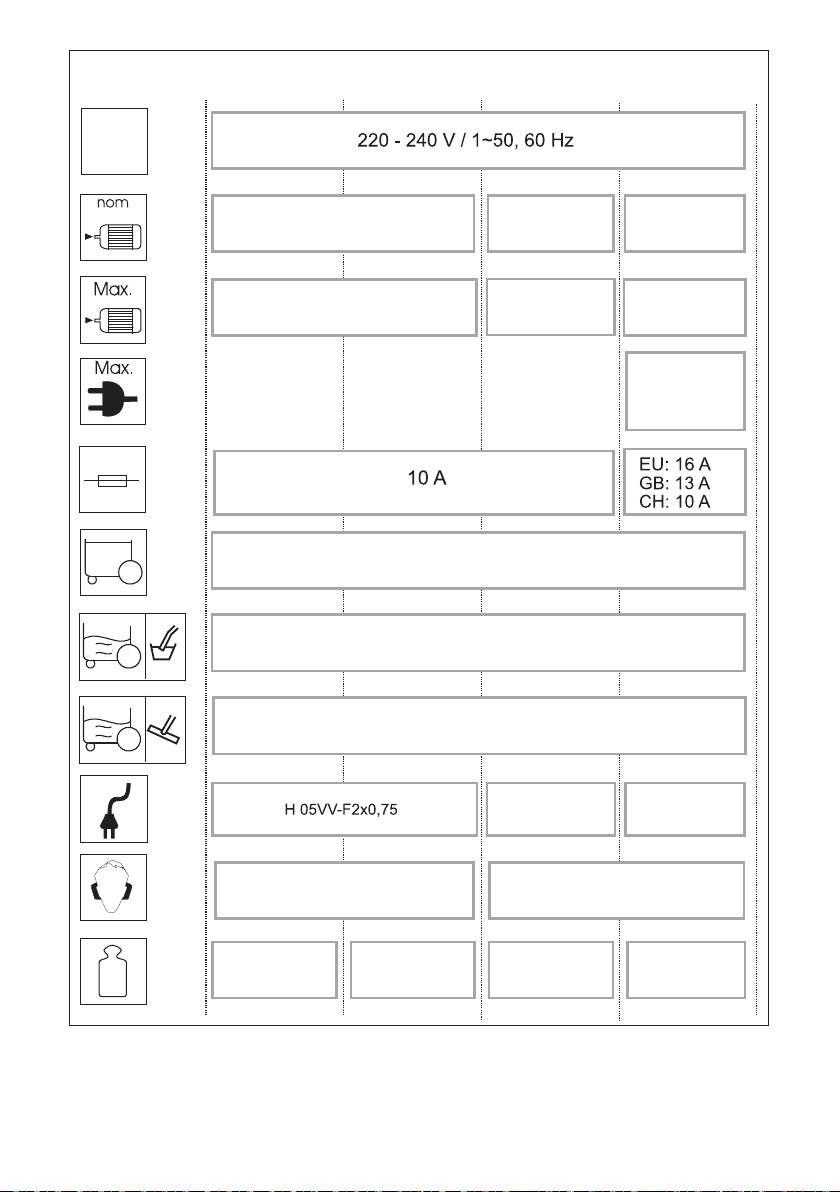
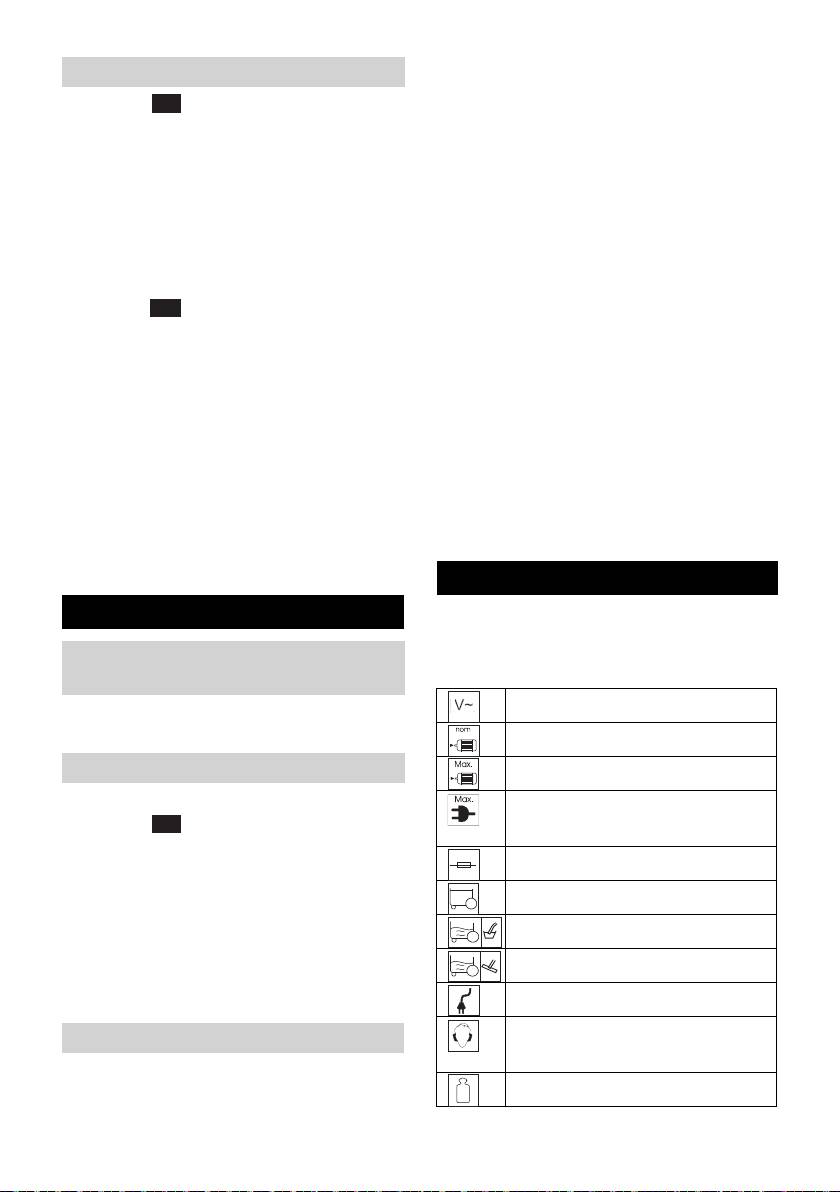
Technische Daten
3 x die Filterreinigungstaste betätigen.
Die Technischen Daten befinden sich auf
Hilfe bei Störungen
den Aufklappseiten. Nachfolgend die Erklä-
rung der dort verwendeten Symbole.
Netzkabeleinzug funktioniert nicht
Netzkabel ist vermutlich verschmutzt,
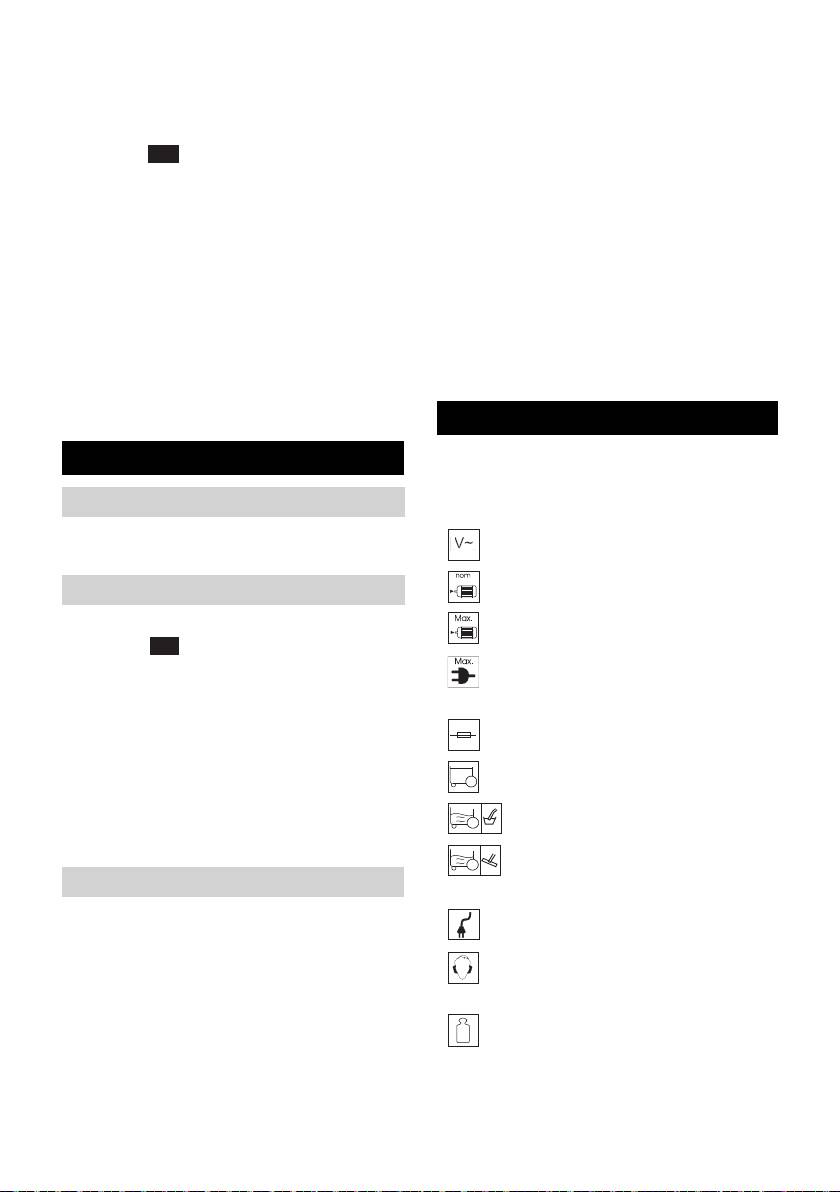
Spannung
Netzkabel reinigen.
Leistung P
nenn
Wasser tritt aus
Gerät sofort ausschalten.
Leistung P
max
Abbildung
J
1
Schwimmersystem reinigen:
Max. Anschlussleistung der Ge-
rätesteckdose
Gerätekopf abnehmen, Schwimmer-
korb (A) in Pfeilrichtung aufdrehen und
Netzabsicherung (träge)
abnehmen. Danach Schwimmer (B)
entnehmen und beides unter fließen-
Behältervolumen
dem Wasser reinigen.
Zur Montage zuerst Schwimmer einfüh-
Wasseraufnahme mit Handgriff
ren, dann Schwimmerkorb aufsetzen
und verriegeln.
Wasseraufnahme mit Bodendü-
Nachlassende Saugleistung
se
Lässt die Saugleistung des Gerätes nach,
Netzkabel
bitte folgende Punkte prüfen:
Zubehör, Saugschlauch oder Saugroh-
Schalldruckpegel
re sind verstopft: Verstopfung entfer-
(EN 60704-2-1)
nen.
Flachfaltenfilter ist verschmutzt:
Gewicht (ohne Zubehör)
Bei Geräten ohne ExPress Filterrei-
Technische Änderungen vorbehalten!
nigung: Flachfaltenfilter ausbauen und
reinigen (siehe Kapitel „Flachfaltenfilter
reinigen“).
12 DE
– 12
arrange for the proper recycling of old appli-
Contents
ances. Please dispose your old appliances
using appropriate collection systems.
General notes. . . . . . . . . . . EN . . .7
Disposing the filters and filter bags
Safety instructions . . . . . . . EN . . .8
Filters and filter bags are made from envi-
Description of the Appliance EN . . .8
ronment-friendly materials.
Operation . . . . . . . . . . . . . . EN . .10
They can therefore be disposed off through
Maintenance and care . . . . EN . .11
the normal household garbage provided
Troubleshooting . . . . . . . . . EN . .12
you have not sucked in substances that are
Technical specifications . . . EN . .12
not permitted to be thrown into household
garbage.
Notes about the ingredients (REACH)
General notes
You will find current information about the
Dear Customer,
ingredients at:
Please read and comply with
www.kaercher.com/REACH
these original instructions prior
Warranty
to the initial operation of your appliance and
store them for later use or subsequent own-
The terms of the guarantee applicable in
ers.
each country have been published by our
respective national distributors. We will re-
Proper use
pair possible faults on your unit free of
The appliance is intended for use as a Mul-
charge within the warranty period, insofar
ti-Purpose Vac corresponding to the de-
as the faults are caused by material defects
scriptions given in these operating
or defective workmanship. Guarantee
instructions and the safety notes.
claims should be addressed to your dealer
This appliance has been designed for use
or the nearest authorized customer service
in private households and is not intended
centre, and supported by documentary evi-
for commercial use.
dence of purchase.
– Protect the unit from rain. Do not store
(See address on the reverse)
outside.
Customer Service
– Caution: Always use a pre-separator
while vacuuming ashes and soot (order
Our KÄRCHER branch will be pleased to
no. 2.863-139).
help you further in the case of questions or
Use the Multi-Purpose Vac only with:
faults.
– Original filter bag.
(See address on the reverse)
– Original spare parts, accessories and
Ordering spare parts and special at-
special accessories.
tachments
The manufacturer is not responsible for any
At the end of the operating instructions you
damages that may occur on account of im-
will find a selected list of spare parts that
proper use or wrong operations.
are often required.
Environmental protection
You can procure the spare parts and the at-
The packaging material can be recy-
tachments from your dealer or your
cled. Please do not place the packag-
KÄRCHER branch office.
ing into the ordinary refuse for disposal, but
(See address on the reverse)
arrange for the proper recycling.
Old appliances contain valuable ma-
terials that can be recycled. Please
– 7
13EN

– Reactive metal dust particles (such as
Safety instructions
aluminium, magnesium, zinc) in combi-
– This device is not intended for use by
nation with highly alkaline or acidic de-
persons (including children) with re-
tergents
duced physical, sensory or mental abil-
– Undiluted, strong acids and alkalies
ities or lacking experience and/or
– Organic solvents (such as petrol, paint
knowledge, unless they are supervised
thinners, acetone, heating oil).
by a person responsible for their safety
In addition, these substances may cause
or are instructed by these persons on
the appliance materials to corrode.
the use of the device. Children should
Description of the Appliance
be supervised, to ensure that they do
not play with the device.
Illustrations on fold-out
– Keep packaging film away from children
pages!
- risk of suffocation!
– Switch the appliance off after every use
These operating instructions describe
and prior to every cleaning/mainte-
the basic models of the Multi-Purpose
nance procedure.
Vacs shown on the front cover.
– Risk of fire. Do not vacuum up any burn-
Depending on the model, there are dif-
ing or glowing objects.
ferences in the equipment and included
– The appliance may not be used in areas
accessories.
where a risk of explosion is present.
When unpacking the product, make sure
몇 Electrical connection
that no accessories are missing and that
none of the package contents have been
The appliance may only be connected to al-
damaged. If you detect any transport dam-
ternating current. The voltage must corre-
ages please contact your dealer.
spond with the type plate on the appliance.
included in the scope of delivery
Risk of electric shock
possible accessories
Never touch the mains plug and the socket
with wet hands.
Suction hose connection
Always hold the plug rather than the cable
when disconnecting the power cord.
To connect the suction hose during vacu-
Check the power cord with mains plug for
uming.
damage before every use. If the power cord
Note: In order to disconnect it, push down
is damaged, please arrange immediately
with your thumb and pull the suction hose
for the exchange by an authorised custom-
out.
er service or a skilled electrician.
To avoid accidents due to electrical faults
Machine socket
we recommend the use of sockets with a
line-side current-limiting circuit breaker
To connect an electric tool.
(max. 30 mA nominal tripping current).
Note: Observe the maximum connected
power (see Chapter "Specifications").
몇 Caution
Certain materials may produce explosive
Blowing connection
vapours or mixtures when agitated by the
suction air!
Connect the suction hose to the blower
Never vacuum up the following materials:
connection, this will activate the blower
– Explosive or combustible gases, liquids
function.
and dust particles (reactive dust parti-
cles)
14 EN
– 8
Carrying handle
Flat fold filter with frame
(already installed in the appliance)
To carry the appliance or to remove the ap-
몇 Caution
pliance head after unlocking.
Filters and their frames must always be in-
serted during operation.
Filter flap release button
Filter bag intake
Push handle
몇 Caution: Please do not dispose of!
Is hooked into the interior of the container,
ExPress filter cleaning button
is used to hold the filter bag.
Filter bag
Filter cleaning display
Note: Do not use a filter bag for wet vacu-
uming!
Accessory compartment, hook
Recommendation for appliances with-
out filter cleaning: To vacuum fine dust,
This accessory compartment allows the
use the filter bag.
storage of the suction hose, suction noz-
zles and the mains cable.
Suction hose with handle
Key for mains cable retraction
Suction tubes 2 x 0.5 m
Rotary switch (ON/OFF)
Floor nozzle
(with switching lever)
Parking position
For vacuuming dust from hard surfaces and
carpets:
To rest the floor nozzle during work inter-
Lever on symbol for carpets
ruptions.
Lever on symbol for hard surfaces
Accessory storage container
Crevice nozzle
This accessory compartment allows the
storage of the suction pipes or other acces-
Adapter
24
sories.
To connect the suction hose with an electric
Container closure
tool.
Pull out to open, push in to lock.
Flexible tool hose
25
Wheels
For more flexibility when working with elec-
tric tools.
Swivel casters
Note: Can also be used with an adapter.
– 9
15EN

Illustration
Operation
Turn on the machine.
몇 Always work with an inserted flat
For appliances without built-in socket.
fold filter - during wet as well as dry
Position I: Suction or blowing
vacuum cleaning!
Position 0: Appliance is switched off
For appliances with built-in socket
Before Startup
Position MAX: Suction or blowing.
Illustration
Position MAX: Vacuuming with
Remove the appliance head and take
connected electric tool
the contents out of the container.
Performance regulation: Reduce the
Illustration
suction if necessary during vacuuming,
Turn the container, press in the swivel
blowing or when working with an elec-
casters in the openings at the base of
tric tool.
the container till the end-point.
Position 0: The appliance is switched
Illustration
off. Electric tool is supplied with voltage.
Install the rear wheels: Break the
bearing halves apart and press the
Dry vacuum cleaning
large halves into the wheel pickup.
몇 Work only with a dry flat fold filter!
For appliances without axle: Place
Illustration
the wheels into the wheel intake.
Recommendation for appliances with-
For appliances with axle: Attach the
out filter cleaning: To vacuum fine dust,
wheels to the axle and place into wheel
use the filter bag.
intake.
The filling level of the filter bag depends
Finally, hook the smaller halves into the
on the dirt that is sucked in.
larger ones and screw them in.
Clogged filter bags can burst - therefore
Illustration
make sure to replace the filter bag in a
Install the hook.
timely manner!
For appliances with pushing handle:
The filter bag needs to be replaced
Illustration
more frequently while sucking in fine
Insert the pushing handle into the two
dust, sand, etc.
respective openings in the appliance
For appliances with ExPress filter clean-
head from above and press them down
ing: When vacuuming without a filter bag,
all the way. Secure from below using 2
the filter cleaning indicator lights up red if
screws.
the flat fold filter needs to be cleaned.
Note: If the pushing handle is removed
Use the filter cleaning.
later on, the bottom openings must be
closed up with the two screws for func-
ExPress filter cleaning
tional reasons.
The ExPress filter cleaning is intended for
Illustration
A 6
the vacuuming of large volumes of fine dust
Insert and lock the appliance head.
without the filter bag inserted.
If the filter cleaning indicator is red, clean
Start up
the flat fold filter:
Illustration
Illustration
Connect accessories.
Press the filter cleaning key 3 x times
Illustration
with the appliance switched on; wait
Plug in the main plug.
about 4 seconds between the individual
presses.
16 EN
– 10

Note: After several filter cleaning pro-
Blowing function
cesses or if the filter cleaning indicator
is red, check the container for its fill vol-
Cleaning hard to reach locations or, where
ume. Empty the container if needed.
vacuuming is not possible, like leaves from
a gravel bed.
Wet vacuum cleaning
Illustration
Attach the accessories to vacuum mois-
Connect the suction hose to the blower
ture or wetness to the suction pipes or
connection, this will activate the blower
directly to the handle.
function.
몇 Caution:
Interrupting operation
Do not use a filter bag!
Turn off the appliance.
Immediately switch the appliance off if foam
Illustration
forms or liquids escape!
Hook the floor nozzle into the parking
Note: If the container is full a float closes
position.
the suction opening and the appliance
works at a higher speed. Switch off the ap-
Finish operation
pliance immediately and empty the contain-
Turn off the appliance and disconnect
er.
the mains plug.
Working with electrical power tools
Empty the container
Adapt the adapter to the connection di-
Illustration
ameter of the electric tool using a knife
Remove the appliance head and empty
if necessary.
the reservoir filled with wet or dry dirt.
Illustration
Storing the appliance
A) Plug the enclosed adapter onto the
Illustration
H
2
handle of the suction hose and connect
Store the accessories and the mains
the electric tool with the connection.
cable on the appliance and store the
or
appliance in dry rooms.
B) Use the flexible tool hose to gain
more flexibility in your work. Connect
Maintenance and care
this hose to the suction hose and to the
Danger
adapter and then to the connection of
Turn off the appliance and remove the
the electric tool.
mains plug prior to any care and mainte-
Illustration
nance work.
For appliances with built-in socket:
Repair works may only be performed by the
Connect the mains plug of the electric
authorized customer service.
power tool to the vacuum cleaner.
몇 Caution
Switch the appliance on (move the rota-
ry switch to the left to position
Do not use abrasives, glass or universal
MAX) and start working.
cleaners! Never immerse the appliance in
water.
Note: The suction turbine starts with a
Clean the appliance and accessory
delay of 0.5 seconds after the electric
parts made of plastic with a commercial
tool has been switched on. After the
plastic cleaner.
electric tool has been switched off, the
suction turbine will continue to run for
If required, rinse the container and ac-
approx. 5 seconds to suck in the re-
cessories with water properly and dry
maining dirt from the suction hose.
them before reuse.
– 11
17EN
Accessories, suction hose or suction
Clean flat fold filter
tubes are clogged, please remove the
Illustration
I
1
obstruction.
For appliances without filter clean-
Flat fold filter contaminated:
ing:
For appliances without ExPress filter
Release and open the filter flap. Re-
cleaning: Remove the flat fold filter and
move the frame and filter and knock the
clean it (see chapter "Cleaning the flat
dirt out of the filter. Clean the filter under
fold filter").
running water if necessary. Do not rub
For appliances with ExPress filter
or brush the filter dry.
cleaning: Activate the filter cleaning
Let it dry completely prior to installation.
button 3 times; if necessary, repeat the
Illustration
I
2
cleaning process with the suction hose
After that, insert the filter first and then
closed (held shut) (see Chapter "Clean-
the frame.
ing flat fold filter").
For appliances with ExPress filter
Clean the filter under running water if
cleaning: Use the filter cleaning (see
necessary.
Chapter "ExPress filter cleaning").
Replace damaged flat folded filter.
Note: If the suction performance is still
Filter bag is full: Insert new filter bag
not satisfactory, in spite of the cleaning,
(Order No. refer to spare parts list at the
separate the suction hose from the
end of this manual).
pipes, hold the opening of the suction
몇 Caution
hose shut/close it and activate the filter
Please do not dispose of the filter bag intake!
cleaning button three more times with
the suction hose held shut.
Technical specifications
Troubleshooting
The specifications are listed on the flaps. In
the following, you will find the explanation
Mains cable retraction does not
of the symbols used.
function
Voltage
The mains cable is probably dirty, clean
the mains cable.
Output P
nom
Water is leaking
Output P
max
Turn off the appliance immediately.
Max. connection output of appli-
Illustration
J
1
ance socket
Clean the floater system.
Mains fuse (slow-blow)
Remove the appliance head, unscrew
the floater basket (A) in the direction of
Container capacity
the arrow and remove it. Remove the
Water intake with handle
floater (B) and clean both under flowing
water.
Water intake with floor nozzle
To install, first insert the floater, then
Power cord
add the floater basket and lock it.
Sound pressure level (EN
Decreasing cleaning power
60704-2-1)
If the suction power becomes less, check
Weight (without accessories)
the following points:
Subject to technical modifications!
18 EN
– 12

Les appareils usés contiennent des
Table des matières
matériaux précieux recyclables les-
quels doivent être apportés à un sys-
Consignes générales . . . . . FR . . .7
tème de recyclage. Pour cette raison,
Consignes de sécurité . . . . FR . . .8
utilisez des systèmes de collecte adéquats
Description de l’appareil. . . FR . . .8
afin d'éliminer les appareils usés.
Utilisation . . . . . . . . . . . . . . FR . .10
Elimination du filtre et du sac du filtre
Entretien et maintenance . . FR . .12
Le filtre et le sac du filtre sont fabriqués en
Assistance en cas de panne FR . .12
matériaux recyclables.
Caractéristiques techniques FR . .13
S'ils ne contiennent aucune substance as-
pirée dont l'élimination est interdite dans
les déchets ménagers, vous pouvez les je-
Consignes générales
ter dans les déchets ordinaires.
Cher client,
Instructions relatives aux ingrédients
Lire cette notice originale avant
(REACH)
la première utilisation de votre
Les informations actuelles relatives aux in-
appareil, se comporter selon ce qu'elle re-
grédients se trouvent sous :
quièrt et la conserver pour une utilisation ul-
www.kaercher.com/REACH
térieure ou pour le propriétaire futur.
Garantie
Utilisation conforme
Dans chaque pays, les conditions de ga-
Cet appareil est conçu pour l'aspiration de
rantie en vigueur sont celles publiées par
liquides et de poussières, conformément
notre société de distribution responsable.
aux descriptions et consignes de sécurité
Nous éliminons gratuitement d’éventuelles
stipulées dans ce mode d'emploi.
pannes sur l’appareil au cours de la durée
Cet appareil ne doit être utilisé que pour un
de la garantie, dans la mesure où une er-
usage domestique.
reur de matériau ou de fabrication en sont
– Protéger l'appareil de la pluie. Ne pas
la cause. En cas de recours en garantie, il
l'entreposer à extérieur.
faut s'adresser avec le bon d’achat au re-
– Attention : en cas d'aspiration de
vendeur respectif ou au prochain service
cendre et de suie, utiliser le présépara-
après-vente.
teur (n° de commande 2.863-139).
(Adresse au dos)
N'utiliser l'aspirateur sec/humide qu'en as-
Service après-vente
sociation avec :
®
– le sac de filtrage original.
Notre succursale Kärcher
se tient à votre
– des pièces de rechange, accessoires
entière disposition pour d'éventuelles ques-
ou accessoires spéciaux originaux.
tions ou problèmes.
(Adresse au dos)
Le fabricant décline toute responsabilité en
cas de dommages dus à une utilisation non
Commande de pièces détachées et
conforme ou incorrecte de l'appareil.
d'accessoires spécifiques
Protection de l’environnement
Une sélection des pièces de rechange utili-
Les matériaux constitutifs de l’embal-
sées le plus se trouve à la fin du mode
lage sont recyclables. Ne pas jeter
d'emploi.
les emballages dans les ordures ména-
Vous obtiendrez des pièces détachées et
gères, mais les remettre à un système de
des accessoires chez votre revendeur ou
®
recyclage.
auprès d'une filiale Kärcher
.
(Adresse au dos)
– 7
19FR

(courant de déclenchement nominal maxi-
Consignes de sécurité
mal de 30 mA).
– Cet appareil n'est pas conçu pour être
몇 Attention
utilisé par des personnes (y compris
Des substances déterminées peuvent pro-
des enfants) avec des capacités phy-
voquer la formation de vapeurs ou de mé-
siques, sensorielles ou mentales limi-
langes explosifs par tourbillonnement avec
tées ou manquant d'expérience et/ou
l’air aspiré.
de connaissances, sauf si elles sont
Ne jamais aspirer les substances sui-
surveillées par une personne respon-
vantes:
sable de leur sécurité ou si elles en ob-
– Des gazes, liquides et poussières
tiennent des instructions sur la manière
(poussières réactives) explosifs ou in-
d'utiliser l'appareil. Les enfants doivent
flammables
être surveillés afin de s'assurer qu'ils ne
– Poussières réactives de métal (p.ex.
jouent pas avec l'appareil.
aluminium, magnésium, zinc) en rap-
– Tenir les films plastiques d'emballages
port avec des détergents alcalins et
hors de portée des enfants, risque
acides
d'étouffement !
– Acides forts et lessives non diluées
– Mettre l'appareil hors service après
– Solvants organiques (p.ex. essence, di-
chaque utilisation et avant chaque net-
lutif de couleur, acétone, fuel).
toyage/entretien.
Par ailleurs, elles peuvent s’avérer agres-
– Risque d'incendie. N’aspirer aucun ob-
sives pour les matériaux utilisés sur l’appa-
jet enflammé ou incandescent.
reil.
– Il est interdit d’utiliser l’appareil dans
Description de l’appareil
des zones présentant des risques d’ex-
plosion.
Pour les illustrations, voir
몇 Raccordement électrique
les pages dépliantes !
L'appareil doit être raccordé uniquement au
courant alternatif. La tension doit être iden-
Ces instructions de service décrivent
tique avec celle indiquée sur la plaque si-
les modèles de base des aspirateurs
gnalétique de l’appareil.
sec/humide répertoriés sur la page de
garde.
Risque de choc électrique
Suivant la modèle, l'équipement et les
Ne jamais saisir le connecteur secteur ni la
accessoires fournis diffèrent.
prise électrique avec des mains humides.
Contrôler le matériel lors du déballage pour
Ne pas tirer sur le câble mais uniquement
constater des accessoires manquants ou
au niveau du connecteur pour débrancher
des dommages. Si des dégâts dus au
l'appareil de la prise électrique.
transport sont constatés, il faut en informer
Avant chaque utilisation, vérifier que le
le revendeur.
câble d'alimentation et le connecteur ne
inclus dans la fourniture
sont pas endommagés. Tout câble d?ali-
accessoires possibles
mentation endommagé doit être immédia-
tement remplacé par le service après-vente
Raccord du tuyau d'aspiration
ou un électricien agréé.
Pour éviter des accidents électriques nous
Pour le raccord du tuyau d'aspiration lors
recommandons d’utiliser des prises de
de l'aspiration.
courant avec un interrupteur de protection
Remarque : pour le retirer, presser le cran
contre les courants de fuite placé en amont
d'arrêt du pouce et retirer le flexible d'aspi-
ration.
20 FR
– 8


