Karcher WD 5.300 M: инструкция
Раздел: Бытовая техника
Тип: Пылесос С Контейнером Для Пыли
Характеристики, спецификации
Инструкция к Пылесосу С Контейнером Для Пыли Karcher WD 5.300 M
WD 5.2xx M
WD 5.2xx MP
WD 5.3xx
WD 5.3xx M
WD 5.4xx
WD 5.5xx M
WD 5.6xx MP
Register and win!
www.karcher.com
59659190 11/12
Δϳ
207
ΒήόϠ
Deutsch 7
English 14
Français 21
Italiano 28
Nederlands 35
Español 42
Português 49
Dansk 56
Norsk 63
Svenska 69
Suomi 76
Ελληνικά 83
Türkçe 91
Русский 98
Magyar 106
Čeština 113
Slovenščina 120
Polski 127
Româneşte 135
Slovenčina 142
Hrvatski 149
Srpski 156
Български 163
Eesti 171
Latviešu 178
Lietuviškai 185
Українська 192

2
16
18
19
19 20 21 22 23 24 25
20 22 25
17
WD 5.2xx M
WD 5.2xx MP
WD 5.3xx
WD 5.3xx M
WD 5.4xx
WD 5.5xx M
WD 5.6xx MP
3
4
5
WD 5.2xx M
WD 5.3xx
WD 5.4xx
WD 5.5xx M
WD 5.2xx MP
WD 5.3xx M
WD 5.6xx MP
1400 W
1600 W
1600 W
1800 W
25 l
30 l
H 05VV-F3G1,5
[V~]
EU: 2100 W
EU: 1800 W
GB: 1800 W
GB: 1400 W
CH: 900 W
CH: 700 W
EU: 10 A / CH: 10 A / GB: 13 A
MP- versions:
EU: 16 A / CH: 10 A / GB: 13 A
15 l 19 l
13 l
15 l
H 05VV-F2x1
MP- versions: H 05VV-F3G1,5
73 dB(A) 7 dB(A)373 dB(A) 73 dB(A)
M 8,1 kg
7,9 kg
8,7 kg
M 9,0 kg
MP 8,4 kg
M 8,4 kg
MP 9,3 kg
6

Umweltschutz
Inhaltsverzeichnis
Die Verpackungsmaterialien sind re-
Allgemeine Hinweise . . . . . DE . . .5
cyclebar. Bitte werfen Sie die Verpa-
Sicherheitshinweise . . . . . . DE . . .6
ckungen nicht in den Hausmüll, sondern
Gerätebeschreibung. . . . . . DE . . .6
führen Sie diese einer Wiederverwertung
Bedienung . . . . . . . . . . . . . DE . . .9
zu.
Pflege und Wartung . . . . . . DE . .10
Altgeräte enthalten wertvolle recyc-
Hilfe bei Störungen. . . . . . . DE . .11
lingfähige Materialien, die einer Ver-
wertung zugeführt werden sollten.
Technische Daten. . . . . . . . DE . .11
Bitte entsorgen Sie Altgeräte deshalb über
geeignete Sammelsysteme.
Allgemeine Hinweise
Entsorgung von Filter und Filterbeutel
Sehr geehrter Kunde,
Filter und Filterbeutel sind aus umweltver-
Lesen Sie vor der ersten Benut-
träglichen Materialien hergestellt.
zung Ihres Gerätes diese Origi-
Sofern sie keine eingesaugten Substanzen
nalbetriebsanleitung, handeln Sie danach
enthalten, die für den Hausmüll verboten
und bewahren Sie diese für späteren Ge-
sind, können sie über den normalen Haus-
brauch oder für Nachbesitzer auf.
müll entsorgt werden.
Hinweise zu Inhaltsstoffen (REACH)
Bestimmungsgemäße Verwendung
Aktuelle Informationen zu Inhaltsstoffen fin-
Das Gerät ist entsprechend der in dieser
den Sie unter:
Betriebsanleitung gegebenen Beschrei-
www.kaercher.de/REACH
bungen und den Sicherheitshinweisen zur
(Adresse siehe Rückseite)
Verwendung als Nass-/Trockensauger be-
Kundendienst
stimmt.
Dieses Gerät wurde für den privaten Ge-
Bei Fragen oder Störungen hilft Ihnen un-
brauch entwickelt und ist nicht für die Bean-
sere KÄRCHER-Niederlassung gerne wei-
spruchungen des gewerblichen Einsatzes
ter.
vorgesehen.
(Adresse siehe Rückseite)
– Das Gerät vor Regen schützen. Nicht
Bestellung von Ersatzteilen und
im Außenbereich lagern.
Sonderzubehör
– Asche und Ruß dürfen mit diesem Ge-
rät nicht gesaugt werden.
Eine Auswahl der am häufigsten benötig-
ten Ersatzteile finden Sie am Ende der Be-
Den Nass-/Trockensauger nur benutzen
triebsanleitung.
mit:
Ersatzteile und Zubehör erhalten Sie bei ih-
– Original-Filterbeutel.
rem Händler oder bei ihrer KÄRCHER-Nie-
– Original-Ersatzteilen, -Zubehör oder -
derlassung.
Sonderzubehör.
(Adresse siehe Rückseite)
Der Hersteller haftet nicht für eventuelle
Schäden, die durch nicht bestimmungsge-
Garantie
mäßen Gebrauch oder falsche Bedienung
In jedem Land gelten die von unserer zu-
verursacht werden.
ständigen Vertriebsgesellschaft herausge-
gebenen Garantiebedingungen. Etwaige
Störungen an Ihrem Gerät beseitigen wir
innerhalb der Garantiefrist kostenlos, so-
fern ein Material- oder Herstellungsfehler
die Ursache sein sollte. Im Garantiefall
– 5
7DE

wenden Sie sich bitte mit Kaufbeleg an Ih-
30 mA Nennauslöse-Stromstärke) zu be-
ren Händler oder die nächste autorisierte
nutzen.
Kundendienststelle.
Gefahr
Bestimmte Stoffe können durch die Verwir-
Sicherheitshinweise
belung mit der Saugluft explosive Dämpfe
– Dieses Gerät ist nicht dafür bestimmt,
oder Gemische bilden!
durch Personen mit eingeschränkten
Nachfolgende Stoffe niemals aufsaugen:
physischen, sensorischen oder geisti-
– Explosive oder brennbare Gase, Flüs-
gen Fähigkeiten oder mangels Erfah-
sigkeiten und Stäube (reaktive Stäube)
rung und/oder mangels Wissen benutzt
– Reaktive Metall-Stäube (z.B. Alumini-
zu werden, es sei denn, sie werden
um, Magnesium, Zink) in Verbindung
durch eine für ihre Sicherheit zuständi-
mit stark alkalischen und sauren Reini-
ge Person beaufsichtigt oder erhielten
gungsmitteln
von ihr Anweisungen, wie das Gerät zu
– Unverdünnte starke Säuren und Lau-
benutzen ist.
gen
– Kinder dürfen das Gerät nur dann ver-
– Organische Lösungsmittel (z.B. Benzin,
wenden, wenn sie über 8 Jahre alt sind
Farbverdünner, Aceton, Heizöl).
und wenn sie durch eine für ihre Sicher-
Zusätzlich können diese Stoffe die am Ge-
heit zuständige Person beaufsichtigt
rät verwendeten Materialien angreifen.
sind oder von ihr Anweisungen erhiel-
ten, wie das Gerät zu benutzen ist.
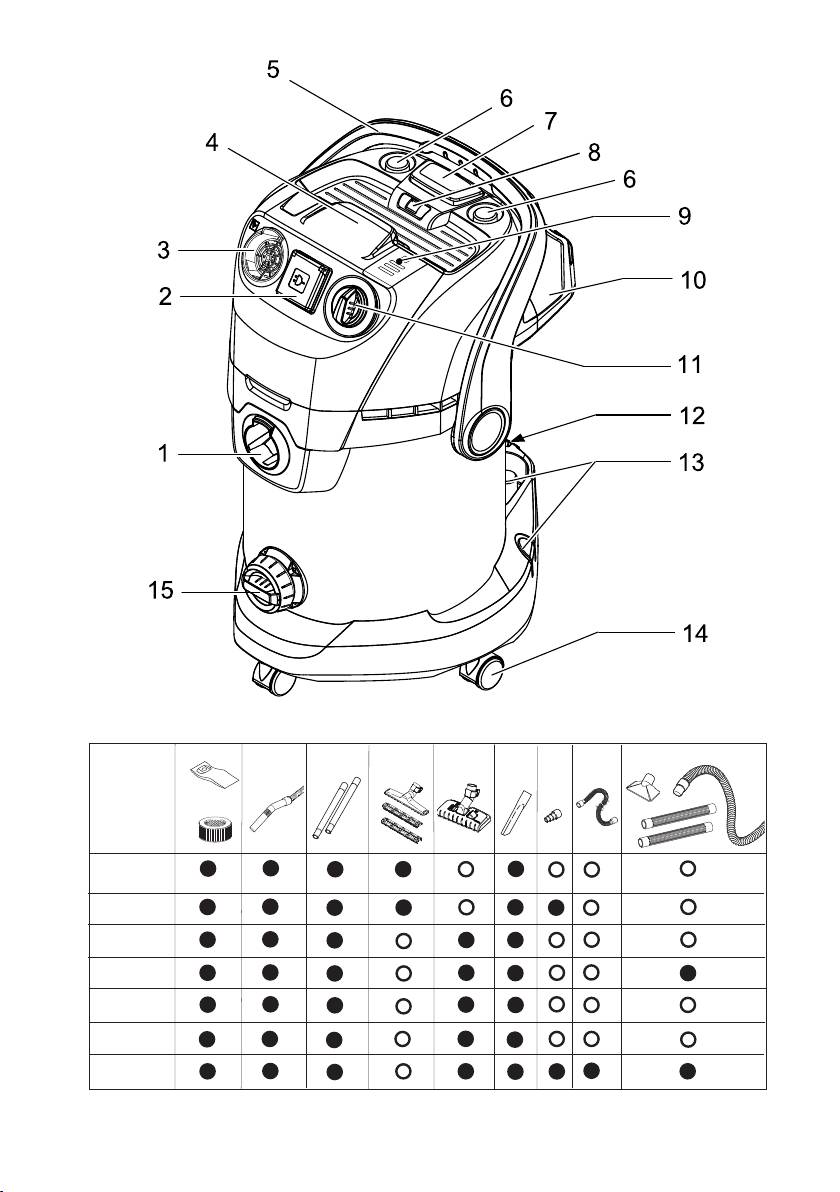
Gerätebeschreibung
– Verpackungsfolien von Kindern fernhal-
Abbildungen siehe Aus-
ten, es besteht Erstickungsgefahr!
klappseiten!
– Gerät nach jedem Gebrauch und vor je-
der Reinigung/Wartung ausschalten.
Diese Betriebsanleitung beschreibt die
– Brandgefahr. Keine brennenden oder
auf dem vorderen Umschlag aufgeführ-
glimmenden Gegenstände aufsaugen.
ten Nass-/Trockensauger.
– Der Betrieb in explosionsgefährdeten
Je nach Modell gibt es Unterschiede in
Bereichen ist untersagt.
Austattung und mitgeliefertem Zube-
몇 Elektrischer Anschluss
hör.
Das Gerät nur an Wechselstrom anschlie-
Prüfen Sie beim Auspacken den Pa-
ßen. Die Spannung muss mit dem Typen-
ckungsinhalt auf fehlendes Zubehör oder
schild des Gerätes übereinstimmen.
Beschädigungen. Benachrichtigen Sie bei
Stromschlaggefahr
Transportschäden bitte Ihren Händler.
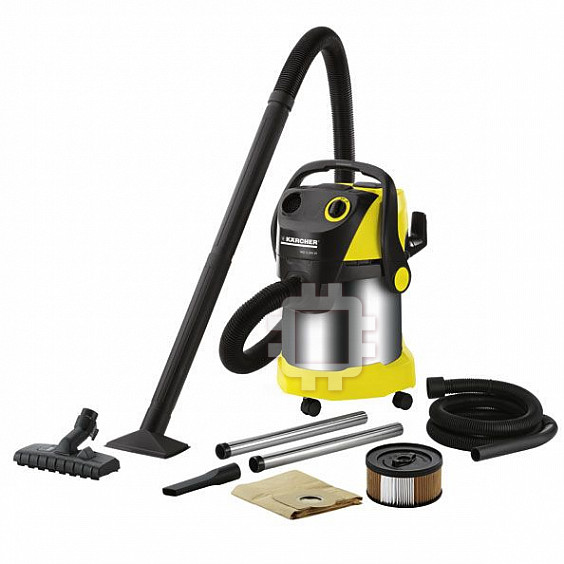
im Lieferumfang enthalten
Netzstecker und Steckdose niemals mit
mögliches Zubehör
feuchten Händen anfassen.
Netzstecker nicht durch Ziehen an der An-
Saugschlauchanschluss
schlussleitung aus der Steckdose ziehen.
Anschlussleitung mit Netzstecker vor je-
Zum Anschließen des Saugschlauches
dem Betrieb auf Schäden prüfen. Beschä-
beim Saugen.
digte Anschlussleitung unverzüglich durch
(siehe Beschreibung / Abbildung )
autorisierten Kundendienst/Elektro-Fach-
kraft austauschen lassen, um Gefährdun-
gen zu vermeiden.
Zur Vermeidung von Elektrounfällen emp-
fehlen wir, Steckdosen mit vorgeschalte-
tem Fehlerstrom-Schutzschalter (max.
8 DE
– 6
Hinweis: Taste nicht bei nassem Patro-
Gerätesteckdose
nenfilter betätigen.
(siehe Beschreibung / Abbildung )
Hinweis: Maximale Anschlussleistung be-
achten (siehe Kapitel „Technische Daten“).
Filterreinigungsanzeige
Zum Anschluss eines Elektrowerkzeu-
ges.
Zeigt die Filterreinigungsanzeige rot,
(siehe Beschreibung / Abbildung )
Taste zur Efficient Filterreinigung betä-
tigen.
Blasanschluss
(siehe Beschreibung / Abbildung )
Saugschlauch in Blasanschluss einste-
Taste Netzkabeleinzug
cken, die Blasfunktion ist damit akti-
viert.
Taste Netzkabeleinzug drücken. Kabel
(siehe Beschreibung / Abbildung )
zieht sich automatisch in das Gerät ein.
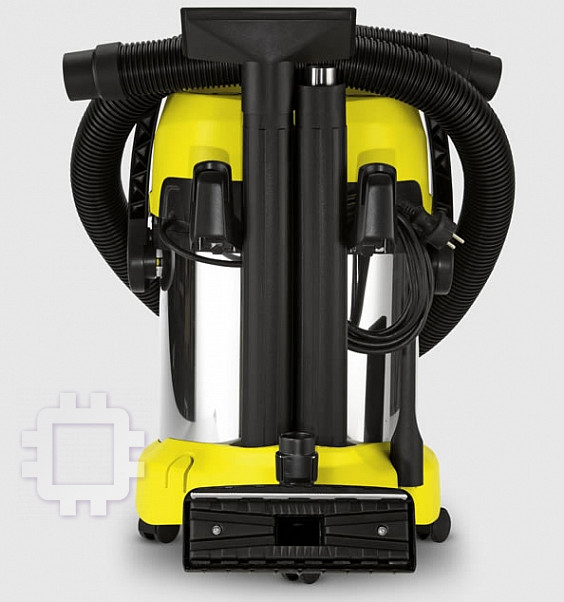
Griffmulde
Zubehöraufnahme Haken
Gerätekopf nach dem Entriegeln an der
Griffmulde fassen und abnehmen.
Diese Zubehöraufnahme ermöglicht die
Aufbewahrung von Saugschlauch,
Tragebügel
Netzanschlussleitung und Saugdüsen.
(siehe Beschreibung / Abbildung )
Der Tragebügel dient gleichzeitig zur
Verriegelung von Gerätekopf und Be-
Drehschalter (EIN/AUS)
hälter. Zum Entriegeln den Bügel ganz
(ohne eingebaute Steckdose)
nach vorne schwenken bis die Verrie-
Stellung I: Saugen oder Blasen.
gelung frei ist.
Stellung 0: Gerät ist ausgeschaltet.
(siehe Beschreibung / Abbildung )
(siehe Beschreibung / Abbildung )
Gerätekopf an der Griffmulde fassen
und abnehmen.
Drehschalter (EIN/AUS)
In Trageposition steht der Bügel nach
(mit eingebauter Steckdose)
oben, beim Arbeiten mit dem Gerät den
Stellung MAX: Saugen oder Blasen.
Bügel nach hinten schwenken bis die
Stellung MAX: Saugen mit ange-
Bedienteile am Gerät zugänglich sind.
schlossenem Elektrowerkzeug
Zubehöraufnahme Gerätekopf
Leistungsregulierung: Bei Bedarf beim
Saugen, Blasen oder beim Arbeiten mit
einem Elektrowerkzeug Saugleistung
Diese Zubehöraufnahme ermöglicht die
reduzieren.
Aufbewahrung von Saugdüsen am Ge-
rätekopf.
Stellung 0: Gerät ausgeschaltet. Elekt-
rowerkzeug ist mit Spannung versorgt.
Hinweis: Diese Zubehöraufnahme wird
zusätzlich zur Anwendung der Efficient
(siehe Beschreibung / Abbildung
Filterreinigung benötigt.
)
(siehe Beschreibung / Abbildung )
Parkposition
Taste Efficient Filterreinigung
Zum Abstellen der Bodendüse bei Ar-
beitsunterbrechungen.
Zum Reinigen des eingebauten Patro-
nenfilters.
(siehe Beschreibung / Abbildung )
– 7
9DE

Zubehöraufnahme Behälter
Saugschlauch mit Handgriff
Diese Zubehöraufnahme ermöglicht die
Saugschlauch in Anschluss eindrü-
Aufbewahrung von Saugrohren oder
cken, er rastet ein.
sonstigem Zubehör.
(siehe Beschreibung / Abbildung )
(siehe Beschreibung / Abbildung )
Hinweis: Zum Entnehmen des Saug-
schlauches Raste mit Daumen drücken
Lenkrolle
und Saugschlauch herausziehen.
Die Lenkrollen sind bei Auslieferung im
Saugrohre 2 x 0,5 m
Behälter untergebracht, vor Inbetrieb-
nahme montieren.
Beide Saugrohre zusammenstecken
(siehe Beschreibung / Abbildung )
und mit Saugschlauch verbinden.
(siehe Beschreibung / Abbildung )
Ablassschraube
Bodendüse
Die Ablassschraube dient der schnellen
(mit Einsätzen)
und komfortablen Entleerung von
Zum Saugen von Hartflächen und Tep-
Schmutzwasser im Behälter. Zur besse-
pichböden den passenden Einsatz ver-
ren Entleerung Behälter nach vorne kip-
wenden.
pen.
Hartflächen, Nasssaugen: Einsatz mit
(siehe Beschreibung / Abbildung )
2 Gummilippen verwenden.
Hartflächen, Trockensaugen: Einsatz
Filterbeutel
mit 2 Borsten verwenden.
Teppichböden, Nass- und Trocken-
Hinweis: Zum Nasssaugen darf kein Filter-
saugen: Ohne Einsatz arbeiten.
beutel eingesetzt werden!
Empfehlung bei Geräten ohne Effici-
Bodendüse
ent Filterreinigung:
(mit Umschalthebel)
Zum Saugen von Feinstaub Filterbeutel
Zum Saugen von Hartflächen und Tep-
einsetzen.
pichböden:
(siehe Beschreibung / Abbildung )
Hebel auf Symbol für Teppichbö-
Patronenfilter
den
(bereits im Gerät eingesetzt)
Hebel auf Symbol für Hartflächen
Der Patronenfilter muss immer, sowohl
Fugendüse
beim Nasssaugen wie auch beim Tro-
ckensaugen eingesetzt sein.
Für Kanten, Fugen, Heizkörper und
Hinweis: Nassen Patronenfilter vor der
schwer zugängige Bereiche.
Weiterverwendung beim Trockensau-
gen trocknen lassen.
Adapter
(siehe Beschreibung / Abbildung )
Zum Verbinden des Saugschlauches
mit einem Elektrowerkzeug.
(siehe Beschreibung / Abbildung )
Adapter bei Bedarf mit einem Messer
an den Anschlussdurchmesser des
Elektrowerkzeuges anpassen.
10 DE
– 8

Der Füllgrad des Filterbeutels ist ab-
24
Flexibler Werkzeugschlauch
hängig vom aufgesaugten Schmutz.
Zugesetzte Filterbeutel können platzen,
Für mehr Flexibilität beim Arbeiten mit
deshalb den Filterbeutel rechtzeitig
Elektrowerkzeugen.
wechseln!
Hinweis: Kann auch mit Adapter ver-
Bei Feinstaub, Sand usw... sollte der
wendet werden.
Filterbeutel häufiger ausgetauscht wer-
(siehe Beschreibung / Abbildung )
den.
Bei Geräten mit Efficient Filterreinigung:
Grobschmutzset
25
Beim Saugen ohne Filterbeutel zeigt die
Filterreinigungsanzeige rot wenn der Patro-
Umfangreiches Saugset für Grob-
nenfilter gereinigt werden soll.
schmutz aller Art.
Efficient Filterreinigung anwenden.
Bedienung
(siehe Beschreibung / Abbildung )
몇 Immer mit eingesetztem Patronenfil-
Nasssaugen
ter arbeiten, sowohl beim Nass- als
Zum Aufsaugen von Feuchtigkeit bzw.
auch beim Trockensaugen!
Nässe gewünschtes Zubehör auf Saug-
rohre bzw. direkt auf den Handgriff auf-
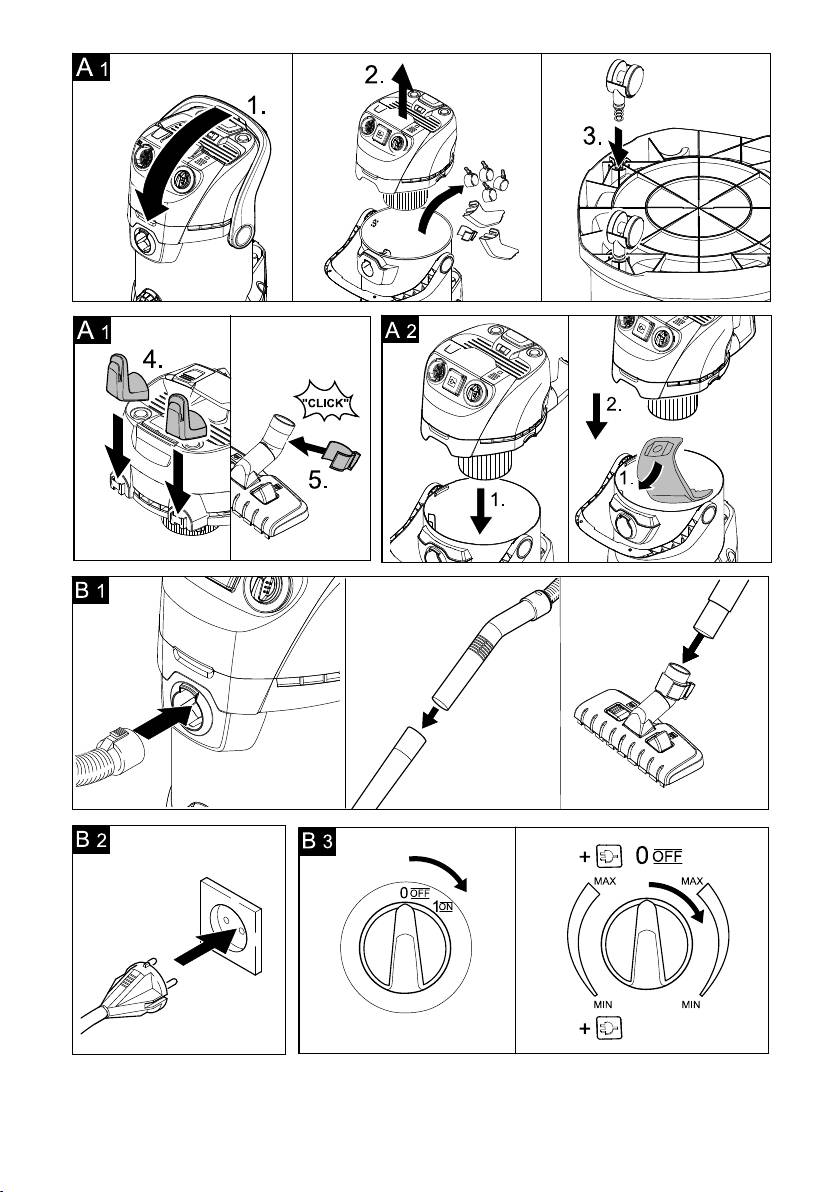
Vor Inbetriebnahme
stecken.
Abbildung
몇 Achtung
Dem Gerät lose beigelegte Teile vor In-
Keinen Filterbeutel verwenden!
betriebnahme montieren.
Bei Schaumbildung oder Flüssigkeitsaus-
Abbildung
tritt das Gerät sofort ausschalten!
Empfehlung bei Geräten ohne Effici-
Hinweis: Ist der Behälter voll, schließt ein
ent Filterreinigung: Zum Saugen von
Schwimmer die Saugöffnung und das Ge-
Feinstaub den Filterbeutel einsetzen.
rät läuft mit erhöhter Drehzahl. Gerät sofort
ausschalten und Behälter entleeren.
Inbetriebnahme
Arbeiten mit Elektrowerkzeugen
Abbildung
Zubehör anschließen.
Adapter bei Bedarf mit einem Messer
Abbildung
an den Anschlussdurchmesser des
Elektrowerkzeuges anpassen.
Netzstecker einstecken.
Abbildung
Abbildung
A) Beiliegenden Adapter auf den Hand-
Gerät einschalten.
griff des Saugschlauchs stecken und
Trockensaugen
mit dem Anschluss des Elektrowerk-
zeugs verbinden.
몇 Nur mit trockenem Patronenfilter ar-
oder
beiten!
B) Für mehr Flexibilität beim Arbeiten
Achtung: Saugen von Asche und Ruß
den flexiblen Werkzeugschlauch ver-
nur mit Vorabscheider (Bestell-Nr.
wenden. Diesen mit Saugschlauch und
2.863-139).
ggfs. mit Adapter verbinden und am An-
Empfehlung bei Geräten ohne Efficient
schluss des Elektrowerkzeugs an-
Filterreinigung: Zum Saugen von Fein-
schließen.
staub den Filterbeutel einsetzen.
(siehe Beschreibung / Abbildung )
– 9
11DE

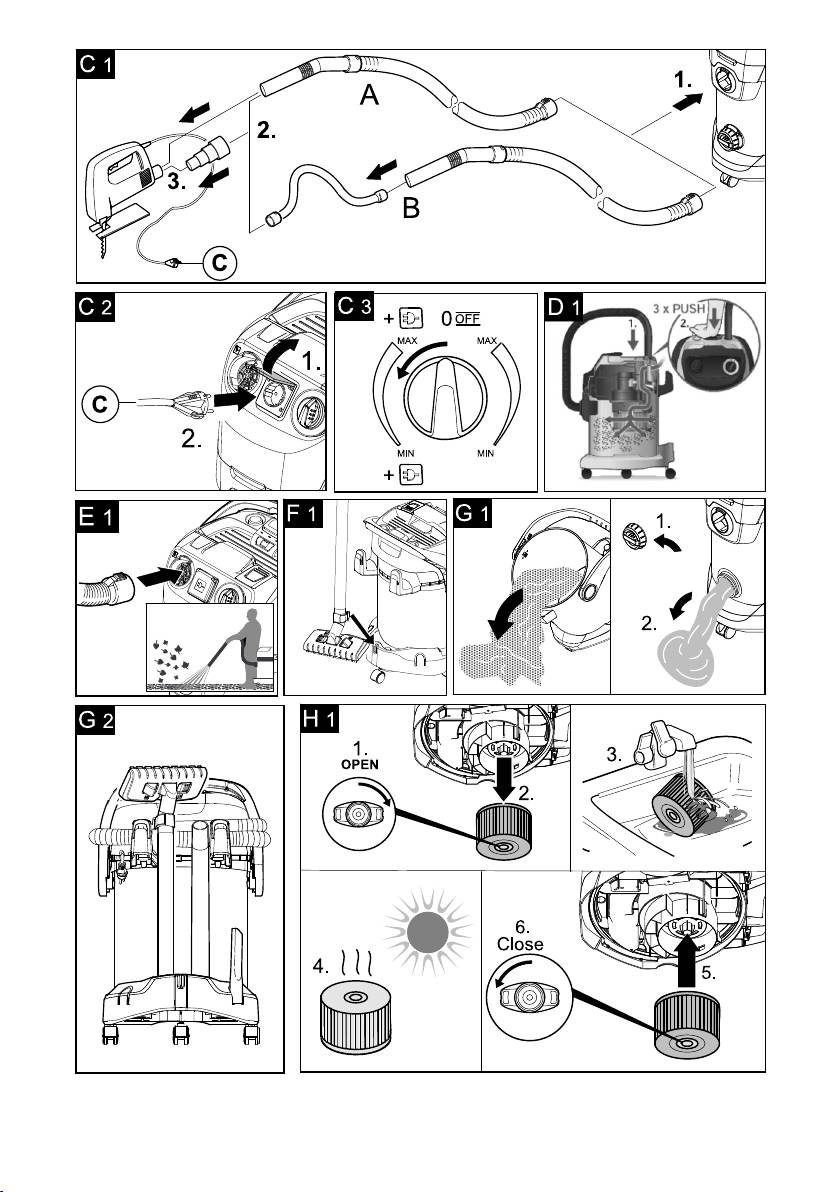
Abbildung
Betrieb beenden
Bei Geräten mit eingebauter Steck-
Gerät ausschalten und Netzstecker zie-
dose: Netzstecker des Elektrowerk-
hen.
zeugs am Sauger einstecken.
Abbildung
Behälter entleeren
Gerät einschalten (Drehschalter nach
Abbildung
links auf Stellung MAX) und mit
Gerätekopf abnehmen, mit Nass- oder
der Arbeit beginnen.
Trockenschmutz gefüllten Behälter ent-
Hinweis: Sobald das Elektrowerkzeug
leeren.
eingeschaltet wird, läuft die Saugturbi-
Bei Geräten mit Ablasschraube: Tro-
ne 0,5 Sekunden verzögert an. Wird
ckenschmutz über Behälter entleeren.
das Elektrowerkzeug ausgeschaltet,
Zum Entleeren von Flüssigkeiten Ab-
läuft die Saugturbine noch ca. 5 Sekun-
lassschraube verwenden.
den nach, um den Restschmutz im
Gerät aufbewahren
Saugschlauch einzusaugen.
Abbildung
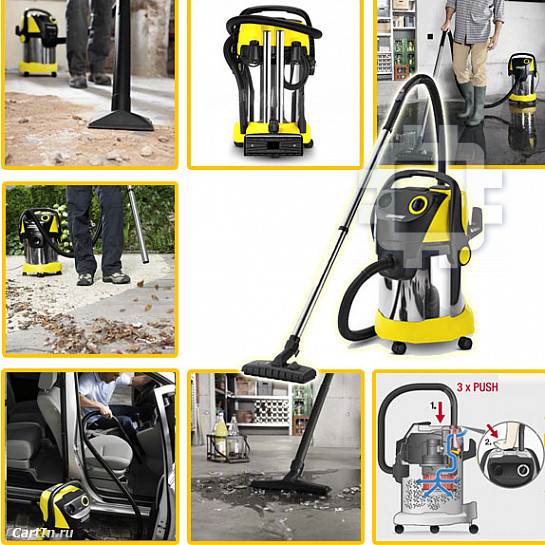
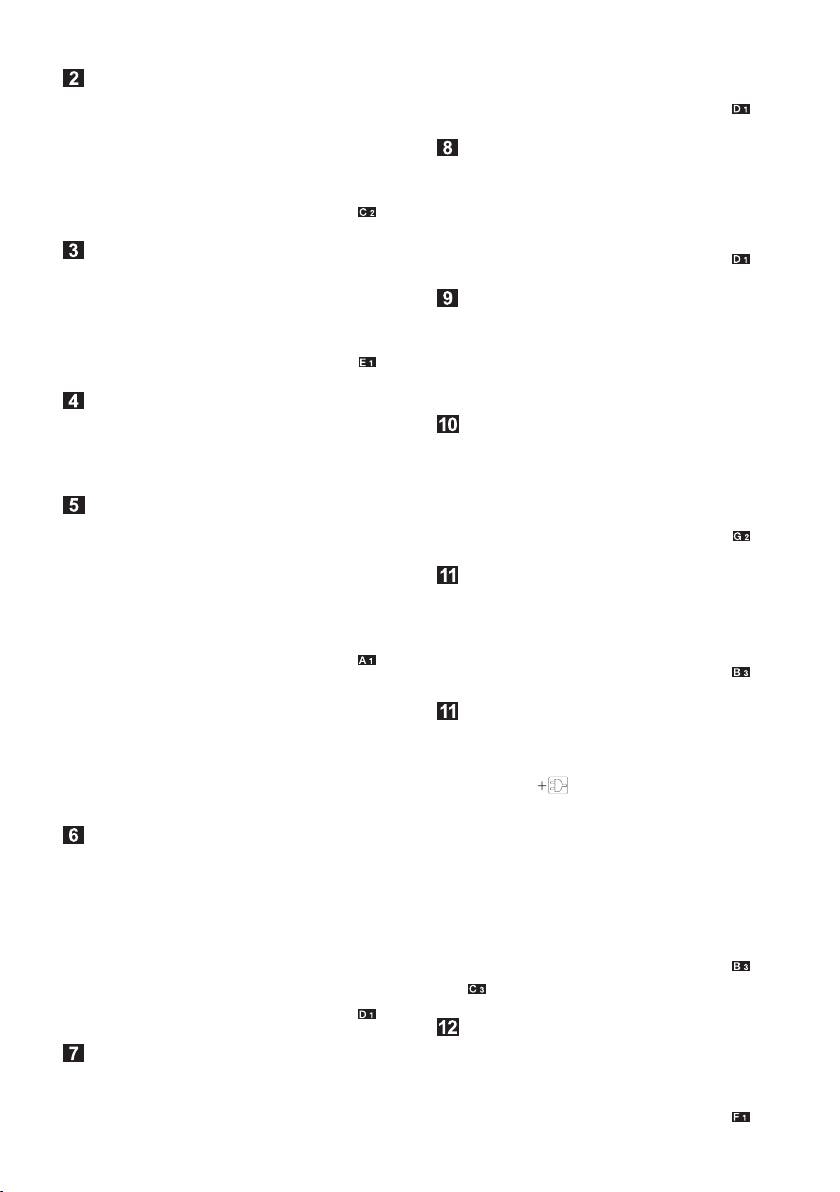
Efficient Filterreinigung
Netzanschlussleitung und Zubehör am
Gerät verstauen. Gerät in trockenen
Bei roter Filterreinigungsanzeige, Filterrei-
Räumen aufbewahren.
nigung anwenden.
Abbildung
Pflege und Wartung
Saugschlauch mit Handgriff in Zubehör-
aufnahme am Gerätekopf stecken. Ef-
Gefahr
ficient Filterreinigungstaste bei
Vor allen Pflege– und Wartungsarbeiten
eingeschaltetem Gerät 3 x drücken, da-
das Gerät ausschalten und den Netzste-
bei 4 Sekunden zwischen den einzel-
cker ziehen.
nen Betätigungen warten.
Reparaturarbeiten und Arbeiten an elektri-
Hinweis: Bei permanent roter Filterrei-
schen Bauteilen dürfen nur vom autorisier-
nigungsanzeige oder nach mehrmali-
ten Kundendienst durchgeführt werden.
gem Betätigen der Filterreinigungstaste
몇 Achtung
den Behälter auf sein Füllvolumen
Keine Scheuermittel, Glas- oder Allzweck-
überprüfen. Ansonsten kann Schmutz
reiniger verwenden! Gerät niemals in Was-
beim Öffnen des Behälters entweichen.
ser tauchen.
Gerät und Zubehörteile aus Kunststoff
Blasfunktion
mit einem handelsüblichen Kunst-
Reinigung von schwer erreichbaren Stellen
stoffreiniger pflegen.
oder wo das Saugen nicht möglich ist, z.B
Behälter und Zubehör bei Bedarf mit
Laub aus dem Kiesbeet.
Wasser ausspülen und vor der Weiter-
Abbildung
verwendung trocknen.
Saugschlauch in Blasanschluss einste-
Abbildung
cken, die Blasfunktion ist damit akti-
Patronenfilter bei Bedarf nur unter flie-
viert.
ßendem Wasser reinigen, nicht abrei-
Betrieb unterbrechen
ben oder abbürsten. Vor dem Einbau
vollständig trocknen lassen.
Gerät ausschalten.
Abbildung
Bodendüse in die Parkposition einhän-
gen.
12 DE
– 10
Hilfe bei Störungen
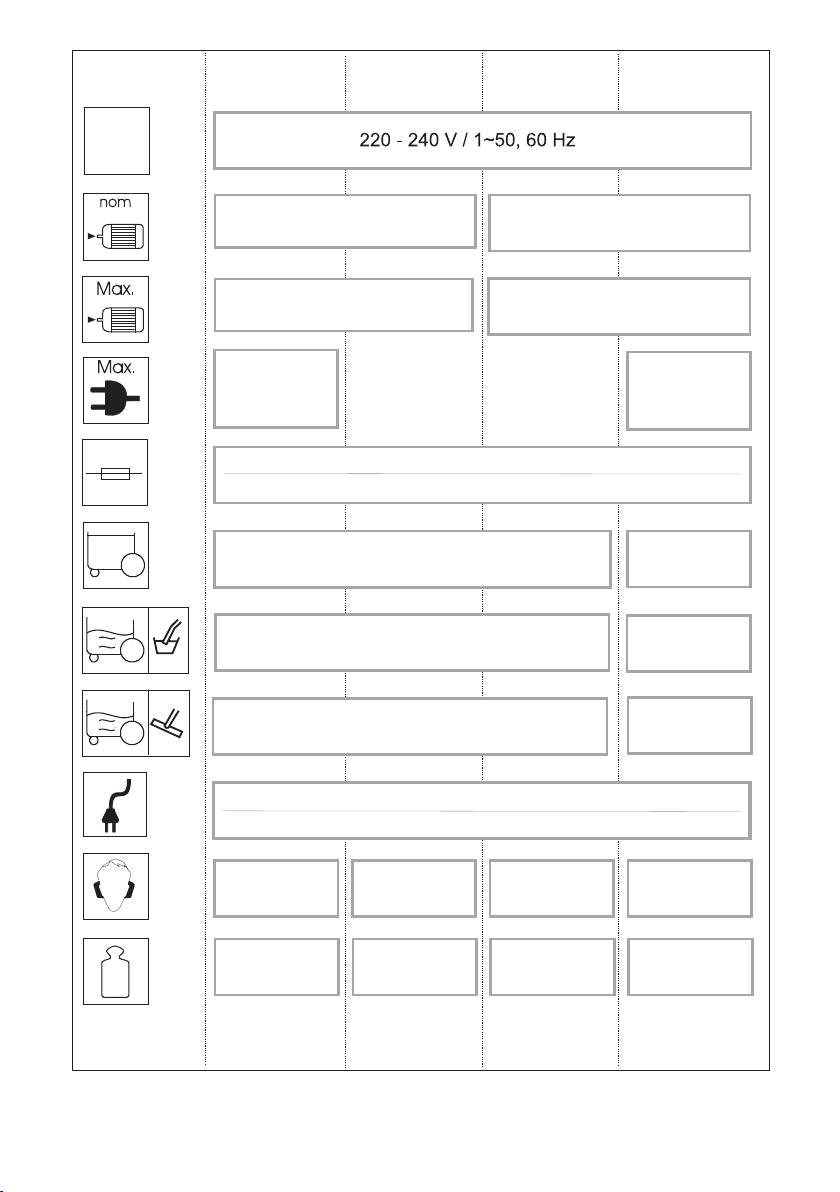
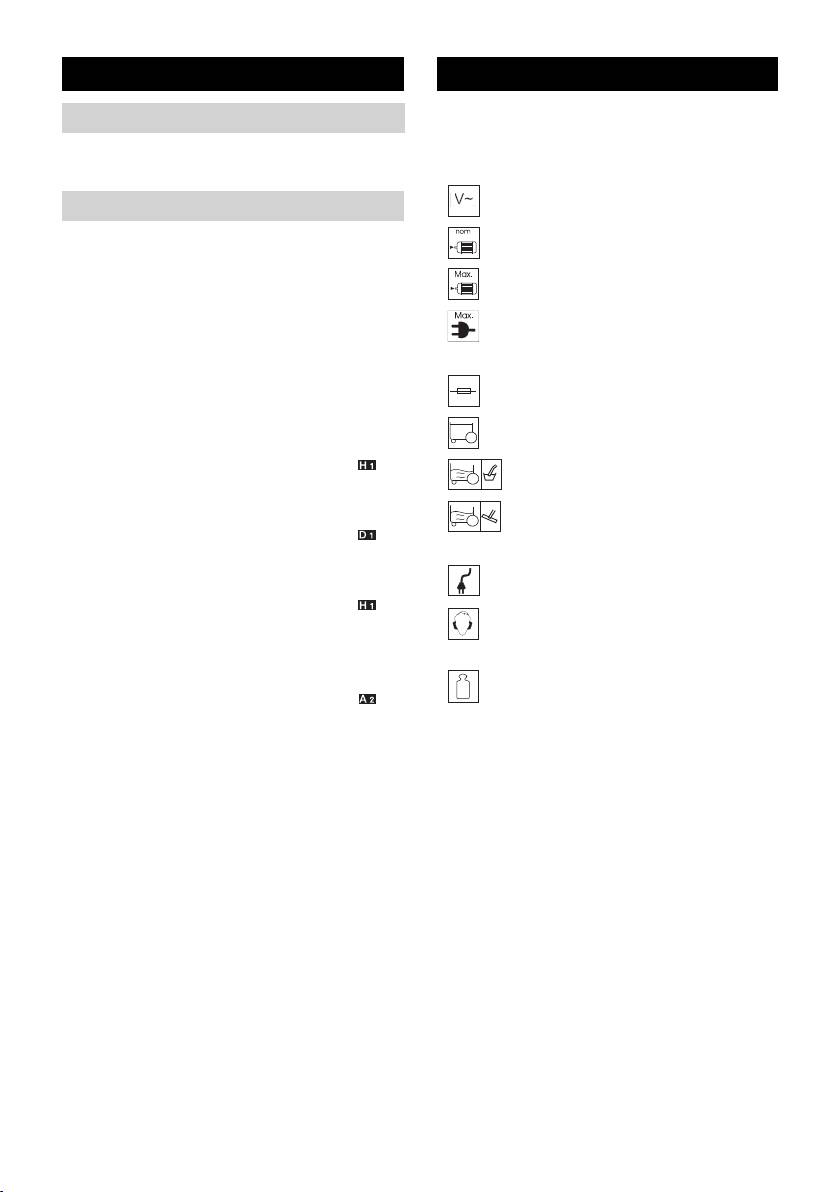
Technische Daten
Die Technischen Daten befinden sich auf
Netzkabeleinzug funktioniert nicht
den Aufklappseiten. Nachfolgend die Erklä-
Netzkabel ist vermutlich verschmutzt,
rung der dort verwendeten Symbole.
Netzkabel reinigen.
Spannung
Nachlassende Saugleistung
Lässt die Saugleistung des Gerätes nach,
Leistung P
nenn
bitte folgende Punkte prüfen.
Zubehör, Saugschlauch oder Saugroh-
Leistung P
max
re sind verstopft, Verstopfung mit einem
Max. Anschlussleistung der Ge-
Stock entfernen.
rätesteckdose
Patronenfilter ist verschmutzt:
Bei Geräten ohne Efficient Filterrei-
Netzabsicherung (träge)
nigung: Patronenfilter abklopfen, bei
Bedarf unter fließendem Wasser reini-
Behältervolumen
gen.
(siehe Beschreibung / Abbildung )
Wasseraufnahme mit Handgriff
Bei Geräten mit Efficient Filterreini-
gung: Filterreinigung anwenden.
Wasseraufnahme mit Bodendü-
(siehe Beschreibung / Abbildung )
se
Bei Bedarf Patronenfilter unter fließen-
Netzkabel
dem Wasser reinigen.
(siehe Beschreibung / Abbildung )
Schalldruckpegel
Beschädigten Patronenfilter wechseln.
(EN 60704-2-1)
Filterbeutel ist voll, neuen Filterbeutel
einsetzen.
Gewicht (ohne Zubehör)
(siehe Beschreibung / Abbildung )
Technische Änderungen vorbehalten!
– 11
13DE

appliances. Please dispose your old appli-
Contents
ances using appropriate collection sys-
tems.
General notes. . . . . . . . . . . EN . . .5
Disposing the filters and filter bags
Safety instructions . . . . . . . EN . . .6
Filters and filter bags are made from envi-
Description of the Appliance EN . . .6
ronment-friendly materials.
Operation . . . . . . . . . . . . . . EN . . .9
They can therefore be disposed off through
Maintenance and care . . . . EN . .10
the normal household garbage provided
Troubleshooting . . . . . . . . . EN . . 11
you have not sucked in substances that are
Technical specifications . . . EN . .11
not permitted to be thrown into household
garbage.
Notes about the ingredients (REACH)
General notes
You will find current information about the
Dear Customer,
ingredients at:
Please read and comply with
www.kaercher.com/REACH
these original instructions prior
(See address on the reverse)
to the initial operation of your appliance and
Customer Service
store them for later use or subsequent own-
ers.
Our KÄRCHER branch will be pleased to
help you further in the case of questions or
Proper use
faults.
The appliance is intended for use as a Mul-
(See address on the reverse)
ti-Purpose Vac corresponding to the de-
Ordering spare parts and special at-
scriptions given in these operating
tachments
instructions and the safety notes.
This appliance has been designed for use
At the end of the operating instructions you
in private households and is not intended
will find a selected list of spare parts that
for commercial use.
are often required.
– Protect the unit from rain. Do not store
You can procure the spare parts and the at-
outside.
tachments from your dealer or your
– This device may not be used to suck in
KÄRCHER branch office.
ash and soot.
(See address on the reverse)
Use the Multi-Purpose Vac only with:
Warranty
– Original filter bag.
– Original spare parts, accessories and
The terms of the guarantee applicable in
special accessories.
each country have been published by our
respective national distributors. We will re-
The manufacturer is not responsible for any
pair possible faults on your unit free of
damages that may occur on account of im-
charge within the warranty period, insofar
proper use or wrong operations.
as the faults are caused by material defects
Environmental protection
or defective workmanship. Guarantee
claims should be addressed to your dealer
The packaging material can be recy-
or the nearest authorized customer service
cled. Please do not place the packag-
centre, and supported by documentary evi-
ing into the ordinary refuse for disposal, but
dence of purchase.
arrange for the proper recycling.
Old appliances contain valuable ma-
terials that can be recycled. Please
arrange for the proper recycling of old
14 EN
– 5

Never vacuum up the following materials:
Safety instructions
– Explosive or combustible gases, liquids
– This appliance is not intended for use
and dust particles (reactive dust parti-
by persons with limited physical, sen-
cles)
soric or mental capacities or lack of ex-
– Reactive metal dust particles (such as
perience and/or skills, unless such
aluminium, magnesium, zinc) in combi-
persons are accompanied and super-
nation with highly alkaline or acidic de-
vised by a person in charge of their
tergents
safety or if they received precise in-
– Undiluted, strong acids and alkalies
structions on the use of this appliance.
– Organic solvents (such as petrol, paint
– Children must only use this appliance if
thinners, acetone, heating oil).
they are older than 8 and if they are su-
In addition, these substances may cause
pervised by a person responsible for
the appliance materials to corrode.
their safety or if they are instructed on
Description of the Appliance
the use of the appliance by such per-
son.
Illustrations on fold-out
– Keep packaging film away from children
pages!
- risk of suffocation!
– Switch the appliance off after every use
These operating instructions describe
and prior to every cleaning/mainte-
the basic models of the Multi-Purpose
nance procedure.
Vacs shown on the front cover.
– Risk of fire. Do not vacuum up any burn-
Depending on the model, there are dif-
ing or glowing objects.
ferences in equipment and supplied ac-
– The appliance may not be used in areas
cessories.
where a risk of explosion is present.
When unpacking the product, make sure
몇 Electrical connection
that no accessories are missing and that
none of the package contents have been
The appliance may only be connected to al-
damaged. If you detect any transport dam-
ternating current. The voltage must corre-
ages please contact your dealer.
spond with the type plate on the appliance.
included in the scope of delivery
Risk of electric shock
possible accessories
Never touch the mains plug and the socket
with wet hands.
Suction hose connection
Do not pull the plug from the socket by pull-
ing on the connecting cable.
To connect the suction hose during vac-
Check the power cord with mains plug for
uuming.
damage before every use. If the power cord
(see description / illustration )
is damaged, please arrange immediately
Machine socket
for the exchange by an authorized custom-
er service or a skilled electrician.
To avoid accidents due to electrical faults
Note: Observe the maximum connected
we recommend the use of sockets with a
power (see Chapter "Specifications").
line-side current-limiting circuit breaker
To connect an electric tool.
(max. 30 mA nominal tripping current).
(see description / illustration )
Danger
Certain materials may produce explosive
vapours or mixtures when agitated by the
suction air!
– 6
15EN
Blowing connection
Filter cleaning display
Connect the suction hose to the blower
If the filter cleaning indicator is red, ac-
connection, this will activate the blower
tivate the switch for efficient filter clean-
function.
ing.
(see description / illustration )
(see description / illustration )
Recessed grip
Key for mains cable retraction
After unlocking it, grab the appliance
Press the key for the mains cable re-
head by the handle recess and remove
traction. The cable will pull itself auto-
it.
matically into the appliance.
Carry handle
Accessory compartment, hook
The carrying handle is also used to lock
This accessory compartment allows the
the appliance head and the container.
storage of the suction hose, the mains
To unlock, push the bow all the way for-
cable and the suction nozzles.
ward until you clear the lock.
(see description / illustration )
(see description / illustration )
Rotary switch (ON/OFF)
Grab the appliance head by the handle
(without built-in socket)
recess and remove it.
Position I: Suction or blowing
In the carrying position, the bow is
pointing up, during work with the appli-
Position 0: Appliance is switched off
ance, swivel the bow toward the back
(see description / illustration )
until the operating controls on the appli-
Rotary switch (ON/OFF)
ance are accessible.
(with built-in socket)
Accessory compartment, appli-
Position MAX: Suction or blowing.
ance head
Position MAX: Vacuuming with
This accessory compartment allows the
connected electric tool
storage of suction nozzles on the appli-
Performance regulation: Reduce the
ance.
suction if necessary during vacuuming,
Note: This accessory compartment is
blowing or when working with an elec-
required to use the efficient filter clean-
tric tool.
ing function.
Position 0: The appliance is switched
(see description / illustration )
off. Electric tool is supplied with voltage.
(see description / illustration )
Switch for Efficient Filter Cleaning
Parking position
To clean the built-in cartridge filter.
Note: Do not activate the switch with a
To rest the floor nozzle during work in-
wet cartridge filter.
terruptions.
(see description / illustration )
(see description / illustration )
16 EN
– 7

Accessory storage container
Suction tubes 2 x 0.5 m
This accessory compartment allows the
Connect both suction pipes and con-
storage of the suction pipes or other ac-
nect them to the suction hose.
cessories.
(see description / illustration )
(see description / illustration )
Floor nozzle
Steering roller
(with inserts)
Use the appropriate insert for vacuum-
The steering rollers are located in the
ing on hard surfaces and carpets.
compartment when the appliance is de-
Hard surfaces, wet vacuuming: Use
livered. These must be attached prior to
the insert with 2 rubber lips.
starting up the appliance.
Hard surfaces, dry vacuuming: Use
(see description / illustration )
the insert with 2 bristles.
Carpets, wet and dry vacuuming:
Drain screw
Work without an insert.
The drain screw is used to quickly and
Floor nozzle
comfortably empty wastewater in the
(with switching lever)
container. Tilt the container forward for
For vacuuming dust from hard surfaces
easier emptying.
and carpets:
(see description / illustration )
Lever on symbol for carpets
Filter bag
Lever on symbol for hard surfaces
Crevice nozzle
Note: Do not use a filter bag for wet vacu-
uming!
For edges, joints, heaters and hard to
Recommendations for appliances
reach locations.
without efficient filter cleaning:
To vacuum fine dust, use the filter bag.
Adapter
(see description / illustration )
To connect the suction hose with an
Cartridge filter
electric tool.
(already installed in the appliance)
(see description / illustration )
The cartridge filter must always be in-
Adapt the adapter to the connection di-
stalled - with wet and dry vacuuming.
ameter of the electric tool using a knife
Note: Let the wet cartridge filter dry pri-
if necessary.
or to using it for dry vacuuming.
24
Flexible tool hose
(see description / illustration )
Suction hose with handle
For more flexibility when working with
electric tools.
Slide the suction hose into the connec-
Note: Can also be used with an adapter.
tion, it will lock into place.
(see description / illustration )
(see description / illustration )
Coarse dirt set
25
Note: In order to disconnect it, push
down with your thumb and pull the suc-
Extensive vacuum set for coarse dirt of
tion hose out.
all kinds.
– 8
17EN
Operation
Wet vacuum cleaning
Attach the accessories to vacuum mois-
몇 Always work with an inserted car-
ture or wetness to the suction pipes or
tridge filter - during wet as well as
directly to the handle.
dry vacuum cleaning!
몇 Caution:
Before Startup
Do not use a filter bag!
Immediately switch the appliance off if foam
Illustration
forms or liquids escape!
Mount loose parts delivered with appli-
Note: If the container is full a float closes
ance prior to start-up.
the suction opening and the appliance
Illustration
works at a higher speed. Switch off the ap-
Recommendations for appliances
pliance immediately and empty the contain-
without efficient filter cleaning: To
er.
vacuum fine dust, use the filter bag.
Working with electrical power tools
Start up
Adapt the adapter to the connection di-
Illustration
ameter of the electric tool using a knife
Connect accessories.
if necessary.
Illustration
Illustration
Plug in the main plug.
A) Plug the enclosed adapter onto the
Illustration
handle of the suction hose and connect
Turn on the machine.
the electric tool with the connection.
or
Dry vacuum cleaning
B) Use the flexible tool hose to gain
몇 Work only with a dry cartridge filter!
more flexibility in your work. Connect
Caution: Always use a pre-separator
this hose to the suction hose and to the
while vacuuming ashes and soot (order
adapter and then to the connection of
no. 2.863-139).
the electric tool.
Recommendations for appliances with-
Illustration
out efficient filter cleaning: To vacuum
For appliances with built-in socket:
fine dust, use the filter bag.
Connect the mains plug of the electric
(see description / illustration )
power tool to the vacuum cleaner.
The filling level of the filter bag depends
Illustration
on the dirt that is sucked in.
Switch the appliance on (move the rota-
Clogged filter bags can burst - therefore
ry switch to the left to position
make sure to replace the filter bag in a
MAX) and start working.
timely manner!
Note: The suction turbine starts with a
The filter bag needs to be replaced
delay of 0.5 seconds after the electric
more frequently while sucking in fine
tool has been switched on. After the
dust, sand, etc.
electric tool has been switched off, the
For appliances with efficient filter clean-
suction turbine will continue to run for
ing: When vacuuming without a filter bag,
approx. 5 seconds to suck in the re-
the filter cleaning indicator lights up red if
maining dirt from the suction hose.
the cartridge filter needs to be cleaned.
Use efficient filter cleaning.
(see description / illustration )
18 EN
– 9

Efficient filter cleaning
Storing the appliance
Illustration
If the filter cleaning indicator is red, initiate
Stow away the mains cable and acces-
the filter cleaning.
sory at the machine. Store the appli-
Illustration
ance in a dry room.
Insert the suction hose with the handle
into the accessory compartment on the
Maintenance and care
appliance head. Press the efficient filter
Danger
cleaning key 3 x times with the appli-
ance switched on; wait 4 seconds be-
Turn off the appliance and remove the
tween the individual presses.
mains plug prior to any care and mainte-
nance work.
Note: If the filter cleaning display is illu-
Repair works may only be performed by the
minated permanently or after the filter
authorized customer service.
cleaning switch has been activated sev-
eral times, check the reservoir for its fill
몇 Caution
volume. Otherwise, the dirt might es-
Do not use abrasives, glass or universal
cape when the container is opened.
cleaners! Never immerse the appliance in
water.
Blowing function
Clean the appliance and accessory
Cleaning hard to reach locations or, where
parts made of plastic with a commercial
vacuuming is not possible, like leaves from
plastic cleaner.
a gravel bed.
If required, rinse the container and ac-
Illustration
cessories with water properly and dry
Connect the suction hose to the blower
them before reuse.
connection, this will activate the blower
Illustration
function.
Only clean the cartridge filter under run-
ning water; do not wipe or brush. Let it
Interrupting operation
dry completely prior to installation.
Turn off the appliance.
Illustration
Hook the floor nozzle into the parking
position.
Finish operation
Turn off the appliance and disconnect
the mains plug.
Empty the container
Illustration
Remove the appliance head and empty
the reservoir filled with wet or dry dirt.
For appliances with drain screw:
Empty the dry dirt over the container.
Use the drain screw to empty liquids.
– 10
19EN
Troubleshooting
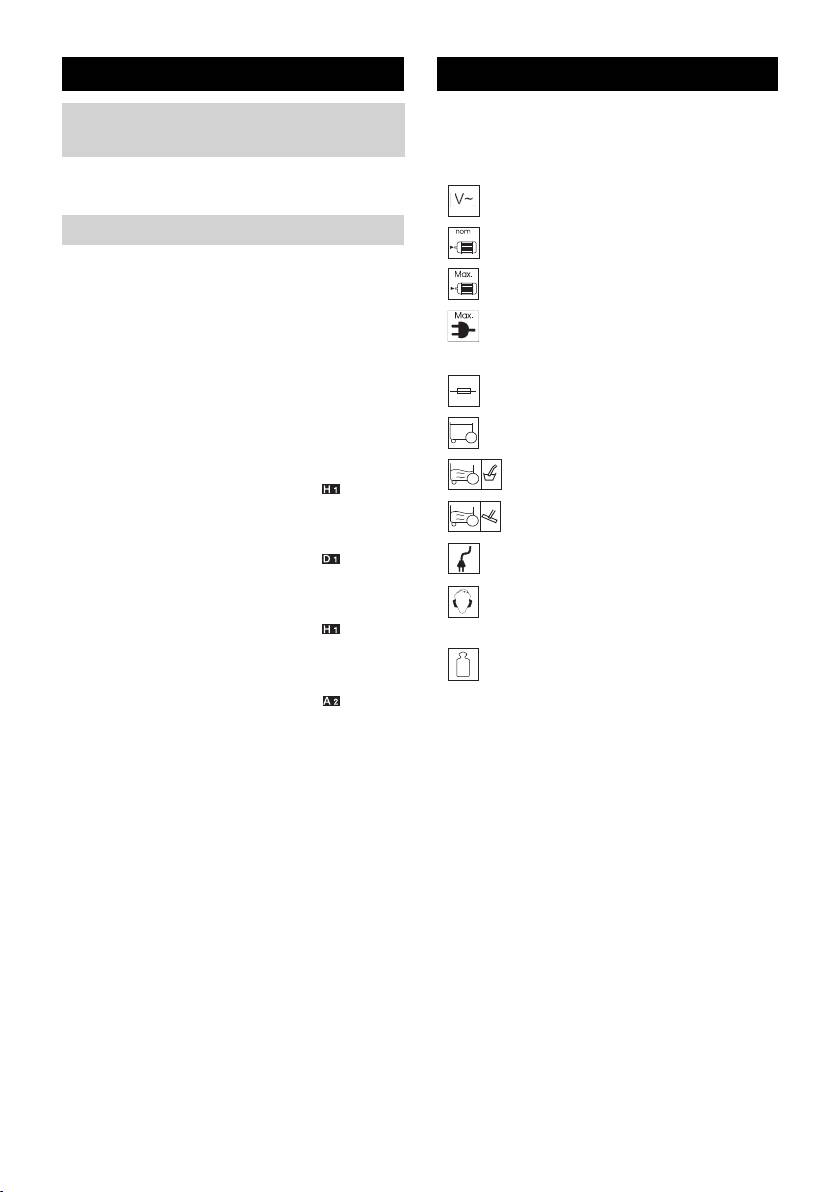
Technical specifications
The specifications are listed on the flaps. In
Mains cable retraction does not
the following, you will find the explanation
function
of the symbols used.
The mains cable is probably dirty, clean
the mains cable.
Voltage
Decreasing cleaning power
Output P
nom
If the cleaning power of the appliance dete-
Output P
riorates please check the following:
max
Accessories, suction hose or suction
Max. connection output of appli-
tubes are clogged, please remove the
ance socket
obstruction using a stick.
Cartridge filter is dirty:
Mains fuse (slow-blow)
For appliances without efficient filter
cleaning: Knock the dirt off the car-
Container capacity
tridge filter, clean it under running water
if necessary.
Water intake with handle
(see description / illustration )
For appliances with efficient filter
Water intake with floor nozzle
cleaning: Use the filter cleaning.
Power cord
(see description / illustration )
Clean the cartridge filter under running
Sound pressure level (EN
water if necessary.
60704-2-1)
(see description / illustration )
Replace damaged cartridge filter.
Weight (without accessories)
Filter bag is full, install new filter bag.
(see description / illustration )
Subject to technical modifications!
20 EN
– 11


