Karcher Balayeuse KM 90-60 R Bp Pack Adv: Before Startup
Before Startup: Karcher Balayeuse KM 90-60 R Bp Pack Adv
-
4
Danger
Danger of crushing while closing the ma-
chine cover. Hence, lower the machine
cover slowly.
Prior to commissioning, maintenance or
adjustment tasks, the appliance cover must
be opened.
Grab the front of the appliance cover
and fold it back together with the seat.
A retaining band keeps the appliance
cover in the rear position.
Danger
Risk of injury, risk of damage!
Observe the weight of the appliance when
you load it!
Do not use a forklift truck to unload the ma-
chine as this may damage it.
Note
Press the emergency-stop button to imme-
diately deactivate all functions and turn the
key switch to the "0" position.
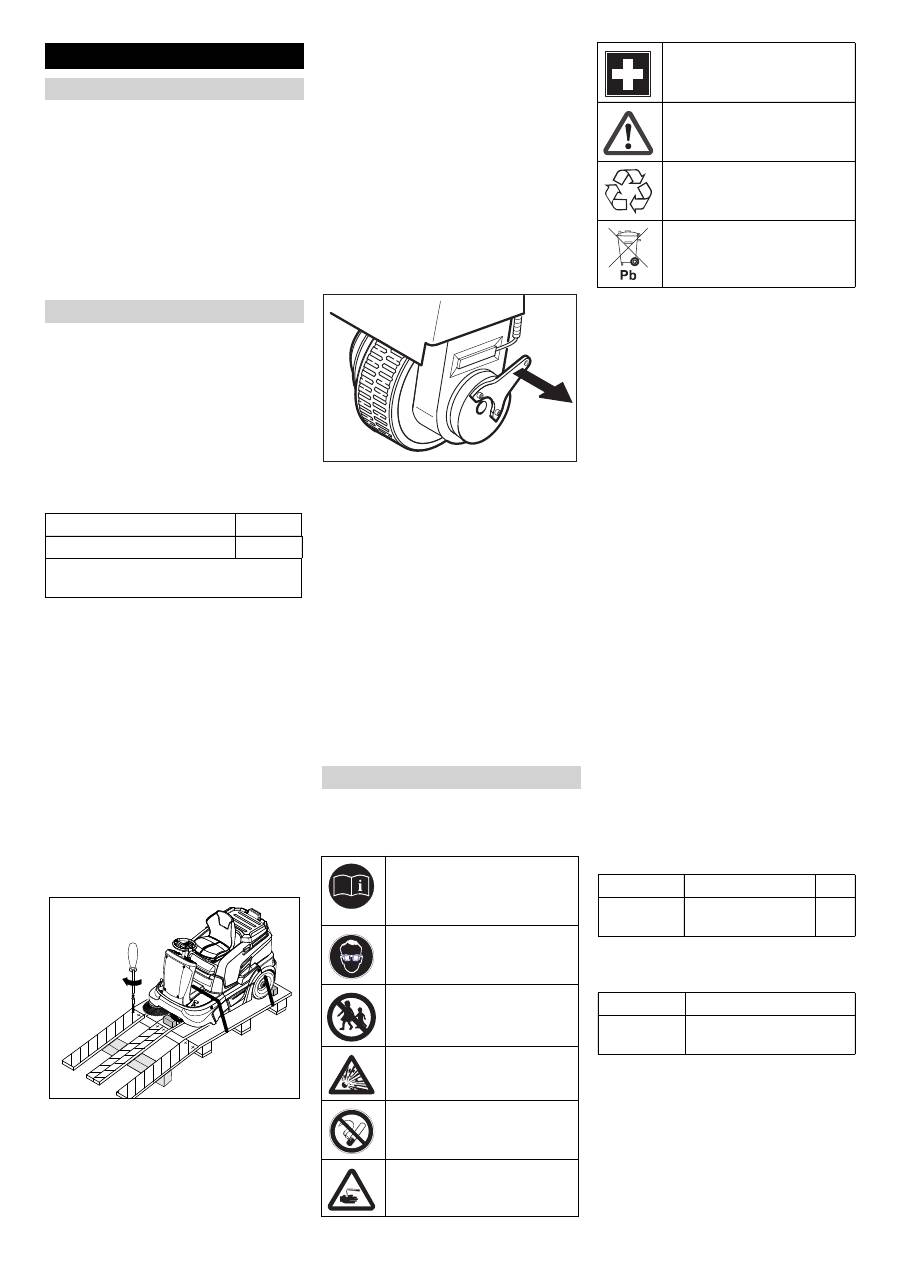
Use a suitable ramp or a crane to load
the appliance!
If the machine is delivered on a pallet,
you must create an unloading ramp us-
ing the boards provided.
To unload the machine, proceed as follows:
Cut plastic packing belt and remove foil.
Remove the elastic tape fasteners at
the stop points.
Four indicated floor boards of the pallet
are fastened with screws. Unscrew
these boards.
Place the boards on the edge of the pal-
let. Place the boards in such a way that
they lie in front of the four wheels of the
machine. Fasten the boards with
screws.
Slide the four support beams included
in the packaging under the ramp.
Remove the wooden blocks used for ar-
resting the wheels and slide them under
the ramp.
Danger
–
Risk of injury! Before releasing the im-
mobilizing brake, the machine must be
secured to prevent it rolling away. After
releasing the emergency brake, the ap-
pliance will roll until a speed of 4.5 km/
h is reached. After that, the electronics
will brake the appliance.
–
It is prohibited to release the emergen-
cy brake on an incline without using the
stopper.
Release parking brake.
Remove the brake level from the wheel
and put it in its position.
The immobilizing brake is thus deacti-
vated; the machine can now be moved.
Slide the machine over the prepared
ramp from the pallet.
Connect the battery, refer to Chapter
"Connecting and installing the battery".
Release emergency-stop button by
turning.
Set main switch to "1".
Press the drive direction switch and
slowly move the machine down from
the ramp.
Set main switch back to "0".
Please observe the following warning notes
when handling batteries:
Danger
Risk of explosion! Do not put tools or similar
on the battery, i.e. on the terminal poles
and cell connectors.
Danger
Risk of injury! Ensure that wounds never
come into contact with lead. Always clean
your hands after having worked with batter-
ies.
Danger
Risk of fire and explosion!
–
Smoking and naked flames are strictly
prohibited.
–
Rooms where batteries are charged
must have good ventilation because
highly explosive gas is emitted during
charging.
–
Batteries must not be stored outside.
Danger
Danger of causticization!
–
Rinse thoroughly with lots of clear water
if acid gets into the eye or comes in con-
tact with the skin.
–
Then consult a doctor immediately.
–
Wash off the acid If it comes in contact
with the clothes.
We recommend the use of our batteries
and chargers as listed below.
Note
With the KM 90/60 R Bp pack, the battery
and charger are already built in.
** Appliance requires 4 batteries
3)
Complete set (24 V/180 Ah) incl. connect-
ing cable, order no. 4.035-387.0
Before Startup
Open/ close device hood
Unloading tips
Weight (without batteries)
205 kg *
Weight (with batteries)
335 kg *
* If upgrade kits are installed, the weight is
respectively higher.
Push the sweeper off the pallet (appli-
ance without built-in battery)
Drive the sweeper off the pallet (appli-
ance with built-in battery)
Batteries
Safety notes regarding the batteries
Observe the directions on the
battery, in the instructions for
use and in the vehicle operat-
ing instructions!
Wear an eye shield!
Keep away children from acid
and batteries!
Risk of explosion!
Fire, sparks, open light, and
smoking not allowed!
Danger of causticization!
First aid!
Warning note!
Disposal!
Do not throw the battery in the
dustbin!
Recommended batteries, chargers
Order No.
Description
6.654-124.0
3)
180 Ah - mainte-
nance-free
6 V**
Order No.
Description
6.654-125.0 Charger for maintenance-
free batteries
18 EN
-
5
Note
Warranty claims will be entertained only if
you use batteries and chargers recom-
mended by Kärcher.
Note
When using batteries of other manufactur-
ers, the maximum battery dimensions must
be observed.
The appliance requires 4 single batteries
with 6 volt each.
Pay attention to the following if you are us-
ing maintenance-free batteries in KM 90/60
R Bp:
–
It is necessary to conform to the maxi-
mum battery dimensions.
–
While charging maintenance-free bat-
teries, it is necessary to tilt the appli-
ance hood upward.
–
While charging maintenance-free bat-
teries, follow the specifications of the
battery manufacturer.
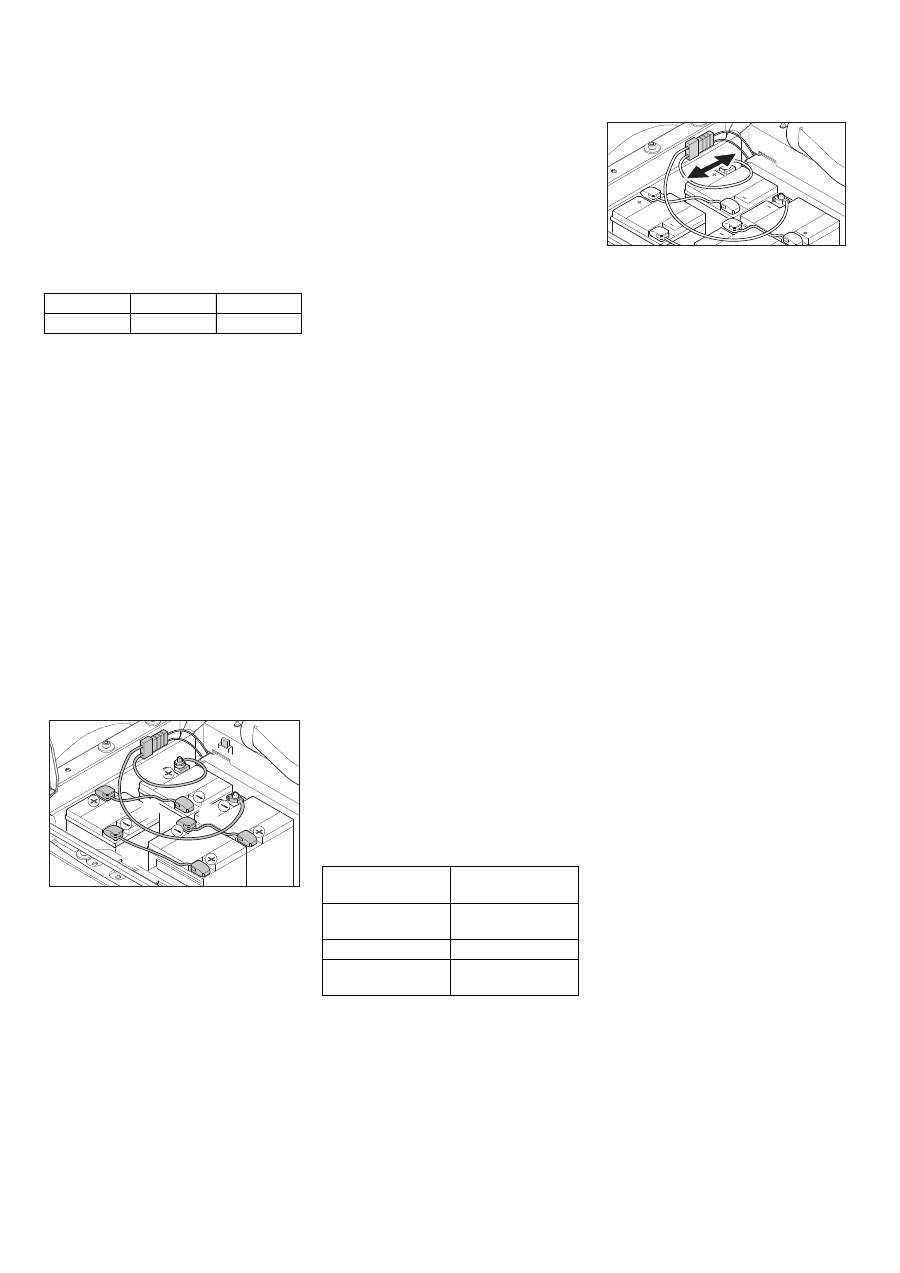
Open the device hood.
Insert batteries into the battery mount.
Adjust the rubber buffers to hold the
batteries properly.
몇
Warning
Pay attention to correct poles.
Note
The connection lines are not included in the
delivery scope.
The illustration shows KM 90/60 R Bp
with retrofitted and connected batteries, as
well as with charge plug for external charg-
er.
Note on KM 90/60 R Bp Pack
: The charg-
er and the battery pack are already in-
stalled and connected by the factory, a
charge plug is not present.
Connect pole terminal (red cable) to
positive pole (+).
Screw the connection lines onto the
batteries.
Connect pole terminal to negative pole
(-).
Note
Before removing the battery, make sure
that the negative pole lead is disconnected.
Check that the battery pole and pole termi-
nals are adequately protected with pole
grease.
몇
Warning
Charge the batteries before commissioning
the machine.
Danger
Risk of injury! Comply with safety regula-
tions on the handling of batteries. Observe
the directions provided by the manufacturer
of the charger.
Danger
Charge the battery only with an appropriate
charger.
Note
When the batteries are charged, first re-
move the charger from the mains and then
disconnect it from the batteries.
Danger
Risk of injury! The charger should be used
only if the mains connection line is in an un-
damaged state. Get the manufacturer, the
customer service agent or a qualified per-
son to immediately replace a damaged
mains connection line.
Note
Normally, the machine is equipped with
maintenance-free batteries.
Open the device hood.
Insert the plug of the charger into the
socket.
Note
The charger has electronic controls and au-
tomatically switches off the charging pro-
cess. All functions of the machine are
automatically interrupted during the charg-
ing process.
The battery control display shows the pro-
gress of the charging process when the
plug is inserted:
Open the device hood.
Separate the battery plug and connect
the charger cable.
Plug in mains connector and switch on
charger.
Note
The recommended chargers (matching the
batteries used) are regulated electronically
and will automatically switch off the charg-
ing process. All functions of the machine
are automatically interrupted during the
charging process.
Add distilled water one hour before the
charging process comes to an end; fol-
low the correct acid level. There are
corresponding indicators on the battery.
Danger
Danger of causticization! Adding water to
the battery in its discharged state can
cause the acid to leak.
Wear protective glasses and protective
clothing when handling battery acid. Ob-
serve the regulations concerning the han-
dling of batteries!
Danger
Danger of causticization!
–
Rinse thoroughly with lots of clear water
if acid gets into the eye or comes in con-
tact with the skin.
–
Then consult a doctor immediately.
–
Change clothing.
–
Wash off the acid If it comes in contact
with the clothes.
몇
Warning
Risk of damage. Use only distilled or desal-
inated water (VDE 0510) for filling the bat-
tery. Do not add any substances (so-called
performance improving agents), else war-
ranty claims will not be entertained.
Switch off the charger and remove the
plug from the socket.
If the machine does not have a built-in
charger: Pull the battery cable from the
charger cable and connect it to the ap-
pliance.
Using batteries made by other manufac-
turers
Maximum battery dimensions (single
battery)
Length
Width
Height
264 mm
190 mm
284 mm
Installing and connecting the batteries
1.
2.
3.
4.
5.
Charge the batteries
(1) Charging procedure KM 90/60 R Bp
Pack
Battery fault
A=blinks yellow,
B=off, C+D+E=red
Battery is being
charged
glows yellow
Battery is charged
glows green
Charger error
A=blinks yellow,
B+E=red, C+D=off
(2) Charging procedure KM 90/60 R Bp
Low maintenance batteries
After charging
19 EN
Оглавление
- Inhaltsverzeichnis
- Sicherheitshinweise
- Bedien- und Funktionselemente
- Vor Inbetriebnahme
- Inbetriebnahme
- Stilllegung
- Pflege und Wartung
- F 1 F 2
- Hilfe bei Störungen
- Technische Daten
- EG-Konformitätserklärung
- Contents
- Safety instructions
- Operating and Functional Elements
- Before Startup
- Start up
- Shutdown Maintenance and care
- F 1 F 2
- Troubleshooting
- Technical specifications
- EC Declaration of Conformity
- Table des matières
- Consignes de sécurité
- Eléments de commande et de fonction
- Avant la mise en service
- Mise en service
- Remisage Entretien et maintenance
- F 1 F 2
- Assistance en cas de panne
- Caractéristiques techniques
- Déclaration de conformité CE
- Indice
- Norme di sicurezza
- Elementi di comando e di funzione
- Prima della messa in funzione
- Messa in funzione
- Fermo dell'impianto Cura e manutenzione
- F 1 F 2
- Guida alla risoluzione dei guasti
- Dati tecnici
- Dichiarazione di conformità CE
- Inhoudsopgave
- Veiligheidsinstructies
- Elementen voor de bediening en de functies
- Voor de inbedrijfstelling
- Inbedrijfstelling
- Stillegging Onderhoud
- F 1 F 2
- Hulp bij storingen
- Technische gegevens
- EG-conformiteitsverklaring
- Índice de contenidos
- Indicaciones de seguridad
- Elementos de operación y funcionamiento
- Antes de la puesta en marcha
- Puesta en marcha
- Parada Cuidados y mantenimiento
- F 1 F 2
- Ayuda en caso de avería
- Datos técnicos
- Declaración de conformidad CE
- Índice
- Avisos de segurança
- Elementos de comando e de funcionamento
- Antes de colocar em funcionamento
- Colocação em funcionamento
- Desactivação da máquina Conservação e manutenção
- F 1 F 2
- Ajuda em caso de avarias
- Dados técnicos
- Declaração de conformidade CE
- Indholdsfortegnelse
- Sikkerhedsanvisninger
- Betjenings- og funktionselementer
- Inden ibrugtagning
- Ibrugtagning
- Drift
- Afbrydning/nedlæggelsePleje og vedligeholdelse
- F 1 F 2
- Hjælp ved fejl
- Tekniske data
- EU-overensstemmelses- erklæring
- Innholdsfortegnelse
- Sikkerhetsanvisninger
- Betjenings- og funksjonelementer
- Før den tas i bruk
- Ta i bruk
- Drift
- Sette bort Pleie og vedlikehold
- F 1 F 2
- Feilretting
- Tekniske data
- EU-samsvarserklæring
- Innehållsförteckning
- Säkerhetsanvisningar
- Manövrerings- och funktionselement
- Före ibruktagande
- Idrifttagning
- Drift
- Nedstängning Skötsel och underhåll
- F 1 F 2
- Åtgärder vid störningar
- Tekniska data
- Försäkran om EU-överens- stämmelse
- Sisällysluettelo
- Turvaohjeet
- Ohjaus- ja käyttölaitteet
- Ennen käyttöönottoa
- Käyttöönotto
- Seisonta-aika Hoito ja huolto
- F 1 F 2
- Häiriöapu
- Tekniset tiedot
- EU-standardinmukaisuu- stodistus
- Πίνακας περιεχομένων
- Υποδείξεις ασφαλείας
- Λειτουργία
- Στοιχεία χειρισμού και λειτουργίας
- Πριν τη θέση σε λειτουργία
- Έναρξη λειτουργίας
- Διακοπή της λειτουργίας Φροντίδα και συντήρηση
- F 1 F 2
- Αντιμετώπιση βλαβών
- Τεχνικά χαρακτηριστικά
- Δήλωση Συμμόρφωσης των Ε . Κ .
- İ çindekiler
- Güvenlik uyar ı lar ı
- Kullan ı m ve çal ı ş ma elemanlar ı
- Cihaz ı çal ı ş t ı rmaya ba ş lamadan önce
- İş letime alma
- Durdurma
- Koruma ve Bak ı m
- F 1 F 2
- Ar ı zalarda yard ı m
- Teknik Bilgiler
- AB uygunluk bildirisi
- Оглавление
- Указания по технике безопасности
- Назначение
- Описание элементов управления и рабочих узлов
- Перед началом работы
- Начало работы
- Вывод из эксплуатации Уход и техническое обслуживание
- F 1 F 2
- Помощь в случае неполадок
- Технические данные
- Заявление о соответствии ЕС
- Tartalomjegyzék
- Biztonsági tanácsok
- Kezelési- és funkciós elemek
- Üzembevétel el ő tt
- Üzembevétel
- Leállítás
- Ápolás és karbantartás
- F 1 F 2
- Segítség üzemzavar esetén
- M ű szaki adatok
- EK konformitási nyiltakozat
- Obsah
- Bezpe č nostní pokyny
- Ovládací a funk č ní prvky
- P ř ed uvedením do provozu
- Uvedení do provozu
- Provoz
- Odstavení Ošet ř ování a údržba
- F 1 F 2
- Pomoc p ř i poruchách
- Technické údaje
- Prohlášení o shod ě pro ES
- Vsebinsko kazalo
- Varnostna navodila
- Upravljalni in funkcijski elementi
- Pred zagonom
- Zagon
- Obratovanje
- Mirovanje naprave Nega in vzdrževanje
- F 1 F 2
- Pomo č pri motnjah
- Tehni č ni podatki
- ES-izjava o skladnosti
- Spis tre ś ci
- Wskazówki bezpiecze ń stwa
- Elementy urz ą dzenia
- Przed pierwszym uruchomieniem
- Uruchamianie
- Wy łą czenie z eksploatacji Czyszczenie i konserwacja
- F 1 F 2
- Usuwanie usterek
- Dane techniczne
- Deklaracja zgodno ś ci UE
- Cuprins
- M ă suri de siguran ţă
- Elemente de utilizare ş i func ţ ionale
- Înainte de punerea în func ţ iune
- Punerea în func ţ iune
- Scoaterea din func ţ iune Îngrijirea ş i între ţ inerea
- F 1 F 2
- Remedierea defec ţ iunilor
- Date tehnice
- Declara ţ ie de conformitate CE
- Obsah
- Bezpe č nostné pokyny
- Ovládacie a funk č né prvky
- Pred uvedením do prevádzky
- Uvedenie do prevádzky
- Odstavenie
- Starostlivos ť a údržba
- F 1 F 2
- Pomoc pri poruchách
- Technické údaje
- Vyhlásenie o zhode s normami EÚ
- Pregled sadržaja
- Sigurnosni napuci
- Komandni i funkcijski elementi
- Prije prve uporabe
- Stavljanje u pogon
- Stavljanje ure đ aja van pogona
- Njega i održavanje
- F 1 F 2
- Otklanjanje smetnji
- Tehni č ki podaci
- EZ izjava o uskla đ enosti
- Pregled sadržaja
- Sigurnosne napomene
- Komandni i funkcioni elementi
- Pre upotrebe
- Stavljanje u pogon
- Stavljanje ure đ aja van pogona
- Nega i održavanje
- F 1 F 2
- Otklanjanje smetnji
- Tehni č ki podaci
- Izjava o uskla đ enosti sa propisima EZ
- Съдържание
- Указания за безопасност
- Функция
- Обслужващи и функционални елементи
- Преди пускане в експлоатация
- Пускане в експлоатация
- Спиране от експлоатация Грижи и поддръжка
- F 1 F 2
- Помощ при неизправности
- Технически данни
- Декларация за съответствие на ЕО
- Sisukord
- Ohutusalased märkused
- Teenindus- ja funktsioonielemendid
- Enne seadme kasutuselevõttu
- Kasutuselevõtt
- Käitamine
- Seismapanek Korrashoid ja tehnohooldus
- F 1 F 2
- Abi häirete korral
- Tehnilised andmed
- EÜ vastavusdeklaratsioon
- Satura r ā d ī t ā js
- Droš ī bas nor ā d ī jumi
- Vad ī bas un funkcijas elementi
- Pirms ekspluat ā cijas uzs ā kšanas
- Ekspluat ā cijas uzs ā kšana
- Iekonserv ē šana
- Kopšana un tehnisk ā apkope
- F 1 F 2
- Pal ī dz ī ba darb ī bas trauc ē jumu gad ī jum ā
- Tehniskie dati
- EK Atbilst ī bas deklar ā cija
- Turinys
- Saugos reikalavimai
- Valdymo ir funkciniai elementai
- Prieš pradedant naudoti
- Naudojimo pradžia
- Naudojimas
- Laikinas prietaiso nenaudojimas Prieži ū ra ir aptarnavimas
- F 1 F 2
- Pagalba gedim ų atveju
- Techniniai duomenys
- EB atitikties deklaracija
- Перелік
- Правила безпеки
- Призначення
- Елементи управління і функціональні вузли
- Перед початком роботи
- Введення в експлуатацію
- Зберігання Догляд та технічне обслуговування
- F 1 F 2
- Допомога у випадку неполадок
- Технічні характеристики
- Заява при відповідність Європейського співтовариства
