Pioneer VSX-920-K: Controls and displays
Controls and displays: Pioneer VSX-920-K
Controls and displays 02
Chapter 2:
English
Controls and displays
Deutsch
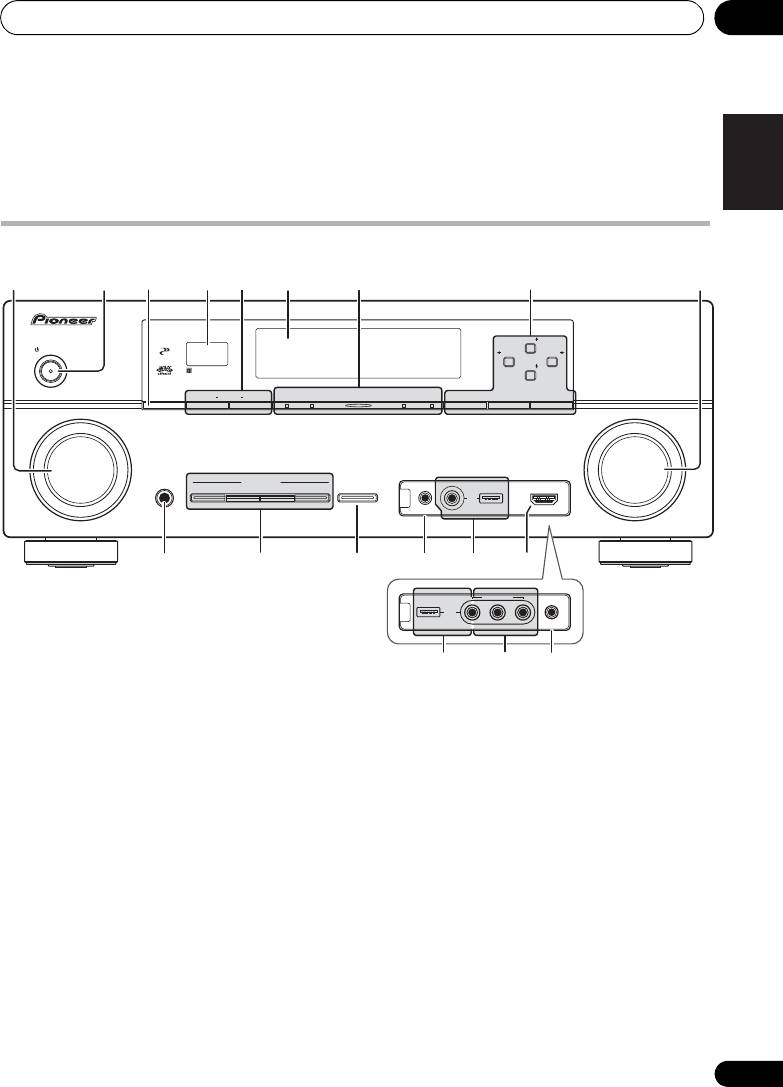
Front panel
Français
Italiano
Nederlands
Español
1
INPUT SELECTOR
dial
5
MULTI-ZONE
controls
Select an input function.
If you’ve made MULTI-ZONE connections (see
MULTI-ZONE setup on page 32) use these
2
STANDBY/ON
controls to control the sub zone from the main
Switches the receiver between on and standby.
zone (see Using the MULTI-ZONE controls on
3
SPEAKERS
page 73).
See Switching the speaker terminals on
6 Character display
page 73.
See Display on page 11.
4 Remote sensor
7Indicators
Receives the signals from the remote control
ADVANCED MCACC
– Lights when
EQ
is
(see Operating range of remote control unit on
set to
ON
in the
AUDIO PARAMETER
menu.
page 14).
PQLS – Lights when the PQLS feature is
active (page 66).
HDMI – Blinks when connecting an HDMI-
equipped component; lights when the
component is connected (page 25).
9
En
12 73 5 8
49
6
AUDIO/ VIDEO MULTI- CHANNEL RECEIVER
VSX
-1020
PHASE
TUNE
CONTROL
STANDBY/ON
PRESET PRESET
TUNE
ADVANCED
iPod
SPEAKERS
CONTROL ON/OFFMULTI-ZONE
MCACC
PQLS HDMI BAND TUNER EDITiPhone
ENTER
INPUT
MASTER
SELECTOR
VOLUME
PHONES
LISTENING MODE
iPod iPhone
AUTO/ALC/DIRECT STEREO STANDARD
ADV SURROUND DIRECT CONTROL
VIDEO CAMERA
iPod
iPhone
MCACC
USB HDMI 5
SETUP MIC
10
11 1412 13
15
VIDEO 2 INPUT
iPod
iPhone
USB
MCACC
AUDIOLRVIDEO
SETUP MIC
14 16 13
VSX-1020/VSX-1025
VSX-920
VSX-1020_SYXCN.book 9 ページ 2010年3月12日 金曜日 午前9時10分

VSX-1020_SYXCN.book 10 ページ 2010年3月12日 金曜日 午前9時10分
Controls and displays02
iPod/iPhone – Lights to indicate iPod/
15
VSX-1020/VSX-1025 only:
HDMI input
iPhone is connected (page 45).
connector
Use for connection to a compatible HDMI
8 Tuner controls
device (Video camera, etc.)(page 34).
BAND – Switches between the AM and FM
radio bands (page 50).
16
VSX-920 only:
VIDEO 2 INPUT terminals
Use to connect your portable equipment such
TUNER EDIT –
Use with
TUNE /
,
as camcorders, video games and portable
PRESET /
and
ENTER
to memorize and
audio/video equipment (page 35).
name stations for recall
(page 50)
.
TUNE / –
Find radio frequencies
(page 50)
.
PRESET / – Find preset stations
(page 50).
9
MASTER VOLUME
dial
10
PHONES
jack
Connect the headphones. When the
headphones are connected, there is no sound
output from the speakers.
11 Listening mode buttons
AUTO/ALC/DIRECT – Switches between
Auto Surround (page 57), Auto Level
Control mode and Stream Direct mode
(page 60).
STEREO – Switches between stereo
playback and Front Stage Surround
Advance modes (page 60).
STANDARD – Press for Standard decoding
and to switch between the various 2 Pro
Logic IIx and Neo:6 options (page 57).
ADV SURROUND – Switch between the
various surround modes (page 59).
12
iPod iPhone DIRECT CONTROL
Change the receiver’s input to the iPod and
enable iPod operations on the iPod (page 46).
13
MCACC SETUP MIC
jack
Connect the supplied microphone (page 39).
14
iPod/iPhone/USB
terminals
Connect your Apple iPod as an audio and video
source, or connect a USB device for audio and
photo playback (page 35, 36).
10
En
Controls and displays 02
English
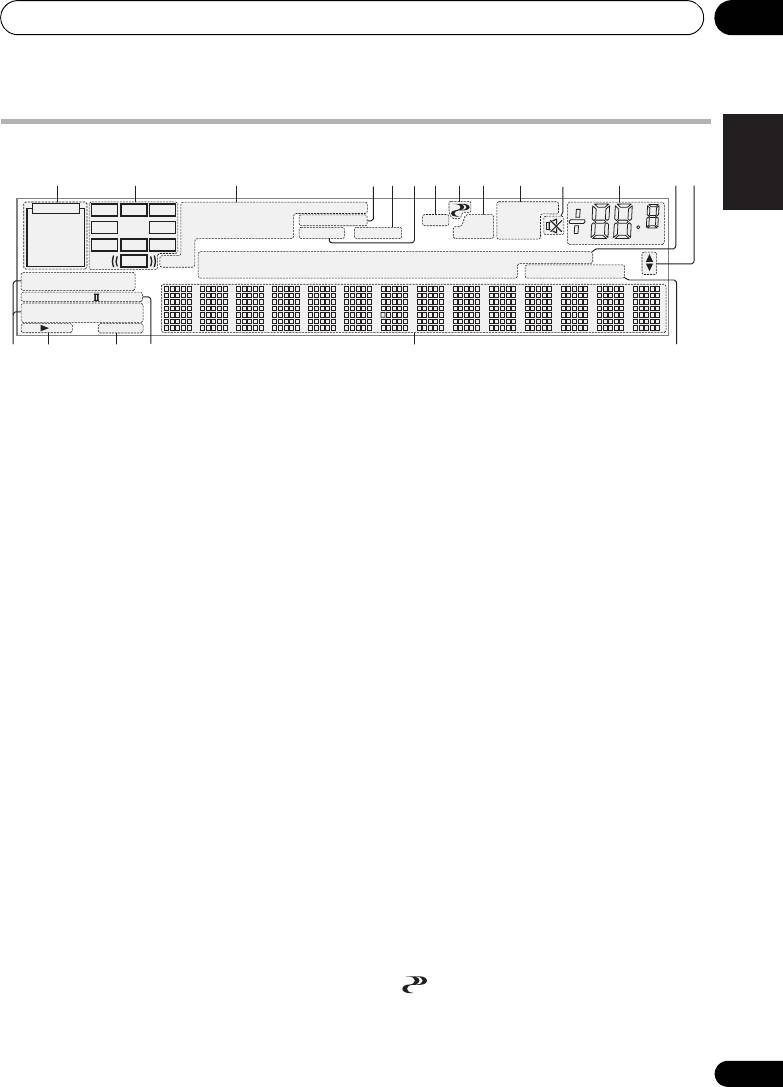
Display
Deutsch
Français
1
SIGNAL
indicators
4
MULTI-ZONE
Light to indicate the currently selected input
Lights when the MULTI-ZONE feature is active
signal. AUTO lights when the receiver is set to
(page 73).
select the input signal automatically (page 61).
5
SOUND
Italiano
2 Program format indicators
Lights when any of the Midnight, Loudness or
Light to indicate the channels to which digital
tone controls feature is selected (page 68).
signals are being input.
Lights when Dialog Enhancement is switched on.
L/R – Left front/Right front channel
6
S.RTRV
C – Center channel
Nederlands
Lights when the Sound Retriever function is
SL/SR – Left surround/Right surround channel
active (page 69).
LFE
– Low frequency effects channel (the
(( ))
indicators light when an LFE signal is being input)
7 Listening mode indicators
XL/XR – Two channels other than the ones above
AUTO SURROUND – Lights when the
XC – Either one channel other than the ones
Auto Surround feature is switched on
above, the mono surround channel or matrix
(page 57).
encode flag
Español
ALC – Lights when the ALC (Auto level
3 Digital format indicators
control) mode is selected (page 60).
Light when a signal encoded in the
STREAM DIRECT – Lights when Direct/
corresponding format is detected.
Pure Direct is selected (page 60).
2
DIGITAL
– Lights with Dolby Digital decoding.
2 DIGITAL PLUS – Lights with Dolby Digital
ADV.SURROUND – Lights when one of the
Plus decoding.
Advanced Surround modes has been
2
TrueHD
– Lights with Dolby TrueHD decoding.
selected (page 59).
DTS
– Lights with DTS decoding.
STEREO – Lights when stereo listening is
DTS HD – Lights with DTS-HD decoding.
switched on (page 59).
96/24 – Lights with DTS 96/24 decoding.
STANDARD – Lights when one of the
WMA9 Pro – Lights to indicate that a WMA9 Pro
signal is being decoded.
Standard Surround modes is switched on
DSD PCM – Light during DSD (Direct Stream
(page 57).
Digital) to PCM conversion with SACDs.
PCM – Lights during playback of PCM signals.
8 (PHASE CONTROL)
MSTR – Lights during playback of DTS-HD
Lights when Phase Control is switched on
Master Audio signal.
(page 62).
11
En
21 3 9754 108
6
11
12 13
14
AUTO
L C R
2
DIGITAL PLUS
DSD PCM
TUNED
RDS
PCM
2
TrueHD
WMA9Pro
MULTI-ZONE STEREO
PQLS
ALC
ATT
SL SR
HDMI
DTS HD ES 96/24
S.RTRV SOUND UP MIX
OVER
MONO
dB
DIGITAL
XL XR
XC
ANALOG
LFE
MSTR
CD
TUNER
SIRIUS
DVD
TV
VIDEO
USB
CD-R
iPod
BD
DVR
HDMI
[ 2 ]
[ 3 ]
[ 4 ]
AUTO SURROUND
STREAM DIRECT
PROLOGIC
2
x
Neo:6
ADV.SURROUND
STEREO STANDARD
SP
AB
SLEEP
7
18 1915 16 17
VSX-1020_SYXCN.book 11 ページ 2010年3月12日 金曜日 午前9時10分

VSX-1020_SYXCN.book 12 ページ 2010年3月12日 金曜日 午前9時10分
Controls and displays02
9 Analog signal indicators
19 Remote control mode indicator
Light to indicate reducing the level of an analog
Lights to indicate the receiver’s remote control
signal (page 75).
mode setting. (Not displayed when set to 1.)
(page 77)
10 Tuner indicators
TUNED – Lights when a broadcast is being
received.
STEREO –
Lights when a stereo FM broadcast
is being received in auto stereo mode.
MONO – Lights when the mono mode is
set using MPX.
RDS – Lights when an RDS broadcast is
received.
11
Lights when the sound is muted (page 14).
12 Master volume level
Shows the overall volume level.
“---” indicates the minimum level, and “+12dB”
indicates the maximum level.
13 Input function indicators
Light to indicate the input function you have
selected.
14 Scroll indicators
Light when there are more selectable items
when making the various settings.
15 Speaker indicators
Indicates the speaker terminal, A and/or B, to
which audio signal output is currently set
(page 73).
16
SLEEP
Lights when the receiver is in sleep mode
(page 75).
17 Matrix decoding format indicators
2PRO LOGIC IIx – This lights to indicate
2 Pro Logic II / 2 Pro Logic IIx decoding
(page 57).
Neo:6 – When one of the Neo:6 modes of
the receiver is on, this lights to indicate
Neo:6 processing (page 57).
18 Character display
Displays various system information.
12
En
Controls and displays 02
English
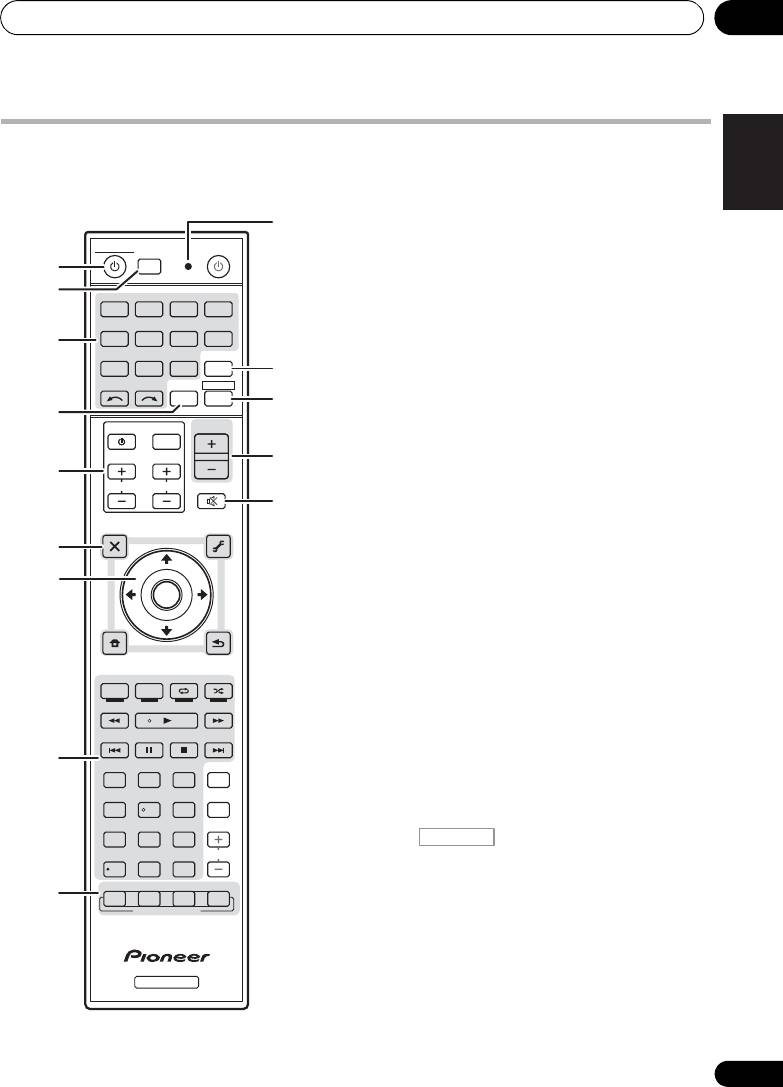
Remote control
This section explains how to operate the
The remote has been conveniently color-coded
remote control for the receiver.
according to component control using the
following system:
• White – Receiver control, TV control
Deutsch
• Blue – Other controls (See page 45, 47, 50,
53, 55 and 83.)
1 RECEIVER
This switches between standby and on for this
receiver.
Français
2
MULTI OPERATION – Use to perform
multi operations (page 81).
R.SETUP – Use to input the preset code
when making remote control settings and
to set the remote control mode (page 77).
Italiano
3 Input function buttons
Press to select control of other components
(page 77).
4
ZONE 2
Nederlands
Switch to perform operations in the sub zone
(page 74).
5
TV CONTROL
buttons
These buttons are dedicated to control the TV
assigned to the TV CTRL button.
Español
– Turn on/off the power of the TV.
INPUT – Select the TV input signal.
CH +/– – Select channels.
VOL +/– – Adjust the volume on your TV.
6 Receiver controls
Press first to access:
AUDIO PARAMETER – Use to access the
Audio options (page 68).
VIDEO PARAMETER – Use to access the
Video options (page 71).
HOME MENU – Use to access the Home
Menu (pages 39, 42, 64, 86, 100 and 106).
RETURN – Press to confirm and exit the
current menu screen.
13
En
10
MULTI
SOURCERECEIVER
OPERATION
1
R.SETUP
2
BD DVD
DVR/BDR HDMI
CDTV
ADAPTERNET RADIO
3
iPod
USB TUNER VIDEO TV CTRL
11
INPUT
SELECT ZONE 2
RECEIVER
12
4
MASTER
INPUT
VOLUME
TV CONTROL
13
5
CH
VOL
MUTE
14
AUDIO
VIDEO
PARAMETER
PARAMETER
LIST
TUNE
TOOLS
6
TOP MENU
T.EDIT
BAND GUIDE
7
PRESET
ENTER
PRESET
PTY
SEARCH
RETURN
HOME
MENU
TUNE
iPod CTRL
PGM
MENU
HDD DVD
PHASE
CTRL STATUS
TV
/
DTV MPX PQLS
8
S.RETRIEVER
MIDNIGHT
AUDIO
213
SIGNAL SEL
MCACC SLEEP
INFO
546
DISP
CH
LEVEL A.ATT DIMMER
79
8
D.ACCESS
CLASS
CH
/
CLR
0
ENTER
AUTO
/
ALC
/
DIRECT
STEREO
STANDARD ADV SURR
9
LISTENING MODE
RECEIVER
VSX-1020_SYXCN.book 13 ページ 2010年3月12日 金曜日 午前9時10分
RECEIVER
Controls and displays02
7
///
,
ENTER
ADV SURR – Switch between the various
Use the arrow buttons when setting up your
surround modes (page 59).
surround sound system (page 86) and the
10 Remote control LED
Audio or Video options (page 68 or 71).
Lights when a command is sent from the
8 Receiver controls
remote control (page 77).
Press first to access:
RECEIVER
11
TV CTRL
PHASE CTRL – Switch on/off Phase Control
Set the preset code of your TV’s manufacturer
(page 62).
when controlling TV (page 78).
STATUS – Check selected receiver settings
(page 75).
12
Switches the remote to control the receiver
PQLS – Select the PQLS setting (page 66).
(used to select the white commands (SIGNAL
S.RETRIEVER – Press to restore CD quality
SEL, etc.)).
sound to compressed audio sources
Switch to perform operations in the main zone.
(page 69).
Also use to set up surround sound.
MIDNIGHT – Switches to Midnight or
Loudness listening (page 68).
13
MASTER VOLUME +/–
Set the listening volume.
SIGNAL SEL – Select an input signal
(page 61).
14
MUTE
MCACC – Switch between MCACC presets
Mutes the sound or restores the sound if it has
(page 61).
been muted (adjusting the volume also
restores the sound).
SLEEP – Use to put the receiver in sleep
mode and select the amount of time before
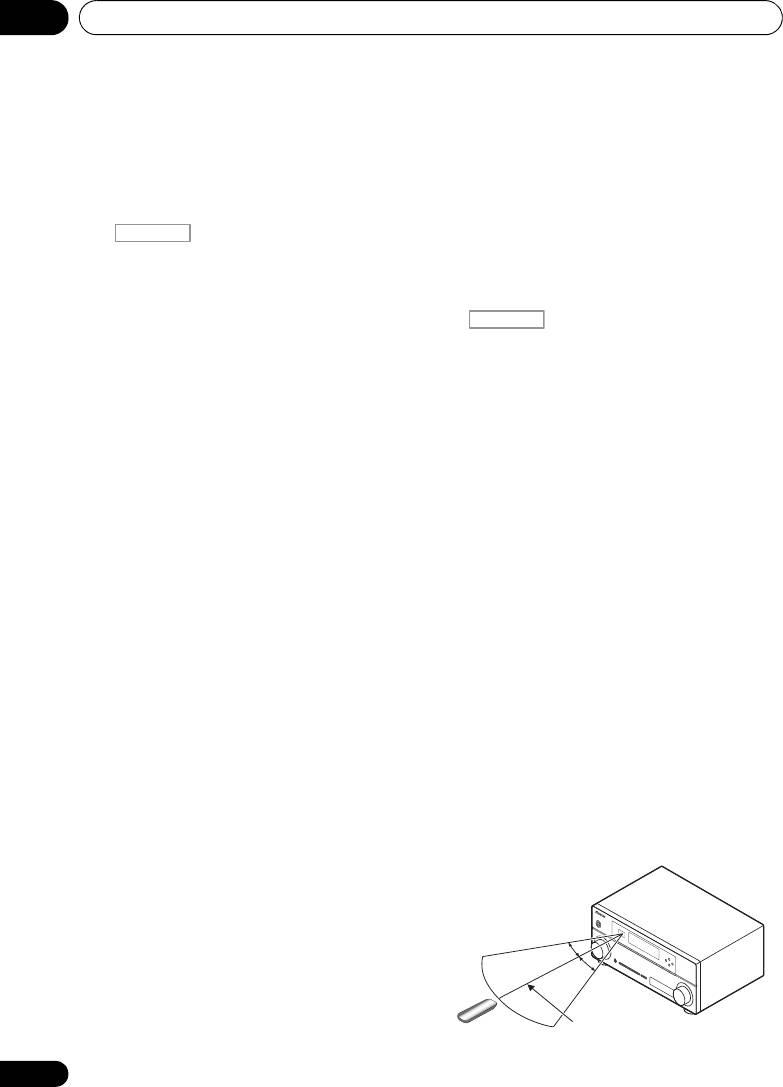
Operating range of remote control
sleep (page 75).
unit
CH LEVEL – Press repeatedly to select a
The remote control may not work properly if:
channel, then use / to adjust the level
(page 103).
• There are obstacles between the remote
control and the receiver’s remote sensor.
A.ATT – Attenuates (lowers) the level of an
analog input signal to prevent distortion
• Direct sunlight or fluorescent light is
(page 75).
shining onto the remote sensor.
DIMMER – Dims or brightens the display
• The receiver is located near a device that is
(page 75).
emitting infrared rays.
• The receiver is operated simultaneously
9 LISTENING MODE controls
with another infrared remote control unit.
AUTO/ALC/DIRECT –
Switches between
Auto Surround
(page 57)
, Auto Level
Control mode and Stream Direct mode
(page 60).
STEREO – Switches between stereo
playback and Front Stage Surround
Advance modes (page 60).
STANDARD – Press for Standard decoding
and to switch between the various 2 Pro
Logic IIx and Neo:6 options (page 57).
14
En
RECEIVER
30°
30°
7 m
VSX-1020_SYXCN.book 14 ページ 2010年3月12日 金曜日 午前9時10分
Оглавление
- Contents
- Flow of settings on the receiver
- Before you start
- Controls and displays
- Connecting your equipment
- Basic Setup
- Basic playback
- Listening to your system
- Control with HDMI function
- Using other functions
- Controlling the rest of your system
- The Advanced MCACC menu
- The System Setup and Other Setup menus
- Additional information
- Table des matières
- Organigramme des réglages sur le récepteur
- Avant de commencer
- Commandes et affichages
- Raccordement de votre équipement
- Configuration de base
- Lecture de base
- Écoute de sources à l’aide de votre système
- Fonction Control HDMI
- Utilisation d’autres fonctions
- Commander le reste de votre système
- Le menu MCACC avancé
- Configuration du système et autres réglages
- Informations complémentaires
- Содержание
- Порядок выполнения настроек на ресивере
- Перед началом работы
- Органы управления и индикаторы
- Подключение оборудования
- Основная настройка
- Основные операции воспроизведения
- Прослушивание системы
- Функция Управление по HDMI
- Использование других функций
- Управление остальными частями системы
- Меню Advanced MCACC
- Меню System Setup (Настройка системы) и Other Setup (Другие настройки)
- Дополнительная информация
