Pioneer VSX-920-K: Controlling the rest of your system
Controlling the rest of your system: Pioneer VSX-920-K
Controlling the rest of your system 09
Chapter 9:
English
Controlling the rest of your
system
Deutsch
However, there are cases where only certain
Operating multiple receivers
functions may be controllable after assigning
the proper preset code, or the codes for the
Up to four receivers can be operated discretely
manufacturer in the remote control will not
using this receiver’s remote control when
Français
work for the model that you are using.
using multiple receivers, provided they are of
the same model as this receiver. The receiver to
If you can’t find a preset code that matches the
be operated is switched by inputting the preset
component you want to control, you can still
code to set the remote control setting.
teach the remote individual commands from
another remote control (see
Programming
• Set the remote modes on the receivers
Italiano
signals from other remote controls
on page 78).
before using this function (see Remote
Control Mode Setup on page 107).
Note
1 Press and hold
R.SETUP
, then press “4”
for three seconds.
• You can cancel or exit any of the steps by
The LED flashes continuously.
pressing R.SETUP.
Nederlands
• To cancel the preset setup mode press
• After one minute of inactivity, the remote
R.SETUP.
automatically exits the operation.
• For greater convenience, assign the TV
2 Press the number button for the receiver
connected to the MONITOR OUT terminal
(“
Receiver 1
” to “
Receiver 4
”) you wish to
to the TV CTRL button, and assign your
operate.
Español
satellite/cable receiver or set-top box
For example, to operate “Receiver 2”, press “2”.
connected to the TV input terminal to the
If the LED lights for one second, the setting has
TV input button. If a single device is
been successfully completed.
connected to both terminals, that device
When the preset code is input, the LED flashes
should be assigned to both the TV CTRL
three times to indicate that the setting has
and TV input buttons.
failed.
• Devices may be assigned to the following
input function buttons.
Setting the remote to control
other components
Most components can be assigned to one of
the input function buttons (such as DVD or
CD) using the component’s manufacturer
preset code stored in the remote.
77
En
MULTI
SOURCERECEIVER
OPERATION
R.SETUP
BD DVD
DVR/BDR HDMI
CDTV
ADAPTERNET RADIO
iPod
USB TUNER VIDEO TV CTRL
INPUT
SELECT ZONE 2
RECEIVER
VSX-1020_SYXCN.book 77 ページ 2010年3月12日 金曜日 午前9時10分
Controlling the rest of your system09
Selecting preset codes directly
Programming signals from other
remote controls
1 Press and hold
R.SETUP
, then press “1”
for three seconds.
If the preset code for your component is not
The LED flashes continuously.
available, or the available preset codes do not
operate correctly, you can program signals
• To cancel the preset setup mode press
from the remote control of another component.
R.SETUP.
This can also be used to program additional
2 Press the input function button for the
operations (buttons not covered in the presets)
1
component you want to control.
after assigning a preset code.
When assigning preset codes to TV CONTROL,
Certain buttons represent operations that
press TV CTRL here.
cannot be learned from other remote controls.
The LED blinks once and flashes continuously.
The buttons available are shown below:
3 Use the number buttons to enter the 4-
digit preset code.
See Preset code list on page 123.
If the LED lights for one second, the setting has
been successfully completed.
When the preset code is fully input, the LED
flashes three times to indicate that the setting
has failed. If this happens, enter the 4-digit
preset code again.
4 Repeat steps 2 through 3 for the other
components you want to control.
To try out the remote control, switch the
component on or off (into standby) by pressing
SOURCE. If it doesn’t seem to work, select
the next code from the list (if there is one).
5Press
R.SETUP
to exit the preset setup
mode.
1 Press and hold
R.SETUP
, then press “2”
for three seconds.
The LED flashes continuously.
• To cancel the preset setup mode press
R.SETUP.
2 Press the input function button for the
component you want to control.
The LED blinks once and flashes continuously.
78
En
Note
MULTI
SOURCERECEIVER
OPERATION
R.SETUP
BD DVD
DVR/BDR HDMI
CDTV
ADAPTERNET RADIO
iPod
USB TUNER VIDEO TV CTRL
INPUT
SELECT ZONE 2
RECEIVER
MASTER
INPUT
VOLUME
TV CONTROL
CH
VOL
MUTE
1 The remote can store about 120 preset codes from other components (this has been tested with codes of Pioneer
format only).
AUDIO
VIDEO
PARAMETER
PARAMETER
LIST
TUNE
TOOLS
TOP MENU
T.EDIT
BAND GUIDE
PRESET
ENTER
PRESET
PTY
SEARCH
RETURN
HOME
MENU
TUNE
iPod CTRL
PGM
MENU
HDD DVD
PHASE
CTRL STATUS
TV
/
DTV MPX PQLS
S.RETRIEVER
MIDNIGHT
AUDIO
213
SIGNAL SEL
MCACC SLEEP
INFO
546
DISP
CH
LEVEL A.ATT DIMMER
79
8
D.ACCESS
CLASS
CH
/
CLR
0
ENTER
AUTO
/
ALC
/
DIRECT
STEREO
STANDARD ADV SURR
LISTENING MODE
VSX-1020_SYXCN.book 78 ページ 2010年3月12日 金曜日 午前9時10分
Controlling the rest of your system 09
3 Point the two remote controls towards
English
each other, then press the button that will be
Erasing one of the remote
doing the learning on this receiver’s remote
control button settings
control.
This erases one of the buttons you have
The LED blinks once and flashes continuously.
programmed and restores the button to the
• The remote controls should be 3 cm apart.
factory default.
Deutsch
1 Press and hold
R.SETUP
, then press “7”
for three seconds.
The LED flashes continuously.
• To cancel the preset setup mode press
R.SETUP.
Français
2 Press the input function button
4 Press the corresponding button on the
corresponding to the command to be erased,
other remote control that is sending (teaching)
then press
ENTER
.
the signal to this receiver’s remote control.
The LED flashes once.
If the LED lights for one second, the setting has
1
Italiano
been successfully completed.
3 Press and hold the button to be erased
for three seconds.
5 To program additional signals for the
If the LED lights for one second, the erasing
current component repeat steps 3 and 4.
has been successfully completed.
To program signals for another component,
exit and repeat steps 2 through 4.
4 Repeat step 3 to erase other buttons.
Nederlands
6 Press
R.SETUP
to exit the programming
5Press
R.SETUP
to exit the erasing mode.
mode.
Español
79
En
Note
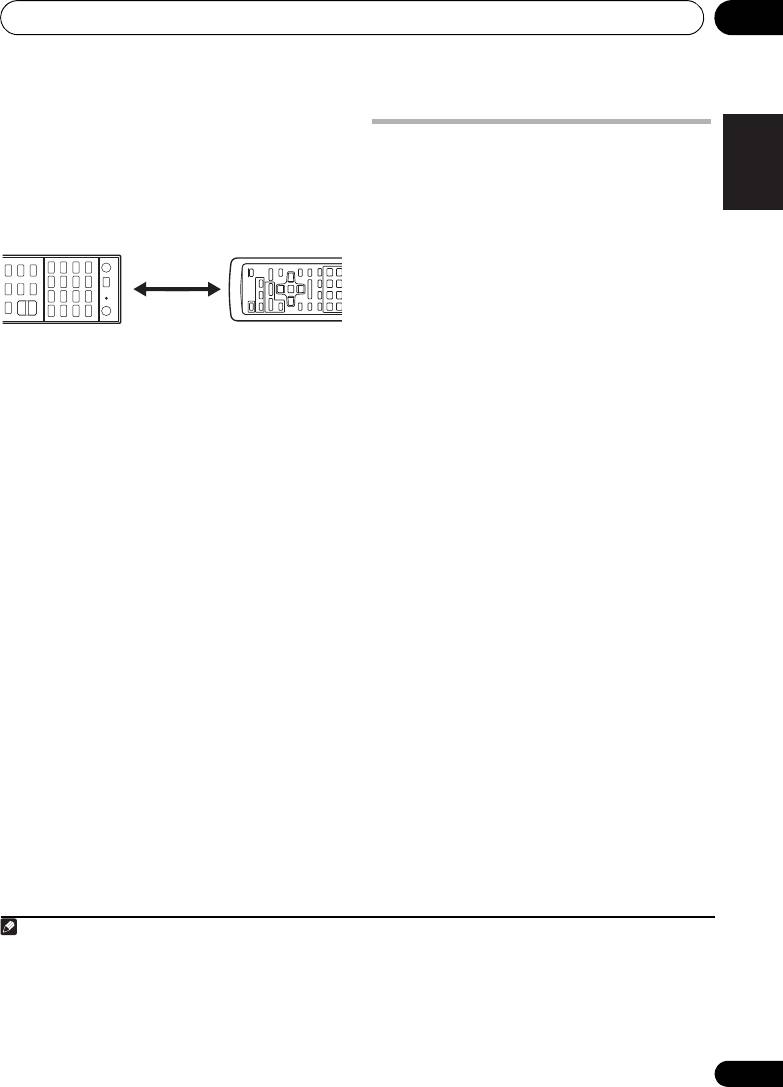
1 • Note that interference from TVs or other devices will sometimes result in the remote control learning the wrong
signal.
• Some commands from other remote controls cannot be learned, but in most cases the remotes just need to be
moved closer together or farther apart.
• If the LED flashes for five seconds, it means the memory is full. See Resetting the input assignment of one of the
input function buttons above to erase a programmed button you’re not using to free up more memory (note that some
signals may take more memory than others).
3 cm
This receiver’s
Other remote
remote control
control
VSX-1020_SYXCN.book 79 ページ 2010年3月12日 金曜日 午前9時10分

VSX-1020_SYXCN.book 80 ページ 2010年3月12日 金曜日 午前9時10分
Controlling the rest of your system09
Resetting the input assignment
Direct function
•Default setting: On
of one of the input function
You can use the direct function feature to
buttons
control one component using the remote
This procedure resets the input assignment
control while at the same time using your
preset at the remote control’s input function
receiver to play a different component. This
button, restoring the default.
could let you, for example, use the remote
control to set up and listen to a CD on the
1 Press and hold
R.SETUP
, then press “9”
receiver, and then use the remote control to
for three seconds.
rewind a tape in your VCR while you continue
The LED flashes continuously.
to listen to your CD player.
• To cancel the preset setup mode press
When direct function is on, any component you
R.SETUP.
select (using the input function buttons) will be
2 Press and hold the input function button
selected by both the receiver and the remote
corresponding to the command to be erased
control. When you turn direct function off, you
for three seconds.
can operate the remote control without
If the LED lights for one second, the erasing
affecting the receiver.
has been successfully completed.
1 Press and hold
R.SETUP
, then press “5”
for three seconds.
The LED flashes continuously.
• To cancel the preset setup mode press
R.SETUP.
2 Press the input function button for the
component you want to control.
3 Press “1” (On) or “0” (Off) to switch the
direct function mode.
If the LED lights for one second, the setting has
been successfully completed.
If the LED flashes three times, the setting has
failed.
4 Press
R.SETUP
to exit the setup.
80
En

Controlling the rest of your system 09
The buttons that can be programmed using
English
Multi operation and System off
Multi operation or System off are the same
buttons as those that can be programmed for
The Multi operation feature allows you to
other remote controls (see Programming
program a series of up to 5 commands for the
signals from other remote controls on page 78).
components in your system.
• Be sure to call up the preset codes of
Programming a Multi operation or a
Deutsch
devices or perform programming signals
shutdown sequence
for other remote controls before multi
operation memory programming
(page 78)
.
1 Press and hold
R.SETUP
, then press “3”
for three seconds.
The Multi operation feature makes it easy to
The LED flashes continuously.
perform the following operations by pressing
Français
just two buttons.
• To cancel the preset setup mode press
R.SETUP.
Press MULTI OPERATION and then the DVD
input function button to:
2 Press the input function button (or
1. Switch this receiver on.
SOURCE
button).
2. Switch this receiver’s input to DVD.
For Multi operations, press the input function
Italiano
3. Transmit a sequence of up to five
you wish to program (for example, if you want
programmed commands.
to start the sequence by switching on your
3
DVD player, press DVD).
Similar to Multi operations, System off allows
you to use two buttons to stop and switch off a
For System off, press the SOURCE button.
series of components in your system at the
The LED blinks twice and flashes
1
Nederlands
same time.
Only one System off operation
continuously.
sequence may be programmed.
3 If necessary, press the input function
Press
MULTI OPERATION
and then
SOURCE
button for the component whose command
to:
you want to input.
1. Transmit a sequence of up to five
This is only necessary if the command is for a
programmed commands.
new component (input function).
Español
2. Switch off all Pioneer devices including the
4 Select the button for the command you
receiver (except DVD recorders and VCRs).
want to input.
For greater convenience, program this receiver
The LED blinks once and flashes continuously.
to perform power on/off and playback
2
• You don’t need to program the receiver to
operations on non-Pioneer devices as well.
switch on or off. This is done automatically.
(The signals for Pioneer devices described
above are not contingent on programming for
non-Pioneer devices.)
81
En
Note
VSX-1020_SYXCN.book 81 ページ 2010年3月12日 金曜日 午前9時10分
1 • Before Multi operation and System off will work correctly, you must setup the remote to work with your TV and other
components (see Operating multiple receivers on page 77 for more on this).
• Some units may take some time to power up, in which case multiple operations may not be possible.
• Power on and off commands only work with components that have a standby mode.
2 Some remote controllers for other manufacturers' devices use the same signals for switching the power on and off.
In some cases, even if this receiver is programmed to perform these commands, power to the non-Pioneer devices
may not be switched on and off correctly. Program the receiver to perform these commands if the non-Pioneer device
uses separate signals for power on/off.
3 With Multi operation, the HDMI and TV CTRL settings cannot be made, but the iPod USB settings can. For other
settable input functions, see Setting the remote to control other components on page 77.

Controlling the rest of your system09
With Pioneer components, you don’t need to
Using System off
program the power to switch off in a shutdown
1 Press
MULTI OPERATION
.
sequence (except DVD recorders).
The LED flashes continuously.
5 Repeat steps 3 to 4 to program a
2
Within five seconds,
press
SOURCE
.
sequence of up to five commands.
The command sequence you programmed will
Programming mode will terminate
run, then all Pioneer components will switch
automatically when the 5 commands are
1
off
, followed by this receiver (switch of all the
entered.
zones becomes off).
•If you press R.SETUP before programming
is completed, commands programmed up
Erasing the settings for the multi-
to that point will be stored.
operation
This erases all the settings programmed in the
Using multi operations
remote control for the multi-operation.
1Press
MULTI OPERATION
.
1 Press and hold
R.SETUP
, then press “8”
The LED flashes continuously.
for three seconds.
The LED flashes continuously.
2
Within five seconds, press
an input
function button that has been set up with a
• To cancel the preset setup mode press
multi operation.
R.SETUP.
The receiver switches on (if it was in standby)
2 Press the input function button
and the programmed multi operation is
containing the program you want to cancel or
performed automatically.
the
SOURCE
button for three seconds.
If the LED lights for one second, the erasing
has been successfully completed.
82
En
Note
VSX-1020_SYXCN.book 82 ページ 2010年3月12日 金曜日 午前9時10分
1 In order to avoid accidently switching off a DVD recorder that is currently recording, no DVD recorder power off codes
are sent.
Controlling the rest of your system 09
English
Clearing all the remote control
settings
This will erase all preset remote control preset
1
codes and programmed buttons.
Deutsch
1 Press and hold
R.SETUP
, then press “0”
for three seconds.
The LED flashes continuously.
2 Press and hold the
ENTER
button for
three seconds.
Français
If the LED lights for one second, the erasing
has been successfully completed.
Default preset codes
Italiano
Nederlands
Español
Controlling components
This remote control can control components
after entering the proper codes (see Setting the
remote to control other components on page 77
for more on this). Use the input function
buttons to select the component.
•The TV CONTROL buttons on the remote
control are dedicated to control the TV
assigned to the TV CTRL button. If you have
two TVs, assign the main TV to the TV CTRL
button.
83
En
Note
Input function
Preset code
button
BD 2248
DVD 2246
DVR/BDR 2238
HDMI 2247
TV 0186
CD 5066
VIDEO 1077
TV CTRL 0186
1 When Programming signals from other remote controls on page 78 are set, all the signals learned in the input function
buttons are cleared. This function is convenient when you want to reset some but not all of input function buttons.
MULTI
SOURCERECEIVER
OPERATION
R.SETUP
BD DVD
DVR/BDR HDMI
CDTV
ADAPTERNET RADIO
iPod
USB TUNER VIDEO TV CTRL
INPUT
SELECT ZONE 2
RECEIVER
MASTER
INPUT
VOLUME
TV CONTROL
CH
VOL
MUTE
AUDIO
VIDEO
PARAMETER
PARAMETER
LIST
TUNE
TOOLS
TOP MENU
T.EDIT
BAND GUIDE
PRESET
ENTER
PRESET
PTY
SEARCH
RETURN
HOME
MENU
TUNE
iPod CTRL
PGM
MENU
HDD DVD
PHASE
CTRL STATUS
TV
/
DTV MPX PQLS
S.RETRIEVER
MIDNIGHT
AUDIO
213
SIGNAL SEL
MCACC SLEEP
INFO
546
DISP
CH
LEVEL A.ATT DIMMER
79
8
D.ACCESS
CLASS
CH
/
CLR
0
ENTER
AUTO
/
ALC
/
DIRECT
STEREO
STANDARD ADV SURR
LISTENING MODE
RECEIVER
VSX-1020_SYXCN.book 83 ページ 2010年3月12日 金曜日 午前9時10分
VSX-1020_SYXCN.book 84 ページ 2010年3月12日 金曜日 午前9時10分
Controlling the rest of your system09
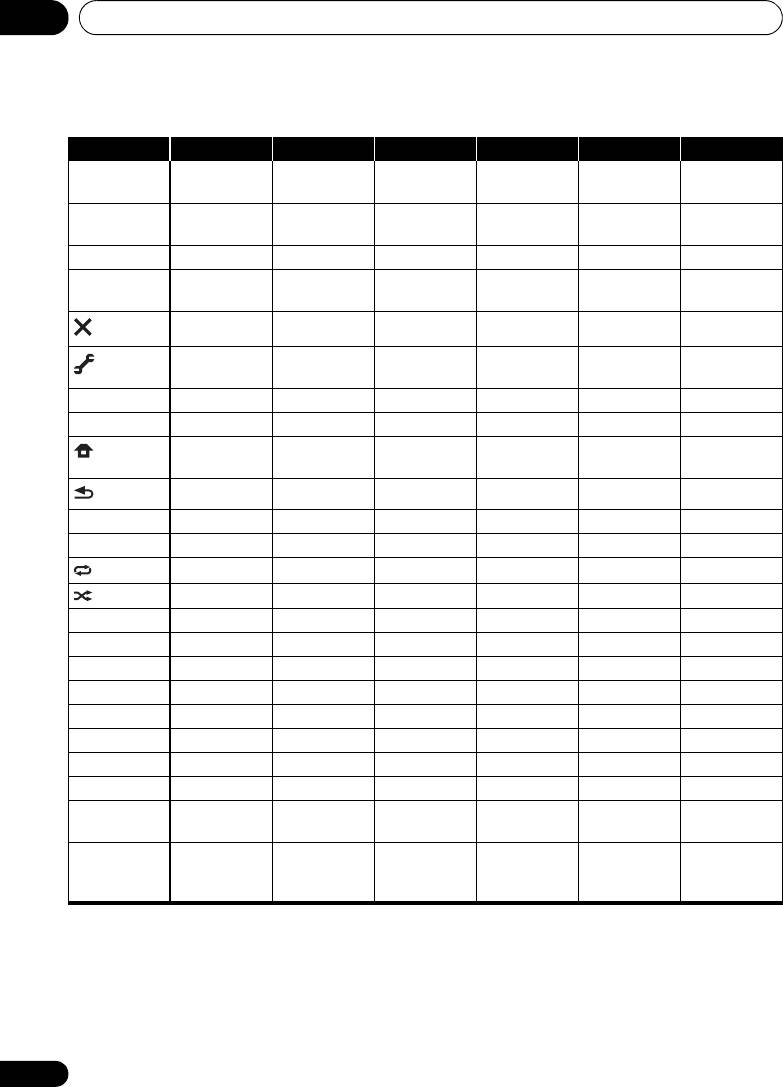
Button(s) TV TV (Monitor) BD/DVD HDD/DVR VCR SAT/CATV
SOURCE POWER ON/
POWER ON/
POWER ON/
POWER ON/
POWER ON/
POWER ON/
OFF
OFF
OFF
OFF
OFF
OFF
Number
numerics numerics numerics numerics numerics numerics
buttons
• (dot) • (dot) KURO LINK CLEAR + -
ENTER
ENTER CH ENTER ENTER ENTER - ENTER
(CLASS)
EXIT/INFO EXIT TOP MENU TOP MENU - LIST
TOOLS/
USER MENU TOOLS GUIDE - GUIDE
GUIDE/EPG
/////////////// - ///
ENTER ENTER ENTER ENTER ENTER - ENTER
HOME MENU HOME MENU HOME MENU HOME MENU - HOME/
MENU
RETURN RETURN RETURN RETURN - RETURN
HDD (Red) Red Red -HDD -Red
DVD (Green) Green Green -DVD -Green
(Yellow)
Yellow Yellow -VCR -Yellow
(Blue)
Blue Blue MENU MENU - Blue
- -
- AUTO SETUP
-FREEZE
- -
- -
ANT
AV SELECTION
-
- SCREEN SIZE -
AUDIO AUDIO AUDIO AUDIO AUDIO AUDIO AUDIO
DISP DISPLAY DISPLAY DISPLAY DISPLAY - DISPLAY/
INFO
CH +/– CH+/
-
CH+/
-
OUTPUT
CH+/
-
CH+/
-
CH+/
-
RESOLUTION
a
+/
-
a. Controls for BD.
84
En
Controlling the rest of your system 09
English
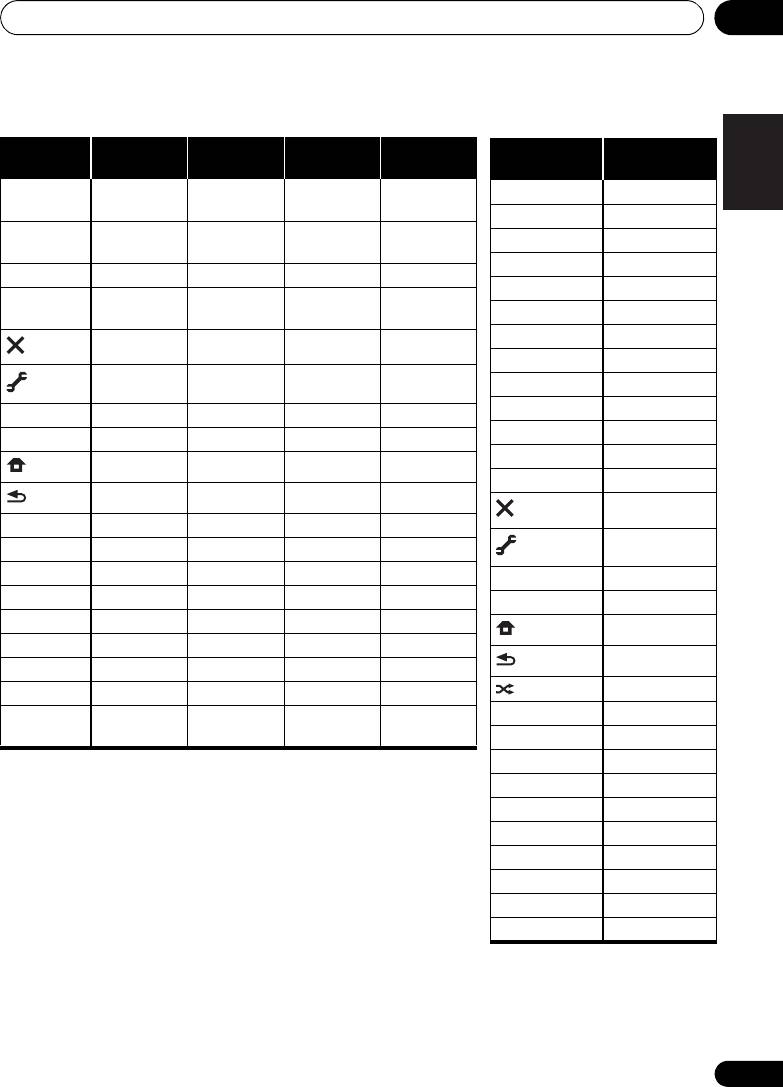
CD/CD-R/
Button(s) LD
MD/DAT TAPE
SACD
SOURCE POWER ON/
POWER ON/
POWER ON/
POWER ON/
OFF
OFF
OFF
OFF
Number
numerics numerics numerics -
Deutsch
buttons
c
• (dot) +10 >10/CLEAR CLEAR
CLEAR
c
ENTER
ENTER DISK/ENTER
OPEN/CLOSE
ENTER
(CLASS)
TOP MENU - - MS
Français
-
b
-MS
LEGATO LINK
////// - -
/
/
/
ENTER ENTER - - -
b
-
SACD SETUP
- -
Italiano
RETURN - - -
Nederlands
b
AUDIO AUDIO
PURE AUDIO
- -
Español
b
DISP DISPLAY/
TIME
- -
INFO
b. Controls for SACD.
c. Controls for MD.
85
En
TV
Button(s)
(Projector)
SOURCE POWER ON
1 MOVIE
2 STANDARD
3 DYNAMIC
4 USER1
5 USER2
6 USER3
7 COLOR+
8 SHARP+
9 GAMMA
0 COLOR
-
• (dot) SHARP
-
ENTER (CLASS) COLOR TEMP
EXIT
INFO
//////
ENTER ENTER
TEST
HIDE
MENU
HDMI1
HDMI2
COMP.
VIDEO
S-VIDEO
BRIGHT
-
BRIGHT+
AUDIO POWER OFF
DISP ASPECT
CH +/– CONTRAST+/
-
VSX-1020_SYXCN.book 85 ページ 2010年3月12日 金曜日 午前9時10分
Оглавление
- Contents
- Flow of settings on the receiver
- Before you start
- Controls and displays
- Connecting your equipment
- Basic Setup
- Basic playback
- Listening to your system
- Control with HDMI function
- Using other functions
- Controlling the rest of your system
- The Advanced MCACC menu
- The System Setup and Other Setup menus
- Additional information
- Table des matières
- Organigramme des réglages sur le récepteur
- Avant de commencer
- Commandes et affichages
- Raccordement de votre équipement
- Configuration de base
- Lecture de base
- Écoute de sources à l’aide de votre système
- Fonction Control HDMI
- Utilisation d’autres fonctions
- Commander le reste de votre système
- Le menu MCACC avancé
- Configuration du système et autres réglages
- Informations complémentaires
- Содержание
- Порядок выполнения настроек на ресивере
- Перед началом работы
- Органы управления и индикаторы
- Подключение оборудования
- Основная настройка
- Основные операции воспроизведения
- Прослушивание системы
- Функция Управление по HDMI
- Использование других функций
- Управление остальными частями системы
- Меню Advanced MCACC
- Меню System Setup (Настройка системы) и Other Setup (Другие настройки)
- Дополнительная информация
