Pioneer SBX-300: Installing and
Installing and: Pioneer SBX-300
Installing and Connecting the Unit 9
En
Chapter 2
Note
English
• When the unit interferes with the stand or
Installing and
other parts of the TV.
– Attach the height adjustment feet and adjust
the height.
Connecting the Unit
• When the TV remote control does not work
well.
– Install the unit away from the TV.
Before connecting the unit or changing the
– Use the IR repeater function (page 16).
connections, be sure to turn off the power and
disconnect the power cord from the outlet.
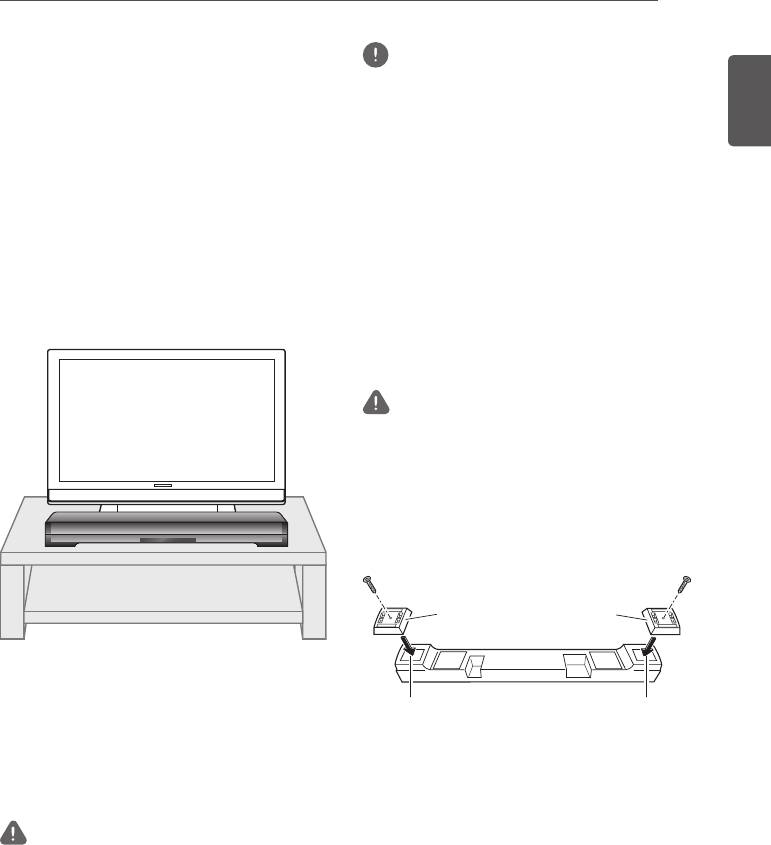
Attach the height adjustment feet
Also, make sure you have finished connecting
• If the unit interferes with the stand or other
all cables before connecting the power cord to
parts of the TV, you can adjust the height of
the wall outlet.
the unit.
• Match each of the left sides and right sides
Installing the Unit
of the unit and height adjustment feet and
then secure the height adjustment feet with
the supplied screws.
Cautions on attaching the height
adjustment feet
• To prevent suffocation caused by accidental
swallowing or an injury or other accident, be sure
to carry out the work in a place that is out of the
reach of infants and young children.
• To prevent damage to the product, choose a level
place and carry out the work on a soft surface such
as a carpet while taking care not to over tighten the
mounting screws.
L
R
Installing the unit in front of a
L R
TV
Mounting the unit to a wall
1 Install the unit away from the TV so
that the rear of the unit does not scratch
You can use the wall mounting fittings on the
the TV.
rear of the unit to mount the unit to a wall.
Caution
Cautions on mounting
• Do not install the unit in an unstable place such
The unit is heavy so there is a risk that its
as on an unsteady stand or tilted surface. The unit
weight could cause the screws to work loose or
may fall or tip over, resulting in injury.
the wall material to fail to support it, resulting
• The unit is not magnetically shielded and so should
in the unit falling. Make sure that the wall you
be used away from a cathode ray tube (CRT) TV
intend to mount the unit to is strong enough to
or monitor. Also, do not place devices that are
easily influenced by magnetism (magnetic cards,
support it. Do not mount the unit to a plywood
watches, video tapes, etc.) near the unit.
or soft surface wall.
Mounting screws are not supplied. Use screws
suitable for the wall material and capable of
supporting the weight of the unit.
Installing and Connecting the Unit10
En
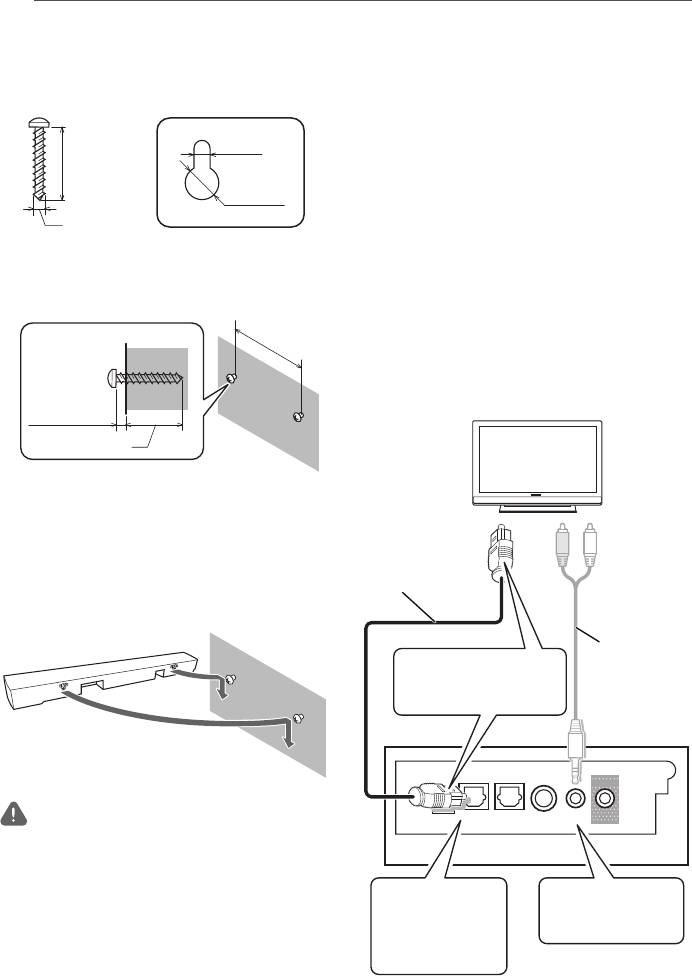
1 Obtain commercially available screws
• Do not hang from the unit. Pay special attention to
children. The unit may fall and break, resulting in
that fit the holes of the wall mounting
injury.
fittings on the rear of the unit.
• Do not connect or disconnect the cables while the
Hole of wall mounting fitting
unit is mounted to a wall. Install the cables in such
a way that a foot or other object cannot get caught
5 mm
in them.
(25 mm)
Connecting to Your TV
10 mm
Connect the unit and TV with the supplied
4 mm
optical digital audio cable.
To enable hearing of the TV audio with the
2 Screw the screws into the wall.
unit, connect the supplied optical digital audio
• Screw in the screws until they are
cable.
sticking out of the wall by 3 mm to 4 mm.
For a TV that only has an analog audio output
Wall mounting
537 mm
terminal, connect the audio output of the TV
screws
and the analog terminal of the unit with a
(commercially
available)
commercially available audio cable.
TV
3 mm to 4 mm
At least 20 mm
3 Hang the unit on the screws by the
holes of the wall mounting fittings on
the rear of the unit.
Optical digital
• Align the holes of the wall mounting
audio cable
fittings on the rear of the unit and the
(included)
screws and then hang the unit on both
screws at the same time.
Analog cable
Remove the protection cap at
(commercially
the end and then connect the
available)
cable while paying attention to
the orientation of the connector.
Rear View
IR OUT
Caution
TV
BD/DVD
STB
ANALOG
• When the unit is mounted to a wall, there is a risk
of it dropping, falling, etc. due to the weight or
mounting method. Take sufficient care not to cause
an accident.
If you will not use
If your TV does not
• Select a location for installation/mounting with
the cable for your TV
have a digital terminal,
sufficient strength to withstand the weight. If you
connection, you can
connect it to the analog
use it to connect your
terminal.
are unsure of the strength or anything else, consult
CD player or other
with a professional.
audio device.
• Pioneer is not responsible for any accidents or
damage that result from improper installation/
mounting, incorrect use, modification, disaster,
etc.

Installing and Connecting the Unit 11
En
Note
English
• SomeTVshavesettingsfordigitalaudiooutput.For
details,seetheoperatinginstructionsforyourTV.
• Setaudiooutputfromthebuilt-inspeakersofthe
TVtoOFF.Ifthiscannotbeset,settheTVvolume
totheminimumlevel.
Connections with
external device
Youcanconnectaplaybackdevice(BD,DVD,
orCDplayer)withanopticaldigitalaudio
outputorasatellitebroadcasttunerorother
devicewithacoaxialdigitalaudiooutputtothe
unittoenjoythesoundofthatdevice.
Rearofunit
TV
BD/DVD
STB
ANALOG
IR OUT
AC IN
IR OUT
TV
BD/DVD
STB
ANALOG
Opticaldigitalaudiocable(commercially
available)
BD player or other device
Satellite broadcast tuner,
cable TV tuner,
or other device
Digitalaudiopincable(commerciallyavailable)
Note
• Anopticaldigitalaudiocablewithasquareplug
canbeconnectedtothisunit.
• WhenanMPEG2-AAC(digitalbroadcast)signalis
inputtoadigitalaudioinputterminal,soundnot
beoutput.
Ifsoundisnotoutput,switchtheaudiooutputof
thedeviceconnectedtothedigitalaudioinput
terminaltoPCM.
Fortheswitchingprocedure,refertotheoperating
instructionsfortheconnecteddevice.
• Someconnecteddeviceshavesettingsforthe
digitalaudiooutput.Fordetails,seetheoperating
instructionsforthespecificplaybackdevice.
Оглавление
- Safety Information
- Before you start
- Installing and
- Operations
- Other Functions
- Other Information and Troubleshooting
- Appendix
- Consignes de sécurité
- Avant de commencer
- Installation et
- Fonctionnement
- Autres fonctions
- Autres informations et résolution des pannes
- Annexe
- Sicherheitshinweise
- Vor der Inbetriebnahme
- Installieren und
- Bedienung
- Andere Funktionen
- Andere Informationen und Fehlerbehebung
- Anhang
- Informazioni sulla sicurezza
- Prima di iniziare
- Installazione e
- Operazioni
- Altre funzioni
- Ulteriori informazioni e Diagnostica
- Appendice
- Veiligheidsinformatie
- Voordat u begint
- Het toestel
- Bediening
- Andere functies
- Overige informatie en storingen verhelpen
- Aanhangsel
- Información de seguridad
- Antes de comenzar
- Instalación y
- Operaciones
- Otras funciones
- Otra información y solución de problemas
- Apéndice
- Информация по технике безопасности
- Перед началом работы
- Установка и
- Управление
- Прочие функции
- Прочие сведения и устранение неисправностей
- Приложение


