Pioneer SBX-300: Before you start
Before you start: Pioneer SBX-300
Before you start 5
En
Chapter 1
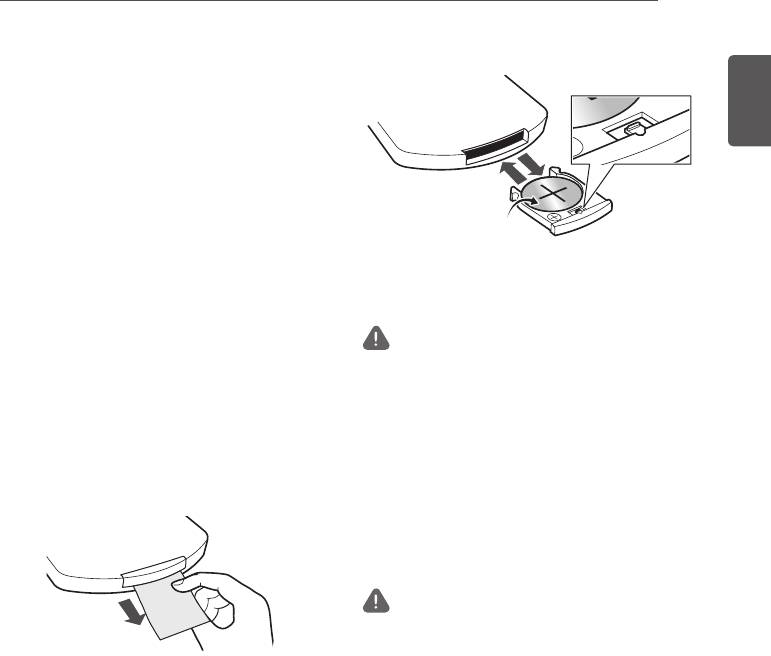
3. Close the battery holder.
Close securely (a click should be heard).
English
Before you start
1
1
Introduction
3
Supplied accessories
2
• Height adjustment foot x 2 (L, R)
• Foot attachment screws x 2
The battery included with the unit have
• Remote control x 1
been provided to allow you to check product
• IR cable x 1
operation and may not last long.
• Optical digital audio cable x 1 (1.5 m)
• Power cord
Warning
• Warranty
• Do not use or store the battery in direct sunlight or
• Operating Instructions (this manual)
other excessively hot place, such as inside a car or
near a heater. This can cause the battery to leak,
Before using the remote
overheat, explode or catch fire. It can also reduce
the life or performance of the battery.
control
• Incorrect replacement of the lithium battery may
The battery comes pre-inserted in the remote
result in an explosion. Only replace the battery with
control. Pull out the insulation sheet before
a battery that is the same or an equivalent type.
using the remote control.
• The battery may have different voltages, even if
they look similar. Do not use different kinds of the
battery together.
• Do not heat the battery, disassemble them, or
throw them into flames or water.
Caution
• When disposing of used the battery, please comply
with governmental regulations or environmental
public institution’s rules that apply in your country/
area.
• To prevent leakage of battery fluid, remove the
Replacing the remote control
battery if you do not plan to use the remote control
battery
for a long period of time (1 month or more). If the
fluid should leak, wipe it carefully off the inside
1. Pull out the battery holder while
of the case, then insert new battery. If a battery
pressing the tab.
should leak and the fluid should get on your skin,
flush it off with large quantities of water.
2. Insert the lithium battery (CR2025 x1)
• To prevent an accident, store the battery out of the
correctly.
reach of infants and young children. If accidentally
Insert the battery in the holder so that the +
swallowed, contact a doctor immediately.
side is facing up.
Before you start6
En
• The unit is operated simultaneously with another
Operating range of remote
infrared remote control unit.
control
• When the IR repeater function (page 16) or
The remote control may not work properly if:
learning function (page 17) is used to operate
TV remote control, the operating range will differ
• There are obstacles between the remote control
depending on the performance of the TV remote
and the unit's remote sensor.
control. (The operating range may be reduced.)
• Direct sunlight or fluorescent light is shining onto
Remote control
the remote sensor.
sensor
• The unit is located near a device that is emitting
infrared rays.
30°30°
7 m
Remote control
Remote control
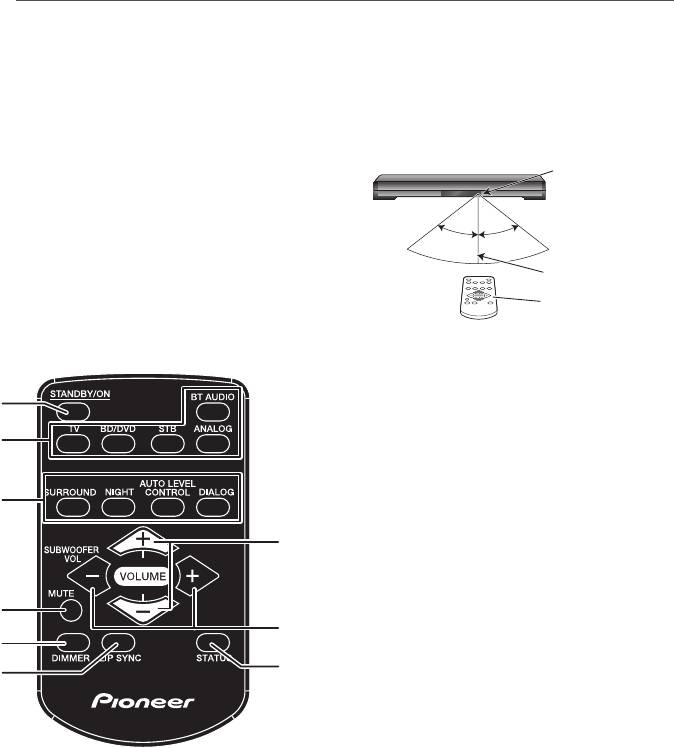
4
MUTE
Temporarily mutes the sound. Press again
1
to restore the original volume.
2
5
DIMMER
Changes the brightness of the indicators on
the front panel of the unit in three steps.
3
6
LIP SYNC (AUDIO SYNC)
Adjusts the lip sync function.
7
7
VOLUME
Adjusts the overall volume including the
subwoofer volume.
4
8
SUBWOOFER VOL
8
Adjusts the subwoofer (bass sound) volume.
5
9
STATUS
9
6
Allows you to confirm the status of various
settings.
1
STANDBY/ON
Turns the power of the unit on/off (standby
mode).
2 Input Selection Buttons
Switches the input of the unit.
3 Sound setting buttons
SURROUND
Turns on/off the surround function.
NIGHT
Turns on/off the night function.
AUTO LEVEL CONTROL
Turns on/off the auto level control function.
DIALOG
Turns the dialog function on/off.
Before you start 7
En
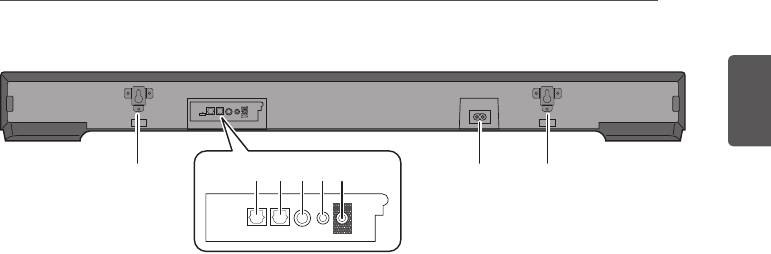
Rear panel
English
IR OUT
TV
BD/DVD
STB
ANALOG
AC IN
6 77
1 2 43 5
IR OUT
TV
BD/DVD
STB
ANALOG
1 Optical digital audio input 1 terminal
4 Analog audio input terminal
(page 10)
(page 10)
Connect a TV or other device with an
(3.5-mm stereo mini jack)
optical digital audio output.
Connect a TV, portable audio player, or
other device with an analog audio output.
2 Optical digital audio input 2 terminal
(page 11)
5 IR OUT terminal (page 16)
Connect a BD, DVD, or CD player or other
Connect the supplied IR Cable when the TV
device with an optical digital audio output.
remote control does not work.
3 Coaxial digital audio input terminal
6 AC IN terminal
(page 11)
Be sure to connect this last.
Connect a satellite broadcast tuner or
7 Wall mounting fittings (page 9)
other device with a coaxial digital audio
output.
Before you start8
En
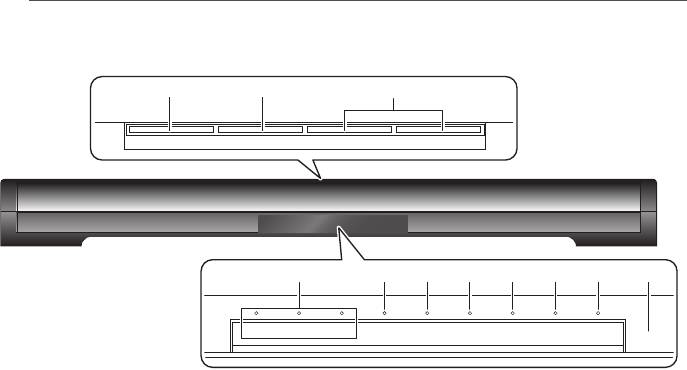
Front panel
STANDBY/ON
INPUT SELECT − VOLUME +
TV BD/DVD SURROUND NIGHT AUTO LEVEL
STB
DIALOG 2
BT AUDIO
ANALOG
CONTROL
DTS
1 2 3
5 6 7 8 9 a b4
1
u
STANDBY/ON
8 DIALOG indicator
Turns the power of the unit on/off (standby
Lit when the dialog function is on.
mode).
9 2/DTS indicator
2 INPUT SELECT
Lit when any of the following audio formats
Switches the input.
is input.
Green: Dolby Digital
3 VOLUME +/–
Red: DTS
Adjusts the volume.
Off: PCM
4 Input selection indicators
a BT AUDIO indicator
The indicator corresponding to the
Lit when connected with a Bluetooth
selected input is lit.
device.
Green: TV, BD/DVD, STB
Flashes when not connected with a
Orange: ANALOG
Bluetooth device.
5 SURROUND indicator
Quick flashing: Pairing mode
Lit when the surround is on.
Slow flashing: Connection standby mode
6 NIGHT indicator
b Remote control sensor
Lit when the night function is on.
7 AUTO LEVEL CONTROL indicator
Lit when the auto level control function is
on.
Оглавление
- Safety Information
- Before you start
- Installing and
- Operations
- Other Functions
- Other Information and Troubleshooting
- Appendix
- Consignes de sécurité
- Avant de commencer
- Installation et
- Fonctionnement
- Autres fonctions
- Autres informations et résolution des pannes
- Annexe
- Sicherheitshinweise
- Vor der Inbetriebnahme
- Installieren und
- Bedienung
- Andere Funktionen
- Andere Informationen und Fehlerbehebung
- Anhang
- Informazioni sulla sicurezza
- Prima di iniziare
- Installazione e
- Operazioni
- Altre funzioni
- Ulteriori informazioni e Diagnostica
- Appendice
- Veiligheidsinformatie
- Voordat u begint
- Het toestel
- Bediening
- Andere functies
- Overige informatie en storingen verhelpen
- Aanhangsel
- Información de seguridad
- Antes de comenzar
- Instalación y
- Operaciones
- Otras funciones
- Otra información y solución de problemas
- Apéndice
- Информация по технике безопасности
- Перед началом работы
- Установка и
- Управление
- Прочие функции
- Прочие сведения и устранение неисправностей
- Приложение


