Pioneer CDJ-2000: Playback
Playback: Pioneer CDJ-2000
En
13
DRB1475-B
Loading USB devices
English
Playback
Insert the USB device into the USB port.
The USB indicator lights.
! When a USB device that has previously been loaded in the CDJ-2000 or a
Pioneer DJ player is loaded, the number of discs for which WAVE informa-
Loading discs
tion, etc., is recorded is displayed on the main unit display.
! Set the disc with the printed side facing up.
! Insert the disc into the disc insertion slot on the set’s front panel.
! Do not insert two or more discs at once.
Removing USB devices from the set
! Do not force discs into the set’s disc insertion slot when the set’s power is off.
Doing so could damage the disc or the set.
! Be sure to follow the procedure below when removing USB devices from the
! When the disc is being drawn in or ejected, do not apply any force to the disc in
set. Removing a USB device without following this procedure could erase the
the direction opposite its movement. Doing so could damage the disc or the set.
set’s management data and make it impossible to read the USB device.
! When turning the set’s power off, be sure to remove the USB device first.
1 Press [POWER].
Turn on the power of this unit.
1 Press [USB STOP] for over 2 second.
The USB indicator turns off.
2 Insert the disc into the disc insertion slot.
Playback starts.
2 Disconnect the USB device.
! When auto cue is turned on, playback starts when [PLAY/PAUSEf] is
pressed. For details on the auto cue function, see Setting auto cue on page 15.
Using the PRO DJ LINK function
Ejecting discs
When two or more CDJ-2000s are connected by LAN cable, tracks recorded on
SD memory cards or USB devices connected to other players can be loaded onto
this unit.
Press [DISC EJECTh].
The disc is ejected from the disc insertion slot.
1 Connect this unit and other DJ players using LAN cables.
! If [DISC EJECTh] is pressed by mistake, press [PLAY/PAUSEf] immedi-
ately. The set is restored to the status it was in just before [DISC EJECTh] was
2 Press [LINK].
pressed. (No sound is output during this time.)
Media loaded in another DJ player is displayed on this unit’s display.
! When [UNLOCK/
LOCK] is set to [LOCK], press [PLAY/PAUSEf] to set the
3 Select the medium and enter.
pause mode, then press [DISC EJECTh].
The medium’s contents are displayed.
4 Select the track and enter.
Loading SD memory cards
The track is loaded into this unit.
! The information below can be shared among DJ players connected by PRO
DJ LINK.
1 Open the SD memory card door.
— Tracks (music files)
2 Insert the SD memory card.
— TAG LIST (page 19)
Insert the SD memory card vertically, with the back side facing forward and the
— INFO (page 20)
notch facing down. Push the card in slowly until it stops.
— Disc cue points
— Disc WAVE displays
3 Close the SD memory card door.
The SD memory card indicator lights.
! When an SD memory card that has previously been loaded in the CDJ-2000 or
Sharing disc information
a Pioneer DJ player is loaded, the number of discs for which WAVE informa-
tion, etc., is recorded is displayed on the main unit display.
1 Load an SD memory card or USB device into the DJ player
connected by PRO DJ LINK.
Ejecting SD memory cards from the set
2 Load a disc in the CDJ-2000.
Do not eject SD memory cards or turn off the CDJ-2000’s power while the SD
When no SD memory card or USB device is loaded in this unit, the player number
memory card indicator is flashing. Doing so could damage the data recorded on
and check screen for DJ players in which SD memory cards or USB devices are
the card.
loaded are displayed on this unit’s display.
1 Open the SD memory card door.
3 Press [MEMORY] on this unit.
The SD memory card indicator turns off.
The disc information set for this unit is registered on the SD memory card/
USB
device of the DJ player connected by PRO DJ LINK.
2 Press the SD memory card in. When it pops back up, pull it out
! When multiple DJ players are connected by PRO DJ LINK and SD memory
vertically.
cards/
USB devices are loaded in two or more DJ players, discs are not regis-
! Do not forcibly insert or remove SD memory cards. Doing so could damage
tered in DJ players other than this one.
the SD memory card or the set.
! If [DELETE] is pressed in step 3, the disc information is not registered on any
! Do not insert any objects other than SD memory cards into the SD memory
DJ player. No disc information is registered on any DJ player until the SD
card insertion slot. Inserting coins or other metal objects could damage the
memory card/
USB device is loaded on the CDJ-2000. To register the disc
internal circuitry, resulting in malfunction.
information, press [DISC], then press [MENU/UTILITY] and select the player
in which the information is to be registered.
13
14
En
DRB1475-B
Browsing libraries and folders
The browsing display differs depending on whether or not library information is
recorded on the SD memory card/
USB device.
! With library information d Library browsing: The music files are displayed by
the categories set in rekordbox (album, artist, etc.).
! Without library information d Folder browsing: The folders/
tracks on the
medium are displayed with a tree structure.
The types of items on the category menu can be changed in rekordbox’s prefer-
ences (environmental settings).
14
2 3 4 51
Forward and reverse scanning
Press [SEARCHm/
n].
When [SEARCHm/
n] pressed and held in, the track is fast-forwarded or fast-
reversed.
! When the music files are recorded in a folder structure, only tracks within the
same category/
folder are fast-forwarded/
fast-reversed.
Finding the beginnings of tracks (Track Search)
Press [TRACK SEARCHo/
p].
Press the [p] to move to the beginning of the next track.
When [o] is pressed, the beginning of the currently playing track is searched.
When pressed twice consecutively, the set returns to the beginning of the previ-
ous track.
! When the music files are recorded in a folder structure, only tracks within the
same category/
folder are searched.
! When auto cue is turned on, the set searches for the beginning of the track
and pauses there (page 15).
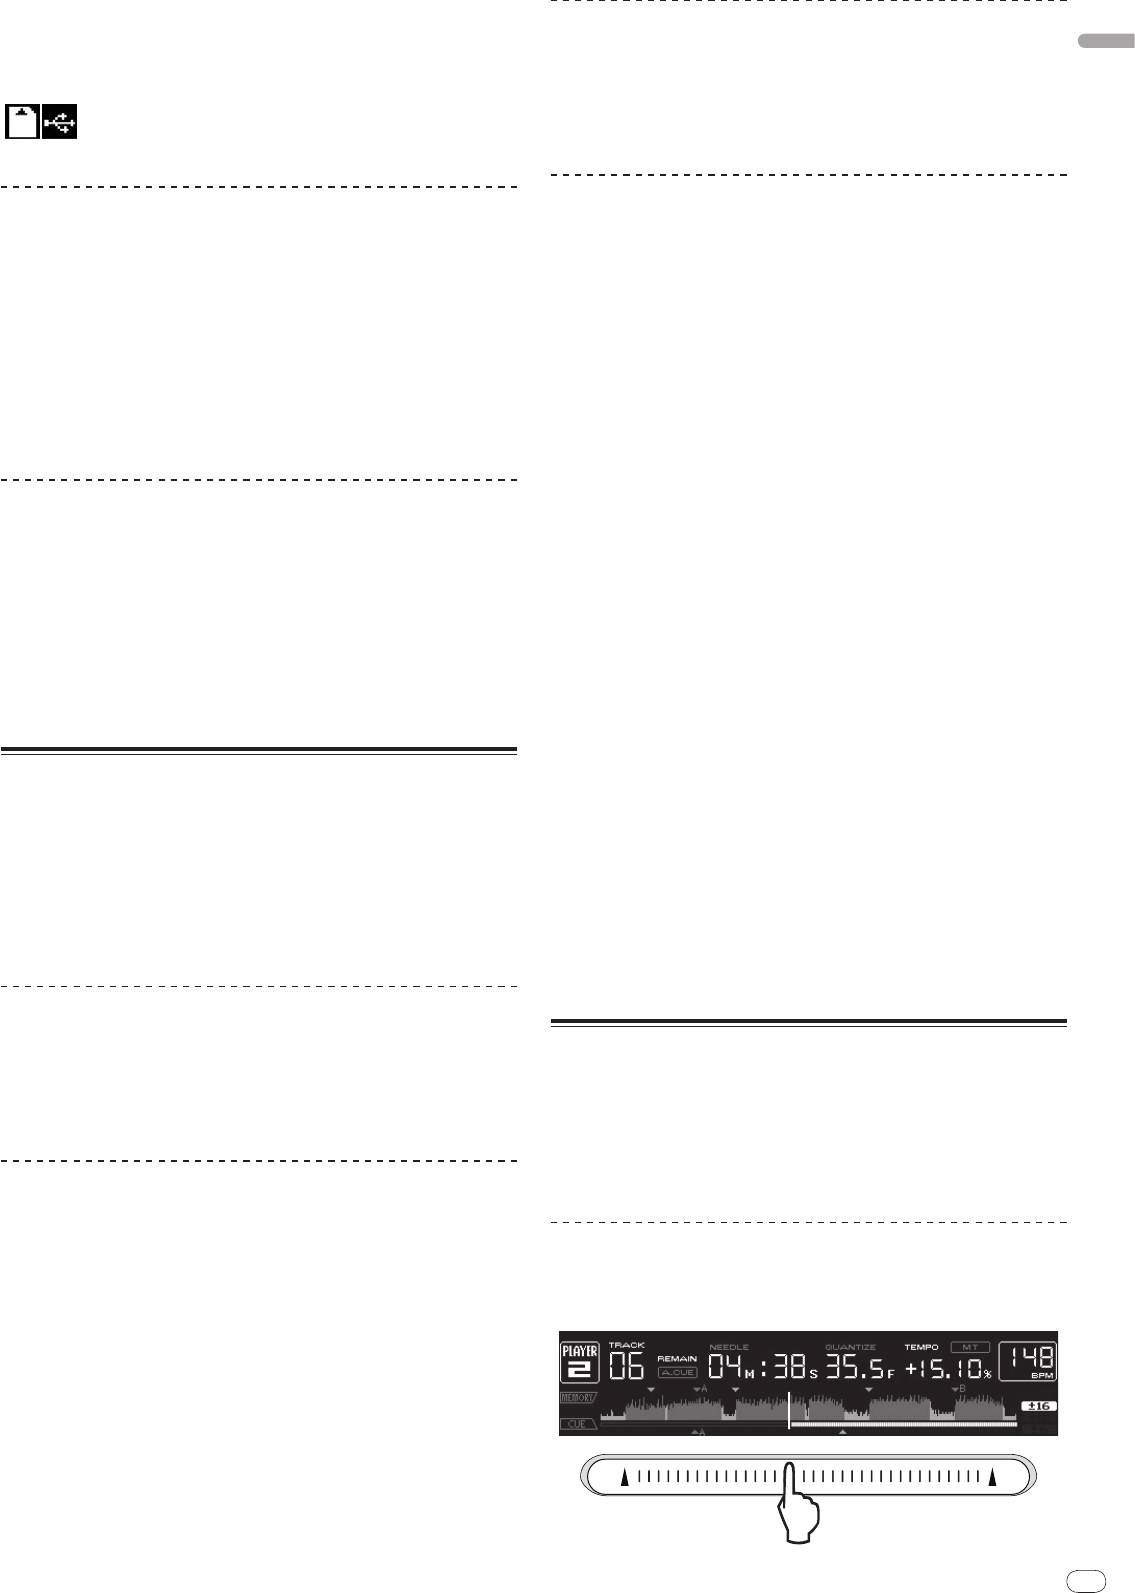
Adjusting the playing speed (Tempo control)
1List of contents
The contents of the selected medium are displayed.
Move [TEMPO] up or down.
2Uppermost level
Displays the name of the upper folder or media of the displayed item.
The tempo increases when moved to the [+] side (down), decreases when
3Cursor
Turn the rotary selector to move the cursor up and down.
moved to the [-] side (up). The rate at which the playing speed is changed is
4Contents of
indicated on the playing speed display.
The contents of the line selected with the cursor are displayed.
selected item
When artwork is registered in rekordbox or when the ID3 tag contains
Selecting the range for adjusting the playing speed
5Jacket photo
a JPEG image, the image for the track selected with the cursor is dis-
played.
Press [TEMPO ±6/±10/±16/WIDE].
The range of adjustment of the [TEMPO] control switches each time the button is
pressed. The adjustment range setting is indicated on the playing speed adjust-
Playback
ment range display.
! The tempo can be adjusted in units of 0.02 % when set to ±6 %, in steps of
0.05 % when set to ±10 %, in steps of 0.05 % when set to ±16 %, and in steps
1 Load the medium in this unit.
of 0.5 % when set to WIDE.
2 Press [DISC], [SD], [USB] or [LINK].
! The adjustment range is ±100 % when set to WIDE. When set to –100 %,
The contents of the selected medium are displayed.
playback stops.
! The adjustment range is set to ±10 % when the power is turned on.
3 Turn the rotary selector.
Select the track. The category/
folder/
track information is displayed.
! Once the lowermost level in the folder is reached, press the rotary selector.
Adjusting the playing speed without changing
Press [BACK] to return to the uppermost level.
the pitch (Master Tempo)
! Press [BACK] for over 1 second or press the media button of the medium you
are browsing to return to the uppermost level.
Press [MASTER TEMPO].
4 Press the rotary selector.
The MASTER TEMPO indicator and [MT] on the main unit display light. The pitch
does not change even when the playing speed is changed with the [TEMPO]
The track is loaded and playback begins. is displayed to the left of the cur-
control.
rently playing track.
! The sound is digitally processed, so the sound quality decreases.
! [TRACK SEARCHo/
p] can be used to select tracks within the currently
playing track’s category/
folder.
! When a disc containing music files recorded with a hierarchical structure is
Playing in reverse
loaded, playback starts from the tracks in the uppermost level.
! When [UNLOCK/
LOCK] is set to [LOCK], press [PLAY/PAUSEf] to set the
pause mode, then press the rotary selector.
Set [DIRECTION FWD/
REV] to [REV].
The REV indicator lights and the track plays in the reverse direction.
! When the music files are recorded in a folder structure, only tracks within the
same category/
folder can be played in reverse. Also note that reverse play-
Pausing
back may not start immediately.
! The direction in which the playing speed is increased or decreased according
During playback, press [PLAY/PAUSEf].
to the direction in which the jog dial is turned is reversed.
The PLAY/PAUSEf and CUE indicators flash. Press [PLAY/PAUSEf] again
! When such operations as track searching and loop playback are performed
to resume playback.
during reverse playback, the audio memory status display on the jog dial
! If no operation is performed for 100 minutes while in the pause mode, the disc
display section flashes and scratch play may not be possible.
automatically stops spinning. When [PLAY/PAUSEf] is pressed at this
time, playback resumes from the first track. When auto cue is turned on, the
set cues to the first track and pauses there.
Resuming playback from the position playing just before
the disc was ejected (Resume)
! After a disc is ejected, if that same disc is immediately reloaded in the CDJ-
2000, playback resumes from the position playing just before the disc was
ejected.
! The resume function only works when the same disc is ejected then reloaded
before loading another disc.
! When [TRACK SEARCHo/
p] is pressed before starting playback, the set
searches for the beginning of the track and playback starts.
! The resume function does not work for SD memory cards or USB devices.
English
En
15
DRB1475-B
3 Turn the rotary selector.
Setting Cue
The auto cue level setting changes.
1 During playback, press [PLAY/PAUSEf].
Changing procedure - [TIME MODE/
AUTO CUE]
Playback is paused.
1 Press [TIME MODE/
AUTO CUE] for at least 5 seconds.
2 Press [CUE].
The auto cue level setting changing mode is set.
The point at which the track is paused is set as the cue point. The CUE indicator
lights and the PLAY/PAUSEf indicators flashes. No sound is output at this
2 Press [CUE/
LOOP CALLc/
d].
time.
The auto cue level setting changes.
! When a new cue point is set, the previously set cue point is canceled.
! To cancel the changing mode, press [TIME MODE/
AUTO CUE] again.
! For instructions on saving cue points. see Storing cue and loop points on page 16.
Setting Loop
Adjusting the cue point position
1 During playback, press [LOOP IN/
CUE (IN ADJUST)] at the
1 Press [SEARCHm/
n] while pausing at the cue point.
position at which you want to start looping (the loop in point).
The CUE and PLAY/PAUSEf indicators flash.
Loop In Point is set.
2 Press [SEARCHm/
n].
! This operation is not necessary if you have already set a Cue Point as a Loop
The cue point can be fine-adjusted in steps of 0.5 frames.
In Point.
! The same operation is possible using the jog dial.
2 Press [LOOP OUT (OUT ADJUST)] at the position at which you
3 Press [CUE].
want to stop looping (the loop out point).
The point at which the button was pressed is set as the cue point.
The Loop Out Point is set, and Loop playback starts from the Loop In Point.
! When a new cue point is set, the previously set cue point is canceled.
! When playing music files, looping can only be set within the same track.
! When the medium containing the track is removed, the cue point is canceled. For
instructions on saving cue points. see Storing cue and loop points on page 16.
Fine-adjusting the loop in point (loop in adjust)
Returning to Cue Point (Back Cue)
1 During loop playback, press [LOOP IN/
CUE (IN ADJUST)].
[LOOP IN/
CUE (IN ADJUST)] switches to a fast flashing and [LOOP OUT
During playback, press [CUE].
(OUT ADJUST)] turns off.
The set immediately returns to the currently set cue point and pauses.
The loop in point’s time is displayed on the main unit display.
! When [PLAY/PAUSEf] is pressed, playback starts from the cue point.
2 Press [SEARCHm/
n].
The loop in point can be adjusted in units of 0.5 frames.
! The same operation is possible using the jog dial.
Checking Cue Point (Cue Point Sampler)
! The loop in point can be adjusted by ±30 frames and must be in front of the
loop out point.
Press and hold [CUE] after returning to the cue point.
Playback starts from the currently set cue point. Playback continues while [CUE]
3 Press [LOOP IN/
CUE (IN ADJUST)].
is pressed in.
! Normal loop playback resumes.
! When the music files are recorded in a folder structure, the cue point can only
! Normal loop playback also resumes if no operation is performed for over 10
be checked for tracks within the same category/
folder.
seconds.
! When playing music files, the loop in point can only be adjusted within the
same track.
Setting Cue Point during playback (Real Time
Cue)
Fine-adjusting the loop out point (loop out
adjust)
During playback, press [LOOP IN/
CUE (IN ADJUST)] at the position
at which you want to set the cue point.
1 During loop playback, press [LOOP OUT (OUT ADJUST)].
The point at which the button was pressed is set as the cue point.
[LOOP OUT (OUT ADJUST)] switches to a fast flashing and [LOOP IN/
CUE
(IN ADJUST)] turns off.
The loop out point’s time is displayed on the main unit display.
Setting auto cue
2 Press [SEARCHm/
n].
When a track is loaded or the track search operation is performed, the silent sec-
The loop out point can be adjusted in units of 0.5 frames.
tion at the beginning of the track is skipped and the cue point is automatically set
! The same operation is possible using the jog dial.
at the point immediately before the sound starts.
! The loop out point adjustment range is anywhere after the loop in point.
Press [TIME MODE/
AUTO CUE] for over 1 second.
3 Press [LOOP OUT (OUT ADJUST)].
Auto cue is turned on. [A. CUE] lights on the main unit display.
Normal loop playback resumes.
! The auto cue level setting remains in the memory, even when the power is
! Normal loop playback also resumes if no operation is performed for over 10
turned off.
seconds.
! When playing music files, the loop out point can only be adjusted within the
same track.
Changing the auto cue level
The sound pressure level for identifying a section as silent can be selected from
among the following eight steps:
Canceling Loop playback (Loop Exit)
–36 dB, –42 dB, –48 dB, –54 dB, –60 dB, –66 dB, –72 dB and –78 dB
! The auto cue level setting remains in the memory, even when the power is
During loop playback, press [RELOOP/EXIT].
turned off.
Playback continues after the Loop Out Point without returning to the Loop In
! There are two ways to change the auto cue level, as shown below.
Point.
Changing procedure - [MENU/UTILITY]
Returning to Loop playback (Reloop)
1 Press [MENU/UTILITY] for over 1 second.
The [UTILITY] screen is displayed.
After canceling loop playback, press [RELOOP/EXIT] during
playback.
2 Select [AUTO CUE LEVEL] and enter.
Playback returns to the previously set Loop In Point, and Loop playback resumes.
15
16
En
DRB1475-B
! When playing tracks recorded on media other than discs, hot cues cannot be
Setting loops automatically (4-beat Loop)
called out even when a disc for which hot cues are recorded is loaded in the
CDJ-2000.
! If you accidentally cancel the hot cue call out mode, eject the SD memory
During playback, press [4-BEAT LOOP/
LOOP CUTTER].
card/
USB device, then reload it.
A loop of 4 beats starting from the point at which the button was pressed is set
automatically according to the BPM of the currently playing track, and loop
playback starts.
Procedure for calling out hot cues (for SD memory cards/
! If the track’s BPM cannot be detected, the BPM is set to 130.
USB devices)
1 Load an SD memory card/
USB device in the CDJ-2000.
Cutting loops (Loop Cut)
2 Load the track whose hot cue you want to call out.
During loop playback, press [4-BEAT LOOP/
LOOP CUTTER].
3 Press [HOT CUE REC/CALL] for over 1 second.
The loop playing time is cut in half each time the button is pressed.
The set switches to the hot cue call out mode, and the HOT CUE indicators (A, B
or C) at which hot cues are recorded flash.
Extending loops
4 Press the [HOT CUE] button (A, B or C) whose hot cue you
want to call out.
During loop playback, press [4-BEAT LOOP/
LOOP CUTTER] while
The hot cue is called out. The HOT CUE (A, B, C) indicator lights.
! If you do not want to call out a hot cue, press [HOT CUE REC/CALL] without
pressing in [LOOP OUT (OUT ADJUST)].
pressing [HOT CUE] (A, B or C). Buttons for which no hot cue was not called
The loop playing time is doubled each time the button is pressed.
out turn off.
! The same operation can be performed as described below.
! If you accidentally cancel the hot cue call out mode, press [HOT CUE
— Press [SEARCHm/
n] while pressing [LOOP OUT (OUT ADJUST)].
REC/CALL] again.
— Turn the jog dial while pressing [LOOP OUT (OUT ADJUST)].
Canceling the hot cue call out mode
Setting Hot Cue
Perform one of the operations below to cancel the hot cue call out mode.
The hot cue call out mode is not canceled when a different track is played.
1 Press [HOT CUE REC/CALL].
1 Calling out hot cues A, B and C.
The set switches to the hot cue recording mode. The HOT CUE indicator (A, B, C)
light red.
2 Press [HOT CUE REC/CALL].
2 During playback or in the pause mode, press [HOT CUE] (A, B
or C) at the point at which you want to set the hot cue.
The position at which the button was pressed or the currently playing loop is set
Storing cue and loop points
at the [HOT CUE] button (note that the direction of playback is not recorded). The
button’s indicator flashes.
1 Load an SD memory card/
USB device in the CDJ-2000.
! While the hot cue is being recorded, it is not possible to record other
[HOT CUE] buttons, set cue points, fast-forward/
fast-reverse or scratch play.
2 Set Cue Point or Loop Point.
! When an SD memory card or USB device is loaded in the player, the point
information is recorded automatically.
3 Press [MEMORY].
! When a hot cue is set during scratch play, playback may stop temporarily.
[ MEMORY] or [ MEMORY] appears on the main unit display. The
stored cue point appears on the playing address display. The point information is
registered on the SD memory card/
USB device.
Playing hot cues
! When both an SD memory card and USB device are loaded on the CDJ-2000,
the SD memory card has priority.
1 Press [HOT CUE REC/CALL].
! To store loop points, press [MEMORY] during loop playback. The stored loop
The hot cue playing mode is set.
points appear on the playing address display.
! The indicators of buttons at which cue points are recorded light green.
! The indicators of buttons at which loop playback is recorded light orange.
! The
icon is displayed to the left of tracks for which cue or loop points
! The indicators of the buttons at which nothing is recorded do not light.
are saved.
! The information is automatically recorded on the SD memory card/
USB
2 During playback or in the pause mode, press [HOT CUE] (A, B
device.
or C).
— Cue point or loop playback information set at [HOT CUE] (A, B and C)
Playback starts instantaneously from the point recorded at that button.
— Track’s WAVE display information
! For loop playback recorded at the [HOT CUE] buttons, the information dif-
fers from loop playback set using the [LOOP IN/
CUE (IN ADJUST)] and
[LOOP OUT (OUT ADJUST)] buttons. Loop playback can be canceled using
Calling out saved cue or loop points
the [RELOOP/EXIT] button and the loop out point can be fine-adjusted using
the [LOOP OUT (OUT ADJUST)] button. Adjusting this directly changes the
information recorded at the [HOT CUE] buttons (A, B and C).
1 Load an SD memory card/
USB device in the CDJ-2000.
2 Load the track whose cue or loop points you want to call out.
Cue and loop points are displayed as marks on the playing address display.
Calling out Hot Cue
3 Press [CUE/
LOOP CALLc/
d].
Playback is moved to the selected point and paused.
Procedure for calling out hot cues (for discs)
! When multiple points are recorded, the point moves each time the button is
pressed.
1 Load an SD memory card/
USB device in the CDJ-2000.
4 Press [PLAY/PAUSEf].
2 Load a disc in the CDJ-2000.
Playback starts from the Cue or Loop point.
When the disc’s hot cues are recorded on the SD memory card/
USB device, the
HOT CUE indicator (A, B or C) flashes.
Deleting cue or loop points individually
3 Press the [HOT CUE] button (A, B or C) whose hot cue you
want to call out.
1 Load an SD memory card/
USB device in the CDJ-2000.
The hot cue is called out. The HOT CUE (A, B, C) indicator lights.
! If you do not want to call out a hot cue, press [HOT CUE REC/CALL] without
2 Load the track containing the cue point or loop points you
pressing [HOT CUE] (A, B or C). Buttons for which no hot cue was not called
want to delete.
out turn off.
Cue and loop points are displayed as marks on the main unit display’s playing
address display.
16
English
En
17
DRB1475-B
3 Press [CUE/
LOOP CALLc/
d].
Playback is moved to the selected point and paused.
Pitch bend [VINYL・CDJ]
! When multiple points are recorded, the point moves each time the button is
pressed.
During playback, spin the outer section of the jog dial.
The playing speed increases when spun clockwise, decreases when spun coun-
4 Press [DELETE].
terclockwise. When spinning is stopped, playback returns to the normal speed.
! When the jog mode is set to the CDJ mode, the same operation can be per-
[ DELETE] is displayed on the main unit display and the selected point
formed by spinning the top of the jog dial.
information is deleted.
Scratch play [VINYL]
Deleting all cue and loop points for a disc
When the jog mode is set to the VINYL mode, tracks can be played according to
the direction and speed at which the jog dial is spun by spinning the top of the
1 Load an SD memory card/
USB device in the CDJ-2000.
jog dial while pressing it.
Cue and loop points are displayed as marks on the main unit display’s playing
address display.
1 Press [JOG MODE].
Set the jog mode to VINYL.
2 Press [DELETE] for at least 5 seconds.
[DISC CUE/
LOOP DATA-DELETE? PUSH MEMORY] appears on the main unit
2 During playback, press the top of the jog dial.
display.
Playback slows then stops.
3 Press [MEMORY].
3 Spin the jog dial in the desired direction and at the desired
All cue and loop points for the disc currently loaded in the CDJ-2000 are deleted.
speed.
! The deletion mode is canceled when any button other than [MEMORY] is
The sound is played according to the direction and speed at which the jog dial is
pressed.
spun by spinning the top of the jog dial while pressing it.
4 Release your hand from the top of the jog dial.
Deleting all disc information recorded on the SD
Normal playback resumes.
memory card/
USB device
Adjusting the load when the jog dial is spun
1 With no disc loaded in the CDJ-2000, press [DELETE] for at
least 5 seconds.
Turn [JOG ADJUST].
[DISC CUE/
LOOP DATA-DELETE ALL? PUSH MEMORY] appears on the main unit
The load gets heavier when turned clockwise, lighter when turned
display.
counterclockwise.
2 Press [MEMORY].
Adjusting the time until which playback stops when the
All the disc information recorded on the SD memory card/
USB device is deleted.
top of the jog dial is pressed
! The deletion mode is canceled when any button other than [MEMORY] is
pressed.
Turn [VINYL SPEED ADJUST TOUCH/BRAKE].
The speed increases when turned clockwise, decreases when turned
counterclockwise.
Operating the jog dial
! When the jog mode is set to VINYL, the speed at which playback stops when
The top of the jog dial has an embedded switch. Do not place objects on the jog
[PLAY/PAUSEf] is pressed changes simultaneously.
dial or subject it to strong forces. Also note that water or other liquids getting into
the set will lead to malfunction.
Adjusting the speed until which normal playback
The jog dial has two modes.
resumes when the top of the jog dial is released
! VINYL mode: When the top of the jog dial is pressed during playback, play-
back stops, and when the jog dial is spun at this time sound is produced
according to the direction in which the jog dial is spun.
Turn [VINYL SPEED ADJUST RELEASE/START].
! CDJ mode: When the top of the jog dial is pressed, playback stops, and such
The speed increases when turned clockwise, decreases when turned
operations as scratch play are not possible.
counterclockwise.
! When the jog mode is set to VINYL, the speed at which playback starts when
[PLAY/PAUSEf] is pressed changes simultaneously.
Frame search [VINYL・
CDJ]
In the pause mode, spin the jog dial.
Operating the [NEEDLE SEARCH] pad
The position at which the track is pausing can be moved in units of 0.5 frames.
! The [NEEDLE SEARCH] pad can only be operated in the following cases:
! The position is moved in the direction of playback when the jog dial is spun
— In the pause mode
clockwise, in the reverse direction when it is spun counterclockwise. The
— While the jog dial is being pressed with the jog mode set to VINYL
position moves 135 for one revolution of the jog dial.
! Touch the [NEEDLE SEARCH] pad with a finger to easily play the sound at the
position at which the pad is touched. Move your finger while touching the pad
to quickly move to the desired position.
Super fast search [VINYL・CDJ]
! For several of the CDJ-2000’s functions, this pad is used to input characters.
Spin the jog dial while pressing in [SEARCHm/
n].
The track is fast-forwarded/
fast-reversed in the direction in which the jog dial is
Playing from the position at which the pad was
spun.
touched
! When the [SEARCHm/
n] button is released, this function is canceled.
! When you stop the jog dial from spinning, normal playback resumes.
! The fast-forward/
fast-reverse speed can be adjusted according to the speed at
Touch the [NEEDLE SEARCH] pad.
which the jog dial is spun.
Super fast track search
When the jog dial is spun while pressing in [TRACK SEARCHo/
p], the track
advances at high speed in the direction in which the jog dial is spun.
17
18
En
DRB1475-B
The track is played from the position at which the pad was released. The current
playing position on the playing address display moves to directly over the posi-
Using the [BROWSE] button
tion at which the pad was touched.
! The position of playback can be moved by moving your finger over the pad
while touching it. Note that when this is done, the position on the playing
address display may not be displayed properly and the sound may not be
Rearranging tracks (Sort menu)
played properly.
When in the library browse mode, the tracks can be rearranged using the Sort
menu. (The Sort menu is not displayed when in the folder browse mode.)
Inputting characters
1 Press [MENU/UTILITY] while the tracks are displayed.
The Sort menu is displayed to the right of the information display screen.
Inputting search characters using the [SEARCH] buttons
1 Touch the [NEEDLE SEARCH] pad.
2 Select and enter the setting item.
The tracks are sorted according to the selected item. The track information is
The character directly above the position touched is enlarged.
displayed.
! Sorting is canceled when [BACK] is pressed to return to the uppermost level.
2 Release your finger from the [NEEDLE SEARCH] pad.
! The types of sorting items on the Sort menu can be changed in the rekordbox
The enlarged character is input.
preferences (environmental settings).
! To input more characters at this point, repeat the above procedure.
! The characters that can be input are letters A – Z, numbers 0 – 9 and symbols.
The characters that can be input switch when the position just below [ABC]
or [123] is pressed.
Searching for tracks (SEARCH)
! The search function can be used to search for tracks recorded on the media
! When
is input, a single character is deleted. If input again, charac-
loaded in the set with [SEARCH].
ters are deleted consecutively.
! Tracks recorded on discs cannot be searched.
! Tracks recorded on media for which library browsing is not possible cannot
be searched.
Operating the CDJ-2000 in combination
1 Select [SEARCH] and enter the setting item.
with other devices
A character appears at the bottom of the main unit display.
2 Use the [NEEDLE SEARCH] pad to input a character.
Tracks including the character you have input are displayed.
Starting playback using a DJ mixer’s fader
! When more characters are input at this point, tracks starting with the charac-
ter string you have input are displayed.
(Fader Start)
! When [BACK] is pressed, the category screen reappears.
1 Connect the CDJ-2000 with a Pioneer DJ mixer using the
included control cord.
Using the jump function
For instructions on connecting, see Basic style on page 11.
The jump function can be used to instantaneously move to the track, category or
2 Move the DJ mixer’s channel fader or cross fader.
folder you want to play.
The DJ player’s pause mode is canceled and the track is played instantaneously.
The jump function includes the two modes below.
Also refer to the operating instructions of the connected DJ mixer.
! Letter jumping: Use this when the tracks are arranged or sorted in alphabeti-
! When the channel fader or cross fader is set back to its original position, play-
cal order.
back cues back to the set cue point and the pause mode is set (Back Cue).
! Page jumping: Use this when the tracks are not arranged or sorted in alpha-
betical order. Turn the rotary selector to jump by page.
Relay play on two DJ players
In the letter jump mode
1 Connect the CDJ-2000 and a DJ mixer.
1 Press the rotary selector for at least 1 second.
For instructions on connecting, see Connections for relay play on page 12.
The mode switches to the letter jump mode. The first letter of the selected track
is enlarged.
2 Set the DJ mixer’s cross fader to the center position.
3 Turn auto cue on for both DJ players.
The DJ players’ auto cue indicators light.
4 Start playback on this unit.
The first track on this unit is played, and once it finished playback begins auto-
matically on the other DJ player. This unit cues to the beginning of the next track
and pauses. This operation is repeated for relay play between the two DJ players.
! The medium can be changed and the cue point set on the DJ player that is in
standby.
2 Select the character or symbol to which you want to jump and
! If the power of one DJ player is turned off during playback, playback may
enter.
start on the other DJ player.
The display moves to the category starting with the selected character or symbol.
! The fader start function does not work during relay play.
! The characters that can be displayed are letters A – Z, numbers 0 – 9 and
! Relay play may not be possible if the two DJ players are not connected to the
symbols.
same DJ mixer.
18
English
En
19
DRB1475-B
In the page jump mode
1 Press the rotary selector for at least 1 second.
The mode switches to the page jump mode.
2 Select the page to which you want to jump and enter.
The display moves to the selected page.
Using hot cue banks
Hot cue banks set ahead of time in rekordbox can be registered at the CDJ-2000’s
[HOT CUE] buttons (A, B and C).
1 Load the medium on which the hot cue bank is registered in
the CDJ-2000.
[HOT CUE BANK] appears in the category items.
2 Select [HOT CUE BANK] and enter the setting item.
The hot cue bank is displayed. The cursor is fixed to hot cue bank A. It cannot be
moved using the rotary selector or other buttons.
3 Select the hot cue bank you want to call out and enter.
The hot cues registered in the hot cue bank are registered at the CDJ-2000’s
[HOT CUE] buttons (A, B or C). The indicators (A, B or C) light.
! When a new hot cue is registered at the CDJ-2000’s [HOT CUE] buttons (A, B
or C), all of the hot cue bank’s point information is deleted.
! Hot cue banks cannot be deleted on the CDJ-2000.
Checking the playing history (HISTORY)
! The track playing history is recorded and displayed at [HISTORY].
! Playlists can be created based on the playing history at [HISTORY] using
rekordbox. For details, see rekordbox’s operating instructions.
1 Load an SD memory card/
USB device in the CDJ-2000.
2 Playing tracks.
The currently playing track is recorded and displayed at [HISTORY].
! When a USB device, etc., is connected to the CDJ-2000 for the first time or
reconnected, the new [HISTORY] is automatically created on the USB device.
! A warning message is displayed if there is not enough free space on the USB
device, etc., or if the device is write-protected.
! The name of [HISTORY] can be preset at [UTILITY] (page 21).
! If a track already recorded in [HISTORY] is played again after playing a dif-
ferent track, it is newly recorded in [HISTORY]. However, tracks played using
the [HOT CUE] buttons (A, B and C) are not recorded in the history (they are
recorded when the hot cue is called out).
! The maximum number of tracks that can be recorded in [HISTORY] is 999.
When a 1 000th track is recorded, the oldest item in the history is deleted.
Deleting [HISTORY]
1 While [HISTORY] is selected, press [MENU/UTILITY].
The delete menu is displayed.
2 Select the range to be deleted and enter.
! [DELETE]: The [HISTORY] item selected with the cursor is deleted.
! [ALL DELETE]: The entire [HISTORY] is deleted.
! The [HISTORY] is deleted when [HISTORY] is converted into a playlist using
rekordbox.
Using the [TAG LIST] button
Up to 60 tracks to be played next or tracks selected for specific DJ scenes can be
preset in the tag list.
19
2 3 41
3Cursor
Turn the rotary selector to move the cursor up and down.
When artwork is registered in rekordbox or when the ID3 tag contains
4Jacket photo
a JPEG image, the image for the track selected with the cursor is dis-
played.
Adding tracks to the tag list
Select the track, then press [TAG TRACK/
REMOVE].
is displayed to the left of the track.
! The number of tracks that can be added to the tag list is 60 tracks per
medium. If you attempt to add a 61st track, a warning message is displayed
and the track cannot be added. (There is no limit to the number of tracks
when a computer on which rekordbox is installed is connected.)
! Tracks can be recorded in the tag list ahead of time using rekordbox.
! When multiple DJ players are connected by PRO DJ LINK, the same tag list
contents are displayed on all DJ players.
! When [TAG TRACK/
REMOVE] is pressed while the information is displayed
after pressing [INFO], the tracks loaded in this unit are added to the tag list.
Adding categories or folders to the tag list
With the list of the tracks displayed on the right side of the
information display screen, press [TAG TRACK/
REMOVE].
The category name/
folder name flashes, and the tracks in that category/
folder
are added to the tag list.
! When a category/
folder including tracks already added to the tag list is
selected and [TAG TRACK/
REMOVE] is pressed, only the tracks not already
on the tag list are added.
! When a folder is added while in the folder browse mode, the track names are
registered as file names. The artist names are not registered.
Adding playlists to the tag list
With the list of the tracks displayed on the right side of the
information display screen, press [TAG TRACK/
REMOVE].
The playlist name flashes, and the tracks in that playlist are added to the tag list.
! When a playlist including tracks that have already been added to the tag list
is selected and [TAG TRACK/
REMOVE] is pressed, only the tracks that were
not previously added to the tag list are added.
! Playlists can also be added by pressing [TAG TRACK/
REMOVE] while artwork
is displayed on the information display screen.
Loading tracks from the tag list
1 Press [TAG LIST].
The tag list is displayed.
2 Select the track to be loaded and enter.
The track is loaded and playback starts.
Removing tracks from the tag list
1 Press [TAG LIST].
The tag list is displayed.
2 Select the track to be removed from the tag list, then press
[TAG TRACK/
REMOVE] for at least 1 second.
The track is removed from the tag list.
! If a track that has been added to the tag list is removed from the tag list while
it is playing, the track is played to the end, then the stop mode is set. The next
track is not played.
! When a medium is removed from the CDJ-2000, all the tracks recorded on
that medium are removed from the tag list.
1List of contents
The contents of the tag list are displayed here.
The name of the medium on which the track is recorded is displayed
2Medium name
here.
20
En
DRB1475-B
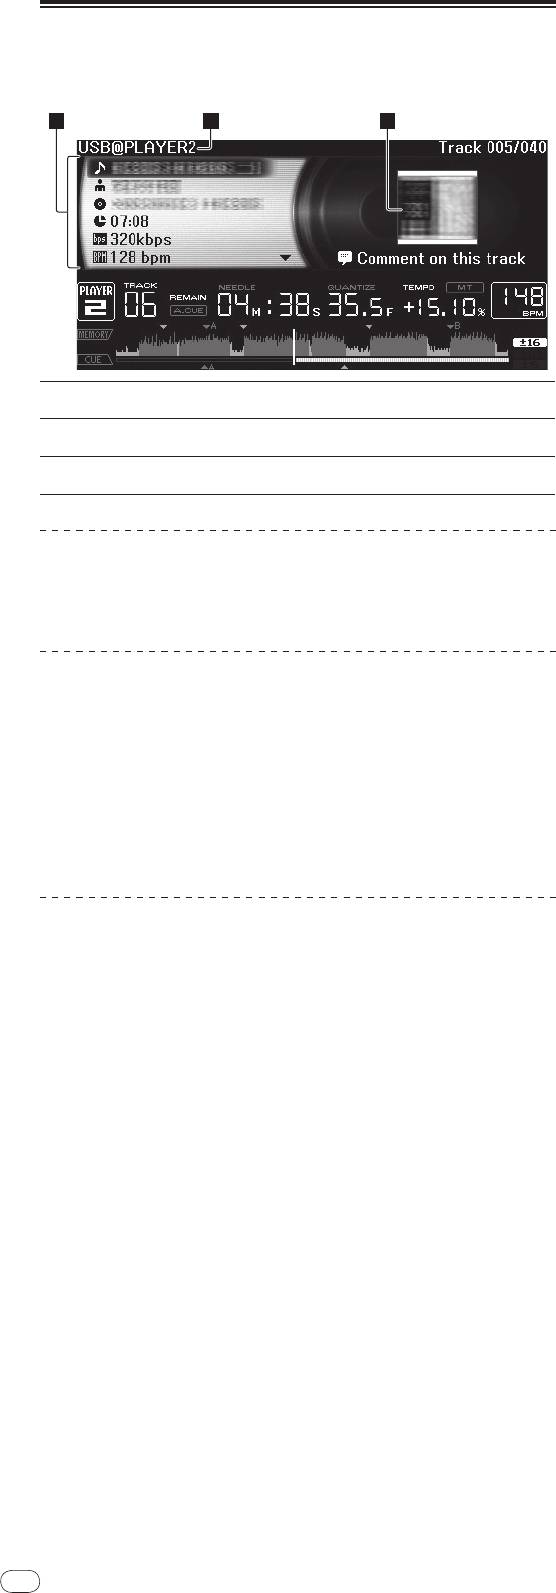
Using the [INFO] button
The details of the tracks loaded in the CDJ-2000 can be checked by pressing
[INFO]. When DJ players are connected by PRO DJ LINK, the details of the tracks
loaded in the other DJ players can also be checked.
20
2 31
The details of the tracks loaded in the DJ player are displayed
1Track details
here.
2Medium/
player
The place where the track information is stored is displayed here.
number
3Jacket photo and
The jacket photo and comment about the track loaded in the DJ
comment
player are displayed here.
Checking the details of loaded tracks
While the track is playing, press [INFO].
The track’s details are displayed.
Displaying details of tracks loaded in other DJ
players
1 Connect this unit and the other DJ players by PRO DJ LINK.
2 Press [INFO], then press [MENU/UTILITY].
The [Link Info] screen appears.
3 Select the DJ player and enter.
The details of the tracks loaded in the selected DJ player are displayed.
! If no tracks are loaded in the selected DJ player, no details are displayed.
Using the information jump function
This function can be used to select items displayed in the details and move them
to the category, etc., in which a track is included.
1 Display the track details.
2 Select and enter the setting item.
The library browse mode for the selected item is set.
! It may not be possible to select some items.
! When a track is selected, it is moved to the category in which the track was
loaded.
! It is not possible to move items from the disc’s details to tracks loaded in a DJ
player connected by PRO DJ LINK.
! When an item for which only an icon is displayed is selected, that icon is
moved to the corresponding category.
Оглавление
- Contents
- Before start
- Before you start
- Part Names and Functions
- Connections
- Playback
- Changing the settings
- Additional information
- Sommaire
- Informations préliminaires
- Avant de commencer
- Noms et fonctions des éléments
- Raccordements
- Lecture
- Changement des réglages
- Informations supplémentaires
- Inhalt
- Vor der Inbetriebnahme
- Bevor Sie beginnen
- Bezeichnungen und Funktionen der Komponenten
- Anschlüsse
- Wiedergabe
- Ändern der Einstellungen
- Zusätzliche Informationen
- Indice
- Prima di cominciare
- Prima di iniziare
- Nome delle varie parti e funzioni
- Collegamenti
- Riproduzione
- Modifica delle impostazioni
- Informazioni aggiuntive
- Inhoud
- Alvorens te beginnen
- Voordat u begint
- Overzicht van de bedieningstoetsen
- Aansluitingen
- Afspelen
- Instellingen aanpassen
- Aanvullende informatie
- Contenido
- Antes de empezar a usar la unidad
- Antes de comenzar
- Nombres y funciones de los controles
- Conexiones
- Reproducción
- Cambio de los ajustes
- Información adicional
- Содержание
- До начала
- Перед началом
- Названия деталей и функции
- Подключения
- Воспроизведение
- Изменение настроек
- Дополнительная информация


