Pioneer CDJ-2000: Part Names and Functions
Part Names and Functions: Pioneer CDJ-2000
8
En
DRB1475-B
Part Names and Functions
8
Control Panel Rear Panel
1211 13 14 15 16 17 18 19
20
UTILITY
BACK
TAG TRACK
/REMOVE
BROWSE TAG LIST INFO MENU
OFF
POWER
ON
LINK
STANDBY
21
POWER
USB
STOP
UNLOCK
LOCK
AUDIO OUT
CONTROL DIGITAL
10
USB
RL
OUT
22
DISC EJECT
SD
23
9
DISC
SD
TIME
AUTO
MODE
CUE
8
HOT CUE
VINYL
24
SPEED ADJUST
TOUCH/BRAKE
36 38 39 40 4137
25
IN / CUE
OUTRELOOP/EXIT
NEEDLE SEARCH
CUE/LOOP
DELETE MEMORY
LOOP
CALL
RELEASE/START
26
7
IN ADJUSTOUT ADJUST
27
JOG ADJUST
4-BEAT LOOP
REC / CALL
28
LOOP CUTTER
LIGHTHEAVY
VINYL
JOG
CDJ
MODE
29
6
DIRECTION
TEMPO
LINK
USB
6
10 16
WIDE
FWD
30
REV
5
MASTER
TEMPO
TRACK SEARCH
31
42 43
4
SEARCH
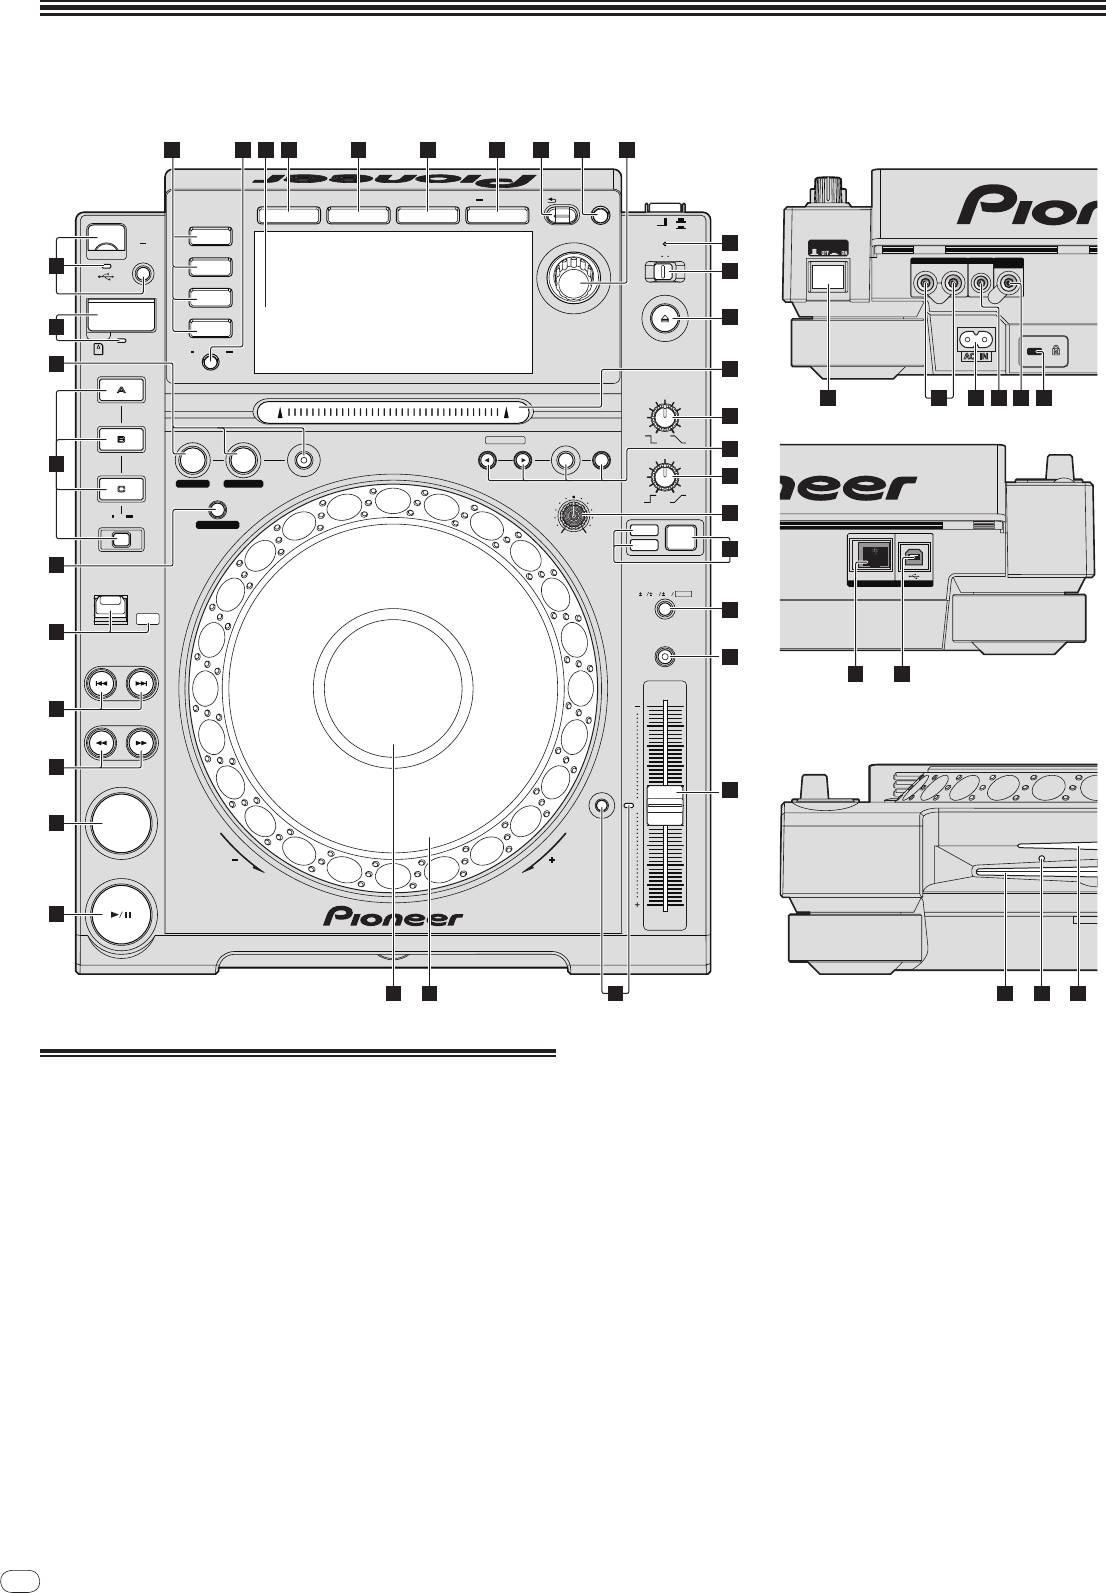
Front Panel
3
32
0
2
CUE
TEMPO
RESET
PLAY / PAUSE
REV
FWD
1
TEMPO
MULTI PLAY ER
CDJ-
2000
333435
45 4644
c TIME MODE/
AUTO CUE (page 15)
Control Panel
d Main unit display (page 10)
1 PLAY/PAUSEf and PLAY/PAUSEf indicator (page 14)
e BROWSE (page 18)
This lights when playing tracks and flashes when in the pause mode.
f TAG LIST (page 19)
2 CUE and CUE indicator (page 15)
This lights when a cue point is set (except during track searching), and
g INFO (page 20)
flashes when a new cue point can be set in the pause mode.
h MENU/UTILITY (page 21)
3 SEARCHm/
n (page 14)
i BACK (page 18)
4 TRACK SEARCHo/
p (page 14)
j TAG TRACK/
REMOVE (page 19)
5 DIRECTION FWD REV and REV indicator (page 14)
k Rotary selector and indicator
6 4-BEAT LOOP/
LOOP CUTTER (page 16)
When selecting tracks or setting items, the cursor moves when the rotary
selector is turned. Press the rotary selector to enter.
7 HOT CUE (A, B, C, REC/CALL) (page 16)
l STANDBY indicator (page 21)
8 LOOP IN/
CUE (IN ADJUST) (page 15), LOOP OUT (OUT ADJUST)
This lights when in the standby mode.
(page 15), RELOOP/EXIT (page 15)
m UNLOCK, LOCK (page 13)
9 SD memory card door, insertion slot and SD memory card
n DISC EJECTh and DISC EJECT indicator (page 13)
indicator (page 13)
o NEEDLE SEARCH pad (page 17)
a USB device insertion slot, USB indicator and USB STOP (page 13)
p VINYL SPEED ADJUST TOUCH/BRAKE (page 17)
b LINK, USB, SD, DISC (page 14)

English
En
9
DRB1475-B
q CUE/LOOP CALLc/
d (page 16), DELETE (page 16), MEMORY
(page 16)
r VINYL SPEED ADJUST RELEASE/START (page 17)
s JOG ADJUST (page 17)
t JOG MODE, VINYL mode indicator and CDJ mode indicator
(page 17)
The mode switches between VINYL and CDJ each time this is pressed. The
indicator for the selected mode lights.
u TEMPO ±6/±10/±16/WIDE (page 14)
v MASTER TEMPO (page 14)
w TEMPO (page 14)
x TEMPO RESET and TEMPO RESET indicator
Regardless of the position of the TEMPO dial, tracks are played at the
original playing speed recorded on the disc, etc. The indicator lights when
TEMPO RESET is turned on.
y Jog dial ( – REV/
+ FWD) and JOG RING ILLUMINATION (page 17)
z Jog dial display section (page 10)
Rear Panel
A POWER wON vOFF
Press to turn the power on and off.
B AUDIO OUT L/
R (page 11)
C AC IN (page 11)
D CONTROL (page 18)
E DIGITAL OUT
F Kensington security slot
G LINK (page 11)
H USB (page 11)
Front Panel
I Disc insertion slot
J Disc force eject pin insertion hole
K Disc insertion slot indicator
About ejecting discs by force
! If the disc cannot be ejected by pressing [DISC EJECTh], the disc can be
ejected forcibly by inserting the disc force eject pin all the way into the disc
force eject pin insertion hole on the main unit’s front panel.
! When forcibly ejecting a disc, be sure to do so following the procedure below.
1 Press [POWER] and wait at least 1 minute after the set’s
power has turned off.
Never forcibly eject a disc directly after turning off the set’s power. Doing so is
dangerous for the reasons described below.
The disc will still be spinning when ejected and could hit your fingers, etc.,
causing injury.
Also, the disc clamp will rotate in an unstable way, and the disc could get
scratched.
2 Use the included disc force eject pin. (Do not use anything
else.)
The included disc force eject pin is mounted on the CDJ-2000’s bottom panel.
When the pin is inserted all the way into the insertion hole, the disc is ejected
5 mm to 10 mm out of the disc insertion slot. Grasp the disc with your fingers and
pull it out.
9
10
En
DRB1475-B
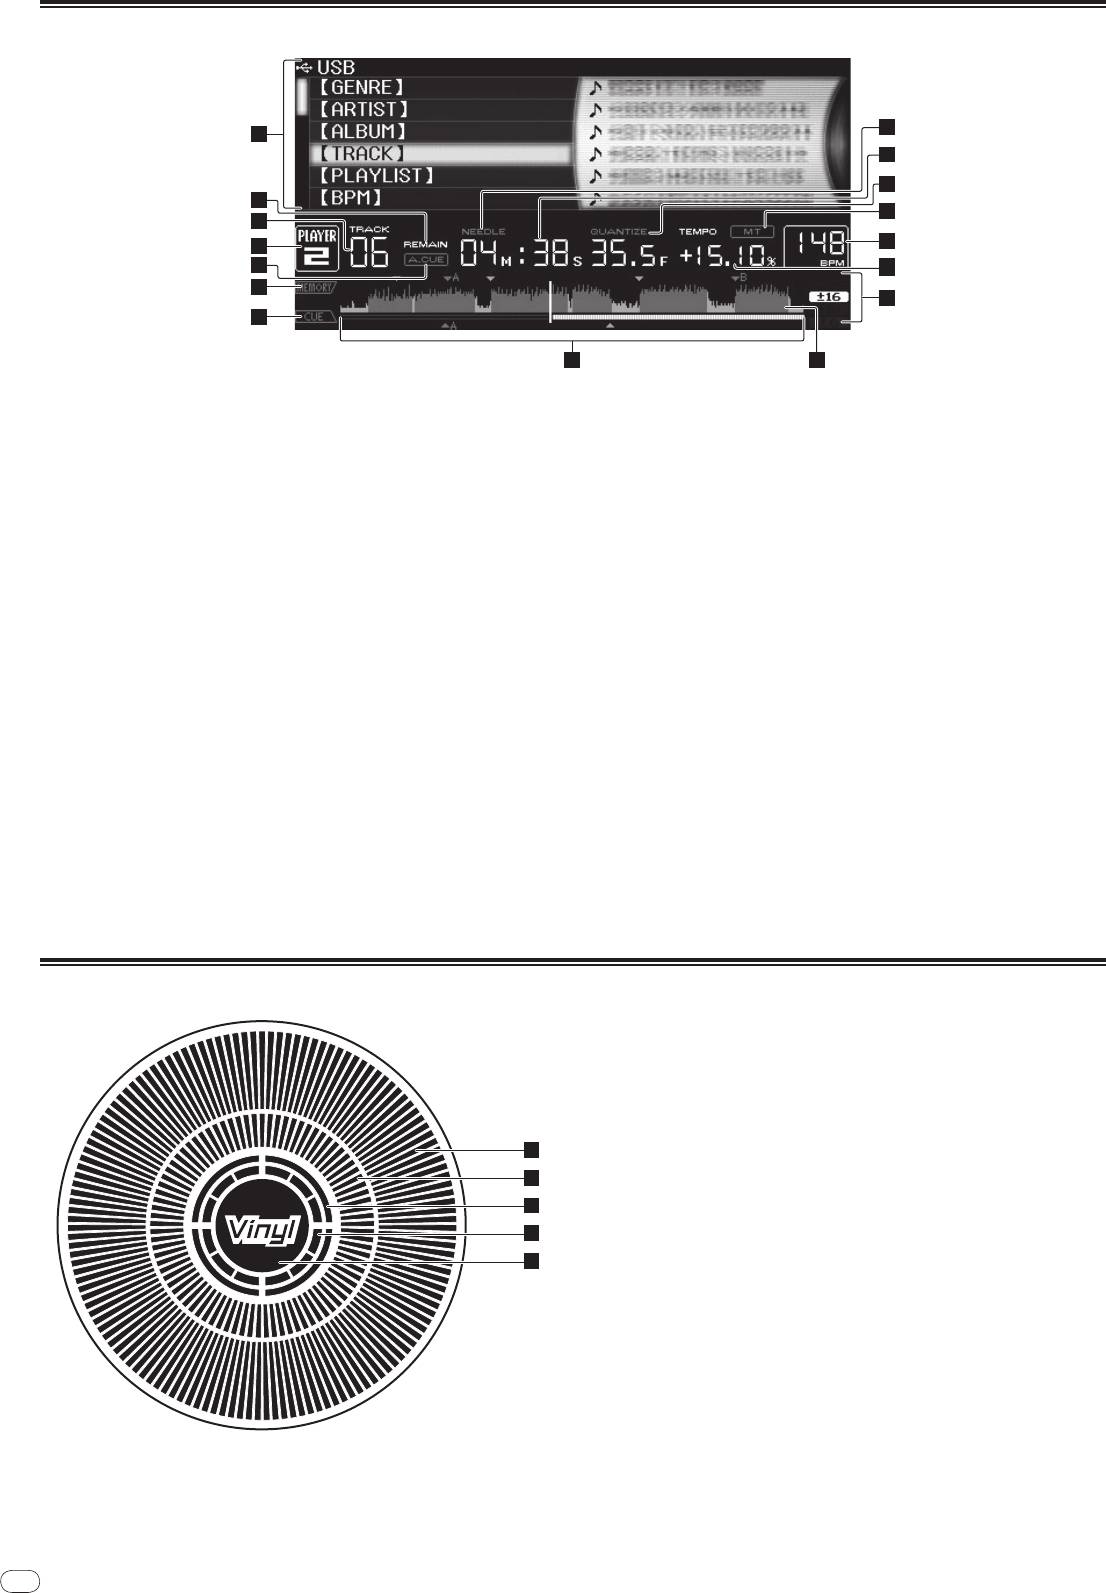
Main unit display
10
10
1
11
12
2
13
3
14
4
5
15
6
16
7
8 9
1 Information display section
a NEEDLE
This lights when needle searching is possible.
2 REMAIN
This lights when the time display is set to the remaining time.
b Time display (minutes, seconds and frames)
There are 75 frames to a second.
3 TRACK
This indicates the track number (01 – 99).
c QUANTIZE
This lights red when [QUANTIZE] is turned on.
4 PLAYER
When [QUANTIZE] is turned on, the loop points and hot cue are automatically
This indicates the player number (1 – 4) assigned to this CDJ-2000.
set to the beat nearest the position at which [LOOP IN/
CUE (IN ADJUST)],
[LOOP OUT (OUT ADJUST)], [4-BEAT LOOP] or [HOT CUE] (A, B or C) was
5 A. CUE (page 15)
pressed.
This lights when auto cue is set.
The quantize function does not work in the following situations ([QUANTIZE]
is displayed in gray):
6 MEMORY
! When playing tracks recorded on discs
Cue points, loop points and hot cues recorded on SD memory cards and USB
! When playing music files that have not been analyzed with rekordbox
devices are displayed as marks.
! In the pause mode
7 CUE
d MT
The positions of cue points, loop points and hot cues are displayed as marks.
This lights when the master tempo is set (page 14).
8 Playing address display
e BPM
The track is displayed as a bar graph. The current playback position is dis-
Displays BPM (Beats Per Minute) of the track currently being played.
played as a white vertical line. When the elapsed time is displayed, the left
edge of the graph lights. When the remaining time is displayed, the display
f Playing speed display
turns off from the left side. The entire graph flashes slowly when there are
The number changes according to the position of [TEMPO].
less than 30 seconds remaining in the track, then begins flashing rapidly
when less than 15 seconds remain.
g Playing speed adjustment range display
This indicates the range in which the playing speed can be adjusted with
9 WAVE display
respect to the original playing speed recorded on the medium.
This displays the WAVE display, guidance, etc.
Jog dial display section
1
2
3
4
5
1 Operation display
This indicates the playing position, with one revolution equal to 135 frames. It
turns during playback and stops in the pause mode.
2 Cue point display
3 Audio memory status display
This flashes when the audio memory is being written. It stops flashing,
remaining lit, when writing is completed.
The operations below may not be possible while the audio memory is being
written.
! Setting Cue Point during playback (Real Time Cue)
! Setting Hot Cue
The display also flashes when there is not enough memory due to scratch
play.
4 Jog touch detection display
When the jog mode is set to VINYL, the top of the jog dial lights when
pressed.
5 VINYL
This lights when the jog mode is set to VINYL (page 17).
Оглавление
- Contents
- Before start
- Before you start
- Part Names and Functions
- Connections
- Playback
- Changing the settings
- Additional information
- Sommaire
- Informations préliminaires
- Avant de commencer
- Noms et fonctions des éléments
- Raccordements
- Lecture
- Changement des réglages
- Informations supplémentaires
- Inhalt
- Vor der Inbetriebnahme
- Bevor Sie beginnen
- Bezeichnungen und Funktionen der Komponenten
- Anschlüsse
- Wiedergabe
- Ändern der Einstellungen
- Zusätzliche Informationen
- Indice
- Prima di cominciare
- Prima di iniziare
- Nome delle varie parti e funzioni
- Collegamenti
- Riproduzione
- Modifica delle impostazioni
- Informazioni aggiuntive
- Inhoud
- Alvorens te beginnen
- Voordat u begint
- Overzicht van de bedieningstoetsen
- Aansluitingen
- Afspelen
- Instellingen aanpassen
- Aanvullende informatie
- Contenido
- Antes de empezar a usar la unidad
- Antes de comenzar
- Nombres y funciones de los controles
- Conexiones
- Reproducción
- Cambio de los ajustes
- Información adicional
- Содержание
- До начала
- Перед началом
- Названия деталей и функции
- Подключения
- Воспроизведение
- Изменение настроек
- Дополнительная информация


